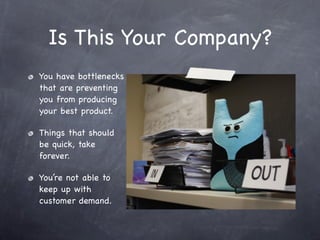
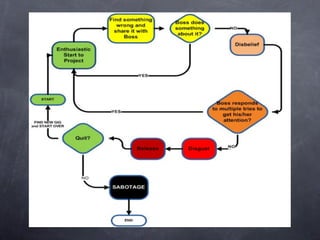
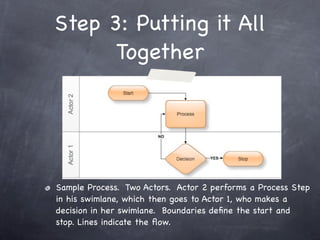
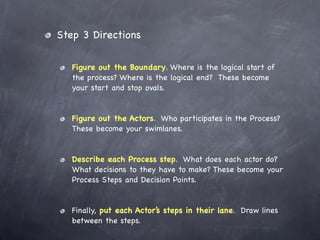
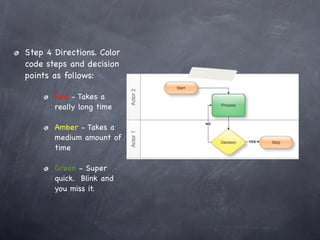
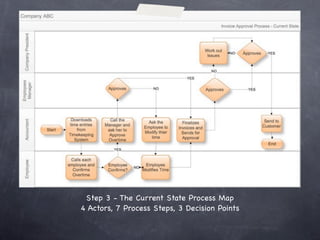
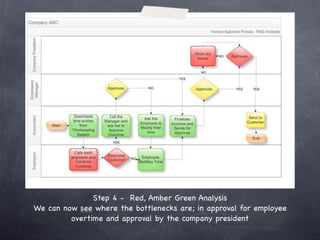
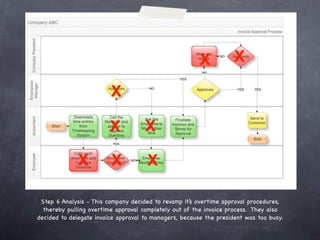
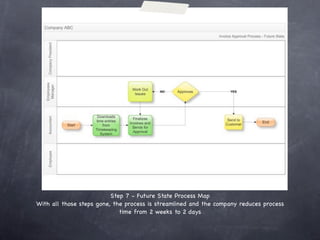
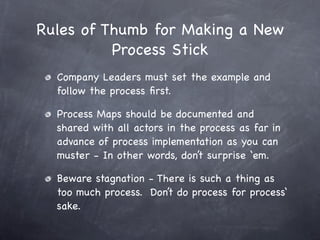
Process Mapping towards
 Process Improvement for
the Small Business Owner
  A quick and usable primer from SeaLight,LLC
Is This Your Company?
You have bottlenecks
that are preventing
you from producing
your best product.

Things that should
be quick, take
forever.

You’re not able to
keep up with
customer demand.
Why Improve your
Business Processes?
     Reason 1
Good process leads to happy employees who
produce better product, have more customer
loyalty, and who are more innovative and
creative...all of which leads to sustained
revenue.
Why Improve?
       Reason 2


Just to have more fun at work
Why Improve?
      Reason 3


To prevent the TEAM CYCLE OF DEATH (next
slide)>>>>>
Why Improve?
      Reason 4


To outperform
everyone else
Can You Improve Without
    Business Process
        Mapping?
  If you’re lucky

  If you have about 5 people in your company
  who are all co-located and communicate with
  each other constantly
Why Process
 Mapping?
 Reason 1
  Process Mapping enables great
  output. Without it, none of these
  things would have happened.
The shoes alone are
  reason enough

     but we’ll go on...
Why Process Mapping?
     Reason 2


   A picture is worth a thousand words
Why Process Mapping?
     Reason 3


 Process Mapping gives you a framework and a
 visual to describe what’s happening
Why Process Mapping?
     Reason 4


 Once it’s clear and visual, you can figure out
 where to make it better, quickly
So How Do You Start?
Process Mapping and Process Improvement
         In 7 Sort of Easy Steps
Step 1:
Describe Your Pain


 Describe your pain in clear language
Step 1 Directions:

   Keep it Simple and Specific.


   Describe in terms of capabilities; in other words, what you
   are no longer or not capable of doing.


   Format: We are not able to _____ because ______.


   Sample: We are not able to get timely payments from our
   customers because it takes us too long to send invoices.


   (Step 1 is also called the ‘Current State’)
Step 2:
Visualize Your Goal


   Describe how it should be
Step 2 Directions:

   Again, keep it Simple and Specific.


   Describe in terms of capabilities you should have; in other
   words, what you want to be capable of doing. And include
   a measurement - something to prove you’ve got it.


   Format: We are able to _____ as measured by ______.


   Sample: We are able to get timely payments from our
   customers as measured by the fact that it only takes us 1
   week to process invoices.


   Note the desired end result and the measurement - This is
   your goal!
Step 3:
   Create A Map


Create a map with boundaries, actors,
 processes, decisions, and swimlanes
Step 3 Caveat


Ok - so this is the part that is sort of easy
(as opposed to just easy). There are a few
key concepts to learn. But you’re smart -you’ll
do fine.

Here we go...
Step 3 Concepts
There are a few pieces to every process map.

Actors These are the people or systems that perform an
activity in the process.

Process Steps These are the activities the actors perform.
These are expressed as verbs.

Decision Points These are the places in the process where the
process can change direction based on a decision.

Boundaries These tell us where the process starts and stops.
Step 3 Mapping Tools
The Actor has a Lane - Called A Swimlane


The Process Steps are Rectangles
                                    Process


The Decision Points are Diamonds
                                     Decision


The Boundaries are Ovals
                                    Start/Stop
Step 3: Putting it All
      Together


Sample Process. Two Actors. Actor 2 performs a Process Step
in his swimlane, which then goes to Actor 1, who makes a
decision in her swimlane. Boundaries define the start and
stop. Lines indicate the flow.
Step 3 Directions

   Figure out the Boundary. Where is the logical start of
   the process? Where is the logical end? These become
   your start and stop ovals.


   Figure out the Actors. Who participates in the Process?
   These become your swimlanes.


   Describe each Process step. What does each actor do?
   What decisions to they have to make? These become your
   Process Steps and Decision Points.


   Finally, put each Actor’s steps in their lane. Draw lines
   between the steps.
Step 4:
Add Visual to the Problem Areas


 Figure out problem areas with Red, Amber,
 Green analysis
Step 4 Directions. Color
code steps and decision
points as follows:

       Red - Takes a
       really long time

       Amber - Takes a
       medium amount of
       time

       Green - Super
       quick. Blink and
       you miss it.
Step 5:
   Analyze The Map


Figure out if there are any unnecessary
issues...er...steps
Step 5 Directions

   Look at the Process Map and ask these questions.


      Why are we doing this step?


      Are all the decision points necessary?


      Are all the actors necessary?


      What changes can we make to remove steps or
      decision points?


   Make notes about what you find.
Step 6:
Design the New Map


Use the goal from step 2 and your findings
from step 5 to create a new map
Step 6 Directions

   Revisit your goal in light of your findings. Ask yourself
   what needs to change in your process to reach your goal.


   Draw a new map as if the changes have already occurred,
   removing steps that are not needed.


   The new map represents the Future State process. It
   hasn’t happened yet, but if it does, you have visually
   mapped out the new process, so teaching the process will
   be easier, as will getting approval to implement the
   process.
Step 7
Run it and Adapt it


Run the process and make changes as needed
A Real World Example
Company ABC takes 2 weeks on average to process
one invoice. They want to get that down to 2 days.
Step 3 - The Current State Process Map
4 Actors, 7 Process Steps, 3 Decision Points
Step 4 - Red, Amber Green Analysis
We can now see where the bottlenecks are; in approval for employee
         overtime and approval by the company president
Step 6 Analysis - This company decided to revamp it’s overtime approval procedures,
  thereby pulling overtime approval completely out of the invoice process. They also
decided to delegate invoice approval to managers, because the president was too busy.
Step 7 - Future State Process Map
With all those steps gone, the process is streamlined and the company reduces process
                             time from 2 weeks to 2 days
Rules of Thumb for Making a New
          Process Stick
  Company Leaders must set the example and
  follow the process first.

  Process Maps should be documented and
  shared with all actors in the process as far in
  advance of process implementation as you can
  muster - In other words, don’t surprise ‘em.

  Beware stagnation - There is such a thing as
  too much process. Don’t do process for process‘
  sake.
Thanks for
Staying This Long!
                    Fine Print:
Business Process Management is a discipline with
many methods and tools. This presentation offers
a few of those methods. To understand more visit
www.abpmp.org.

If you need help with your processes, contact us
at info@sealightllc.com or call 301-842-4177.


www.sealightllc.com

Process Mapping and Process Improvement for the Small Business Owner

  • 1.
    Process Mapping towards Process Improvement for the Small Business Owner A quick and usable primer from SeaLight,LLC
  • 2.
    Is This YourCompany? You have bottlenecks that are preventing you from producing your best product. Things that should be quick, take forever. You’re not able to keep up with customer demand.
  • 3.
    Why Improve your BusinessProcesses? Reason 1 Good process leads to happy employees who produce better product, have more customer loyalty, and who are more innovative and creative...all of which leads to sustained revenue.
  • 4.
    Why Improve? Reason 2 Just to have more fun at work
  • 5.
    Why Improve? Reason 3 To prevent the TEAM CYCLE OF DEATH (next slide)>>>>>
  • 7.
    Why Improve? Reason 4 To outperform everyone else
  • 8.
    Can You ImproveWithout Business Process Mapping? If you’re lucky If you have about 5 people in your company who are all co-located and communicate with each other constantly
  • 9.
    Why Process Mapping? Reason 1 Process Mapping enables great output. Without it, none of these things would have happened.
  • 10.
    The shoes aloneare reason enough but we’ll go on...
  • 11.
    Why Process Mapping? Reason 2 A picture is worth a thousand words
  • 12.
    Why Process Mapping? Reason 3 Process Mapping gives you a framework and a visual to describe what’s happening
  • 13.
    Why Process Mapping? Reason 4 Once it’s clear and visual, you can figure out where to make it better, quickly
  • 14.
    So How DoYou Start? Process Mapping and Process Improvement In 7 Sort of Easy Steps
  • 15.
    Step 1: Describe YourPain Describe your pain in clear language
  • 16.
    Step 1 Directions: Keep it Simple and Specific. Describe in terms of capabilities; in other words, what you are no longer or not capable of doing. Format: We are not able to _____ because ______. Sample: We are not able to get timely payments from our customers because it takes us too long to send invoices. (Step 1 is also called the ‘Current State’)
  • 17.
    Step 2: Visualize YourGoal Describe how it should be
  • 18.
    Step 2 Directions: Again, keep it Simple and Specific. Describe in terms of capabilities you should have; in other words, what you want to be capable of doing. And include a measurement - something to prove you’ve got it. Format: We are able to _____ as measured by ______. Sample: We are able to get timely payments from our customers as measured by the fact that it only takes us 1 week to process invoices. Note the desired end result and the measurement - This is your goal!
  • 19.
    Step 3: Create A Map Create a map with boundaries, actors, processes, decisions, and swimlanes
  • 20.
    Step 3 Caveat Ok- so this is the part that is sort of easy (as opposed to just easy). There are a few key concepts to learn. But you’re smart -you’ll do fine. Here we go...
  • 21.
    Step 3 Concepts Thereare a few pieces to every process map. Actors These are the people or systems that perform an activity in the process. Process Steps These are the activities the actors perform. These are expressed as verbs. Decision Points These are the places in the process where the process can change direction based on a decision. Boundaries These tell us where the process starts and stops.
  • 22.
    Step 3 MappingTools The Actor has a Lane - Called A Swimlane The Process Steps are Rectangles Process The Decision Points are Diamonds Decision The Boundaries are Ovals Start/Stop
  • 23.
    Step 3: Puttingit All Together Sample Process. Two Actors. Actor 2 performs a Process Step in his swimlane, which then goes to Actor 1, who makes a decision in her swimlane. Boundaries define the start and stop. Lines indicate the flow.
  • 24.
    Step 3 Directions Figure out the Boundary. Where is the logical start of the process? Where is the logical end? These become your start and stop ovals. Figure out the Actors. Who participates in the Process? These become your swimlanes. Describe each Process step. What does each actor do? What decisions to they have to make? These become your Process Steps and Decision Points. Finally, put each Actor’s steps in their lane. Draw lines between the steps.
  • 25.
    Step 4: Add Visualto the Problem Areas Figure out problem areas with Red, Amber, Green analysis
  • 26.
    Step 4 Directions.Color code steps and decision points as follows: Red - Takes a really long time Amber - Takes a medium amount of time Green - Super quick. Blink and you miss it.
  • 27.
    Step 5: Analyze The Map Figure out if there are any unnecessary issues...er...steps
  • 28.
    Step 5 Directions Look at the Process Map and ask these questions. Why are we doing this step? Are all the decision points necessary? Are all the actors necessary? What changes can we make to remove steps or decision points? Make notes about what you find.
  • 29.
    Step 6: Design theNew Map Use the goal from step 2 and your findings from step 5 to create a new map
  • 30.
    Step 6 Directions Revisit your goal in light of your findings. Ask yourself what needs to change in your process to reach your goal. Draw a new map as if the changes have already occurred, removing steps that are not needed. The new map represents the Future State process. It hasn’t happened yet, but if it does, you have visually mapped out the new process, so teaching the process will be easier, as will getting approval to implement the process.
  • 31.
    Step 7 Run itand Adapt it Run the process and make changes as needed
  • 32.
    A Real WorldExample Company ABC takes 2 weeks on average to process one invoice. They want to get that down to 2 days.
  • 33.
    Step 3 -The Current State Process Map 4 Actors, 7 Process Steps, 3 Decision Points
  • 34.
    Step 4 -Red, Amber Green Analysis We can now see where the bottlenecks are; in approval for employee overtime and approval by the company president
  • 35.
    Step 6 Analysis- This company decided to revamp it’s overtime approval procedures, thereby pulling overtime approval completely out of the invoice process. They also decided to delegate invoice approval to managers, because the president was too busy.
  • 36.
    Step 7 -Future State Process Map With all those steps gone, the process is streamlined and the company reduces process time from 2 weeks to 2 days
  • 37.
    Rules of Thumbfor Making a New Process Stick Company Leaders must set the example and follow the process first. Process Maps should be documented and shared with all actors in the process as far in advance of process implementation as you can muster - In other words, don’t surprise ‘em. Beware stagnation - There is such a thing as too much process. Don’t do process for process‘ sake.
  • 38.
    Thanks for Staying ThisLong! Fine Print: Business Process Management is a discipline with many methods and tools. This presentation offers a few of those methods. To understand more visit www.abpmp.org. If you need help with your processes, contact us at info@sealightllc.com or call 301-842-4177. www.sealightllc.com