This document provides instructions for using Bill Redirect software to send caller ID phone numbers from a modem to Windows applications. The software can configure buttons to send phone numbers to applications like Notepad, Excel, or a custom application when clicked. It also allows automatically opening files with the phone number as the filename when calls are received. The instructions provide steps to configure the serial port and buttons to integrate caller ID numbers into any Windows application.


![Step #4 (Button description and configuration)
Button description
This button shows how this software can send the received phone number to any existing software
To test this button do this:
• Open the file c:BillProduction.cfgtest.txt with your Windows Notepad
• Click on the button “Send to Notepad test.txt”
• At this time, you should see the caller phone number (number only) appear in the Notepad.
To change the configuration of this button and send the phone number in your current software
Follow the steps below:
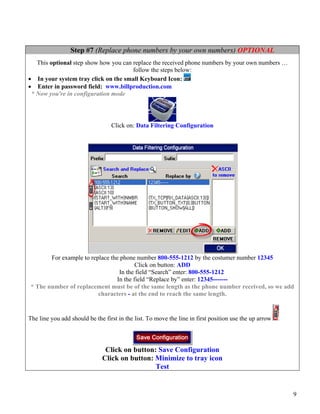
• In your system tray click on the small Keyboard Icon:
• Enter in password field: www.billproduction.com
* Now you're in configuration mode
• To see/edit the configuration of this button: Click on button:
• Use the field “Button Text” to change the text on the button.
• In the field “String to send … is push” there is:
{APP[test]}{TX_KEYB[{MULTIPLY[{BUTTON_TXT[00]},1,#]}{ENTER}]}
• Replace the word test by the title of the window of your software.
* You can enter just a part of the title, for example if the window title is “my application software” you can enter just a part
of the title for example: my application
• To add a keyboard sequence just before sending the phone number to your software…
For example CTRL f use this syntax:
{APP[test]}{TX_KEYB[{CTRL}f{MULTIPLY[{BUTTON_TXT[00]},1,#]}{ENTER}]}
To see all possibilities, see end of this manual section "Keyboard buffer output, possible values"
http://www.billproduction.com/Bill_Redirect_Manual.pdf
• To test your new configuration click on button: Run
* Now you're in run mode
6](https://image.slidesharecdn.com/billredirectandcalleridmodem-130226115927-phpapp02/85/How-support-caller-Id-phone-number-with-a-modem-7-320.jpg)
![Step #5 ( Button description and configuration )
Button description
This button shows how this software can start a software with a phone number argument.
To test this button do this:
• Click on the button “Open NotePad”
• At this time, notepad opens and it tries to open the file: phone number received.txt
Example if the number received is then it will try to open the file 9987654366.TXT
To change this configuration and open a phone number file with your software
Follow the steps below:
• In your system tray click on the small Keyboard Icon:
• Enter in password field: www.billproduction.com
* Now you're in configuration mode
• To see/edit the configuration of this button: Click on button:
• Use the field “Button Text” to change the text on the button.
• In the field “String to send … is push” there is:
{RUN_PRG[C:WINDOWSNOTEPAD.EXE {MULTIPLY[{BUTTON_TXT[00]},1,#]}.TXT,3]}
• Replace the C:WINDOWSNOTEPAD.EXE by the file that runs your application.
• Replace the .TXT by your file extension.
• Optional: Use this syntax to automatically hide the menu after pressing the button:
RUN_PRG[C:WINDOWSNOTEPAD.EXE {MULTIPLY[{BUTTON_TXT[00]},1,#]}.TXT,3]}{BUTTON_HIDE[ALL]}
• To test your new configuration click on button: Run
* Now you're in run mode
7](https://image.slidesharecdn.com/billredirectandcalleridmodem-130226115927-phpapp02/85/How-support-caller-Id-phone-number-with-a-modem-8-320.jpg)
![Step #6 ( Button description and configuration )
Button description
This button shows how this software can send the phone number received to any existing software
To test this button do this:
• Open Microsoft Excel
• Click on the button “Search in Excel”
• At this time, you should see the caller phone number (number only) searched in excel.
Example if the number received is then it will try to search 9987654366
To change this configuration and search the phone number received in your current software
Follow the steps below:
• In your system tray click on the small Keyboard Icon:
• Enter in password field: www.billproduction.com
* Now you're in configuration mode
• To see/edit the configuration of this button: Click on button:
• Use the field “Button Text” to change the text on the button.
• In the field “String to send … is push” there is:
{APP[Microsoft Excel]}{TX_KEYB[{CTRL}f{MULTIPLY[{BUTTON_TXT[00]},1,#]}{ENTER}]}
• Replace Microsoft Excel by the title of the window of your software.
* You can enter just a part of the title, for example if the window title is “my application software” you can enter just a part
of the title for example: my application
• Replace {CTRL}f by your keyboard sequence to sending before phone number.
* To see all possibilities, see end of this manual section "Keyboard buffer output, possible values"
http://www.billproduction.com/Bill_Redirect_Manual.pdf
• To test your new configuration click on button: Run
* Now you're in run mode
8](https://image.slidesharecdn.com/billredirectandcalleridmodem-130226115927-phpapp02/85/How-support-caller-Id-phone-number-with-a-modem-9-320.jpg)