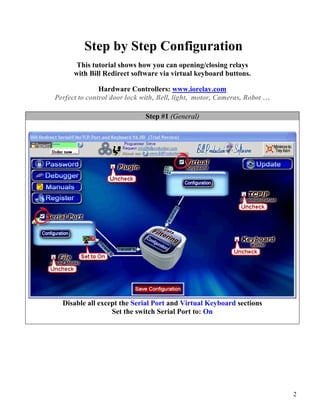
This document provides instructions for configuring and using Bill Redirect software to control relays connected to National Control Devices R4x and R8x Pro RS-232 E3C Networkable Relay Controllers. It describes the hardware controllers, supported operating systems, and provides a 5-step tutorial for setting up and testing virtual keyboard buttons to send commands to open and close individual relays or groups of relays. It also provides information on customizing the software and contact information.

![Step #4 (Virtual Keyboard 1 button example)
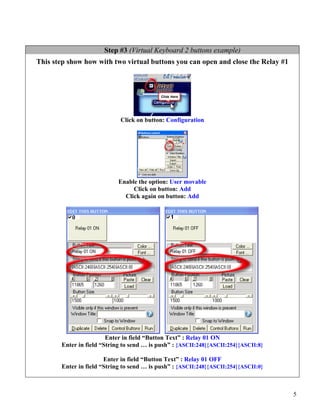
This step show how with one virtual button you can open the Relay #2 when the first
time this button is pressed and close this really when it’s pressed again
Click on button: Add
Enter in field “Button Text” : Relay 02 ON/OFF
Enter in field “String to send … is push” :
{EV1}{ASCII:248}{ASCII:254}{ASCII:9}{TX_BUTTON_TXT[02,Relay 02
ON]}{EV1}{EV2}{ASCII:248}{ASCII:254}{ASCII:1}{TX_BUTTON_TXT[02,Relay 02 OFF]}{EV2}
6](https://image.slidesharecdn.com/billredirectncdr4xr8xrelays-130226115924-phpapp01/85/Control-Relays-via-RS-232-USB-7-320.jpg)
![Step #5 (Virtual Keyboard 1 button second example)
This step show how with one virtual button you can open the Relay #3 when the
button is pressed and close this relay when it is released.
Click on button: Add
Enter in field “Button Text” : Relay 03 ON/OFF
Enter in field “String to send … is push” :
{*P}{ASCII:248}{ASCII:254}{ASCII:10}{TX_BUTTON_TXT[03,Relay 03
ON]}{*P}{*R}{ASCII:248}{ASCII:254}{ASCII:2}{TX_BUTTON_TXT[03,Relay 03 OFF]}{*R}
Click on button: Save Configuration
Click on button: Minimize to Tray Icon
TEST
7](https://image.slidesharecdn.com/billredirectncdr4xr8xrelays-130226115924-phpapp01/85/Control-Relays-via-RS-232-USB-8-320.jpg)