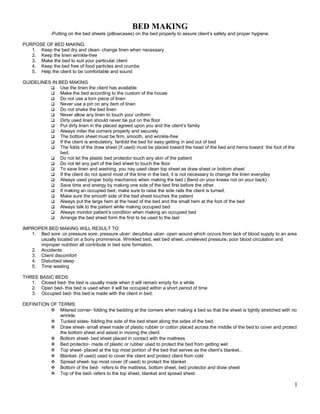
BED MAKING
-Putting on the bed sheets (pillowcases) on the bed properly to assure client’s safety and proper hygiene.
PURPOSE OF BED MAKING
1. Keep the bed dry and clean- change linen when necessary
2. Keep the linen wrinkle-free
3. Make the bed to suit your particular client
4. Keep the bed free of food particles and crumbs
5. Help the client to be comfortable and sound
GUIDELINES IN BED MAKING
 Use the linen the client has available
 Make the bed according to the custom of the house
 Do not use a torn piece of linen
 Never use a pin on any item of linen
 Do not shake the bed linen
 Never allow any linen to touch your uniform
 Dirty used linen should never be put on the floor
 Put dirty linen in the placed agreed upon you and the client’s family
 Always miter the corners properly and securely
 The bottom sheet must be firm, smooth, and wrinkle-free
 If the client is ambulatory, fanfold the bed for easy getting in and out of bed
 The folds of the draw sheet (if used) must be placed toward the head of the bed and hems toward the foot of the
bed.
 Do not let the plastic bed protector touch any skin of the patient
 Do not let any part of the bed sheet to touch the floor
 To save linen and washing, you nay used clean top sheet as draw sheet or bottom sheet
 If the client do not spend most of the time in the bed, it is not necessary to change the linen everyday
 Always used proper body mechanics when making the bed ( Bend on your knees not on your back)
 Save time and energy by making one side of the bed first before the other.
 If making an occupied bed, make sure to raise the side rails the client is turned.
 Make sure the smooth side of the bed sheet touches the patient
 Always put the large hem at the head of the bed and the small hem at the foot of the bed
 Always talk to the patient while making occupied bed
 Always monitor patient’s condition when making an occupied bed
 Arrange the bed sheet form the first to be used to the last
IMPROPER BED MAKING WILL RESULT TO:
1. Bed sore ;or pressure sore; pressure ulcer; decubitus ulcer- open wound which occurs from lack of blood supply to an area
usually located on a bony prominence. Wrinkled bed, wet bed sheet, unrelieved pressure, poor blood circulation and
improper nutrition all contribute in bed sore formation.
2. Accidents
3. Client discomfort
4. Disturbed sleep
5. Time wasting
THREE BASIC BEDS
1. Closed bed- the bed is usually made when it will remain empty for a while.
2. Open bed- this bed is used when it will be occupied within a short period of time
3. Occupied bed- this bed is made with the client in bed.
DEFINITION OF TERMS
 Mitered corner- folding the bedding at the corners when making a bed so that the sheet is tightly stretched with no
wrinkle.
 Tucked sides- folding the side of the bed sheet along the sides of the bed.
 Draw sheet- small sheet made of plastic rubber or cotton placed across the middle of the bed to cover and protect
the bottom sheet and assist in moving the client
 Bottom sheet- bed sheet placed in contact with the mattress
 Bed protector- made of plastic or rubber used to protect the bed from getting wet
 Top sheet- placed at the top most portion of the bed that serves as the client’s blanket..
 Blanket- (if used) used to cover the client and protect client from cold
 Spread sheet- top most cover (If used) to protect the blanket
 Bottom of the bed- refers to the mattress, bottom sheet, bed protector and draw sheet
 Top of the bed- refers to the top sheet, blanket and spread sheet
1
 Head of the bed- the part of the bed nearest to the head board
 Foot of the bed- part of the bed nearest to the foot board
 Hem- the folded-stitched sides of the bed sheet
 Bed cuff- the folded top portion of the top sheet, blanket and spread sheet
 Bed stripping- proper technique of removing bed sheets without contamination
When to do bed making:
1. Check the rules and regulation set by the home institution regarding this matter.
2. After bed bathing
3. If the linen are wet or soiled after perineal washing or feeding
4. Upon patient’s request, if logical
5. if the bed sheet is out-of-order.
Materials needed according to layer from the bottom of the bed to the top of the bed:
• Bottom sheet- largest bed sheet, if possible
• Plastic or rubber bed protector
• Draw sheet- half the size of ordinary bed sheet used to protect the client from bed protector
• Top sheet
• Blanket
• Spread sheet
NOTE:
o Hospital bed- this only uses bed sheet, bed protector, draw sheet and top sheet
o Home bed –(cold country) all 6 bed sheets are used.
o Know the number of bed sheets used by your home institution.
MITERING:
1. Pick up the edge of the sheet at the side of the bed 12 inches from the head of the mattress
2. Place the triangle on the top of the mattress
PROCEDURES:
A. CLOSED UNOCCUPIED BED
1. Assemble your equipment:
a. Bottom sheet
b. Bed protector
c. Draw sheet
d. Top sheet
e. Pillow
f. Pillow cases
g. Chair
2. Wash your hands
3. Place a chair near the bed
4. Put the pillow on the chair
5. Adjust the height of the bed as to your own comfort, if possible
6. Pull the mattress to the head of the bed until it touches the headboard
7. Fold the bottom sheet lengthwise and place the folded side at the bed’s center from head to foot. Put the small hem at the
foot of the bed, even with the edge of the mattress. Place the large hem at the head of the bed with about 8 inches left to
tuck in.
8. Open the sheet so as it would hang evenly over each side of the bed but should not touch the floor.
9. Tuck the sheet tightly at the head of the bed by lifting the mattress using your hand closest to the foot of the bed.
10. Miter the corners. Tuck the hanging portion.
11. Work on one side of the bed until it is finished.
12. Place the bed protector. Tuck it in
13. Place the draw sheet. Tuck it in
14. Place the top sheet folded lengthwise at the center of the bed from head to foot of the bed. Place the large hem at the level
of the edge of the mattress at the head of the bed. Open the sheet with the rough side up. Tightly tuck the sheet and miter
the corners at the foot of the bed. Do not tuck the sides of the bed.
15. Fold the top sheet at least 6 inches to make a cuff.
16. Put the pillowcase on the pillow:
a. Hold the pillowcase at the center of the end seam
b. With your hand outside the case, turn the case back over your hand
c. Grasp the pillow through the case at the center of the pillow
d. Bring the case down over the pillow
e. Fit the corner of the pillow into the seamless corner of the case
f. Fold the extra material from the side seam under the pillow
2
g. Place the pillow on the bed with the open end away from the door
17. Adjust the bed to its lowest horizontal position, if possible.
18. Wash your hands.
PROCEDURE: Occupied Bed
1. Assemble your equipment near the bed
2. Wash you hands
3. Tell the client you are going to make the bed
4. Lower the bed according to your comfort, if possible
5. Loosen all the sheets around the entire bed
6. Leave the client covered with top sheet.
7. Move the client so it will touch the head board
8. Raise the side rail on the opposite side from where you will be working and lock in place
9. Ask the client to turn on his side toward the side rail. If the client cannot can not turn let him lye on his back but move him
as far as possible toward the rail
10. Fold the draw sheet toward the client and tuck it against his back
11. Raise the plastic draw sheet and tuck it under the draw sheet
12. Roll the bottom sheet toward the client and tuck it against his back.
13. Take the large clean sheet and fold it in lengthwise. Do not permit the sheet to touch the floor or your uniform. Place it on
the bed, with the fold running along the middle of the mattress. The small hem should be even at the edge of the foot of
the bed and the large hem at the head with excess of 18 inches. Fold the half of the sheet toward the client. Tuck the fold
against his back below the bed protector. Tuck and miter
14. Pull the bed protector and tuck it in
15. Place a clean draw sheet folded in half and place it over the bed protector. Unfold and tuck the other half under the client
above the bottom sheet. Tuck the sides.
16. Ask the client to roll over the hump (assist him as needed) towards you. Raise the rail on your side and lower the rail on
the other side.
17. Pull the soiled bottom sheet. Fold and put it on chair. Do the same with the draw sheet.
18. Pull the clean bottom sheet then tuck and miter
19. Pull the clean draw sheet then tuck
20. Have the client turn on his back. Moving the client toward the center of the bed.
21. Change the pillow case
22. Spread a clean top sheet over the used one with the large hem on the head. The middle should run along the center of the
bed. Ask the client to hold it or tuck it on his shoulder while pulling the soiled top sheet toward the foot of the bed. Fold then
hang on the chair.
23. Tuck the top sheet on your side. Go to the other side. Tuck and miter the top sheet. Leaving enough room to allow
movement of the client’s feet.
24. Make the cuff
25. Make the client comfortable. You may raise the backrest and knee rest if allowed.
26. Lower the entire bed toward its lowest horizontal position
27. Put the side rails
28. Put all linens inside the soiled pillow case then put on soiled linen laundry basket
29. Wash your hands
30. Chart any observations you made during this procedure.
BED STRIPPING:
Purpose:
1. To freshen bed and make it possible to turn mattress when patient is out of bed
2. To provide an opportunity the condition of the equipment.
Procedure:
1. Tidy bedside table first and move it out of the way
2. Place chair at the foot of the bed
3. Remove soiled pillowcase. Place it at foot part of the Bed
4. Place pillow on chair
5. Loosen the bedding all around the bed
6. Fold the top sheet from top to bottom then in half and place over back of chair to be used again
7. Fold the draw sheet, bed protector and bottom sheet in the same manner.
8. Remove mattress cover if soiled, or if new bed will be made for new patient
9. Gather all soiled linens and put inside the soiled pillowcase. Turn mattress
10. Air the bed from 15-20 minutes or more before making
11. Discard dirty linens in the hamper.
12. Wash your hands
3
PREPARED BY: MANNY JUN P. PADUA RN,MAN
4

Bed making

  • 1.
    BED MAKING -Putting onthe bed sheets (pillowcases) on the bed properly to assure client’s safety and proper hygiene. PURPOSE OF BED MAKING 1. Keep the bed dry and clean- change linen when necessary 2. Keep the linen wrinkle-free 3. Make the bed to suit your particular client 4. Keep the bed free of food particles and crumbs 5. Help the client to be comfortable and sound GUIDELINES IN BED MAKING  Use the linen the client has available  Make the bed according to the custom of the house  Do not use a torn piece of linen  Never use a pin on any item of linen  Do not shake the bed linen  Never allow any linen to touch your uniform  Dirty used linen should never be put on the floor  Put dirty linen in the placed agreed upon you and the client’s family  Always miter the corners properly and securely  The bottom sheet must be firm, smooth, and wrinkle-free  If the client is ambulatory, fanfold the bed for easy getting in and out of bed  The folds of the draw sheet (if used) must be placed toward the head of the bed and hems toward the foot of the bed.  Do not let the plastic bed protector touch any skin of the patient  Do not let any part of the bed sheet to touch the floor  To save linen and washing, you nay used clean top sheet as draw sheet or bottom sheet  If the client do not spend most of the time in the bed, it is not necessary to change the linen everyday  Always used proper body mechanics when making the bed ( Bend on your knees not on your back)  Save time and energy by making one side of the bed first before the other.  If making an occupied bed, make sure to raise the side rails the client is turned.  Make sure the smooth side of the bed sheet touches the patient  Always put the large hem at the head of the bed and the small hem at the foot of the bed  Always talk to the patient while making occupied bed  Always monitor patient’s condition when making an occupied bed  Arrange the bed sheet form the first to be used to the last IMPROPER BED MAKING WILL RESULT TO: 1. Bed sore ;or pressure sore; pressure ulcer; decubitus ulcer- open wound which occurs from lack of blood supply to an area usually located on a bony prominence. Wrinkled bed, wet bed sheet, unrelieved pressure, poor blood circulation and improper nutrition all contribute in bed sore formation. 2. Accidents 3. Client discomfort 4. Disturbed sleep 5. Time wasting THREE BASIC BEDS 1. Closed bed- the bed is usually made when it will remain empty for a while. 2. Open bed- this bed is used when it will be occupied within a short period of time 3. Occupied bed- this bed is made with the client in bed. DEFINITION OF TERMS  Mitered corner- folding the bedding at the corners when making a bed so that the sheet is tightly stretched with no wrinkle.  Tucked sides- folding the side of the bed sheet along the sides of the bed.  Draw sheet- small sheet made of plastic rubber or cotton placed across the middle of the bed to cover and protect the bottom sheet and assist in moving the client  Bottom sheet- bed sheet placed in contact with the mattress  Bed protector- made of plastic or rubber used to protect the bed from getting wet  Top sheet- placed at the top most portion of the bed that serves as the client’s blanket..  Blanket- (if used) used to cover the client and protect client from cold  Spread sheet- top most cover (If used) to protect the blanket  Bottom of the bed- refers to the mattress, bottom sheet, bed protector and draw sheet  Top of the bed- refers to the top sheet, blanket and spread sheet 1
  • 2.
     Head ofthe bed- the part of the bed nearest to the head board  Foot of the bed- part of the bed nearest to the foot board  Hem- the folded-stitched sides of the bed sheet  Bed cuff- the folded top portion of the top sheet, blanket and spread sheet  Bed stripping- proper technique of removing bed sheets without contamination When to do bed making: 1. Check the rules and regulation set by the home institution regarding this matter. 2. After bed bathing 3. If the linen are wet or soiled after perineal washing or feeding 4. Upon patient’s request, if logical 5. if the bed sheet is out-of-order. Materials needed according to layer from the bottom of the bed to the top of the bed: • Bottom sheet- largest bed sheet, if possible • Plastic or rubber bed protector • Draw sheet- half the size of ordinary bed sheet used to protect the client from bed protector • Top sheet • Blanket • Spread sheet NOTE: o Hospital bed- this only uses bed sheet, bed protector, draw sheet and top sheet o Home bed –(cold country) all 6 bed sheets are used. o Know the number of bed sheets used by your home institution. MITERING: 1. Pick up the edge of the sheet at the side of the bed 12 inches from the head of the mattress 2. Place the triangle on the top of the mattress PROCEDURES: A. CLOSED UNOCCUPIED BED 1. Assemble your equipment: a. Bottom sheet b. Bed protector c. Draw sheet d. Top sheet e. Pillow f. Pillow cases g. Chair 2. Wash your hands 3. Place a chair near the bed 4. Put the pillow on the chair 5. Adjust the height of the bed as to your own comfort, if possible 6. Pull the mattress to the head of the bed until it touches the headboard 7. Fold the bottom sheet lengthwise and place the folded side at the bed’s center from head to foot. Put the small hem at the foot of the bed, even with the edge of the mattress. Place the large hem at the head of the bed with about 8 inches left to tuck in. 8. Open the sheet so as it would hang evenly over each side of the bed but should not touch the floor. 9. Tuck the sheet tightly at the head of the bed by lifting the mattress using your hand closest to the foot of the bed. 10. Miter the corners. Tuck the hanging portion. 11. Work on one side of the bed until it is finished. 12. Place the bed protector. Tuck it in 13. Place the draw sheet. Tuck it in 14. Place the top sheet folded lengthwise at the center of the bed from head to foot of the bed. Place the large hem at the level of the edge of the mattress at the head of the bed. Open the sheet with the rough side up. Tightly tuck the sheet and miter the corners at the foot of the bed. Do not tuck the sides of the bed. 15. Fold the top sheet at least 6 inches to make a cuff. 16. Put the pillowcase on the pillow: a. Hold the pillowcase at the center of the end seam b. With your hand outside the case, turn the case back over your hand c. Grasp the pillow through the case at the center of the pillow d. Bring the case down over the pillow e. Fit the corner of the pillow into the seamless corner of the case f. Fold the extra material from the side seam under the pillow 2
  • 3.
    g. Place thepillow on the bed with the open end away from the door 17. Adjust the bed to its lowest horizontal position, if possible. 18. Wash your hands. PROCEDURE: Occupied Bed 1. Assemble your equipment near the bed 2. Wash you hands 3. Tell the client you are going to make the bed 4. Lower the bed according to your comfort, if possible 5. Loosen all the sheets around the entire bed 6. Leave the client covered with top sheet. 7. Move the client so it will touch the head board 8. Raise the side rail on the opposite side from where you will be working and lock in place 9. Ask the client to turn on his side toward the side rail. If the client cannot can not turn let him lye on his back but move him as far as possible toward the rail 10. Fold the draw sheet toward the client and tuck it against his back 11. Raise the plastic draw sheet and tuck it under the draw sheet 12. Roll the bottom sheet toward the client and tuck it against his back. 13. Take the large clean sheet and fold it in lengthwise. Do not permit the sheet to touch the floor or your uniform. Place it on the bed, with the fold running along the middle of the mattress. The small hem should be even at the edge of the foot of the bed and the large hem at the head with excess of 18 inches. Fold the half of the sheet toward the client. Tuck the fold against his back below the bed protector. Tuck and miter 14. Pull the bed protector and tuck it in 15. Place a clean draw sheet folded in half and place it over the bed protector. Unfold and tuck the other half under the client above the bottom sheet. Tuck the sides. 16. Ask the client to roll over the hump (assist him as needed) towards you. Raise the rail on your side and lower the rail on the other side. 17. Pull the soiled bottom sheet. Fold and put it on chair. Do the same with the draw sheet. 18. Pull the clean bottom sheet then tuck and miter 19. Pull the clean draw sheet then tuck 20. Have the client turn on his back. Moving the client toward the center of the bed. 21. Change the pillow case 22. Spread a clean top sheet over the used one with the large hem on the head. The middle should run along the center of the bed. Ask the client to hold it or tuck it on his shoulder while pulling the soiled top sheet toward the foot of the bed. Fold then hang on the chair. 23. Tuck the top sheet on your side. Go to the other side. Tuck and miter the top sheet. Leaving enough room to allow movement of the client’s feet. 24. Make the cuff 25. Make the client comfortable. You may raise the backrest and knee rest if allowed. 26. Lower the entire bed toward its lowest horizontal position 27. Put the side rails 28. Put all linens inside the soiled pillow case then put on soiled linen laundry basket 29. Wash your hands 30. Chart any observations you made during this procedure. BED STRIPPING: Purpose: 1. To freshen bed and make it possible to turn mattress when patient is out of bed 2. To provide an opportunity the condition of the equipment. Procedure: 1. Tidy bedside table first and move it out of the way 2. Place chair at the foot of the bed 3. Remove soiled pillowcase. Place it at foot part of the Bed 4. Place pillow on chair 5. Loosen the bedding all around the bed 6. Fold the top sheet from top to bottom then in half and place over back of chair to be used again 7. Fold the draw sheet, bed protector and bottom sheet in the same manner. 8. Remove mattress cover if soiled, or if new bed will be made for new patient 9. Gather all soiled linens and put inside the soiled pillowcase. Turn mattress 10. Air the bed from 15-20 minutes or more before making 11. Discard dirty linens in the hamper. 12. Wash your hands 3
  • 4.
    PREPARED BY: MANNYJUN P. PADUA RN,MAN 4