WHAT IS BEDMAKING?
•Bed making is one of the important
caregiving techniques to prepare various
types of bed for patients or clients to
ensure comfort and useful position for a
particular condition. The bed is especially
important for patients who are sick.
IMPORTANCE OF BED-MAKING
1. Prevents discomfort, infections, and
pressure ulcers
2. Enhances healing through rest and
cleanliness
3. Demonstrates professionalism and
quality of care
4. Supports patient dignity, especially in
institutional care
3.
DEFINITION OF TERMS:
•Fanfold: Specifically folding the edge of
the sheet used in the bed 6-8 inches
outward.
• Mitered corner: a means of anchoring
sheet on mattresses.
• Toe pleat: a fold made in the top bed
clothes to provide additional space for
patients toes.
• Foot drop: plantar flexion of the foot with
permanent contracture of the
gastronomies (calf) muscle and tendon.
• Bed cradle: is a curved, semi- circular
made of metal that can be placed over a
portion of the patient's body.
• Hospital bed: It's usually about 26-28
inches (65-70) cm above to floor. The
ideal hospital bed should be selected for
its impact on patients comfort, safety,
medical condition, and ability to change
position.
4.
Types of BedMaking in Hospital:
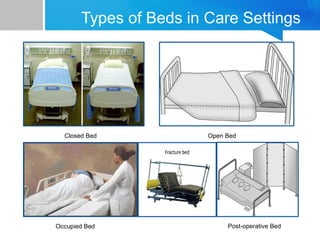
Types of Beds in Care Settings
1. Closed Bed – prepared for a new patient or
when not in use.
2. Open Bed – for ambulatory patients or
ready for occupancy
3. Occupied Bed – made while patient is in
bed, often due to immobility.
4. Post-Operative Bed – prepared to receive
a patient from surgery. Known as recovery
bed or anesthetic bed, and used for a
patient with large cast or other
circumstance that would make it difficult for
him to transfer easily into bed.
5. Fracture Bed – for patients with body
immobilization (e.g., traction)
5.
Types of Bedsin Care Settings
Closed Bed Open Bed
Occupied Bed Post-operative Bed
6.
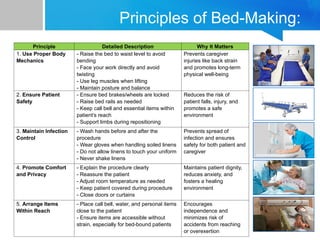
Principles of Bed-Making:
PrincipleDetailed Description Why It Matters
1. Use Proper Body
Mechanics
- Raise the bed to waist level to avoid
bending
- Face your work directly and avoid
twisting
- Use leg muscles when lifting
- Maintain posture and balance
Prevents caregiver
injuries like back strain
and promotes long-term
physical well-being
2. Ensure Patient
Safety
- Ensure bed brakes/wheels are locked
- Raise bed rails as needed
- Keep call bell and essential items within
patient’s reach
- Support limbs during repositioning
Reduces the risk of
patient falls, injury, and
promotes a safe
environment
3. Maintain Infection
Control
- Wash hands before and after the
procedure
- Wear gloves when handling soiled linens
- Do not allow linens to touch your uniform
- Never shake linens
Prevents spread of
infection and ensures
safety for both patient and
caregiver
4. Promote Comfort
and Privacy
- Explain the procedure clearly
- Reassure the patient
- Adjust room temperature as needed
- Keep patient covered during procedure
- Close doors or curtains
Maintains patient dignity,
reduces anxiety, and
fosters a healing
environment
5. Arrange Items
Within Reach
- Place call bell, water, and personal items
close to the patient
- Ensure items are accessible without
strain, especially for bed-bound patients
Encourages
independence and
minimizes risk of
accidents from reaching
or overexertion
7.
Standard Bed Linensand Their Uses:
Linen Type Description Purpose / Use
Bottom Sheet Flat or fitted sheet
placed directly on
mattress
Provides a clean, smooth
surface for the patient to lie on;
protects mattress from body oils
and sweat
Rubber Sheet Waterproof sheet
made of rubber or
plastic
Prevents fluids such as urine,
blood, or spills from soiling the
mattress; maintains hygiene
and mattress integrity
Absorbent Pad Disposable or
washable pad placed
on top of rubber
sheet
Absorbs moisture, protects bed
linens and mattress; increases
patient comfort
Draw Sheet Small flat sheet
placed between
bottom sheet and top
sheet
Used to help reposition or move
patient safely; reduces friction
and skin damage
Pillowcase Fabric cover for pillow Keeps pillow clean and
hygienic; provides comfort for
the patient’s head
Top Sheet Flat sheet placed
over the patient and
under the blanket
Provides a layer of warmth and
modesty; protects blanket from
direct contact with the patient
8.
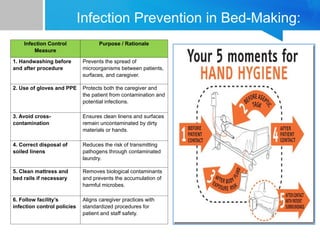
Infection Prevention inBed-Making:
Infection Control
Measure
Purpose / Rationale
1. Handwashing before
and after procedure
Prevents the spread of
microorganisms between patients,
surfaces, and caregiver.
2. Use of gloves and PPE Protects both the caregiver and
the patient from contamination and
potential infections.
3. Avoid cross-
contamination
Ensures clean linens and surfaces
remain uncontaminated by dirty
materials or hands.
4. Correct disposal of
soiled linens
Reduces the risk of transmitting
pathogens through contaminated
laundry.
5. Clean mattress and
bed rails if necessary
Removes biological contaminants
and prevents the accumulation of
harmful microbes.
6. Follow facility’s
infection control policies
Aligns caregiver practices with
standardized procedures for
patient and staff safety.
9.
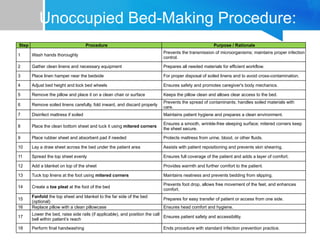
Unoccupied Bed-Making Procedure:
StepProcedure Purpose / Rationale
1 Wash hands thoroughly
Prevents the transmission of microorganisms; maintains proper infection
control.
2 Gather clean linens and necessary equipment Prepares all needed materials for efficient workflow.
3 Place linen hamper near the bedside For proper disposal of soiled linens and to avoid cross-contamination.
4 Adjust bed height and lock bed wheels Ensures safety and promotes caregiver's body mechanics.
5 Remove the pillow and place it on a clean chair or surface Keeps the pillow clean and allows clear access to the bed.
6 Remove soiled linens carefully, fold inward, and discard properly
Prevents the spread of contaminants; handles soiled materials with
care.
7 Disinfect mattress if soiled Maintains patient hygiene and prepares a clean environment.
8 Place the clean bottom sheet and tuck it using mitered corners
Ensures a smooth, wrinkle-free sleeping surface; mitered corners keep
the sheet secure.
9 Place rubber sheet and absorbent pad if needed Protects mattress from urine, blood, or other fluids.
10 Lay a draw sheet across the bed under the patient area Assists with patient repositioning and prevents skin shearing.
11 Spread the top sheet evenly Ensures full coverage of the patient and adds a layer of comfort.
12 Add a blanket on top of the sheet Provides warmth and further comfort to the patient.
13 Tuck top linens at the foot using mitered corners Maintains neatness and prevents bedding from slipping.
14 Create a toe pleat at the foot of the bed
Prevents foot drop, allows free movement of the feet, and enhances
comfort.
15
Fanfold the top sheet and blanket to the far side of the bed
(optional)
Prepares for easy transfer of patient or access from one side.
16 Replace pillow with a clean pillowcase Ensures head comfort and hygiene.
17
Lower the bed, raise side rails (if applicable), and position the call
bell within patient’s reach
Ensures patient safety and accessibility.
18 Perform final handwashing Ends procedure with standard infection prevention practice.
10.
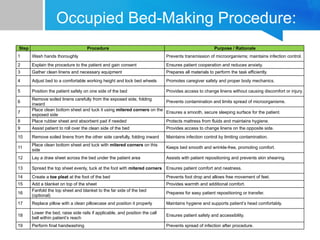
Occupied Bed-Making Procedure:
StepProcedure Purpose / Rationale
1 Wash hands thoroughly Prevents transmission of microorganisms; maintains infection control.
2 Explain the procedure to the patient and gain consent Ensures patient cooperation and reduces anxiety.
3 Gather clean linens and necessary equipment Prepares all materials to perform the task efficiently.
4 Adjust bed to a comfortable working height and lock bed wheels Promotes caregiver safety and proper body mechanics.
5 Position the patient safely on one side of the bed Provides access to change linens without causing discomfort or injury.
6
Remove soiled linens carefully from the exposed side, folding
inward
Prevents contamination and limits spread of microorganisms.
7
Place clean bottom sheet and tuck it using mitered corners on the
exposed side
Ensures a smooth, secure sleeping surface for the patient.
8 Place rubber sheet and absorbent pad if needed Protects mattress from fluids and maintains hygiene.
9 Assist patient to roll over the clean side of the bed Provides access to change linens on the opposite side.
10 Remove soiled linens from the other side carefully, folding inward Maintains infection control by limiting contamination.
11
Place clean bottom sheet and tuck with mitered corners on this
side
Keeps bed smooth and wrinkle-free, promoting comfort.
12 Lay a draw sheet across the bed under the patient area Assists with patient repositioning and prevents skin shearing.
13 Spread the top sheet evenly, tuck at the foot with mitered corners Ensures patient comfort and neatness.
14 Create a toe pleat at the foot of the bed Prevents foot drop and allows free movement of feet.
15 Add a blanket on top of the sheet Provides warmth and additional comfort.
16
Fanfold the top sheet and blanket to the far side of the bed
(optional)
Prepares for easy patient repositioning or transfer.
17 Replace pillow with a clean pillowcase and position it properly Maintains hygiene and supports patient’s head comfortably.
18
Lower the bed, raise side rails if applicable, and position the call
bell within patient’s reach
Ensures patient safety and accessibility.
19 Perform final handwashing Prevents spread of infection after procedure.
11.
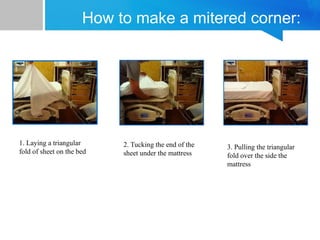
How to makea mitered corner:
1. Laying a triangular
fold of sheet on the bed
2. Tucking the end of the
sheet under the mattress
3. Pulling the triangular
fold over the side the
mattress
12.
COMFORT
• Make underbedding smooth, tight and securely tucked in.
• Place upper bedding high enough to cover patient’s shoulder comfortably.
• Secure to bedding at foot so that it will stay in well and be loose over the
feet.
• RESOURCES (TIME, ENERGY AND
MATERIALS)
• Bring all equipment to bed at one time.
• Remove all used equipment at one time.
• Avoid unnecessary trips around the bed by placing each piece on bed
before going to far side of bed.
• Sure accurate movements will make it unnecessary to pat and straighten
linen.
13.
WORKMANSHIP
• Smooth tightbed with well-made corners
• Smooth flat pillows with cases evenly fitted.
• Keep unit orderly during the procedure.
• Check unit for standard equipment and see the patient’s personal effects
are in good order.