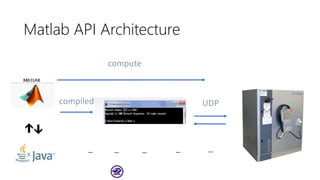
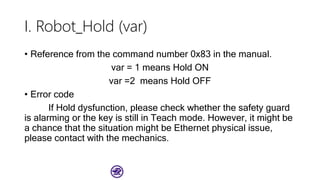
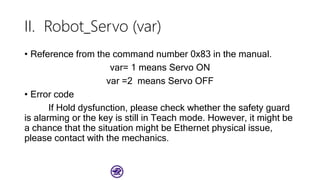
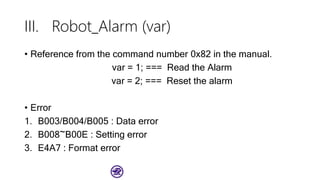
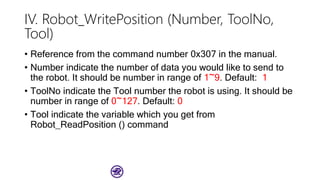
Department of Electronics Engineering
National Chiao-Tung University
Hsin-Chu, Taiwan
Basic Tutorial
for
Robotic Arm
Yu-Wei Chen
yuweiichen@gmail.com
GitHub: yuweichen1008
August 31st, 2018
2018/8/30
National Chiao-Tung University Department of Electronics
Engineering
1
Outline
• Robotic Arm
• Basic
• Rotational Matrix
• YASKAWA Solution
• UDP fix point move
• Programming panel (PP) introduction
• Lab Solution
• High Speed Commend (with Java) on Eclipse IDE
• Environment Setup
• Matlab API
2018/8/30
National Chiao-Tung University
Department of Electronics Engineering
2
Robotic Arm Basic
• Mathematical Theory
• Mechanical View
• Variants Types of Robot
2018/8/30
National Chiao-Tung University
Department of Electronics Engineering
3
KUKA ABB YASKAWA MH12
UR5
Rotation on 2D plane
• Assume there is a point on 2-D plane as (x,y) , rotate at origin
(0,0) with ccw angle 𝜃 we can get the new coordinate (x’,y’) with
simple equation
• 𝑥′
= 𝑥 × 𝑐𝑜𝑠𝜃 − 𝑦 × 𝑠𝑖𝑛𝜃
• 𝑦′ = 𝑥 × 𝑠𝑖𝑛𝜃 − 𝑦 × 𝑐𝑜𝑠𝜃
• If you learn the linear algebra =>
𝑋′ = 𝑅𝑋
Where R is the rotational matrix𝑅 𝜃 =
𝑐𝑜𝑠𝜃 −𝑠𝑖𝑛𝜃
𝑠𝑖𝑛𝜃 𝑐𝑜𝑠𝜃
2018/8/30
National Chiao-Tung University
Department of Electronics Engineering
4
More Rotational Matrix
• Interesting example for rotation (counter-clockwise)
• −: −1
• +: +1
2018/8/30
National Chiao-Tung University
Department of Electronics Engineering
5
90° 180° 270°
Rotational Matrix
2018/8/30
National Chiao-Tung University
Department of Electronics Engineering
6
Rotational Matrix
• In general, we used to applied the convention for the rotational
matrix as following order Z -> Y -> X (aka Euler ZYX
Convention)
2018/8/30
National Chiao-Tung University
Department of Electronics Engineering
7
http://web.mit.edu/2.05/www/Handout/HO2.PDF
Euler ZYX Convention
• Rotational Matrix Derivation
2018/8/30
National Chiao-Tung University
Department of Electronics Engineering
8
𝛼 = 𝑡𝑎𝑛−1
𝑟21
𝑟11
𝛽 = 𝑡𝑎𝑛−1
−
𝑟31
𝑟32
2
+ 𝑟33
2
𝛾 = tan−1
𝑟32
𝑟33
𝑹 =
𝑐𝑜𝑠𝛼 −𝑠𝑖𝑛𝛼 0
𝑠𝑖𝑛𝛼 𝑐𝑜𝑠𝛼 0
0 0 1
⋅
𝑐𝑜𝑠𝛽 0 𝑠𝑖𝑛𝛽
0 1 0
−𝑠𝑖𝑛𝛽 0 𝑐𝑜𝑠𝛽
⋅
1 0 0
0 𝑐𝑜𝑠𝛾 −𝑠𝑖𝑛𝛾
0 𝑠𝑖𝑛𝛾 𝑐𝑜𝑠𝛾
=
cos 𝛼 cos 𝛽 cos 𝛼 sin 𝛽 sin 𝛾 − sin 𝛼 cos 𝛾 cos 𝛼 sin 𝛽 cos 𝛾 + sin 𝛼 sin 𝛾
sin 𝛼 cos 𝛽 sin 𝛼 sin 𝛽 sin 𝛾 + cos 𝛼 cos 𝛾 sin 𝛼 sin 𝛽 cos 𝛾 − cos 𝛼 sin 𝛾
− sin 𝛽 cos 𝛽 sin 𝛾 cos 𝛽 cos 𝛾
𝛼,𝛽,𝛾 are the transformed angle in rad
Posture and Position
• Position in space means the point (x,y,z) under some
coordinate system (Cartesian(Euler)/Cylindrical/Spherical)
• Posture is combinational description for an 3D object(e.g.
Human Body/Robot)
• Why posture matter for controlling the robotic arm?
2018/8/30
National Chiao-Tung University
Department of Electronics Engineering
9
Robotic Arm Mechanical Constraints
• Limited for AC servo motor
First thing first, AC motor is used for industrial robotic arm for
1. Speed control
2. High precision
3. High payload (bigger magnet)
But AC motor is limited by its angle (PWM duty cycle 0%(0°) to
100%(180°) )
• Singularity Point
• Rotational singularity (Infinite value from tangent)
2018/8/30
National Chiao-Tung University
Department of Electronics Engineering
10
Rotational Matrix
• For Ry <= 180° => cos(Ry) > 0
Rz=atan2(M(2,1),M(1,1));
Ry=atan2(-M(3,1),sqrt(M(3,2)^2+M(3,3)^2));
Rx=atan2(M(3,2),M(3,3));
result=RobotRotation(Rx, Ry, Rz);
• For Ry > 180 ° => cos(Ry) < 0
Rz=atan2(-M(2,1),-M(1,1));
Ry=atan2(-M(3,1),-sqrt(M(3,2)^2+M(3,3)^2));
Rx=atan2(-M(3,2),-M(3,3));
result=RobotRotation(Rx, Ry, Rz);
2018/8/30
National Chiao-Tung University
Department of Electronics Engineering
11
atan2(y,x) give the value crossing the original point(0,0)
https://zh.wikipedia.org/wiki/Atan2
YASKAWA MH12 Project
• Program provided from the
manufacture
• Two types of move:
1. Send the direct posture
2. Send the increment according
to current posture
• But this is not useful for
unknown posture(unless you fix
the path you want)
2018/8/30
National Chiao-Tung University
Department of Electronics Engineering
12
Programming Panel(1/2)
• Control on the P.P. (Robot Panel)
• Green bottom light: Running
• White bottom light: Holding
• Servo light: “blink” or “light” mean
Servo on!
• Key: change to Remote or Play mode when
controlling trough PC via Ethernet.
Programming Panel(2/2)
1. Manager mode’s and default password: n’s 9(long press nine)
2. Change the Ethernet protocol: long press 版面 while booting,
password: n’s 5(nines five) to save the setting.
3. Change tool number enable: First, change to manager mode,
than, you may see the menu of setup robot condition . Press
“SHIFT” and “Coordinate” at the same time, not under “Tool
coordinate” mode.
4. Change user coordinate #: press “SHIFT” and “Coordinate” at
the same time under “Tool coordinate” mode.
High Speed Commend
• Send Commend to robot controller with UDP package, the TCP
is not support this time according to the datasheet manufacture
provided.
• In order to achieve the high-speed commend, the multithread is
implement for controlling the robot position and trajectory path.
2018/8/30
National Chiao-Tung University
Department of Electronics Engineering
15
UDP
• Typical Application: VoIP(Skype?)、YouTube
• 8-byte (64-bits) UDP Header + YASKAWA format (All the
YASKAWA robot share the same setting)
• UDP IPv4 protocol => Not reliable Comm.
• Failure communication Handle (Callback function)
• More Information on Debug section (p.32 ~ p.35)
2018/8/30
National Chiao-Tung University
Department of Electronics Engineering
16
Network Setup Basic
• Robot TCP/IP is static subjected to domain as 192.168.2.250
with default gateway of 192.168.2.254
• Therefore, in order to connect to Robot with UDP, set your
Network Adapter according to following procedure with IP in
same Innet subdomain starting with 192.168.2.XXX(XXX start
from 2 to 249)
192.168.2 : Internet
.250 : Robot Controller
192.168.2.254 : Default Gateway
2018/8/30
National Chiao-Tung University
Department of Electronics Engineering
17
Setup Network Adapter(1/2)
2018/8/30
National Chiao-Tung University
Department of Electronics Engineering
18
Setup Network Adapter(2/2)
2018/8/30
National Chiao-Tung University
Department of Electronics Engineering
19
Eclipse IDE
• Create a new workspace in the Github repo you’ve clone from
https://github.com/yuweichen1008/JavaRobot
• Example:
2018/8/30
National Chiao-Tung University
Department of Electronics Engineering
20
Eclipse Shortcuts
• [Ctrl + Shift + O]:自動匯入所需要的類別:Auto include
• [Ctrl + Shift + F]:程式碼自動排版 : Auto align
• [Ctrl + Left-click]:查看使用類別的原始碼 : Check the source
code
• [Ctrl+ / ]:將選取的文字多行註解起來 : Comment the code
Eclipse Theme
Setup Java Project
• Go to File > Open Projects from File System > Java
2018/8/30
National Chiao-Tung University
Department of Electronics Engineering
23
Sending the UDP Package to Robot
2018/8/30
National Chiao-Tung University
Department of Electronics Engineering
24
Field test
8/30/2018 NCTU RFVLSI 25
X +
Y +
Z +Z +
How to control the Robot
• In application of EM antenna calibration: Fix at some point
(x,y,z) and adjust the posture (rx,ry,rz)
https://drive.google.com/file/d/1pBF59-vNRgaSsKtFvtJfPHziJ1QjR3rqDg/view?usp=sharing
• We have to calculate the path with memorizing the original
posture (x,y,z,rx,ry,rz), we can memorize the original posture in
Matlab easily
• We will introduce the Matlab API next!
2018/8/30
National Chiao-Tung University
Department of Electronics Engineering
26
Matlab API Architecture
UDP
compute
compiled
JavaRobot API Flow
8/30/2018 NCTU RFVLSI 28
JavaRobot
RobotMove
(Callback Function)
SendUDP
UDPNode
Robotic Arm Controller
Functionality functions
(interface)
Matlab
Function flow
JavaRobot Data Structure & Philosophy
2018/8/30 29
• Simple, clean, straight forward, easy for debugging
JavaRobot
RobotMove RobotRead
Command functions
API Main Function
1. Read the current position with the function of
[Tool] = Read_Position ()
2. Get the position and save it as variable Tool, and than use
the Robot_Move_Angle ()
to move to assign pitch and yaw value.
3. We can read the angle with
[pitch, yaw] = Robot_ReadAngle()
4. Reset the surface back to original point or move to the
Tool with Robot_Move(Tool, speed)
Special Function
Robot_Hold ()
Robot_Hold is the function to turn on or off the hold. Hold
resemble pause in the control. It can be useful when it comes to
temperately check the robot status.
Robot_Servo ()
Robot_Servo is the function to turn on or off the servo.
Robot_Alarm ()
Alarm able to read and also reset the alarm which, in this case,
will also show on the P.P.
Robot_WritePosition ()
This function will write the current position into robot for the next
operation.
I. Robot_Hold (var)
• Reference from the command number 0x83 in the manual.
var = 1 means Hold ON
var =2 means Hold OFF
• Error code
If Hold dysfunction, please check whether the safety guard
is alarming or the key is still in Teach mode. However, it might be
a chance that the situation might be Ethernet physical issue,
please contact with the mechanics.
II. Robot_Servo (var)
• Reference from the command number 0x83 in the manual.
var= 1 means Servo ON
var =2 means Servo OFF
• Error code
If Hold dysfunction, please check whether the safety guard
is alarming or the key is still in Teach mode. However, it might be
a chance that the situation might be Ethernet physical issue,
please contact with the mechanics.
III. Robot_Alarm (var)
• Reference from the command number 0x82 in the manual.
var = 1; === Read the Alarm
var = 2; === Reset the alarm
• Error
1. B003/B004/B005 : Data error
2. B008~B00E : Setting error
3. E4A7 : Format error
IV. Robot_WritePosition (Number, ToolNo,
Tool)
• Reference from the command number 0x307 in the manual.
• Number indicate the number of data you would like to send to
the robot. It should be number in range of 1~9. Default: 1
• ToolNo indicate the Tool number the robot is using. It should be
number in range of 0~127. Default: 0
• Tool indicate the variable which you get from
Robot_ReadPosition () command
Conclusion
• For more advanced topic on Robotic Arm, I would like to provide
some challenge:
1. Contribute to the Open Source JavaRobot
2. Implement the forward kinematic + inverse kinematic with
basic RRT algorithm (Rapidly-exploring random tree)
3. Beat the benchmark on ROS(robotic operating system)
4. Display with nicer UI with python, C# or even more
2018/8/30
National Chiao-Tung University
Department of Electronics Engineering
36
Wireshark
Filter Option:
ip.addr==192.168.2.250 && udp
Analysis
• The 16-bit units are represented in big-endian byte order
BOM sheet
Data Part (1/2)
Data Part (2/2)
• The data part is scheduled under the schema which we can refer to below
Sub-header(Request)
• Command No. fixed to 0307 in our case
• Instance and Attribute are 00 00 for the write purpose
• Service  0x33:Read plural data
0x34:Write plural data
• After padding(fixed to Byte3 & Byte 4) is the Data part(for 3.3.34 Plural Robot Position Type
Variable (P) Reading / Writing Command on page 83)

Basic Tutorial for Robotic Arm

  • 1.
    Department of ElectronicsEngineering National Chiao-Tung University Hsin-Chu, Taiwan Basic Tutorial for Robotic Arm Yu-Wei Chen yuweiichen@gmail.com GitHub: yuweichen1008 August 31st, 2018 2018/8/30 National Chiao-Tung University Department of Electronics Engineering 1
  • 2.
    Outline • Robotic Arm •Basic • Rotational Matrix • YASKAWA Solution • UDP fix point move • Programming panel (PP) introduction • Lab Solution • High Speed Commend (with Java) on Eclipse IDE • Environment Setup • Matlab API 2018/8/30 National Chiao-Tung University Department of Electronics Engineering 2
  • 3.
    Robotic Arm Basic •Mathematical Theory • Mechanical View • Variants Types of Robot 2018/8/30 National Chiao-Tung University Department of Electronics Engineering 3 KUKA ABB YASKAWA MH12 UR5
  • 4.
    Rotation on 2Dplane • Assume there is a point on 2-D plane as (x,y) , rotate at origin (0,0) with ccw angle 𝜃 we can get the new coordinate (x’,y’) with simple equation • 𝑥′ = 𝑥 × 𝑐𝑜𝑠𝜃 − 𝑦 × 𝑠𝑖𝑛𝜃 • 𝑦′ = 𝑥 × 𝑠𝑖𝑛𝜃 − 𝑦 × 𝑐𝑜𝑠𝜃 • If you learn the linear algebra => 𝑋′ = 𝑅𝑋 Where R is the rotational matrix𝑅 𝜃 = 𝑐𝑜𝑠𝜃 −𝑠𝑖𝑛𝜃 𝑠𝑖𝑛𝜃 𝑐𝑜𝑠𝜃 2018/8/30 National Chiao-Tung University Department of Electronics Engineering 4
  • 5.
    More Rotational Matrix •Interesting example for rotation (counter-clockwise) • −: −1 • +: +1 2018/8/30 National Chiao-Tung University Department of Electronics Engineering 5 90° 180° 270°
  • 6.
    Rotational Matrix 2018/8/30 National Chiao-TungUniversity Department of Electronics Engineering 6
  • 7.
    Rotational Matrix • Ingeneral, we used to applied the convention for the rotational matrix as following order Z -> Y -> X (aka Euler ZYX Convention) 2018/8/30 National Chiao-Tung University Department of Electronics Engineering 7 http://web.mit.edu/2.05/www/Handout/HO2.PDF
  • 8.
    Euler ZYX Convention •Rotational Matrix Derivation 2018/8/30 National Chiao-Tung University Department of Electronics Engineering 8 𝛼 = 𝑡𝑎𝑛−1 𝑟21 𝑟11 𝛽 = 𝑡𝑎𝑛−1 − 𝑟31 𝑟32 2 + 𝑟33 2 𝛾 = tan−1 𝑟32 𝑟33 𝑹 = 𝑐𝑜𝑠𝛼 −𝑠𝑖𝑛𝛼 0 𝑠𝑖𝑛𝛼 𝑐𝑜𝑠𝛼 0 0 0 1 ⋅ 𝑐𝑜𝑠𝛽 0 𝑠𝑖𝑛𝛽 0 1 0 −𝑠𝑖𝑛𝛽 0 𝑐𝑜𝑠𝛽 ⋅ 1 0 0 0 𝑐𝑜𝑠𝛾 −𝑠𝑖𝑛𝛾 0 𝑠𝑖𝑛𝛾 𝑐𝑜𝑠𝛾 = cos 𝛼 cos 𝛽 cos 𝛼 sin 𝛽 sin 𝛾 − sin 𝛼 cos 𝛾 cos 𝛼 sin 𝛽 cos 𝛾 + sin 𝛼 sin 𝛾 sin 𝛼 cos 𝛽 sin 𝛼 sin 𝛽 sin 𝛾 + cos 𝛼 cos 𝛾 sin 𝛼 sin 𝛽 cos 𝛾 − cos 𝛼 sin 𝛾 − sin 𝛽 cos 𝛽 sin 𝛾 cos 𝛽 cos 𝛾 𝛼,𝛽,𝛾 are the transformed angle in rad
  • 9.
    Posture and Position •Position in space means the point (x,y,z) under some coordinate system (Cartesian(Euler)/Cylindrical/Spherical) • Posture is combinational description for an 3D object(e.g. Human Body/Robot) • Why posture matter for controlling the robotic arm? 2018/8/30 National Chiao-Tung University Department of Electronics Engineering 9
  • 10.
    Robotic Arm MechanicalConstraints • Limited for AC servo motor First thing first, AC motor is used for industrial robotic arm for 1. Speed control 2. High precision 3. High payload (bigger magnet) But AC motor is limited by its angle (PWM duty cycle 0%(0°) to 100%(180°) ) • Singularity Point • Rotational singularity (Infinite value from tangent) 2018/8/30 National Chiao-Tung University Department of Electronics Engineering 10
  • 11.
    Rotational Matrix • ForRy <= 180° => cos(Ry) > 0 Rz=atan2(M(2,1),M(1,1)); Ry=atan2(-M(3,1),sqrt(M(3,2)^2+M(3,3)^2)); Rx=atan2(M(3,2),M(3,3)); result=RobotRotation(Rx, Ry, Rz); • For Ry > 180 ° => cos(Ry) < 0 Rz=atan2(-M(2,1),-M(1,1)); Ry=atan2(-M(3,1),-sqrt(M(3,2)^2+M(3,3)^2)); Rx=atan2(-M(3,2),-M(3,3)); result=RobotRotation(Rx, Ry, Rz); 2018/8/30 National Chiao-Tung University Department of Electronics Engineering 11 atan2(y,x) give the value crossing the original point(0,0) https://zh.wikipedia.org/wiki/Atan2
  • 12.
    YASKAWA MH12 Project •Program provided from the manufacture • Two types of move: 1. Send the direct posture 2. Send the increment according to current posture • But this is not useful for unknown posture(unless you fix the path you want) 2018/8/30 National Chiao-Tung University Department of Electronics Engineering 12
  • 13.
    Programming Panel(1/2) • Controlon the P.P. (Robot Panel) • Green bottom light: Running • White bottom light: Holding • Servo light: “blink” or “light” mean Servo on! • Key: change to Remote or Play mode when controlling trough PC via Ethernet.
  • 14.
    Programming Panel(2/2) 1. Managermode’s and default password: n’s 9(long press nine) 2. Change the Ethernet protocol: long press 版面 while booting, password: n’s 5(nines five) to save the setting. 3. Change tool number enable: First, change to manager mode, than, you may see the menu of setup robot condition . Press “SHIFT” and “Coordinate” at the same time, not under “Tool coordinate” mode. 4. Change user coordinate #: press “SHIFT” and “Coordinate” at the same time under “Tool coordinate” mode.
  • 15.
    High Speed Commend •Send Commend to robot controller with UDP package, the TCP is not support this time according to the datasheet manufacture provided. • In order to achieve the high-speed commend, the multithread is implement for controlling the robot position and trajectory path. 2018/8/30 National Chiao-Tung University Department of Electronics Engineering 15
  • 16.
    UDP • Typical Application:VoIP(Skype?)、YouTube • 8-byte (64-bits) UDP Header + YASKAWA format (All the YASKAWA robot share the same setting) • UDP IPv4 protocol => Not reliable Comm. • Failure communication Handle (Callback function) • More Information on Debug section (p.32 ~ p.35) 2018/8/30 National Chiao-Tung University Department of Electronics Engineering 16
  • 17.
    Network Setup Basic •Robot TCP/IP is static subjected to domain as 192.168.2.250 with default gateway of 192.168.2.254 • Therefore, in order to connect to Robot with UDP, set your Network Adapter according to following procedure with IP in same Innet subdomain starting with 192.168.2.XXX(XXX start from 2 to 249) 192.168.2 : Internet .250 : Robot Controller 192.168.2.254 : Default Gateway 2018/8/30 National Chiao-Tung University Department of Electronics Engineering 17
  • 18.
    Setup Network Adapter(1/2) 2018/8/30 NationalChiao-Tung University Department of Electronics Engineering 18
  • 19.
    Setup Network Adapter(2/2) 2018/8/30 NationalChiao-Tung University Department of Electronics Engineering 19
  • 20.
    Eclipse IDE • Createa new workspace in the Github repo you’ve clone from https://github.com/yuweichen1008/JavaRobot • Example: 2018/8/30 National Chiao-Tung University Department of Electronics Engineering 20
  • 21.
    Eclipse Shortcuts • [Ctrl+ Shift + O]:自動匯入所需要的類別:Auto include • [Ctrl + Shift + F]:程式碼自動排版 : Auto align • [Ctrl + Left-click]:查看使用類別的原始碼 : Check the source code • [Ctrl+ / ]:將選取的文字多行註解起來 : Comment the code
  • 22.
  • 23.
    Setup Java Project •Go to File > Open Projects from File System > Java 2018/8/30 National Chiao-Tung University Department of Electronics Engineering 23
  • 24.
    Sending the UDPPackage to Robot 2018/8/30 National Chiao-Tung University Department of Electronics Engineering 24
  • 25.
    Field test 8/30/2018 NCTURFVLSI 25 X + Y + Z +Z +
  • 26.
    How to controlthe Robot • In application of EM antenna calibration: Fix at some point (x,y,z) and adjust the posture (rx,ry,rz) https://drive.google.com/file/d/1pBF59-vNRgaSsKtFvtJfPHziJ1QjR3rqDg/view?usp=sharing • We have to calculate the path with memorizing the original posture (x,y,z,rx,ry,rz), we can memorize the original posture in Matlab easily • We will introduce the Matlab API next! 2018/8/30 National Chiao-Tung University Department of Electronics Engineering 26
  • 27.
  • 28.
    JavaRobot API Flow 8/30/2018NCTU RFVLSI 28 JavaRobot RobotMove (Callback Function) SendUDP UDPNode Robotic Arm Controller Functionality functions (interface) Matlab Function flow
  • 29.
    JavaRobot Data Structure& Philosophy 2018/8/30 29 • Simple, clean, straight forward, easy for debugging JavaRobot RobotMove RobotRead Command functions
  • 30.
    API Main Function 1.Read the current position with the function of [Tool] = Read_Position () 2. Get the position and save it as variable Tool, and than use the Robot_Move_Angle () to move to assign pitch and yaw value. 3. We can read the angle with [pitch, yaw] = Robot_ReadAngle() 4. Reset the surface back to original point or move to the Tool with Robot_Move(Tool, speed)
  • 31.
    Special Function Robot_Hold () Robot_Holdis the function to turn on or off the hold. Hold resemble pause in the control. It can be useful when it comes to temperately check the robot status. Robot_Servo () Robot_Servo is the function to turn on or off the servo. Robot_Alarm () Alarm able to read and also reset the alarm which, in this case, will also show on the P.P. Robot_WritePosition () This function will write the current position into robot for the next operation.
  • 32.
    I. Robot_Hold (var) •Reference from the command number 0x83 in the manual. var = 1 means Hold ON var =2 means Hold OFF • Error code If Hold dysfunction, please check whether the safety guard is alarming or the key is still in Teach mode. However, it might be a chance that the situation might be Ethernet physical issue, please contact with the mechanics.
  • 33.
    II. Robot_Servo (var) •Reference from the command number 0x83 in the manual. var= 1 means Servo ON var =2 means Servo OFF • Error code If Hold dysfunction, please check whether the safety guard is alarming or the key is still in Teach mode. However, it might be a chance that the situation might be Ethernet physical issue, please contact with the mechanics.
  • 34.
    III. Robot_Alarm (var) •Reference from the command number 0x82 in the manual. var = 1; === Read the Alarm var = 2; === Reset the alarm • Error 1. B003/B004/B005 : Data error 2. B008~B00E : Setting error 3. E4A7 : Format error
  • 35.
    IV. Robot_WritePosition (Number,ToolNo, Tool) • Reference from the command number 0x307 in the manual. • Number indicate the number of data you would like to send to the robot. It should be number in range of 1~9. Default: 1 • ToolNo indicate the Tool number the robot is using. It should be number in range of 0~127. Default: 0 • Tool indicate the variable which you get from Robot_ReadPosition () command
  • 36.
    Conclusion • For moreadvanced topic on Robotic Arm, I would like to provide some challenge: 1. Contribute to the Open Source JavaRobot 2. Implement the forward kinematic + inverse kinematic with basic RRT algorithm (Rapidly-exploring random tree) 3. Beat the benchmark on ROS(robotic operating system) 4. Display with nicer UI with python, C# or even more 2018/8/30 National Chiao-Tung University Department of Electronics Engineering 36
  • 37.
  • 38.
    Analysis • The 16-bitunits are represented in big-endian byte order
  • 39.
  • 40.
  • 41.
    Data Part (2/2) •The data part is scheduled under the schema which we can refer to below
  • 42.
    Sub-header(Request) • Command No.fixed to 0307 in our case • Instance and Attribute are 00 00 for the write purpose • Service  0x33:Read plural data 0x34:Write plural data • After padding(fixed to Byte3 & Byte 4) is the Data part(for 3.3.34 Plural Robot Position Type Variable (P) Reading / Writing Command on page 83)