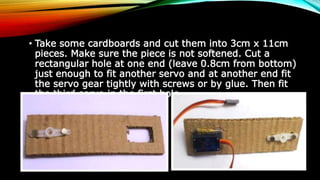
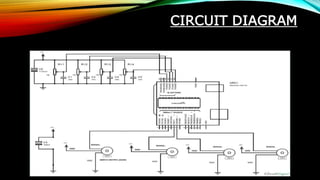
3. PRESENTED BY: STUDENTS OF B.VOC
(TELEMATICS)
NAMES OF THE STUDENTS WITH THERE ROLL NO:
• RISHABH GAUR : 1904812
• HARIOM PARMAR : 1904799
• ASHISH KATARA :1904794
• SAKSHI YADAV : 1904813
• SHIVAM : 1904816
6. Robotic Arm Project Using Arduino
• Nowadays, manual labor is being reduced at big scale industries and
factories to increase efficiency and gain profit by installing robots that
can do repetitive works. A onetime installation of such a device may
cost a huge amount, but in the long run, will turn out to be more
profitable that manual labor. Out of the lot, a simple robotic arm is one
of the most commonly installed machines. We are introducing the basic
concepts of an Arduino controlled robotic arm project.
• The programmable robotic arm finds extensive applications in its use in
extreme conditions like space mission or underwater expeditions. It is
also using in nuclear power plants and in toxic atmosphere where
human surveillance is difficult.
• There are numerous types of robotic arm used in industries but going
to give you details on a basic prototype.
7. • This setup also looks as a Robotic Crane or we can convert it into a Crane
by doing some easy tweaks. This project will be helpful for beginners
who want to learn to develop a Simple Robot in low cost or just want to
learn working with Arduino and servo motors.
• This Arduino Robotic Arm can be controlled by four
Potentiometer attached to it, each potentiometer is used to control each
servo. You can move these servos by rotating the pots to pick some
object, with some practice you can easily pick and move the object from
one place to another. We have used low torque servos here but you can
use more powerful servos to pick heavy objects.
8. COMPONENTS REQUIRED
•Arduino Uno
•1000uF Capacitor (4 pieces)
•100nF Capacitor (4 pieces)
•Servo Motor (SG 90- four pieces)
•10K pot- Variable Resistor (4 pieces)
•Power Supply (5v- preferably two)
9.
10.
11.
12. SERVO MOTOR
• Servo Motors are mainly used when there is a need for
accurate shaft movement or position. These are not
proposed for high speed applications. Servo motors are
proposed for low speed, medium torque and accurate
position application. So these motors are best for
designing robotic arm.
• Servo motors are available at different shapes and sizes.
We are going to use small servo motors, here we
use four SG90 servos. A servo motor will have mainly
there wires, one is for positive voltage another is for
ground and last one is for position setting. The RED wire
is connected to power, Black wire is connected to ground
and YELLOW wire is connected to signal.
13. CONSTRUCTION OF ROBOTIC
ARM
• Take a flat and stable surface, like a table or a hard card
board. Next place a servo motor in the middle and glue it
in place. This servo acts as base of arm. The degree of
the rotation is given in the picture.
14. • Place a small piece of cardboard on top of first servo and
then place the second servo on this piece of board and
glue it in place. The servo rotation must match the
diagram.
15. • Take some cardboards and cut them into 3cm x 11cm
pieces. Make sure the piece is not softened. Cut a
rectangular hole at one end (leave 0.8cm from bottom)
just enough to fit another servo and at another end fit
the servo gear tightly with screws or by glue. Then fit
the third servo in the first hole.
16. • Now cut another cardboard piece with lengths shown in
figure below and glue another gear at the bottom of this
piece.
17. • Now glue the fourth and last servo at the edge of second
piece
19. • When we attach this setup to the base it should look like,
20. • We just need to make the hook to grab and pick the
object like a robotic hand. For hook, cut another two
pieces of card board of lengths 1cmx7cm & 4cmx5cm.
Glue them together as shown in figure and stick final
gear at the very edge.
21. • Mount this piece on top and with this we have done
building our Robotic Arm. our basic robotic arm design
got completed and that's how we have built our low cost
robotic arm. Now connect the circuit in breadboard as per
circuit diagram.
23. HOW TO OPERATE ROBOTIC
ARM:
• There are four pots provided to the user. And by rotating
these four pots, we provide variable voltage at the ADC
channels of UNO. So the digital values of Arduino are
under control of user. These digital values are mapped to
adjust the servo motor position, hence the servo position
is in control of user and by rotating these Pots user can
move the joints of Robotic arm and can pick or grab any
object.