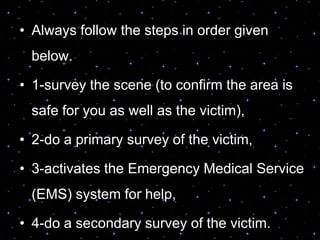
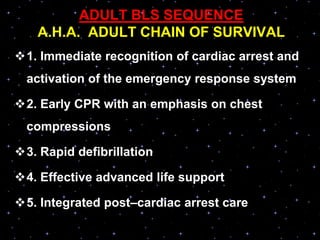
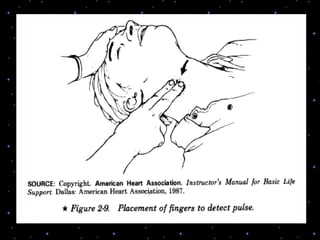
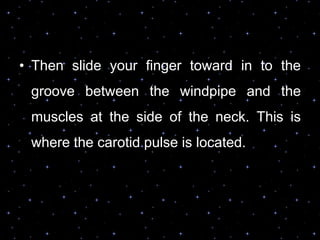
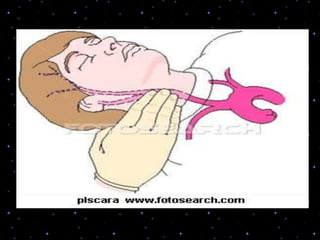
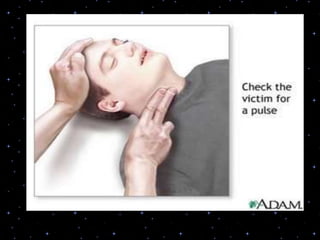
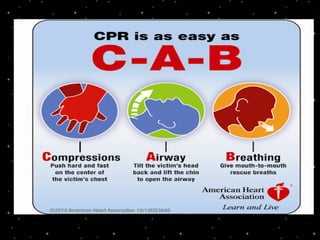
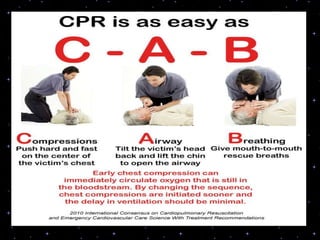
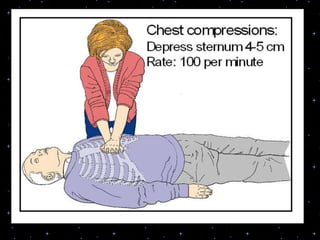
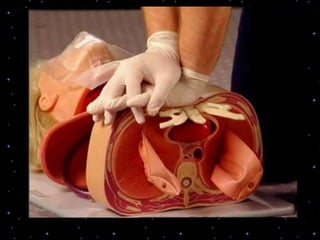
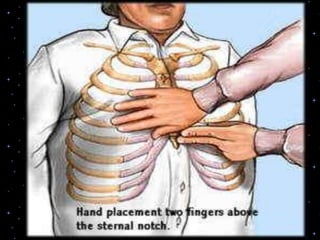
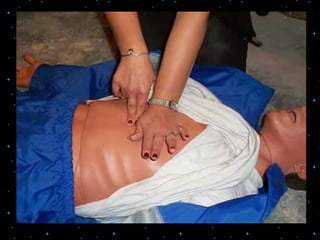
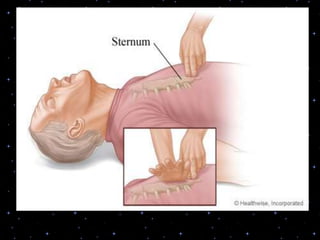
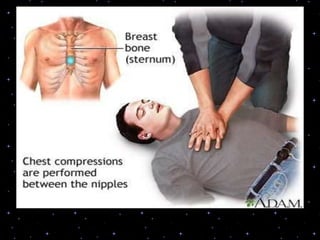
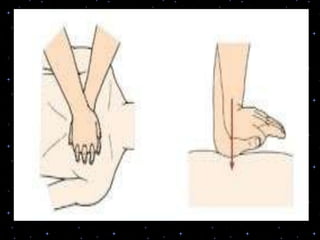
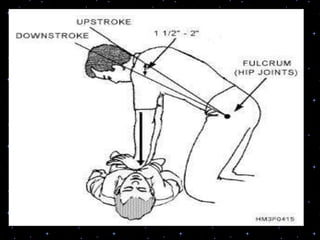
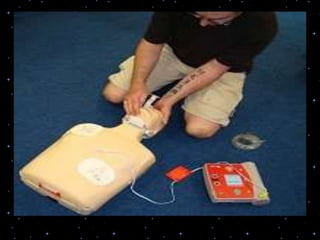
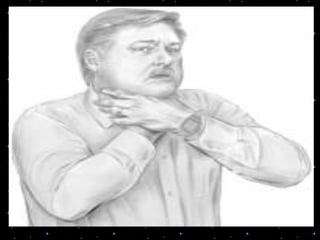
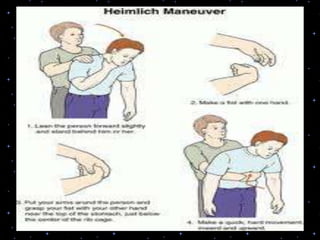
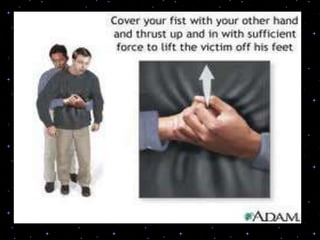
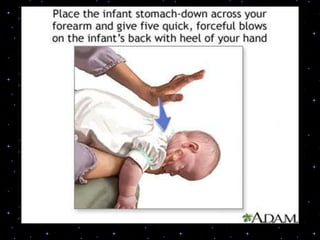
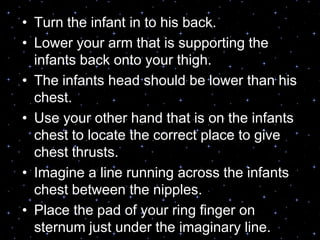
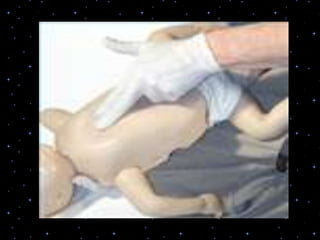
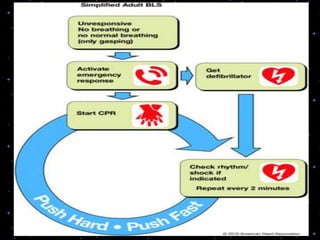
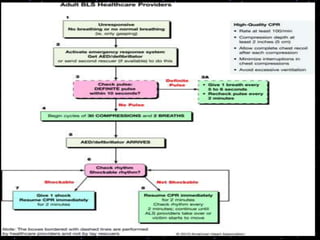
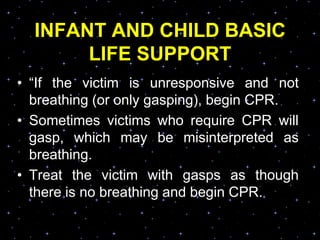
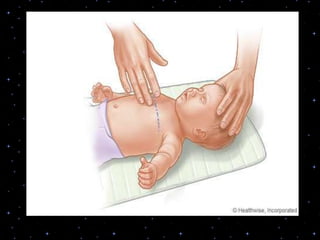
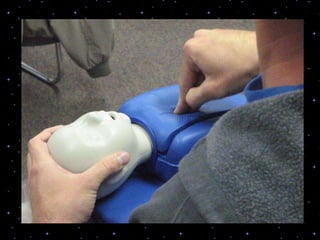
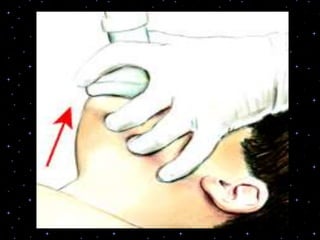
This document provides information on basic life support (BLS) procedures. It begins with an introduction to BLS, which includes immediate recognition of cardiac arrest, activation of emergency services, early CPR, and use of an automated external defibrillator. It then defines BLS and outlines the emergency action principle of assessing safety, doing a primary survey of the victim, activating EMS, and conducting a secondary assessment. The document provides detailed steps for conducting CPR, including chest compressions, opening the airway, giving rescue breaths, and using an AED. It also covers foreign body airway obstruction and procedures for infants.
Advanced Cardiovascular Life Support (ACLS) is the pre-eminent resuscitation course for the recognition and intervention of cardiopulmonary arrest or other cardiovascular emergencies.
CPR – or Cardiopulmonary Resuscitation – is an emergency lifesaving procedure performed when the heart stops beating. Immediate CPR can double or triple chances of survival after cardiac arrest.
A presentation used to train medical professionals to perform BLS in emergency condition. it will provide a better understanding about the steps of BLS and the order in which it should be perfomed.
I. Introduction
A. Definition of CPR
1. Explanation of what CPR stands for
2. Definition of CPR as a life-saving technique
B. Importance of CPR
1. Statistics on cardiac arrest and survival rates
2. Explanation of why CPR is crucial for saving lives
C. Objective of the manual
1. Explanation of what readers will learn from the manual
2. Statement of the manual's purpose
II. Getting Started with CPR
A. Assessing the situation
1. Importance of assessing the situation before starting CPR
2. Factors to consider when assessing the situation
B. Checking for responsiveness
1. Explanation of how to check for responsiveness
2. Importance of checking for responsiveness
C. Activating the emergency response system
1. Explanation of when to activate the emergency response system
2. Step-by-step guide to activating the emergency response system
III. Basic Life Support Techniques
A. Key components of basic life support
1. Explanation of the components of basic life support
2. Importance of each component
B. The ABCs of CPR
1. Explanation of the ABCs of CPR
2. Importance of each step in the ABCs of CPR
C. Performing chest compressions
1. Explanation of how to perform chest compressions
2. Importance of proper chest compression technique
D. Delivering rescue breaths
1. Explanation of how to deliver rescue breaths
2. Importance of proper rescue breath technique
E. Utilizing an automated external defibrillator (AED)
1. Explanation of what an AED is and how it works
2. Step-by-step guide to using an AED
F. Administering medications during CPR
1. Explanation of medications used during CPR
2. Dosages and administration guidelines for each medication
IV. Advanced Life Support Techniques
A. Advanced airway management
1. Explanation of advanced airway management techniques
2. Importance of advanced airway management in CPR
B. Advanced monitoring techniques
1. Explanation of advanced monitoring techniques
2. Importance of advanced monitoring in CPR
C. Invasive interventions
1. Explanation of invasive interventions
2. Importance of invasive interventions in CPR
D. Extracorporeal membrane oxygenation (ECMO)
1. Explanation of ECMO
2. Importance of ECMO in CPR
V. Improving Outcomes in CPR
A. Factors influencing CPR outcomes
1. Explanation of factors that influence CPR outcomes
2. Importance of understanding these factors
B. Strategies for improving CPR outcomes
1. Explanation of strategies for improving CPR outcomes
2. Importance of implementing these strategies
C. The role of high-quality CPR in improving outcomes
1. Explanation of what high-quality CPR is
2. Importance of performing high-quality CPR
VI. Special Considerations in CPR
A. CPR in special populations
1. Explanation of special populations that require unique CPR techniques
2. Importance of understanding these unique CPR techniques
B. CPR in special settings
1. Explanation of special settings that require unique CPR techniques
2. Importance of understanding these unique CPR techniques
C. CPR during a pandemic
1
Basic Life Support, or BLS, generally refers to the type of care that first-responders, healthcare providers and public safety professionals provide to anyone who is experiencing cardiac arrest, respiratory distress or an obstructed airway. It requires knowledge and skills in cardiopulmonary resuscitation (CPR), using automated external defibrillators (AED) and relieving airway obstructions in patients of every age.
CPR is a process of oxygenating heart, lung through external cardiac massage and artificial respiration until the definite medical treatment can restore the normal functioning of heart, lung and brain.
Basic Life Support is a life saving procedure ensuring patient survival in various life-threatening conditions. It includes Chain of survival, Cardio-pulmonary Resuscitation (CPR).
Pulmonary Thromboembolism - etilogy, types, medical- Surgical and nursing man...VarunMahajani
Disruption of blood supply to lung alveoli due to blockage of one or more pulmonary blood vessels is called as Pulmonary thromboembolism. In this presentation we will discuss its causes, types and its management in depth.
The prostate is an exocrine gland of the male mammalian reproductive system
It is a walnut-sized gland that forms part of the male reproductive system and is located in front of the rectum and just below the urinary bladder
Function is to store and secrete a clear, slightly alkaline fluid that constitutes 10-30% of the volume of the seminal fluid that along with the spermatozoa, constitutes semen
A healthy human prostate measures (4cm-vertical, by 3cm-horizontal, 2cm ant-post ).
It surrounds the urethra just below the urinary bladder. It has anterior, median, posterior and two lateral lobes
It’s work is regulated by androgens which are responsible for male sex characteristics
Generalised disease of the prostate due to hormonal derangement which leads to non malignant enlargement of the gland (increase in the number of epithelial cells and stromal tissue)to cause compression of the urethra leading to symptoms (LUTS
Title: Sense of Smell
Presenter: Dr. Faiza, Assistant Professor of Physiology
Qualifications:
MBBS (Best Graduate, AIMC Lahore)
FCPS Physiology
ICMT, CHPE, DHPE (STMU)
MPH (GC University, Faisalabad)
MBA (Virtual University of Pakistan)
Learning Objectives:
Describe the primary categories of smells and the concept of odor blindness.
Explain the structure and location of the olfactory membrane and mucosa, including the types and roles of cells involved in olfaction.
Describe the pathway and mechanisms of olfactory signal transmission from the olfactory receptors to the brain.
Illustrate the biochemical cascade triggered by odorant binding to olfactory receptors, including the role of G-proteins and second messengers in generating an action potential.
Identify different types of olfactory disorders such as anosmia, hyposmia, hyperosmia, and dysosmia, including their potential causes.
Key Topics:
Olfactory Genes:
3% of the human genome accounts for olfactory genes.
400 genes for odorant receptors.
Olfactory Membrane:
Located in the superior part of the nasal cavity.
Medially: Folds downward along the superior septum.
Laterally: Folds over the superior turbinate and upper surface of the middle turbinate.
Total surface area: 5-10 square centimeters.
Olfactory Mucosa:
Olfactory Cells: Bipolar nerve cells derived from the CNS (100 million), with 4-25 olfactory cilia per cell.
Sustentacular Cells: Produce mucus and maintain ionic and molecular environment.
Basal Cells: Replace worn-out olfactory cells with an average lifespan of 1-2 months.
Bowman’s Gland: Secretes mucus.
Stimulation of Olfactory Cells:
Odorant dissolves in mucus and attaches to receptors on olfactory cilia.
Involves a cascade effect through G-proteins and second messengers, leading to depolarization and action potential generation in the olfactory nerve.
Quality of a Good Odorant:
Small (3-20 Carbon atoms), volatile, water-soluble, and lipid-soluble.
Facilitated by odorant-binding proteins in mucus.
Membrane Potential and Action Potential:
Resting membrane potential: -55mV.
Action potential frequency in the olfactory nerve increases with odorant strength.
Adaptation Towards the Sense of Smell:
Rapid adaptation within the first second, with further slow adaptation.
Psychological adaptation greater than receptor adaptation, involving feedback inhibition from the central nervous system.
Primary Sensations of Smell:
Camphoraceous, Musky, Floral, Pepperminty, Ethereal, Pungent, Putrid.
Odor Detection Threshold:
Examples: Hydrogen sulfide (0.0005 ppm), Methyl-mercaptan (0.002 ppm).
Some toxic substances are odorless at lethal concentrations.
Characteristics of Smell:
Odor blindness for single substances due to lack of appropriate receptor protein.
Behavioral and emotional influences of smell.
Transmission of Olfactory Signals:
From olfactory cells to glomeruli in the olfactory bulb, involving lateral inhibition.
Primitive, less old, and new olfactory systems with different path
- Video recording of this lecture in English language: https://youtu.be/lK81BzxMqdo
- Video recording of this lecture in Arabic language: https://youtu.be/Ve4P0COk9OI
- Link to download the book free: https://nephrotube.blogspot.com/p/nephrotube-nephrology-books.html
- Link to NephroTube website: www.NephroTube.com
- Link to NephroTube social media accounts: https://nephrotube.blogspot.com/p/join-nephrotube-on-social-media.html
ARTIFICIAL INTELLIGENCE IN HEALTHCARE.pdfAnujkumaranit
Artificial intelligence (AI) refers to the simulation of human intelligence processes by machines, especially computer systems. It encompasses tasks such as learning, reasoning, problem-solving, perception, and language understanding. AI technologies are revolutionizing various fields, from healthcare to finance, by enabling machines to perform tasks that typically require human intelligence.
Anti ulcer drugs and their Advance pharmacology ||
Anti-ulcer drugs are medications used to prevent and treat ulcers in the stomach and upper part of the small intestine (duodenal ulcers). These ulcers are often caused by an imbalance between stomach acid and the mucosal lining, which protects the stomach lining.
||Scope: Overview of various classes of anti-ulcer drugs, their mechanisms of action, indications, side effects, and clinical considerations.
New Directions in Targeted Therapeutic Approaches for Older Adults With Mantl...i3 Health
i3 Health is pleased to make the speaker slides from this activity available for use as a non-accredited self-study or teaching resource.
This slide deck presented by Dr. Kami Maddocks, Professor-Clinical in the Division of Hematology and
Associate Division Director for Ambulatory Operations
The Ohio State University Comprehensive Cancer Center, will provide insight into new directions in targeted therapeutic approaches for older adults with mantle cell lymphoma.
STATEMENT OF NEED
Mantle cell lymphoma (MCL) is a rare, aggressive B-cell non-Hodgkin lymphoma (NHL) accounting for 5% to 7% of all lymphomas. Its prognosis ranges from indolent disease that does not require treatment for years to very aggressive disease, which is associated with poor survival (Silkenstedt et al, 2021). Typically, MCL is diagnosed at advanced stage and in older patients who cannot tolerate intensive therapy (NCCN, 2022). Although recent advances have slightly increased remission rates, recurrence and relapse remain very common, leading to a median overall survival between 3 and 6 years (LLS, 2021). Though there are several effective options, progress is still needed towards establishing an accepted frontline approach for MCL (Castellino et al, 2022). Treatment selection and management of MCL are complicated by the heterogeneity of prognosis, advanced age and comorbidities of patients, and lack of an established standard approach for treatment, making it vital that clinicians be familiar with the latest research and advances in this area. In this activity chaired by Michael Wang, MD, Professor in the Department of Lymphoma & Myeloma at MD Anderson Cancer Center, expert faculty will discuss prognostic factors informing treatment, the promising results of recent trials in new therapeutic approaches, and the implications of treatment resistance in therapeutic selection for MCL.
Target Audience
Hematology/oncology fellows, attending faculty, and other health care professionals involved in the treatment of patients with mantle cell lymphoma (MCL).
Learning Objectives
1.) Identify clinical and biological prognostic factors that can guide treatment decision making for older adults with MCL
2.) Evaluate emerging data on targeted therapeutic approaches for treatment-naive and relapsed/refractory MCL and their applicability to older adults
3.) Assess mechanisms of resistance to targeted therapies for MCL and their implications for treatment selection
TEST BANK for Operations Management, 14th Edition by William J. Stevenson, Ve...kevinkariuki227
TEST BANK for Operations Management, 14th Edition by William J. Stevenson, Verified Chapters 1 - 19, Complete Newest Version.pdf
Ozempic: Preoperative Management of Patients on GLP-1 Receptor Agonists Saeid Safari
Preoperative Management of Patients on GLP-1 Receptor Agonists like Ozempic and Semiglutide
ASA GUIDELINE
NYSORA Guideline
2 Case Reports of Gastric Ultrasound
micro teaching on communication m.sc nursing.pdfAnurag Sharma
Microteaching is a unique model of practice teaching. It is a viable instrument for the. desired change in the teaching behavior or the behavior potential which, in specified types of real. classroom situations, tends to facilitate the achievement of specified types of objectives.
These lecture slides, by Dr Sidra Arshad, offer a quick overview of physiological basis of a normal electrocardiogram.
Learning objectives:
1. Define an electrocardiogram (ECG) and electrocardiography
2. Describe how dipoles generated by the heart produce the waveforms of the ECG
3. Describe the components of a normal electrocardiogram of a typical bipolar leads (limb II)
4. Differentiate between intervals and segments
5. Enlist some common indications for obtaining an ECG
Study Resources:
1. Chapter 11, Guyton and Hall Textbook of Medical Physiology, 14th edition
2. Chapter 9, Human Physiology - From Cells to Systems, Lauralee Sherwood, 9th edition
3. Chapter 29, Ganong’s Review of Medical Physiology, 26th edition
4. Electrocardiogram, StatPearls - https://www.ncbi.nlm.nih.gov/books/NBK549803/
5. ECG in Medical Practice by ABM Abdullah, 4th edition
6. ECG Basics, http://www.nataliescasebook.com/tag/e-c-g-basics
These simplified slides by Dr. Sidra Arshad present an overview of the non-respiratory functions of the respiratory tract.
Learning objectives:
1. Enlist the non-respiratory functions of the respiratory tract
2. Briefly explain how these functions are carried out
3. Discuss the significance of dead space
4. Differentiate between minute ventilation and alveolar ventilation
5. Describe the cough and sneeze reflexes
Study Resources:
1. Chapter 39, Guyton and Hall Textbook of Medical Physiology, 14th edition
2. Chapter 34, Ganong’s Review of Medical Physiology, 26th edition
3. Chapter 17, Human Physiology by Lauralee Sherwood, 9th edition
4. Non-respiratory functions of the lungs https://academic.oup.com/bjaed/article/13/3/98/278874
Prix Galien International 2024 Forum ProgramLevi Shapiro
June 20, 2024, Prix Galien International and Jerusalem Ethics Forum in ROME. Detailed agenda including panels:
- ADVANCES IN CARDIOLOGY: A NEW PARADIGM IS COMING
- WOMEN’S HEALTH: FERTILITY PRESERVATION
- WHAT’S NEW IN THE TREATMENT OF INFECTIOUS,
ONCOLOGICAL AND INFLAMMATORY SKIN DISEASES?
- ARTIFICIAL INTELLIGENCE AND ETHICS
- GENE THERAPY
- BEYOND BORDERS: GLOBAL INITIATIVES FOR DEMOCRATIZING LIFE SCIENCE TECHNOLOGIES AND PROMOTING ACCESS TO HEALTHCARE
- ETHICAL CHALLENGES IN LIFE SCIENCES
- Prix Galien International Awards Ceremony
Factory Supply Best Quality Pmk Oil CAS 28578–16–7 PMK Powder in Stockrebeccabio
Factory Supply Best Quality Pmk Oil CAS 28578–16–7 PMK Powder in Stock
Telegram: bmksupplier
signal: +85264872720
threema: TUD4A6YC
You can contact me on Telegram or Threema
Communicate promptly and reply
Free of customs clearance, Double Clearance 100% pass delivery to USA, Canada, Spain, Germany, Netherland, Poland, Italy, Sweden, UK, Czech Republic, Australia, Mexico, Russia, Ukraine, Kazakhstan.Door to door service
Hot Selling Organic intermediates
3. INTRODUCTION
• Fundamental aspects of Basic Life Support
(BLS) include immediate recognition of
sudden cardiac arrest (SCA) and activation of
the emergency response system (EMS),
early cardiopulmonary resuscitation (CPR),
and rapid defibrillation with an automated
external defibrillator (AED).
• Dr. Peter Safar is considered as the father of
modern day CPR
4. DEFINITION
• Basic life support is an emergency
procedure that consists of recognising an
arrest and initiating proper
cardiopulmonary resuscitation techniques
to maintain life without the use of drugs
or specialist equipment until the victim
either recovers or is transported to a
medical facility where advance life
support measures are available.
5. EMERGENCY ACTION
PRINCIPLE
• In each emergency, we need to follow the
emergency action principle so that we do
not forget anything that might affect
personal safety (yours and the victim‟s) and
the victim‟s survival.
6. • Always follow the steps in order given
below.
• 1-survey the scene (to confirm the area is
safe for you as well as the victim),
• 2-do a primary survey of the victim,
• 3-activates the Emergency Medical Service
(EMS) system for help,
• 4-do a secondary survey of the victim.
7. ADULT BLS SEQUENCE
A.H.A. ADULT CHAIN OF SURVIVAL
1. Immediate recognition of cardiac arrest and
activation of the emergency response system
2. Early CPR with an emphasis on chest
compressions
3. Rapid defibrillation
4. Effective advanced life support
5. Integrated post–cardiac arrest care
8.
9. ENSURE SAFETY
• Survey the scene and make sure that
the area is safe for the victim as well as
to the rescuer.
10. • If a lone rescuer finds an unresponsive adult
(i.e., no movement or response to
stimulation) or witnesses an adult
who collapses,
• after ensuring that the scene is safe and
positioning the victim in supine on a firm
surface,
11. Immediate Recognition and Activation of
the Emergency Response System
• The rescuer should check for a response
by tapping the victim on the shoulder and
shouting at the victim, “Are you all right?” If
the victim is responsive, he or she will
answer, move, or moan.
12. • The rescuer should also check for no breathing
or no normal breathing (i.e., only gasping)
while checking for responsiveness.
• if the healthcare provider finds the victim is
unresponsive with no breathing or no normal
breathing (i.e., only gasping), the rescuer should
assume the victim is in cardiac arrest.
• And then, the rescuer should shout for help to
activate the Emergency Response System
(EMS) and to get an AED if available.
13. • The victim has occasional gasps, which can
occur in the first minutes after Sudden
Cardiac Arrest (SCA) and may be
confused with adequate breathing.
• Occasional gasps do not necessarily result
in adequate ventilation.
• The rescuer should treat the victim who has
occasional gasps as if he or she is not
breathing.
14. PULSE CHECK
The healthcare provider should take not more
than 10 seconds to check for a pulse; and if the
rescuer does not definitely feel a pulse within
that time, the rescuer should start chest
compressions.
The carotid pulse can check while keeping the
victims head tilted back with one hand on the
forehead, use the other hand to find the pulse.
First, place your index or middle finger on the
Adams apple.
15.
16. • Then slide your finger toward in to the
groove between the windpipe and the
muscles at the side of the neck. This is
where the carotid pulse is located.
17.
18.
19.
20. EARLY CPR
Sequence of cardiopulmonary
resuscitation (CPR)
Compression – Airway- Breathing-
Defibrillation
C-A-B-D
21.
22.
23.
24. CHEST COMPRESSIONS
• Chest compressions consist of forceful
rhythmic applications of pressure over the
lower half of the sternum.
• These compressions create blood flow by
increasing intrathoracic pressure and
directly compressing the heart.
25. • This generates blood flow and
oxygen delivery to the vital organs
26. • The rescuer should place the heel of the
dominant hand on the centre (middle) of the
victim's chest (which is the lower half of
the sternum) and the heel of the other hand on
top of the first so that the hands are overlapped
and parallel
• Position yourself vertically above the victim's
chest and, with your arms straight, the adult
sternum should be depressed at least 2 inches (5
cm) with chest compression and chest
recoil/relaxation times approximately equal.
• Allow the chest to completely recoil after each
compression.
27.
28. • To provide effective chest compressions,
push hard and push fast.
• healthcare providers should compress the
adult chest at a rate of at least 100
compressions per minute with a compression
depth of at least 2 inches/5 cm.
29. • Rescuers should allow complete recoil of
the chest after each compression, to
allow the heart to fill completely before the
next compression.
30.
31. A compression-ventilation ratio of 30:2 is
recommended.
To maximize the effectiveness of chest
compressions, place the victim on a firm
surface when possible, in a supine
position with the rescuer kneeling beside
the victim's chest.
Rescuers should attempt to minimize the
frequency and duration of interruptions in
compressions to maximize the number of
compressions delivered per minute.
32.
33.
34.
35.
36.
37.
38.
39.
40.
41.
42.
43. • Incomplete recoil during BLS, CPR is
associated with higher intrathoracic
pressures and significantly decreased
hemodynamics, including decreased
coronary perfusion, cardiac index,
myocardial blood flow, and cerebral
perfusion.
45. OPEN THE AIRWAY:
• The common cause of airway obstruction
is back of the tongue blocking the air way.
• A healthcare provider should use the head
tilt–chin lift maneuver to open the airway of
a victim with no evidence of head or neck
trauma.
• If healthcare providers suspect a cervical
spine injury, they should open the airway
using a jaw thrust without head extension.
46.
47.
48.
49. • Because maintaining a patent airway
and providing adequate ventilation are
priorities in CPR, use the head tilt–chin lift
maneuver if the jaw thrust does not
adequately open the airway.
50. Jaw thrust
• The practitioner uses their thumbs to
physically push the posterior (back)
aspects of the mandible upwards When
the mandible is displaced forward, it
pulls the tongue forward and prevents it
from occluding (blocking) the entrance
to the trachea, helping to ensure a
patent (secure) airway.
51.
52.
53.
54.
55.
56.
57. RESCUE BREATHING
• During CPR, the primary purpose of
assisted ventilation is to maintain
adequate oxygenation;
• the secondary purpose is to
eliminate CO2.
58. 1) MOUTH-TO-MOUTH
RESCUE BREATHING
Mouth-to-mouth rescue breathing provides
oxygen and ventilation to the victim.
To provide mouth-to-mouth rescue
breaths, open the victim's airway, pinch the
victim's nose, and create an airtight mouth-
to-mouth seal.
Give 1 breath over 1 second.
take a "regular" (not a deep) breathe, and
give rescue breath over 1 second.
59.
60. • Taking a regular rather than a deep
breath prevents the rescuer from getting
dizzy or lightheaded and prevents over
inflation of the victim's lungs.
• The most common cause of ventilation
difficulty is an improperly opened
airway, so if the victim's chest does not
rise with the first rescue breath.
• Reposition the head by performing
the head tilt–chin lift again and then give
the second rescue breath.
61.
62. • If an adult victim with spontaneous
circulation (ie, strong and easily
palpable pulses) requires support of
ventilation, the healthcare provider
should give rescue breaths at a rate of
about 1 breath every 5 to 6 seconds, or
about 10 to 12 breaths per minute.
• Each breath should be given over 1
second regardless of whether an
advanced airway is in place.
• Each breath should cause visible chest
rise.
63. • Use a compression to ventilation ratio of
30 chest compressions to 2 ventilations
64.
65.
66. • More important, excessive ventilation can
be harmful because it increases
intrathoracic pressure, decreases venous
return to the heart, and diminishes
cardiac output and survival.
67. 2) MOUTH-TO–BARRIER
DEVICE BREATHING.
• Some healthcare providers may
hesitate to give mouth-to-mouth rescue
breathing and prefer to use a barrier
device.
• The risk of disease
transmission through mouth-to-barrier
ventilation is very low.
• When using a barrier device the rescuer
should not delay chest compressions
while setting up the device.
68.
69.
70. 3) MOUTH-TO-NOSE AND
MOUTH-TO-STOMA
VENTILATION
• Mouth-to-nose ventilation is recommended
if ventilation through the victim's mouth is
impossible (eg, the mouth is
seriously injured), the mouth cannot be
opened, the victim is in water, or a mouth-
to-mouth seal is difficult to achieve.
• A case series suggests that mouth-to-nose
ventilation in adults is feasible, safe, and
effective
71.
72.
73. AED, DEFIBRILLATION
• An Automated External Defibrillator (AED)
is used when the heart stops beating
normally and needs to be reset by an
electric shock.
• AEDs are designed for adults but most can
be adapted for children with paediatric
pads down to 1 year of age.
• Provide 5 cycles of CPR, 30 compressions
to 2 breaths, for 2 minutes before using an
AED on a child from 1 year to puberty
74.
75. SEQUENCE OF ACTIONS WHEN
USING AN AUTOMATED EXTERNAL
DEFIBRILLATOR
• The following sequence applies to the
use of both semi-automatic and
automatic AEDs in a victim who is found
to be unconscious and not breathing
normally.
• 1. Follow the adult BLS sequence as
described. Do not delay starting CPR
unless the AED is available
Immediately.
76. 2. AS SOON AS THE AED
ARRIVES:
• If more than one rescuer is present, continue
CPR while the AED is switched on.
• If you are alone, stop CPR and switch on the
AED.
• Follow the voice / visual prompts. Attach the
electrode pads to the patient‟s bare chest.
• Ensure that nobody touches the victim while the
AED is analysing the rhythm.
77.
78. Placement of AED pads• Place one AED pad to the right of the
sternum, below the clavicle. Place the
other pad in the left mid-axillary line,
approximately over the position of the
V6 ECG electrode. It is important that
this pad is placed sufficiently laterally
and that it is clear of any breast tissue.
79.
80.
81.
82.
83. 3A. If a shock is indicated:
• Ensure that nobody touches the victim.
• Push the shock button as directed (fully
automatic AEDs will deliver the shock
automatically).
• Continue as directed by the voice / visual
prompts.
• Minimise, as far as possible interruptions
in chest compression.
84.
85. 3B. If no shock is indicated:
• Resume CPR immediately using a ratio of
30 compressions to 2 rescue breaths.
Continue as directed by the voice / visual
prompts
86.
87. FOREIGN BODY AIRWAY
OBSTRUCTION (FBAO)
(CHOKING)• The rescuer should intervene if the
choking victim shows signs of severe
airway obstruction.
• These include signs of poor air exchange
and increased breathing difficulty, such as
a silent cough, cyanosis, or inability to
speak or breathe.
• The victim may clutch the neck,
demonstrating the universal choking sign.
88.
89. • Quickly ask, "Are you choking?" If the
victim indicates "yes" by nodding his head
without speaking, this will verify that the
victim has severe airway obstruction.
90. RELIEF OF FOREIGN-BODY
AIRWAY OBSTRUCTION
• If mild obstruction is present and the victim
is coughing forcefully, do not interfere with
the patient's spontaneous coughing and
breathing efforts.
• Attempt to relieve the obstruction, only if
signs of severe obstruction develop: the
cough becomes silent, respiratory difficulty
increases and is accompanied by stridor,
or the victim becomes unresponsive.
91. • Activate the EMS system quickly if the
patient is having difficulty breathing.
92. ABDOMINAL THRUSTS
(HEIMLICH MANEUVER)
• Stand behind the victim.
• The victim may be either standing or
sitting.
• Wrap your arms around his or her waist.
Make a fist with one hand.
93. • Place the thumb side of your fist against
the middle of the victim‟s abdomen, just
above the naval and well below the lower
tip of sternum.
94. • Grasp your fist with your other hand.
Keeping your elbows out from the victim,
press your fist in to the persons abdomen
with a quick upward thrust.
• Think of each thrust as a separate and
distinct attempt to dislodge the object.
Repeat the thrusts until the obstruction is
cleared.
95.
96.
97.
98.
99.
100.
101.
102. CHEST THRUSTS
• Chest thrusts should be used for obese
patients if the rescuer is unable to encircle
the victim's abdomen.
• If the choking victim is in the late stages of
pregnancy, the rescuer should use
chest thrusts instead of abdominal thrusts.
103. • To do chest thrusts with the person either
standing or sitting, stand behind the
person and place your arms under the
person‟s armpit and around the chest.
Place the thumb side of your fist on the
middle of the sternum.
104. • Grasp your fist with your other hand and
give backward thrusts.
• Give thrust until obstruction is cleared.
• Each thrust should be a separate and
distinct attempt to dislodge the object
105.
106.
107.
108.
109.
110. ABDOMINAL THRUSTS FOR
AN UNCONSCIOUS VICTIM
• If the adult victim with Foreign-Body Airway
Obstruction becomes unresponsive, the
rescuer should carefully support the patient to
the ground.
• Immediately activate (or send someone to
activate) EMS, and then begin CPR.
• The healthcare provider should carefully lower
the victim to the ground, send someone to
activate the emergency response system and
begin CPR (without a pulse check).
111. • After 2 minutes, if someone has not
already done so, the healthcare
provider should activate the emergency
response system.
• Each time the airway is opened during
CPR, the rescuer should look for an
object in the victim's mouth and if found,
remove it.
• Straddle the victim‟s thighs. Place the
heel of one hand against the middle of
the victim‟s abdomen, just above the
umbilicus and well below the lower tip of
the sternum.
112. • Place your other hand directly on the top of
the first hand with your fingers pointed
towards the victims head
• Press into abdomen with a quick upward
thrust. Give 6-10 thrusts. Be sure that your
hands are directly on the middle of the
abdomen when you press. After 6-10, thrusts
do a finger sweep.
113.
114. FOREIGN-BODY AIRWAY
OBSTRUCTION IN INFANT
• Give 5 back blows as follows
• Hold the infants jaw between thumb and
fingers.
• Slide your other hand behind the
infant‟s shoulder blade closest to you so
that your finger supports the back of the
infants head and neck.
• Turn the infant over so that he is face
down on your forearm.
115. • Support infants head and neck with your
hand by firmly holding the jaw between your
thumb and fingers.
• Lower your arm on to your thigh. The infants
head should be lower than his chest.
• Give 5 back blows forcefully between the
infants shoulder blades with the heel of your
hand
116.
117.
118. GIVE 5 CHEST THRUSTS AS
FOLLOWS
• Place your free hand and forearm along
infants head and back so that the infant is
sandwiched between your tow hand and
forearms.
• Support the back of the infants head and
neck with your fingers.
• Support the infant‟s neck, jaw, and chest
from the front with one hand while you
support the infants back with your other
hand and forearm.
119.
120. • Turn the infant in to his back.
• Lower your arm that is supporting the
infants back onto your thigh.
• The infants head should be lower than his
chest.
• Use your other hand that is on the infants
chest to locate the correct place to give
chest thrusts.
• Imagine a line running across the infants
chest between the nipples.
• Place the pad of your ring finger on
sternum just under the imaginary line.
121. • Then place the pads of two finger next to
the ring finger just under nipple line.
• Rise the ring finger if you feel the notch
at the end of the infants sternum, move
your finger up a little bit.
• The pads of your finger should lie in the
same direction as the infants sternum.
• Use the pads of two fingers to compress
the sternum.
• Compress the sternum 1 inch and then
the sternum return to its normal position.
122. • Keep your fingers in contact with the
sternum.
• Compress 5 times.
• Keep giving back blows and chest
compression until the object is coughed
up.
123.
124.
125.
126.
127.
128. INFANT AND CHILD BASIC
LIFE SUPPORT
• “If the victim is unresponsive and not
breathing (or only gasping), begin CPR.
• Sometimes victims who require CPR will
gasp, which may be misinterpreted as
breathing.
• Treat the victim with gasps as though
there is no breathing and begin CPR.
129.
130.
131.
132. • ” For an unresponsive child who is not
breathing or not breathing normally, begin
CPR with 30 compressions followed by
opening the airway and giving 2 rescue
breaths.
• Repeat cycles of 30:2 (CAB method).
133. • For an infant, lone rescuers (whether lay
rescuers or healthcare providers) should
compress the sternum with 2 finger placed
just below the intermammary line.
• Do not compress over the xiphoid or ribs.
• Rescuers should compress at least one-
third the depth of the chest, or about 4 cm
(1.5 inches).
134. • Do not press on the xiphoid or the ribs.
There are no data to determine if the 1- or
2-hand method produces better
compressions and better outcome.
135. • For a child, lay rescuers and healthcare
providers should compress the lower half
of the sternum at least one third of the AP
dimension of the chest or approximately 5
cm (2 inches) with the heel of 1 or 2 hands.
136.
137.
138.
139.
140.
141.
142. • Push fast; push at a rate of at least 100
compressions per minute.”
• “Chest compressions of appropriate rate and
depth.
• „Push fast‟: push at a rate of at least 100
compressions per minute.
143. • Push hard‟: push with sufficient force to
depress at least one third the
anterior‐posterior (AP) diameter of the
chest or approximately 1 ½ inches (4 cm)
in infants and 2 inches (5 cm) in children
144.
145. OPEN THE AIRWAY AND GIVE
VENTILATIONS• For the lone rescuer a compression-to-
ventilation ratio of 30:2 is recommended.
• After the initial set of 30 compressions, open
the airway and give 2 breaths.
• In an unresponsive infant or child, the tongue
may obstruct the airway and interfere with
ventilations.
146. • Open the airway using a head tilt–chin lift
maneuver for both injured and non-injured
victims.
• To give breaths to an infant, use a mouth-
to-mouth-and-nose technique; to give
breaths to a child, use a mouth-to-mouth
technique.
147. • Make sure the breaths are effective (ie,
the chest rises).
• Each breath should take about 1 second.
If the chest does not rise, reposition the
head, make a better seal, and try again.
• It may be necessary to move the child's
head through a range of positions to
provide optimal airway patency and
effective rescue breathing
148.
149.
150. • In an infant, if you have difficulty making
an effective seal over the mouth and nose,
try either mouth-to-mouth or mouth-to-
nose ventilation.
• If you use the mouth-to-mouth technique,
pinch the nose closed.
• If you use the mouth-to-nose technique,
close the mouth.
151.
152. • In either case make sure the chest rises
when you give a breath.
• If you are the only rescuer, provide 2
effective ventilations using as short a
pause in chest compressions as possible
after each set of 30 compressions.
153.
154.
155.
156. DEFIBRILLATION
• Ventricular fibrillation (VF) can be the
cause of sudden collapse or may
develop during resuscitation attempts.
• Children with sudden witnessed
collapse (eg, a child collapsing during
an athletic event) are likely to have VF
or pulseless ventricular tachycardia (VT)
and need immediate CPR and rapid
defibrillation.
157. • VF and pulseless VT are referred to as
"shockable rhythms" because they
respond to electric shocks (defibrillation).
• Many AEDs have high specificity in
recognizing paediatric shockable rhythms,
and some are equipped to decrease (or
attenuate) the delivered energy to make
them suitable for infants and children <8
years of age
• For infants a manual defibrillator is
preferred when a shockable rhythm is
identified by a trained healthcare provider.
158. • The recommended first energy dose for
defibrillation is 2 J/kg. If a second dose is
required, it should be doubled to 4 J/kg.
• If a manual defibrillator is not available, an
AED equipped with a paediatric attenuator
is preferred for infants.
• An AED with a paediatric attenuator is also
preferred for children <8 year of age.
159. • If neither is available, an AED without a
dose attenuator may be used.
• AEDs that deliver relatively high-energy
doses have been successfully used in
infants with minimal myocardial damage
and good neurological outcomes.
160.
161.
162.
163. Neonatal CPR
• Rubbing the back or flicking the sole of
the feet to stimulate the baby
• Compression to ventilation ratio is 3:1
• Compression with 2 thumbs, with
fingers encircling the chest and
supporting the back
• 40- 60 breaths/ minute is advisable