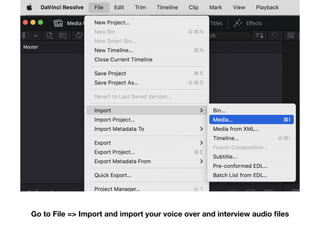
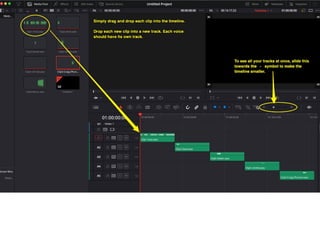
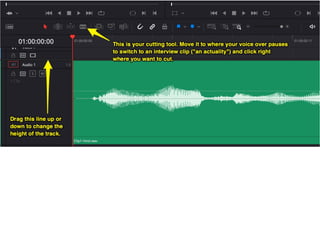
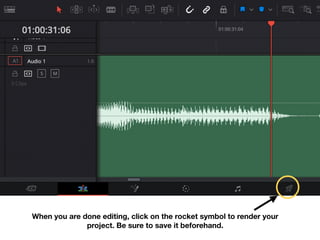
Editing Audio (and video) with DaVinci Resolve
Select and click open
Go to File => Import and import your voice over and interview audio
fi
les
Your voice over and
interview audio
fi
les will
now show up in the top left
hand corner of the screen.
Change the view to “edit”
Adjusting audio levels
The straight white line shows your overall audio level. You can move it up
and down to raise or lower the overall audio level of the entire clip.
Sometimes you want to manipulate just a few seconds of audio though. For
that, select the select tool and option click on the line to add points to the line.
This will allow you to manipulate audio levels on speci
fi
c segments of your
fi
le.
In this example I have added 4 points. The I dragged the middle two down. This
will allow you to lower the audio level on the section you pulled down.
Each clip has a handle you can grab at the beginning and end of the clip.
You can use your selector tool and drag the handle out a few seconds to fade
the audio in and out. You can also play with the curve of the fade.
Saving your project
When you are done editing, click on the rocket symbol to render your
project. Be sure to save it beforehand.
When you are done editing, click on the rocket
symbol to render your project
Select Audio only
Name your
fi
le
Select “single clip”
Select Wave
You will see your project in the Render Queue now. Select “Render All.”
That’s it! Once it’s done rendering, you can upload the .wav
fi
le to
SoundCloud.
Adding your Audio Report to your Blog
Go to SoundCloud.com and upload your .wav
fi
le
When it’s uploaded, click “copy link”
Then go to Wordpress and add a new Post
Click the blue + sign and type in soundcloud.
Paste the link and hit return. Save the post. Done!

Audio Editing

  • 1.
    Editing Audio (andvideo) with DaVinci Resolve
  • 2.
  • 3.
    Go to File=> Import and import your voice over and interview audio fi les
  • 4.
    Your voice overand interview audio fi les will now show up in the top left hand corner of the screen. Change the view to “edit”
  • 10.
  • 11.
    The straight whiteline shows your overall audio level. You can move it up and down to raise or lower the overall audio level of the entire clip.
  • 12.
    Sometimes you wantto manipulate just a few seconds of audio though. For that, select the select tool and option click on the line to add points to the line. This will allow you to manipulate audio levels on speci fi c segments of your fi le.
  • 13.
    In this exampleI have added 4 points. The I dragged the middle two down. This will allow you to lower the audio level on the section you pulled down.
  • 14.
    Each clip hasa handle you can grab at the beginning and end of the clip.
  • 15.
    You can useyour selector tool and drag the handle out a few seconds to fade the audio in and out. You can also play with the curve of the fade.
  • 16.
  • 17.
    When you aredone editing, click on the rocket symbol to render your project. Be sure to save it beforehand.
  • 18.
    When you aredone editing, click on the rocket symbol to render your project Select Audio only Name your fi le Select “single clip” Select Wave
  • 19.
    You will seeyour project in the Render Queue now. Select “Render All.” That’s it! Once it’s done rendering, you can upload the .wav fi le to SoundCloud.
  • 20.
    Adding your AudioReport to your Blog
  • 21.
    Go to SoundCloud.comand upload your .wav fi le
  • 22.
    When it’s uploaded,click “copy link”
  • 23.
    Then go toWordpress and add a new Post Click the blue + sign and type in soundcloud. Paste the link and hit return. Save the post. Done!