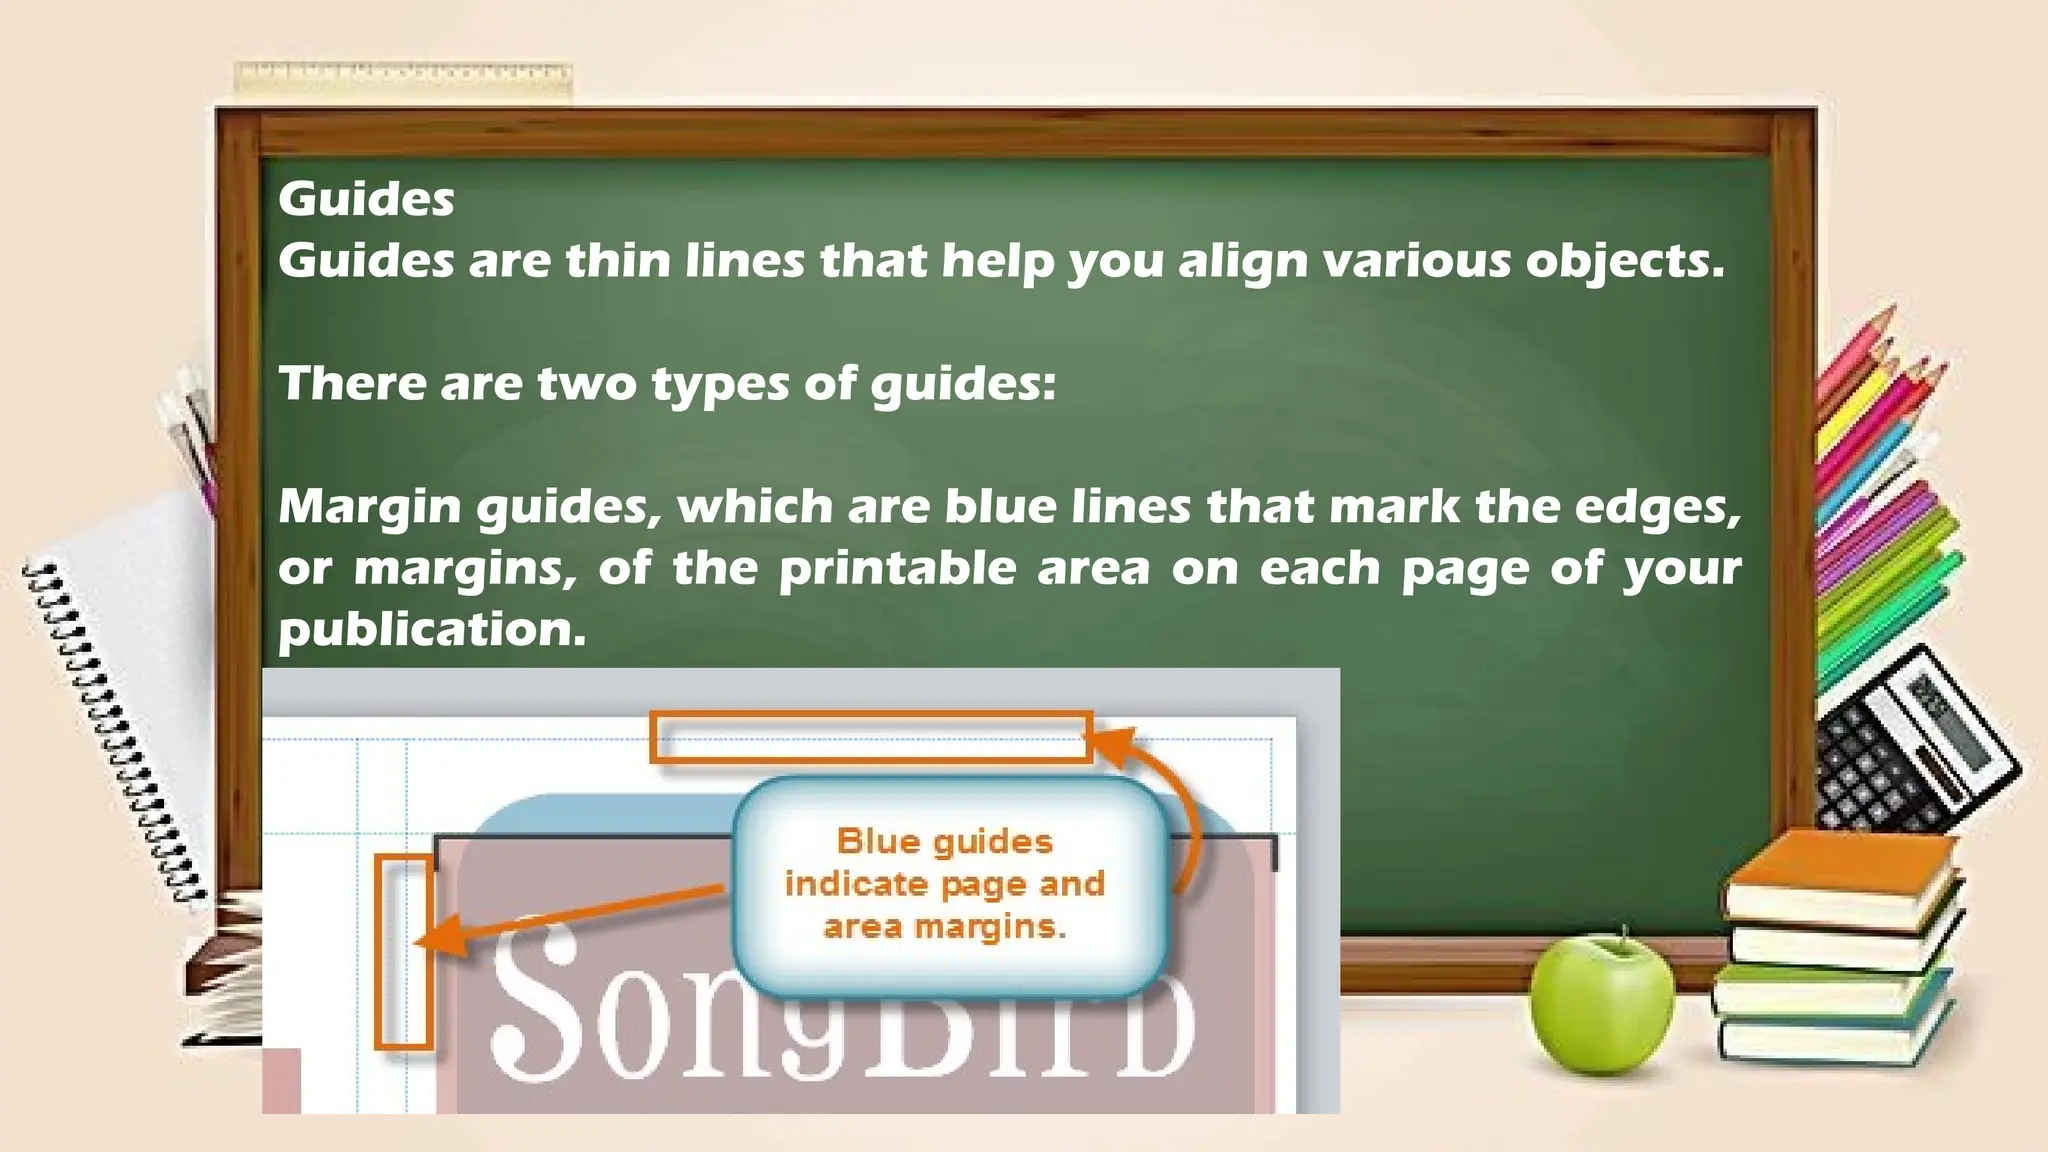
Desktop Publishing
and the
MS Publisher Software
Desktop Publishing is the process of
using the computer and specific
software to combine text and graphics
to produce documents such as
newsletter, brochures, books, Web
pages, and many other printed
documents.
Things to do with Desktop Publishing
Steps and Procedures when Using
Desktop Publishing Software
Desktop publishing software doesn’t work in the same
way as word processing software. It is different from
graphics software. From setting up a basic document to
complicated arrangements of text and graphics you
learn how to use desktop publishing software by
following this step-by-step plan.
1.Have a plan, make a sketch
2.Choose a template
3.Up your document
4.Place text in your document
5.Format your text
6. Place graphics in your document
7. Tweak your graphics placement
8. Apply the rules of desktop
publishing
9.Print a draft and proofread it
10. Print your project
Module 2
The MS Publisher
One of the most common Desktop
Publishing software is the Microsoft
Publisher. It allows you to
manipulate features such as page
size, text, graphics and borders to
create professional quality printed
documents
WORKING WITH MS PUBLISHER
1. Click on the Start button, select All Programs menu »
Microsoft Office » Microsoft Office Publisher. You will
see an icon on your desktop that looks like this .
Double click on this icon to open MS
Publisher.
2. Publisher start up in the Getting
Started with the Microsoft Office
Publisher window offering many pre-
formatted designs to use in creating your
publication.
The MS Publisher Window
The Publisher Window contains many
parts that work together to make
creating documents easier.
Understanding these elements will help
you become comfortable with the
application.
Publisher Window
Publisher appears as displayed below when a new blank
Publication file is created. You have on your left the
navigation pane to allow you to navigate through the
pages of your publication and on the right the
individual page or pages selected in the navigation
pane. This is the area to place the objects that make up
your publication. It is either textual or graphical in
nature.
The Basic Parts of the MS
Publisher
Quick Access Toolbar
The Quick Access Toolbar
lets you access common
commands, no matter
which tab you are using in
the Ribbon. By default, it
shows the Save, Undo, and
Redo commands
The Page Navigation Pane
allows you to view and work
with the pages in your
publication. You can add,
delete, rearrange, and
duplicate pages in the Page
Navigation pane. You can also
organize your pages into
Sections.
The Ribbon
The Ribbon contains multiple tabs, each with
several groups of commands. Some tabs, like
"Text Box Tools" or "Picture Tools," may appear
only when you are working with certain items
like text boxes or images.
Viewing Tools
Publisher offers a group of viewing tools to help you
control the layout of your text, images and objects on
the page. These viewing tools are for your editing
purposes only.
They can be turned on and off and will not appear in
your printed publication.
To access and choose viewing tools, select the View
tab and locate the Show group. Click the checkboxes
of the various view options to turn them on and off.
Publication Viewing Tools
The publication viewing tools include:
Rulers You can use the rulers to the left and top of your
publication to help you line up text, images and other
objects and get a clearer idea of exactly where those
objects will appear on the printed page. When you select
an object in your publication, a white space will appear
on the rulers to show the object's location.
Baselines are evenly-spaced horizontal lines that you
can use to line up text. You'll learn about
automatically aligning text to your baselines in the
Working with Text lesson.
Boundaries
Boundaries are dark blue dashed borders that appear
around your objects. Viewing object boundaries can be
useful when you are aligning objects or wrapping text.
Guides
Guides are thin lines that help you align various objects.
There are two types of guides:
Margin guides, which are blue lines that mark the edges,
or margins, of the printable area on each page of your
publication.
Customizable guides, which are green lines that you can
add in your publication.
The Task Pane
The right task pane shows a larger thumbnail of the
selected design and any available settings which can
be changed.
Make changes in the color scheme, font scheme,
business information, page size, layout, etc.
Some publication types do not allow for editing of
some of the options. In this case, they will be grayed
out.
When all settings are chosen, click the Create button
to create the publication.
If the default setting fits the needs for a publication,
just double click on the type of publication
Backstage View
In Publisher 2010, options for saving, printing and
creating publications are all located in Backstage view.
It is like the Office Button Menu from Publisher 2007 or
the File Menu from earlier versions of Publisher.
However, unlike those menus, it is a full-page view,
which makes it easier to work with.
Than
k

Quarter 1 Week 1 and 2_TLE 80000000.pptx

  • 1.
  • 2.
    Desktop Publishing isthe process of using the computer and specific software to combine text and graphics to produce documents such as newsletter, brochures, books, Web pages, and many other printed documents.
  • 3.
    Things to dowith Desktop Publishing
  • 4.
    Steps and Procedureswhen Using Desktop Publishing Software Desktop publishing software doesn’t work in the same way as word processing software. It is different from graphics software. From setting up a basic document to complicated arrangements of text and graphics you learn how to use desktop publishing software by following this step-by-step plan.
  • 5.
    1.Have a plan,make a sketch 2.Choose a template 3.Up your document 4.Place text in your document 5.Format your text
  • 6.
    6. Place graphicsin your document 7. Tweak your graphics placement 8. Apply the rules of desktop publishing 9.Print a draft and proofread it 10. Print your project
  • 7.
    Module 2 The MSPublisher
  • 8.
    One of themost common Desktop Publishing software is the Microsoft Publisher. It allows you to manipulate features such as page size, text, graphics and borders to create professional quality printed documents
  • 10.
    WORKING WITH MSPUBLISHER 1. Click on the Start button, select All Programs menu » Microsoft Office » Microsoft Office Publisher. You will see an icon on your desktop that looks like this . Double click on this icon to open MS Publisher.
  • 11.
    2. Publisher startup in the Getting Started with the Microsoft Office Publisher window offering many pre- formatted designs to use in creating your publication.
  • 12.
    The MS PublisherWindow The Publisher Window contains many parts that work together to make creating documents easier. Understanding these elements will help you become comfortable with the application.
  • 13.
    Publisher Window Publisher appearsas displayed below when a new blank Publication file is created. You have on your left the navigation pane to allow you to navigate through the pages of your publication and on the right the individual page or pages selected in the navigation pane. This is the area to place the objects that make up your publication. It is either textual or graphical in nature.
  • 16.
    The Basic Partsof the MS Publisher
  • 18.
    Quick Access Toolbar TheQuick Access Toolbar lets you access common commands, no matter which tab you are using in the Ribbon. By default, it shows the Save, Undo, and Redo commands
  • 19.
    The Page NavigationPane allows you to view and work with the pages in your publication. You can add, delete, rearrange, and duplicate pages in the Page Navigation pane. You can also organize your pages into Sections.
  • 20.
    The Ribbon The Ribboncontains multiple tabs, each with several groups of commands. Some tabs, like "Text Box Tools" or "Picture Tools," may appear only when you are working with certain items like text boxes or images.
  • 21.
    Viewing Tools Publisher offersa group of viewing tools to help you control the layout of your text, images and objects on the page. These viewing tools are for your editing purposes only. They can be turned on and off and will not appear in your printed publication.
  • 22.
    To access andchoose viewing tools, select the View tab and locate the Show group. Click the checkboxes of the various view options to turn them on and off.
  • 23.
    Publication Viewing Tools Thepublication viewing tools include: Rulers You can use the rulers to the left and top of your publication to help you line up text, images and other objects and get a clearer idea of exactly where those objects will appear on the printed page. When you select an object in your publication, a white space will appear on the rulers to show the object's location.
  • 24.
    Baselines are evenly-spacedhorizontal lines that you can use to line up text. You'll learn about automatically aligning text to your baselines in the Working with Text lesson.
  • 25.
    Boundaries Boundaries are darkblue dashed borders that appear around your objects. Viewing object boundaries can be useful when you are aligning objects or wrapping text.
  • 26.
    Guides Guides are thinlines that help you align various objects. There are two types of guides: Margin guides, which are blue lines that mark the edges, or margins, of the printable area on each page of your publication.
  • 27.
    Customizable guides, whichare green lines that you can add in your publication.
  • 28.
    The Task Pane Theright task pane shows a larger thumbnail of the selected design and any available settings which can be changed.
  • 29.
    Make changes inthe color scheme, font scheme, business information, page size, layout, etc. Some publication types do not allow for editing of some of the options. In this case, they will be grayed out. When all settings are chosen, click the Create button to create the publication. If the default setting fits the needs for a publication, just double click on the type of publication
  • 30.
    Backstage View In Publisher2010, options for saving, printing and creating publications are all located in Backstage view. It is like the Office Button Menu from Publisher 2007 or the File Menu from earlier versions of Publisher. However, unlike those menus, it is a full-page view, which makes it easier to work with.
  • 32.