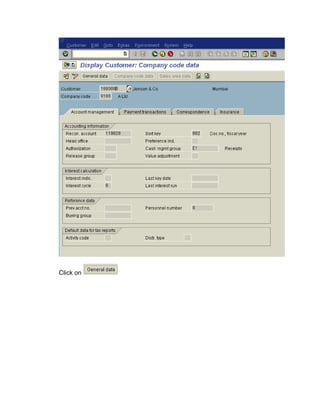
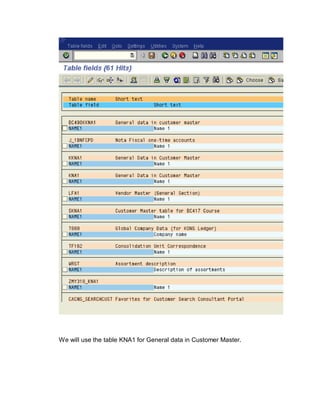
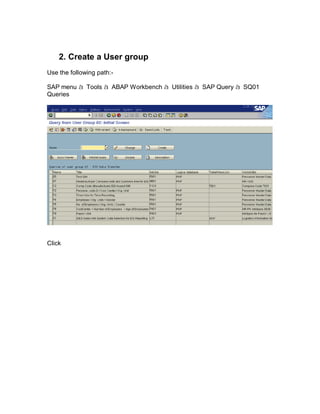
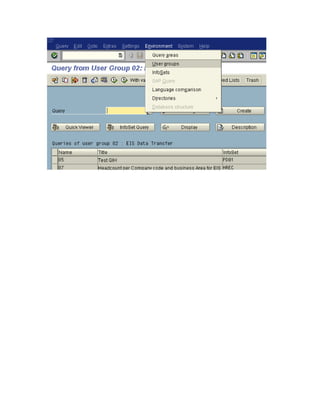
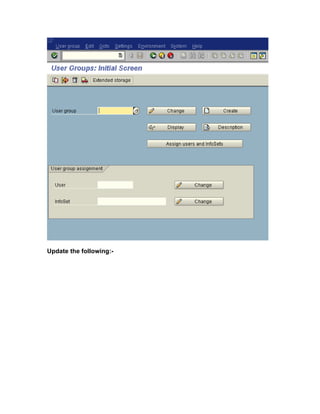
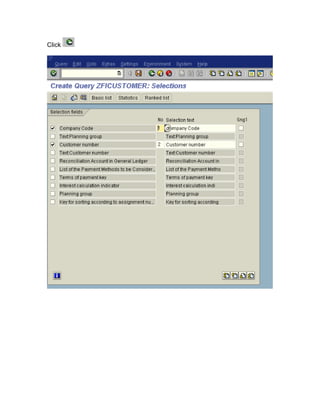
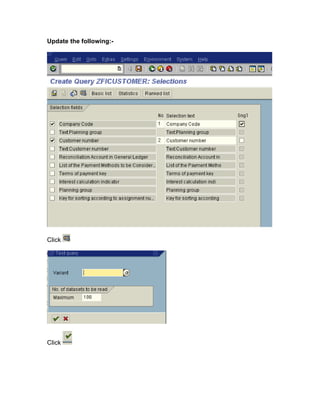
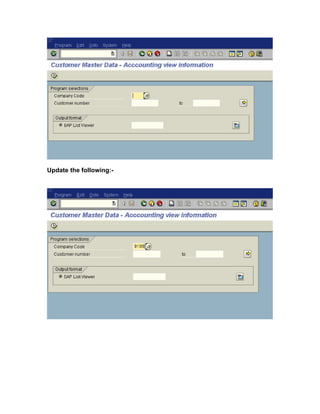
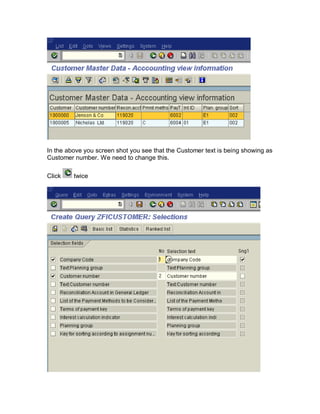
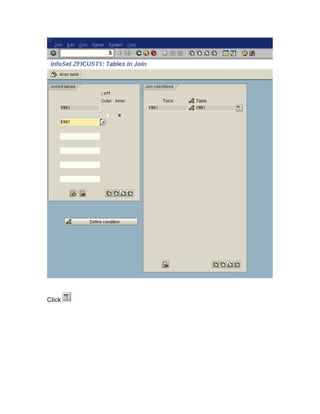
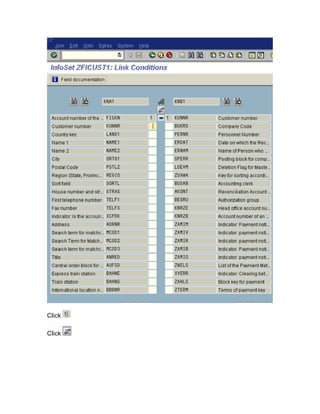
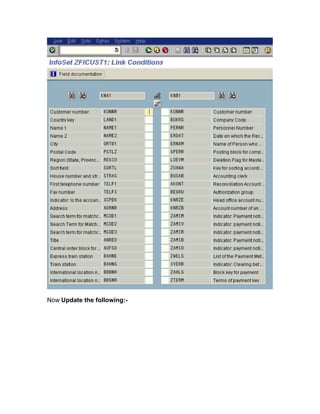
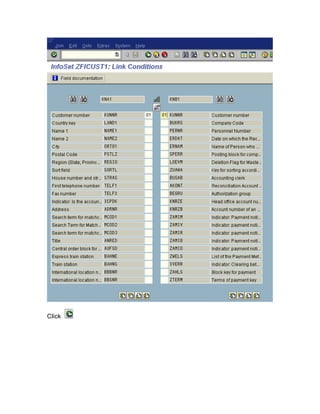
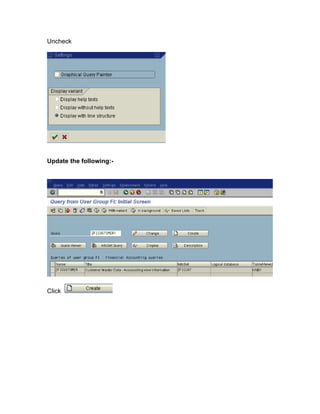
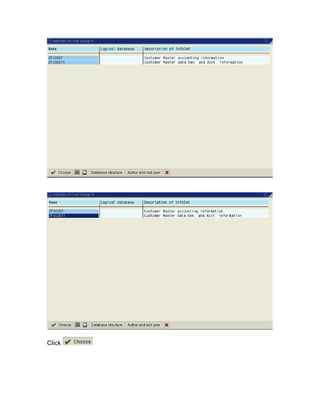
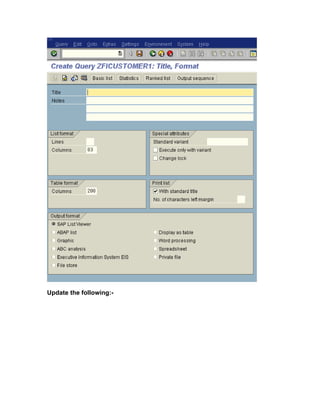
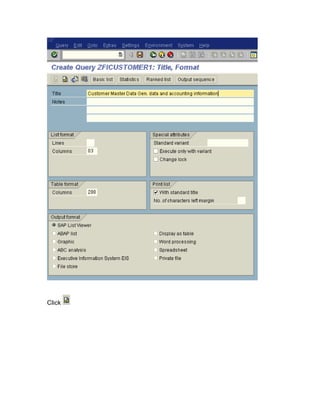
ABAP Query


Published by Team of SAP Consultants at
             SAPTOPJOBS
        www.sap-topjobs.com


         Copyright 2005@SAPTOPJOBS


All rights reserved. No part of this publication may be reproduced, stored in a
retrieval system, or transmitted in any form, or by any means electronic or
mechanical including photocopying, recording or any information storage and
retrieval system without permission in writing from SAPTOPJOBS.
TABLE OF CONTENT

INTRODUCTION ..................................................................................................3
Scenario 1.............................................................................................................4
1. Finding Database tables for creating queries.................................................4
2. Create a User group ....................................................................................19
3. Create an Infoset .........................................................................................27
4. Assign Infoset to User Group.......................................................................39
5. Create Query ...............................................................................................41
Scenario 2...........................................................................................................64
1. Creating an Infoset ......................................................................................65
2. Assign Infoset to User group........................................................................86
3. Create a Query ............................................................................................88
4. Transporting Queries .................................................................................108
INTRODUCTION

In every project we come across situations where the client is not satisfied by the
standard SAP reports. In such situations most of the times functional consultants
have to be at the mercy of ABAPERS. This not only costs time but also a good
deal of money for the client.

ABAP Query was a blessing in disguise for both functional SAP consultants as
well as end users of the company. Here, one could easily design various reports
without any technical knowledge. Functional consultants will find this tool very
useful and an added skill in today multi tasking environment.

We have attempted to bring you meat of ABAP query in this document. I am sure
you would find this very useful in your current job as a consultant or a end user.
Scenario 1

  1. Finding Database tables for creating queries
  We want to view the company code segment of the entire customer masters
  in the company. Standard reports available do not give the desired
  information. Therefore we feel the need to create an ABAP Query.

  To create an ABAP query you need to know the database table where the
  information exists.

  How can that be obtained?

  Option 1

  We want to see the company code information of a customer.
  Use the relevant transaction code to see the information. In this case it is
  FD03

  Go to the company code data
Position the cursor on the field Recon. account   and press function
key F1 on the key board to see the field help.
Click on Technical info
Thus you get the Transparent table name – KNB1

Here you have easily got the table.

Option 2

Sometimes the table name is not as easily available as was available in
option 1.

In the same transaction
Click on
Click on the field Name   and now again press function key F1 on
the keyboard
Click on
In the above screen transparent table is not visible.

Note down the field name NAME1

In another session type in transaction code SE90 in the command field.
Click
Click


Click
Double click
Update the following:-
Click
Click   down to find where customer table for general data appears
We will use the table KNA1 for General data in Customer Master.
2. Create a User group
Use the following path:-

SAP menu à Tools à ABAP Workbench à Utilities à SAP Query à SQ01
Queries


Click
Update the following:-
Click
Update the following:-


Click


Assign users to the user group. You need to assign the users of the particular
department to the user group.

Click on
You will update the relevant users who will be using these queries.
Click
Click on


Click
3. Create an Infoset
Click Environment à Infosets
Update the following:-
Click
Click

Update the following:-
Click


Click
Click
Click
You will notice in the above screen that some fields have T above them


This means that in this field text is also available.

Now we need to select fields from the table (left hand side) to the Field
Group/data fields (right hand side).

Position the cursor on

Then position the cursor on
Click on Insert field(s) in field group
Click

Hold the Ctrl key on the keyboard and select other fields also


By clicking
Click
Click

Click     to generate the infoset

The infoset is now ready to use in the query.

Click
4. Assign Infoset to User Group

Update the following:-


Click
Select


Click


Click
5. Create Query
Here we maintain the source fields which are to be updated with the data.


Click   to select user group
Select

Click
Update the following:-


Click
Click

Click
Update the following:-
Click
Select

Click
Update the following:-
Click
Click
Update the following:-
Click

Click
Click
Double click


Click
Double click

Similarly double click other fields to select
Click
Update the following:-


Click


Click
Update the following:-
In the above you screen shot you see that the Customer text is being showing as
Customer number. We need to change this.

Click    twice
Click


Click                the field will open up
Change it to Customer Name
Click on


Click
Click


Click


Click on

Click      until you reach
Now you can execute this query

By selecting


Click


Scenario 2
In scenario 1 we saw a simple query, where in all information required was
available in a single table.

But that is not the case always. Information which we require is not available in a
single table and is scattered across in more than one table. In such as scenario
you need to create a join between these tables through a common field between
these tables.

In this scenario we want to have information of the customer master with name,
address and also the accounting information.

We have seen earlier that the customer address information is available in the
table KNA1 and the accounting information for the customer is available in the
table KNB1. These 2 tables can be joined based on the common field customer
number in them.
Let us proceed with creating a new query

    1. Creating an Infoset


Update the following:-
Click
Update the following:-


Click
Click


Update the following:-


Click
Click


Click
Click

Click


Select
Click on Settings à Settings

Click
Select


Now click
Click
Position the cursor on

Click Undo relationship
Click

Click
Now Update the following:-
Click
Click
Click
Click
Click

Click
Click

Thereafter select all the fields you want to move on the right side.

Press the Ctrl button to select more than one field.


Click


Click
Click   until you will see

Select the following fields
Select


Click
Click


Click on

Click

Click


Click
2. Assign Infoset to User group


Click
Select


Click on

Click      twice
3. Create a Query

Click Other user group


Click

Click
Click
Uncheck


Update the following:-


Click
Click
Update the following:-
Click
Select


Click
Select
Click
Click
Click
Update the following:-
Click
Click
Click
Click
Click      twice


Click on

Click      thrice


To execute a query

Select


And then Click
4. Transporting Queries
Click
Update the following:-
Click


Click
Click
Click

Abap query

  • 1.
    ABAP Query Published byTeam of SAP Consultants at SAPTOPJOBS www.sap-topjobs.com Copyright 2005@SAPTOPJOBS All rights reserved. No part of this publication may be reproduced, stored in a retrieval system, or transmitted in any form, or by any means electronic or mechanical including photocopying, recording or any information storage and retrieval system without permission in writing from SAPTOPJOBS.
  • 2.
    TABLE OF CONTENT INTRODUCTION..................................................................................................3 Scenario 1.............................................................................................................4 1. Finding Database tables for creating queries.................................................4 2. Create a User group ....................................................................................19 3. Create an Infoset .........................................................................................27 4. Assign Infoset to User Group.......................................................................39 5. Create Query ...............................................................................................41 Scenario 2...........................................................................................................64 1. Creating an Infoset ......................................................................................65 2. Assign Infoset to User group........................................................................86 3. Create a Query ............................................................................................88 4. Transporting Queries .................................................................................108
  • 3.
    INTRODUCTION In every projectwe come across situations where the client is not satisfied by the standard SAP reports. In such situations most of the times functional consultants have to be at the mercy of ABAPERS. This not only costs time but also a good deal of money for the client. ABAP Query was a blessing in disguise for both functional SAP consultants as well as end users of the company. Here, one could easily design various reports without any technical knowledge. Functional consultants will find this tool very useful and an added skill in today multi tasking environment. We have attempted to bring you meat of ABAP query in this document. I am sure you would find this very useful in your current job as a consultant or a end user.
  • 4.
    Scenario 1 1. Finding Database tables for creating queries We want to view the company code segment of the entire customer masters in the company. Standard reports available do not give the desired information. Therefore we feel the need to create an ABAP Query. To create an ABAP query you need to know the database table where the information exists. How can that be obtained? Option 1 We want to see the company code information of a customer. Use the relevant transaction code to see the information. In this case it is FD03 Go to the company code data
  • 5.
    Position the cursoron the field Recon. account and press function key F1 on the key board to see the field help.
  • 6.
  • 7.
    Thus you getthe Transparent table name – KNB1 Here you have easily got the table. Option 2 Sometimes the table name is not as easily available as was available in option 1. In the same transaction
  • 8.
  • 9.
    Click on thefield Name and now again press function key F1 on the keyboard
  • 10.
  • 11.
    In the abovescreen transparent table is not visible. Note down the field name NAME1 In another session type in transaction code SE90 in the command field.
  • 12.
  • 13.
  • 14.
  • 15.
  • 16.
  • 17.
    Click down to find where customer table for general data appears
  • 18.
    We will usethe table KNA1 for General data in Customer Master.
  • 19.
    2. Create aUser group Use the following path:- SAP menu à Tools à ABAP Workbench à Utilities à SAP Query à SQ01 Queries Click
  • 21.
  • 22.
  • 23.
    Update the following:- Click Assignusers to the user group. You need to assign the users of the particular department to the user group. Click on
  • 24.
    You will updatethe relevant users who will be using these queries.
  • 25.
  • 26.
  • 27.
    3. Create anInfoset Click Environment à Infosets
  • 28.
  • 29.
  • 30.
  • 31.
  • 32.
  • 33.
  • 34.
    You will noticein the above screen that some fields have T above them This means that in this field text is also available. Now we need to select fields from the table (left hand side) to the Field Group/data fields (right hand side). Position the cursor on Then position the cursor on
  • 35.
    Click on Insertfield(s) in field group
  • 36.
    Click Hold the Ctrlkey on the keyboard and select other fields also By clicking
  • 37.
  • 38.
    Click Click to generate the infoset The infoset is now ready to use in the query. Click
  • 39.
    4. Assign Infosetto User Group Update the following:- Click
  • 40.
  • 41.
    5. Create Query Herewe maintain the source fields which are to be updated with the data. Click to select user group
  • 42.
  • 43.
  • 44.
  • 45.
  • 46.
  • 47.
  • 48.
  • 49.
  • 51.
  • 52.
  • 53.
  • 54.
  • 55.
  • 56.
    Double click Similarly doubleclick other fields to select
  • 57.
  • 58.
  • 59.
  • 60.
    In the aboveyou screen shot you see that the Customer text is being showing as Customer number. We need to change this. Click twice
  • 61.
    Click Click the field will open up Change it to Customer Name
  • 62.
  • 63.
  • 64.
    Now you canexecute this query By selecting Click Scenario 2 In scenario 1 we saw a simple query, where in all information required was available in a single table. But that is not the case always. Information which we require is not available in a single table and is scattered across in more than one table. In such as scenario you need to create a join between these tables through a common field between these tables. In this scenario we want to have information of the customer master with name, address and also the accounting information. We have seen earlier that the customer address information is available in the table KNA1 and the accounting information for the customer is available in the table KNB1. These 2 tables can be joined based on the common field customer number in them.
  • 65.
    Let us proceedwith creating a new query 1. Creating an Infoset Update the following:-
  • 66.
  • 67.
  • 68.
  • 69.
  • 70.
  • 71.
    Click on Settingsà Settings Click
  • 72.
  • 73.
  • 74.
    Position the cursoron Click Undo relationship
  • 75.
  • 76.
    Now Update thefollowing:-
  • 77.
  • 78.
  • 79.
  • 80.
  • 81.
  • 82.
    Click Thereafter select allthe fields you want to move on the right side. Press the Ctrl button to select more than one field. Click Click
  • 83.
    Click until you will see Select the following fields
  • 84.
  • 85.
  • 86.
    2. Assign Infosetto User group Click
  • 87.
  • 88.
    3. Create aQuery Click Other user group Click Click
  • 89.
  • 90.
  • 91.
  • 92.
  • 93.
  • 94.
  • 95.
  • 96.
  • 97.
  • 99.
  • 100.
  • 101.
  • 103.
  • 105.
  • 106.
  • 107.
    Click twice Click on Click thrice To execute a query Select And then Click
  • 108.
  • 110.
  • 112.
  • 113.
  • 114.