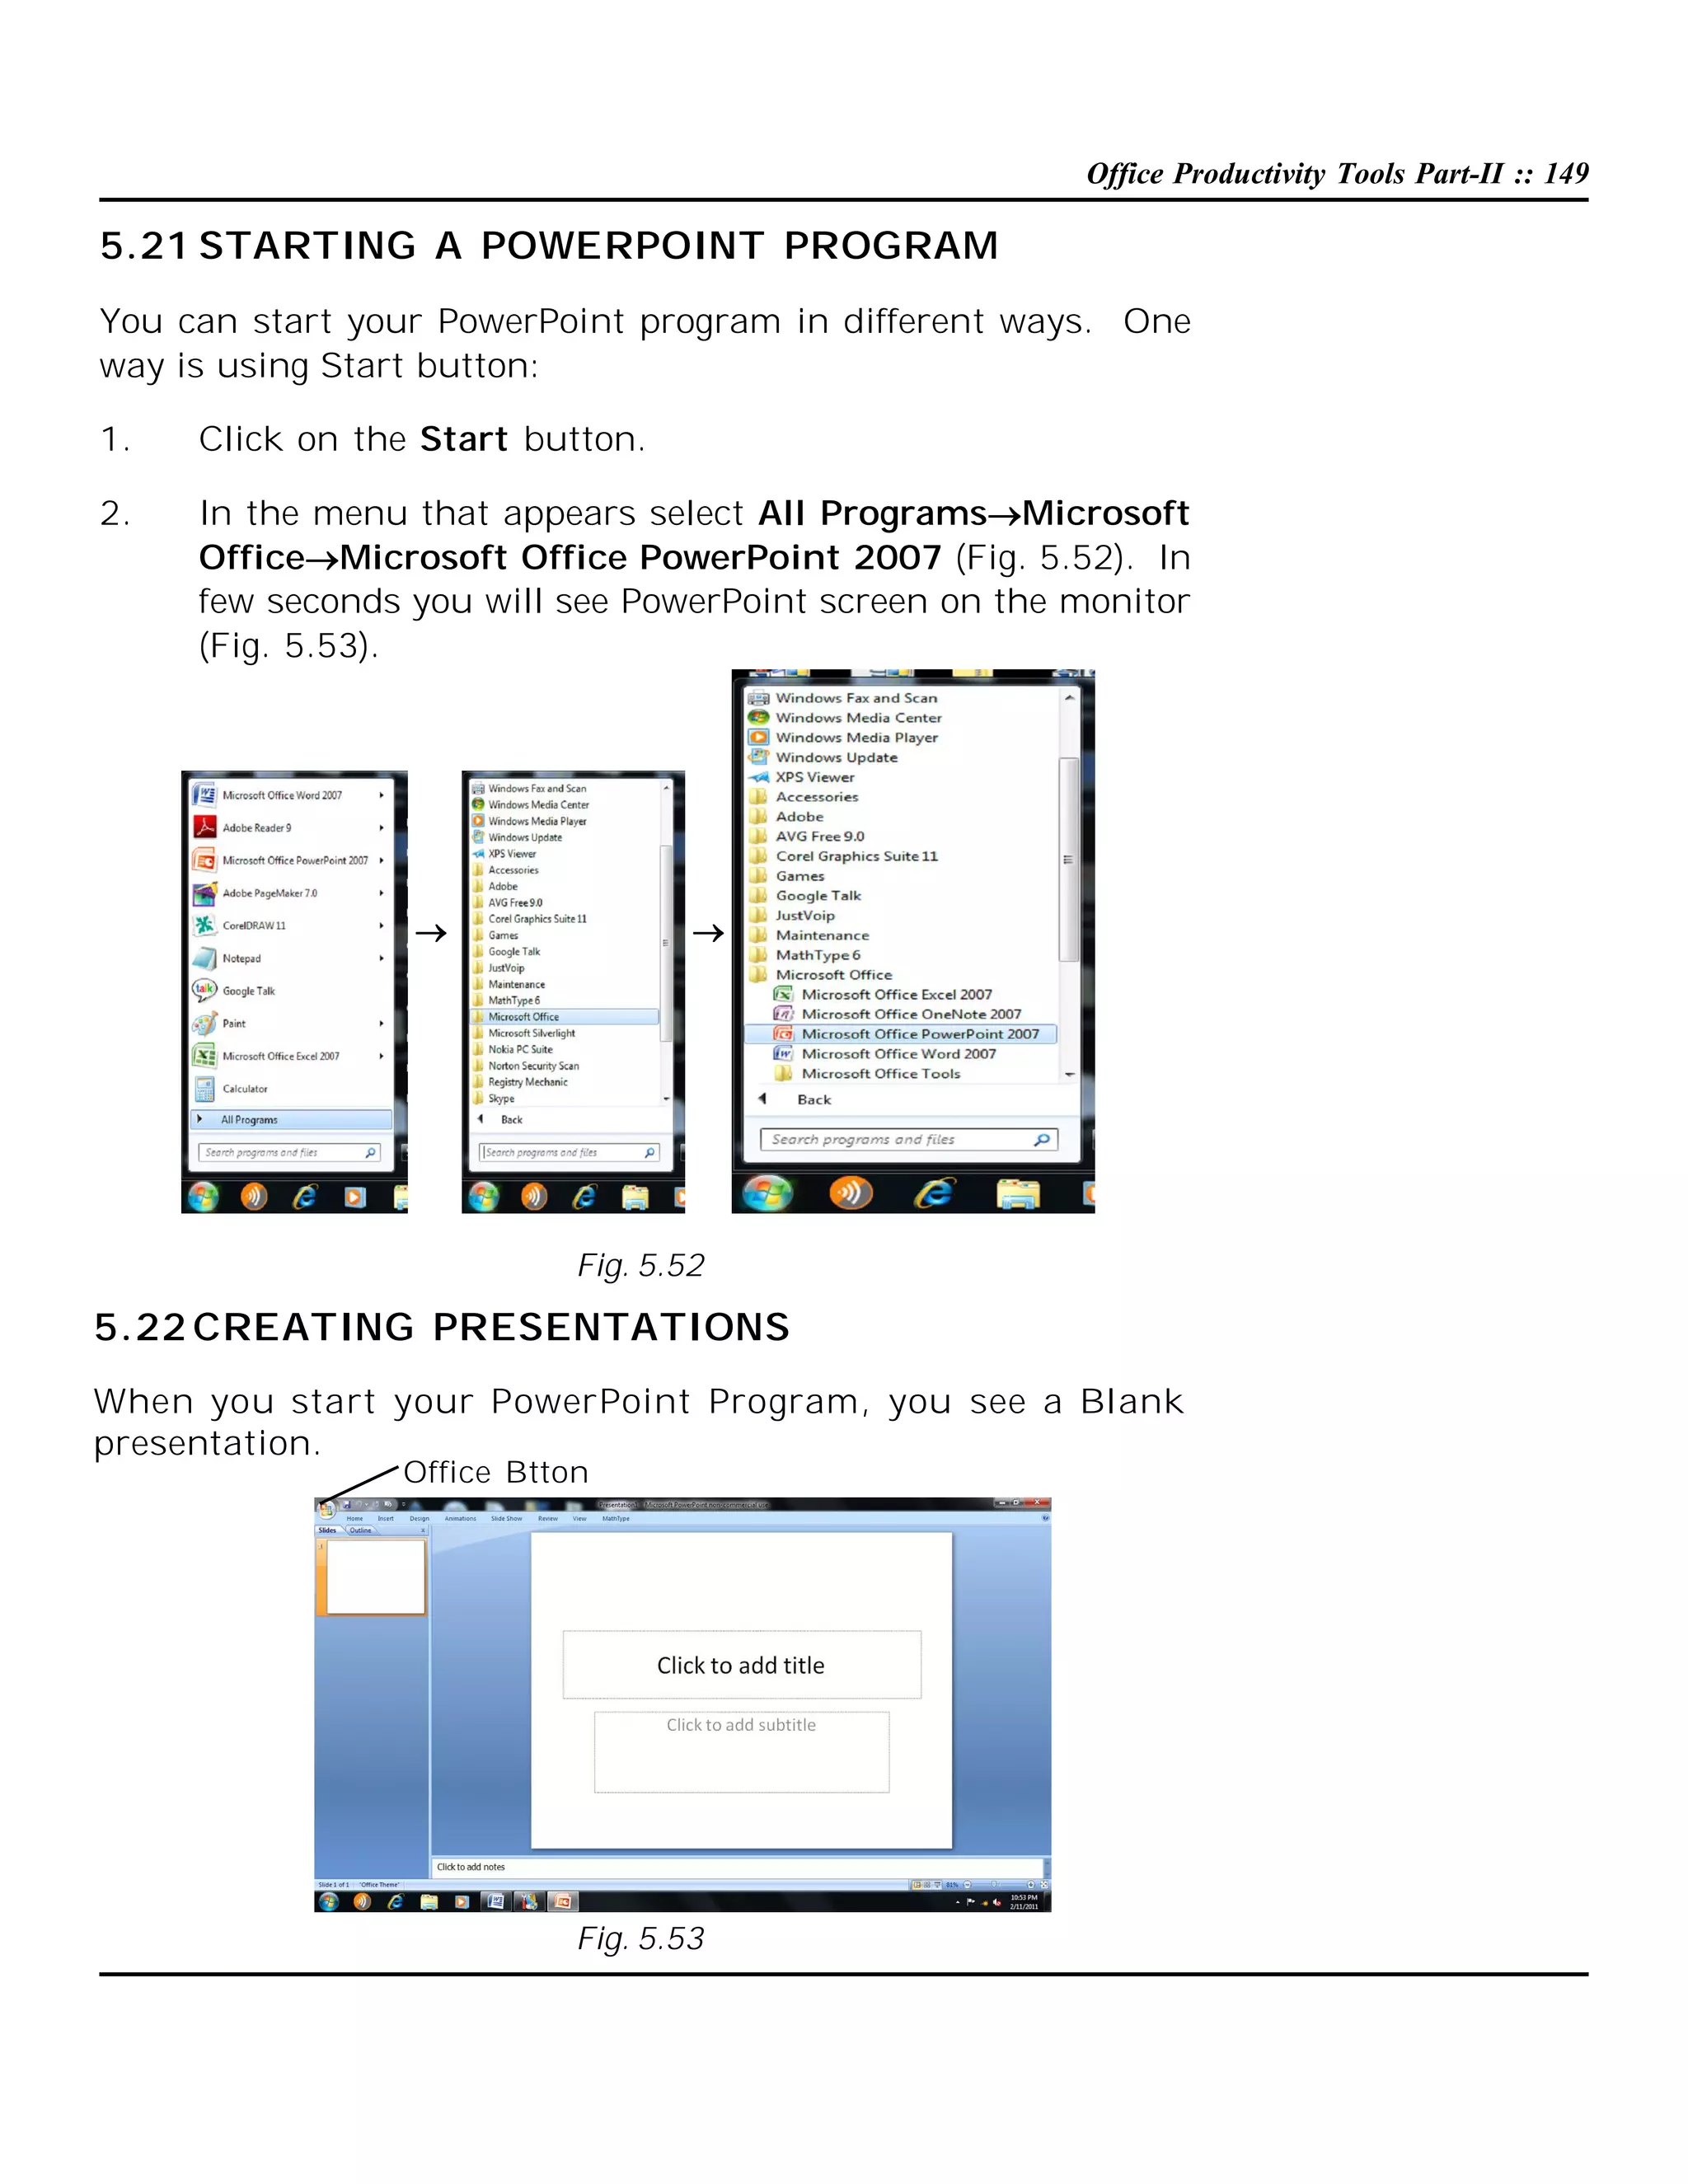
Office Productivity Tools Part-II :: 149

5.21 STARTING A POWERPOINT PROGRAM
You can start your PowerPoint program in different ways. One
way is using Start button:
1.

Click on the Start button.

2.

In the menu that appears select All ProgramsMicrosoft
OfficeMicrosoft Office PowerPoint 2007 (Fig. 5.52). In
few seconds you will see PowerPoint screen on the monitor
(Fig. 5.53).





Fig. 5.52

5.22 CREATING PRESENTATIONS
When you start your PowerPoint Program, you see a Blank
presentation.
Office Btton

Fig. 5.53
150 :: Computer and Office Applications

Note: In PowrePoint 2007 Office button replaces the File menu
of other programs and the bar below the title bar is known as the
Ribbon ( Menu and Tool bars of some other programs).
Ribbon consist of a number of Tabs (Home, Insert, ….) . Tabs
are designed to be task oriented
Groups within each Tab break a task into subtasks
Command button in each group carry out a command or display
a menu of commands.
You can also go to Office button on the top left corner of the page
and click on New. You can choose a blank presentation from the
page displayed (Fig. 5.54).

Fig. 5.54

5.22.1 Installed templates
Select the Installed templates tab and then select the desired
template (Fig. 5.55). The Installed template provides templates
and ideas for a variety of presentation types. Select the template
you want and move through the wizard by clicking button or the
Office Productivity Tools Part-II :: 151

scroll-bar after making necessary choices. Choose the type of
presentation you would like and click on Create when finished.
Your presentation is ready for show.

Fig. 5.55

5.22.2 Design Template
Click on the Installed Themes box to select the Design Template
you want to use. A number of template names will appear in the
whi te box. These Install ed Themes give you dif ferent
backgrounds and text formatting to begin your presentation.
Preview each design by highlighting the template name on the list.
Press Create after you have chosen the design (Fig. 5.56).

Fig. 5.56
152 :: Computer and Office Applications

5.22.3 Slide Layouts
If you do not choose any template, you can start you r presentation
by choosing a Blank presentati on option from t he New
Presentation dialog box shown earlier in fig. 5.54.
Once you have chosen a blank form for your new presentation,
the first slide of your presentation appears. You can right click
on the slide to choose the layout you want. There are nine
different slide layouts from which to choose (Fig. 5.57). You
simply make your selection and click on it. Each choice described
below, dictates how your completed slides will appear.
1.

Ti tl e Sl ide: This option i s useful for beginning a
presentation; use this slide if you want to include subtitles
or smaller text underneath a title.

2.

Title and Content: Anytime you need to make a list of
things that fall underneath a general subject, choose this
layout.

Fig. 5.57

3.
4.
5.

Section Header: This option is useful for making a major
section within the presentation
Two Content: This is a useful option for putting different
elements or text boxes.
Comparison: This is a useful option for doing pro/con lists.
Office Productivity Tools Part-II :: 153

6.
7.
8.

9.

Title Only: This option is great for the beginning of a
presentation. No subtitles are included in this layout
Blank: Use this layout if you want a blank slide formatted
according to the master Slide.
Content with caption: Use this option to describe the
content (usually a graphic object like a chart or picture) on
the right side of the slide and Title with description on the
left side.
Picture with caption: Use this option to place title over
one linked object.

5.22.4 Selecting the content
There are six types of elements shown inside the text box which
are listed below. You can select from the contents within the slide
(Fig. 5.58).

1

2

3

4

5

6

Fig. 5.58

1.

Insert table
154 :: Computer and Office Applications

2.

Insert chart

3.

Insert SmartArt Graphic

4.

Insert picture from file

5.

Insert Clip Art

6.

Insert Media Clip

5.22.5 Open an Existing Presentation
Select the Open tab from the Office button to open an existing
presentation. Select the folder in which the file is located, from
the Look in: drop-down menu and highlight the file on the list.
Click Open to open the presentation (Fig. 5.59).

Fig. 5.59

5.23 VIEWING SLIDES
PowerPoint consists of multiple views to help you in the creation
and presentation of your slides. These views are Normal, Slide
Sorter, and Slide Show. The first two views are for creating your
presentation and the last one is for presentation of slide show.
You can access these views by clicking the respective view
buttons at the bottom right of the PowerPoint window (Fig. 5.60).
Office Productivity Tools Part-II :: 155

Or select the View and then the respective command on the menu
bar. For example, if you want to choose Normal view, select
ViewNormal command on the menu bar.

5.23.1 Normal View
The Normal View divides the screen into three sections: the main
window, where the current slide is displayed; the outline pane
on the left; and the notes pane at the bottom. This is where you
will do most of your work. You can resize each pane by clicking
its border and dragging it to the size that you want it to be. To
access Normal view, click on Normal view button at the bottom
right of the window or select ViewNormal command on the
menu bar.

Previous slide
Next slide

Normal Slide sorter Slide show

Fig. 5.60

5.23.2 Slide Sorter View
A small image of each slide is displayed on Slide Sorter View.
Slides can easily be ordered and sorted using this view. You can
also use this view to add special effect, such as the transactions
156 :: Computer and Office Applications

that occur when each new slide appears. To access Slide Sorter
view, click on Slide Sorter view button at the bottom right of the
window or select ViewSlide Sorter command on the menu bar
(Fig. 5.61).

Fig. 5.61

5.23.3 Slide Show View
The Slide Show View is the view to use when you preview your
presentation to make sure every thing is in place, or when you
deliver a presentation to an audience. Because all sounds,
animations, hyperlinks, and action settings of your presentation
will be working, you can see exactly how your show will turn out.
To access Slide Show view, click on Slide Show button at the
bottom right of the window or select ViewSlide Show command
on the menu bar.

5.24 DESIGN TIPS
Although, PowerPoint provides you with some very powerful tools
to give excellent presentations, making the wrong design choices
can defeat all your efforts. Making the right decisions is not
difficult. By following the guidelines below, you can prepare best
slides.
1.
Use contrasting colors for the text and the background so
the text will be easy to read.
2.
Use font size large enough to be seen from the back of the
room where the presentation will be held. A font size of 24point or larger is recommended.
3.
Use short phrases and sentences to convey your message.
4.
Use simple slide transitions. Too many different transitions
will distract your audience from the subject of the
presentation.
Office Productivity Tools Part-II :: 157

5.

6.

Avoid cluttering the slides with too much text or graphics.
Your audience should hear what you have to say and not
be distracted by a busy screen.
Keep text simple and easy to read by not using many
different text effects such as bold, italics, underlining, larger
font size for emphasis within a sentence, or a different font
all on the same slide.

5.25 WORKING WITH SLIDES
Slides are the building blocks of your presentation. You can also
create or use layouts and designs, add notes and create
handouts, and customize the look of your slides. You can create
new slides by inserting them into your show. When you create a
new slide, you can use any of the nine layouts available (Refer
to Section 5.22.3) in the New Slide dialog box or choose a blank
slide. Once you have created a new slide, you can insert various
elements such as text, pictures, graphs, tables etc.

5.25.1 Applying a Design Template
To add a design template or change the existing one, select Design
tag on the Ribbon. Select the template by clicking on it (Fig. 5.62).

Fig. 5.62
158 :: Computer and Office Applications

5.25.2 Changing Slide Layouts
To change the layout template of
the slide select Home Layout
command on the menu bar. The
Slide Layout dialog box appears
with nine layouts. Click on one of
the layout thumbnail images to
apply (Fig. 5.63).

5.25.3 Slides from Outline
Fig. 5.63
Slides from outline provides a way
to create slides from text file outline.
You can use this feature to create a group of slides that contain
a lot of text. You can also create new slides by typing text in the
outline pane. To access the Insert Outline dialog box, select
Home  New Slide  Slide from Outline command on the menu
bar

5.25.4 Duplicate Selected Slides
Duplicate Selected Slides gives you a duplicate of a slide when
you need to create similar slides. To insert a copy of the current
slide after the current slide, choose the slide you want to
duplicate, and then Right click for the Duplicate Slide command
on the menu bar or press CTRL+SHIFT+D keys (Fig. 5.64).

Fig. 5.64
Office Productivity Tools Part-II :: 159

You can also cut/copy and paste slides by selecting the whole
slide.

5.25.5 Reordering Slides
To reorder a slide in Slide Sorter View, simply click on the slide
you wish to move and drag it to the new location (refer to
Fig. 5.61). In Normal or Outline View, click on the slide in the
slide pane and move and drag the slide to a new location.

5.25.6 Hide Slides
If you do not want a slide to appear during the slide show, but
do not want to delete the slide as it may be used later, the slide
can be hidden by right clicking on the slide in the slide pane and
selecting Hide (Fig. 5.65). You can unhide a hidden slide in a
similar manner.

Fig. 5.65

5.25.7 Moving Between Slides
You can move from one slide to another slide by using the
following tools:
Scroll Bars: Use the Scroll Bars to move from one slide to another
slide or through the text that is displayed in the notes pane and
the outline pane.
Next Slide and Previous Slide Buttons: The Next Slide and
Previous Slide buttons move you to the next slide or previous
slide in a slide show. These buttons, indicated by a double-arrow,
are located at the bottom of the vertical scroll bar (Fig 5.66).
160 :: Computer and Office Applications

Previous slide
Next slide

Fig. 5.66

Using Outline Pane: Change to Outline view and then click on
the slide that you want to view. You can move around in the
outline pane by using your mouse, or by using up and down
arrow keys.

INTEXT QUESTIONS 5.4
9.

10.

11.

State True or False.
(a)
In both Normal view and Outline view you can see:
current slide, slide outline, and notes.
(b)
Usi ng t he contrasti ng colors for the text and
background of the slides, is not a good practice.
(c)
While preparing slides use long phrases sentences to
convey your message.
How many slide layouts are available in New Slide dialog
box?
(a) 7 (b) 9 (c) 14, (d) 17
The PowerPoint dialog box is useful to create a new
presentation using:
Office Productivity Tools Part-II :: 161

12.

(a)
Installed templates
(b)
Open
(c)
Installed Themes and Blank Presentation
(d)
both (a) and (c) above
Which of the following views is shown in the presentation
of slides in a conference?
(a)
Slide view
(b)
Slide Sorter view
(c)
Outline view
(d)
Slide Show view

5.26 WORKING WITH TEXT
You can work with text to communicate your ideas to your
audience. PowerPoint gives you several ways to insert, edit, and
format text for your presentations.

5.26.1 Inserting Text
You can insert text by using the outlining toolbar or inserting text
boxes.
Outline Text: The outline text can be used to create slides of a
similar nature. By using the Outlining toolbar, you can create
heads, lists, and paragraphs. PowerPoint uses the format of your
outline to correctly insert text in a slide. Heading 1 becomes the
title of a slide, heading 2 becomes the first line of the text box,
and so on. When you select a predefined layout and switch over
to Outline view as explained earlier, you can see the Outline text
options on the left side window. To choose Outlining toolbar,
select the Outline pane next to the slide pane on left side below
the menu bar.
Text Boxes: The text boxes are the way that PowerPoint puts
text on a slide. When you create a slide, and use a specific slide
layout, the slide will have one or more text boxes in it. Simply
click on the existing text to add new text.
If you want to add a new text box to the slide, select InsertText
Box command on the menu bar and then draw the text box with
the mouse at a place where you want to insert the text box.
162 :: Computer and Office Applications

If you want to resize a text box, follow the steps given below:
1.

Select the text box you wish to resize by clicking on it with
the mouse. A border with eight handles will appear around
the text box. The four handles on the corners will resize
the length and width of the box at once while the handles
on the sides will resize only in one direction.

2.

Click one of the handles as per your requirement and drag
it with the mouse. Release the mouse button when it is the
size you want to be. Move the text box by clicking and
dragging the thick dotted border with the mouse.

If you want to delete a text box from a template, simply click the
border of the text box, and then press the DELETE key on the
keyboard.

5.26.2 Formatting Text
Format Fonts: Select the text that will be formatted by
highlighting the text either on the outline or on the slide. You can
select from HomeFont menu bar or right click on the
highlighted selection and select the Font menu from the popup
shortcut menu (Fig. 5.67). Select a font face, size, style, effect, and
color from the Font dialog box.

Fig. 5.67
Office Productivity Tools Part-II :: 163

Bulleted Lists on Design Templates: Bulleted lists allow you to
clearly display the main points of your presentation on slides. The
text boxes on design templates already include bulleted lists.
Click the placeholder on the slide to begin adding text and press
the ENTER key to return to the next line and add a new bulleted
item. To go to the next line without adding another bullet, hold
down the SHIFT key while pressing ENTER.
Bulleted List from a Text Box: If you are not creating a bulleted
list from an existing placeholder on a design template, or if you
would like to add an additional bulleted list, follow these steps
to create a new list:
1.

In slide view, create a text box by selecting InsertText
Box from the menu bar.

2.

"Draw" the text box on the slide by holding down the left
mouse button while you move the mouse until the box is
the size you want it.

3.

Choose the Bullets or Numbering from the Home 
Paragraph menu bar.

4.

Change the Size of the bullet by changing the percentage
in relation to the text.

5.

Choose a color for the bullet from the Color menu. Click
More Colors for a larger selection.

6.

Select one of the bullet
types shown and click
OK (Fig. 5.68). Or click
the Picture button to
view the Picture Bullet
wi ndow (Fi g. 5.69).
Select one of the bullets
and click OK.

Fig. 5.68
164 :: Computer and Office Applications

Fig. 5.69

5.26.3 Adding Notes
From Normal View, notes can be added to the slide. These notes
will not be seen on your presentation, but they can be printed
out on paper along with the slide the notes refer to by selecting
Print What: Notes Pages on the Print menu (Fig. 5.70 and 5.71).

Fig. 5.70

5.27 SAVING AND PRINTING
You can save your presentation slides as a file in a folder. You
can also save the slides as Web page so that you can post them
on Internet. Printing is similar to what you have done in Word and
Excel. Remember to set up your page before printing your
presentation slides.
Office Productivity Tools Part-II :: 165

5.27.1 Page Setup
Select Office buttonPrint Preview from the menu bar to access
options for printing the presentation slides. Select the format the
printed slides will be used for, from the Slides drop-down menu
(Fig 5.71).

Fig. 5.71

5.27.2 Save as File
To save your presentation slides as a file, select Of fi ce
buttonSave As command on the menu bar or simply click on
the Save button on the toolbar on top. The Save As dialog box
appears. Choose the folder and drive that your file will be located,
type the name of the file, and then click Save in the Save As dialog
box (Fig 5.72).

Fig. 5.72
166 :: Computer and Office Applications

5.27.3 Save as Web Page
Presentations can be saved by selecting Office buttonSave As
command on the menu bar as explained earlier. However, if you
want to post PowerPoint presentations on the Internet, you may
want to save them as Web pages so that the visitors to your web
site can view the presentation even if they do not have PowerPoint
installed on their computers. Select OfficeSave As and select
Web Page command from the drop down. Choose your web page
directory on the network from the Look in: drop-down menu and
name the file in the File name: box. Click Save to save the
presentation in web format (Fig 5.73).

Fig. 5.73

5.27.4 Print
Select Office buttonPrint command on the menu bar to print
the presentation. The Print dialog box appears. Choose the
following options in the Print box.
Print range - Select All to print all the slides in the presentation,
Current slide to print only the current slide, or enter slide
numbers in the Slides field to print only certain slides.
Office Productivity Tools Part-II :: 167

Copies - Enter the number of copies of each slide specified in
Print range and check the Collate box if necessary (Fig 5.24).
Print What 

Slides - prints a full-page slide on each page.



Handouts - pri nts as
many sl ides as you
designate on each page.



Notes Page - prints one
sl ide with that slide's
notes on each page



Outline view - prints the
outline of the presentation

Click OK to print.

Fig. 5.74

5.28 RUN A SLIDE SHOW
After you create your slides, you can run your slide show.


Choose the Slide Show tab. Click the From Beginning
button in the Start Slide Show group. OR



Click the Slide Show icon in the bottom right corner of your
screen.

Slide show of your presentation will appear on your screen.
Press ESC key to End t he slide show and return t o the
PowerPoint.

5.29 CLOSE A PRESENTATION
To close the current presentation slides file, select Office
buttonClose command on the menu bar. If the file contains
any unsaved changes, you will be prompted to save the file before
closing.
168 :: Computer and Office Applications

5.30 EXIT POWERPOINT PROGRAM
When finished your work in PowerPoint and closed all the files,
you can quit the PowerPoint program by selecting Office
buttonExit PowerPoint command on the menu bar.

INTEXT QUESTIONS 5.5
13. (i)

How do you move from one slide to another slide?
(a) Using Scroll bars
(b) Using Next Slide and Previous slide buttons
(c) Using outline pane
(d) All of the above

(ii) How do you insert text in a slide?
(a) Using outline text
(b) Inserting text boxes
(c) Right clicking
(d) (a) and (b) above
(iii) You can add notes to your slides from:
(a) Slide Sorter view
(b) Normal view
(c) Slide Show view
(d) (a) and (b)
(iv) Text can be easily inserted into the slides using:
(a) Normal view
(b) Outline view
(c) Slide Sorter view
(d) (a) and (b) above
Office Productivity Tools Part-II :: 169

5.31 WHAT YOU HAVE LEARNT
In this lesson you have learnt about database and its importance in
day-today life. You also learnt how to create a table and modify it.
Different ways of creating queries and designing forms and reports
have also been discussed. Creation of a powerful presentation using
multimedia features for effective communication have also been
included at the end.

5.32 TERMINAL QUESTIONS
1.

What is a database?

2.

Explain with the help of an example the terms table, field
and record.

3.

What is a Data type? Explain with the help of examples any
four data types.

4.

What is a primary key and how is it assigned in a table?

5.

How can you create a query based on 2 tables? What is the
most necessary condition for creating such type of query?

6.

How can you change the positions of the columns in the
query design view? Explain with an example.

7.

Write down short note on the following:
(i) Form
(ii) Report

8.

Write down the various steps for creating a Form using Form
Wizard.

9.

Explain any three features of PowerPoint.

10.

Explain any one method of creating a presentation.

11.

Explain steps in inserting a text box in a slide.

12.

How do you change the amount of space between lines in
a text box?

13.

How do you insert picture bullets in slides?
170 :: Computer and Office Applications

5.33 ANSWER TO INTEXT QUESTIONS
Intext Questions 5.1
1.

(a) True

(b) False

(c) True

(d) False

(e) False

2.

(a) Field

(b) Primary key

3.

(c)

4.

(a)

Intext Questions 5.2
5.

(a) False

(b) True

6.

(a) Two

(c) False

(b) Design

Intext Questions 5.3
7.

(a) New Query

(b) Table

(c) Design

(d) Run

(e) Logical
8.

(a) False

(b) True

(d) False

(c) True

(e) False

Intext Questions 5.4
9.

(a) True

(b) False

10. (b)
11. (d)
12. (d)
Intext Questions 5.5
13. (i)

(d)

(ii) (d)

(iii) (b)

(iv) (d)

(c) False

(d) True

Office productivity tools (part ii) (2.74 mb)

  • 1.
    Office Productivity ToolsPart-II :: 149 5.21 STARTING A POWERPOINT PROGRAM You can start your PowerPoint program in different ways. One way is using Start button: 1. Click on the Start button. 2. In the menu that appears select All ProgramsMicrosoft OfficeMicrosoft Office PowerPoint 2007 (Fig. 5.52). In few seconds you will see PowerPoint screen on the monitor (Fig. 5.53).   Fig. 5.52 5.22 CREATING PRESENTATIONS When you start your PowerPoint Program, you see a Blank presentation. Office Btton Fig. 5.53
  • 2.
    150 :: Computerand Office Applications Note: In PowrePoint 2007 Office button replaces the File menu of other programs and the bar below the title bar is known as the Ribbon ( Menu and Tool bars of some other programs). Ribbon consist of a number of Tabs (Home, Insert, ….) . Tabs are designed to be task oriented Groups within each Tab break a task into subtasks Command button in each group carry out a command or display a menu of commands. You can also go to Office button on the top left corner of the page and click on New. You can choose a blank presentation from the page displayed (Fig. 5.54). Fig. 5.54 5.22.1 Installed templates Select the Installed templates tab and then select the desired template (Fig. 5.55). The Installed template provides templates and ideas for a variety of presentation types. Select the template you want and move through the wizard by clicking button or the
  • 3.
    Office Productivity ToolsPart-II :: 151 scroll-bar after making necessary choices. Choose the type of presentation you would like and click on Create when finished. Your presentation is ready for show. Fig. 5.55 5.22.2 Design Template Click on the Installed Themes box to select the Design Template you want to use. A number of template names will appear in the whi te box. These Install ed Themes give you dif ferent backgrounds and text formatting to begin your presentation. Preview each design by highlighting the template name on the list. Press Create after you have chosen the design (Fig. 5.56). Fig. 5.56
  • 4.
    152 :: Computerand Office Applications 5.22.3 Slide Layouts If you do not choose any template, you can start you r presentation by choosing a Blank presentati on option from t he New Presentation dialog box shown earlier in fig. 5.54. Once you have chosen a blank form for your new presentation, the first slide of your presentation appears. You can right click on the slide to choose the layout you want. There are nine different slide layouts from which to choose (Fig. 5.57). You simply make your selection and click on it. Each choice described below, dictates how your completed slides will appear. 1. Ti tl e Sl ide: This option i s useful for beginning a presentation; use this slide if you want to include subtitles or smaller text underneath a title. 2. Title and Content: Anytime you need to make a list of things that fall underneath a general subject, choose this layout. Fig. 5.57 3. 4. 5. Section Header: This option is useful for making a major section within the presentation Two Content: This is a useful option for putting different elements or text boxes. Comparison: This is a useful option for doing pro/con lists.
  • 5.
    Office Productivity ToolsPart-II :: 153 6. 7. 8. 9. Title Only: This option is great for the beginning of a presentation. No subtitles are included in this layout Blank: Use this layout if you want a blank slide formatted according to the master Slide. Content with caption: Use this option to describe the content (usually a graphic object like a chart or picture) on the right side of the slide and Title with description on the left side. Picture with caption: Use this option to place title over one linked object. 5.22.4 Selecting the content There are six types of elements shown inside the text box which are listed below. You can select from the contents within the slide (Fig. 5.58). 1 2 3 4 5 6 Fig. 5.58 1. Insert table
  • 6.
    154 :: Computerand Office Applications 2. Insert chart 3. Insert SmartArt Graphic 4. Insert picture from file 5. Insert Clip Art 6. Insert Media Clip 5.22.5 Open an Existing Presentation Select the Open tab from the Office button to open an existing presentation. Select the folder in which the file is located, from the Look in: drop-down menu and highlight the file on the list. Click Open to open the presentation (Fig. 5.59). Fig. 5.59 5.23 VIEWING SLIDES PowerPoint consists of multiple views to help you in the creation and presentation of your slides. These views are Normal, Slide Sorter, and Slide Show. The first two views are for creating your presentation and the last one is for presentation of slide show. You can access these views by clicking the respective view buttons at the bottom right of the PowerPoint window (Fig. 5.60).
  • 7.
    Office Productivity ToolsPart-II :: 155 Or select the View and then the respective command on the menu bar. For example, if you want to choose Normal view, select ViewNormal command on the menu bar. 5.23.1 Normal View The Normal View divides the screen into three sections: the main window, where the current slide is displayed; the outline pane on the left; and the notes pane at the bottom. This is where you will do most of your work. You can resize each pane by clicking its border and dragging it to the size that you want it to be. To access Normal view, click on Normal view button at the bottom right of the window or select ViewNormal command on the menu bar. Previous slide Next slide Normal Slide sorter Slide show Fig. 5.60 5.23.2 Slide Sorter View A small image of each slide is displayed on Slide Sorter View. Slides can easily be ordered and sorted using this view. You can also use this view to add special effect, such as the transactions
  • 8.
    156 :: Computerand Office Applications that occur when each new slide appears. To access Slide Sorter view, click on Slide Sorter view button at the bottom right of the window or select ViewSlide Sorter command on the menu bar (Fig. 5.61). Fig. 5.61 5.23.3 Slide Show View The Slide Show View is the view to use when you preview your presentation to make sure every thing is in place, or when you deliver a presentation to an audience. Because all sounds, animations, hyperlinks, and action settings of your presentation will be working, you can see exactly how your show will turn out. To access Slide Show view, click on Slide Show button at the bottom right of the window or select ViewSlide Show command on the menu bar. 5.24 DESIGN TIPS Although, PowerPoint provides you with some very powerful tools to give excellent presentations, making the wrong design choices can defeat all your efforts. Making the right decisions is not difficult. By following the guidelines below, you can prepare best slides. 1. Use contrasting colors for the text and the background so the text will be easy to read. 2. Use font size large enough to be seen from the back of the room where the presentation will be held. A font size of 24point or larger is recommended. 3. Use short phrases and sentences to convey your message. 4. Use simple slide transitions. Too many different transitions will distract your audience from the subject of the presentation.
  • 9.
    Office Productivity ToolsPart-II :: 157 5. 6. Avoid cluttering the slides with too much text or graphics. Your audience should hear what you have to say and not be distracted by a busy screen. Keep text simple and easy to read by not using many different text effects such as bold, italics, underlining, larger font size for emphasis within a sentence, or a different font all on the same slide. 5.25 WORKING WITH SLIDES Slides are the building blocks of your presentation. You can also create or use layouts and designs, add notes and create handouts, and customize the look of your slides. You can create new slides by inserting them into your show. When you create a new slide, you can use any of the nine layouts available (Refer to Section 5.22.3) in the New Slide dialog box or choose a blank slide. Once you have created a new slide, you can insert various elements such as text, pictures, graphs, tables etc. 5.25.1 Applying a Design Template To add a design template or change the existing one, select Design tag on the Ribbon. Select the template by clicking on it (Fig. 5.62). Fig. 5.62
  • 10.
    158 :: Computerand Office Applications 5.25.2 Changing Slide Layouts To change the layout template of the slide select Home Layout command on the menu bar. The Slide Layout dialog box appears with nine layouts. Click on one of the layout thumbnail images to apply (Fig. 5.63). 5.25.3 Slides from Outline Fig. 5.63 Slides from outline provides a way to create slides from text file outline. You can use this feature to create a group of slides that contain a lot of text. You can also create new slides by typing text in the outline pane. To access the Insert Outline dialog box, select Home  New Slide  Slide from Outline command on the menu bar 5.25.4 Duplicate Selected Slides Duplicate Selected Slides gives you a duplicate of a slide when you need to create similar slides. To insert a copy of the current slide after the current slide, choose the slide you want to duplicate, and then Right click for the Duplicate Slide command on the menu bar or press CTRL+SHIFT+D keys (Fig. 5.64). Fig. 5.64
  • 11.
    Office Productivity ToolsPart-II :: 159 You can also cut/copy and paste slides by selecting the whole slide. 5.25.5 Reordering Slides To reorder a slide in Slide Sorter View, simply click on the slide you wish to move and drag it to the new location (refer to Fig. 5.61). In Normal or Outline View, click on the slide in the slide pane and move and drag the slide to a new location. 5.25.6 Hide Slides If you do not want a slide to appear during the slide show, but do not want to delete the slide as it may be used later, the slide can be hidden by right clicking on the slide in the slide pane and selecting Hide (Fig. 5.65). You can unhide a hidden slide in a similar manner. Fig. 5.65 5.25.7 Moving Between Slides You can move from one slide to another slide by using the following tools: Scroll Bars: Use the Scroll Bars to move from one slide to another slide or through the text that is displayed in the notes pane and the outline pane. Next Slide and Previous Slide Buttons: The Next Slide and Previous Slide buttons move you to the next slide or previous slide in a slide show. These buttons, indicated by a double-arrow, are located at the bottom of the vertical scroll bar (Fig 5.66).
  • 12.
    160 :: Computerand Office Applications Previous slide Next slide Fig. 5.66 Using Outline Pane: Change to Outline view and then click on the slide that you want to view. You can move around in the outline pane by using your mouse, or by using up and down arrow keys. INTEXT QUESTIONS 5.4 9. 10. 11. State True or False. (a) In both Normal view and Outline view you can see: current slide, slide outline, and notes. (b) Usi ng t he contrasti ng colors for the text and background of the slides, is not a good practice. (c) While preparing slides use long phrases sentences to convey your message. How many slide layouts are available in New Slide dialog box? (a) 7 (b) 9 (c) 14, (d) 17 The PowerPoint dialog box is useful to create a new presentation using:
  • 13.
    Office Productivity ToolsPart-II :: 161 12. (a) Installed templates (b) Open (c) Installed Themes and Blank Presentation (d) both (a) and (c) above Which of the following views is shown in the presentation of slides in a conference? (a) Slide view (b) Slide Sorter view (c) Outline view (d) Slide Show view 5.26 WORKING WITH TEXT You can work with text to communicate your ideas to your audience. PowerPoint gives you several ways to insert, edit, and format text for your presentations. 5.26.1 Inserting Text You can insert text by using the outlining toolbar or inserting text boxes. Outline Text: The outline text can be used to create slides of a similar nature. By using the Outlining toolbar, you can create heads, lists, and paragraphs. PowerPoint uses the format of your outline to correctly insert text in a slide. Heading 1 becomes the title of a slide, heading 2 becomes the first line of the text box, and so on. When you select a predefined layout and switch over to Outline view as explained earlier, you can see the Outline text options on the left side window. To choose Outlining toolbar, select the Outline pane next to the slide pane on left side below the menu bar. Text Boxes: The text boxes are the way that PowerPoint puts text on a slide. When you create a slide, and use a specific slide layout, the slide will have one or more text boxes in it. Simply click on the existing text to add new text. If you want to add a new text box to the slide, select InsertText Box command on the menu bar and then draw the text box with the mouse at a place where you want to insert the text box.
  • 14.
    162 :: Computerand Office Applications If you want to resize a text box, follow the steps given below: 1. Select the text box you wish to resize by clicking on it with the mouse. A border with eight handles will appear around the text box. The four handles on the corners will resize the length and width of the box at once while the handles on the sides will resize only in one direction. 2. Click one of the handles as per your requirement and drag it with the mouse. Release the mouse button when it is the size you want to be. Move the text box by clicking and dragging the thick dotted border with the mouse. If you want to delete a text box from a template, simply click the border of the text box, and then press the DELETE key on the keyboard. 5.26.2 Formatting Text Format Fonts: Select the text that will be formatted by highlighting the text either on the outline or on the slide. You can select from HomeFont menu bar or right click on the highlighted selection and select the Font menu from the popup shortcut menu (Fig. 5.67). Select a font face, size, style, effect, and color from the Font dialog box. Fig. 5.67
  • 15.
    Office Productivity ToolsPart-II :: 163 Bulleted Lists on Design Templates: Bulleted lists allow you to clearly display the main points of your presentation on slides. The text boxes on design templates already include bulleted lists. Click the placeholder on the slide to begin adding text and press the ENTER key to return to the next line and add a new bulleted item. To go to the next line without adding another bullet, hold down the SHIFT key while pressing ENTER. Bulleted List from a Text Box: If you are not creating a bulleted list from an existing placeholder on a design template, or if you would like to add an additional bulleted list, follow these steps to create a new list: 1. In slide view, create a text box by selecting InsertText Box from the menu bar. 2. "Draw" the text box on the slide by holding down the left mouse button while you move the mouse until the box is the size you want it. 3. Choose the Bullets or Numbering from the Home  Paragraph menu bar. 4. Change the Size of the bullet by changing the percentage in relation to the text. 5. Choose a color for the bullet from the Color menu. Click More Colors for a larger selection. 6. Select one of the bullet types shown and click OK (Fig. 5.68). Or click the Picture button to view the Picture Bullet wi ndow (Fi g. 5.69). Select one of the bullets and click OK. Fig. 5.68
  • 16.
    164 :: Computerand Office Applications Fig. 5.69 5.26.3 Adding Notes From Normal View, notes can be added to the slide. These notes will not be seen on your presentation, but they can be printed out on paper along with the slide the notes refer to by selecting Print What: Notes Pages on the Print menu (Fig. 5.70 and 5.71). Fig. 5.70 5.27 SAVING AND PRINTING You can save your presentation slides as a file in a folder. You can also save the slides as Web page so that you can post them on Internet. Printing is similar to what you have done in Word and Excel. Remember to set up your page before printing your presentation slides.
  • 17.
    Office Productivity ToolsPart-II :: 165 5.27.1 Page Setup Select Office buttonPrint Preview from the menu bar to access options for printing the presentation slides. Select the format the printed slides will be used for, from the Slides drop-down menu (Fig 5.71). Fig. 5.71 5.27.2 Save as File To save your presentation slides as a file, select Of fi ce buttonSave As command on the menu bar or simply click on the Save button on the toolbar on top. The Save As dialog box appears. Choose the folder and drive that your file will be located, type the name of the file, and then click Save in the Save As dialog box (Fig 5.72). Fig. 5.72
  • 18.
    166 :: Computerand Office Applications 5.27.3 Save as Web Page Presentations can be saved by selecting Office buttonSave As command on the menu bar as explained earlier. However, if you want to post PowerPoint presentations on the Internet, you may want to save them as Web pages so that the visitors to your web site can view the presentation even if they do not have PowerPoint installed on their computers. Select OfficeSave As and select Web Page command from the drop down. Choose your web page directory on the network from the Look in: drop-down menu and name the file in the File name: box. Click Save to save the presentation in web format (Fig 5.73). Fig. 5.73 5.27.4 Print Select Office buttonPrint command on the menu bar to print the presentation. The Print dialog box appears. Choose the following options in the Print box. Print range - Select All to print all the slides in the presentation, Current slide to print only the current slide, or enter slide numbers in the Slides field to print only certain slides.
  • 19.
    Office Productivity ToolsPart-II :: 167 Copies - Enter the number of copies of each slide specified in Print range and check the Collate box if necessary (Fig 5.24). Print What  Slides - prints a full-page slide on each page.  Handouts - pri nts as many sl ides as you designate on each page.  Notes Page - prints one sl ide with that slide's notes on each page  Outline view - prints the outline of the presentation Click OK to print. Fig. 5.74 5.28 RUN A SLIDE SHOW After you create your slides, you can run your slide show.  Choose the Slide Show tab. Click the From Beginning button in the Start Slide Show group. OR  Click the Slide Show icon in the bottom right corner of your screen. Slide show of your presentation will appear on your screen. Press ESC key to End t he slide show and return t o the PowerPoint. 5.29 CLOSE A PRESENTATION To close the current presentation slides file, select Office buttonClose command on the menu bar. If the file contains any unsaved changes, you will be prompted to save the file before closing.
  • 20.
    168 :: Computerand Office Applications 5.30 EXIT POWERPOINT PROGRAM When finished your work in PowerPoint and closed all the files, you can quit the PowerPoint program by selecting Office buttonExit PowerPoint command on the menu bar. INTEXT QUESTIONS 5.5 13. (i) How do you move from one slide to another slide? (a) Using Scroll bars (b) Using Next Slide and Previous slide buttons (c) Using outline pane (d) All of the above (ii) How do you insert text in a slide? (a) Using outline text (b) Inserting text boxes (c) Right clicking (d) (a) and (b) above (iii) You can add notes to your slides from: (a) Slide Sorter view (b) Normal view (c) Slide Show view (d) (a) and (b) (iv) Text can be easily inserted into the slides using: (a) Normal view (b) Outline view (c) Slide Sorter view (d) (a) and (b) above
  • 21.
    Office Productivity ToolsPart-II :: 169 5.31 WHAT YOU HAVE LEARNT In this lesson you have learnt about database and its importance in day-today life. You also learnt how to create a table and modify it. Different ways of creating queries and designing forms and reports have also been discussed. Creation of a powerful presentation using multimedia features for effective communication have also been included at the end. 5.32 TERMINAL QUESTIONS 1. What is a database? 2. Explain with the help of an example the terms table, field and record. 3. What is a Data type? Explain with the help of examples any four data types. 4. What is a primary key and how is it assigned in a table? 5. How can you create a query based on 2 tables? What is the most necessary condition for creating such type of query? 6. How can you change the positions of the columns in the query design view? Explain with an example. 7. Write down short note on the following: (i) Form (ii) Report 8. Write down the various steps for creating a Form using Form Wizard. 9. Explain any three features of PowerPoint. 10. Explain any one method of creating a presentation. 11. Explain steps in inserting a text box in a slide. 12. How do you change the amount of space between lines in a text box? 13. How do you insert picture bullets in slides?
  • 22.
    170 :: Computerand Office Applications 5.33 ANSWER TO INTEXT QUESTIONS Intext Questions 5.1 1. (a) True (b) False (c) True (d) False (e) False 2. (a) Field (b) Primary key 3. (c) 4. (a) Intext Questions 5.2 5. (a) False (b) True 6. (a) Two (c) False (b) Design Intext Questions 5.3 7. (a) New Query (b) Table (c) Design (d) Run (e) Logical 8. (a) False (b) True (d) False (c) True (e) False Intext Questions 5.4 9. (a) True (b) False 10. (b) 11. (d) 12. (d) Intext Questions 5.5 13. (i) (d) (ii) (d) (iii) (b) (iv) (d) (c) False (d) True