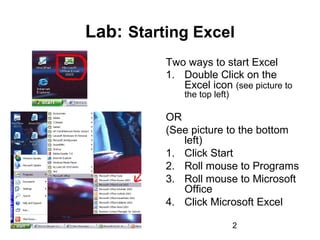
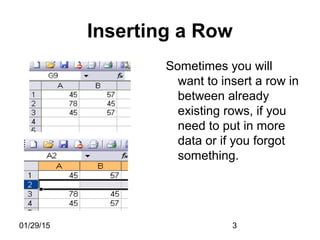
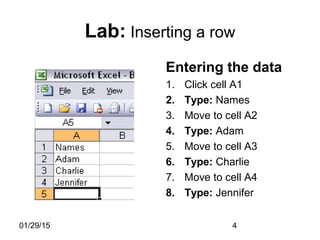
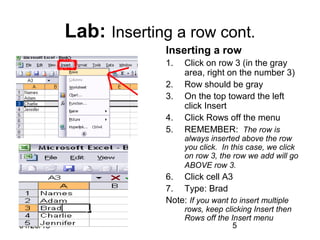
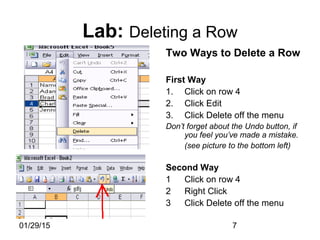
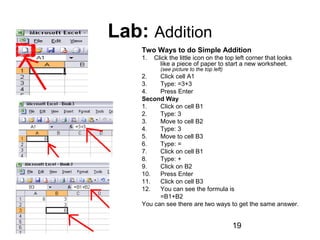
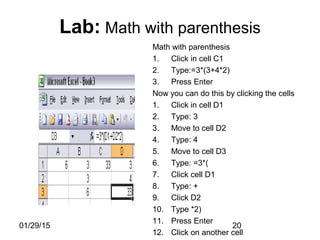
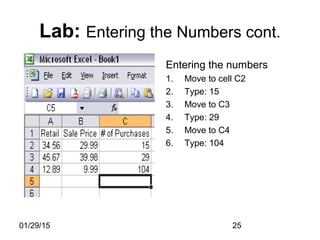
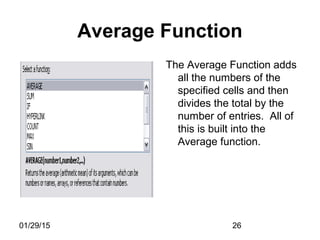
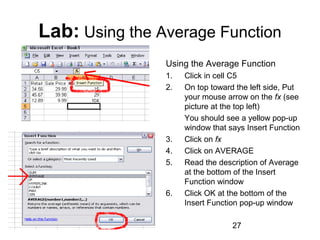
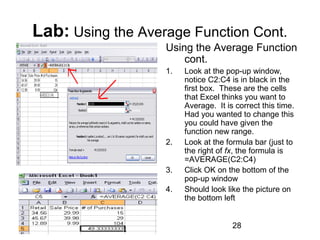
Excel for Beginners
Class 3
Creating formulas, Formatting
Cells, Columns, Rows
01/29/15 2
Lab: Starting Excel
Two ways to start Excel
1. Double Click on the
Excel icon (see picture to
the top left)
OR
(See picture to the bottom
left)
1. Click Start
2. Roll mouse to Programs
3. Roll mouse to Microsoft
Office
4. Click Microsoft Excel
01/29/15 3
Inserting a Row
Sometimes you will
want to insert a row in
between already
existing rows, if you
need to put in more
data or if you forgot
something.
01/29/15 4
Lab: Inserting a row
Entering the data
1. Click cell A1
2. Type: Names
3. Move to cell A2
4. Type: Adam
5. Move to cell A3
6. Type: Charlie
7. Move to cell A4
8. Type: Jennifer
01/29/15 5
Lab: Inserting a row cont.
Inserting a row
1. Click on row 3 (in the gray
area, right on the number 3)
2. Row should be gray
3. On the top toward the left
click Insert
4. Click Rows off the menu
5. REMEMBER: The row is
always inserted above the row
you click. In this case, we click
on row 3, the row we add will go
ABOVE row 3.
6. Click cell A3
7. Type: Brad
Note: If you want to insert multiple
rows, keep clicking Insert then
Rows off the Insert menu
01/29/15 6
Deleting a Row
Sometimes you realize
you need
to delete a row or
multiple rows.
01/29/15 7
Lab: Deleting a Row
Two Ways to Delete a Row
First Way
1. Click on row 4
2. Click Edit
3. Click Delete off the menu
Don’t forget about the Undo button, if
you feel you’ve made a mistake.
(see picture to the bottom left)
Second Way
1 Click on row 4
2 Right Click
3 Click Delete off the menu
01/29/15 8
Inserting a Column
Sometimes you need to
insert a column in
between columns after
you have already entered
the data.
01/29/15 9
Lab: Inserting a Column
Two Ways to Insert a Column
First Way
1. Click on Column B (in the gray
area on the letter B itself)
2. Click Insert
3. Click Columns off the menu
Note: The column will always be
inserted to the left.
4. Click in cell B1
5. Type: Addresses
Second Way
1. Click on column B
2. Right Click
3. Click Insert
01/29/15 10
Deleting a Column
Sometimes you need to
delete a column in
between columns
after you have
already entered the
data.
01/29/15 11
Lab: Deleting a Column
Deleting a column
First Way
1. Click on column B (on the letter
B itself in the gray area)
2. Click Edit
3. Click Delete
Note: the column you clicked on
will be deleted.
Second Way
1. Click on column B
2. Right Click
3. Click Delete
01/29/15 12
Copying One Cell
You can copy one cell or multiple cells.
Start a new worksheet by clicking the little
piece of paper in the top left hand
corner
1. Click cell A1
2. Type: 45
3. Move to cell B1
4. Type: 57
5. Move to cell A2
6. Type: 78
7. Click on cell A1
8. Click the word Edit at the top left of
the screen, then click Copy
Notice cell A1 has a flashing box
around it.
9. Click cell B2
10. Click the word Edit at the top left of
the screen, then click Paste.
01/29/15 13
Copying and Pasting in Excel
Three ways to copy and paste
1. Click on the cell you to copy
2. Click the word Edit at the top
left of the screen
3. Click Copy off the menu
4. Click in the cell you want to
paste the copied cell
5. Click Edit, and click Paste
Second Way
1. Click on the cell you want to
copy
2. On the keyboard, hold down
CTRL key and tap the C key
3. Move to the cell you want to
paste the copied cell
4. On the keyboard, hold down
the CTRL key and tap the V
key
01/29/15 14
Copying and Pasting in Excel
Third Way to copy and paste
1. Click on the cell you want to
copy
2. Click on the copy button
(underneath Format, looks like two
tiny pieces of paper)
(see picture to the top left)
3. Click the cell you want to paste
the cell into.
4. Click on the paste button
(just to the right of the copy button
looks like a clipboard with paper
on it.) (see picture to the bottom
left)
01/29/15 15
Copying Multiple cells
You can copy as many cells as
you need. The cells must be
highlighted.
1. Click on cell A1
2. Hold down the left mouse
button and drag the mouse to
cell B2
(2nd
cell should be gray)
3. Now the cells are highlighted
4. Copy the cells using Edit,
Copy shortcut button or
CTRL C or the copy button
(as we discussed previously)
01/29/15 16
Pasting the multiple cells
To paste the cells
1. Click on the cell you want the
copied cells to go
2. You can just click one cell
and all the cells you copied
will be pasted.
3. Paste the cells by clicking
Edit Paste, CTRL V or the
paste button
As we discussed previously
01/29/15 17
Simple Math
You can do addition,
subtraction, multiplication,
division
Symbols for function:
Add +
Subtract -
Multiply *
Divide /
The = sign signifies the beginning
of math, you can use cell
coordinates or numbers.
For example:
=A1+A3
=4*4/2
01/29/15 18
Simple to more complex math
For example:
=3*(4+4/2)
=3*4+4/2
( )Parenthesis are necessary if
you need to do multiple steps
that don’t follow the order of
operations.
Review: Order of Operations
1. First do all operations that lie
inside parentheses.
2. Next, do any work with exponents
or radicals
3. Working from left to right, do all
multiplication and division.
4. Finally, working from left to right,
do all addition and subtraction.
01/29/15 19
Lab: Addition
Two Ways to do Simple Addition
1. Click the little icon on the top left corner that looks
like a piece of paper to start a new worksheet.
(see picture to the top left)
2. Click cell A1
3. Type: =3+3
4. Press Enter
Second Way
1. Click on cell B1
2. Type: 3
3. Move to cell B2
4. Type: 3
5. Move to cell B3
6. Type: =
7. Click on cell B1
8. Type: +
9. Click on B2
10. Press Enter
11. Click on cell B3
12. You can see the formula is
=B1+B2
You can see there are two ways to get the same answer.
01/29/15 20
Lab: Math with parenthesis
Math with parenthesis
1. Click in cell C1
2. Type:=3*(3+4*2)
3. Press Enter
Now you can do this by clicking the cells
1. Click in cell D1
2. Type: 3
3. Move to cell D2
4. Type: 4
5. Move to cell D3
6. Type: =3*(
7. Click cell D1
8. Type: +
9. Click D2
10. Type *2)
11. Press Enter
12. Click on another cell
01/29/15 21
Lab: Copying the formula
Once you have the formula the
way you like it, you can copy
it.
1. Click in cell E1
2. Type: 5
3. Move to cell E2
4. Type: 7
5. Click cell D3
6. Click the word Edit at the top
left side of the screen, then
click copy (see picture to the
left)
7. Click cell E3
8. Click Edit, then click Paste
01/29/15 22
Excel can do Math
Excel can do simple to
complex math.
Some of the functions
are already preset,
like AutoSum (we
learned this one last
week)
We will learn another
well used function.
01/29/15 23
Lab: Creating the Headings
Creating data to play with
1. Click little piece of paper in the top
left hand corner (New)
2. Click cell A1
3. Type: Retail
4. Move to cell B1
5. Type: Sale Price
6. Move to cell C1
7. Type: # of Purchases
8. Adjust the column widths
Review: Adjusting column widths:
Put your mouse next to the line
between column A & Column B until
you see a plus sign with arrow tips
on either side (see picture to the
bottom left) now double click your
mouse. Do the same for columns B
& C and C & D.
01/29/15 24
Entering in the numbers
1. Move to cell A2
2. Type: 34.56
3. Move to cell A3
4. Type: 45.67
5. Move to cell A4
6. Type: 12.89
7. Move to cell B2
8. Type: 29.99
9. Move to cell B3
10. Type: 39.98
11. Move to cell B4
12. Type: 9.99
Lab: Entering the Numbers
01/29/15 25
Lab: Entering the Numbers cont.
Entering the numbers
1. Move to cell C2
2. Type: 15
3. Move to C3
4. Type: 29
5. Move to C4
6. Type: 104
01/29/15 26
Average Function
The Average Function adds
all the numbers of the
specified cells and then
divides the total by the
number of entries. All of
this is built into the
Average function.
01/29/15 27
Lab: Using the Average Function
Using the Average Function
1. Click in cell C5
2. On top toward the left side, Put
your mouse arrow on the fx (see
picture at the top left)
You should see a yellow pop-up
window that says Insert Function
3. Click on fx
4. Click on AVERAGE
5. Read the description of Average
at the bottom of the Insert
Function window
6. Click OK at the bottom of the
Insert Function pop-up window
01/29/15 28
Lab: Using the Average Function Cont.
Using the Average Function
cont.
1. Look at the pop-up window,
notice C2:C4 is in black in the
first box. These are the cells
that Excel thinks you want to
Average. It is correct this time.
Had you wanted to change this
you could have given the
function new range.
2. Look at the formula bar (just to
the right of fx, the formula is
=AVERAGE(C2:C4)
3. Click OK on the bottom of the
pop-up window
4. Should look like the picture on
the bottom left
01/29/15 29
Lab: Decreasing the numbers
after the Decimal point
Decreasing the numbers after
the Decimal point
1. Click on cell C5
2. See picture to the top left, Click
the tiny down arrow just to the
left of where it says Arial
3. Click on Show Buttons on Two
Rows
4. Place your mouse arrow on the .
00 icons. (see picture to bottom
left) A yellow pop-up
.00 should say Increase
Decimal or Decrease Decimal.
5. Click on Decrease Decimal until
you have just two numbers past
the decimal point.
01/29/15 30
Questions?
Next week is the last
class.
We will be learning how
to manipulate
worksheets, saving,
and printing

Excel for beginners class 3

  • 1.
    Excel for Beginners Class3 Creating formulas, Formatting Cells, Columns, Rows
  • 2.
    01/29/15 2 Lab: StartingExcel Two ways to start Excel 1. Double Click on the Excel icon (see picture to the top left) OR (See picture to the bottom left) 1. Click Start 2. Roll mouse to Programs 3. Roll mouse to Microsoft Office 4. Click Microsoft Excel
  • 3.
    01/29/15 3 Inserting aRow Sometimes you will want to insert a row in between already existing rows, if you need to put in more data or if you forgot something.
  • 4.
    01/29/15 4 Lab: Insertinga row Entering the data 1. Click cell A1 2. Type: Names 3. Move to cell A2 4. Type: Adam 5. Move to cell A3 6. Type: Charlie 7. Move to cell A4 8. Type: Jennifer
  • 5.
    01/29/15 5 Lab: Insertinga row cont. Inserting a row 1. Click on row 3 (in the gray area, right on the number 3) 2. Row should be gray 3. On the top toward the left click Insert 4. Click Rows off the menu 5. REMEMBER: The row is always inserted above the row you click. In this case, we click on row 3, the row we add will go ABOVE row 3. 6. Click cell A3 7. Type: Brad Note: If you want to insert multiple rows, keep clicking Insert then Rows off the Insert menu
  • 6.
    01/29/15 6 Deleting aRow Sometimes you realize you need to delete a row or multiple rows.
  • 7.
    01/29/15 7 Lab: Deletinga Row Two Ways to Delete a Row First Way 1. Click on row 4 2. Click Edit 3. Click Delete off the menu Don’t forget about the Undo button, if you feel you’ve made a mistake. (see picture to the bottom left) Second Way 1 Click on row 4 2 Right Click 3 Click Delete off the menu
  • 8.
    01/29/15 8 Inserting aColumn Sometimes you need to insert a column in between columns after you have already entered the data.
  • 9.
    01/29/15 9 Lab: Insertinga Column Two Ways to Insert a Column First Way 1. Click on Column B (in the gray area on the letter B itself) 2. Click Insert 3. Click Columns off the menu Note: The column will always be inserted to the left. 4. Click in cell B1 5. Type: Addresses Second Way 1. Click on column B 2. Right Click 3. Click Insert
  • 10.
    01/29/15 10 Deleting aColumn Sometimes you need to delete a column in between columns after you have already entered the data.
  • 11.
    01/29/15 11 Lab: Deletinga Column Deleting a column First Way 1. Click on column B (on the letter B itself in the gray area) 2. Click Edit 3. Click Delete Note: the column you clicked on will be deleted. Second Way 1. Click on column B 2. Right Click 3. Click Delete
  • 12.
    01/29/15 12 Copying OneCell You can copy one cell or multiple cells. Start a new worksheet by clicking the little piece of paper in the top left hand corner 1. Click cell A1 2. Type: 45 3. Move to cell B1 4. Type: 57 5. Move to cell A2 6. Type: 78 7. Click on cell A1 8. Click the word Edit at the top left of the screen, then click Copy Notice cell A1 has a flashing box around it. 9. Click cell B2 10. Click the word Edit at the top left of the screen, then click Paste.
  • 13.
    01/29/15 13 Copying andPasting in Excel Three ways to copy and paste 1. Click on the cell you to copy 2. Click the word Edit at the top left of the screen 3. Click Copy off the menu 4. Click in the cell you want to paste the copied cell 5. Click Edit, and click Paste Second Way 1. Click on the cell you want to copy 2. On the keyboard, hold down CTRL key and tap the C key 3. Move to the cell you want to paste the copied cell 4. On the keyboard, hold down the CTRL key and tap the V key
  • 14.
    01/29/15 14 Copying andPasting in Excel Third Way to copy and paste 1. Click on the cell you want to copy 2. Click on the copy button (underneath Format, looks like two tiny pieces of paper) (see picture to the top left) 3. Click the cell you want to paste the cell into. 4. Click on the paste button (just to the right of the copy button looks like a clipboard with paper on it.) (see picture to the bottom left)
  • 15.
    01/29/15 15 Copying Multiplecells You can copy as many cells as you need. The cells must be highlighted. 1. Click on cell A1 2. Hold down the left mouse button and drag the mouse to cell B2 (2nd cell should be gray) 3. Now the cells are highlighted 4. Copy the cells using Edit, Copy shortcut button or CTRL C or the copy button (as we discussed previously)
  • 16.
    01/29/15 16 Pasting themultiple cells To paste the cells 1. Click on the cell you want the copied cells to go 2. You can just click one cell and all the cells you copied will be pasted. 3. Paste the cells by clicking Edit Paste, CTRL V or the paste button As we discussed previously
  • 17.
    01/29/15 17 Simple Math Youcan do addition, subtraction, multiplication, division Symbols for function: Add + Subtract - Multiply * Divide / The = sign signifies the beginning of math, you can use cell coordinates or numbers. For example: =A1+A3 =4*4/2
  • 18.
    01/29/15 18 Simple tomore complex math For example: =3*(4+4/2) =3*4+4/2 ( )Parenthesis are necessary if you need to do multiple steps that don’t follow the order of operations. Review: Order of Operations 1. First do all operations that lie inside parentheses. 2. Next, do any work with exponents or radicals 3. Working from left to right, do all multiplication and division. 4. Finally, working from left to right, do all addition and subtraction.
  • 19.
    01/29/15 19 Lab: Addition TwoWays to do Simple Addition 1. Click the little icon on the top left corner that looks like a piece of paper to start a new worksheet. (see picture to the top left) 2. Click cell A1 3. Type: =3+3 4. Press Enter Second Way 1. Click on cell B1 2. Type: 3 3. Move to cell B2 4. Type: 3 5. Move to cell B3 6. Type: = 7. Click on cell B1 8. Type: + 9. Click on B2 10. Press Enter 11. Click on cell B3 12. You can see the formula is =B1+B2 You can see there are two ways to get the same answer.
  • 20.
    01/29/15 20 Lab: Mathwith parenthesis Math with parenthesis 1. Click in cell C1 2. Type:=3*(3+4*2) 3. Press Enter Now you can do this by clicking the cells 1. Click in cell D1 2. Type: 3 3. Move to cell D2 4. Type: 4 5. Move to cell D3 6. Type: =3*( 7. Click cell D1 8. Type: + 9. Click D2 10. Type *2) 11. Press Enter 12. Click on another cell
  • 21.
    01/29/15 21 Lab: Copyingthe formula Once you have the formula the way you like it, you can copy it. 1. Click in cell E1 2. Type: 5 3. Move to cell E2 4. Type: 7 5. Click cell D3 6. Click the word Edit at the top left side of the screen, then click copy (see picture to the left) 7. Click cell E3 8. Click Edit, then click Paste
  • 22.
    01/29/15 22 Excel cando Math Excel can do simple to complex math. Some of the functions are already preset, like AutoSum (we learned this one last week) We will learn another well used function.
  • 23.
    01/29/15 23 Lab: Creatingthe Headings Creating data to play with 1. Click little piece of paper in the top left hand corner (New) 2. Click cell A1 3. Type: Retail 4. Move to cell B1 5. Type: Sale Price 6. Move to cell C1 7. Type: # of Purchases 8. Adjust the column widths Review: Adjusting column widths: Put your mouse next to the line between column A & Column B until you see a plus sign with arrow tips on either side (see picture to the bottom left) now double click your mouse. Do the same for columns B & C and C & D.
  • 24.
    01/29/15 24 Entering inthe numbers 1. Move to cell A2 2. Type: 34.56 3. Move to cell A3 4. Type: 45.67 5. Move to cell A4 6. Type: 12.89 7. Move to cell B2 8. Type: 29.99 9. Move to cell B3 10. Type: 39.98 11. Move to cell B4 12. Type: 9.99 Lab: Entering the Numbers
  • 25.
    01/29/15 25 Lab: Enteringthe Numbers cont. Entering the numbers 1. Move to cell C2 2. Type: 15 3. Move to C3 4. Type: 29 5. Move to C4 6. Type: 104
  • 26.
    01/29/15 26 Average Function TheAverage Function adds all the numbers of the specified cells and then divides the total by the number of entries. All of this is built into the Average function.
  • 27.
    01/29/15 27 Lab: Usingthe Average Function Using the Average Function 1. Click in cell C5 2. On top toward the left side, Put your mouse arrow on the fx (see picture at the top left) You should see a yellow pop-up window that says Insert Function 3. Click on fx 4. Click on AVERAGE 5. Read the description of Average at the bottom of the Insert Function window 6. Click OK at the bottom of the Insert Function pop-up window
  • 28.
    01/29/15 28 Lab: Usingthe Average Function Cont. Using the Average Function cont. 1. Look at the pop-up window, notice C2:C4 is in black in the first box. These are the cells that Excel thinks you want to Average. It is correct this time. Had you wanted to change this you could have given the function new range. 2. Look at the formula bar (just to the right of fx, the formula is =AVERAGE(C2:C4) 3. Click OK on the bottom of the pop-up window 4. Should look like the picture on the bottom left
  • 29.
    01/29/15 29 Lab: Decreasingthe numbers after the Decimal point Decreasing the numbers after the Decimal point 1. Click on cell C5 2. See picture to the top left, Click the tiny down arrow just to the left of where it says Arial 3. Click on Show Buttons on Two Rows 4. Place your mouse arrow on the . 00 icons. (see picture to bottom left) A yellow pop-up .00 should say Increase Decimal or Decrease Decimal. 5. Click on Decrease Decimal until you have just two numbers past the decimal point.
  • 30.
    01/29/15 30 Questions? Next weekis the last class. We will be learning how to manipulate worksheets, saving, and printing