Download to read offline


![ifconfig command
Syntax: ifconfig [options] [interface]
Options
◦ netmask MASK Specifies the netmask for the interface
◦ hw ADDRESS Sets the MAC address of the interface
◦ Up Brings up the interface
◦ down Bring down the interface
5](https://image.slidesharecdn.com/5-networking-231003052550-c3d183fe/85/5-Networking-in-Red-Hat-5-320.jpg)


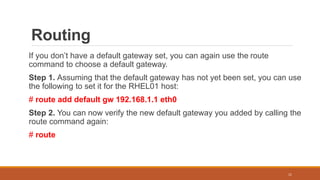
![Routing
Options Description
add Adds a net route
del Deletes an existing route
flush flush Flushes any temporary routes
10
Syntax: route [options]](https://image.slidesharecdn.com/5-networking-231003052550-c3d183fe/85/5-Networking-in-Red-Hat-10-320.jpg)


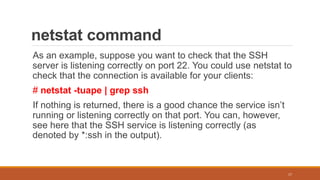
![netstat command
Syntax: netstat [options]
16](https://image.slidesharecdn.com/5-networking-231003052550-c3d183fe/85/5-Networking-in-Red-Hat-16-320.jpg)
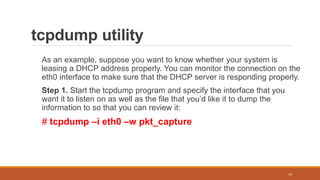
![Network Monitoring and Analysis
you can use a packet capture utility to view all the raw data being
sent across the interfaces on your machine.
To help out, you can use the tcpdump utility.
Syntax: tcpdump [options]
18](https://image.slidesharecdn.com/5-networking-231003052550-c3d183fe/85/5-Networking-in-Red-Hat-18-320.jpg)


This document discusses networking concepts and commands in Red Hat Linux. It covers commands like ifconfig, route, netstat, ping, and tcpdump that are used to view and configure network interfaces, routing tables, active connections, test connectivity, and capture network packets. It also discusses network configuration files and how to set static IP addresses, create static routes, bond multiple Ethernet interfaces together, and troubleshoot network issues.