The document provides a comprehensive overview of various Cisco switch commands and their functionalities, including resetting interface configurations, applying settings to multiple interfaces, and monitoring traffic. It covers commands for managing VLANs, logging, access control lists, user sessions, service source interfaces, privilege levels, and troubleshooting tools. Additional insights are given into the use of diagnostic tests and observing network behaviors to ensure optimal device management.


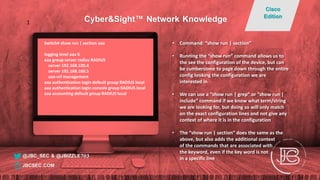

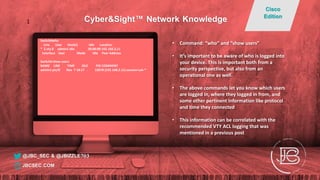


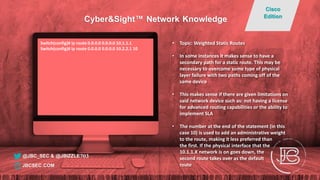
![Switch#sh ip route
Codes: L - local, C - connected, S - static, R - RIP, M - mobile, B - BGP
D - EIGRP, EX - EIGRP external, O - OSPF, IA - OSPF inter area
N1 - OSPF NSSA external type 1, N2 - OSPF NSSA external type 2
E1 - OSPF external type 1, E2 - OSPF external type 2
i - IS-IS, su - IS-IS summary, L1 - IS-IS level-1, L2 - IS-IS level-2
ia - IS-IS inter area, * - candidate default, U - per-user static route
o - ODR, P - periodic downloaded static route, + - replicated route
Gateway of last resort is not set
4.0.0.0/32 is subnetted, 1 subnets
D 4.4.4.4 [90/158720] via 10.1.5.1, 00:17:32, FastEthernet0/10
5.0.0.0/32 is subnetted, 1 subnets
D 5.5.5.5 [90/161280] via 10.1.5.1, 0017:32, FastEthernet0/10
6.0.0.0/32 is subnetted, 1 subnets
C 6.6.6.6 is directly connected, Loopback0
10.0.0.0/8 is variably subnetted, 4 subnets, 2 masks
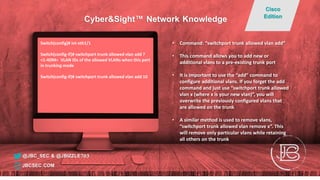
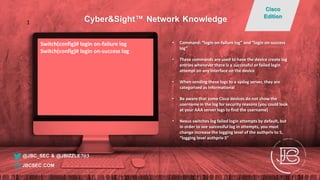
• Command: “show ip route”
• This command shows all the routes that the
device knows and is using to send traffic to
different destinations
• It also identifies information including directly
connected routes vs routes that it has learned via
other means, the protocols that it has learned
these routes from and the administrative
distance (ranking for protocols) and the metric
(ranking within the protocol)
• If you are having communication issues, this is
one of the first places to go when
troubleshooting to verify that you do have
a valid route to your destination.
@JBC_SEC & @JBIZZLE703
Cyber&Sight™ Network Knowledge
Cisco
Edition
JBCSEC.COM](https://image.slidesharecdn.com/networkknowledge-cisco-copy-200609143919/85/Helpful-Cisco-Tips-and-Tricks-for-New-Network-Engineers-31-320.jpg)


![Java Web Services [3/5]: WSDL, WADL and UDDI](https://cdn.slidesharecdn.com/ss_thumbnails/jws-chapter3-130106065523-phpapp01-thumbnail.jpg?width=640&height=640&fit=bounds)


![Ccna lab manual[1]](https://cdn.slidesharecdn.com/ss_thumbnails/ccnalabmanual1-120706013431-phpapp02-thumbnail.jpg?width=640&height=640&fit=bounds)


