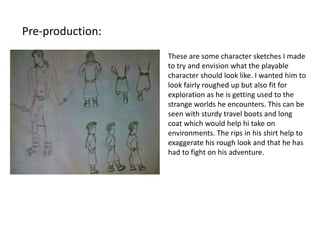
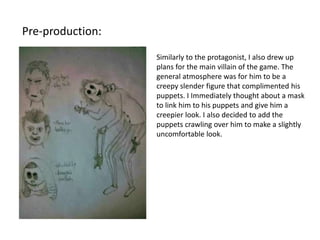
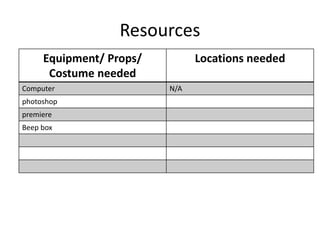
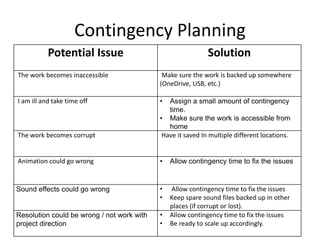
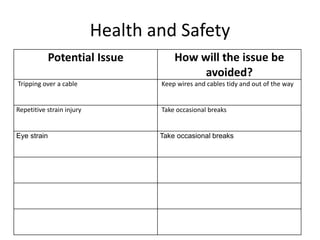
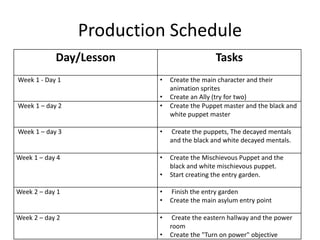
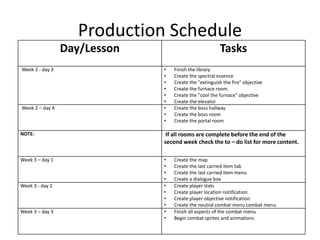
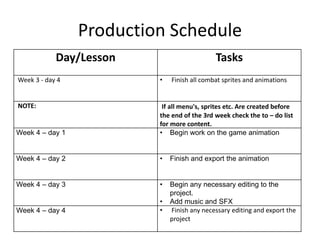
Pre-Production
Jack Lowes
Pre-production
• What are you making?
• I am creating a small animation to showcase a small section of an
RPG adventure video game.
• Why?
• I Intend to create a more horror themed experience to appeal to my
audience and create a world space for players to delve into.
• Who is it for? (Audience)
• The game is targeted towards male 16 to 18 year olds.
• Where will it appear/on what? (How will audience see it)
• The game would appear on stores associated with gaming
platforms. Alternatively clips showcasing gameplay on sites such as
youtube would be available.
Reflection:
Style sheet - Colour
I like this colour pallete as
it is very dark and offers a
variety of browns to give
an old, dark look as well as
a few complimantary
colours. It may be a little to
dark to see
This pallete is great as it is
brighter however it still
keeps the dark tone of the
colours and also look
grimier creating a feeling of
discomfort
This pallete uses many
grays which fit an asylum
aesthetic. It has a darker
tone to the colours and
helps convey a scarier
atmosphere. It could also
be used to show a non
colour TV type of effect.
Style sheet - Font
Agency FB – A very narrow font that could be used
for enemy or overall text
LilyUPC – being a bolder font this could be used to emphasise certain points
in a characters speech
Rockwell – A very big, blocky font that could be
used for character names
SimSun-ExtB – This font has a slightly
robotic feel and could reflect a character
in a similar field.
Pre-production:
These are some character sketches I made
to try and envision what the playable
character should look like. I wanted him to
look fairly roughed up but also fit for
exploration as he is getting used to the
strange worlds he encounters. This can be
seen with sturdy travel boots and long
coat which would help hi take on
environments. The rips in his shirt help to
exaggerate his rough look and that he has
had to fight on his adventure.
Pre-production:
Similarly to the protagonist, I also drew up
plans for the main villain of the game. The
general atmosphere was for him to be a
creepy slender figure that complimented his
puppets. I Immediately thought about a mask
to link him to his puppets and give him a
creepier look. I also decided to add the
puppets crawling over him to make a slightly
uncomfortable look.
Resources
Equipment/ Props/
Costume needed
Locations needed
Computer N/A
photoshop
premiere
Beep box
Contingency Planning
Potential Issue Solution
The work becomes inaccessible Make sure the work is backed up somewhere
(OneDrive, USB, etc.)
I am ill and take time off • Assign a small amount of contingency
time.
• Make sure the work is accessible from
home
The work becomes corrupt Have it saved In multiple different locations.
Animation could go wrong • Allow contingency time to fix the issues
Sound effects could go wrong • Allow contingency time to fix the issues
• Keep spare sound files backed up in other
places (if corrupt or lost).
Resolution could be wrong / not work with
project direction
• Allow contingency time to fix the issues
• Be ready to scale up accordingly.
Health and Safety
Potential Issue How will the issue be
avoided?
Tripping over a cable Keep wires and cables tidy and out of the way
Repetitive strain injury Take occasional breaks
Eye strain Take occasional breaks
Production Schedule
Day/Lesson Tasks
Week 1 - Day 1 • Create the main character and their
animation sprites
• Create an Ally (try for two)
Week 1 – day 2 • Create the Puppet master and the black and
white puppet master
Week 1 – day 3 • Create the puppets, The decayed mentals
and the black and white decayed mentals.
Week 1 – day 4 • Create the Mischievous Puppet and the
black and white mischievous puppet.
• Start creating the entry garden.
Week 2 – day 1 • Finish the entry garden
• Create the main asylum entry point
Week 2 – day 2 • Create the eastern hallway and the power
room
• Create the "Turn on power" objective
Production Schedule
Day/Lesson Tasks
Week 2 - day 3 • Finish the library
• Create the spectral essence
• Create the "extinguish the fire" objective
• Create the furnace room.
• Create the "cool the furnace" objective
• Create the elevator
Week 2 – day 4 • Create the boss hallway
• Create the boss room
• Create the portal room
NOTE: If all rooms are complete before the end of the
second week check the to – do list for more content.
Week 3 – day 1 • Create the map
• Create the last carried item tab
• Create the last carried item menu
• Create a dialogue box
Week 3 - day 2 • Create player stats
• Create player location notification
• Create player objective notification
• Create the neutral combat menu combat menu
Week 3 – day 3 • Finish all aspects of the combat menu
• Begin combat sprites and animations
Production Schedule
Day/Lesson Tasks
Week 3 - day 4 • Finish all combat sprites and animations
NOTE: If all menu's, sprites etc. Are created before
the end of the 3rd week check the to – do list
for more content.
Week 4 – day 1 • Begin work on the game animation
Week 4 – day 2 • Finish and export the animation
Week 4 – day 3 • Begin any necessary editing to the
project.
• Add music and SFX
Week 4 – day 4 • Finish any necessary editing and export the
project

4. pre production(1) (1)

  • 1.
  • 2.
    Pre-production • What areyou making? • I am creating a small animation to showcase a small section of an RPG adventure video game. • Why? • I Intend to create a more horror themed experience to appeal to my audience and create a world space for players to delve into. • Who is it for? (Audience) • The game is targeted towards male 16 to 18 year olds. • Where will it appear/on what? (How will audience see it) • The game would appear on stores associated with gaming platforms. Alternatively clips showcasing gameplay on sites such as youtube would be available. Reflection:
  • 3.
    Style sheet -Colour I like this colour pallete as it is very dark and offers a variety of browns to give an old, dark look as well as a few complimantary colours. It may be a little to dark to see This pallete is great as it is brighter however it still keeps the dark tone of the colours and also look grimier creating a feeling of discomfort This pallete uses many grays which fit an asylum aesthetic. It has a darker tone to the colours and helps convey a scarier atmosphere. It could also be used to show a non colour TV type of effect.
  • 4.
    Style sheet -Font Agency FB – A very narrow font that could be used for enemy or overall text LilyUPC – being a bolder font this could be used to emphasise certain points in a characters speech Rockwell – A very big, blocky font that could be used for character names SimSun-ExtB – This font has a slightly robotic feel and could reflect a character in a similar field.
  • 5.
    Pre-production: These are somecharacter sketches I made to try and envision what the playable character should look like. I wanted him to look fairly roughed up but also fit for exploration as he is getting used to the strange worlds he encounters. This can be seen with sturdy travel boots and long coat which would help hi take on environments. The rips in his shirt help to exaggerate his rough look and that he has had to fight on his adventure.
  • 6.
    Pre-production: Similarly to theprotagonist, I also drew up plans for the main villain of the game. The general atmosphere was for him to be a creepy slender figure that complimented his puppets. I Immediately thought about a mask to link him to his puppets and give him a creepier look. I also decided to add the puppets crawling over him to make a slightly uncomfortable look.
  • 7.
    Resources Equipment/ Props/ Costume needed Locationsneeded Computer N/A photoshop premiere Beep box
  • 8.
    Contingency Planning Potential IssueSolution The work becomes inaccessible Make sure the work is backed up somewhere (OneDrive, USB, etc.) I am ill and take time off • Assign a small amount of contingency time. • Make sure the work is accessible from home The work becomes corrupt Have it saved In multiple different locations. Animation could go wrong • Allow contingency time to fix the issues Sound effects could go wrong • Allow contingency time to fix the issues • Keep spare sound files backed up in other places (if corrupt or lost). Resolution could be wrong / not work with project direction • Allow contingency time to fix the issues • Be ready to scale up accordingly.
  • 9.
    Health and Safety PotentialIssue How will the issue be avoided? Tripping over a cable Keep wires and cables tidy and out of the way Repetitive strain injury Take occasional breaks Eye strain Take occasional breaks
  • 10.
    Production Schedule Day/Lesson Tasks Week1 - Day 1 • Create the main character and their animation sprites • Create an Ally (try for two) Week 1 – day 2 • Create the Puppet master and the black and white puppet master Week 1 – day 3 • Create the puppets, The decayed mentals and the black and white decayed mentals. Week 1 – day 4 • Create the Mischievous Puppet and the black and white mischievous puppet. • Start creating the entry garden. Week 2 – day 1 • Finish the entry garden • Create the main asylum entry point Week 2 – day 2 • Create the eastern hallway and the power room • Create the "Turn on power" objective
  • 11.
    Production Schedule Day/Lesson Tasks Week2 - day 3 • Finish the library • Create the spectral essence • Create the "extinguish the fire" objective • Create the furnace room. • Create the "cool the furnace" objective • Create the elevator Week 2 – day 4 • Create the boss hallway • Create the boss room • Create the portal room NOTE: If all rooms are complete before the end of the second week check the to – do list for more content. Week 3 – day 1 • Create the map • Create the last carried item tab • Create the last carried item menu • Create a dialogue box Week 3 - day 2 • Create player stats • Create player location notification • Create player objective notification • Create the neutral combat menu combat menu Week 3 – day 3 • Finish all aspects of the combat menu • Begin combat sprites and animations
  • 12.
    Production Schedule Day/Lesson Tasks Week3 - day 4 • Finish all combat sprites and animations NOTE: If all menu's, sprites etc. Are created before the end of the 3rd week check the to – do list for more content. Week 4 – day 1 • Begin work on the game animation Week 4 – day 2 • Finish and export the animation Week 4 – day 3 • Begin any necessary editing to the project. • Add music and SFX Week 4 – day 4 • Finish any necessary editing and export the project

Editor's Notes

  • #4 Use this space to document whatever pre-production work you did for your project. It will vary from person to person and project to project.
  • #5 Use this space to document whatever pre-production work you did for your project. It will vary from person to person and project to project.
  • #6 Use this space to document whatever pre-production work you did for your project. It will vary from person to person and project to project.
  • #7 Use this space to document whatever pre-production work you did for your project. It will vary from person to person and project to project.