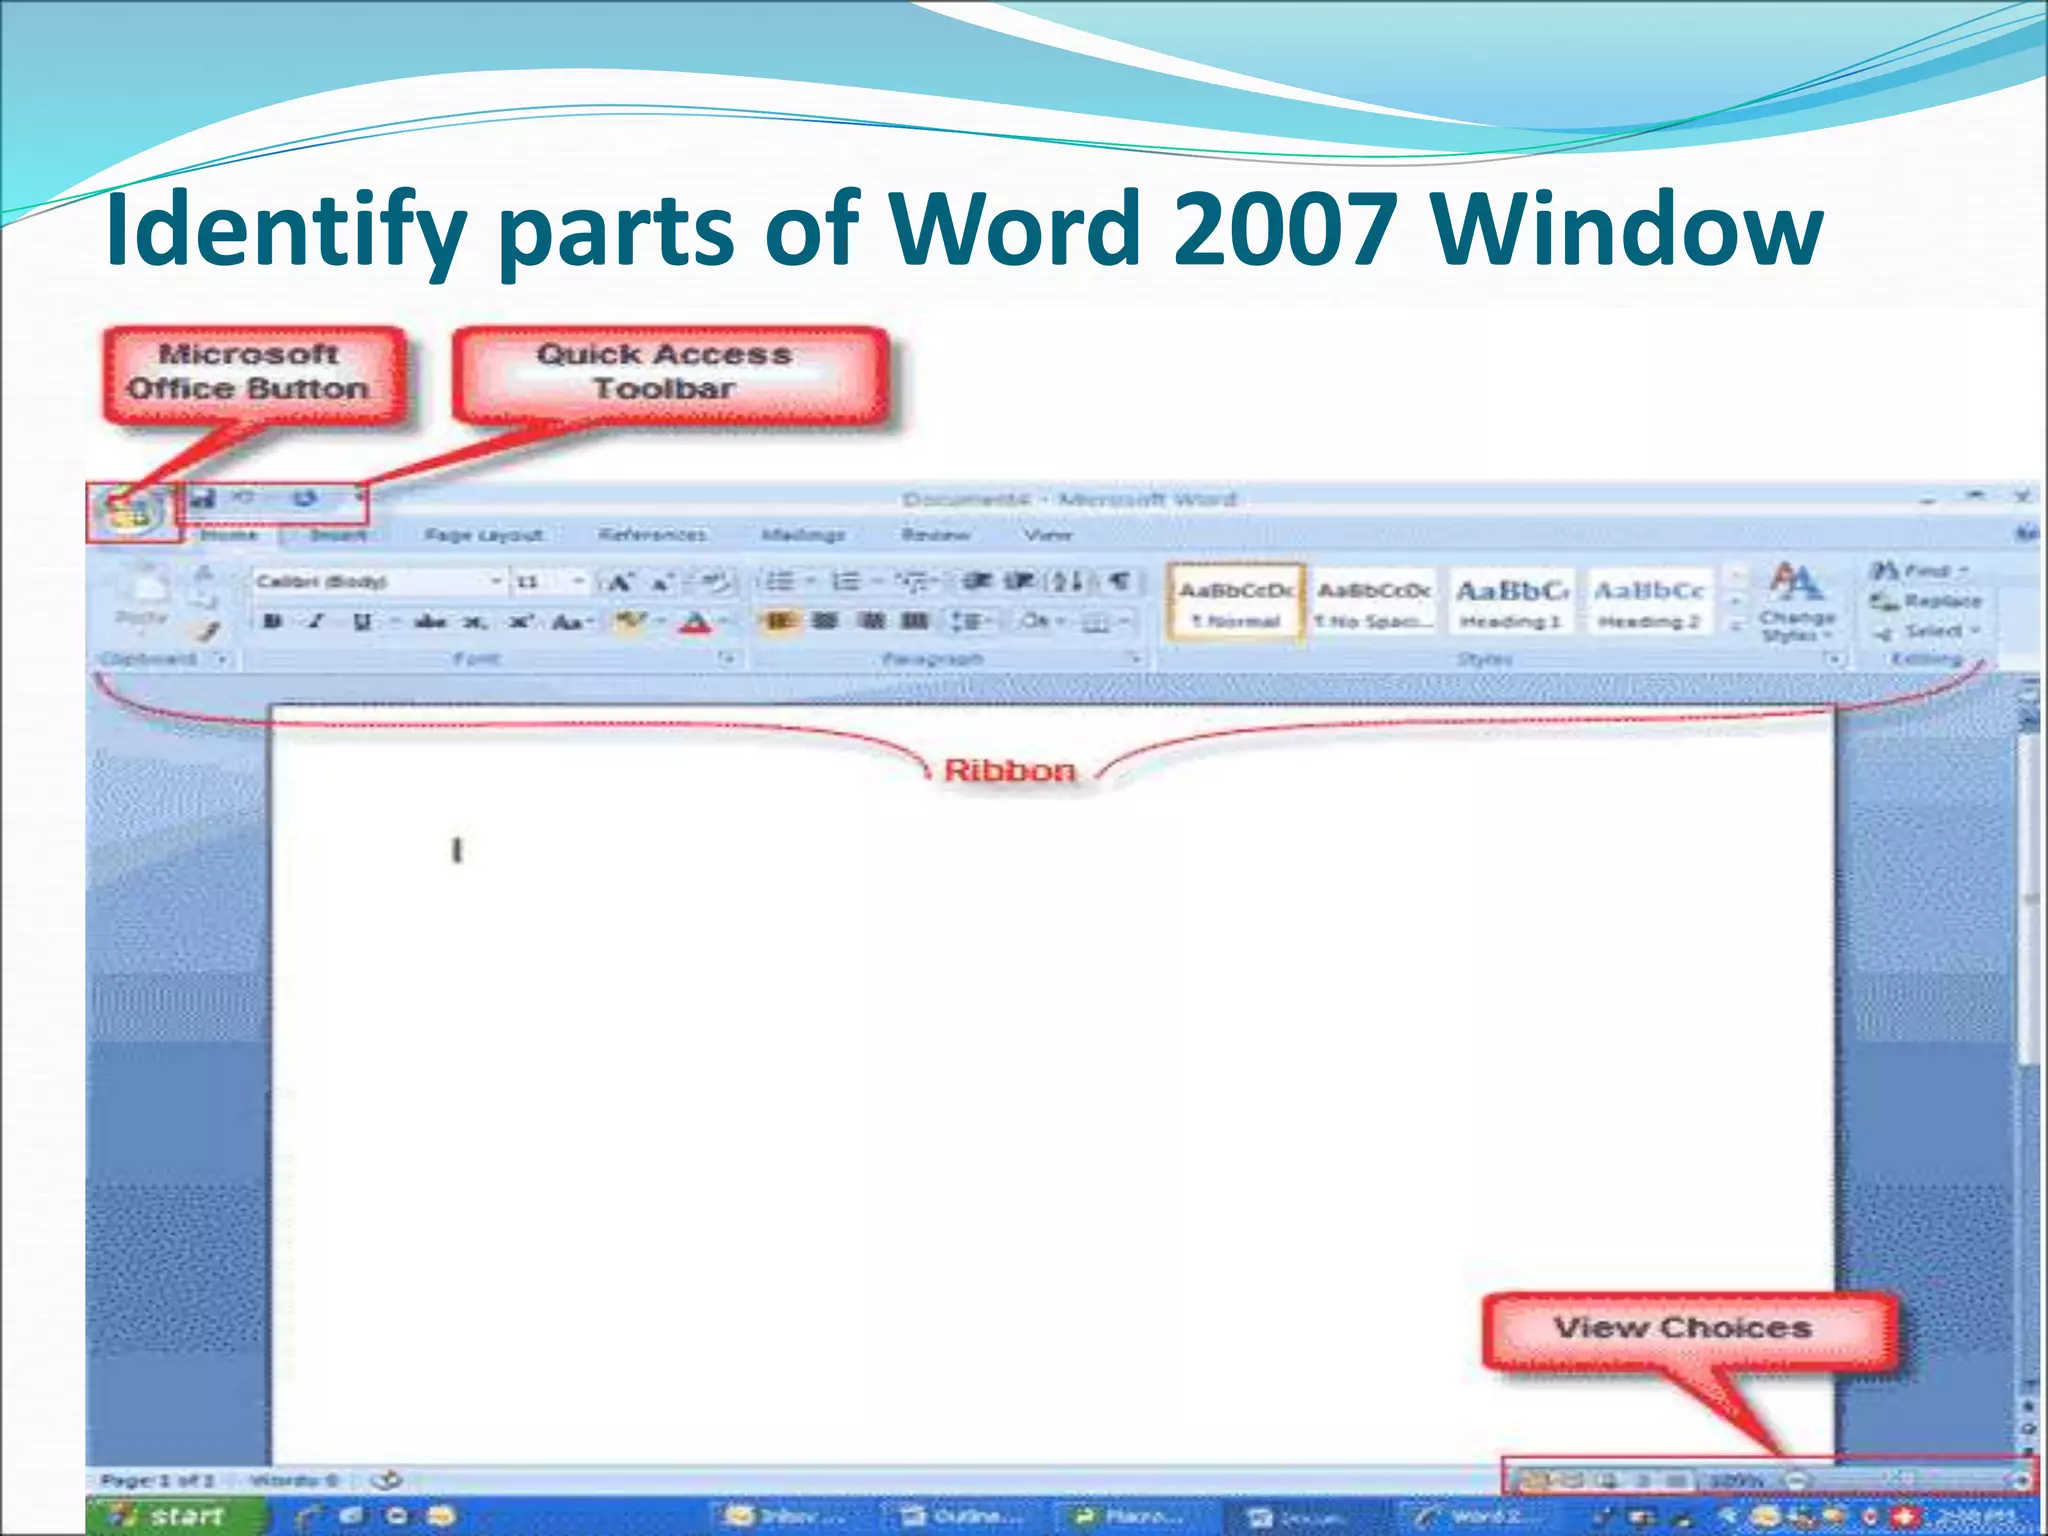
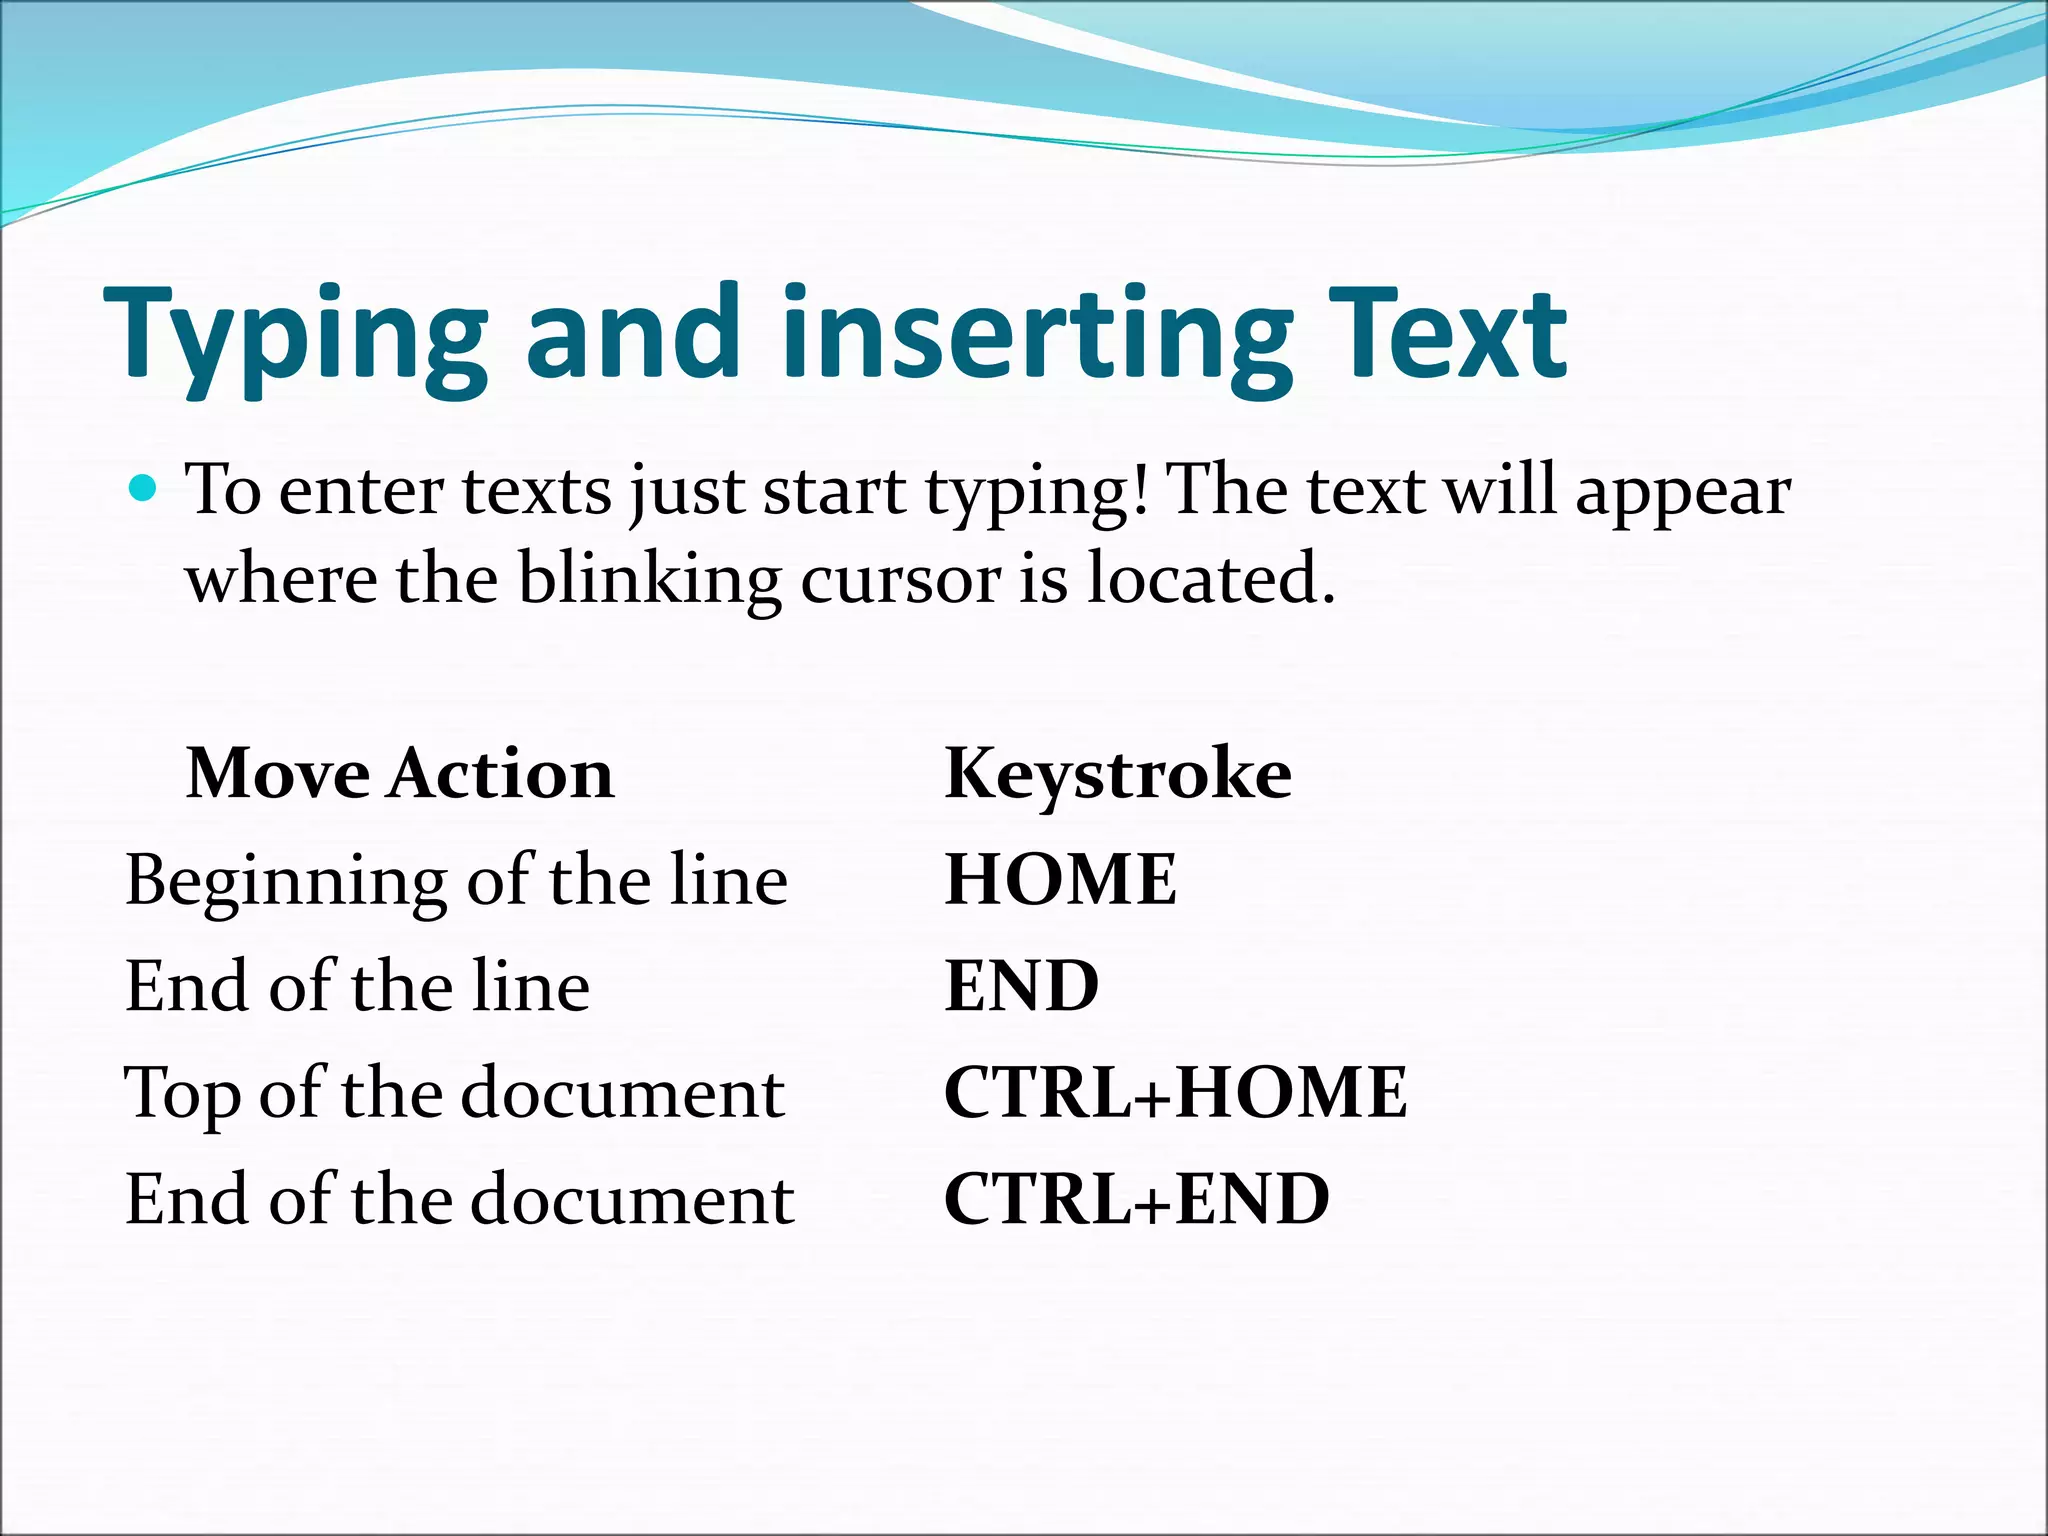
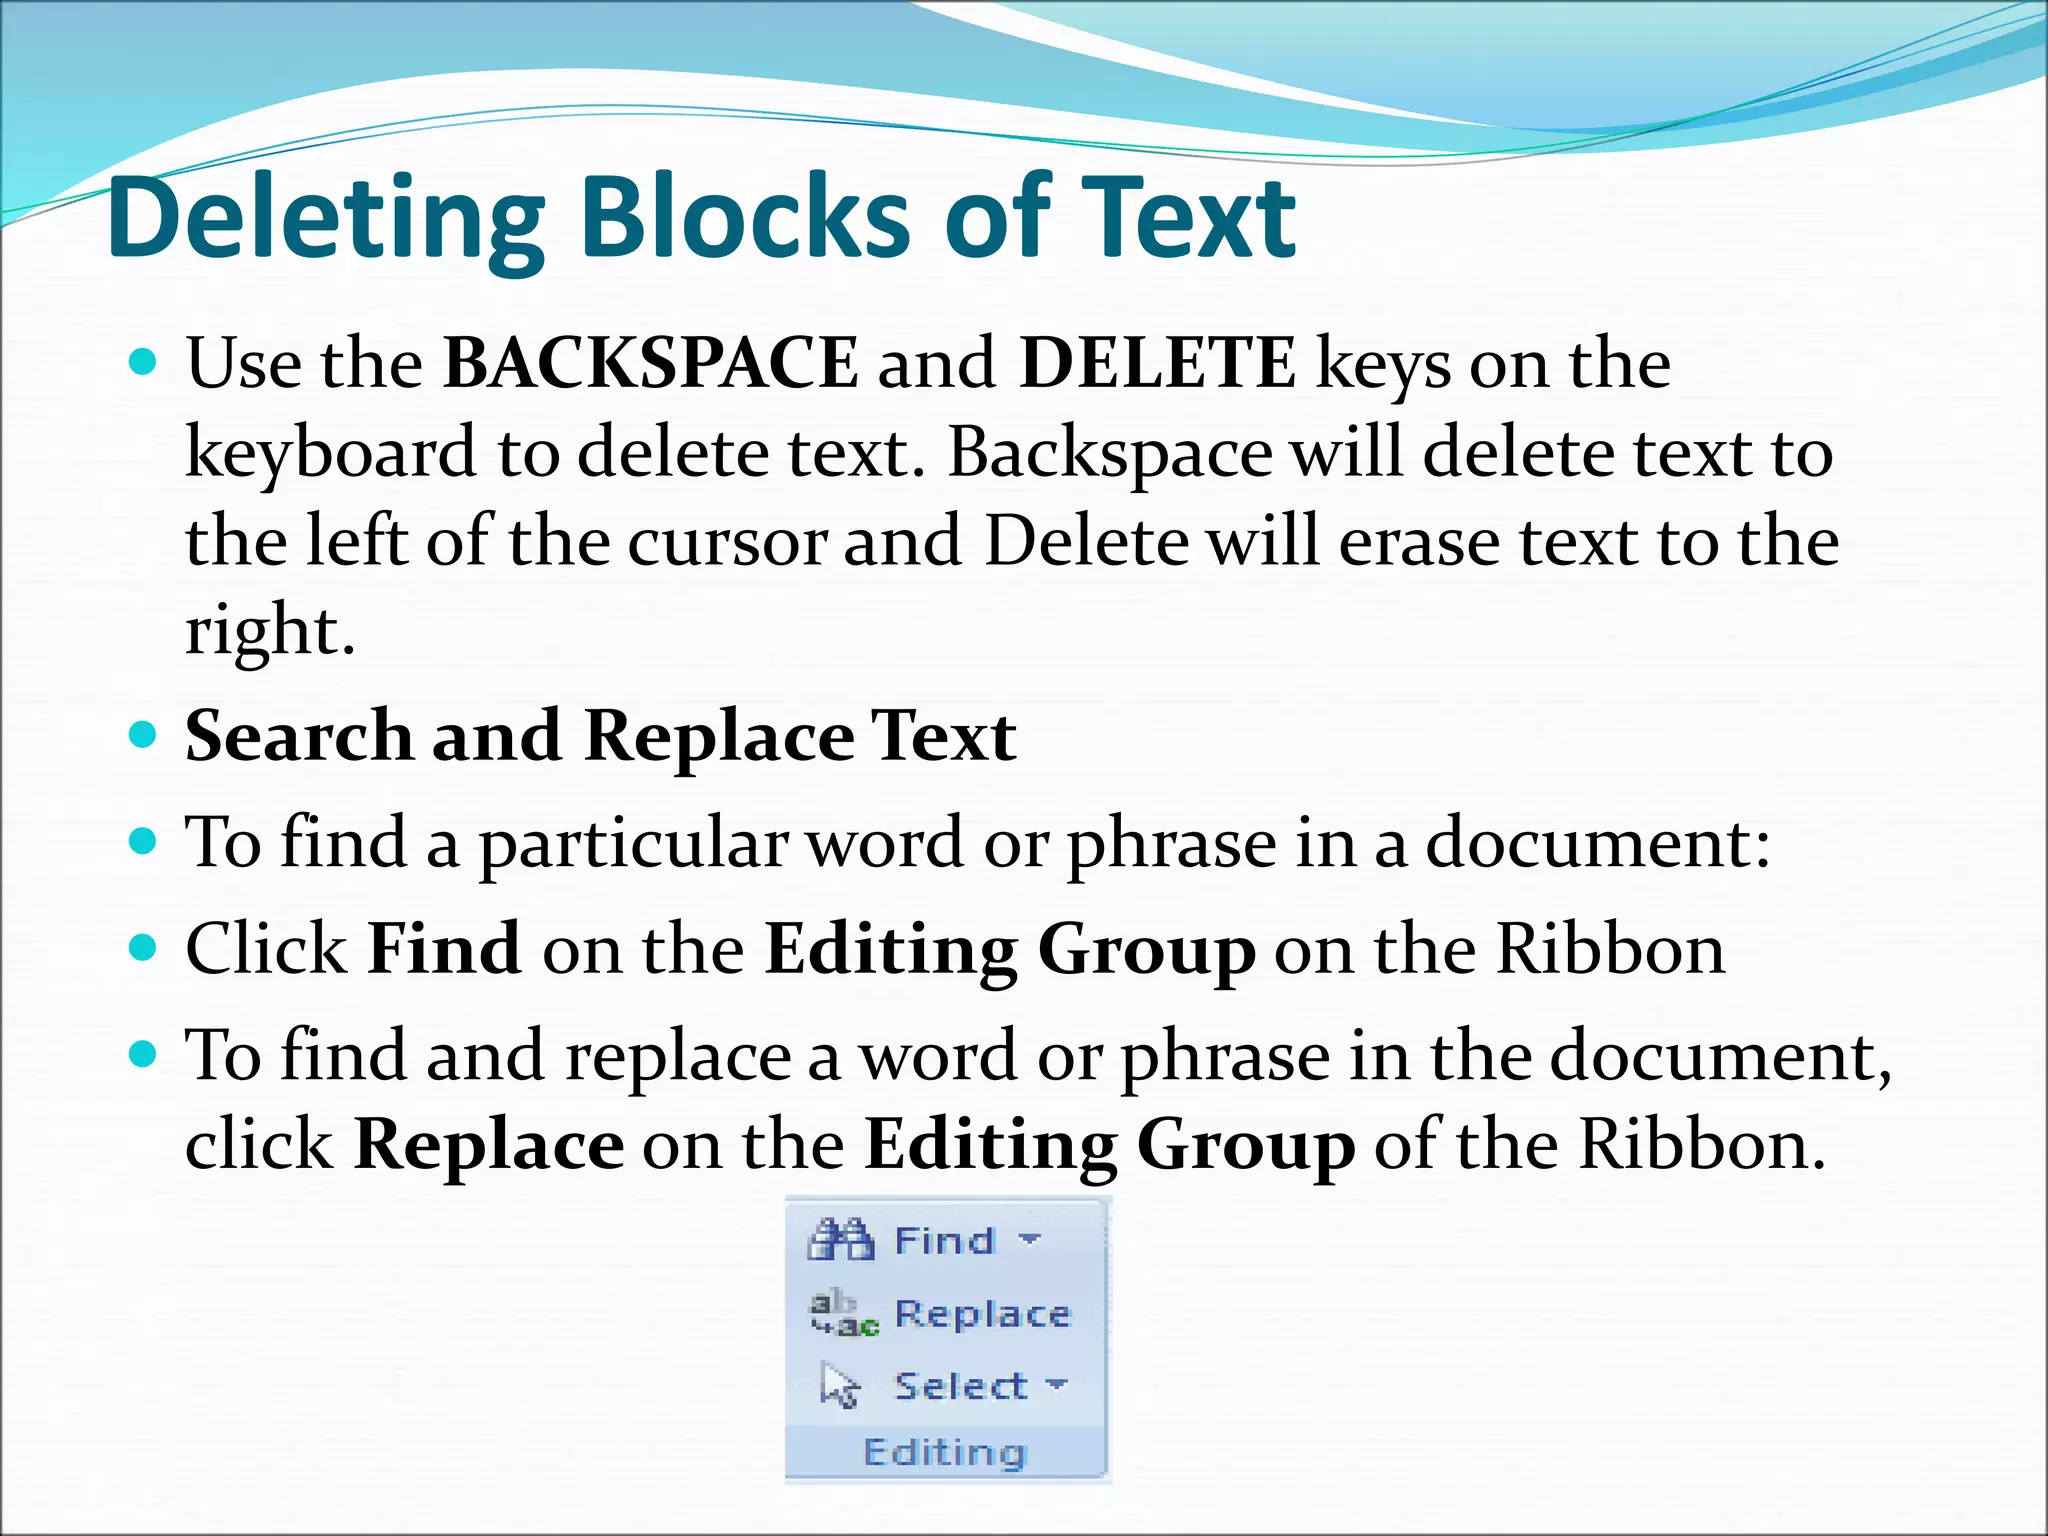
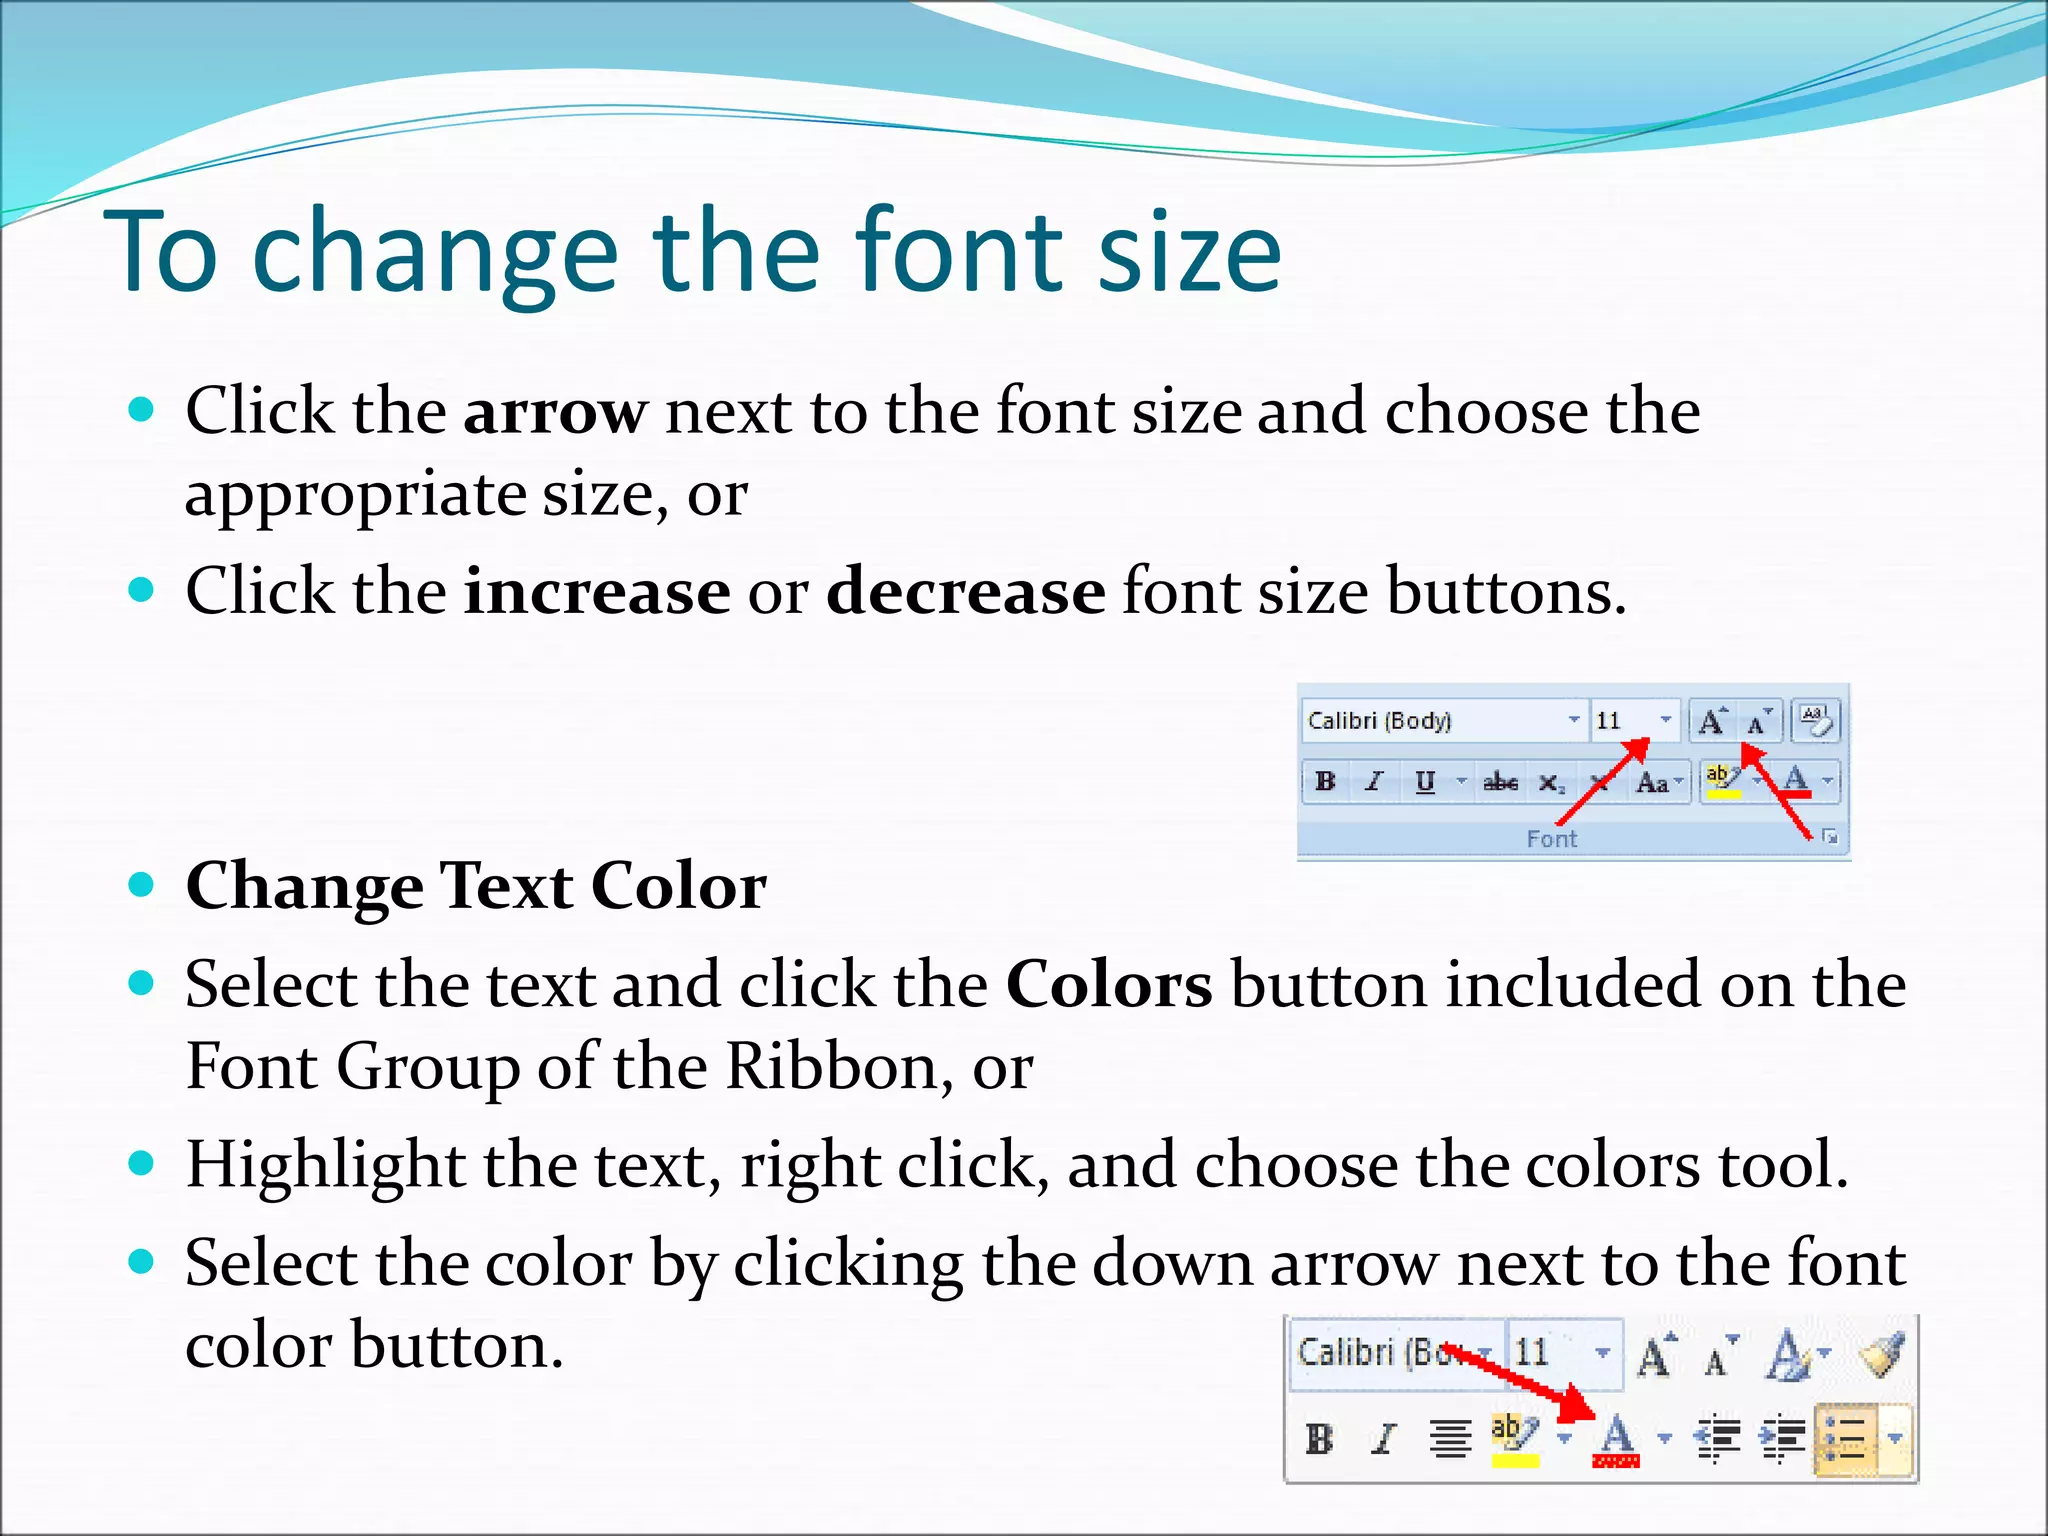
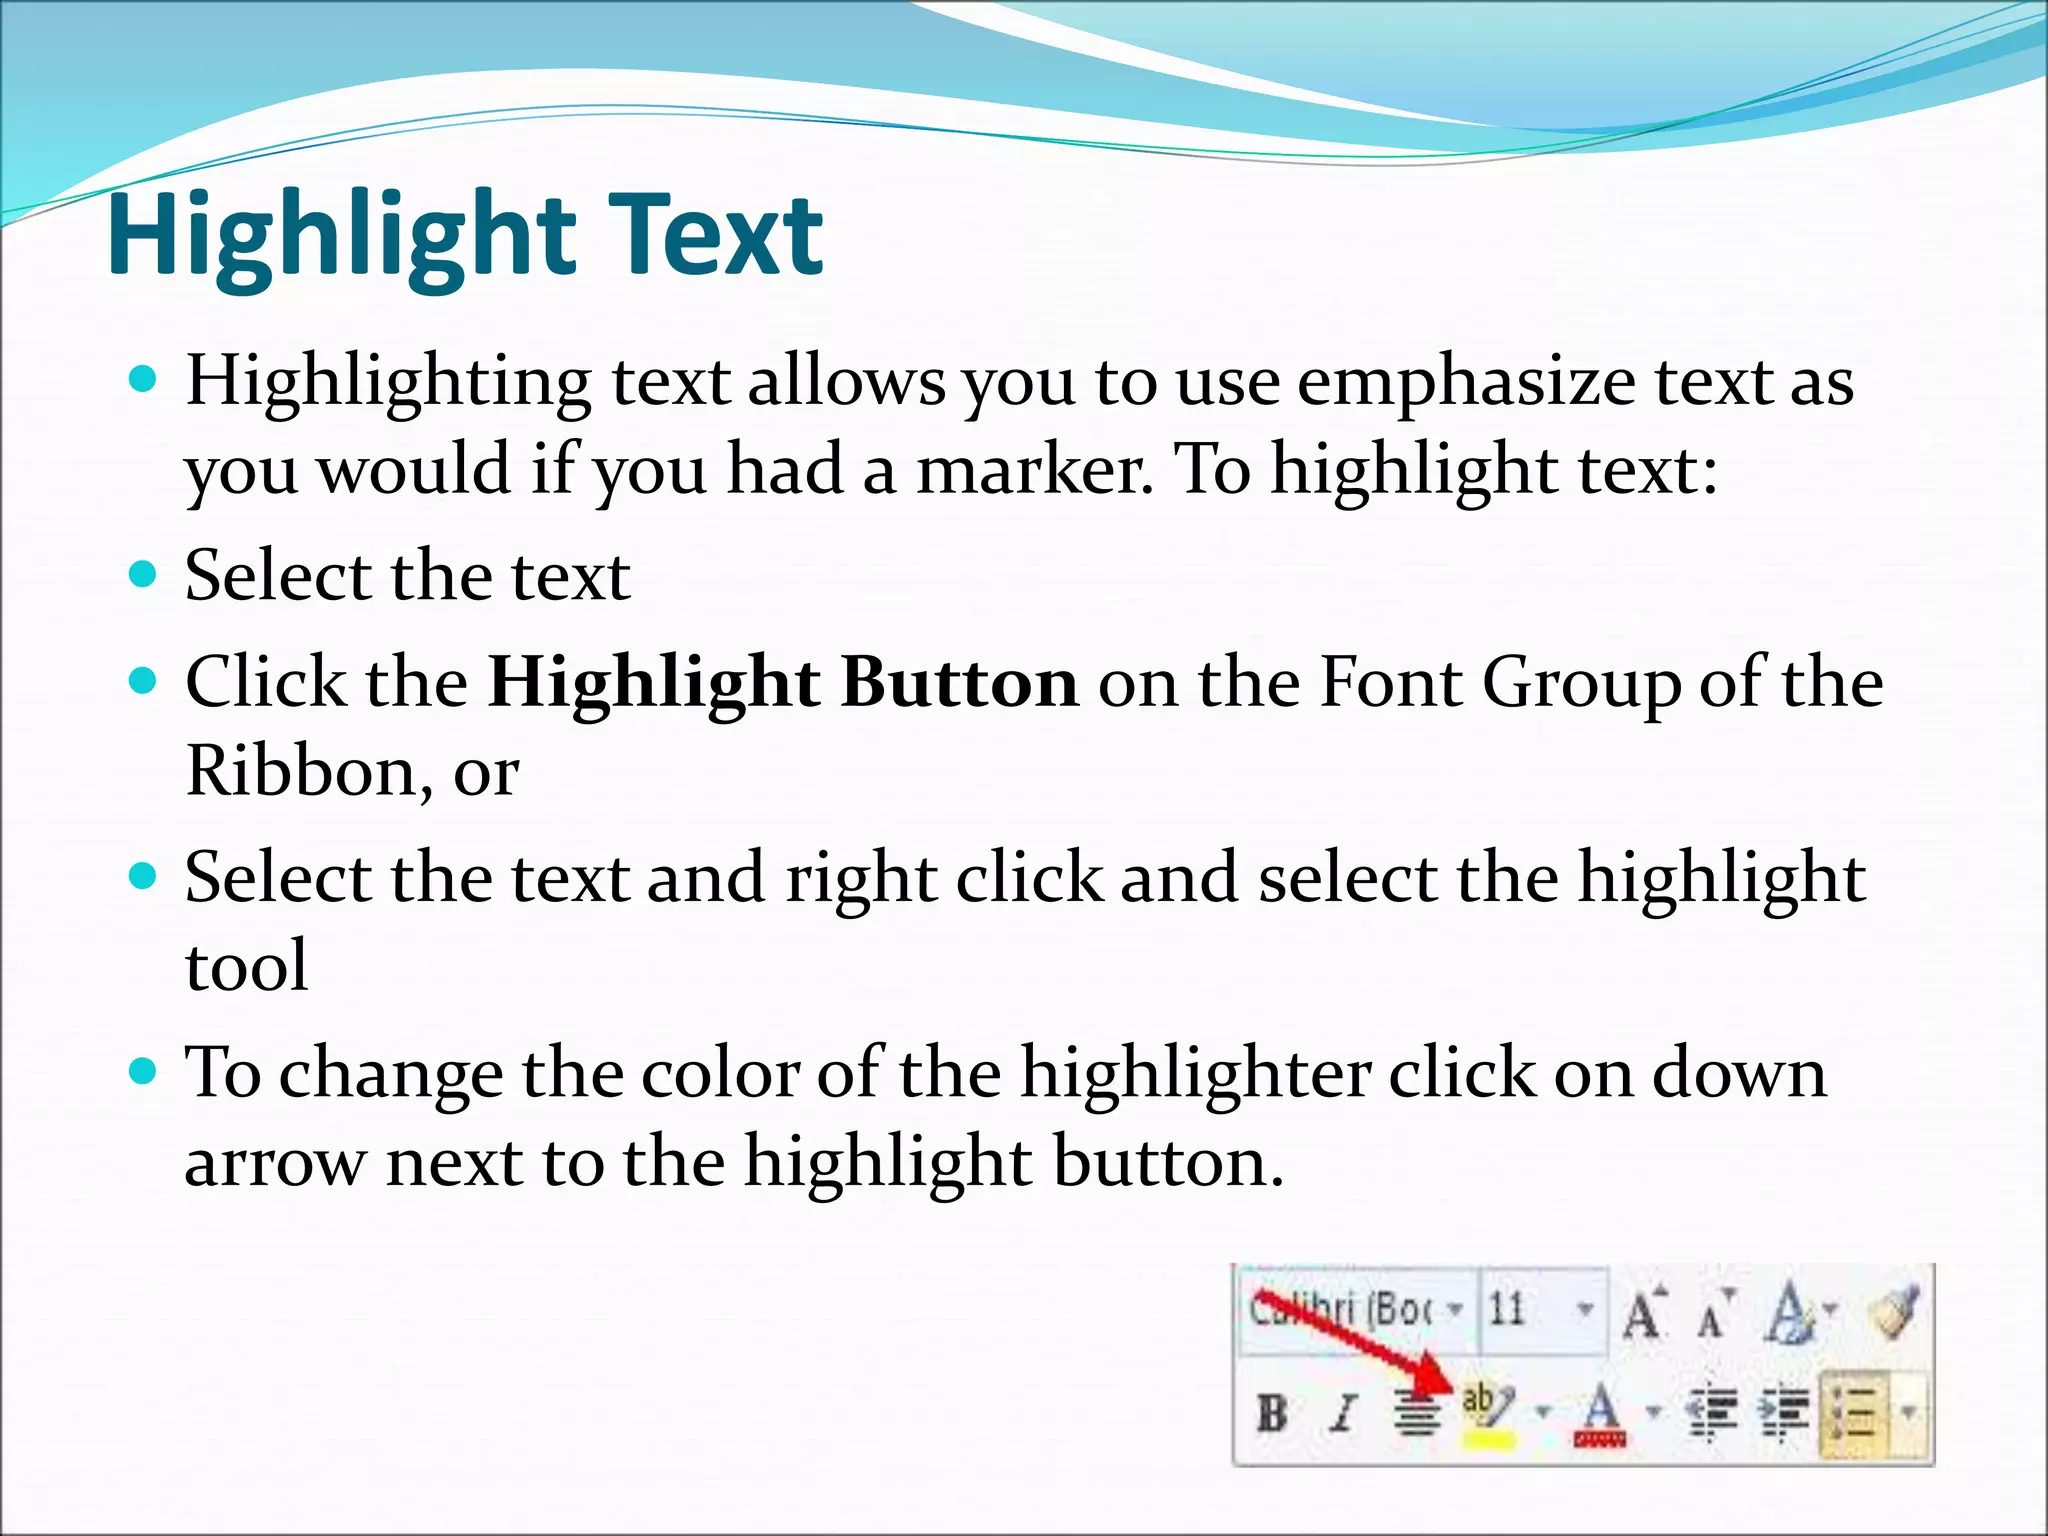
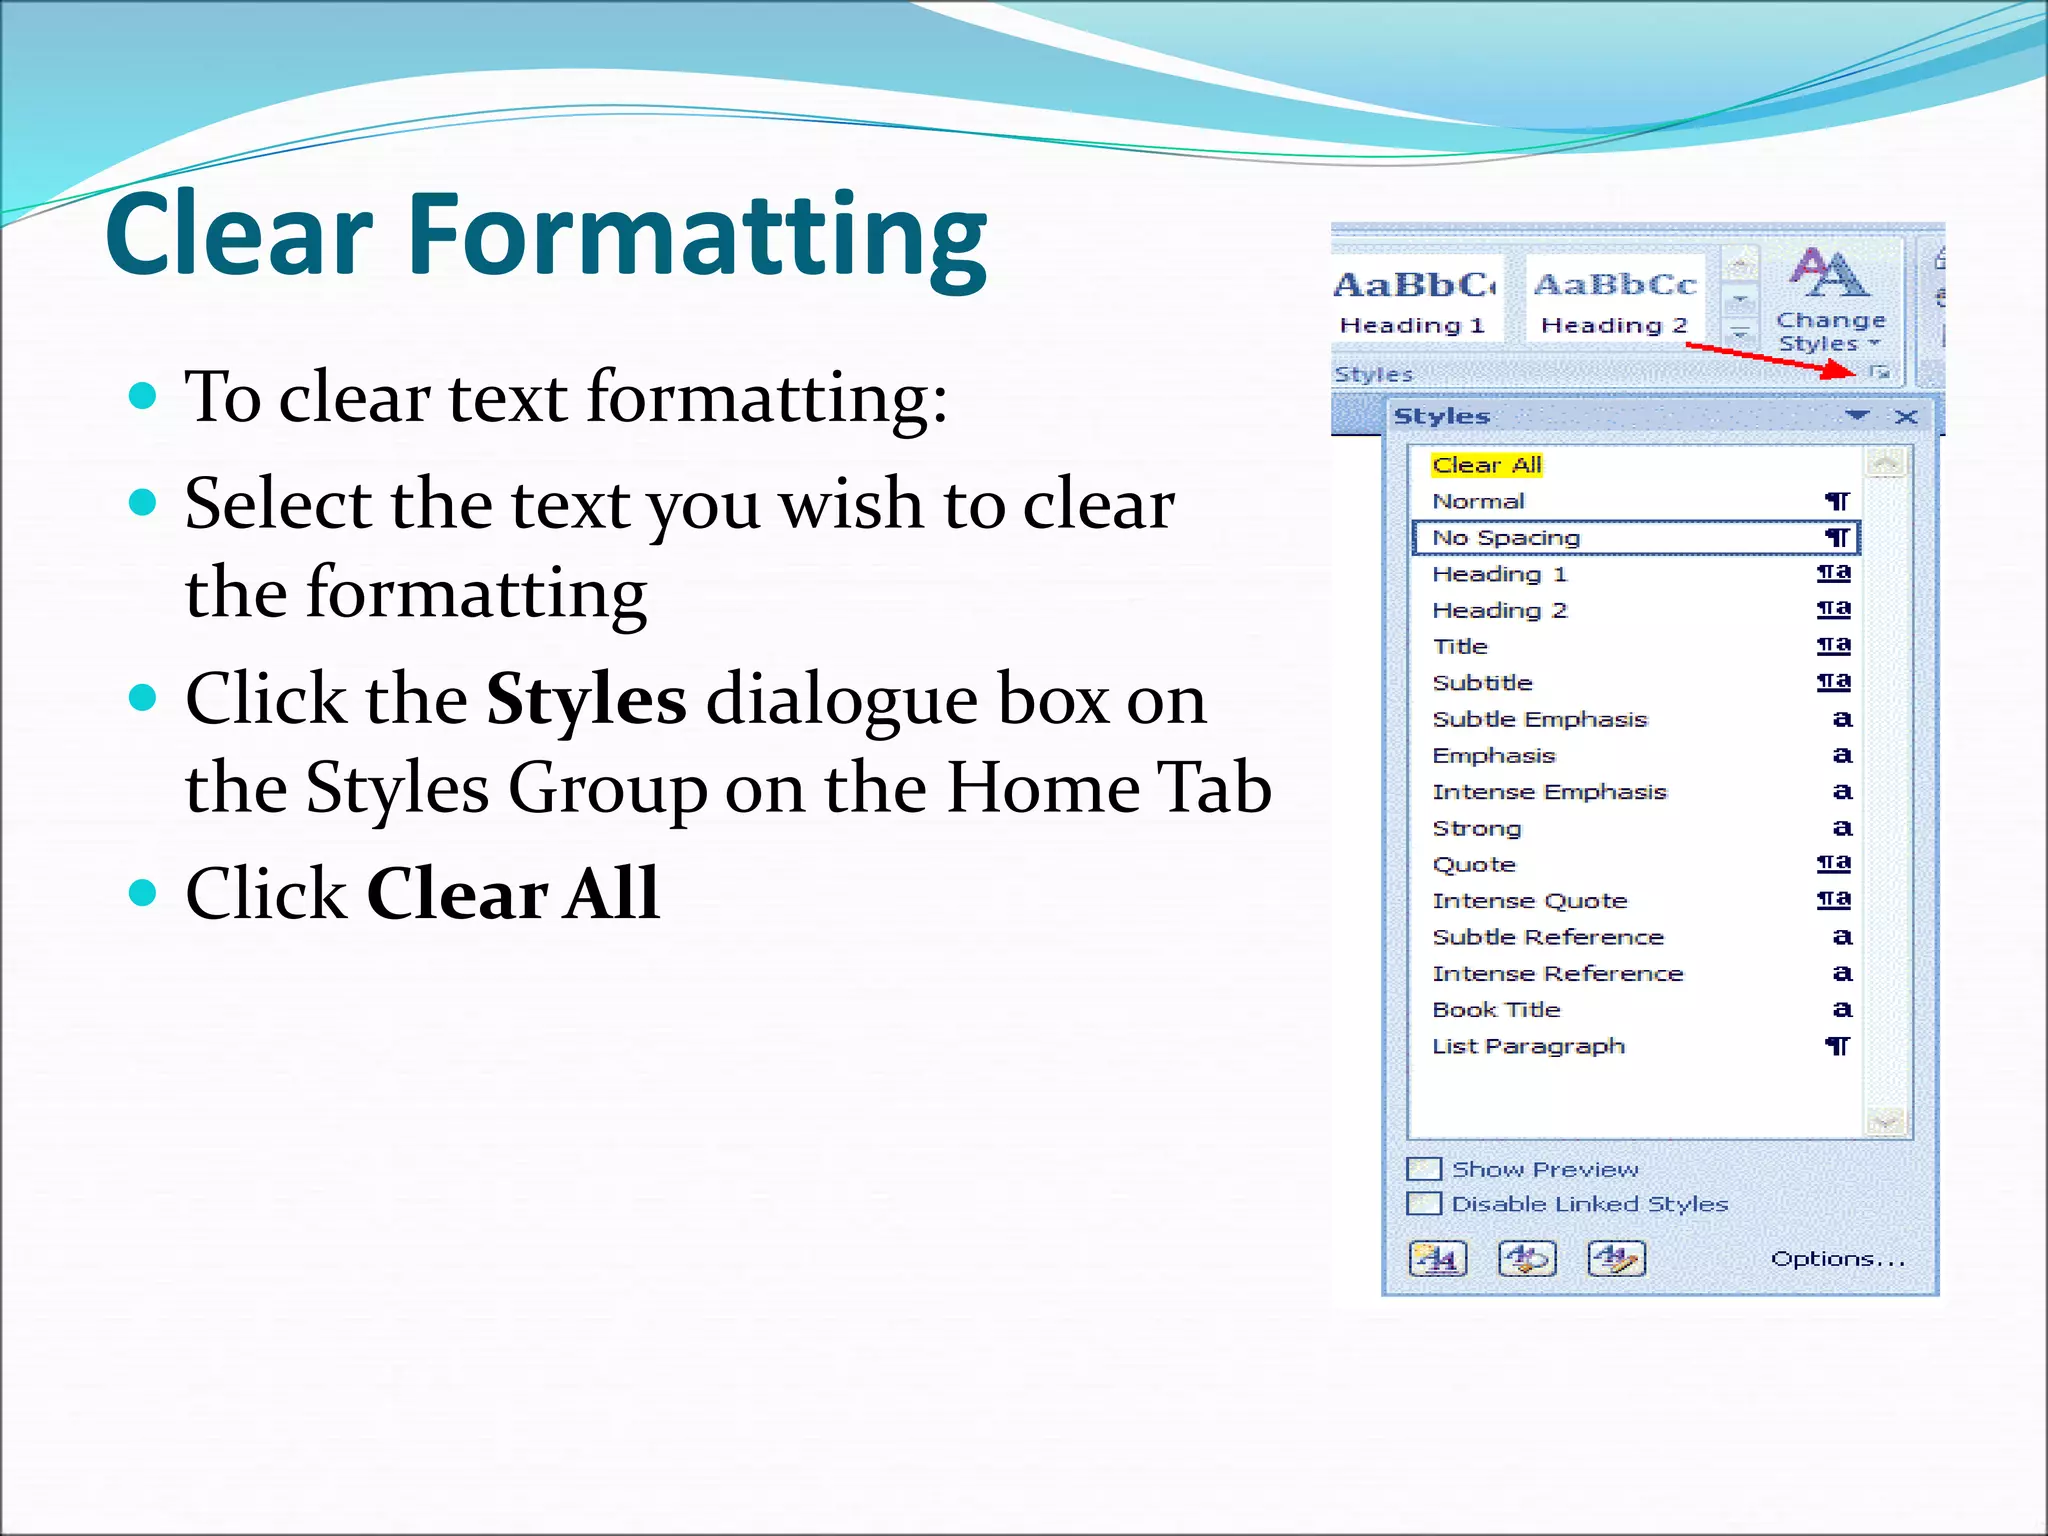
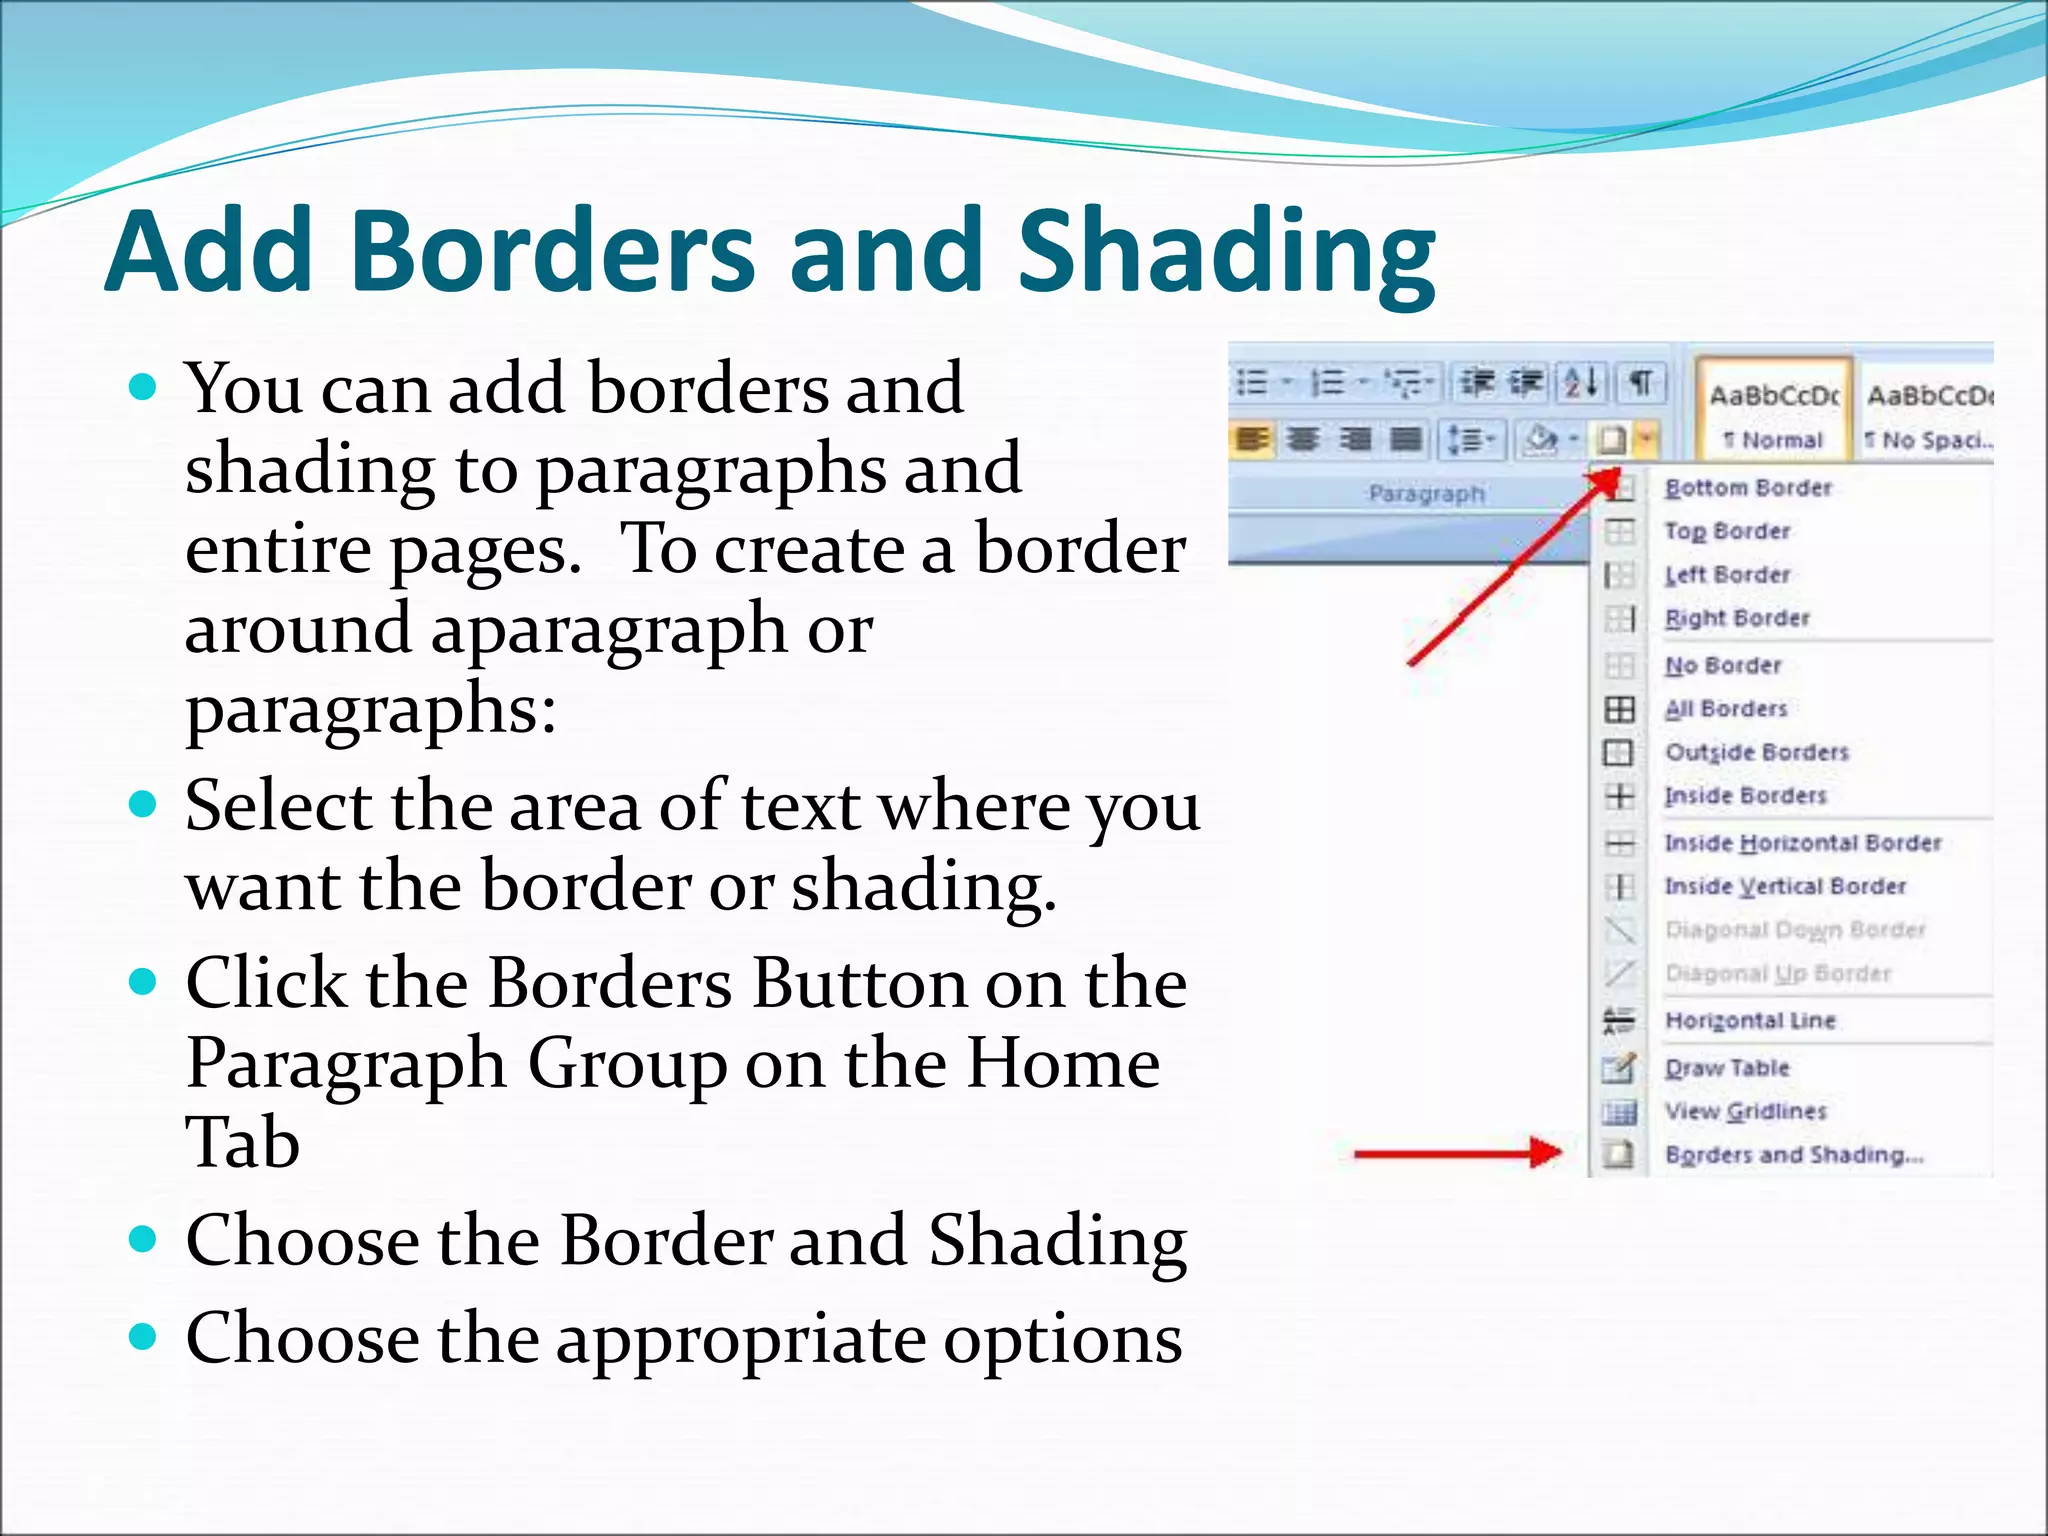
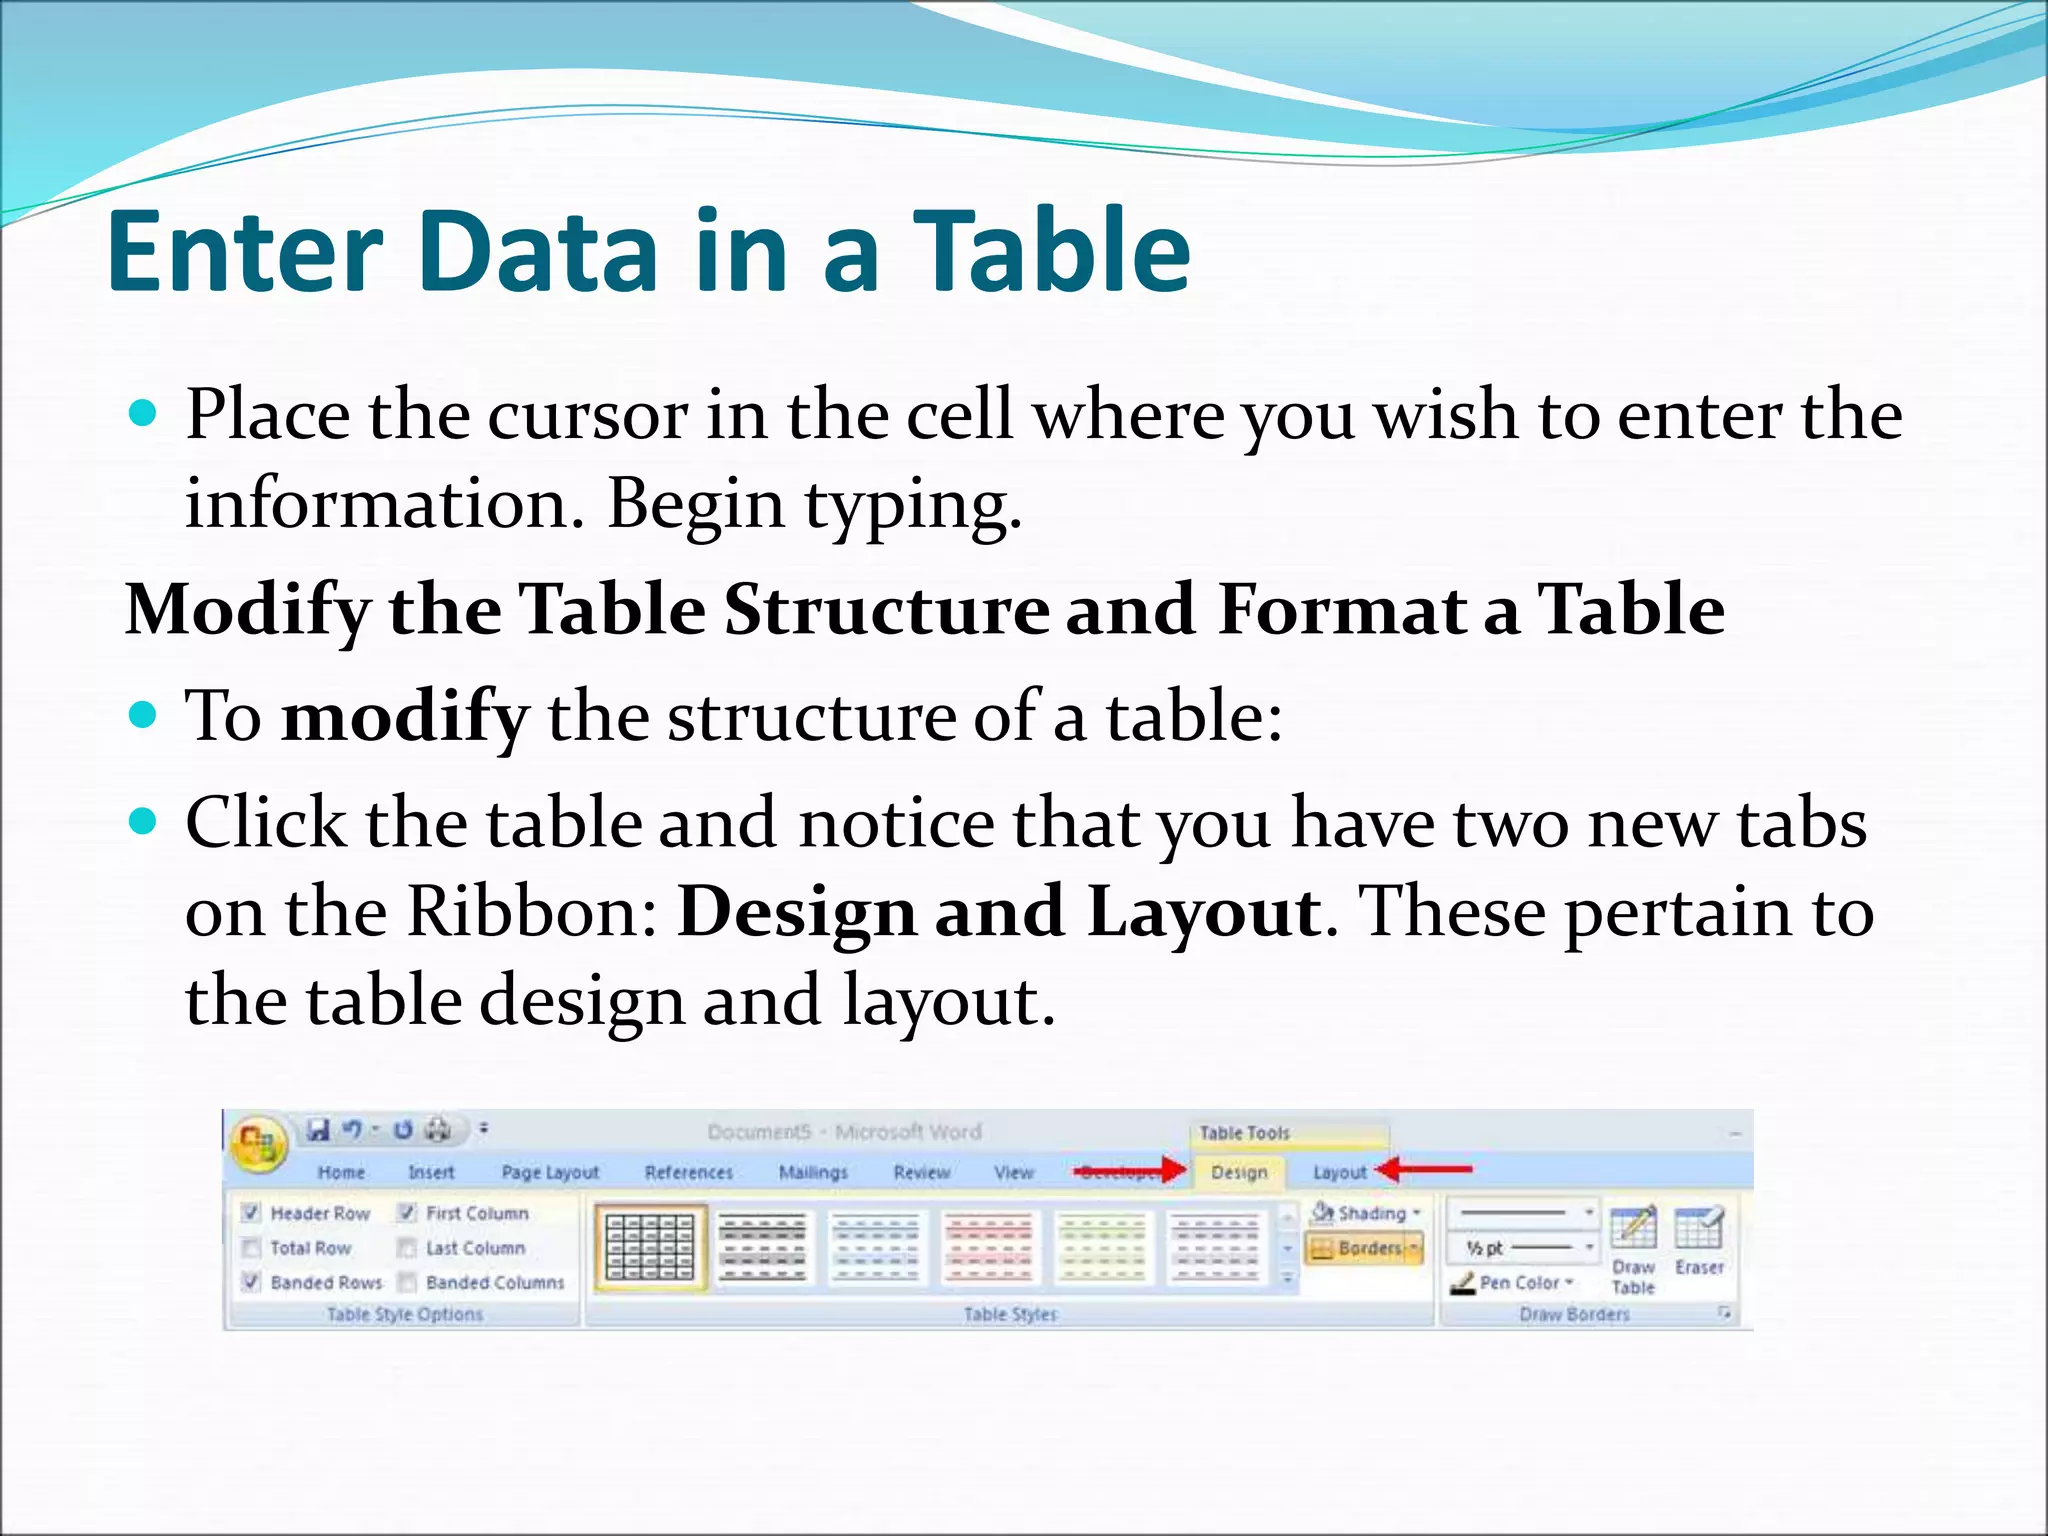
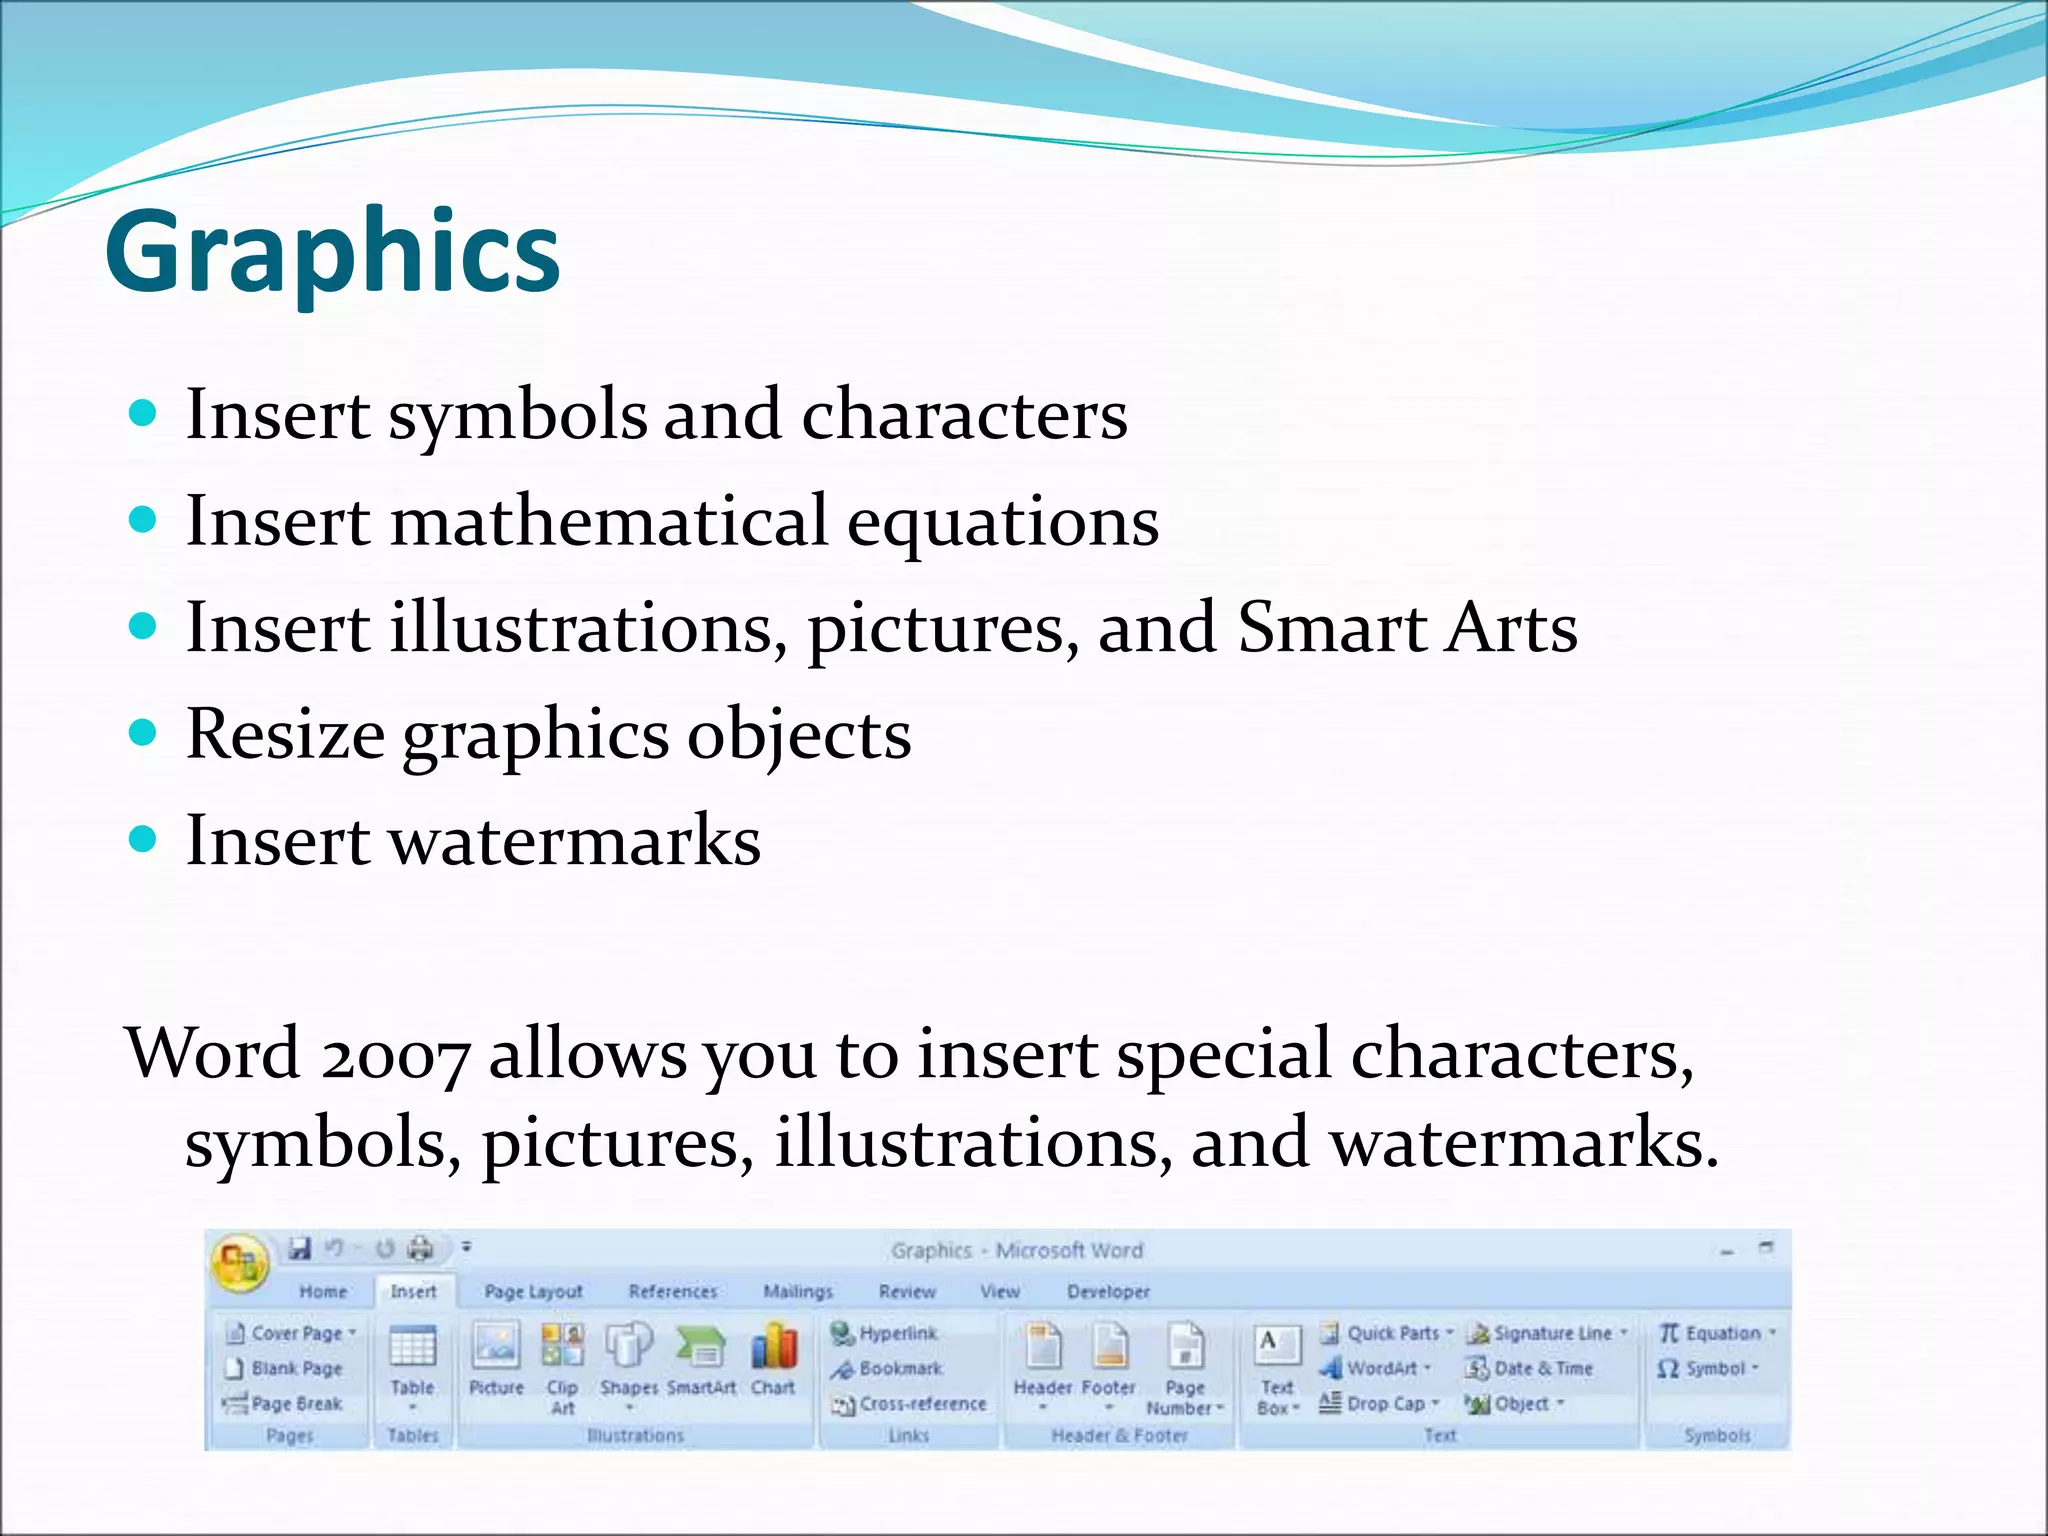
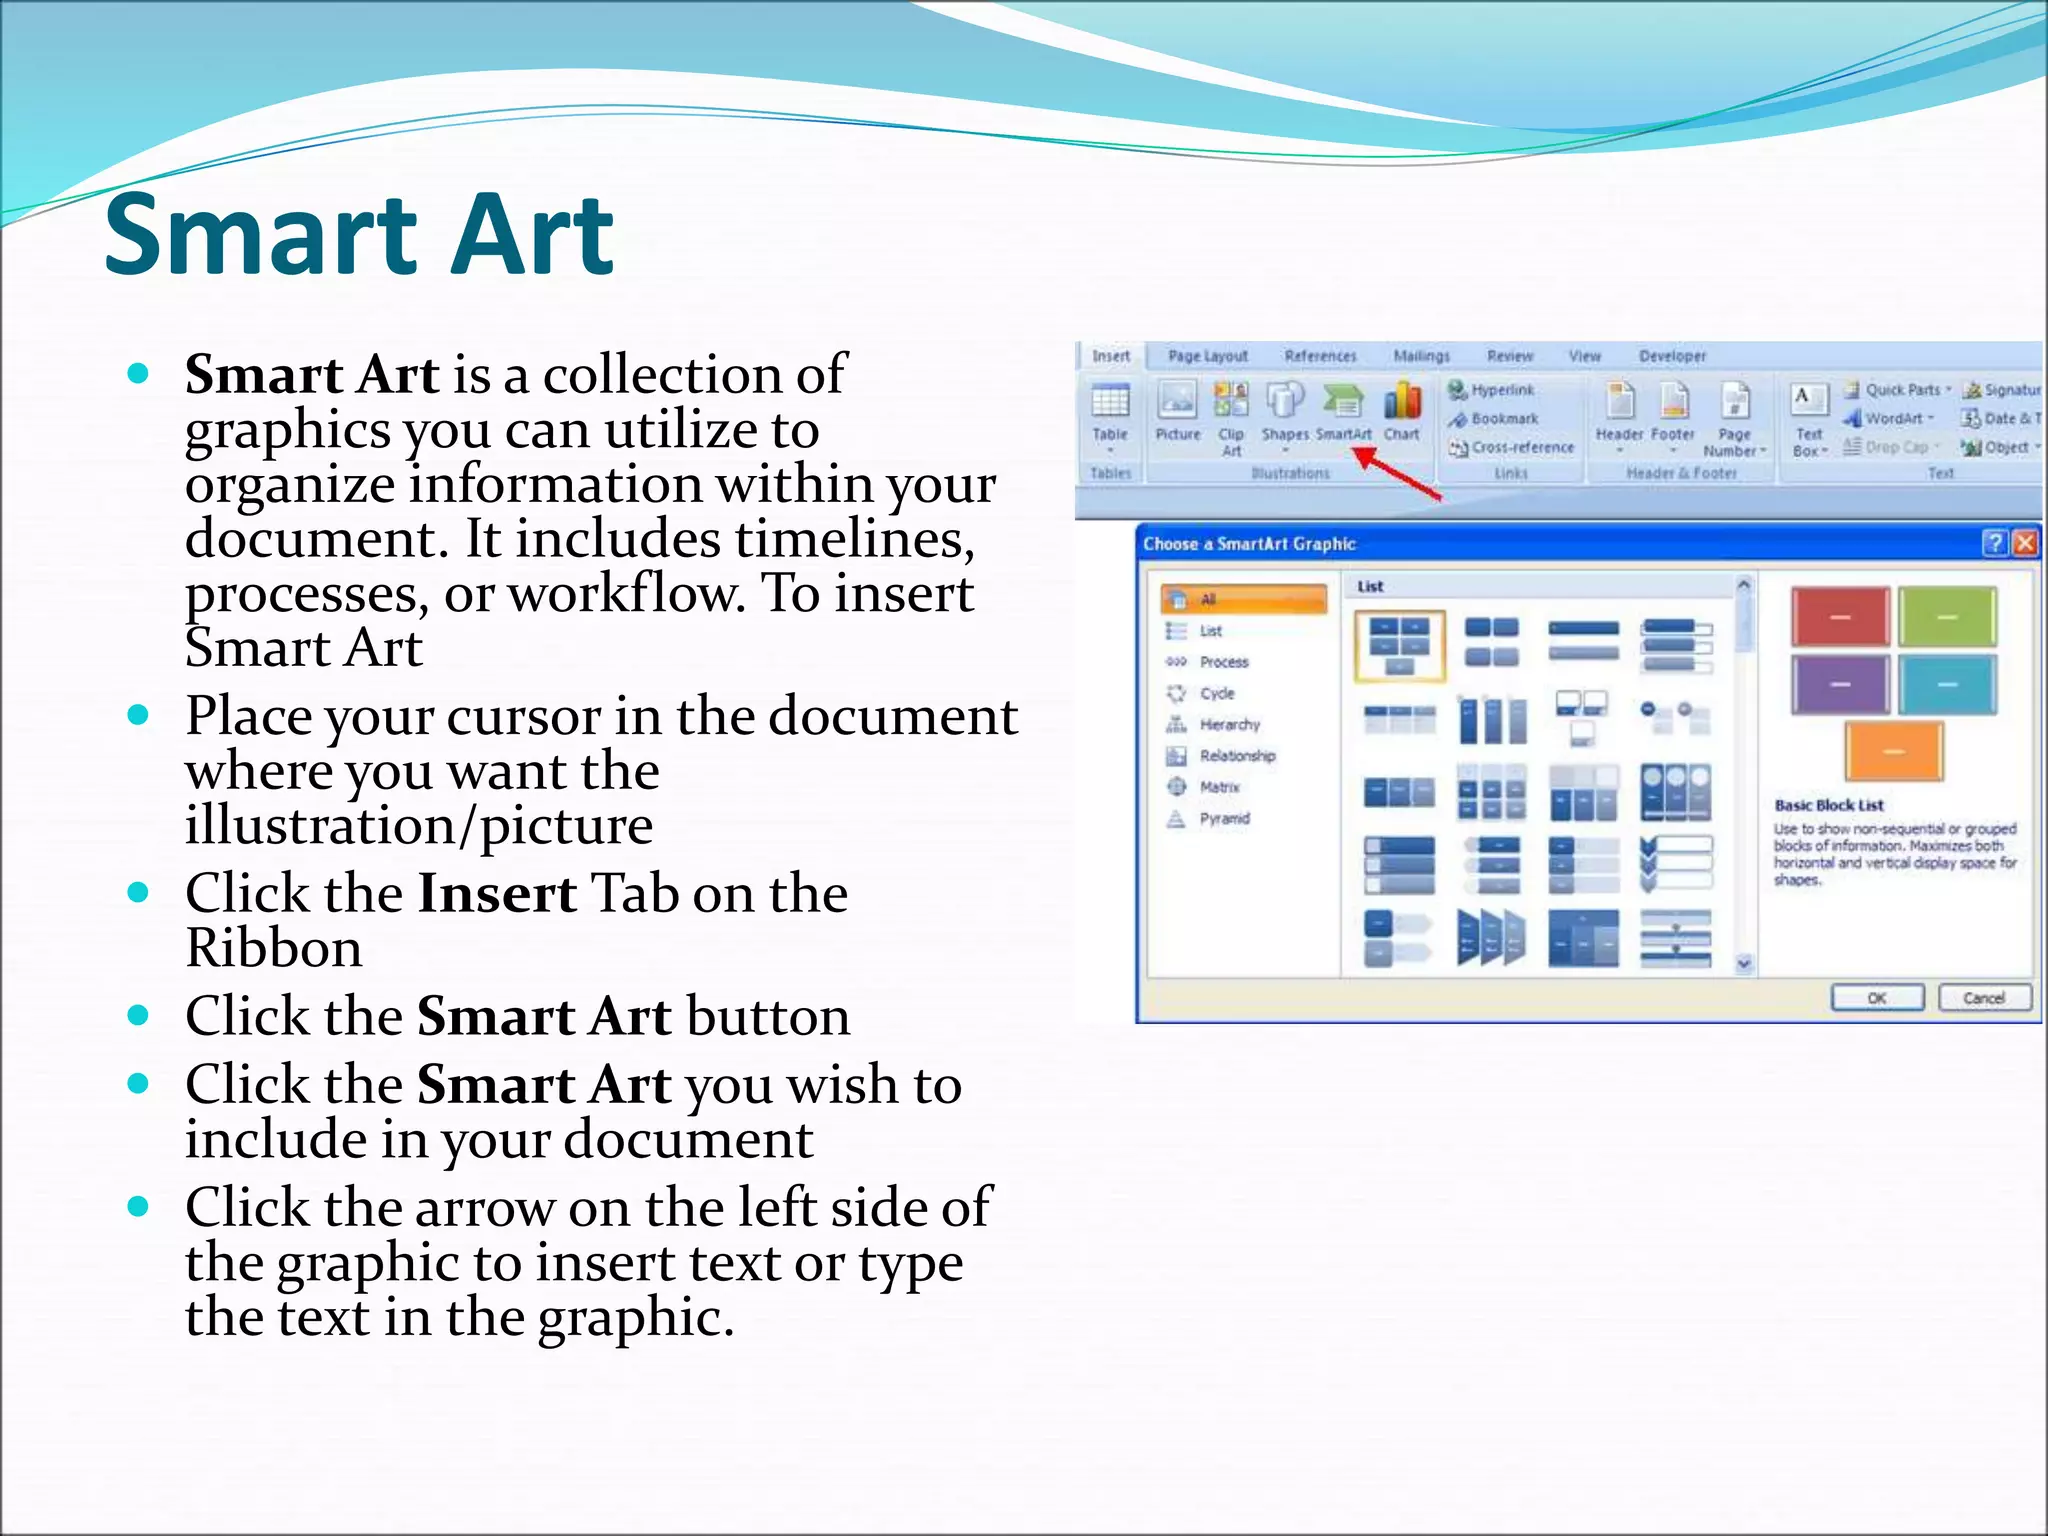
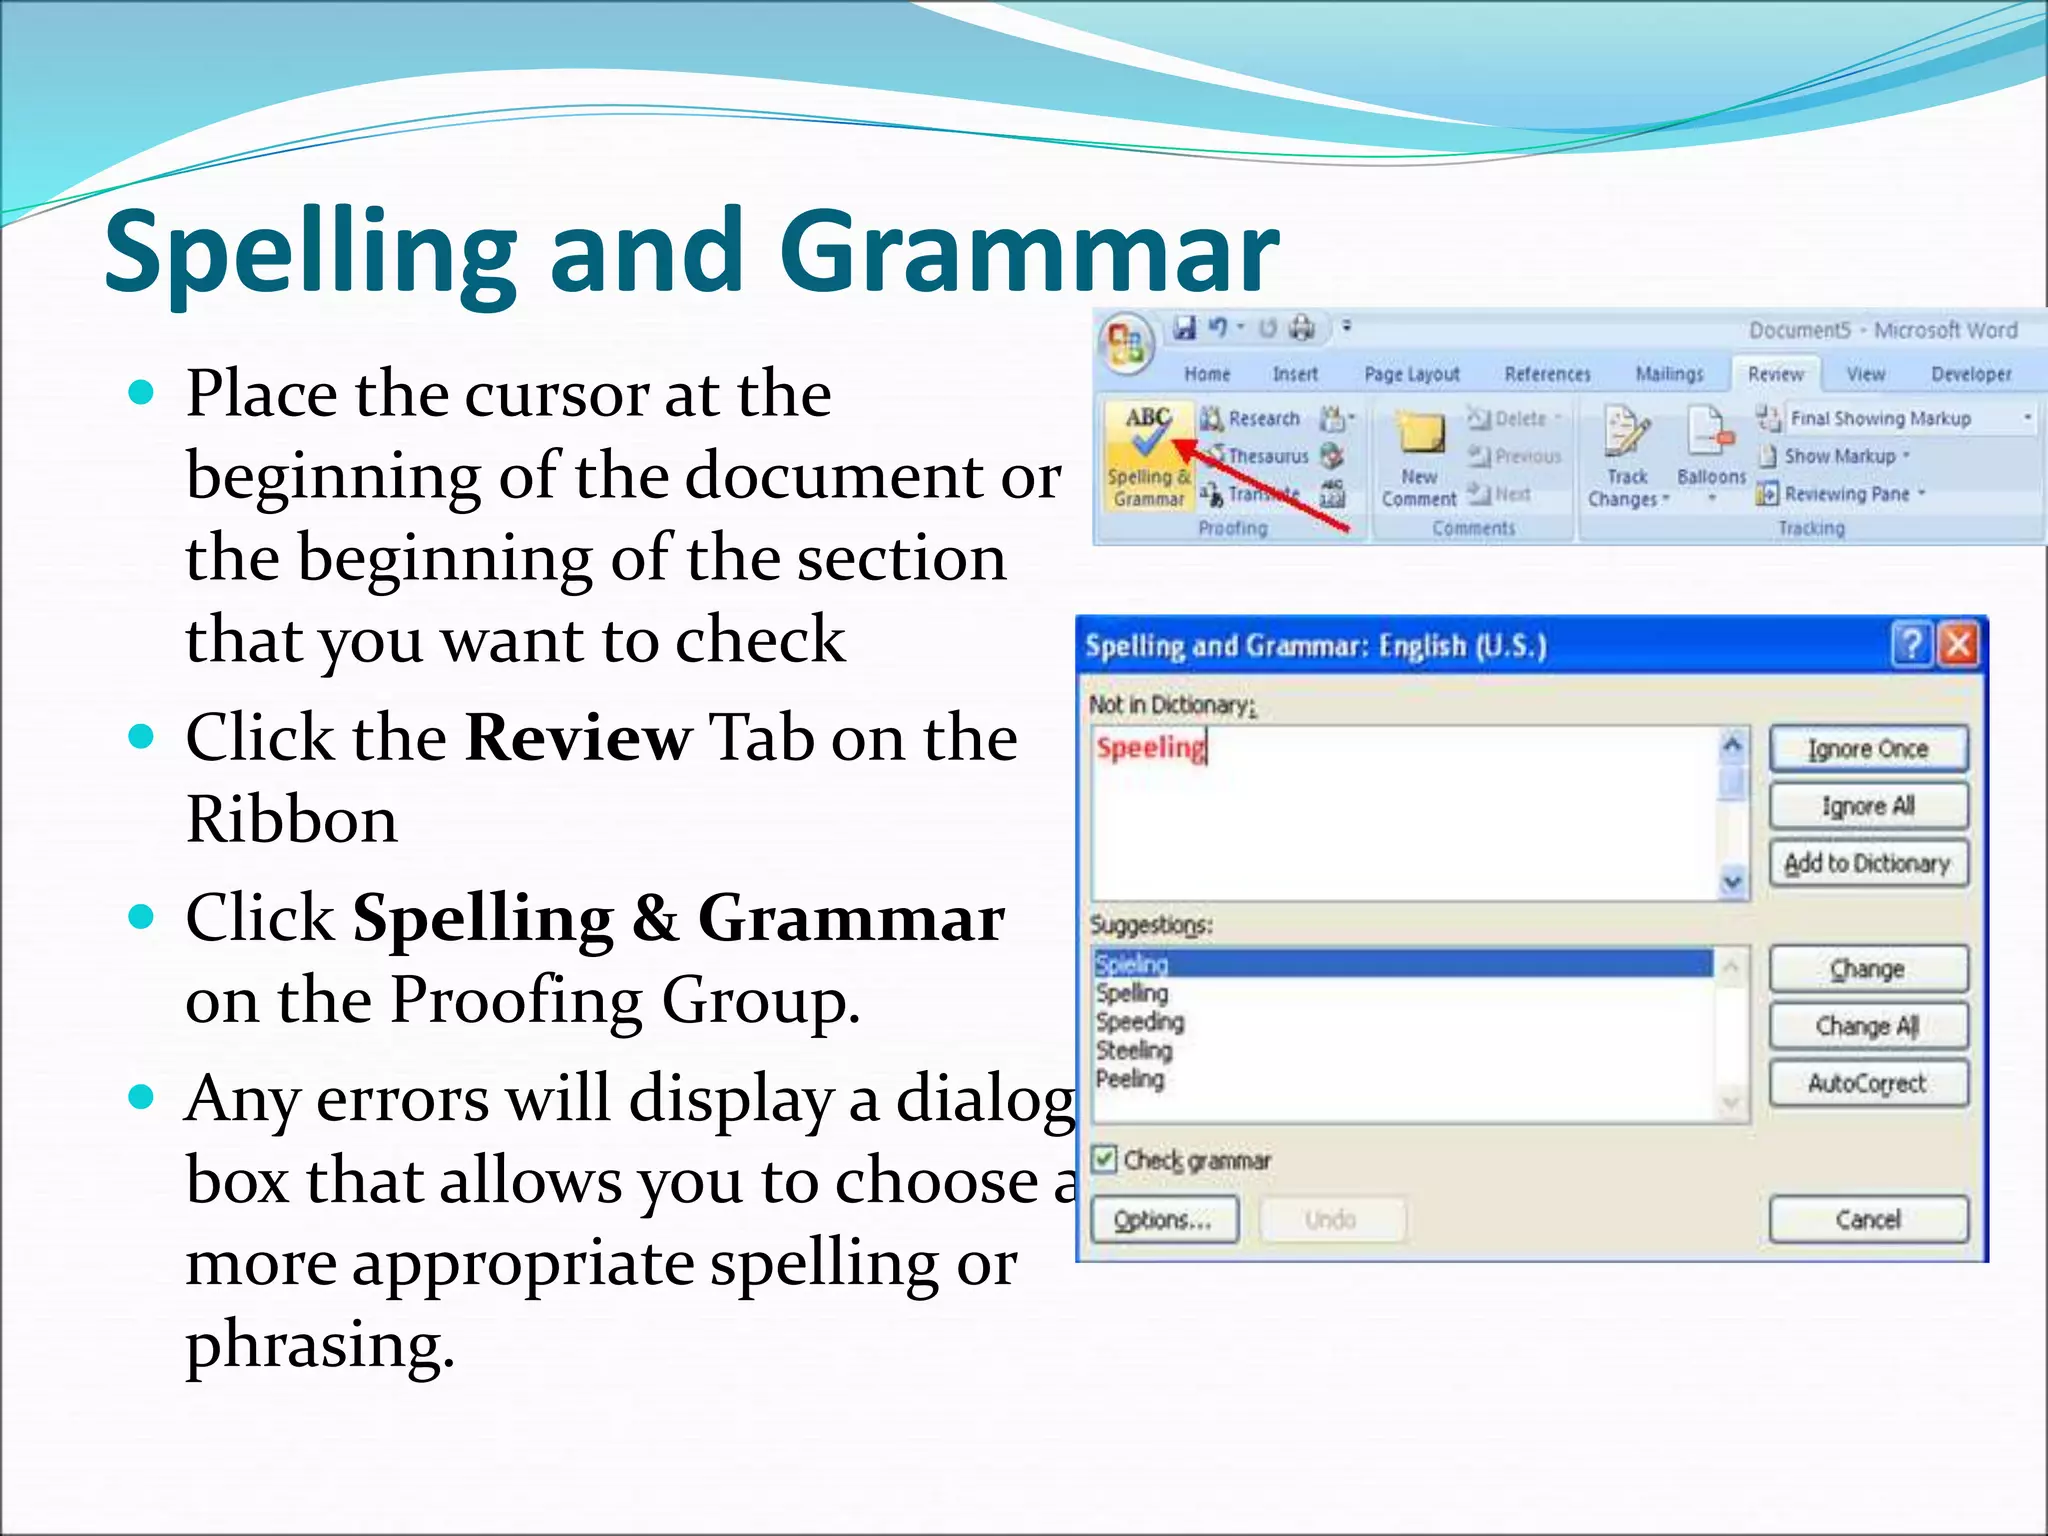
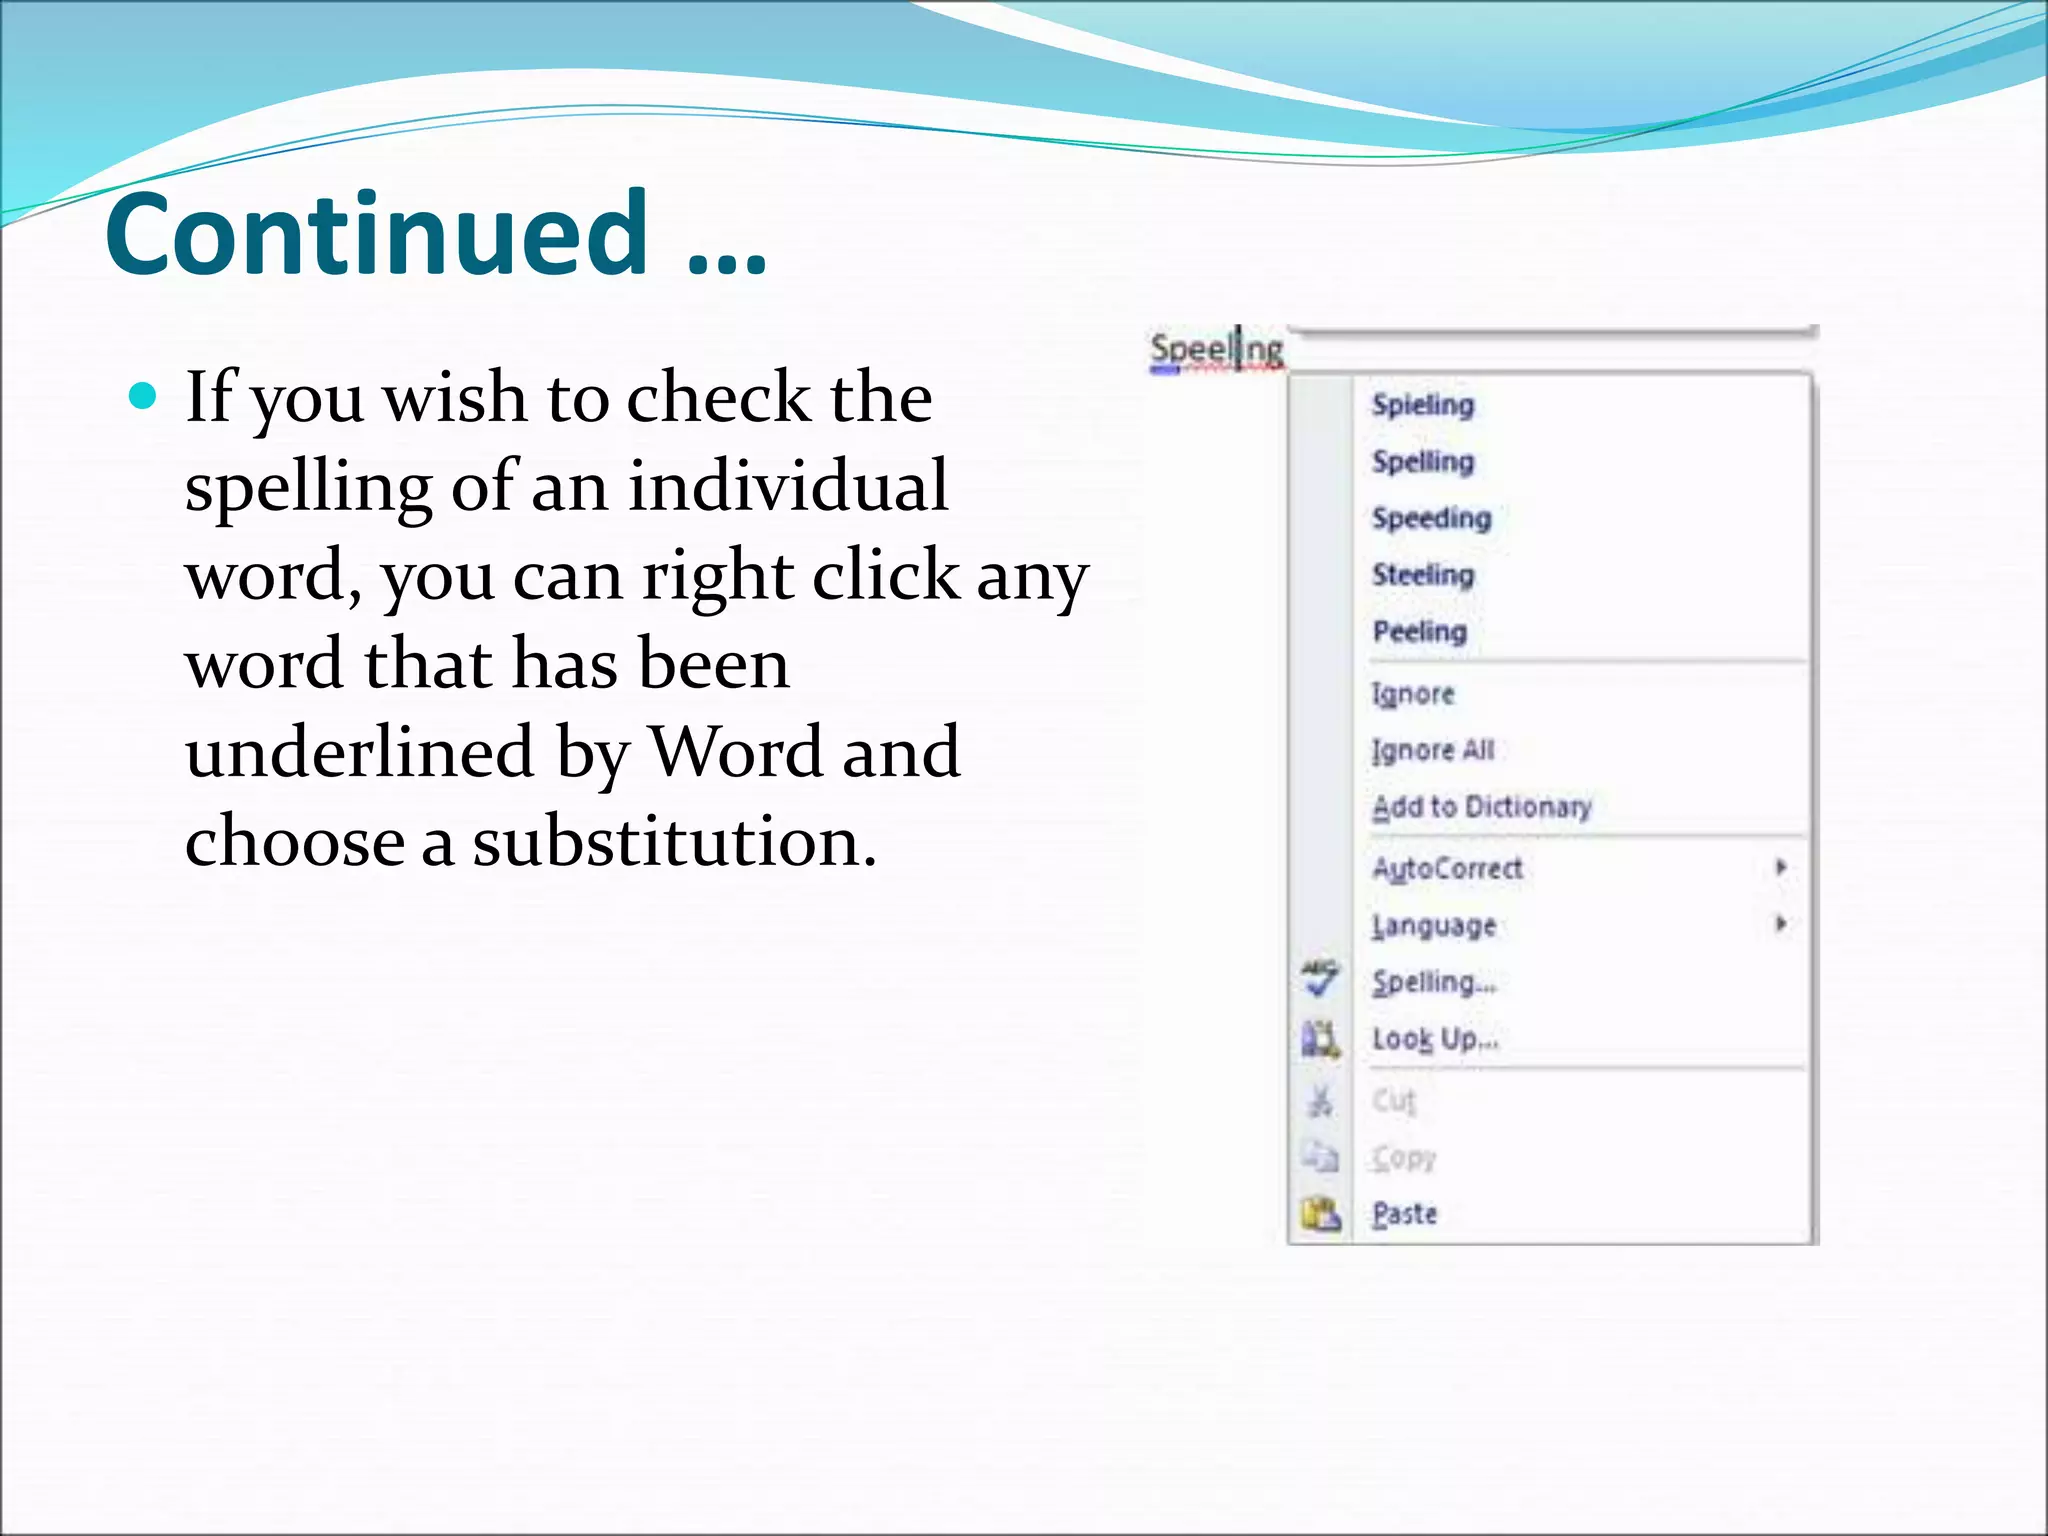
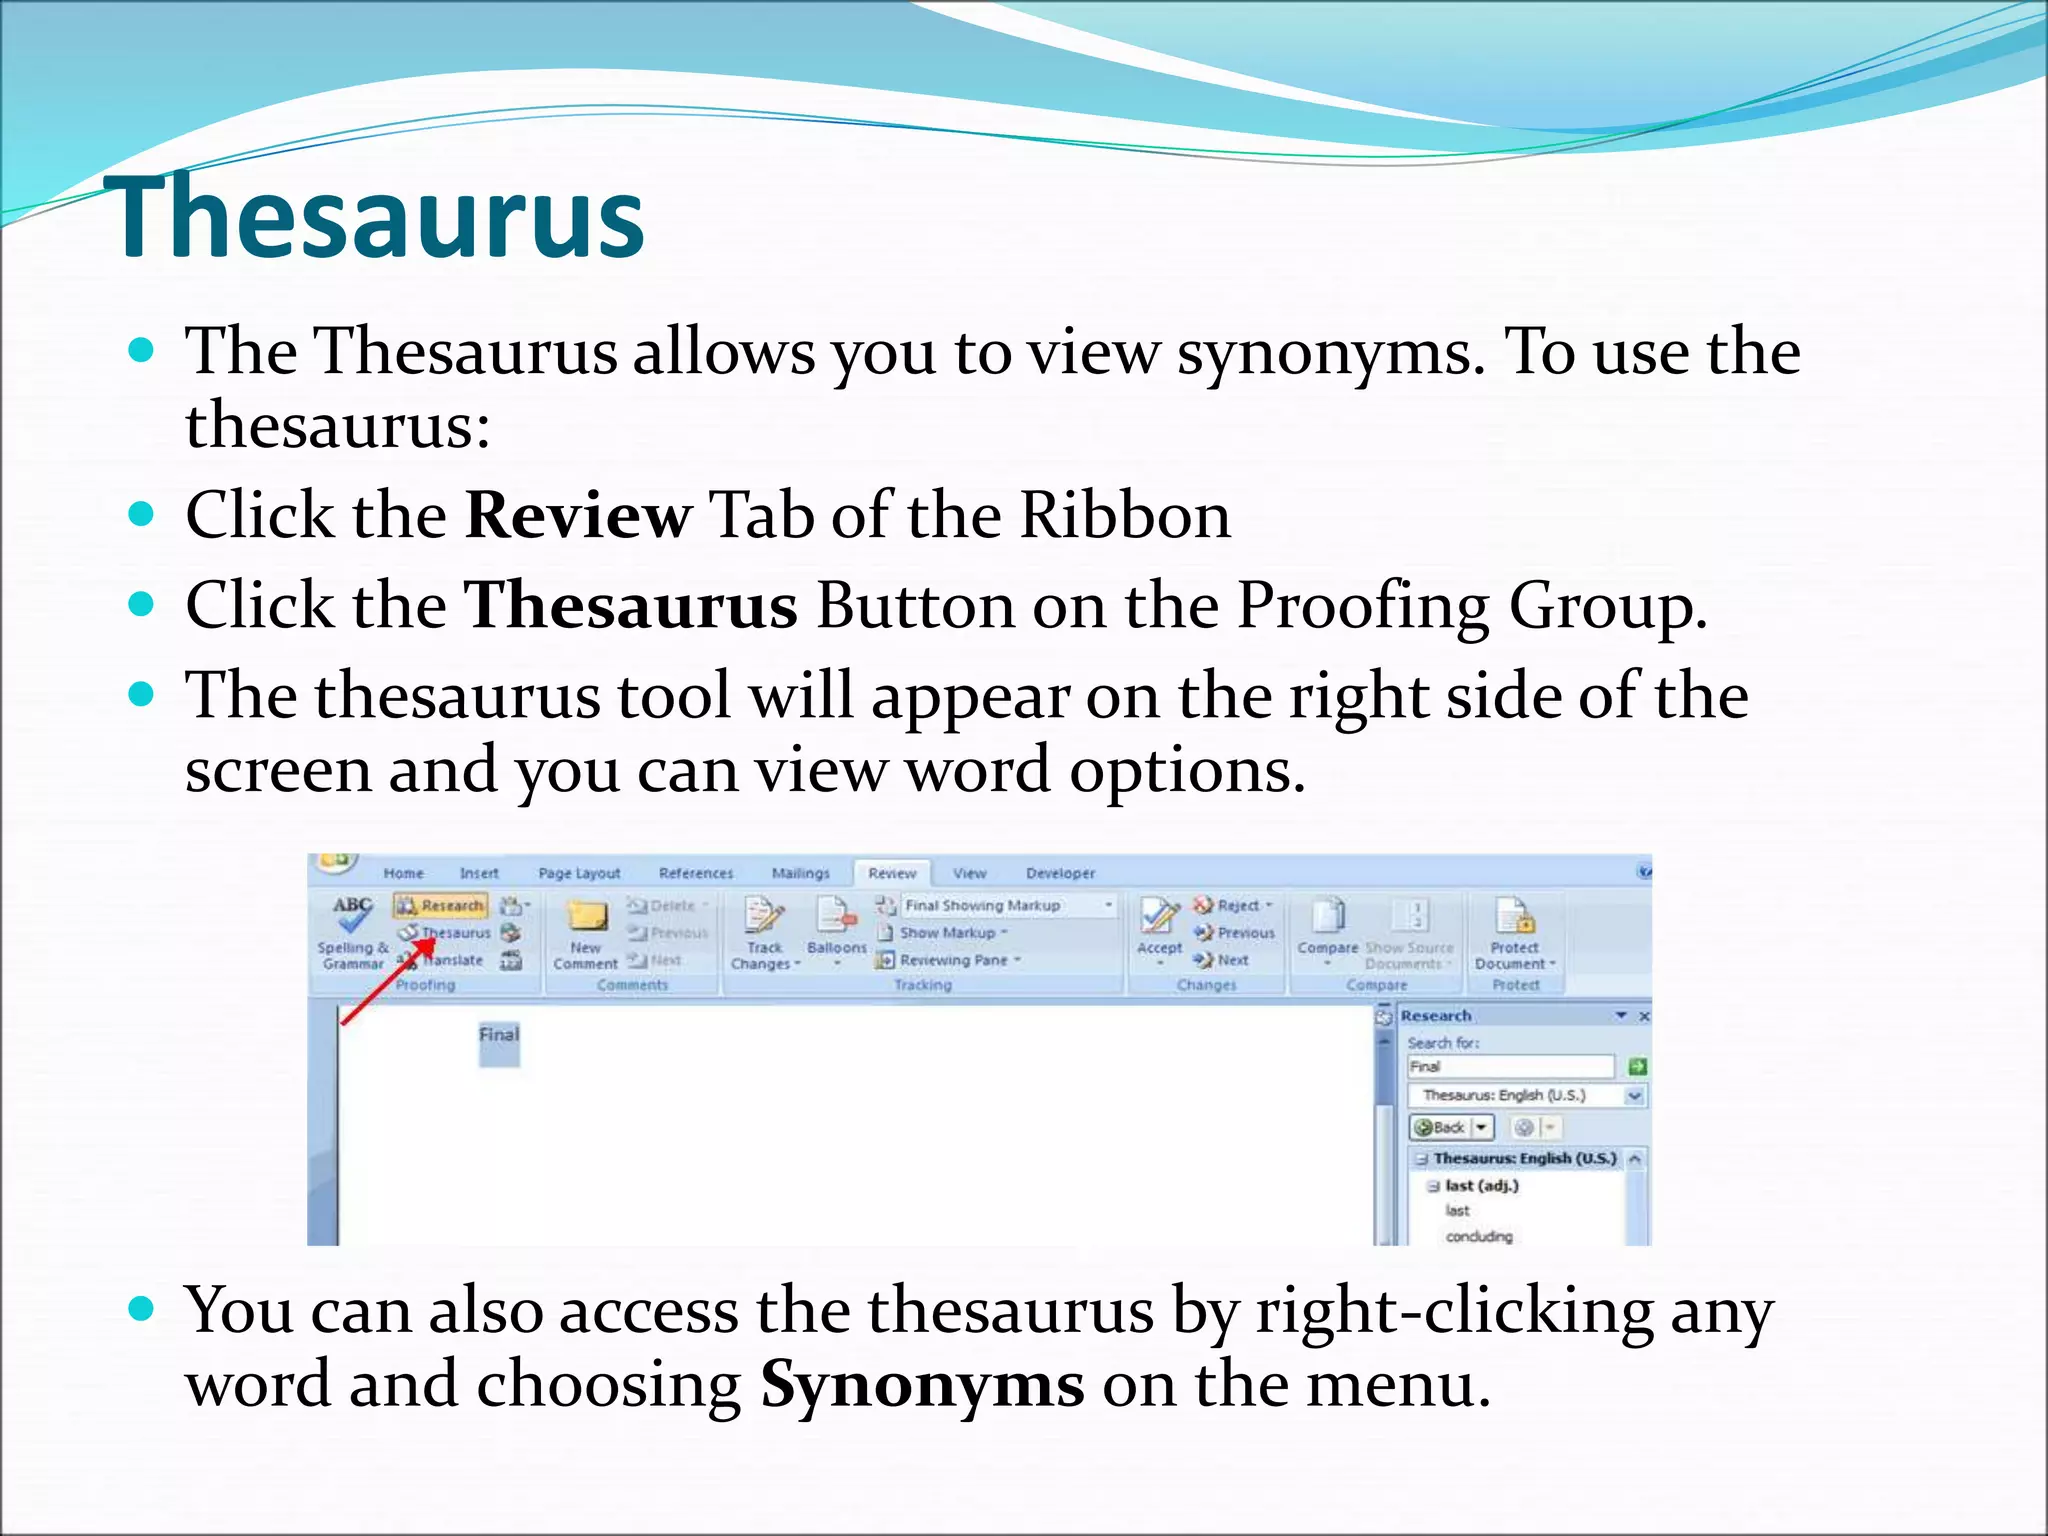
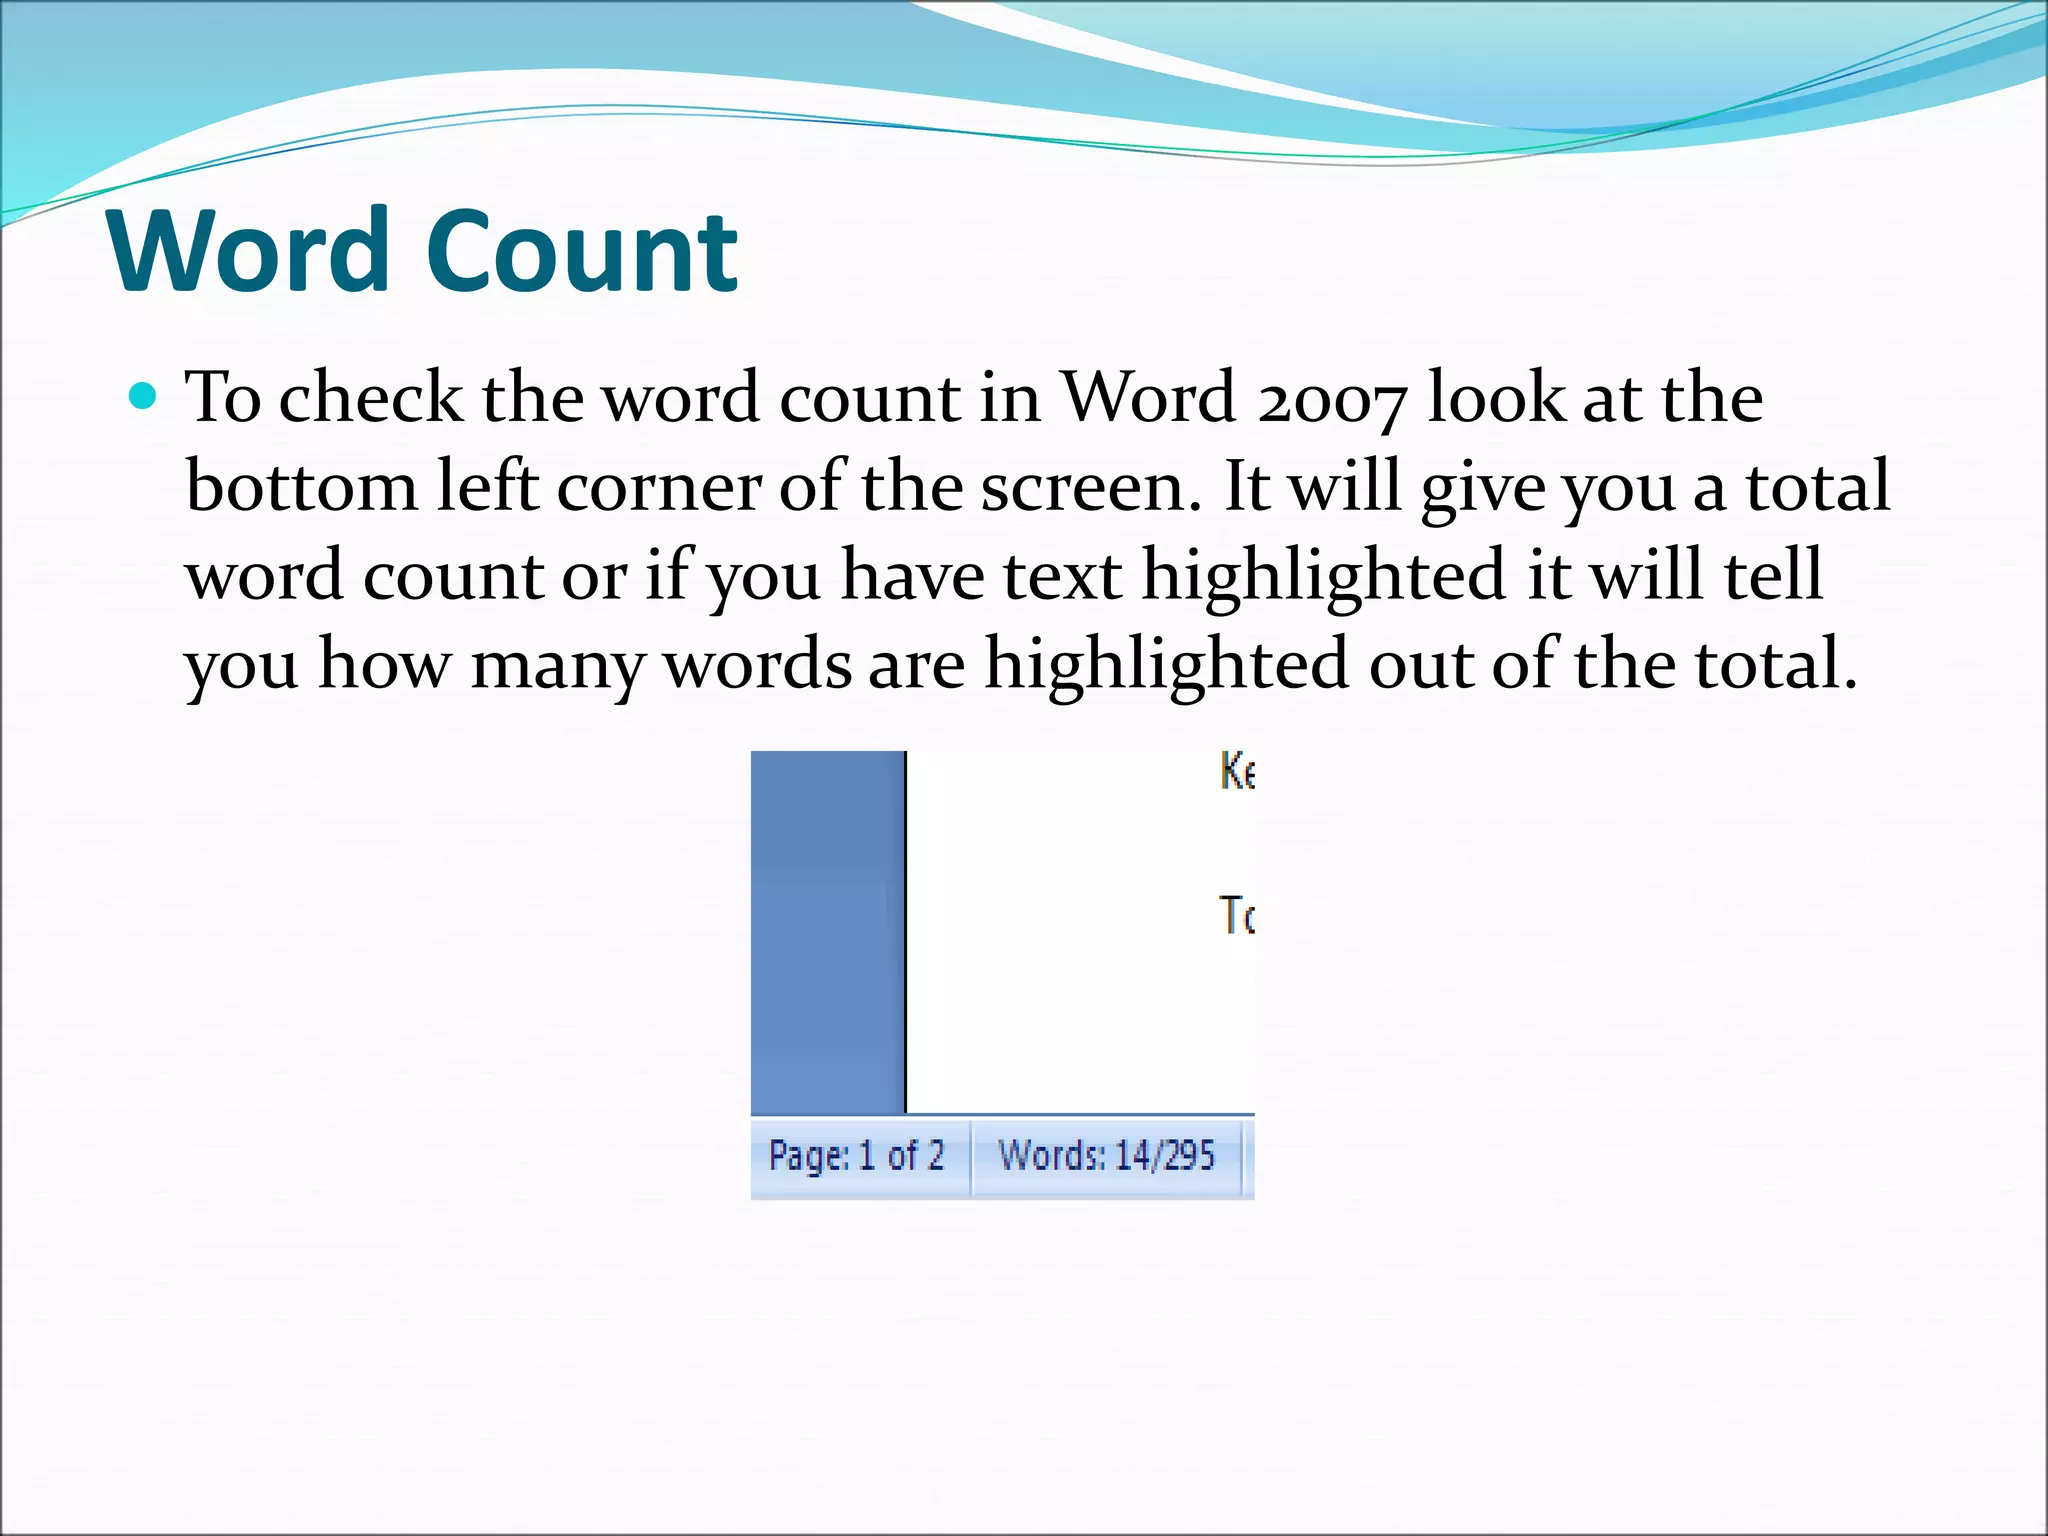
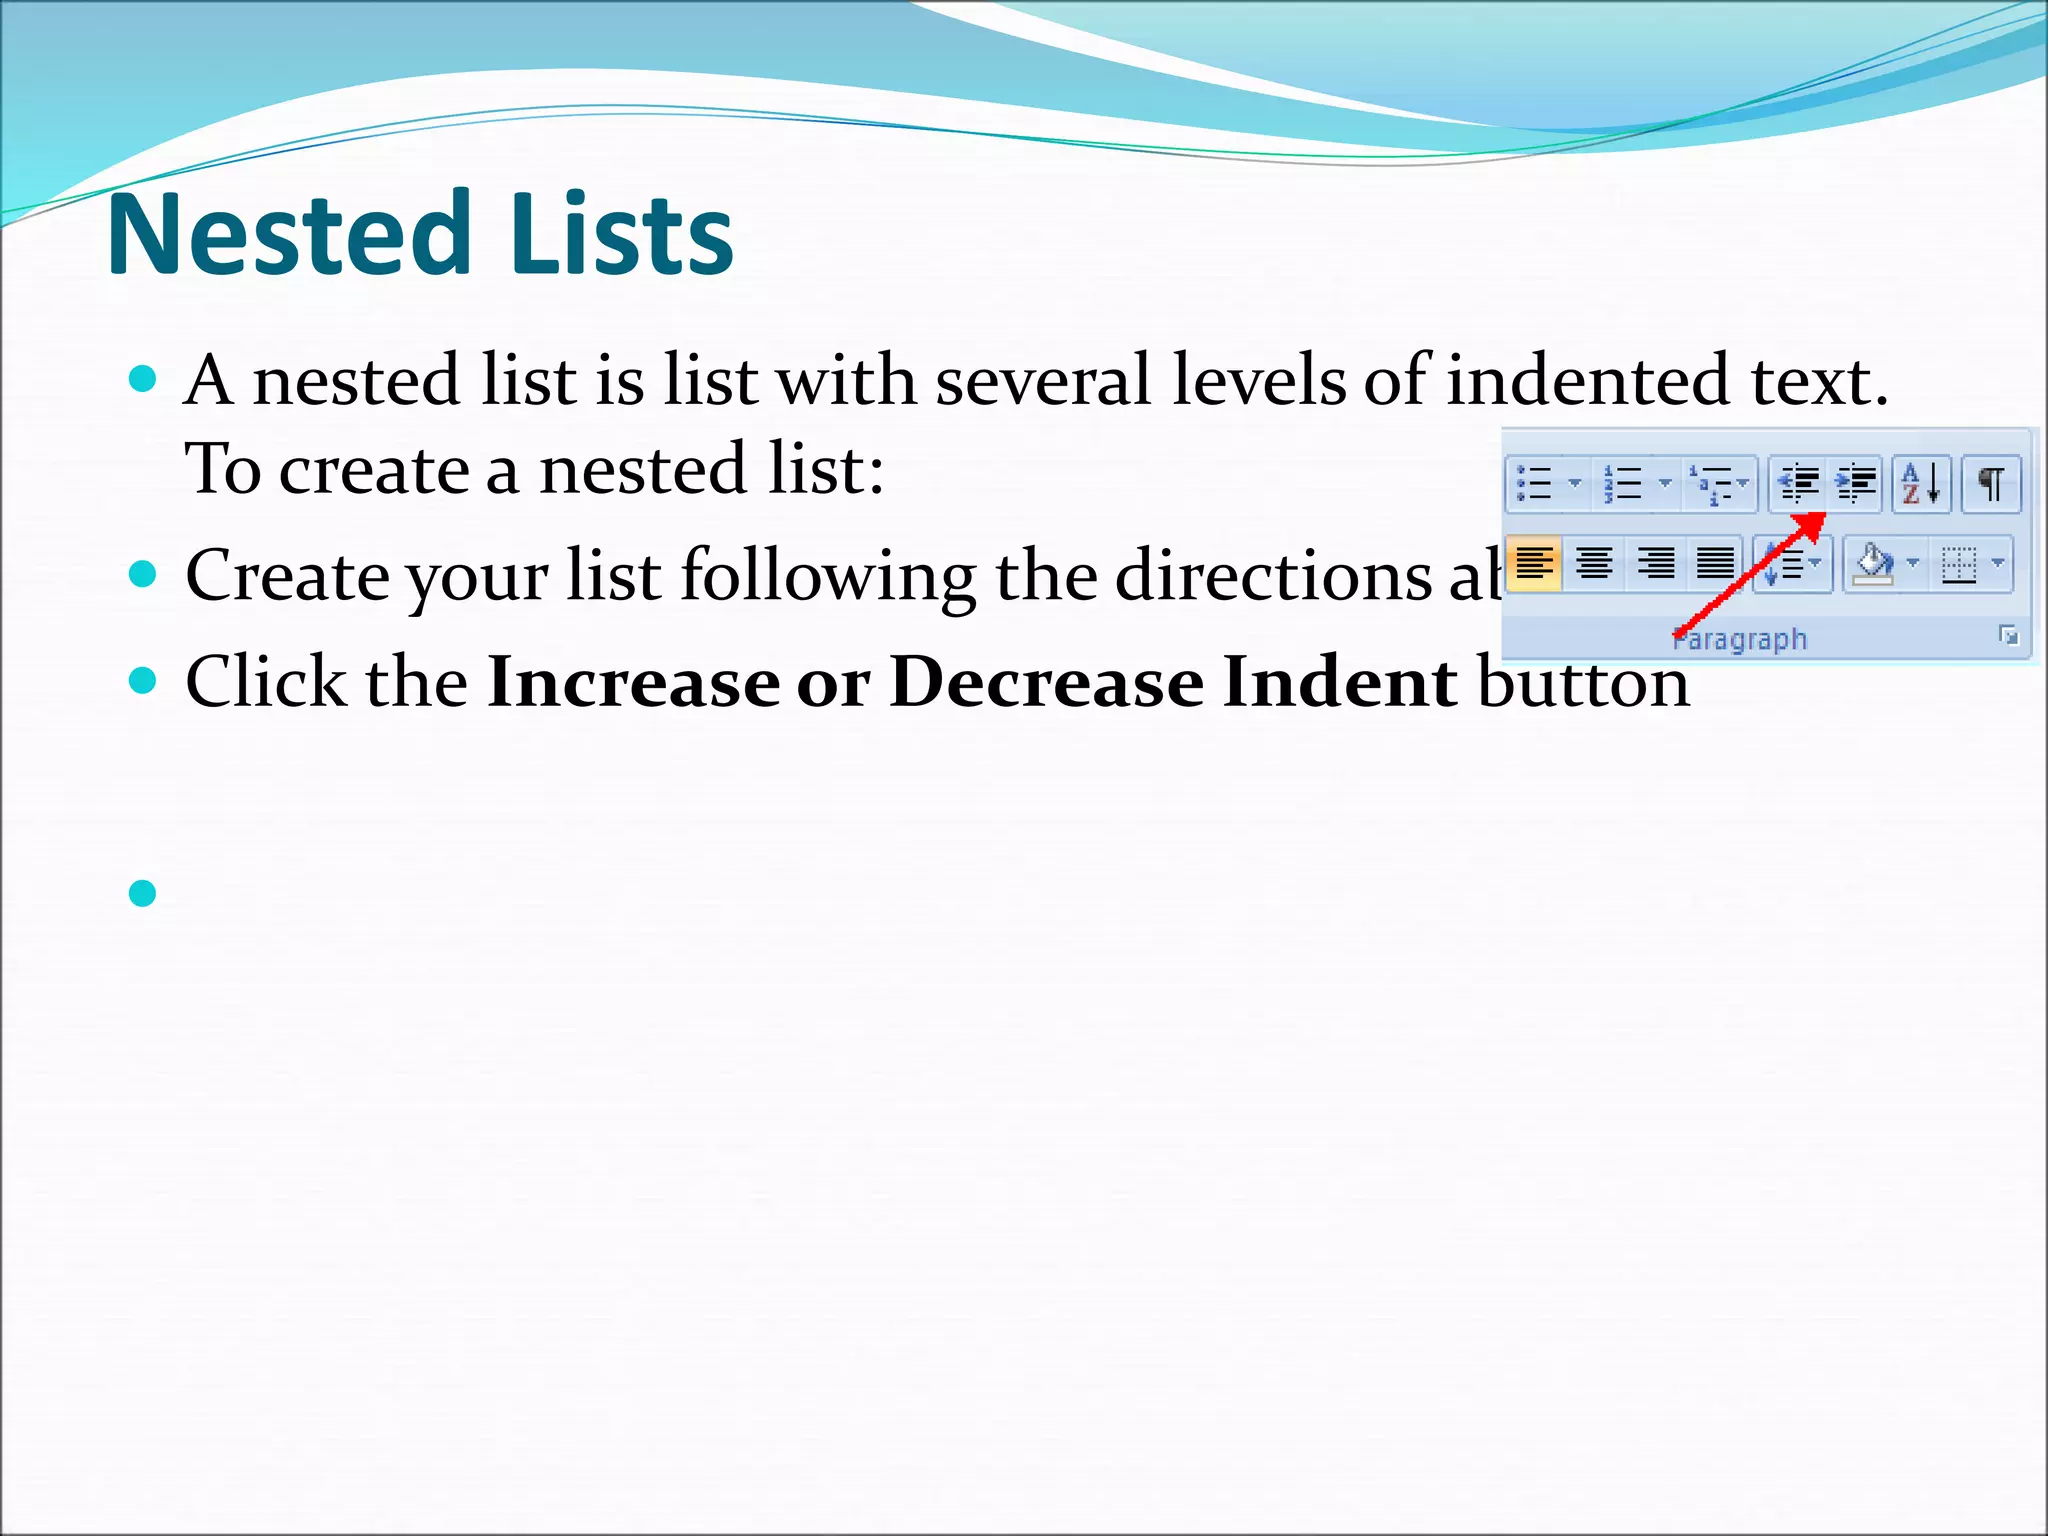
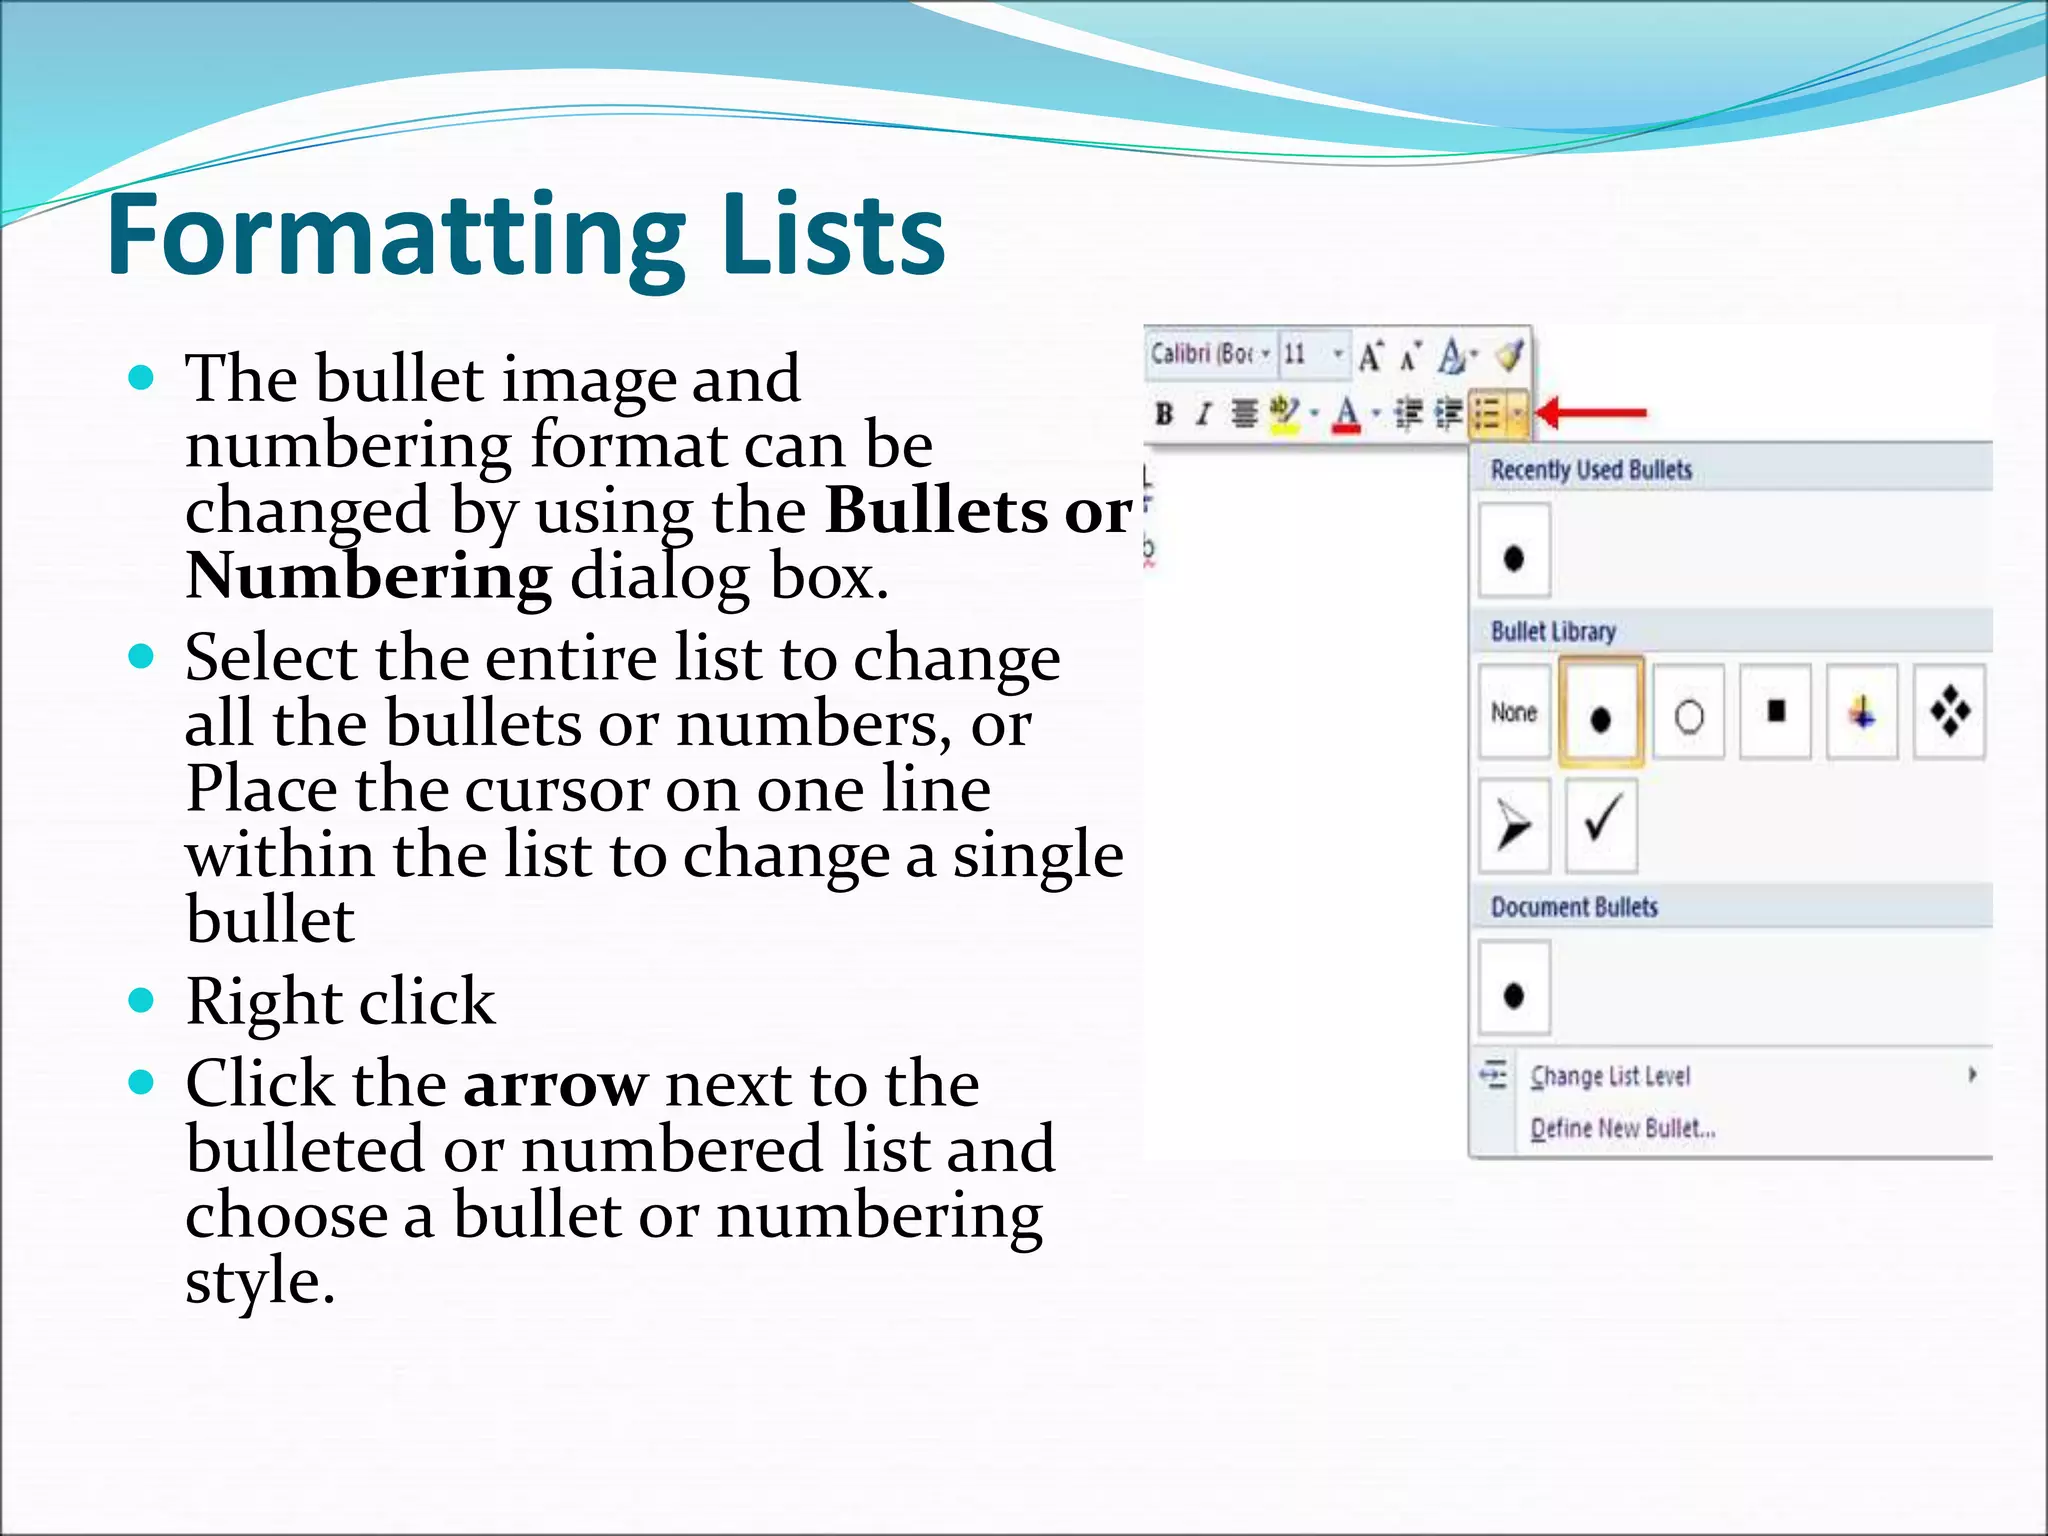
SlideShare a Scribd company logo
1 of 42
Training
Identify parts of Word 2007 Window
Menus
 the Microsoft Office Button
 the Quick Access Toolbar
 the Ribbon
Microsoft Office Button
 The Microsoft Office
button performs many of
the functions.
 This button allows you to
create a new document,
open an existing
document, save or save as,
print, send (through email
or fax), publish or close.
The Ribbon
 The Ribbon is the panel at the top portion of the document. It has seven
tabs: Home, Insert, Page Layout, References, Mailings, Review, and View
that contain many new and existing features of Word.
 Each tab is divided into groups.
The ribbon continued …
Each of the tabs contains the following tools:
 Home: Clipboard, Fonts, Paragraph, Styles, and Editing.
 Insert: Pages, Tables, Illustrations, Links, Header & Footer, Text,
and Symbols
 Page Layout: Themes, Page Setup, Page Background, Paragraph,
Arrange
 References: Table of Contents, Footnote, Citation &
Bibliography, Captions, Index, and Table of Authorities
 Mailings: Create, Start Mail Merge, Write & Insert Fields,
Preview Results, Finish
 Review: Proofing, Comments, Tracking, Changes, Compare,
Protect
 View: Document Views, Show/Hide, Zoom, Window, Macros
Working with Documents
 Create a New Document
 Open an Existing Document
 Save a Document
 Rename a Document
 Switch between Multiple Documents
 Change the Document View
 Close a Document
Document Views
There are many ways to view a document in Word.
 Print Layout: This is a view of the document, as it would
appear when printed. It includes all tables, text, graphics,
and images.
 Full Screen Reading: This is a full view length view of a
document. Good for viewing two pages at a time.
 Web Layout: This is a view of the document, as it would
appear in a web browser.
 Outline: This is an outline form of the document in the
form of bullets.
 Draft: This view does not display pictures or layouts, just
text.
Editing a Document
 Move through the text of the document
 Use text selection technique
 Use cut, copy and paste
 Rearrange blocks of text
 Delete blocks of text
 Search and replace text
 Undo or repeat changes
Typing and inserting Text
 To enter texts just start typing! The text will appear
where the blinking cursor is located.
Move Action Keystroke
Beginning of the line HOME
End of the line END
Top of the document CTRL+HOME
End of the document CTRL+END
Selecting Text
 To change any attributes of text it must be highlighted first.
 Select the text by dragging the mouse over the desired text while
keeping the left mouse button depressed, or hold down the SHIFT key
on the keyboard while using the arrow buttons to highlight the text.
Selection Technique
Whole word
double-click within the word
Whole paragraph
triple-click within the paragraph
Several words or lines
drag the mouse over the words, or hold down SHIFT while using the
arrow keys
Entire document
choose Editing | Select | Select All from the Ribbon, or press
CTRL+A
Deleting Blocks of Text
 Use the BACKSPACE and DELETE keys on the
keyboard to delete text. Backspace will delete text to
the left of the cursor and Delete will erase text to the
right.
 Search and Replace Text
 To find a particular word or phrase in a document:
 Click Find on the Editing Group on the Ribbon
 To find and replace a word or phrase in the document,
click Replace on the Editing Group of the Ribbon.
Undo Changes
 To undo changes:
 Click the Undo Button on the Quick Access Toolbar
 Formatting Text
 Use styles
 Change font face, font size and text color
 Use predefined formatting options
 Highlight text
 Use format painter
 Clear formatting
Styles
 A style is a format-enhancing tool that includes font
typefaces, font size
 Change Font Typeface and Size
 Click the arrow next to the font name and choose a
font.
 Remember that you can preview how the new font will
look by highlighting the text, and hovering over the
new font typeface.
To change the font size
 Click the arrow next to the font size and choose the
appropriate size, or
 Click the increase or decrease font size buttons.
 Change Text Color
 Select the text and click the Colors button included on the
Font Group of the Ribbon, or
 Highlight the text, right click, and choose the colors tool.
 Select the color by clicking the down arrow next to the font
color button.
Highlight Text
 Highlighting text allows you to use emphasize text as
you would if you had a marker. To highlight text:
 Select the text
 Click the Highlight Button on the Font Group of the
Ribbon, or
 Select the text and right click and select the highlight
tool
 To change the color of the highlighter click on down
arrow next to the highlight button.
Copy Formatting
 If you have already formatted text the way you want it
and would like another portion of the document to
have the same formatting, you can copy the
formatting.
 Select the text with the formatting you want to copy.
 Copy the format of the text selected by clicking the
Format Painter button on the Clipboard Group of the
Home Tab
 Apply the copied format by selecting the text and
clicking on it.
Clear Formatting
 To clear text formatting:
 Select the text you wish to clear
the formatting
 Click the Styles dialogue box on
the Styles Group on the Home Tab
 Click Clear All
Formatting Paragraphs
 Change paragraph alignment
 Indent paragraph
 Add borders and shading
 Create hyperlinks
 Change paragraph and line spacing
 Formatting paragraphs allows you to change the look
of the overall document.
Change Paragraph Alignment
 The paragraph alignment allows you to
set how you want text to appear. To
change the alignment:
 Click the Home Tab
 Choose the appropriate button for
alignment on the Paragraph Group.
 Align Left: the text is aligned with your left
margin
 Center: The text is centered within your
margins
 Align Right: Aligns text with the right
margin
 Justify: Aligns text to both the left and
right margins.
Indent Paragraphs
 Indenting paragraphs allows you set text
within a paragraph at different margins.
There are several options for indenting:
 First Line: Controls the left boundary for
the first line of a paragraph
 Hanging: Controls the left boundary of
every line in a paragraph except the first
one
 Left: Controls the left boundary for every
line in a paragraph
 Right: Controls the right boundary for
every line in a paragraph
Add Borders and Shading
 You can add borders and
shading to paragraphs and
entire pages. To create a border
around aparagraph or
paragraphs:
 Select the area of text where you
want the border or shading.
 Click the Borders Button on the
Paragraph Group on the Home
Tab
 Choose the Border and Shading
 Choose the appropriate options
Apply Styles
 Styles are a present collection of formatting that you
can apply to text. To utilize Quick Styles:
 Select the text you wish to format.
 Click the dialog box next to the Styles Group on the
Home Tab.
 Click the style you wish to apply.
Adding Tables
 Create a table
 Enter data in a Table
 Modify table structure
 Modify format of a table
 Tables are used to display data in a table format.
Create a Table
 Place the cursor on the page where you
want the new table
 Click the Insert Tab of the Ribbon
 Click the Tables Button on the Tables
Group. You can create a table one of
four ways:
 Highlight the number of row and
columns
 Click Insert Table and enter the
number of rows and columns
 Click the Draw Table, create your table
by clicking and entering the rows and
columns
 Click Quick Tables and choose a table
Enter Data in a Table
 Place the cursor in the cell where you wish to enter the
information. Begin typing.
Modify the Table Structure and Format a Table
 To modify the structure of a table:
 Click the table and notice that you have two new tabs
on the Ribbon: Design and Layout. These pertain to
the table design and layout.
Graphics
 Insert symbols and characters
 Insert mathematical equations
 Insert illustrations, pictures, and Smart Arts
 Resize graphics objects
 Insert watermarks
Word 2007 allows you to insert special characters,
symbols, pictures, illustrations, and watermarks.
Symbols and Special Characters
 Special characters are punctuation,
spacing, or typographical
characters that are not generally
available on the standard
keyboard. To insert symbols and
special characters:
 Place your cursor in the document
where you want the symbol
 Click the Insert Tab on the Ribbon
 Click the Symbol button on the
Symbols Group
 Choose the appropriate symbol.
Illustrations, Pictures, and Smart Art
 Word 2007 allows you to insert illustrations and
pictures into a document. To insert illustrations:
 Place your cursor in the document where you want the
illustration/picture
 Click the Insert Tab on the Ribbon
 Click the Clip Art Button
 The dialog box will open on the screen and you can
search for clip art.
 Choose the illustration you wish to include
To insert a picture
 Place your cursor in the
document where you
want the
illustration/picture
 Click the Insert Tab on
the Ribbon
 Click the Picture Button
 Browse to the picture you
wish to include
 Click the Picture
 Click Insert
Smart Art
 Smart Art is a collection of
graphics you can utilize to
organize information within your
document. It includes timelines,
processes, or workflow. To insert
Smart Art
 Place your cursor in the document
where you want the
illustration/picture
 Click the Insert Tab on the
Ribbon
 Click the Smart Art button
 Click the Smart Art you wish to
include in your document
 Click the arrow on the left side of
the graphic to insert text or type
the text in the graphic.
Resize Graphics
 All graphics can be resized by clicking the image and
clicking one corner of the image and dragging the
cursor to the size you want the picture.
Proofing a Document
 Check spelling and grammar of a document
 Find synonyms by using Thesaurus
 Setup AutoCorrect tool
 Customize the dictionary
 Count words
Spelling and Grammar
 Place the cursor at the
beginning of the document or
the beginning of the section
that you want to check
 Click the Review Tab on the
Ribbon
 Click Spelling & Grammar
on the Proofing Group.
 Any errors will display a dialog
box that allows you to choose a
more appropriate spelling or
phrasing.
Continued …
 If you wish to check the
spelling of an individual
word, you can right click any
word that has been
underlined by Word and
choose a substitution.
Thesaurus
 The Thesaurus allows you to view synonyms. To use the
thesaurus:
 Click the Review Tab of the Ribbon
 Click the Thesaurus Button on the Proofing Group.
 The thesaurus tool will appear on the right side of the
screen and you can view word options.
 You can also access the thesaurus by right-clicking any
word and choosing Synonyms on the menu.
Word Count
 To check the word count in Word 2007 look at the
bottom left corner of the screen. It will give you a total
word count or if you have text highlighted it will tell
you how many words are highlighted out of the total.
Insert Common Header and Footer Information
 To insert Header and Footer information such as page
numbers, date, or title, first, decide if you want the
information in the header (at the top of the page) or in the
Footer (at the bottom of the page), then:
 Click the Insert Tab on the Ribbon
 Click Header or Footer
 Choose a style
 The Header/Footer Design Tab will display on the
Ribbon
 Choose the information that you would like to have in the
header or footer (date, time, page numbers, etc.) or type in
the information you would like to have in the header or
footer
Insert a Cover Page
 Click the Insert Tab on the Ribbon
 Click the Cover Page Button on the Pages Group
 Choose a style for the cover page
Lists
 Create bulleted and numbered lists
 Create nested lists
 Format lists
 Lists allow you to format and organize text with numbers,
bullets, or in an outline.
Bulleted and Numbered Lists
 Bulleted lists have bullet points, numbered lists have numbers,
and outline lists combine numbers and letters depending on the
organization of the list.
 To add a list to existing text:
 Select the text you wish to make a list
 From the Paragraph Group on the Home Tab, Click the Bulleted
or Numbered Lists button
Nested Lists
 A nested list is list with several levels of indented text.
To create a nested list:
 Create your list following the directions above
 Click the Increase or Decrease Indent button

Formatting Lists
 The bullet image and
numbering format can be
changed by using the Bullets or
Numbering dialog box.
 Select the entire list to change
all the bullets or numbers, or
Place the cursor on one line
within the list to change a single
bullet
 Right click
 Click the arrow next to the
bulleted or numbered list and
choose a bullet or numbering
style.

More Related Content

Similar to Microsoft Word 2007 training.ppt

Introduction to MS WORD
Introduction to MS WORDIntroduction to MS WORD
Introduction to MS WORDMuhammad Irfan
 
Libre Office Writer Lesson 3: Using Styles and Templates
Libre Office Writer Lesson 3: Using Styles and TemplatesLibre Office Writer Lesson 3: Using Styles and Templates
Libre Office Writer Lesson 3: Using Styles and TemplatesSmart Chicago Collaborative
 
Use of technology in the Ministry
Use of technology in the MinistryUse of technology in the Ministry
Use of technology in the MinistryAwrUmingan
 
Microsoft office word 2003
Microsoft office word 2003Microsoft office word 2003
Microsoft office word 2003sasika fernando
 
MS PowerPoint 2010 tutorial 3
MS PowerPoint 2010 tutorial 3MS PowerPoint 2010 tutorial 3
MS PowerPoint 2010 tutorial 3Khalfan Alshuaili
 
Lesson 3 text basics ( powerpoint)
Lesson 3   text basics ( powerpoint)Lesson 3   text basics ( powerpoint)
Lesson 3 text basics ( powerpoint)guevarra_2000
 
Lesson 3 text basics ( powerpoint)
Lesson 3   text basics ( powerpoint)Lesson 3   text basics ( powerpoint)
Lesson 3 text basics ( powerpoint)guevarra_2000
 
Lesson 3 text basics ( powerpoint)
Lesson 3   text basics ( powerpoint)Lesson 3   text basics ( powerpoint)
Lesson 3 text basics ( powerpoint)guevarra_2000
 
Basic formatting operations in ms word
Basic formatting operations in ms wordBasic formatting operations in ms word
Basic formatting operations in ms wordDr. Sunil Kumar
 
OpenOffice.org Writer: The Basics
OpenOffice.org Writer: The BasicsOpenOffice.org Writer: The Basics
OpenOffice.org Writer: The BasicsCzarli Evangelista
 
Microsoft Office
Microsoft OfficeMicrosoft Office
Microsoft OfficeSwati Sinha
 
Microsoft word features
Microsoft word featuresMicrosoft word features
Microsoft word featuresSaira Randhawa
 
GRADE 7 LESSON 5 MS WORD INTRO.ppt
GRADE 7 LESSON 5 MS WORD INTRO.pptGRADE 7 LESSON 5 MS WORD INTRO.ppt
GRADE 7 LESSON 5 MS WORD INTRO.pptLimEchYrr
 

Similar to Microsoft Word 2007 training.ppt (20)

Introduction to MS WORD
Introduction to MS WORDIntroduction to MS WORD
Introduction to MS WORD
 
Libre Office Writer Lesson 3: Using Styles and Templates
Libre Office Writer Lesson 3: Using Styles and TemplatesLibre Office Writer Lesson 3: Using Styles and Templates
Libre Office Writer Lesson 3: Using Styles and Templates
 
Use of technology in the Ministry
Use of technology in the MinistryUse of technology in the Ministry
Use of technology in the Ministry
 
MS Word 2007 shortcuts
MS Word 2007 shortcutsMS Word 2007 shortcuts
MS Word 2007 shortcuts
 
MS Word 2010 tutorial 6
MS Word 2010 tutorial 6MS Word 2010 tutorial 6
MS Word 2010 tutorial 6
 
Microsoft Word
Microsoft WordMicrosoft Word
Microsoft Word
 
Microsoft office word 2003
Microsoft office word 2003Microsoft office word 2003
Microsoft office word 2003
 
MS PowerPoint 2010 tutorial 3
MS PowerPoint 2010 tutorial 3MS PowerPoint 2010 tutorial 3
MS PowerPoint 2010 tutorial 3
 
Lesson 3 text basics ( powerpoint)
Lesson 3   text basics ( powerpoint)Lesson 3   text basics ( powerpoint)
Lesson 3 text basics ( powerpoint)
 
Lesson 3 text basics ( powerpoint)
Lesson 3   text basics ( powerpoint)Lesson 3   text basics ( powerpoint)
Lesson 3 text basics ( powerpoint)
 
Lesson 3 text basics ( powerpoint)
Lesson 3   text basics ( powerpoint)Lesson 3   text basics ( powerpoint)
Lesson 3 text basics ( powerpoint)
 
MS Word Introduction and Tools.
MS Word Introduction and Tools.MS Word Introduction and Tools.
MS Word Introduction and Tools.
 
Basic formatting operations in ms word
Basic formatting operations in ms wordBasic formatting operations in ms word
Basic formatting operations in ms word
 
PowerPoint Tutorial
PowerPoint TutorialPowerPoint Tutorial
PowerPoint Tutorial
 
Formatting content in_word_2010
Formatting content in_word_2010Formatting content in_word_2010
Formatting content in_word_2010
 
OpenOffice.org Writer: The Basics
OpenOffice.org Writer: The BasicsOpenOffice.org Writer: The Basics
OpenOffice.org Writer: The Basics
 
Ms word
Ms wordMs word
Ms word
 
Microsoft Office
Microsoft OfficeMicrosoft Office
Microsoft Office
 
Microsoft word features
Microsoft word featuresMicrosoft word features
Microsoft word features
 
GRADE 7 LESSON 5 MS WORD INTRO.ppt
GRADE 7 LESSON 5 MS WORD INTRO.pptGRADE 7 LESSON 5 MS WORD INTRO.ppt
GRADE 7 LESSON 5 MS WORD INTRO.ppt
 

Recently uploaded

KSHARA STURA .pptx---KSHARA KARMA THERAPY (CAUSTIC THERAPY)————IMP.OF KSHARA ...
KSHARA STURA .pptx---KSHARA KARMA THERAPY (CAUSTIC THERAPY)————IMP.OF KSHARA ...KSHARA STURA .pptx---KSHARA KARMA THERAPY (CAUSTIC THERAPY)————IMP.OF KSHARA ...
KSHARA STURA .pptx---KSHARA KARMA THERAPY (CAUSTIC THERAPY)————IMP.OF KSHARA ...M56BOOKSTORE PRODUCT/SERVICE
 
Hybridoma Technology ( Production , Purification , and Application )
Hybridoma Technology  ( Production , Purification , and Application  ) Hybridoma Technology  ( Production , Purification , and Application  )
Hybridoma Technology ( Production , Purification , and Application ) Sakshi Ghasle
 
Enzyme, Pharmaceutical Aids, Miscellaneous Last Part of Chapter no 5th.pdf
Enzyme, Pharmaceutical Aids, Miscellaneous Last Part of Chapter no 5th.pdfEnzyme, Pharmaceutical Aids, Miscellaneous Last Part of Chapter no 5th.pdf
Enzyme, Pharmaceutical Aids, Miscellaneous Last Part of Chapter no 5th.pdfSumit Tiwari
 
mini mental status format.docx
mini    mental       status     format.docxmini    mental       status     format.docx
mini mental status format.docxPoojaSen20
 
ECONOMIC CONTEXT - LONG FORM TV DRAMA - PPT
ECONOMIC CONTEXT - LONG FORM TV DRAMA - PPTECONOMIC CONTEXT - LONG FORM TV DRAMA - PPT
ECONOMIC CONTEXT - LONG FORM TV DRAMA - PPTiammrhaywood
 
_Math 4-Q4 Week 5.pptx Steps in Collecting Data
_Math 4-Q4 Week 5.pptx Steps in Collecting Data_Math 4-Q4 Week 5.pptx Steps in Collecting Data
_Math 4-Q4 Week 5.pptx Steps in Collecting DataJhengPantaleon
 
Presiding Officer Training module 2024 lok sabha elections
Presiding Officer Training module 2024 lok sabha electionsPresiding Officer Training module 2024 lok sabha elections
Presiding Officer Training module 2024 lok sabha electionsanshu789521
 
URLs and Routing in the Odoo 17 Website App
URLs and Routing in the Odoo 17 Website AppURLs and Routing in the Odoo 17 Website App
URLs and Routing in the Odoo 17 Website AppCeline George
 
The basics of sentences session 2pptx copy.pptx
The basics of sentences session 2pptx copy.pptxThe basics of sentences session 2pptx copy.pptx
The basics of sentences session 2pptx copy.pptxheathfieldcps1
 
Crayon Activity Handout For the Crayon A
Crayon Activity Handout For the Crayon ACrayon Activity Handout For the Crayon A
Crayon Activity Handout For the Crayon AUnboundStockton
 
“Oh GOSH! Reflecting on Hackteria's Collaborative Practices in a Global Do-It...
“Oh GOSH! Reflecting on Hackteria's Collaborative Practices in a Global Do-It...“Oh GOSH! Reflecting on Hackteria's Collaborative Practices in a Global Do-It...
“Oh GOSH! Reflecting on Hackteria's Collaborative Practices in a Global Do-It...Marc Dusseiller Dusjagr
 
Solving Puzzles Benefits Everyone (English).pptx
Solving Puzzles Benefits Everyone (English).pptxSolving Puzzles Benefits Everyone (English).pptx
Solving Puzzles Benefits Everyone (English).pptxOH TEIK BIN
 
Presentation by Andreas Schleicher Tackling the School Absenteeism Crisis 30 ...
Presentation by Andreas Schleicher Tackling the School Absenteeism Crisis 30 ...Presentation by Andreas Schleicher Tackling the School Absenteeism Crisis 30 ...
Presentation by Andreas Schleicher Tackling the School Absenteeism Crisis 30 ...EduSkills OECD
 
microwave assisted reaction. General introduction
microwave assisted reaction. General introductionmicrowave assisted reaction. General introduction
microwave assisted reaction. General introductionMaksud Ahmed
 
Sanyam Choudhary Chemistry practical.pdf
Sanyam Choudhary Chemistry practical.pdfSanyam Choudhary Chemistry practical.pdf
Sanyam Choudhary Chemistry practical.pdfsanyamsingh5019
 
How to Make a Pirate ship Primary Education.pptx
How to Make a Pirate ship Primary Education.pptxHow to Make a Pirate ship Primary Education.pptx
How to Make a Pirate ship Primary Education.pptxmanuelaromero2013
 

Recently uploaded (20)

9953330565 Low Rate Call Girls In Rohini Delhi NCR
9953330565 Low Rate Call Girls In Rohini  Delhi NCR9953330565 Low Rate Call Girls In Rohini  Delhi NCR
9953330565 Low Rate Call Girls In Rohini Delhi NCR
 
KSHARA STURA .pptx---KSHARA KARMA THERAPY (CAUSTIC THERAPY)————IMP.OF KSHARA ...
KSHARA STURA .pptx---KSHARA KARMA THERAPY (CAUSTIC THERAPY)————IMP.OF KSHARA ...KSHARA STURA .pptx---KSHARA KARMA THERAPY (CAUSTIC THERAPY)————IMP.OF KSHARA ...
KSHARA STURA .pptx---KSHARA KARMA THERAPY (CAUSTIC THERAPY)————IMP.OF KSHARA ...
 
Hybridoma Technology ( Production , Purification , and Application )
Hybridoma Technology  ( Production , Purification , and Application  ) Hybridoma Technology  ( Production , Purification , and Application  )
Hybridoma Technology ( Production , Purification , and Application )
 
Enzyme, Pharmaceutical Aids, Miscellaneous Last Part of Chapter no 5th.pdf
Enzyme, Pharmaceutical Aids, Miscellaneous Last Part of Chapter no 5th.pdfEnzyme, Pharmaceutical Aids, Miscellaneous Last Part of Chapter no 5th.pdf
Enzyme, Pharmaceutical Aids, Miscellaneous Last Part of Chapter no 5th.pdf
 
mini mental status format.docx
mini    mental       status     format.docxmini    mental       status     format.docx
mini mental status format.docx
 
ECONOMIC CONTEXT - LONG FORM TV DRAMA - PPT
ECONOMIC CONTEXT - LONG FORM TV DRAMA - PPTECONOMIC CONTEXT - LONG FORM TV DRAMA - PPT
ECONOMIC CONTEXT - LONG FORM TV DRAMA - PPT
 
_Math 4-Q4 Week 5.pptx Steps in Collecting Data
_Math 4-Q4 Week 5.pptx Steps in Collecting Data_Math 4-Q4 Week 5.pptx Steps in Collecting Data
_Math 4-Q4 Week 5.pptx Steps in Collecting Data
 
Model Call Girl in Tilak Nagar Delhi reach out to us at 🔝9953056974🔝
Model Call Girl in Tilak Nagar Delhi reach out to us at 🔝9953056974🔝Model Call Girl in Tilak Nagar Delhi reach out to us at 🔝9953056974🔝
Model Call Girl in Tilak Nagar Delhi reach out to us at 🔝9953056974🔝
 
Presiding Officer Training module 2024 lok sabha elections
Presiding Officer Training module 2024 lok sabha electionsPresiding Officer Training module 2024 lok sabha elections
Presiding Officer Training module 2024 lok sabha elections
 
URLs and Routing in the Odoo 17 Website App
URLs and Routing in the Odoo 17 Website AppURLs and Routing in the Odoo 17 Website App
URLs and Routing in the Odoo 17 Website App
 
The basics of sentences session 2pptx copy.pptx
The basics of sentences session 2pptx copy.pptxThe basics of sentences session 2pptx copy.pptx
The basics of sentences session 2pptx copy.pptx
 
Crayon Activity Handout For the Crayon A
Crayon Activity Handout For the Crayon ACrayon Activity Handout For the Crayon A
Crayon Activity Handout For the Crayon A
 
“Oh GOSH! Reflecting on Hackteria's Collaborative Practices in a Global Do-It...
“Oh GOSH! Reflecting on Hackteria's Collaborative Practices in a Global Do-It...“Oh GOSH! Reflecting on Hackteria's Collaborative Practices in a Global Do-It...
“Oh GOSH! Reflecting on Hackteria's Collaborative Practices in a Global Do-It...
 
Solving Puzzles Benefits Everyone (English).pptx
Solving Puzzles Benefits Everyone (English).pptxSolving Puzzles Benefits Everyone (English).pptx
Solving Puzzles Benefits Everyone (English).pptx
 
Presentation by Andreas Schleicher Tackling the School Absenteeism Crisis 30 ...
Presentation by Andreas Schleicher Tackling the School Absenteeism Crisis 30 ...Presentation by Andreas Schleicher Tackling the School Absenteeism Crisis 30 ...
Presentation by Andreas Schleicher Tackling the School Absenteeism Crisis 30 ...
 
Código Creativo y Arte de Software | Unidad 1
Código Creativo y Arte de Software | Unidad 1Código Creativo y Arte de Software | Unidad 1
Código Creativo y Arte de Software | Unidad 1
 
microwave assisted reaction. General introduction
microwave assisted reaction. General introductionmicrowave assisted reaction. General introduction
microwave assisted reaction. General introduction
 
TataKelola dan KamSiber Kecerdasan Buatan v022.pdf
TataKelola dan KamSiber Kecerdasan Buatan v022.pdfTataKelola dan KamSiber Kecerdasan Buatan v022.pdf
TataKelola dan KamSiber Kecerdasan Buatan v022.pdf
 
Sanyam Choudhary Chemistry practical.pdf
Sanyam Choudhary Chemistry practical.pdfSanyam Choudhary Chemistry practical.pdf
Sanyam Choudhary Chemistry practical.pdf
 
How to Make a Pirate ship Primary Education.pptx
How to Make a Pirate ship Primary Education.pptxHow to Make a Pirate ship Primary Education.pptx
How to Make a Pirate ship Primary Education.pptx
 

Microsoft Word 2007 training.ppt

  • 2. Identify parts of Word 2007 Window
  • 3. Menus  the Microsoft Office Button  the Quick Access Toolbar  the Ribbon
  • 4. Microsoft Office Button  The Microsoft Office button performs many of the functions.  This button allows you to create a new document, open an existing document, save or save as, print, send (through email or fax), publish or close.
  • 5. The Ribbon  The Ribbon is the panel at the top portion of the document. It has seven tabs: Home, Insert, Page Layout, References, Mailings, Review, and View that contain many new and existing features of Word.  Each tab is divided into groups.
  • 6. The ribbon continued … Each of the tabs contains the following tools:  Home: Clipboard, Fonts, Paragraph, Styles, and Editing.  Insert: Pages, Tables, Illustrations, Links, Header & Footer, Text, and Symbols  Page Layout: Themes, Page Setup, Page Background, Paragraph, Arrange  References: Table of Contents, Footnote, Citation & Bibliography, Captions, Index, and Table of Authorities  Mailings: Create, Start Mail Merge, Write & Insert Fields, Preview Results, Finish  Review: Proofing, Comments, Tracking, Changes, Compare, Protect  View: Document Views, Show/Hide, Zoom, Window, Macros
  • 7. Working with Documents  Create a New Document  Open an Existing Document  Save a Document  Rename a Document  Switch between Multiple Documents  Change the Document View  Close a Document
  • 8. Document Views There are many ways to view a document in Word.  Print Layout: This is a view of the document, as it would appear when printed. It includes all tables, text, graphics, and images.  Full Screen Reading: This is a full view length view of a document. Good for viewing two pages at a time.  Web Layout: This is a view of the document, as it would appear in a web browser.  Outline: This is an outline form of the document in the form of bullets.  Draft: This view does not display pictures or layouts, just text.
  • 9. Editing a Document  Move through the text of the document  Use text selection technique  Use cut, copy and paste  Rearrange blocks of text  Delete blocks of text  Search and replace text  Undo or repeat changes
  • 10. Typing and inserting Text  To enter texts just start typing! The text will appear where the blinking cursor is located. Move Action Keystroke Beginning of the line HOME End of the line END Top of the document CTRL+HOME End of the document CTRL+END
  • 11. Selecting Text  To change any attributes of text it must be highlighted first.  Select the text by dragging the mouse over the desired text while keeping the left mouse button depressed, or hold down the SHIFT key on the keyboard while using the arrow buttons to highlight the text. Selection Technique Whole word double-click within the word Whole paragraph triple-click within the paragraph Several words or lines drag the mouse over the words, or hold down SHIFT while using the arrow keys Entire document choose Editing | Select | Select All from the Ribbon, or press CTRL+A
  • 12. Deleting Blocks of Text  Use the BACKSPACE and DELETE keys on the keyboard to delete text. Backspace will delete text to the left of the cursor and Delete will erase text to the right.  Search and Replace Text  To find a particular word or phrase in a document:  Click Find on the Editing Group on the Ribbon  To find and replace a word or phrase in the document, click Replace on the Editing Group of the Ribbon.
  • 13. Undo Changes  To undo changes:  Click the Undo Button on the Quick Access Toolbar  Formatting Text  Use styles  Change font face, font size and text color  Use predefined formatting options  Highlight text  Use format painter  Clear formatting
  • 14. Styles  A style is a format-enhancing tool that includes font typefaces, font size  Change Font Typeface and Size  Click the arrow next to the font name and choose a font.  Remember that you can preview how the new font will look by highlighting the text, and hovering over the new font typeface.
  • 15. To change the font size  Click the arrow next to the font size and choose the appropriate size, or  Click the increase or decrease font size buttons.  Change Text Color  Select the text and click the Colors button included on the Font Group of the Ribbon, or  Highlight the text, right click, and choose the colors tool.  Select the color by clicking the down arrow next to the font color button.
  • 16. Highlight Text  Highlighting text allows you to use emphasize text as you would if you had a marker. To highlight text:  Select the text  Click the Highlight Button on the Font Group of the Ribbon, or  Select the text and right click and select the highlight tool  To change the color of the highlighter click on down arrow next to the highlight button.
  • 17. Copy Formatting  If you have already formatted text the way you want it and would like another portion of the document to have the same formatting, you can copy the formatting.  Select the text with the formatting you want to copy.  Copy the format of the text selected by clicking the Format Painter button on the Clipboard Group of the Home Tab  Apply the copied format by selecting the text and clicking on it.
  • 18. Clear Formatting  To clear text formatting:  Select the text you wish to clear the formatting  Click the Styles dialogue box on the Styles Group on the Home Tab  Click Clear All
  • 19. Formatting Paragraphs  Change paragraph alignment  Indent paragraph  Add borders and shading  Create hyperlinks  Change paragraph and line spacing  Formatting paragraphs allows you to change the look of the overall document.
  • 20. Change Paragraph Alignment  The paragraph alignment allows you to set how you want text to appear. To change the alignment:  Click the Home Tab  Choose the appropriate button for alignment on the Paragraph Group.  Align Left: the text is aligned with your left margin  Center: The text is centered within your margins  Align Right: Aligns text with the right margin  Justify: Aligns text to both the left and right margins.
  • 21. Indent Paragraphs  Indenting paragraphs allows you set text within a paragraph at different margins. There are several options for indenting:  First Line: Controls the left boundary for the first line of a paragraph  Hanging: Controls the left boundary of every line in a paragraph except the first one  Left: Controls the left boundary for every line in a paragraph  Right: Controls the right boundary for every line in a paragraph
  • 22. Add Borders and Shading  You can add borders and shading to paragraphs and entire pages. To create a border around aparagraph or paragraphs:  Select the area of text where you want the border or shading.  Click the Borders Button on the Paragraph Group on the Home Tab  Choose the Border and Shading  Choose the appropriate options
  • 23. Apply Styles  Styles are a present collection of formatting that you can apply to text. To utilize Quick Styles:  Select the text you wish to format.  Click the dialog box next to the Styles Group on the Home Tab.  Click the style you wish to apply.
  • 24. Adding Tables  Create a table  Enter data in a Table  Modify table structure  Modify format of a table  Tables are used to display data in a table format.
  • 25. Create a Table  Place the cursor on the page where you want the new table  Click the Insert Tab of the Ribbon  Click the Tables Button on the Tables Group. You can create a table one of four ways:  Highlight the number of row and columns  Click Insert Table and enter the number of rows and columns  Click the Draw Table, create your table by clicking and entering the rows and columns  Click Quick Tables and choose a table
  • 26. Enter Data in a Table  Place the cursor in the cell where you wish to enter the information. Begin typing. Modify the Table Structure and Format a Table  To modify the structure of a table:  Click the table and notice that you have two new tabs on the Ribbon: Design and Layout. These pertain to the table design and layout.
  • 27. Graphics  Insert symbols and characters  Insert mathematical equations  Insert illustrations, pictures, and Smart Arts  Resize graphics objects  Insert watermarks Word 2007 allows you to insert special characters, symbols, pictures, illustrations, and watermarks.
  • 28. Symbols and Special Characters  Special characters are punctuation, spacing, or typographical characters that are not generally available on the standard keyboard. To insert symbols and special characters:  Place your cursor in the document where you want the symbol  Click the Insert Tab on the Ribbon  Click the Symbol button on the Symbols Group  Choose the appropriate symbol.
  • 29. Illustrations, Pictures, and Smart Art  Word 2007 allows you to insert illustrations and pictures into a document. To insert illustrations:  Place your cursor in the document where you want the illustration/picture  Click the Insert Tab on the Ribbon  Click the Clip Art Button  The dialog box will open on the screen and you can search for clip art.  Choose the illustration you wish to include
  • 30. To insert a picture  Place your cursor in the document where you want the illustration/picture  Click the Insert Tab on the Ribbon  Click the Picture Button  Browse to the picture you wish to include  Click the Picture  Click Insert
  • 31. Smart Art  Smart Art is a collection of graphics you can utilize to organize information within your document. It includes timelines, processes, or workflow. To insert Smart Art  Place your cursor in the document where you want the illustration/picture  Click the Insert Tab on the Ribbon  Click the Smart Art button  Click the Smart Art you wish to include in your document  Click the arrow on the left side of the graphic to insert text or type the text in the graphic.
  • 32. Resize Graphics  All graphics can be resized by clicking the image and clicking one corner of the image and dragging the cursor to the size you want the picture.
  • 33. Proofing a Document  Check spelling and grammar of a document  Find synonyms by using Thesaurus  Setup AutoCorrect tool  Customize the dictionary  Count words
  • 34. Spelling and Grammar  Place the cursor at the beginning of the document or the beginning of the section that you want to check  Click the Review Tab on the Ribbon  Click Spelling & Grammar on the Proofing Group.  Any errors will display a dialog box that allows you to choose a more appropriate spelling or phrasing.
  • 35. Continued …  If you wish to check the spelling of an individual word, you can right click any word that has been underlined by Word and choose a substitution.
  • 36. Thesaurus  The Thesaurus allows you to view synonyms. To use the thesaurus:  Click the Review Tab of the Ribbon  Click the Thesaurus Button on the Proofing Group.  The thesaurus tool will appear on the right side of the screen and you can view word options.  You can also access the thesaurus by right-clicking any word and choosing Synonyms on the menu.
  • 37. Word Count  To check the word count in Word 2007 look at the bottom left corner of the screen. It will give you a total word count or if you have text highlighted it will tell you how many words are highlighted out of the total.
  • 38. Insert Common Header and Footer Information  To insert Header and Footer information such as page numbers, date, or title, first, decide if you want the information in the header (at the top of the page) or in the Footer (at the bottom of the page), then:  Click the Insert Tab on the Ribbon  Click Header or Footer  Choose a style  The Header/Footer Design Tab will display on the Ribbon  Choose the information that you would like to have in the header or footer (date, time, page numbers, etc.) or type in the information you would like to have in the header or footer
  • 39. Insert a Cover Page  Click the Insert Tab on the Ribbon  Click the Cover Page Button on the Pages Group  Choose a style for the cover page
  • 40. Lists  Create bulleted and numbered lists  Create nested lists  Format lists  Lists allow you to format and organize text with numbers, bullets, or in an outline. Bulleted and Numbered Lists  Bulleted lists have bullet points, numbered lists have numbers, and outline lists combine numbers and letters depending on the organization of the list.  To add a list to existing text:  Select the text you wish to make a list  From the Paragraph Group on the Home Tab, Click the Bulleted or Numbered Lists button
  • 41. Nested Lists  A nested list is list with several levels of indented text. To create a nested list:  Create your list following the directions above  Click the Increase or Decrease Indent button 
  • 42. Formatting Lists  The bullet image and numbering format can be changed by using the Bullets or Numbering dialog box.  Select the entire list to change all the bullets or numbers, or Place the cursor on one line within the list to change a single bullet  Right click  Click the arrow next to the bulleted or numbered list and choose a bullet or numbering style.