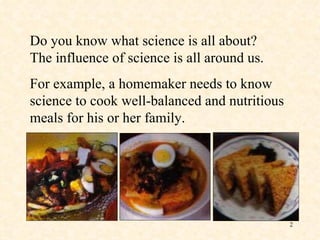
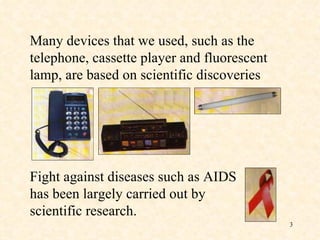
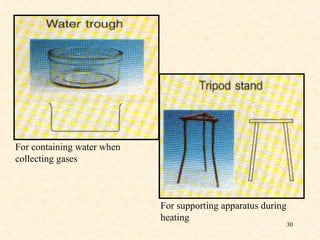
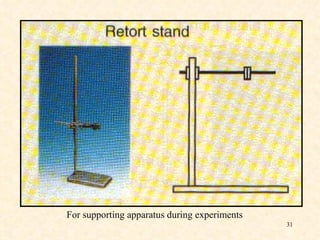
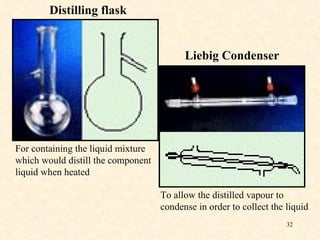
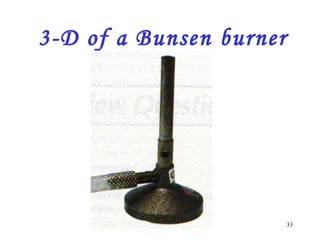
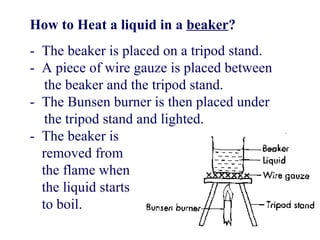
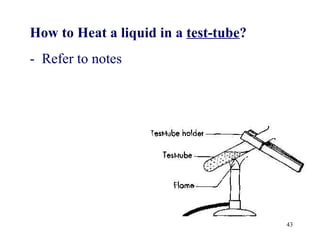
Introduction to  Science
Do you know what science is all about? The influence of science is all around us. For example, a homemaker needs to know science to cook well-balanced and nutritious meals for his or her family.
Many devices that we used, such as the telephone, cassette player and fluorescent lamp, are based on scientific discoveries . Fight against diseases such as AIDS has been largely carried out by scientific research.
Scientists are also making new discoveries to solve global problems such as air and water pollution. From such findings, they are able to warn us about new hazards to our health so that certain precautions can be taken. Hazy weather
Attitudes - Science encourages man to develop positive attitudes. The attitudes important to the learning of science are Attitudes of a GOOD Scientist… Curiosity Perseverance
Cooperation with others Tolerance Positive approach to failure Open-mindedness
Impartiality Healthy scepticism Integrity Refusal to believe superstitions
How Scientist Work?   Refer to notes The Scientific Method
In the Science Laboratory…
Science experiments are usually performed in laboratories. Although performing experiments is fun, it can be dangerous if we are not careful. For our safety as well as the safety of others in the laboratory, we must follow laboratory safety rules. Safety Rules in the Laboratory…
- Do not enter the laboratory without the teacher’s permission. General safety rules - Open all doors and windows unless otherwise instructed by your teacher . - Do not carry out any test or experiment without the teacher’s permission. - Read the instructions first and understand them before starting any experiment. If in doubt, always ask your teacher.
- Handle all apparatus and chemicals carefully and correctly. Always check the label on the container before using the substance it contains. - Do not pour any unused chemicals back  into its container to avoid contamination. - Do not taste any chemicals unless otherwise instructed by the teacher. - Do not eat, drink or play in the laboratory. - Do not tamper with the electrical mains and   other fittings in the laboratory.
- Work tidily. Wash up all used apparatus and dispose of the waste correctly. -  Return the apparatus to their proper storage places after cleaning. - Do not remove any apparatus or chemicals from the laboratory. - Wash your hands after all laboratory   work.
- Wear goggles when mixing or heating   chemicals. Safety rules when heating or mixing chemicals - Place flammable substances away from a naked flames.  - Point the mouth of a test tube or boiling tube which is being heated away from yourself or your friends.
- Report all accidents, injuries, breakage   and spillage to your teacher immediately. When accidents occurs - Should a chemical get into your mouth, spit it out into a basin and rinse your mouth with plenty of water. - If any chemical comes into contact with other parts of your body or clothing, wash thoroughly with water and report to your teacher.
Sleeping in the laboratory Playing in the laboratory Hair may catch fire if not tied up The chemicals in the pipette may enter the mouth Tampering with faulty  electrical components Pointing the mouth of the test tube  which is being heated towards herself Spillage of liquids on the bench Susan Shamala Ali Alice Meng Tat Mike
Containers of dangerous chemicals are labelled with special symbols to warn others about the hazardous nature of the chemicals. Symbol Type of  Proper handling hazardous substances Hazard Symbols…  Flammable substances Example: petrol, kerosene, alcohol Keep flammable substances away from fire or heat.
Explosive substances Example: mixture of hydrogen and oxygen Explosive substances usually explode when heated or lit. Use them according to the instructions given. Corrosive substances Example: strong acid and alkali Avoid direct contact with the corrosive substances which can cause burns. Wash off any spilled acid or alkali on your skin or clothes with plenty of water.
Poison or toxic substances Example: mercury, cyanide, chlorine gas Do not eat, drink or taste these poisonous substances. Use them according to the instructions given. Irritating or stimulative substances Example: chloroform, alcohol, bromine vapour Avoid inhaling the vapour of stimulative substances. Use them in a fume chamber.
This danger sign warns you to be careful. When smelling unknown gases, fan a small part of the gas towards your nose. ! Radioactive substances Example: radioactive carbon, uranium, plutonium Strictly adhere to all safety precautions when handling radioactive substances.
There are many types of apparatus, especially glassware, in your school laboratory. Some common laboratory items are test tubes, beakers, conical flasks, measuring cylinders, test tube holders, gas jars, balances, tripods and retort stands. You must know how to use these apparatus and draw each of them in outline only and in their correct proportions. (sectional diagram) Laboratory Equipments…
For containing or heating small amount of substances For containing or heating small amount of liquids
For containing chemicals or collecting liquids
For preparation of gases if the process requires heating For containing chemicals when preparing gases if the process requires no heating
For measuring a  volume of liquid For measuring a  volume of liquid
For measuring very accurately a specific volume of liquid, such as 10.0 cm 3 , 25.0 cm 3  and 50.0 cm 3 For transferring liquids into a flask
For separating an insoluble solid from a liquid with the help of a piece of filter paper For displaced liquid to flow out through its spout
For collecting gases For separating an experimental set-up from the outside environment
For evaporating a liquid from a solution For heating solids directly over a flame
For containing water when collecting gases For supporting apparatus during heating
For supporting apparatus during experiments
To allow the distilled vapour to condense in order to collect the liquid Liebig Condenser For containing the liquid mixture which would distill the component liquid when heated Distilling flask
3-D of a Bunsen burner
2-D of a Bunsen burner
Gas tap:  to control the flow of gas to the Bunsen burner Parts of a Bunsen burner and their functions… Barrel:  to raise the flame to a suitable height for burning Collar:  to regulate the amount of air entering the burner through the air-holes Air-holes:  to allow air to enter the burner Base:  to support burner so that it will not topple Jet:  to enable the gas to rush out of the gas supply and to draw in air
To Light the Bunsen burner: 1.  The steps are: (i)  Close  the air-holes. (ii)  Put the lighter   above the barrel . (iii)  Turn on   the gas tap . (iv)  Strike the lighter  to ignite the gas. (v )  Open the air-hole  until a  non-luminous flame  is obtained.   Types of flame Luminous flame -  Produced when the gas does not burn completely (when air hole closed) Non-Luminous flame -  Produced when the gas burns completely (when air-hole is  partially opened) Strike back -  Produced when there is too much air (air-hole too big or air-hole opened too fast)
- Occurs when the  air-holes are closed , insufficient air is allowed to mix with the gas therefore  gas  does not burn completely . - Carbon particles are produced. - Orange  in colour. - Appear flickering and unsteady. - Not very hot.  Luminous flame
Luminous flame Must learn how to  draw  and  label  the parts dark zone of unburnt gas blue zone of partial combustion almost colourless zone of complete combustion orange  zone of incomplete combustion Bunsen burner
- Occurs when the  air-holes are  opened , allowing sufficient air into the burner therefore  gas is  burn  completely . - Blue  in colour. - Burns steadily. - Hotter than Luminous flame . - Hottest part of the flame is just above the tip of the dark blue zone. Non-Luminous flame
Non-Luminous flame Must learn how to  draw  and  label  the parts dark zone of unburnt gas blue zone of partial combustion almost colourless zone of complete combustion hottest part Bunsen burner
- Occurs when there is  too much air . - There is a large supply of air because the air-holes are fully opened.  - Instead of burning at the mouth of the barrel, the gas burns at the jet. - When a Strike Back occurs,  turned off immediately. - Very hot.   Strike Back
How to Heat a liquid in a  beaker ? - The beaker is placed on a tripod stand. - A piece of wire gauze is placed between   the beaker and the tripod stand. - The Bunsen burner is then placed under   the tripod stand and lighted. - The beaker is removed from the flame when the liquid starts to boil.
How to Heat a liquid in a  test-tube ? - Refer to notes

Introduction to science

  • 1.
  • 2.
    Do you knowwhat science is all about? The influence of science is all around us. For example, a homemaker needs to know science to cook well-balanced and nutritious meals for his or her family.
  • 3.
    Many devices thatwe used, such as the telephone, cassette player and fluorescent lamp, are based on scientific discoveries . Fight against diseases such as AIDS has been largely carried out by scientific research.
  • 4.
    Scientists are alsomaking new discoveries to solve global problems such as air and water pollution. From such findings, they are able to warn us about new hazards to our health so that certain precautions can be taken. Hazy weather
  • 5.
    Attitudes - Scienceencourages man to develop positive attitudes. The attitudes important to the learning of science are Attitudes of a GOOD Scientist… Curiosity Perseverance
  • 6.
    Cooperation with othersTolerance Positive approach to failure Open-mindedness
  • 7.
    Impartiality Healthy scepticismIntegrity Refusal to believe superstitions
  • 8.
    How Scientist Work? Refer to notes The Scientific Method
  • 9.
    In the ScienceLaboratory…
  • 10.
    Science experiments areusually performed in laboratories. Although performing experiments is fun, it can be dangerous if we are not careful. For our safety as well as the safety of others in the laboratory, we must follow laboratory safety rules. Safety Rules in the Laboratory…
  • 11.
    - Do notenter the laboratory without the teacher’s permission. General safety rules - Open all doors and windows unless otherwise instructed by your teacher . - Do not carry out any test or experiment without the teacher’s permission. - Read the instructions first and understand them before starting any experiment. If in doubt, always ask your teacher.
  • 12.
    - Handle allapparatus and chemicals carefully and correctly. Always check the label on the container before using the substance it contains. - Do not pour any unused chemicals back into its container to avoid contamination. - Do not taste any chemicals unless otherwise instructed by the teacher. - Do not eat, drink or play in the laboratory. - Do not tamper with the electrical mains and other fittings in the laboratory.
  • 13.
    - Work tidily.Wash up all used apparatus and dispose of the waste correctly. - Return the apparatus to their proper storage places after cleaning. - Do not remove any apparatus or chemicals from the laboratory. - Wash your hands after all laboratory work.
  • 14.
    - Wear goggleswhen mixing or heating chemicals. Safety rules when heating or mixing chemicals - Place flammable substances away from a naked flames. - Point the mouth of a test tube or boiling tube which is being heated away from yourself or your friends.
  • 15.
    - Report allaccidents, injuries, breakage and spillage to your teacher immediately. When accidents occurs - Should a chemical get into your mouth, spit it out into a basin and rinse your mouth with plenty of water. - If any chemical comes into contact with other parts of your body or clothing, wash thoroughly with water and report to your teacher.
  • 16.
    Sleeping in thelaboratory Playing in the laboratory Hair may catch fire if not tied up The chemicals in the pipette may enter the mouth Tampering with faulty electrical components Pointing the mouth of the test tube which is being heated towards herself Spillage of liquids on the bench Susan Shamala Ali Alice Meng Tat Mike
  • 17.
    Containers of dangerouschemicals are labelled with special symbols to warn others about the hazardous nature of the chemicals. Symbol Type of Proper handling hazardous substances Hazard Symbols… Flammable substances Example: petrol, kerosene, alcohol Keep flammable substances away from fire or heat.
  • 18.
    Explosive substances Example:mixture of hydrogen and oxygen Explosive substances usually explode when heated or lit. Use them according to the instructions given. Corrosive substances Example: strong acid and alkali Avoid direct contact with the corrosive substances which can cause burns. Wash off any spilled acid or alkali on your skin or clothes with plenty of water.
  • 19.
    Poison or toxicsubstances Example: mercury, cyanide, chlorine gas Do not eat, drink or taste these poisonous substances. Use them according to the instructions given. Irritating or stimulative substances Example: chloroform, alcohol, bromine vapour Avoid inhaling the vapour of stimulative substances. Use them in a fume chamber.
  • 20.
    This danger signwarns you to be careful. When smelling unknown gases, fan a small part of the gas towards your nose. ! Radioactive substances Example: radioactive carbon, uranium, plutonium Strictly adhere to all safety precautions when handling radioactive substances.
  • 21.
    There are manytypes of apparatus, especially glassware, in your school laboratory. Some common laboratory items are test tubes, beakers, conical flasks, measuring cylinders, test tube holders, gas jars, balances, tripods and retort stands. You must know how to use these apparatus and draw each of them in outline only and in their correct proportions. (sectional diagram) Laboratory Equipments…
  • 22.
    For containing orheating small amount of substances For containing or heating small amount of liquids
  • 23.
    For containing chemicalsor collecting liquids
  • 24.
    For preparation ofgases if the process requires heating For containing chemicals when preparing gases if the process requires no heating
  • 25.
    For measuring a volume of liquid For measuring a volume of liquid
  • 26.
    For measuring veryaccurately a specific volume of liquid, such as 10.0 cm 3 , 25.0 cm 3 and 50.0 cm 3 For transferring liquids into a flask
  • 27.
    For separating aninsoluble solid from a liquid with the help of a piece of filter paper For displaced liquid to flow out through its spout
  • 28.
    For collecting gasesFor separating an experimental set-up from the outside environment
  • 29.
    For evaporating aliquid from a solution For heating solids directly over a flame
  • 30.
    For containing waterwhen collecting gases For supporting apparatus during heating
  • 31.
    For supporting apparatusduring experiments
  • 32.
    To allow thedistilled vapour to condense in order to collect the liquid Liebig Condenser For containing the liquid mixture which would distill the component liquid when heated Distilling flask
  • 33.
    3-D of aBunsen burner
  • 34.
    2-D of aBunsen burner
  • 35.
    Gas tap: to control the flow of gas to the Bunsen burner Parts of a Bunsen burner and their functions… Barrel: to raise the flame to a suitable height for burning Collar: to regulate the amount of air entering the burner through the air-holes Air-holes: to allow air to enter the burner Base: to support burner so that it will not topple Jet: to enable the gas to rush out of the gas supply and to draw in air
  • 36.
    To Light theBunsen burner: 1. The steps are: (i) Close the air-holes. (ii) Put the lighter above the barrel . (iii) Turn on the gas tap . (iv) Strike the lighter to ignite the gas. (v ) Open the air-hole until a non-luminous flame is obtained. Types of flame Luminous flame - Produced when the gas does not burn completely (when air hole closed) Non-Luminous flame - Produced when the gas burns completely (when air-hole is partially opened) Strike back - Produced when there is too much air (air-hole too big or air-hole opened too fast)
  • 37.
    - Occurs whenthe air-holes are closed , insufficient air is allowed to mix with the gas therefore gas does not burn completely . - Carbon particles are produced. - Orange in colour. - Appear flickering and unsteady. - Not very hot. Luminous flame
  • 38.
    Luminous flame Mustlearn how to draw and label the parts dark zone of unburnt gas blue zone of partial combustion almost colourless zone of complete combustion orange zone of incomplete combustion Bunsen burner
  • 39.
    - Occurs whenthe air-holes are opened , allowing sufficient air into the burner therefore gas is burn completely . - Blue in colour. - Burns steadily. - Hotter than Luminous flame . - Hottest part of the flame is just above the tip of the dark blue zone. Non-Luminous flame
  • 40.
    Non-Luminous flame Mustlearn how to draw and label the parts dark zone of unburnt gas blue zone of partial combustion almost colourless zone of complete combustion hottest part Bunsen burner
  • 41.
    - Occurs whenthere is too much air . - There is a large supply of air because the air-holes are fully opened. - Instead of burning at the mouth of the barrel, the gas burns at the jet. - When a Strike Back occurs, turned off immediately. - Very hot. Strike Back
  • 42.
    How to Heata liquid in a beaker ? - The beaker is placed on a tripod stand. - A piece of wire gauze is placed between the beaker and the tripod stand. - The Bunsen burner is then placed under the tripod stand and lighted. - The beaker is removed from the flame when the liquid starts to boil.
  • 43.
    How to Heata liquid in a test-tube ? - Refer to notes