

Recommended
Recommended
More Related Content
What's hot
What's hot (20)
Similar to CSS Module 9 - Network Printer
Similar to CSS Module 9 - Network Printer (20)
Recently uploaded
Recently uploaded (20)
CSS Module 9 - Network Printer
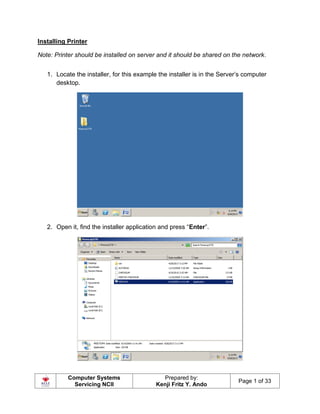
- 1. Computer Systems Servicing NCII Prepared by: Kenji Fritz Y. Ando Page 1 of 33 Installing Printer Note: Printer should be installed on server and it should be shared on the network. 1. Locate the installer, for this example the installer is in the Server’s computer desktop. 2. Open it, find the installer application and press “Enter”.
- 2. Computer Systems Servicing NCII Prepared by: Kenji Fritz Y. Ando Page 2 of 33 3. Choose the default setting and click “Next”. 4. Click “Easy Install”
- 3. Computer Systems Servicing NCII Prepared by: Kenji Fritz Y. Ando Page 3 of 33 5. Click “Install”. 6. Click “Yes” to accept the agreement.
- 4. Computer Systems Servicing NCII Prepared by: Kenji Fritz Y. Ando Page 4 of 33 7. Click “Next”. 8. Wait until the installation process is finish.
- 5. Computer Systems Servicing NCII Prepared by: Kenji Fritz Y. Ando Page 5 of 33 9. By this time, plug the printer into your computer via USB and turn it on. Wait until it detects the printer.
- 6. Computer Systems Servicing NCII Prepared by: Kenji Fritz Y. Ando Page 6 of 33
- 7. Computer Systems Servicing NCII Prepared by: Kenji Fritz Y. Ando Page 7 of 33 10.Click “Next”
- 8. Computer Systems Servicing NCII Prepared by: Kenji Fritz Y. Ando Page 8 of 33 11.Click “Next” 12.Click “Agree” to finish installation process.
- 9. Computer Systems Servicing NCII Prepared by: Kenji Fritz Y. Ando Page 9 of 33 Sharing Printing 1. Click “Start” and go to “Device and Printers”
- 10. Computer Systems Servicing NCII Prepared by: Kenji Fritz Y. Ando Page 10 of 33 2. Under Printer and Faxes, select the printer and right click. Select “Printer Properties” 3. Click the Sharing tab and tick “Share this printer”, click “Apply” and “OK”
- 11. Computer Systems Servicing NCII Prepared by: Kenji Fritz Y. Ando Page 11 of 33 4. And now, it should be shared in the network. All host (under the same network) should see resources that is being shared by the server. All you need to do is to access the IP address of the computer that share the network resources (e.g printer). 5. For instance, go to client computer and type 192.168.1.5 (IP address of the server where the printer is installed and shared). A window will prompt and all the resources and folder that is shared on that computer will be shown.
- 12. Computer Systems Servicing NCII Prepared by: Kenji Fritz Y. Ando Page 12 of 33 1st method – Adding Network printer on client computer 1. Click Start and go to “Device and Printers” 2. At the upper left corner, click “Add a printer”.
- 13. Computer Systems Servicing NCII Prepared by: Kenji Fritz Y. Ando Page 13 of 33 3. Click “Add a network, wireless or Bluetooth printer” 4. Click “The printer that I want isn’t listed”
- 14. Computer Systems Servicing NCII Prepared by: Kenji Fritz Y. Ando Page 14 of 33 5. Tick “Browse for a printer” radio button and click “Next”. 6. Click “Network”, if you see the server’s computer under Network, select it and click “Select”.
- 15. Computer Systems Servicing NCII Prepared by: Kenji Fritz Y. Ando Page 15 of 33 7. If Servers computer cannot be seen under Network, in the Printer textbox enter Server’s address. 8. Select the shared printer.
- 16. Computer Systems Servicing NCII Prepared by: Kenji Fritz Y. Ando Page 16 of 33 9. It will try to connect to the printer, looking for driver. If successful, printer will be installed in the client. 10.Click “Next”.
- 17. Computer Systems Servicing NCII Prepared by: Kenji Fritz Y. Ando Page 17 of 33 11.You have the option to “Print a Test Page” or click “Next” and do the Print a Test Page later. 12.Now, we have successfully installed a network printer e.i Canon iP2700 series on 192.168.1.5
- 18. Computer Systems Servicing NCII Prepared by: Kenji Fritz Y. Ando Page 18 of 33 2nd method – Adding Network printer on client computer 13.Directly go to the servers network, just input in the search bar two backslash with the IP address of the target computer (e.g 192.168.1.5) 14.If a login screen will appear use the Administrator login credentials. If no logon screen after the 1st step, you will be prompted automatically to the shared resources of the target computer.
- 19. Computer Systems Servicing NCII Prepared by: Kenji Fritz Y. Ando Page 19 of 33 15.All resources and folder shared on the target address will appear in a new window. 16.Double click the shared printer to install the network printer to the client computer.
- 20. Computer Systems Servicing NCII Prepared by: Kenji Fritz Y. Ando Page 20 of 33 17.If no problem during the process, the network printer will be installed on the client computer. 18.We can check by going to “Device and Printers” to see if the printer driver is installed. It is a network printer that is connected to the server (192.168.1.5), that would mean that the server must be available/ turn on so that clients can print to this shared printer.
- 21. Computer Systems Servicing NCII Prepared by: Kenji Fritz Y. Ando Page 21 of 33 19.Right click to the printer icon and select “Printer Properties”. 20.One of our goal for the assessment is to Print Test Page (contains printer info…) and print candidate’s basic info like Full Name, Address and Contact Number.
- 22. Computer Systems Servicing NCII Prepared by: Kenji Fritz Y. Ando Page 22 of 33 21.Prepare a bond paper on the printer, if it’s ready then click “Print Test Page”. 1st page - Printed Hard Copy of Printer Test Page
- 23. Computer Systems Servicing NCII Prepared by: Kenji Fritz Y. Ando Page 23 of 33 22.Open Notepad and type the following: Full name, Address and Contact number. Press Ctrl + P (shortcut key for printing), select the network printer (Canon IP2700 series on 192.168.1.5) and click “Print” 23.A dialog box will appear that it is printing. If done, call the attention of the assessor and surrender the printed copy to the assessor.
- 24. Computer Systems Servicing NCII Prepared by: Kenji Fritz Y. Ando Page 24 of 33 2nd Page – Printed Candidate Basic Info
- 25. Computer Systems Servicing NCII Prepared by: Kenji Fritz Y. Ando Page 25 of 33 Printer Security – Allow or disallow a certain user to access the printer 1. Click “Start” and go to “Device and Printers” 2. Go to “Security”, click “Everyone” and remove it.
- 26. Computer Systems Servicing NCII Prepared by: Kenji Fritz Y. Ando Page 26 of 33 3. Click “Add…” button, and type the user you want to give permission to access the printer. For this example, user1 will be allow to use the printer. 4. Click “Check Names”, it should auto fill the object name if there is a match on the ADDS database.
- 27. Computer Systems Servicing NCII Prepared by: Kenji Fritz Y. Ando Page 27 of 33 5. Click “Apply” and “OK”. Now user1 with a name of Cardo T. Dalisay is added to group/user that has an allow permission to access the printer. 6. Now, login to Client computer using user1 credentials. Let’s see if the we can access the printer since we have allow it in the previous step. For this guide we are using accounts in the ADDS Users and Computers we have previously configured. user1 – Cardo T. Dalisay user2 – Onyok T. Dalisday
- 28. Computer Systems Servicing NCII Prepared by: Kenji Fritz Y. Ando Page 28 of 33 7. Click “Start” and in the search bar type 192.168.1.5 (IP address of the server where the printer is installed and shared). 8. You will be prompted automatically to the shared resources of the target computer.
- 29. Computer Systems Servicing NCII Prepared by: Kenji Fritz Y. Ando Page 29 of 33 9. Double click the shared printer to install the network printer to the client computer. 10.It will download the driver from the target computer.
- 30. Computer Systems Servicing NCII Prepared by: Kenji Fritz Y. Ando Page 30 of 33 11.The driver is successfully installed on user1 account since we have given user1 permission to access/ use the network printer. 12.Now check whether the printer is installed, go to “Device and Printers”.
- 31. Computer Systems Servicing NCII Prepared by: Kenji Fritz Y. Ando Page 31 of 33 13.Right click to the printer icon and select “Printer Properties”. 14.Click “Print Test Page”. Now we can conclude that the security setting we set in the printer is working. It gives permission to user1to access/ used the printer. Only user1 among the users in the ADDS User and Computer Database is allowed to use the printer.
- 32. Computer Systems Servicing NCII Prepared by: Kenji Fritz Y. Ando Page 32 of 33 15.Now, login to Client computer using user2 credentials – Onyok T. Dalisay. 16.Click “Start” and in the search bar type 192.168.1.5 (IP address of the server where the printer is installed and shared).
- 33. Computer Systems Servicing NCII Prepared by: Kenji Fritz Y. Ando Page 33 of 33 17.Double click the shared printer to install the network printer to the client computer. 18.As what we can see in the image below, there is an error, since in the security configuration above - user2 is not allowed to use the shared printer. 19.If just for instance you want to allow user2 to use the printer, then add user2 account in the printer’s security configuration.