Installing TP-Link PS310U V2 on Windows 10
•Download as DOCX, PDF•
3 likes•11,408 views

Installing TP-Link PS310U V2 on Windows 10, without having to run MFP Server Application. Since the Windows 10 keep showing Blue Screen Of Death (BSOD) on running MFP Server, i have come up with this idea. Combination of Bonjour approaches that i got from Internet.

Recommended
Recommended
More Related Content
What's hot
What's hot (20)
Similar to Installing TP-Link PS310U V2 on Windows 10
Similar to Installing TP-Link PS310U V2 on Windows 10 (20)
Recently uploaded
Recently uploaded (20)
Installing TP-Link PS310U V2 on Windows 10
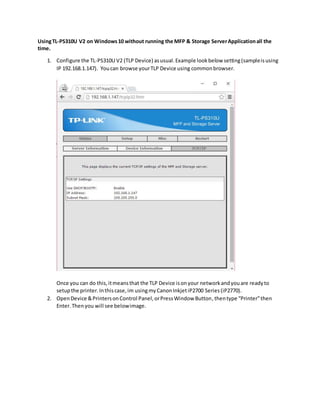
- 1. UsingTL-PS310U V2 on Windows10 without running the MFP & Storage ServerApplicationall the time. 1. Configure the TL-PS310U V2 (TLP Device) asusual.Example lookbelow setting(sampleisusing IP 192.168.1.147). Youcan browse yourTLP Device using commonbrowser. Once you can do this,itmeansthat the TLP Device isonyour networkandyouare readyto setupthe printer.Inthiscase,im usingmyCanonInkjetiP2700 Series(iP2770). 2. OpenDevice &PrintersonControl Panel,orPressWindow Button,thentype “Printer”then Enter.Thenyou will see belowimage.
- 2. 3. Click“Adda printer”.Thenit will automaticallysearchfordevices.Instead,click“The Printer that I wantisn’tlisted”.
- 3. 4. Thenit will showAddPrinterpage.Youwill be shownsome selections.Select“Addalocal printeror networkprinterwithmanual settings”.Thennext. 5. On the nextpage,youwill be askedforprinterport.Inthiscase select“Create anew port”, then select“StandardTCP/IPPort”.Thennext. 6. Nextpage youwill be askedforIPaddressof you device.PutinyourTLP Device’sIPAddressand on the Port Name,addsome text.Forexample,192.168.1.147_X. AlsorememberNOTtotick
- 4. the “Querythe printerandautomaticallyselectthe drivertouse”. 7. You, thenwill be shownapage withDetectingTCP/IPPort.Waita few minutesdependsonyour networkconfiguration.Itwill show youthatthe systemcannotfindanydevices.Don’tworry, thisisas expected.Thenyouwill be shownthe page likenextpage. Select“Custom”thenclick“Settings…”.
- 5. 8. Thenyou will be poppedoutawindow like below. SelectProtocol to“LPR”. In thiswindow popup,youneedtofill inthe LPR Settings,the “Queue Name”.The Queue Name istakenfromMFP Application.Follow the redarrow ().
- 6. 9. Above image isexampleformycase.For yourcase it wouldbe differenttoeachTLP Devicesand Printerdevices. Then,put the Queue Name fromMFPApplicationtopreviousWindow Popup.Itwill be somethinglikethis. Let othersettingasis.ThenPress OK,you will be backto previouswindowpage.
- 7. 10. In thispage,justclickNext. 11. You will be askedtoselectyourprinterdriver.Selectbasedonyourprintermodel andtype from Windowsstandarddrivers.Oryoucan use from yourprinterCD/DVDsetupkit. Afterdone selecting,thenNext. 12. Thenyou will be askedwhetheryouwouldliketouse currentdriverorreplace it.Thisis only happenwhenyoualreadyhave printerdriverbefore.Iassume thatyouhave installed
- 8. previously.So,Iwouldselecttoreplace like screenbelow. 13. Thenput the name of yourcomputerhere.My example,will have Copy1since Ihave the printeralreadyinstalled.Youcanrename asfree as youwantedto.
- 9. 14. Also,if youwantto share yourprinterovernetworkyoucan alsosetinhere. But for mycase,i didn’tshare. 15. Last but not least,thisisthe endof installingprocess.Setthisprinterasdefaultbytickingthe selection“Setasthe defaultprinter”ornot.Alsoif youwantto do Printtest,justpressthe button“Printa test page”.ThenFinish.Hope itworksforyou guys.