CSS Module 8 - Configuring the Wireless Access Point
•
1 like•698 views

CSS Module 8 - Configuring the Wireless Access Point (WAP)

Recommended
More Related Content
What's hot
What's hot (20)
Similar to CSS Module 8 - Configuring the Wireless Access Point
Similar to CSS Module 8 - Configuring the Wireless Access Point (20)
Recently uploaded
Recently uploaded (20)
CSS Module 8 - Configuring the Wireless Access Point
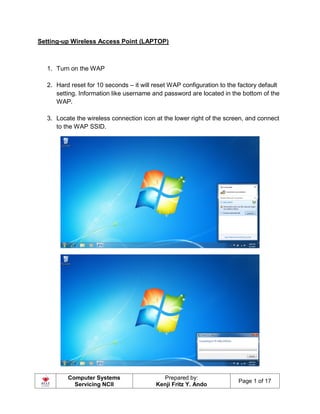
- 1. Computer Systems Servicing NCII Prepared by: Kenji Fritz Y. Ando Page 1 of 17 Setting-up Wireless Access Point (LAPTOP) 1. Turn on the WAP 2. Hard reset for 10 seconds – it will reset WAP configuration to the factory default setting. Information like username and password are located in the bottom of the WAP. 3. Locate the wireless connection icon at the lower right of the screen, and connect to the WAP SSID.
- 2. Computer Systems Servicing NCII Prepared by: Kenji Fritz Y. Ando Page 2 of 17 4. Click “Connect to the network without setting it up”.
- 3. Computer Systems Servicing NCII Prepared by: Kenji Fritz Y. Ando Page 3 of 17 5. Since we reset the WAP, by default we can connect without having a password 6. Right click the wireless icon and click “Open Network and Sharing Center”.
- 4. Computer Systems Servicing NCII Prepared by: Kenji Fritz Y. Ando Page 4 of 17 7. Click “Wireless Network Connection” 8. Wireless Network Connection Status will prompt, click “Details…”
- 5. Computer Systems Servicing NCII Prepared by: Kenji Fritz Y. Ando Page 5 of 17 9. Find the “IPv4 Default Gateway”, we will use the address (192.168.1.1) to access the WAP. 10.Open Internet Explorer and type the default gateway in step 9 – 192.168.1.1.
- 6. Computer Systems Servicing NCII Prepared by: Kenji Fritz Y. Ando Page 6 of 17 11.Use the following credentials on the bottom of the WAP a. username : admin b. password : admin 12.Click Login
- 7. Computer Systems Servicing NCII Prepared by: Kenji Fritz Y. Ando Page 7 of 17 13.Our goal is to change the default broadcast SSID, apply authentication and enabling MAC filtering. 14.Go to “Interface Setup” and under that select “Wireless”. 15.Scroll down, find the SSID and implement authentication.
- 8. Computer Systems Servicing NCII Prepared by: Kenji Fritz Y. Ando Page 8 of 17 16.Change the SSID in accordance to your workstation number. For instance, if you are in workstation 5 rename SSID to CORE_WAP#5. Implement WPA- PSK/WPA-2-PSK authentication type and setup password – Password123. 17.Locate “Wireless MAC Address Filter” still under the same page. Its main function is to allow certain MAC addresses (PC’s) to access the wireless network (Allow Association).
- 9. Computer Systems Servicing NCII Prepared by: Kenji Fritz Y. Ando Page 9 of 17 18.Locate your MAC address or physical address by going to CMD. We need to register first the laptop MAC address to the filter so that we can access the wireless network later. Note: Only MAC address registered in the Allow Association can access the network after it will be save. 19.Type “getmac” to list computers physical address.
- 10. Computer Systems Servicing NCII Prepared by: Kenji Fritz Y. Ando Page 10 of 17 20.Or you can command “ipconfig /all” to list a much more detailed info about the computers adapters. Find the “Wireless LAN adapter Wireless Network Connection” and copy its physical address. 21.Click “Save” and wait for a while.
- 11. Computer Systems Servicing NCII Prepared by: Kenji Fritz Y. Ando Page 11 of 17 22.Ideally we save the configuration we will be disconnected to the WAP network since we have changed the SSID and put password on it. 23.Connect to the new SSID.
- 12. Computer Systems Servicing NCII Prepared by: Kenji Fritz Y. Ando Page 12 of 17 24.Use the password we set to it earlier – Password123. 25.Since our laptop MAC address is registered in the MAC filtering, there will be no problem in connecting to the WAP network.
- 13. Computer Systems Servicing NCII Prepared by: Kenji Fritz Y. Ando Page 13 of 17 26.Connect your cellular phone to the WAP_CORE#5 SSID. Use the password we set – Password123.
- 14. Computer Systems Servicing NCII Prepared by: Kenji Fritz Y. Ando Page 14 of 17 27. Since MAC filtering is enable, we can’t connect our cellular phone to the network even if we know the password. 28.To see phone MAC address, go to “Settings” under that click “About”.
- 15. Computer Systems Servicing NCII Prepared by: Kenji Fritz Y. Ando Page 15 of 17 29.Click “Status” 30.Locate “Wi-Fi MAC address”, copy it and add to the Wireless MAC Filtering of the Access Point.
- 16. Computer Systems Servicing NCII Prepared by: Kenji Fritz Y. Ando Page 16 of 17 31.Access again 192.168.1.1. 32.Add the MAC address of your phone to the Wireless MAC Filtering and click “Save”.
- 17. Computer Systems Servicing NCII Prepared by: Kenji Fritz Y. Ando Page 17 of 17 33.Try to connect again to the CORE_WAP#5. 34.It should connect to the Wireless Network since we already register the phone’s MAC address to the Wireless MAC Filtering.