FULL ENJOY - 9953040155 Call Girls in Gandhi Vihar | Delhi
Development diary front cover
1. Development Diary…
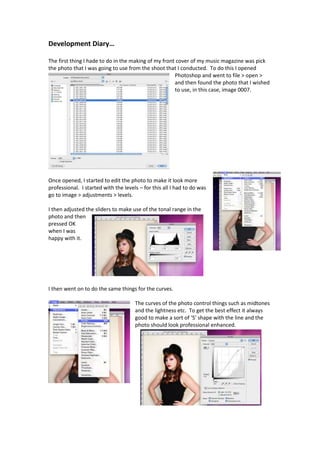
The first thing I hade to do in the making of my front cover of my music magazine was pick
the photo that I was going to use from the shoot that I conducted. To do this I opened
Photoshop and went to file > open >
and then found the photo that I wished
to use, in this case, image 0007.
Once opened, I started to edit the photo to make it look more
professional. I started with the levels – for this all I had to do was
go to image > adjustments > levels.
I then adjusted the sliders to make use of the tonal range in the
photo and then
pressed OK
when I was
happy with it.
I then went on to do the same things for the curves.
The curves of the photo control things such as midtones
and the lightness etc. To get the best effect it always
good to make a sort of ‘S’ shape with the line and the
photo should look professional enhanced.
2. Finally I unsharp masked the photo to make it really clear.
To do this all I needed to do was go to filter > sharpen > unsharp mask. I then ensured that
the amount was 150, the radius was 2.0 and the threshold was 4 – this is important other
wise the photo could end up looking too harsh or grainy.
Here is the finished photo compared to its original state.
As you can see the second photo looks a lot more professional – the colours look richer and
the photo appears clearer. As my music genre for my magazine is Gothic/industrial/cyber,
the appearance of my model in the photo my be flawless and look it’s best. This links to the
culture that surrounds my audience and how their appearance and what they chose to wear
or style themselves is always perfect as it plays such a big part in their musical influences.
3. Next, I went on to ‘perfecting’ the photo in terms of any flaws the model my
have had e.g. an imperfection on her skin etc. To do this I used the spot
healing tool on Photoshop and simply used it on any areas I wanted to look
better. The tool works by ‘blotting out’ the imperfection and making it match the skin tone
around it.
For example, here you can see an imperfection on the arm of model, but by clicking on it
using the spot healing tool you can see how it has gotten rid of it.
Finally, to make the skin look ‘perfect’, and to comply with typical conventions of the
‘Gothic’ genre of having clear pale skin, I air- brushed my models skin.
To do this I duplicated the layer of the
image – the ensured that should I
make any mistakes I could just get rid
of the layer and the rest of the image
that I had already edited would be
fine. All I need to do was go to the
selection bar at the top of the page
and select duplicate layer.
Once I had completed this I went on to select the
brush tool. I had previously downloaded some
‘skin brushes’ off of the Internet for Photoshop
and these brushes allowed me to achieve the
effect I wanted without the skin looking ‘fake’ of over edited as
they are very fine.
I then just used the colour selector tool or the eye-dropper to
select the colour that I wanted from the skin (as the skin isn’t
the same tone all over).
4. Here is the before and after of the image – you can see here that the skin looks so clear and
‘perfect’ and the skin tone has been evened out more which helps to comply with
conventions of the culture of the music genre.
Now that I have altered the levels, curves
and ‘perfected’ the photo, I was ready to
‘cut’ it away from the background ready to
be applied to a new document. To do this I used the
magnetic lasso tool on Photoshop. This tool allows me to
quickly ‘outline’ the part of the photo I want, and then I
can go in and use the mask tool to neaten it up with the
eraser tool.
Once I had done this and gotten it how I wanted I went on open a new document that would
act the cover for my magazine and something I could apply my ‘cut-out’ image to.
All I was required to do at this stage was go to file and select new, then this dialogue box
came up:
I then changed the dimensions to that of an A4 page and pressed OK.
5. I then had my new page created and ready to apply the image onto it.
To do this I took the selected image using the move tool and dragged
and dropped it onto the new document.
Next, I resized the image till it was how I wanted it. For this, I used a keyboard
shortcut by holding down the control key and pressing the T button, I was able to
resize the image to my liking and then simply press entre when I was happy with it.
Another keyboard tool I used was the shift key – by holding this down when resizing
the image it stops the proportion changing so my model
didn’t end up looking ‘funny shaped’.
Here the finished, resized photo on the new document.
I then had to move onto the background of the cover. To do this I
duplicated the background layer by right clicking it with the
mouse and selecting the duplicate option. I then decided that on
this layer I was going to apply a slight gradient – to do this I used
the gradient tool in Photoshop.
6. Once I had applied the gradient by dragging the mouse
across the entire cover, this is what it looked like. (The
colours I chose were a light pink and pale grey.)
The next thing I included was the title. I found the text for my title on a font website
and then saved the image to use in my magazine.
I firstly opened the file by using the normal file> open method.
Once open, I then selected the magic wand tool on Photoshop – I used this to
select all the white space around the text itself as I didn’t want this on my cover. I
then went to the task bar at the top and picked ‘select’. I wanted to inverse the
selection I had made so only the text
to put onto the cover. Once inversed,
I used the move cursor on Photoshop
and dragged and dropped the text
selection onto the cover.
I then positioned and resized it by
using a keyboard shortcut; holding
down ‘cmd’ and ‘T’.
I then did the exact same
thing for the slogan that I
had for my magazine.
This is what the heading
looked like after.
7. To make the heading more unique and something that would stand out in amongst
other magazines in a shop, I wanted to add something that would give it it’s own
identity - I decided to simply add a line going through the slogan on the heading.
All I needed to do was select the shape tool on Photoshop and pick the
‘line’ option.
I then had to ‘draw’ the line by dragging it across the page and make it the length
and weight that I wanted. I then position the line
onto of the text and made it the same colour.
Because the line was really strong it kind of
distracted from the text itself so I decided to
change the percentage of opacity that it had. For
this I simply selected the layer and lowered the
level of opacity on the panel at the top of the
layers bar.
Here is what the finished headline looked like.
Text was the next thing I looked to add to the cover (in terms of coverlines etc.)
The text was relatively easy to decide and arrange. I just clicked on the text
icon in Photoshop and then used the text tool bar at the top of the screen to
change the text to what I desired – as you can see here I used a font called ‘Bank
Gothic’.
8. The CD was the next element to on the cover that I
looked at adding. The CD that I wanted to included was
is going to be in a cardboard flat case that could be
easily attached to the magazine and that has smaller
dimensions than a typical plastic CD case – the
measurements being 12 x 12. So I had a guide of where
I would be putting the CD and for the image and text for
it I drew a 12 x 12 black square using the shape tool and
positioned where it was going to be.
I then inserted the image I want
to put on the cover (just like how
I did the main image) and resized
and positioned this too.
Finally I added the text using the text option on
Photoshop and editing it to what I wanted using
the text tool bar.
I then went about adding in the splatter effect that I wanted on the background as
all the main components were on the cover now.
For this I went onto the Internet and downloaded some
special Photoshop brushes that I could use to achieve the
effect that I wanted. I then loaded the brushes and they
appeared in my brushes collection as shown. It was then a
case of experimenting with the diameter of all the brushes
and the various shapes of them to find the ones that I
wanted to use.
Once I had done this I then had to change the level of
opacity so that the colour wasn’t as strong. I did this using
the paint brush tool bar.
9. Before I just started apply the effect using the
brushes I had to ensure that I was on the right
level so that the effect would appear underneath
all the images and text. For this I simply selected
the ‘background copy’ layer that I made
previously in the layers bar.
This is what it looked like when I had finished.
(I used black and a magenta/purple colour as it
matched the house style.)
(Ignore photo on CD – it was only used to
make everything clearer during construction.)
The next thing I chose do to was the
straplines. I wanted straplines at both the
bottom and top of the cover. I just used the
shape tool again to make these and filled
them in black.
I then positioned it where I wanted and made it the correct size.
This is what it looked like after.
10. The barcode was the next thing I added to the cover. I found a picture of a barcode
that I wanted to use from the Internet and then opened it in Photoshop.
Once I did this I used the move cursor tool in Photoshop to drag and drop the
barcode onto the cover. When I had done this I just resized and positioned it like
with the other elements on the cover.
Finally I did the insert that I wanted to have on the cover. I again used the shape
tool in Photoshop, only changing it to a circle. Once I had the circle positioned and
sized to what I wanted I went on to add the text onto it. I used the text tool in
Photoshop again for this.
Here is what it looked like.