SlideShare a Scribd company logo
1 of 19
To begin creating the second disc for my digi-pack, I essentially just had to
go through the same process as when I was creating the first disk, but I
would just be adding different features. The very first thing I needed to
do was add a template of a disk and because I already had one saved in
my documents, it just meant that I had to open it. To open this template
all I had to do was click ‘File’ and then ‘Open’.
This pop up box then appeared
and I was able to find the location
in which this template was saved
in. Once I had found the location
this template was in, I then
selected it and clicked ‘Open’.
In the image I have presented on the
left, you are able to see what this
template looked like once I had got it
onto my document.
The next thing I wanted to do
was add the same black
background that I used on the
previous disk and this meant as
it was already saved in my
documents, I just had to open
my documents to find it. So to
do this, all I had to do was click
‘File’ and then ‘Open’. Once I
had done that, this pop up box
then appeared and I was able
to find the location in which
this image was saved in. Once I
had found the image, I then
selected it and clicked ‘Open’.
Once I had got the image onto my document, I then needed to resize it as it
was too big to fit on my document and to do this I just had to click ‘Edit’,
‘Transform’ and then ‘Scale’. While making the image smaller, I had to hold
down the ‘Shift’ button on the keyboard and this was to ensure that the
image wouldn’t go obscure and would look the same, but would just be
smaller.
After I had changed the size
of the image, I then wanted
to change the colour of the
image and I was able to do
this by clicking ‘Image’,
‘Adjustments’ and then
‘Brightness/Contrast’.
This pop up box then appeared and I was
able to change the brightness and contrast
settings of the image. Once I had changed
the settings to what I wanted them to be, I
then clicked ‘OK’.
In the image I have
presented on the left, you
are able to see how my
second disk was beginning
to look.
I then decided to copy the artist and album
name text from the first disk and I moved it
onto this disk so I wouldn’t have to create
them again and ensure they are the right size.
You are able to see this as I have presented it
in the image on the left.
I then wanted to add some
effects to the artist name that
had been presented on the disk
to make it stand out more and I
was able to do this by clicking
‘Layer’, ‘Layer Style’ and then
‘Blending Options’.
This pop up box then appeared and I was able to
add the effects I wanted to the text. The effects I
decided to use were called ‘Bevel and Emboss’,
‘Contour’, ‘Stroke’, ‘Inner Shadow’, ‘Outer Glow’
and ‘Drop Shadow’. Once I had selected all of the
effects I wanted, I then clicked ‘OK’.
After that, I then wanted to add
some effects to the album name
to again make it stand out more
and I was able to do this by
clicking ‘Layer’, ‘Layer Style’ and
then ‘Blending Options’.
This pop up box then appeared and I was
able to choose the effects I wanted. The
effects I decided to use were called ‘Bevel
and Emboss’, ‘Stroke’, ‘Inner Shadow’ and
‘Drop Shadow’. Once I had selected all of
the effects I wanted, I then selected ‘OK’.
Once I had made changes to the
text, I then wanted to add an age
restriction logo to enable the
viewer to know what ages would
be able to watch the video that is
on the disk. So to do this, I went
onto Google Images and once I
had found a logo I wanted to
use, I then right clicked on it and
selected ‘Save Image As’.
This pop up box then appeared and I was
able to choose a location to save this
image in. Once I had found somewhere to
save the image, I then named it ‘Rating
logo’ and clicked ‘Save’.
I then went back onto Photoshop
to enable me to add this image
onto my document. To add this
image, all I had to do was click
‘File’ and then ‘Open’.
This pop up box then appeared and I
was able to find the location in which I
had saved this image in. When I found
the image I wanted, I then selected it
and clicked ‘Open’.
Once I had got this image onto
my document, I then needed to
resize it as it was too small and
I was able to do this by clicking
‘Edit’, ‘Transform’ and then
‘Scale’.
I then wanted to add some effects
to this image to make it stand out
more and I was able to do this by
clicking ‘Layer’, ‘Layer Style’ and
then ‘Blending Options’.
This pop up box then appeared
and I was able to choose the
effects that I wanted to add to
this image. The effects I
decided to use were called
‘Bevel and Emboss’, ‘Stroke’,
‘Inner Shadow’ and ‘Drop
Shadow’. Once I had selected
all of the effects I wanted, I
then clicked ‘OK’.
Once I had added this logo, I then went
through the same process to add both the
DVD logo and the record label logo that my
artist is signed to as you are able to see in
the image I have presented on the left.
Once I had done this, I then wanted to
add text which would read ‘Deluxe Disk’
to ensure that the audience would know
that this is the extra disk they get in the
digi-pack. So to do this, I had to click on
the ‘Text Tool’ and then I selected the
font called ‘Fairydust8’. Once I had done
this, I then wrote out the text and placed
it into the position that I wanted it to be
in on the disk.
Once I had written this text, I then
wanted to add some effects to it
to make it stand out more and I
was able to do this by clicking
‘Layer’, ‘Layer Style’ and then
‘Blending Options’.
This pop up box then
appeared and I was able to
choose the effects I wanted.
The effects I decided to use
were called ‘Bevel and
Emboss’, ‘Stroke’ and ‘Drop
Shadow’. Once I had selected
the effects I wanted, I then
clicked ‘OK’.
In the image I have presented
on the left, you are able to see
how my second disk was
turning out to look once I had
added the ‘Deluxe Disk’ text.
I then decided to copy the
copyright code that was
presented on the first disk and
I was able to do this just by
dragging it from the first disk
onto the second. Once I had
done this, you are able to see
how the disk turned out as I
have presented it in the image
on the left.
Once I had transferred this text, I
then wanted to add some effects
to it to make it stand out and I
was able to do this by clicking
‘Layer’, ‘Layer Style’ and then
‘Blending options’.
This pop up box then
appeared and I was able to
choose the effects I wanted
to add to this text. The
effects I decided to use were
called ‘Stroke’, ‘Outer Glow’
and ‘Drop Shadow’. Once I
had selected all of the effects
I wanted to use, I then
clicked ‘OK’.
I then wanted to add the serial number onto the disk
and again I was able to do this by selecting the ‘Text
Tool’ and then selecting the font called ‘Arial’. Once I
had done this, I then wrote out the text and placed it
into the position I wanted it to be in.
Once the text had been placed in
the position I wanted it to be in, I
then wanted to add some effects to
the text to make it stand out more
and I was able to do this by selecting
‘Layer’, ‘Layer Style’ and then
‘Blending Options’.
This pop up box then appeared and I was
able to choose the effects I wanted. The
effects I decided to use were called ‘Bevel
and Emboss’, ‘Inner Shadow’ and ‘Drop
Shadow’. Once I had selected all of the
effects I wanted, I then clicked ‘OK’.
Once I had added this
feature, you are then able
to see how my disk had
turned out in the image I
have presented on the left.
Once I had completed creating my disk, I then
needed to save it as an image again to get rid of
the excess background that appears and to
ensure that the disk will actually look like a disk
from a digi-pack. To do this I had to click ‘File’
and then ‘Save As’.
This pop up box then appeared and I was
able to choose a location to save this
document in. Once I had found somewhere
to save it, I then clicked on the drop down
box next to where it says ‘Format’ and
selected ‘JPEG’ and this was again to ensure
that the document would be saved as an
image rather than a Photoshop document.
Once I had made all of these changes, I then
clicked ‘Save’.
I then needed to open up the
document to begin making changes
to it and I was able to do this by
clicking ‘File’ and then ‘Open’.
This pop up box then appeared
and I was able to find the
location in which I had saved
this image. Once I had found the
image I was looking for, I then
selected it and pressed ‘Open’.
Once I had got this image open, I then
wanted to get rid of all of the excess black
background that appeared outside of the
circle and again I was able to do this by
selecting the ‘Magic Wand Tool’. Once I
had done this, I then selected all of the
black background that appeared outside of
the disk template and then pressed
‘Delete’ on the keyboard and this then got
rid of the background and made it
transparent - meaning, whenever I try to
place this image somewhere, the only
thing that will appear is the disk, rather
than the excess background that was
visible when creating the disk.

More Related Content

What's hot

Development diary front cover
Development diary front coverDevelopment diary front cover
Development diary front coverKate-Anna Smith
 
Editing images used in the Production of my magazine- Showing Technologies
Editing images used in the Production of my magazine- Showing TechnologiesEditing images used in the Production of my magazine- Showing Technologies
Editing images used in the Production of my magazine- Showing Technologieschelsmiller95
 
3D game engine work flow
3D game engine work flow3D game engine work flow
3D game engine work flowsoulsama
 
Digi-Pack Development Diary
Digi-Pack Development DiaryDigi-Pack Development Diary
Digi-Pack Development Diaryellierawl
 
Making the front cover (screenshots)
Making the front cover (screenshots)Making the front cover (screenshots)
Making the front cover (screenshots)georgia lonie
 
Unit 73- Criteria 4: Programming Sounds Into a Video Game.
Unit 73- Criteria 4: Programming Sounds Into a Video Game.Unit 73- Criteria 4: Programming Sounds Into a Video Game.
Unit 73- Criteria 4: Programming Sounds Into a Video Game.ConnahTilley
 

What's hot (12)

Development diary front cover
Development diary front coverDevelopment diary front cover
Development diary front cover
 
How to use picmonkey
How to use picmonkeyHow to use picmonkey
How to use picmonkey
 
Skills 3 p1
Skills 3 p1Skills 3 p1
Skills 3 p1
 
Editing images used in the Production of my magazine- Showing Technologies
Editing images used in the Production of my magazine- Showing TechnologiesEditing images used in the Production of my magazine- Showing Technologies
Editing images used in the Production of my magazine- Showing Technologies
 
3D game engine work flow
3D game engine work flow3D game engine work flow
3D game engine work flow
 
Digi-Pack Development Diary
Digi-Pack Development DiaryDigi-Pack Development Diary
Digi-Pack Development Diary
 
Question 4
Question 4Question 4
Question 4
 
Making the front cover (screenshots)
Making the front cover (screenshots)Making the front cover (screenshots)
Making the front cover (screenshots)
 
Unit 73- Criteria 4: Programming Sounds Into a Video Game.
Unit 73- Criteria 4: Programming Sounds Into a Video Game.Unit 73- Criteria 4: Programming Sounds Into a Video Game.
Unit 73- Criteria 4: Programming Sounds Into a Video Game.
 
Skills development
Skills developmentSkills development
Skills development
 
Picture manager
Picture managerPicture manager
Picture manager
 
Flickr tutorial
Flickr tutorialFlickr tutorial
Flickr tutorial
 

Viewers also liked

Viewers also liked (20)

Written Answers
Written AnswersWritten Answers
Written Answers
 
Real world
Real worldReal world
Real world
 
Liiar analysis of music video
Liiar analysis of music videoLiiar analysis of music video
Liiar analysis of music video
 
Liiar analysis of ancillary texts
Liiar analysis of ancillary textsLiiar analysis of ancillary texts
Liiar analysis of ancillary texts
 
Feedback
FeedbackFeedback
Feedback
 
Last survey answers
Last survey answersLast survey answers
Last survey answers
 
Punk Responses
Punk ResponsesPunk Responses
Punk Responses
 
Hardware used evaluation
Hardware used evaluationHardware used evaluation
Hardware used evaluation
 
Survey monkey results
Survey monkey resultsSurvey monkey results
Survey monkey results
 
Digipack Images
Digipack ImagesDigipack Images
Digipack Images
 
Narrative
Narrative Narrative
Narrative
 
Audience Theory
Audience TheoryAudience Theory
Audience Theory
 
Personal Albums
Personal Albums Personal Albums
Personal Albums
 
Paramore conventions
Paramore conventionsParamore conventions
Paramore conventions
 
Yellowcard conventions
Yellowcard conventionsYellowcard conventions
Yellowcard conventions
 
From Under The Cork Tree Conventions
From Under The Cork Tree ConventionsFrom Under The Cork Tree Conventions
From Under The Cork Tree Conventions
 
Record label info
Record label infoRecord label info
Record label info
 
Fav photoshoot pics
Fav photoshoot picsFav photoshoot pics
Fav photoshoot pics
 
Day 4 Equipment
Day 4 Equipment Day 4 Equipment
Day 4 Equipment
 
Song Upload Onto Phone
Song Upload Onto PhoneSong Upload Onto Phone
Song Upload Onto Phone
 

Similar to Cd 2 process

How To Use PowerPoint and SlideShare To Upload Your Sims 2 Stories
How To Use PowerPoint and SlideShare To Upload Your Sims 2 StoriesHow To Use PowerPoint and SlideShare To Upload Your Sims 2 Stories
How To Use PowerPoint and SlideShare To Upload Your Sims 2 StoriesStephanie Sahr
 
Media q4 update
Media q4 updateMedia q4 update
Media q4 updateBrowner97
 
01.) Production experiments
01.) Production experiments01.) Production experiments
01.) Production experimentsgeorgewetton1
 
Photoshop Elements Tutorial
Photoshop Elements TutorialPhotoshop Elements Tutorial
Photoshop Elements Tutorialkarenalapray
 
Fanzine evaluation
Fanzine evaluationFanzine evaluation
Fanzine evaluationBen Harris
 
6. What have you learnt about technologies from the process of constructing t...
6. What have you learnt about technologies from the process of constructing t...6. What have you learnt about technologies from the process of constructing t...
6. What have you learnt about technologies from the process of constructing t...caitlinhulse
 
Print screens of making my poster
Print screens of making my posterPrint screens of making my poster
Print screens of making my posterfatemajohara
 
Production process of film poster
Production process of film posterProduction process of film poster
Production process of film posterEmzzino
 
Final poster creation
Final poster creationFinal poster creation
Final poster creationomar2099
 
Adjusting brightness/contrast and colour
Adjusting brightness/contrast and colourAdjusting brightness/contrast and colour
Adjusting brightness/contrast and colourMichaelaHead
 
3. production experiments (fmp)
3. production experiments (fmp)3. production experiments (fmp)
3. production experiments (fmp)Shaun Gardner
 
Premiere pro guide
Premiere pro guidePremiere pro guide
Premiere pro guideelliotnjones
 
Photoshop printscreens
Photoshop printscreensPhotoshop printscreens
Photoshop printscreensThomas Hogarth
 

Similar to Cd 2 process (20)

How To Use PowerPoint and SlideShare To Upload Your Sims 2 Stories
How To Use PowerPoint and SlideShare To Upload Your Sims 2 StoriesHow To Use PowerPoint and SlideShare To Upload Your Sims 2 Stories
How To Use PowerPoint and SlideShare To Upload Your Sims 2 Stories
 
Experiments
ExperimentsExperiments
Experiments
 
Media q4 update
Media q4 updateMedia q4 update
Media q4 update
 
Diary for promotional film
Diary for promotional filmDiary for promotional film
Diary for promotional film
 
01.) Production experiments
01.) Production experiments01.) Production experiments
01.) Production experiments
 
Evaluation
EvaluationEvaluation
Evaluation
 
Editing Images
Editing ImagesEditing Images
Editing Images
 
Photoshop Elements Tutorial
Photoshop Elements TutorialPhotoshop Elements Tutorial
Photoshop Elements Tutorial
 
Fanzine evaluation
Fanzine evaluationFanzine evaluation
Fanzine evaluation
 
Step-By-Step
Step-By-StepStep-By-Step
Step-By-Step
 
6. What have you learnt about technologies from the process of constructing t...
6. What have you learnt about technologies from the process of constructing t...6. What have you learnt about technologies from the process of constructing t...
6. What have you learnt about technologies from the process of constructing t...
 
Print screens of making my poster
Print screens of making my posterPrint screens of making my poster
Print screens of making my poster
 
Production process of film poster
Production process of film posterProduction process of film poster
Production process of film poster
 
Final poster creation
Final poster creationFinal poster creation
Final poster creation
 
Adjusting brightness/contrast and colour
Adjusting brightness/contrast and colourAdjusting brightness/contrast and colour
Adjusting brightness/contrast and colour
 
Poster
Poster Poster
Poster
 
3. production experiments (fmp)
3. production experiments (fmp)3. production experiments (fmp)
3. production experiments (fmp)
 
Premiere pro guide
Premiere pro guidePremiere pro guide
Premiere pro guide
 
Photoshop printscreens
Photoshop printscreensPhotoshop printscreens
Photoshop printscreens
 
Using motion
Using motionUsing motion
Using motion
 

More from Rebecca Witty

Game Environment Survey
Game Environment Survey Game Environment Survey
Game Environment Survey Rebecca Witty
 
Final Character Design Feedback Survey
Final Character Design Feedback SurveyFinal Character Design Feedback Survey
Final Character Design Feedback SurveyRebecca Witty
 
Character Sketches Feedback Survey
Character Sketches Feedback SurveyCharacter Sketches Feedback Survey
Character Sketches Feedback SurveyRebecca Witty
 
Character Design - Survey Responses
Character Design - Survey ResponsesCharacter Design - Survey Responses
Character Design - Survey ResponsesRebecca Witty
 

More from Rebecca Witty (9)

Game Environment Survey
Game Environment Survey Game Environment Survey
Game Environment Survey
 
Final Character Design Feedback Survey
Final Character Design Feedback SurveyFinal Character Design Feedback Survey
Final Character Design Feedback Survey
 
Character Sketches Feedback Survey
Character Sketches Feedback SurveyCharacter Sketches Feedback Survey
Character Sketches Feedback Survey
 
Character Design - Survey Responses
Character Design - Survey ResponsesCharacter Design - Survey Responses
Character Design - Survey Responses
 
Final
FinalFinal
Final
 
Day3 images
Day3 imagesDay3 images
Day3 images
 
Day2 images
Day2 imagesDay2 images
Day2 images
 
Day1 images
Day1 imagesDay1 images
Day1 images
 
Day 1 equipment
Day 1 equipmentDay 1 equipment
Day 1 equipment
 

Recently uploaded

भारत-रोम व्यापार.pptx, Indo-Roman Trade,
भारत-रोम व्यापार.pptx, Indo-Roman Trade,भारत-रोम व्यापार.pptx, Indo-Roman Trade,
भारत-रोम व्यापार.pptx, Indo-Roman Trade,Virag Sontakke
 
Earth Day Presentation wow hello nice great
Earth Day Presentation wow hello nice greatEarth Day Presentation wow hello nice great
Earth Day Presentation wow hello nice greatYousafMalik24
 
Framing an Appropriate Research Question 6b9b26d93da94caf993c038d9efcdedb.pdf
Framing an Appropriate Research Question 6b9b26d93da94caf993c038d9efcdedb.pdfFraming an Appropriate Research Question 6b9b26d93da94caf993c038d9efcdedb.pdf
Framing an Appropriate Research Question 6b9b26d93da94caf993c038d9efcdedb.pdfUjwalaBharambe
 
Solving Puzzles Benefits Everyone (English).pptx
Solving Puzzles Benefits Everyone (English).pptxSolving Puzzles Benefits Everyone (English).pptx
Solving Puzzles Benefits Everyone (English).pptxOH TEIK BIN
 
“Oh GOSH! Reflecting on Hackteria's Collaborative Practices in a Global Do-It...
“Oh GOSH! Reflecting on Hackteria's Collaborative Practices in a Global Do-It...“Oh GOSH! Reflecting on Hackteria's Collaborative Practices in a Global Do-It...
“Oh GOSH! Reflecting on Hackteria's Collaborative Practices in a Global Do-It...Marc Dusseiller Dusjagr
 
History Class XII Ch. 3 Kinship, Caste and Class (1).pptx
History Class XII Ch. 3 Kinship, Caste and Class (1).pptxHistory Class XII Ch. 3 Kinship, Caste and Class (1).pptx
History Class XII Ch. 3 Kinship, Caste and Class (1).pptxsocialsciencegdgrohi
 
KSHARA STURA .pptx---KSHARA KARMA THERAPY (CAUSTIC THERAPY)————IMP.OF KSHARA ...
KSHARA STURA .pptx---KSHARA KARMA THERAPY (CAUSTIC THERAPY)————IMP.OF KSHARA ...KSHARA STURA .pptx---KSHARA KARMA THERAPY (CAUSTIC THERAPY)————IMP.OF KSHARA ...
KSHARA STURA .pptx---KSHARA KARMA THERAPY (CAUSTIC THERAPY)————IMP.OF KSHARA ...M56BOOKSTORE PRODUCT/SERVICE
 
Introduction to ArtificiaI Intelligence in Higher Education
Introduction to ArtificiaI Intelligence in Higher EducationIntroduction to ArtificiaI Intelligence in Higher Education
Introduction to ArtificiaI Intelligence in Higher Educationpboyjonauth
 
Historical philosophical, theoretical, and legal foundations of special and i...
Historical philosophical, theoretical, and legal foundations of special and i...Historical philosophical, theoretical, and legal foundations of special and i...
Historical philosophical, theoretical, and legal foundations of special and i...jaredbarbolino94
 
Hierarchy of management that covers different levels of management
Hierarchy of management that covers different levels of managementHierarchy of management that covers different levels of management
Hierarchy of management that covers different levels of managementmkooblal
 
EPANDING THE CONTENT OF AN OUTLINE using notes.pptx
EPANDING THE CONTENT OF AN OUTLINE using notes.pptxEPANDING THE CONTENT OF AN OUTLINE using notes.pptx
EPANDING THE CONTENT OF AN OUTLINE using notes.pptxRaymartEstabillo3
 
Incoming and Outgoing Shipments in 1 STEP Using Odoo 17
Incoming and Outgoing Shipments in 1 STEP Using Odoo 17Incoming and Outgoing Shipments in 1 STEP Using Odoo 17
Incoming and Outgoing Shipments in 1 STEP Using Odoo 17Celine George
 
ECONOMIC CONTEXT - PAPER 1 Q3: NEWSPAPERS.pptx
ECONOMIC CONTEXT - PAPER 1 Q3: NEWSPAPERS.pptxECONOMIC CONTEXT - PAPER 1 Q3: NEWSPAPERS.pptx
ECONOMIC CONTEXT - PAPER 1 Q3: NEWSPAPERS.pptxiammrhaywood
 
DATA STRUCTURE AND ALGORITHM for beginners
DATA STRUCTURE AND ALGORITHM for beginnersDATA STRUCTURE AND ALGORITHM for beginners
DATA STRUCTURE AND ALGORITHM for beginnersSabitha Banu
 
Capitol Tech U Doctoral Presentation - April 2024.pptx
Capitol Tech U Doctoral Presentation - April 2024.pptxCapitol Tech U Doctoral Presentation - April 2024.pptx
Capitol Tech U Doctoral Presentation - April 2024.pptxCapitolTechU
 
MARGINALIZATION (Different learners in Marginalized Group
MARGINALIZATION (Different learners in Marginalized GroupMARGINALIZATION (Different learners in Marginalized Group
MARGINALIZATION (Different learners in Marginalized GroupJonathanParaisoCruz
 
How to Make a Pirate ship Primary Education.pptx
How to Make a Pirate ship Primary Education.pptxHow to Make a Pirate ship Primary Education.pptx
How to Make a Pirate ship Primary Education.pptxmanuelaromero2013
 
Enzyme, Pharmaceutical Aids, Miscellaneous Last Part of Chapter no 5th.pdf
Enzyme, Pharmaceutical Aids, Miscellaneous Last Part of Chapter no 5th.pdfEnzyme, Pharmaceutical Aids, Miscellaneous Last Part of Chapter no 5th.pdf
Enzyme, Pharmaceutical Aids, Miscellaneous Last Part of Chapter no 5th.pdfSumit Tiwari
 

Recently uploaded (20)

भारत-रोम व्यापार.pptx, Indo-Roman Trade,
भारत-रोम व्यापार.pptx, Indo-Roman Trade,भारत-रोम व्यापार.pptx, Indo-Roman Trade,
भारत-रोम व्यापार.pptx, Indo-Roman Trade,
 
Earth Day Presentation wow hello nice great
Earth Day Presentation wow hello nice greatEarth Day Presentation wow hello nice great
Earth Day Presentation wow hello nice great
 
Framing an Appropriate Research Question 6b9b26d93da94caf993c038d9efcdedb.pdf
Framing an Appropriate Research Question 6b9b26d93da94caf993c038d9efcdedb.pdfFraming an Appropriate Research Question 6b9b26d93da94caf993c038d9efcdedb.pdf
Framing an Appropriate Research Question 6b9b26d93da94caf993c038d9efcdedb.pdf
 
Solving Puzzles Benefits Everyone (English).pptx
Solving Puzzles Benefits Everyone (English).pptxSolving Puzzles Benefits Everyone (English).pptx
Solving Puzzles Benefits Everyone (English).pptx
 
“Oh GOSH! Reflecting on Hackteria's Collaborative Practices in a Global Do-It...
“Oh GOSH! Reflecting on Hackteria's Collaborative Practices in a Global Do-It...“Oh GOSH! Reflecting on Hackteria's Collaborative Practices in a Global Do-It...
“Oh GOSH! Reflecting on Hackteria's Collaborative Practices in a Global Do-It...
 
History Class XII Ch. 3 Kinship, Caste and Class (1).pptx
History Class XII Ch. 3 Kinship, Caste and Class (1).pptxHistory Class XII Ch. 3 Kinship, Caste and Class (1).pptx
History Class XII Ch. 3 Kinship, Caste and Class (1).pptx
 
KSHARA STURA .pptx---KSHARA KARMA THERAPY (CAUSTIC THERAPY)————IMP.OF KSHARA ...
KSHARA STURA .pptx---KSHARA KARMA THERAPY (CAUSTIC THERAPY)————IMP.OF KSHARA ...KSHARA STURA .pptx---KSHARA KARMA THERAPY (CAUSTIC THERAPY)————IMP.OF KSHARA ...
KSHARA STURA .pptx---KSHARA KARMA THERAPY (CAUSTIC THERAPY)————IMP.OF KSHARA ...
 
Introduction to ArtificiaI Intelligence in Higher Education
Introduction to ArtificiaI Intelligence in Higher EducationIntroduction to ArtificiaI Intelligence in Higher Education
Introduction to ArtificiaI Intelligence in Higher Education
 
Historical philosophical, theoretical, and legal foundations of special and i...
Historical philosophical, theoretical, and legal foundations of special and i...Historical philosophical, theoretical, and legal foundations of special and i...
Historical philosophical, theoretical, and legal foundations of special and i...
 
Hierarchy of management that covers different levels of management
Hierarchy of management that covers different levels of managementHierarchy of management that covers different levels of management
Hierarchy of management that covers different levels of management
 
OS-operating systems- ch04 (Threads) ...
OS-operating systems- ch04 (Threads) ...OS-operating systems- ch04 (Threads) ...
OS-operating systems- ch04 (Threads) ...
 
EPANDING THE CONTENT OF AN OUTLINE using notes.pptx
EPANDING THE CONTENT OF AN OUTLINE using notes.pptxEPANDING THE CONTENT OF AN OUTLINE using notes.pptx
EPANDING THE CONTENT OF AN OUTLINE using notes.pptx
 
ESSENTIAL of (CS/IT/IS) class 06 (database)
ESSENTIAL of (CS/IT/IS) class 06 (database)ESSENTIAL of (CS/IT/IS) class 06 (database)
ESSENTIAL of (CS/IT/IS) class 06 (database)
 
Incoming and Outgoing Shipments in 1 STEP Using Odoo 17
Incoming and Outgoing Shipments in 1 STEP Using Odoo 17Incoming and Outgoing Shipments in 1 STEP Using Odoo 17
Incoming and Outgoing Shipments in 1 STEP Using Odoo 17
 
ECONOMIC CONTEXT - PAPER 1 Q3: NEWSPAPERS.pptx
ECONOMIC CONTEXT - PAPER 1 Q3: NEWSPAPERS.pptxECONOMIC CONTEXT - PAPER 1 Q3: NEWSPAPERS.pptx
ECONOMIC CONTEXT - PAPER 1 Q3: NEWSPAPERS.pptx
 
DATA STRUCTURE AND ALGORITHM for beginners
DATA STRUCTURE AND ALGORITHM for beginnersDATA STRUCTURE AND ALGORITHM for beginners
DATA STRUCTURE AND ALGORITHM for beginners
 
Capitol Tech U Doctoral Presentation - April 2024.pptx
Capitol Tech U Doctoral Presentation - April 2024.pptxCapitol Tech U Doctoral Presentation - April 2024.pptx
Capitol Tech U Doctoral Presentation - April 2024.pptx
 
MARGINALIZATION (Different learners in Marginalized Group
MARGINALIZATION (Different learners in Marginalized GroupMARGINALIZATION (Different learners in Marginalized Group
MARGINALIZATION (Different learners in Marginalized Group
 
How to Make a Pirate ship Primary Education.pptx
How to Make a Pirate ship Primary Education.pptxHow to Make a Pirate ship Primary Education.pptx
How to Make a Pirate ship Primary Education.pptx
 
Enzyme, Pharmaceutical Aids, Miscellaneous Last Part of Chapter no 5th.pdf
Enzyme, Pharmaceutical Aids, Miscellaneous Last Part of Chapter no 5th.pdfEnzyme, Pharmaceutical Aids, Miscellaneous Last Part of Chapter no 5th.pdf
Enzyme, Pharmaceutical Aids, Miscellaneous Last Part of Chapter no 5th.pdf
 

Cd 2 process

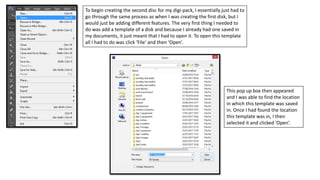
  • 1. To begin creating the second disc for my digi-pack, I essentially just had to go through the same process as when I was creating the first disk, but I would just be adding different features. The very first thing I needed to do was add a template of a disk and because I already had one saved in my documents, it just meant that I had to open it. To open this template all I had to do was click ‘File’ and then ‘Open’. This pop up box then appeared and I was able to find the location in which this template was saved in. Once I had found the location this template was in, I then selected it and clicked ‘Open’.
  • 2. In the image I have presented on the left, you are able to see what this template looked like once I had got it onto my document. The next thing I wanted to do was add the same black background that I used on the previous disk and this meant as it was already saved in my documents, I just had to open my documents to find it. So to do this, all I had to do was click ‘File’ and then ‘Open’. Once I had done that, this pop up box then appeared and I was able to find the location in which this image was saved in. Once I had found the image, I then selected it and clicked ‘Open’.
  • 3. Once I had got the image onto my document, I then needed to resize it as it was too big to fit on my document and to do this I just had to click ‘Edit’, ‘Transform’ and then ‘Scale’. While making the image smaller, I had to hold down the ‘Shift’ button on the keyboard and this was to ensure that the image wouldn’t go obscure and would look the same, but would just be smaller. After I had changed the size of the image, I then wanted to change the colour of the image and I was able to do this by clicking ‘Image’, ‘Adjustments’ and then ‘Brightness/Contrast’.
  • 4. This pop up box then appeared and I was able to change the brightness and contrast settings of the image. Once I had changed the settings to what I wanted them to be, I then clicked ‘OK’. In the image I have presented on the left, you are able to see how my second disk was beginning to look.
  • 5. I then decided to copy the artist and album name text from the first disk and I moved it onto this disk so I wouldn’t have to create them again and ensure they are the right size. You are able to see this as I have presented it in the image on the left. I then wanted to add some effects to the artist name that had been presented on the disk to make it stand out more and I was able to do this by clicking ‘Layer’, ‘Layer Style’ and then ‘Blending Options’.
  • 6. This pop up box then appeared and I was able to add the effects I wanted to the text. The effects I decided to use were called ‘Bevel and Emboss’, ‘Contour’, ‘Stroke’, ‘Inner Shadow’, ‘Outer Glow’ and ‘Drop Shadow’. Once I had selected all of the effects I wanted, I then clicked ‘OK’. After that, I then wanted to add some effects to the album name to again make it stand out more and I was able to do this by clicking ‘Layer’, ‘Layer Style’ and then ‘Blending Options’.
  • 7. This pop up box then appeared and I was able to choose the effects I wanted. The effects I decided to use were called ‘Bevel and Emboss’, ‘Stroke’, ‘Inner Shadow’ and ‘Drop Shadow’. Once I had selected all of the effects I wanted, I then selected ‘OK’. Once I had made changes to the text, I then wanted to add an age restriction logo to enable the viewer to know what ages would be able to watch the video that is on the disk. So to do this, I went onto Google Images and once I had found a logo I wanted to use, I then right clicked on it and selected ‘Save Image As’.
  • 8. This pop up box then appeared and I was able to choose a location to save this image in. Once I had found somewhere to save the image, I then named it ‘Rating logo’ and clicked ‘Save’. I then went back onto Photoshop to enable me to add this image onto my document. To add this image, all I had to do was click ‘File’ and then ‘Open’.
  • 9. This pop up box then appeared and I was able to find the location in which I had saved this image in. When I found the image I wanted, I then selected it and clicked ‘Open’. Once I had got this image onto my document, I then needed to resize it as it was too small and I was able to do this by clicking ‘Edit’, ‘Transform’ and then ‘Scale’.
  • 10. I then wanted to add some effects to this image to make it stand out more and I was able to do this by clicking ‘Layer’, ‘Layer Style’ and then ‘Blending Options’. This pop up box then appeared and I was able to choose the effects that I wanted to add to this image. The effects I decided to use were called ‘Bevel and Emboss’, ‘Stroke’, ‘Inner Shadow’ and ‘Drop Shadow’. Once I had selected all of the effects I wanted, I then clicked ‘OK’.
  • 11. Once I had added this logo, I then went through the same process to add both the DVD logo and the record label logo that my artist is signed to as you are able to see in the image I have presented on the left. Once I had done this, I then wanted to add text which would read ‘Deluxe Disk’ to ensure that the audience would know that this is the extra disk they get in the digi-pack. So to do this, I had to click on the ‘Text Tool’ and then I selected the font called ‘Fairydust8’. Once I had done this, I then wrote out the text and placed it into the position that I wanted it to be in on the disk.
  • 12. Once I had written this text, I then wanted to add some effects to it to make it stand out more and I was able to do this by clicking ‘Layer’, ‘Layer Style’ and then ‘Blending Options’. This pop up box then appeared and I was able to choose the effects I wanted. The effects I decided to use were called ‘Bevel and Emboss’, ‘Stroke’ and ‘Drop Shadow’. Once I had selected the effects I wanted, I then clicked ‘OK’.
  • 13. In the image I have presented on the left, you are able to see how my second disk was turning out to look once I had added the ‘Deluxe Disk’ text. I then decided to copy the copyright code that was presented on the first disk and I was able to do this just by dragging it from the first disk onto the second. Once I had done this, you are able to see how the disk turned out as I have presented it in the image on the left.
  • 14. Once I had transferred this text, I then wanted to add some effects to it to make it stand out and I was able to do this by clicking ‘Layer’, ‘Layer Style’ and then ‘Blending options’. This pop up box then appeared and I was able to choose the effects I wanted to add to this text. The effects I decided to use were called ‘Stroke’, ‘Outer Glow’ and ‘Drop Shadow’. Once I had selected all of the effects I wanted to use, I then clicked ‘OK’.
  • 15. I then wanted to add the serial number onto the disk and again I was able to do this by selecting the ‘Text Tool’ and then selecting the font called ‘Arial’. Once I had done this, I then wrote out the text and placed it into the position I wanted it to be in. Once the text had been placed in the position I wanted it to be in, I then wanted to add some effects to the text to make it stand out more and I was able to do this by selecting ‘Layer’, ‘Layer Style’ and then ‘Blending Options’.
  • 16. This pop up box then appeared and I was able to choose the effects I wanted. The effects I decided to use were called ‘Bevel and Emboss’, ‘Inner Shadow’ and ‘Drop Shadow’. Once I had selected all of the effects I wanted, I then clicked ‘OK’. Once I had added this feature, you are then able to see how my disk had turned out in the image I have presented on the left.
  • 17. Once I had completed creating my disk, I then needed to save it as an image again to get rid of the excess background that appears and to ensure that the disk will actually look like a disk from a digi-pack. To do this I had to click ‘File’ and then ‘Save As’. This pop up box then appeared and I was able to choose a location to save this document in. Once I had found somewhere to save it, I then clicked on the drop down box next to where it says ‘Format’ and selected ‘JPEG’ and this was again to ensure that the document would be saved as an image rather than a Photoshop document. Once I had made all of these changes, I then clicked ‘Save’.
  • 18. I then needed to open up the document to begin making changes to it and I was able to do this by clicking ‘File’ and then ‘Open’. This pop up box then appeared and I was able to find the location in which I had saved this image. Once I had found the image I was looking for, I then selected it and pressed ‘Open’.
  • 19. Once I had got this image open, I then wanted to get rid of all of the excess black background that appeared outside of the circle and again I was able to do this by selecting the ‘Magic Wand Tool’. Once I had done this, I then selected all of the black background that appeared outside of the disk template and then pressed ‘Delete’ on the keyboard and this then got rid of the background and made it transparent - meaning, whenever I try to place this image somewhere, the only thing that will appear is the disk, rather than the excess background that was visible when creating the disk.