Analysing 2 front covers and 2 contents for the prelimiary task
Screen caps for fc !!
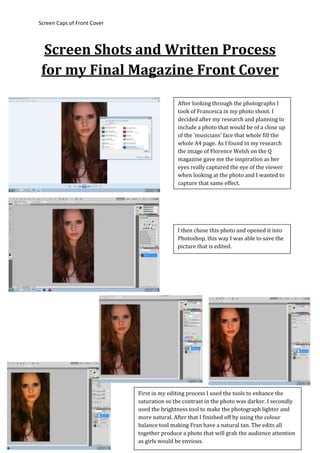
1. Screen Caps of Front Cover
Screen Shots and Written Process
for my Final Magazine Front Cover
After looking through the photographs I
took of Francesca in my photo shoot. I
decided after my research and planning to
include a photo that would be of a close up
of the ‘musicians’ face that whole fill the
whole A4 page. As I found in my research
the image of Florence Welsh on the Q
magazine gave me the inspiration as her
eyes really captured the eye of the viewer
when looking at the photo and I wanted to
capture that same effect.
I then chose this photo and opened it into
Photoshop, this way I was able to save the
picture that is edited.
First in my editing process I used the tools to enhance the
saturation so the contrast in the photo was darker. I secondly
used the brightness tool to make the photograph lighter and
more natural. After that I finished off by using the colour
balance tool making Fran have a natural tan. The edits all
together produce a photo that will grab the audience attention
as girls would be envious.
2. Screen Caps of Front Cover
After I edited and saved my photo from
photoshop I opened up an InDesign document
A4 size. To help me make my magazine look
professional and neat I used a document grid.
This you can do by clicking ‘view’ then ‘grids &
guides’ and lastly ‘show document grid’.
This is a screenshot of the document after the
grid has been placed into the page.
To start my front cover off I wanted to make my
image fill the whole page. After saving my edited
image as a JPEG file I was able to easily transfer
the image into the InDesign document. This is
done by ‘File’, ‘Place..’ and then after selecting the
photo you wish to paste in click ‘ok’.
The image then appears on to the A4 document
however by clicking ‘Ctrl’ on the keyboard and
dragging the corners of the image you are able to
place the image in the exact positioning of the
front cover and where you’d like it to go.
After this the image may be a little pixelated
therefore by clicking right click and ‘Display
Performance’ then ‘High Quality Display’ it evens
out the image giving it a professional finish.
After my image was complete I had to start on the font. To
do this I used my research are selected the font the target
audience thought was most appropriate for the genre of
magazine I was looking to do.
I remembered the name of this particular font and looked
it back up on ‘dafonts.com’.
3. Screen Caps of Front Cover
I then took a screenshot of this font and pasted it into
the programme ‘Paint’ where I cropped out the rest of
the image so just the font was left.
I then cut this into a new paint program this was then
easier for me to save the font as its own individual JPEG
file.
After this was saved I couldn’t just place this into my InDesign
document otherwise it would have a white background when I
wanted a clear one so the main image was still visible. Therefore
I copied this picture into a word document and used the ‘Delete
Background’ tool in able to get the images just on their own.
4. Screen Caps of Front Cover
After this I couldn’t paste this masthead onto my
InDesign document as the black would fade into the
image and wouldn’t stand out on the page. I used the
editing tools in Microsoft Word and made the font
white, this will be perfect when placing on top of the
image so it will be visible to the audience.
I then right clicked on the masthead and clicked ‘Copy’.
After it was pasted onto the page I held down ‘Ctrl’ and
while dragging the corners of the image I fitted it to the
top of the page and placed it exactly where I wanted it.
On InDesign I then right clicked and ‘Paste’ this pasted
my masthead onto my document for me.
5. Screen Caps of Front Cover
After my masthead I placed on an issue date and year this
would let the audience know that the magazine they are
reading is not out of date and the information is new news.
I then inserted in an ‘EXCLUSIVE INTERVIEW’ this puff lets
the audience know what is the main article inside the
magazine. The buzzword makes the interview sound unique
and special as though the audience can’t read it anywhere
else.
I then used the colour tools to make this font yellow as this
is my house style , it is inspired by the yellow and white
summer theme of the official Reading Festival logo and as
my magazine genre is based on Indie Rock is would be
perfect for the target audience.
After this I added in the name of the person that the
interview was about and chose a popular artist that fits in
perfectly with the genre of my magazine. Even though the
photograph is not of that actual celebrity I am pretending
it is.
6. Screen Caps of Front Cover
I then added in an information detail underneath as
though a catchy phrase to draw in the audience as to what
the audience are going to be reading about.
I then added in another article underneath as another title
and information and this article about the bands means
that the target audience get all the details they want to
know about the bands they like in this genre of music.
After this I added in another detail article about what else
would be in the magazine, this is under the interview text
so the audience know it is a different subject but also in
the magazine. I used capitals to difference the title of the
article from the information about the article which is
underneath.
This article about festival clothing is what would able to
the target audience boys as well as girls as they all love
going to festivals and want to always look their best.
I then used the italics tools to slant the text to make it
different from the others in order to stand out from the
page and make it different to the other text on the front.
7. Screen Caps of Front Cover
I then had to insert a barcode to make the magazine look
realistic. For this I typed barcode in on Google images
found the best one that looked appropriate. I then copied
and pasted this onto my front cover and placed it by
dragging it to the right size and making it fit perfectly in
the right bottom corner of the page.
I then added a price of £2.50 which is what the audience
suggested after my questionnaire results. And I also added a
$ dollar price as all the magazines in store have them.
After this I added in my final article I wanted to place on the
front cover which was an official line up of a festival. I
decided to choose Reading and Leeds as it is extremely
popular in the genre of music my article is featuring.
8. Screen Caps of Front Cover
I then took wanted to see what the magazine looked like
without all the text boxes and grids so I selected view and
then overprint preview. This takes away all the textboxes
in order for me to see the whole magazine without all the
lines and what it would look like if it was printed.
After pasting this and dragging it into place so it looks
perfect and in the right place for the audiences’ eye.
Therefore I took the logo off of Google Images and then
copied and pasted this into the document.
9. Screen Caps of Front Cover
This is the screenshot with the boxes taken away but the
grids still there. I kept them so I was able to move things
around but still able to keep things neat and straight
therefore it will be the perfect magazine which will look
very professional.
As this whole coursework magazine project will be
finished at the end of April I decided to change the date of
the issue to May which would seem more appropriate.
This is a screenshot of me moving different bits of text
and things around to make it look the best it can look.
10. Screen Caps of Front Cover
This is my final magazine; however I made some
changes to it. For example the masthead was to
pixelated as it was an image. Therefore I found a
font that was extremely similar and then I made 2
full stops a big font and placed them in the same
places as the other font had. I then added ‘Issue
One’ under the date so that the audience can keep
up with each issue. I then stuck to the colours of
yellow and white and making the titles of the
articles have yellow text. I then also changed the
name of the celebrity to the name of the model I
used; this is because even though she isn’t famous
the magazine gives the illusion that she is; making
the magazine more realistic.
After about a week I decided there was
something not quite right with my front
cover therefore decided I needed to change it.
Therefore I decided the ‘EXCLUSIVE
INTERVIEW’ needed to stand out more. I
created a black box and placed this behind
the writing to make the yellow stand out a lot
more. I then made the ‘FRANKIE SHAW’ a lot
bigger to make my target audience able to
see the artist name even more therefore
wanting to buy the magazine as she is a
popular artist. After that I made the cover
lines bigger with large font therefore making
it easier for the audience to know exactly
what’s in the issue. I made the price a little
smaller to make it look in more proportion
and then I made the issue date and number
smaller to make the whole cover fit better
together in the end. I am very happy now
with my final result.