SlideShare a Scribd company logo
1 of 28
Smooth And Soften Skin In A Photo With Photoshop
Step 1: Duplicate The Background Layer
With my image newly opened in Photoshop,ifwe look in my Layers panel, we see the image sitting on
the Background layer which is currently the only layer in the document:
We'll remove any unwanted blemishes in the skin. We'll do the work on a separate layer, which means
we'll need to make a copy ofthe Background layer. To do that, press and hold the Alt key on your
keyboard as you click on the Background layer and drag itdown onto the New Layer icon at the bottom
of the Layers panel (second icon from the right):
Dragging the Background layer onto the New Layer icon while holding Alt.
Holding down the Alt key tells Photoshop to pop open the Duplicate Layer dialog box,allowing us to
name the duplicate layer before it's added. Since we'll be using the SpotHealing Brush to remove any
blemishes, let's name the layer "SpotHealing". Click OK when you're done to close outofthe dialog
box:
The Layers panel showing the original image on the Background layer.
Naming the layer "SpotHealing".
If we look again in the Layers panel, we see the SpotHealing layer now sitting above the Background
layer. The SpotHealing layer is highlighted in blue which tells us that it is now the active layer. Anything
we do nextwill be done to this layer, while the original image remains safe and unharmed on the
Background layer:
The Layers panel showing the new SpotHealing layer.
Step 2: Select The Spot Healing Brush Tool
Next, choose the Spot Healing Brush Tool from the Tools panel:
Selecting the SpotHealing Brush Tool.
Step 3: Set The Spot Healing Brush To "Content-Aware"
With the SpotHealing Brush selected, make sure the Type option in the Options Bar along the top of
the screen is setto Content-Aware. This is a relatively new feature for the SpotHealing Brush (first
added in CS5) that allows Photoshop to make better decisions aboutthe replacementtexture it
chooses for the problem area you've clicked on:
Make sure Content-Aware is selected (which it should be by default).
Step 4: Click On The Problem Spots To Heal Them
To remove any unwanted skin blemishes, all we need to do is click on them with the SpotHealing
Brush. Photoshop will instantly replace the problem texture with good texture from the surrounding
area.
For example, ifwe look atthe young woman's forehead, we see a relatively large blemish justto the
right of center. To remove it, I'll position the SpotHealing Brush over top ofit. For bestresults, you'll
want your brush to be slightly larger than the area you're trying to replace, and you can change the size
of the brush directly from the keyboard. Press the right bracket key ( ] ) repeatedly to make the brush
larger or the left bracket key ( [ ) to make it smaller. You'll find the bracketkeys directly to the right of
the letter P on moststandard keyboards.
Here we see my brush cursor (the black circular outline) positioned over the blemish Iwant to remove:
Positioning the SpotHealing Brush over a problem area.
I'll click on itwith the SpotHealing Brush, and like magic, it's gone!Photoshop analyzed the area, found
some good texture from the area surrounding it, and then blended the good texture in with the problem
area's original tone and color to produce seamless results:
The result after clicking on the area to remove the blemish.
I'll do the same thing with another blemish on her forehead, keeping my brush justa bit larger than the
problem area:
Positioning the SpotHealing Brush over a second blemish.
Once again, I'll click on the blemish with the SpotHealing Brush and Photoshop instantly removes it. If
you find that Photoshop did notdo as good ofa job as you were hoping, press Ctrl+Z(Win) /
Command+Z (Mac) on your keyboard to undo it. Resize your brush so it's a bitlarger or smaller than
last time, then click to try again:
The second blemish is gone.
I'll click on the remaining blemishes on her forehead to remove them, and here's the result. Things are
already looking much better:
The blemishes have been removed from her forehead.
I'll continue working my way around her face to remove any other problem spots, including a few small
pimples on her chin. Keep in mind as you're working thatwhile it's okay to remove temporary problems
like acne or other minor skin issues, it's usually not okay to remove permanentfeatures like moles or
even certain scars, as these things are part ofwhat makes someone who they are. After all, the goal of
image retouching should be to help people look their best, notmake them look like somebody else.
Here's a side-by-side comparison ofwhat she looked like originally (left) and after some quick
retouching with the SpotHealing Brush (right). With mostphotos, the whole process should take no
more than a couple ofminutes. Icovered the SpotHealing Brush fairly quick here, butto learn more
about it, check outour Removing Acne, Skin Blemishes With The Spot Healing Brush tutorial
where I cover itin much more detail:
Before (left) and after (right).
Step 5: Duplicate The Spot Healing Layer
Now that we've removed any blemishes, we're ready to smooth and soften the skin. Just like we did
with the SpotHealing Brush, we'll do the work on its own separate layer. Press and hold the Alt (Win) /
Option (Mac) key on your keyboard as you click on the Spot Healing layer and drag it down onto the
New Layer icon at the bottom ofthe Layers panel:
Dragging the SpotHealing layer onto the New Layer icon while holding Alt(Win) / Option (Mac).
When the Duplicate Layer dialog box opens, name the layer "Soften Skin", then click OK:
Naming the duplicate layer "Soften Skin".
The new Soften Skin layer appears above the SpotHealing layer in the Layers panel:
The Layers panel showing the new Soften Skin layer.
Step 6: Apply The High Pass Filter
To soften the skin, we'll use Photoshop's High Pass filter. Go up to the Filter menu in the Menu Bar
along the top ofthe screen, choose Other down near the bottom of the list, and then choose High
Pass:
Going to Filter > Other > High Pass.
If you're familiar with the High Pass filter, it's mostlikely because you've used itbefore as an advanced
way of sharpening images. In this case, we're softening the skin, not sharpening it, but many ofthe
steps are the same. The High Pass filter works by looking for edges in the image (areas where there's a
big, sudden change in brightness or color between neighboring pixels). In the case ofa portrait photo,
the edges would be along the hair, around the eyes, the mouth, and so on. Skin, on the other hand, has
relatively low amounts ofdetail with much smoother transitions, so itwould be largely ignored.
If we were sharpening the image, the High Pass filter would allow us to sharpen the edges without
affecting the skin. What we're going to use itfor, though, is the exact opposite. We're going to letthe
High Pass filter detectthe edges notso we can sharpen them, but so we can soften everything except
the edges.
The Radius value at the bottom of the High Pass filter's dialog box controls the "thickness" ofthe
edges.In other words, once Photoshop has detected an edge, the Radius value tells ithow many
additional pixels on either side ofitto include as part of the edge. Low Radius values will detectonly
the finest details, butto make sure we don'tend up softening these areas, we want more ofthe edge to
be included. For a typical portraitshot, a Radius value of 24 pixels works well, so that's what I'll use:
Setting the Radius value to 24 pixels.
If your subjectis further back in the photo, or you're working on a fairly low resolution image, a smaller
Radius value mightwork better. In that case, you mightwant to try 18 pixels or even 12 pixels
depending on the size ofthe image. The reason I'm mentioning these values specifically is because it's
important for the next step that you choose a value that's easily divisible by 3. For example,24 divided
by 3 is 8, 18 divided by 3 is 6, and 12 divided by 3 is 4. Nice, easy numbers. Again, we'llsee why in the
nextstep.
Click OK to close outofthe High Pass filter's dialog box. Your image will turn mostly gray, with the gray
being the areas with little to no detail detected. The edges are shown with higher contrast:
The result after applying the High Pass filter.
Step 7: Apply The Gaussian Blur Filter
Next, we'll add some blurring to our High Pass filter effect using Photoshop's Gaussian Blur filter. It may
seem counterintuitive, butthe blurring will actually help to bring outmore good texture in the skin.
Go up to the Filter menu at the top ofthe screen, choose Blur, and then choose Gaussian Blur:
Going to Filter > Blur > Gaussian Blur.
Just like with the High Pass filter, we control the blur amount using the Radius value along the bottom
of the Gaussian Blur dialog box. Enter an amount that's exactly one third of the value you entered for
the High Pass filter. In my case, I went with a radius of 24 pixels for High Pass, so for the Gaussian Blur
filter, I'll enter one third of that which is 8 pixels:
Setting the Gaussian Blur's radius to one third of the High Pass radius.
Click OK to close outofthe dialog box. The High Pass effectnow looks softer and less detailed:
The result after applying the Gaussian Blur filter.
Step 8: Change The Layer Blend Mode To Linear Light
To blend the High Pass filter effectin with the image, change the blend mode for the Soften Skin layer
from Normal (the default mode) to Linear Light. You'll find the Blend Mode option in the upper left
corner ofthe Layers panel:
Changing the blend mode ofthe Soften Skin layer to Linear Light.
This creates a very high contrast, over-sharpened effect. Don'tworry if you think this looks terrible; it
will look even worse in a moment:
The result after changing the Soften Skin layer's blend mode to Linear Light.
Learn More: Photoshop's Five Essential Blend Modes For Photo Editing
Step 9: Invert The Layer
If our goal was to over-sharpen the heck outthe image, we'd be done. Butofcourse, we're trying to
smooth and soften the skin. To use our High Pass effect not for sharpening butfor softening, we need
to invert the Soften Skin layer. To do that, go up to the Image menu at the top ofthe screen, choose
Adjustments, and then choose Invert. Or, just press Ctrl+I (Win) / Command+I (Mac) on your
keyboard:
Going to Image > Adjustments > Invert.
With the layer inverted, the image goes from being over-sharpened to looking like a weird, blurry mess
with big ugly halos around everything:
The result after inverting the Soften Skin layer.
Step 10: Open The Blending Options
To reduce the halo effect, click on the small menu icon in the upper right corner ofthe Layers panel:
Clicking the Layers panel menu icon.
Choose Blending Options from the menu that appears:
Choosing "Blending Options"from the Layers panel menu.
This opens the Layer Style dialog box setto the Blending Options in the middle column. Ifyou look
down at the bottom, you'll see two sets ofsliders; one labeled "This Layer" and another below itlabeled
"Underlying Layer". These are Photoshop's Blend If sliders and they allow us to control how our
currently-selected layer (the Soften Skin layer) blends with the layer below it. To reduce the intensity of
the halos, we need the first setofsliders (the one on top labeled "This Layer"). You can ignore the other
one:
The Blend If sliders. The one on top is the one we need.
You'll find the actual sliders below either end ofthe horizontal gradientbar. There's one for controlling
the darker areas of the image on the left and one for the lighter areas on the right:
The dark (left) and light (right) sliders.
It looks like the sliders are solid,butwe can actually splitthem in half and then spread the two halves of
each slider apart. If we were to simply click on one ofthe sliders and drag itaround, we'd create very
harsh and noticeable transitions between the layers. But by splitting the sliders apart, the space
between the two halves creates a much smoother and more subtle blend.
We'll start by reducing the lighter halos. To do that, press and hold the Alt (Win) / Option (Mac) key on
your keyboard as you click on the slider on the right and begin dragging ittowards the left. The Alt
(Win) / Option (Mac) key tells Photoshop to splitthe slider in half so that as you're dragging, only the left
side ofthe slider actually moves while the right side stays in place.
Keep an eye on the image as you're dragging the slider and you'll see the lighter halos fading away.
You'll need to drag almostall the way to the left to reduce them as much as possible:
Dragging the left half ofthe slider on the right.
Here's the result after dragging the first slider. Mostofthe lighter halos are now gone, or at least, much
less noticeable.Only the darker ones remain:
The result after dragging the first slider.
To reduce the darker halos, press and hold your Alt (Win) / Option (Mac) key as you click on the slider
on the left and drag the right half ofit towards the right. Again, you'll need to drag almostall the way to
the right for mostof the dark halos to disappear:
Dragging the right half ofthe slider on the left.
When you're done, click OK to close outofthe Layer Style dialog box,and here's the result. Notice how
smooth the skin looks:
The image after dragging the second slider.
Step 11: Add A Layer Mask
At this point, we've softened the skin, butwe've also softened the eyes, mouth, hair, and everything
else in the image. We need a way to hide the effecteverywhere except the skin, and we can do that
using a layer mask. Press and hold the Alt (Win) / Option (Mac) key on your keyboard and click the
Add Layer Mask icon at the bottom ofthe Layers panel:
Adding a layer mask while holding Alt(Win) / Option (Mac).
This adds a layer mask to the Soften Skin layer. Normally, Photoshop fills a layer mask with white,
which allows the entire layer to remain visible until we paint over certain areas with black to hide them.
But by pressing and holding Alt(Win) / Option (Mac) as we clicked the Add Layer Mask icon, we told
Photoshop to fill the mask with black, as we can see by looking atthe layer mask thumbnail. This
temporarily hides the entire softening effect from view:
A black-filled layer mask has been added to the Soften Skin layer.
Learn More: Understanding Layer Masks in Photoshop
Step 12: Select The Brush Tool
We're going to paintback the softening effect, but only over the skin. To do that, selectPhotoshop's
Brush Tool from the Tools panel:
Selecting the Brush Tool.
Step 13: Set Your Foreground Color To White
We'll need to painton the mask with white. Photoshop uses the current Foreground color as the color
of the brush, so make sure your Foreground color is setto white. You can see your current Foreground
and Background colors in the color swatches near the bottom ofthe Tools panel. The swatch in the
upper leftis the Foreground color. Ifit's not showing white, press the letter D on your keyboard to
quickly resetthe colors to their defaults:
The Foreground (upper left) and Background (lower right) color swatches.
Step 14: Paint Over The Skin
With the Brush Tool in hand and white as your Foreground color, simply paintover the skin to reveal
the softening effect. A soft-edge brush will work best. We already know that we can adjust the size of
the brush using the left and right bracketkeys, butifyou press and hold your Shift key while pressing
the left bracket key, you'll make the brush softer. Holding Shift while pressing the right bracket key
will make the brush harder.
Before you begin painting, it's also a good idea to look up in the Options Bar and check to make sure
that the Mode option (short for Blend Mode) for the Brush Tool is setto Normal, Opacity is set to
100% and Flow is also setto 100%. If you made changes to any ofthese settings in the pastand forgot
to setthem back, you could end up with unexpected results:
Making sure the Mode, Opacity and Fill options are all setto their defaults.
I'll start by painting over her forehead. Since we're painting on the layer mask, noton the layer itself, we
don'tsee our brush strokes. Instead, we reveal the softening effectin the areas where we've painted:
Painting with white on the layer mask to reveal the softening effecton her forehead.
I'll do the same thing over her nose, her cheeks, and around her eyes, adjusting my brush size as
needed so Idon'taccidentally paintover her eyes or any other areas that should remain sharp. If you
do slip and paintover the wrong area, simply press the letter X on your keyboard to swap your
Foreground and Background colors.This will set your Foreground color to black. Paint with black
over the area to hide it, then press X once again to setyour Foreground color back to white and
continue painting:
Revealing more ofthe softening effect, but just over the skin.
To finish things off, I'll paint around her mouth and over her chin, being careful to avoid her lips:
Revealing the skin softening effect over the lower portion ofher face.
Viewing The Layer Mask
If you want to see exactly where you've painted,you can view the layer mask itselfin the documentby
pressing and holding your Alt (Win) / Option (Mac) key and clicking on the mask thumbnail in the
Layers panel:
Holding Alt(Win) / Option (Mac) and clicking the layer mask thumbnail.
Your image will temporarily be replaced by the mask. The white areas are where you've painted. It
looks a little creepy, butthis can be a handy way of checking to make sure you haven'tmissed any
spots. You can even paintdirectly on the mask if you need to. To switch back to your image, justpress
and hold Alt(Win) / Option (Mac) and click again on the mask thumbnail in the Layers panel:
Use the mask view to look for any areas you missed.
Step 15: Lower The Layer Opacity
Finally, the skin softening effect is usually too intense at this point. To reduce it, simply lower the
opacity ofthe Soften Skin layer. You'll find the Opacity option directly across from the Blend Mode
option at the top ofthe Layers panel. In general, an opacity value ofbetween 40% and 60% works best,
but it will depend on your image.For my image, I'll setthe opacity to 50%:
Lowering the opacity ofthe skin softening effectto 50%.
And with that, we're done!Here, after lowering the opacity, is my final skin softening result:
The final result.

More Related Content

What's hot

Using The Toolbox
Using The ToolboxUsing The Toolbox
Using The Toolboxguestb15e93
 
Digital work station intro
Digital work station introDigital work station intro
Digital work station introWhitney Brooks
 
Realistic cast shadow effect in photoshop
Realistic cast shadow effect in photoshopRealistic cast shadow effect in photoshop
Realistic cast shadow effect in photoshopmicah20
 
How to learn photoshop
How to learn photoshopHow to learn photoshop
How to learn photoshopjazza patrick
 
Lesson 9 (Tools Palette 1)
Lesson 9 (Tools Palette 1)Lesson 9 (Tools Palette 1)
Lesson 9 (Tools Palette 1)Denden Amarante
 
Photo retouching tips and tricks in photoshop
Photo retouching tips and tricks in photoshopPhoto retouching tips and tricks in photoshop
Photo retouching tips and tricks in photoshopRemon Mia
 
Photoshop tutorial 2 rubber and quick select tools
Photoshop tutorial 2   rubber and quick select toolsPhotoshop tutorial 2   rubber and quick select tools
Photoshop tutorial 2 rubber and quick select toolsAndrew Willetts
 
Crazy Photos: An Introduction to GIMP
Crazy Photos: An Introduction to GIMPCrazy Photos: An Introduction to GIMP
Crazy Photos: An Introduction to GIMPRino Landa
 
Paths, Masks And Blend Modes
Paths, Masks And Blend ModesPaths, Masks And Blend Modes
Paths, Masks And Blend ModesShan
 
Pepsi vector tutorial
Pepsi vector tutorialPepsi vector tutorial
Pepsi vector tutorialbalermm
 
Skills Development Notes in Photoshop
Skills Development Notes in PhotoshopSkills Development Notes in Photoshop
Skills Development Notes in Photoshopidlemindz
 
Skills developmetn photoshop
Skills developmetn photoshopSkills developmetn photoshop
Skills developmetn photoshopidlemindz
 
Photoshop booklet 2016
Photoshop booklet 2016Photoshop booklet 2016
Photoshop booklet 2016missfcmay
 
Photoshop editing booklet 2019
Photoshop editing booklet 2019Photoshop editing booklet 2019
Photoshop editing booklet 2019missfcmay
 

What's hot (20)

Adobe Photoshop: Retouching Tools
Adobe Photoshop: Retouching ToolsAdobe Photoshop: Retouching Tools
Adobe Photoshop: Retouching Tools
 
Using The Toolbox
Using The ToolboxUsing The Toolbox
Using The Toolbox
 
Adobe Photoshop: Selection Tools
Adobe Photoshop: Selection ToolsAdobe Photoshop: Selection Tools
Adobe Photoshop: Selection Tools
 
Writing ED material
Writing ED materialWriting ED material
Writing ED material
 
Digital work station intro
Digital work station introDigital work station intro
Digital work station intro
 
Eval Q4 Photoshop
Eval Q4 PhotoshopEval Q4 Photoshop
Eval Q4 Photoshop
 
Realistic cast shadow effect in photoshop
Realistic cast shadow effect in photoshopRealistic cast shadow effect in photoshop
Realistic cast shadow effect in photoshop
 
How to learn photoshop
How to learn photoshopHow to learn photoshop
How to learn photoshop
 
Adobe Photoshop: Painting Tools
Adobe Photoshop: Painting ToolsAdobe Photoshop: Painting Tools
Adobe Photoshop: Painting Tools
 
Lesson 9 (Tools Palette 1)
Lesson 9 (Tools Palette 1)Lesson 9 (Tools Palette 1)
Lesson 9 (Tools Palette 1)
 
Photo retouching tips and tricks in photoshop
Photo retouching tips and tricks in photoshopPhoto retouching tips and tricks in photoshop
Photo retouching tips and tricks in photoshop
 
Photoshop tutorial 2 rubber and quick select tools
Photoshop tutorial 2   rubber and quick select toolsPhotoshop tutorial 2   rubber and quick select tools
Photoshop tutorial 2 rubber and quick select tools
 
Crazy Photos: An Introduction to GIMP
Crazy Photos: An Introduction to GIMPCrazy Photos: An Introduction to GIMP
Crazy Photos: An Introduction to GIMP
 
Paths, Masks And Blend Modes
Paths, Masks And Blend ModesPaths, Masks And Blend Modes
Paths, Masks And Blend Modes
 
Pepsi vector tutorial
Pepsi vector tutorialPepsi vector tutorial
Pepsi vector tutorial
 
Photoshop tools
Photoshop toolsPhotoshop tools
Photoshop tools
 
Skills Development Notes in Photoshop
Skills Development Notes in PhotoshopSkills Development Notes in Photoshop
Skills Development Notes in Photoshop
 
Skills developmetn photoshop
Skills developmetn photoshopSkills developmetn photoshop
Skills developmetn photoshop
 
Photoshop booklet 2016
Photoshop booklet 2016Photoshop booklet 2016
Photoshop booklet 2016
 
Photoshop editing booklet 2019
Photoshop editing booklet 2019Photoshop editing booklet 2019
Photoshop editing booklet 2019
 

Similar to Smooth and soften skin in a photo with photoshop

P 17 Skin Retouching
P 17 Skin RetouchingP 17 Skin Retouching
P 17 Skin Retouchingsumidahilo
 
Menggunakan Radial blur
Menggunakan Radial blurMenggunakan Radial blur
Menggunakan Radial blurasyarifaisal
 
217 quick guide to photoshop cs6
217 quick guide to photoshop cs6217 quick guide to photoshop cs6
217 quick guide to photoshop cs6Rodel Morales
 
photoshop tutorial-majed1
photoshop tutorial-majed1photoshop tutorial-majed1
photoshop tutorial-majed1mayed_bs
 
How to Create Simple Manipulation Using Lighting Effects
How to Create Simple Manipulation Using Lighting EffectsHow to Create Simple Manipulation Using Lighting Effects
How to Create Simple Manipulation Using Lighting EffectsKinga Howard
 
Photoshop Tutorial- Skin Retouching Technique
 Photoshop Tutorial- Skin Retouching Technique Photoshop Tutorial- Skin Retouching Technique
Photoshop Tutorial- Skin Retouching TechniqueKinga Howard
 
Cut out image with hard hair mask
Cut out image with hard hair maskCut out image with hard hair mask
Cut out image with hard hair masksujon hasan
 
Photo shop cs5-watercolor-painting-effect-tutorial
Photo shop cs5-watercolor-painting-effect-tutorialPhoto shop cs5-watercolor-painting-effect-tutorial
Photo shop cs5-watercolor-painting-effect-tutorialMenSagam Technologies
 
How to Make a Gradient in Photoshop
How to Make a Gradient in PhotoshopHow to Make a Gradient in Photoshop
How to Make a Gradient in PhotoshopZenith Clipping
 
How to Sharpen an Image in Photoshop
How to Sharpen an Image in PhotoshopHow to Sharpen an Image in Photoshop
How to Sharpen an Image in PhotoshopZenith Clipping
 
Curs photoshop
Curs photoshopCurs photoshop
Curs photoshopKpaula40
 
adobephotoshop_frerking
adobephotoshop_frerking adobephotoshop_frerking
adobephotoshop_frerking Agung Yuwono
 
How to add a drop shadow to your product images in Adobe Photoshop
How to add a drop shadow to your product images in Adobe PhotoshopHow to add a drop shadow to your product images in Adobe Photoshop
How to add a drop shadow to your product images in Adobe PhotoshopPixc
 
How to Blur Background in Photoshop 2023
How to Blur Background in Photoshop 2023How to Blur Background in Photoshop 2023
How to Blur Background in Photoshop 2023Zenith Clipping
 
Photoshop Tutorial Booklet
Photoshop Tutorial BookletPhotoshop Tutorial Booklet
Photoshop Tutorial BookletGraveney School
 
Photoshop tips online class version 2015
Photoshop tips online class version 2015Photoshop tips online class version 2015
Photoshop tips online class version 2015arteachertech
 
Create a Photo Collage in Photoshop.pdf
Create a Photo Collage in Photoshop.pdfCreate a Photo Collage in Photoshop.pdf
Create a Photo Collage in Photoshop.pdfPinkverge
 

Similar to Smooth and soften skin in a photo with photoshop (20)

P 17 Skin Retouching
P 17 Skin RetouchingP 17 Skin Retouching
P 17 Skin Retouching
 
Learning Photoshop.pptx
Learning Photoshop.pptxLearning Photoshop.pptx
Learning Photoshop.pptx
 
Menggunakan Radial blur
Menggunakan Radial blurMenggunakan Radial blur
Menggunakan Radial blur
 
Edgy Colors
Edgy ColorsEdgy Colors
Edgy Colors
 
217 quick guide to photoshop cs6
217 quick guide to photoshop cs6217 quick guide to photoshop cs6
217 quick guide to photoshop cs6
 
photoshop tutorial-majed1
photoshop tutorial-majed1photoshop tutorial-majed1
photoshop tutorial-majed1
 
How to Create Simple Manipulation Using Lighting Effects
How to Create Simple Manipulation Using Lighting EffectsHow to Create Simple Manipulation Using Lighting Effects
How to Create Simple Manipulation Using Lighting Effects
 
Photoshop Tutorial- Skin Retouching Technique
 Photoshop Tutorial- Skin Retouching Technique Photoshop Tutorial- Skin Retouching Technique
Photoshop Tutorial- Skin Retouching Technique
 
Cut out image with hard hair mask
Cut out image with hard hair maskCut out image with hard hair mask
Cut out image with hard hair mask
 
Photo shop cs5-watercolor-painting-effect-tutorial
Photo shop cs5-watercolor-painting-effect-tutorialPhoto shop cs5-watercolor-painting-effect-tutorial
Photo shop cs5-watercolor-painting-effect-tutorial
 
P 13 Spolight
P 13 SpolightP 13 Spolight
P 13 Spolight
 
How to Make a Gradient in Photoshop
How to Make a Gradient in PhotoshopHow to Make a Gradient in Photoshop
How to Make a Gradient in Photoshop
 
How to Sharpen an Image in Photoshop
How to Sharpen an Image in PhotoshopHow to Sharpen an Image in Photoshop
How to Sharpen an Image in Photoshop
 
Curs photoshop
Curs photoshopCurs photoshop
Curs photoshop
 
adobephotoshop_frerking
adobephotoshop_frerking adobephotoshop_frerking
adobephotoshop_frerking
 
How to add a drop shadow to your product images in Adobe Photoshop
How to add a drop shadow to your product images in Adobe PhotoshopHow to add a drop shadow to your product images in Adobe Photoshop
How to add a drop shadow to your product images in Adobe Photoshop
 
How to Blur Background in Photoshop 2023
How to Blur Background in Photoshop 2023How to Blur Background in Photoshop 2023
How to Blur Background in Photoshop 2023
 
Photoshop Tutorial Booklet
Photoshop Tutorial BookletPhotoshop Tutorial Booklet
Photoshop Tutorial Booklet
 
Photoshop tips online class version 2015
Photoshop tips online class version 2015Photoshop tips online class version 2015
Photoshop tips online class version 2015
 
Create a Photo Collage in Photoshop.pdf
Create a Photo Collage in Photoshop.pdfCreate a Photo Collage in Photoshop.pdf
Create a Photo Collage in Photoshop.pdf
 

More from Cardinal Newman Catholic School

Research into documentary newspaper adverts and double page
Research into documentary newspaper adverts and double pageResearch into documentary newspaper adverts and double page
Research into documentary newspaper adverts and double pageCardinal Newman Catholic School
 

More from Cardinal Newman Catholic School (20)

Jada boparan 11 rnn
Jada boparan   11 rnnJada boparan   11 rnn
Jada boparan 11 rnn
 
Konrad xeno 10 rds
Konrad xeno 10 rdsKonrad xeno 10 rds
Konrad xeno 10 rds
 
Milosz bieganski
Milosz bieganskiMilosz bieganski
Milosz bieganski
 
Urte polianskyte 7 prn
Urte polianskyte   7 prnUrte polianskyte   7 prn
Urte polianskyte 7 prn
 
Findlay thompson 7 prn
Findlay thompson   7 prnFindlay thompson   7 prn
Findlay thompson 7 prn
 
4. media ancillary task planning
4. media ancillary task planning4. media ancillary task planning
4. media ancillary task planning
 
media doc costume and props
media doc costume and propsmedia doc costume and props
media doc costume and props
 
media evaluation question 2
media evaluation question 2media evaluation question 2
media evaluation question 2
 
Text wrap
Text wrapText wrap
Text wrap
 
Research into documentary newspaper adverts and double page
Research into documentary newspaper adverts and double pageResearch into documentary newspaper adverts and double page
Research into documentary newspaper adverts and double page
 
Documentary research
Documentary researchDocumentary research
Documentary research
 
Documentary reality
Documentary realityDocumentary reality
Documentary reality
 
Documentary conventions
Documentary conventionsDocumentary conventions
Documentary conventions
 
Checklist guidance
Checklist guidanceChecklist guidance
Checklist guidance
 
A2 evaluation
A2 evaluationA2 evaluation
A2 evaluation
 
Useful Media Glossary
Useful Media GlossaryUseful Media Glossary
Useful Media Glossary
 
B324 production portfolio
B324 production portfolioB324 production portfolio
B324 production portfolio
 
B324 checklist
B324 checklistB324 checklist
B324 checklist
 
A2 action plan proforma 2017 2018
A2 action plan proforma 2017 2018A2 action plan proforma 2017 2018
A2 action plan proforma 2017 2018
 
Course overview
Course overviewCourse overview
Course overview
 

Recently uploaded

What is Model Inheritance in Odoo 17 ERP
What is Model Inheritance in Odoo 17 ERPWhat is Model Inheritance in Odoo 17 ERP
What is Model Inheritance in Odoo 17 ERPCeline George
 
Computed Fields and api Depends in the Odoo 17
Computed Fields and api Depends in the Odoo 17Computed Fields and api Depends in the Odoo 17
Computed Fields and api Depends in the Odoo 17Celine George
 
ACC 2024 Chronicles. Cardiology. Exam.pdf
ACC 2024 Chronicles. Cardiology. Exam.pdfACC 2024 Chronicles. Cardiology. Exam.pdf
ACC 2024 Chronicles. Cardiology. Exam.pdfSpandanaRallapalli
 
Employee wellbeing at the workplace.pptx
Employee wellbeing at the workplace.pptxEmployee wellbeing at the workplace.pptx
Employee wellbeing at the workplace.pptxNirmalaLoungPoorunde1
 
EPANDING THE CONTENT OF AN OUTLINE using notes.pptx
EPANDING THE CONTENT OF AN OUTLINE using notes.pptxEPANDING THE CONTENT OF AN OUTLINE using notes.pptx
EPANDING THE CONTENT OF AN OUTLINE using notes.pptxRaymartEstabillo3
 
Influencing policy (training slides from Fast Track Impact)
Influencing policy (training slides from Fast Track Impact)Influencing policy (training slides from Fast Track Impact)
Influencing policy (training slides from Fast Track Impact)Mark Reed
 
Crayon Activity Handout For the Crayon A
Crayon Activity Handout For the Crayon ACrayon Activity Handout For the Crayon A
Crayon Activity Handout For the Crayon AUnboundStockton
 
How to do quick user assign in kanban in Odoo 17 ERP
How to do quick user assign in kanban in Odoo 17 ERPHow to do quick user assign in kanban in Odoo 17 ERP
How to do quick user assign in kanban in Odoo 17 ERPCeline George
 
HỌC TỐT TIẾNG ANH 11 THEO CHƯƠNG TRÌNH GLOBAL SUCCESS ĐÁP ÁN CHI TIẾT - CẢ NĂ...
HỌC TỐT TIẾNG ANH 11 THEO CHƯƠNG TRÌNH GLOBAL SUCCESS ĐÁP ÁN CHI TIẾT - CẢ NĂ...HỌC TỐT TIẾNG ANH 11 THEO CHƯƠNG TRÌNH GLOBAL SUCCESS ĐÁP ÁN CHI TIẾT - CẢ NĂ...
HỌC TỐT TIẾNG ANH 11 THEO CHƯƠNG TRÌNH GLOBAL SUCCESS ĐÁP ÁN CHI TIẾT - CẢ NĂ...Nguyen Thanh Tu Collection
 
ECONOMIC CONTEXT - PAPER 1 Q3: NEWSPAPERS.pptx
ECONOMIC CONTEXT - PAPER 1 Q3: NEWSPAPERS.pptxECONOMIC CONTEXT - PAPER 1 Q3: NEWSPAPERS.pptx
ECONOMIC CONTEXT - PAPER 1 Q3: NEWSPAPERS.pptxiammrhaywood
 
Alper Gobel In Media Res Media Component
Alper Gobel In Media Res Media ComponentAlper Gobel In Media Res Media Component
Alper Gobel In Media Res Media ComponentInMediaRes1
 
Hierarchy of management that covers different levels of management
Hierarchy of management that covers different levels of managementHierarchy of management that covers different levels of management
Hierarchy of management that covers different levels of managementmkooblal
 
Judging the Relevance and worth of ideas part 2.pptx
Judging the Relevance  and worth of ideas part 2.pptxJudging the Relevance  and worth of ideas part 2.pptx
Judging the Relevance and worth of ideas part 2.pptxSherlyMaeNeri
 
Framing an Appropriate Research Question 6b9b26d93da94caf993c038d9efcdedb.pdf
Framing an Appropriate Research Question 6b9b26d93da94caf993c038d9efcdedb.pdfFraming an Appropriate Research Question 6b9b26d93da94caf993c038d9efcdedb.pdf
Framing an Appropriate Research Question 6b9b26d93da94caf993c038d9efcdedb.pdfUjwalaBharambe
 
Grade 9 Q4-MELC1-Active and Passive Voice.pptx
Grade 9 Q4-MELC1-Active and Passive Voice.pptxGrade 9 Q4-MELC1-Active and Passive Voice.pptx
Grade 9 Q4-MELC1-Active and Passive Voice.pptxChelloAnnAsuncion2
 
Difference Between Search & Browse Methods in Odoo 17
Difference Between Search & Browse Methods in Odoo 17Difference Between Search & Browse Methods in Odoo 17
Difference Between Search & Browse Methods in Odoo 17Celine George
 

Recently uploaded (20)

What is Model Inheritance in Odoo 17 ERP
What is Model Inheritance in Odoo 17 ERPWhat is Model Inheritance in Odoo 17 ERP
What is Model Inheritance in Odoo 17 ERP
 
Computed Fields and api Depends in the Odoo 17
Computed Fields and api Depends in the Odoo 17Computed Fields and api Depends in the Odoo 17
Computed Fields and api Depends in the Odoo 17
 
ACC 2024 Chronicles. Cardiology. Exam.pdf
ACC 2024 Chronicles. Cardiology. Exam.pdfACC 2024 Chronicles. Cardiology. Exam.pdf
ACC 2024 Chronicles. Cardiology. Exam.pdf
 
TataKelola dan KamSiber Kecerdasan Buatan v022.pdf
TataKelola dan KamSiber Kecerdasan Buatan v022.pdfTataKelola dan KamSiber Kecerdasan Buatan v022.pdf
TataKelola dan KamSiber Kecerdasan Buatan v022.pdf
 
Employee wellbeing at the workplace.pptx
Employee wellbeing at the workplace.pptxEmployee wellbeing at the workplace.pptx
Employee wellbeing at the workplace.pptx
 
EPANDING THE CONTENT OF AN OUTLINE using notes.pptx
EPANDING THE CONTENT OF AN OUTLINE using notes.pptxEPANDING THE CONTENT OF AN OUTLINE using notes.pptx
EPANDING THE CONTENT OF AN OUTLINE using notes.pptx
 
Influencing policy (training slides from Fast Track Impact)
Influencing policy (training slides from Fast Track Impact)Influencing policy (training slides from Fast Track Impact)
Influencing policy (training slides from Fast Track Impact)
 
Crayon Activity Handout For the Crayon A
Crayon Activity Handout For the Crayon ACrayon Activity Handout For the Crayon A
Crayon Activity Handout For the Crayon A
 
Raw materials used in Herbal Cosmetics.pptx
Raw materials used in Herbal Cosmetics.pptxRaw materials used in Herbal Cosmetics.pptx
Raw materials used in Herbal Cosmetics.pptx
 
How to do quick user assign in kanban in Odoo 17 ERP
How to do quick user assign in kanban in Odoo 17 ERPHow to do quick user assign in kanban in Odoo 17 ERP
How to do quick user assign in kanban in Odoo 17 ERP
 
HỌC TỐT TIẾNG ANH 11 THEO CHƯƠNG TRÌNH GLOBAL SUCCESS ĐÁP ÁN CHI TIẾT - CẢ NĂ...
HỌC TỐT TIẾNG ANH 11 THEO CHƯƠNG TRÌNH GLOBAL SUCCESS ĐÁP ÁN CHI TIẾT - CẢ NĂ...HỌC TỐT TIẾNG ANH 11 THEO CHƯƠNG TRÌNH GLOBAL SUCCESS ĐÁP ÁN CHI TIẾT - CẢ NĂ...
HỌC TỐT TIẾNG ANH 11 THEO CHƯƠNG TRÌNH GLOBAL SUCCESS ĐÁP ÁN CHI TIẾT - CẢ NĂ...
 
OS-operating systems- ch04 (Threads) ...
OS-operating systems- ch04 (Threads) ...OS-operating systems- ch04 (Threads) ...
OS-operating systems- ch04 (Threads) ...
 
ECONOMIC CONTEXT - PAPER 1 Q3: NEWSPAPERS.pptx
ECONOMIC CONTEXT - PAPER 1 Q3: NEWSPAPERS.pptxECONOMIC CONTEXT - PAPER 1 Q3: NEWSPAPERS.pptx
ECONOMIC CONTEXT - PAPER 1 Q3: NEWSPAPERS.pptx
 
Alper Gobel In Media Res Media Component
Alper Gobel In Media Res Media ComponentAlper Gobel In Media Res Media Component
Alper Gobel In Media Res Media Component
 
Rapple "Scholarly Communications and the Sustainable Development Goals"
Rapple "Scholarly Communications and the Sustainable Development Goals"Rapple "Scholarly Communications and the Sustainable Development Goals"
Rapple "Scholarly Communications and the Sustainable Development Goals"
 
Hierarchy of management that covers different levels of management
Hierarchy of management that covers different levels of managementHierarchy of management that covers different levels of management
Hierarchy of management that covers different levels of management
 
Judging the Relevance and worth of ideas part 2.pptx
Judging the Relevance  and worth of ideas part 2.pptxJudging the Relevance  and worth of ideas part 2.pptx
Judging the Relevance and worth of ideas part 2.pptx
 
Framing an Appropriate Research Question 6b9b26d93da94caf993c038d9efcdedb.pdf
Framing an Appropriate Research Question 6b9b26d93da94caf993c038d9efcdedb.pdfFraming an Appropriate Research Question 6b9b26d93da94caf993c038d9efcdedb.pdf
Framing an Appropriate Research Question 6b9b26d93da94caf993c038d9efcdedb.pdf
 
Grade 9 Q4-MELC1-Active and Passive Voice.pptx
Grade 9 Q4-MELC1-Active and Passive Voice.pptxGrade 9 Q4-MELC1-Active and Passive Voice.pptx
Grade 9 Q4-MELC1-Active and Passive Voice.pptx
 
Difference Between Search & Browse Methods in Odoo 17
Difference Between Search & Browse Methods in Odoo 17Difference Between Search & Browse Methods in Odoo 17
Difference Between Search & Browse Methods in Odoo 17
 

Smooth and soften skin in a photo with photoshop

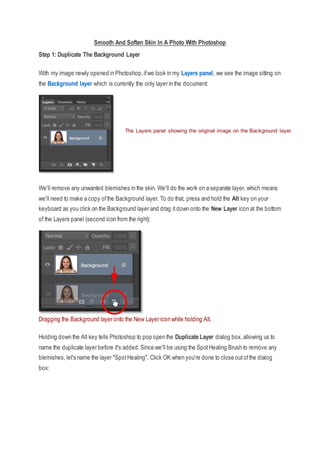
  • 1. Smooth And Soften Skin In A Photo With Photoshop Step 1: Duplicate The Background Layer With my image newly opened in Photoshop,ifwe look in my Layers panel, we see the image sitting on the Background layer which is currently the only layer in the document: We'll remove any unwanted blemishes in the skin. We'll do the work on a separate layer, which means we'll need to make a copy ofthe Background layer. To do that, press and hold the Alt key on your keyboard as you click on the Background layer and drag itdown onto the New Layer icon at the bottom of the Layers panel (second icon from the right): Dragging the Background layer onto the New Layer icon while holding Alt. Holding down the Alt key tells Photoshop to pop open the Duplicate Layer dialog box,allowing us to name the duplicate layer before it's added. Since we'll be using the SpotHealing Brush to remove any blemishes, let's name the layer "SpotHealing". Click OK when you're done to close outofthe dialog box: The Layers panel showing the original image on the Background layer.
  • 2. Naming the layer "SpotHealing". If we look again in the Layers panel, we see the SpotHealing layer now sitting above the Background layer. The SpotHealing layer is highlighted in blue which tells us that it is now the active layer. Anything we do nextwill be done to this layer, while the original image remains safe and unharmed on the Background layer: The Layers panel showing the new SpotHealing layer. Step 2: Select The Spot Healing Brush Tool Next, choose the Spot Healing Brush Tool from the Tools panel: Selecting the SpotHealing Brush Tool. Step 3: Set The Spot Healing Brush To "Content-Aware"
  • 3. With the SpotHealing Brush selected, make sure the Type option in the Options Bar along the top of the screen is setto Content-Aware. This is a relatively new feature for the SpotHealing Brush (first added in CS5) that allows Photoshop to make better decisions aboutthe replacementtexture it chooses for the problem area you've clicked on: Make sure Content-Aware is selected (which it should be by default). Step 4: Click On The Problem Spots To Heal Them To remove any unwanted skin blemishes, all we need to do is click on them with the SpotHealing Brush. Photoshop will instantly replace the problem texture with good texture from the surrounding area. For example, ifwe look atthe young woman's forehead, we see a relatively large blemish justto the right of center. To remove it, I'll position the SpotHealing Brush over top ofit. For bestresults, you'll want your brush to be slightly larger than the area you're trying to replace, and you can change the size of the brush directly from the keyboard. Press the right bracket key ( ] ) repeatedly to make the brush larger or the left bracket key ( [ ) to make it smaller. You'll find the bracketkeys directly to the right of the letter P on moststandard keyboards. Here we see my brush cursor (the black circular outline) positioned over the blemish Iwant to remove:
  • 4. Positioning the SpotHealing Brush over a problem area. I'll click on itwith the SpotHealing Brush, and like magic, it's gone!Photoshop analyzed the area, found some good texture from the area surrounding it, and then blended the good texture in with the problem area's original tone and color to produce seamless results: The result after clicking on the area to remove the blemish.
  • 5. I'll do the same thing with another blemish on her forehead, keeping my brush justa bit larger than the problem area: Positioning the SpotHealing Brush over a second blemish. Once again, I'll click on the blemish with the SpotHealing Brush and Photoshop instantly removes it. If you find that Photoshop did notdo as good ofa job as you were hoping, press Ctrl+Z(Win) / Command+Z (Mac) on your keyboard to undo it. Resize your brush so it's a bitlarger or smaller than last time, then click to try again:
  • 6. The second blemish is gone. I'll click on the remaining blemishes on her forehead to remove them, and here's the result. Things are already looking much better: The blemishes have been removed from her forehead.
  • 7. I'll continue working my way around her face to remove any other problem spots, including a few small pimples on her chin. Keep in mind as you're working thatwhile it's okay to remove temporary problems like acne or other minor skin issues, it's usually not okay to remove permanentfeatures like moles or even certain scars, as these things are part ofwhat makes someone who they are. After all, the goal of image retouching should be to help people look their best, notmake them look like somebody else. Here's a side-by-side comparison ofwhat she looked like originally (left) and after some quick retouching with the SpotHealing Brush (right). With mostphotos, the whole process should take no more than a couple ofminutes. Icovered the SpotHealing Brush fairly quick here, butto learn more about it, check outour Removing Acne, Skin Blemishes With The Spot Healing Brush tutorial where I cover itin much more detail: Before (left) and after (right). Step 5: Duplicate The Spot Healing Layer Now that we've removed any blemishes, we're ready to smooth and soften the skin. Just like we did with the SpotHealing Brush, we'll do the work on its own separate layer. Press and hold the Alt (Win) /
  • 8. Option (Mac) key on your keyboard as you click on the Spot Healing layer and drag it down onto the New Layer icon at the bottom ofthe Layers panel: Dragging the SpotHealing layer onto the New Layer icon while holding Alt(Win) / Option (Mac). When the Duplicate Layer dialog box opens, name the layer "Soften Skin", then click OK: Naming the duplicate layer "Soften Skin". The new Soften Skin layer appears above the SpotHealing layer in the Layers panel: The Layers panel showing the new Soften Skin layer.
  • 9. Step 6: Apply The High Pass Filter To soften the skin, we'll use Photoshop's High Pass filter. Go up to the Filter menu in the Menu Bar along the top ofthe screen, choose Other down near the bottom of the list, and then choose High Pass: Going to Filter > Other > High Pass. If you're familiar with the High Pass filter, it's mostlikely because you've used itbefore as an advanced way of sharpening images. In this case, we're softening the skin, not sharpening it, but many ofthe steps are the same. The High Pass filter works by looking for edges in the image (areas where there's a big, sudden change in brightness or color between neighboring pixels). In the case ofa portrait photo, the edges would be along the hair, around the eyes, the mouth, and so on. Skin, on the other hand, has relatively low amounts ofdetail with much smoother transitions, so itwould be largely ignored. If we were sharpening the image, the High Pass filter would allow us to sharpen the edges without affecting the skin. What we're going to use itfor, though, is the exact opposite. We're going to letthe High Pass filter detectthe edges notso we can sharpen them, but so we can soften everything except the edges. The Radius value at the bottom of the High Pass filter's dialog box controls the "thickness" ofthe edges.In other words, once Photoshop has detected an edge, the Radius value tells ithow many additional pixels on either side ofitto include as part of the edge. Low Radius values will detectonly the finest details, butto make sure we don'tend up softening these areas, we want more ofthe edge to be included. For a typical portraitshot, a Radius value of 24 pixels works well, so that's what I'll use:
  • 10. Setting the Radius value to 24 pixels. If your subjectis further back in the photo, or you're working on a fairly low resolution image, a smaller Radius value mightwork better. In that case, you mightwant to try 18 pixels or even 12 pixels depending on the size ofthe image. The reason I'm mentioning these values specifically is because it's important for the next step that you choose a value that's easily divisible by 3. For example,24 divided by 3 is 8, 18 divided by 3 is 6, and 12 divided by 3 is 4. Nice, easy numbers. Again, we'llsee why in the nextstep. Click OK to close outofthe High Pass filter's dialog box. Your image will turn mostly gray, with the gray being the areas with little to no detail detected. The edges are shown with higher contrast:
  • 11. The result after applying the High Pass filter. Step 7: Apply The Gaussian Blur Filter Next, we'll add some blurring to our High Pass filter effect using Photoshop's Gaussian Blur filter. It may seem counterintuitive, butthe blurring will actually help to bring outmore good texture in the skin. Go up to the Filter menu at the top ofthe screen, choose Blur, and then choose Gaussian Blur: Going to Filter > Blur > Gaussian Blur.
  • 12. Just like with the High Pass filter, we control the blur amount using the Radius value along the bottom of the Gaussian Blur dialog box. Enter an amount that's exactly one third of the value you entered for the High Pass filter. In my case, I went with a radius of 24 pixels for High Pass, so for the Gaussian Blur filter, I'll enter one third of that which is 8 pixels: Setting the Gaussian Blur's radius to one third of the High Pass radius. Click OK to close outofthe dialog box. The High Pass effectnow looks softer and less detailed:
  • 13. The result after applying the Gaussian Blur filter. Step 8: Change The Layer Blend Mode To Linear Light To blend the High Pass filter effectin with the image, change the blend mode for the Soften Skin layer from Normal (the default mode) to Linear Light. You'll find the Blend Mode option in the upper left corner ofthe Layers panel:
  • 14. Changing the blend mode ofthe Soften Skin layer to Linear Light. This creates a very high contrast, over-sharpened effect. Don'tworry if you think this looks terrible; it will look even worse in a moment: The result after changing the Soften Skin layer's blend mode to Linear Light. Learn More: Photoshop's Five Essential Blend Modes For Photo Editing
  • 15. Step 9: Invert The Layer If our goal was to over-sharpen the heck outthe image, we'd be done. Butofcourse, we're trying to smooth and soften the skin. To use our High Pass effect not for sharpening butfor softening, we need to invert the Soften Skin layer. To do that, go up to the Image menu at the top ofthe screen, choose Adjustments, and then choose Invert. Or, just press Ctrl+I (Win) / Command+I (Mac) on your keyboard: Going to Image > Adjustments > Invert. With the layer inverted, the image goes from being over-sharpened to looking like a weird, blurry mess with big ugly halos around everything:
  • 16. The result after inverting the Soften Skin layer. Step 10: Open The Blending Options To reduce the halo effect, click on the small menu icon in the upper right corner ofthe Layers panel: Clicking the Layers panel menu icon. Choose Blending Options from the menu that appears:
  • 17. Choosing "Blending Options"from the Layers panel menu. This opens the Layer Style dialog box setto the Blending Options in the middle column. Ifyou look down at the bottom, you'll see two sets ofsliders; one labeled "This Layer" and another below itlabeled "Underlying Layer". These are Photoshop's Blend If sliders and they allow us to control how our currently-selected layer (the Soften Skin layer) blends with the layer below it. To reduce the intensity of the halos, we need the first setofsliders (the one on top labeled "This Layer"). You can ignore the other one: The Blend If sliders. The one on top is the one we need. You'll find the actual sliders below either end ofthe horizontal gradientbar. There's one for controlling the darker areas of the image on the left and one for the lighter areas on the right: The dark (left) and light (right) sliders.
  • 18. It looks like the sliders are solid,butwe can actually splitthem in half and then spread the two halves of each slider apart. If we were to simply click on one ofthe sliders and drag itaround, we'd create very harsh and noticeable transitions between the layers. But by splitting the sliders apart, the space between the two halves creates a much smoother and more subtle blend. We'll start by reducing the lighter halos. To do that, press and hold the Alt (Win) / Option (Mac) key on your keyboard as you click on the slider on the right and begin dragging ittowards the left. The Alt (Win) / Option (Mac) key tells Photoshop to splitthe slider in half so that as you're dragging, only the left side ofthe slider actually moves while the right side stays in place. Keep an eye on the image as you're dragging the slider and you'll see the lighter halos fading away. You'll need to drag almostall the way to the left to reduce them as much as possible: Dragging the left half ofthe slider on the right. Here's the result after dragging the first slider. Mostofthe lighter halos are now gone, or at least, much less noticeable.Only the darker ones remain:
  • 19. The result after dragging the first slider. To reduce the darker halos, press and hold your Alt (Win) / Option (Mac) key as you click on the slider on the left and drag the right half ofit towards the right. Again, you'll need to drag almostall the way to the right for mostof the dark halos to disappear: Dragging the right half ofthe slider on the left. When you're done, click OK to close outofthe Layer Style dialog box,and here's the result. Notice how smooth the skin looks:
  • 20. The image after dragging the second slider. Step 11: Add A Layer Mask At this point, we've softened the skin, butwe've also softened the eyes, mouth, hair, and everything else in the image. We need a way to hide the effecteverywhere except the skin, and we can do that using a layer mask. Press and hold the Alt (Win) / Option (Mac) key on your keyboard and click the Add Layer Mask icon at the bottom ofthe Layers panel: Adding a layer mask while holding Alt(Win) / Option (Mac).
  • 21. This adds a layer mask to the Soften Skin layer. Normally, Photoshop fills a layer mask with white, which allows the entire layer to remain visible until we paint over certain areas with black to hide them. But by pressing and holding Alt(Win) / Option (Mac) as we clicked the Add Layer Mask icon, we told Photoshop to fill the mask with black, as we can see by looking atthe layer mask thumbnail. This temporarily hides the entire softening effect from view: A black-filled layer mask has been added to the Soften Skin layer. Learn More: Understanding Layer Masks in Photoshop Step 12: Select The Brush Tool We're going to paintback the softening effect, but only over the skin. To do that, selectPhotoshop's Brush Tool from the Tools panel: Selecting the Brush Tool. Step 13: Set Your Foreground Color To White We'll need to painton the mask with white. Photoshop uses the current Foreground color as the color of the brush, so make sure your Foreground color is setto white. You can see your current Foreground and Background colors in the color swatches near the bottom ofthe Tools panel. The swatch in the
  • 22. upper leftis the Foreground color. Ifit's not showing white, press the letter D on your keyboard to quickly resetthe colors to their defaults: The Foreground (upper left) and Background (lower right) color swatches. Step 14: Paint Over The Skin With the Brush Tool in hand and white as your Foreground color, simply paintover the skin to reveal the softening effect. A soft-edge brush will work best. We already know that we can adjust the size of the brush using the left and right bracketkeys, butifyou press and hold your Shift key while pressing the left bracket key, you'll make the brush softer. Holding Shift while pressing the right bracket key will make the brush harder. Before you begin painting, it's also a good idea to look up in the Options Bar and check to make sure that the Mode option (short for Blend Mode) for the Brush Tool is setto Normal, Opacity is set to 100% and Flow is also setto 100%. If you made changes to any ofthese settings in the pastand forgot to setthem back, you could end up with unexpected results: Making sure the Mode, Opacity and Fill options are all setto their defaults. I'll start by painting over her forehead. Since we're painting on the layer mask, noton the layer itself, we don'tsee our brush strokes. Instead, we reveal the softening effectin the areas where we've painted:
  • 23. Painting with white on the layer mask to reveal the softening effecton her forehead. I'll do the same thing over her nose, her cheeks, and around her eyes, adjusting my brush size as needed so Idon'taccidentally paintover her eyes or any other areas that should remain sharp. If you do slip and paintover the wrong area, simply press the letter X on your keyboard to swap your Foreground and Background colors.This will set your Foreground color to black. Paint with black over the area to hide it, then press X once again to setyour Foreground color back to white and continue painting:
  • 24. Revealing more ofthe softening effect, but just over the skin. To finish things off, I'll paint around her mouth and over her chin, being careful to avoid her lips:
  • 25. Revealing the skin softening effect over the lower portion ofher face. Viewing The Layer Mask If you want to see exactly where you've painted,you can view the layer mask itselfin the documentby pressing and holding your Alt (Win) / Option (Mac) key and clicking on the mask thumbnail in the Layers panel:
  • 26. Holding Alt(Win) / Option (Mac) and clicking the layer mask thumbnail. Your image will temporarily be replaced by the mask. The white areas are where you've painted. It looks a little creepy, butthis can be a handy way of checking to make sure you haven'tmissed any spots. You can even paintdirectly on the mask if you need to. To switch back to your image, justpress and hold Alt(Win) / Option (Mac) and click again on the mask thumbnail in the Layers panel:
  • 27. Use the mask view to look for any areas you missed. Step 15: Lower The Layer Opacity Finally, the skin softening effect is usually too intense at this point. To reduce it, simply lower the opacity ofthe Soften Skin layer. You'll find the Opacity option directly across from the Blend Mode option at the top ofthe Layers panel. In general, an opacity value ofbetween 40% and 60% works best, but it will depend on your image.For my image, I'll setthe opacity to 50%:
  • 28. Lowering the opacity ofthe skin softening effectto 50%. And with that, we're done!Here, after lowering the opacity, is my final skin softening result: The final result.