Create a Realistic Break-Apart Effect in Photoshop
•
0 likes•279 views

This document provides a tutorial to create a realistic break-apart effect in Photoshop. The tutorial uses debris brushes, a watercolor brush, layer blending, masks, and adjustments. Key steps include selecting the model, duplicating and masking layers to remove parts of the model, adding a black and white adjustment preserved with masking, using debris brushes on additional layers with masks to create the break apart effect, and painting a watercolor background. The final result is a realistic looking disintegrating effect on the model with a painted background.

Recommended
Recommended
More Related Content
What's hot
What's hot (20)
Viewers also liked
Similar to Create a Realistic Break-Apart Effect in Photoshop
Similar to Create a Realistic Break-Apart Effect in Photoshop (20)
Recently uploaded
Recently uploaded (20)
Create a Realistic Break-Apart Effect in Photoshop
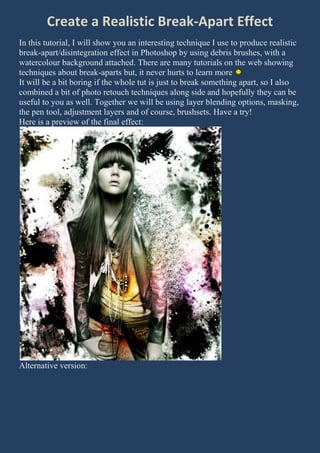
- 1. Create a Realistic Break-Apart Effect In this tutorial, I will show you an interesting technique I use to produce realistic break-apart/disintegration effect in Photoshop by using debris brushes, with a watercolour background attached. There are many tutorials on the web showing techniques about break-aparts but, it never hurts to learn more It will be a bit boring if the whole tut is just to break something apart, so I also combined a bit of photo retouch techniques along side and hopefully they can be useful to you as well. Together we will be using layer blending options, masking, the pen tool, adjustment layers and of course, brushsets. Have a try! Here is a preview of the final effect: Alternative version:
- 2. OK let’s get started! To complete this tutorial, you will need the following stocks: Female stock Debris Brush Watercolor Brush Step 1 Create a new document sized 3100px * 3600px with White background. Open the “Female Stock” image in Photoshop, use Pen Tool (or whatever selection method you prefer) to make a working path around the model:
- 5. If you chose to use Pen Tool, make sure to make a selection after you close the path (by right-click inside the path with Pen Tool selected):
- 6. After clicking “Make Selection …”, keep the Feather radius to 0px and tick the “Anti-aliased” checkbox as shown below: If your selection isn’t perfact, you can hit Ctrl + Alt + R and bring up the refine edge option and apply the following settings:
- 7. Then copy and paste the selection on our document and name this newly-created
- 8. layer as “model”, resize and position it as shown below: Step 2 Duplicate the “model” layer twice. Then on the first duplicated layer, change the blending option to “linear burn”:
- 9. Add a vector mask and grab a soft round brush, gently erase the portion as shown below:
- 11. This is the effect after apply the layer mask, you can see the dask parts are now gone:
- 12. Then on the second duplicated layer, change its blending mode to “Screen”, then also grab a soft round brush and apply the following mask onto it:
- 14. Here is the effect so far:
- 15. Step 3 I decided to add some black and white adjustment to the model however preserve the yellow and orange parts of the image. So we can go to Layer > New adjustment Layer > Black and White and apply the followng options:
- 16. On the mask of this adjustment layer, use the Eraser tool with a soft brush to erase the following part of the image:
- 17. I also feel like to preserve the lip colour for the model, so I used the Eraser Tool (with a opacity of 40%) to gently erase the lip part on the mask of this adjustment layer: And you will have the following effect:
- 18. We can adjust the lighting contrast a bit for the model. So go to Layer > New adjustment layer > Curves and apply the following settings:
- 19. And here is the effect so far:
- 20. Step 4 Now we’re on the break-apart bit of the tutorial! Firstly load the “Debris Brush” into Photoshop, then create a new layer called “break apart” on top of all other layers: Grab one of the brush in the “Debris Brush” set, use a colour match the
- 21. background colour (in this case it’s white), then use the lasso tool with 100px feather to draw a selection in the area you would like to break apart, simply paint over it: Duplicate this “break apart” layer, hit Ctrl + I and invert the colour on the duplicated layer:
- 22. Add a layer mask on the duplicated layer, this time use the Eraser tool with the Debris Brush, eraser the area and reduce the density of the black part:
- 23. Also use the Warp Tool (Ctrl + T and right-click choose Warp) to add a bit of motion:
- 24. Also tidy up the bits and pieces arund the hair with a soft eraser:
- 25. Here is the effect I have after apply the above steps: Step 5 Now we can use the watercolour brush to add some background for this image. Create a new layer just above the background layer, load the “Watercolor Brush” into Photoshop and simply paint over it (great chance to use your creativity!) Here is what I have after the painting:
- 26. We can futher add some colour onto our image. To do this, simple create a new layer on top of all other layers, set its blending option to “overlay”, use a big soft brush and paint over it. Here is my effect so far:
- 27. Ok that’s it for this tutorial! You can of course add some of your own texture or filter effect and see what the end results are! Here is my final image for this tutorial: (I slightly adjusted the colour balance and curves ) – Click to enlarge:
- 29. Hope you enjoy it & learn something new from this tutorial. Learn more