
Recommended
More Related Content
What's hot
What's hot (18)
Similar to Cut out image with hard hair mask
Similar to Cut out image with hard hair mask (20)
Recently uploaded
Recently uploaded (20)
Cut out image with hard hair mask
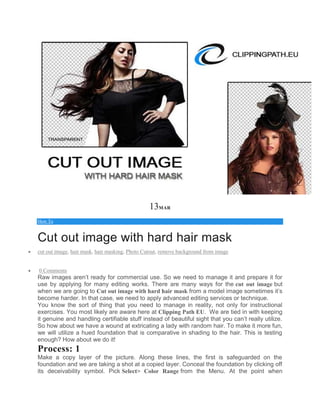
- 1. 13MAR How To Cut out image with hard hair mask cut out image, hair mask, hair masking, Photo Cutout, remove background from image 0 Comments Raw images aren’t ready for commercial use. So we need to manage it and prepare it for use by applying for many editing works. There are many ways for the cut out image but when we are going to Cut out image with hard hair mask from a model image sometimes it’s become harder. In that case, we need to apply advanced editing services or technique. You know the sort of thing that you need to manage in reality, not only for instructional exercises. You most likely are aware here at Clipping Path EU. We are tied in with keeping it genuine and handling certifiable stuff instead of beautiful sight that you can’t really utilize. So how about we have a wound at extricating a lady with random hair. To make it more fun, we will utilize a hued foundation that is comparative in shading to the hair. This is testing enough? How about we do it! Process: 1 Make a copy layer of the picture. Along these lines, the first is safeguarded on the foundation and we are taking a shot at a copied layer. Conceal the foundation by clicking off its deceivability symbol. Pick Select> Color Range from the Menu. At the point when
- 2. the Color Range Dialog box open, pick the Left Eye Dropper device and tap on the foundation shading in the picture window (pink). You will see the chose shading turn white in the discourse box. Move the Fuzziness slider until the point when the picture is generally dark and the foundation is a perfect as you can get it. Tip: To add shading to the determination tap on the eyedropper apparatus with the, in addition, to sign and snap in the picture. Snap alright for Cut out image with hard hair mask.
- 3. Process: 2 With the choice dynamic, change to the Channels palette. Tap the spare choice as channel catch; it’s the second one to one side on the base of the channels palette. Another alpha channel will now be unmistakable. Press “Ctrl/Cmd+D” to Deselect and tap on Alpha 1 in the channels palette. The primary window will now turn high contrast. The benefit of utilizing a channel is the capacity to adjust the choice without affecting the first picture. Dark speaks to the regions that we need to keep and white, the zones to be disposed of.
- 5. Process: 3 Notice that there are zones of dim, this future semi-straightforward and need to wind up strong highly contrasting (with the exception of regions that ought to be semitransparent, for example, delicate edges). There are minor specks additionally unmistakable; there will make for an extremely muddled choice. Here is a speedy arrangement that I have concocted: Click Image>Adjustments>Levels. In the levels Dialog box, tap the dark point slider on the left and drag it to one side until the point that the hazy areas have turned into a strong dark, Slide the White guide slider toward the left until the point that the whites are pleasant and clean and the grainy impact has gone. Snap alright to apply for Cut out image with hard hair mask.
- 6. Process: 4 Pick a dark brush and make the edge hard. Paint over every one of the regions that have a place in the question covers out. Utilize a bigger brush for expansive regions and a little brush for better detail, for example, around the plumes. Utilize a white paint shading to paint out the zones that ought to be expelled. Process: 5 Once in a while, it can be difficult to figure which part of the picture has a place in the closer view and a look at the first picture is required. Tap on eye symbol to one side of RGB at the highest point of the Channels palette. The first photograph is currently noticeable and the cover shows up as ruddy shading. Tap the eye symbol to backpedal to the veil see. The cover can likewise be covered up by flipping the eye (deceivability symbol). Continue going until the point when you have a perfect cover. Process: 6
- 7. Hold Cmd (Ctrl PC) and tap on the Alpha 1 thumbnail. You will now observe a dynamic determination. Tap on RGB to see the shading picture. Open the layers palette. Select the working layer and include a layered cover. The covered region of the background will now be expelled to uncover a decent clean veiling impact. In the event that it looks the inverse, tap on the layer cover and press Ctrl/Cmd+I to rearrange the veil. You can touch up the veil by painting with dark or white to include or expel parts of the picture. Process: 7 In the event that there are zones that still should be evacuated, for example, on the correct side of this picture, rehash the procedure steps. Since each picture is one of a kind, some will require a few passes and some should be possible in a solitary pass. As should be obvious, this strategy is exceptionally compelling and the picture can be dropped onto any foundation. Take a gander at the upper left of the picture to perceive how exact the cut out is on the nitty gritty quills. Attempt that with the pen device!
- 8. Hope you are enjoying Cut Out image Tutorial. Connect with us and get a more interesting tutorial in Photoshop image editing service.