
Recommended
More Related Content
What's hot
What's hot (20)
Similar to Final reflective task
Similar to Final reflective task (20)
More from Declan Brophy
More from Declan Brophy (20)
Recently uploaded
Recently uploaded (20)
Final reflective task
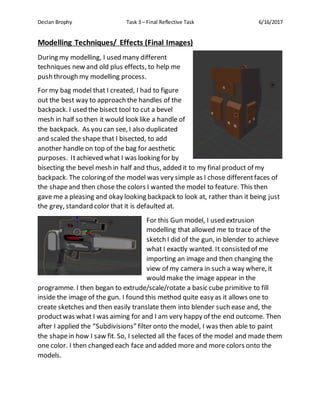
- 1. Declan Brophy Task 3 – Final Reflective Task 6/16/2017 Modelling Techniques/ Effects (Final Images) During my modelling, I used many different techniques new and old plus effects, to help me push through my modelling process. For my bag model that I created, I had to figure out the best way to approach the handles of the backpack. I used the bisect tool to cut a bevel mesh in half so then it would look like a handle of the backpack. As you can see, I also duplicated and scaled the shape that I bisected, to add another handle on top of the bag for aesthetic purposes. Itachieved what I was looking for by bisecting the bevel mesh in half and thus, added it to my final product of my backpack. The coloring of the model was very simple as I chose differentfaces of the shapeand then chose the colors I wanted the model to feature. This then gave me a pleasing and okay looking backpack to look at, rather than it being just the grey, standard color that it is defaulted at. For this Gun model, I used extrusion modelling that allowed me to trace of the sketch I did of the gun, in blender to achieve what I exactly wanted. It consisted of me importing an image and then changing the view of my camera in such a way where, it would make the image appear in the programme. I then began to extrude/scale/rotate a basic cube primitive to fill inside the image of the gun. I found this method quite easy as it allows one to create sketches and then easily translate them into blender such ease and, the productwas what I was aiming for and I am very happy of the end outcome. Then after I applied the “Subdivisions” filter onto the model, I was then able to paint the shapein how I saw fit. So, I selected all the faces of the model and made them one color. I then changed each face and added more and more colors onto the models.
- 2. Declan Brophy Task 3 – Final Reflective Task 6/16/2017 This is the cardboard boxthat I had created blender and decided to follow up with the idea fromone of my sketches that I had produced. I used a basic cube primitive and stretched it out to give me a rectangular- looking shapethat suited the appearance of my sketch. I then split the faces up all around the shape, into many different faces to give me enough leg roomto add extra detail to the model. As you can see, I had highlighted my 1 half on top of the box and simply deleted the faces along with the edges. I then decided that I want to change my original sketch up a bit and decided to havethe box model opening. I simply extruded the edges and stretched it an angle to give me the illusion of the box being opened. I also added a white tape around the box that changes in width depending on whereit is. I yet again, extrude the faces outwards and selected the faces to colored a white. I didn’tdo this all over the shapeand decided to merely justadd a white color to the faces of the box, to give it more depth. With my adding the color to the tape and the box itself, my fellow colleagues could confidently tell that it was a cardboard box which, of coursewas my intension. I am happy with how this model had turned out but I feel like I could have done a lot moreto it aesthetically, by adding images onto the shape to give it a more immersivelook/feel. This model out of all the others I had created was the more simplistic one in terms of aesthetics and technique. The main techniques and skills that went into this model consisted of me extruding each face of the cube inwards to give me a crate-like appearance. I then also split the current faces up of my cube and decided to use them mainly for the corners of my cube, so I could make the corners prominent and noticeable. To also achieve the “X” shape on the crate, I had to create a cube primitive and scale it to a thin, rectangular shape. I then simply duplicated it and made an “X” shapewith them both and joined them together. Fromhere onwards, I kepton duplicating the “X” on each of the faces and placing them in a
- 3. Declan Brophy Task 3 – Final Reflective Task 6/16/2017 matching manner. After I had done this, I decided to change the color of the crate by selecting the faces I wanted to color and choosethe right color accordingly. I did this the with entire cube by making it brown and the corners plus the “X” shapeof the cube, were turned into a grey color to give me a more aesthetically pleasing look for the cube. By me applying whatI had known to my knowledge, it certainly achieves what I intended to create. My ladder model was also very simplistic in nature as it practically consisted of stretching out a cube primitive and scaling it in such a way whereItgave me a rectangular shape for me to work with. I then duplicated the shapeand moveit to the other side of the shape so that I had a small gap in-between them, so that I could place my step objects later. To be efficient, I duplicated one of the rectangular shapes and re-scaled it so that it looked like a step on a ladder. I then kept on duplicating the newly create shape and attaching it onto the larger rectangles. Then once I had finished, I then joined all of it together to give me one entire object. In terms of its appearance, it was the same as the others with me highlighting faces on the object and changing them accordingly. Though very simplistic in nature, I achieved what I intended to create originally and resembles my sketch to near perfection. This barrelmodel was very simplistic in both aspects of techniques and aesthetics. Itconsisted of me using a cylinder primitive for my starting point. I then scaled it to resemble the shapeof an actual barrel. WhatI then did, I extruded the face on top and indented it a bit to give me a rim for the barrel. I then split the entire object into different faces by dividing them into smaller ones for me to work with. I also wanted a lid for my barrel, So created a bevel primitive and scaled it in a way where it was very thin; this would act as my lid for the barrel container. In terms of its
- 4. Declan Brophy Task 3 – Final Reflective Task 6/16/2017 aesthetics, I colored the main part of the barrel red/white to give me a striped appearance. I also made surethat I duplicated and added another bevel for the lid of my container and joined them both up to the cylinder. I then also colored these in a red. The face on top of the cylinder was changed to a grey, to give off the illusion of a metal casing. Both techniques and effects game me my desired look for my model and I certainly achieved what I wanted it to originally be. My intentions of the models. My original intentions of me creating these models were to fulfill the briefs requirements and created them for this sake. I may also use these models in future projects potentially but then, I could create new ones and improve on what I had previously justdone. I would say that I have achieved this as I have fulfilled the clients brief and requirements of whathe/she wants me to achieve; I have done this by me, the creator, creating the models myself and having files of them as proof of my work. I also feel like the models still have some reusability to them as they they’rebasic in nature, thus being used for testing out upcoming game projects in the future. 3D Software Issues + How I overcame them I came across a few issues during my model development process and one of them was implementing the extrusion modelling method to my work. I merely asked a work colleague of mine that shown me how to implement images in the softwareand how to snap the views effectively, so I could trace the image with ease. Oncehe had shown me, I had then learnt how to do this extrusion method effectively myself and achieved a model of a high-quality due to being exposed to this method. I also wanted my “gun” model to be quite rounded as that’s whatmy main intention was for the design of the gun. I had researched this myself and found
- 5. Declan Brophy Task 3 – Final Reflective Task 6/16/2017 that I would need to add a modifier called “Subdivision” and apply it to my model. I then achieved the intended look of my model and was perfectly happy with it. Both issues that had been previously mentioned were all in relation to this model and this is what I achieved by solving the problems that I came across with it. I also came across another problemwhere I had trouble “joining” two objects together. This problemone took me a little time navigating around the UI of Blender until I had stumbled up it. I then used this method of conjoining two or more objects together in some of my other models that I had created. Ittook logical thinking and a critical approach for me to solvethe problems at hand. If I were to do the work again, I would be more awareof the previous problems that I had come across thus, learning from prior mistakes to sufficeat the work, if I wereto do it again that is. Critical Evaluation I feel like my overall products areof a quality that would sufficeenough for what I am trying to accomplish. My idea for my game isn’tgoing to be made public so the quality of the models to some extent, wouldn’t really matter but I have tried my bestwith what I know with this 3D modeling software(Blender). I feel like if I were to invest moretime in this software, I feellike my work could be improved significantly as I would be more confident in creating models and the prior knowledgeof knowing how to this programme. I feel like I have met the briefs requirements and what Itwants me to achieve, as I have made the models to appropriate to the PEGI rating of 16 and the “survival” keyword thatI was also given in the brief.