9. 10)
Theme or focus of image & reasons for choice
A lot of the inspiration for the following images comes from photographer Dean Chalkey
and his photoshoot of singer Jake Bugg. I wanted to recreate that sense of urbanisms in
order to reflect the artist genre of music- indie rock. This particular genre is often
associated with being low budget, hence why I chose to take the photo in an alley
way.
Throughout all my images I wanted to give them a grungy feel, therefore I
photographed during early evening when the sun was at its lowest point and the
10. natural lighting was beginning to get darker.
The central focus of all the images is the subject’s facial features and the structure
rather than her entire face. The use of a camera flash against the dark lighting draws
attention straight to the focal point and cancels out all distractions.
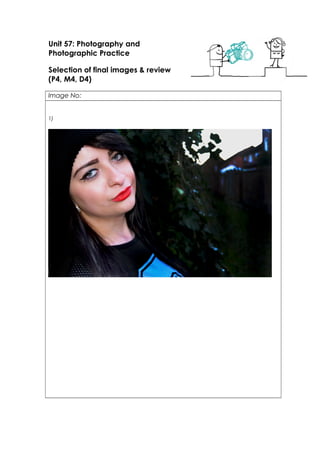
In image one I wanted the setting to be obvious in order to reflect the theme and
genre, however I didn’t want it to divert away from the subject. The colour red is an
emotionally intense colour and one that everyone notices, to me it connotes a sense of
passion and empowerment which is why I chose to make the subject wear the lipstick; I
wanted to reflect exactly what the colour represents in relation to their genre of music
and their presence within that industry. The red against the harsh lighting makes it stand
out, therefore drawing in attention.
Image two continues with the theme of the following photograph; however I also
wanted the eyes to be focus. With the use of editing I extenuated the colour of them in
order to make them appear brighter. With that and the subject’s sharp facial features I
again wanted to connote a sense of seriousness and empowerment within the industry
whilst also reflecting the genre of music. A baby face to me would be associated with
pop music whereas a more sharp and defined face shows the power of this genre.
Image three and four are very similar in style in both the angle they’re taken at and the
use of editing techniques. By looking straight into the camera the subject is building a
relationship with viewers and directly addressing them which is vital for musicians-
therefore her eyes were a focus within the images.
When taking image five and ten I was trying to create an element of mystique- fairy tale
meets urban. The use of a brick wall and the subjects clothing is very ‘hip’ and modern,
however the pale skin, charcoal black hair and red lips- enhanced through editing- aim
to play homage to the snow white movie.
Images six through to nine are a lot softer rather than serious- I wanted them to appear
more friendly and welcoming. As with the other images the eyes are the focus, hence
why they’re a lot brighter than the other features. The body language within the photos
aims to be more casual rather than posed in order to appear more realistic and
relatable.
Techniques used
An average shutter speed of 1/500 was used in image one in order to capture the
subject since she wasn’t moving, however a small aperture of f4 was used in order to
allow for more light through the lens due to the dark natural lighting. A camera flash
abled me to light up the subjects face in order for it to stand out against the
background.
I continued to use a shutter speed of 1/500 for image two; however I increased the fstop
slightly to f5 since I wanted the image to be slightly darker. An ISO of 100 allowed me to
capture crisp and clear photos.
The fstop remained the same for image three and four; however the wind began to
11. pick up a little which meant the subjects hair was blowing around. In order to freeze the
motion the shutter speed was decreased to 1/300 so that the exposure time was shorter-
although I achieved what I set out to do, looking back at both images I should have
allowed for a bigger aperture as to let a little more light in.
In order to achieve my desired effect for image five the lighting needed to be natural
so that the colouring could be as vivid as possible, therefore I ensured that this shot was
taken just before the sun was about to set. Since the sun was fairly bright a shutter speed
of 1/600 was used in order to achieve an evenly exposed image, whilst the aperture
was set at f4.5.
Images six, seven, eight and nine were set at the same setting- a lot of the major
changes were made during editing which I now realise was a mistake. The lighting
during the capturing of these images was now much darker; this meant that I had to
use an aperture of 1/100 in order to allow for a longer exposure. Even with a slow shutter
speed, the images were still appearing fairly dark; therefore an fstop of f4.5 was used in
order to allow for a larger lens opening which meant more light was let through.
Image ten was taken fairly early on in the evening and therefore a shutter speed of
1/500 and fstop of f5 was used in order to achieve an evenly exposed image. An ISO of
100 allowed for a crisp, clear photo.
Strengths & suggested improvements
Whilst I’m happy with the composition of the photographs, I believe that I could improve
on the settings I use to take the photos. Creating crisp photo is something I struggled
with- this is obvious within image; even though I was using an ISO of 100 I wasn’t focusing
the camera properly. Creating evenly lit photos is something I believe I have achieved
effectively. Whilst I’m happy with the style of editing I chose to use, some of the images
are slightly too dark due to overusing the burn tool. Particularly in image six, I’ve noticed
that during editing when increasing the brightness of the eyes I’ve slightly overdone the
right one in comparison to the left- this is something I need to change if I was to redo the
images.
Editing details
Image one- Auto colour was applied in order to correct the colours before applying a
black filter to the background in order to darken it. With the use of the dodge tool I
slightly lightened both the subject’s eyes and skin whilst the burn tool allowed me to
darken her hair. Since the lips were the focus of the image, I used the magnetic lasso toll
to highlight them before increasing the vibrancy.
Image two- Auto colour was again applied to the image; however instead of a filter I
used the burn tool in order to create the grungy effect on the background and to
darken both her hair and eyebrows. The dodge tool was again used to brighten the
eyes and skin, before again highlighting the lips using the magnetic lasso tool and
increasing the vibrancy. Using the burn tool I also highlighted certain parts of the face in
order to make it seem sharper.
Image four and five- A black filter was again applied to the image and with the use of
12. the burn tool I again darkened the hair and eyebrows before shadowing certain parts
of the face in order to give a cheekbone effect. The eyes were brightened using the
dodge tool, however I also selected the using the magnetic lasso tool and applied a
blue filter.
Image five-Auto colour was applied to the image, however since the image needed to
appear natural and earth in order to represent the theme of urban/fairytale no filter was
applied. With the use of the dodge tool I lightened the colour of the skin quite drastically
in order for it to be as pale as possible, whilst the burn tool allowed me to turn the
subjects eye make-up, eyebrows and hair as jet black as possible. With the use of the
magnetic lasso tool I highlighted the lips before increasing the vibrancy and applying a
bright red filter.
Image six, seven, eight and nine- With each of the following images both auto colour
was applied in order to correct the colour and a black filter to darken the photos;
image nine also consists of a red filter in order to bring some warmthness. Rather than
increasing the brightness of the lips within these images, I darkened them with burn tool-
this also includes the eyes and hair. Image seven was cropped in order to remove some
of the excess fencing that drew attention away from the subject due to the graffiti on it.
Image ten- Although an ISO of 100 was used, the camera was not focused properly and
therefore the image is not as crisp as I’d of liked. I wanted the image to stay as natural
as possible; therefore the only major change is the darkening of the hair, eye make-up
and eyebrows with the use of the burn tool.
Capture Log
Setting Shutter Speed ISO Aperture
Image one: Manual
Image two: Manual
Image three: Manual
Image four: Manual
Image five: Manual
Image six: Manual
Image seven: Manual
Image eight: Manual
Image nine: Manual
Image ten: Manual
1/500
1/500
1/300
1/300
1/600
1/100
1/100
1/100
1/100
1/500
100
100
100
100
100
100
100
100
100
100
F4
F5
F5
F5
F4.5
F4.5
F4.5
F4.5
F4.5
F5