
Recommended
More Related Content
What's hot
What's hot (19)
Viewers also liked
Viewers also liked (20)
Similar to Task 4 portraite photograph evaluation
Similar to Task 4 portraite photograph evaluation (20)
More from skyeeneel
More from skyeeneel (20)
Task 4 portraite photograph evaluation
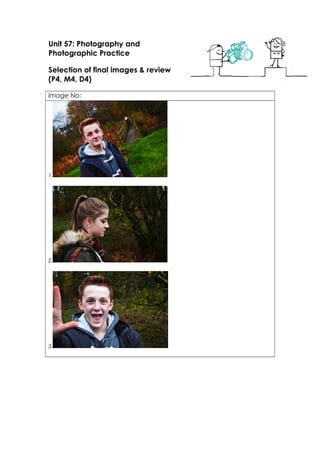
- 1. Unit 57: Photography and Photographic Practice Selection of final images & review (P4, M4, D4) Image No: 1. 2. 3.
- 2. 4. 5. 6.
- 3. 7. 8.
- 4. 9. 10. Theme or focus of image & reasons for choice 1. The reason I chose this image is because the way I was holding the camera and the angle it was made this image really stand out to me. Also the way the background is set out makes this a good image, apart from the person on the bridge. 2. This was an image where the model seen is staring down at the water. This gives the impression she is thinking about something and lost in deep thought. The way she is positioned in according to the background also works really well. 3. I really like this Image because it wasn’t planned, it wasn’t serious, but this gives the image a sense of playfulness, excitement and joy. 4. This is one of my favourite images because the way the smoke is in the wind, and the background. Also the editing I did on this Image makes the smoke really stand out from the background. Also the placing of the models face (slightly to the left) then the smoke (Middle) then the background (The right) makes this image a lot better. 5. The Positioning of the image is very similar to image 4, but the model is blowing smoke rings instead of casually blowing it out. This, although the same image, gives a completely different look. Along with the editing.
- 5. 6. This isn't my favourite Image but you can see a lot of different technical things here, with the depth of field and the rule of thirds, this image shows a lot of different things. 7. This is without a doubt my favourite image, this is because of the thought i put into getting it. Also both positioning of the model and the editing used makes this image even better. 8. This image was done on accident, because the model was just turning looking into the water, and I took the photo because it looked nice. There was no planning Involved. 9. In this Image, the look if very similar to Image 8, but this Image actually was planned and i made the model pose. The reason for this was because I liked the first on that much. But because they are so similar I edited them completely different. 10. I wanted to properly show the meaning of rule of thirds in this image because I think that is the most important part of any Image, especially portrait images. So I did this Image, and edited it to have the main focus on the models face and have the background not as highlighted but still central. On all of my Images you can tell that the theme of them was to capture the models looking serious, but also show my understanding of the Rule Of Thirds, and Depth Of Field. I think they came out really well but they could have been planned better. Techniques used On the images I collected on my photo shoot I wanted to pride myself and show full understanding of Rule of thirds, this is because I personally believe no matter what the image is of, the rule of thirds is the most Important aspect of an Image. On image 1, the way i tilted the camera, changing its angle, made the image look and feel completely different. I believe it brought some life to the image and made it more eye catching. Also the fact that there is a lot of background makes the image really good. On image 10. Although the editing isn't the greatest, I believe this Image is perfect for showing rule of thirds. This is because the model is in the far left with background for the rest of the image, and the background not only contains grass and bushes, but rocks as well. This was good because it almost broke the Image up and made It more interesting. On Image 6, the model is doing a smoke ring, but the background Is very blurry. This shows depth of field. The same as image 2, 3 and 9. Strengths & suggested improvements Strengths: • On the images I used I made sure that the placing of the faces in the image in comparison to the background was good. • The way I planned my images was very good. • The editing I did on the images was very good, and they came out how I wanted them to Weaknesses: • I could have used more models. • My range of images could have been a lot better. • I could have used different settings; this would have made my images a lot more diverse and better. Editing details The editing detail for these images was pretty straight forward. There was a main theme of editing I used and that was: raising and lowering of the vibrancy, brightness, contrast and saturation. This so I could get the desired colour and look of my image, I also used different
- 6. levels mixed together to make different styles of images. On Images 1, 2 and 3, I didn’t do any other type of editing apart from the original theme. On Image 4, I did a lot more. Other than the original theme i also looked through the different types of way to edit the photo and found one that allows you to change different parts of the image Into different shades of black/grey/White. This was very good as I could edit different parts to make more stands out from the other. I also used the colour edit tool to make the different shades a different colour too. I also used this edit for images 7 and 8. In image 5 I plainly just edited the vibrancy, saturation, contrast and brightness to heighten the image and make it stand out more. Image 6, I decided Instead of making the vibrancy higher and bring the colours out in the image; I turned It down making the dull colours. I also turned the saturation down to give the image a sort of cold feel to it. Images 7 and 8 are spoken about above. In image 9 I used the theme, and not much else. However I did raise the brightness above what I normally did, this was to make his face paler and look better. On image 10, I made the most editing. This was because I not only did I edit the theme I also turned the whole Image black and white. I then went over and made the model Into colour again, This was done to make the model stand out and make the image more aesthetically pleasing. Capture Log Setting Shutter Speed ISO Aperture 1. Manual 2. Manual 3. Manual 4. Manual 5. Manual 6. Manual 7. Manual 8. Manual 9. Manual 10. Manual 1. 1/500 sec 2. 1/500 sec 3. 1/100 sec 4. 1/250 sec 5. 1/320 sec 6. 1/320 sec 7. 1/250 sec 8. 1/160 sec 9. 1/160 sec 10. 1/250 sec 1. ISO - 3200 2. ISO - 3200 3. ISO - 3200 4. ISO - 3200 5. ISO - 3200 6. ISO - 3200 7. ISO - 3200 8. ISO - 3200 9. ISO - 3200 10. ISO - 3200 1. f/5.6 2. f/5.6 3. f/5.6 4. f/5.6 5. f/5.6 6. f/5.6 7. f/5.6 8. f/5.6 9. f/5.6 10. f/5.6
- 7. levels mixed together to make different styles of images. On Images 1, 2 and 3, I didn’t do any other type of editing apart from the original theme. On Image 4, I did a lot more. Other than the original theme i also looked through the different types of way to edit the photo and found one that allows you to change different parts of the image Into different shades of black/grey/White. This was very good as I could edit different parts to make more stands out from the other. I also used the colour edit tool to make the different shades a different colour too. I also used this edit for images 7 and 8. In image 5 I plainly just edited the vibrancy, saturation, contrast and brightness to heighten the image and make it stand out more. Image 6, I decided Instead of making the vibrancy higher and bring the colours out in the image; I turned It down making the dull colours. I also turned the saturation down to give the image a sort of cold feel to it. Images 7 and 8 are spoken about above. In image 9 I used the theme, and not much else. However I did raise the brightness above what I normally did, this was to make his face paler and look better. On image 10, I made the most editing. This was because I not only did I edit the theme I also turned the whole Image black and white. I then went over and made the model Into colour again, This was done to make the model stand out and make the image more aesthetically pleasing. Capture Log Setting Shutter Speed ISO Aperture 1. Manual 2. Manual 3. Manual 4. Manual 5. Manual 6. Manual 7. Manual 8. Manual 9. Manual 10. Manual 1. 1/500 sec 2. 1/500 sec 3. 1/100 sec 4. 1/250 sec 5. 1/320 sec 6. 1/320 sec 7. 1/250 sec 8. 1/160 sec 9. 1/160 sec 10. 1/250 sec 1. ISO - 3200 2. ISO - 3200 3. ISO - 3200 4. ISO - 3200 5. ISO - 3200 6. ISO - 3200 7. ISO - 3200 8. ISO - 3200 9. ISO - 3200 10. ISO - 3200 1. f/5.6 2. f/5.6 3. f/5.6 4. f/5.6 5. f/5.6 6. f/5.6 7. f/5.6 8. f/5.6 9. f/5.6 10. f/5.6