
Recommended
More Related Content
What's hot
What's hot (20)
Viewers also liked
Viewers also liked (14)
Similar to 18:02:16 Photo-Shoot
Similar to 18:02:16 Photo-Shoot (20)
Recently uploaded
Recently uploaded (20)
18:02:16 Photo-Shoot
- 2. Shot List • Front Cover Shot (Gabbie’s attic, full body, Polly holding LP) • LP Shot (studio shot, close up Polly) • Contents Page Shot (Gabbie’s attic, Gabbie lying on the floor) • Double Page Spread (Studio Shot, Jacob looking at records) • Double Page Spread (G.Attic, Polly smoking)
- 3. Wardrobe, Hair and Makeup Polly: Pale complexion; golden smokey eye; thin, winged, black eyeliner; light bronzer to bring out cheek bones, deep red lipstick. Dark clothing, dungarees, stripy top, yellow jumper, red dress. Straight hair, Space buns. Gabbie: Natural makeup, not covering freckles, mascara to lengthen & darken lashes and eyebrows filled in. Dark clothing, Band t-shirt. Hair down, loose waves. Jacob: Natural face. White t-shirt, black jacket, black jeans, glasses. Messy hair, gelled.
- 4. Front Cover Shot I set up the shot by positioning the Arri on the left hand side of the camera and the soft box, turned upwards on the right of the camera. This set up allowed me to light Polly in the foreground, whilst keeping the background in shadow. Furthermore, to highlight the symbol in the background, I placed a golden reflector opposite the Arri to reflect some of the light back onto the symbol and add another point of focus in the background of my image. This gives the photo depth. To increase this effect, helped blur the background out by using a smoke machine to obscure the clarity. The green square that Polly is holding works as a green screen in which I can comp in the LP album cover with her face on. This way I can match up the shoulders to fit perfectly to create a effective illusion. Additionally, I closed the blinds to prevent natural light entering the shot. This helps give the image an ‘underground’ feeling and helps create a stronger contrast in lighting. I used Gabbie's attic for this image as it has a great brick wallpaper background which adds to the grungy, alternative style of my magazine.
- 5. LP Shot I wanted this image to be striking, yet soft and beautiful. I achieved this by only using the soft box with flash and Arri filling to soften Polly’s features, whilst still getting a well exposed image. Due to the fact that the duration of electronic flash is very brief, it’s important to adjust a DSLR’s shutter speed so that the shutter is fully opened and all areas of the frame are open simultaneously. To ensure this, I set my shutter speed to 200. Any lower and the image would be overexposed, however any higher and the shutter would not have fully opened, leaving a black unexposed band at the top or bottom of the image. Nevertheless, I used the 125mm macro lens so that I could get a short depth of focus. This allowed me to get Polly’s eyes in sharp focus, whereas her hair and neck were out of focus. This brings out her eyes and gives the image more depth, making it more detailed and interesting to view.
- 6. Contents Page Shot This was a tricky shot to take as it’s looking down on the subject. To achieve this shot, I adjusted the legs on the camera’s tripod so that the front two were as short as possible, whereas the back leg was extended to it’s longest length (and weighed down so that the camera didn’t fall directly onto the model’s face). I lit this shot mostly by placing the soft box on the left to make sure her features remained soft and flattering. Nevertheless, I also used the Arri by facing it away from Gabbie’s face and simply reflecting it back towards her with the golden reflector. This brought out the golden hues in her ginger hair and also helped to add colour to her skin tone. I used a basic 25-75mm on this shot as it gave me a good range of zoom to play about with. I put Gabbie in a Pixies T-shirt, adding to the mise-en-scene to create a consistent theme to the magazine.
- 7. Double Page Spread (Jacob) This was probably my easiest shot to take. Although, I did play about with the framing of the image quite a bit. I had planned to simply take a landscape shot, which worked fine, using the same standard lens as I used for my contents page and a basic light setup of the Arri, soft-box and natural light. On the other hand, I tried taking this image in a panorama format to produce an unusual portrait shot. I used my 125mm Macro lens to take multiple close up shots of Jacob, which I then stitched together to create an image with a very short depth of focus. Natural light
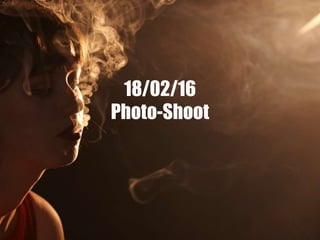
- 8. Double Page Spread (Polly) This was the most simple, yet potentially the hardest shot I challenged myself in taking. I used the Arri (shining horizontally from the top right hand corner of the view finder) to back light Polly. Furthermore, to ensure that the smoke was visible and in focus, as well as her face (but keeping the heavily back lit appearance) I only used fill-in to light up Polly’s face. It was extremely difficult to get the exposure and aperture correct in this shot as I haven’t taken an image like it before. Nevertheless, once I had exposed for the fill-in, I was left with a product to be happy with. I dressed Polly in a red dress, to match her red lipstick. This red, against the white smoke and black background, keeps the magazine’s colour scheme consistent. This consistency gives the magazine a uniform appearance, letting the reader know that they are reading ‘EDGE’ throughout. Additionally, to make sure my background was dark enough to recreate the look of a stage, I used a black screen to absorb any light. Trying to get the exposure correct…