
Recommended
More Related Content
What's hot
What's hot (20)
Viewers also liked
Viewers also liked (16)
Similar to Cameron McRae - 2D Game Workflow
Similar to Cameron McRae - 2D Game Workflow (20)
More from CameronMcRae901
More from CameronMcRae901 (20)
Recently uploaded
Recently uploaded (20)
Cameron McRae - 2D Game Workflow
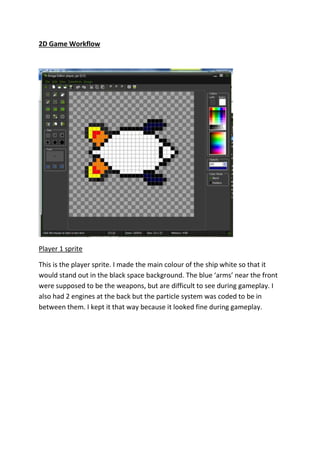
- 1. 2D Game Workflow Player 1 sprite This is the player sprite. I made the main colour of the ship white so that it would stand out in the black space background. The blue ‘arms’ near the front were supposed to be the weapons, but are difficult to see during gameplay. I also had 2 engines at the back but the particle system was coded to be in between them. I kept it that way because it looked fine during gameplay.
- 2. Coding keyboard controls I chose the W, A, S and D keys for moving the player because they are the standard movement controls for PC games.
- 3. Level limit coding I created a level limit, so that the player is always within the room and can’t fly offscreen. Background designing I made a black background to be space, and all of the white dots are distant stars. It made the background like this to suit the rest of the game.
- 4. I also have a second background of only white dots that move at a different speed than the first one, so that the game has a better effect of movement. Jet sprite and coding particle system I created the particle system to make the ship look more alive, and not just an image sliding around on the screen. I coded it so the jet sprite appears at the back of the ship, then gets smaller as it moves away, and then repeat. Testing the game so far This screenshot shows the earliest version of my game. It only includes the background, the player ship and its particle system.
- 5. Creating the player laser sprite The player laser is green because I wanted it to really stand out from everything else on the screen, and to add a sort of toxic/acid feel to it. Coding player projectile movement and removing once off the screen I made it so that the player laser is removed from the game once it leaves the screen. This is because if I didn’t do that, and enough lasers continue to exist, it may eventually crash the game.
- 6. Adding code to make the player able to fire the projectile I added code so that the player laser can actually be fired. I decided to make the ‘enter’ button into the fire button. Adding a projectile sound and adding code to have it play when a projectile is fired. I added a sound to the player laser so that the player feels like they are actually shooting lasers out of their ship.
- 7. Creating an enemy sprite I decided to make the first enemy a dark grey, but that made it difficult to see it because of the dark background. I made the ‘eye’ red, and added a red glow surrounding the enemy so it is easier to see, and looks more evil. Coding enemy spawn and formation I made it so that enemy 1 spawns in groups of 3 in a specific formation, but at different parts of the y axis. This makes the enemy seem more like an organised force against the player, but also makes the gameplay easier.
- 8. Creating enemy explosions I chose to have some of the explosion to be green because the player laser is green, and thought it would look better during gameplay. Coding enemy explosion This is the coding for the enemy to turn into the explosion when hit by the player laser. Ingame it looks like the enemy has actually blown up.
- 9. Testing the game so far (screenshot taken from a later version where the enemy can shoot) This screenshot shows the player laser being fired (near the middle of the screen) and an enemy blowing up from being hit. The lasers near the player are from a later version of the game. Creating enemy laser I made the enemy laser as a glowing orb of energy that moves towards the player. I chose to make the lasers round to match the shape of the enemy that shoots them. Coding enemy shooting the player Here I added code to make the enemy able to fire its laser at the player. I made it so that the laser moves straight towards where the player was when it shoots.
- 10. Coding health/shield bar This coding makes it so that a red shield bar is shown in the top left of the screen. Coding shield damage This code makes it so the shield gets lower (damaged) when hit by an enemy/laser. Coding player destruction This code changes the player ship into a different explosion animation when the shield is lowered to 0 (around 4 hits from an enemy.
- 11. Coding point system The code on the right puts a score up on the screen just below the shield bar. The code on the left makes it so points can be gained. Coding point gain when enemy is killed This code adds 1 point to the score when an enemy is destroyed by the player. Testing the game so far The left screenshot shows the player being destroyed and the right screenshot shows the shield bar and score in the top left.
- 12. Creating the second enemy sprite and laser I made the second enemy look, move, and shoot differently than the first enemy, to make them diverse. The second enemy is a yellow colour, but with a black outline around it. Both enemies have an ‘eye’ on them, but this one’s eye looks more like a real one. I changed the laser for the second enemy too. Coding Enemy and Laser 2 I coded enemy 2 pretty much the same, but I made it so it shoots straight ahead instead of at the player.
- 13. Creating player shield visual I wanted to make the player feel like their ship has actually been hit by a laser, so I added a second player frame to show a shield on the front of the ship and coded it to only appear when an enemy laser hits the player. Coding player and enemy collision (extra damage) and adding shield deflect sound for enemy and enemy laser I added a sound for when the player is hit that sounds like a shield deflecting a shot. I also added code so that when the player and an enemy come into contact with each other, the enemy blows up and the player takes extra damage.
- 14. Adding music to play in the background I added music to the game so that it would be more entertaining and make the game feel more complete. Without the music the only sounds are laser shots and explosions, which makes the game feel empty. Testing the game (final version) This is the ‘final’ version of the game (end of the tutorial videos). More features such as a game over screen may be added in the future, but for now this is it.