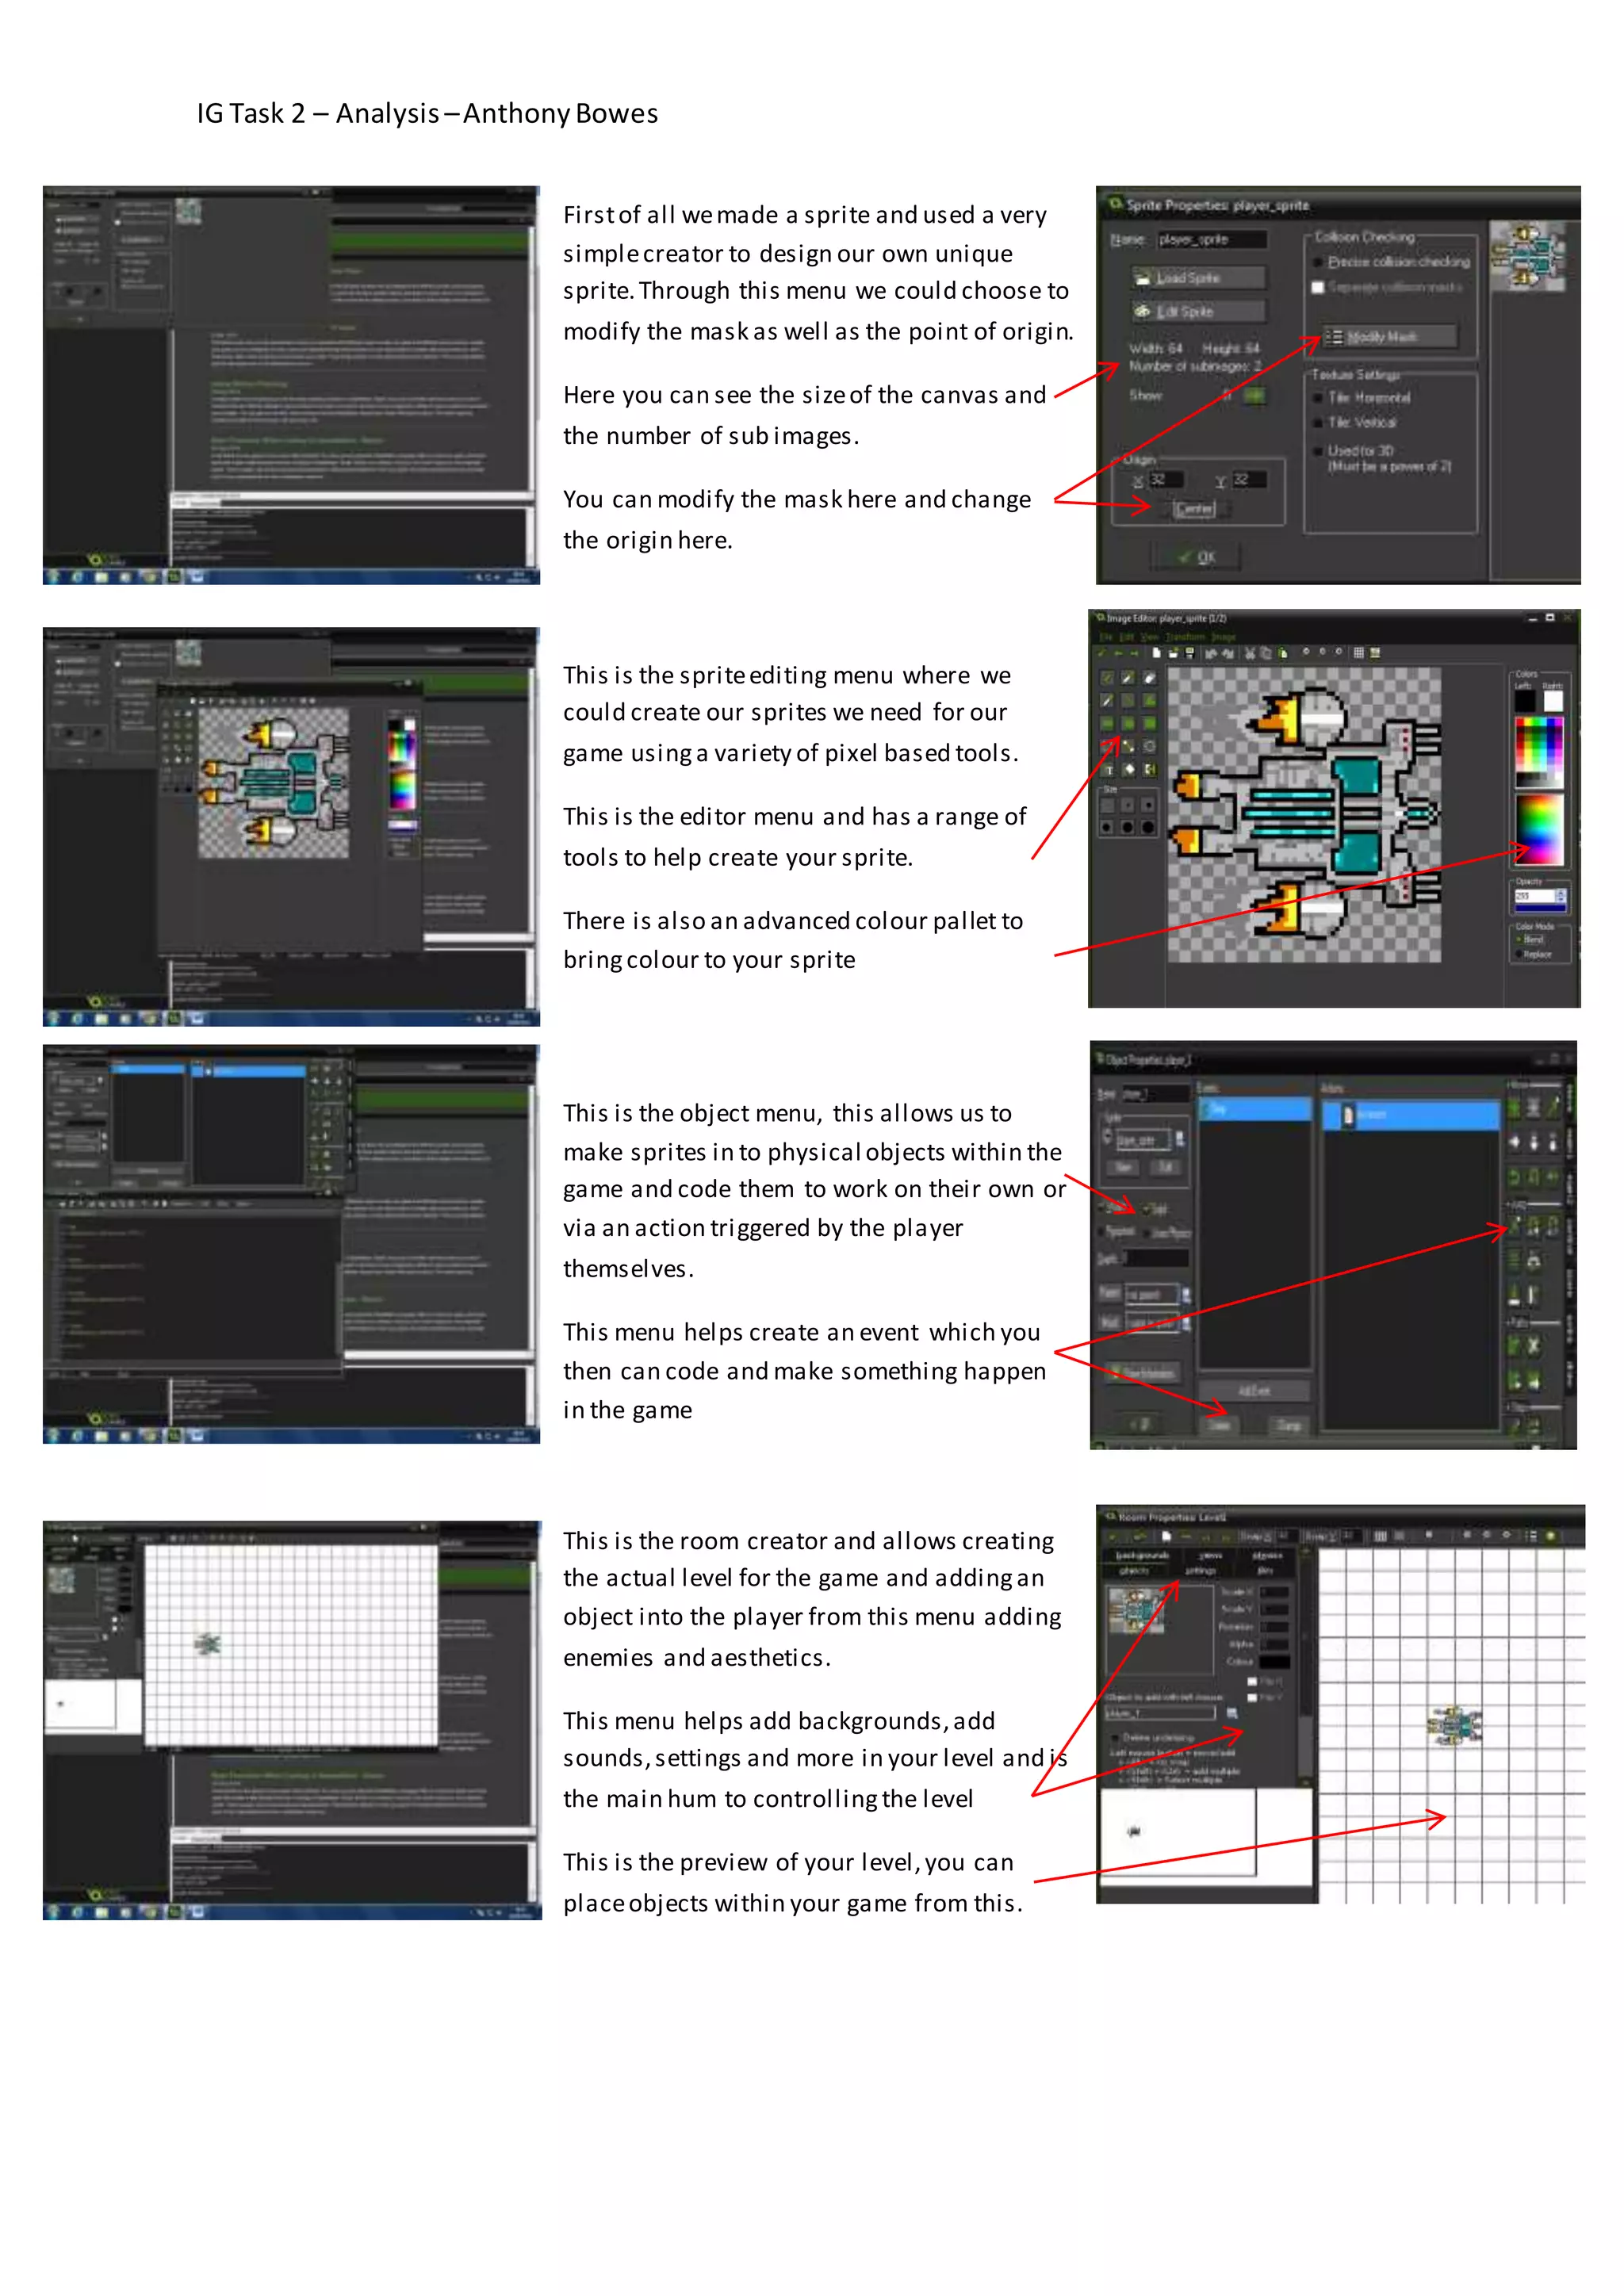
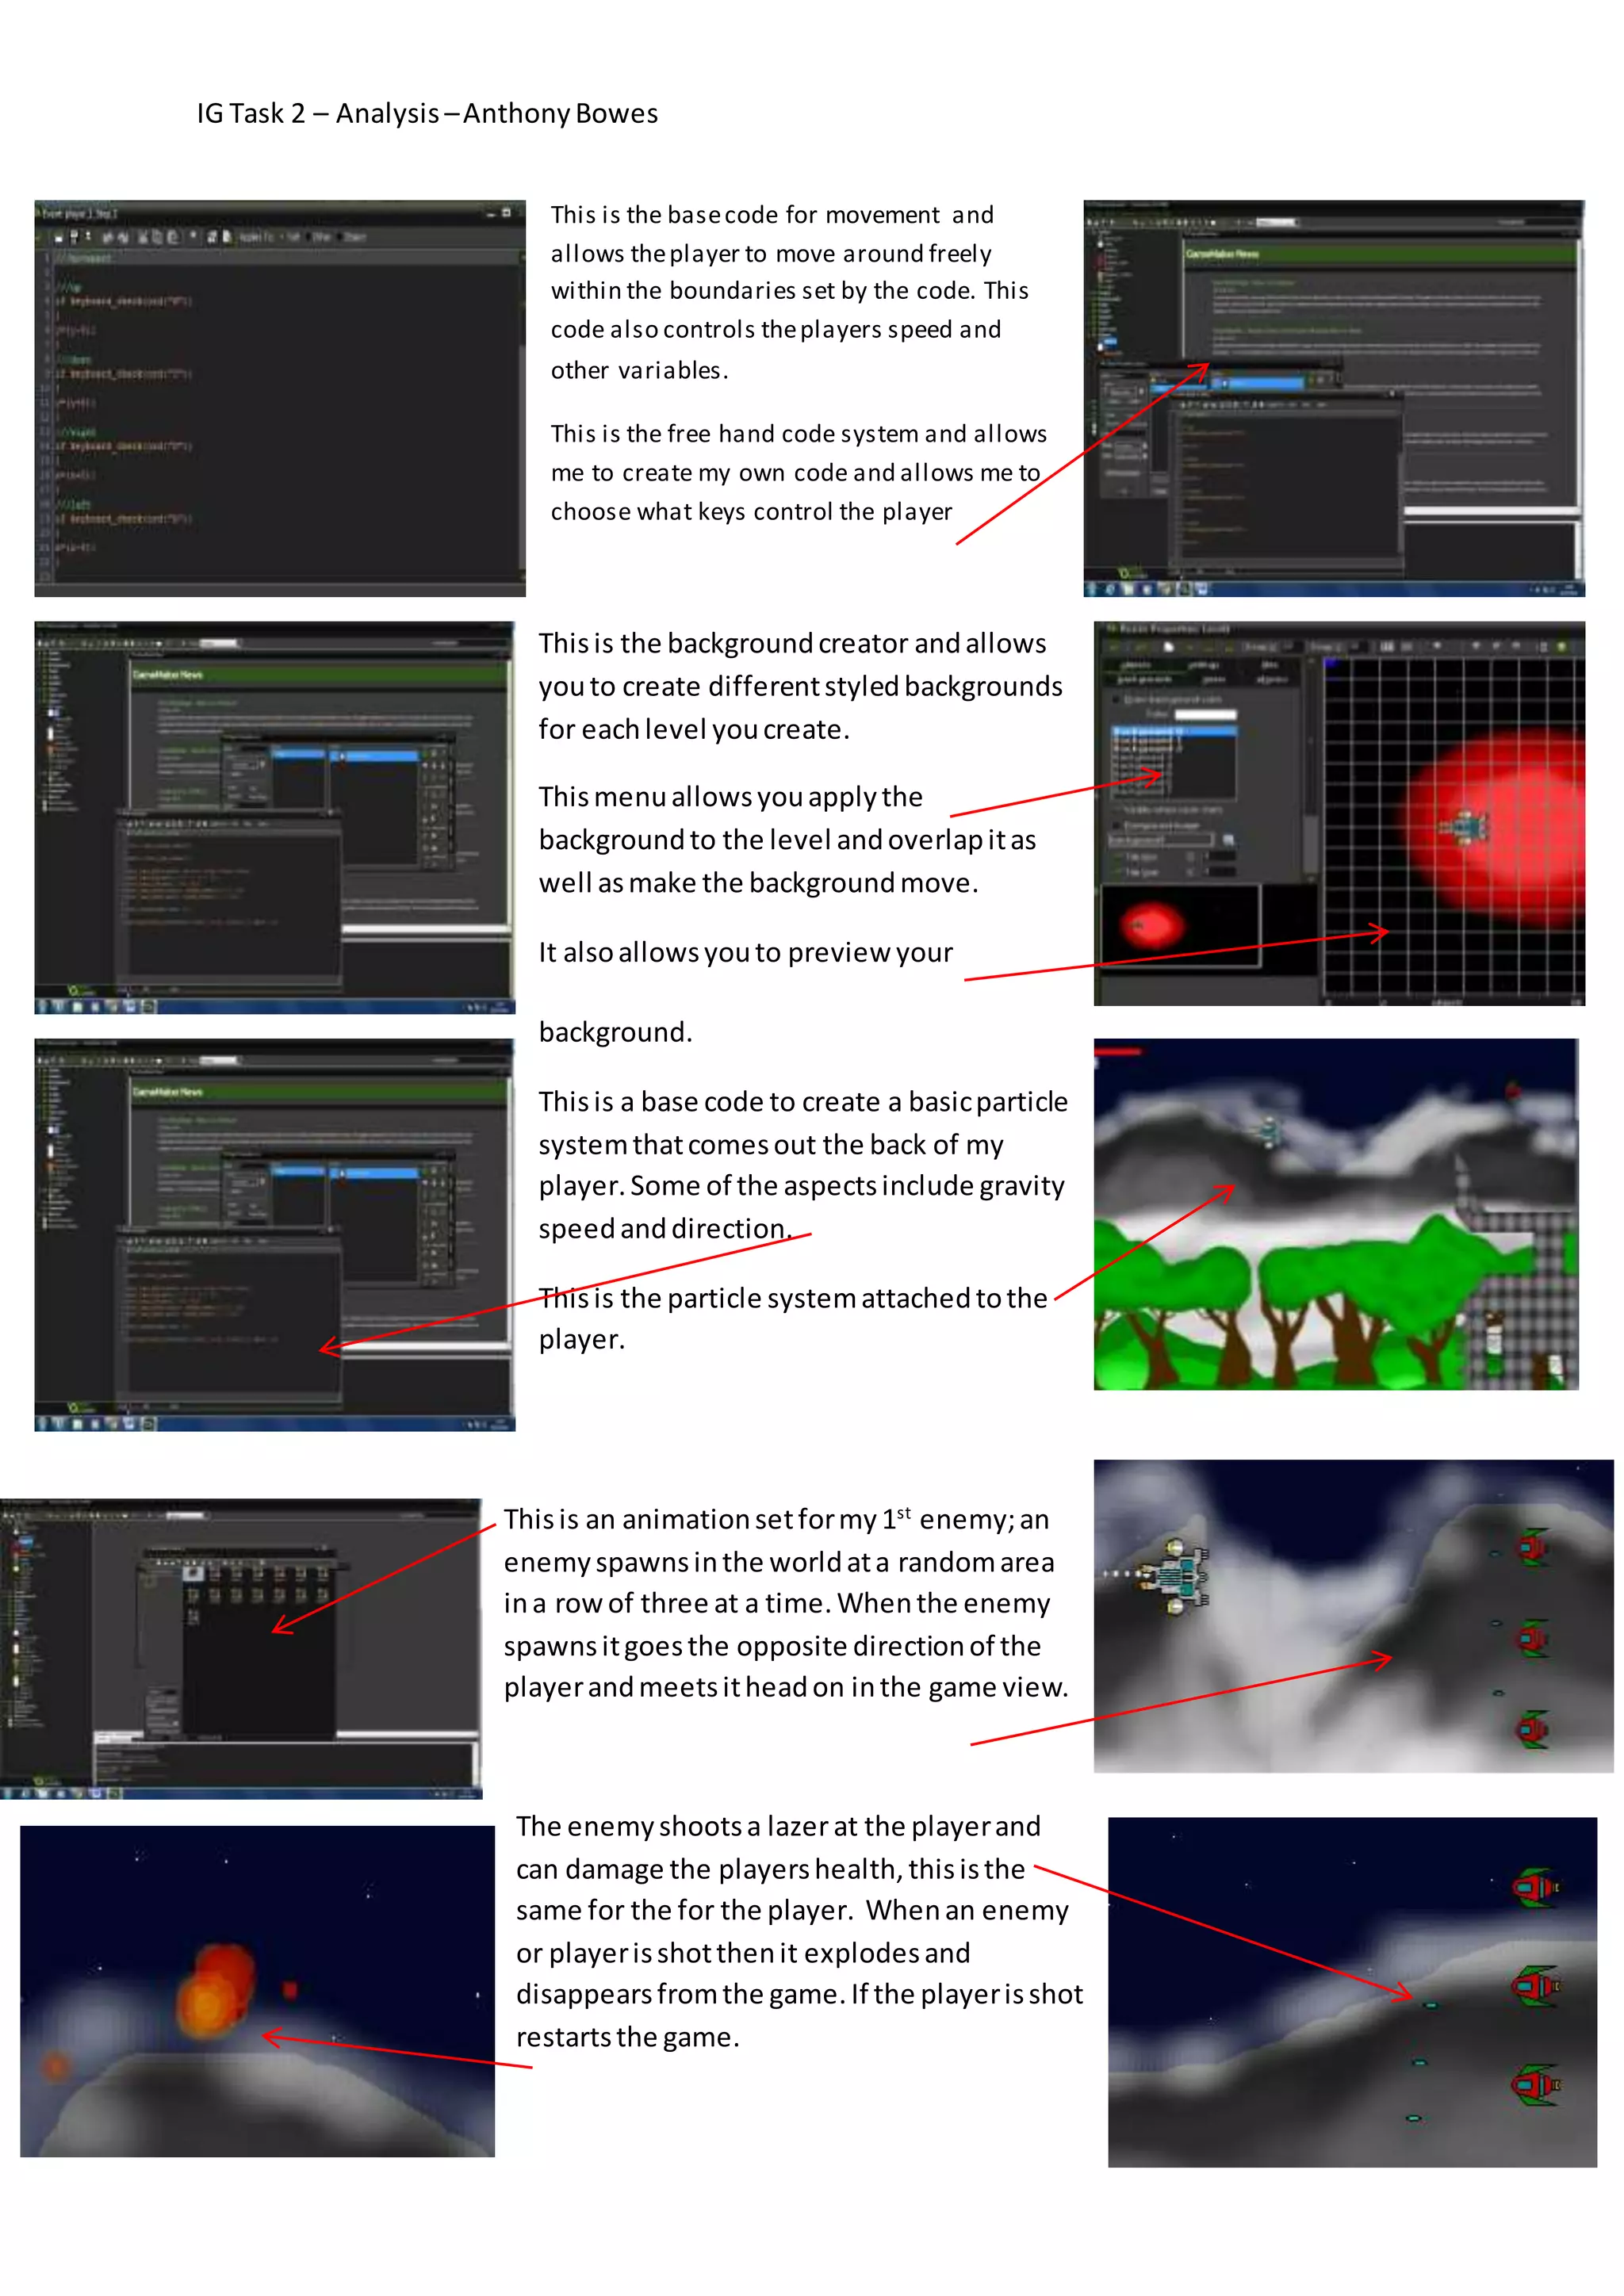
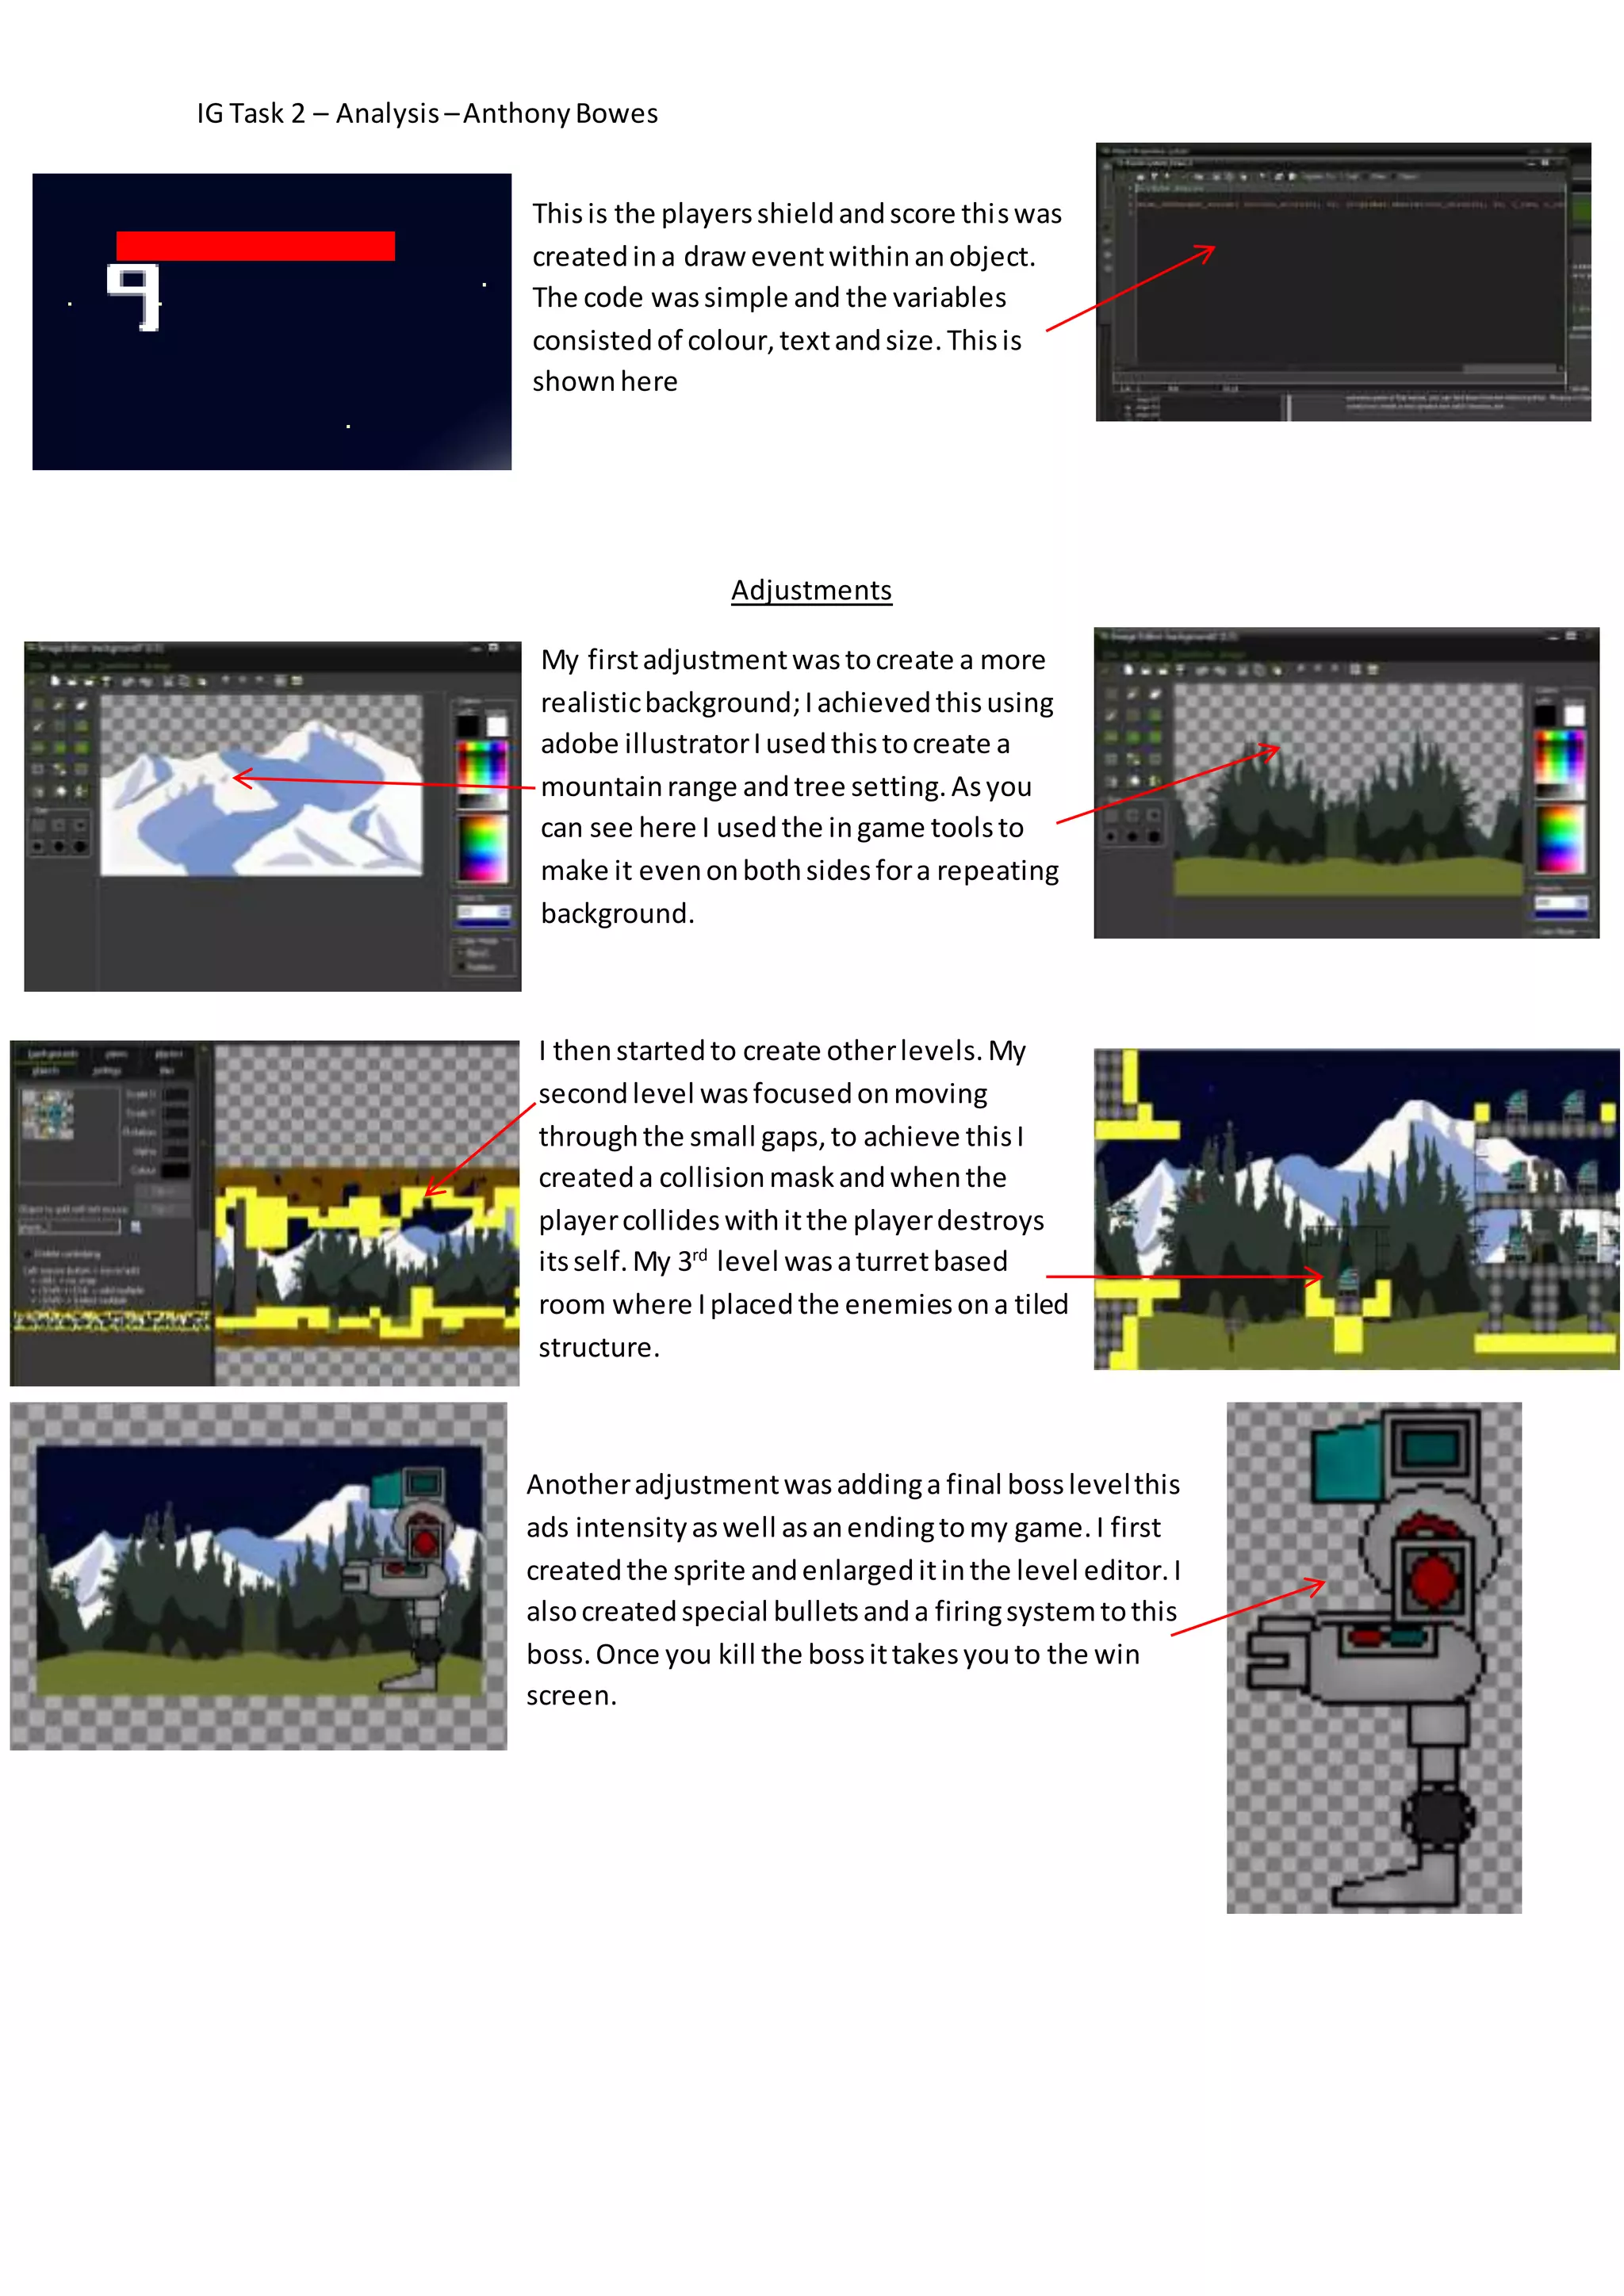
IG Task 2 – Analysis – Anthony Bowes 
First of all we made a sprite and used a very 
simple creator to design our own unique 
sprite. Through this menu we could choose to 
modify the mask as well as the point of origin. 
Here you can see the size of the canvas and 
the number of sub images. 
You can modify the mask here and change 
the origin here. 
This is the sprite editing menu where we 
could create our sprites we need for our 
game using a variety of pixel based tools. 
This is the editor menu and has a range of 
tools to help create your sprite. 
There is also an advanced colour pallet to 
bring colour to your sprite 
This is the object menu, this allows us to 
make sprites in to physical objects within the 
game and code them to work on their own or 
via an action triggered by the player 
themselves. 
This menu helps create an event which you 
then can code and make something happen 
in the game 
This is the room creator and allows creating 
the actual level for the game and adding an 
object into the player from this menu adding 
enemies and aesthetics. 
This menu helps add backgrounds, add 
sounds, settings and more in your level and is 
the main hum to controlling the level 
This is the preview of your level, you can 
place objects within your game from this.
IG Task 2 – Analysis – Anthony Bowes 
This is the base code for movement and 
allows the player to move around freely 
within the boundaries set by the code. This 
code also controls the players speed and 
other variables. 
This is the free hand code system and allows 
me to create my own code and allows me to 
choose what keys control the player 
This is the background creator and allows 
you to create different styled backgrounds 
for each level you create. 
This menu allows you apply the 
background to the level and overlap it as 
well as make the background move. 
It also allows you to preview your 
background. 
This is a base code to create a basic particle 
system that comes out the back of my 
player. Some of the aspects include gravity 
speed and direction. 
This is the particle system attached to the 
player. 
This is an animation set for my 1st enemy; an 
enemy spawns in the world at a random area 
in a row of three at a time. When the enemy 
spawns it goes the opposite direction of the 
player and meets it head on in the game view. 
The enemy shoots a lazer at the player and 
can damage the players health, this is the 
same for the for the player. When an enemy 
or player is shot then it explodes and 
disappears from the game. If the player is shot 
restarts the game.
IG Task 2 – Analysis – Anthony Bowes 
This is the players shield and score this was 
created in a draw event within an object. 
The code was simple and the variables 
consisted of colour, text and size. This is 
shown here 
Adjustments 
My first adjustment was to create a more 
realistic background; I achieved this using 
adobe illustrator I used this to create a 
mountain range and tree setting. As you 
can see here I used the in game tools to 
make it even on both sides for a repeating 
background. 
I then started to create other levels. My 
second level was focused on moving 
through the small gaps, to achieve this I 
created a collision mask and when the 
player collides with it the player destroys 
its self. My 3rd level was a turret based 
room where I placed the enemies on a tiled 
structure. 
Another adjustment was adding a final boss level this 
ads intensity as well as an ending to my game. I first 
created the sprite and enlarged it in the level editor. I 
also created special bullets and a firing system to this 
boss. Once you kill the boss it takes you to the win 
screen.
IG Task 2 – Analysis – Anthony Bowes 
I created a death screen next this 
activated when the player was killed 
and allowed you to restart the whole 
game. I also created a win screen for 
when you completed the game this also 
had an option to restart the game. 
I then created a start screen which 
had the games name and an option 
to start the game it was made using 
the background used in my game. 
Next I made a tutorial screen which 
game a brief tutorial on how to play 
the game as well as randomized tips. 
Finally I added music to my game 
there was a new piece of music for 
different components of the game so 
the title screen had music different to 
the main music. I used the creation 
code menu to code the certain stop 
and start codes into the game

Work Flow for 2D Game

  • 1.
    IG Task 2– Analysis – Anthony Bowes First of all we made a sprite and used a very simple creator to design our own unique sprite. Through this menu we could choose to modify the mask as well as the point of origin. Here you can see the size of the canvas and the number of sub images. You can modify the mask here and change the origin here. This is the sprite editing menu where we could create our sprites we need for our game using a variety of pixel based tools. This is the editor menu and has a range of tools to help create your sprite. There is also an advanced colour pallet to bring colour to your sprite This is the object menu, this allows us to make sprites in to physical objects within the game and code them to work on their own or via an action triggered by the player themselves. This menu helps create an event which you then can code and make something happen in the game This is the room creator and allows creating the actual level for the game and adding an object into the player from this menu adding enemies and aesthetics. This menu helps add backgrounds, add sounds, settings and more in your level and is the main hum to controlling the level This is the preview of your level, you can place objects within your game from this.
  • 2.
    IG Task 2– Analysis – Anthony Bowes This is the base code for movement and allows the player to move around freely within the boundaries set by the code. This code also controls the players speed and other variables. This is the free hand code system and allows me to create my own code and allows me to choose what keys control the player This is the background creator and allows you to create different styled backgrounds for each level you create. This menu allows you apply the background to the level and overlap it as well as make the background move. It also allows you to preview your background. This is a base code to create a basic particle system that comes out the back of my player. Some of the aspects include gravity speed and direction. This is the particle system attached to the player. This is an animation set for my 1st enemy; an enemy spawns in the world at a random area in a row of three at a time. When the enemy spawns it goes the opposite direction of the player and meets it head on in the game view. The enemy shoots a lazer at the player and can damage the players health, this is the same for the for the player. When an enemy or player is shot then it explodes and disappears from the game. If the player is shot restarts the game.
  • 3.
    IG Task 2– Analysis – Anthony Bowes This is the players shield and score this was created in a draw event within an object. The code was simple and the variables consisted of colour, text and size. This is shown here Adjustments My first adjustment was to create a more realistic background; I achieved this using adobe illustrator I used this to create a mountain range and tree setting. As you can see here I used the in game tools to make it even on both sides for a repeating background. I then started to create other levels. My second level was focused on moving through the small gaps, to achieve this I created a collision mask and when the player collides with it the player destroys its self. My 3rd level was a turret based room where I placed the enemies on a tiled structure. Another adjustment was adding a final boss level this ads intensity as well as an ending to my game. I first created the sprite and enlarged it in the level editor. I also created special bullets and a firing system to this boss. Once you kill the boss it takes you to the win screen.
  • 4.
    IG Task 2– Analysis – Anthony Bowes I created a death screen next this activated when the player was killed and allowed you to restart the whole game. I also created a win screen for when you completed the game this also had an option to restart the game. I then created a start screen which had the games name and an option to start the game it was made using the background used in my game. Next I made a tutorial screen which game a brief tutorial on how to play the game as well as randomized tips. Finally I added music to my game there was a new piece of music for different components of the game so the title screen had music different to the main music. I used the creation code menu to code the certain stop and start codes into the game