1. Callum Deighton
Work Flow of making my 2D Game
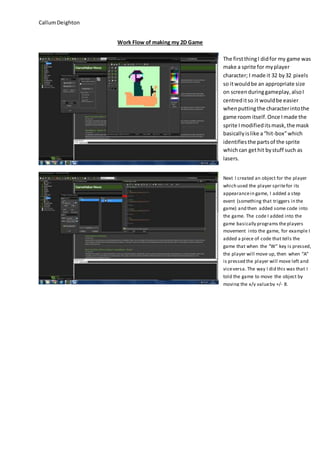
The first thing I did for my game was
make a sprite for my player
character; I made it 32 by 32 pixels
so it would be an appropriate size
on screen during gameplay, also I
centred it so it would be easier
when putting the character into the
game room itself. Once I made the
sprite I modified its mask, the mask
basically is like a “hit-box” which
identifies the parts of the sprite
which can get hit by stuff such as
lasers.
Next I created an object for the player
which used the player sprite for its
appearance in game, I added a step
event (something that triggers in the
game) and then added some code into
the game. The code I added into the
game basically programs the players
movement into the game, for example I
added a piece of code that tells the
game that when the “W” key is pressed,
the player will move up, then when “A”
is pressed the player will move left and
vice versa. The way I did this was that I
told the game to move the object by
moving the x/y value by +/- 8.
2. Callum Deighton
After programming my player
character the next thing I would
create would be the room in which
the game would be played. I made
the length of the room 1024x576
pixels so the game can be played at
an appropriate time.
Once I programmed my room I
created a scrolling background for
my game which, as the name
suggests, moves alongside the
player in the background, I gave my
game a space theme so I used a lot
of various stars and planets for my
background. Once I had done this I
had uploaded the background to the
room as well as placed my player
character into the game and then I
tested it.
3. Callum Deighton
Once my room was complete I
began creating a particle system
which would function as the jet
engine for my player character, I
would make a small sprite which
would be the appearance of the
particles that would come out of the
jet. Next I created some coding that
would incorporate it into the game.
In the coding I basically told the
game where to put the particle
system, the size of it, what sprite to
use etc.
As soon as I had made and tested
my particle system my next plan
was to create projectiles for my
player character to fire, what i did
was I created a small rectangular
sprite for the laser itself and then
created an object for it, in the code I
told the game where the projectile
would spawn as well as to make it
get destroyed when it left the
boundaries of the room so It
wouldn’t infinitely keep going
through the game.
4. Callum Deighton
Next I downloaded some provided
sounds into my game folders then
created separate sound files for the
game such as sound effects for
when the player shoots a laser and
music to play in the background
during gameplay. I would attach the
sound effects to the object or room
so it would play as soon as it would
spawn/start.
My next plan would be to then add
an enemy into the game for the
player to fight. For the sprite I would
duplicate the sprite of my player
character and then edit it to alter its
appearance. Next for making the
enemy spawn I would create a
system object that would determine
when the enemy will spawn and
how many will spawn. Then in the
enemy object I would code on how
fast it will spawn.
5. Callum Deighton
Once I had tested that the enemies
would spawn into the game I would
next create an explosion sprite for
the enemy as well as create multiple
frames of different colours of the
sprite. Next I coded the enemy sprite
so when it would collide with the
players laser (also I programmed the
player laser to get destroyed as well
when it collides with the enemy).
Next for the explosion I made an
object of the sprite and coded it so It
would appear as soon as the enemy
would be hit by the players laser as
well as make it repeat and spread to
create more of a desired effect.
Next I made a laser for the
enemy sprite which also
featured multiple frames. When
coding it I would tell the game
so that it would “home in” on
the player and that it would also
get destroyed when it left the
room boundaries.
6. Callum Deighton
The next task I had once I tested
the enemy laser was to create a
health/shield system for the
player in-game. In the system
object I would code a health bar
for the player to spawn in the
corner of the room, I would also
have to code the colour, size
and percentage of the health.
Next I would program the
enemy laser so that it would
take off a certain percentage
away from the health bar.
Next I created a new
explosion sprite for the
player which would be a
different variety of colours
from the enemy explosion.
Next I would program the
player object so that when
the player's health reaches
0% it will turn into the
explosion sprite and the
game will restart.
7. Callum Deighton
Added Title Screen to the game with music
Once I had fully coded the
player health and explosion I
would then program a score
counter into the game which
will count how many times
an enemy is destroyed the
counter increases by one.
Next I created a font for the
counter so for how the
numbers would appear
visually. Next in the system I
would code where it would
appear on the screen and
how it would increase when
the player destroys an
enemy.
Once I finished and
tested the score system
I would make a second
tougher enemy to put
into the game, I also
created a bigger enemy
laser for him which
would take a larger
percentage of the
players health, but the
laser would move
directly horizontally
instead of homing in. In
the system I coded it so
that the second enemy
would travel in a
different pattern from
the first enemy.
8. Callum Deighton
The next thing I planned for my
game was creating an intro/title
s creen. I would create a new
background which would feature
the pl ayer’s character as well as
the ti tl e of the game. Next I
created some new sprites and
objects for a start and quit button
for the menu which would
program the room to do as the
button would say as well as
change colour when it is
interacted with by the mouse.
Al so I create a new room for the
intro s creen which would be the
fi rs t s creen for the player to
interact with. I would also add
mus ic for the s creen which would
play once the game s tarted (and
would end once either of the
buttons was pressed.
My next plan was to make a
death screen which would
appear when the player died.
First I created a sprite for the
game over sprite and then
afterwards I would create a
background and room for the
game over screen. Next I
created an object for the
game over sprite which I
would code so that when the
player exploded, after a brief
amount of time the game
would move back to the title
screen. Also I would use
music for this screen and
program the room to stop all
other sounds and music from
playing.
9. Callum Deighton
My final plan was to add a
boss battle to the game, first
I searched online for
inspiration on what to design
my boss, next I created a
new room for the boss to
appear in and a key to spawn
in the first game room after a
certain amount of time which
would transport the player to
the boss room. Next I created
a larger missile for the boss
to fire which would fire
quicker and instantly kill the
player, once I tested that I
would create a health system
for the boss so that once the
player had fired enough
projectiles at the boss the
boss would be defeated.
Finally I created a win screen
which would appear for the
player once the boss was
defeated and it would run
credits up the win screen
that I had made as well as
add new music for the boss
and win rooms. After that my
game had been completed
and I filmed footage of my
game to show alongside my
blog.