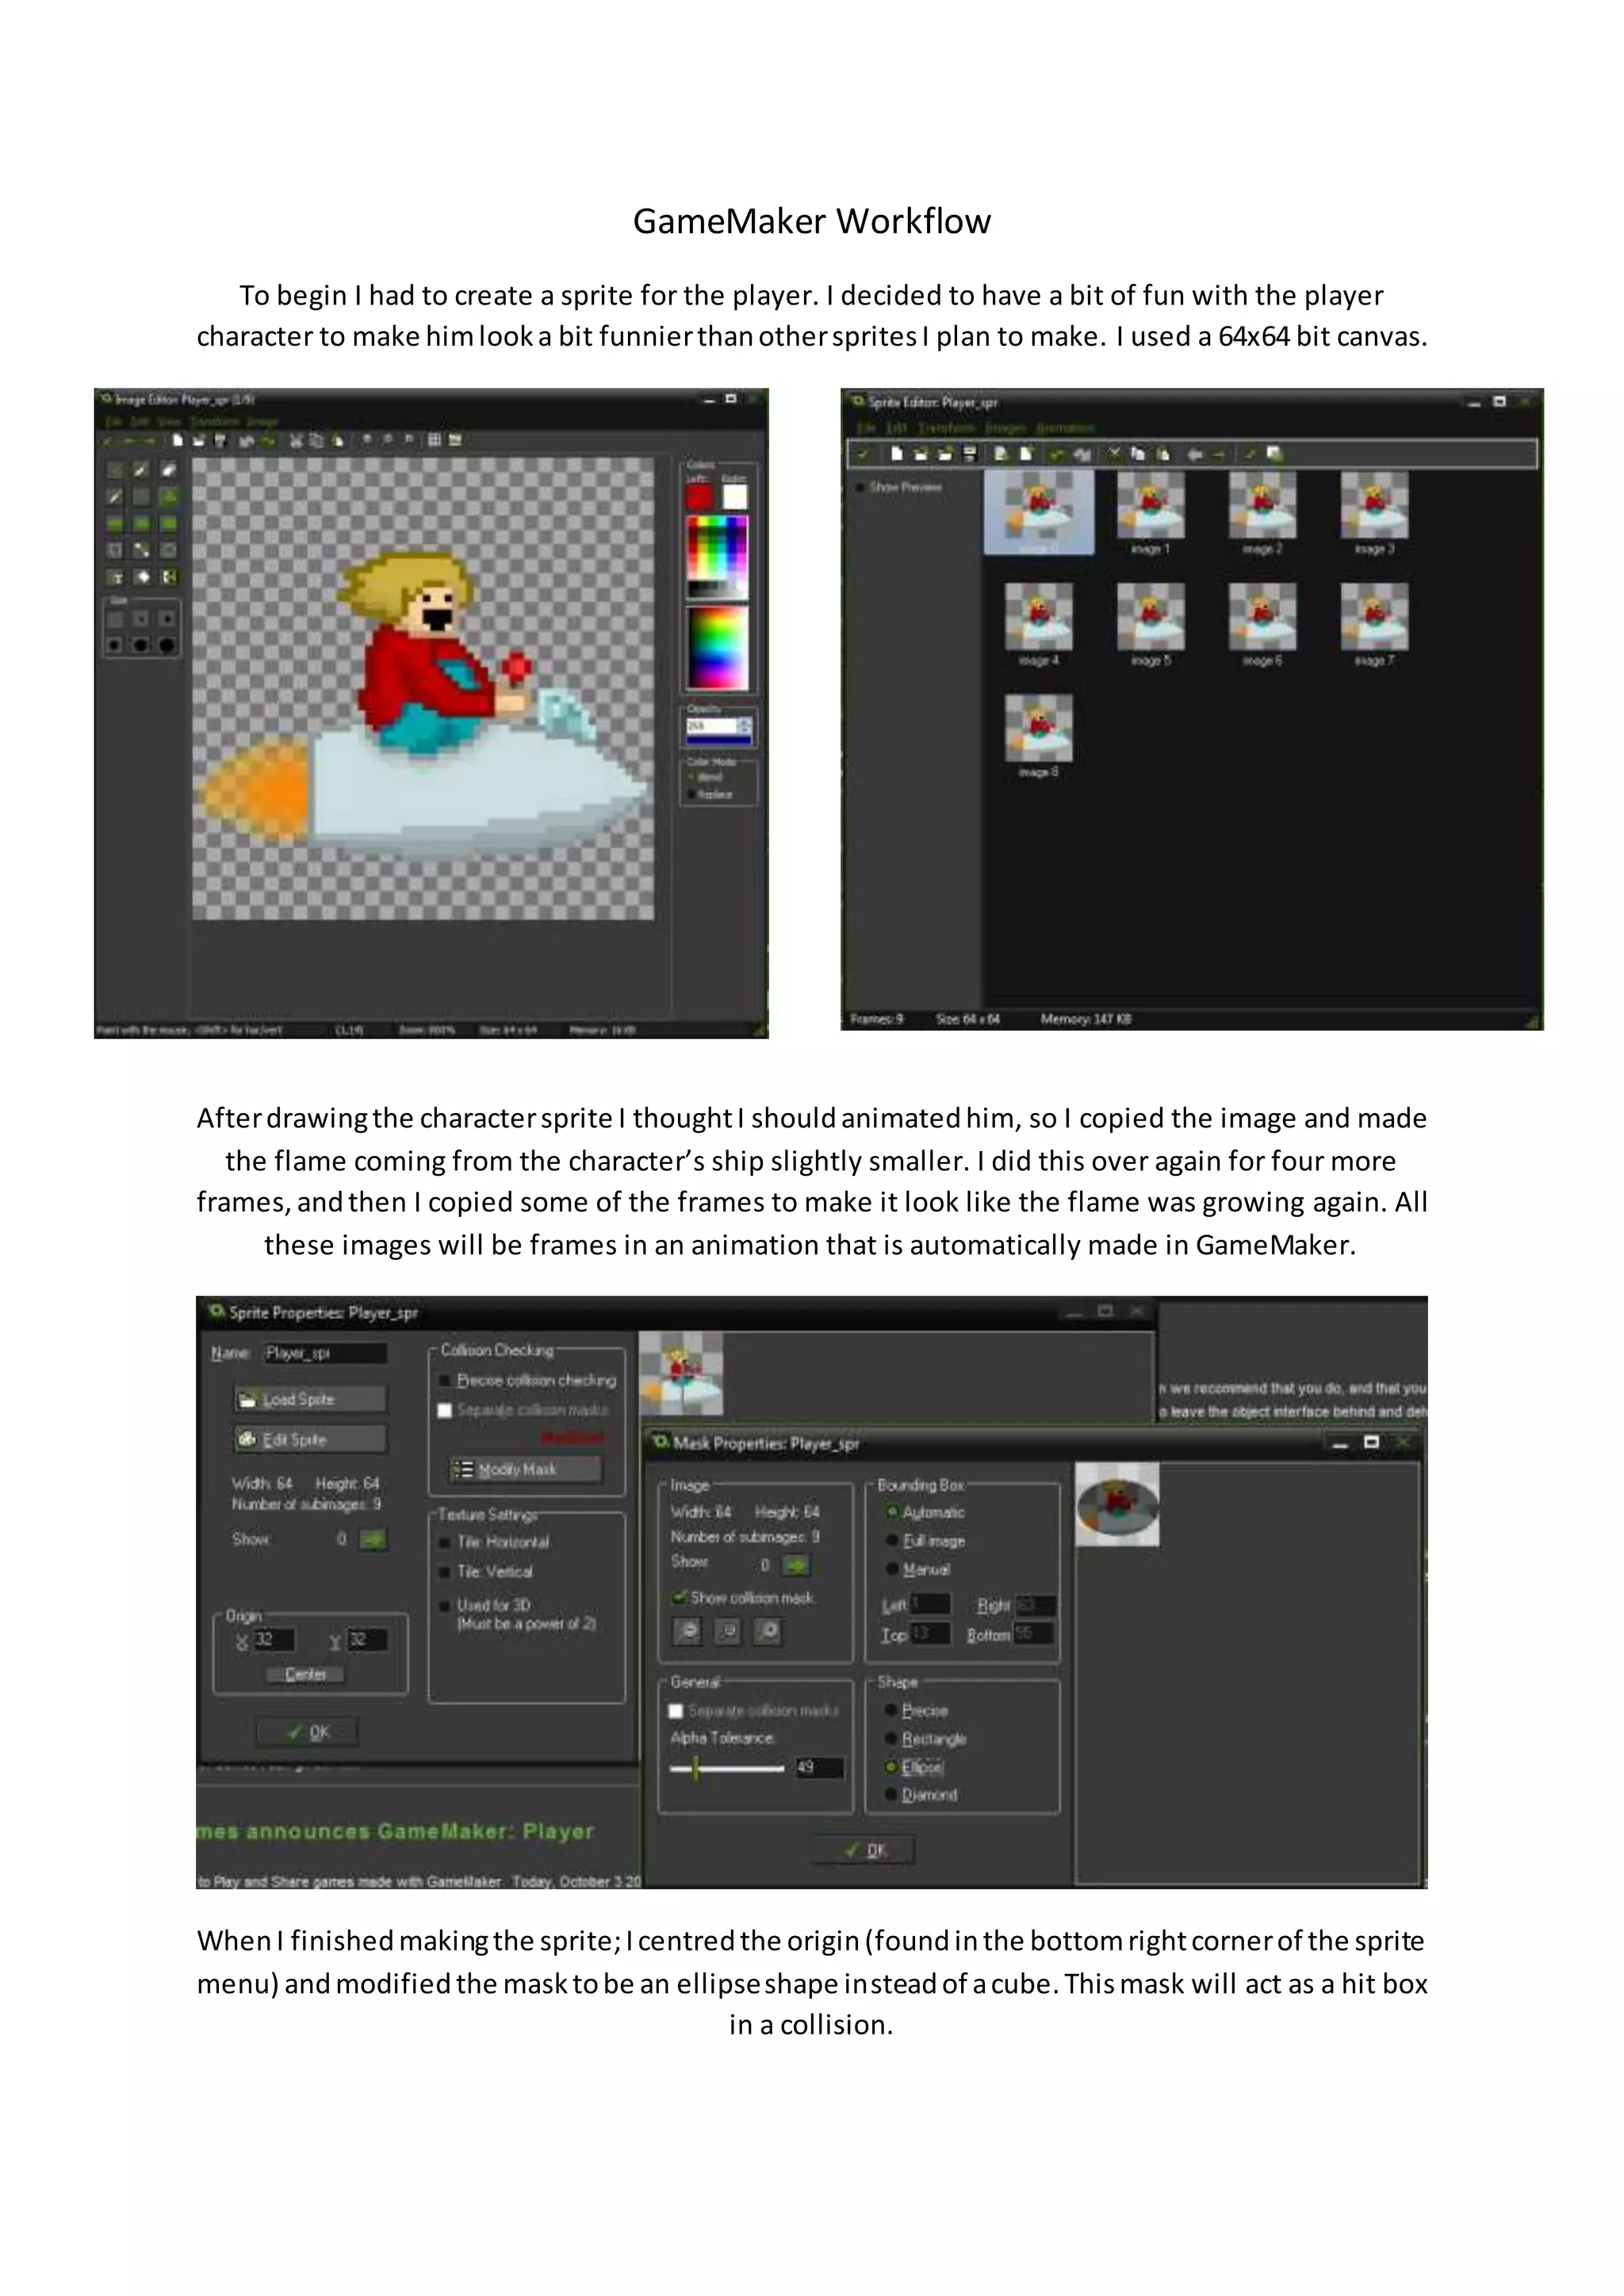
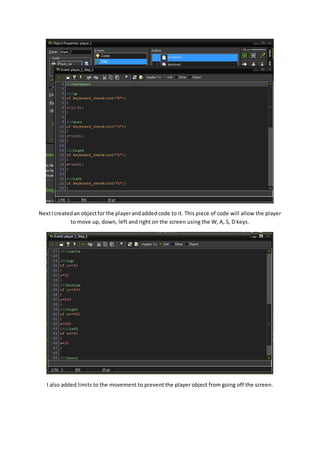
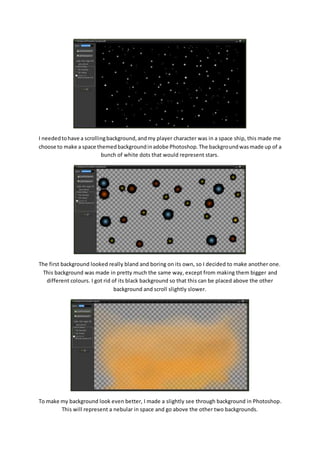
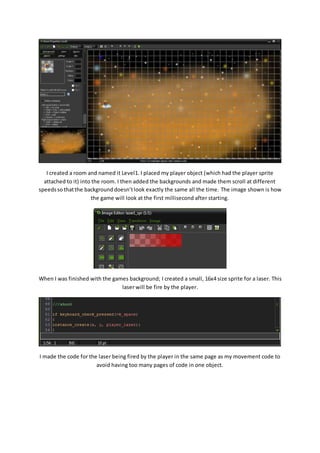
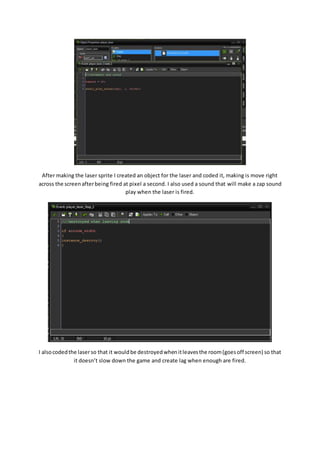
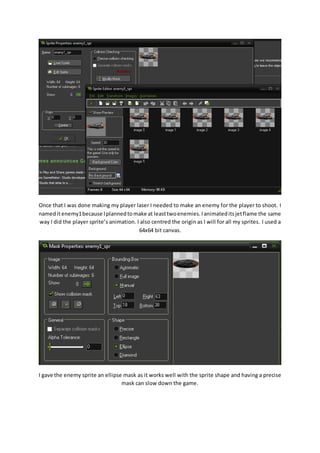
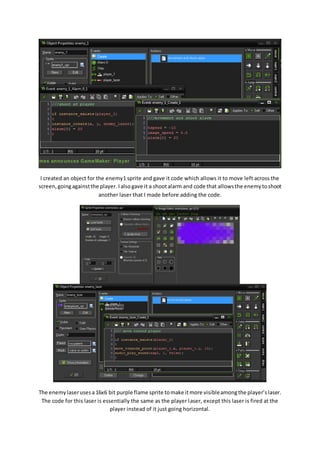
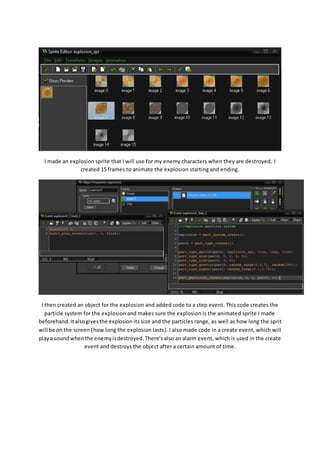
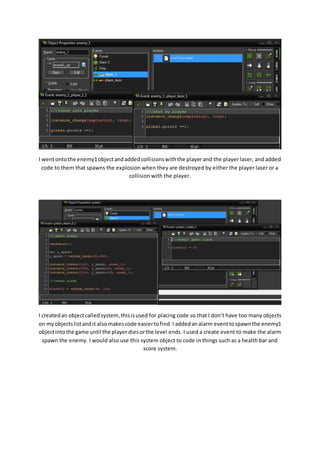
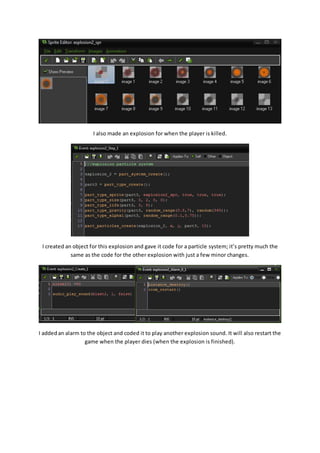
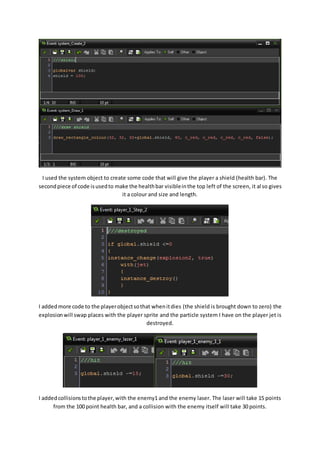
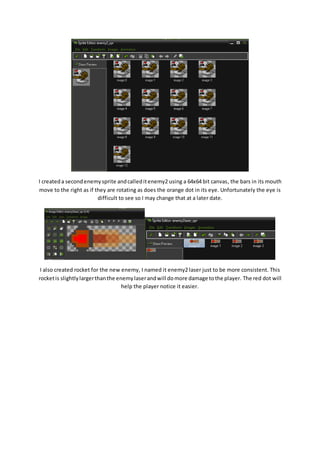
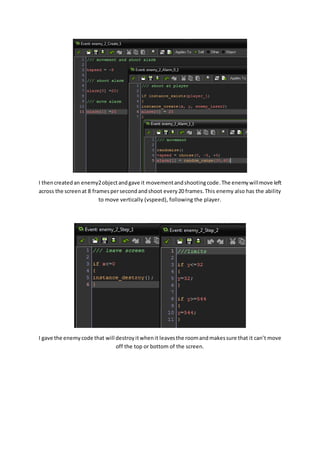
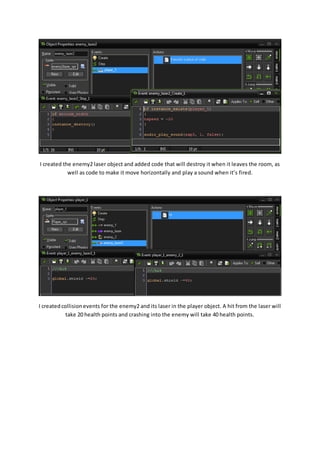
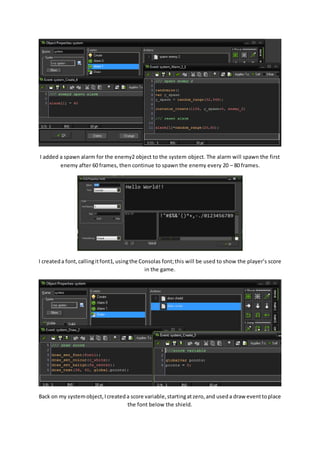
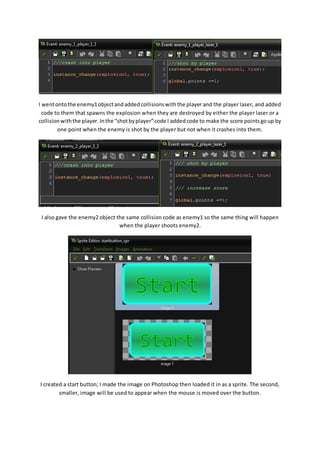
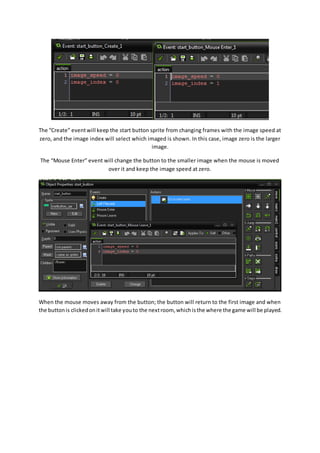
SlideShare a Scribd company logo
1 of 18
GameMaker Workflow 
To begin I had to create a sprite for the player. I decided to have a bit of fun with the player 
character to make him look a bit funnier than other sprites I plan to make. I used a 64x64 bit canvas. 
After drawing the character sprite I thought I should animated him, so I copied the image and made 
the flame coming from the character’s ship slightly smaller. I did this over again for four more 
frames, and then I copied some of the frames to make it look like the flame was growing again. All 
these images will be frames in an animation that is automatically made in GameMaker. 
When I finished making the sprite; I centred the origin (found in the bottom right corner of the sprite 
menu) and modified the mask to be an ellipse shape instead of a cube. This mask will act as a hit box 
in a collision.
Next I created an object for the player and added code to it. This piece of code will allow the player 
to move up, down, left and right on the screen using the W, A, S, D keys. 
I also added limits to the movement to prevent the player object from going off the screen.
I needed to have a scrolling background, and my player character was in a space ship, this made me 
choose to make a space themed background in adobe Photoshop. The background was made up of a 
bunch of white dots that would represent stars. 
The first background looked really bland and boring on its own, so I decided to make another one. 
This background was made in pretty much the same way, except from making them bigger and 
different colours. I got rid of its black background so that this can be placed above the other 
background and scroll slightly slower. 
To make my background look even better, I made a slightly see through background in Photoshop. 
This will represent a nebular in space and go above the other two backgrounds.
I created a room and named it Level1. I placed my player object (which had the player sprite 
attached to it) into the room. I then added the backgrounds and made them scroll at different 
speeds so that the background doesn’t look exactly the same all the time. The image shown is how 
the game will look at the first millisecond after starting. 
When I was finished with the games background; I created a small, 16x4 size sprite for a laser. This 
laser will be fire by the player. 
I made the code for the laser being fired by the player in the same page as my movement code to 
avoid having too many pages of code in one object.
After making the laser sprite I created an object for the laser and coded it, making is move right 
across the screen after being fired at pixel a second. I also used a sound that will make a zap sound 
play when the laser is fired. 
I also coded the laser so that it would be destroyed when it leaves the room (goes off screen) so that 
it doesn’t slow down the game and create lag when enough are fired.
To give the player’s jet some smoke I had to create a particle effect, but first I had to make a sprite . I 
only had to make a simple grey circle to represent smoke. The sprite was made on a 16x16 canvas. 
I created an object for the jet smoke, calling it “jet”. I made a step event in the object and added this 
code for a particle system. The particle system will make the smoke spawn behind the player 
constantly at a random size, with the limits to the size being specified, and then shrink and de - 
spawn.
Once that I was done making my player laser I needed to make an enemy for the player to shoot. I 
named it enemy1 because I planned to make at least two enemies. I animated its jet flame the same 
way I did the player sprite’s animation. I also centred the origin as I will for all my sprites. I used a 
64x64 bit canvas. 
I gave the enemy sprite an ellipse mask as it works well with the sprite shape and having a precise 
mask can slow down the game.
I created an object for the enemy1 sprite and gave it code which allows it to move left across the 
screen, going against the player. I also gave it a shoot alarm and code that allows the enemy to shoot 
another laser that I made before adding the code. 
The enemy laser uses a 16x6 bit purple flame sprite to make it more visible among the player’s laser. 
The code for this laser is essentially the same as the player laser, except this laser is fired at the 
player instead of it just going horizontal.
I made an explosion sprite that I will use for my enemy characters when they are destroyed. I 
created 15 frames to animate the explosion starting and ending. 
I then created an object for the explosion and added code to a step event. This code creates the 
particle system for the explosion and makes sure the explosion is the animated sprite I made 
beforehand. It also gives the explosion its size and the particles range, as well as how long the sprit 
will be on the screen (how long the explosion lasts). I also made code in a create event, which will 
play a sound when the enemy is destroyed. There’s also an alarm event, which is used in the create 
event and destroys the object after a certain amount of time.
I went onto the enemy1 object and added collisions with the player and the player laser, and added 
code to them that spawns the explosion when they are destroyed by either the player laser or a 
collision with the player. 
I created an object called system, this is used for placing code so that I don’t have too many objects 
on my objects list and it also makes code easier to find. I added an alarm event to spawn the enemy1 
object into the game until the player dies or the level ends. I used a create event to make the alarm 
spawn the enemy. I would also use this system object to code in things such as a health bar and 
score system.
I also made an explosion for when the player is killed. 
I created an object for this explosion and gave it code for a particle system; it’s pretty much the 
same as the code for the other explosion with just a few minor changes. 
I added an alarm to the object and coded it to play another explosion sound. It will also restart the 
game when the player dies (when the explosion is finished).
I used the system object to create some code that will give the player a shield (health bar). The 
second piece of code is used to make the health bar visible in the top left of the screen, it al so gives 
it a colour and size and length. 
I added more code to the player object so that when it dies (the shield is brought down to zero) the 
explosion will swap places with the player sprite and the particle system I have on the player jet is 
destroyed. 
I added collisions to the player, with the enemy1 and the enemy laser. The laser will take 15 points 
from the 100 point health bar, and a collision with the enemy itself will take 30 points.
I created a second enemy sprite and called it enemy2 using a 64x64 bit canvas, the bars in its mouth 
move to the right as if they are rotating as does the orange dot in its eye. Unfortunately the eye is 
difficult to see so I may change that at a later date. 
I also created rocket for the new enemy, I named it enemy2 laser just to be more consistent. This 
rocket is slightly larger than the enemy laser and will do more damage to the player. The red dot will 
help the player notice it easier.
I then created an enemy2 object and gave it movement and shooting code. The enemy will move left 
across the screen at 8 frames per second and shoot every 20 frames. This enemy also has the ability 
to move vertically (vspeed), following the player. 
I gave the enemy code that will destroy it when it leaves the room and makes sure that it can’t move 
off the top or bottom of the screen.
I created the enemy2 laser object and added code that will destroy it when it leaves the room, as 
well as code to make it move horizontally and play a sound when it’s fired. 
I created collision events for the enemy2 and its laser in the player object. A hit from the laser will 
take 20 health points and crashing into the enemy will take 40 health points.
I added a spawn alarm for the enemy2 object to the system object. The alarm will spawn the first 
enemy after 60 frames, then continue to spawn the enemy every 20 – 80 frames. 
I created a font, calling it font1, using the Consolas font; this will be used to show the player’s score 
in the game. 
Back on my system object, I created a score variable, starting at zero, and used a draw event to place 
the font below the shield.
I went onto the enemy1 object and added collisions with the player and the player laser, and added 
code to them that spawns the explosion when they are destroyed by either the player laser or a 
collision with the player. In the “shot by player” code I added code to make the score points go up by 
one point when the enemy is shot by the player but not when it crashes into them. 
I also gave the enemy2 object the same collision code as enemy1 so the same thing will happen 
when the player shoots enemy2. 
I created a start button; I made the image on Photoshop then loaded it in as a sprite. The second, 
smaller, image will be used to appear when the mouse is moved over the button.
The “Create” event will keep the start button sprite from changing frames with the image speed at 
zero, and the image index will select which imaged is shown. In this case, image zero is the larger 
image. 
The “Mouse Enter” event will change the button to the smaller image when the mouse is moved 
over it and keep the image speed at zero. 
When the mouse moves away from the button; the button will return to the first image and when 
the button is clicked on it will take you to the next room, which is the where the game will be played.

More Related Content

What's hot

Scratch for kids syllabus for 5 hours by bibek pandit
Scratch for kids syllabus for 5 hours by bibek panditScratch for kids syllabus for 5 hours by bibek pandit
Scratch for kids syllabus for 5 hours by bibek panditBibekPandit2
 
Cameron McRae - 2D Game Workflow
Cameron McRae - 2D Game WorkflowCameron McRae - 2D Game Workflow
Cameron McRae - 2D Game WorkflowCameronMcRae901
 
Introduction to Game Programming: Using C# and Unity 3D - Chapter 3 (Preview)
Introduction to Game Programming: Using C# and Unity 3D - Chapter 3 (Preview)Introduction to Game Programming: Using C# and Unity 3D - Chapter 3 (Preview)
Introduction to Game Programming: Using C# and Unity 3D - Chapter 3 (Preview)noorcon
 
Level desighn workflow
Level desighn workflowLevel desighn workflow
Level desighn workflowKeatonBradley
 
Game Development with AndEngine
Game Development with AndEngineGame Development with AndEngine
Game Development with AndEngineDaniela Da Cruz
 
Jowen roche 2 d game workflow
Jowen roche 2 d game workflowJowen roche 2 d game workflow
Jowen roche 2 d game workflowaknatdeahobia
 
Run and jump tutorial (part 2) scenes
Run and jump tutorial (part 2)   scenesRun and jump tutorial (part 2)   scenes
Run and jump tutorial (part 2) scenesMuhd Basheer
 
Chapt 4 scene parameters
Chapt 4   scene parametersChapt 4   scene parameters
Chapt 4 scene parametersMuhd Basheer
 
Forest assassin 2 d platformer game
Forest assassin 2 d platformer gameForest assassin 2 d platformer game
Forest assassin 2 d platformer gameAnshuman Pattnaik
 
Documentation of my 2D game
Documentation of my 2D gameDocumentation of my 2D game
Documentation of my 2D gamerosstapher
 
Run and jump tutorial (part 3) behaviours
Run and jump tutorial (part 3)   behavioursRun and jump tutorial (part 3)   behaviours
Run and jump tutorial (part 3) behavioursMuhd Basheer
 
Galactic Wars XNA Game
Galactic Wars XNA GameGalactic Wars XNA Game
Galactic Wars XNA GameSohil Gupta
 
Work Flow for 2D Game
Work Flow for 2D GameWork Flow for 2D Game
Work Flow for 2D Gamebowes96123
 

What's hot (19)

Scratch for kids syllabus for 5 hours by bibek pandit
Scratch for kids syllabus for 5 hours by bibek panditScratch for kids syllabus for 5 hours by bibek pandit
Scratch for kids syllabus for 5 hours by bibek pandit
 
Cameron McRae - 2D Game Workflow
Cameron McRae - 2D Game WorkflowCameron McRae - 2D Game Workflow
Cameron McRae - 2D Game Workflow
 
2D game workflow
2D game workflow2D game workflow
2D game workflow
 
Gamemaker work flow
Gamemaker work flowGamemaker work flow
Gamemaker work flow
 
Introduction to Game Programming: Using C# and Unity 3D - Chapter 3 (Preview)
Introduction to Game Programming: Using C# and Unity 3D - Chapter 3 (Preview)Introduction to Game Programming: Using C# and Unity 3D - Chapter 3 (Preview)
Introduction to Game Programming: Using C# and Unity 3D - Chapter 3 (Preview)
 
2dworkflow complete
2dworkflow complete2dworkflow complete
2dworkflow complete
 
Level desighn workflow
Level desighn workflowLevel desighn workflow
Level desighn workflow
 
Game Development with AndEngine
Game Development with AndEngineGame Development with AndEngine
Game Development with AndEngine
 
Jowen roche 2 d game workflow
Jowen roche 2 d game workflowJowen roche 2 d game workflow
Jowen roche 2 d game workflow
 
Documentation
DocumentationDocumentation
Documentation
 
Run and jump tutorial (part 2) scenes
Run and jump tutorial (part 2)   scenesRun and jump tutorial (part 2)   scenes
Run and jump tutorial (part 2) scenes
 
Chapt 4 scene parameters
Chapt 4   scene parametersChapt 4   scene parameters
Chapt 4 scene parameters
 
Forest assassin 2 d platformer game
Forest assassin 2 d platformer gameForest assassin 2 d platformer game
Forest assassin 2 d platformer game
 
Documentation of my 2D game
Documentation of my 2D gameDocumentation of my 2D game
Documentation of my 2D game
 
Unity
UnityUnity
Unity
 
Run and jump tutorial (part 3) behaviours
Run and jump tutorial (part 3)   behavioursRun and jump tutorial (part 3)   behaviours
Run and jump tutorial (part 3) behaviours
 
Galactic Wars XNA Game
Galactic Wars XNA GameGalactic Wars XNA Game
Galactic Wars XNA Game
 
Workflow
WorkflowWorkflow
Workflow
 
Work Flow for 2D Game
Work Flow for 2D GameWork Flow for 2D Game
Work Flow for 2D Game
 

Viewers also liked

Madrid web activity
Madrid web activityMadrid web activity
Madrid web activityNoeliaRG
 
Title page e portfolio
Title page e portfolioTitle page e portfolio
Title page e portfoliokww5126
 
America drawn to war 3
America drawn to war 3America drawn to war 3
America drawn to war 3erisipi
 
Opening Keynote: "The Pivot Point of Art & Science"
Opening Keynote: "The Pivot Point of Art & Science"Opening Keynote: "The Pivot Point of Art & Science"
Opening Keynote: "The Pivot Point of Art & Science"iMedia Connection
 
Игровые автоматы
Игровые автоматыИгровые автоматы
Игровые автоматыnewvulkan
 
Usa in wwi 4
Usa in wwi 4Usa in wwi 4
Usa in wwi 4erisipi
 
NY sirloin with green beans, tomatoes, mushrooms, blue cheese and balsamic re...
NY sirloin with green beans, tomatoes, mushrooms, blue cheese and balsamic re...NY sirloin with green beans, tomatoes, mushrooms, blue cheese and balsamic re...
NY sirloin with green beans, tomatoes, mushrooms, blue cheese and balsamic re...Trecie Jeffcoat
 
Some students have a background or story that is so central to their identity...
Some students have a background or story that is so central to their identity...Some students have a background or story that is so central to their identity...
Some students have a background or story that is so central to their identity...Yuchen Peng
 

Viewers also liked (18)

Hong Kong Democratic Foundation "2016 Legco & 2017 CE Elections Consultation"...
Hong Kong Democratic Foundation "2016 Legco & 2017 CE Elections Consultation"...Hong Kong Democratic Foundation "2016 Legco & 2017 CE Elections Consultation"...
Hong Kong Democratic Foundation "2016 Legco & 2017 CE Elections Consultation"...
 
Madrid web activity
Madrid web activityMadrid web activity
Madrid web activity
 
Title page e portfolio
Title page e portfolioTitle page e portfolio
Title page e portfolio
 
America drawn to war 3
America drawn to war 3America drawn to war 3
America drawn to war 3
 
Opening Keynote: "The Pivot Point of Art & Science"
Opening Keynote: "The Pivot Point of Art & Science"Opening Keynote: "The Pivot Point of Art & Science"
Opening Keynote: "The Pivot Point of Art & Science"
 
RecursosEducativosDigitales
RecursosEducativosDigitalesRecursosEducativosDigitales
RecursosEducativosDigitales
 
HFA103013
HFA103013HFA103013
HFA103013
 
Игровые автоматы
Игровые автоматыИгровые автоматы
Игровые автоматы
 
Zucchine veloci in vaso
Zucchine veloci in vasoZucchine veloci in vaso
Zucchine veloci in vaso
 
Usa in wwi 4
Usa in wwi 4Usa in wwi 4
Usa in wwi 4
 
NY sirloin with green beans, tomatoes, mushrooms, blue cheese and balsamic re...
NY sirloin with green beans, tomatoes, mushrooms, blue cheese and balsamic re...NY sirloin with green beans, tomatoes, mushrooms, blue cheese and balsamic re...
NY sirloin with green beans, tomatoes, mushrooms, blue cheese and balsamic re...
 
Some students have a background or story that is so central to their identity...
Some students have a background or story that is so central to their identity...Some students have a background or story that is so central to their identity...
Some students have a background or story that is so central to their identity...
 
Assassin’s Creed
Assassin’s CreedAssassin’s Creed
Assassin’s Creed
 
Riddles! by Ivette
Riddles! by IvetteRiddles! by Ivette
Riddles! by Ivette
 
Scary maze
Scary mazeScary maze
Scary maze
 
Die Younger
Die YoungerDie Younger
Die Younger
 
CULTO DE SANTA CEIA
CULTO DE SANTA CEIACULTO DE SANTA CEIA
CULTO DE SANTA CEIA
 
Formula for freedom
Formula for freedomFormula for freedom
Formula for freedom
 

Similar to GameMaker Workflow

Ben Atherton 2D Side Scrolling Shooter Workflow
Ben Atherton 2D Side Scrolling Shooter WorkflowBen Atherton 2D Side Scrolling Shooter Workflow
Ben Atherton 2D Side Scrolling Shooter WorkflowBen_Atherton
 
2D Top-down shooter workflow
2D Top-down shooter workflow2D Top-down shooter workflow
2D Top-down shooter workflowraimondklavins
 
Level desighn workflow
Level desighn workflowLevel desighn workflow
Level desighn workflowKeatonBradley
 
My Level Design For 2D Scroll Game By Arron Coakley
My Level Design For 2D Scroll Game By Arron CoakleyMy Level Design For 2D Scroll Game By Arron Coakley
My Level Design For 2D Scroll Game By Arron CoakleyArron96
 
2d game engine workflow
2d game engine workflow2d game engine workflow
2d game engine workflowluisfvazquez1
 
JoshuaGrey-2DGameWorkflow
JoshuaGrey-2DGameWorkflowJoshuaGrey-2DGameWorkflow
JoshuaGrey-2DGameWorkflowJoshgrey16
 
My Level Design For 2D Scroll Game
My Level Design For 2D Scroll GameMy Level Design For 2D Scroll Game
My Level Design For 2D Scroll GameArron96
 
Level design workflow 3
Level design workflow 3Level design workflow 3
Level design workflow 3tommo123456
 
Level design workflow 3
Level design workflow 3Level design workflow 3
Level design workflow 3tommo123456
 

Similar to GameMaker Workflow (20)

Ben Atherton 2D Side Scrolling Shooter Workflow
Ben Atherton 2D Side Scrolling Shooter WorkflowBen Atherton 2D Side Scrolling Shooter Workflow
Ben Atherton 2D Side Scrolling Shooter Workflow
 
Gamemaker work flow
Gamemaker work flowGamemaker work flow
Gamemaker work flow
 
Workflow
WorkflowWorkflow
Workflow
 
Workflow
WorkflowWorkflow
Workflow
 
Work Flow
Work FlowWork Flow
Work Flow
 
2D Top-down shooter workflow
2D Top-down shooter workflow2D Top-down shooter workflow
2D Top-down shooter workflow
 
Level desighn workflow
Level desighn workflowLevel desighn workflow
Level desighn workflow
 
Evaluation fmp
Evaluation   fmpEvaluation   fmp
Evaluation fmp
 
My Level Design For 2D Scroll Game By Arron Coakley
My Level Design For 2D Scroll Game By Arron CoakleyMy Level Design For 2D Scroll Game By Arron Coakley
My Level Design For 2D Scroll Game By Arron Coakley
 
Work Flow
Work FlowWork Flow
Work Flow
 
2d game engine workflow
2d game engine workflow2d game engine workflow
2d game engine workflow
 
Workflow
WorkflowWorkflow
Workflow
 
JoshuaGrey-2DGameWorkflow
JoshuaGrey-2DGameWorkflowJoshuaGrey-2DGameWorkflow
JoshuaGrey-2DGameWorkflow
 
2D Game Workflow
2D Game Workflow2D Game Workflow
2D Game Workflow
 
My Level Design For 2D Scroll Game
My Level Design For 2D Scroll GameMy Level Design For 2D Scroll Game
My Level Design For 2D Scroll Game
 
Task 2 workflow
Task 2 workflowTask 2 workflow
Task 2 workflow
 
Workflow
WorkflowWorkflow
Workflow
 
Work Flow
Work FlowWork Flow
Work Flow
 
Level design workflow 3
Level design workflow 3Level design workflow 3
Level design workflow 3
 
Level design workflow 3
Level design workflow 3Level design workflow 3
Level design workflow 3
 

More from adampatrickhughes

More from adampatrickhughes (20)

Adam hughes final major project production diary
Adam hughes final major project production diary Adam hughes final major project production diary
Adam hughes final major project production diary
 
Production log construction
Production log constructionProduction log construction
Production log construction
 
Production Log - Export
Production Log - ExportProduction Log - Export
Production Log - Export
 
Production Log - Modelling
Production Log - ModellingProduction Log - Modelling
Production Log - Modelling
 
2 D Game Research
2 D Game Research2 D Game Research
2 D Game Research
 
ha11_hidden_places
ha11_hidden_placesha11_hidden_places
ha11_hidden_places
 
Task 1 briefs
Task 1   briefsTask 1   briefs
Task 1 briefs
 
FMP Assignment Brief
FMP Assignment BriefFMP Assignment Brief
FMP Assignment Brief
 
Unity 3D Game Workflow
Unity 3D Game WorkflowUnity 3D Game Workflow
Unity 3D Game Workflow
 
Animators research
Animators researchAnimators research
Animators research
 
Clay artists
Clay artistsClay artists
Clay artists
 
Artist Research - Wire
Artist Research - WireArtist Research - Wire
Artist Research - Wire
 
Artist Research - Creatures
Artist Research - CreaturesArtist Research - Creatures
Artist Research - Creatures
 
Engine terminology
Engine terminologyEngine terminology
Engine terminology
 
Ig je game engines_y2_assignment brief
Ig je game engines_y2_assignment briefIg je game engines_y2_assignment brief
Ig je game engines_y2_assignment brief
 
Skills Audit
Skills AuditSkills Audit
Skills Audit
 
Unit66 production log
Unit66 production logUnit66 production log
Unit66 production log
 
Adam hughes ig3 annotations
Adam hughes ig3 annotationsAdam hughes ig3 annotations
Adam hughes ig3 annotations
 
Unit 73 ig3 assignment programming sound assets to a game 2013_y1
Unit 73 ig3 assignment programming sound assets to a game 2013_y1Unit 73 ig3 assignment programming sound assets to a game 2013_y1
Unit 73 ig3 assignment programming sound assets to a game 2013_y1
 
Robot moodboard
Robot moodboardRobot moodboard
Robot moodboard
 

Recently uploaded

Grant Readiness 101 TechSoup and Remy Consulting
Grant Readiness 101 TechSoup and Remy ConsultingGrant Readiness 101 TechSoup and Remy Consulting
Grant Readiness 101 TechSoup and Remy ConsultingTechSoup
 
Accessible design: Minimum effort, maximum impact
Accessible design: Minimum effort, maximum impactAccessible design: Minimum effort, maximum impact
Accessible design: Minimum effort, maximum impactdawncurless
 
Alper Gobel In Media Res Media Component
Alper Gobel In Media Res Media ComponentAlper Gobel In Media Res Media Component
Alper Gobel In Media Res Media ComponentInMediaRes1
 
_Math 4-Q4 Week 5.pptx Steps in Collecting Data
_Math 4-Q4 Week 5.pptx Steps in Collecting Data_Math 4-Q4 Week 5.pptx Steps in Collecting Data
_Math 4-Q4 Week 5.pptx Steps in Collecting DataJhengPantaleon
 
Paris 2024 Olympic Geographies - an activity
Paris 2024 Olympic Geographies - an activityParis 2024 Olympic Geographies - an activity
Paris 2024 Olympic Geographies - an activityGeoBlogs
 
Arihant handbook biology for class 11 .pdf
Arihant handbook biology for class 11 .pdfArihant handbook biology for class 11 .pdf
Arihant handbook biology for class 11 .pdfchloefrazer622
 
Sanyam Choudhary Chemistry practical.pdf
Sanyam Choudhary Chemistry practical.pdfSanyam Choudhary Chemistry practical.pdf
Sanyam Choudhary Chemistry practical.pdfsanyamsingh5019
 
Mastering the Unannounced Regulatory Inspection
Mastering the Unannounced Regulatory InspectionMastering the Unannounced Regulatory Inspection
Mastering the Unannounced Regulatory InspectionSafetyChain Software
 
Measures of Central Tendency: Mean, Median and Mode
Measures of Central Tendency: Mean, Median and ModeMeasures of Central Tendency: Mean, Median and Mode
Measures of Central Tendency: Mean, Median and ModeThiyagu K
 
PSYCHIATRIC History collection FORMAT.pptx
PSYCHIATRIC   History collection FORMAT.pptxPSYCHIATRIC   History collection FORMAT.pptx
PSYCHIATRIC History collection FORMAT.pptxPoojaSen20
 
Kisan Call Centre - To harness potential of ICT in Agriculture by answer farm...
Kisan Call Centre - To harness potential of ICT in Agriculture by answer farm...Kisan Call Centre - To harness potential of ICT in Agriculture by answer farm...
Kisan Call Centre - To harness potential of ICT in Agriculture by answer farm...Krashi Coaching
 
mini mental status format.docx
mini    mental       status     format.docxmini    mental       status     format.docx
mini mental status format.docxPoojaSen20
 
Hybridoma Technology ( Production , Purification , and Application )
Hybridoma Technology  ( Production , Purification , and Application  ) Hybridoma Technology  ( Production , Purification , and Application  )
Hybridoma Technology ( Production , Purification , and Application ) Sakshi Ghasle
 
POINT- BIOCHEMISTRY SEM 2 ENZYMES UNIT 5.pptx
POINT- BIOCHEMISTRY SEM 2 ENZYMES UNIT 5.pptxPOINT- BIOCHEMISTRY SEM 2 ENZYMES UNIT 5.pptx
POINT- BIOCHEMISTRY SEM 2 ENZYMES UNIT 5.pptxSayali Powar
 
CARE OF CHILD IN INCUBATOR..........pptx
CARE OF CHILD IN INCUBATOR..........pptxCARE OF CHILD IN INCUBATOR..........pptx
CARE OF CHILD IN INCUBATOR..........pptxGaneshChakor2
 
Introduction to ArtificiaI Intelligence in Higher Education
Introduction to ArtificiaI Intelligence in Higher EducationIntroduction to ArtificiaI Intelligence in Higher Education
Introduction to ArtificiaI Intelligence in Higher Educationpboyjonauth
 
Introduction to AI in Higher Education_draft.pptx
Introduction to AI in Higher Education_draft.pptxIntroduction to AI in Higher Education_draft.pptx
Introduction to AI in Higher Education_draft.pptxpboyjonauth
 
URLs and Routing in the Odoo 17 Website App
URLs and Routing in the Odoo 17 Website AppURLs and Routing in the Odoo 17 Website App
URLs and Routing in the Odoo 17 Website AppCeline George
 

Recently uploaded (20)

Grant Readiness 101 TechSoup and Remy Consulting
Grant Readiness 101 TechSoup and Remy ConsultingGrant Readiness 101 TechSoup and Remy Consulting
Grant Readiness 101 TechSoup and Remy Consulting
 
Accessible design: Minimum effort, maximum impact
Accessible design: Minimum effort, maximum impactAccessible design: Minimum effort, maximum impact
Accessible design: Minimum effort, maximum impact
 
Alper Gobel In Media Res Media Component
Alper Gobel In Media Res Media ComponentAlper Gobel In Media Res Media Component
Alper Gobel In Media Res Media Component
 
_Math 4-Q4 Week 5.pptx Steps in Collecting Data
_Math 4-Q4 Week 5.pptx Steps in Collecting Data_Math 4-Q4 Week 5.pptx Steps in Collecting Data
_Math 4-Q4 Week 5.pptx Steps in Collecting Data
 
Paris 2024 Olympic Geographies - an activity
Paris 2024 Olympic Geographies - an activityParis 2024 Olympic Geographies - an activity
Paris 2024 Olympic Geographies - an activity
 
Arihant handbook biology for class 11 .pdf
Arihant handbook biology for class 11 .pdfArihant handbook biology for class 11 .pdf
Arihant handbook biology for class 11 .pdf
 
Sanyam Choudhary Chemistry practical.pdf
Sanyam Choudhary Chemistry practical.pdfSanyam Choudhary Chemistry practical.pdf
Sanyam Choudhary Chemistry practical.pdf
 
Mastering the Unannounced Regulatory Inspection
Mastering the Unannounced Regulatory InspectionMastering the Unannounced Regulatory Inspection
Mastering the Unannounced Regulatory Inspection
 
Staff of Color (SOC) Retention Efforts DDSD
Staff of Color (SOC) Retention Efforts DDSDStaff of Color (SOC) Retention Efforts DDSD
Staff of Color (SOC) Retention Efforts DDSD
 
Measures of Central Tendency: Mean, Median and Mode
Measures of Central Tendency: Mean, Median and ModeMeasures of Central Tendency: Mean, Median and Mode
Measures of Central Tendency: Mean, Median and Mode
 
PSYCHIATRIC History collection FORMAT.pptx
PSYCHIATRIC   History collection FORMAT.pptxPSYCHIATRIC   History collection FORMAT.pptx
PSYCHIATRIC History collection FORMAT.pptx
 
Kisan Call Centre - To harness potential of ICT in Agriculture by answer farm...
Kisan Call Centre - To harness potential of ICT in Agriculture by answer farm...Kisan Call Centre - To harness potential of ICT in Agriculture by answer farm...
Kisan Call Centre - To harness potential of ICT in Agriculture by answer farm...
 
mini mental status format.docx
mini    mental       status     format.docxmini    mental       status     format.docx
mini mental status format.docx
 
Hybridoma Technology ( Production , Purification , and Application )
Hybridoma Technology  ( Production , Purification , and Application  ) Hybridoma Technology  ( Production , Purification , and Application  )
Hybridoma Technology ( Production , Purification , and Application )
 
POINT- BIOCHEMISTRY SEM 2 ENZYMES UNIT 5.pptx
POINT- BIOCHEMISTRY SEM 2 ENZYMES UNIT 5.pptxPOINT- BIOCHEMISTRY SEM 2 ENZYMES UNIT 5.pptx
POINT- BIOCHEMISTRY SEM 2 ENZYMES UNIT 5.pptx
 
CARE OF CHILD IN INCUBATOR..........pptx
CARE OF CHILD IN INCUBATOR..........pptxCARE OF CHILD IN INCUBATOR..........pptx
CARE OF CHILD IN INCUBATOR..........pptx
 
Código Creativo y Arte de Software | Unidad 1
Código Creativo y Arte de Software | Unidad 1Código Creativo y Arte de Software | Unidad 1
Código Creativo y Arte de Software | Unidad 1
 
Introduction to ArtificiaI Intelligence in Higher Education
Introduction to ArtificiaI Intelligence in Higher EducationIntroduction to ArtificiaI Intelligence in Higher Education
Introduction to ArtificiaI Intelligence in Higher Education
 
Introduction to AI in Higher Education_draft.pptx
Introduction to AI in Higher Education_draft.pptxIntroduction to AI in Higher Education_draft.pptx
Introduction to AI in Higher Education_draft.pptx
 
URLs and Routing in the Odoo 17 Website App
URLs and Routing in the Odoo 17 Website AppURLs and Routing in the Odoo 17 Website App
URLs and Routing in the Odoo 17 Website App
 

GameMaker Workflow

  • 1. GameMaker Workflow To begin I had to create a sprite for the player. I decided to have a bit of fun with the player character to make him look a bit funnier than other sprites I plan to make. I used a 64x64 bit canvas. After drawing the character sprite I thought I should animated him, so I copied the image and made the flame coming from the character’s ship slightly smaller. I did this over again for four more frames, and then I copied some of the frames to make it look like the flame was growing again. All these images will be frames in an animation that is automatically made in GameMaker. When I finished making the sprite; I centred the origin (found in the bottom right corner of the sprite menu) and modified the mask to be an ellipse shape instead of a cube. This mask will act as a hit box in a collision.
  • 2. Next I created an object for the player and added code to it. This piece of code will allow the player to move up, down, left and right on the screen using the W, A, S, D keys. I also added limits to the movement to prevent the player object from going off the screen.
  • 3. I needed to have a scrolling background, and my player character was in a space ship, this made me choose to make a space themed background in adobe Photoshop. The background was made up of a bunch of white dots that would represent stars. The first background looked really bland and boring on its own, so I decided to make another one. This background was made in pretty much the same way, except from making them bigger and different colours. I got rid of its black background so that this can be placed above the other background and scroll slightly slower. To make my background look even better, I made a slightly see through background in Photoshop. This will represent a nebular in space and go above the other two backgrounds.
  • 4. I created a room and named it Level1. I placed my player object (which had the player sprite attached to it) into the room. I then added the backgrounds and made them scroll at different speeds so that the background doesn’t look exactly the same all the time. The image shown is how the game will look at the first millisecond after starting. When I was finished with the games background; I created a small, 16x4 size sprite for a laser. This laser will be fire by the player. I made the code for the laser being fired by the player in the same page as my movement code to avoid having too many pages of code in one object.
  • 5. After making the laser sprite I created an object for the laser and coded it, making is move right across the screen after being fired at pixel a second. I also used a sound that will make a zap sound play when the laser is fired. I also coded the laser so that it would be destroyed when it leaves the room (goes off screen) so that it doesn’t slow down the game and create lag when enough are fired.
  • 6. To give the player’s jet some smoke I had to create a particle effect, but first I had to make a sprite . I only had to make a simple grey circle to represent smoke. The sprite was made on a 16x16 canvas. I created an object for the jet smoke, calling it “jet”. I made a step event in the object and added this code for a particle system. The particle system will make the smoke spawn behind the player constantly at a random size, with the limits to the size being specified, and then shrink and de - spawn.
  • 7. Once that I was done making my player laser I needed to make an enemy for the player to shoot. I named it enemy1 because I planned to make at least two enemies. I animated its jet flame the same way I did the player sprite’s animation. I also centred the origin as I will for all my sprites. I used a 64x64 bit canvas. I gave the enemy sprite an ellipse mask as it works well with the sprite shape and having a precise mask can slow down the game.
  • 8. I created an object for the enemy1 sprite and gave it code which allows it to move left across the screen, going against the player. I also gave it a shoot alarm and code that allows the enemy to shoot another laser that I made before adding the code. The enemy laser uses a 16x6 bit purple flame sprite to make it more visible among the player’s laser. The code for this laser is essentially the same as the player laser, except this laser is fired at the player instead of it just going horizontal.
  • 9. I made an explosion sprite that I will use for my enemy characters when they are destroyed. I created 15 frames to animate the explosion starting and ending. I then created an object for the explosion and added code to a step event. This code creates the particle system for the explosion and makes sure the explosion is the animated sprite I made beforehand. It also gives the explosion its size and the particles range, as well as how long the sprit will be on the screen (how long the explosion lasts). I also made code in a create event, which will play a sound when the enemy is destroyed. There’s also an alarm event, which is used in the create event and destroys the object after a certain amount of time.
  • 10. I went onto the enemy1 object and added collisions with the player and the player laser, and added code to them that spawns the explosion when they are destroyed by either the player laser or a collision with the player. I created an object called system, this is used for placing code so that I don’t have too many objects on my objects list and it also makes code easier to find. I added an alarm event to spawn the enemy1 object into the game until the player dies or the level ends. I used a create event to make the alarm spawn the enemy. I would also use this system object to code in things such as a health bar and score system.
  • 11. I also made an explosion for when the player is killed. I created an object for this explosion and gave it code for a particle system; it’s pretty much the same as the code for the other explosion with just a few minor changes. I added an alarm to the object and coded it to play another explosion sound. It will also restart the game when the player dies (when the explosion is finished).
  • 12. I used the system object to create some code that will give the player a shield (health bar). The second piece of code is used to make the health bar visible in the top left of the screen, it al so gives it a colour and size and length. I added more code to the player object so that when it dies (the shield is brought down to zero) the explosion will swap places with the player sprite and the particle system I have on the player jet is destroyed. I added collisions to the player, with the enemy1 and the enemy laser. The laser will take 15 points from the 100 point health bar, and a collision with the enemy itself will take 30 points.
  • 13. I created a second enemy sprite and called it enemy2 using a 64x64 bit canvas, the bars in its mouth move to the right as if they are rotating as does the orange dot in its eye. Unfortunately the eye is difficult to see so I may change that at a later date. I also created rocket for the new enemy, I named it enemy2 laser just to be more consistent. This rocket is slightly larger than the enemy laser and will do more damage to the player. The red dot will help the player notice it easier.
  • 14. I then created an enemy2 object and gave it movement and shooting code. The enemy will move left across the screen at 8 frames per second and shoot every 20 frames. This enemy also has the ability to move vertically (vspeed), following the player. I gave the enemy code that will destroy it when it leaves the room and makes sure that it can’t move off the top or bottom of the screen.
  • 15. I created the enemy2 laser object and added code that will destroy it when it leaves the room, as well as code to make it move horizontally and play a sound when it’s fired. I created collision events for the enemy2 and its laser in the player object. A hit from the laser will take 20 health points and crashing into the enemy will take 40 health points.
  • 16. I added a spawn alarm for the enemy2 object to the system object. The alarm will spawn the first enemy after 60 frames, then continue to spawn the enemy every 20 – 80 frames. I created a font, calling it font1, using the Consolas font; this will be used to show the player’s score in the game. Back on my system object, I created a score variable, starting at zero, and used a draw event to place the font below the shield.
  • 17. I went onto the enemy1 object and added collisions with the player and the player laser, and added code to them that spawns the explosion when they are destroyed by either the player laser or a collision with the player. In the “shot by player” code I added code to make the score points go up by one point when the enemy is shot by the player but not when it crashes into them. I also gave the enemy2 object the same collision code as enemy1 so the same thing will happen when the player shoots enemy2. I created a start button; I made the image on Photoshop then loaded it in as a sprite. The second, smaller, image will be used to appear when the mouse is moved over the button.
  • 18. The “Create” event will keep the start button sprite from changing frames with the image speed at zero, and the image index will select which imaged is shown. In this case, image zero is the larger image. The “Mouse Enter” event will change the button to the smaller image when the mouse is moved over it and keep the image speed at zero. When the mouse moves away from the button; the button will return to the first image and when the button is clicked on it will take you to the next room, which is the where the game will be played.