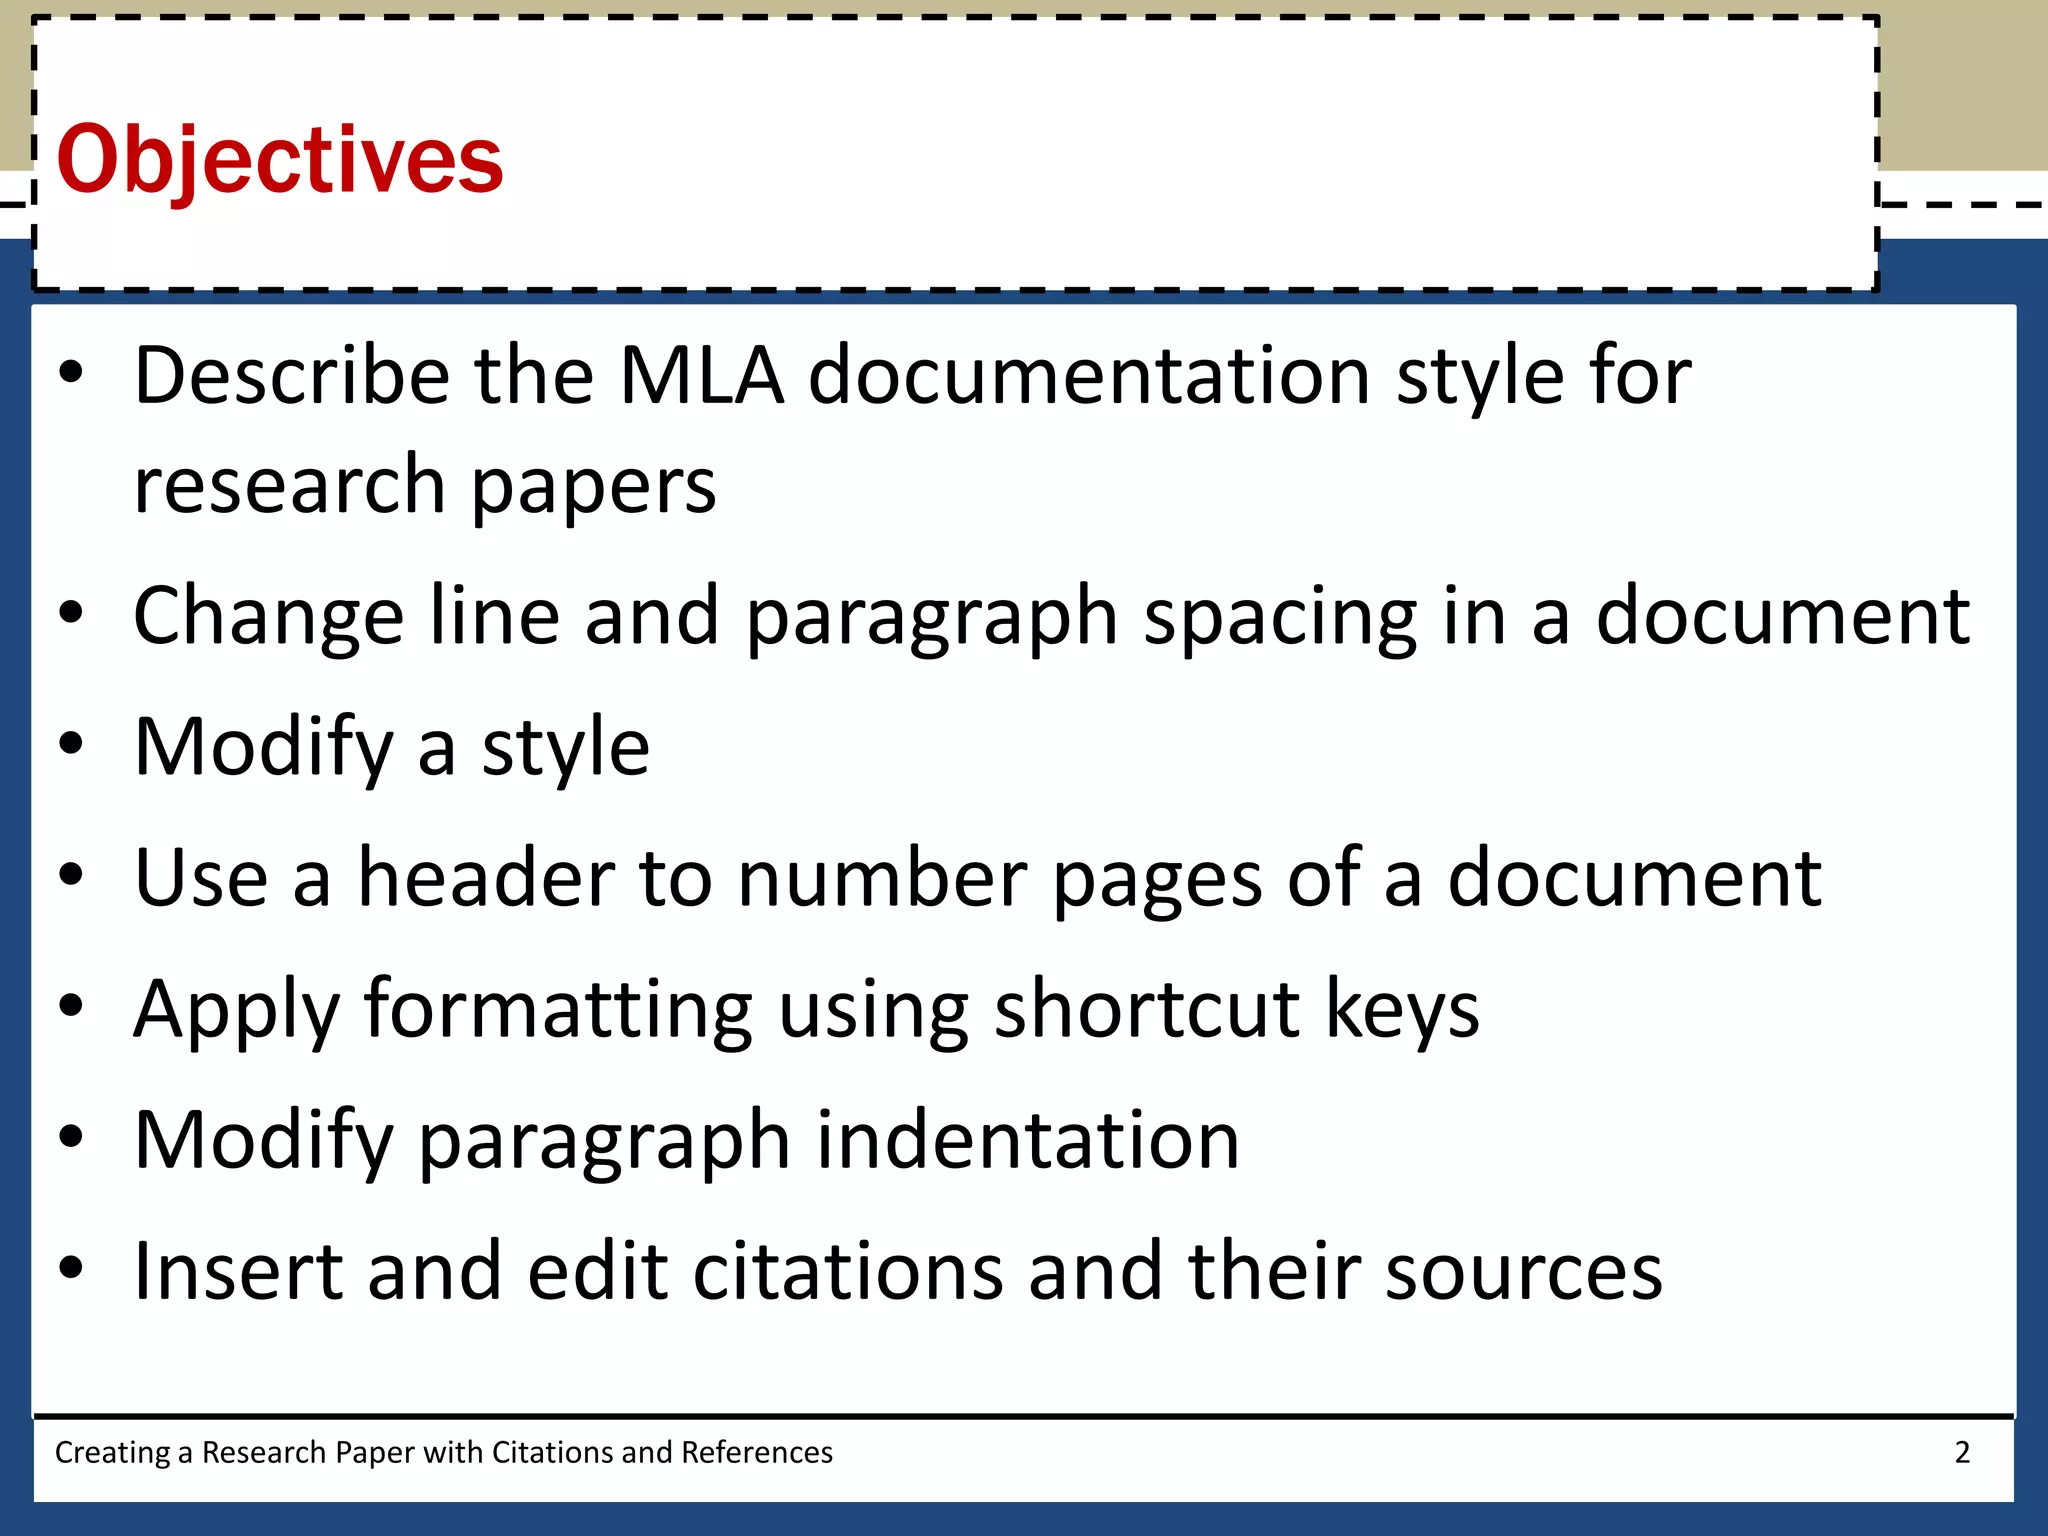
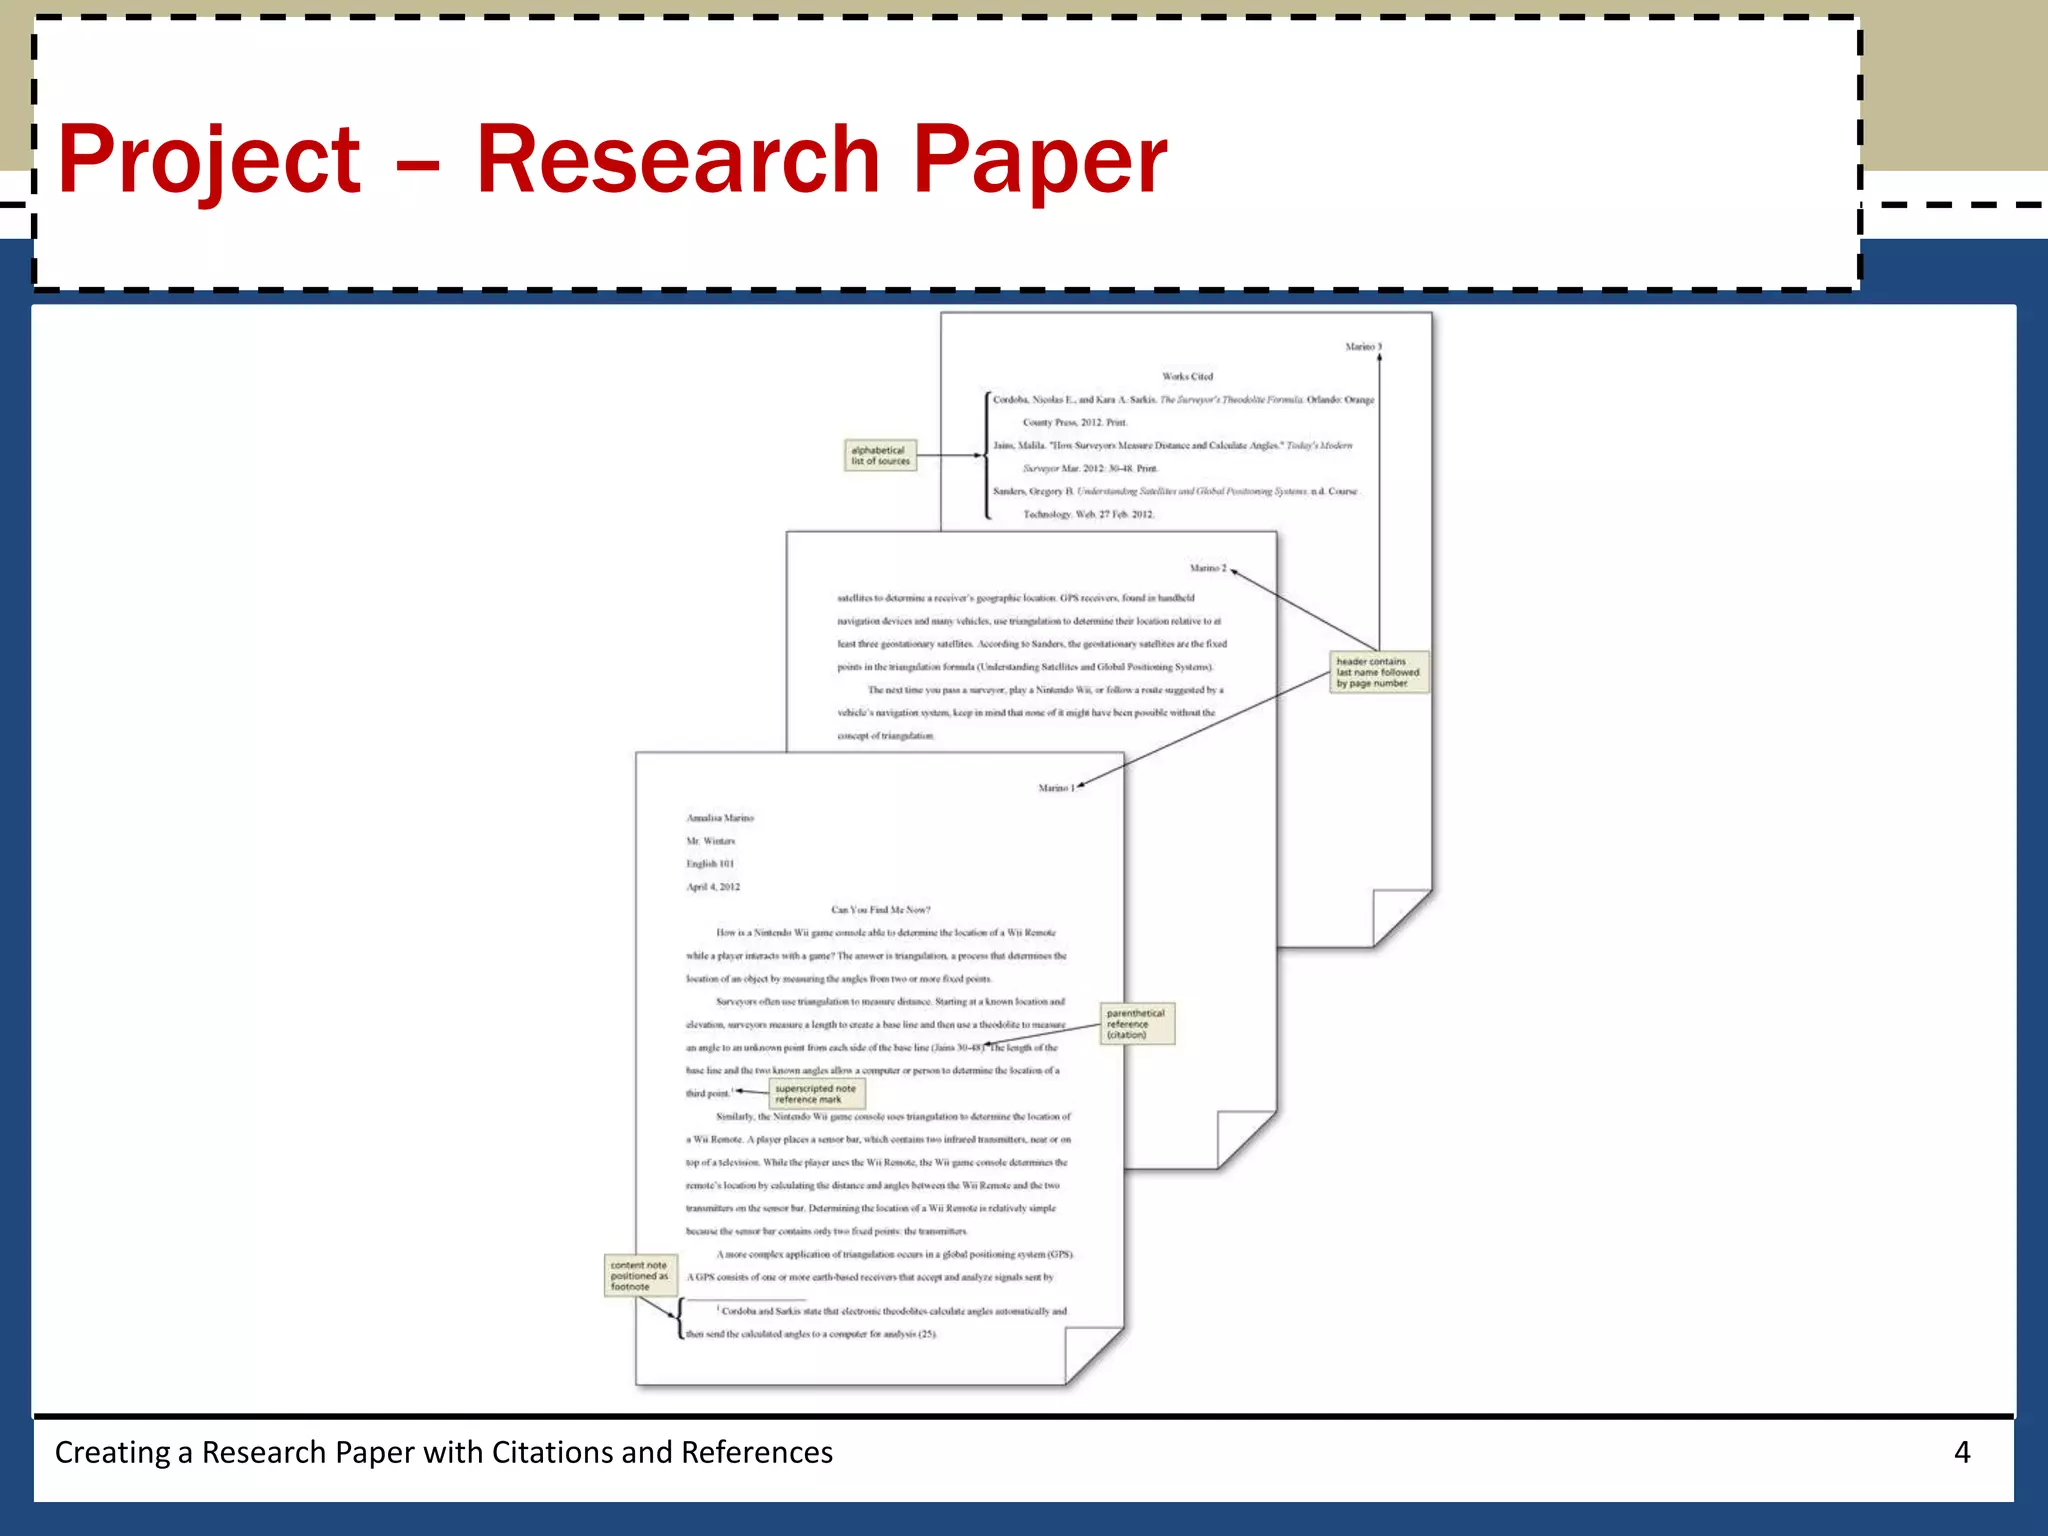
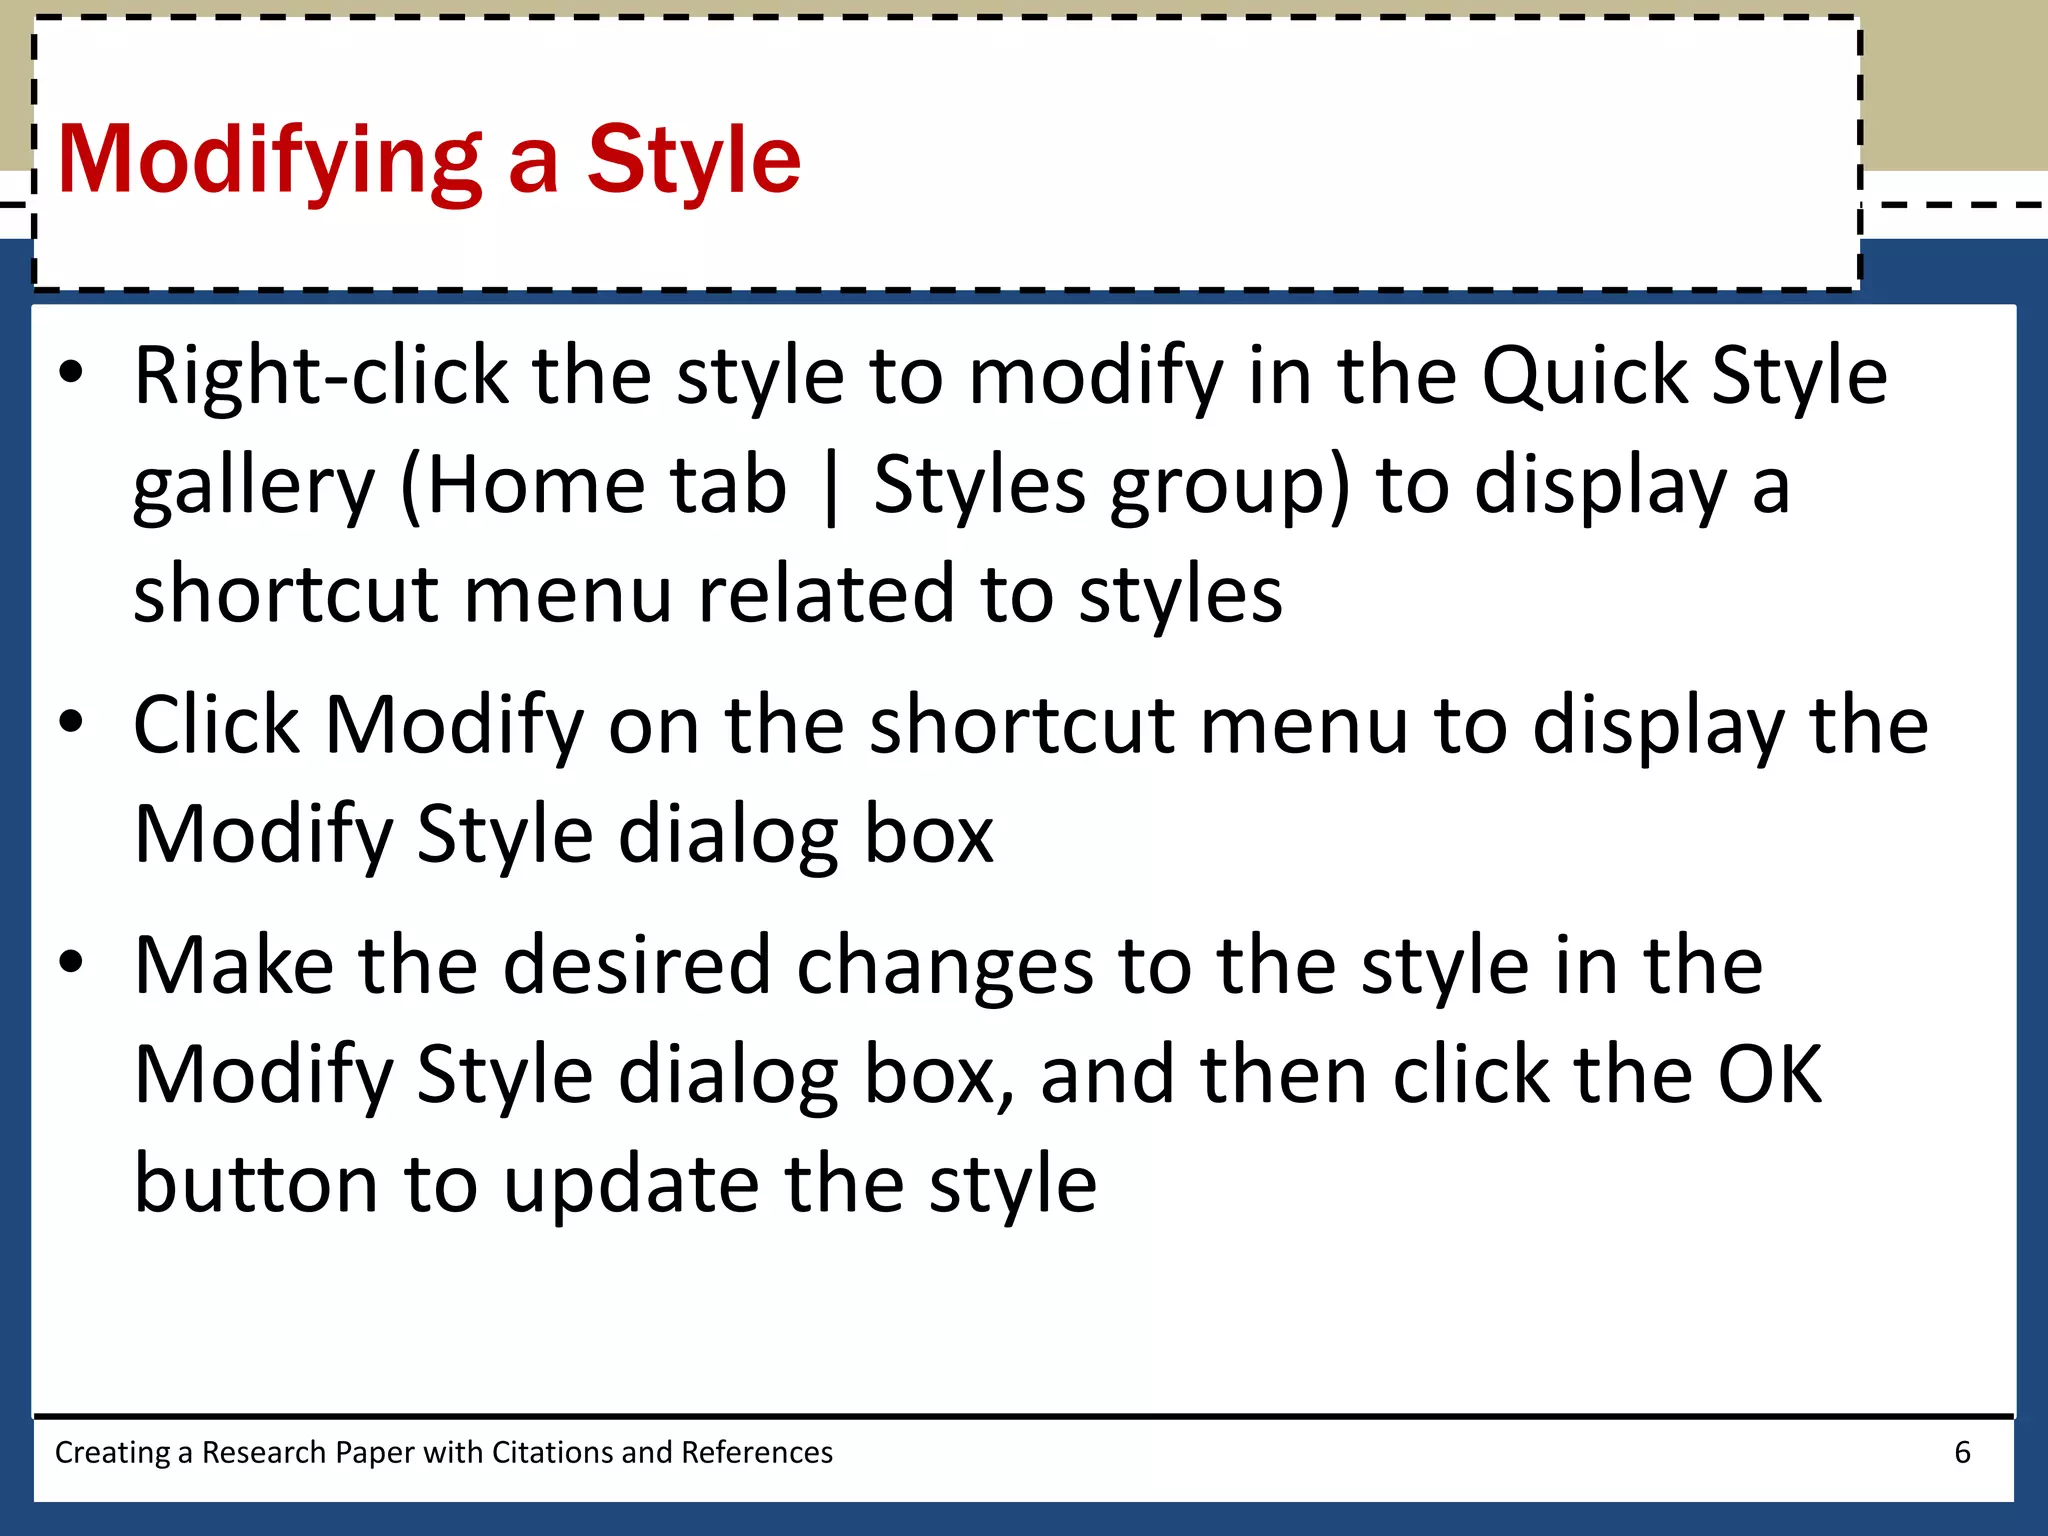
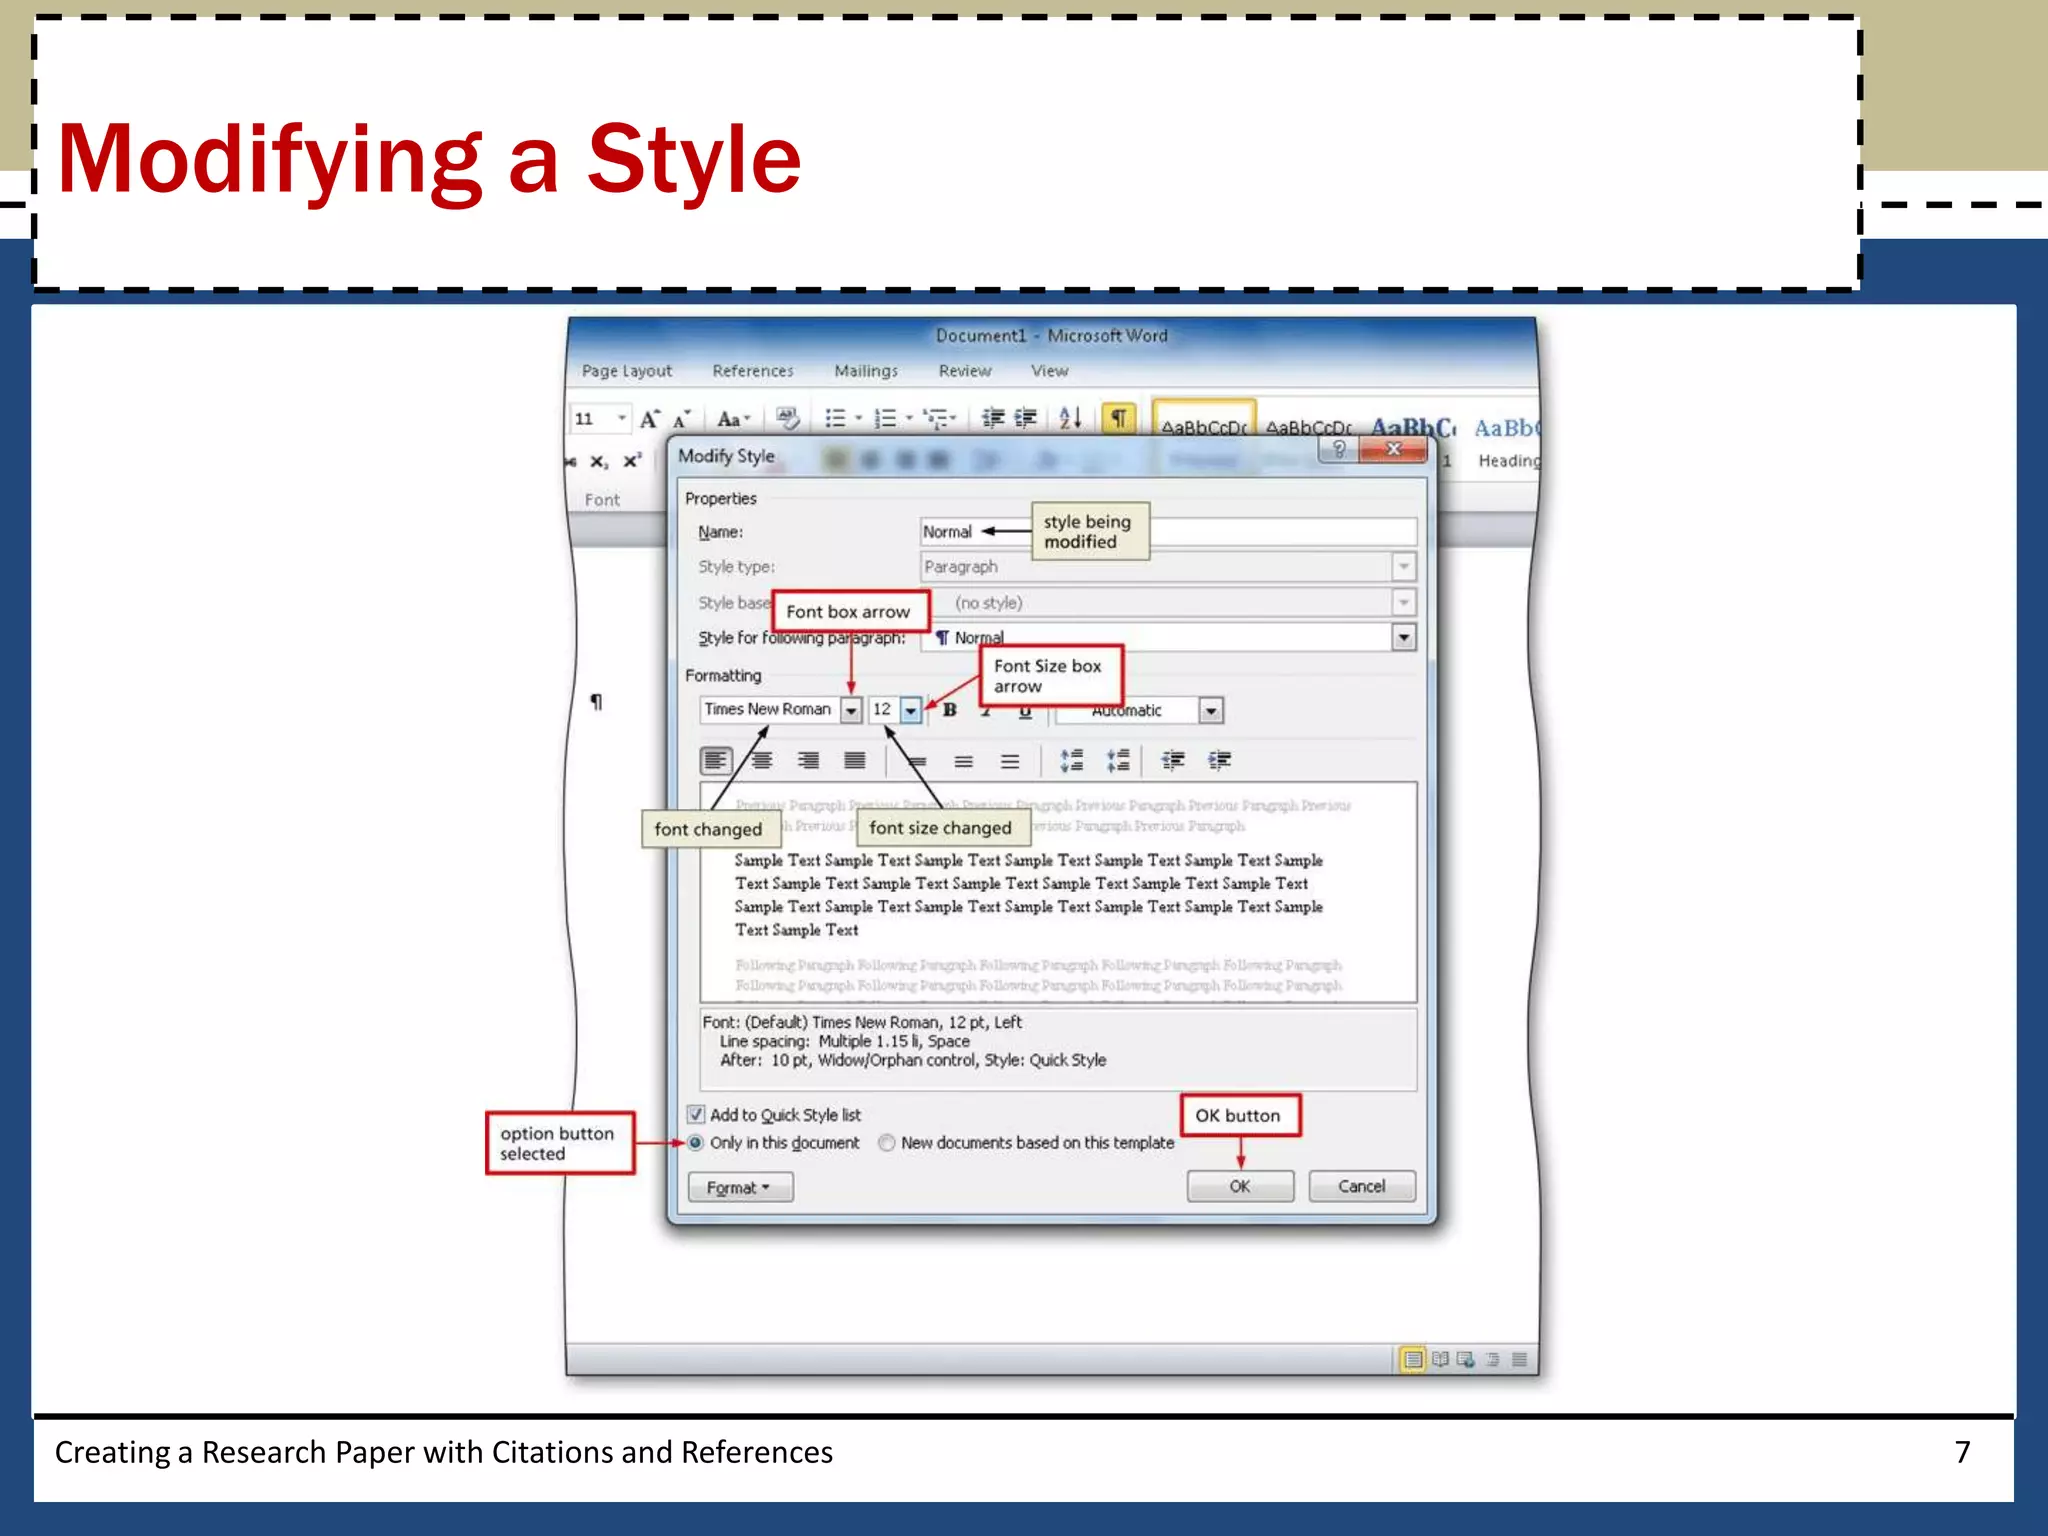
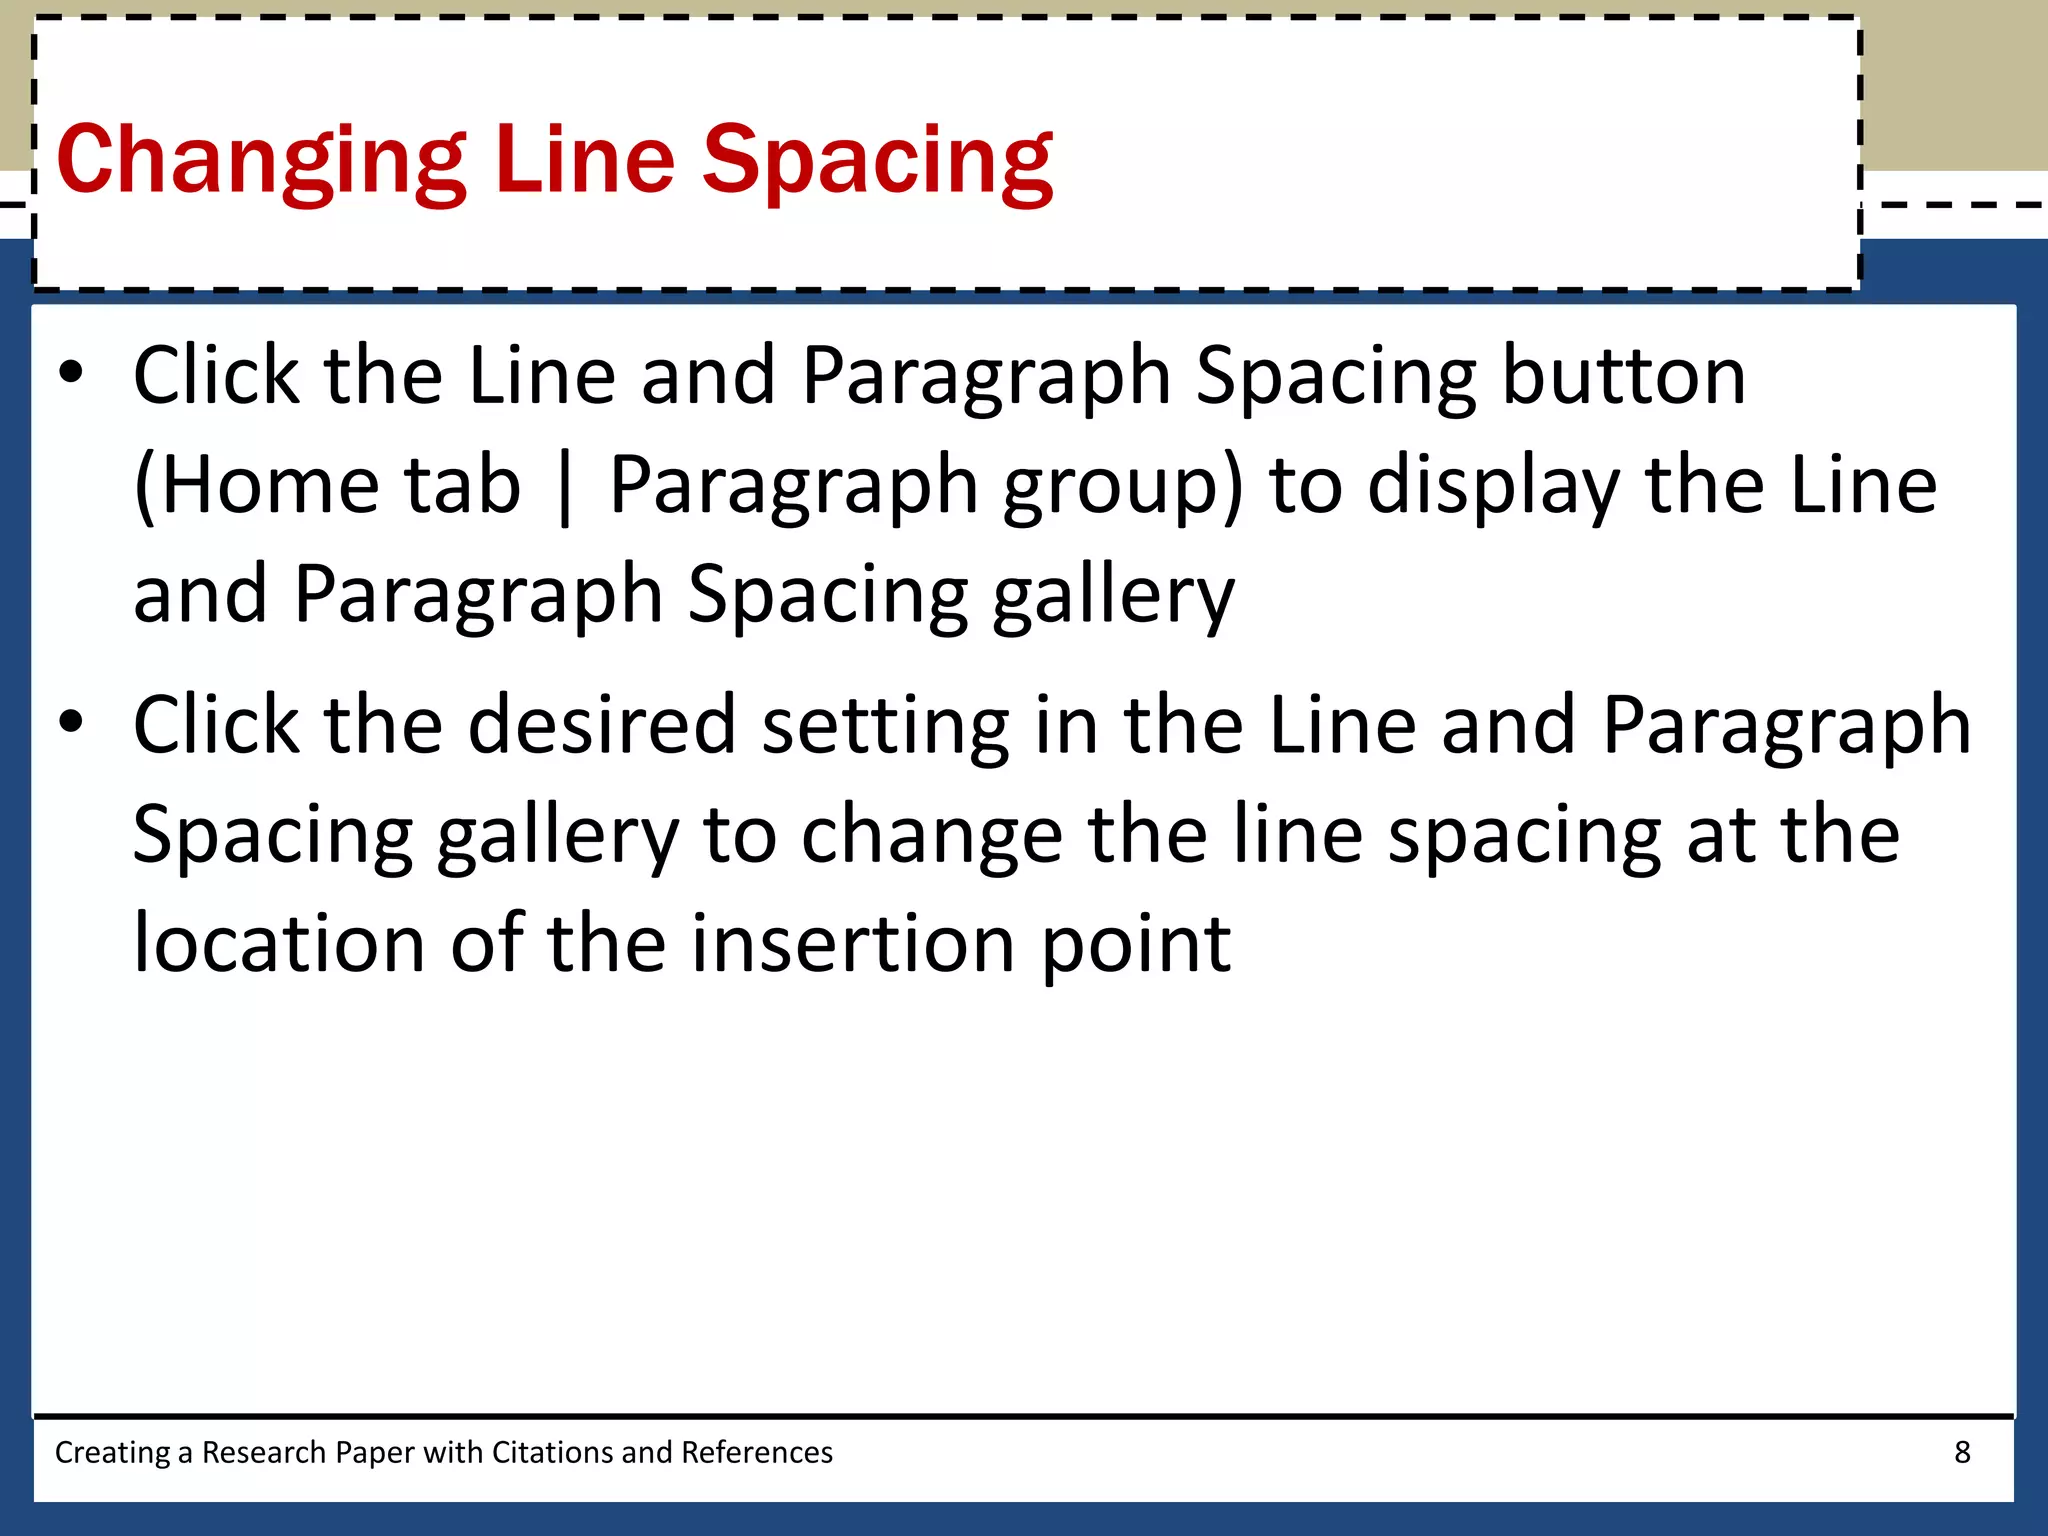
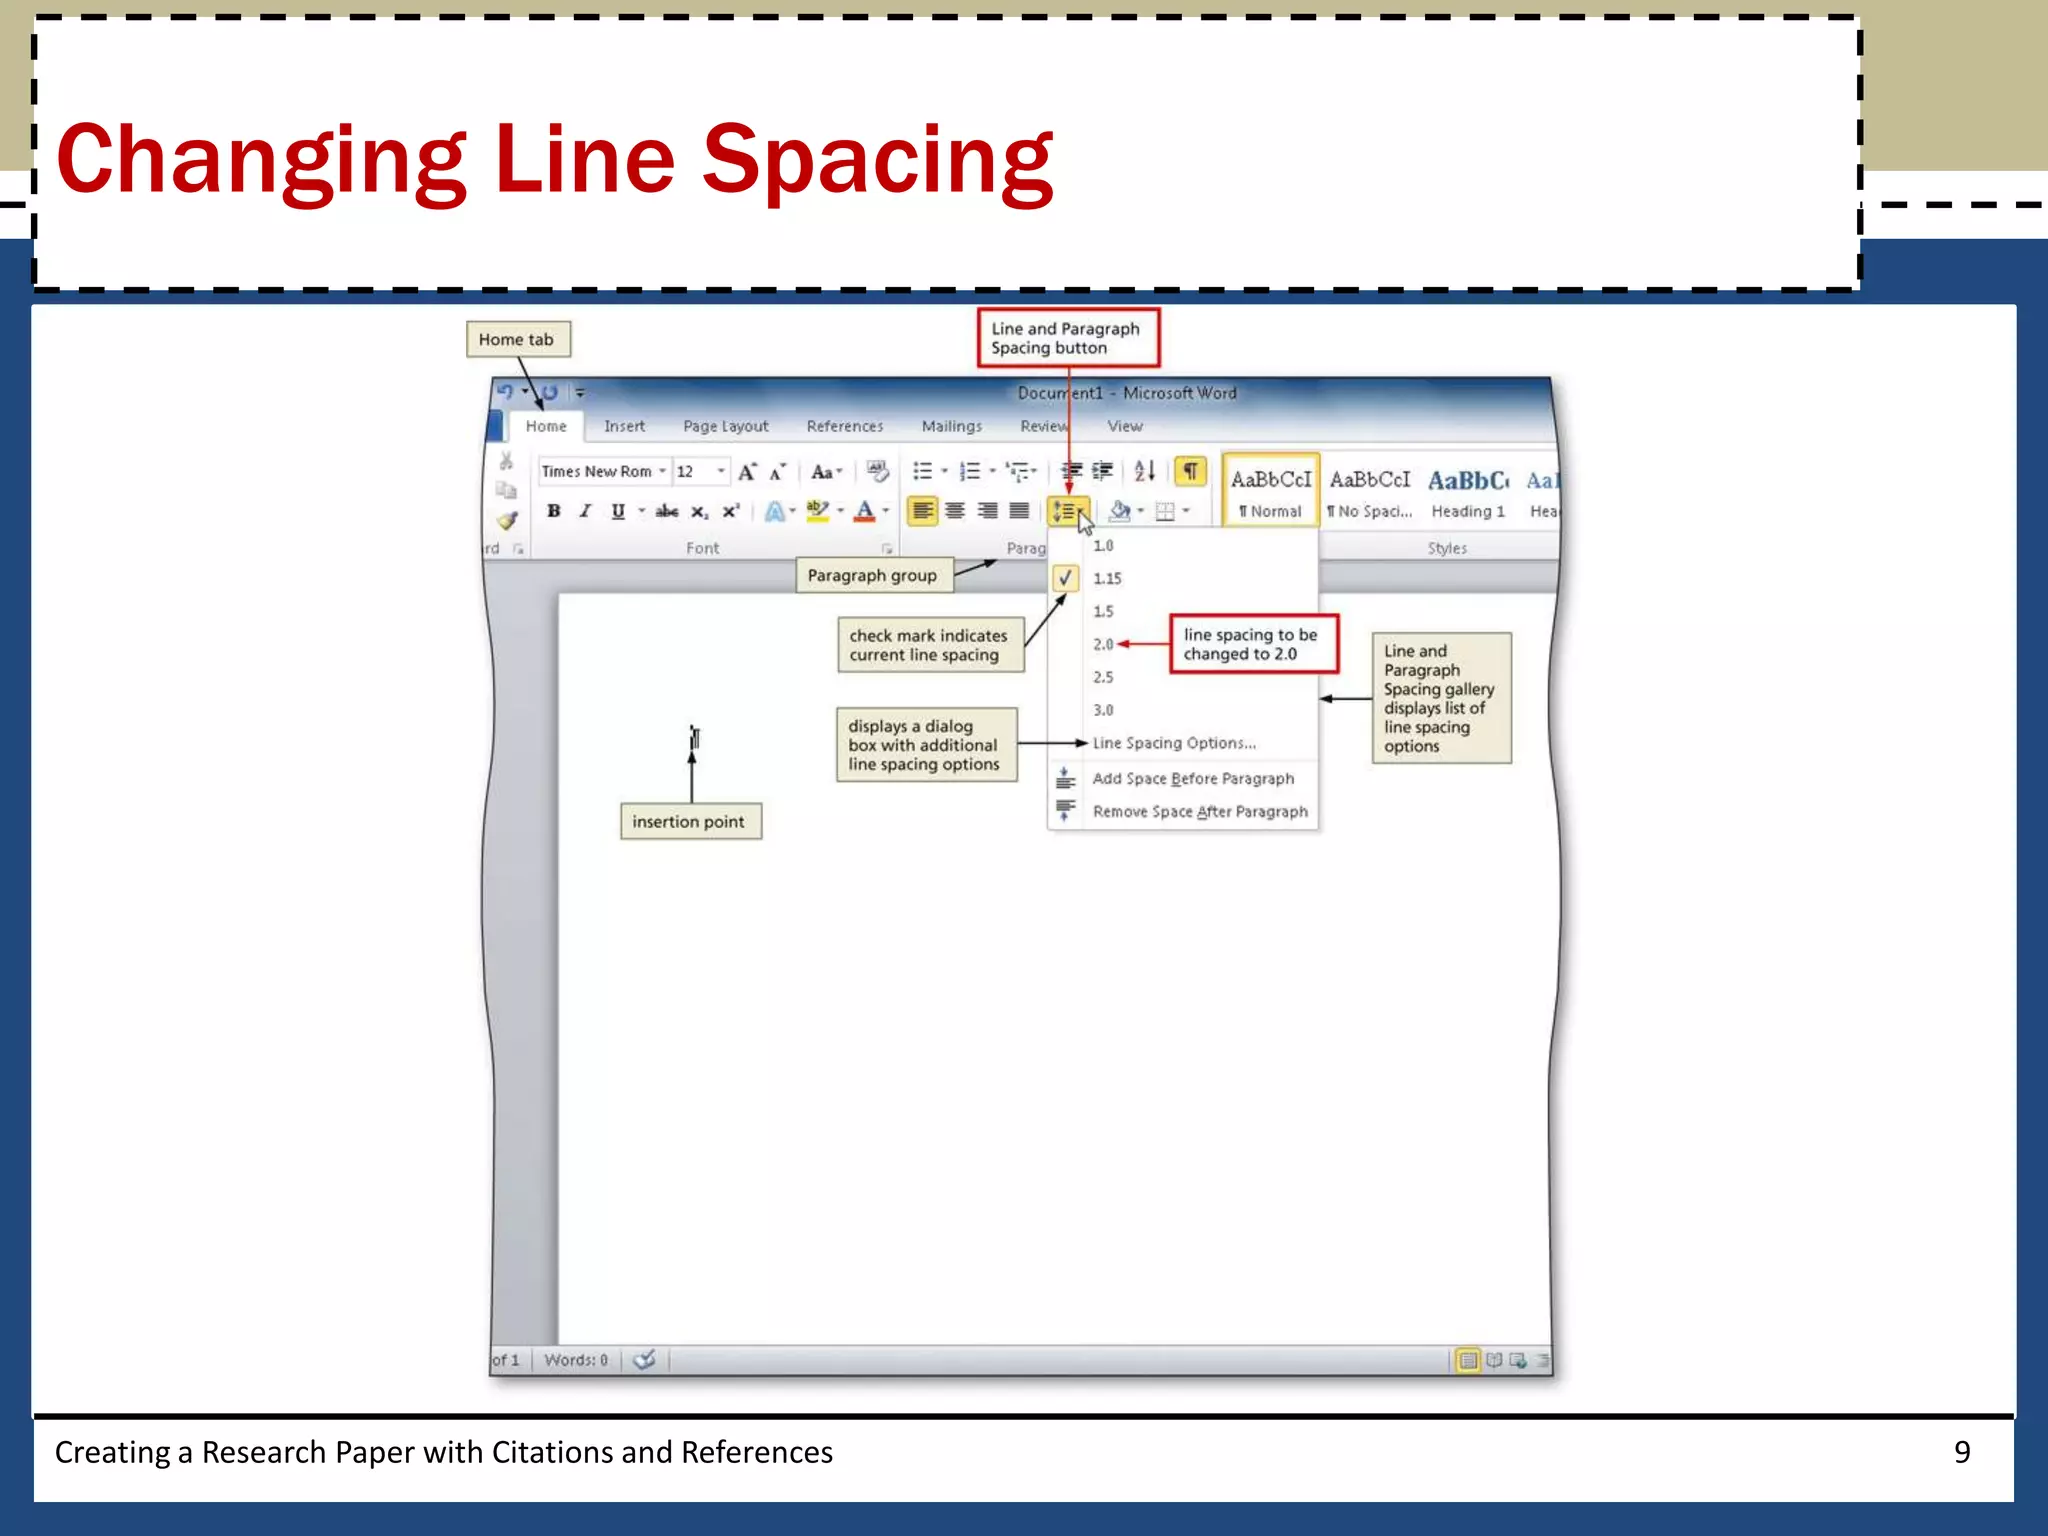
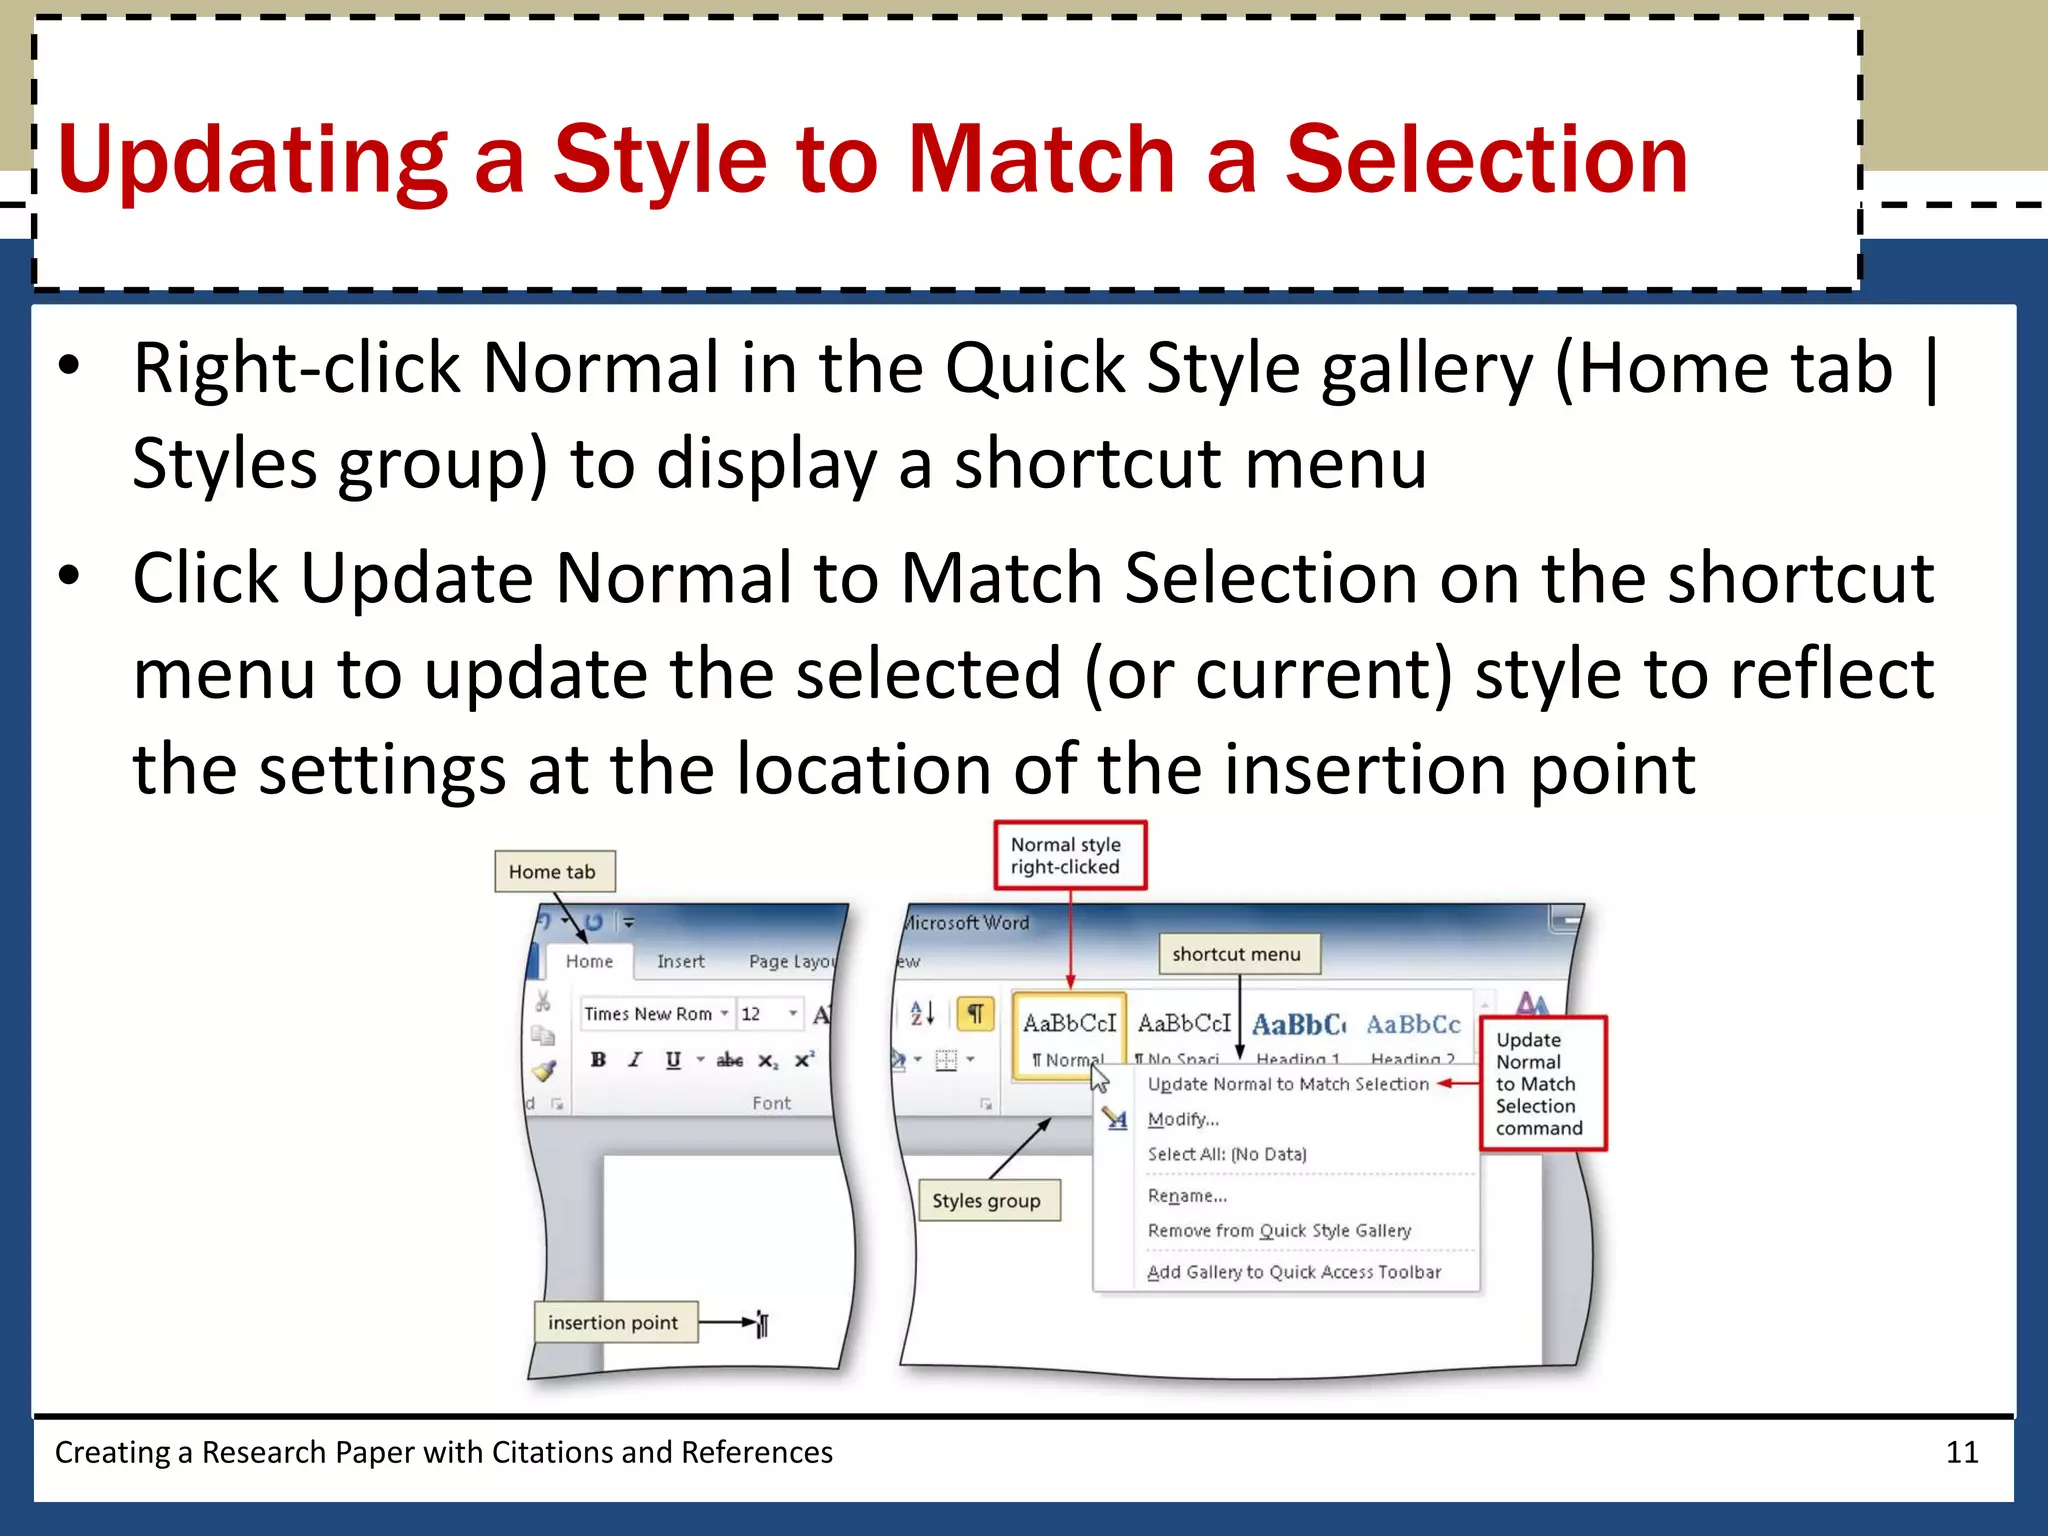
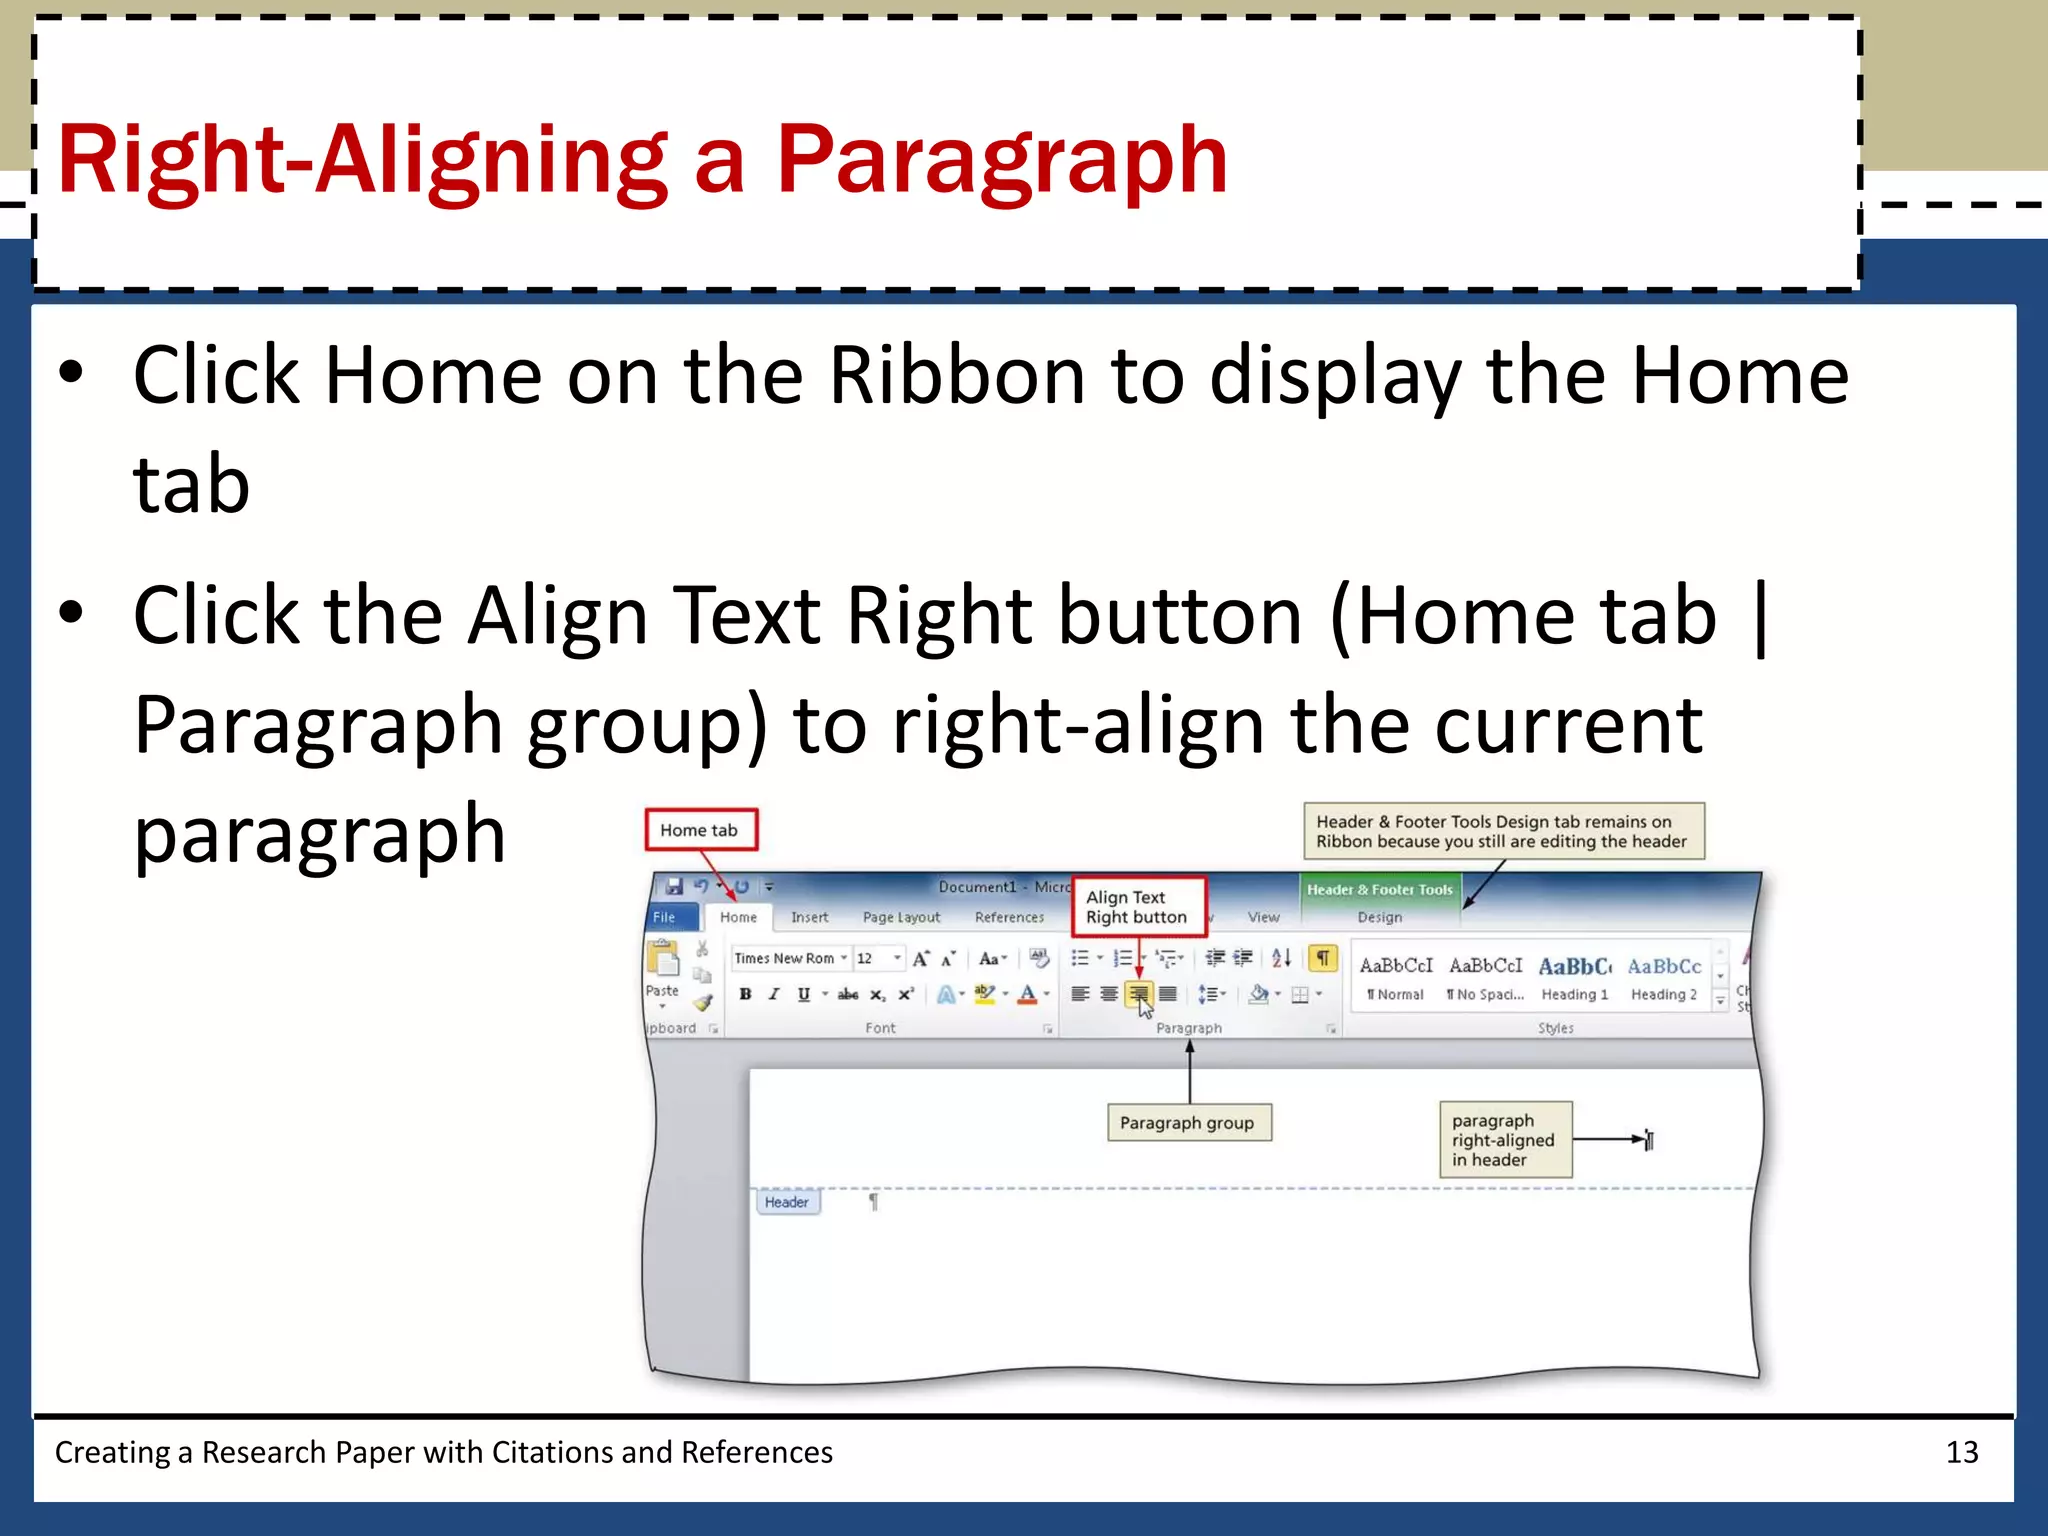
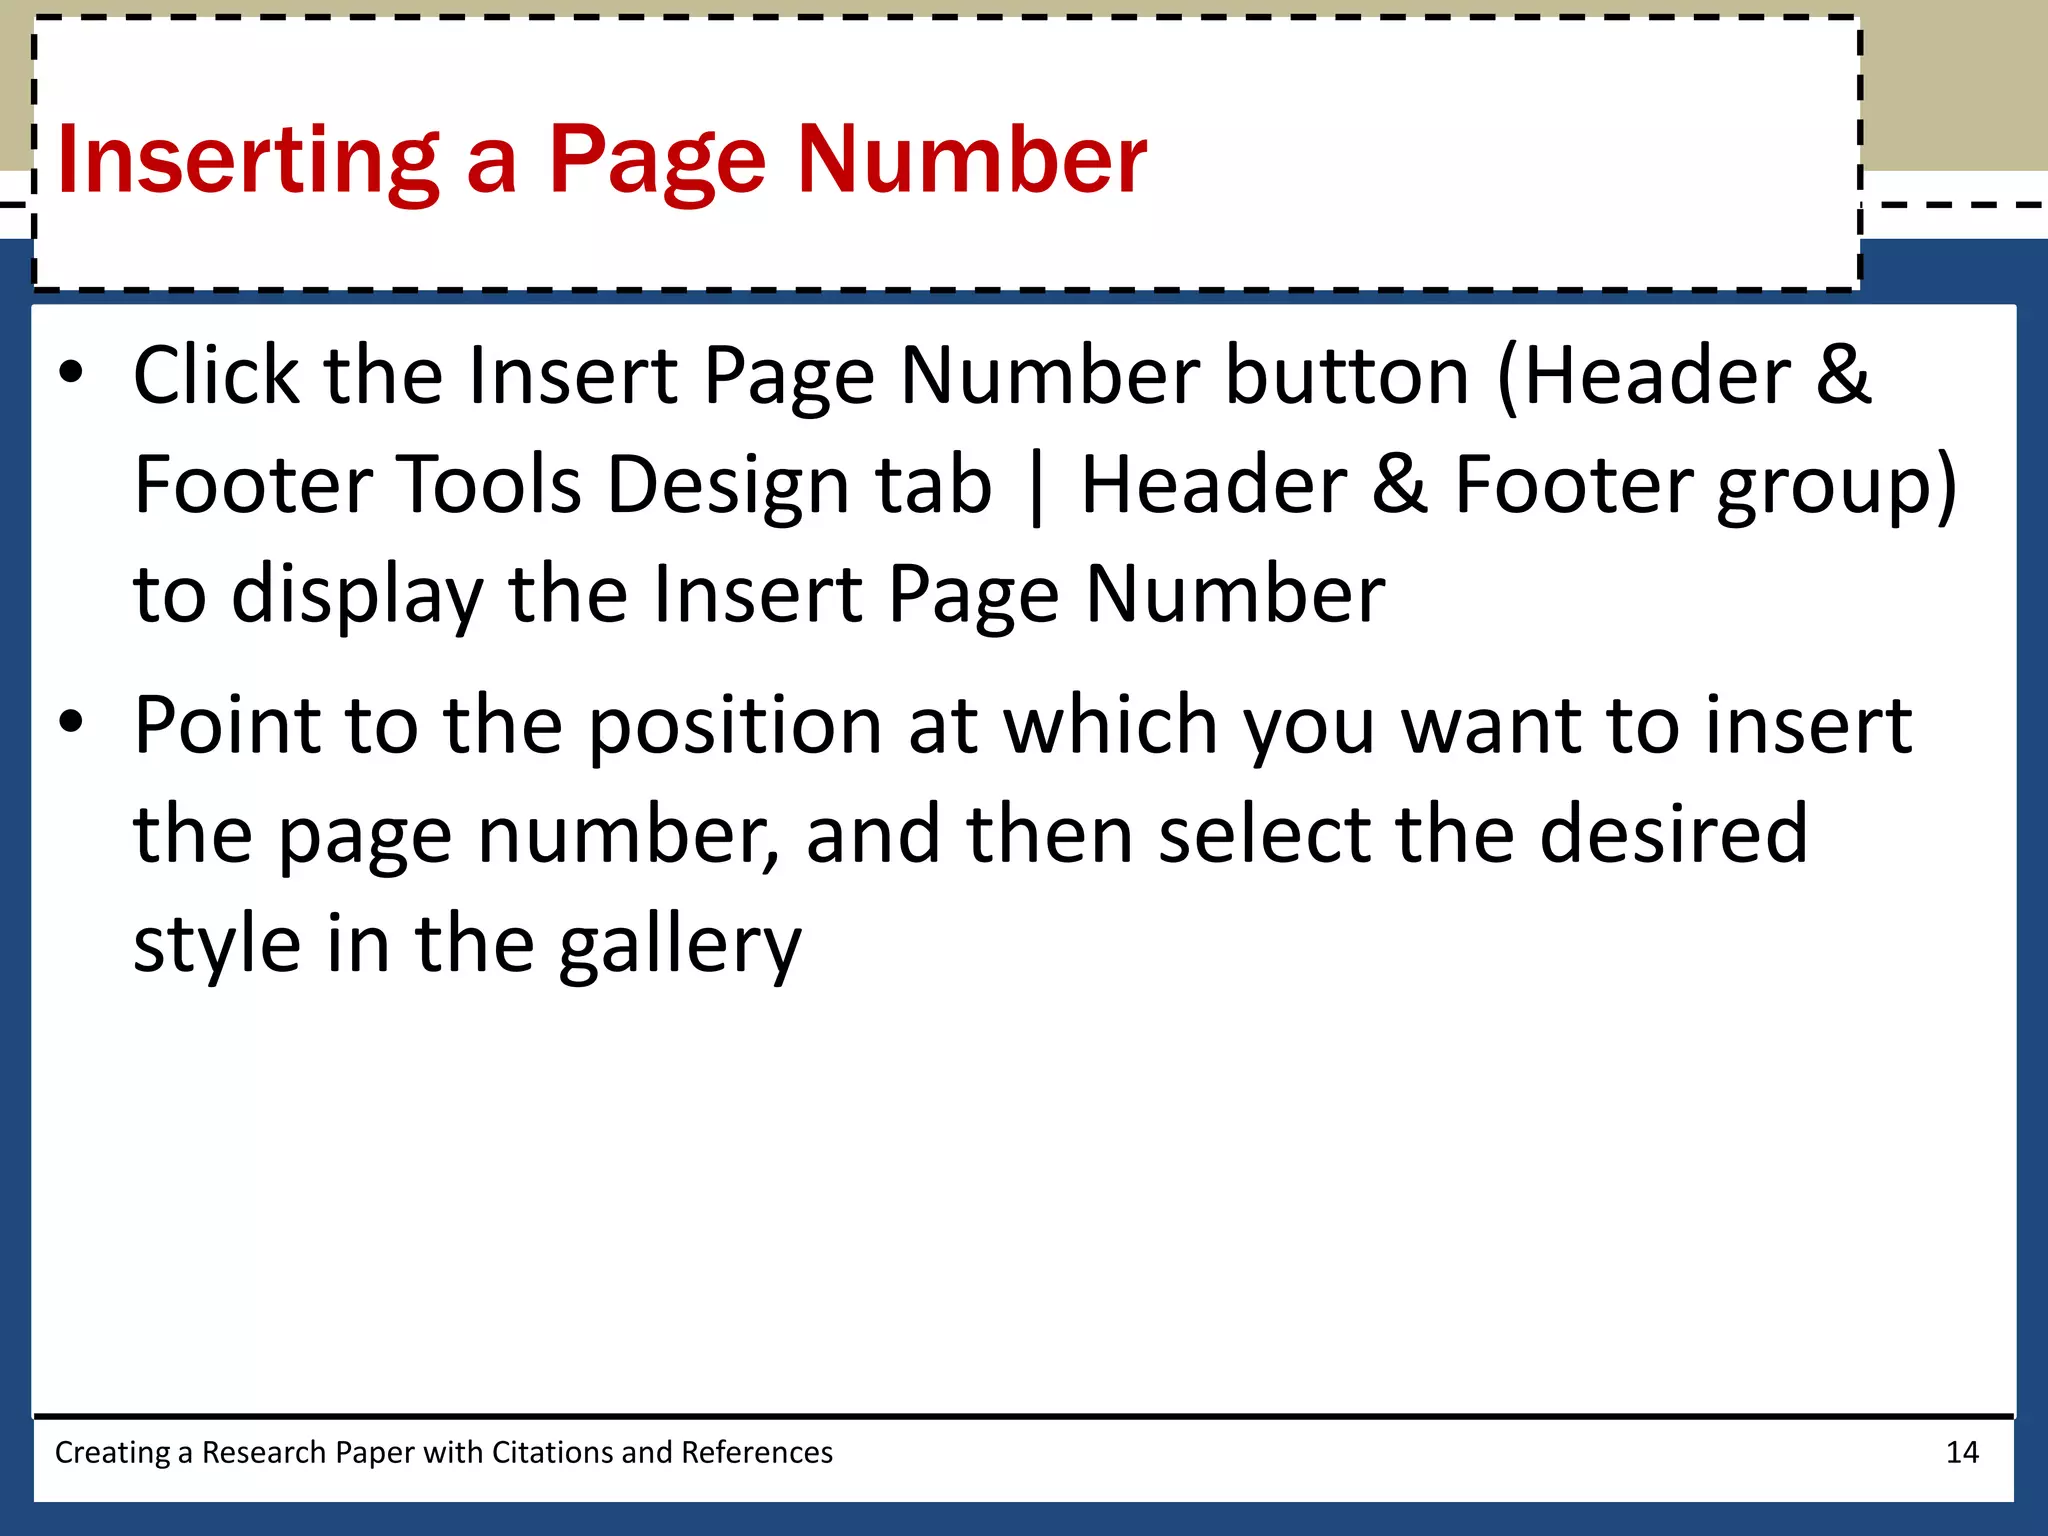
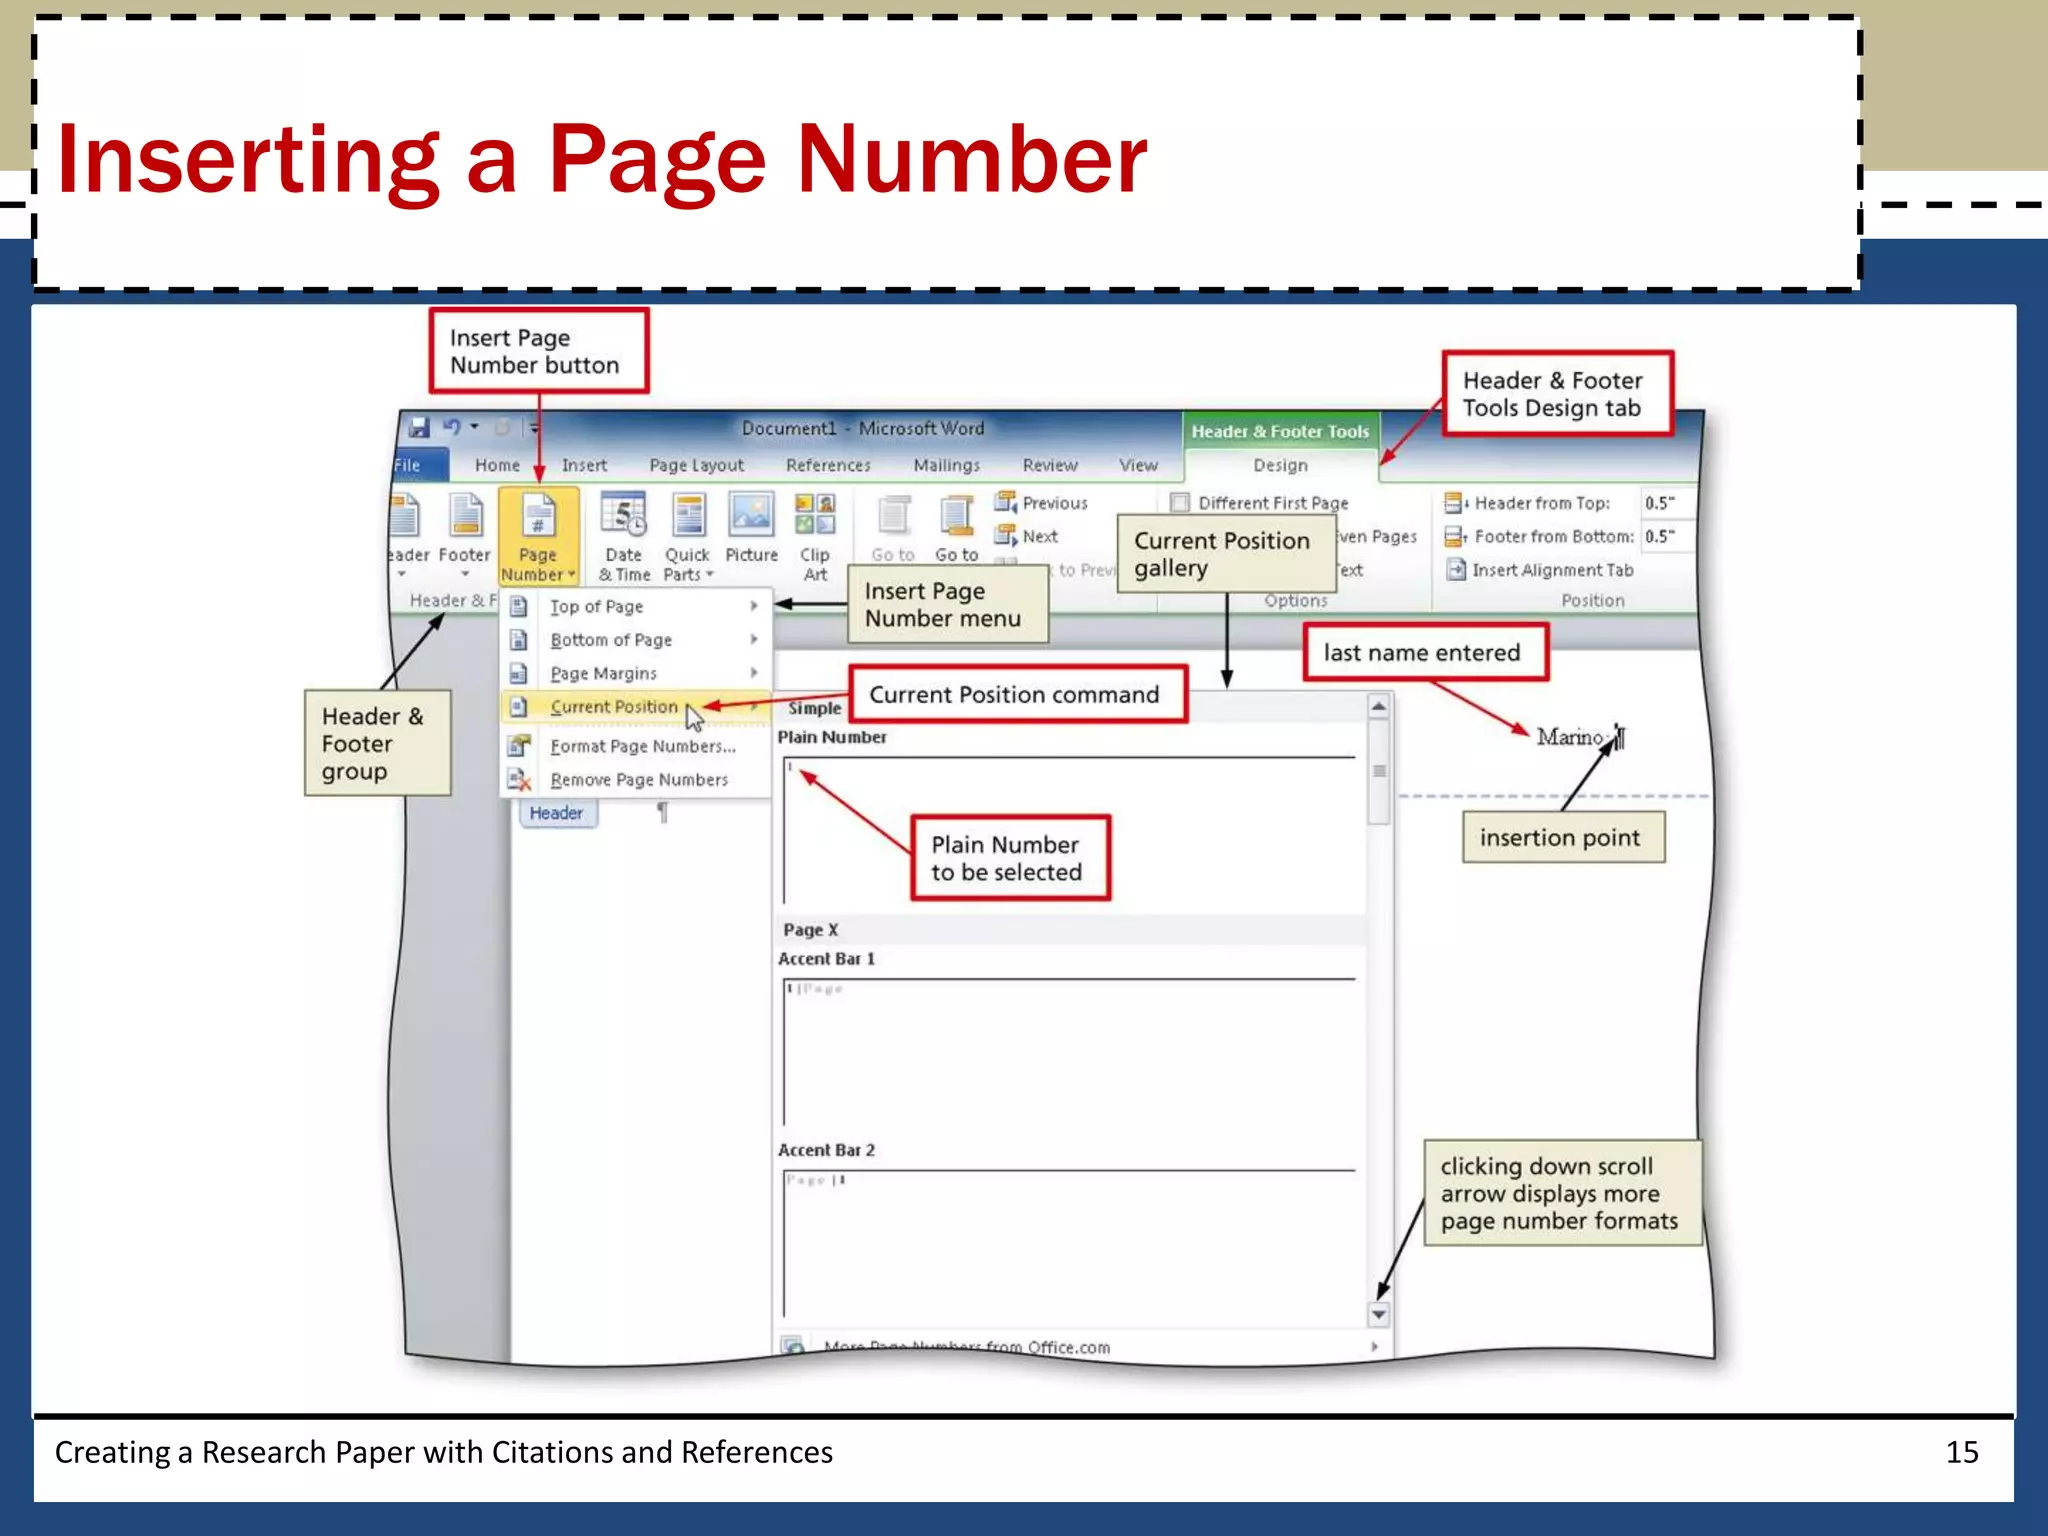
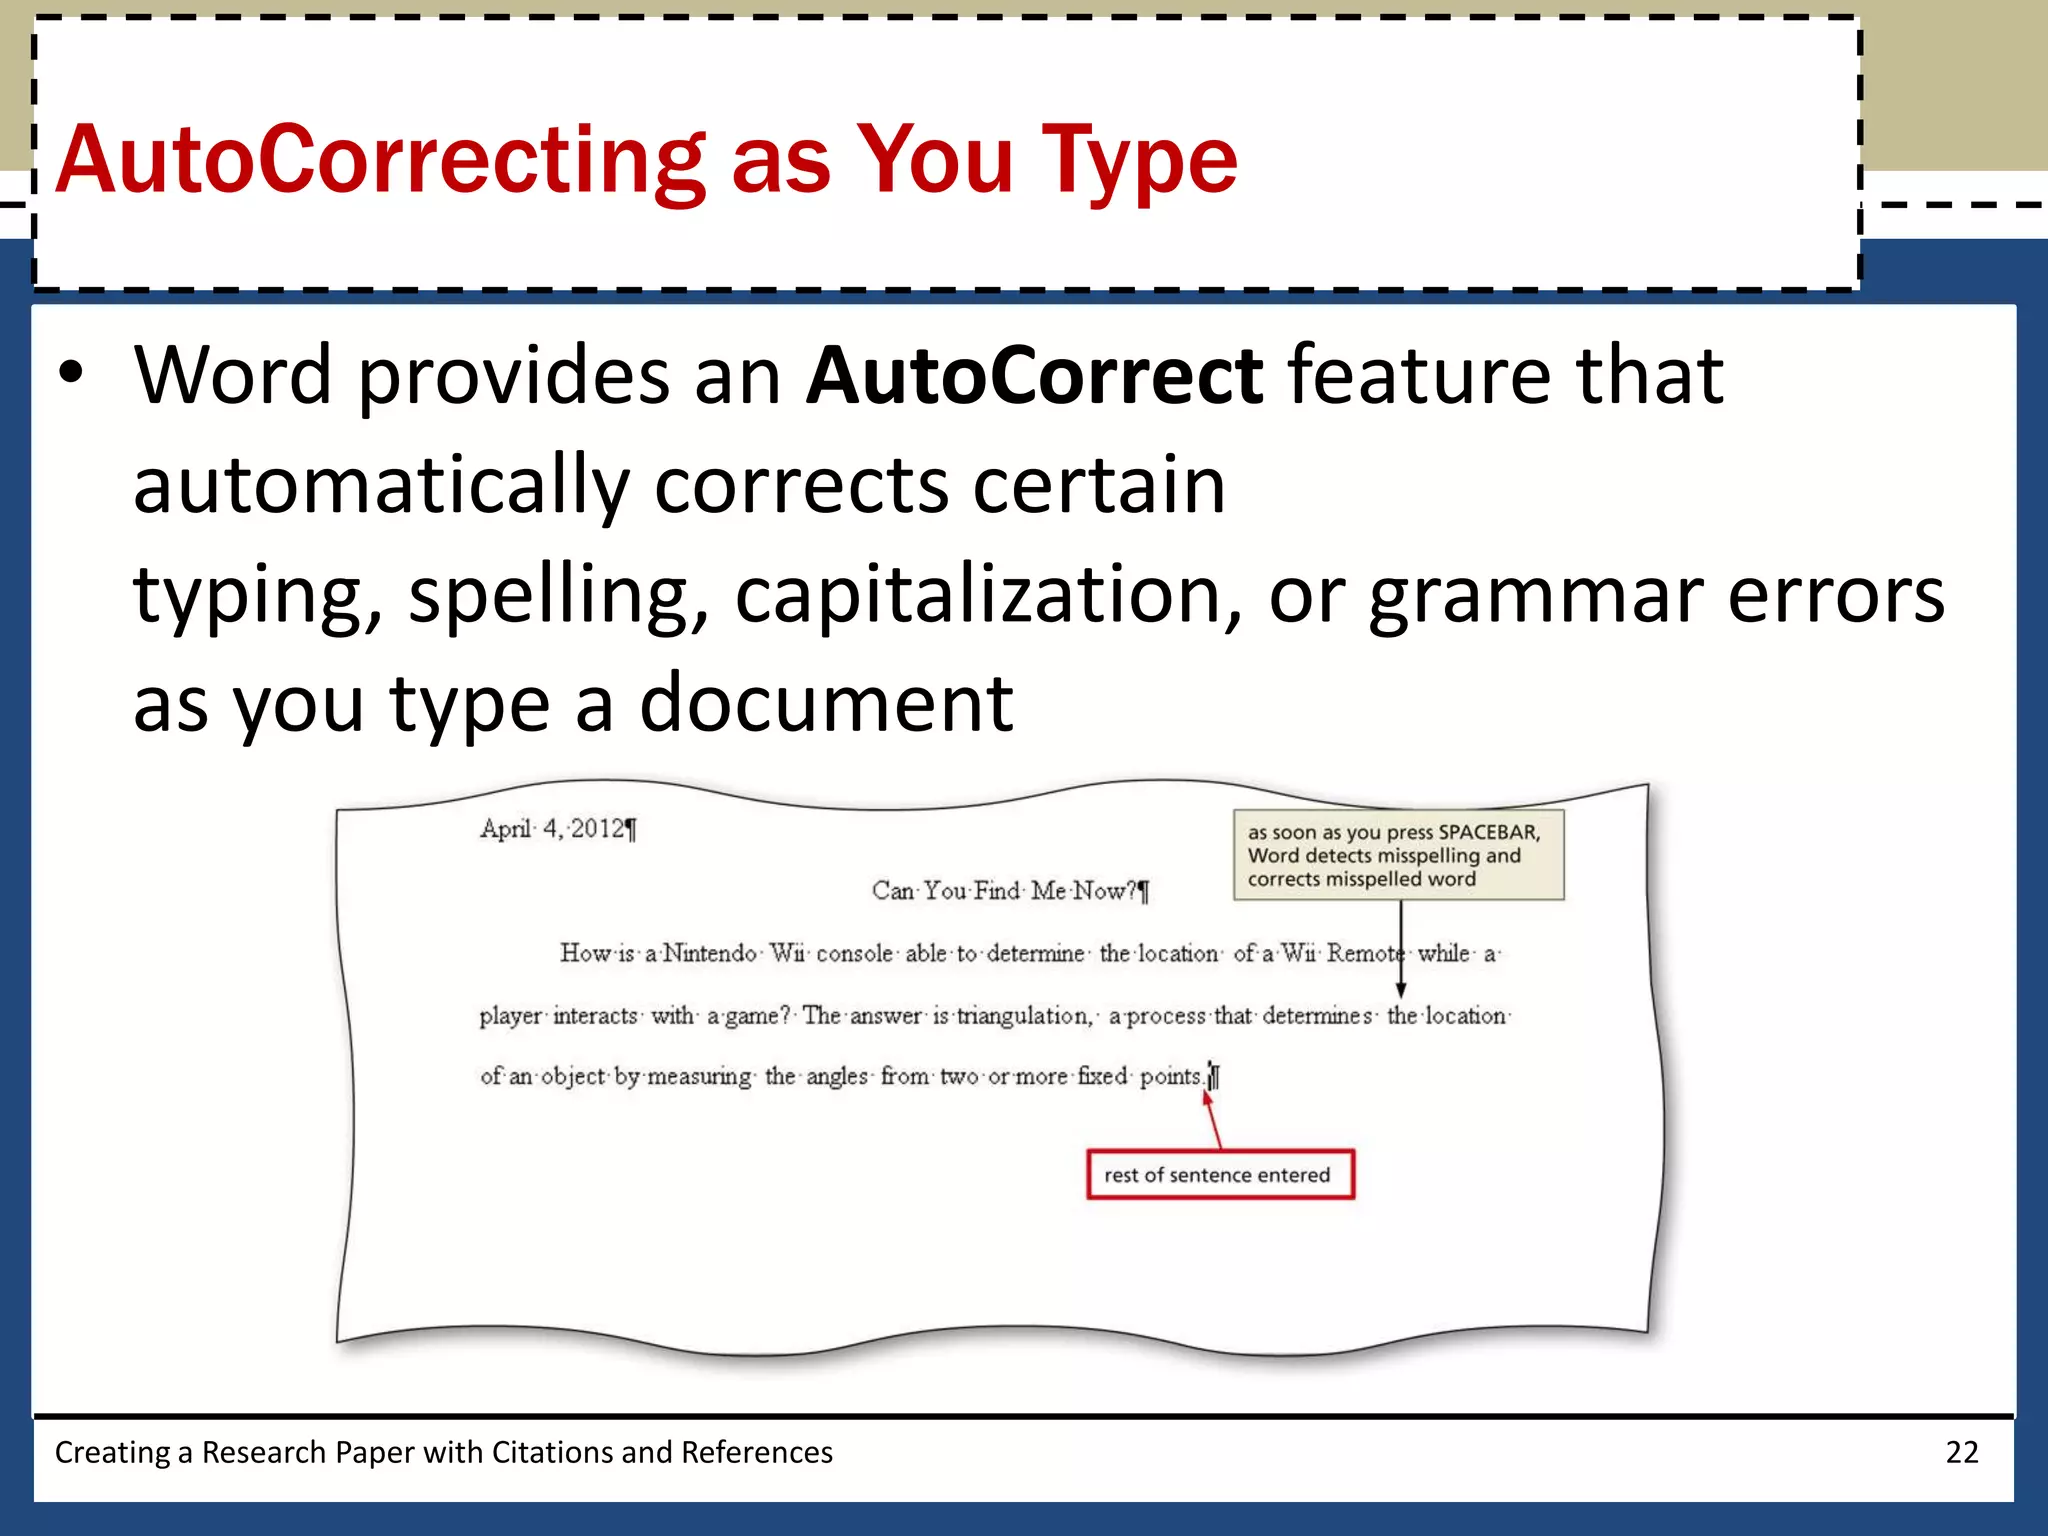
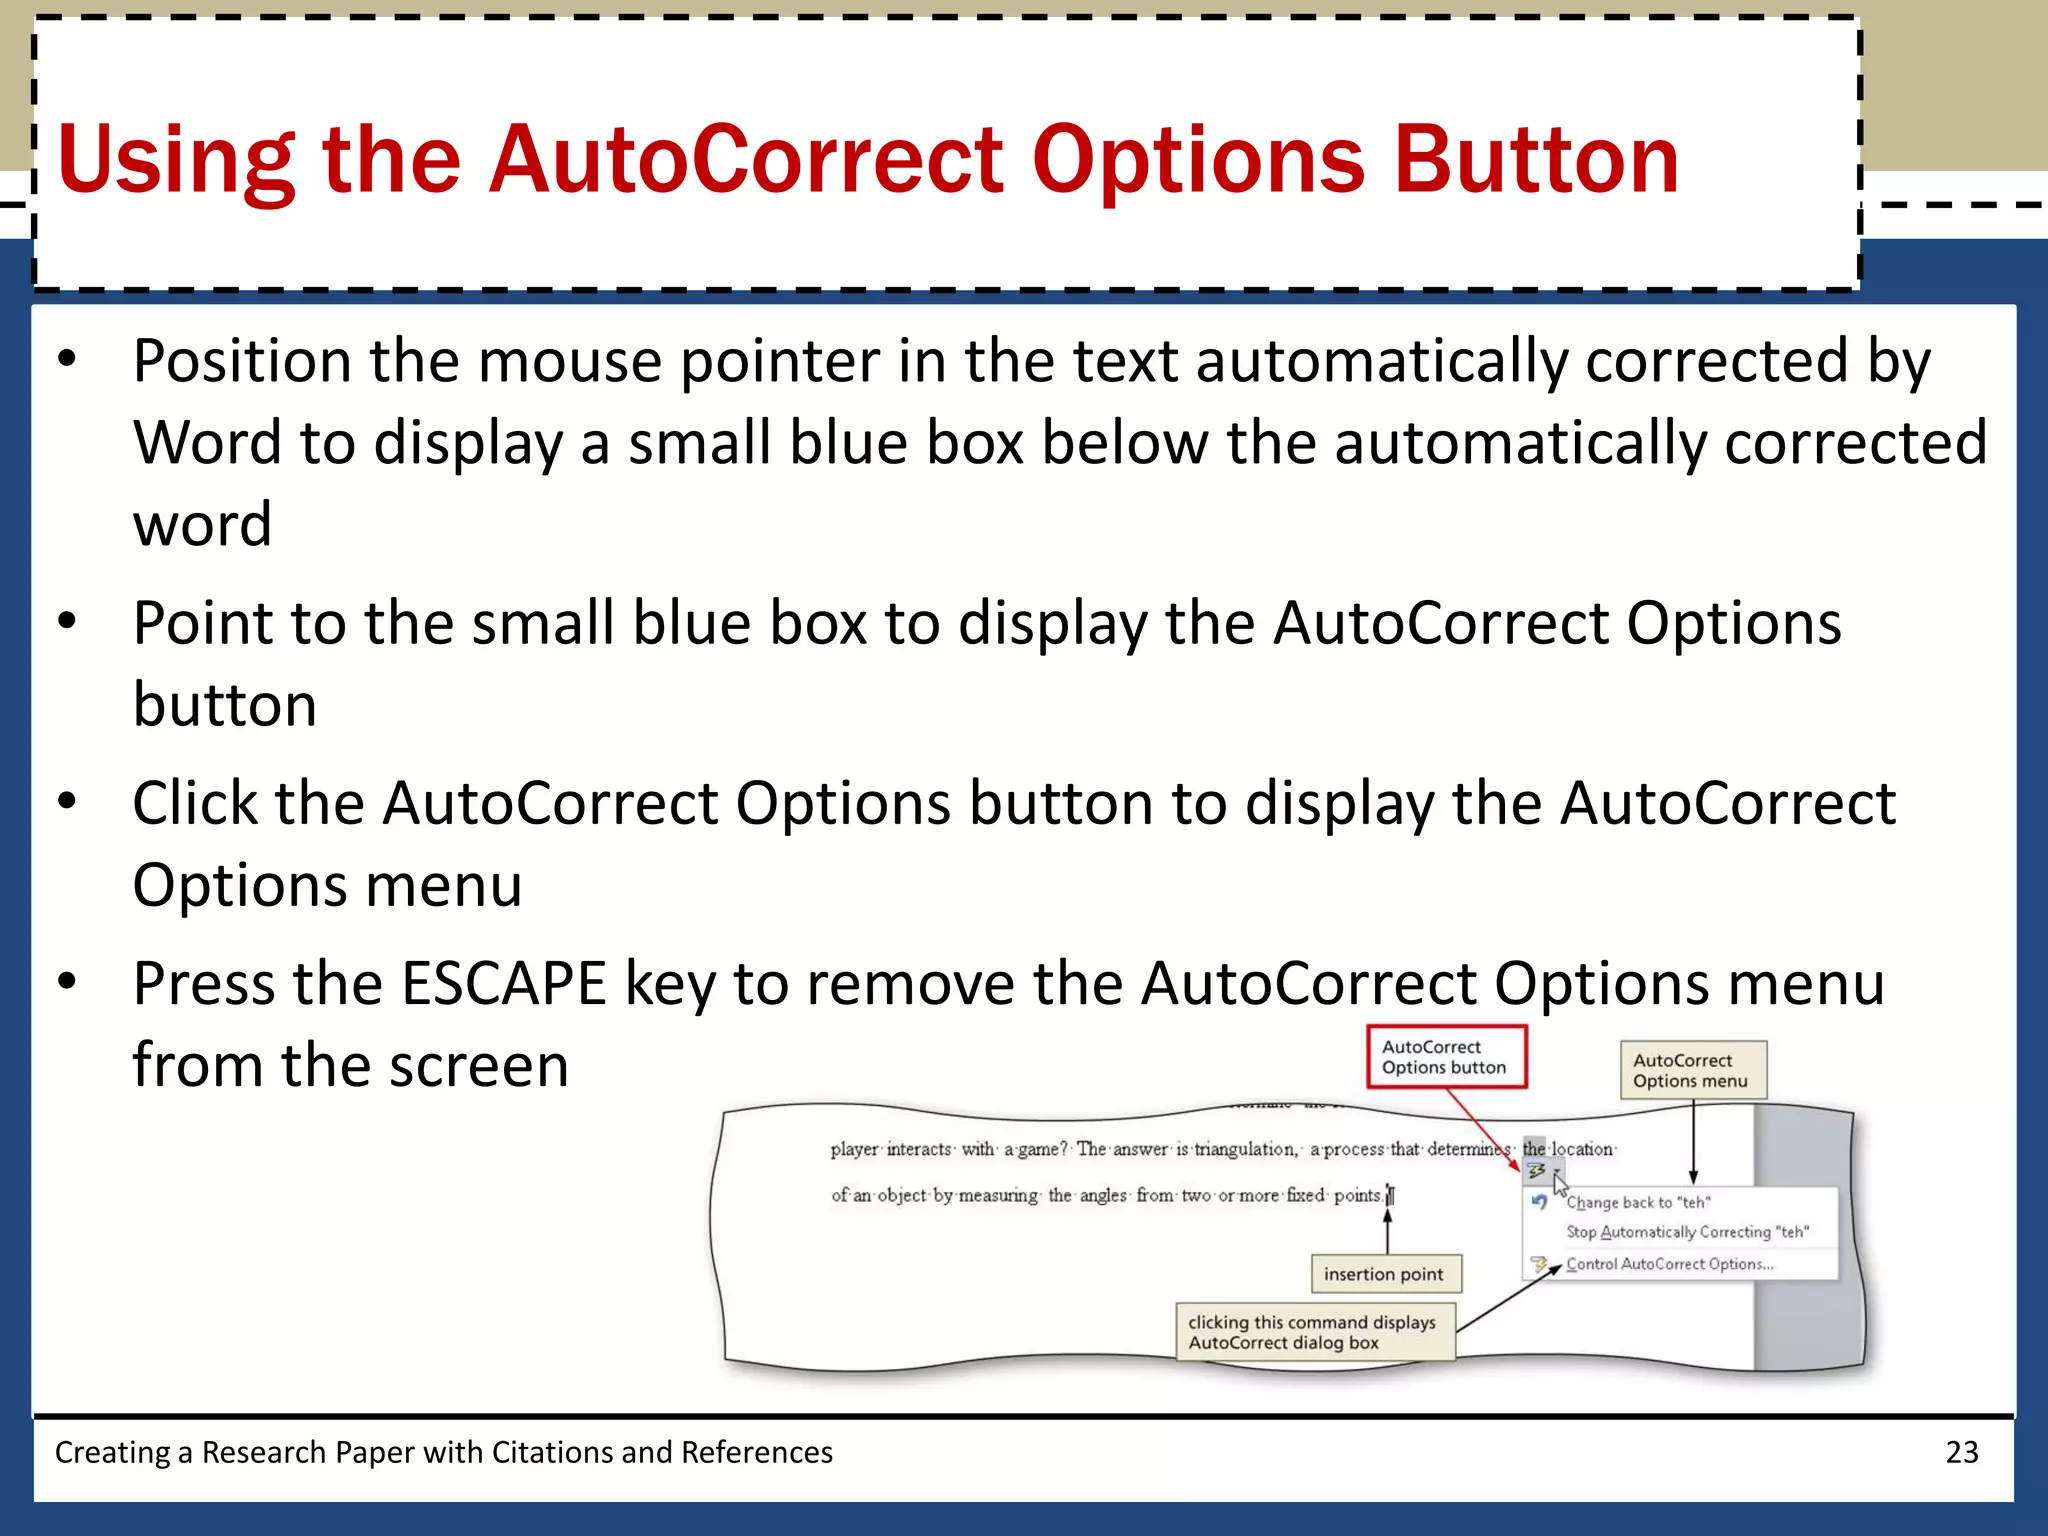
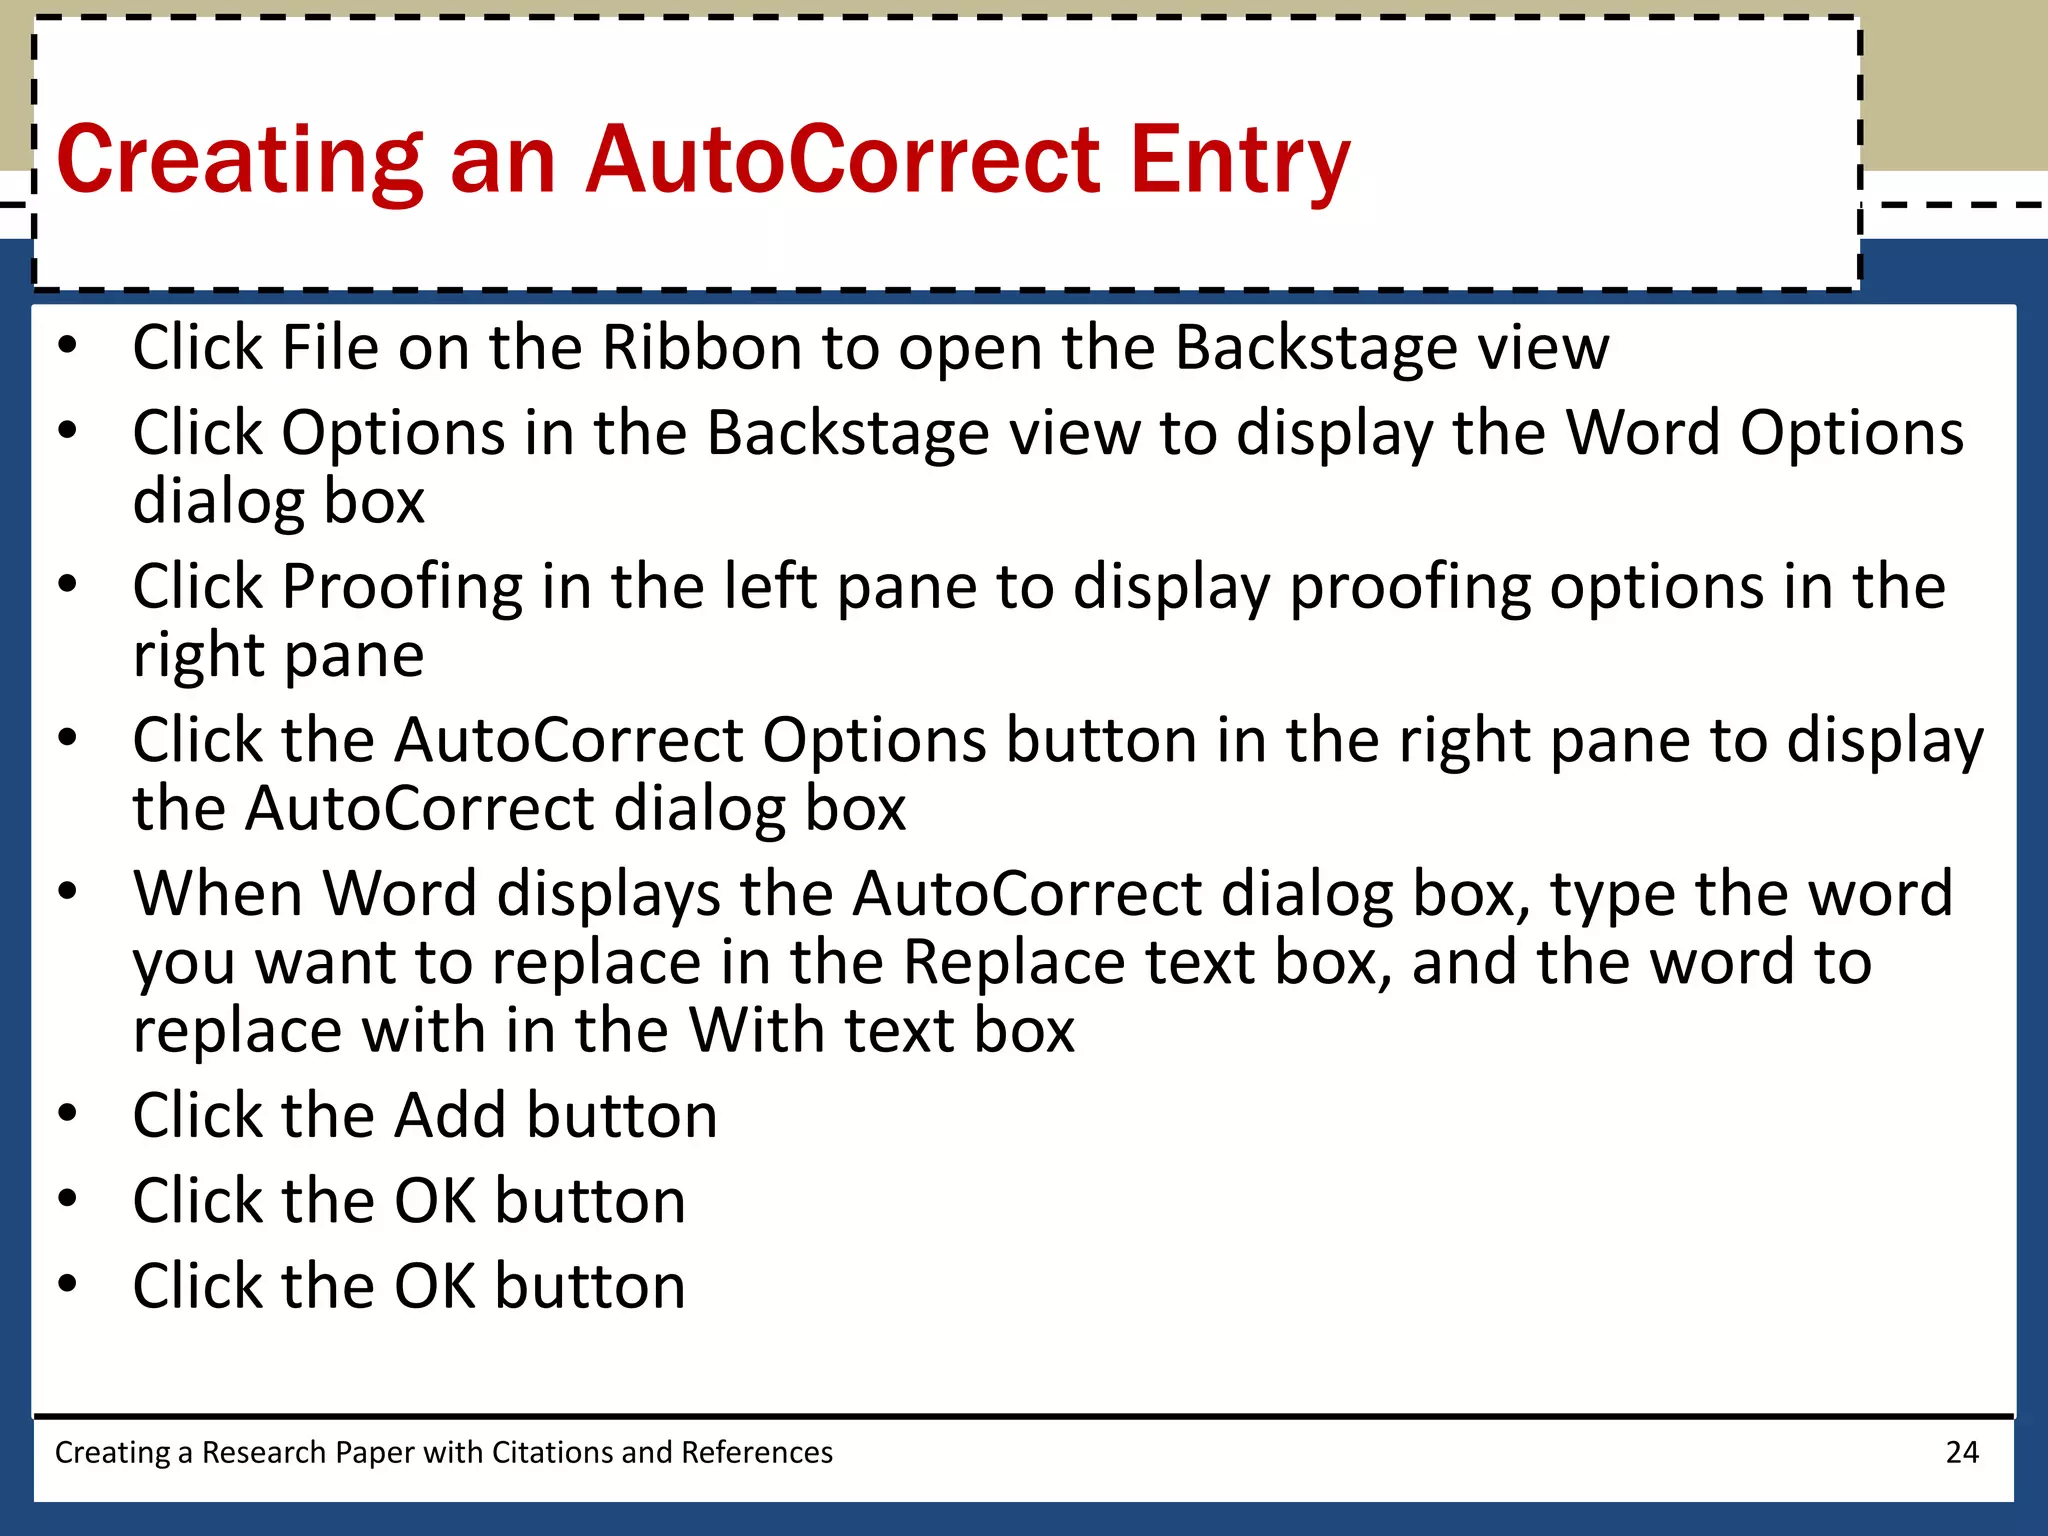
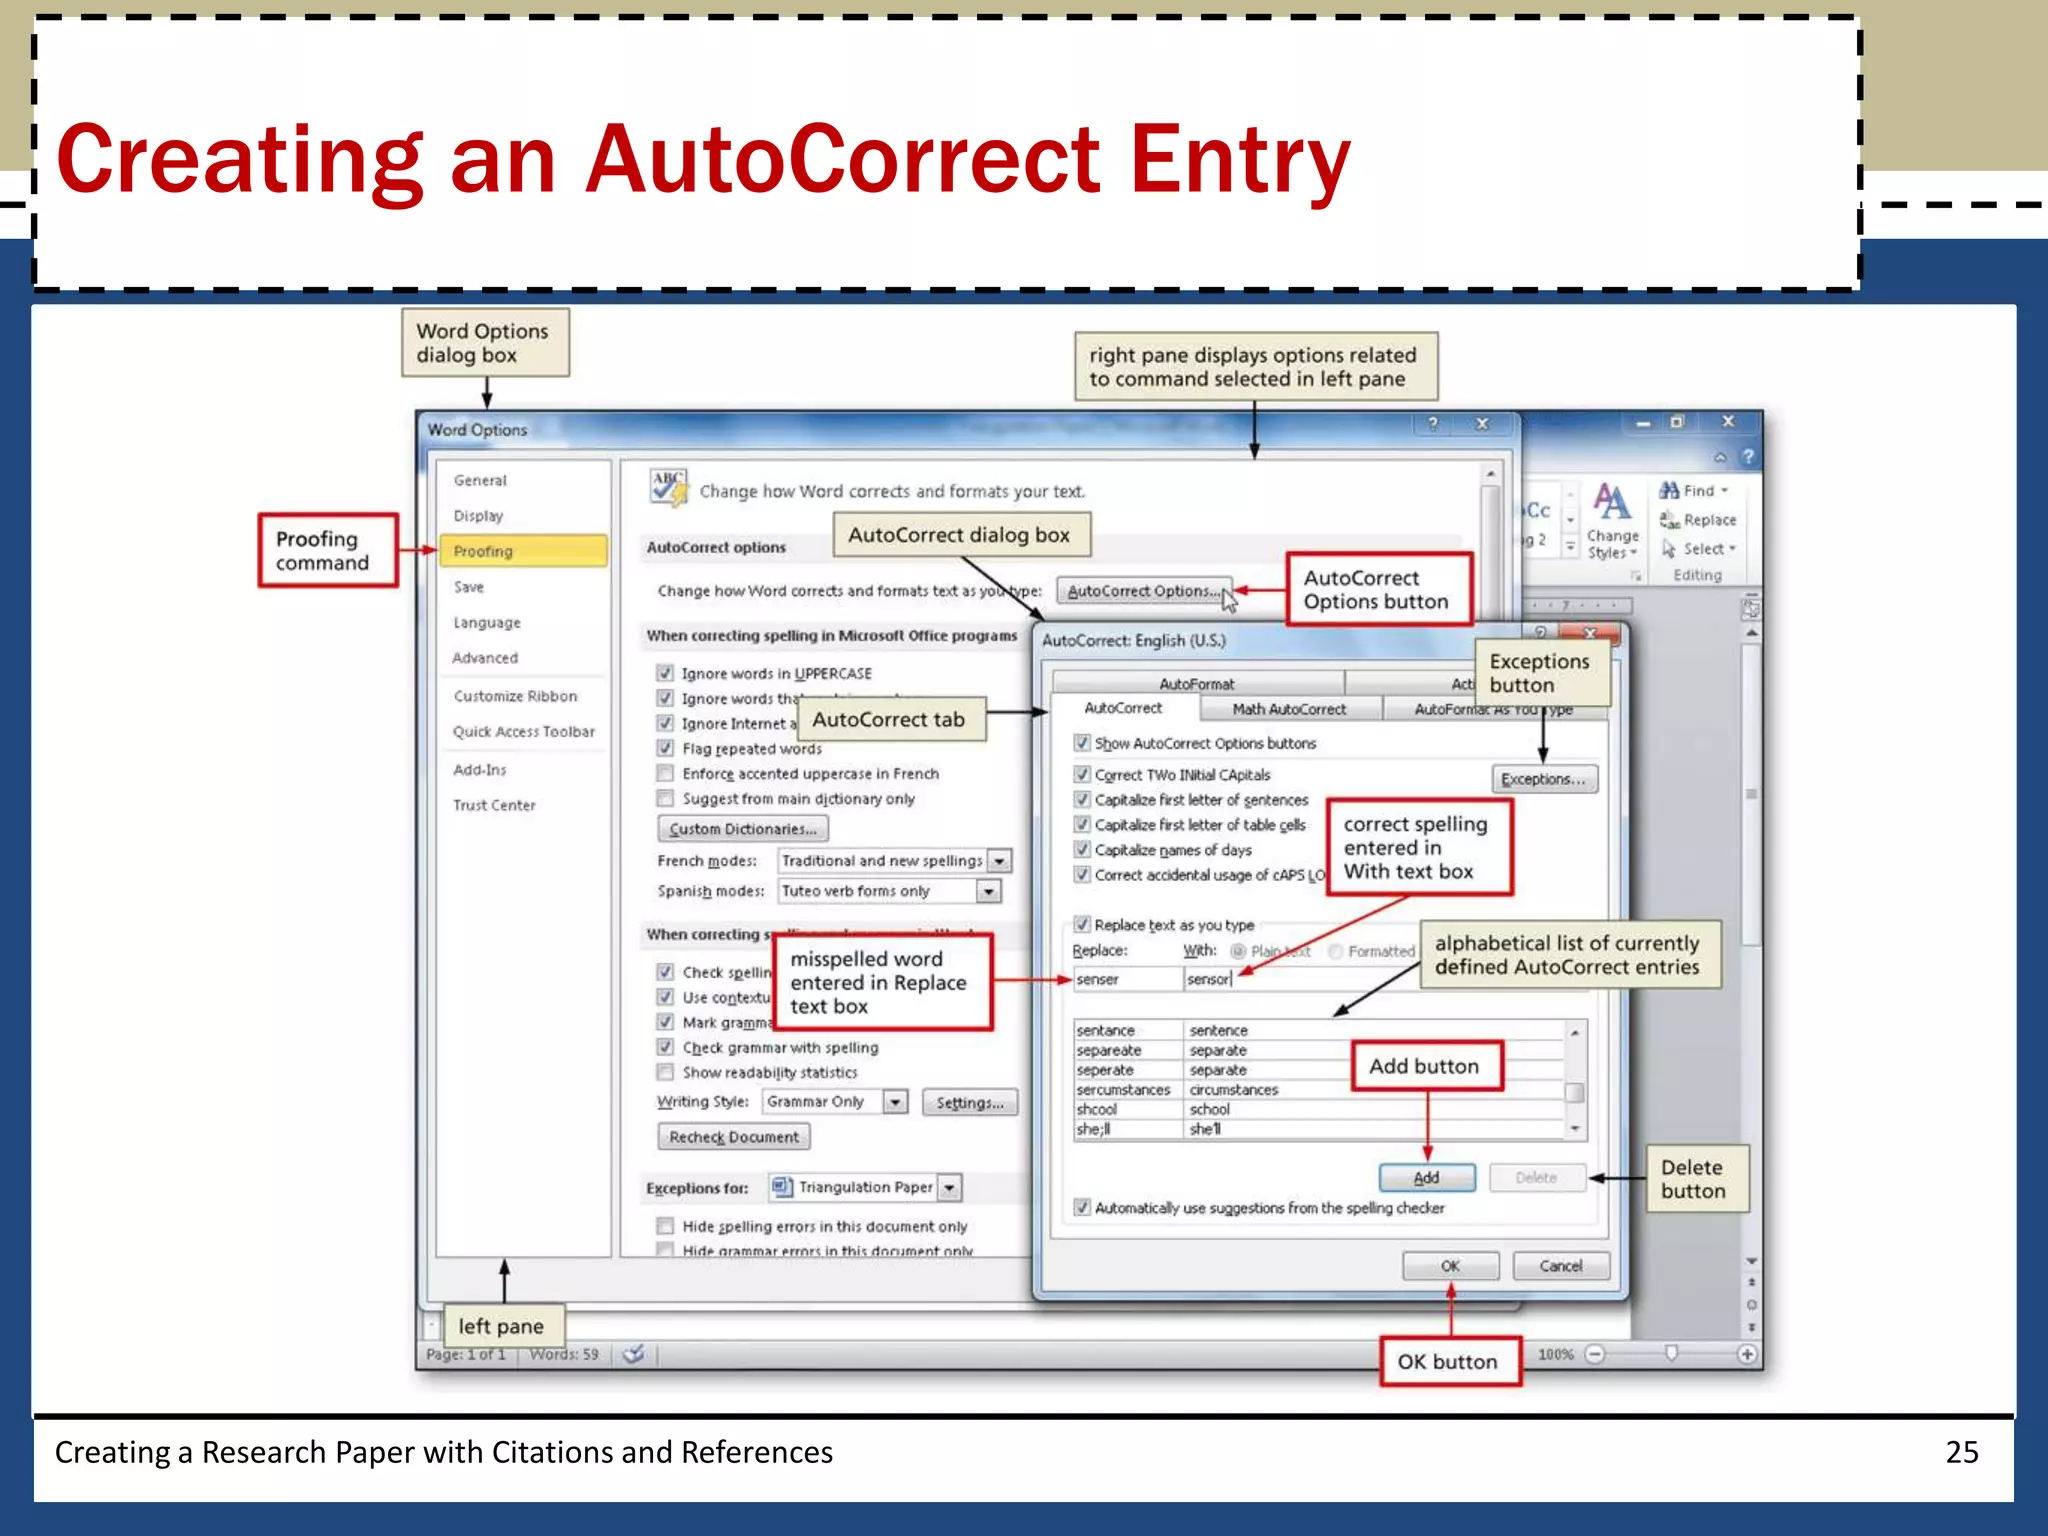
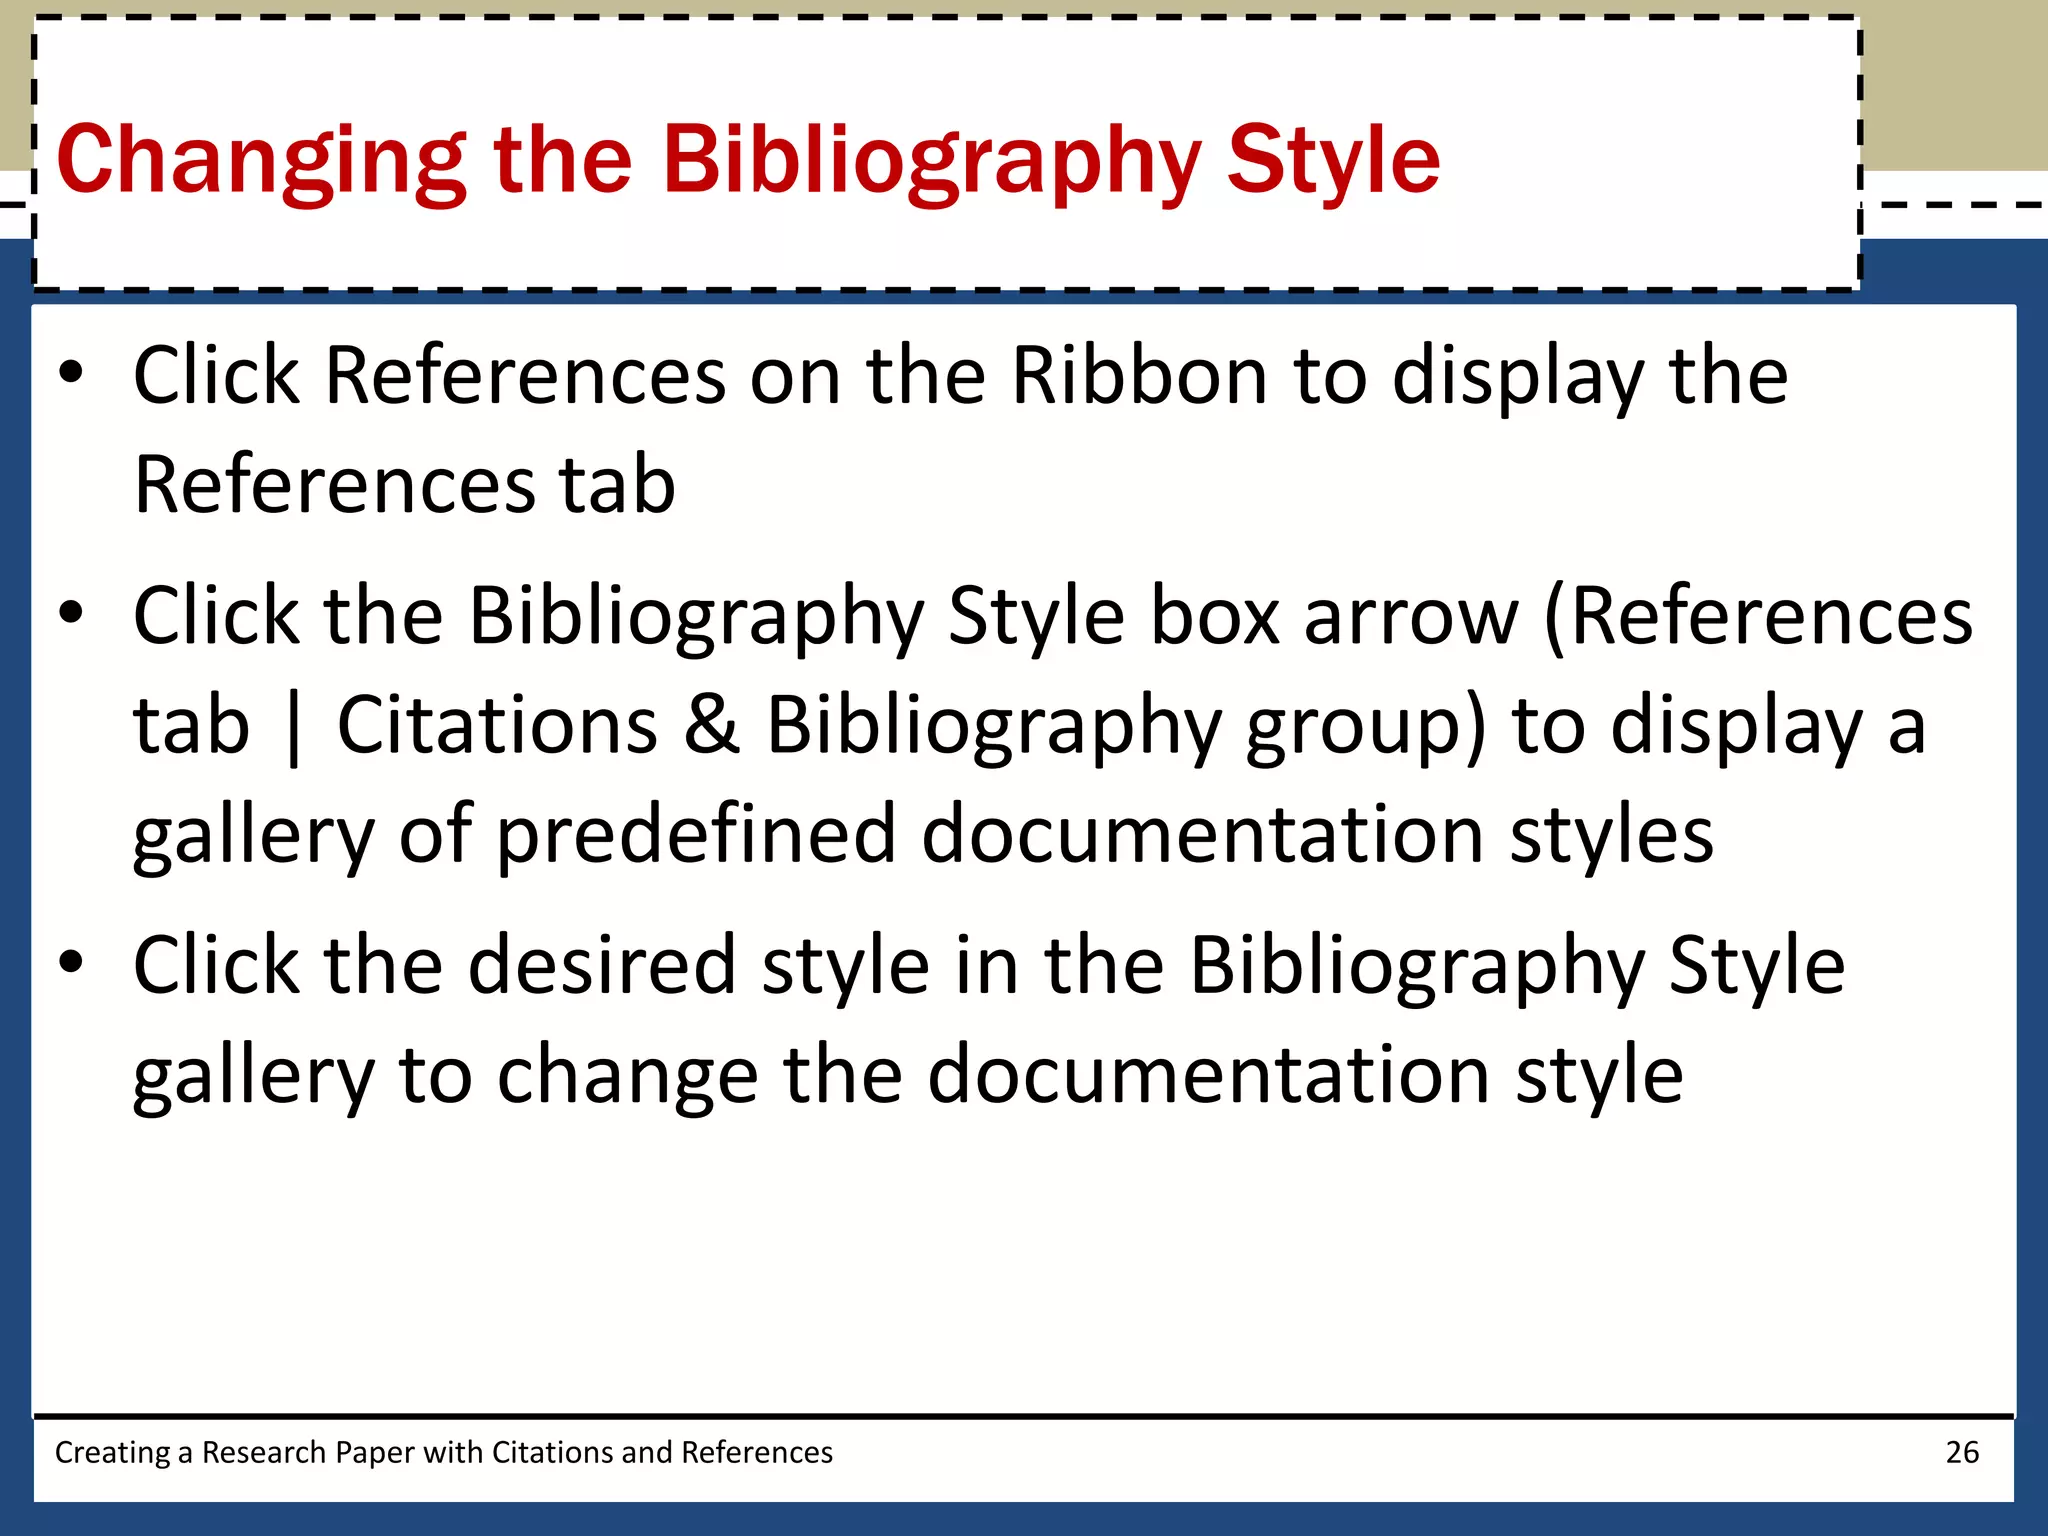
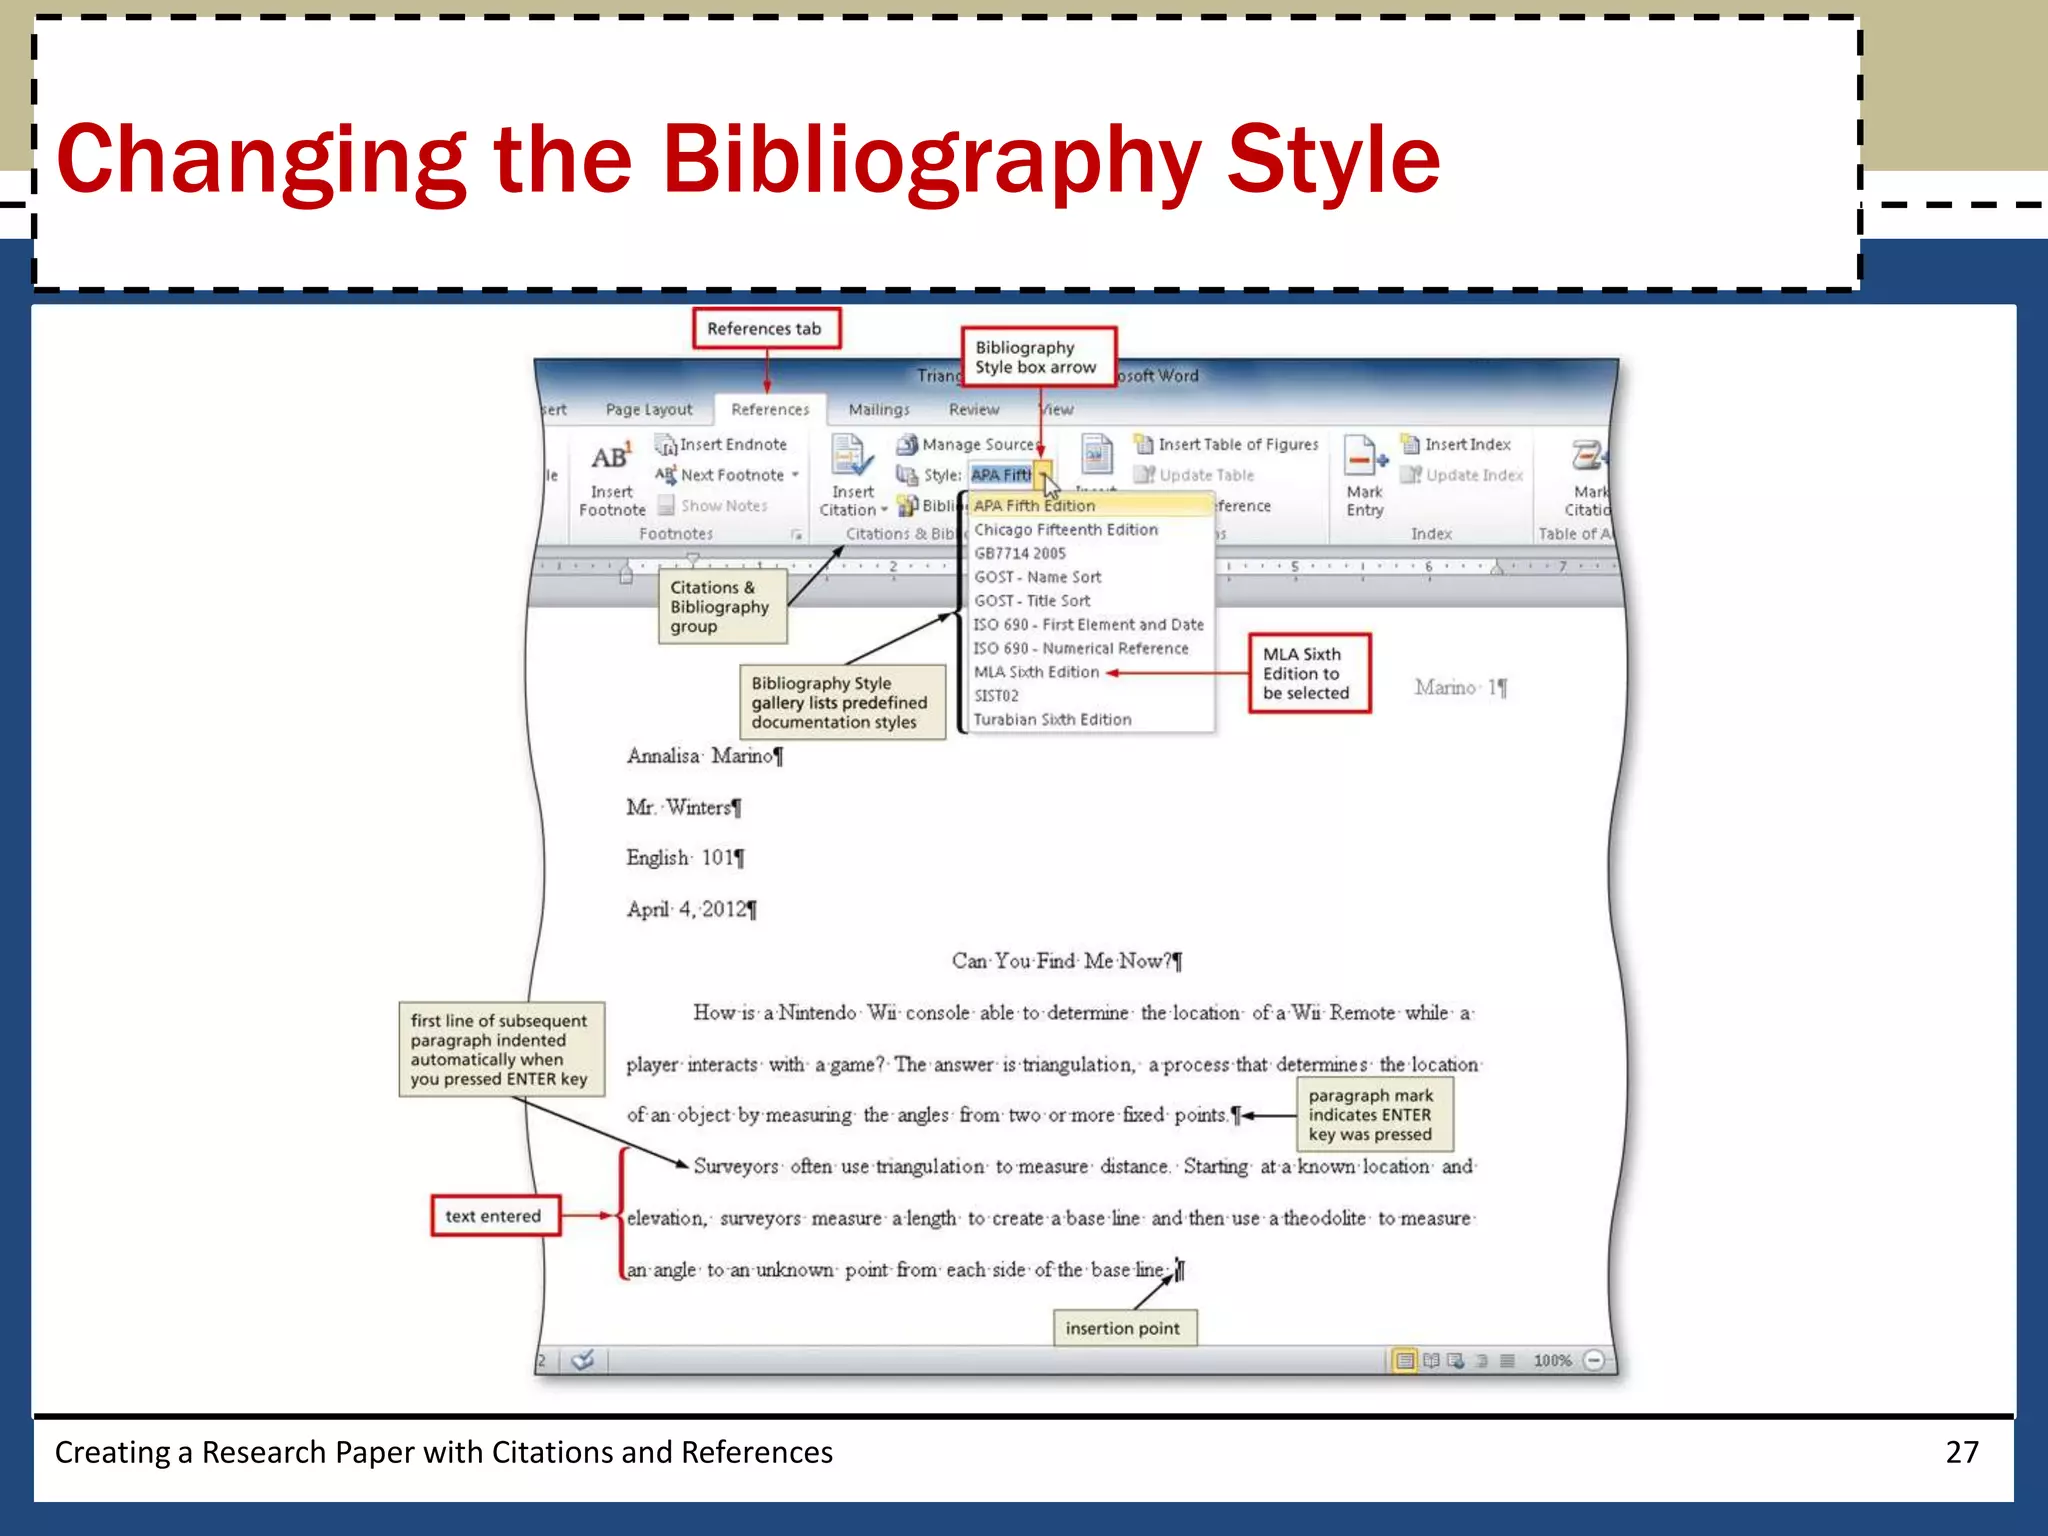
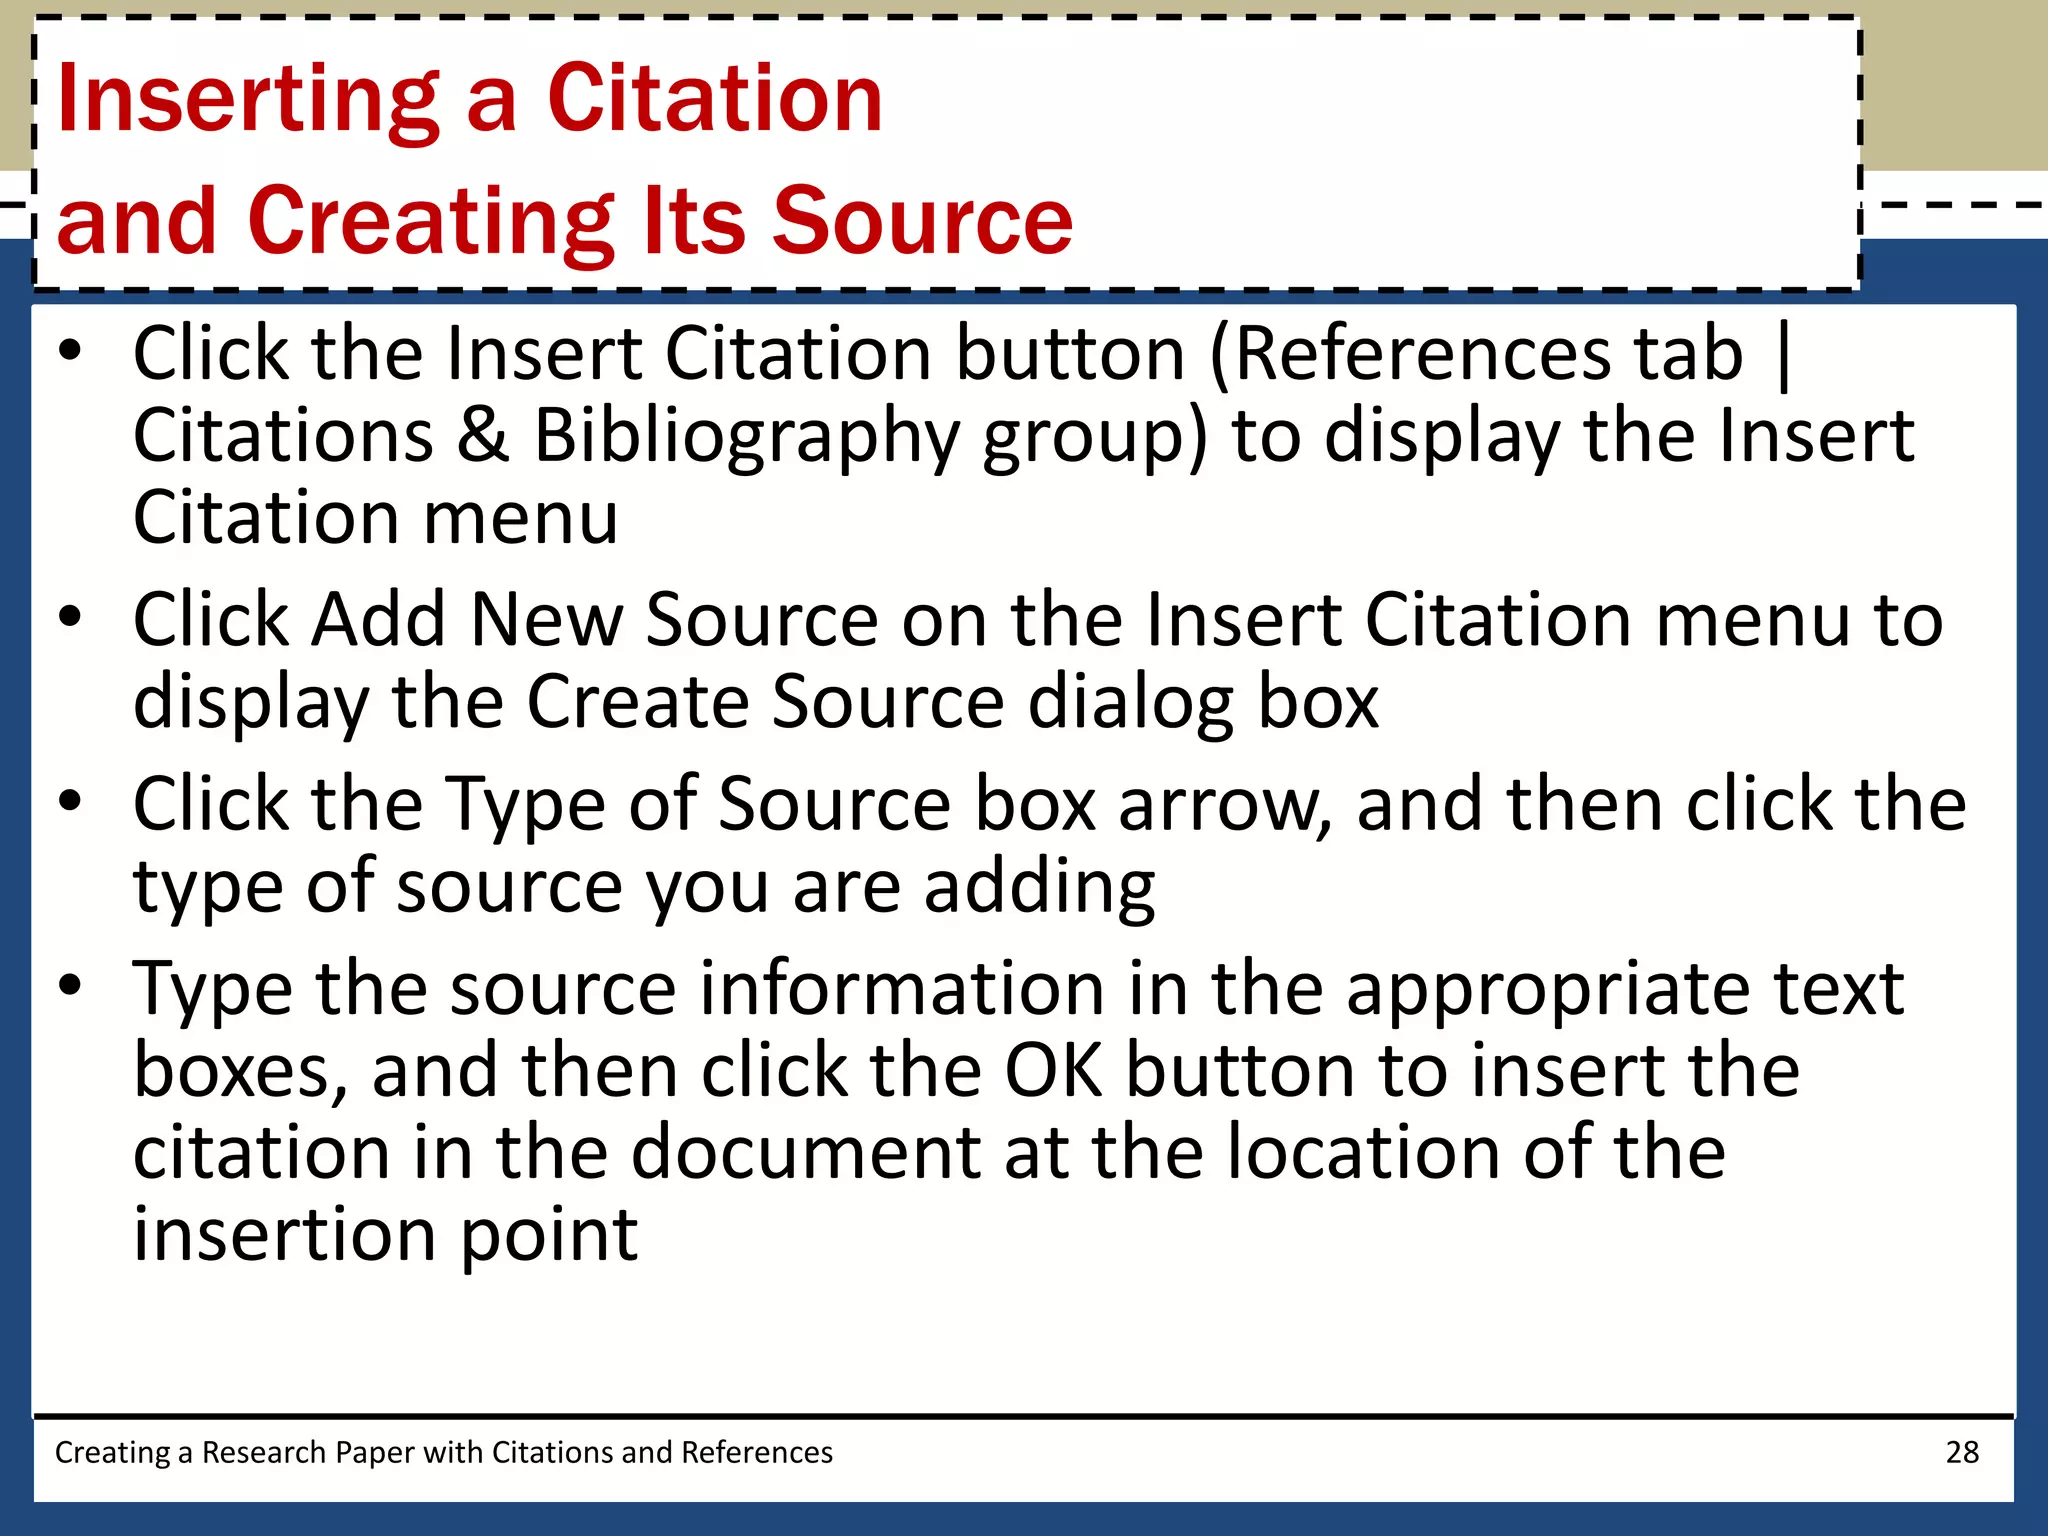
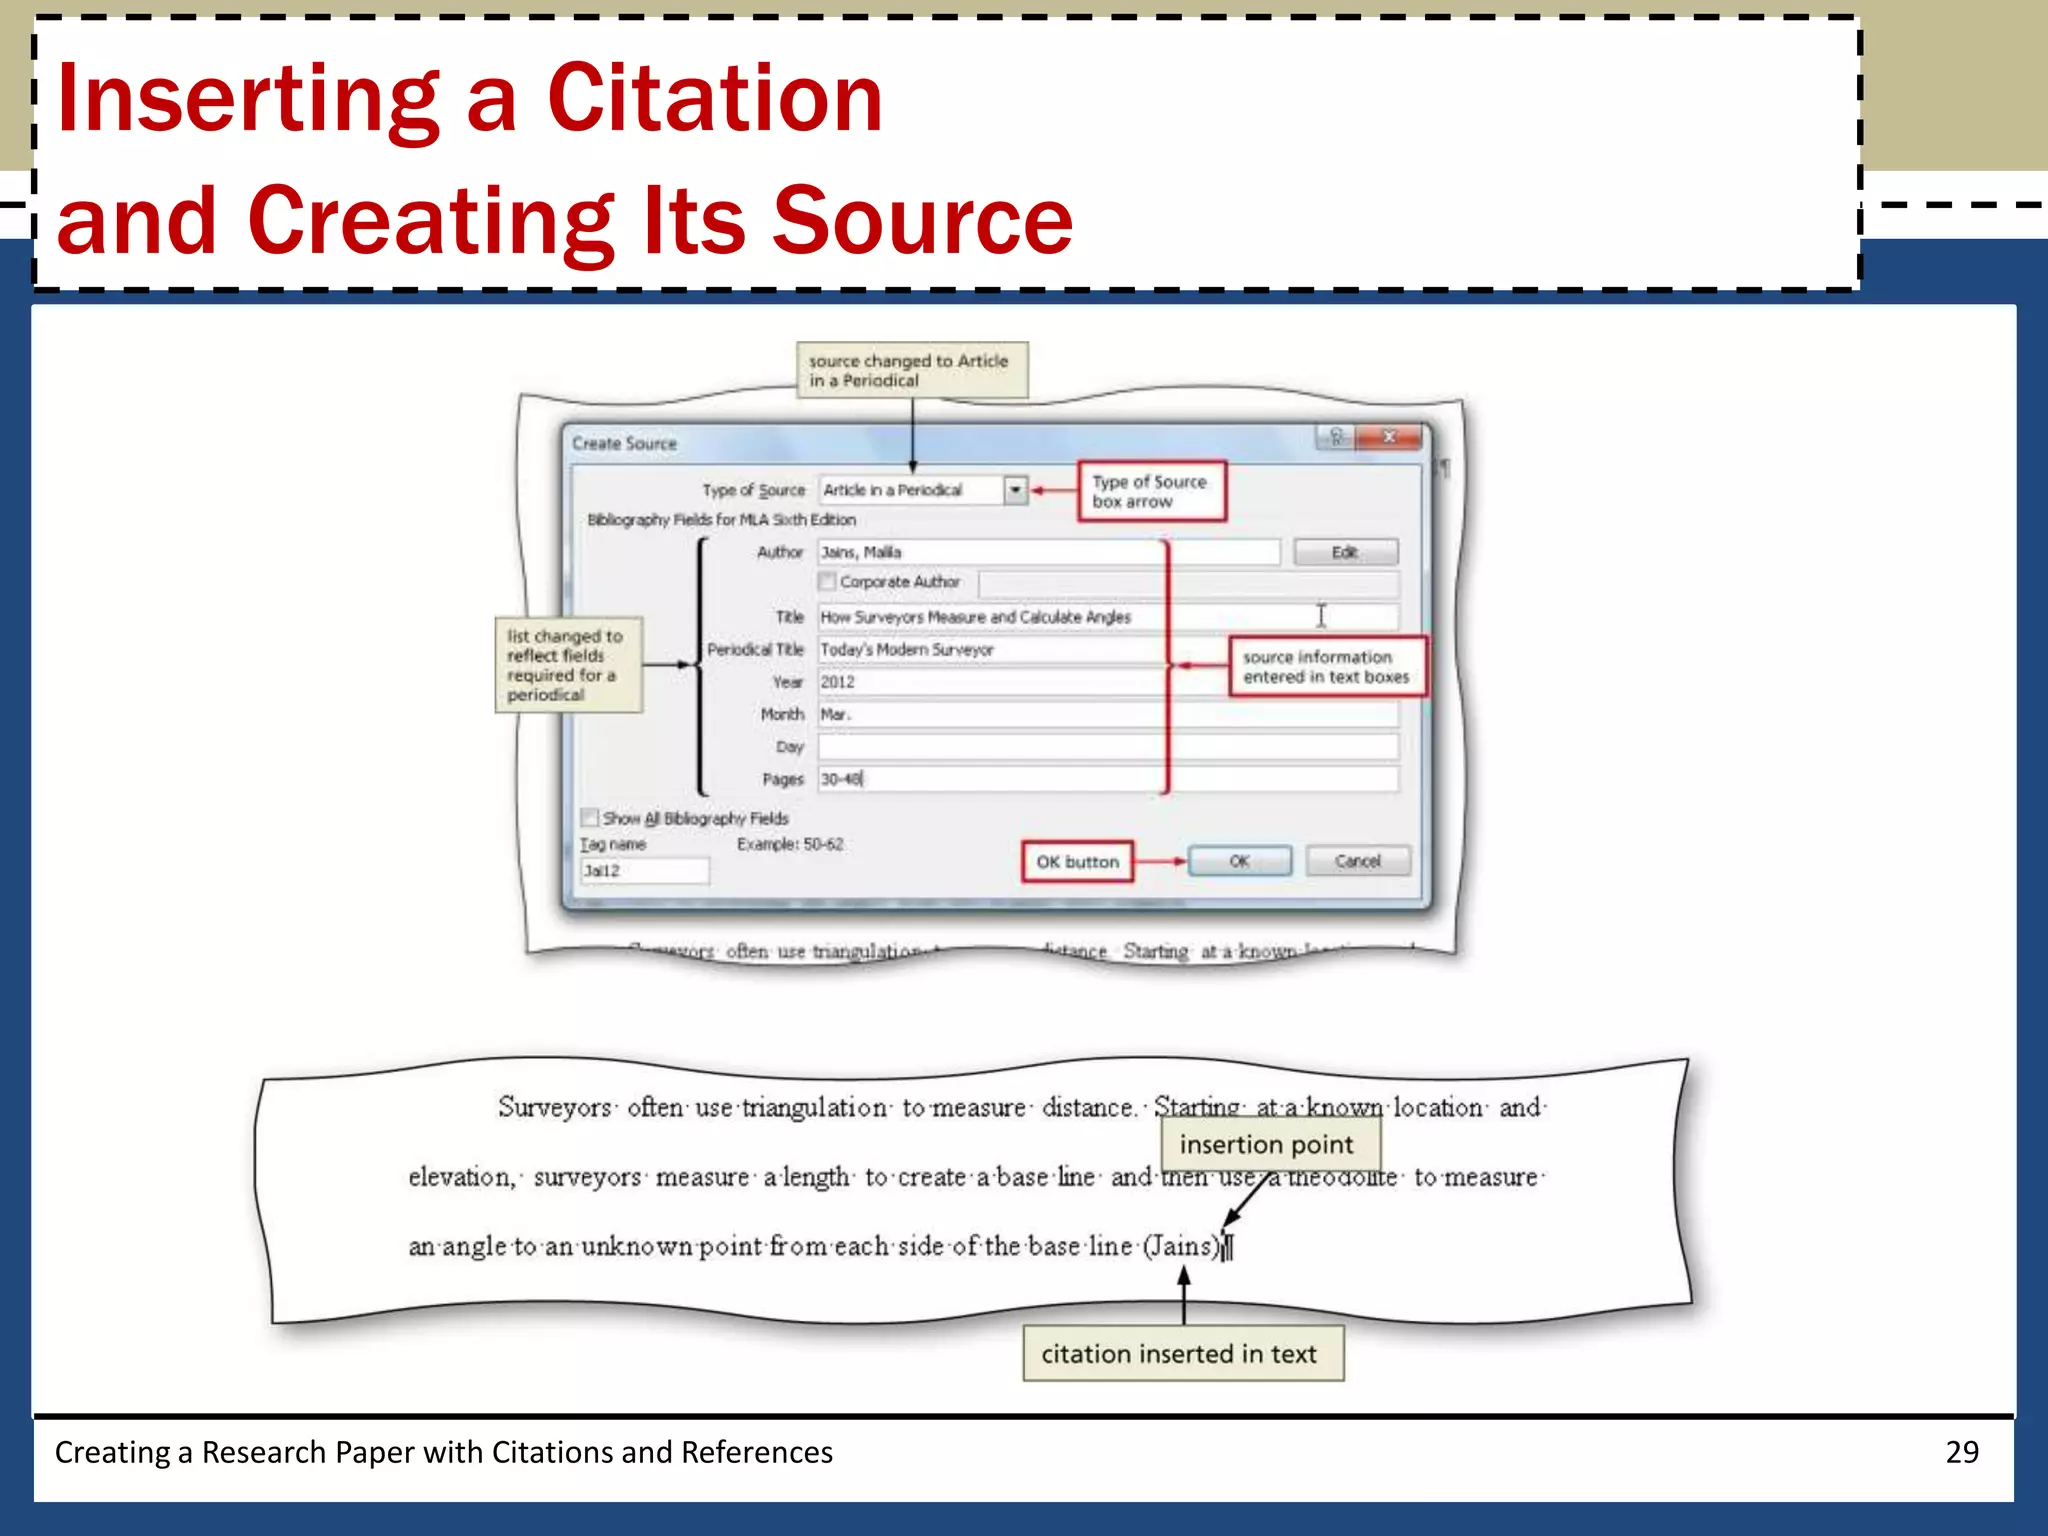
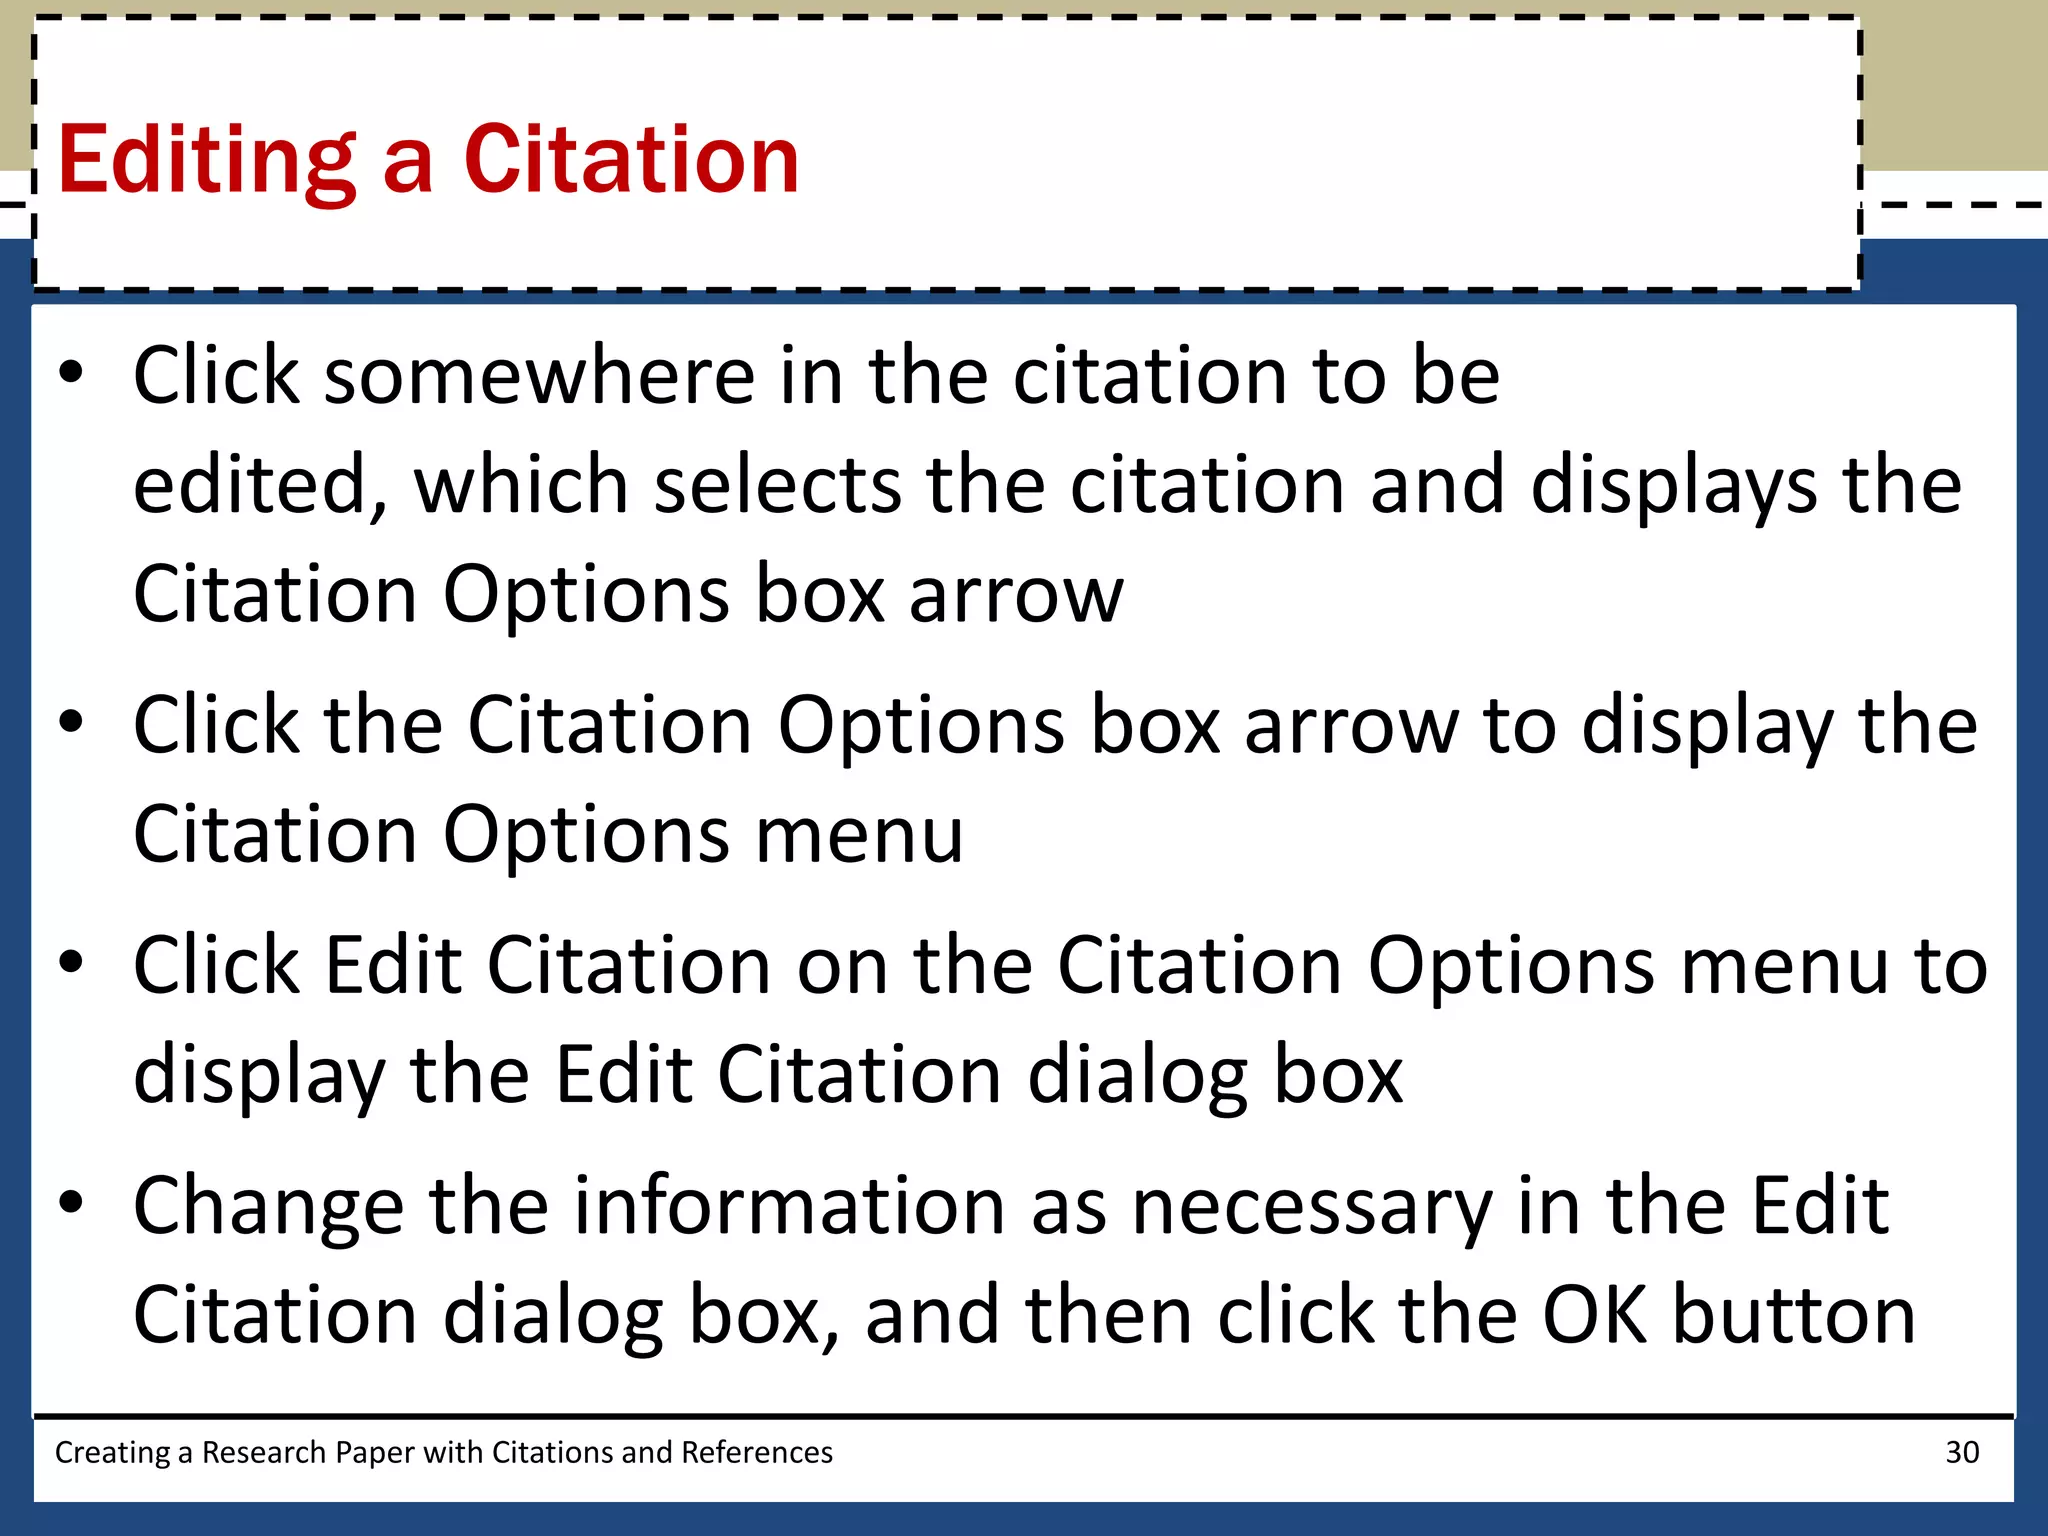
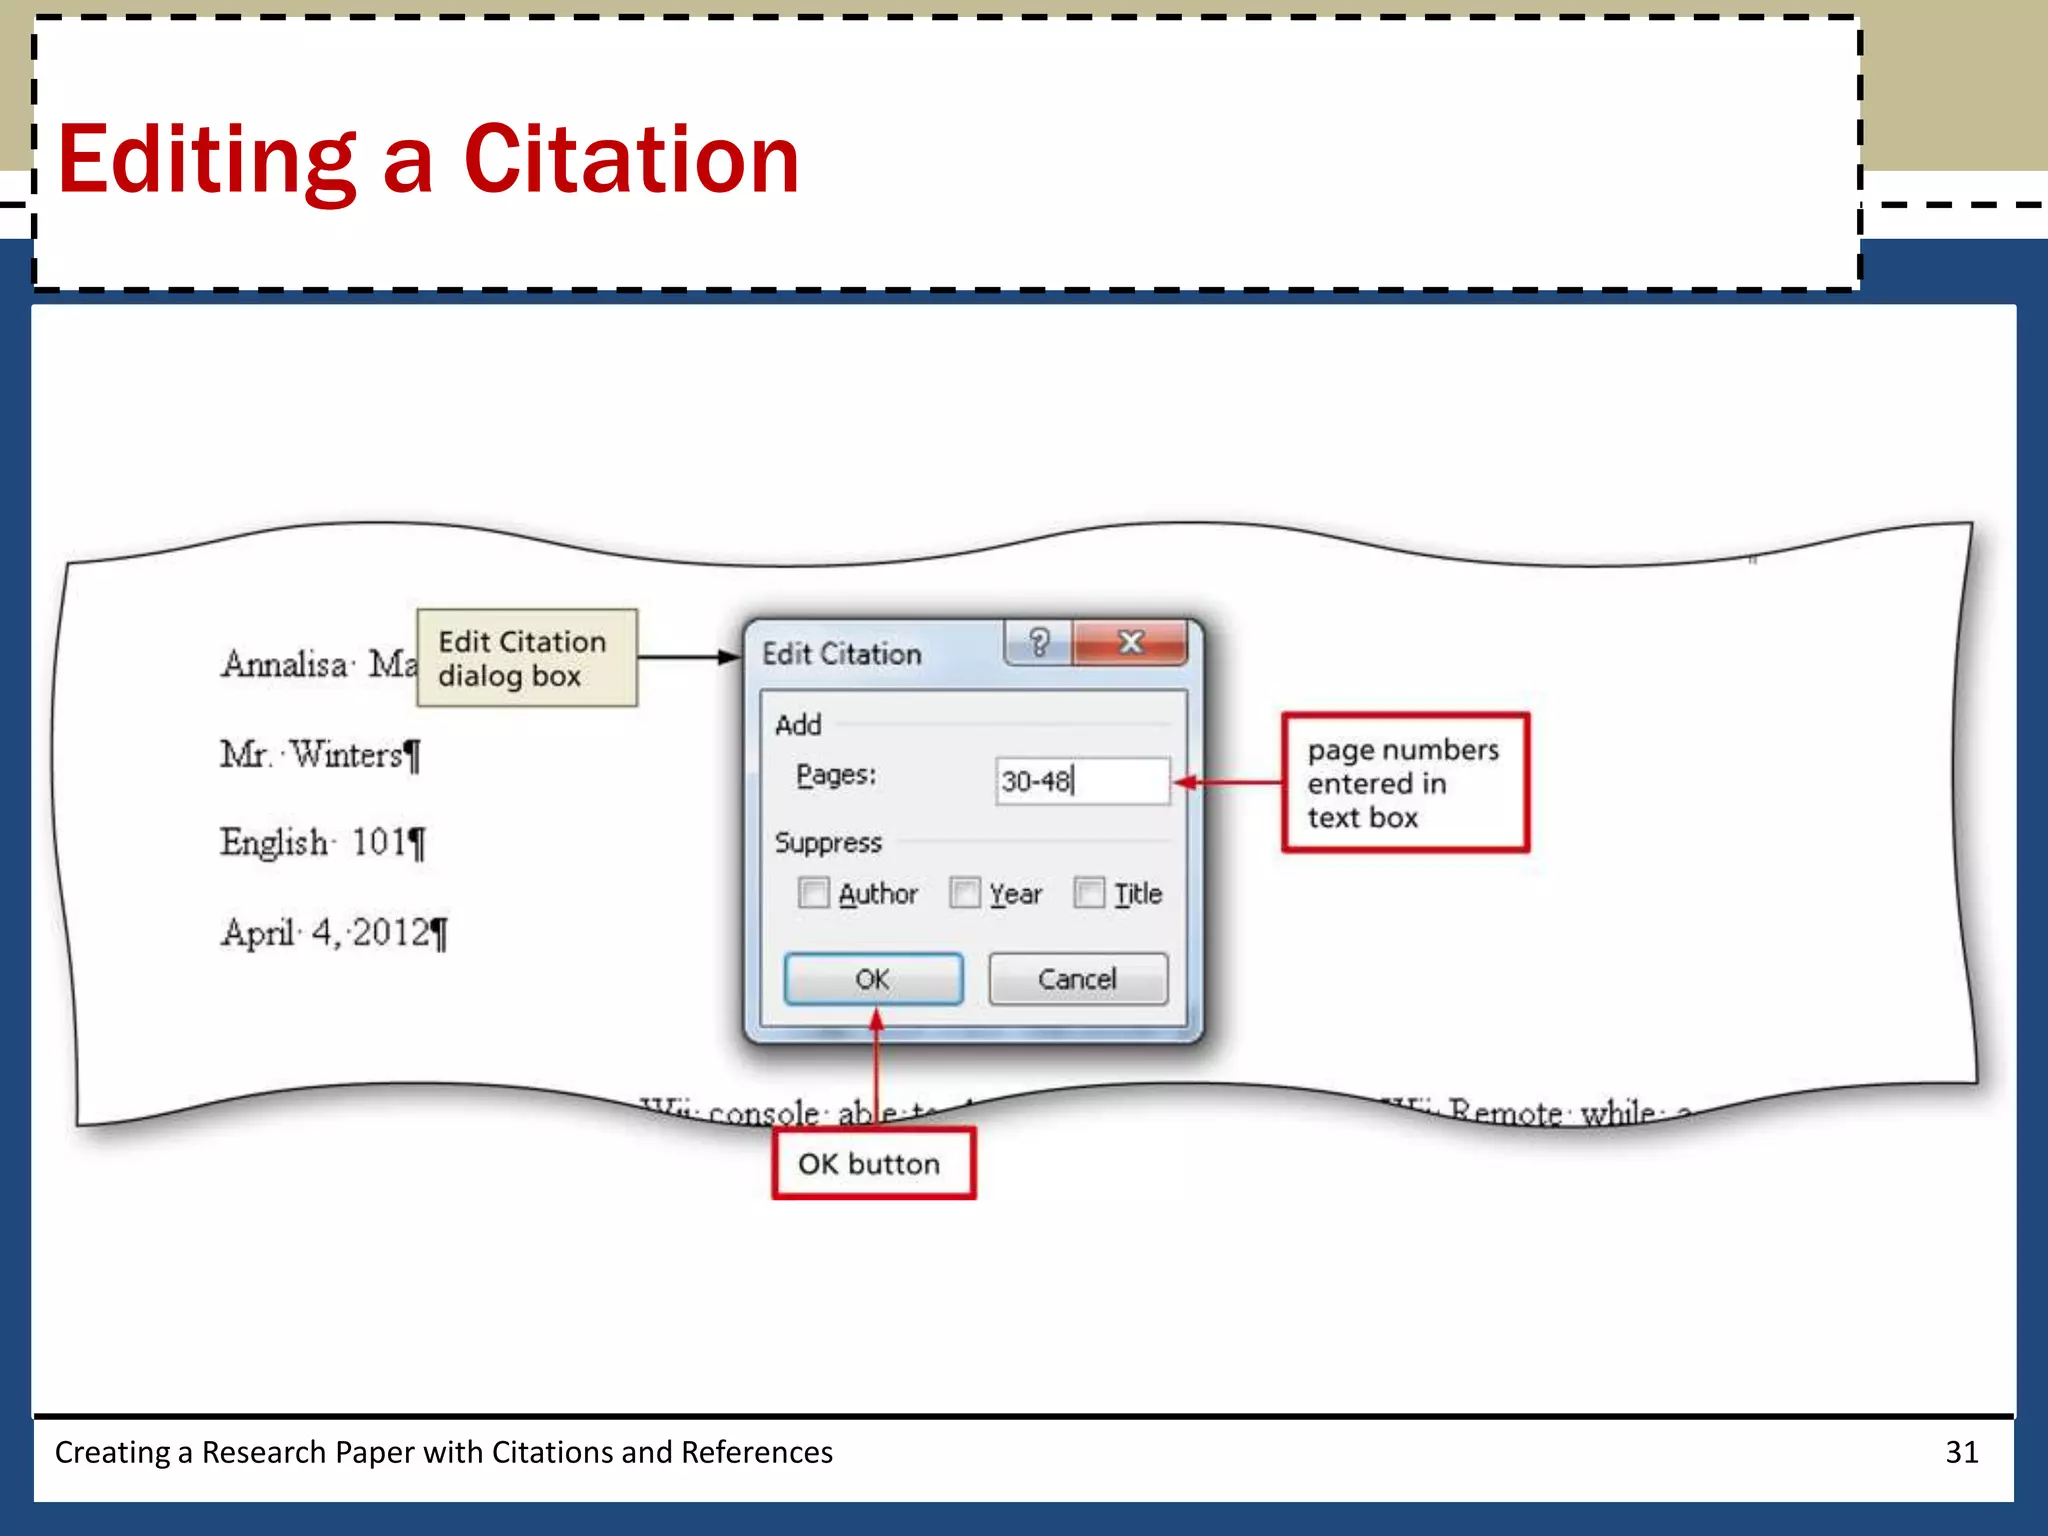
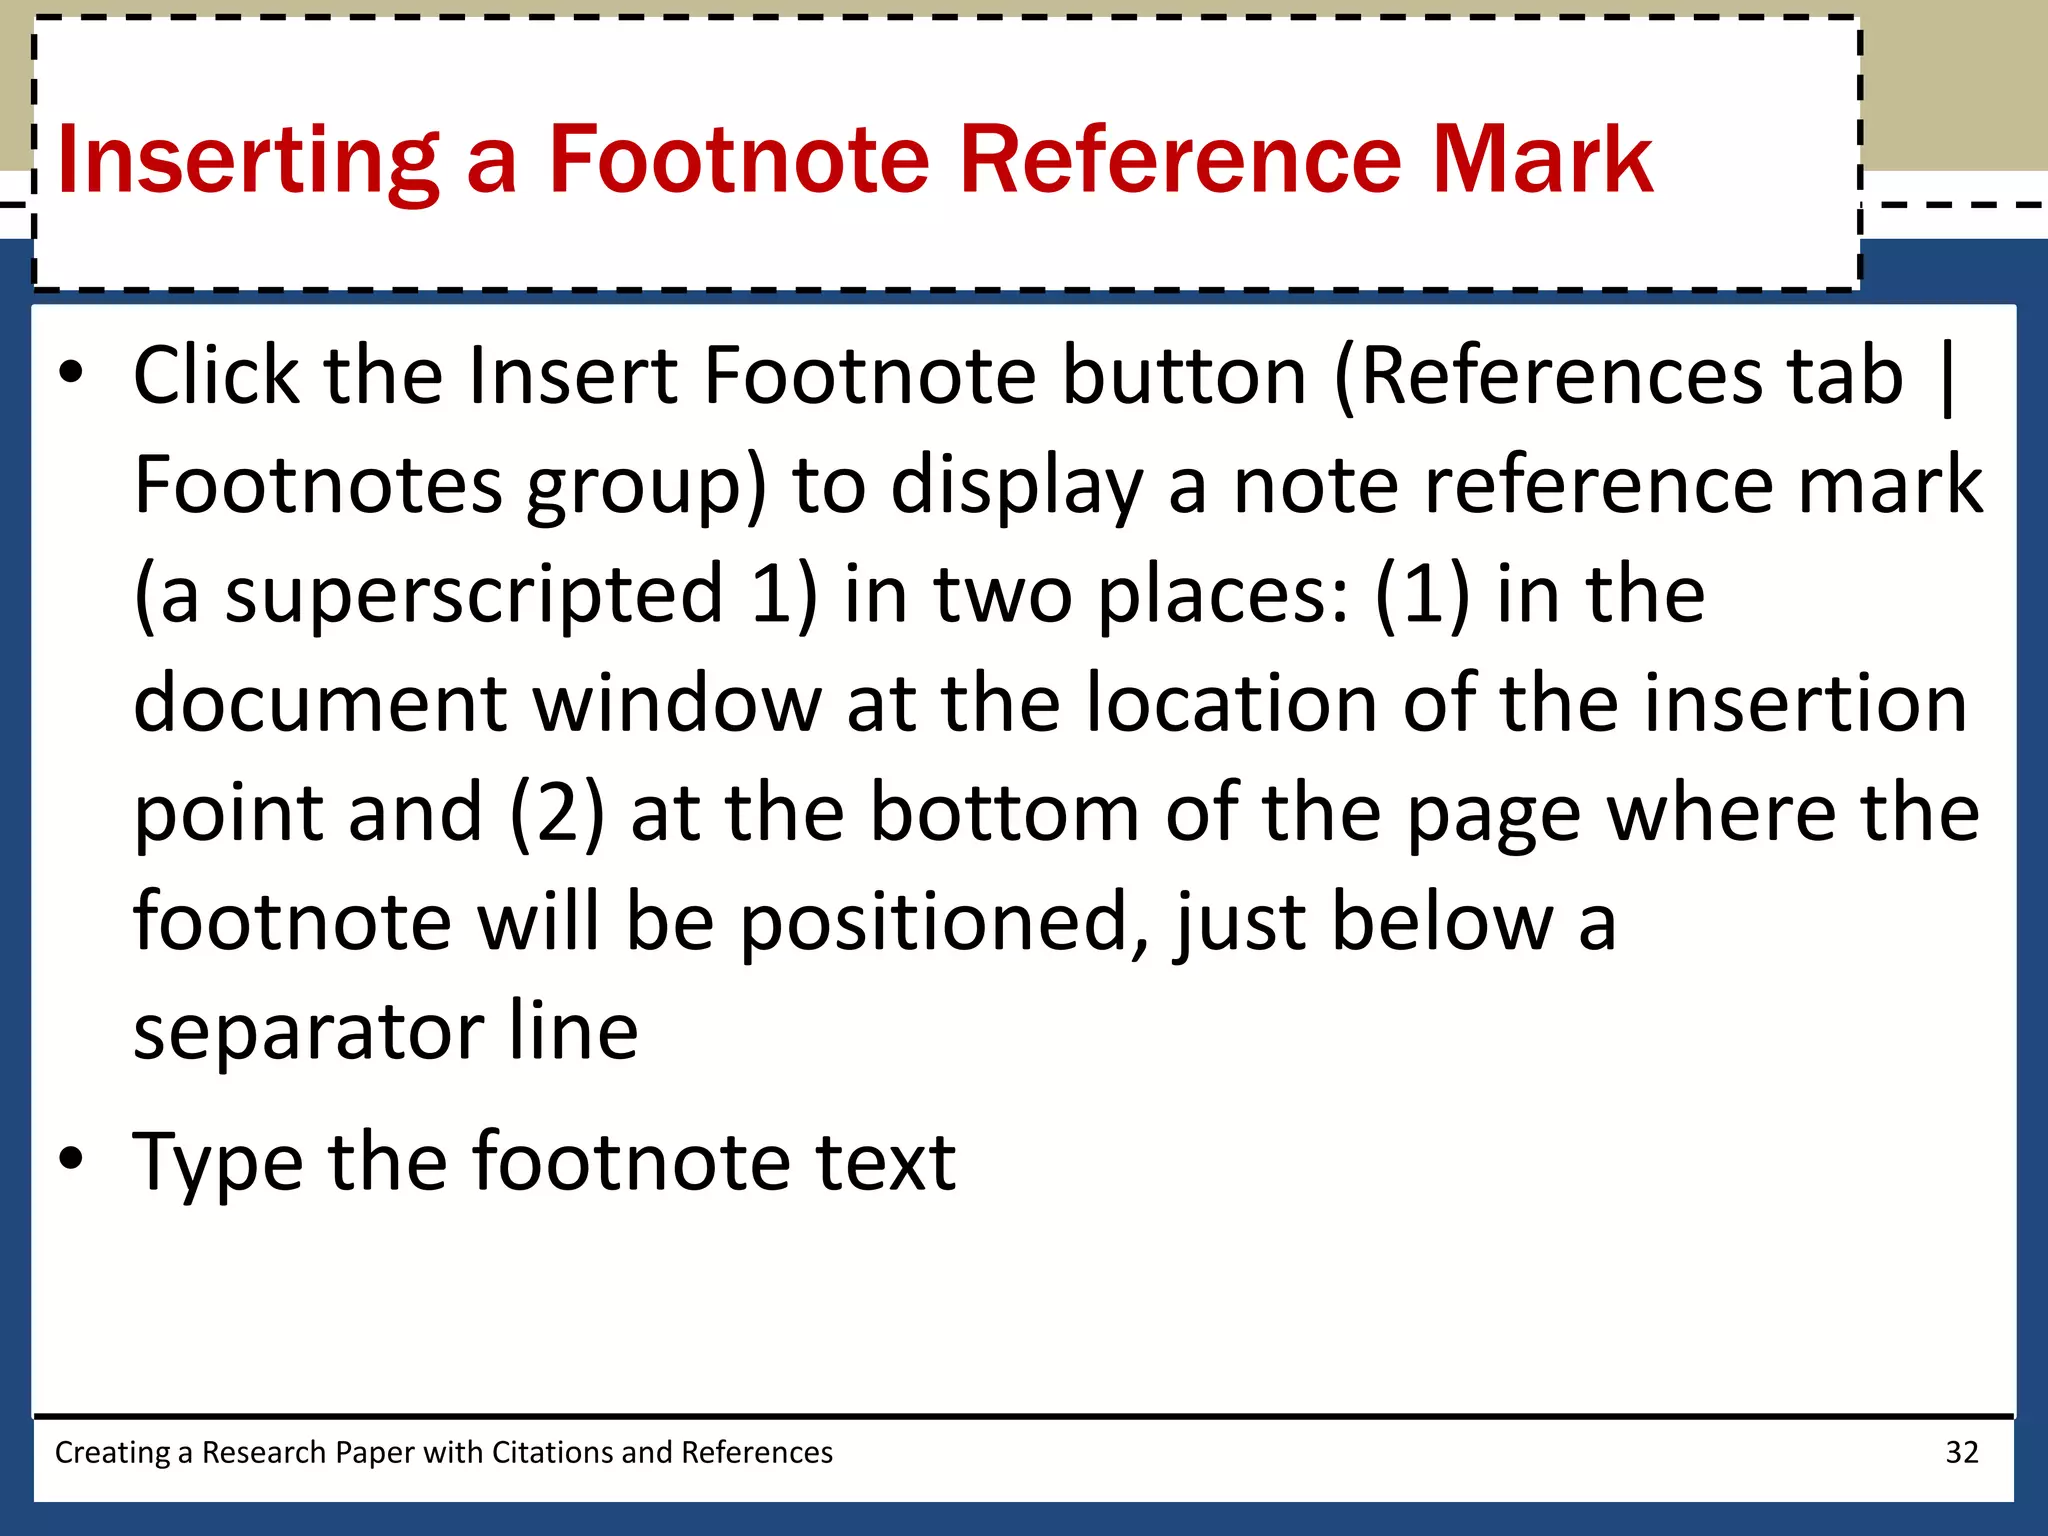
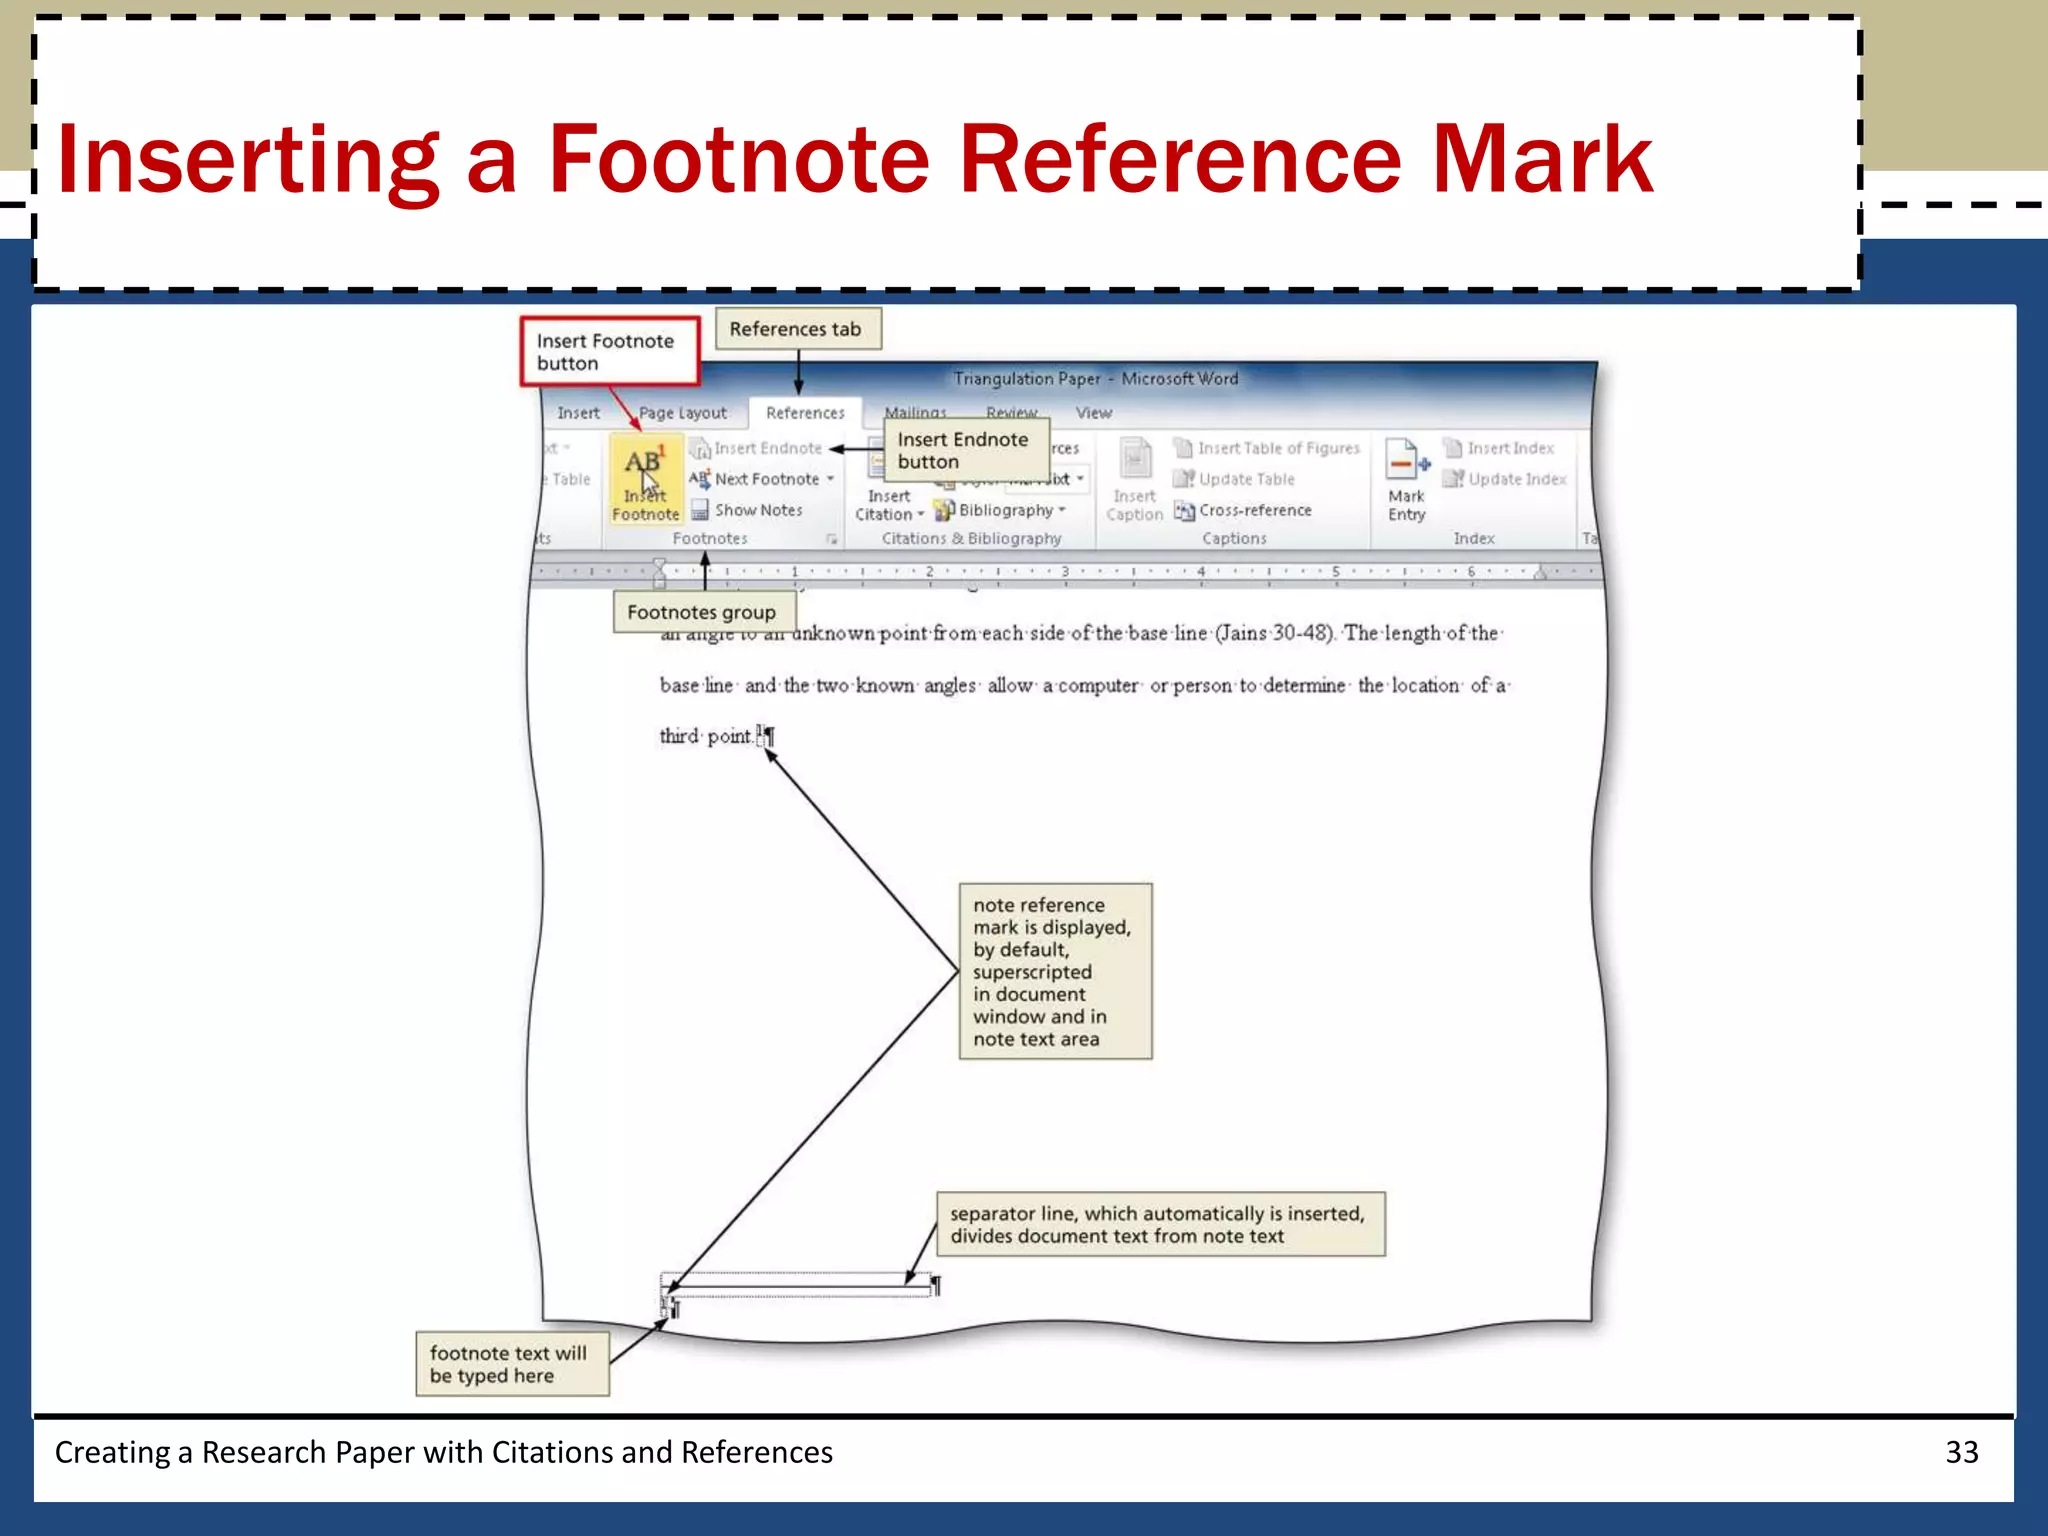
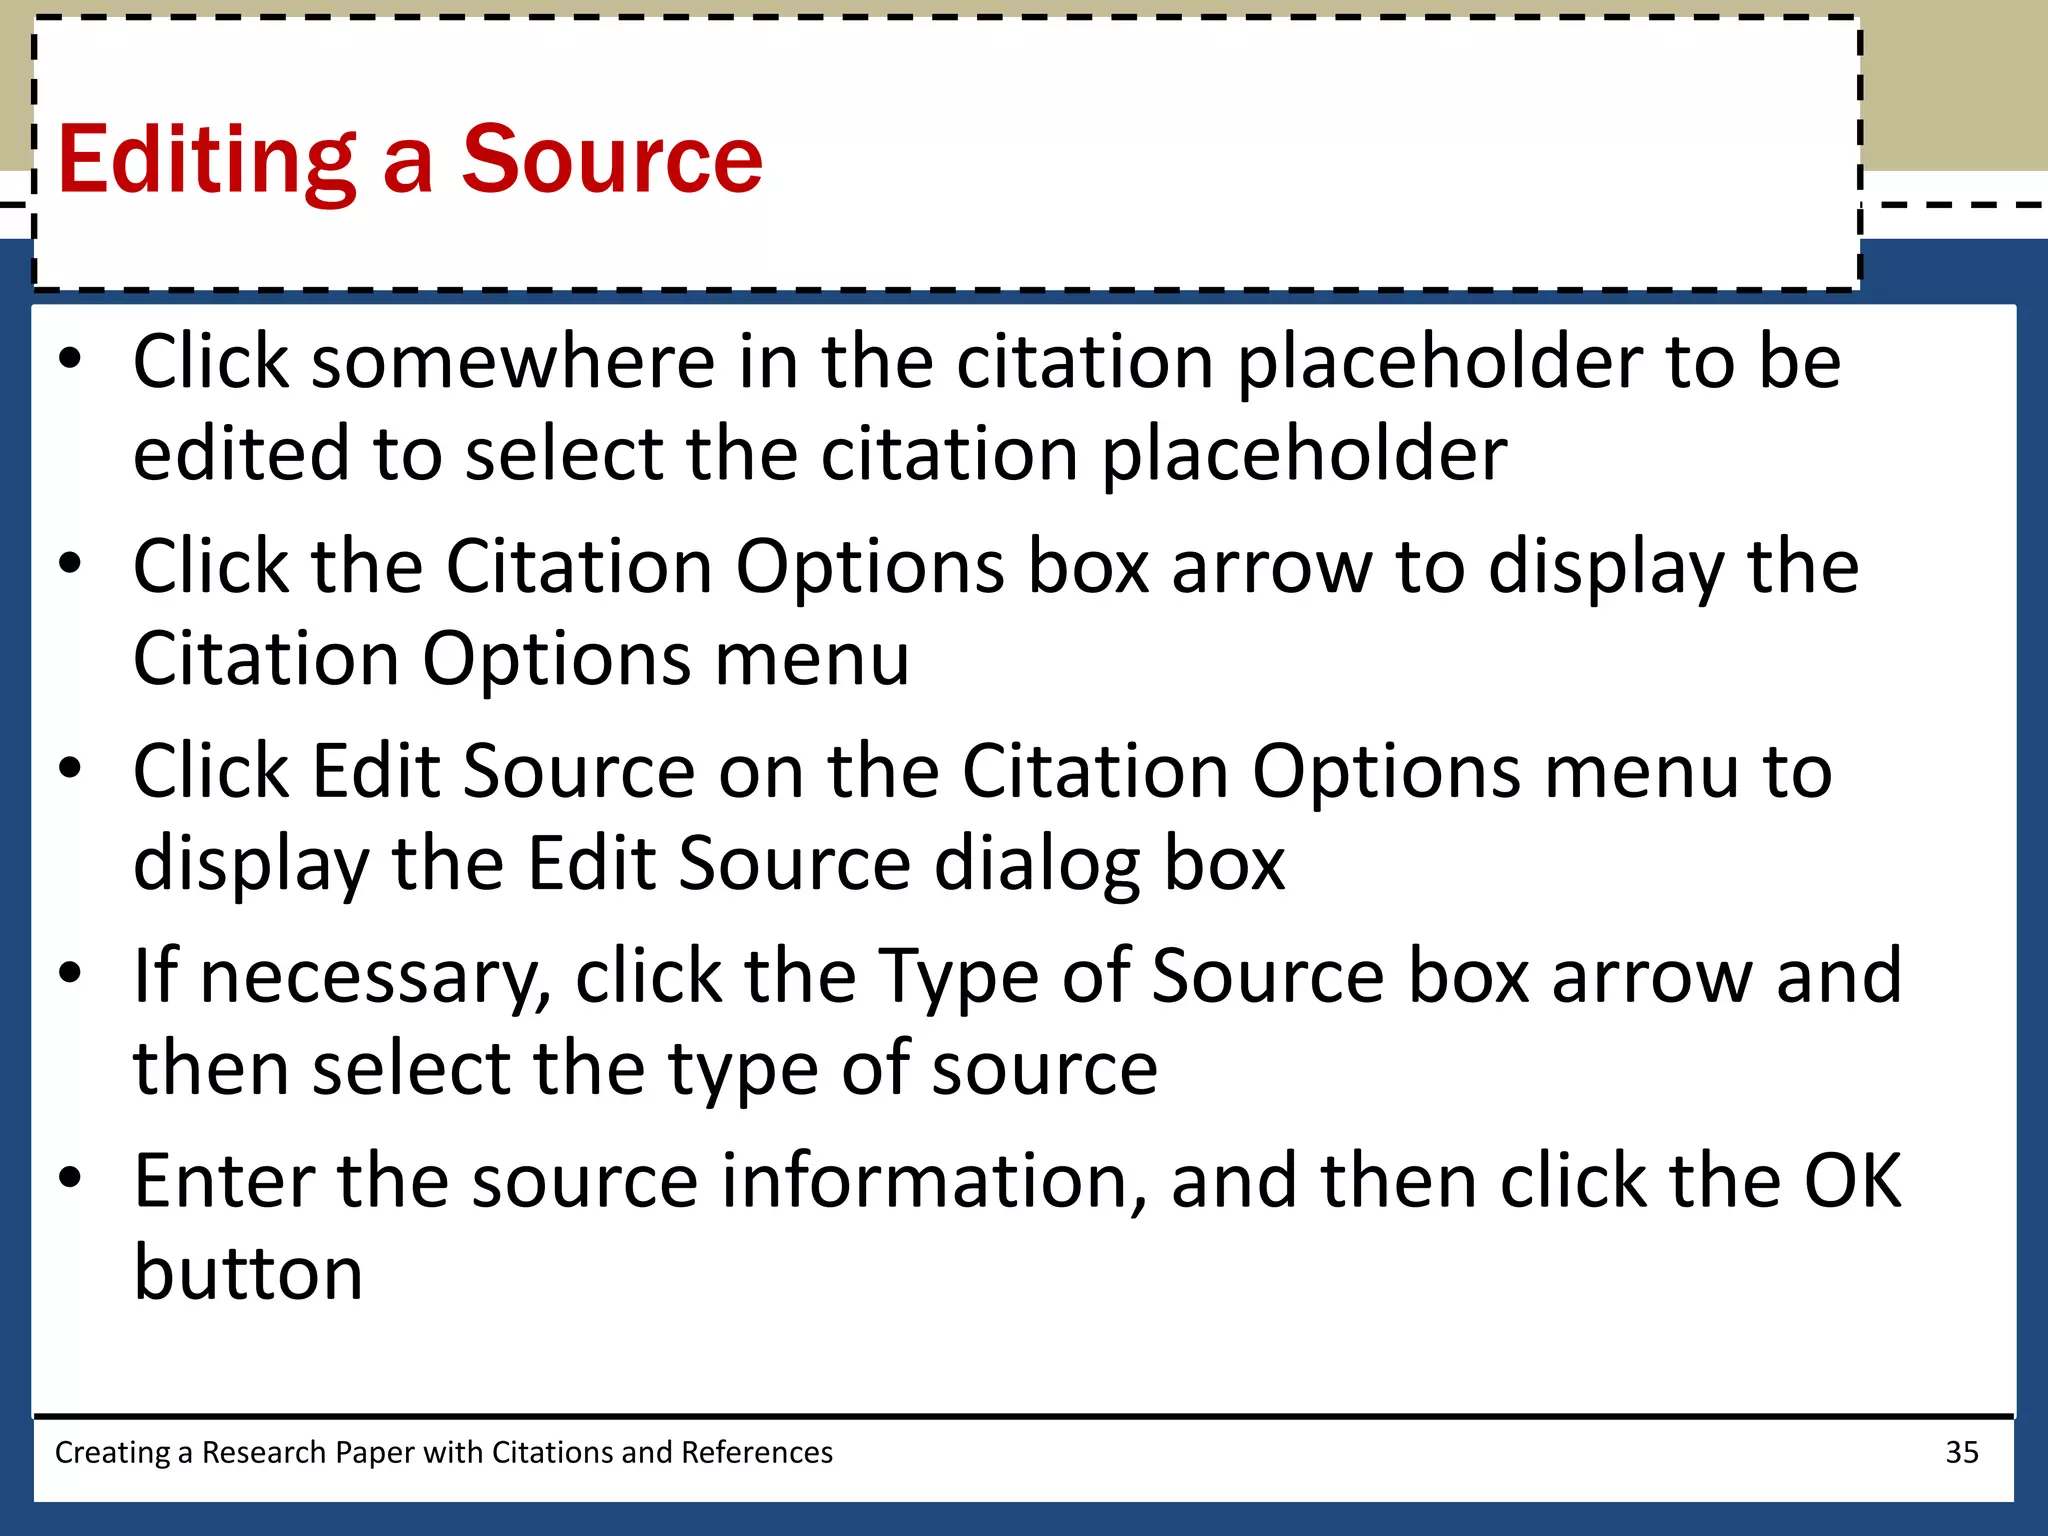
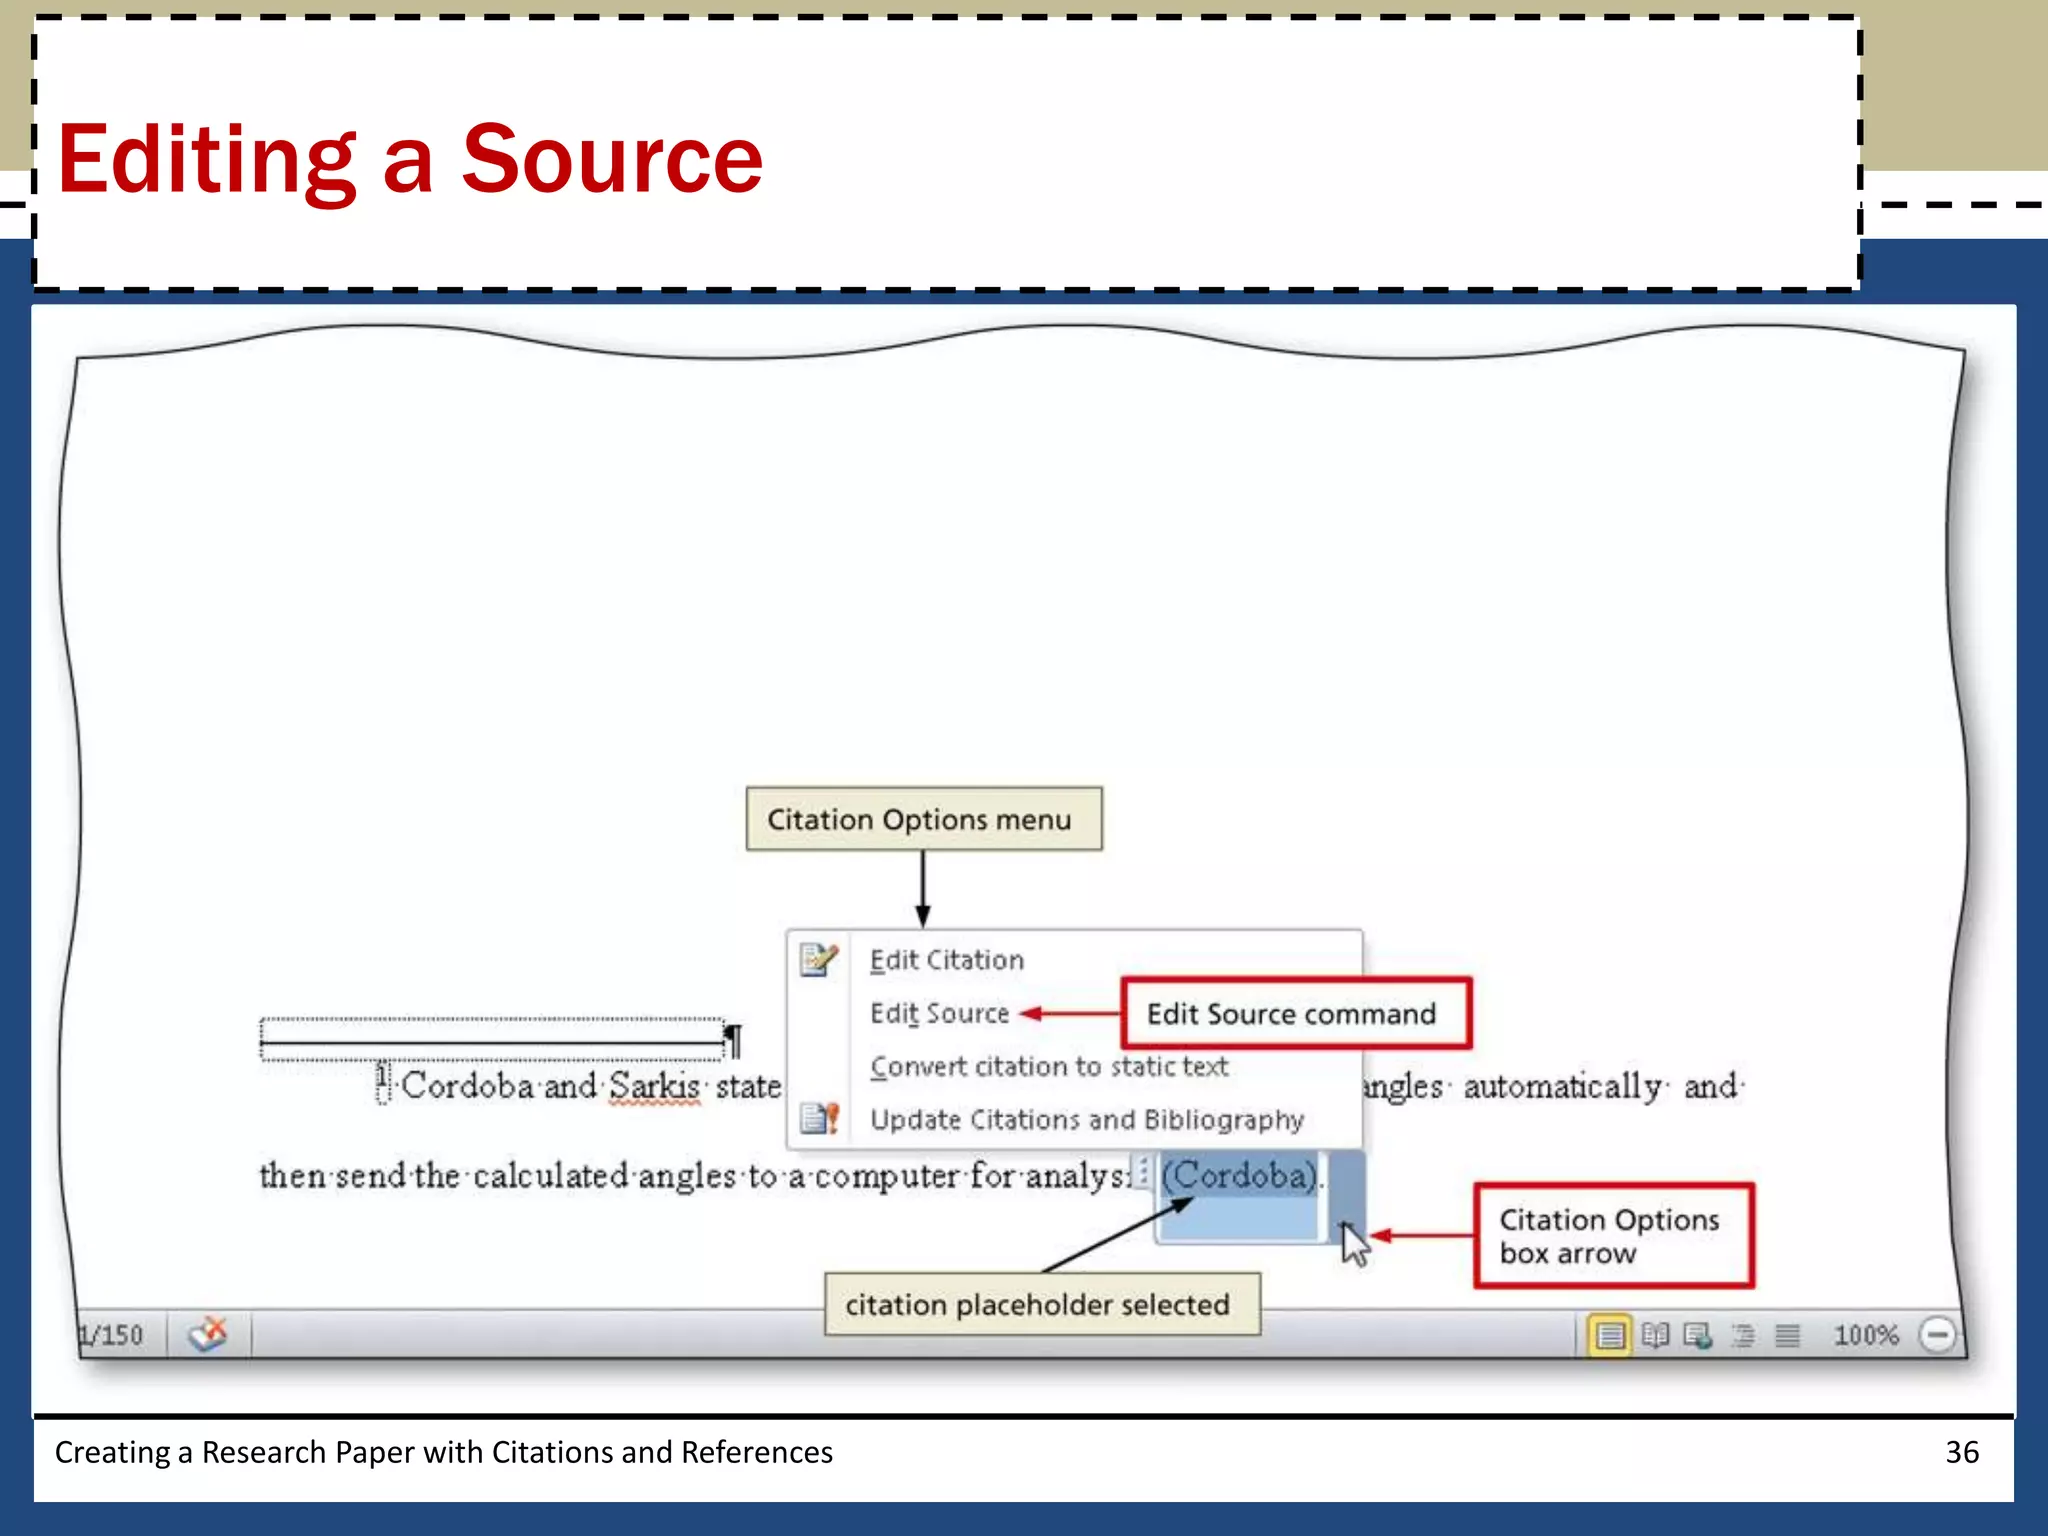
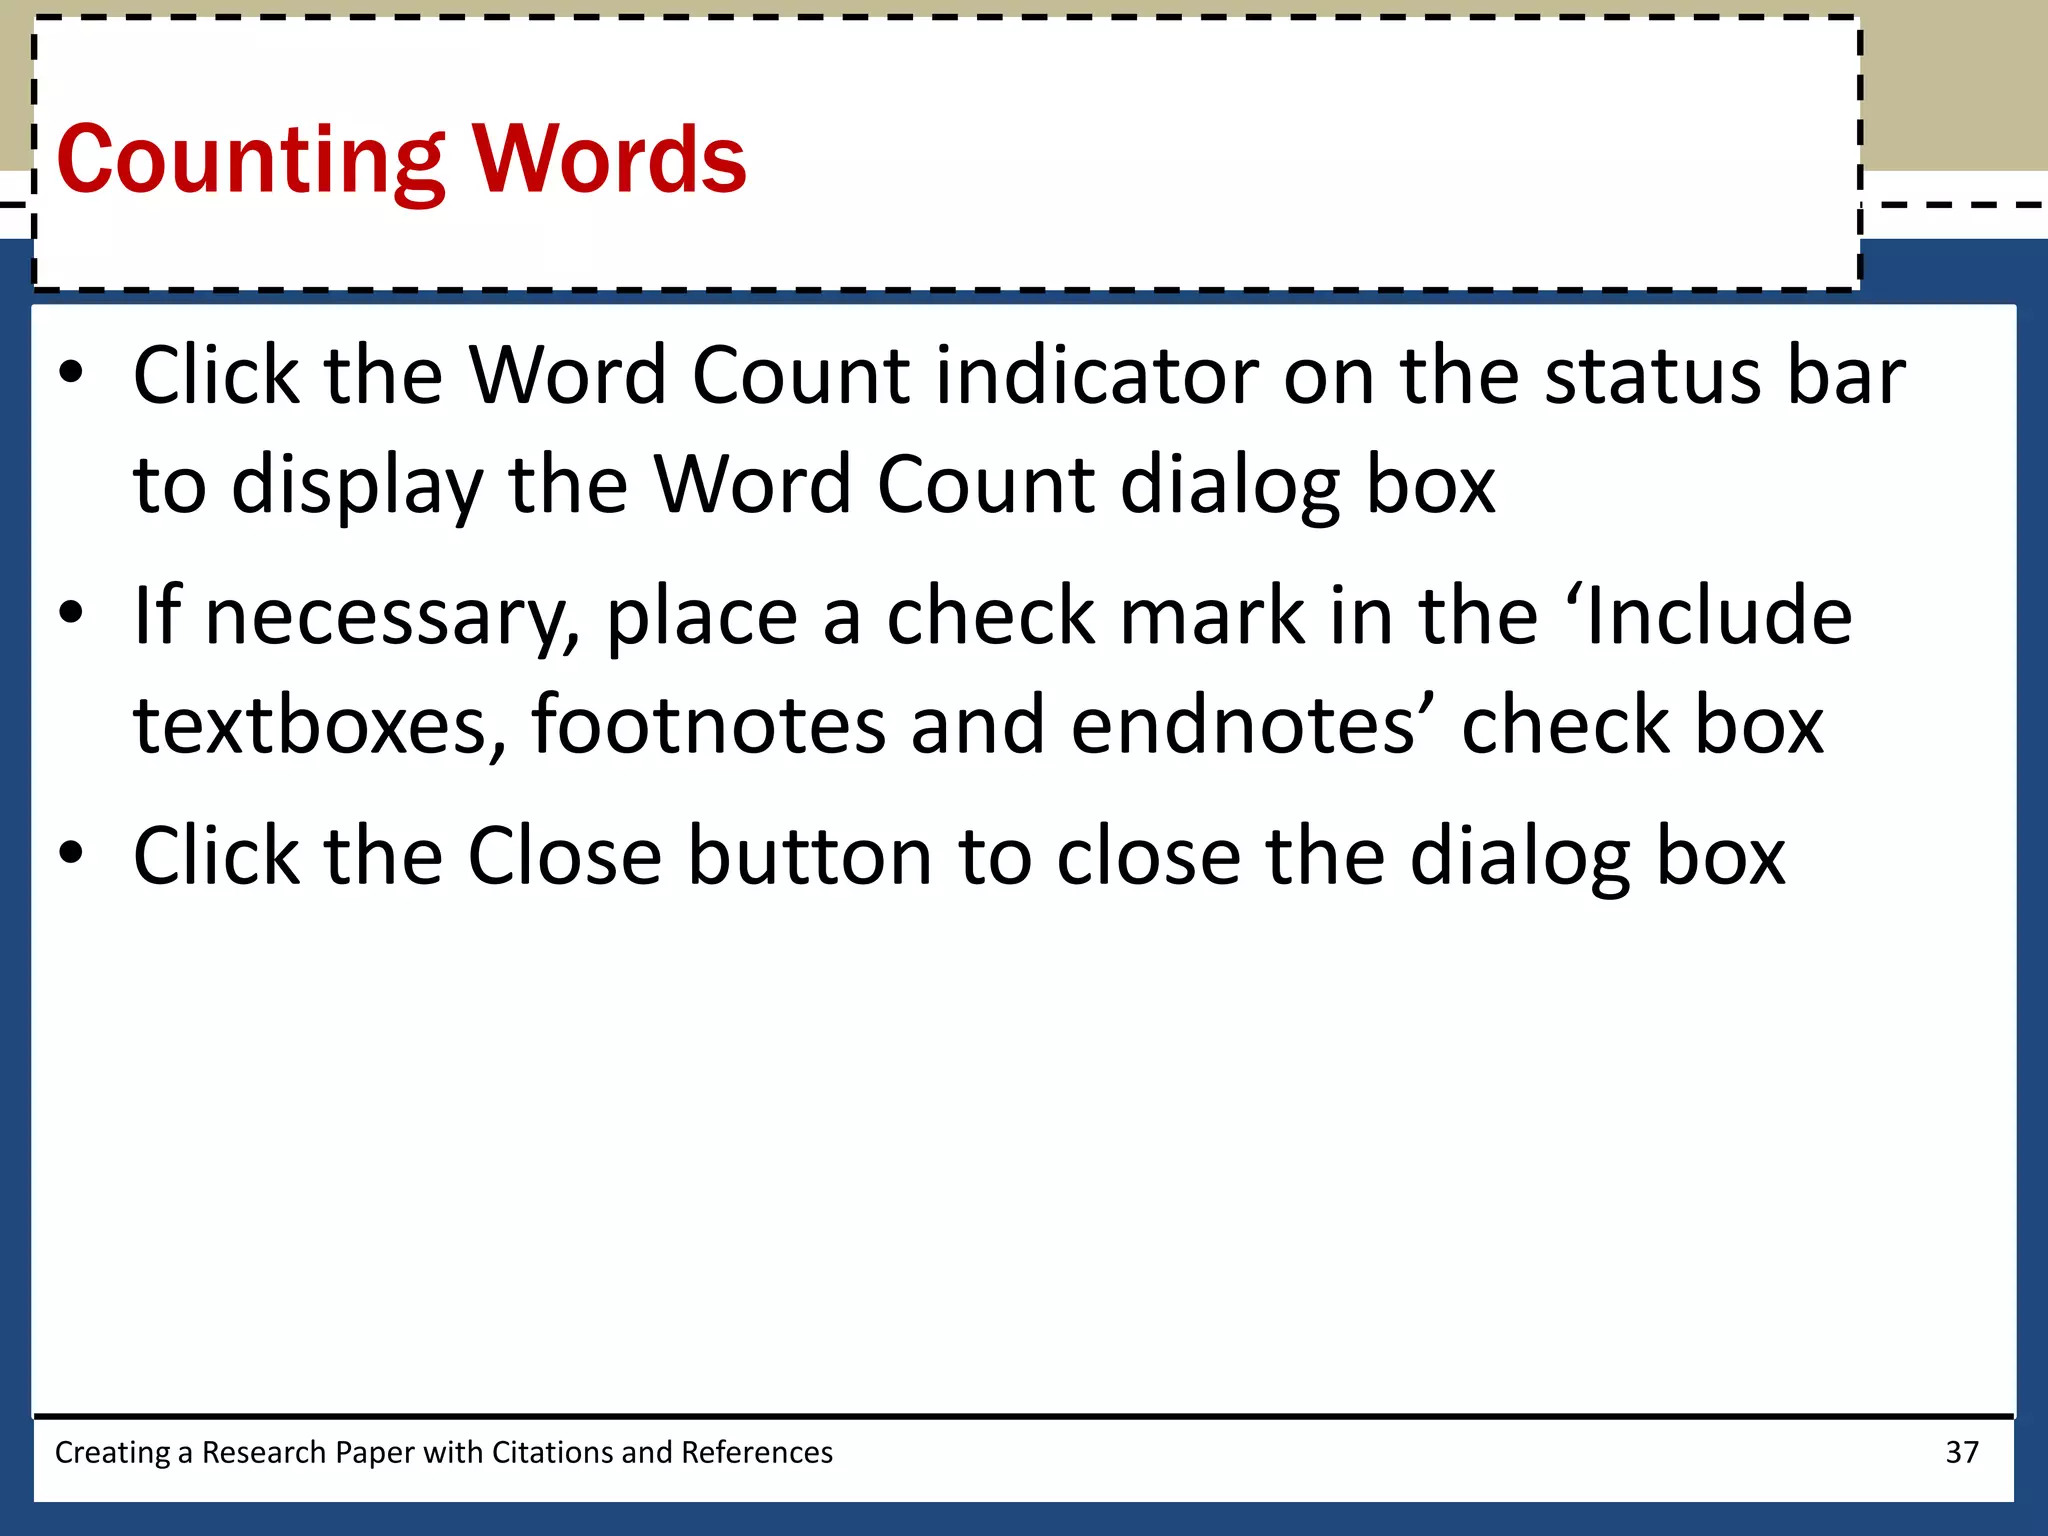
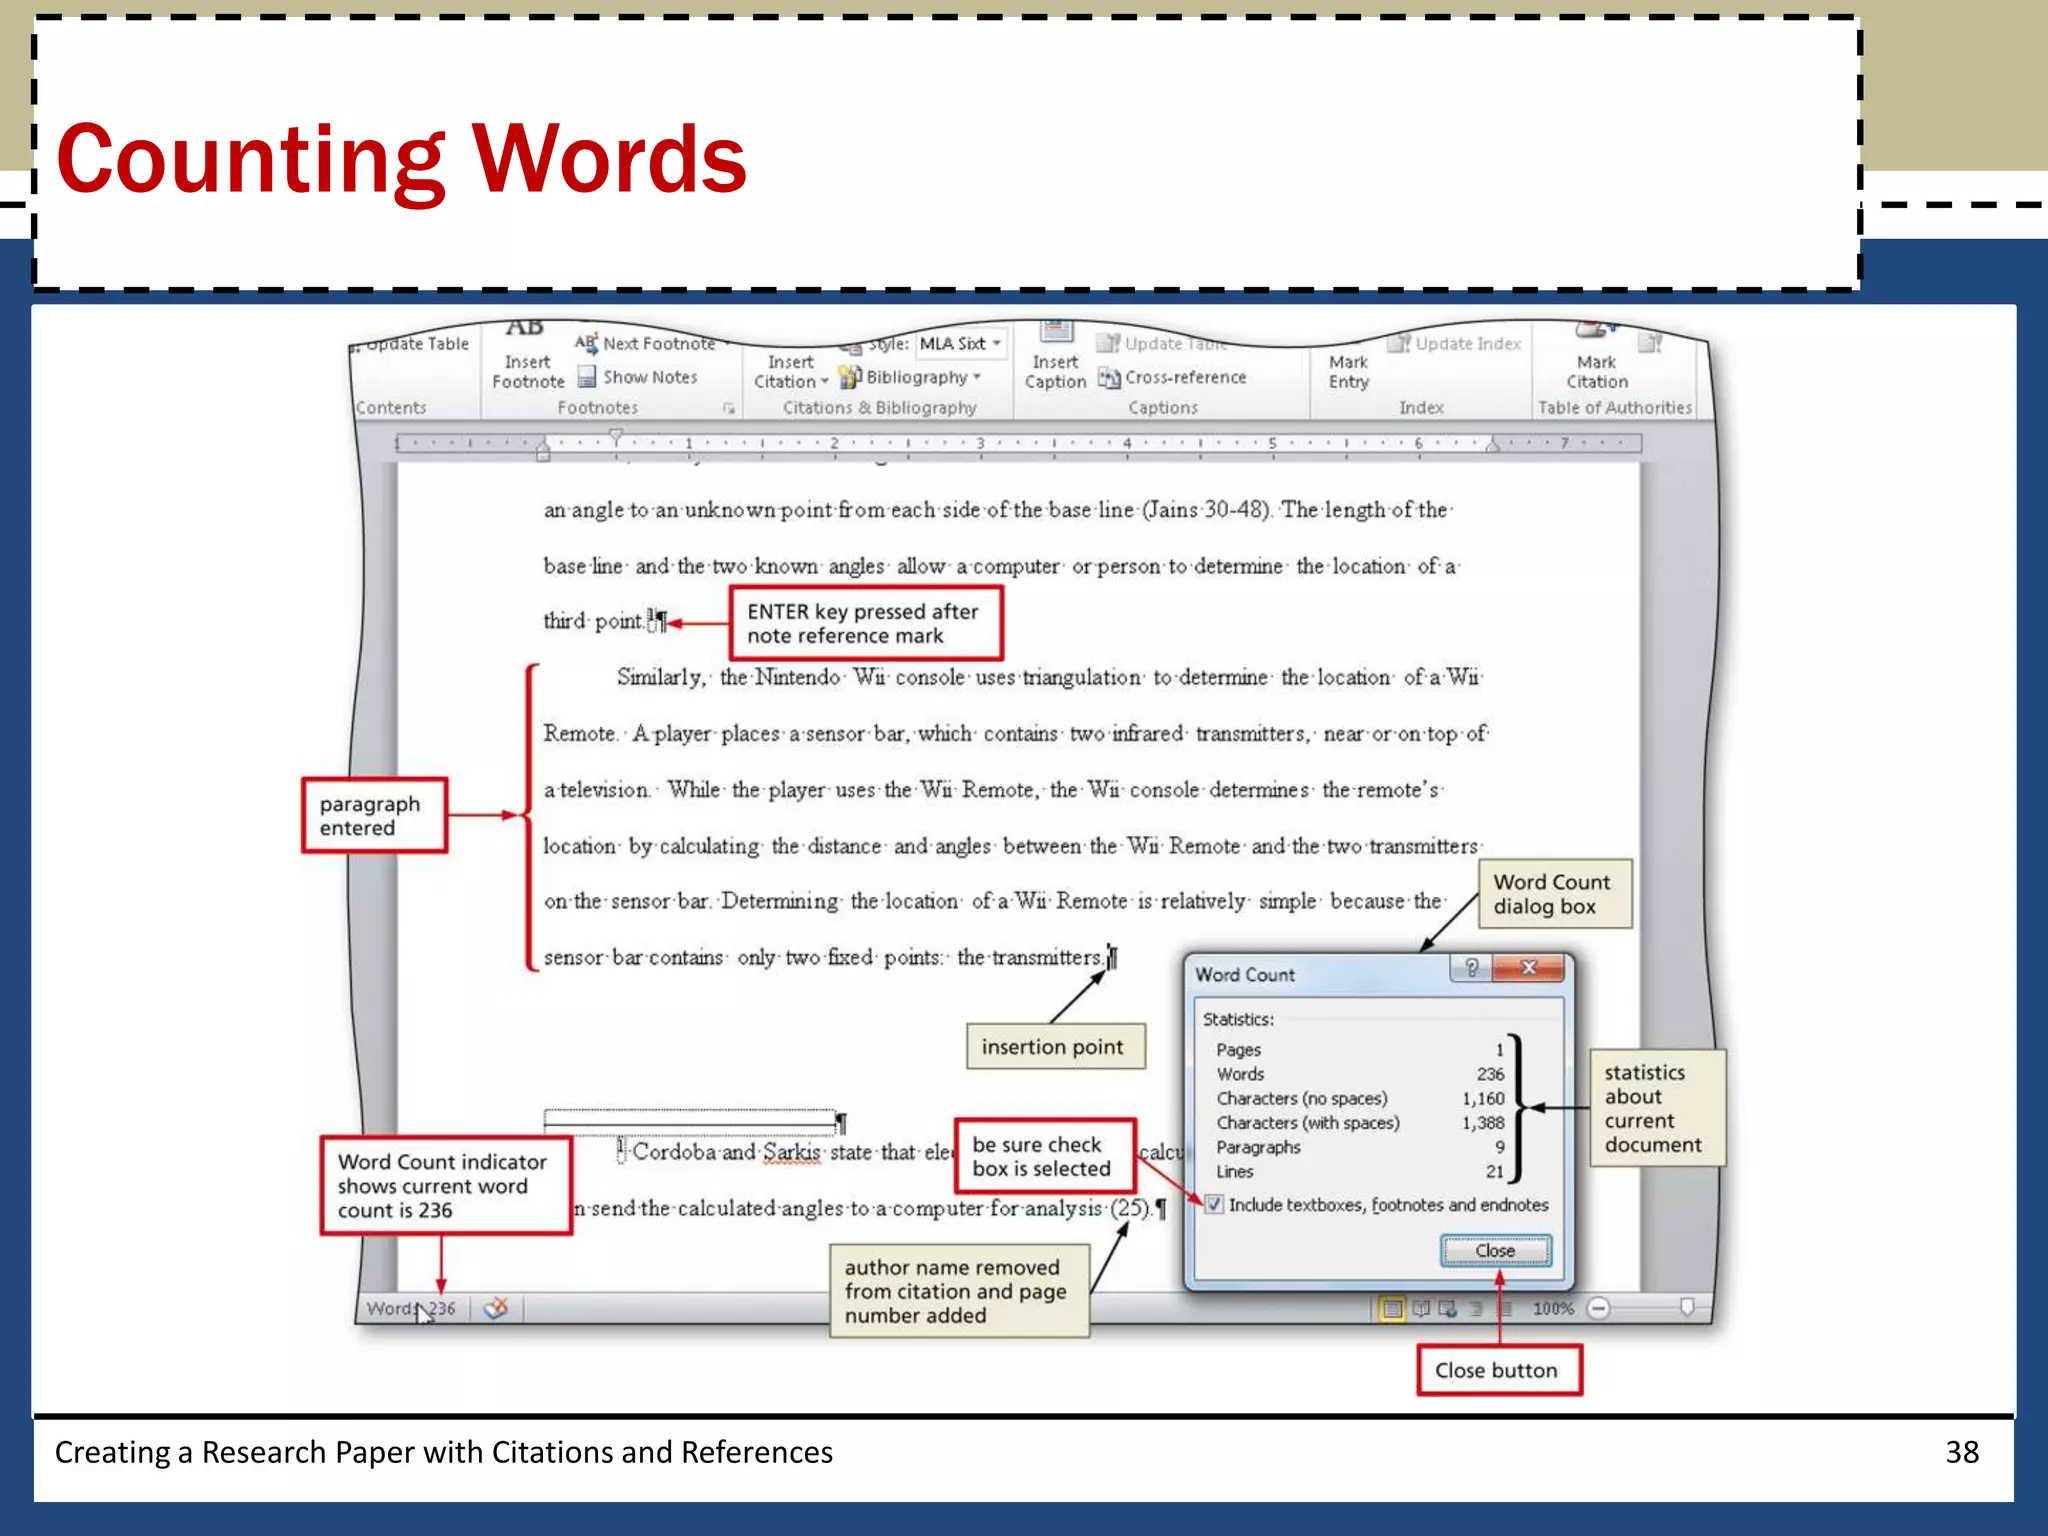
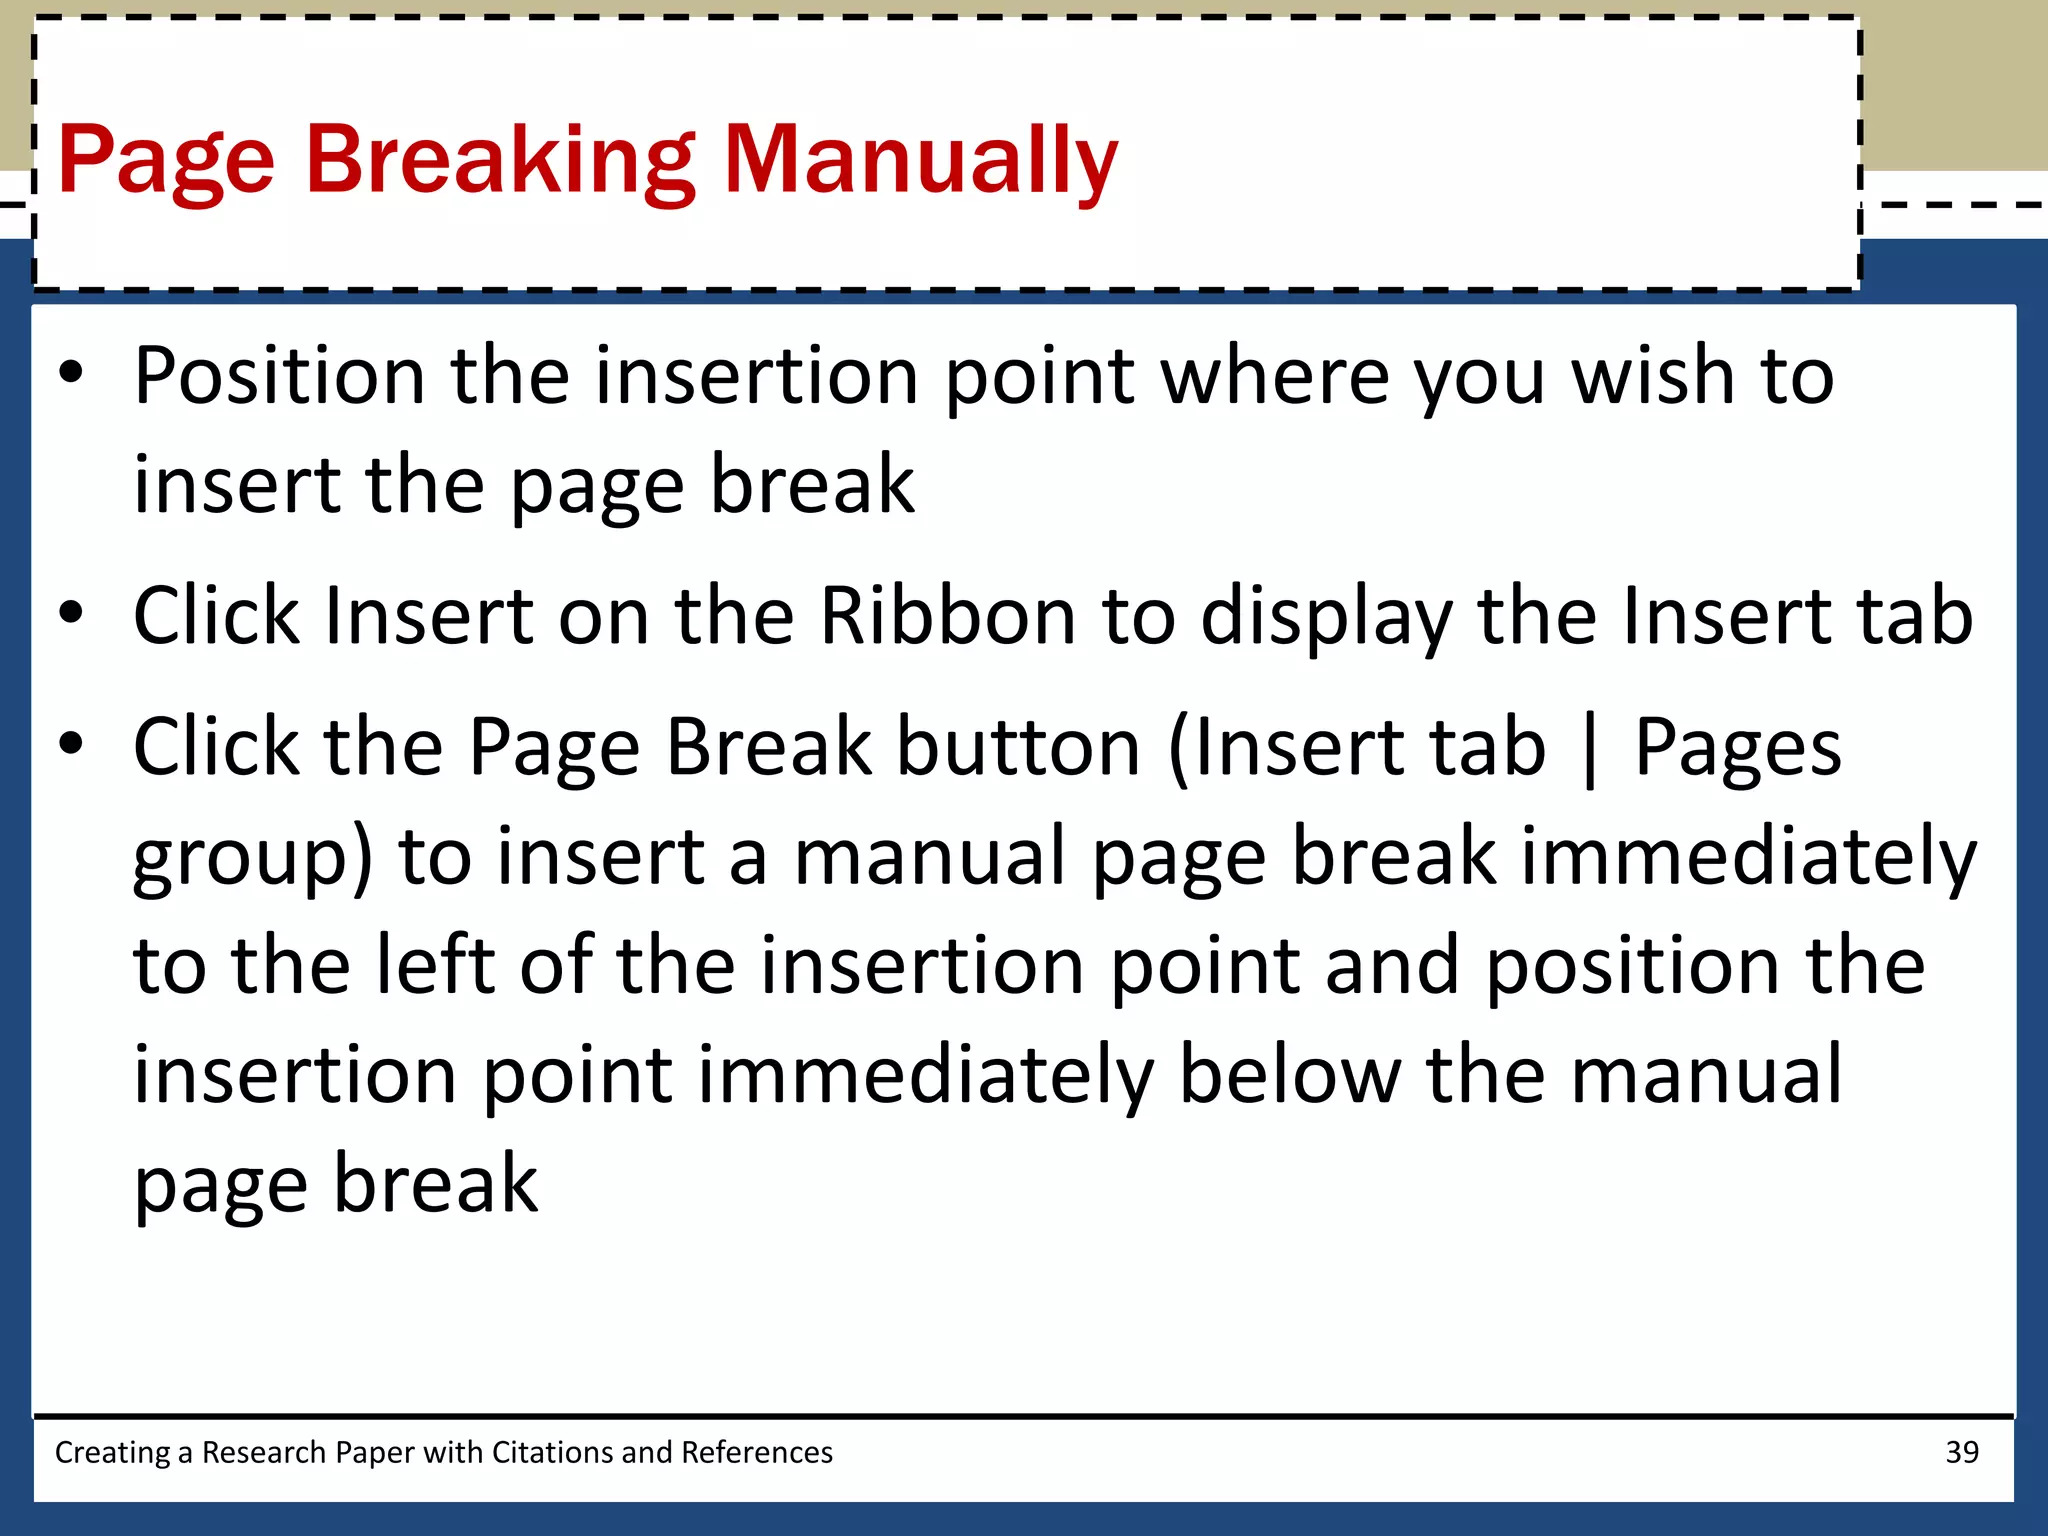
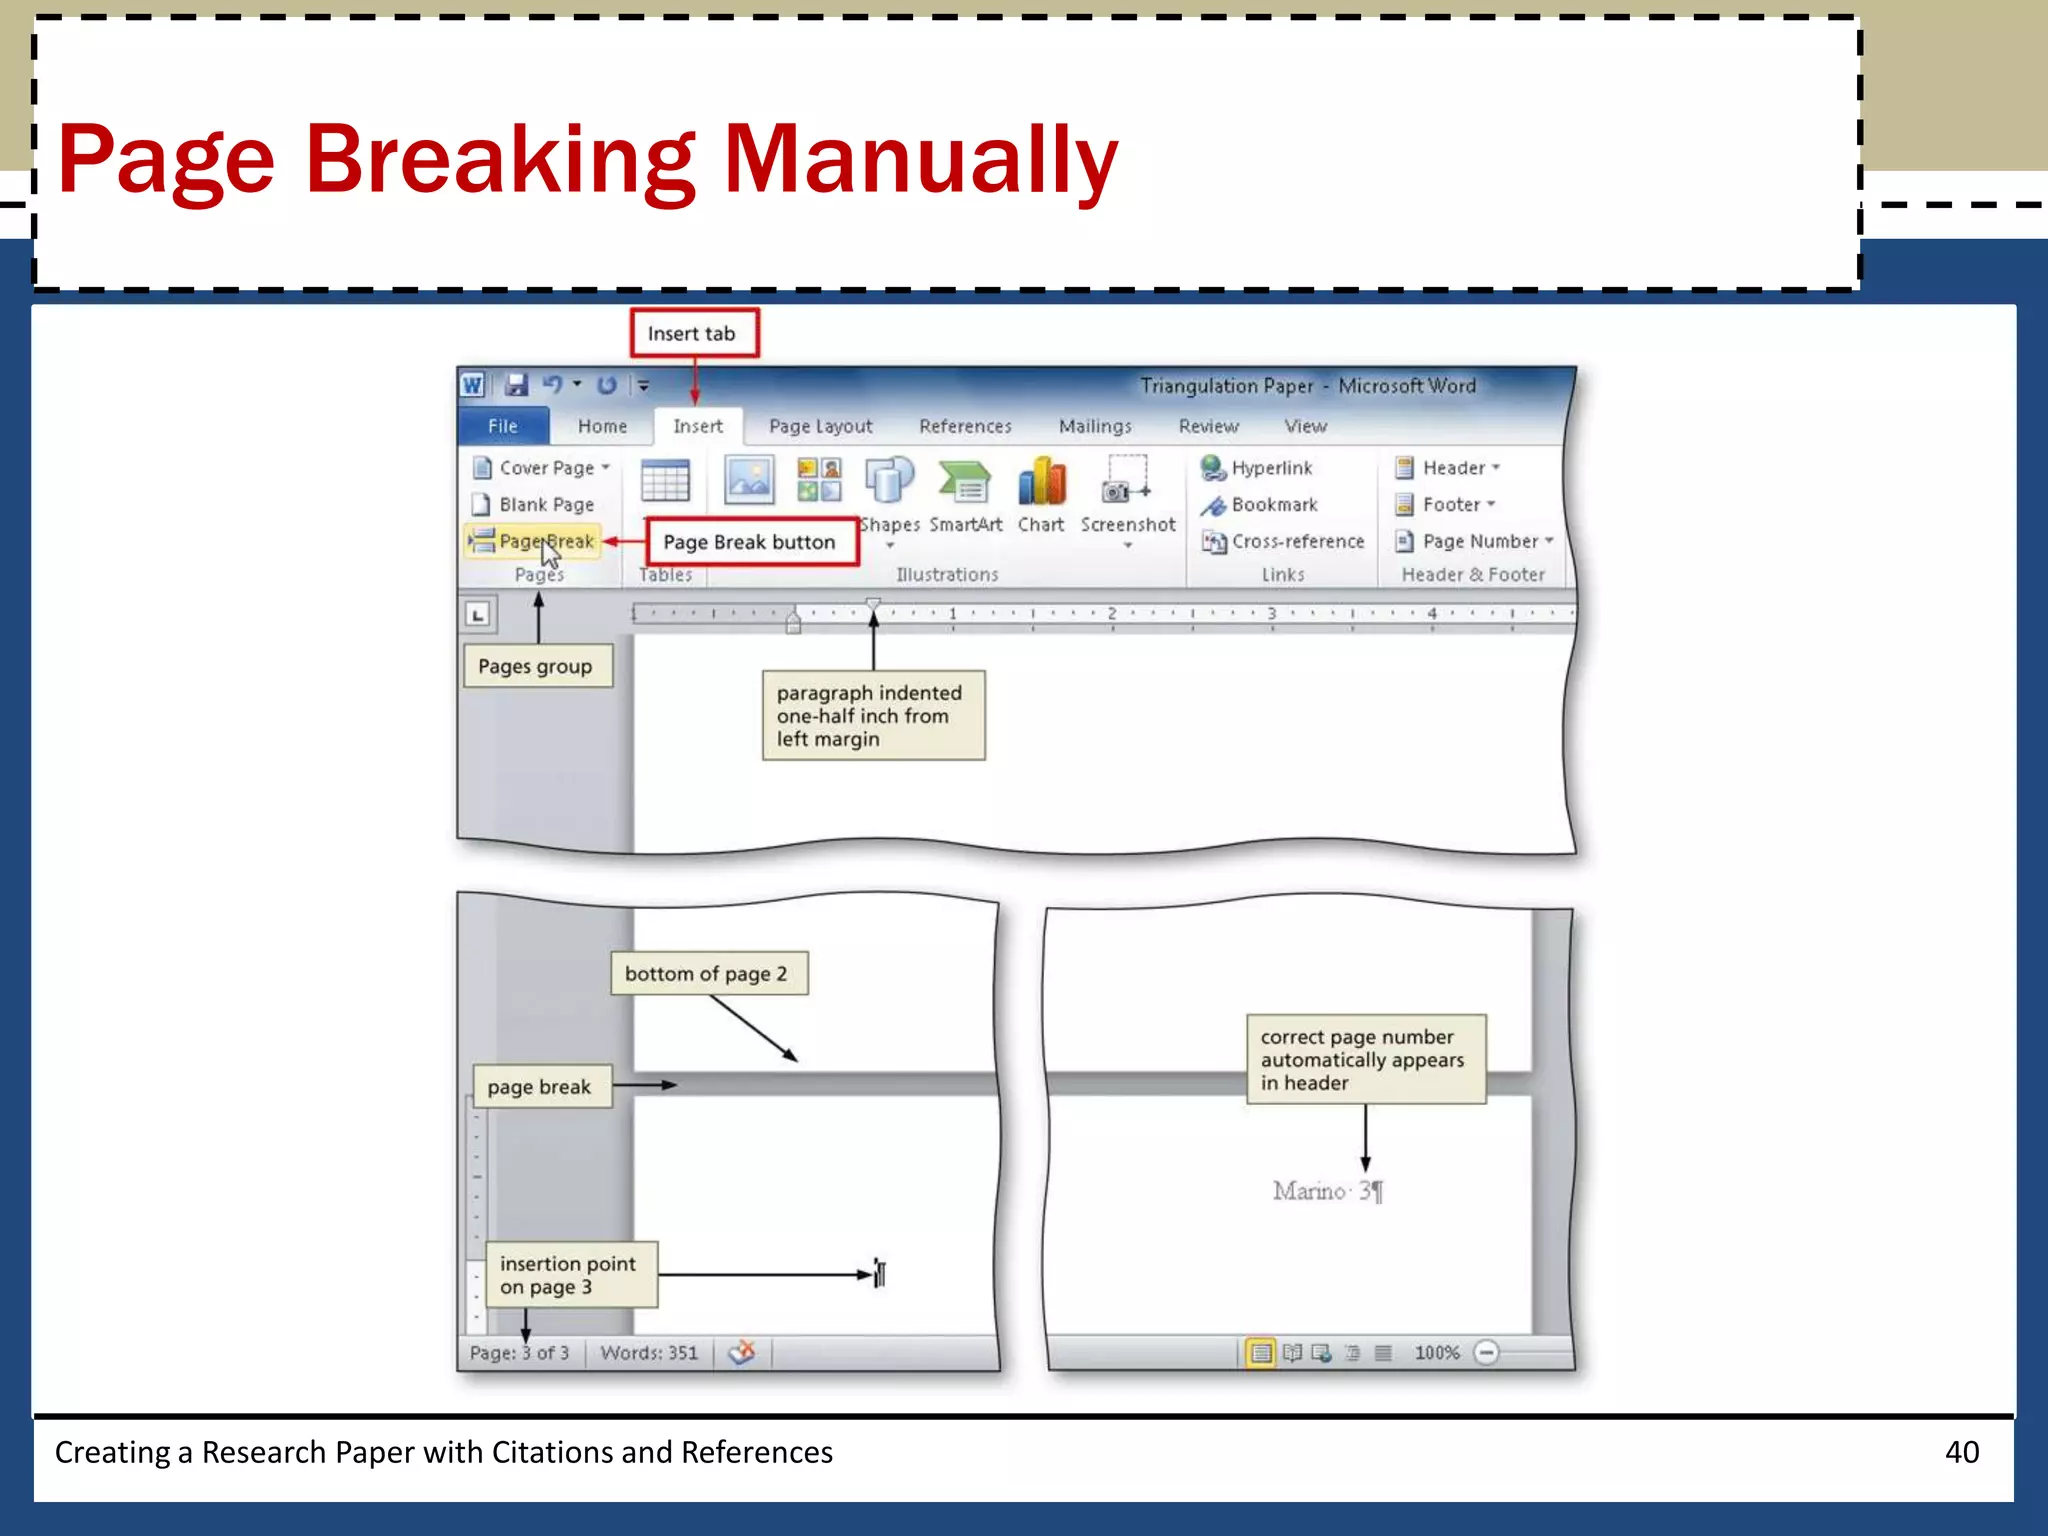
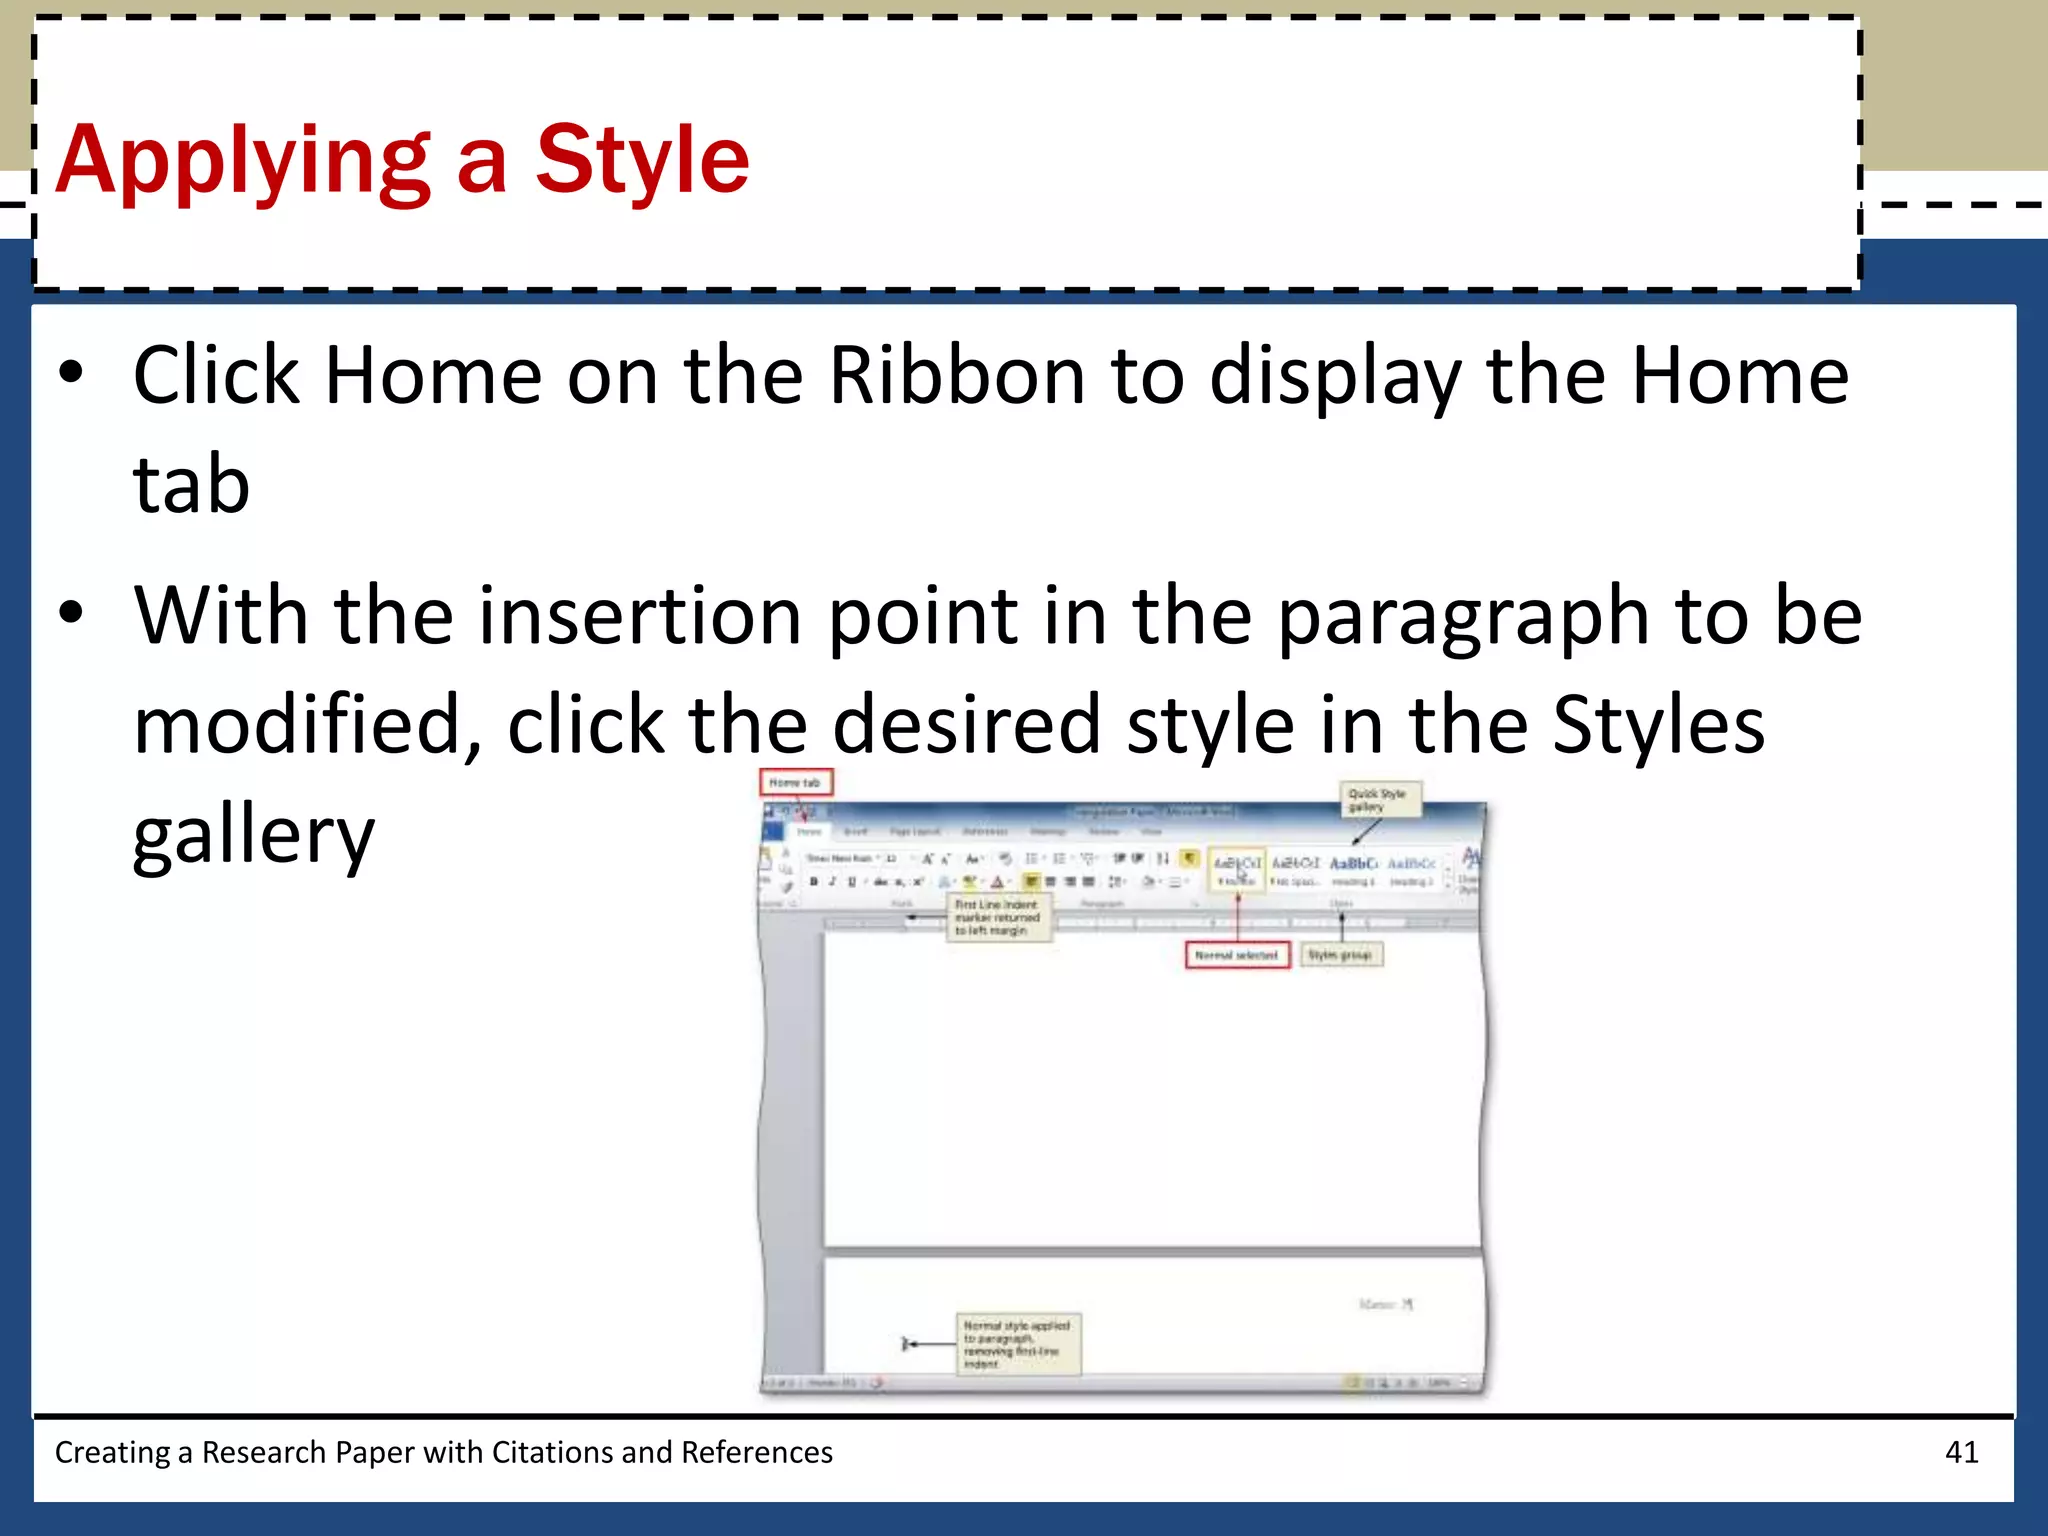
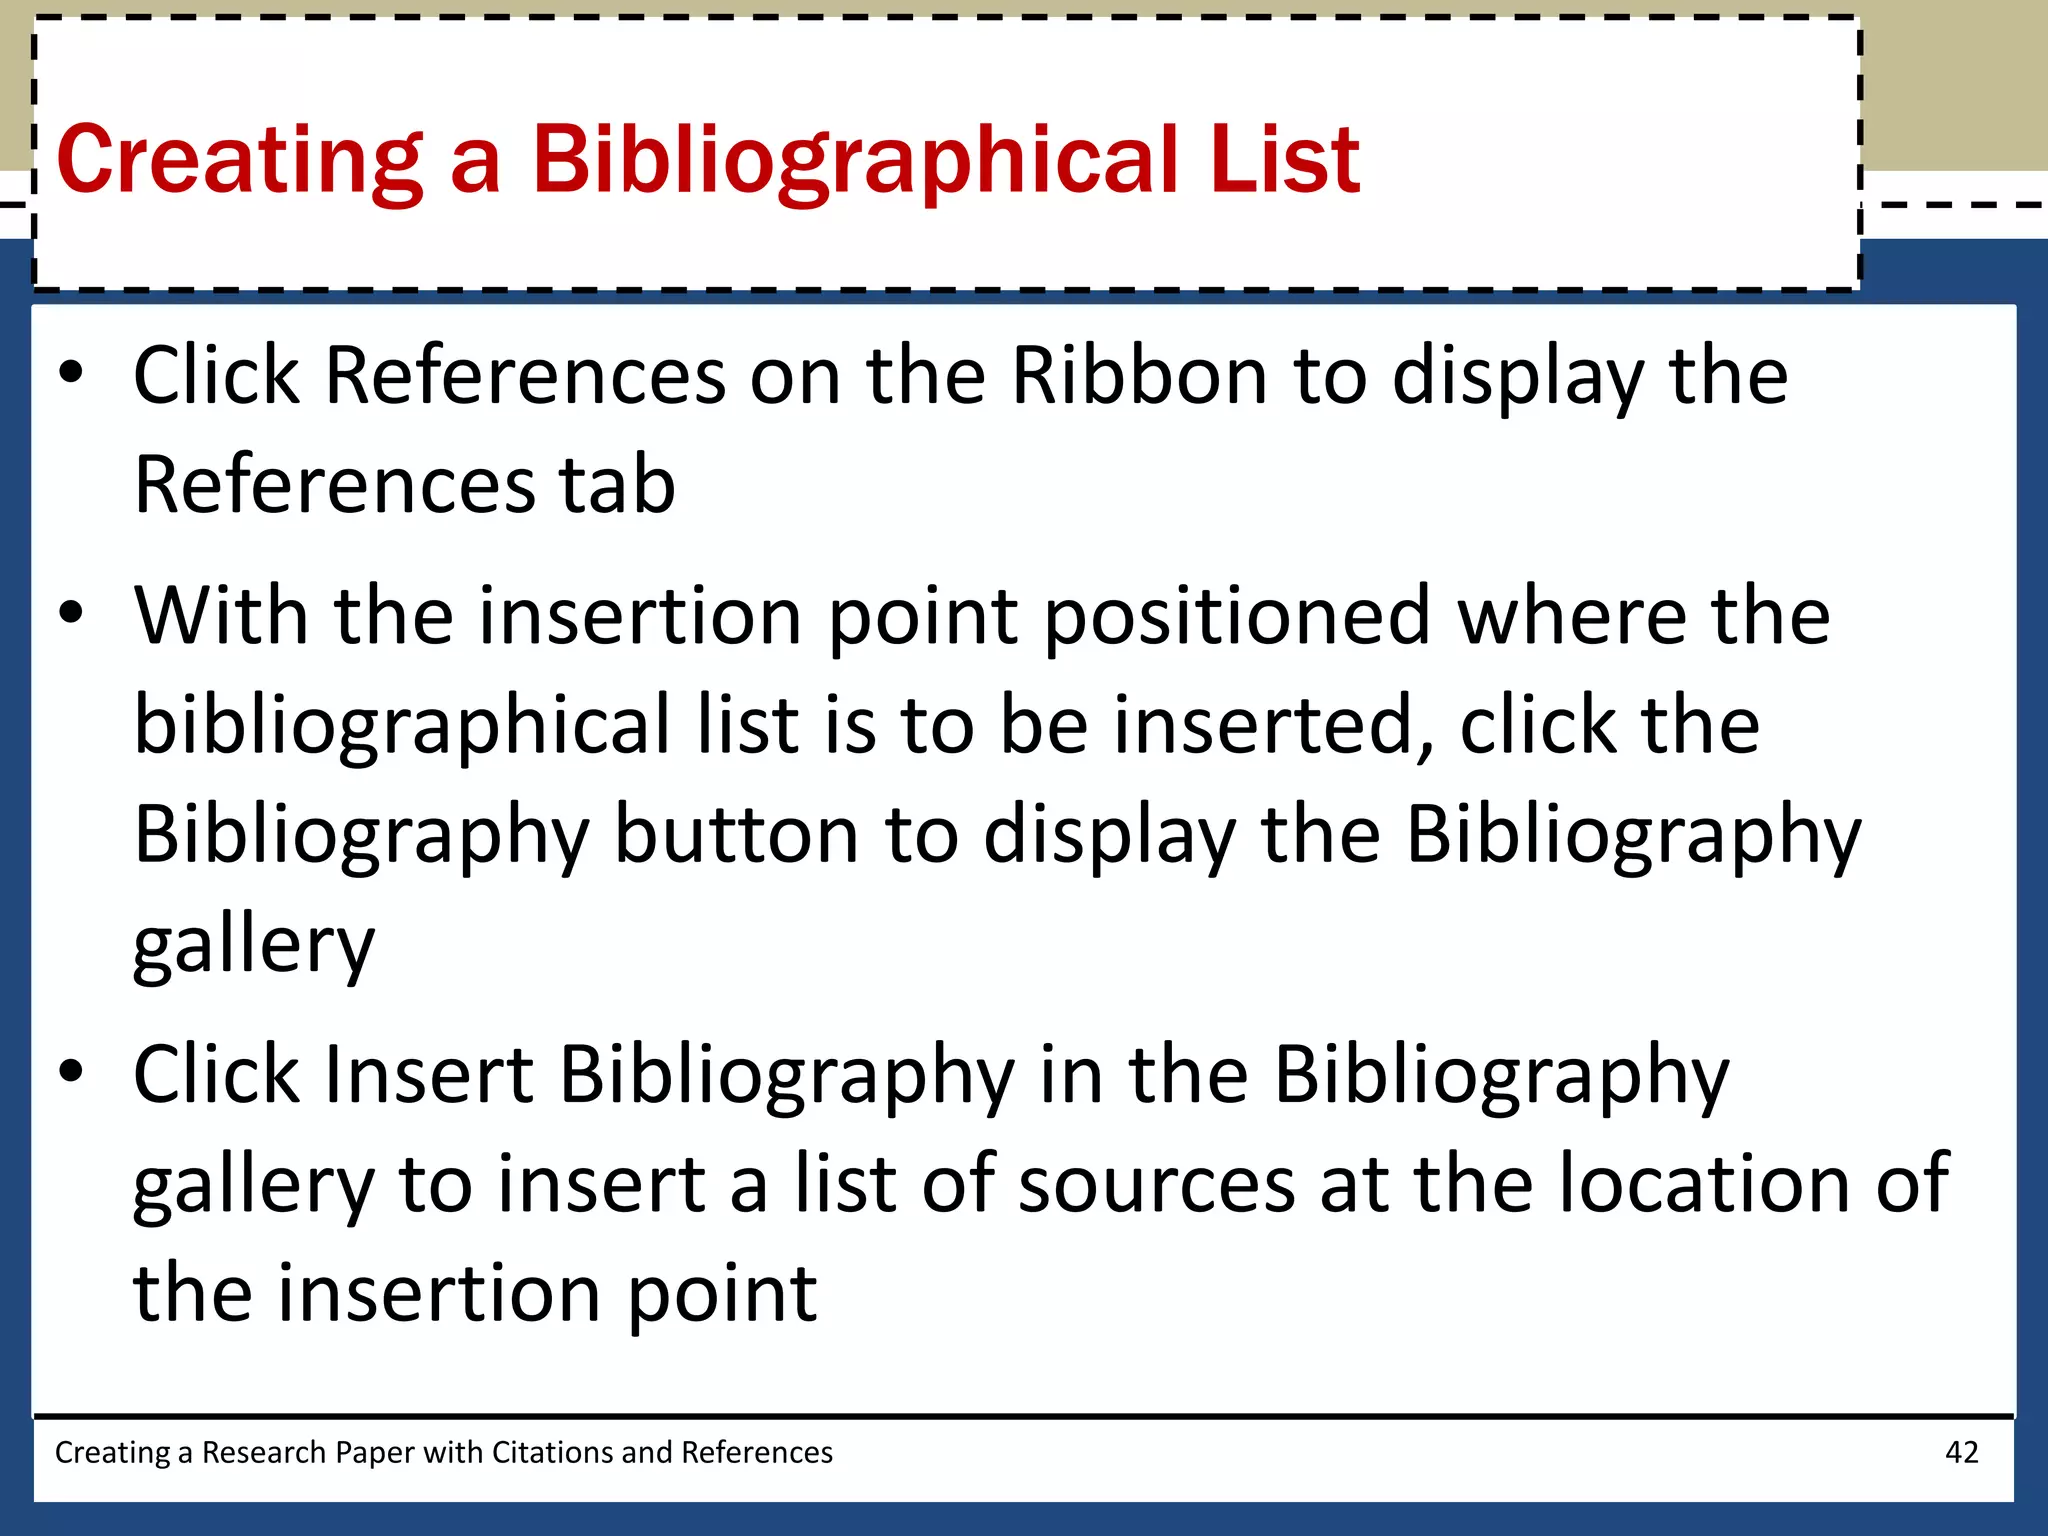
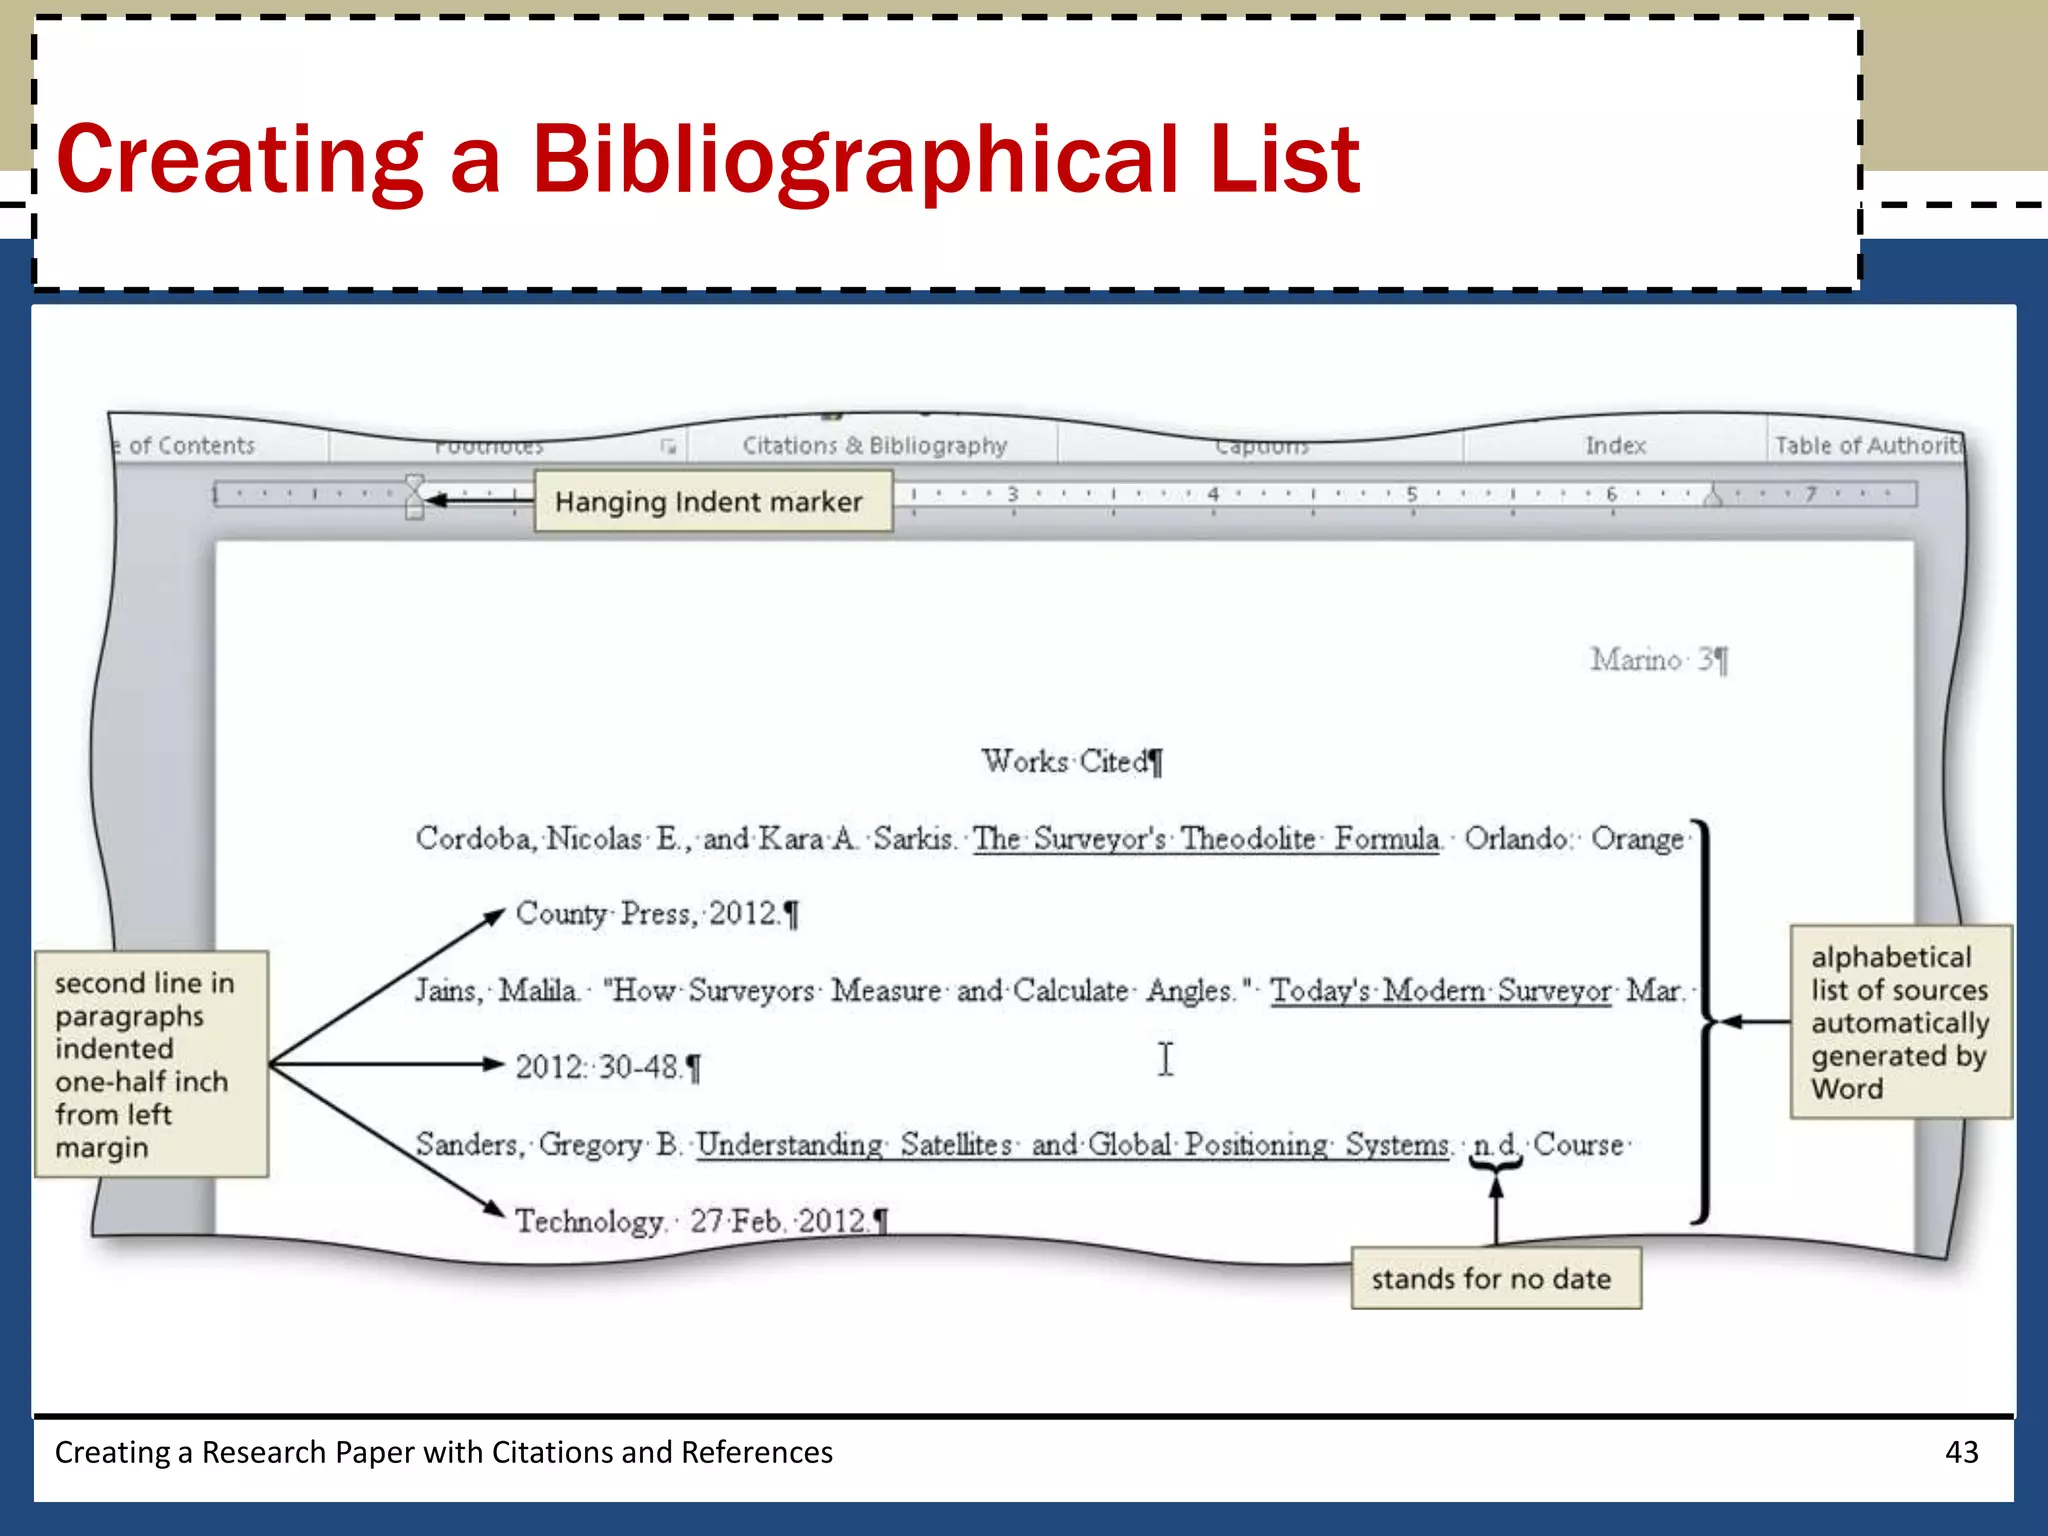
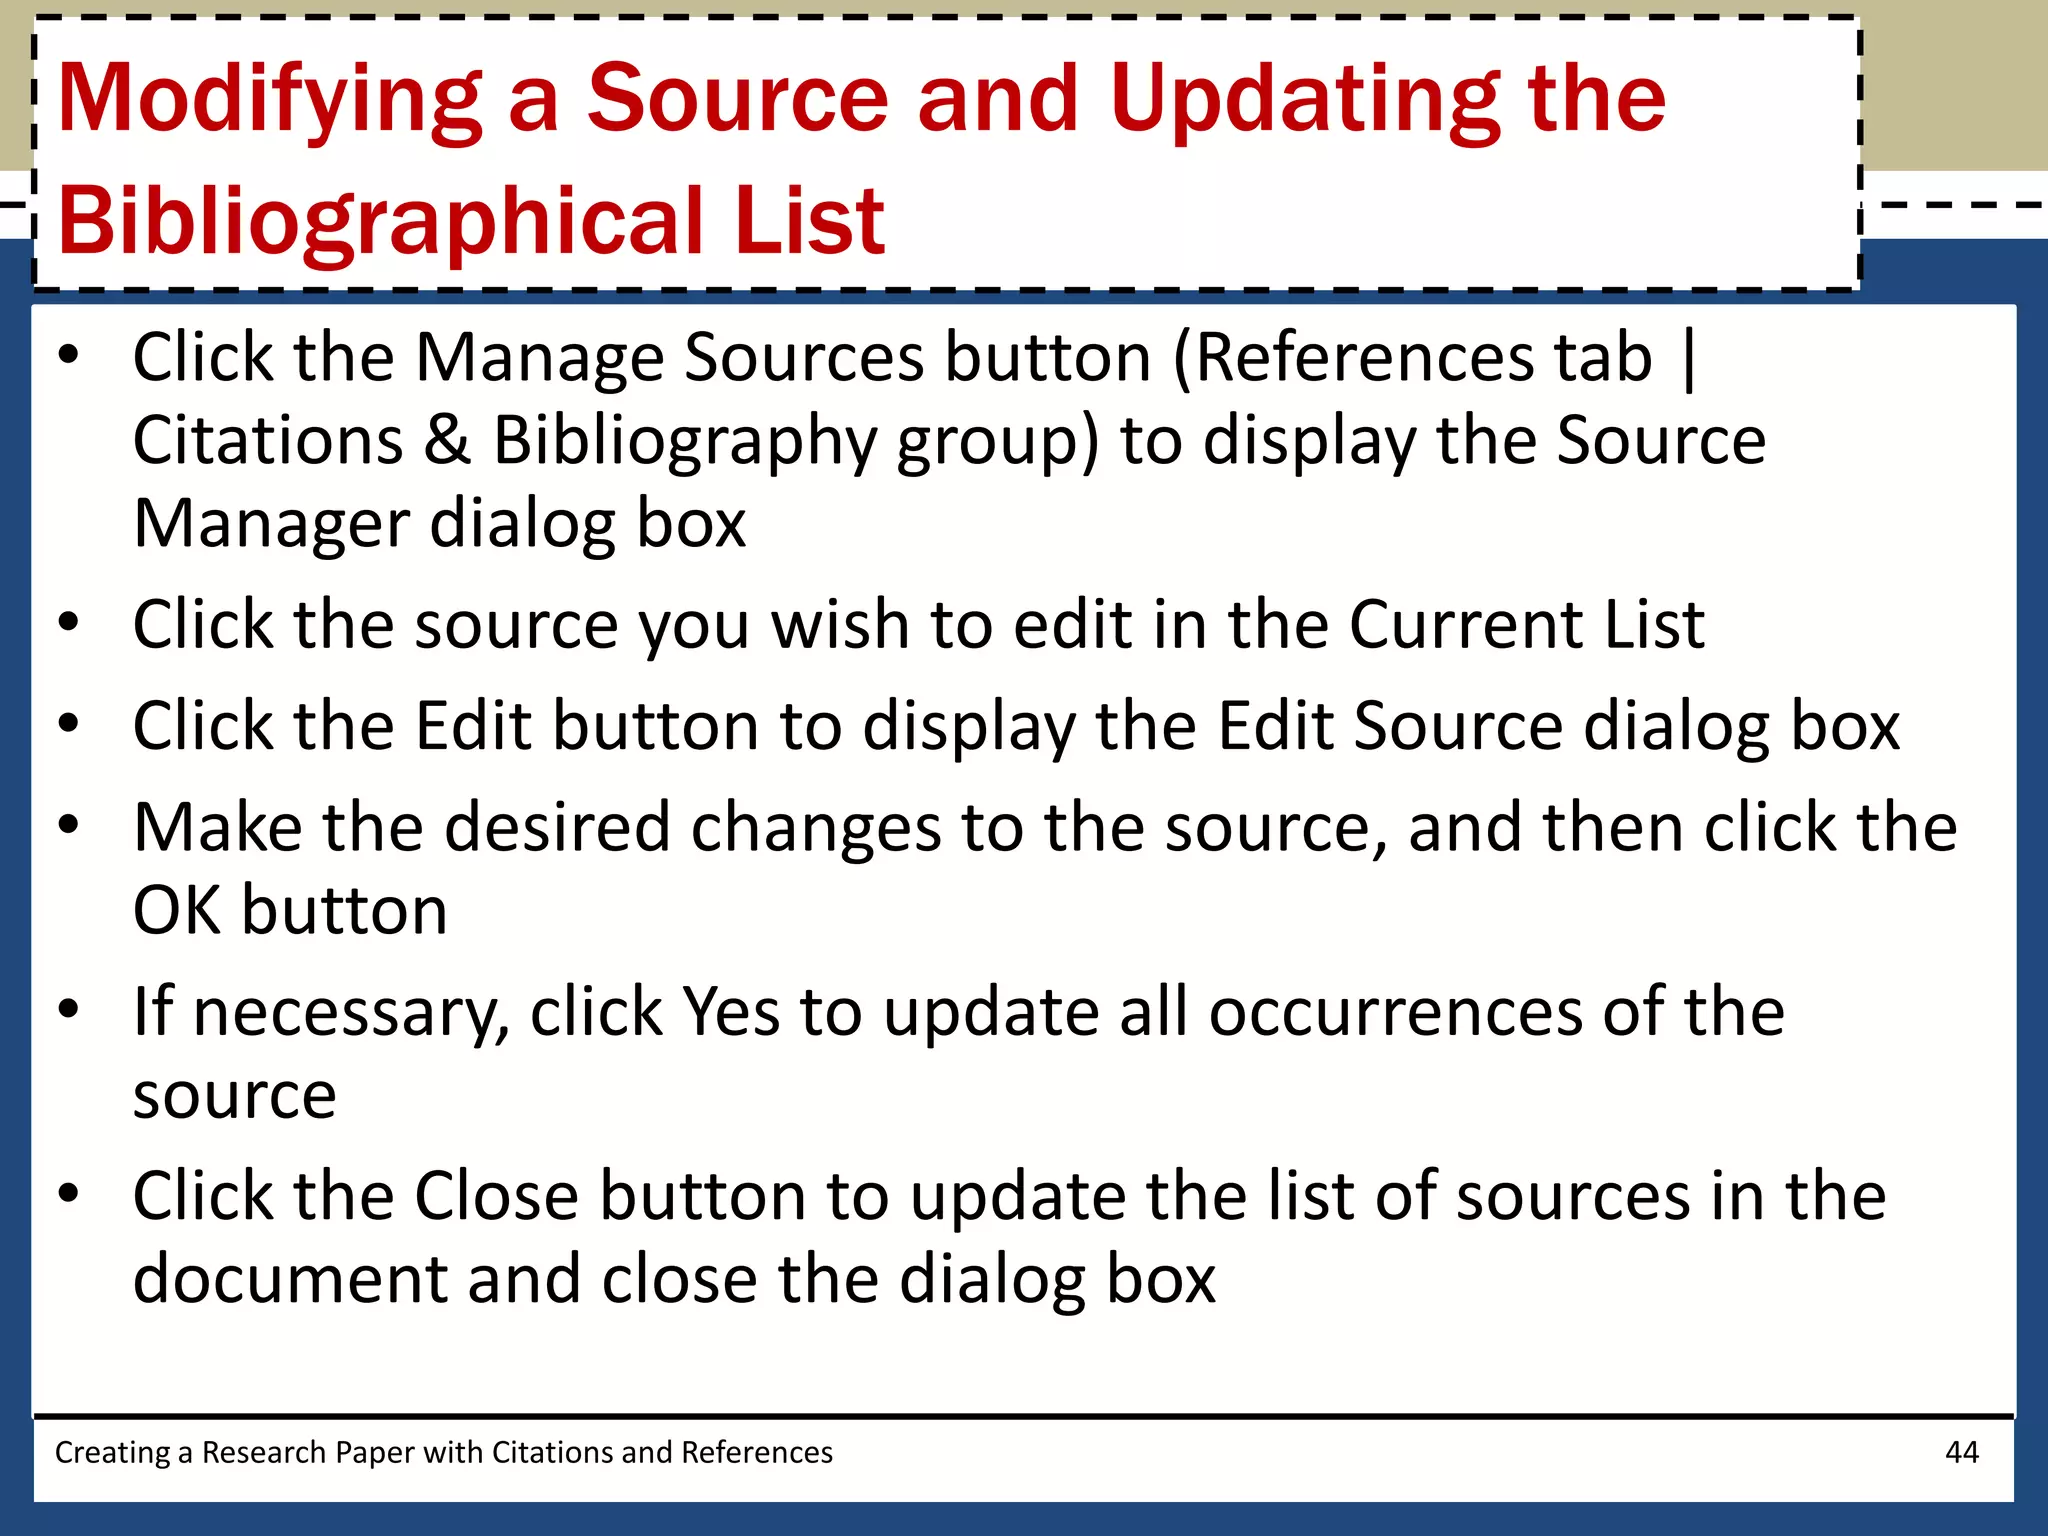
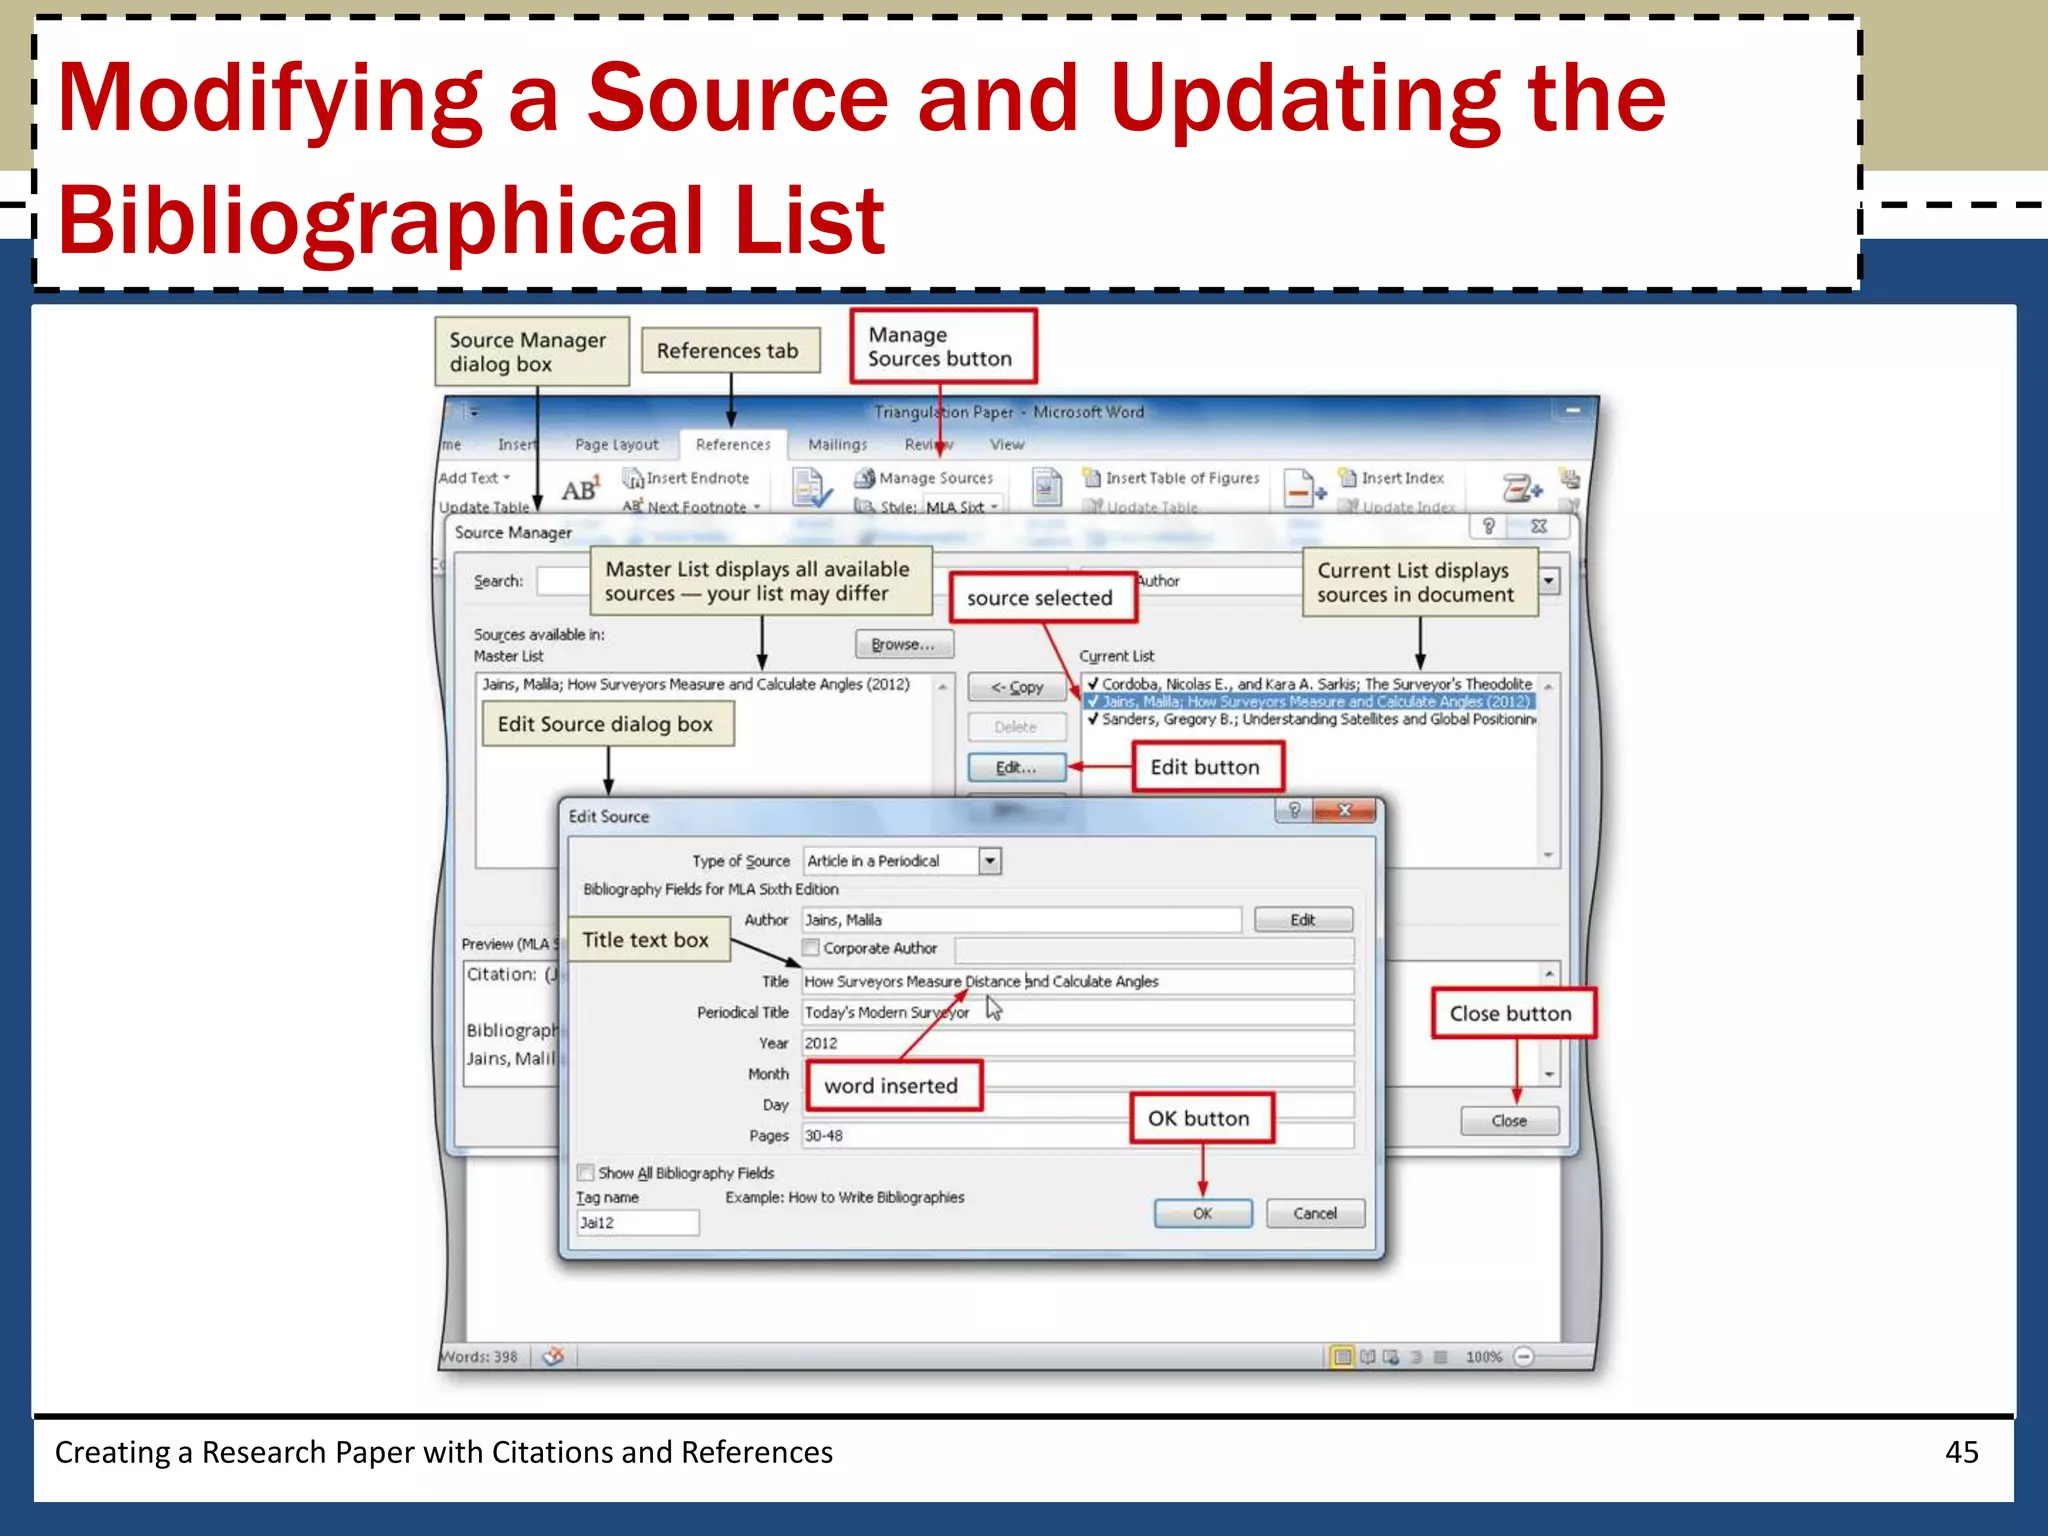
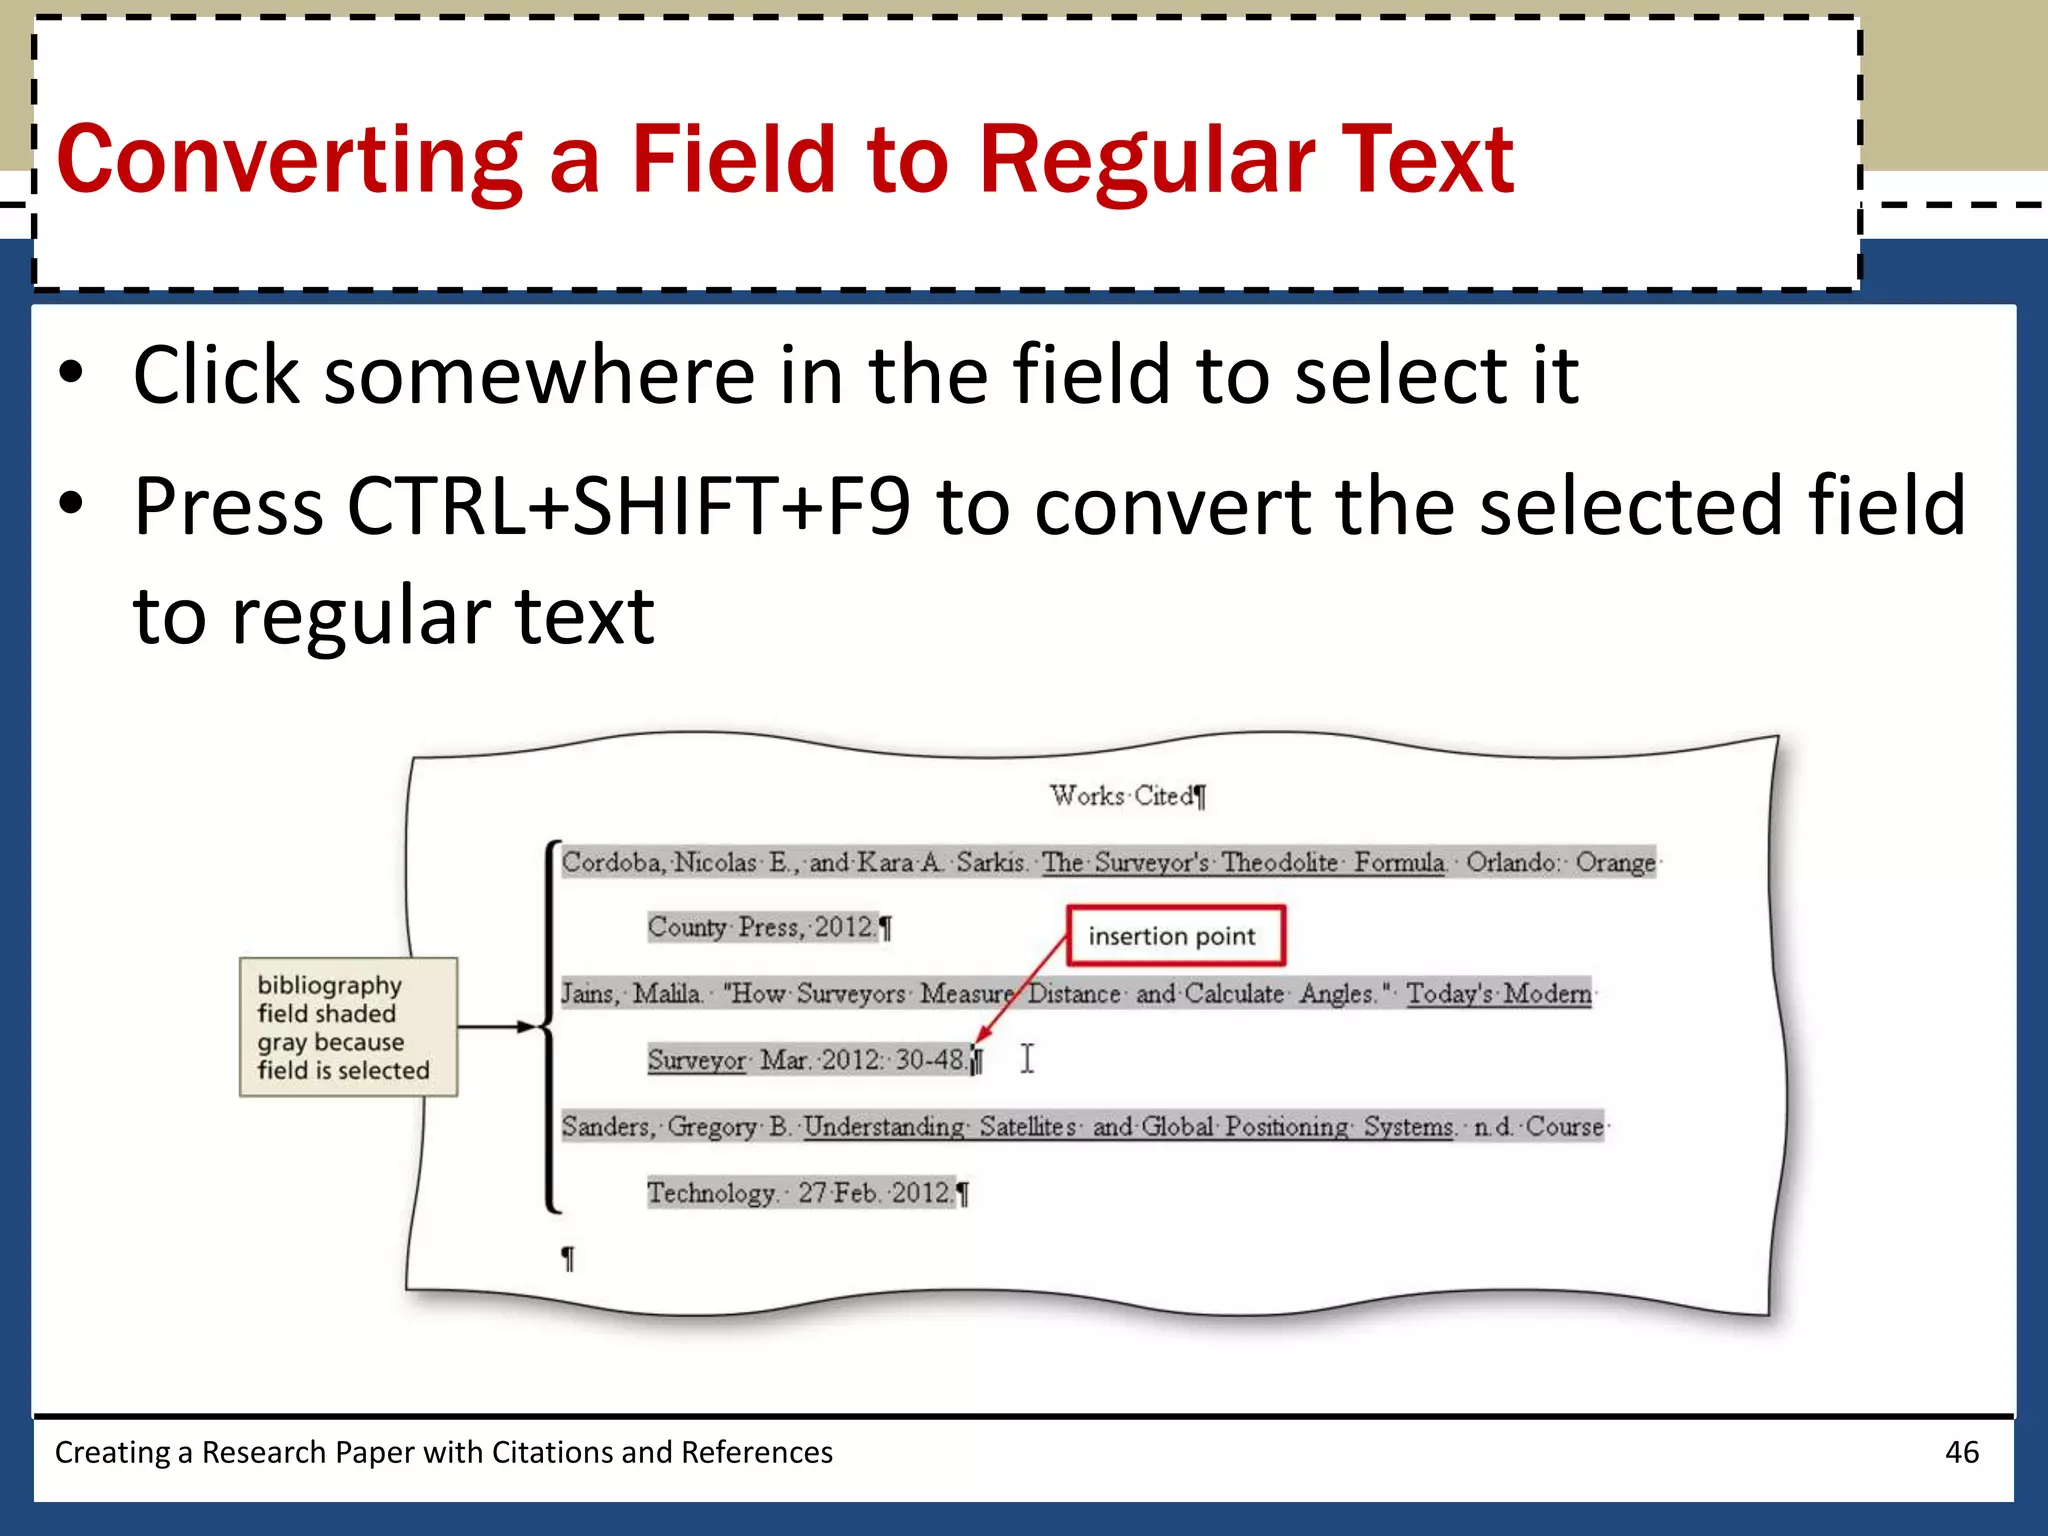
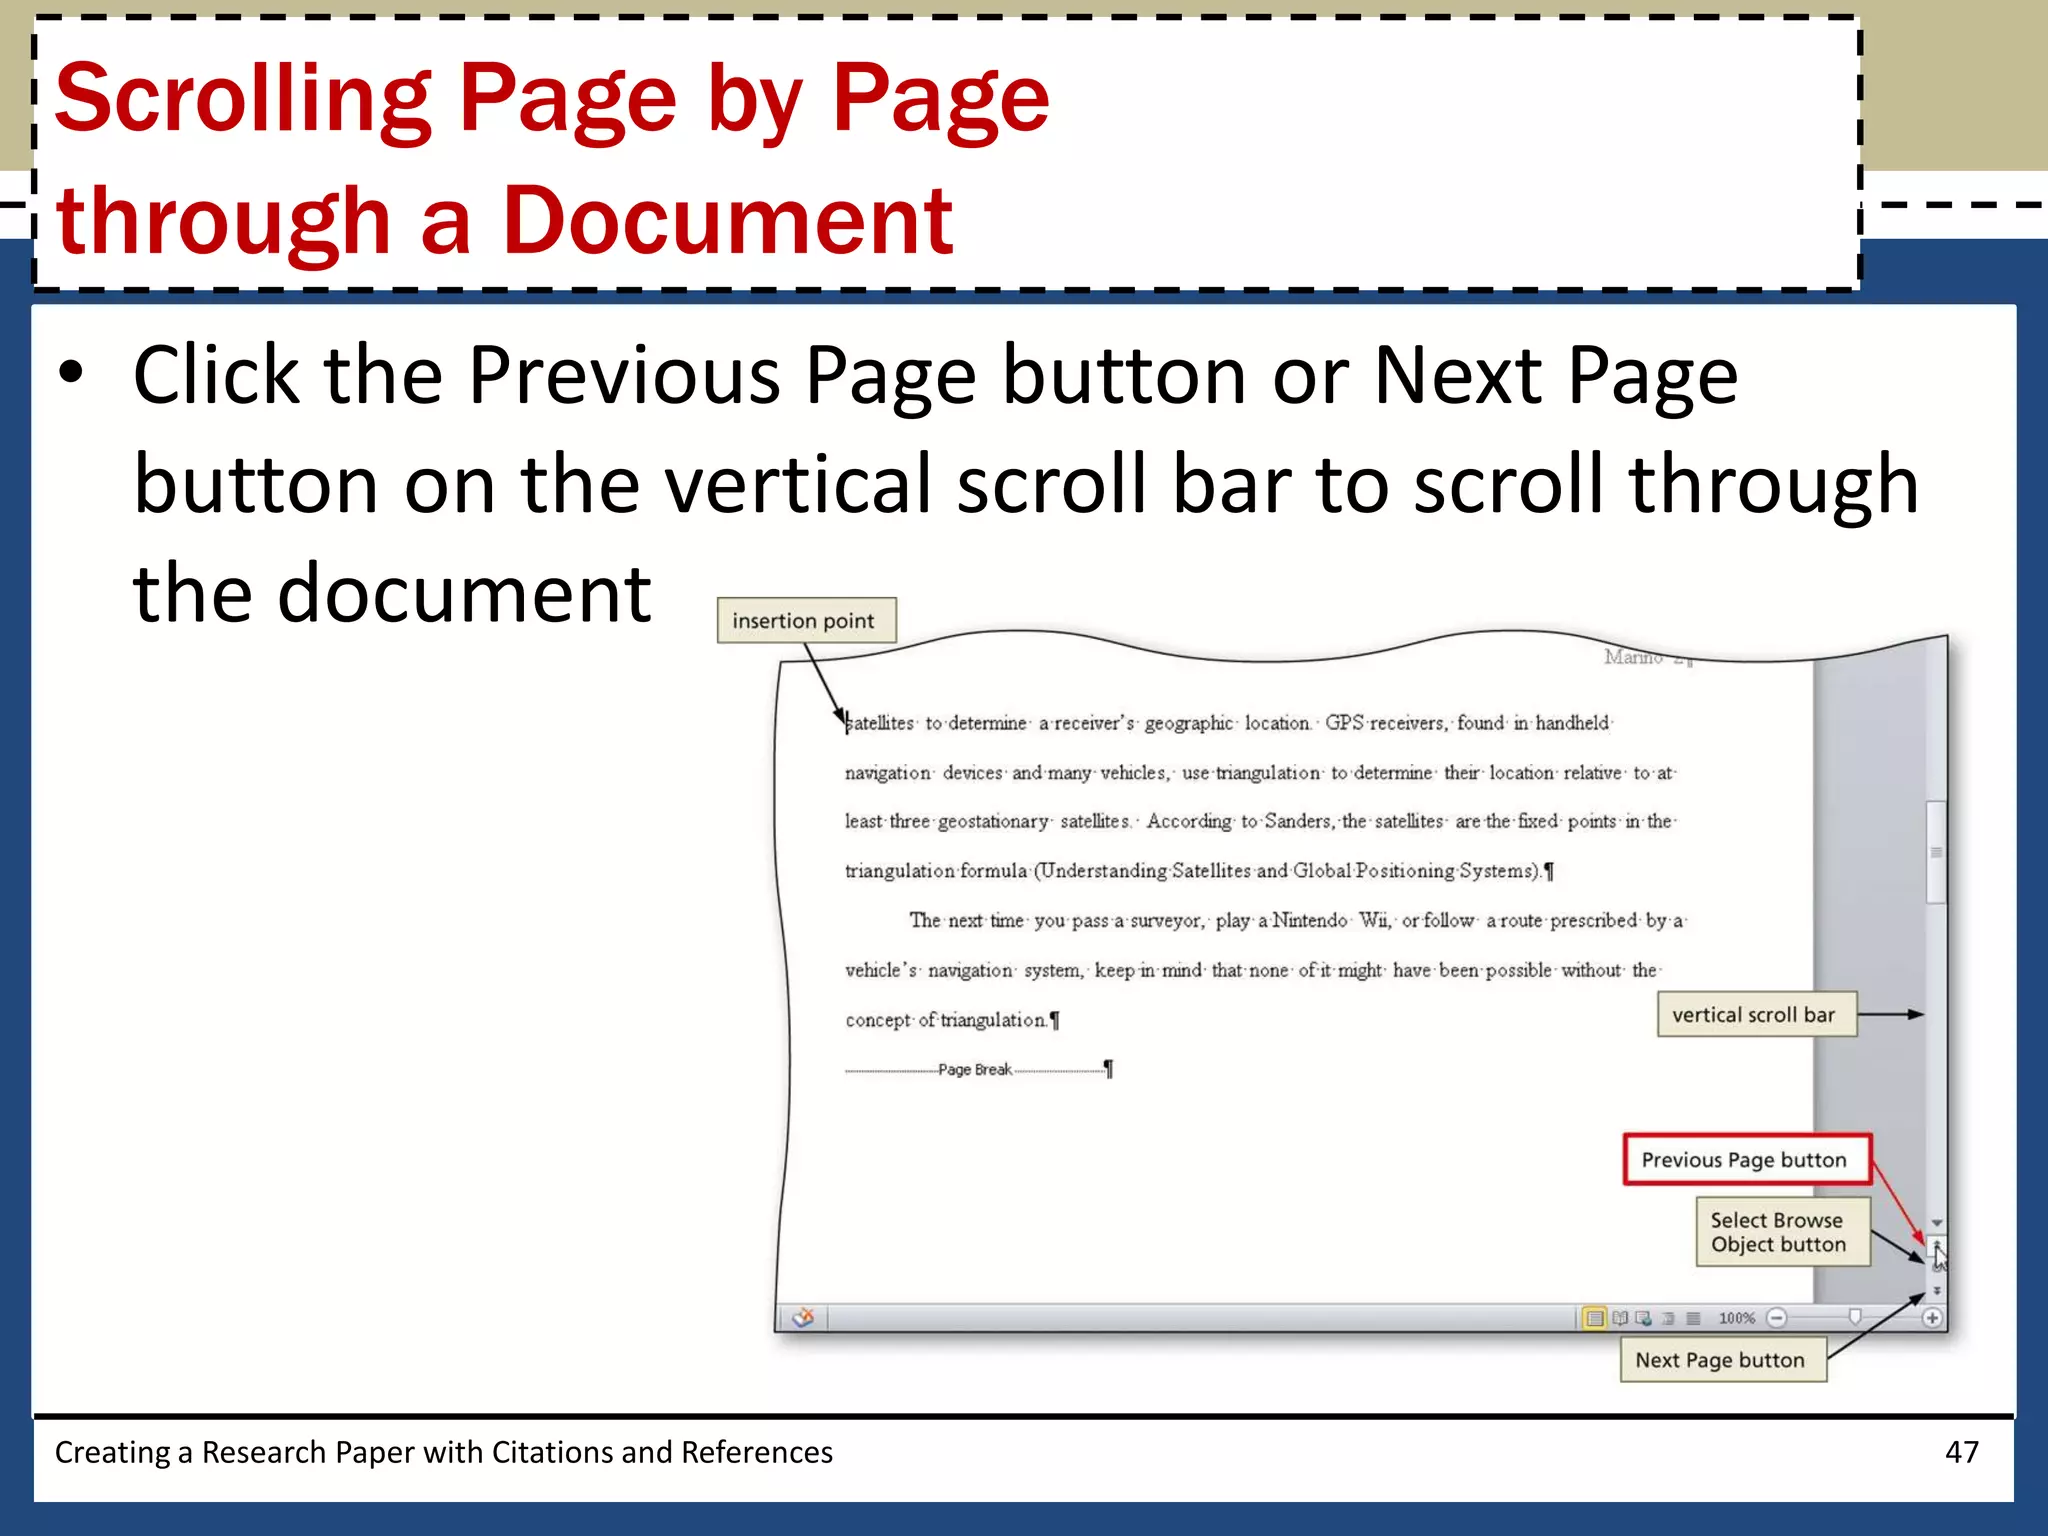
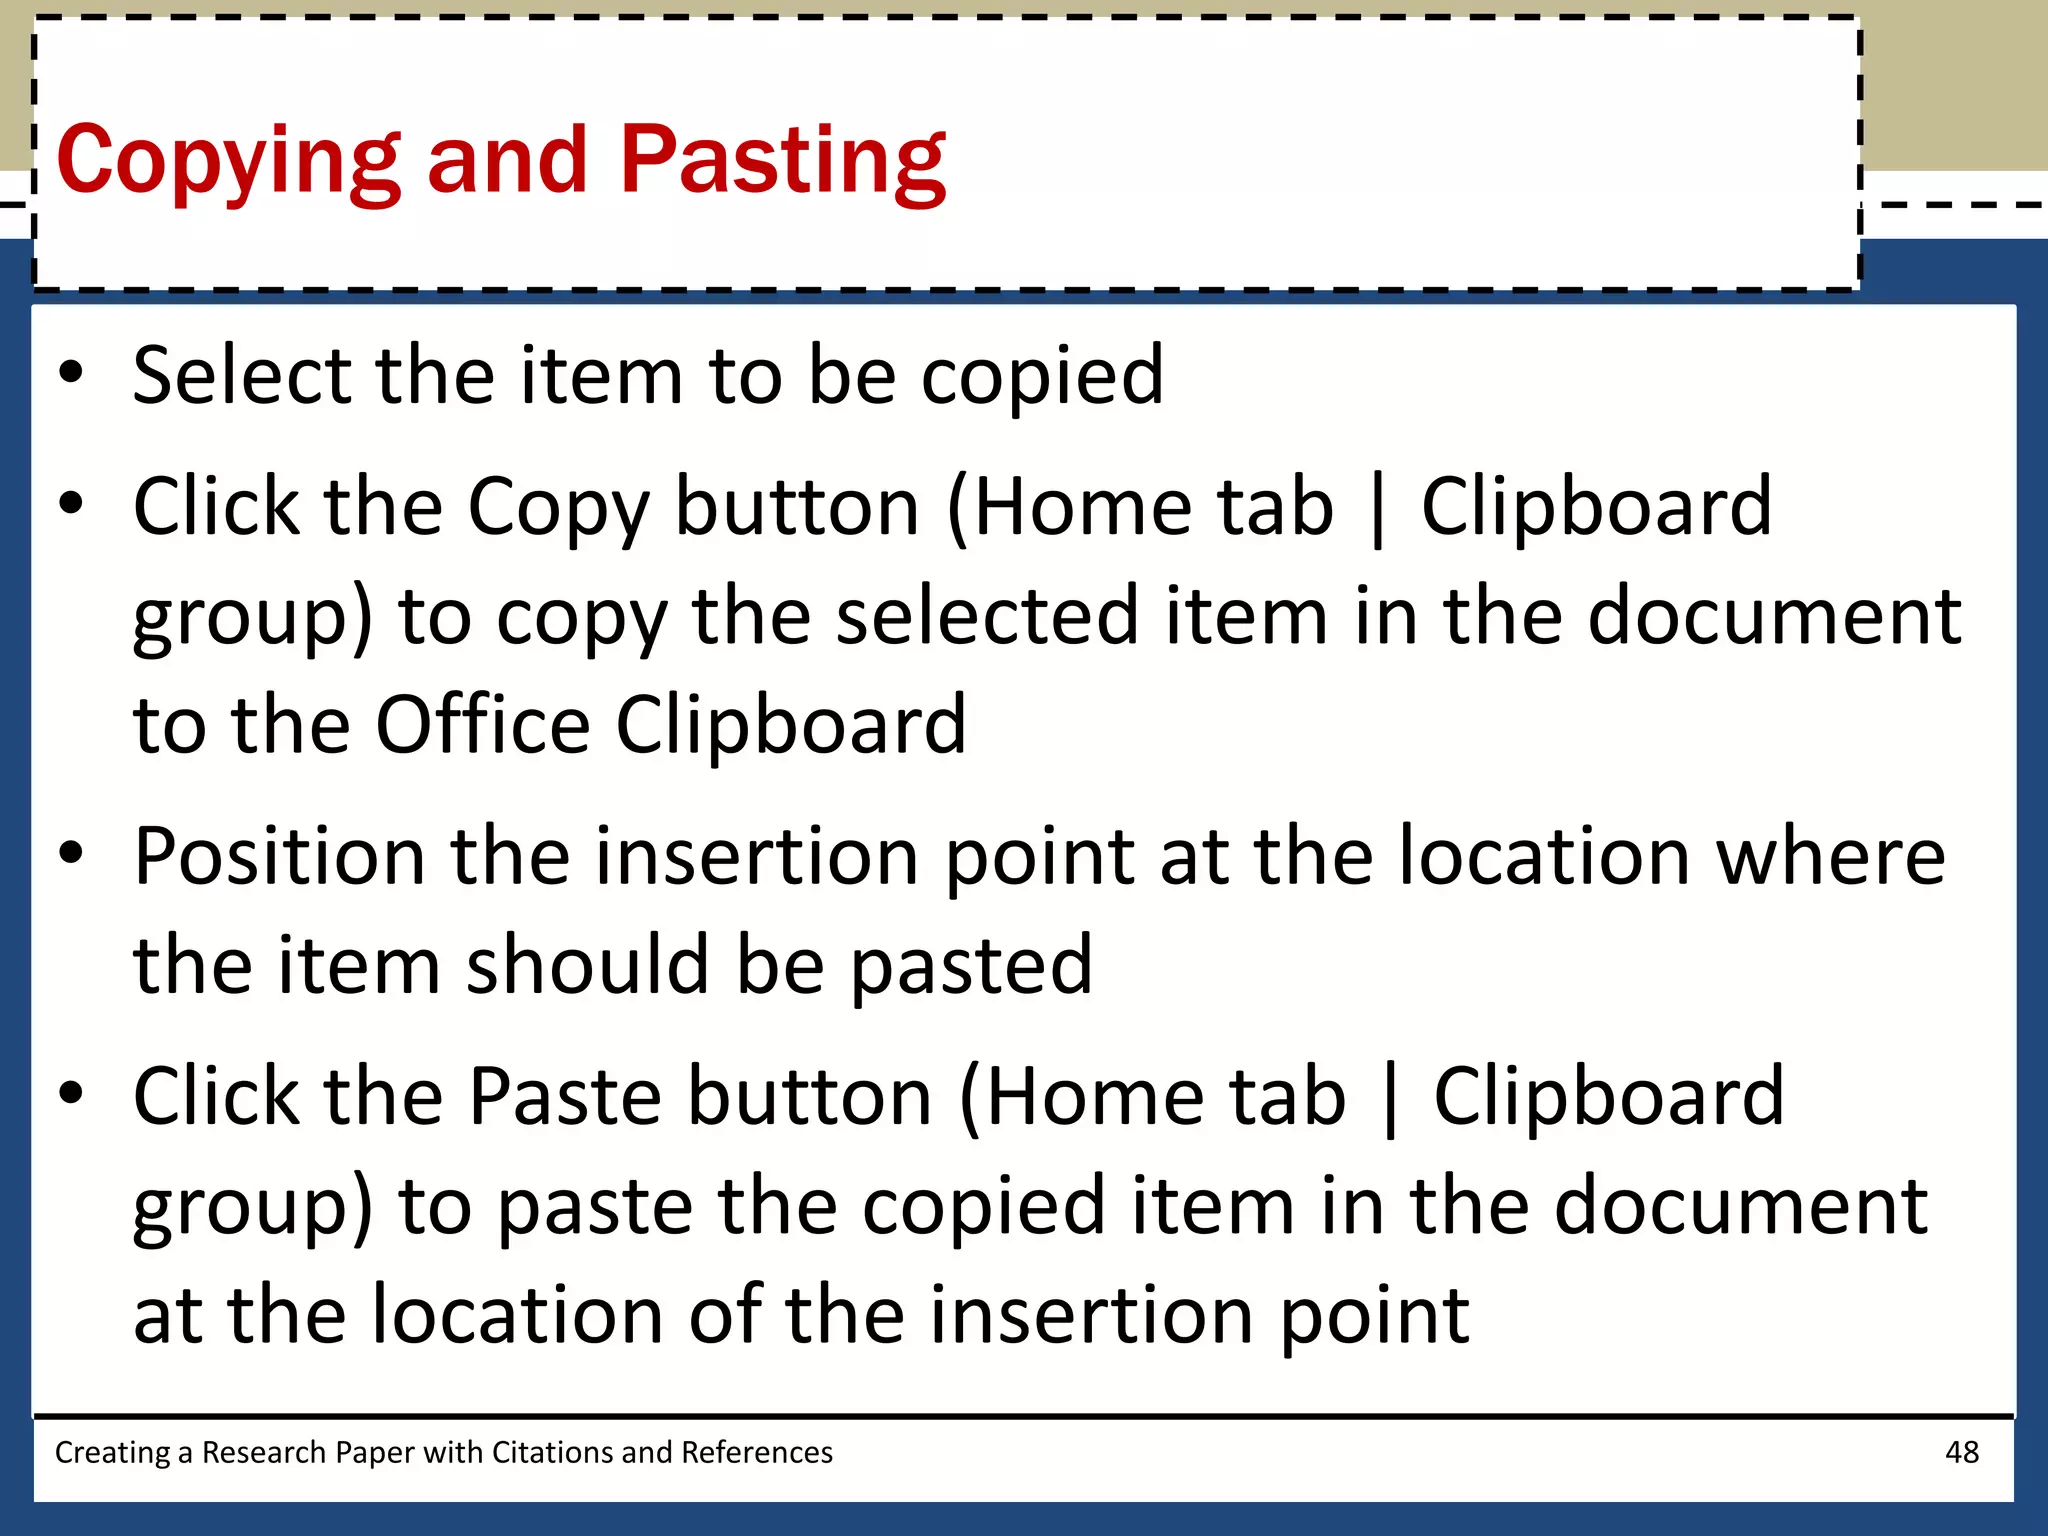
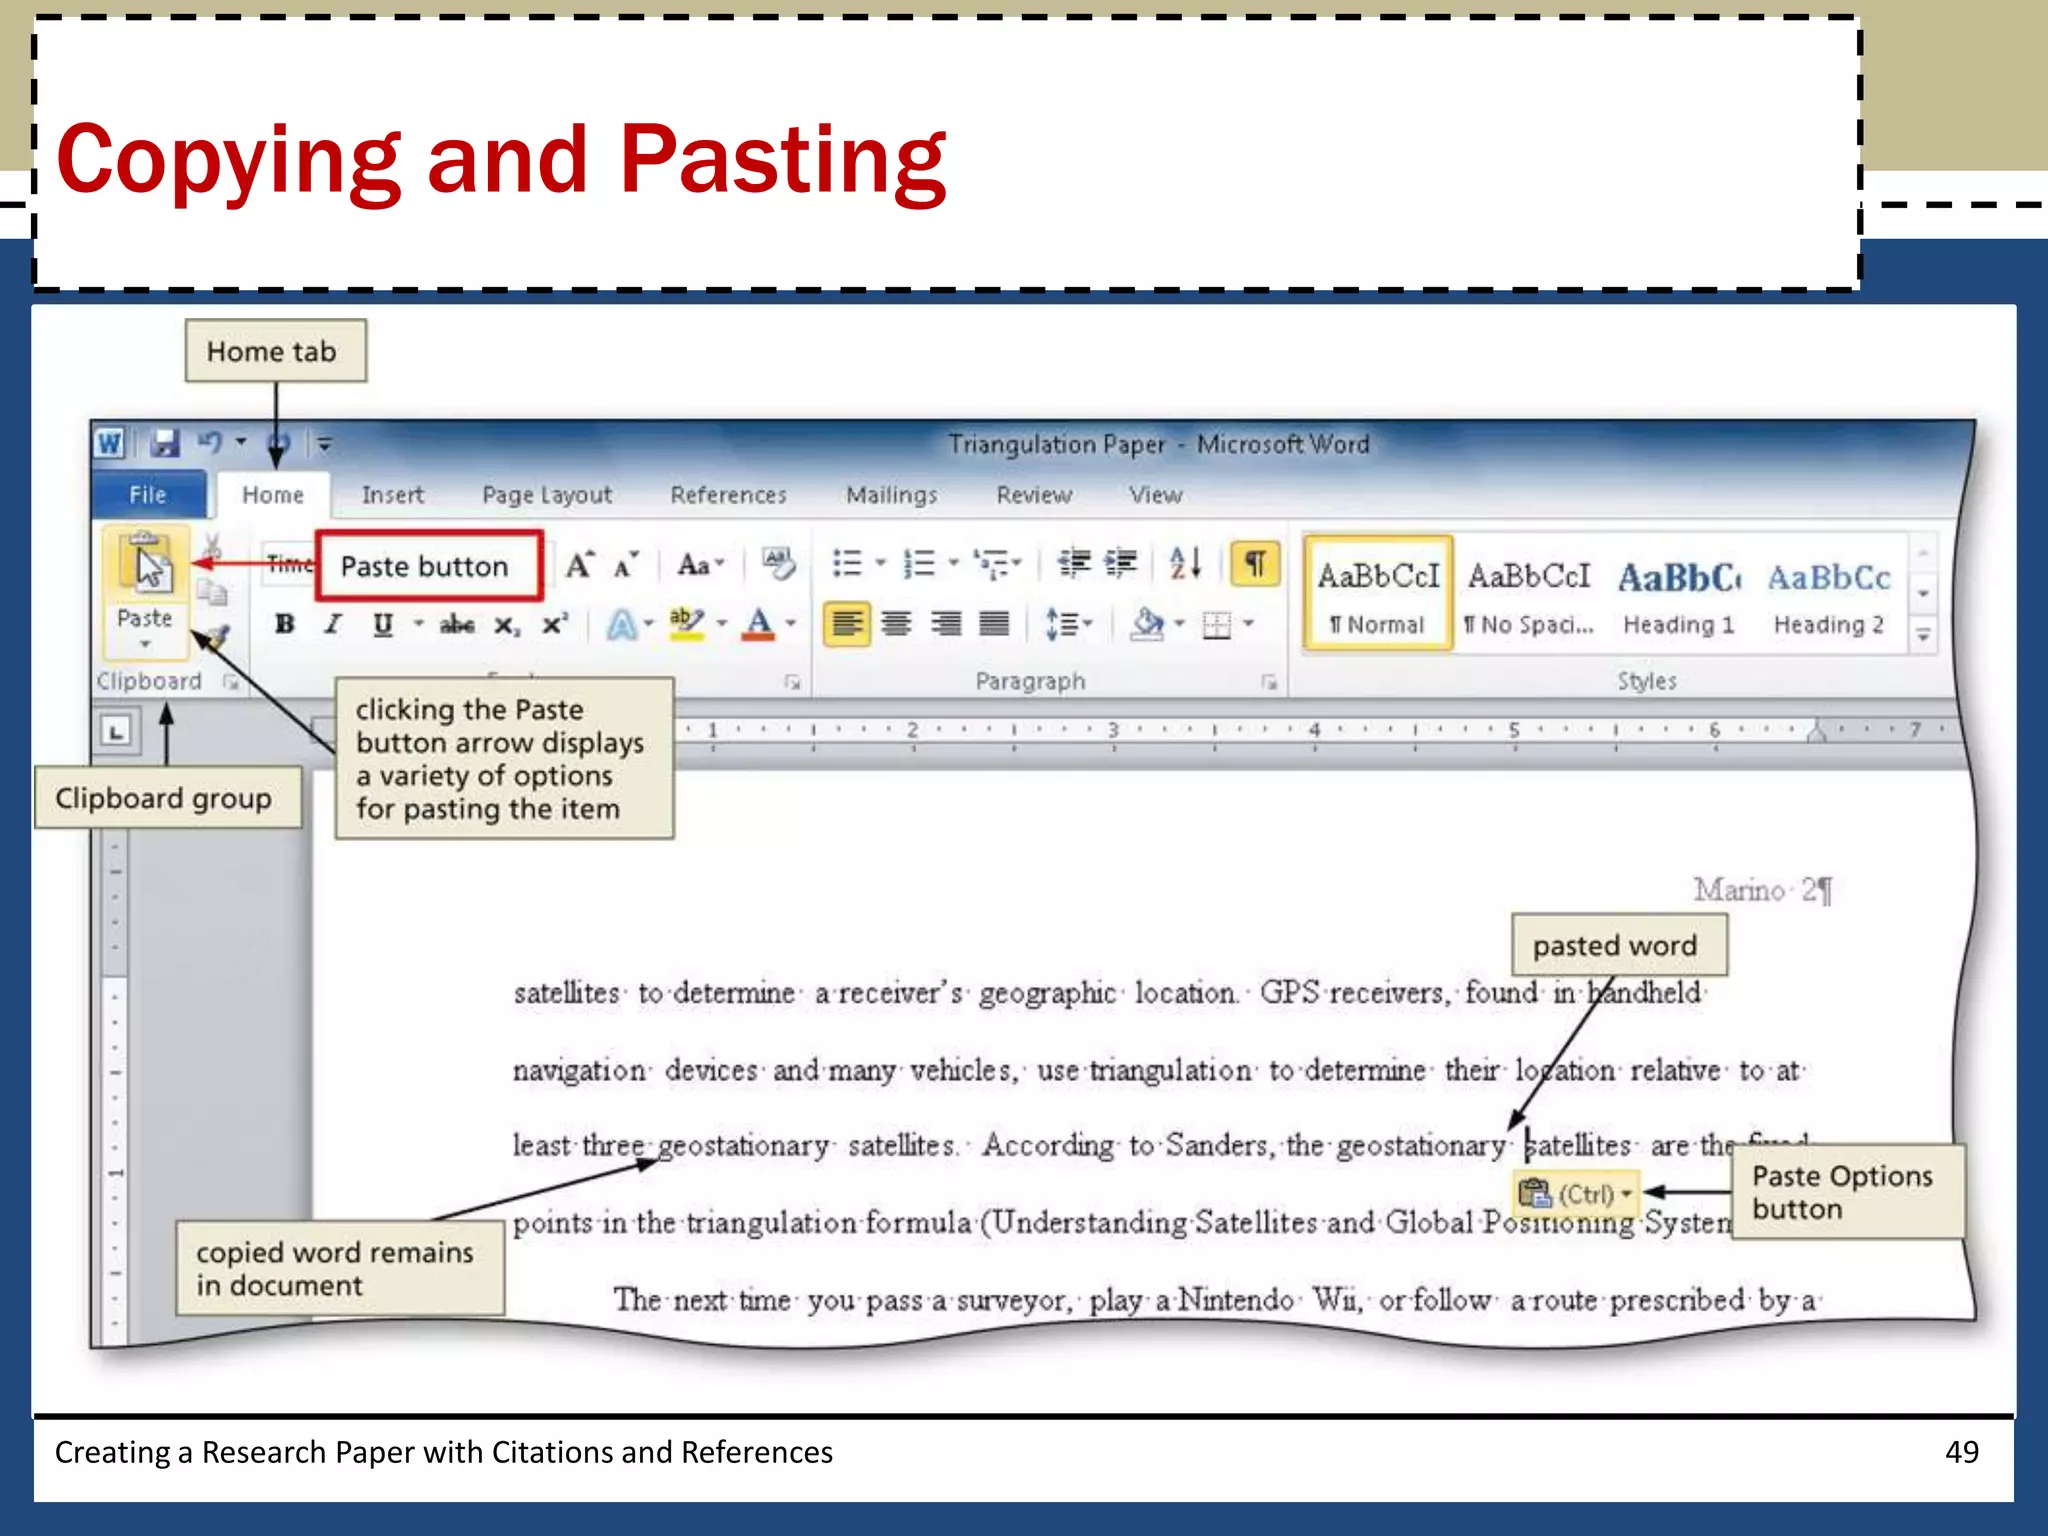
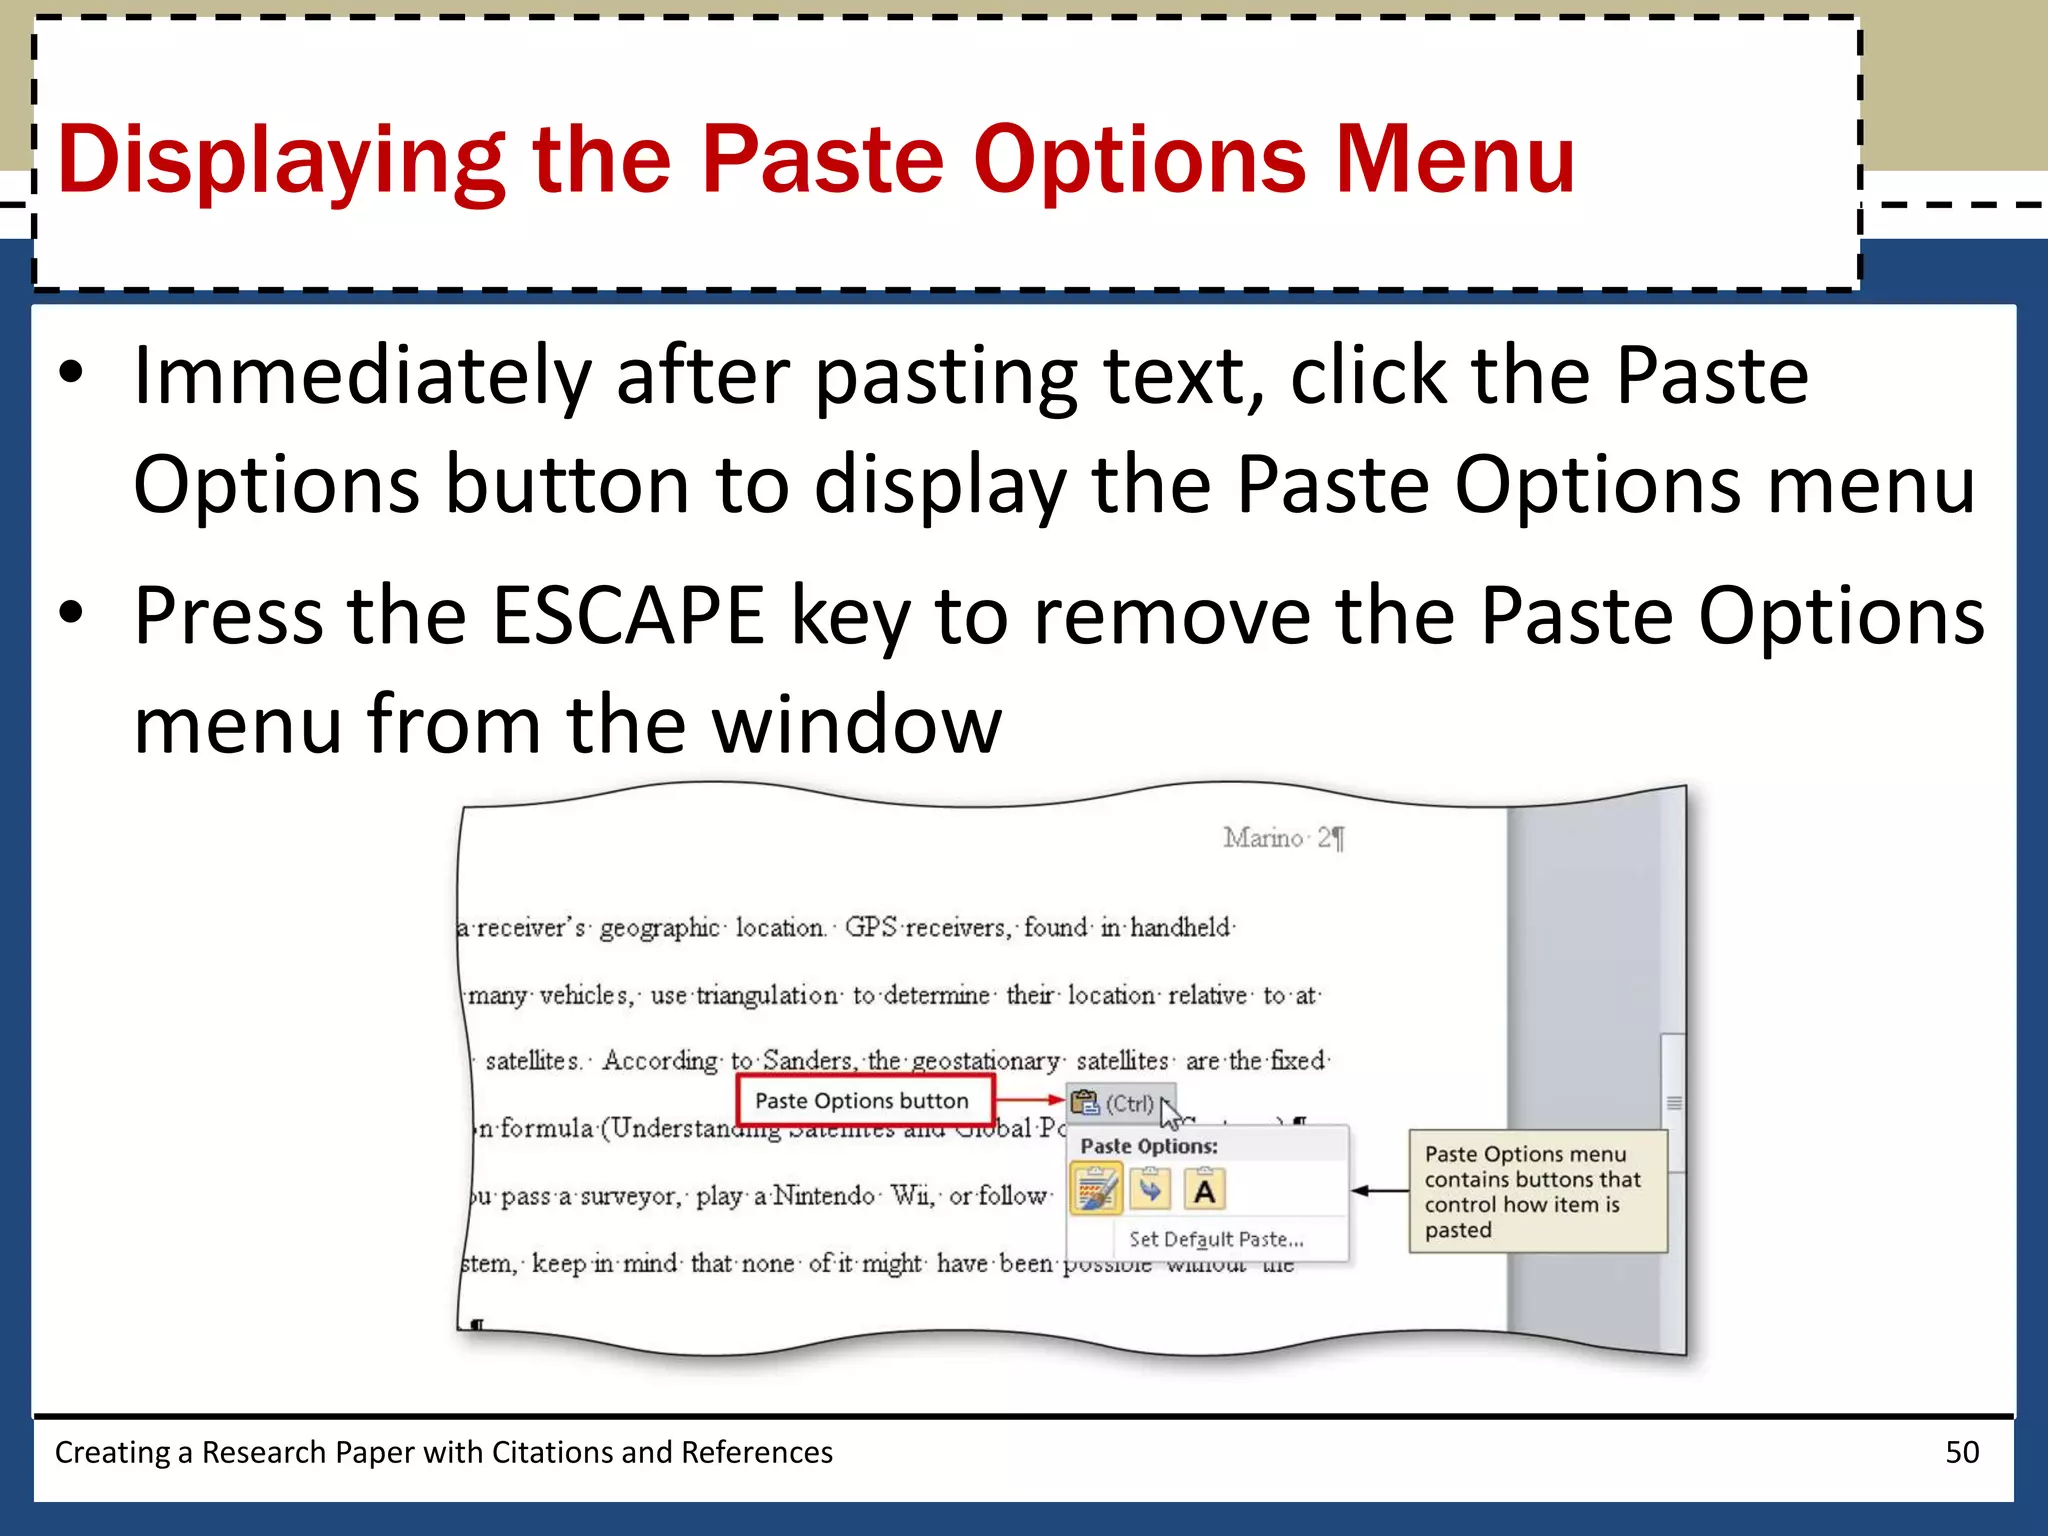
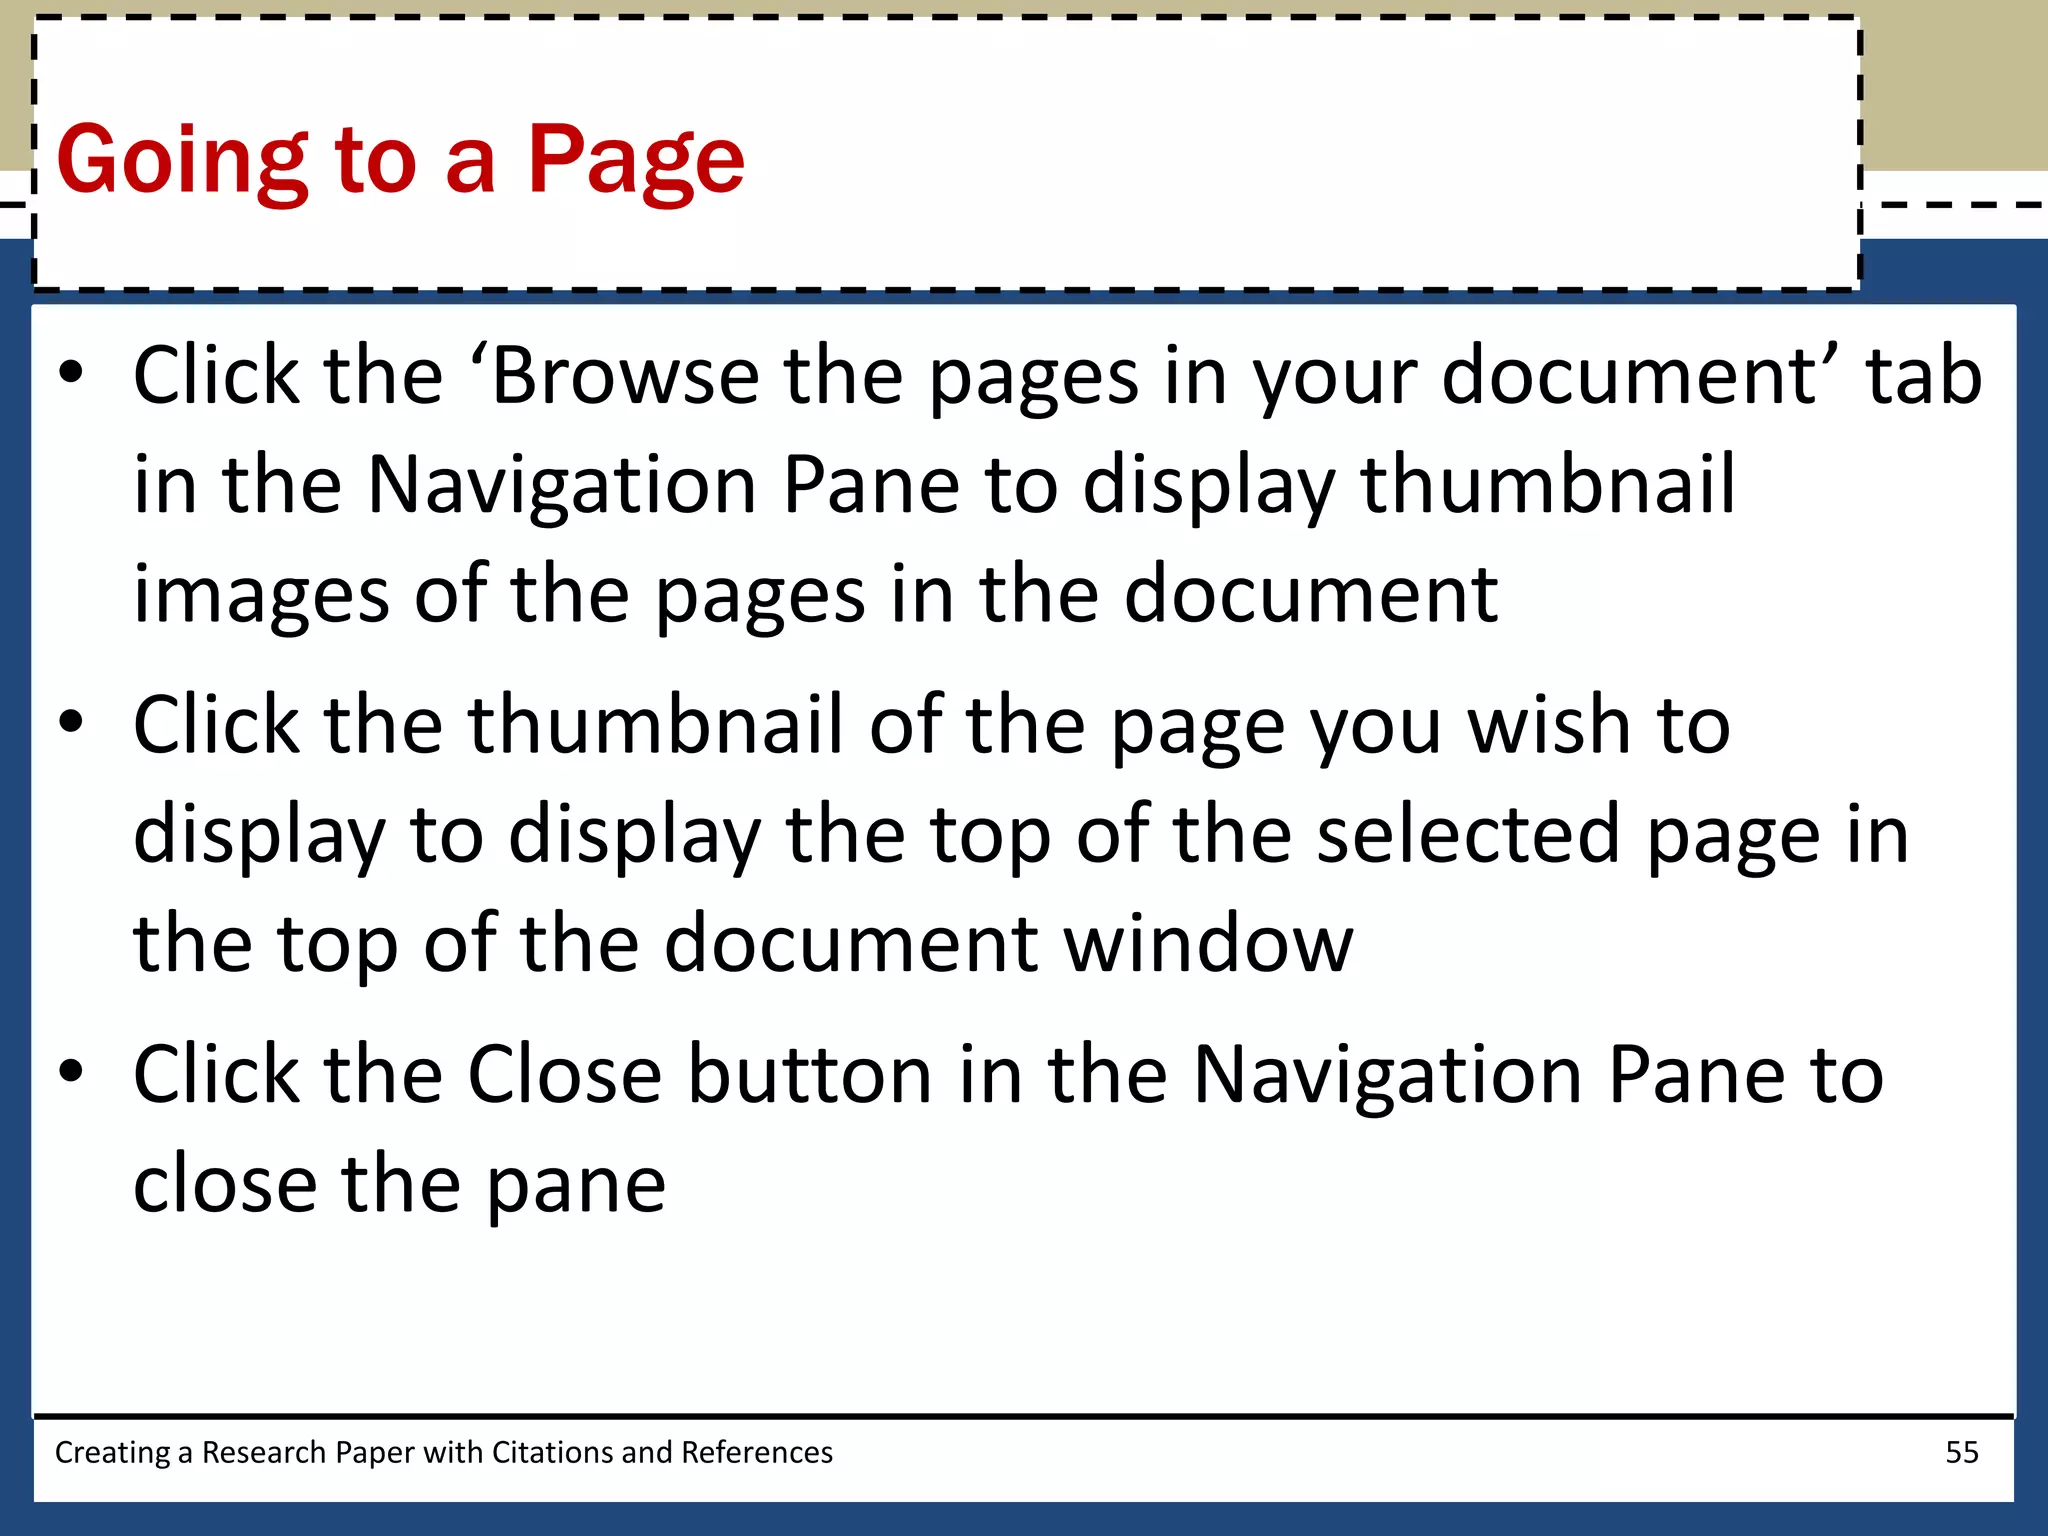
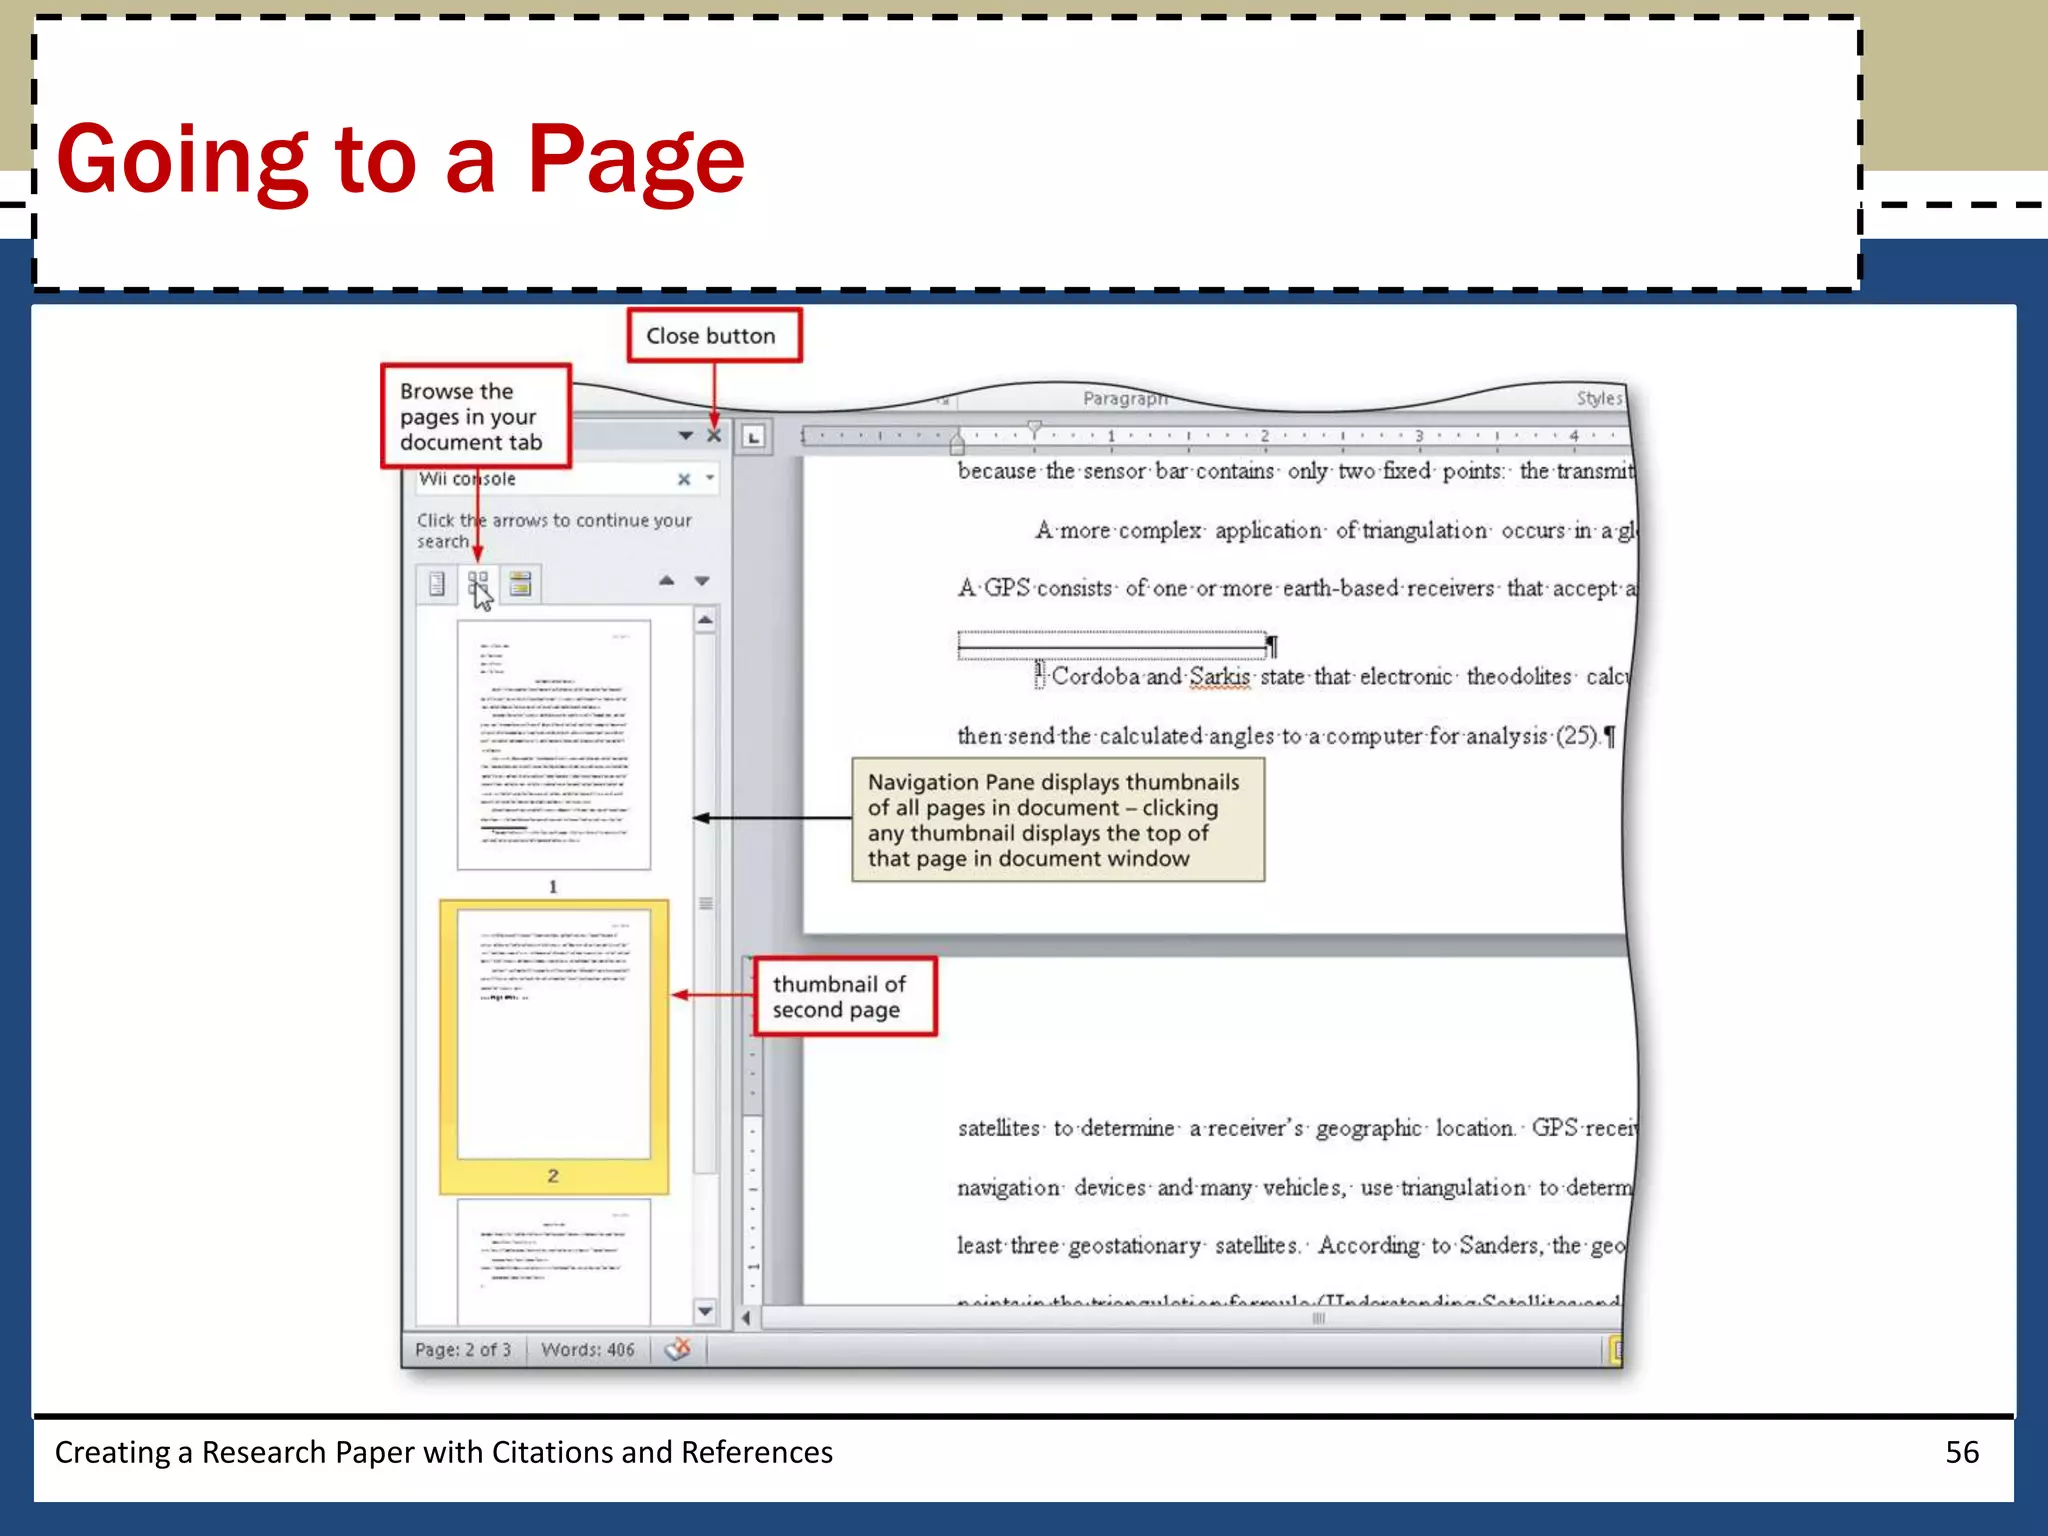
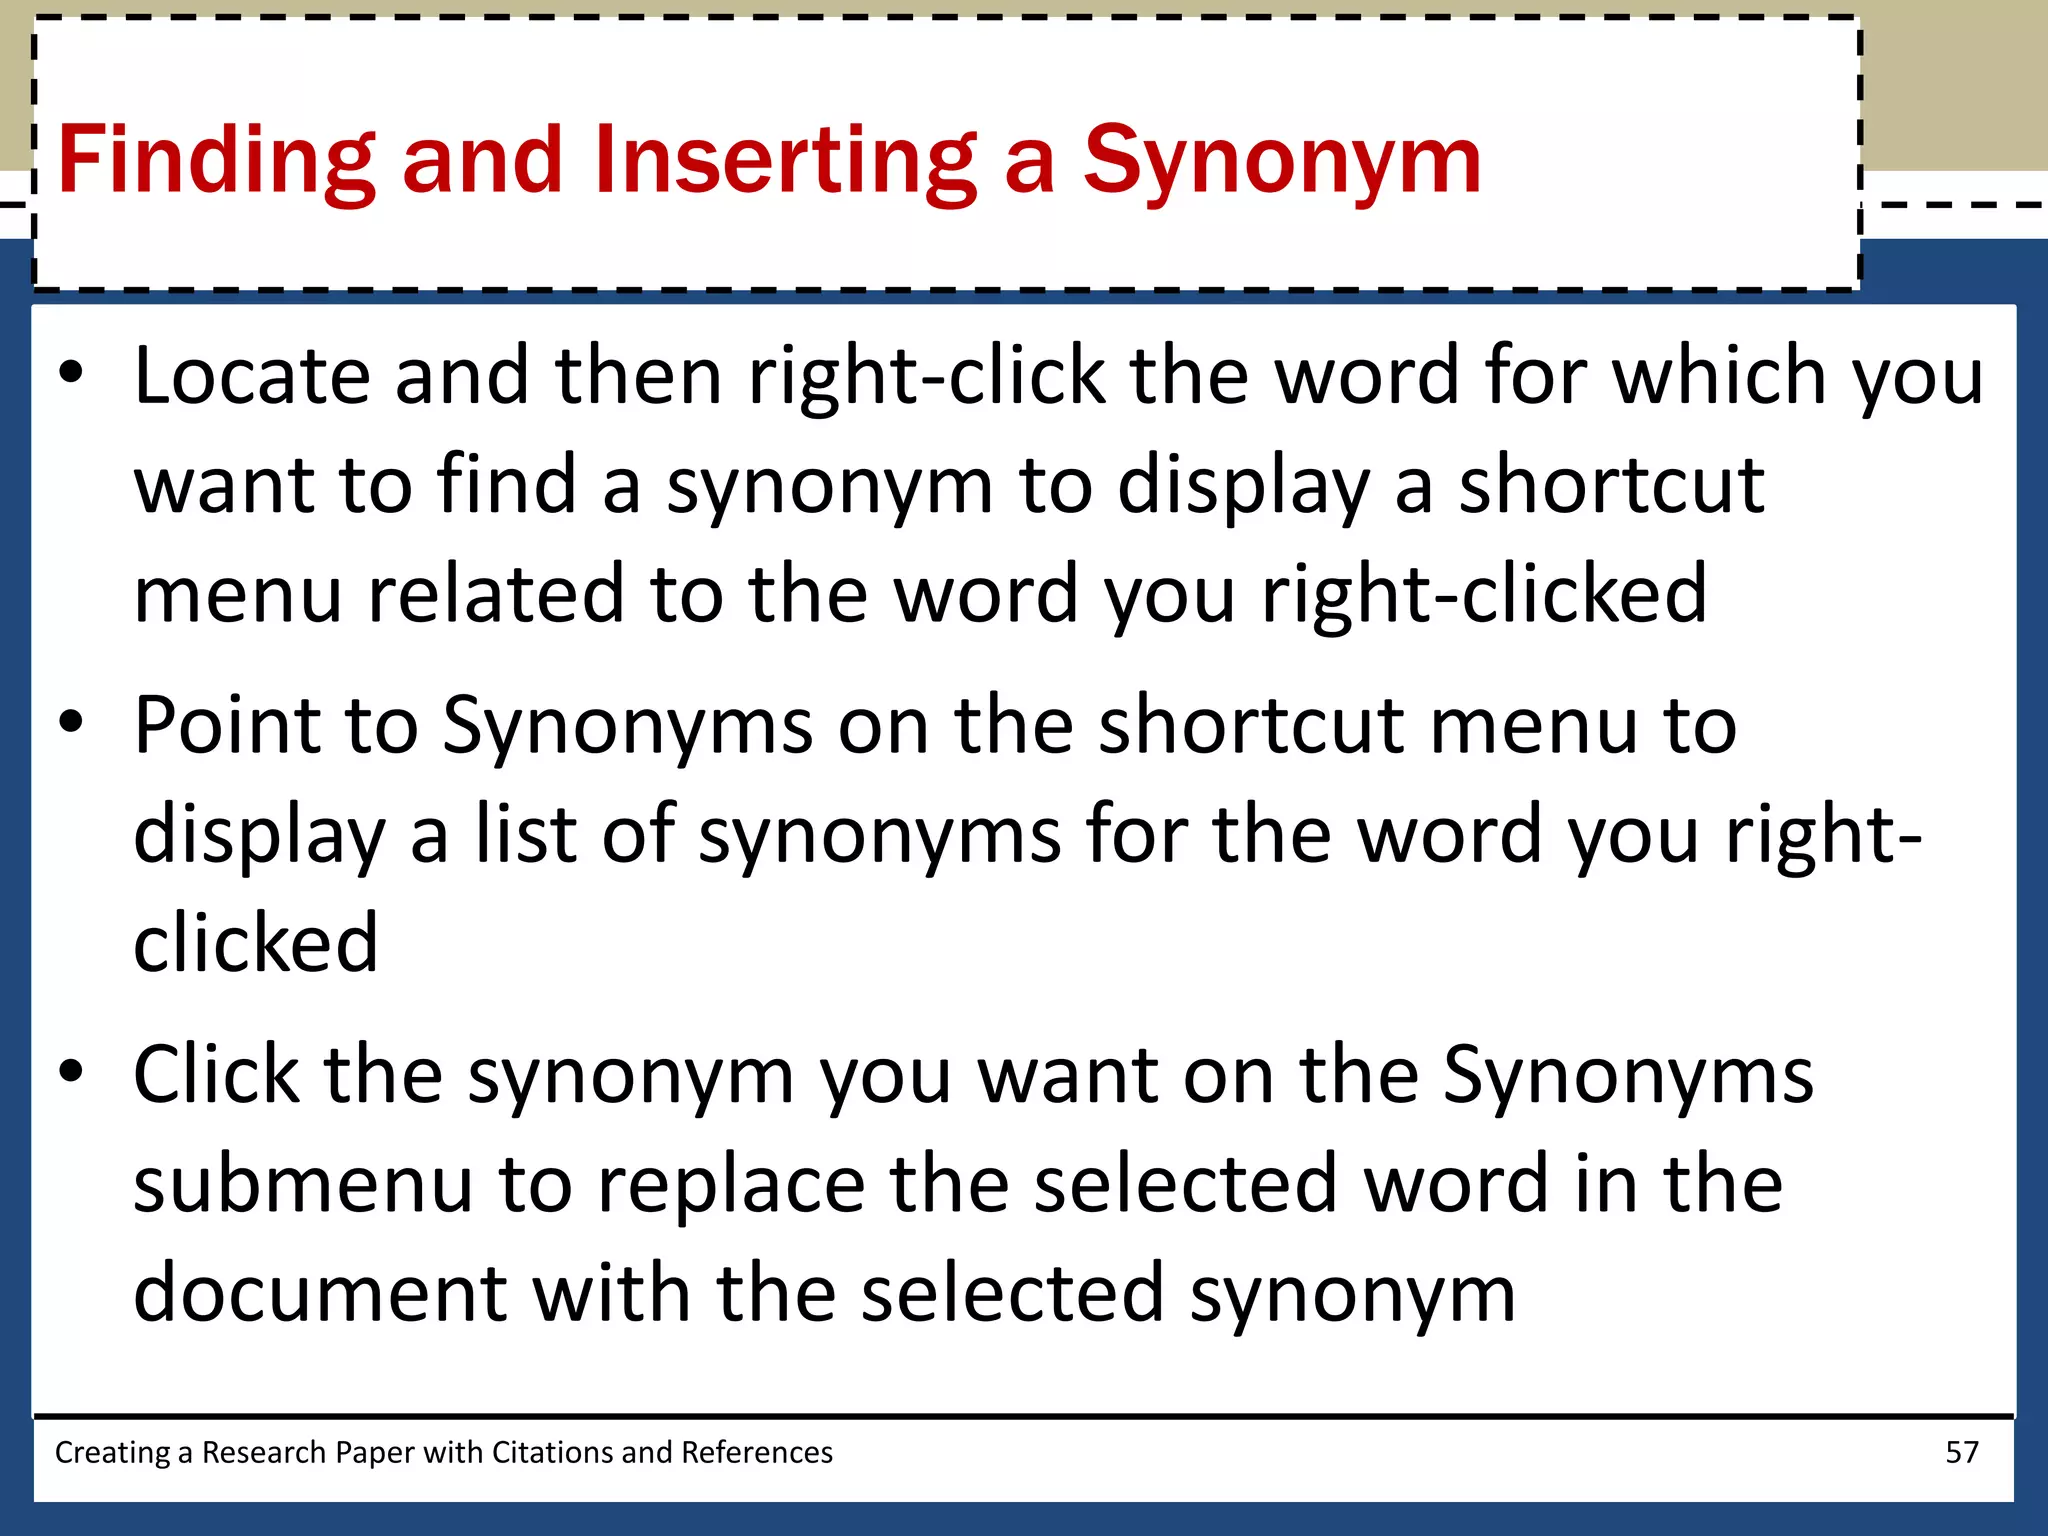
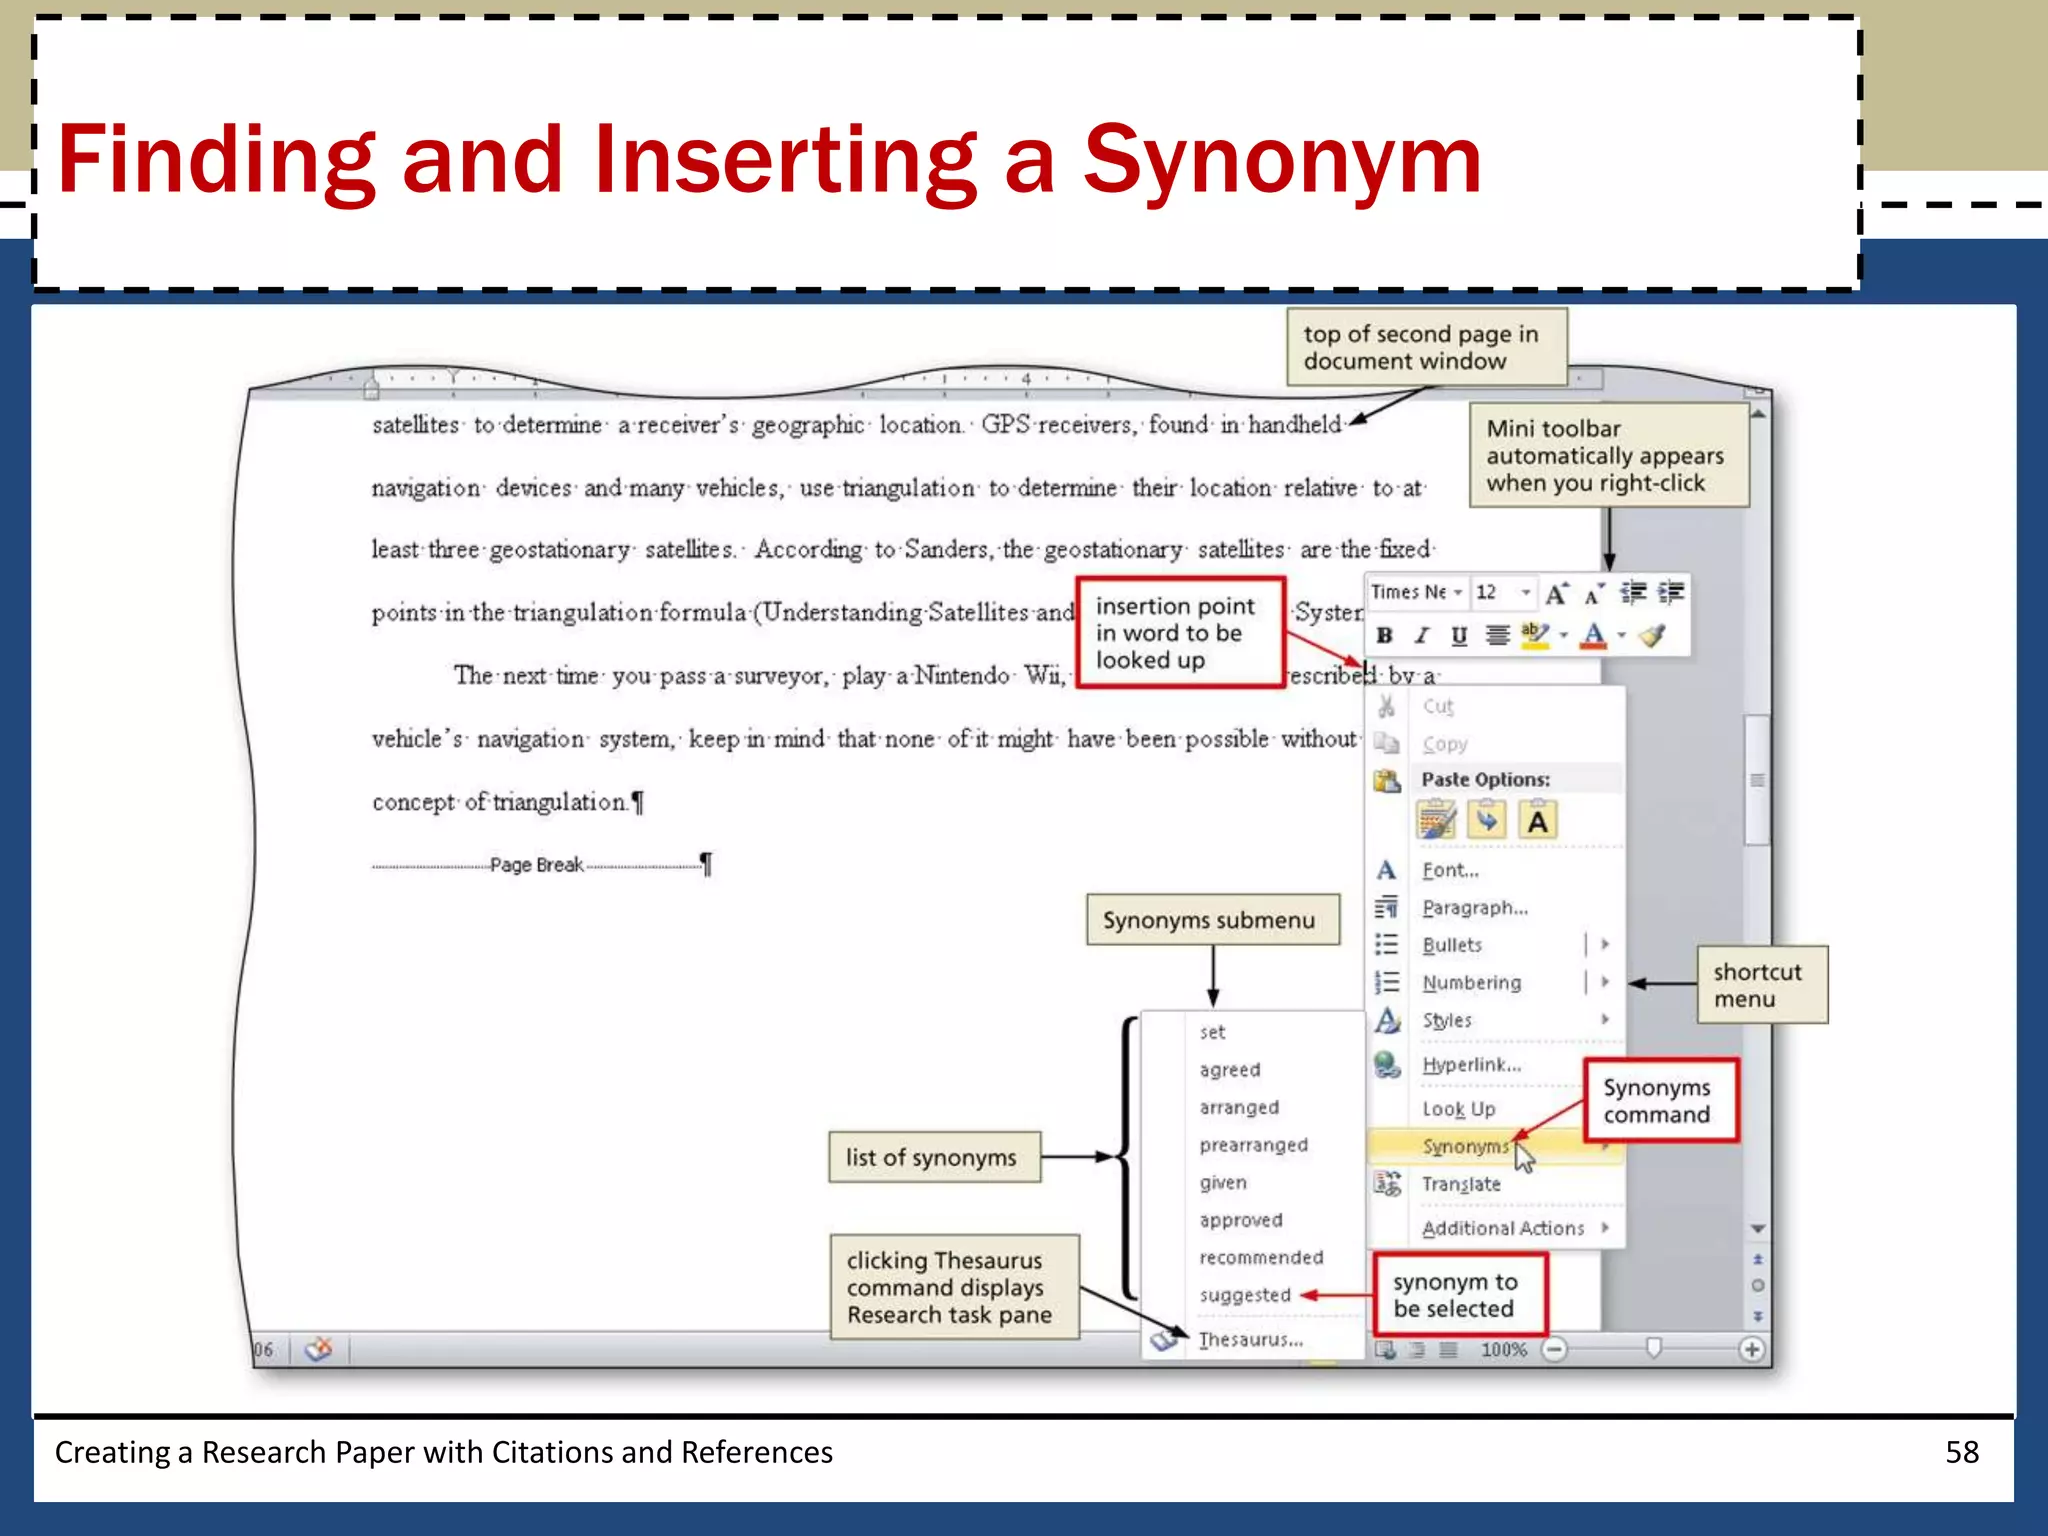
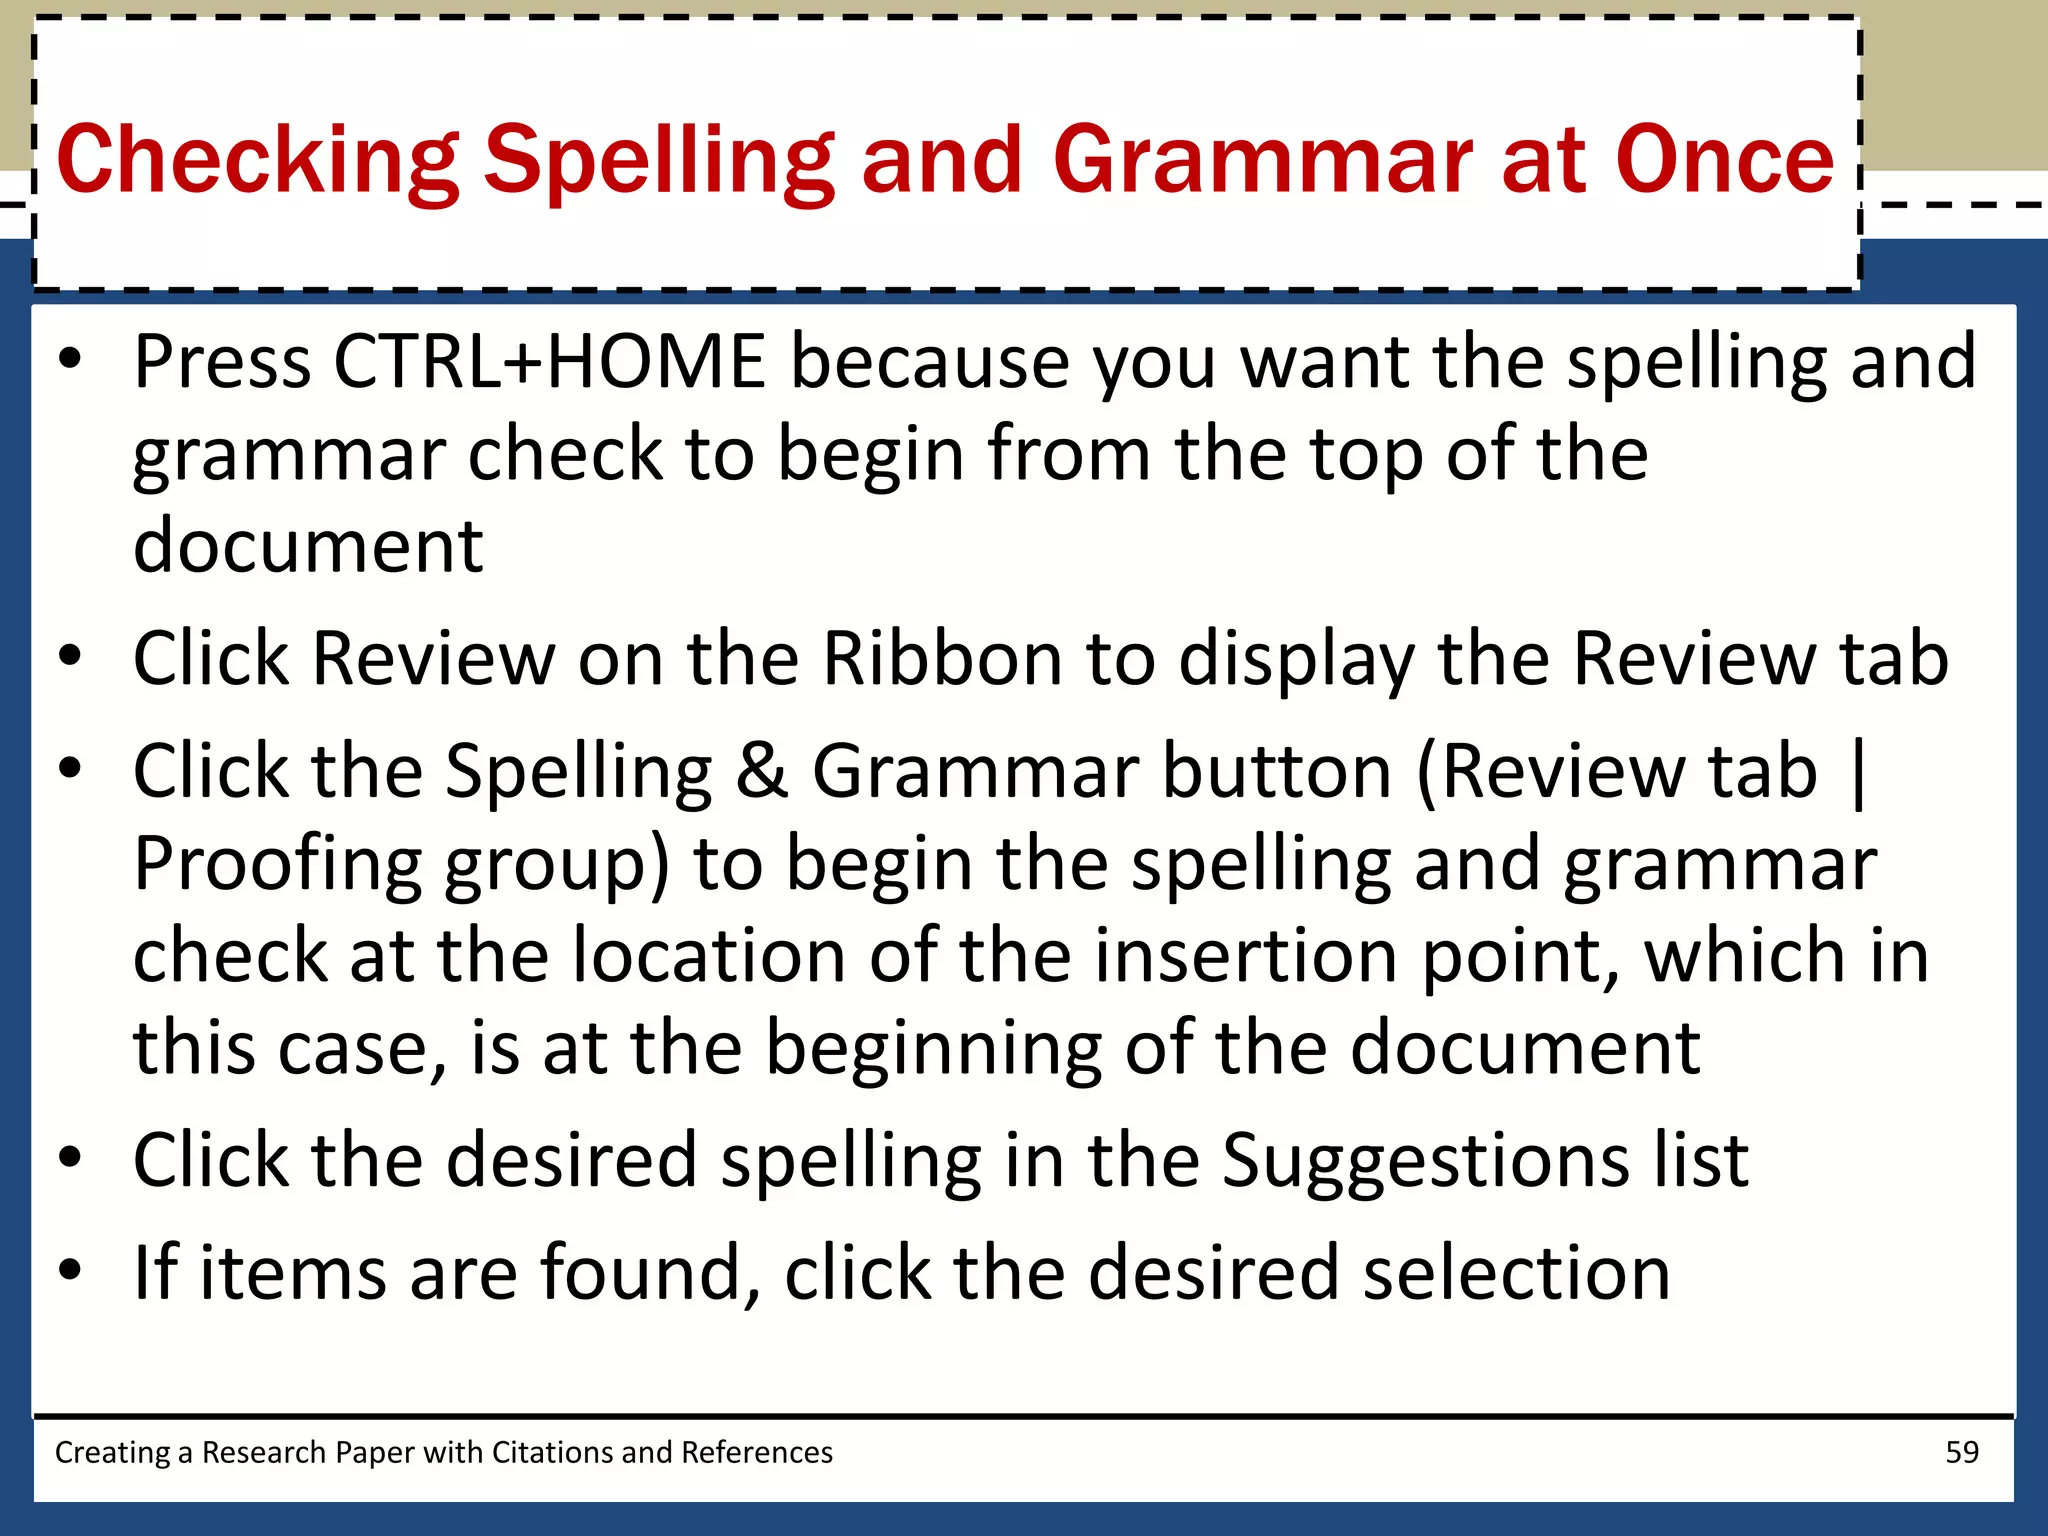
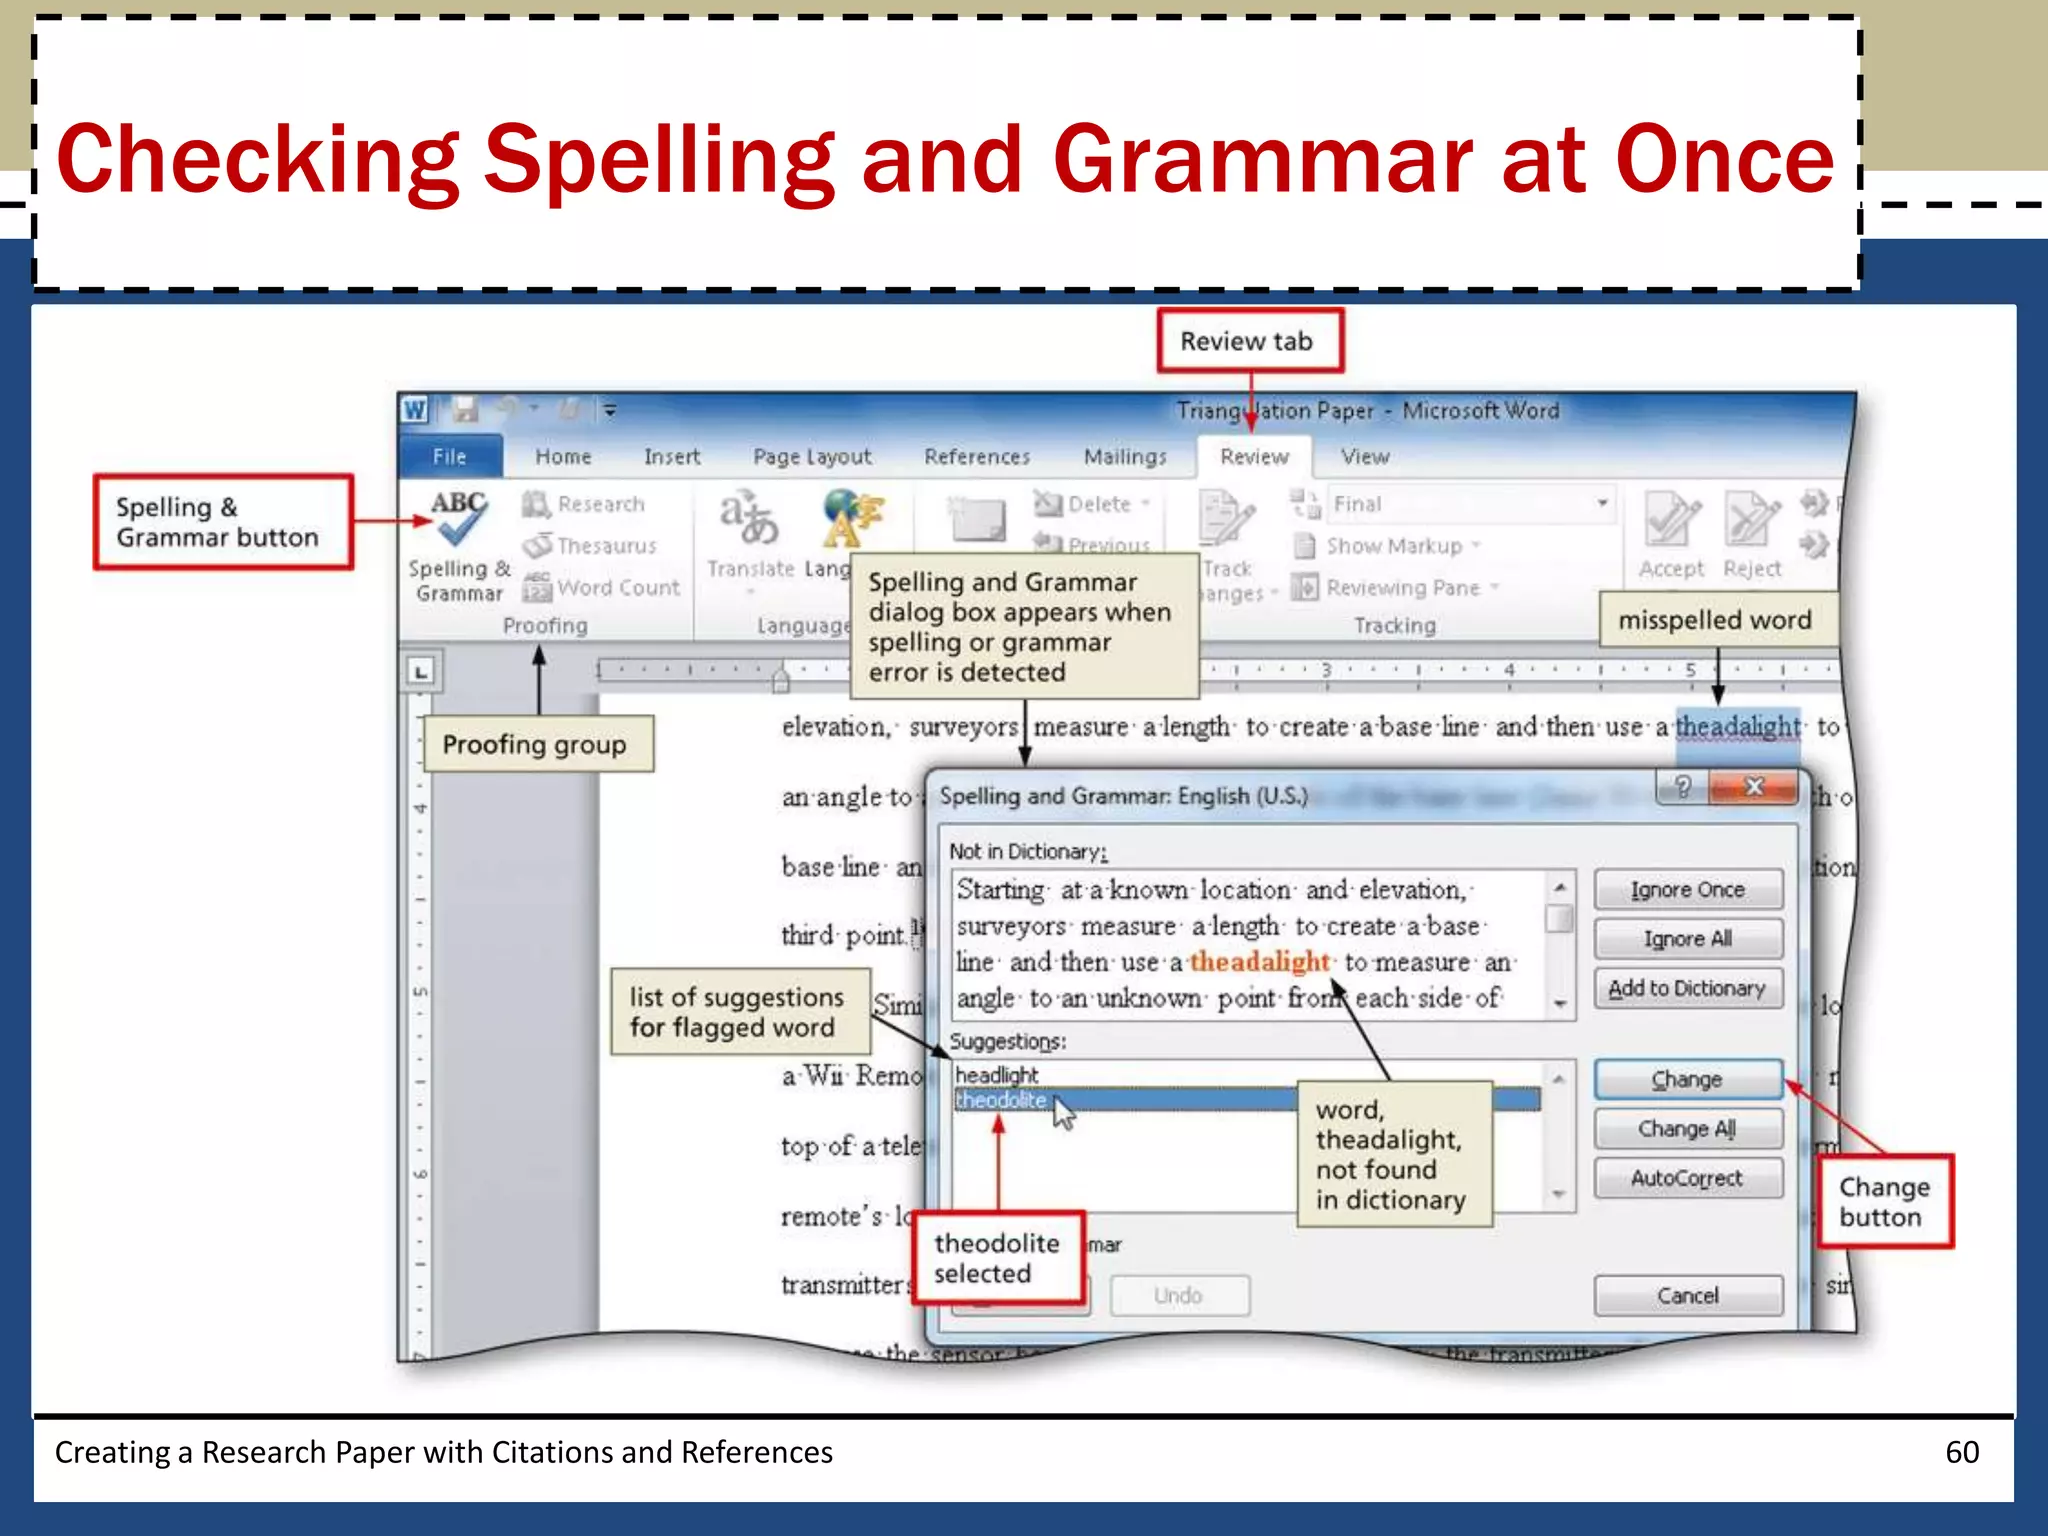
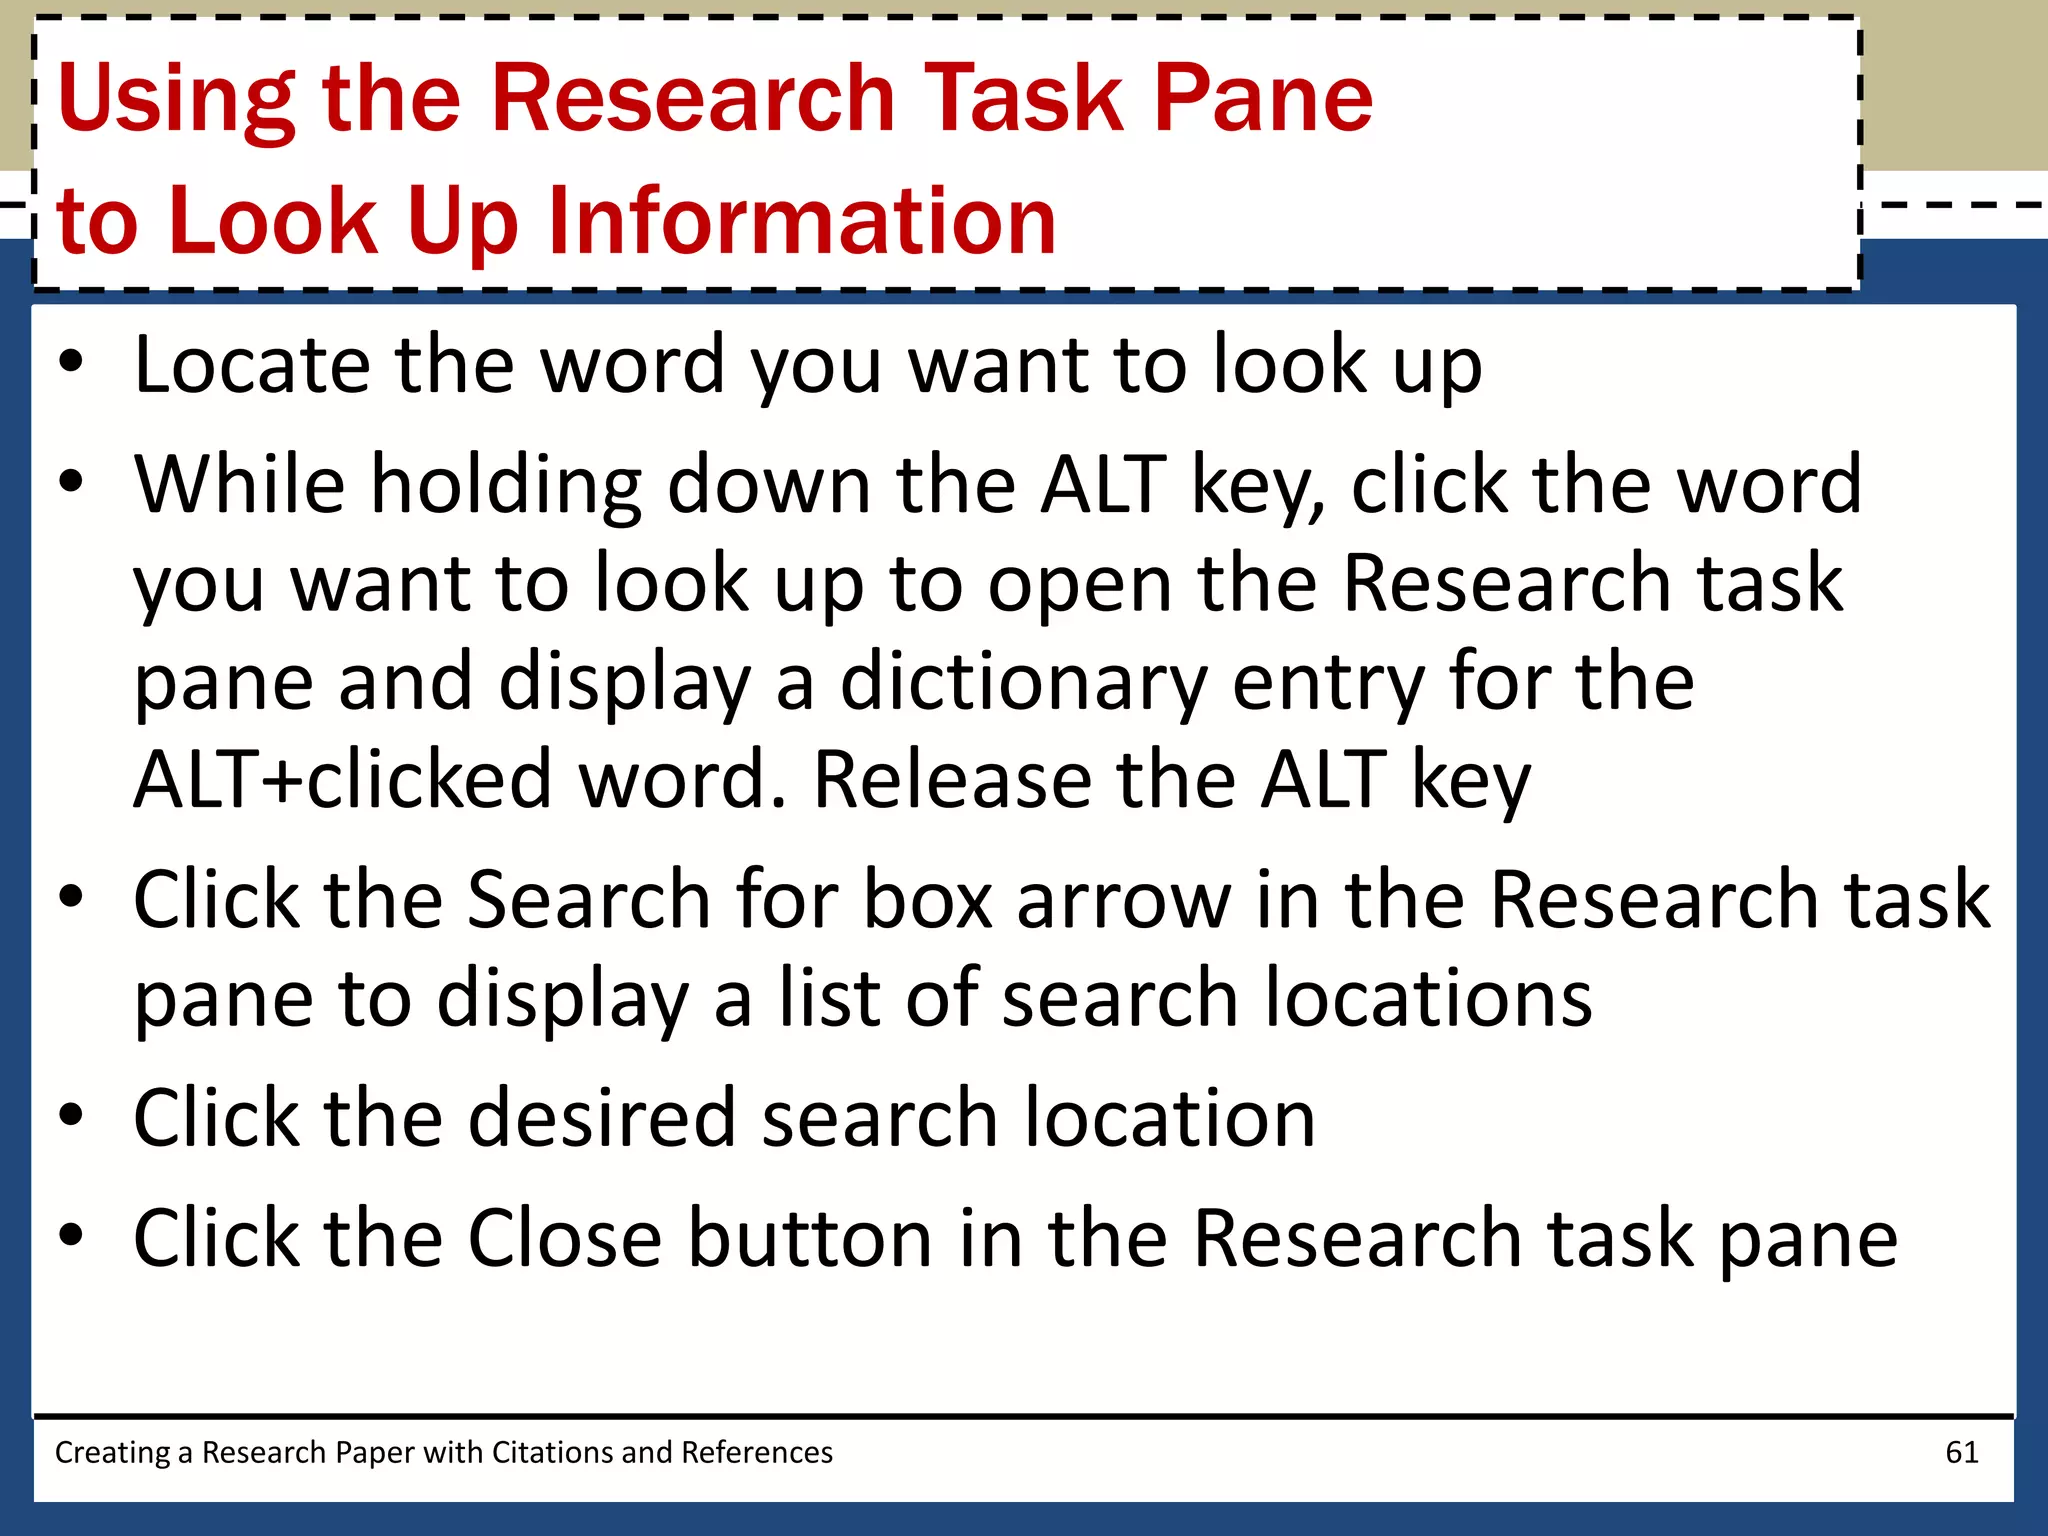
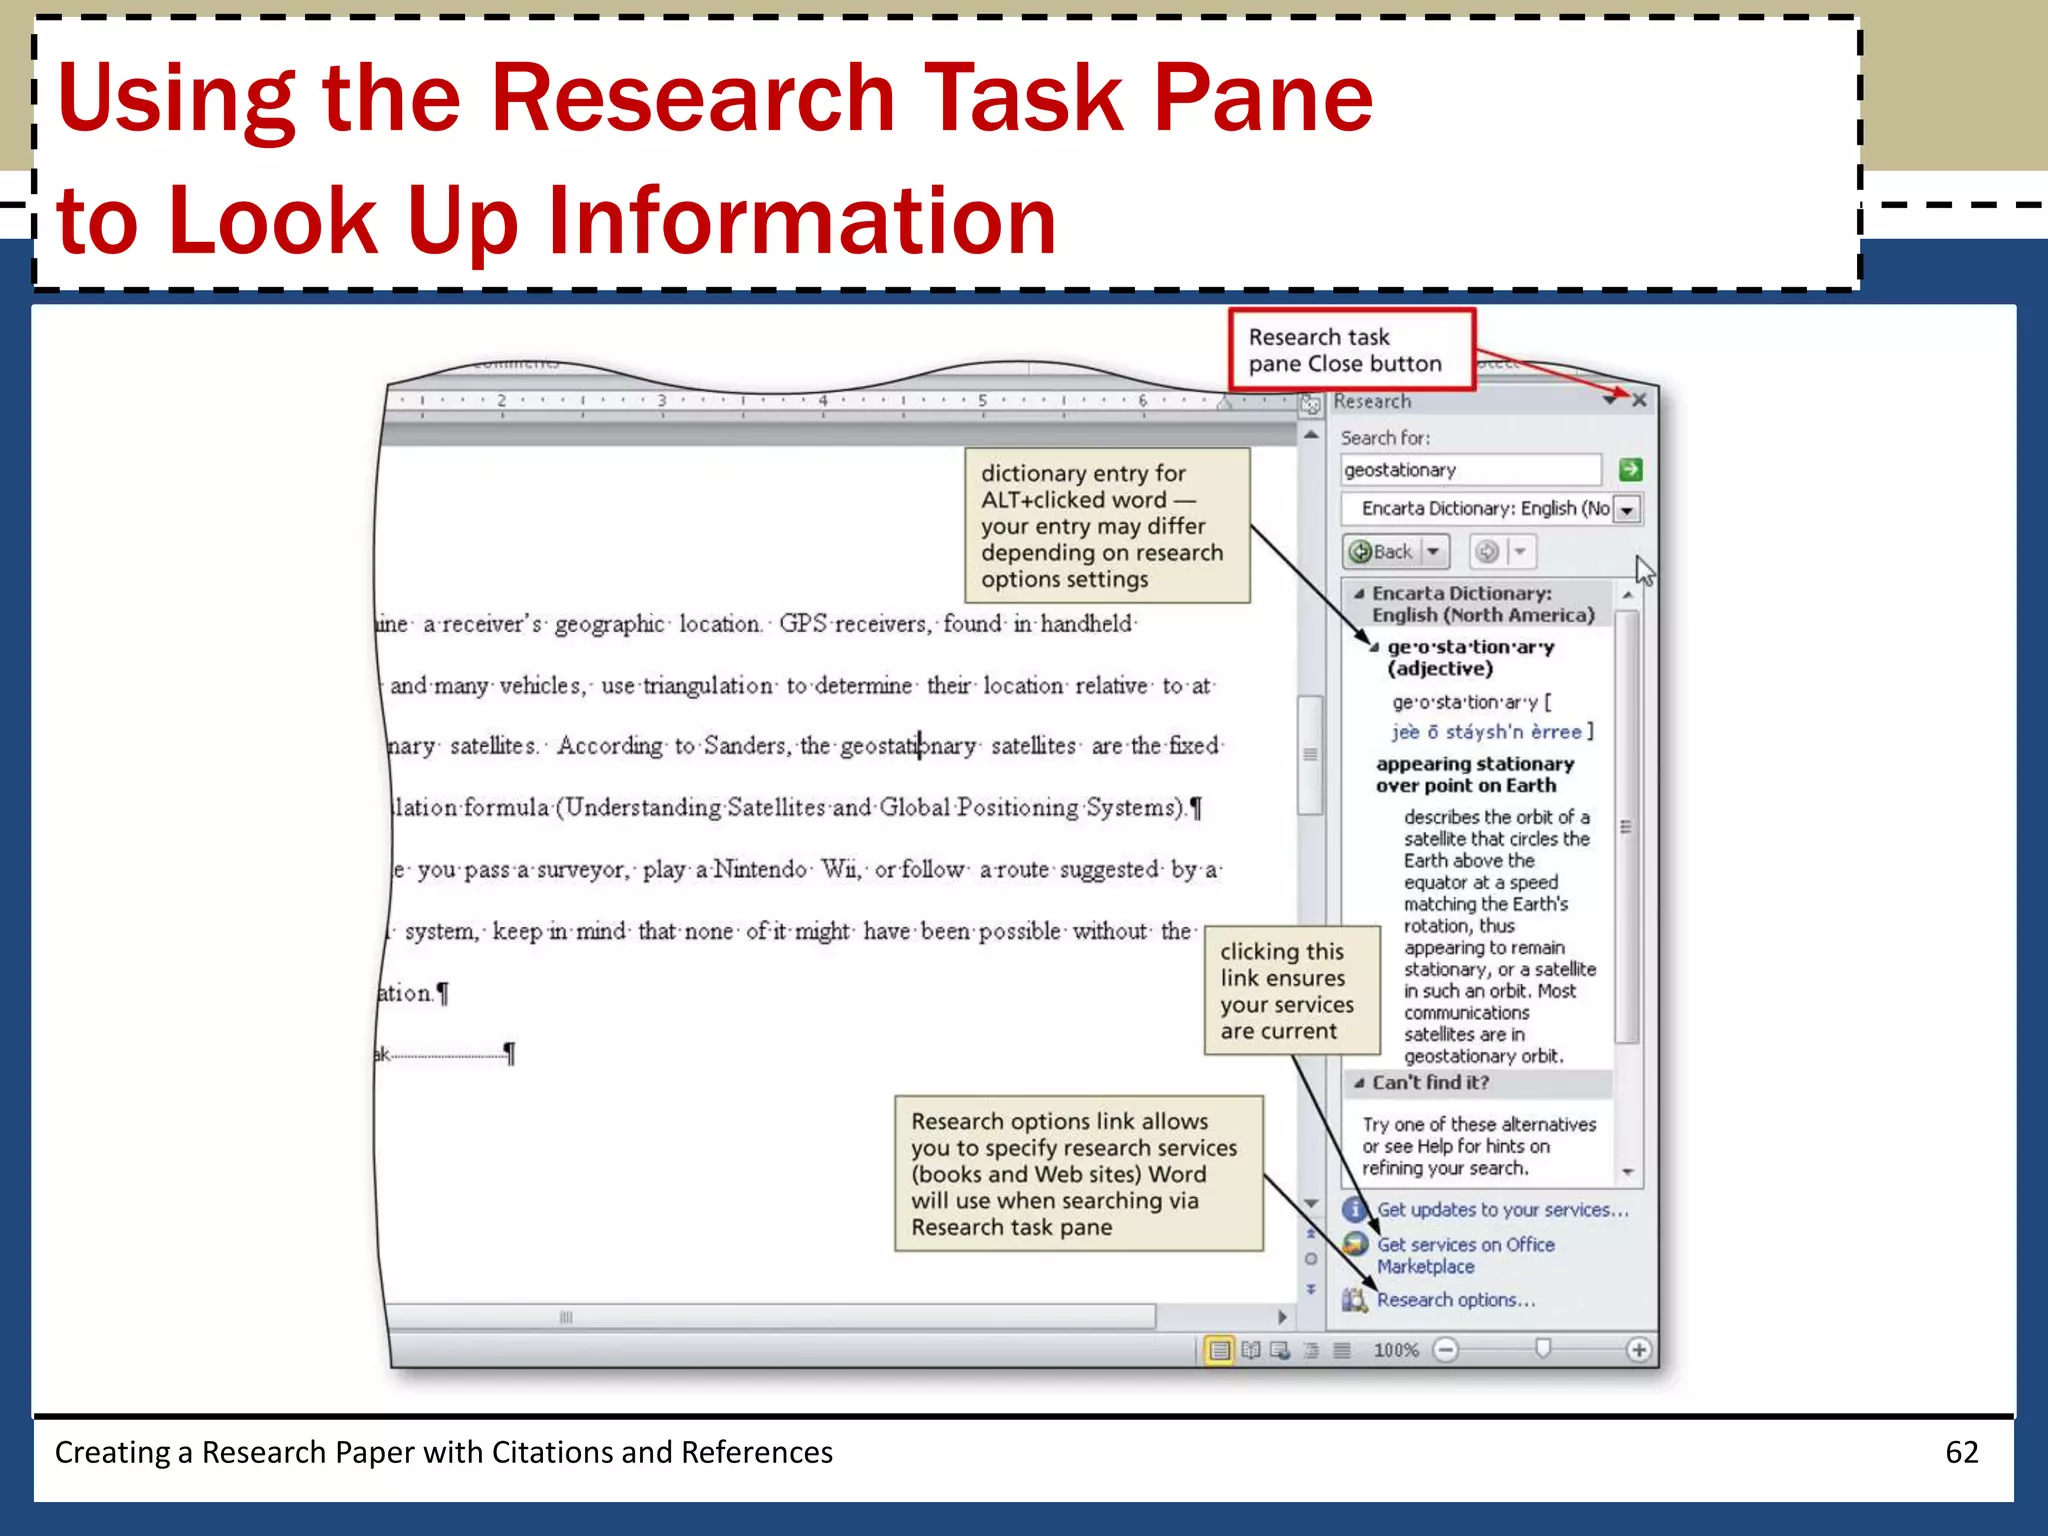
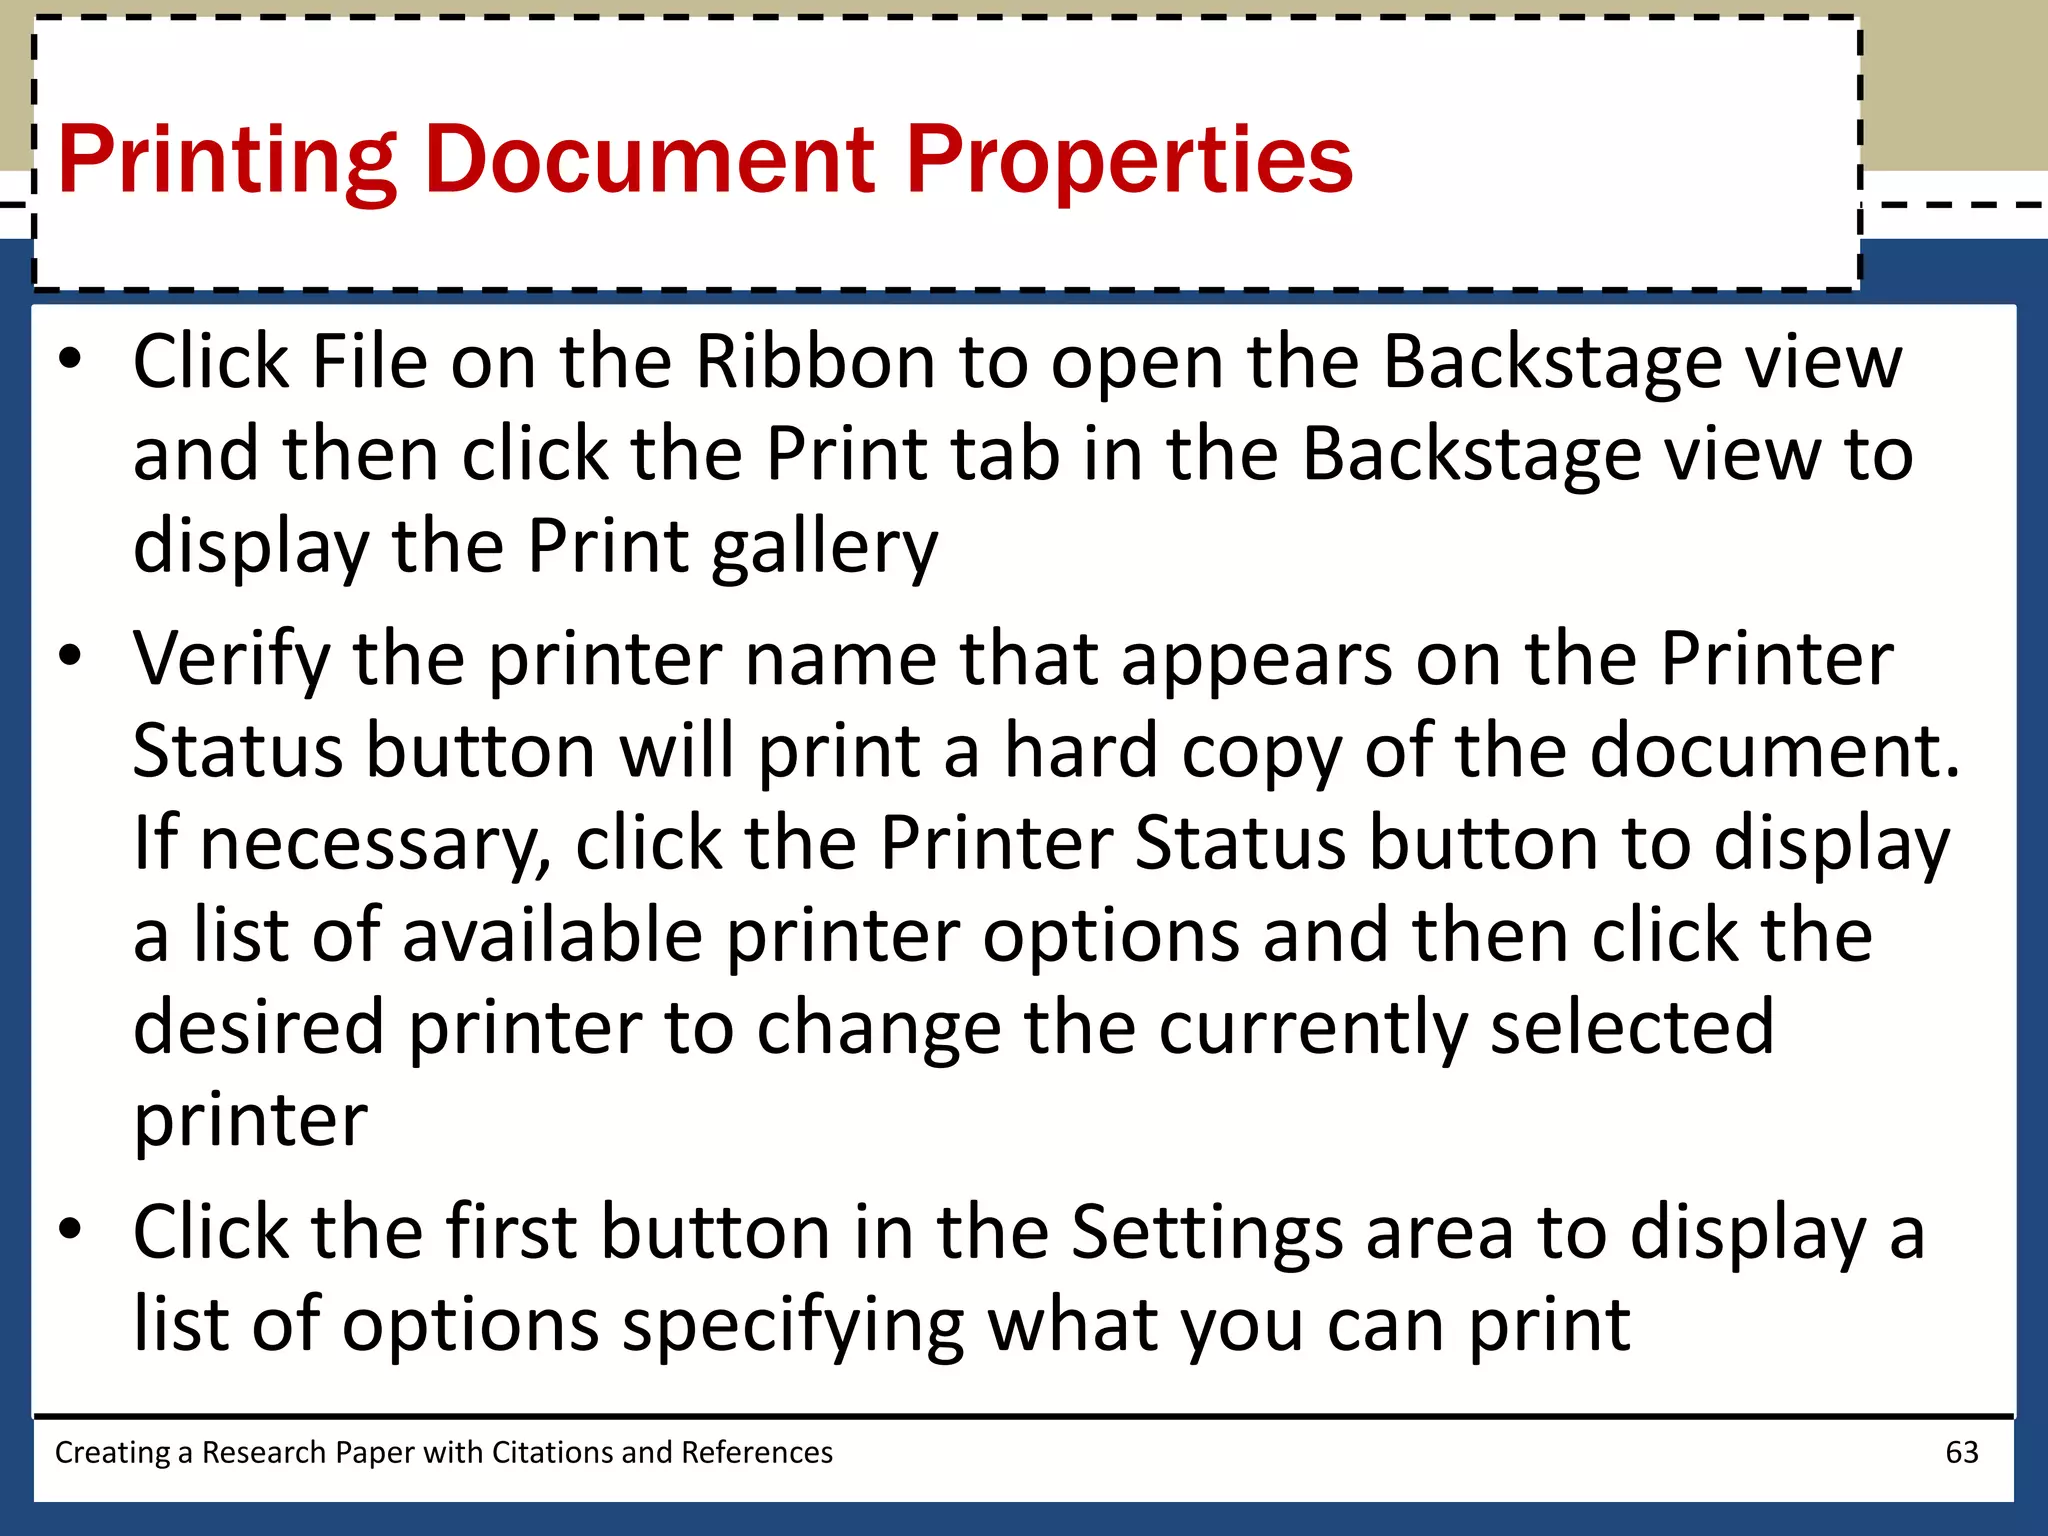
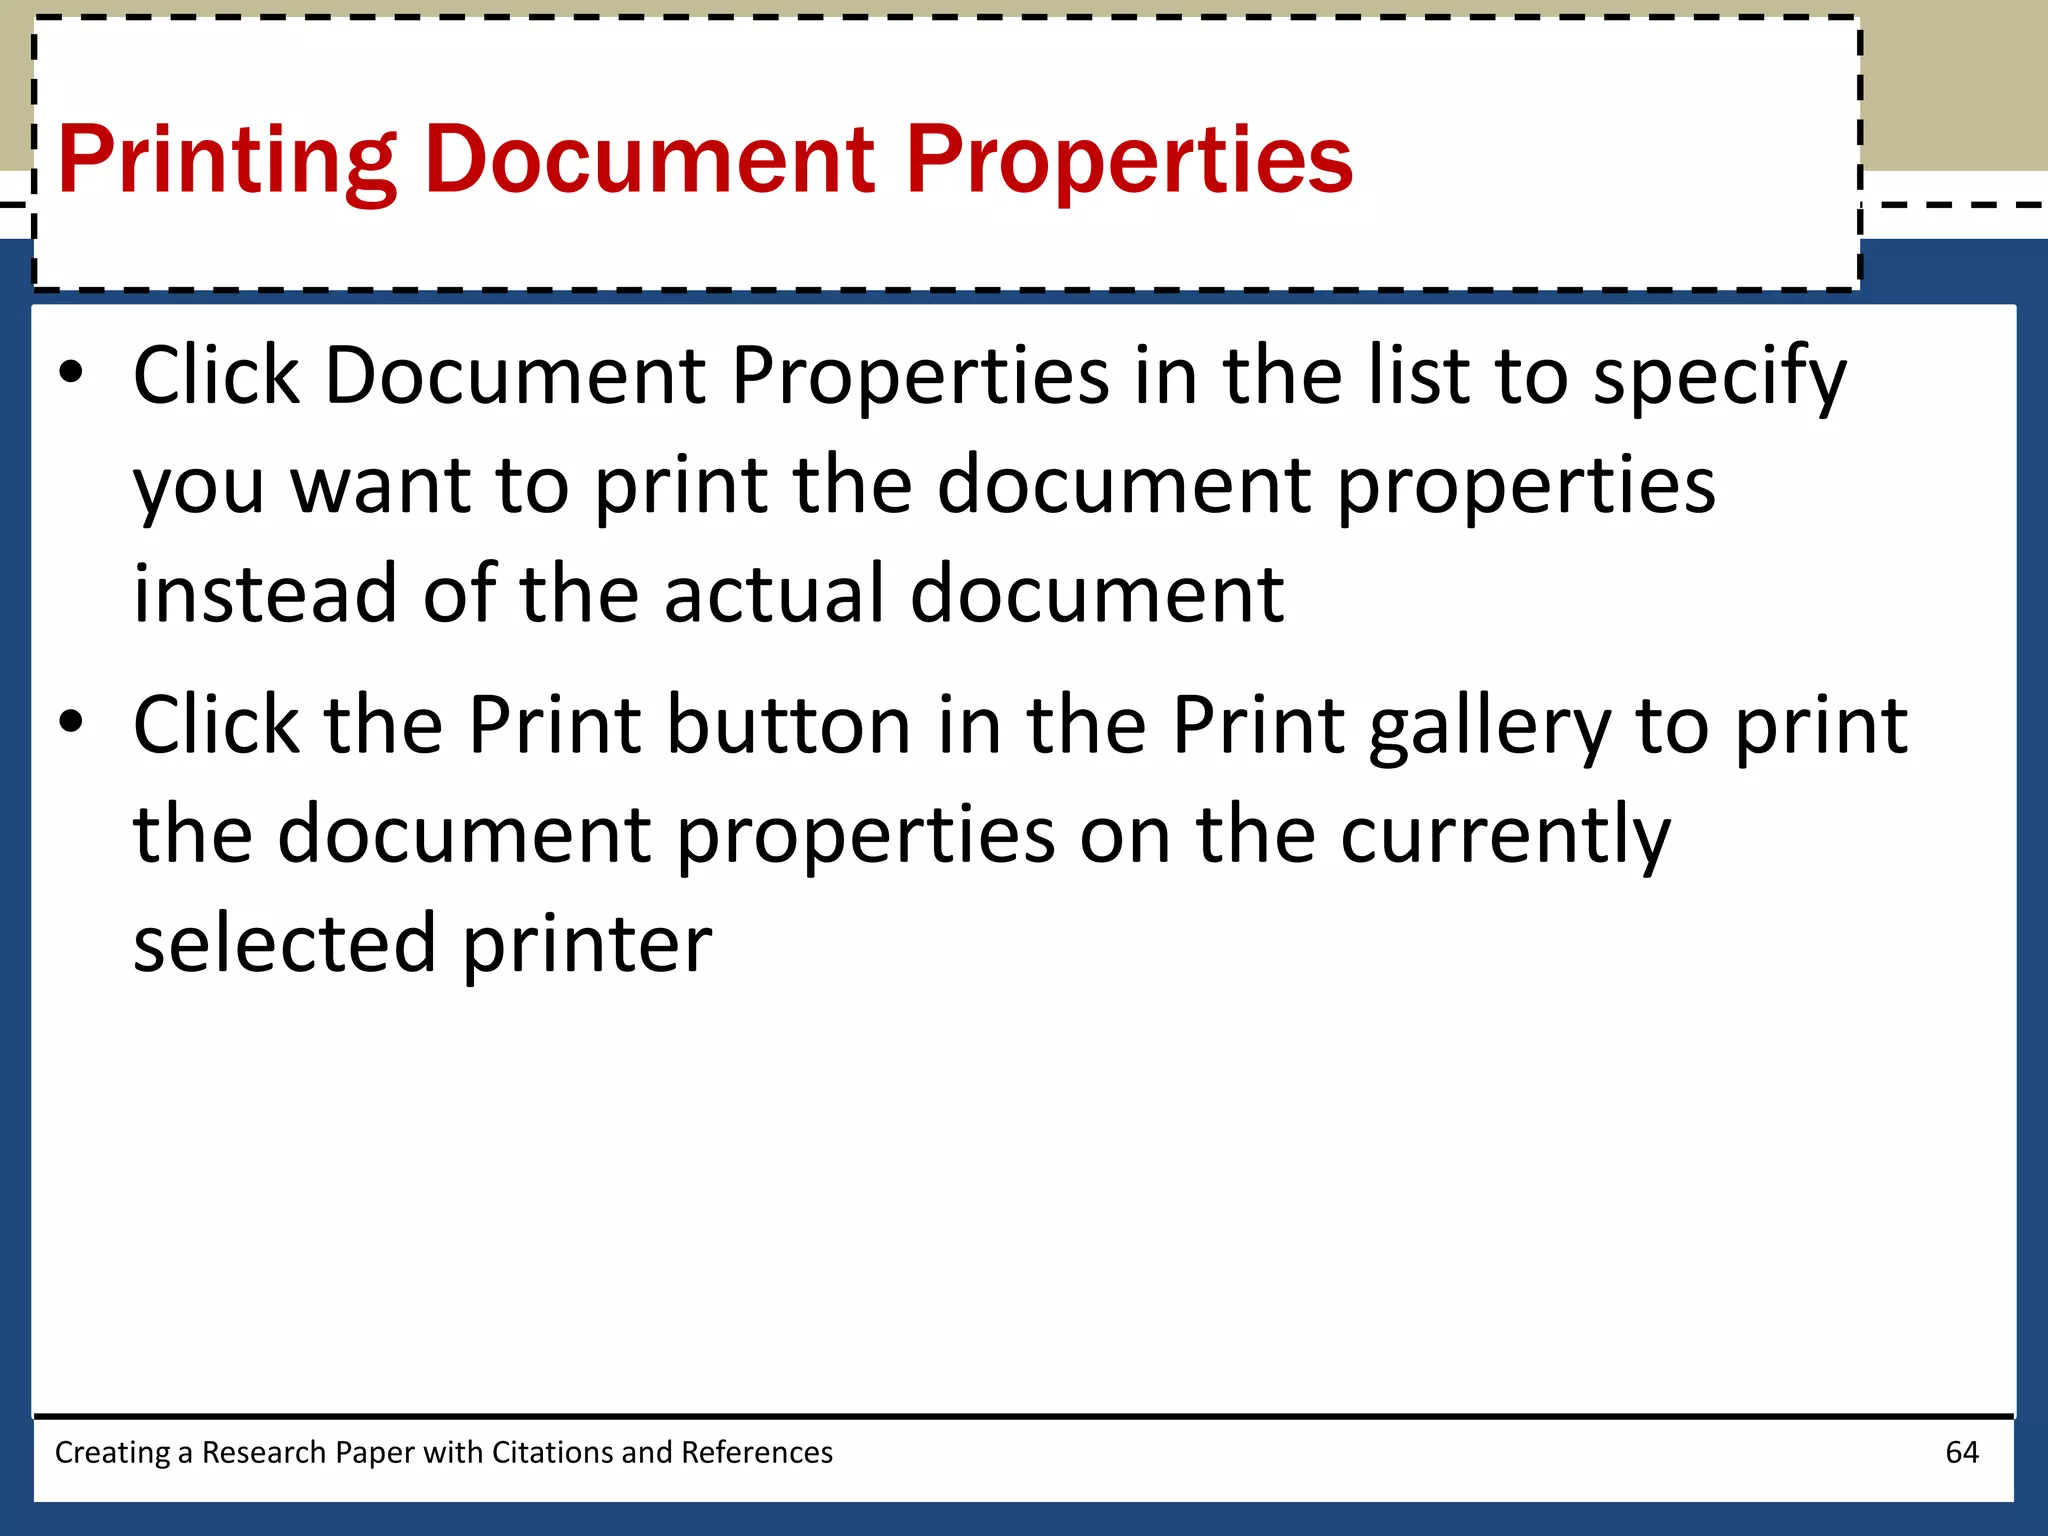
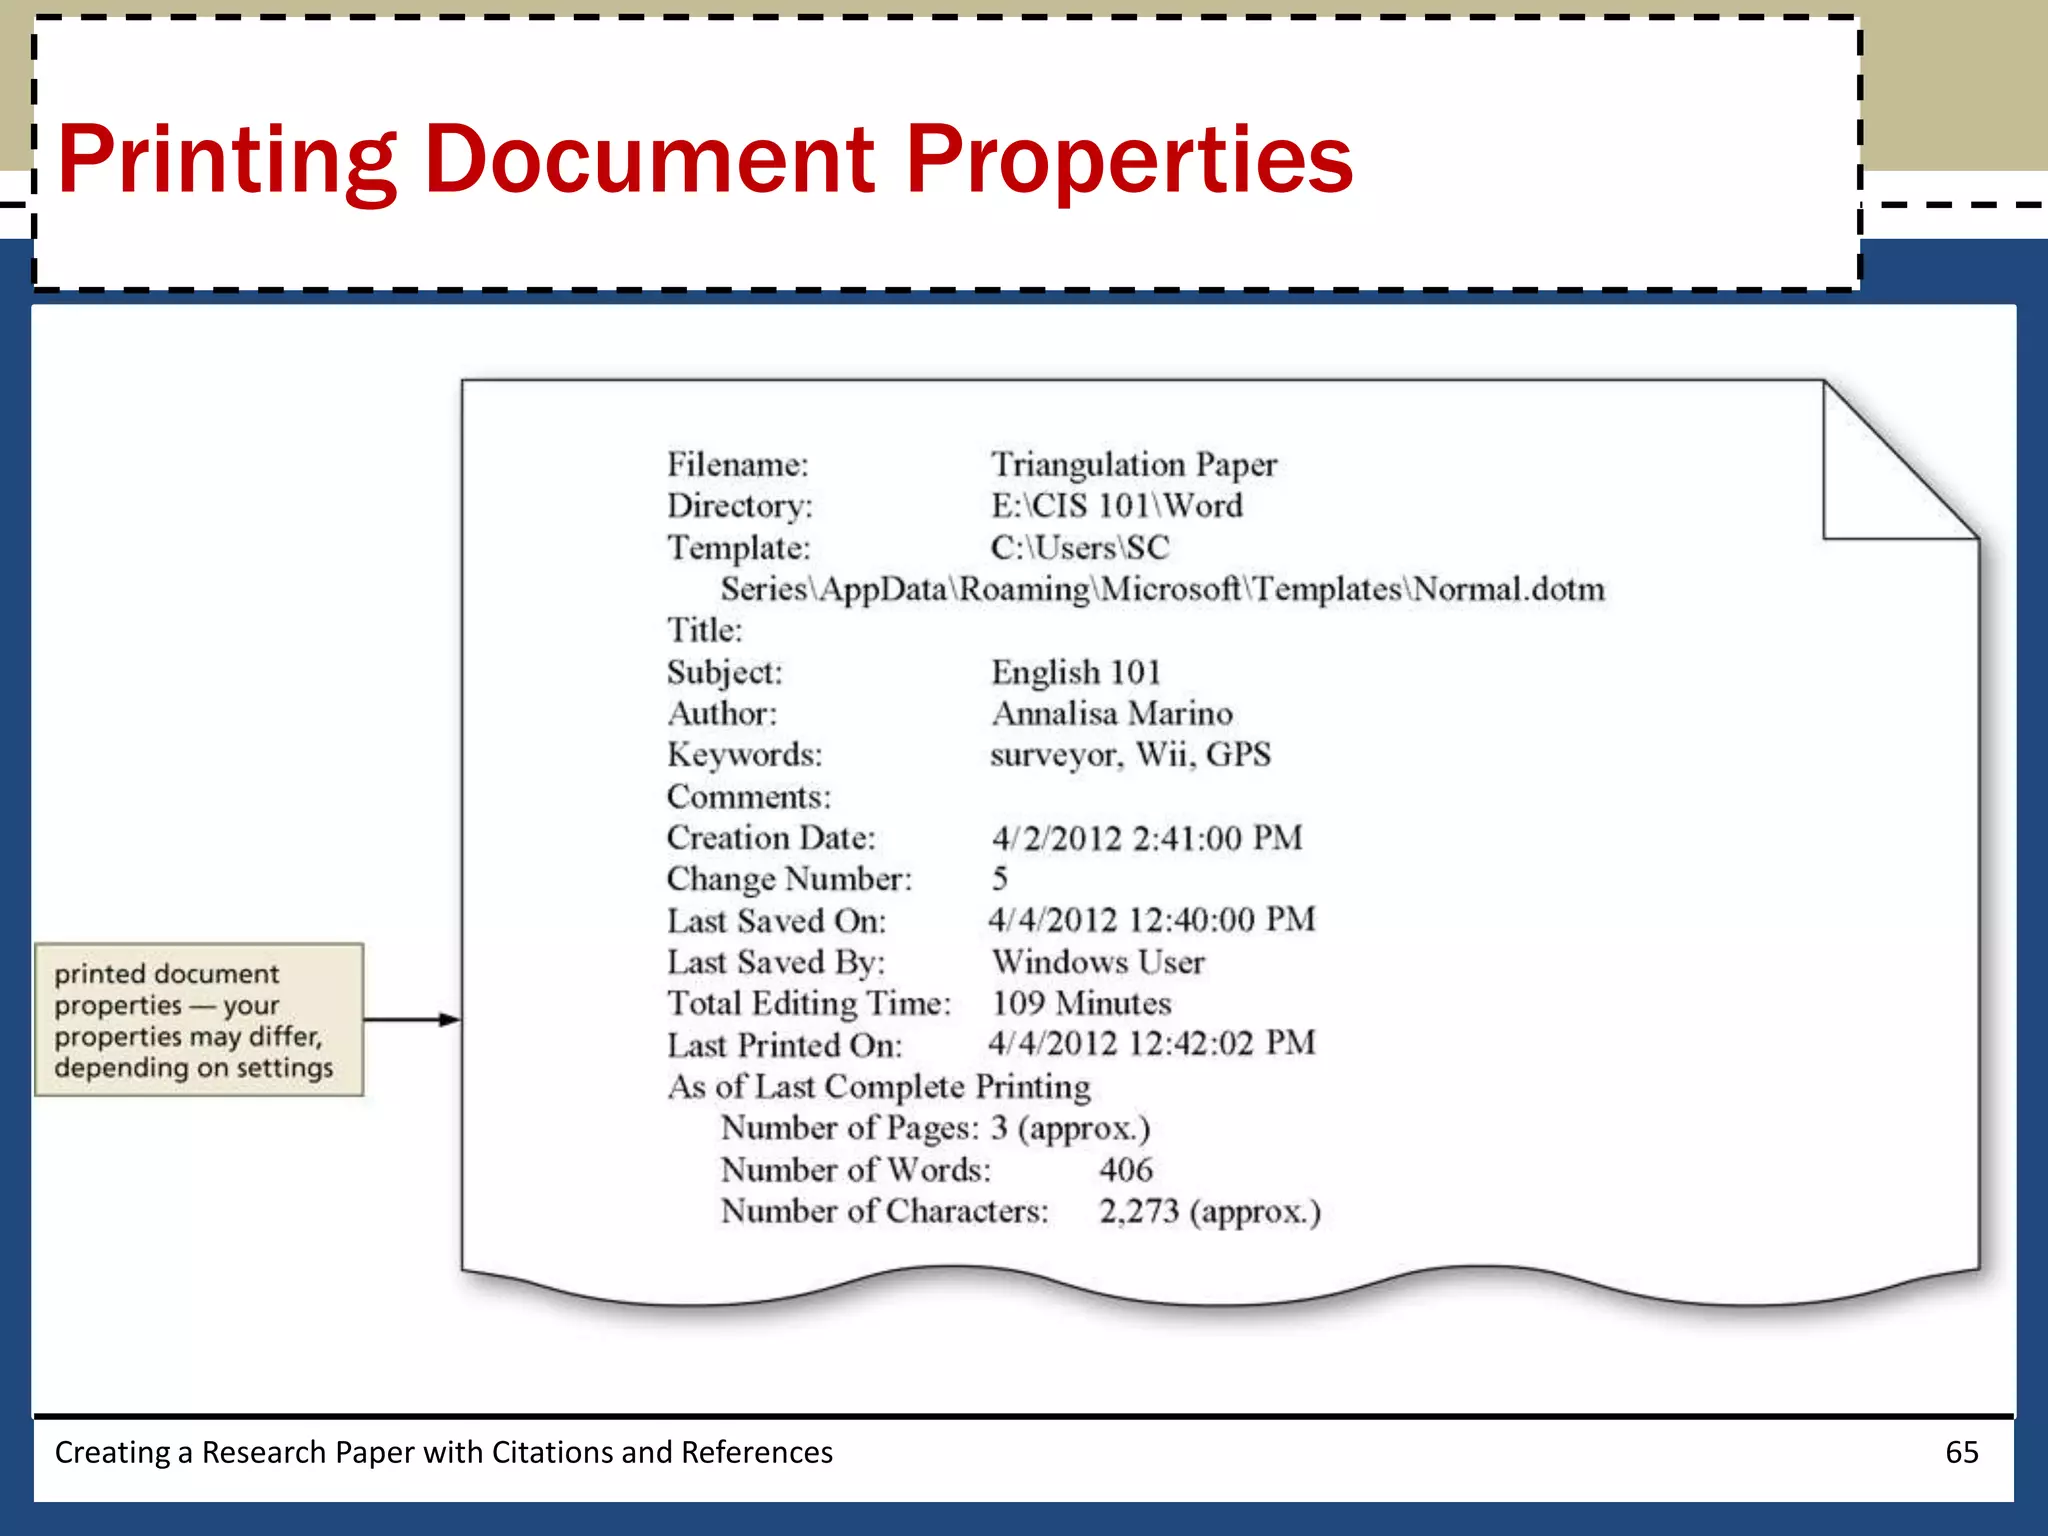
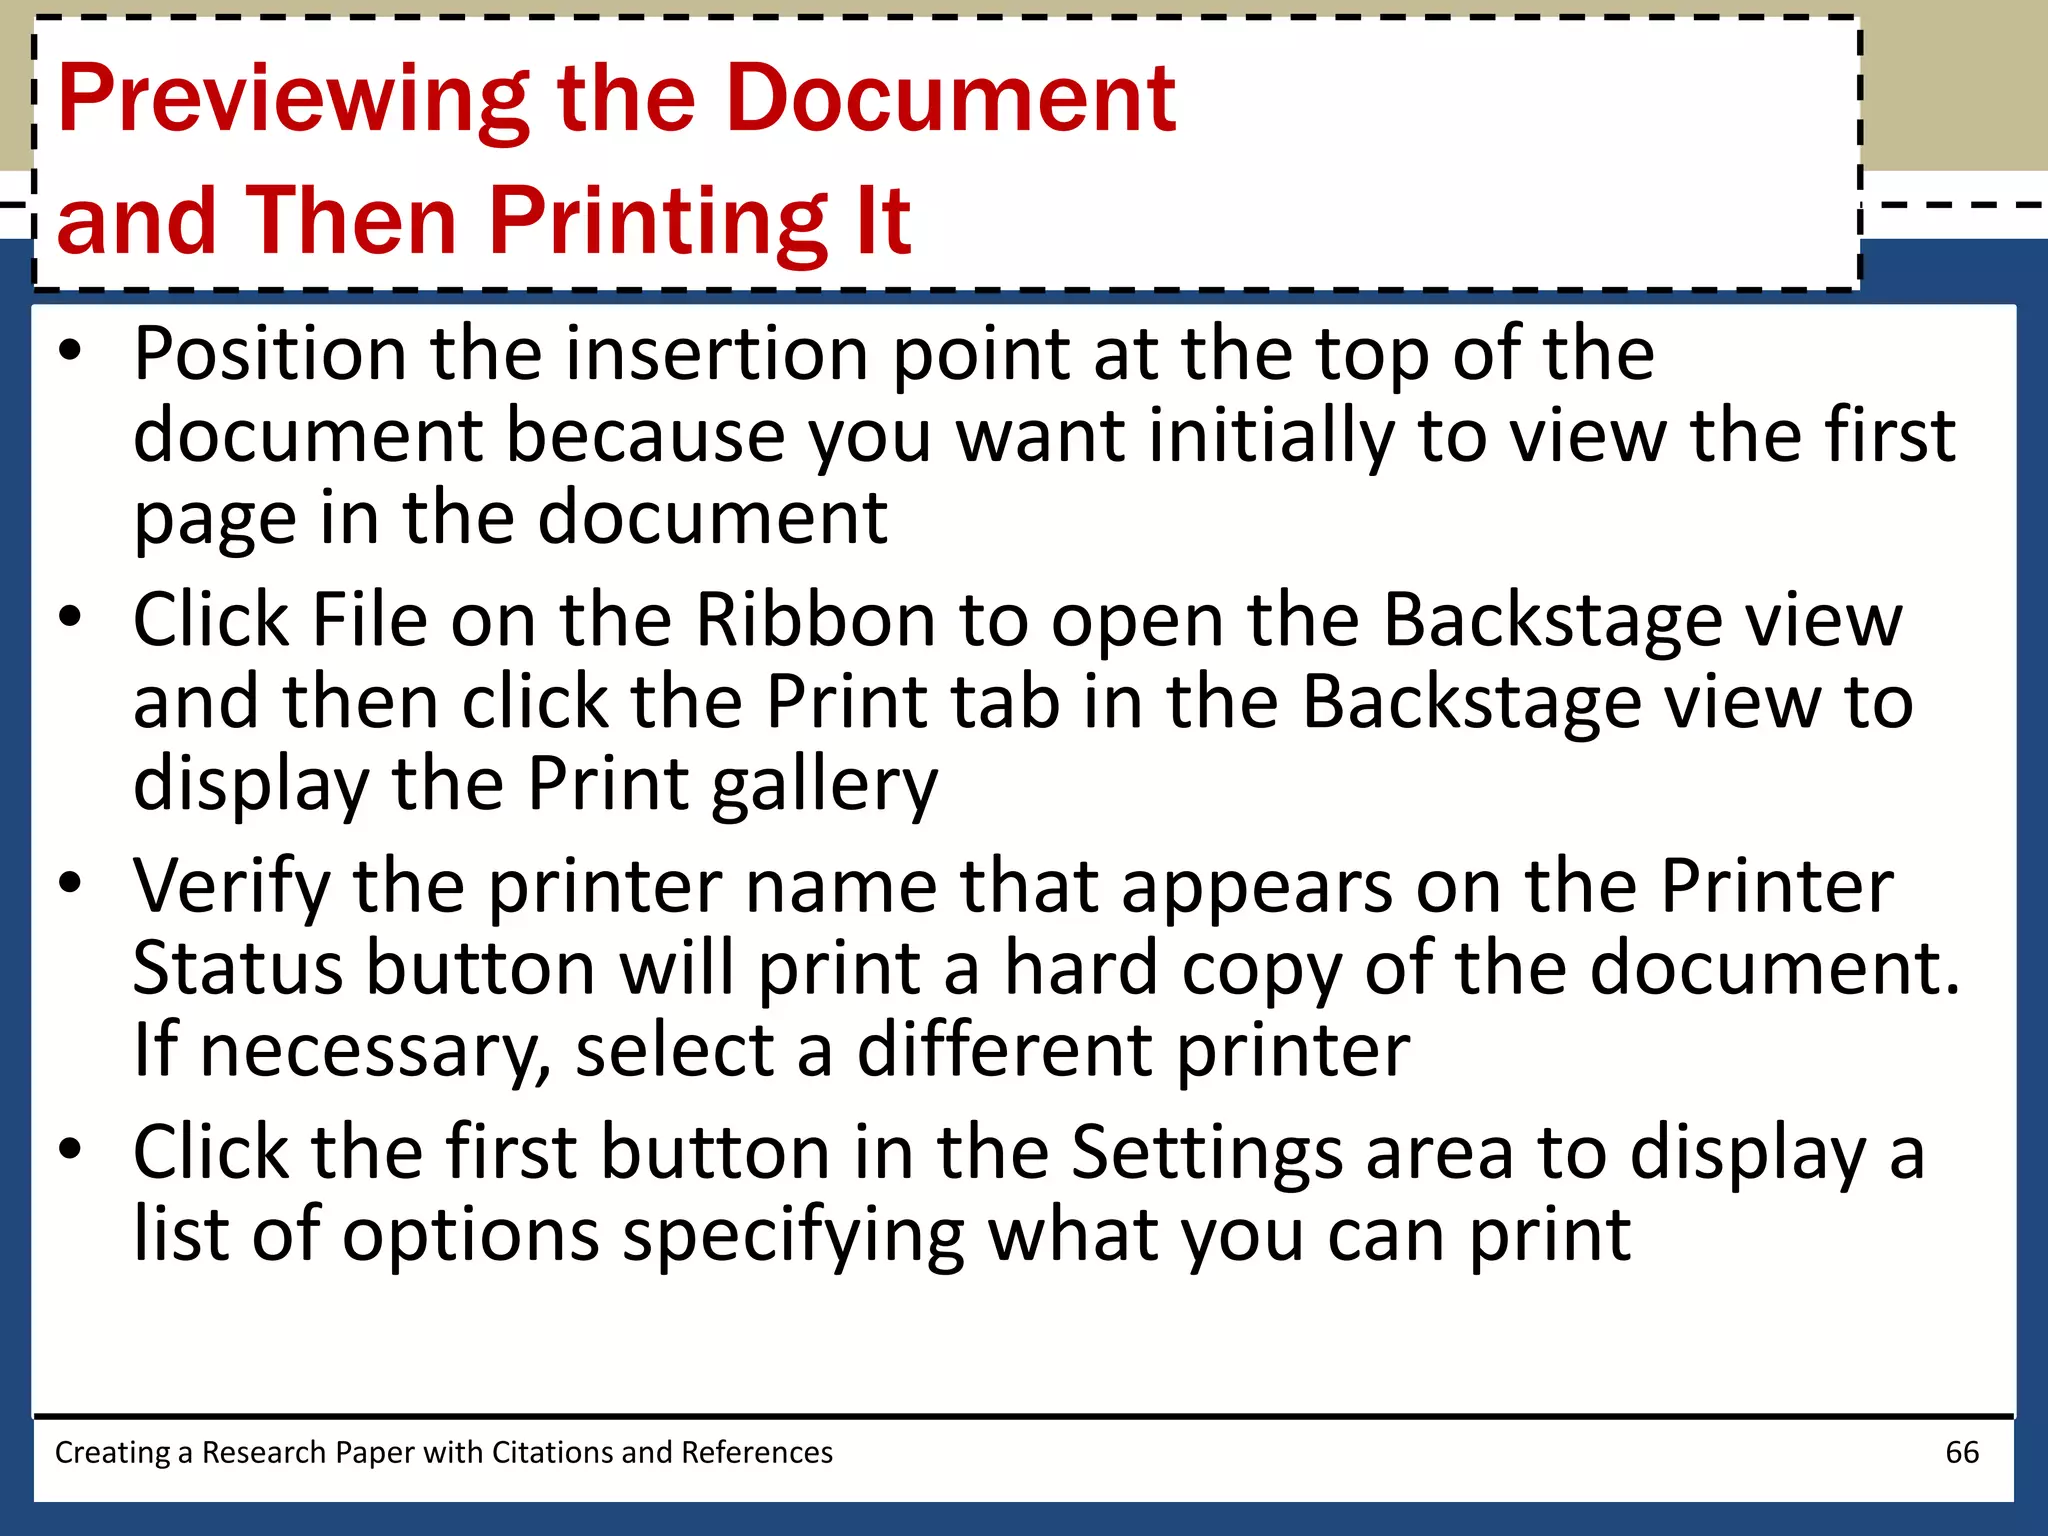
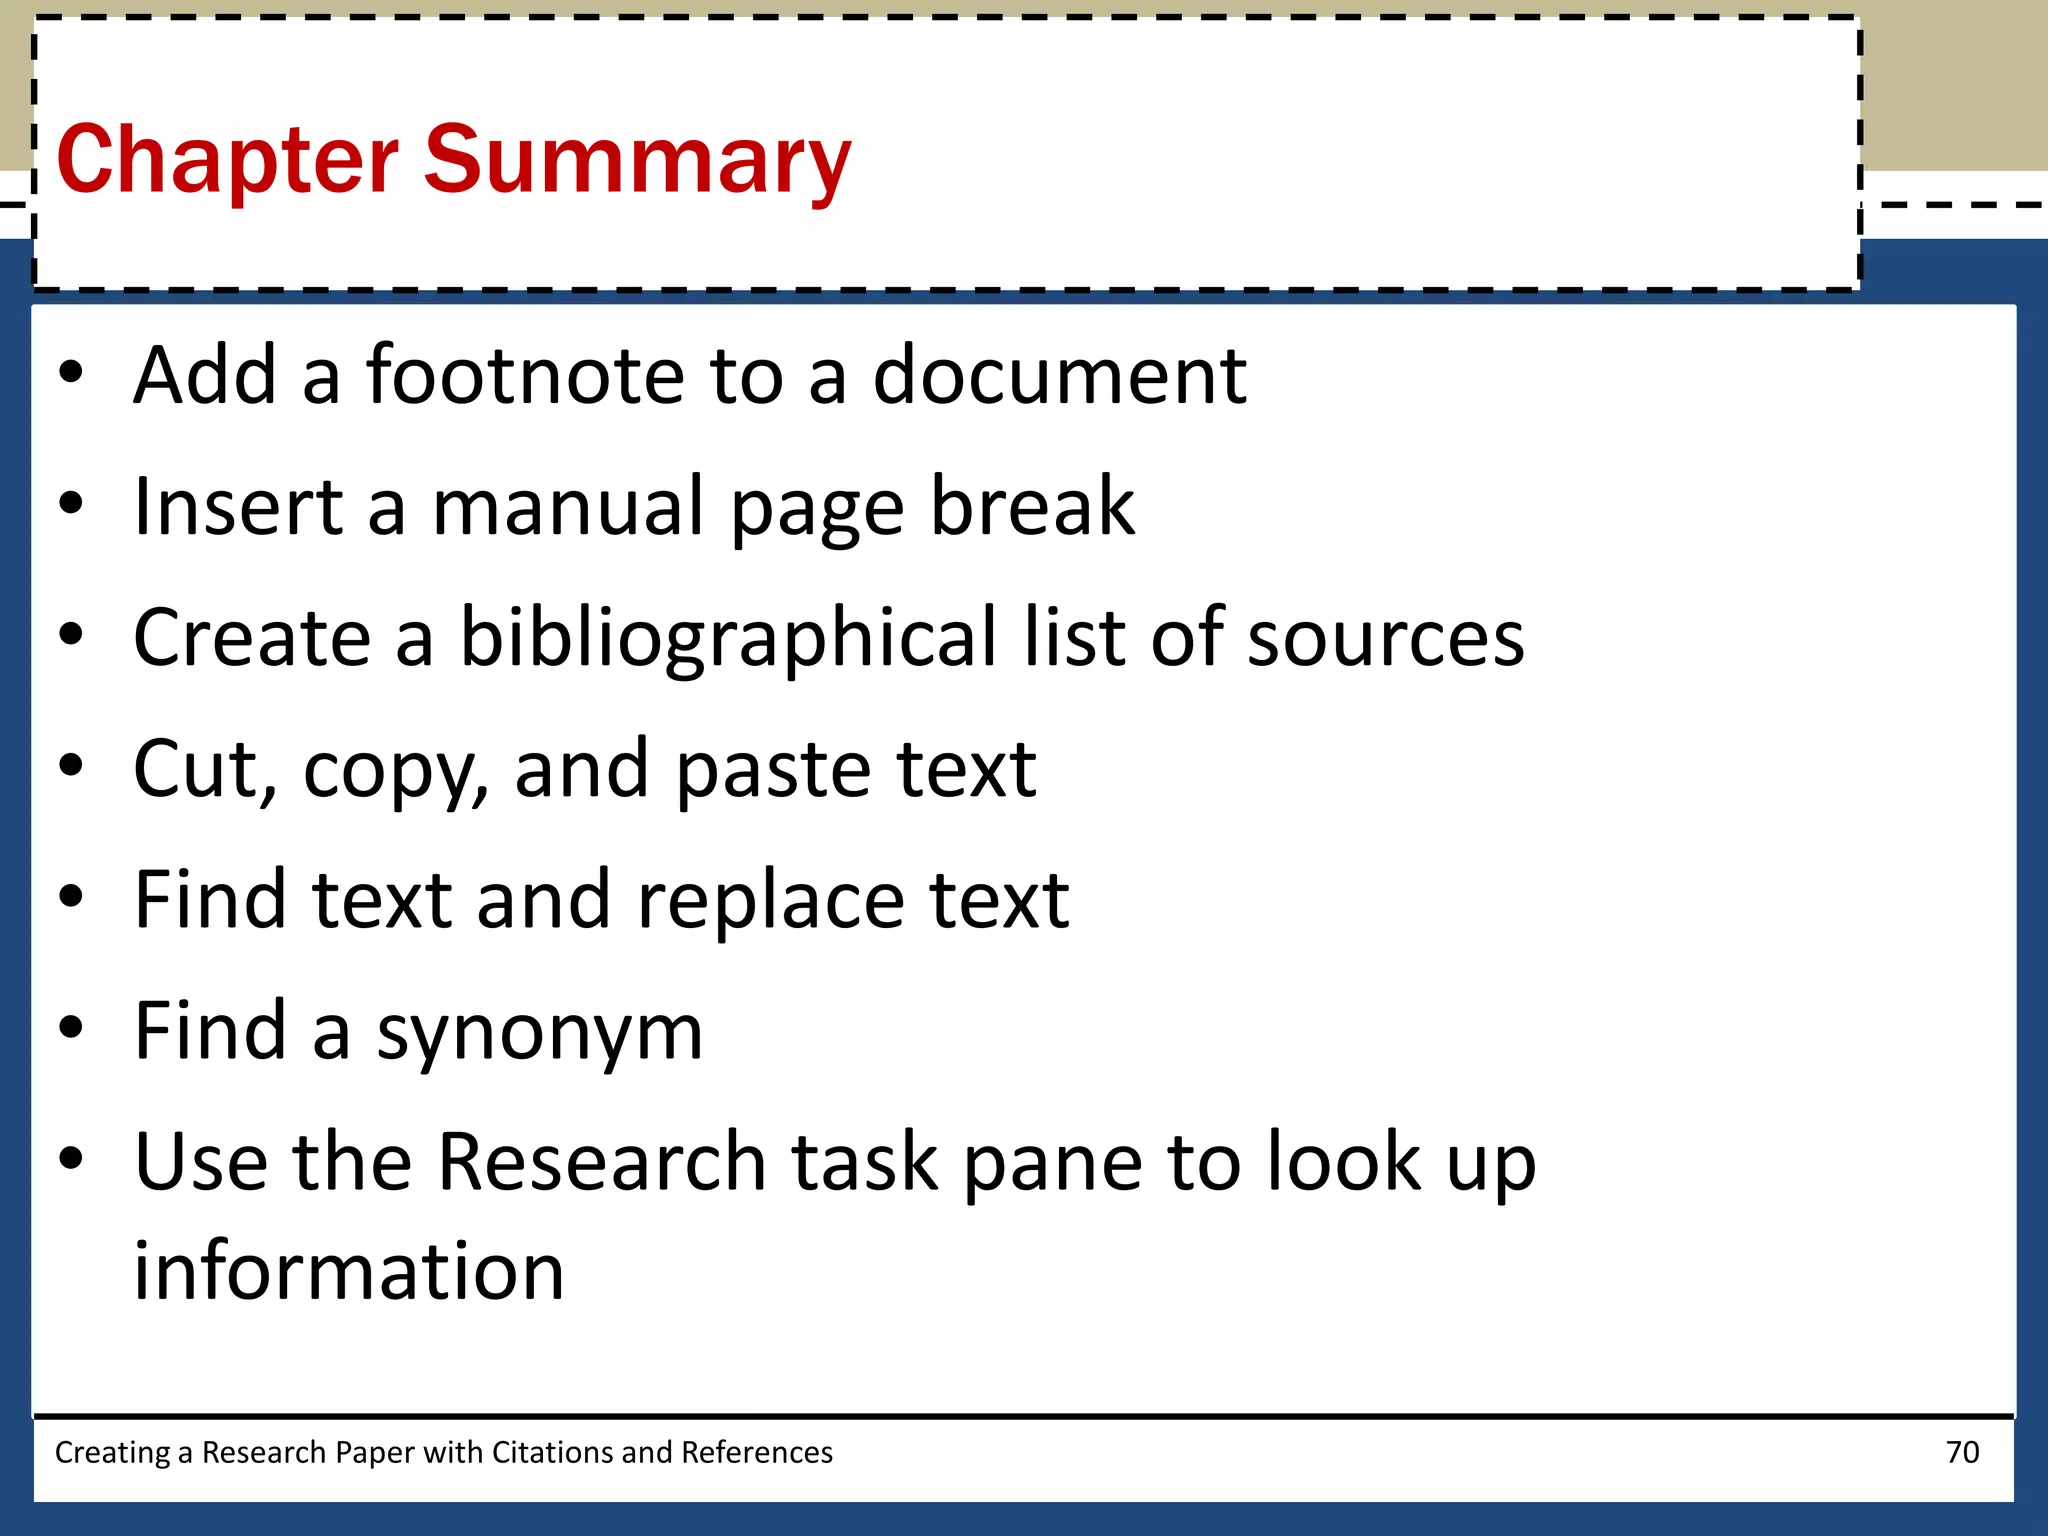
Microsoft
Word 2010
       Chapter 2

Creating a Research Paper
      with Citations
     and References
Objectives

• Describe the MLA documentation style for
  research papers
• Change line and paragraph spacing in a document
• Modify a style
• Use a header to number pages of a document
• Apply formatting using shortcut keys
• Modify paragraph indentation
• Insert and edit citations and their sources
Creating a Research Paper with Citations and References   2
Objectives

•    Add a footnote to a document
•    Insert a manual page break
•    Create a bibliographical list of sources
•    Cut, copy, and paste text
•    Find text and replace text
•    Find a synonym
•    Use the Research task pane to look up
     information
Creating a Research Paper with Citations and References   3
Project – Research Paper


Creating a Research Paper with Citations and References   4
General Project Guidelines

•    Select a topic
•    Research the topic and take notes
•    Organize your ideas
•    Write the first draft, referencing sources
•    Create the list of sources
•    Proofread and revise the paper


Creating a Research Paper with Citations and References   5
Modifying a Style

• Right-click the style to modify in the Quick Style
  gallery (Home tab | Styles group) to display a
  shortcut menu related to styles
• Click Modify on the shortcut menu to display the
  Modify Style dialog box
• Make the desired changes to the style in the
  Modify Style dialog box, and then click the OK
  button to update the style

Creating a Research Paper with Citations and References   6
Modifying a Style


Creating a Research Paper with Citations and References   7
Changing Line Spacing

• Click the Line and Paragraph Spacing button
  (Home tab | Paragraph group) to display the Line
  and Paragraph Spacing gallery
• Click the desired setting in the Line and Paragraph
  Spacing gallery to change the line spacing at the
  location of the insertion point


Creating a Research Paper with Citations and References   8
Changing Line Spacing


Creating a Research Paper with Citations and References   9
Removing Space after a Paragraph
• Click the Line and Paragraph Spacing button (Home tab |
  Paragraph group) to display the Line and Paragraph
  Spacing gallery
• Click Remove Space After Paragraph in the Line and
  Paragraph Spacing gallery so that no blank space appears
  after paragraphs


Creating a Research Paper with Citations and References   10
Updating a Style to Match a Selection
• Right-click Normal in the Quick Style gallery (Home tab |
  Styles group) to display a shortcut menu
• Click Update Normal to Match Selection on the shortcut
  menu to update the selected (or current) style to reflect
  the settings at the location of the insertion point


Creating a Research Paper with Citations and References   11
Switching to the Header
• Click Insert on the Ribbon to display the Insert tab
• Click the Header button (Insert tab | Header & Footer
  group) to display the Header gallery
• Click Edit Header in the Header gallery to switch from the
  document text to the header, which allows you to edit
  the contents of the header


Creating a Research Paper with Citations and References   12
Right-Aligning a Paragraph

• Click Home on the Ribbon to display the Home
  tab
• Click the Align Text Right button (Home tab |
  Paragraph group) to right-align the current
  paragraph


Creating a Research Paper with Citations and References   13
Inserting a Page Number

• Click the Insert Page Number button (Header &
  Footer Tools Design tab | Header & Footer group)
  to display the Insert Page Number
• Point to the position at which you want to insert
  the page number, and then select the desired
  style in the gallery


Creating a Research Paper with Citations and References   14
Inserting a Page Number


Creating a Research Paper with Citations and References   15
Closing the Header

• Click the Close Header and Footer button (Header
  & Footer Tools Design tab | Close group) to close
  the header and switch back to the document text


Creating a Research Paper with Citations and References   16
Click and Type

• Position the mouse pointer in the location where
  you want to type, in the center of the document
  window until a center icon appears below the I-
  beam
• Double-click to center the paragraph and mark
  the insertion point between the left and right
  margins
• Type the desired text and then press the ENTER
  key to position the insertion point on the next line
Creating a Research Paper with Citations and References   17
Click and Type


Creating a Research Paper with Citations and References   18
Shortcut Keys


Creating a Research Paper with Citations and References   19
Displaying the Rulers

• If the rulers are not displayed, click the View Ruler
  button on the vertical scroll bar to display the
  horizontal and vertical rulers on the screen


Creating a Research Paper with Citations and References   20
First-Line Indenting Paragraphs

• With the insertion point in the paragraph to be
  indented, drag the First Line Indent marker to the
  desired location on the ruler to set the location
  for the first-line indent


Creating a Research Paper with Citations and References   21
AutoCorrecting as You Type

• Word provides an AutoCorrect feature that
  automatically corrects certain
  typing, spelling, capitalization, or grammar errors
  as you type a document


Creating a Research Paper with Citations and References   22
Using the AutoCorrect Options Button
• Position the mouse pointer in the text automatically corrected by
  Word to display a small blue box below the automatically corrected
  word
• Point to the small blue box to display the AutoCorrect Options
  button
• Click the AutoCorrect Options button to display the AutoCorrect
  Options menu
• Press the ESCAPE key to remove the AutoCorrect Options menu
  from the screen


Creating a Research Paper with Citations and References           23
Creating an AutoCorrect Entry
• Click File on the Ribbon to open the Backstage view
• Click Options in the Backstage view to display the Word Options
  dialog box
• Click Proofing in the left pane to display proofing options in the
  right pane
• Click the AutoCorrect Options button in the right pane to display
  the AutoCorrect dialog box
• When Word displays the AutoCorrect dialog box, type the word
  you want to replace in the Replace text box, and the word to
  replace with in the With text box
• Click the Add button
• Click the OK button

Creating a Research Paper with Citations and References           24
Creating an AutoCorrect Entry


Creating a Research Paper with Citations and References   25
Changing the Bibliography Style

• Click References on the Ribbon to display the
  References tab
• Click the Bibliography Style box arrow (References
  tab | Citations & Bibliography group) to display a
  gallery of predefined documentation styles
• Click the desired style in the Bibliography Style
  gallery to change the documentation style


Creating a Research Paper with Citations and References   26
Changing the Bibliography Style


Creating a Research Paper with Citations and References   27
Inserting a Citation
and Creating Its Source
• Click the Insert Citation button (References tab |
  Citations & Bibliography group) to display the Insert
  Citation menu
• Click Add New Source on the Insert Citation menu to
  display the Create Source dialog box
• Click the Type of Source box arrow, and then click the
  type of source you are adding
• Type the source information in the appropriate text
  boxes, and then click the OK button to insert the
  citation in the document at the location of the
  insertion point

Creating a Research Paper with Citations and References   28
Inserting a Citation
and Creating Its Source


Creating a Research Paper with Citations and References   29
Editing a Citation

• Click somewhere in the citation to be
  edited, which selects the citation and displays the
  Citation Options box arrow
• Click the Citation Options box arrow to display the
  Citation Options menu
• Click Edit Citation on the Citation Options menu to
  display the Edit Citation dialog box
• Change the information as necessary in the Edit
  Citation dialog box, and then click the OK button
Creating a Research Paper with Citations and References   30
Editing a Citation


Creating a Research Paper with Citations and References   31
Inserting a Footnote Reference Mark

• Click the Insert Footnote button (References tab |
  Footnotes group) to display a note reference mark
  (a superscripted 1) in two places: (1) in the
  document window at the location of the insertion
  point and (2) at the bottom of the page where the
  footnote will be positioned, just below a
  separator line
• Type the footnote text

Creating a Research Paper with Citations and References   32
Inserting a Footnote Reference Mark


Creating a Research Paper with Citations and References   33
Inserting a Citation Placeholder

• Click the Insert Citation button (References tab |
  Citations & Bibliography group) to display the
  Insert Citation menu
• Click Add New Placeholder on the Insert Citation
  menu to display the Placeholder Name dialog box
• Click the placeholder name, and then click the OK
  button


Creating a Research Paper with Citations and References   34
Editing a Source
• Click somewhere in the citation placeholder to be
  edited to select the citation placeholder
• Click the Citation Options box arrow to display the
  Citation Options menu
• Click Edit Source on the Citation Options menu to
  display the Edit Source dialog box
• If necessary, click the Type of Source box arrow and
  then select the type of source
• Enter the source information, and then click the OK
  button
Creating a Research Paper with Citations and References   35
Editing a Source


Creating a Research Paper with Citations and References   36
Counting Words

• Click the Word Count indicator on the status bar
  to display the Word Count dialog box
• If necessary, place a check mark in the ‘Include
  textboxes, footnotes and endnotes’ check box
• Click the Close button to close the dialog box


Creating a Research Paper with Citations and References   37
Counting Words


Creating a Research Paper with Citations and References   38
Page Breaking Manually

• Position the insertion point where you wish to
  insert the page break
• Click Insert on the Ribbon to display the Insert tab
• Click the Page Break button (Insert tab | Pages
  group) to insert a manual page break immediately
  to the left of the insertion point and position the
  insertion point immediately below the manual
  page break

Creating a Research Paper with Citations and References   39
Page Breaking Manually


Creating a Research Paper with Citations and References   40
Applying a Style

• Click Home on the Ribbon to display the Home
  tab
• With the insertion point in the paragraph to be
  modified, click the desired style in the Styles
  gallery


Creating a Research Paper with Citations and References   41
Creating a Bibliographical List

• Click References on the Ribbon to display the
  References tab
• With the insertion point positioned where the
  bibliographical list is to be inserted, click the
  Bibliography button to display the Bibliography
  gallery
• Click Insert Bibliography in the Bibliography
  gallery to insert a list of sources at the location of
  the insertion point
Creating a Research Paper with Citations and References   42
Creating a Bibliographical List


Creating a Research Paper with Citations and References   43
Modifying a Source and Updating the
Bibliographical List
• Click the Manage Sources button (References tab |
  Citations & Bibliography group) to display the Source
  Manager dialog box
• Click the source you wish to edit in the Current List
• Click the Edit button to display the Edit Source dialog box
• Make the desired changes to the source, and then click the
  OK button
• If necessary, click Yes to update all occurrences of the
  source
• Click the Close button to update the list of sources in the
  document and close the dialog box

Creating a Research Paper with Citations and References     44
Modifying a Source and Updating the
Bibliographical List


Creating a Research Paper with Citations and References   45
Converting a Field to Regular Text

• Click somewhere in the field to select it
• Press CTRL+SHIFT+F9 to convert the selected field
  to regular text


Creating a Research Paper with Citations and References   46
Scrolling Page by Page
through a Document
• Click the Previous Page button or Next Page
  button on the vertical scroll bar to scroll through
  the document


Creating a Research Paper with Citations and References   47
Copying and Pasting

• Select the item to be copied
• Click the Copy button (Home tab | Clipboard
  group) to copy the selected item in the document
  to the Office Clipboard
• Position the insertion point at the location where
  the item should be pasted
• Click the Paste button (Home tab | Clipboard
  group) to paste the copied item in the document
  at the location of the insertion point
Creating a Research Paper with Citations and References   48
Copying and Pasting


Creating a Research Paper with Citations and References   49
Displaying the Paste Options Menu

• Immediately after pasting text, click the Paste
  Options button to display the Paste Options menu
• Press the ESCAPE key to remove the Paste Options
  menu from the window


Creating a Research Paper with Citations and References   50
Finding Text

• Click the Find button (Home tab | Editing group)
  to display the Navigation Pane
• Type the text to find in the Navigation Pane text
  box to display all occurrences of the typed
  text, called the search text, in the Navigation Pane
  and to highlight the occurrences of the search text
  in the document window


Creating a Research Paper with Citations and References   51
Finding Text


Creating a Research Paper with Citations and References   52
Replacing Text
• Click the Replace button (Home tab | Editing group) to
  display the Replace sheet in the Find and Replace dialog
  box
• Type the text to find in the Find what text box
• Press the TAB key. Type the text to replace within the
  Replace with text box
• Click the Replace All button to instruct Word to replace all
  occurrences of the Find what text with the Replace with
  text. If Word displays a dialog box asking if you want to
  continue searching from the beginning of the
  document, click the Yes button
• Click the OK button
• Click the Close button
Creating a Research Paper with Citations and References          53
Replacing Text


Creating a Research Paper with Citations and References   54
Going to a Page

• Click the ‘Browse the pages in your document’ tab
  in the Navigation Pane to display thumbnail
  images of the pages in the document
• Click the thumbnail of the page you wish to
  display to display the top of the selected page in
  the top of the document window
• Click the Close button in the Navigation Pane to
  close the pane

Creating a Research Paper with Citations and References   55
Going to a Page


Creating a Research Paper with Citations and References   56
Finding and Inserting a Synonym

• Locate and then right-click the word for which you
  want to find a synonym to display a shortcut
  menu related to the word you right-clicked
• Point to Synonyms on the shortcut menu to
  display a list of synonyms for the word you right-
  clicked
• Click the synonym you want on the Synonyms
  submenu to replace the selected word in the
  document with the selected synonym
Creating a Research Paper with Citations and References   57
Finding and Inserting a Synonym


Creating a Research Paper with Citations and References   58
Checking Spelling and Grammar at Once
• Press CTRL+HOME because you want the spelling and
  grammar check to begin from the top of the
  document
• Click Review on the Ribbon to display the Review tab
• Click the Spelling & Grammar button (Review tab |
  Proofing group) to begin the spelling and grammar
  check at the location of the insertion point, which in
  this case, is at the beginning of the document
• Click the desired spelling in the Suggestions list
• If items are found, click the desired selection
Creating a Research Paper with Citations and References   59
Checking Spelling and Grammar at Once


Creating a Research Paper with Citations and References   60
Using the Research Task Pane
to Look Up Information
• Locate the word you want to look up
• While holding down the ALT key, click the word
  you want to look up to open the Research task
  pane and display a dictionary entry for the
  ALT+clicked word. Release the ALT key
• Click the Search for box arrow in the Research task
  pane to display a list of search locations
• Click the desired search location
• Click the Close button in the Research task pane

Creating a Research Paper with Citations and References   61
Using the Research Task Pane
to Look Up Information


Creating a Research Paper with Citations and References   62
Printing Document Properties
• Click File on the Ribbon to open the Backstage view
  and then click the Print tab in the Backstage view to
  display the Print gallery
• Verify the printer name that appears on the Printer
  Status button will print a hard copy of the document.
  If necessary, click the Printer Status button to display
  a list of available printer options and then click the
  desired printer to change the currently selected
  printer
• Click the first button in the Settings area to display a
  list of options specifying what you can print
Creating a Research Paper with Citations and References   63
Printing Document Properties

• Click Document Properties in the list to specify
  you want to print the document properties
  instead of the actual document
• Click the Print button in the Print gallery to print
  the document properties on the currently
  selected printer


Creating a Research Paper with Citations and References   64
Printing Document Properties


Creating a Research Paper with Citations and References   65
Previewing the Document
and Then Printing It
• Position the insertion point at the top of the
  document because you want initially to view the first
  page in the document
• Click File on the Ribbon to open the Backstage view
  and then click the Print tab in the Backstage view to
  display the Print gallery
• Verify the printer name that appears on the Printer
  Status button will print a hard copy of the document.
  If necessary, select a different printer
• Click the first button in the Settings area to display a
  list of options specifying what you can print

Creating a Research Paper with Citations and References   66
Previewing the Document
and Then Printing It
• Click Print All Pages in the list to specify you want
  to print all pages in the actual document
• Click the Next Page button in the Print gallery to
  preview the next page of the document in the
  Print gallery
• Click the Print button in the Print gallery to print
  the document on the currently selected printer


Creating a Research Paper with Citations and References   67
Previewing the Document
and Then Printing It


Creating a Research Paper with Citations and References   68
Chapter Summary

• Describe the MLA documentation style for
  research papers
• Change line and paragraph spacing in a document
• Modify a style
• Use a header to number pages of a document
• Apply formatting using shortcut keys
• Modify paragraph indentation
• Insert and edit citations and their sources
Creating a Research Paper with Citations and References   69
Chapter Summary

•    Add a footnote to a document
•    Insert a manual page break
•    Create a bibliographical list of sources
•    Cut, copy, and paste text
•    Find text and replace text
•    Find a synonym
•    Use the Research task pane to look up
     information
Creating a Research Paper with Citations and References   70
Microsoft
Word 2010
 Chapter 2 Complete

Wd chapter 02

  • 1.
    Microsoft Word 2010 Chapter 2 Creating a Research Paper with Citations and References
  • 2.
    Objectives • Describe theMLA documentation style for research papers • Change line and paragraph spacing in a document • Modify a style • Use a header to number pages of a document • Apply formatting using shortcut keys • Modify paragraph indentation • Insert and edit citations and their sources Creating a Research Paper with Citations and References 2
  • 3.
    Objectives • Add a footnote to a document • Insert a manual page break • Create a bibliographical list of sources • Cut, copy, and paste text • Find text and replace text • Find a synonym • Use the Research task pane to look up information Creating a Research Paper with Citations and References 3
  • 4.
    Project – ResearchPaper Creating a Research Paper with Citations and References 4
  • 5.
    General Project Guidelines • Select a topic • Research the topic and take notes • Organize your ideas • Write the first draft, referencing sources • Create the list of sources • Proofread and revise the paper Creating a Research Paper with Citations and References 5
  • 6.
    Modifying a Style •Right-click the style to modify in the Quick Style gallery (Home tab | Styles group) to display a shortcut menu related to styles • Click Modify on the shortcut menu to display the Modify Style dialog box • Make the desired changes to the style in the Modify Style dialog box, and then click the OK button to update the style Creating a Research Paper with Citations and References 6
  • 7.
    Modifying a Style Creatinga Research Paper with Citations and References 7
  • 8.
    Changing Line Spacing •Click the Line and Paragraph Spacing button (Home tab | Paragraph group) to display the Line and Paragraph Spacing gallery • Click the desired setting in the Line and Paragraph Spacing gallery to change the line spacing at the location of the insertion point Creating a Research Paper with Citations and References 8
  • 9.
    Changing Line Spacing Creatinga Research Paper with Citations and References 9
  • 10.
    Removing Space aftera Paragraph • Click the Line and Paragraph Spacing button (Home tab | Paragraph group) to display the Line and Paragraph Spacing gallery • Click Remove Space After Paragraph in the Line and Paragraph Spacing gallery so that no blank space appears after paragraphs Creating a Research Paper with Citations and References 10
  • 11.
    Updating a Styleto Match a Selection • Right-click Normal in the Quick Style gallery (Home tab | Styles group) to display a shortcut menu • Click Update Normal to Match Selection on the shortcut menu to update the selected (or current) style to reflect the settings at the location of the insertion point Creating a Research Paper with Citations and References 11
  • 12.
    Switching to theHeader • Click Insert on the Ribbon to display the Insert tab • Click the Header button (Insert tab | Header & Footer group) to display the Header gallery • Click Edit Header in the Header gallery to switch from the document text to the header, which allows you to edit the contents of the header Creating a Research Paper with Citations and References 12
  • 13.
    Right-Aligning a Paragraph •Click Home on the Ribbon to display the Home tab • Click the Align Text Right button (Home tab | Paragraph group) to right-align the current paragraph Creating a Research Paper with Citations and References 13
  • 14.
    Inserting a PageNumber • Click the Insert Page Number button (Header & Footer Tools Design tab | Header & Footer group) to display the Insert Page Number • Point to the position at which you want to insert the page number, and then select the desired style in the gallery Creating a Research Paper with Citations and References 14
  • 15.
    Inserting a PageNumber Creating a Research Paper with Citations and References 15
  • 16.
    Closing the Header •Click the Close Header and Footer button (Header & Footer Tools Design tab | Close group) to close the header and switch back to the document text Creating a Research Paper with Citations and References 16
  • 17.
    Click and Type •Position the mouse pointer in the location where you want to type, in the center of the document window until a center icon appears below the I- beam • Double-click to center the paragraph and mark the insertion point between the left and right margins • Type the desired text and then press the ENTER key to position the insertion point on the next line Creating a Research Paper with Citations and References 17
  • 18.
    Click and Type Creatinga Research Paper with Citations and References 18
  • 19.
    Shortcut Keys Creating aResearch Paper with Citations and References 19
  • 20.
    Displaying the Rulers •If the rulers are not displayed, click the View Ruler button on the vertical scroll bar to display the horizontal and vertical rulers on the screen Creating a Research Paper with Citations and References 20
  • 21.
    First-Line Indenting Paragraphs •With the insertion point in the paragraph to be indented, drag the First Line Indent marker to the desired location on the ruler to set the location for the first-line indent Creating a Research Paper with Citations and References 21
  • 22.
    AutoCorrecting as YouType • Word provides an AutoCorrect feature that automatically corrects certain typing, spelling, capitalization, or grammar errors as you type a document Creating a Research Paper with Citations and References 22
  • 23.
    Using the AutoCorrectOptions Button • Position the mouse pointer in the text automatically corrected by Word to display a small blue box below the automatically corrected word • Point to the small blue box to display the AutoCorrect Options button • Click the AutoCorrect Options button to display the AutoCorrect Options menu • Press the ESCAPE key to remove the AutoCorrect Options menu from the screen Creating a Research Paper with Citations and References 23
  • 24.
    Creating an AutoCorrectEntry • Click File on the Ribbon to open the Backstage view • Click Options in the Backstage view to display the Word Options dialog box • Click Proofing in the left pane to display proofing options in the right pane • Click the AutoCorrect Options button in the right pane to display the AutoCorrect dialog box • When Word displays the AutoCorrect dialog box, type the word you want to replace in the Replace text box, and the word to replace with in the With text box • Click the Add button • Click the OK button • Click the OK button Creating a Research Paper with Citations and References 24
  • 25.
    Creating an AutoCorrectEntry Creating a Research Paper with Citations and References 25
  • 26.
    Changing the BibliographyStyle • Click References on the Ribbon to display the References tab • Click the Bibliography Style box arrow (References tab | Citations & Bibliography group) to display a gallery of predefined documentation styles • Click the desired style in the Bibliography Style gallery to change the documentation style Creating a Research Paper with Citations and References 26
  • 27.
    Changing the BibliographyStyle Creating a Research Paper with Citations and References 27
  • 28.
    Inserting a Citation andCreating Its Source • Click the Insert Citation button (References tab | Citations & Bibliography group) to display the Insert Citation menu • Click Add New Source on the Insert Citation menu to display the Create Source dialog box • Click the Type of Source box arrow, and then click the type of source you are adding • Type the source information in the appropriate text boxes, and then click the OK button to insert the citation in the document at the location of the insertion point Creating a Research Paper with Citations and References 28
  • 29.
    Inserting a Citation andCreating Its Source Creating a Research Paper with Citations and References 29
  • 30.
    Editing a Citation •Click somewhere in the citation to be edited, which selects the citation and displays the Citation Options box arrow • Click the Citation Options box arrow to display the Citation Options menu • Click Edit Citation on the Citation Options menu to display the Edit Citation dialog box • Change the information as necessary in the Edit Citation dialog box, and then click the OK button Creating a Research Paper with Citations and References 30
  • 31.
    Editing a Citation Creatinga Research Paper with Citations and References 31
  • 32.
    Inserting a FootnoteReference Mark • Click the Insert Footnote button (References tab | Footnotes group) to display a note reference mark (a superscripted 1) in two places: (1) in the document window at the location of the insertion point and (2) at the bottom of the page where the footnote will be positioned, just below a separator line • Type the footnote text Creating a Research Paper with Citations and References 32
  • 33.
    Inserting a FootnoteReference Mark Creating a Research Paper with Citations and References 33
  • 34.
    Inserting a CitationPlaceholder • Click the Insert Citation button (References tab | Citations & Bibliography group) to display the Insert Citation menu • Click Add New Placeholder on the Insert Citation menu to display the Placeholder Name dialog box • Click the placeholder name, and then click the OK button Creating a Research Paper with Citations and References 34
  • 35.
    Editing a Source •Click somewhere in the citation placeholder to be edited to select the citation placeholder • Click the Citation Options box arrow to display the Citation Options menu • Click Edit Source on the Citation Options menu to display the Edit Source dialog box • If necessary, click the Type of Source box arrow and then select the type of source • Enter the source information, and then click the OK button Creating a Research Paper with Citations and References 35
  • 36.
    Editing a Source Creatinga Research Paper with Citations and References 36
  • 37.
    Counting Words • Clickthe Word Count indicator on the status bar to display the Word Count dialog box • If necessary, place a check mark in the ‘Include textboxes, footnotes and endnotes’ check box • Click the Close button to close the dialog box Creating a Research Paper with Citations and References 37
  • 38.
    Counting Words Creating aResearch Paper with Citations and References 38
  • 39.
    Page Breaking Manually •Position the insertion point where you wish to insert the page break • Click Insert on the Ribbon to display the Insert tab • Click the Page Break button (Insert tab | Pages group) to insert a manual page break immediately to the left of the insertion point and position the insertion point immediately below the manual page break Creating a Research Paper with Citations and References 39
  • 40.
    Page Breaking Manually Creatinga Research Paper with Citations and References 40
  • 41.
    Applying a Style •Click Home on the Ribbon to display the Home tab • With the insertion point in the paragraph to be modified, click the desired style in the Styles gallery Creating a Research Paper with Citations and References 41
  • 42.
    Creating a BibliographicalList • Click References on the Ribbon to display the References tab • With the insertion point positioned where the bibliographical list is to be inserted, click the Bibliography button to display the Bibliography gallery • Click Insert Bibliography in the Bibliography gallery to insert a list of sources at the location of the insertion point Creating a Research Paper with Citations and References 42
  • 43.
    Creating a BibliographicalList Creating a Research Paper with Citations and References 43
  • 44.
    Modifying a Sourceand Updating the Bibliographical List • Click the Manage Sources button (References tab | Citations & Bibliography group) to display the Source Manager dialog box • Click the source you wish to edit in the Current List • Click the Edit button to display the Edit Source dialog box • Make the desired changes to the source, and then click the OK button • If necessary, click Yes to update all occurrences of the source • Click the Close button to update the list of sources in the document and close the dialog box Creating a Research Paper with Citations and References 44
  • 45.
    Modifying a Sourceand Updating the Bibliographical List Creating a Research Paper with Citations and References 45
  • 46.
    Converting a Fieldto Regular Text • Click somewhere in the field to select it • Press CTRL+SHIFT+F9 to convert the selected field to regular text Creating a Research Paper with Citations and References 46
  • 47.
    Scrolling Page byPage through a Document • Click the Previous Page button or Next Page button on the vertical scroll bar to scroll through the document Creating a Research Paper with Citations and References 47
  • 48.
    Copying and Pasting •Select the item to be copied • Click the Copy button (Home tab | Clipboard group) to copy the selected item in the document to the Office Clipboard • Position the insertion point at the location where the item should be pasted • Click the Paste button (Home tab | Clipboard group) to paste the copied item in the document at the location of the insertion point Creating a Research Paper with Citations and References 48
  • 49.
    Copying and Pasting Creatinga Research Paper with Citations and References 49
  • 50.
    Displaying the PasteOptions Menu • Immediately after pasting text, click the Paste Options button to display the Paste Options menu • Press the ESCAPE key to remove the Paste Options menu from the window Creating a Research Paper with Citations and References 50
  • 51.
    Finding Text • Clickthe Find button (Home tab | Editing group) to display the Navigation Pane • Type the text to find in the Navigation Pane text box to display all occurrences of the typed text, called the search text, in the Navigation Pane and to highlight the occurrences of the search text in the document window Creating a Research Paper with Citations and References 51
  • 52.
    Finding Text Creating aResearch Paper with Citations and References 52
  • 53.
    Replacing Text • Clickthe Replace button (Home tab | Editing group) to display the Replace sheet in the Find and Replace dialog box • Type the text to find in the Find what text box • Press the TAB key. Type the text to replace within the Replace with text box • Click the Replace All button to instruct Word to replace all occurrences of the Find what text with the Replace with text. If Word displays a dialog box asking if you want to continue searching from the beginning of the document, click the Yes button • Click the OK button • Click the Close button Creating a Research Paper with Citations and References 53
  • 54.
    Replacing Text Creating aResearch Paper with Citations and References 54
  • 55.
    Going to aPage • Click the ‘Browse the pages in your document’ tab in the Navigation Pane to display thumbnail images of the pages in the document • Click the thumbnail of the page you wish to display to display the top of the selected page in the top of the document window • Click the Close button in the Navigation Pane to close the pane Creating a Research Paper with Citations and References 55
  • 56.
    Going to aPage Creating a Research Paper with Citations and References 56
  • 57.
    Finding and Insertinga Synonym • Locate and then right-click the word for which you want to find a synonym to display a shortcut menu related to the word you right-clicked • Point to Synonyms on the shortcut menu to display a list of synonyms for the word you right- clicked • Click the synonym you want on the Synonyms submenu to replace the selected word in the document with the selected synonym Creating a Research Paper with Citations and References 57
  • 58.
    Finding and Insertinga Synonym Creating a Research Paper with Citations and References 58
  • 59.
    Checking Spelling andGrammar at Once • Press CTRL+HOME because you want the spelling and grammar check to begin from the top of the document • Click Review on the Ribbon to display the Review tab • Click the Spelling & Grammar button (Review tab | Proofing group) to begin the spelling and grammar check at the location of the insertion point, which in this case, is at the beginning of the document • Click the desired spelling in the Suggestions list • If items are found, click the desired selection Creating a Research Paper with Citations and References 59
  • 60.
    Checking Spelling andGrammar at Once Creating a Research Paper with Citations and References 60
  • 61.
    Using the ResearchTask Pane to Look Up Information • Locate the word you want to look up • While holding down the ALT key, click the word you want to look up to open the Research task pane and display a dictionary entry for the ALT+clicked word. Release the ALT key • Click the Search for box arrow in the Research task pane to display a list of search locations • Click the desired search location • Click the Close button in the Research task pane Creating a Research Paper with Citations and References 61
  • 62.
    Using the ResearchTask Pane to Look Up Information Creating a Research Paper with Citations and References 62
  • 63.
    Printing Document Properties •Click File on the Ribbon to open the Backstage view and then click the Print tab in the Backstage view to display the Print gallery • Verify the printer name that appears on the Printer Status button will print a hard copy of the document. If necessary, click the Printer Status button to display a list of available printer options and then click the desired printer to change the currently selected printer • Click the first button in the Settings area to display a list of options specifying what you can print Creating a Research Paper with Citations and References 63
  • 64.
    Printing Document Properties •Click Document Properties in the list to specify you want to print the document properties instead of the actual document • Click the Print button in the Print gallery to print the document properties on the currently selected printer Creating a Research Paper with Citations and References 64
  • 65.
    Printing Document Properties Creatinga Research Paper with Citations and References 65
  • 66.
    Previewing the Document andThen Printing It • Position the insertion point at the top of the document because you want initially to view the first page in the document • Click File on the Ribbon to open the Backstage view and then click the Print tab in the Backstage view to display the Print gallery • Verify the printer name that appears on the Printer Status button will print a hard copy of the document. If necessary, select a different printer • Click the first button in the Settings area to display a list of options specifying what you can print Creating a Research Paper with Citations and References 66
  • 67.
    Previewing the Document andThen Printing It • Click Print All Pages in the list to specify you want to print all pages in the actual document • Click the Next Page button in the Print gallery to preview the next page of the document in the Print gallery • Click the Print button in the Print gallery to print the document on the currently selected printer Creating a Research Paper with Citations and References 67
  • 68.
    Previewing the Document andThen Printing It Creating a Research Paper with Citations and References 68
  • 69.
    Chapter Summary • Describethe MLA documentation style for research papers • Change line and paragraph spacing in a document • Modify a style • Use a header to number pages of a document • Apply formatting using shortcut keys • Modify paragraph indentation • Insert and edit citations and their sources Creating a Research Paper with Citations and References 69
  • 70.
    Chapter Summary • Add a footnote to a document • Insert a manual page break • Create a bibliographical list of sources • Cut, copy, and paste text • Find text and replace text • Find a synonym • Use the Research task pane to look up information Creating a Research Paper with Citations and References 70
  • 71.