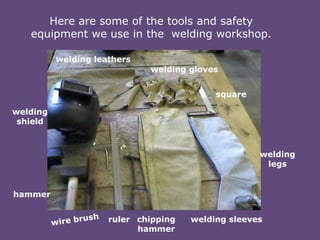
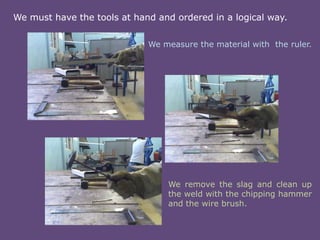
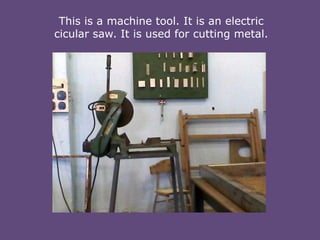
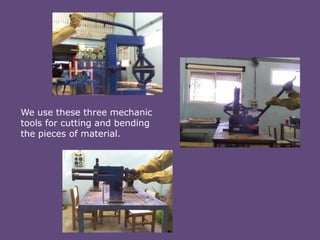
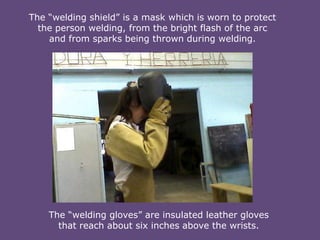
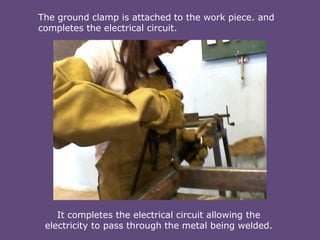
THE

1st YEAR

WELDING

II CICLE

WORKSHOP

E.E.T. Nº 16
Gather

the tools
and materials
you will need
to begin
welding.

And set up
a safe
work area.
Here are some of the tools and safety
equipment we use in the welding workshop.
welding leathers
welding gloves
square
welding
shield

welding
legs

hammer
ruler chipping
hammer

welding sleeves
We must have the tools at hand and ordered in a logical way.
We measure the material with the ruler.

We remove the slag and clean up
the weld with the chipping hammer
and the wire brush.
This is a machine tool. It is an electric
cicular saw. It is used for cutting metal.
We use these three mechanic
tools for cutting and bending
the pieces of material.
This is an arc welding machine. It converts
120-240 volt AC electricity to welding
voltage, typically 40-70 volts AC.
The welder must wear safety clothes
to prevent the damage of sparks.

Here, the welder is putting on the “welding boots”.
The “welding leathers” is a specially insulated leather apron.

The “welding sleeves” are also made of leather.
The “welding shield” is a mask which is worn to protect
the person welding, from the bright flash of the arc
and from sparks being thrown during welding.

The “welding gloves” are insulated leather gloves
that reach about six inches above the wrists.
We use a punch to mark the metal surface.
The ground clamp is attached to the work piece. and
completes the electrical circuit.

It completes the electrical circuit allowing the
electricity to pass through the metal being welded.
The “welding leads” hold the electrode.
After properly fitting the work pieces, strike the arc.
Then move the arc to create a bead.
Chip the weld between passes to remove the
slag or the melted electrode flux material.
Then wire brush, so only clean molten metal
will fill the weld on the subsequent pass.
Following these simple
steps we will have the
window frame done in
two weeks work.
AUTHORS:

September, 2013

The welding workshop group 3

  • 1.
  • 2.
    Gather the tools and materials youwill need to begin welding. And set up a safe work area.
  • 3.
    Here are someof the tools and safety equipment we use in the welding workshop. welding leathers welding gloves square welding shield welding legs hammer ruler chipping hammer welding sleeves
  • 4.
    We must havethe tools at hand and ordered in a logical way. We measure the material with the ruler. We remove the slag and clean up the weld with the chipping hammer and the wire brush.
  • 5.
    This is amachine tool. It is an electric cicular saw. It is used for cutting metal.
  • 6.
    We use thesethree mechanic tools for cutting and bending the pieces of material.
  • 7.
    This is anarc welding machine. It converts 120-240 volt AC electricity to welding voltage, typically 40-70 volts AC.
  • 8.
    The welder mustwear safety clothes to prevent the damage of sparks. Here, the welder is putting on the “welding boots”.
  • 9.
    The “welding leathers”is a specially insulated leather apron. The “welding sleeves” are also made of leather.
  • 10.
    The “welding shield”is a mask which is worn to protect the person welding, from the bright flash of the arc and from sparks being thrown during welding. The “welding gloves” are insulated leather gloves that reach about six inches above the wrists.
  • 11.
    We use apunch to mark the metal surface.
  • 12.
    The ground clampis attached to the work piece. and completes the electrical circuit. It completes the electrical circuit allowing the electricity to pass through the metal being welded.
  • 13.
    The “welding leads”hold the electrode.
  • 14.
    After properly fittingthe work pieces, strike the arc.
  • 15.
    Then move thearc to create a bead.
  • 16.
    Chip the weldbetween passes to remove the slag or the melted electrode flux material.
  • 17.
    Then wire brush,so only clean molten metal will fill the weld on the subsequent pass.
  • 18.
    Following these simple stepswe will have the window frame done in two weeks work.
  • 19.