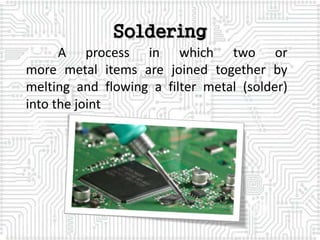
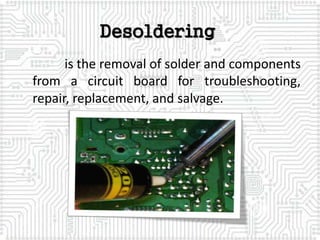
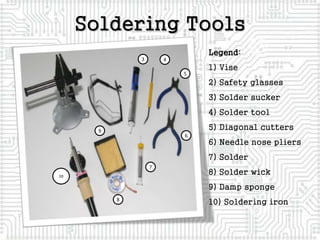
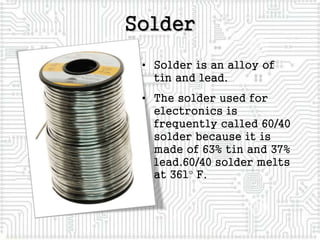
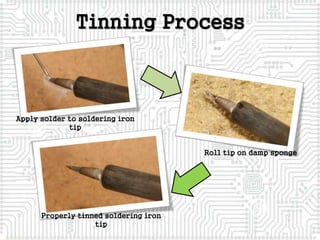
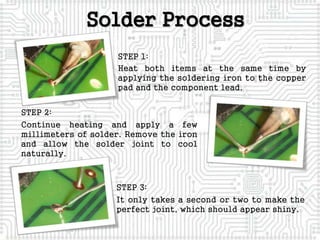
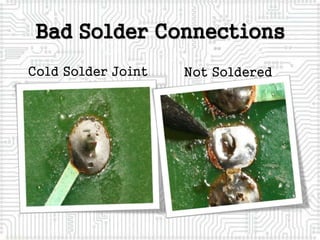
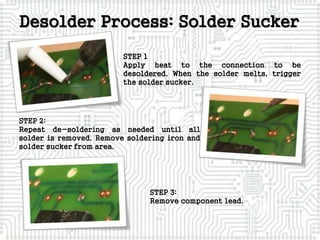
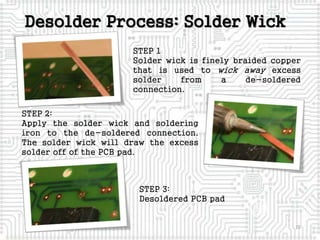
EDRIAN R. DOMINGO
BSED 3F – TECHNOLOGY AND LIVELIHOOD EDUCATION
Soldering and Desoldering
This presentation will…
• Differentiate soldering from desoldering
• Review the tools needed to solder and desolder
electronic components.
• Demonstrate how to tin a soldering iron tip.
• Demonstrate the soldering process.
• Show the characteristics of a good solder connection.
• Review classic soldering mistakes.
• Demonstrate the de-soldering process.
Soldering & Desoldering
Soldering
A process in which two or
more metal items are joined together by
melting and flowing a filter metal (solder)
into the joint
Desoldering
is the removal of solder and components
from a circuit board for troubleshooting,
repair, replacement, and salvage.
1 2
Soldering Tools
3 4
5
6
9
8
10
7
Legend:
1) Vise
2) Safety glasses
3) Solder sucker
4) Solder tool
5) Diagonal cutters
6) Needle nose pliers
7) Solder
8) Solder wick
9) Damp sponge
10) Soldering iron
Soldering Iron
Care and Maintainance
• A soldering iron must be coated
with a thin coat of solder. This
will allow for the transfer of
heat to the work piece.
• This procedure is called
tinning.
• The tip must be kept coated
with a shiny layer of solder by
occasional wiping and applying
solder directly to the tip.
Soldering Iron
It is hand tool used
in soldering. It
supplies heat to melt
the solder so that it
can flow into the joint
between two work
pieces.
Solder
• Solder is an alloy of
tin and lead.
• The solder used for
electronics is
frequently called 60/40
solder because it is
made of 63% tin and 37%
lead.60/40 solder melts
at 361 F.
Tinning Process
Apply solder to soldering iron
tip
Properly tinned soldering iron
tip
Roll tip on damp sponge
Solder Process
STEP 1:
Heat both items at the same time by
applying the soldering iron to the copper
pad and the component lead.
STEP 2:
Continue heating and apply a few
millimeters of solder. Remove the iron
and allow the solder joint to cool
naturally.
STEP 3:
It only takes a second or two to make the
perfect joint, which should appear shiny.
A Good Solder Must Be…
•Smooth
•Bright
•Shiny
•Clean
•Concave fillet
Bad Solder Connections
Cold Solder Joint Not Soldered
Bad Solder Connections
Solder Bridge Lifted Trace/Pad
Desolder Process: Solder Sucker
STEP 1
Apply heat to the connection to be
desoldered. When the solder melts, trigger
the solder sucker.
STEP 2:
Repeat de-soldering as needed until all
solder is removed. Remove soldering iron and
solder sucker from area.
STEP 3:
Remove component lead.
Desolder Process: Solder Wick
15
STEP 1
Solder wick is finely braided copper
that is used to wick away excess
solder from a de-soldered
connection.
STEP 2:
Apply the solder wick and soldering
iron to the de-soldered connection.
The solder wick will draw the excess
solder off of the PCB pad.
STEP 3:
Desoldered PCB pad
• Wear safety glasses when soldering. This includes
all individuals in the vicinity of someone who is
soldering.
• Place soldering iron in an approved holder when
not in use. The iron is hot and can cause burns.
• Place the soldering iron so that the cord does not
get caught up in your arms or on others.
• Ensure access to proper ventilation.
• Verify that the type of solder is safe to use in
your working environment.
• Secure the components to be soldered before
beginning the soldering process.
Rules for Workplace
Safety
• Provide plenty of space to work.
• Use a properly-sized point for the soldering job to
be completed.
• Verify that the tip on the soldering iron has a sharp
point and has not been damaged in any way.
• Check the power cord for burned or melted sections
that show bare wires. Label those cords DO NOT USE
and ask the instructor to repair or replace.
• Do not to touch molten solder - it is hot!
• Make sure that the solder strand is long enough to
keep fingers away from the hot iron.
• Tie back long hair and remove or tuck loose clothing.
• Use heat sinks for heat-sensitive parts. Provide
sufficient cooling time before removing parts.
• Do not flick solder off of the iron. Flicking can cause
solder to spray and hit skin or eyes.
• Hold the scrap end when cutting excess leads so that
the scrap lead is not thrown into the air.
• Cut leads evenly with wire cutters.
• Make sure that leads do not short across other traces
or leads.
• Thoroughly wash your hands after handling solder.
REFERENCES
Books
Basbas, Leonara D. et al. (2007) Learning and Living in the 21st Century. Rex Book
Store, Inc.: Sta. Mesa Heights, Quezon City
Del Valle, Julita O. et al. (2009) Technology and Livelihood Education: Making Life
and a Living. Mind Builders Publishing House: Quezon City
Websites
http://en.wikipedia.org/wiki/Soldering_iron
http://en.wikipedia.org/wiki/Desoldering
http://www.epemag.wimborne.co.uk/solderfaq.htm
https://www.ifixit.com/Guide/How+To+Solder+and+Desolder+Connections/750
https://learn.adafruit.com/adafruit-guide-excellent-soldering/common-problems
http://www.instructables.com/id/Soldering-and-Desoldering-Surface-Mount-
Components/

PROCEDURES IN SOLDERING AND DESOLDERING ELECTRONIC MATERIALS

  • 1.
    EDRIAN R. DOMINGO BSED3F – TECHNOLOGY AND LIVELIHOOD EDUCATION
  • 2.
    Soldering and Desoldering Thispresentation will… • Differentiate soldering from desoldering • Review the tools needed to solder and desolder electronic components. • Demonstrate how to tin a soldering iron tip. • Demonstrate the soldering process. • Show the characteristics of a good solder connection. • Review classic soldering mistakes. • Demonstrate the de-soldering process. Soldering & Desoldering
  • 3.
    Soldering A process inwhich two or more metal items are joined together by melting and flowing a filter metal (solder) into the joint
  • 4.
    Desoldering is the removalof solder and components from a circuit board for troubleshooting, repair, replacement, and salvage.
  • 5.
    1 2 Soldering Tools 34 5 6 9 8 10 7 Legend: 1) Vise 2) Safety glasses 3) Solder sucker 4) Solder tool 5) Diagonal cutters 6) Needle nose pliers 7) Solder 8) Solder wick 9) Damp sponge 10) Soldering iron
  • 6.
    Soldering Iron Care andMaintainance • A soldering iron must be coated with a thin coat of solder. This will allow for the transfer of heat to the work piece. • This procedure is called tinning. • The tip must be kept coated with a shiny layer of solder by occasional wiping and applying solder directly to the tip.
  • 7.
    Soldering Iron It ishand tool used in soldering. It supplies heat to melt the solder so that it can flow into the joint between two work pieces.
  • 8.
    Solder • Solder isan alloy of tin and lead. • The solder used for electronics is frequently called 60/40 solder because it is made of 63% tin and 37% lead.60/40 solder melts at 361 F.
  • 9.
    Tinning Process Apply solderto soldering iron tip Properly tinned soldering iron tip Roll tip on damp sponge
  • 10.
    Solder Process STEP 1: Heatboth items at the same time by applying the soldering iron to the copper pad and the component lead. STEP 2: Continue heating and apply a few millimeters of solder. Remove the iron and allow the solder joint to cool naturally. STEP 3: It only takes a second or two to make the perfect joint, which should appear shiny.
  • 11.
    A Good SolderMust Be… •Smooth •Bright •Shiny •Clean •Concave fillet
  • 12.
    Bad Solder Connections ColdSolder Joint Not Soldered
  • 13.
    Bad Solder Connections SolderBridge Lifted Trace/Pad
  • 14.
    Desolder Process: SolderSucker STEP 1 Apply heat to the connection to be desoldered. When the solder melts, trigger the solder sucker. STEP 2: Repeat de-soldering as needed until all solder is removed. Remove soldering iron and solder sucker from area. STEP 3: Remove component lead.
  • 15.
    Desolder Process: SolderWick 15 STEP 1 Solder wick is finely braided copper that is used to wick away excess solder from a de-soldered connection. STEP 2: Apply the solder wick and soldering iron to the de-soldered connection. The solder wick will draw the excess solder off of the PCB pad. STEP 3: Desoldered PCB pad
  • 17.
    • Wear safetyglasses when soldering. This includes all individuals in the vicinity of someone who is soldering. • Place soldering iron in an approved holder when not in use. The iron is hot and can cause burns. • Place the soldering iron so that the cord does not get caught up in your arms or on others. • Ensure access to proper ventilation. • Verify that the type of solder is safe to use in your working environment. • Secure the components to be soldered before beginning the soldering process. Rules for Workplace Safety
  • 18.
    • Provide plentyof space to work. • Use a properly-sized point for the soldering job to be completed. • Verify that the tip on the soldering iron has a sharp point and has not been damaged in any way. • Check the power cord for burned or melted sections that show bare wires. Label those cords DO NOT USE and ask the instructor to repair or replace. • Do not to touch molten solder - it is hot! • Make sure that the solder strand is long enough to keep fingers away from the hot iron.
  • 19.
    • Tie backlong hair and remove or tuck loose clothing. • Use heat sinks for heat-sensitive parts. Provide sufficient cooling time before removing parts. • Do not flick solder off of the iron. Flicking can cause solder to spray and hit skin or eyes. • Hold the scrap end when cutting excess leads so that the scrap lead is not thrown into the air. • Cut leads evenly with wire cutters. • Make sure that leads do not short across other traces or leads. • Thoroughly wash your hands after handling solder.
  • 20.
    REFERENCES Books Basbas, Leonara D.et al. (2007) Learning and Living in the 21st Century. Rex Book Store, Inc.: Sta. Mesa Heights, Quezon City Del Valle, Julita O. et al. (2009) Technology and Livelihood Education: Making Life and a Living. Mind Builders Publishing House: Quezon City Websites http://en.wikipedia.org/wiki/Soldering_iron http://en.wikipedia.org/wiki/Desoldering http://www.epemag.wimborne.co.uk/solderfaq.htm https://www.ifixit.com/Guide/How+To+Solder+and+Desolder+Connections/750 https://learn.adafruit.com/adafruit-guide-excellent-soldering/common-problems http://www.instructables.com/id/Soldering-and-Desoldering-Surface-Mount- Components/