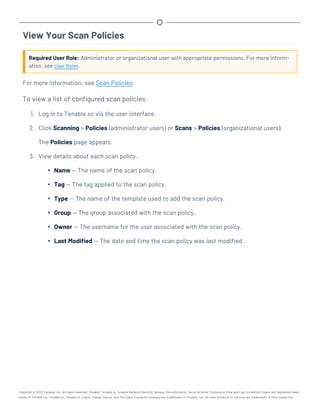
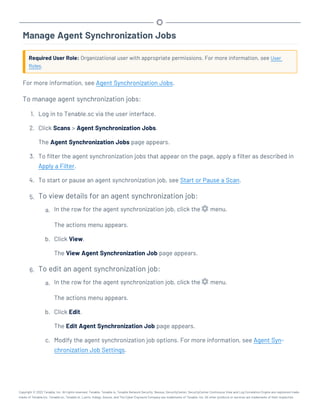
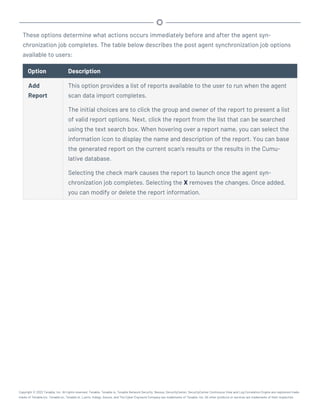
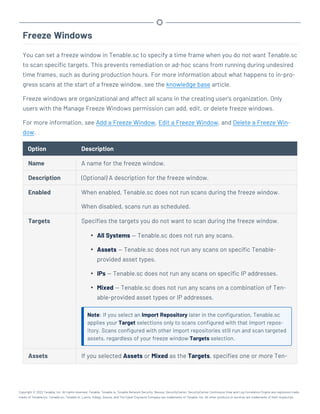
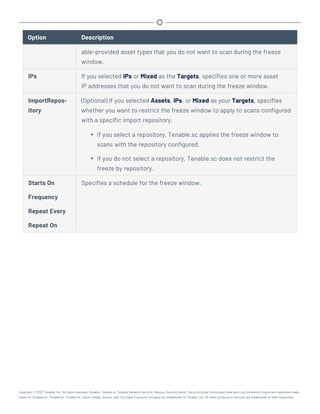
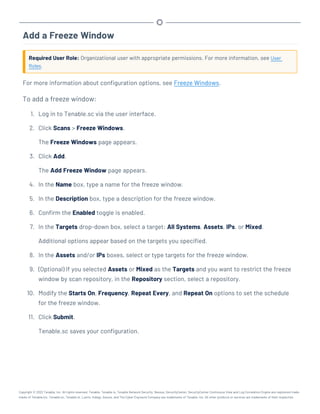
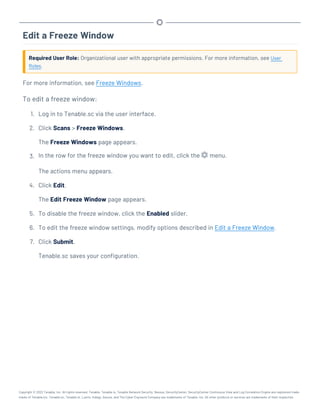
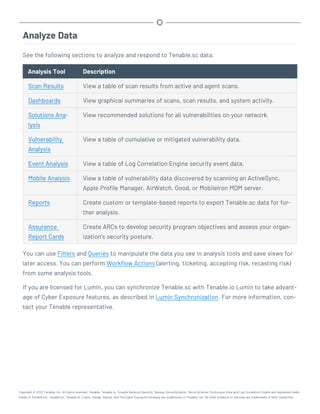
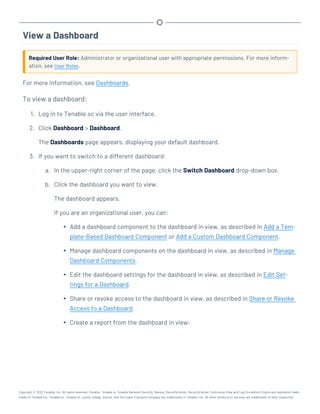
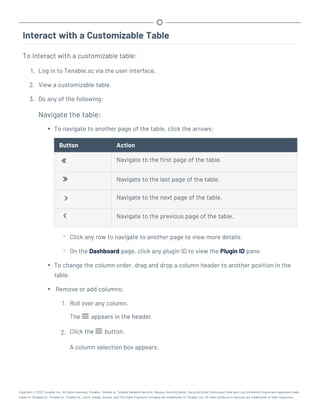
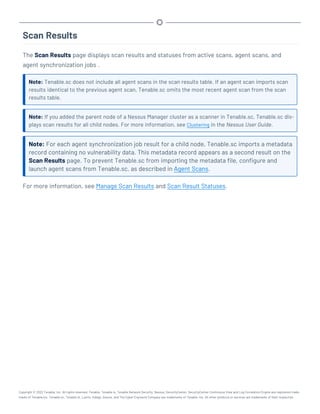
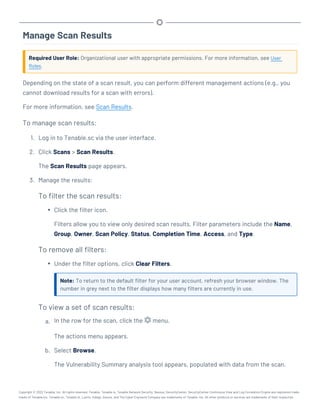
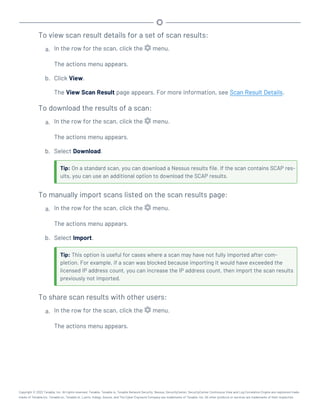
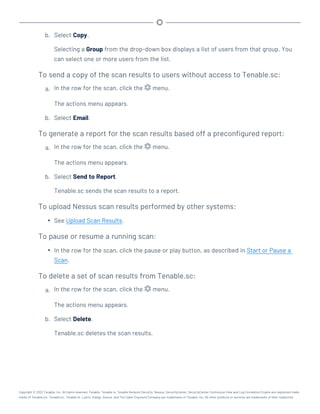
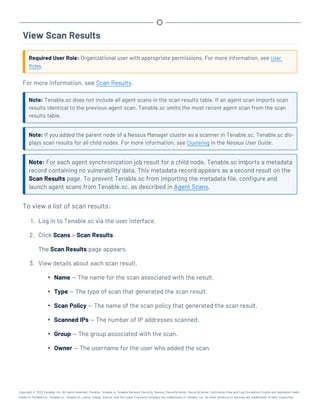
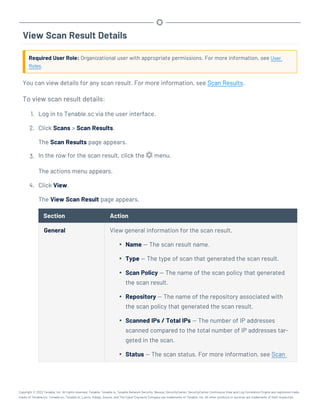
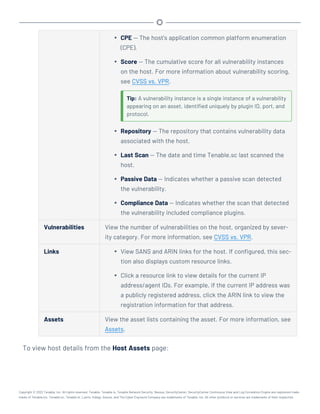
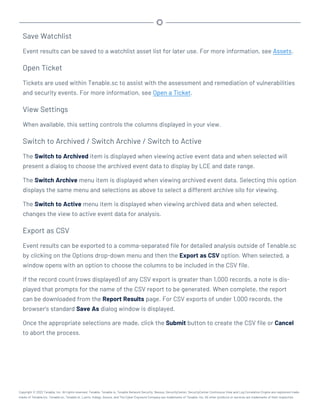
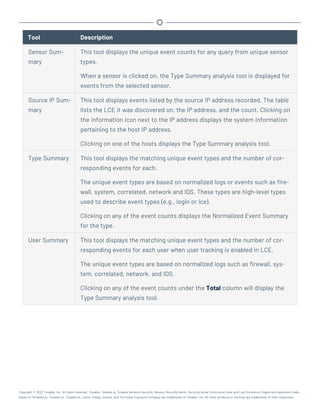
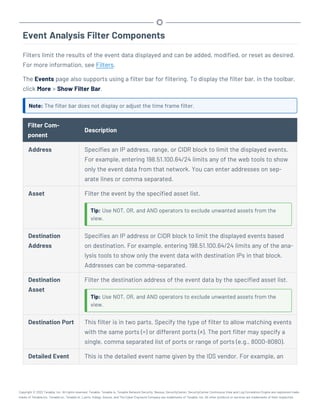
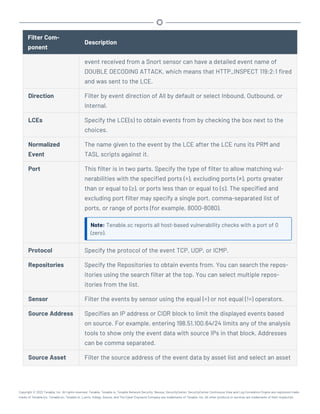
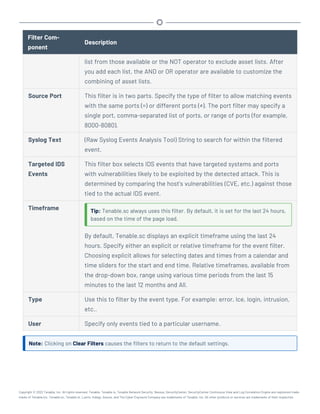
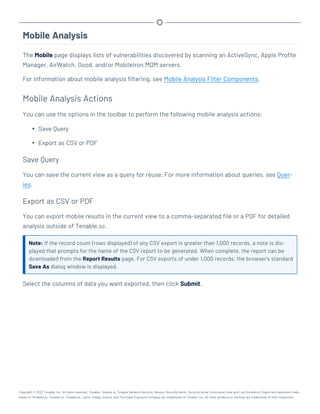
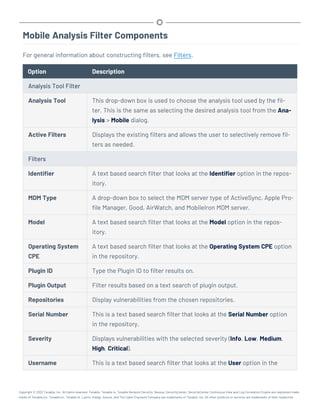
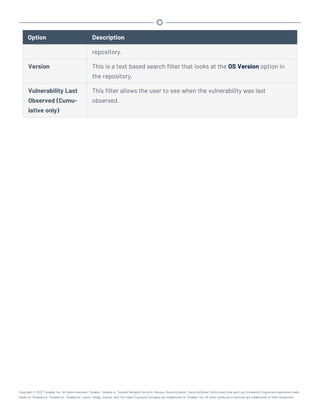
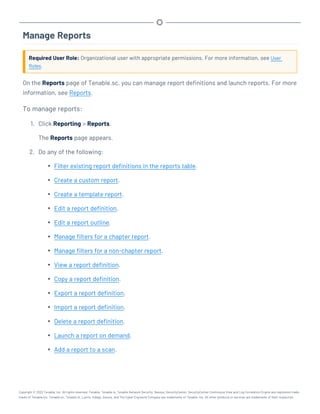
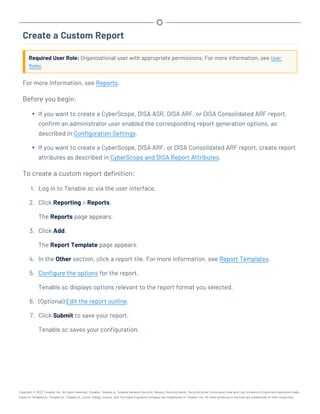
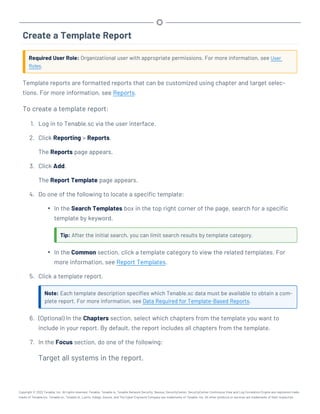
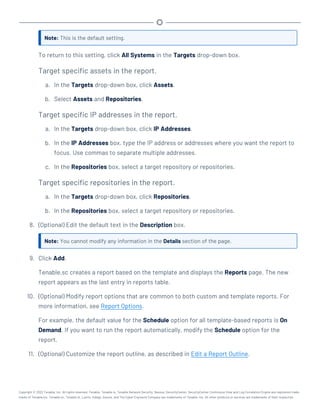
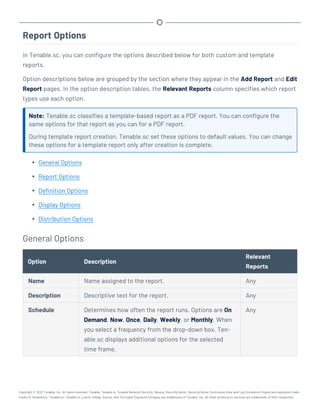
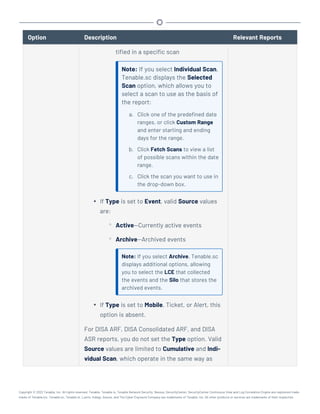
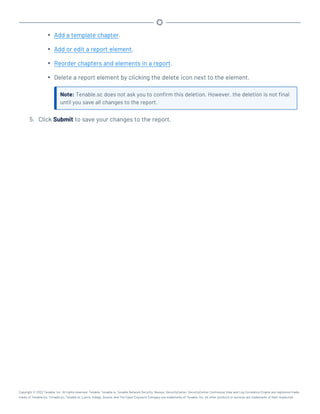
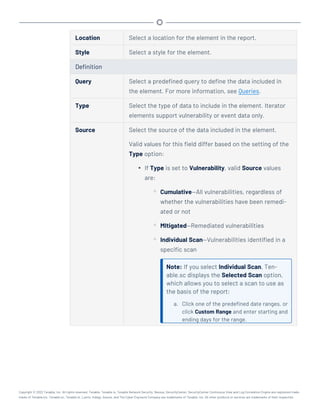
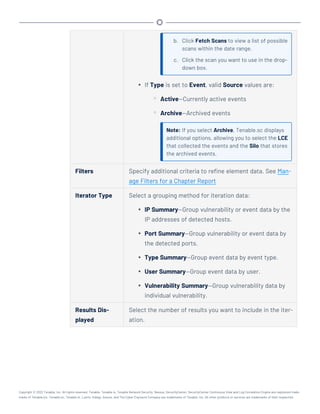
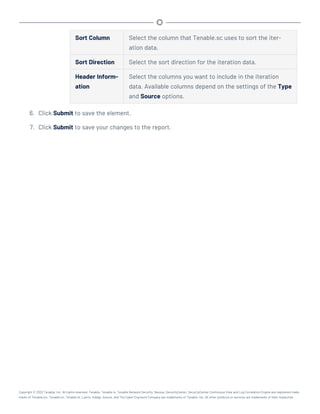
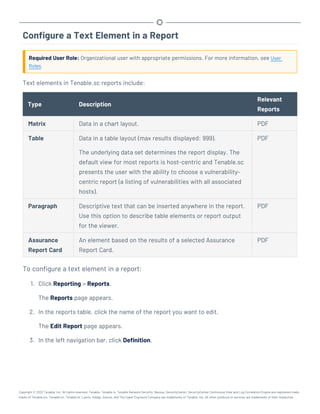
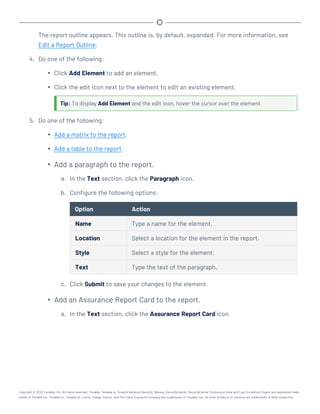
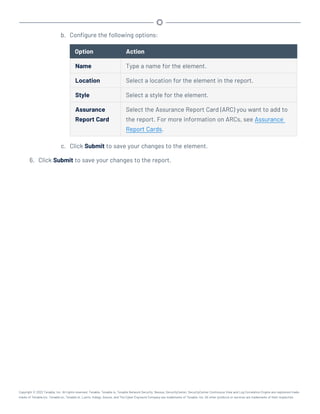
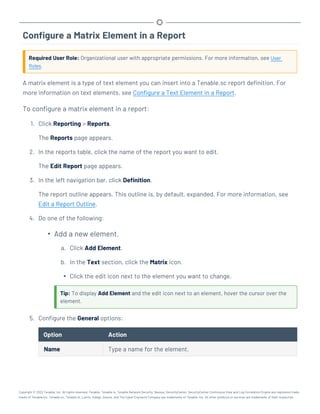
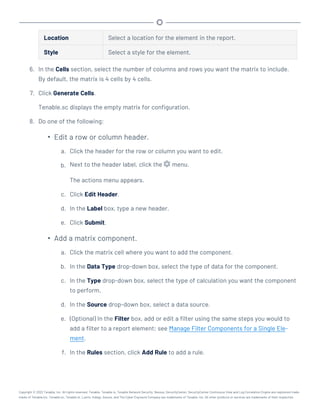
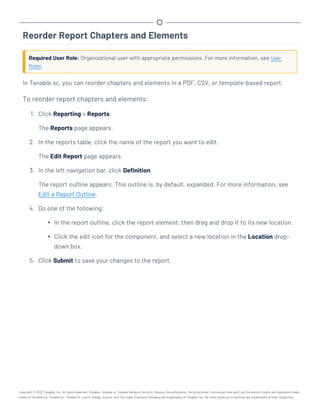
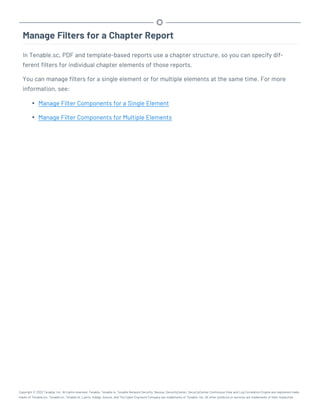
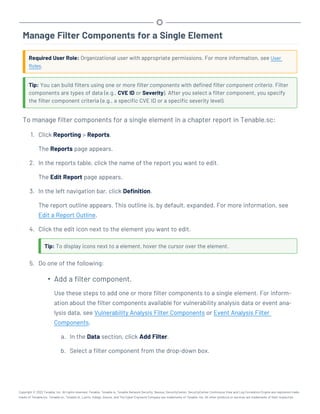
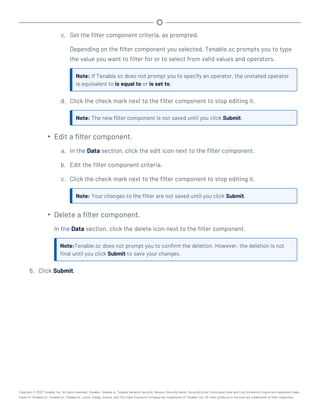
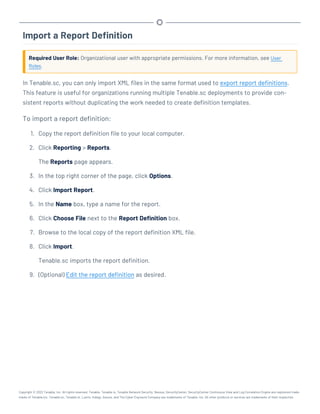
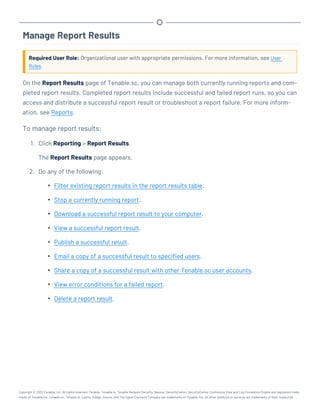
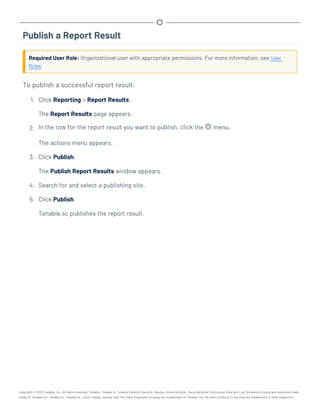
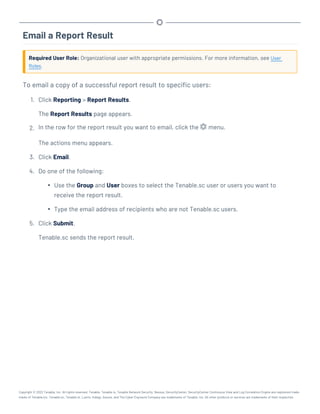
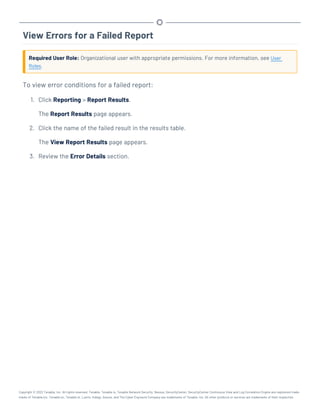
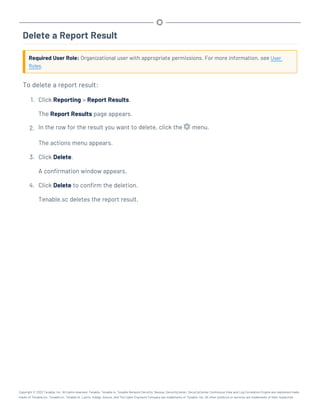
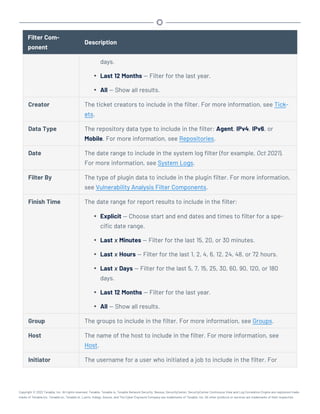
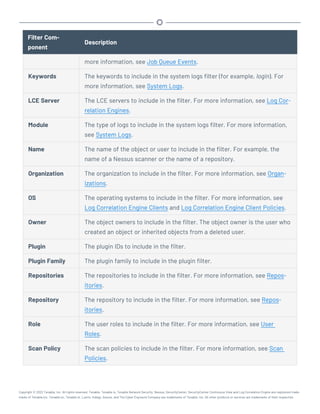
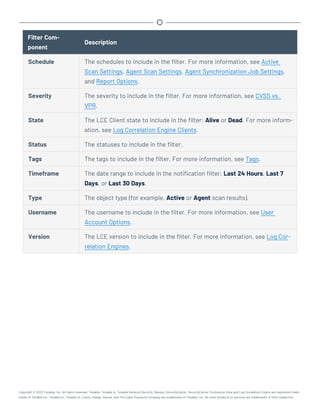
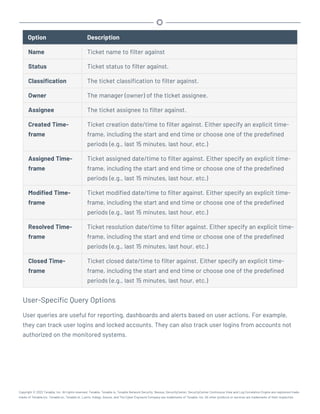
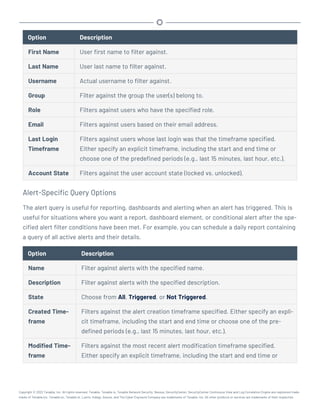
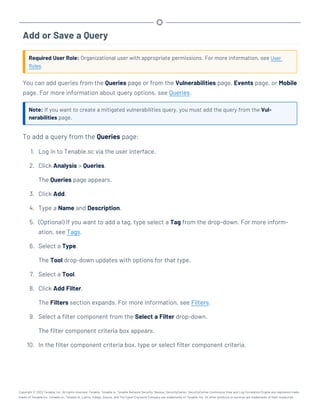
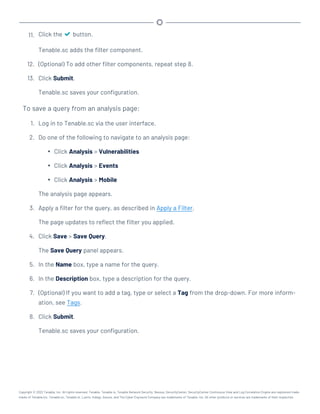
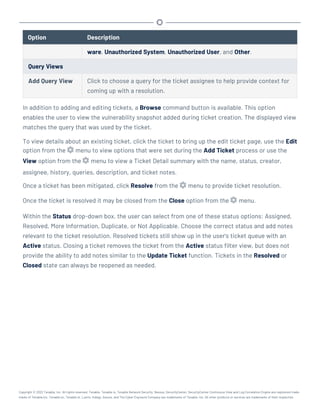
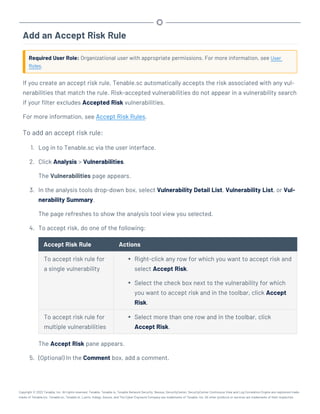
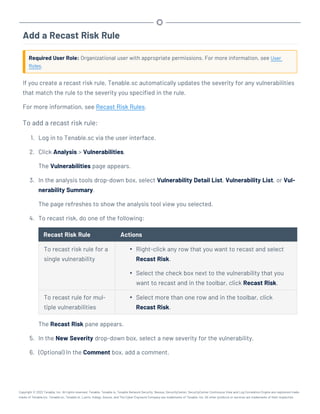
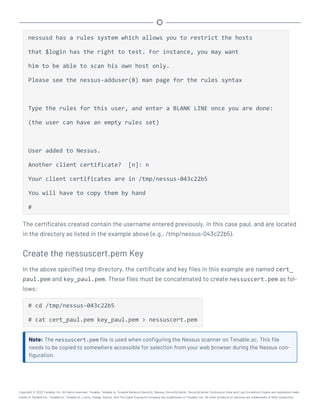
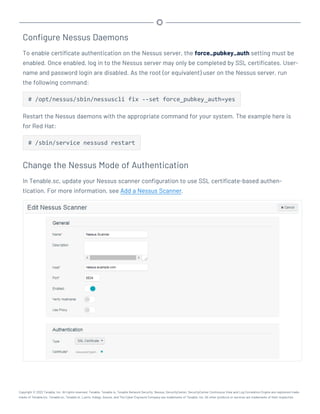
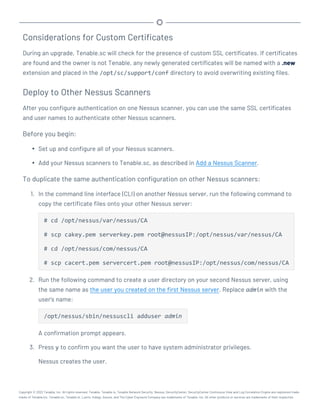
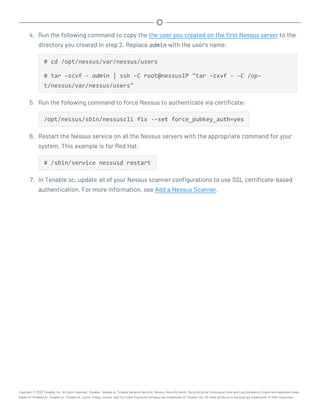
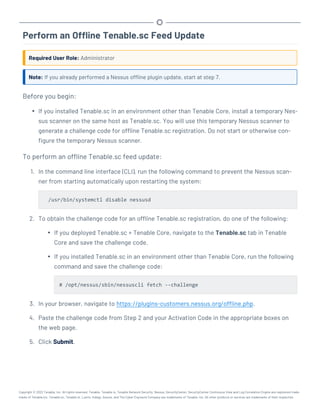
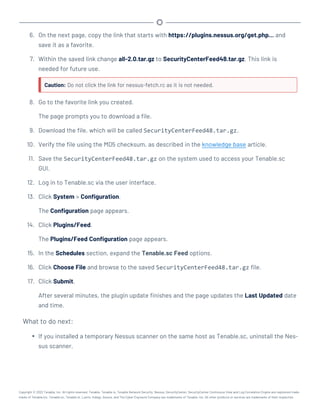
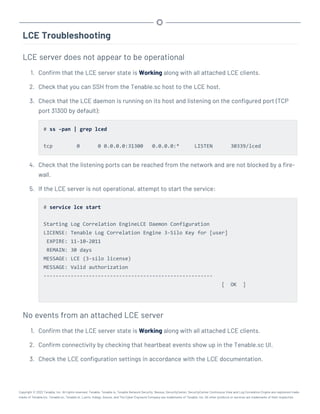
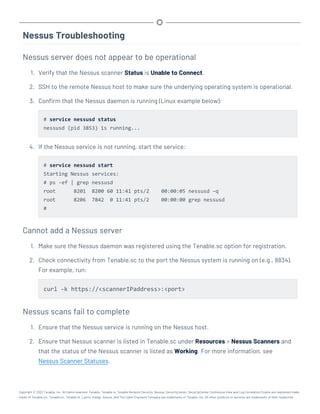
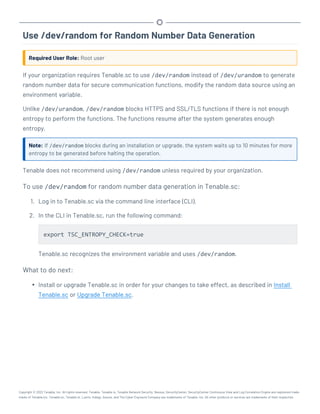
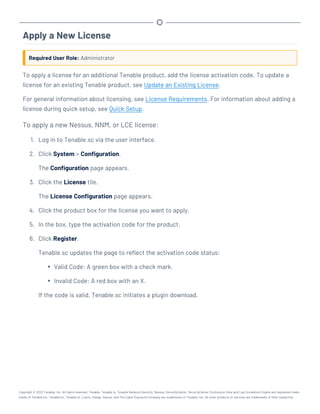
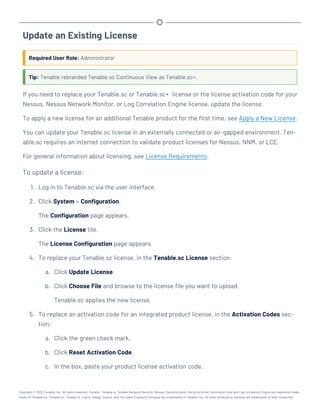
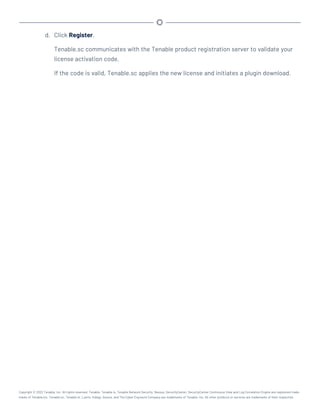
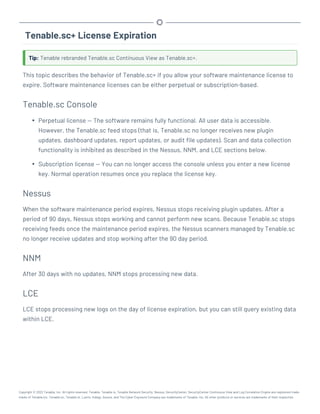
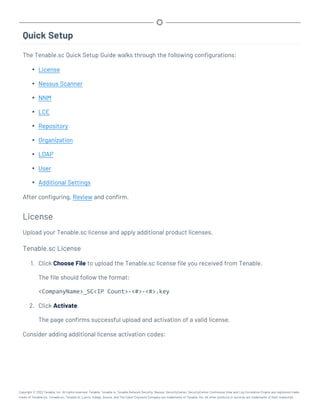
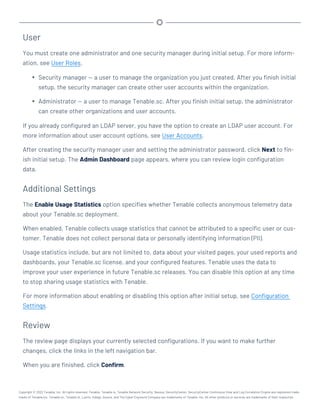
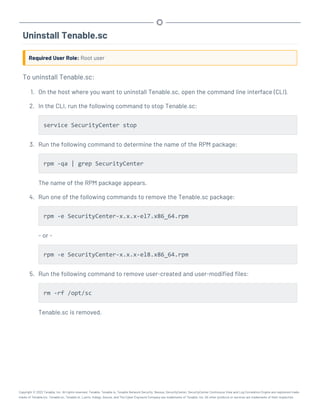
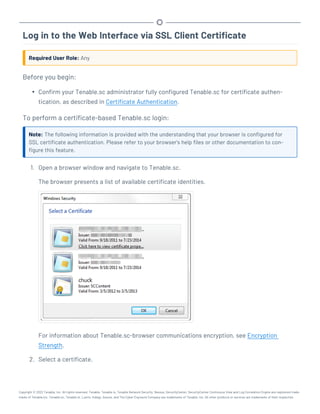
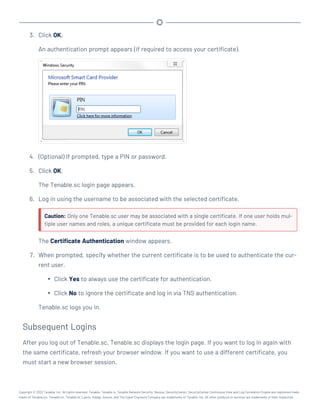
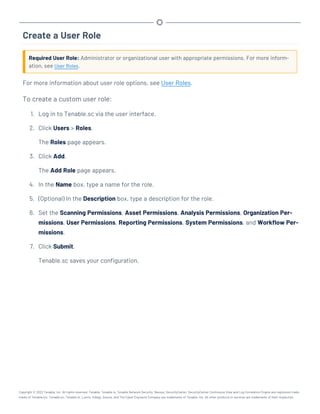
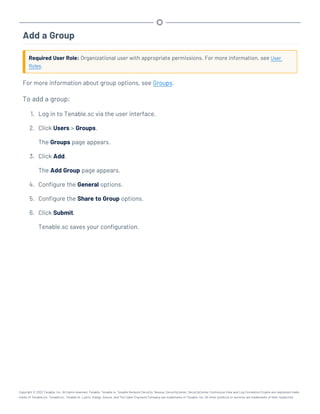
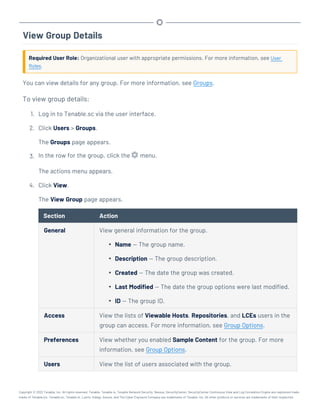
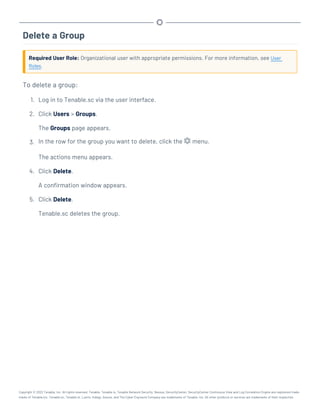
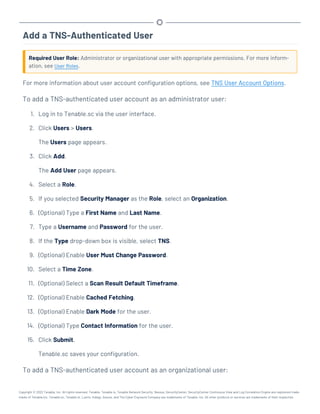
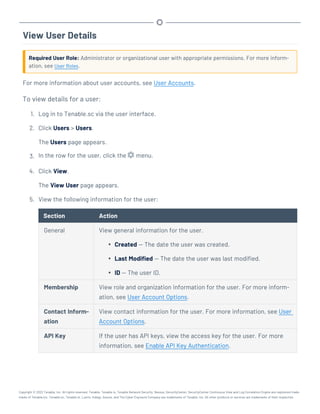
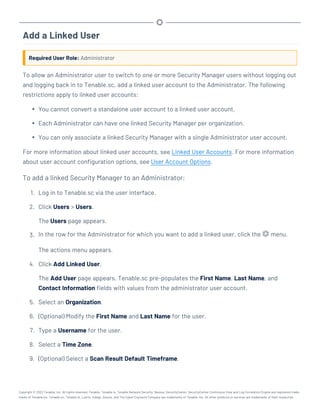
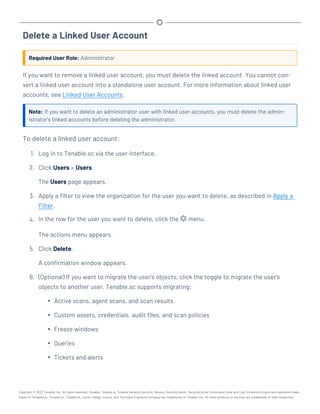
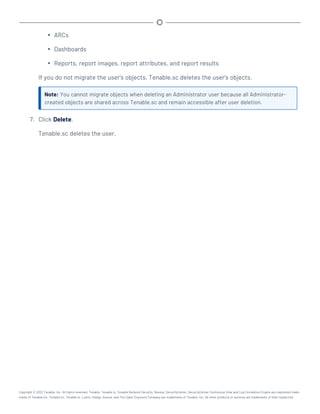
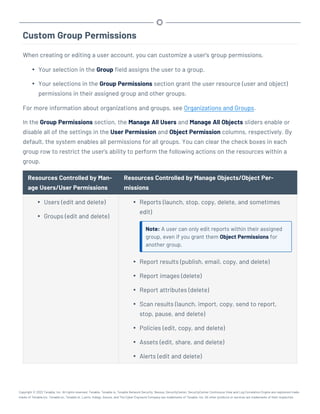
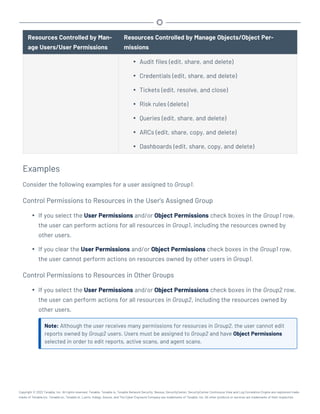
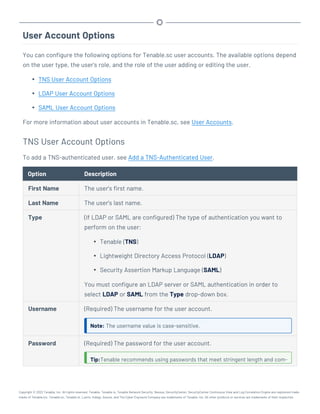
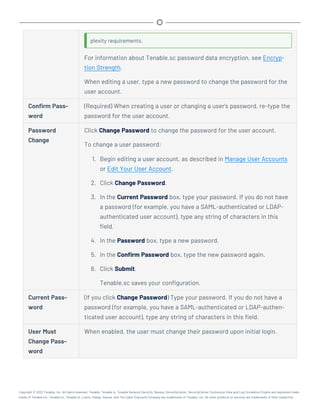
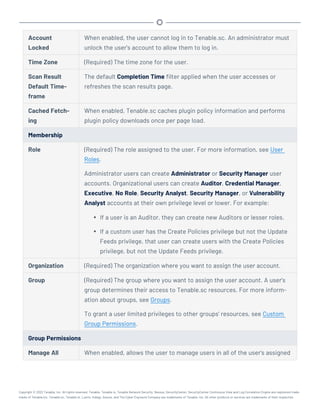
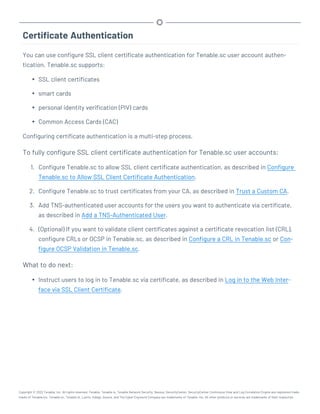
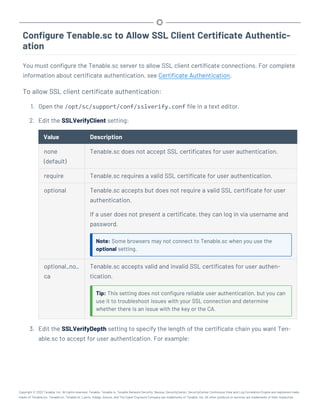
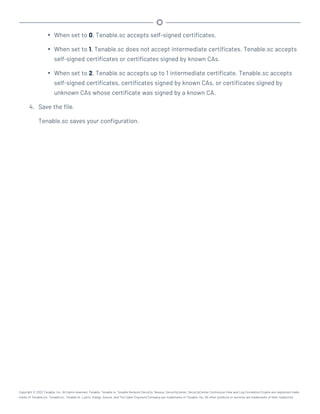
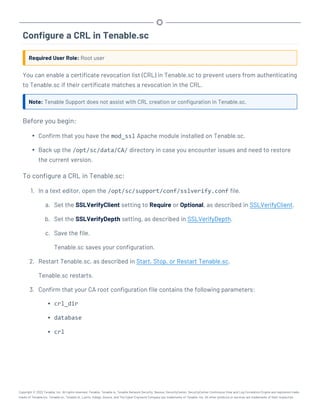
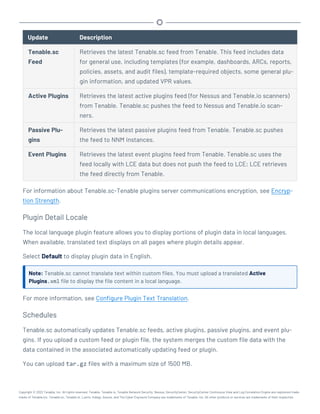
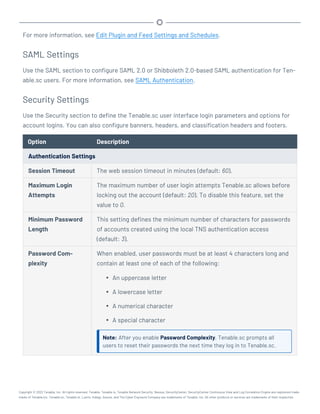
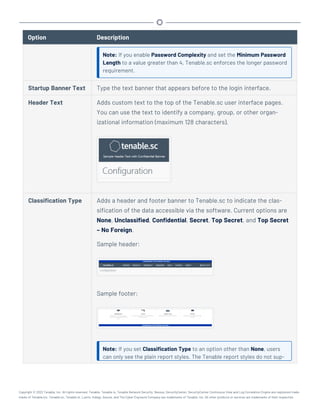
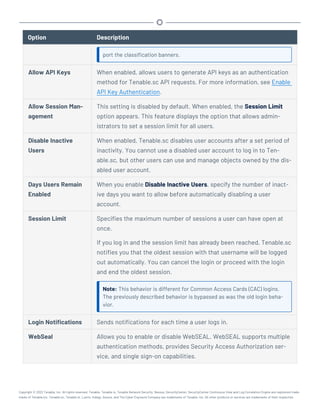
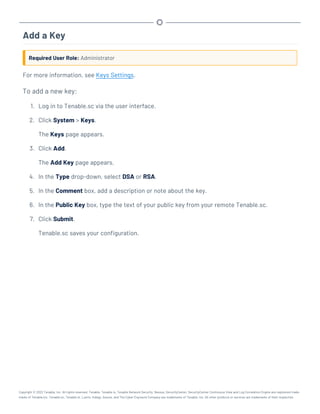
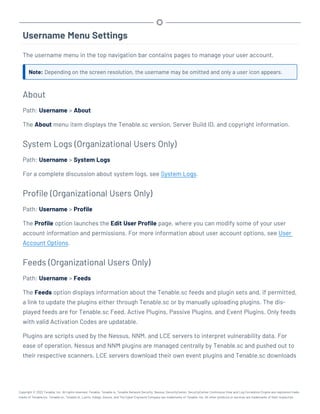
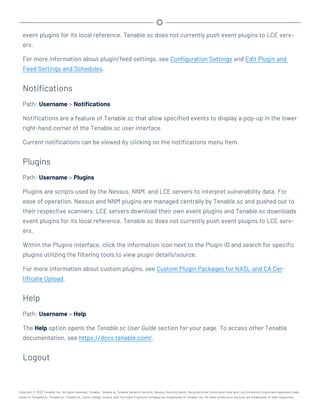
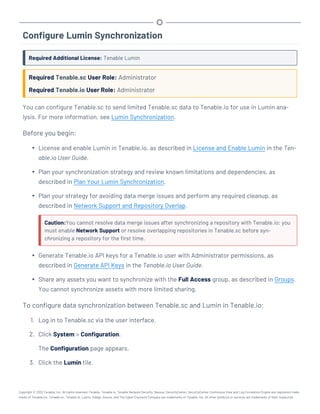
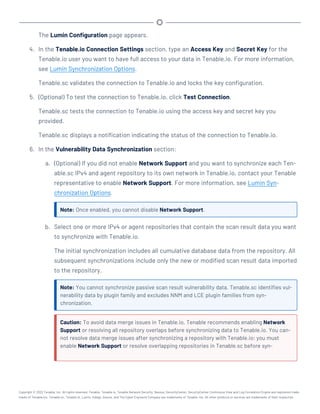
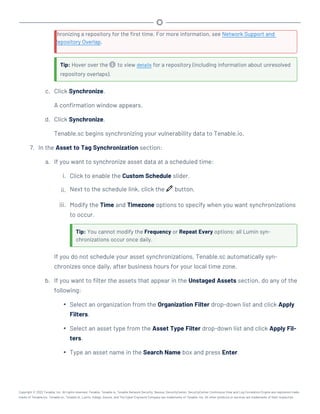
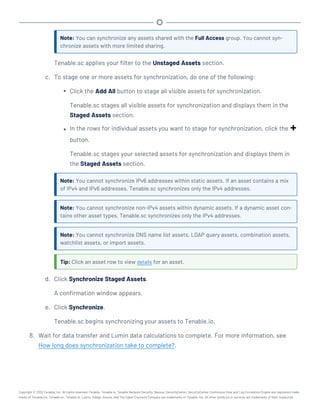
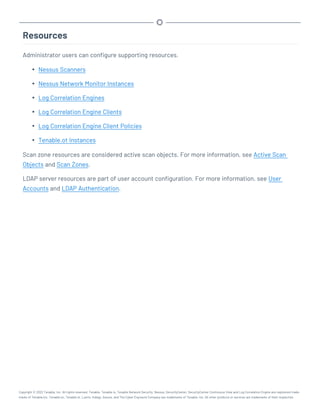
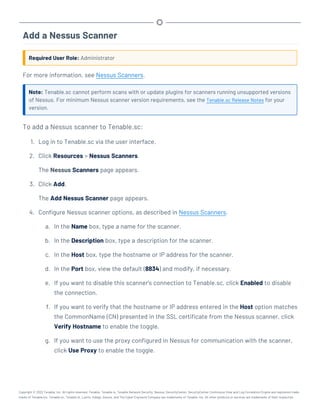
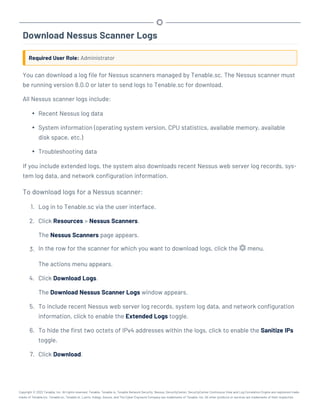
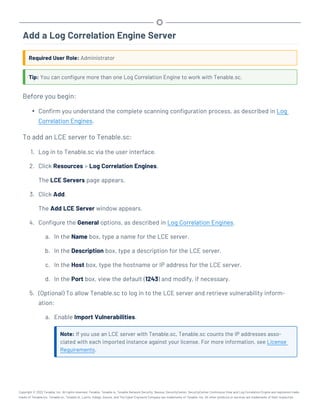
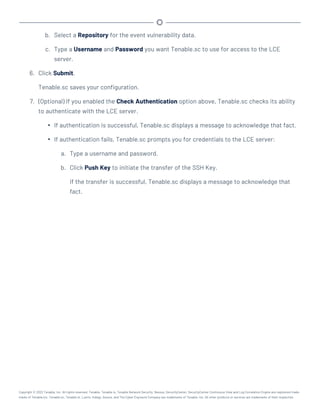
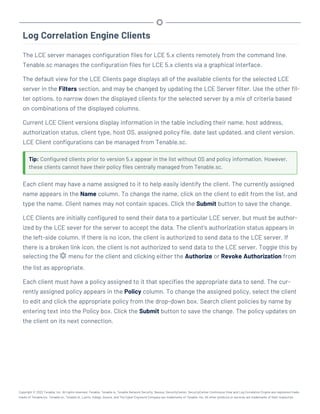
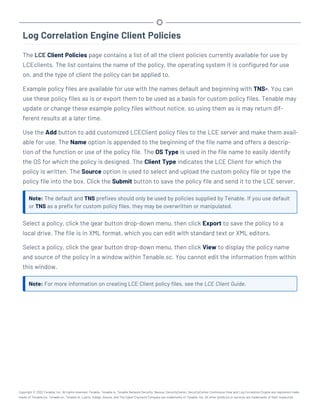
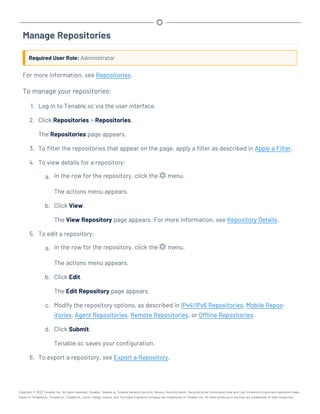
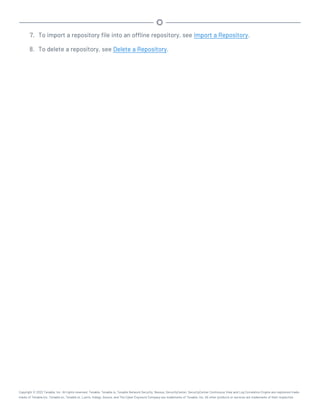
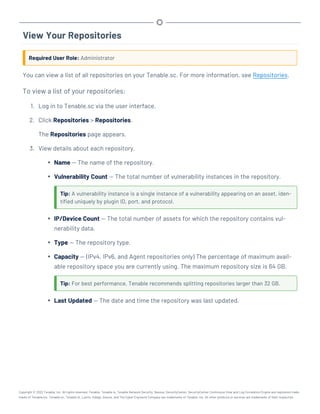
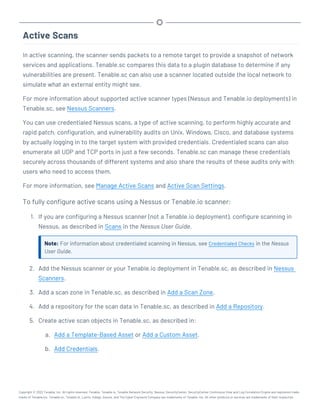
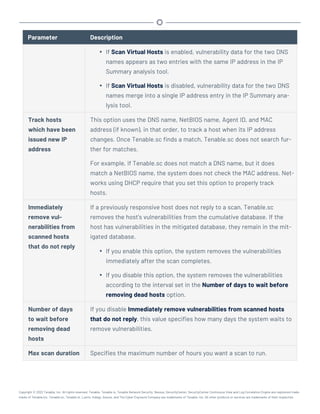
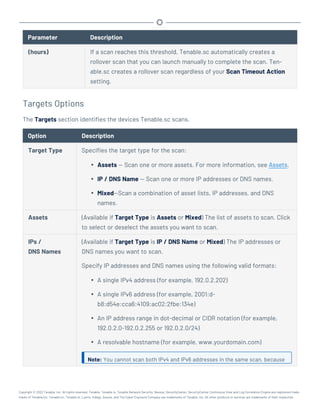
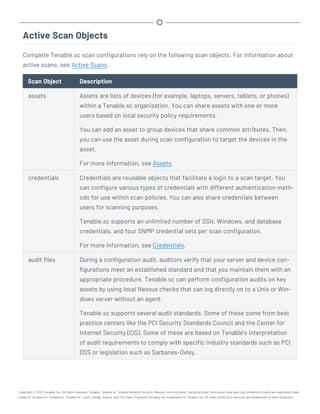
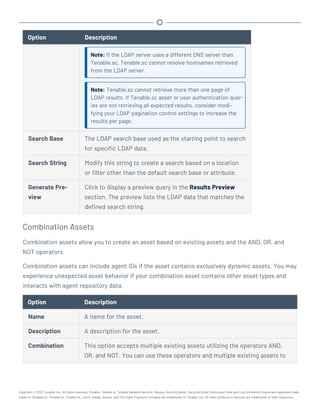
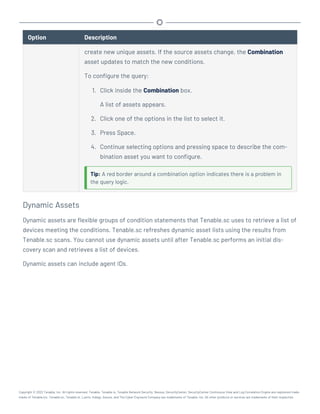
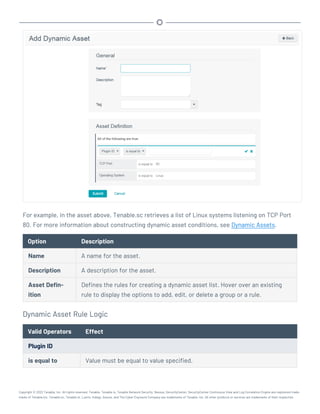
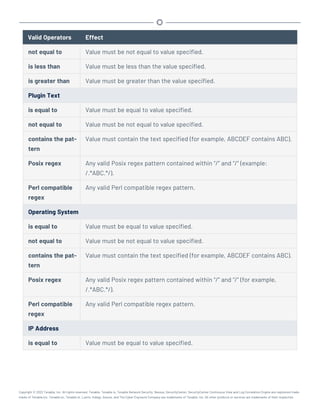
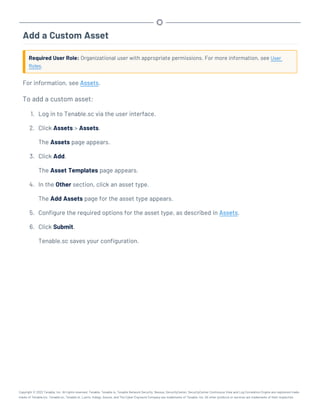
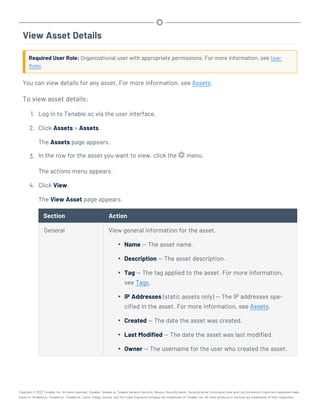
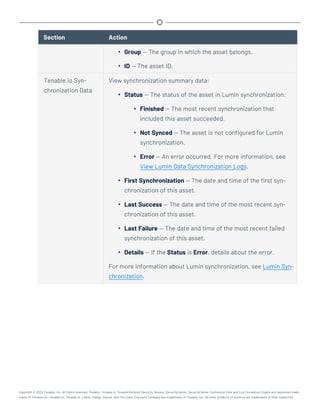
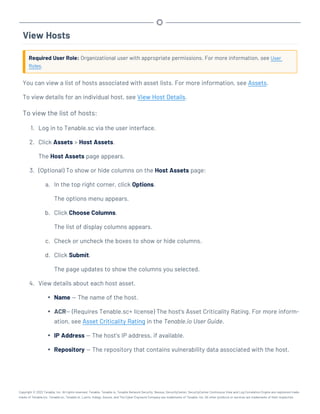
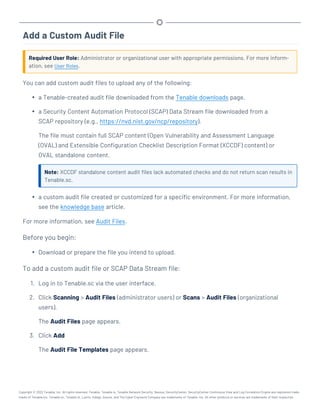
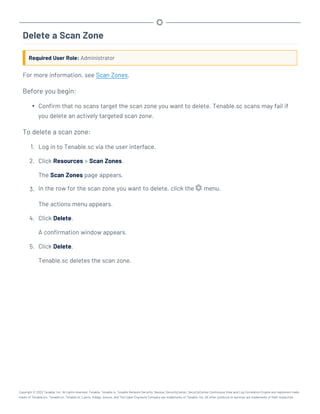
This document provides an overview and instructions for using Tenable.sc:
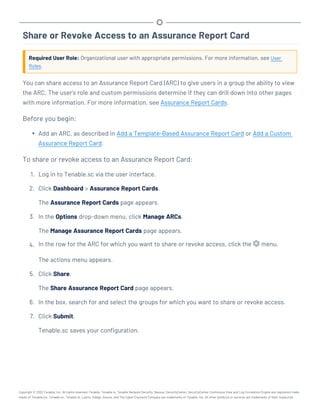
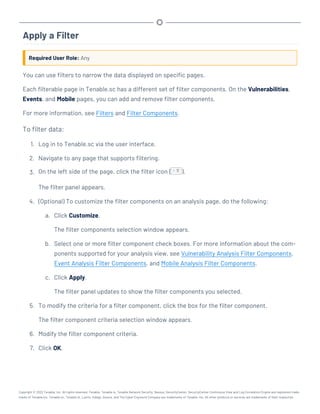
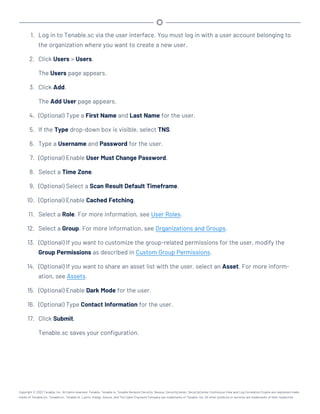
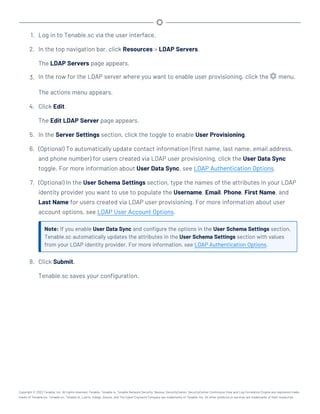
- It outlines the system requirements, installation, upgrade, and configuration steps for Tenable.sc including hardware requirements, licensing, ports, and more.
- It describes how to perform user access, authentication, and authorization configuration including roles, organizations, groups, and linked accounts.
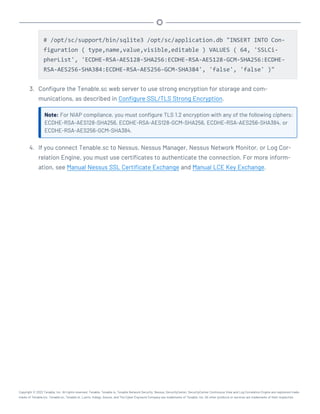
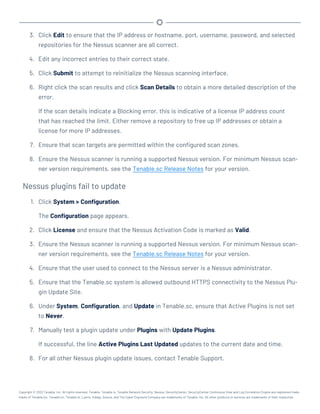
- It provides instructions for configuring scans, repositories, credentials, policies, and other resources and explains how to analyze vulnerabilities, events, and other data through dashboards, reports, and filters.

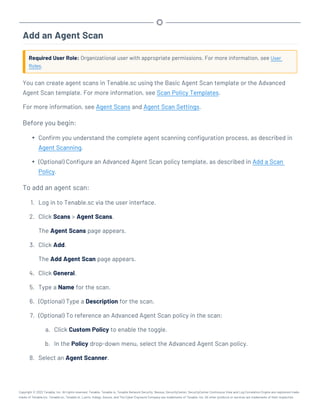
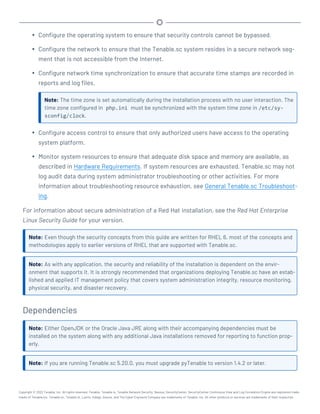
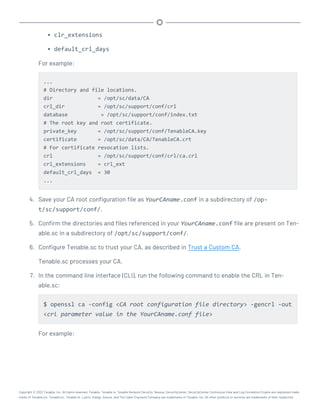
![Hardware Requirements
You can run Tenable.sc on hardware, with or without Tenable Core. For more information about Ten-
able Core, see the Tenable Core User Guide.
Note:Tenable strongly discourages running Tenable.sc or Tenable Core + Tenable.sc in an environment
shared with other Tenable applications.
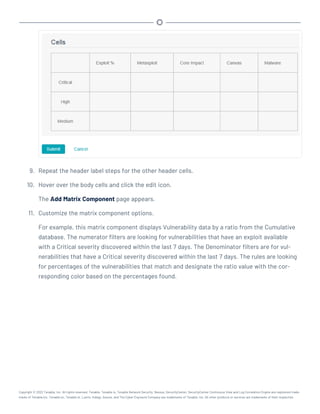
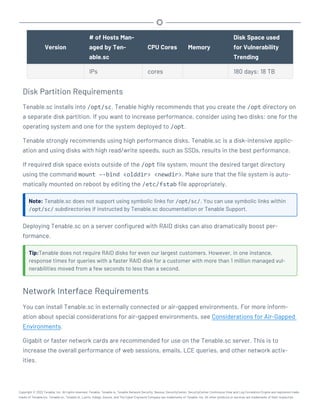
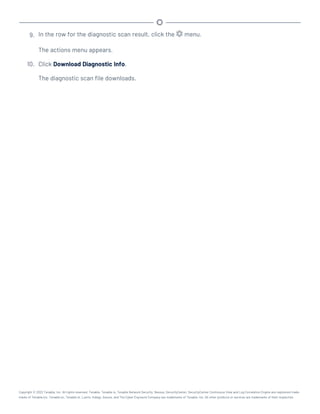
Storage Requirements
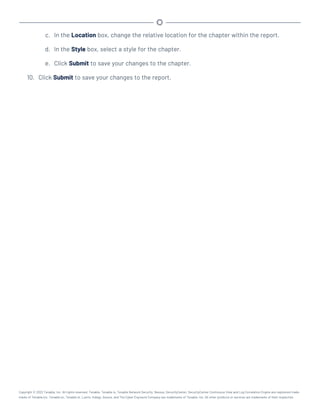
Tenable recommends installing Tenable.sc on direct-attached storage (DAS) devices (or storage
area networks [SANs], if necessary) with a storage latency of 10 milliseconds or less.
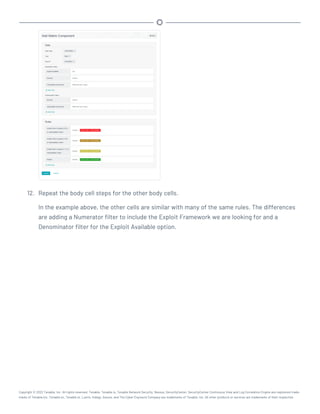
Tenable does not support installing Tenable.sc on network-attached storage (NAS).
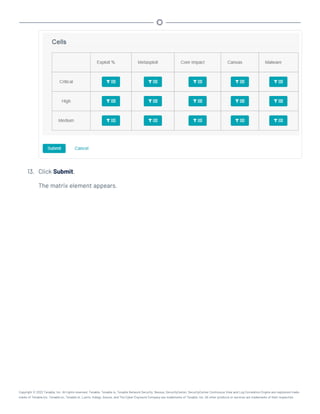
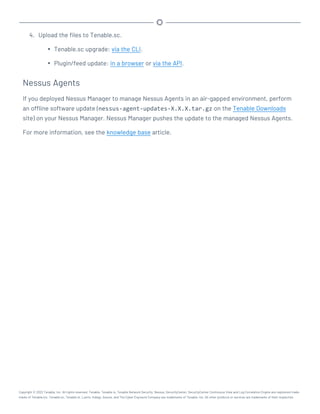
Disk Space Requirements
Enterprise networks can vary in performance, capacity, protocols, and overall activity. Resource
requirements to consider for deployments include raw network speed, the size of the network being
monitored, and the configuration of the application. Processors, memory, and network cards will be
heavily based on the former. Disk space requirements will vary depending on usage based on the
amount and length of time data is stored on the system.
An important consideration is that Tenable.sc can be configured to save a snapshot of vulnerability
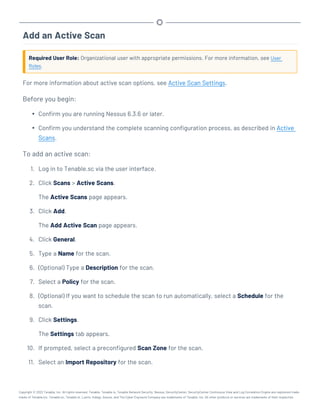
archives each day. In addition, the size of the vulnerability data stored by Tenable.sc depends on
the number and types of vulnerabilities, not just the number of hosts. For example, 100 hosts with
100 vulnerabilities each could consume as much data as 1,000 hosts with 10 vulnerabilities each. In
addition, the output for vulnerability check plugins that do directory listings, etc. is much larger
than Open Port plugins from discovery scans.
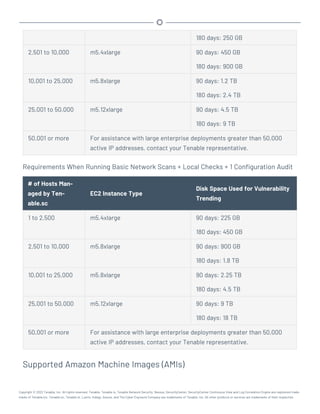
For networks of 35,000 to 50,000 hosts, Tenable has encountered data sizes of up to 25 GB. That
number is based on storage of 50,000 hosts and approximately 500 KB per host.
Additionally, during active scanning sessions, large scans and multiple smaller scans have been
reported to consume as much as 150 GB of disk space as results are acquired. Once a scan has com-
pleted and its results are imported, that disk space is freed up.
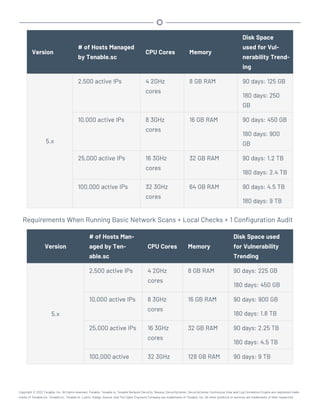
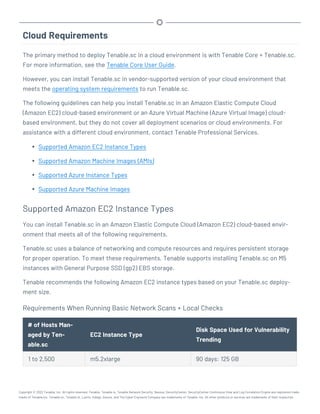
Requirements When Running Basic Network Scans + Local Checks
Copyright © 2022 Tenable, Inc. All rights reserved. Tenable, Tenable.io, Tenable Network Security, Nessus, SecurityCenter, SecurityCenter Continuous View and Log Correlation Engine are registered trade-
marks of Tenable,Inc. Tenable.sc, Tenable.ot, Lumin, Indegy, Assure, and The Cyber Exposure Company are trademarks of Tenable, Inc. All other products or services are trademarks of their respective](https://image.slidesharecdn.com/tenablescuserguide-230130150954-04b86af4/85/Tenablesc_UserGuide-pdf-26-320.jpg)


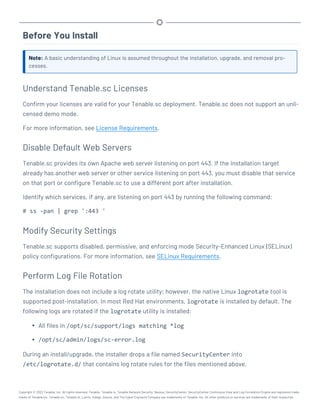
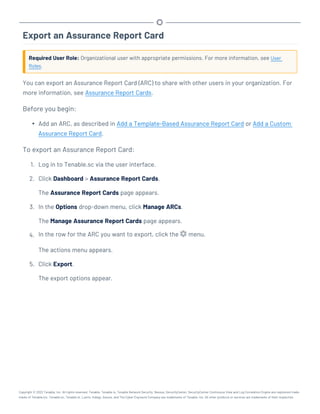
![- or -
# rpm -ivh SecurityCenter-x.x.x-el8.x86_64.rpm
Output similar to the following is generated:
# rpm -ivh SecurityCenter-5.x.x-es6.x86_64.rpm
Preparing... ########################################### [100%]
1:SecurityCenter ########################################### [100%]
Installing Nessus plugins ... complete
Applying database updates ... complete.
By default, SecurityCenter will listen for HTTPS requests on ALL available
interfaces. To complete your installation, please point your web browser to one of
the following URL(s):
https://x.x.x.x
Starting SecurityCenter services
[ OK ] SecurityCenter services: [ OK ]
#
The system installs the package into /opt/sc and attempts to start all required daemons and
web server services.
Tip: In rare cases, a system restart is required after installation in order to start all services. For
more information, see Start, Stop, or Restart Tenable.sc.
Copyright © 2022 Tenable, Inc. All rights reserved. Tenable, Tenable.io, Tenable Network Security, Nessus, SecurityCenter, SecurityCenter Continuous View and Log Correlation Engine are registered trade-
marks of Tenable,Inc. Tenable.sc, Tenable.ot, Lumin, Indegy, Assure, and The Cyber Exposure Company are trademarks of Tenable, Inc. All other products or services are trademarks of their respective](https://image.slidesharecdn.com/tenablescuserguide-230130150954-04b86af4/85/Tenablesc_UserGuide-pdf-64-320.jpg)
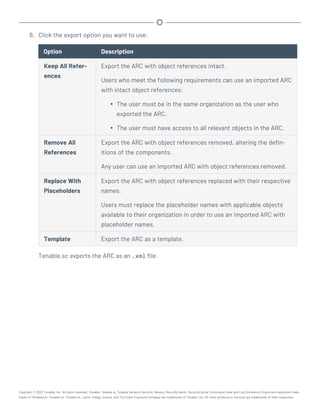
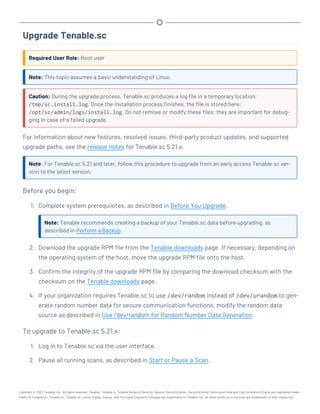
![Before You Upgrade
Note: A basic understanding of Linux is assumed throughout the installation, upgrade, and removal pro-
cesses.
l Tenable.sc Upgrade Path
l Java Version Requirements
l Halt or Complete Running Jobs
l Perform a Tenable.sc Backup
l Rename Your Mount Point
Tenable.sc Upgrade Path
For more information about the upgrade paths to Tenable.sc version 5.21.x, see the Tenable.sc
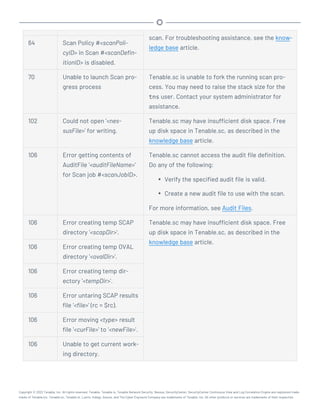
Release Notes.
Java Version Requirements
If you have not installed the Oracle Java JRE or OpenJDK, Tenable.sc displays the following warn-
ing:
[WARNING] SecurityCenter has determined that Oracle Java JRE and OpenJDK is not
installed. One of two must be installed for SecurityCenter reporting to func-
tion properly.
You must install the latest version of Oracle Java JRE or OpenJDK to take full advantage of Ten-
able.sc reporting.
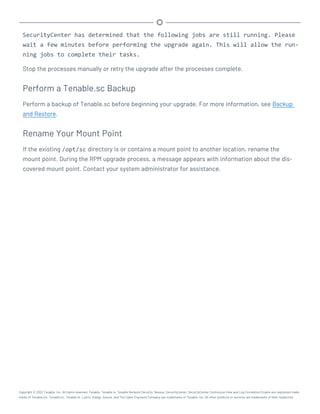
Halt or Complete Running Jobs
Tenable recommends stopping all running Tenable.sc processes before beginning an upgrade. If pro-
cesses are running (for example, Nessus scans), Tenable.sc displays the following message along
with the related process names and their PIDs:
Copyright © 2022 Tenable, Inc. All rights reserved. Tenable, Tenable.io, Tenable Network Security, Nessus, SecurityCenter, SecurityCenter Continuous View and Log Correlation Engine are registered trade-
marks of Tenable,Inc. Tenable.sc, Tenable.ot, Lumin, Indegy, Assure, and The Cyber Exposure Company are trademarks of Tenable, Inc. All other products or services are trademarks of their respective](https://image.slidesharecdn.com/tenablescuserguide-230130150954-04b86af4/85/Tenablesc_UserGuide-pdf-70-320.jpg)
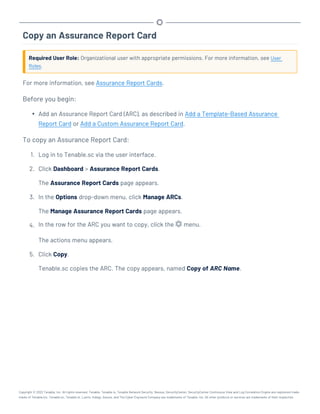
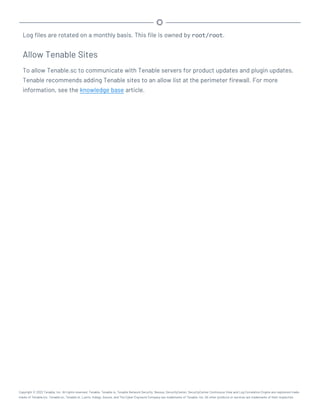
![3. Prepare the upgrade command you intend to run:
l Use rpm with the “-Uvh” switches from the command-line of the Tenable.sc server.
l Use “sudo -i” when performing sudo upgrades of Tenable.sc to ensure the proper use
of environmental variables.
For example:
# rpm -Uvh SecurityCenter-x.x.x-el7.x86_64.rpm
- or -
# rpm -Uvh SecurityCenter-x.x.x-el8.x86_64.rpm
The upgrade begins. Tenable.sc is not available until the upgrade finishes.
# rpm -Uvh SecurityCenter-x.x.x-el6.x86_64.rpm
Preparing... ########################################### [100%]
Shutting down SecurityCenter services: [ OK ]
Backing up previous application files ... complete.
1:SecurityCenter ########################################### [100%]
Applying database updates ... complete.
Beginning data migration.
Starting plugins database migration...complete.
(1 of 4) Converting Repository 1 ... complete.
(2 of 4) Converting Repository 2 ... complete.
(3 of 4) Converting Repository 3 ... complete.
(4 of 4) Converting Repository 4 ... complete.
Migration complete.
Starting SecurityCenter services: [ OK ]
~]#
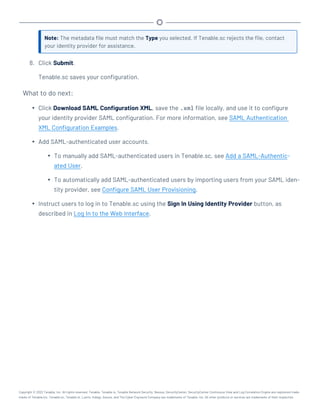
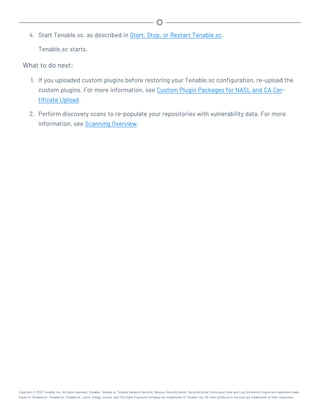
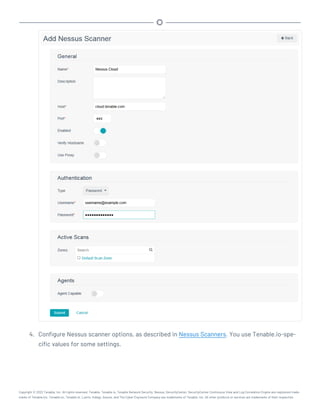
What to do next:
l (Optional) If you used custom Apache SSL certificates before upgrading Tenable.sc, restore
the custom SSL certificates, as described in Restore Custom SSL Certificates.
Copyright © 2022 Tenable, Inc. All rights reserved. Tenable, Tenable.io, Tenable Network Security, Nessus, SecurityCenter, SecurityCenter Continuous View and Log Correlation Engine are registered trade-
marks of Tenable,Inc. Tenable.sc, Tenable.ot, Lumin, Indegy, Assure, and The Cyber Exposure Company are trademarks of Tenable, Inc. All other products or services are trademarks of their respective](https://image.slidesharecdn.com/tenablescuserguide-230130150954-04b86af4/85/Tenablesc_UserGuide-pdf-73-320.jpg)
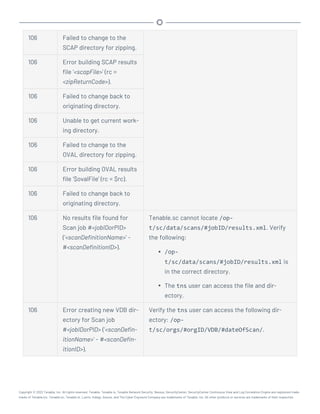
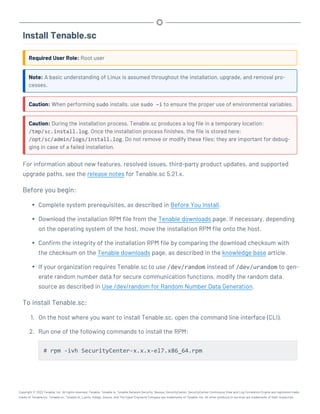
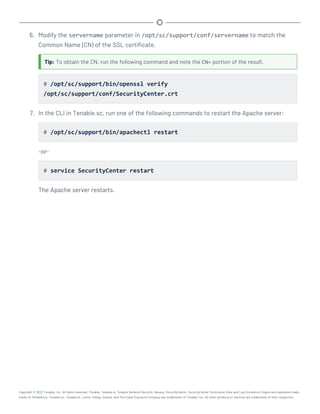
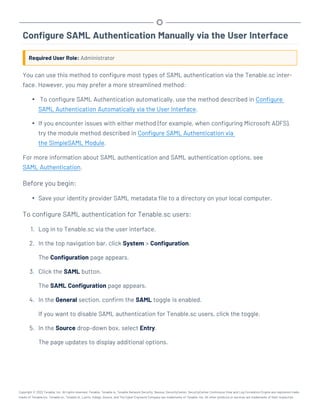
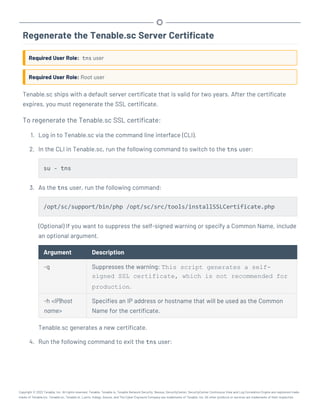
![Restore Custom SSL Certificates
Required User Role: Root user
If you used custom Apache SSL certificates before upgrading Tenable.sc, you must restore the cus-
tom Apache SSL certificates after you upgrade Tenable.sc.
Tenable.sc creates a backup of the certificates during the upgrade process. Tenable.sc copies the
existing custom SSL certificates to the Apache configuration backup directory that the upgrade pro-
cess creates in the /tmp/[version].apache.conf-######## directory. The exact name of the
directory varies, but the system displays the name during the upgrade process and reports it in the
/opt/sc/admin/log/install.log file.
Before you begin:
l Upgrade to a new version of Tenable.sc, as described in Upgrade Tenable.sc.
To restore custom SSL certificates after upgrading Tenable.sc:
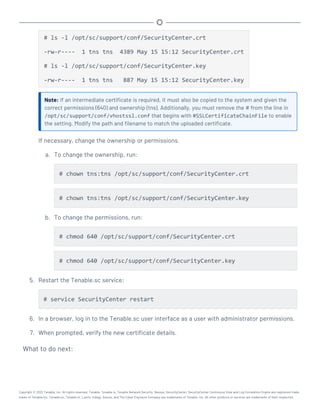
1. Log in to Tenable.sc via the command line interface (CLI).
2. In the CLI in Tenable.sc, run the following command:
# cp /tmp/[version].apache.conf-########/SecurityCenter.cert
/opt/sc/support/conf/SecurityCenter.crt
3. Select yes to overwrite the existing file.
4. In the CLI in Tenable.sc, run the following command:
# cp /tmp/[version].apache.conf-########/SecurityCenter.pem
/opt/sc/support/conf/SecurityCenter.key
5. Select yes to overwrite the existing file.
Caution: Ensure that the newly copied files have permissions of 0640 and ownership of tns:tns.
Copyright © 2022 Tenable, Inc. All rights reserved. Tenable, Tenable.io, Tenable Network Security, Nessus, SecurityCenter, SecurityCenter Continuous View and Log Correlation Engine are registered trade-
marks of Tenable,Inc. Tenable.sc, Tenable.ot, Lumin, Indegy, Assure, and The Cyber Exposure Company are trademarks of Tenable, Inc. All other products or services are trademarks of their respective](https://image.slidesharecdn.com/tenablescuserguide-230130150954-04b86af4/85/Tenablesc_UserGuide-pdf-74-320.jpg)


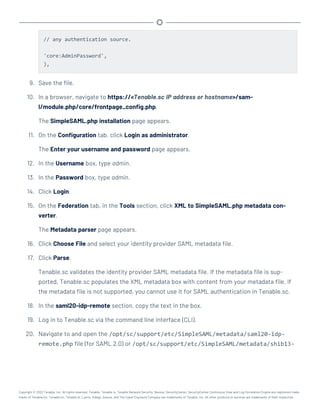
![idp-remote.php file (for Shibboleth 2.0).
21. Paste the text into the file, after the <?php line.
22. Save the file.
23. Navigate to and open the /opt/sc/support/etc/SimpleSAML/config/authsources.php
file again.
24. Confirm the idp URL in the authsources.php file matches the $metadata URL in the
saml20-idp-remote.php or shib13-idp-remote.php file:
Valid authsources.php syntax example:
'idp' => 'http://www.okta.com/abcdefghijKLmnopQr0s1'
Valid saml20-idp-remote.php or shib13-idp-remote.php syntax example:
$metadata['http://www.okta.com/abcdefghijKLmnopQr0s1']
25. In a browser, navigate to https://<Tenable.sc IP address or hostname>/sam-
l/module.php/core/frontpage_config.php.
The SimpleSAML.php installation page appears.
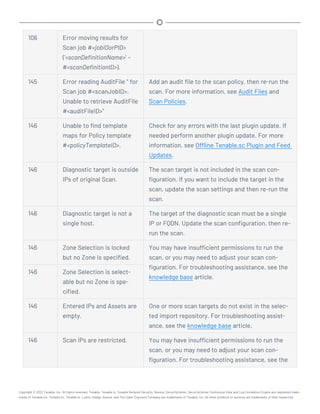
26. On the Authentication tab, click Test configured authentication sources.
The Test authentication sources page appears.
27. Click 1.
Your identity provider login page appears.
28. Log in to your identity provider.
The SAML 2.0 SP Demo Example page appears. If this page does not appear, the con-
figuration did not succeed.
What to do next:
Copyright © 2022 Tenable, Inc. All rights reserved. Tenable, Tenable.io, Tenable Network Security, Nessus, SecurityCenter, SecurityCenter Continuous View and Log Correlation Engine are registered trade-
marks of Tenable,Inc. Tenable.sc, Tenable.ot, Lumin, Indegy, Assure, and The Cyber Exposure Company are trademarks of Tenable, Inc. All other products or services are trademarks of their respective](https://image.slidesharecdn.com/tenablescuserguide-230130150954-04b86af4/85/Tenablesc_UserGuide-pdf-168-320.jpg)


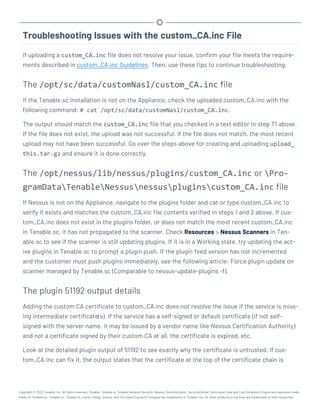

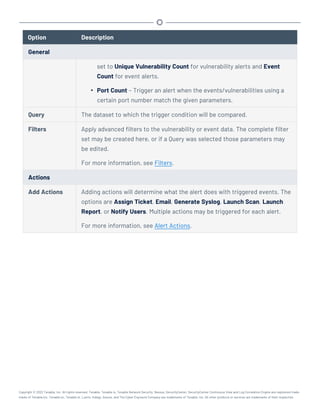
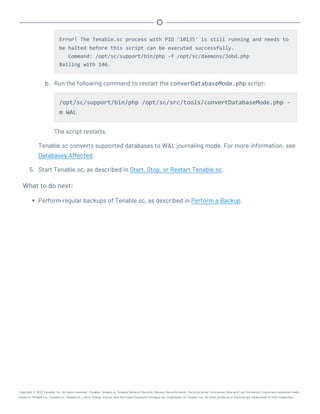
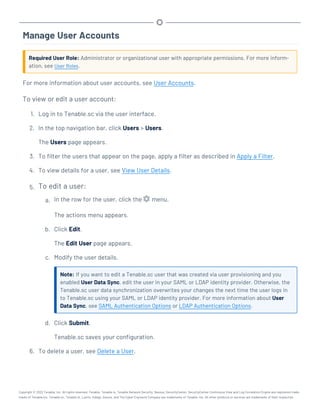
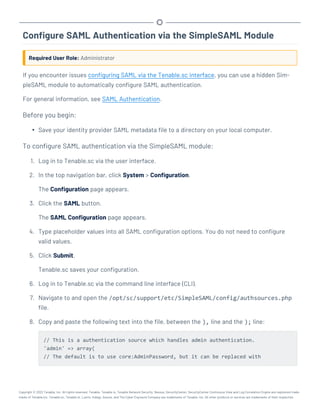
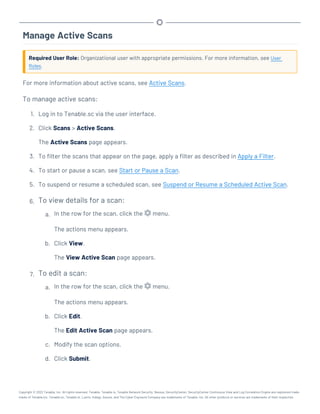
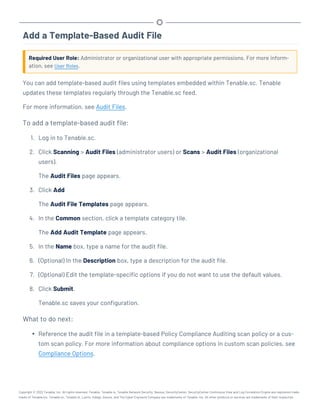
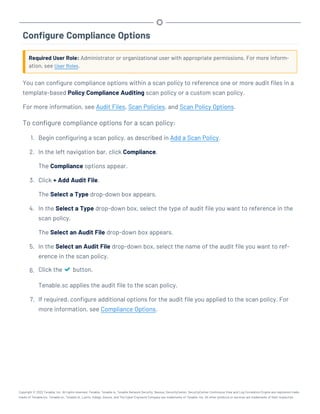
![Perform a Configuration Backup
Required User Role: Root user
For more information about the backup and restore process and the configurations included in a
configuration backup, see Backup and Restore.
Before you begin:
l If you uploaded custom plugins, save a copy of your custom plugins in a safe location.
To perform a backup of your Tenable.sc configuration:
1. Log in to Tenable.sc via the command line interface (CLI).
2. Stop Tenable.sc, as described in Start, Stop, or Restart Tenable.sc.
Tenable.sc stops.
3. In the CLI in Tenable.sc, do one of the following:
l To save the configuration backup file to a local directory, run the following command,
where [local directory path] is the local directory where you want to save the
backup file:
/opt/sc/support/bin/php /opt/sc/src/tools/backupSCConfiguration.php
-l [local directory path]
For example:
/opt/sc/support/bin/php /opt/sc/src/tools/backupSCConfiguration.php
-l /tmp/
l To save the configuration backup file to a remote directory, run the following command,
where [remote directory absolute path] is the absolute path to the remote dir-
ectory where you want to save the backup file:
Copyright © 2022 Tenable, Inc. All rights reserved. Tenable, Tenable.io, Tenable Network Security, Nessus, SecurityCenter, SecurityCenter Continuous View and Log Correlation Engine are registered trade-
marks of Tenable,Inc. Tenable.sc, Tenable.ot, Lumin, Indegy, Assure, and The Cyber Exposure Company are trademarks of Tenable, Inc. All other products or services are trademarks of their respective](https://image.slidesharecdn.com/tenablescuserguide-230130150954-04b86af4/85/Tenablesc_UserGuide-pdf-258-320.jpg)
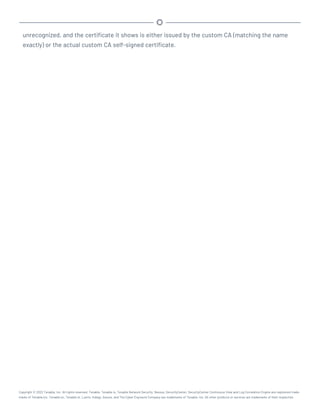
![/opt/sc/support/bin/php /opt/sc/src/tools/backupSCConfiguration.php
-r [user]@[host]:[remote absolute path to configuration backups
directory]
For example:
/opt/sc/support/bin/php /opt/sc/src/tools/backupSCConfiguration.php
-r tns@100.100.100.100:/tmp/
Tenable.sc creates the configuration backup file and saves it to the specified directory.
Tip: The configuration backup file name includes the backup date and time, the Tenable.sc host-
name, and the Tenable.sc version (for example, SC-config-20211101-165111-sc-hostname-5_
20_0.tar.gz).
4. Start Tenable.sc, as described in Start, Stop, or Restart Tenable.sc.
Tenable.sc starts.
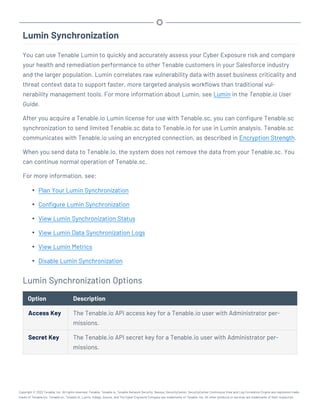
What to do next:
l (Optional) Restore the configuration backup file, as described in Restore a Configuration
Backup.
Copyright © 2022 Tenable, Inc. All rights reserved. Tenable, Tenable.io, Tenable Network Security, Nessus, SecurityCenter, SecurityCenter Continuous View and Log Correlation Engine are registered trade-
marks of Tenable,Inc. Tenable.sc, Tenable.ot, Lumin, Indegy, Assure, and The Cyber Exposure Company are trademarks of Tenable, Inc. All other products or services are trademarks of their respective](https://image.slidesharecdn.com/tenablescuserguide-230130150954-04b86af4/85/Tenablesc_UserGuide-pdf-259-320.jpg)
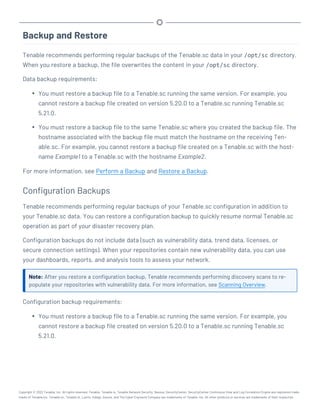
![Restore a Configuration Backup
Required User Role: Root user
For more information about the backup and restore process and the configurations included in a
configuration backup, see Backup and Restore.
Note: For best performance, after restoring a configuration backup, ensure the hostname associated with
the configuration backup file matches the hostname on the receiving Tenable.sc.
Before you begin:
1. Perform a configuration backup of your Tenable.sc, as described in Perform a Configuration
Backup.
2. Confirm your receiving Tenable.sc meets the requirements described in Backup and Restore.
To restore a configuration backup file:
1. Log in to Tenable.sc via the command line interface (CLI).
2. Stop Tenable.sc, as described in Start, Stop, or Restart Tenable.sc.
Tenable.sc stops.
3. In the CLI in Tenable.sc, run the following command to restore the configuration backup,
where [path to backup file] is the path to the backup file you want to restore:
/opt/sc/support/bin/php /opt/sc/src/tools/restoreSCConfiguration.php -l
[path to backup file]
For example:
/opt/sc/support/bin/php /opt/sc/src/tools/restoreSCConfiguration.php -l
/tmp/SC-config-20211101-165111-sc-hostname-5_20_0.tar.gz
Tenable.sc restores the configuration backup.
Copyright © 2022 Tenable, Inc. All rights reserved. Tenable, Tenable.io, Tenable Network Security, Nessus, SecurityCenter, SecurityCenter Continuous View and Log Correlation Engine are registered trade-
marks of Tenable,Inc. Tenable.sc, Tenable.ot, Lumin, Indegy, Assure, and The Cyber Exposure Company are trademarks of Tenable, Inc. All other products or services are trademarks of their respective](https://image.slidesharecdn.com/tenablescuserguide-230130150954-04b86af4/85/Tenablesc_UserGuide-pdf-260-320.jpg)


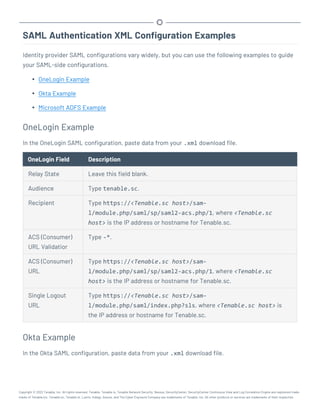
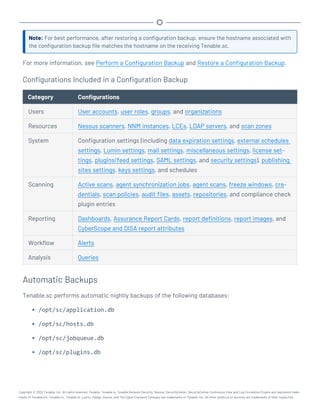
![/opt/sc/customer-tools/exportRepository.sh [repID] [trendingDays]
[trendWithRaw]
Variable Description
repID The repository ID of the repository you want to export. To locate the
repository ID, view the details for the repository, as described in
View Repository Details.
trendingDays (IP and Agent repositories only) The number of days of vulnerability
trending data to include. To use the preconfigured repository set-
ting, type default.
Note: The number of days of trending data included in the export can-
not exceed the Days Trending setting for the repository or the number
of days of trending data available for the repository. For example, if you
request 30 days of trending data, but trending data has been enabled for
only 15 days, then the export includes only 15 days of trending data. For
more information about repository settings, see IPv4/IPv6 Repositories
and Agent Repositories.
trendWithRaw (IP and agent repositories only) Specify whether you want the export
to include plugin output data: yes or no. To use the preconfigured
repository setting, type default.
(Optional) To automatically overwrite an existing repository file with the same name, include
the optional argument -f.
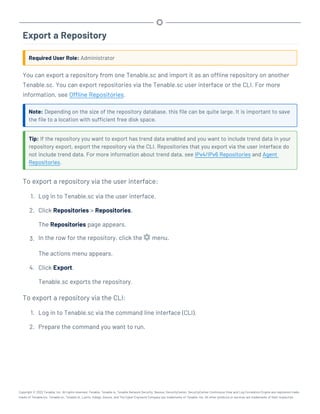
3. In the CLI in Tenable.sc, run the export command.
For example:
/opt/sc/customer-tools/exportRepository.sh 1 default default -f
Tenable.sc exports the repository.
What to do next:
Copyright © 2022 Tenable, Inc. All rights reserved. Tenable, Tenable.io, Tenable Network Security, Nessus, SecurityCenter, SecurityCenter Continuous View and Log Correlation Engine are registered trade-
marks of Tenable,Inc. Tenable.sc, Tenable.ot, Lumin, Indegy, Assure, and The Cyber Exposure Company are trademarks of Tenable, Inc. All other products or services are trademarks of their respective](https://image.slidesharecdn.com/tenablescuserguide-230130150954-04b86af4/85/Tenablesc_UserGuide-pdf-331-320.jpg)


![<?xml version="1.0" encoding="UTF-8"?>
<BES xmlns:xsi="http://www.w3.org/2001/XMLSchema-instance" xsi:noNamespaceSchemaLocation="BES.xsd">
<Analysis>
<Title>Tenable</Title>
<Description>This analysis provides SecurityCenter with the data it needs for vulnerability reporting. <
<Relevance>true</Relevance>
<Source>Internal</Source>
<SourceReleaseDate>2013-01-31</SourceReleaseDate>
<MIMEField>
<Name>x-fixlet-modification-time</Name>
<Value>Thu, 13 May 2021 21:43:29 +0000</Value>
</MIMEField>
<Domain>BESC</Domain>
<Property Name="Packages - With Versions (Tenable)" ID="74"><![CDATA[if (exists true whose (if true then
repository) else false)) then unique values of (lpp_name of it & "|" & version of it as string & "|" & "fileset"
tecture of operating system) of filesets of products of object repository else if (exists true whose (if true th
anpackage) else false)) then unique values of (name of it & "|" & version of it as string & "|" & "deb" & "|" &
it & "|" & architecture of operating system) of packages whose (exists version of it) of debianpackages else if
whose (if true then (exists rpm) else false)) then unique values of (name of it & "|" & version of it as string
"|" & architecture of it & "|" & architecture of operating system) of packages of rpm else if (exists true whose
(exists ips image) else false)) then unique values of (full name of it & "|" & version of it as string & "|" & "
architecture of operating system) of latest installed packages of ips image else if (exists true whose (if true
pkgdb) else false)) then unique values of(pkginst of it & "|" & version of it & "|" & "pkg10") of pkginfos of pk
"<unsupported>"]]></Property>
<Property Name="Tenable AIX Technology Level" ID="76">current technology level of operating system</Prop
<Property Name="Tenable Solaris - Showrev -a" ID="77"><![CDATA[if ((operating system as string as lowerc
"SunOS 5.10" as lowercase) AND (exists file "/var/opt/BESClient/showrev_patches.b64")) then lines of file "/var/
opt/BESClient/showrev_patches.b64" else "<unsupported>"]]></Property>
</Analysis>
</BES>
BES file:
<?xml version="1.0" encoding="UTF-8"?>
<BES xmlns:xsi="http://www.w3.org/2001/XMLSchema-instance" xsi:noNamespaceSchemaLocation="BES.xsd">
<Task>
<Title>Tenable - Solaris 5.10 - showrev -a Capture</Title>
<Description><![CDATA[<enter a description of the task here> ]]></Description>
<GroupRelevance JoinByIntersection="false">
<SearchComponentPropertyReference PropertyName="OS" Comparison="Contains">
<SearchText>SunOS 5.10</SearchText>
<Relevance>exists (operating system) whose (it as string as lowercase contains "SunOS
5.10" as lowercase)</Relevance>
</SearchComponentPropertyReference>
</GroupRelevance>
<Category></Category>
<Source>Internal</Source>
<SourceID></SourceID>
<SourceReleaseDate>2021-05-12</SourceReleaseDate>
<SourceSeverity></SourceSeverity>
<CVENames></CVENames>
<SANSID></SANSID>
<MIMEField>
<Name>x-fixlet-modification-time</Name>
<Value>Thu, 13 May 2021 21:50:58 +0000</Value>
</MIMEField>
Copyright © 2022 Tenable, Inc. All rights reserved. Tenable, Tenable.io, Tenable Network Security, Nessus, SecurityCenter, SecurityCenter Continuous View and Log Correlation Engine are registered trade-
marks of Tenable,Inc. Tenable.sc, Tenable.ot, Lumin, Indegy, Assure, and The Cyber Exposure Company are trademarks of Tenable, Inc. All other products or services are trademarks of their respective](https://image.slidesharecdn.com/tenablescuserguide-230130150954-04b86af4/85/Tenablesc_UserGuide-pdf-516-320.jpg)
![<Domain>BESC</Domain>
<DefaultAction ID="Action1">
<Description>
<PreLink>Click </PreLink>
<Link>here</Link>
<PostLink> to deploy this action.</PostLink>
</Description>
<ActionScript MIMEType="application/x-sh"><![CDATA[#!/bin/sh
/usr/bin/showrev -a > /var/opt/BESClient/showrev_patches
/usr/sfw/bin/openssl base64 -in /var/opt/BESClient/showrev_patches -out /var/opt/BESClient/showrev_
patches.b64
]]></ActionScript>
</DefaultAction>
</Task>
</BES>
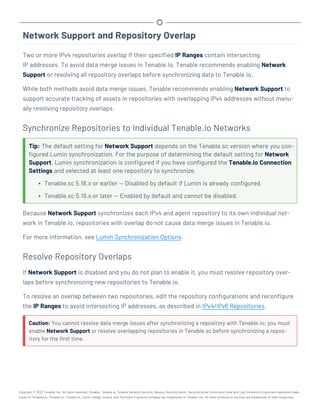
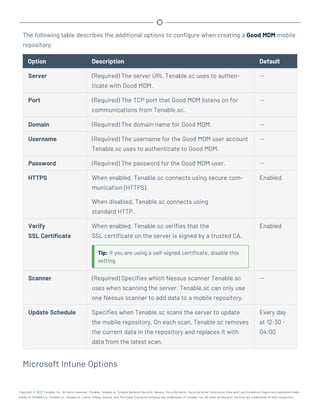
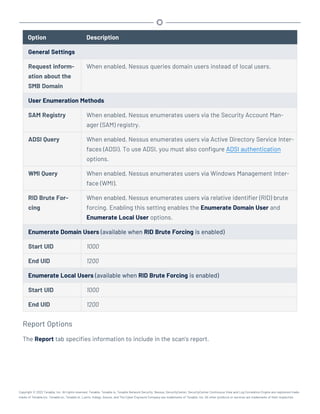
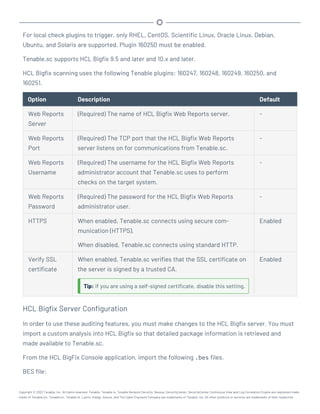
Microsoft System Center Configuration Manager (SCCM)
Microsoft System Center Configuration Manager (SCCM) is available to manage large groups of Win-
dows-based systems. Tenable.sc can query the SCCM service to verify whether or not patches are
installed on systems managed by SCCM and display the patch information through the scan results.
Tenable.sc connects to the server that is running the SCCM site (e.g., credentials must be valid for
the SCCM service, so the selected user must have privileges to query all the data in the SCCM MMC).
This server may also run the SQL database, or the database and the SCCM repository can be on sep-
arate servers. When leveraging this audit, Tenable.sc must connect to the SCCM server via WMI and
HTTPS.
SCCM scanning uses the following Tenable plugins: 57029, 57030, 73636, and 58186.
Note: SCCM patch management plugins support SCCM 2007, SCCM 2012, SCCM 2016, and SCCM 2019.
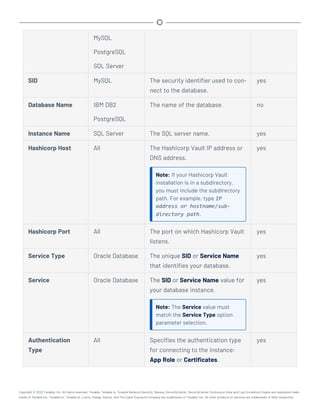
Credential Description Default
Server (Required) The SCCM IP address or system name. -
Domain (Required) The name of the SCCM server's domain. -
Username (Required) The username for the SCCM user account that Ten-
able.sc uses to perform checks on the target system. The user
account must have privileges to query all data in the
SCCM MMC.
-
Copyright © 2022 Tenable, Inc. All rights reserved. Tenable, Tenable.io, Tenable Network Security, Nessus, SecurityCenter, SecurityCenter Continuous View and Log Correlation Engine are registered trade-
marks of Tenable,Inc. Tenable.sc, Tenable.ot, Lumin, Indegy, Assure, and The Cyber Exposure Company are trademarks of Tenable, Inc. All other products or services are trademarks of their respective](https://image.slidesharecdn.com/tenablescuserguide-230130150954-04b86af4/85/Tenablesc_UserGuide-pdf-517-320.jpg)