SlideShare a Scribd company logo
Radiographic Technique 1
September, 2011
Prepared by:
Behzad Ommani
Bachelor of Radiology
Master of Medical Engineering
Anatomy
Radiography
Shoulder
Shoulder
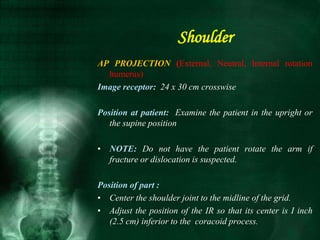
AP PROJECTION (External, Neutral, Internal rotation
humerus)
Image receptor: 24 x 30 cm crosswise
Position at patient: Examine the patient in the upright or
the supine position
• NOTE: Do not have the patient rotate the arm if
fracture or dislocation is suspected.
Position of part :
• Center the shoulder joint to the midline of the grid.
• Adjust the position of the IR so that its center is I inch
(2.5 cm) inferior to the coracoid process.
• If necessary to overcome the curve of the back and the
resultant obliquity of the shoulder structures, slightly
rotate the patient enough to place the body of the
scapula parallel with the plane of the IR.
Central ray : Perpendicular to a point I inch (2.5 cm)
inferior to the coracoid process.
Respiration: Suspend.
Shoulder
Shoulder
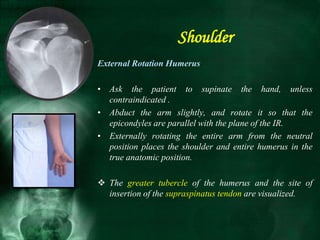
External Rotation Humerus
• Ask the patient to supinate the hand, unless
contraindicated .
• Abduct the arm slightly, and rotate it so that the
epicondyles are parallel with the plane of the IR.
• Externally rotating the entire arm from the neutral
position places the shoulder and entire humerus in the
true anatomic position.
 The greater tubercle of the humerus and the site of
insertion of the supraspinatus tendon are visualized.
Shoulder
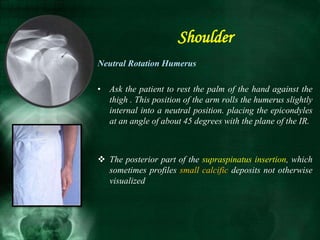
Neutral Rotation Humerus
• Ask the patient to rest the palm of the hand against the
thigh . This position of the arm rolls the humerus slightly
internal into a neutral position. placing the epicondyles
at an angle of about 45 degrees with the plane of the IR.
 The posterior part of the supraspinatus insertion, which
sometimes profiles small calcific deposits not otherwise
visualized
Shoulder
Internal Rotation Humerus
• Ask the patient to flex the elbow somewhat, rotate the
arm internally. and rest the back of the hand on the hip.
Adjust the arm to place the epicondyles perpendicular to
the plane of the IR.
 The proximal humerus is seen in a true lateral position.
When the arm can be abducted enough to clear the
lesser tubercle of the head of the scapula, a profile
image of the site of the insertion of the subscapular
tendon is seen.
Shoulder
Shoulder
TRANSTHORACIC LATERAL PROJECTION
(R or L position) LAWRENCE METHOD
Image receptor: 24 x 30 cm lengthwise
Position at patient:
• For upright positioning. seat or stand the patient in the
lateral position before a vertical grid device. If an
upright position is not possible.
• place the patient in a recumbent position on the table
with radiolucent pads elevating the head and shoulders.
• Have the patient raise the uninjured arm, rest the
forearm on the head. And elevate the shoulder as much
as possible.
• Center the IR to the surgical neck area of the affected
humerus.
Respiration: Full inspiration.
Having the lungs full of air improves the contrast and
decreases the exposure necessary to penetrate the body.
 A minimum exposure time of 3 seconds (4 to 5 seconds is
desirable) will give excellent results when a low
milliamperage is used
Shoulder
Central ray : Perpendicular to the IR. entering the
midcoronal plane at the level of the surgical neck. If the
patient cannot elevate the unaffected shoulder. angle the
central ray 10 to 15 degrees cephalad to obtain a
comparable radiograph.
Shoulder
Shoulder
Radiography
Shoulder Joint
Shoulder Joint
SUPEROINFERIOR AXIAL PROJECTION
Image receptor: 18 x 24 cm placed lengthwise for accurate
centering to the shoulder joint.
Positionof patient : Seat the patient at the end of the table
on a stool or chair high enough to enable extension of
the shoulder under examination well over the IR.
Position at patient:
• Place the IR near the end of the table and parallel with
its long axis.
• Have the patient lean laterally over the IR until the
shoulder joint is over the midpoint of the IR.
• Bring the elbow to rest on the table. Flex the patient's
elbow 90 degrees, and place the hand in the prone
position.
• Have the patient tilt the head toward the unaffected
shoulder.
Respiration: Suspend.
Central ray : Angled 5 to 15 degrees through the shoulder
joint and toward the elbow.
Shoulder Joint
Shoulder Joint
AP AXIAL PROJECTION
• Image receptor: 8 x 10 inch (18 x 24 cm) crosswise
Position at patient: Position the patient in the upright or
supine body position.
Position of part :
Center the scapulohumeral joint of the shoulder being
examined to the midline of the grid .
Respiration: Suspend
Shoulder Joint
Central ray : Directed through the scapulohumeral joint at
a cephalic angle of 35 degrees.
 The axial image shows the relationship of the head of
the humerus to the glenoid cavity. This is useful in
diagnosing cases of posterior dislocation.
Shoulder Joint
PA OBLIQUE PROJECTION
(RAO or LAO position) Scapular Y
Image receptor: (24 x 30 cm)
• This projection, described by Rubin, Gray, and Green, I
obtained its name as a result of the appearance of the
scapula.
• The body of the scapula forms the vertical component of
the Y, and the acromion and coracoid processes form
the upper limbs.
• The projection is useful in the evaluation of suspected
shoulder dislocations.
Shoulder Joint
Position at patient : the upright position is preferred. RAO
or LAO position
Position of part :
• Position the anterior surface of the shoulder being
examined against the upright table.
• Rotate the patient so that the midcoronal plane forms
an angle of 45 to 60 degrees to the IR.
• Palpate the scapula, and place its flat surface
perpendicular to the IR. Position the center of the IR at
the level.
Respiration: Suspend
Central ray : Perpendicular to the scapulohumeral joint.
Shoulder Joint
Shoulder Joint
• In anterior (subcoracoid) dislocations, the
humeral head is beneath the coracoid
process.
Shoulder Joint
In posterior (subacromial) dislocations,
it is projected beneath the acromion
process.
AP OBLIQUE PROJECTION (Glenoid Cavity)
(RPO or LPO position) GRASHEY METHOD
Image receptor : 8 x 10 inch (18 x 24 cm) crosswise
Position of patient : Achieve this position with the patient in
the supine or upright position.
Position of part :
• Center the IR to the scapulohumeral joint.
• Rotate the body approximately 35 to 45 degrees toward
the affected side.
Shoulder Joint
• Adjust the degree of rotation to place the scapula
parallel with the plane of the IR.
• This allows the head of the humerus to be in contact with
the IR.
• If the patient is in the supine position, the body may need
to be rotated more than 45 degrees to place the scapula
parallel to the IR.
• In addition, support the elevated shoulder and hip on
sandbags .
• Abduct the arm slightly in internal rotation, and place
palm of the hand on the abdomen.
Respiration: Suspend.
Shoulder Joint
Shoulder Joint
Central ray : Perpendicular to the glenoid cavity at a point
2 inches (5 cm) medial and 2 inches (5 cm) inferior to the
superolateral border of the shoulder.
Shoulder Joint
AP AXIAL PROJECTION (Proximal Humerus)
STRYKER "NOTCH" METHOD
• Dislocations of the shoulder are frequently caused by
posterior defects involving the posterolateral head of the
humerus. Such defects, called Hill-Sachs defects, are
often not demonstrated using conventional radiographic
positions.
• Hall. Isaac. and Booth' described the notch projection.
Image receptor : 24 x 30 cm
Position of patient : Place the patient on the radiographic
table in the supine position.
Position of part :
• With the coracoid process of the affected shoulder
centered to the table.
• Ask the patient to flex the arm slightly beyond 90
degrees and place the palm of the hand on top of the
head with fingertips resting on the head.
Respiration: Suspend
Shoulder Joint
Central ray : Angled 10 degrees cephalad, entering the
coracoid process.
Shoulder Joint
Shoulder Joint
AP OBLIQUE PROJECTION (Glenoid Cavity)
(RPO or LPO position) APPLE METHOD
This projection is similar to the Grashey Method but uses
weighted abduction to demonstrate a loss of articular
cartilage in the scapulohumeral joint.
Image receptor : 24 x 30 cm crosswise
Position of patient : Achieve this position with the patient
seated or upright.
Position of part :
Similar Grashey.
• The patient should hold a 1 pound weight in his or her
hand on the same side as the affected shoulder in a
neutral position.
• While holding the weight have the patient abduct the
arm 90 degrees from the midline of the body .
Respiration : Suspend.
Central ray : Perpendicular to the IR at the level of the
coracoid process.
Shoulder Joint
Shoulder Joint
Shoulder Joint
AP AXIAL OBLIQUE PROJECTION (Glenoid Cavity)
(RPO or LPO position) GARTH METHOD
This projection is recommended for acute shoulder trauma
and for identifying posterior scapulohumeral
dislocations, glenoid fractures, Hill-Sachs lesions, and
soft tissue calcifications.
Image receptor : 24 x 30 cm lengthwise
Position of patient : Achieve this position with the patient
seated or upright.
Position of part :
Similar Grashey.
• Flex the elbow of the affected arm and place arm across
the chest.
Respiration: Suspend.
Central ray : Angled 45 degrees caudad through the
scapulohumeral joint.
Shoulder Joint
Radiography
Acromioclavicular
Articulations
Acromioclavicular Articulations
AP PROJECTION (Bilateral)
PEARSON METHOD
Image receptor : 18 x 43 cm or two 8 X 10 inch (18 x 24
cm), as needed to fit the patient
SID: 72 inches (183 cm). A longer SID reduces
magnification, which enables both joints to be included
on one image.
• It also reduces the distortion of the joint space resulting
from central ray divergence.
Position of patient : Achieve this position with the patient
seated or upright.
• Center the midline of the body to the midline of the grid.
• Ensure that the weight of the body is equally distributed
on the feet to avoid rotation.
• With the patient's arms hanging by the sides, adjust the
shoulders to lie in the same horizontal plane.
• It is important that the arms hang unsupported.
Make two exposures:
• one in which the patient is standing upright without
weights attached, and a second in which the patient has
equal weights (5 to 8 Ib) affixed to each wrist
Acromioclavicular Articulations
AP AXIAL PROJECTION
ALEXANDER METHOD
Alexander' suggested that both AP and PA axial oblique
projections be used in cases of suspected
acromioclavicular subluxation or dislocation. Each side
is examined separately.
Image receptor : 8 x 10 inch (18 x 24 cm) lengthwise
Position of patient : Achieve this position with the patient
seated or upright.
Positionof part :
• Center the affected shoulder under examination to the
grid.
• Adjust the height of the IR so that the midpoint of the
film is at the level of the acromioclavicular joint.
• Adjust the patient's position to center the coracoid
process to the IR.
Respiration: Suspend.
Central ray : Directed to the coracoid process at a cephalic
angle of 15 degrees . This angulation projects the
acromioclavicular joint above the acromion.
Acromioclavicular Articulations
PA AXIAL OBLIQUE PROJECTION
(RAO or LAO position) ALEXANDER METHOD
Image receptor : 8 x 10 inch (18 x 24 cm) lengthwise
Position of patient : Achieve this position with the patient
seated or upright.
Positionof part :
• Stand or sit the patient facing the IR, and place the hand
of the affected side under the opposite axilla.
• Rotate the patient so the midcoronal plane forms an
angle of 45 to 60 degrees from the IR to place the
scapula perpendicular to the IR.
• Adjust the patient's position to center the
acromioclavicular joint to the midline of the grid.
Central ray : Directed through the acromioclavicular joint
at an angle of 15 degrees caudad.
Acromioclavicular Articulations
Radiography
Clavicle
Clavicle
AP PROJECTION
Image receptor : 24 x 30 cm Crosswise
Position of patient : Place the patient in the supine or
upright position.
 If the clavicle is being examined for a fracture or a
destructive disease or if the patient cannot be placed in
the upright position, use the supine position to reduce
the possibility of fragment displacement or additional
injury.
Position of part :
• Adjust the body to center the clavicle to the midline of
the table or vertical grid device.
• Place the arms along the sides of the body, and adjust
the shoulders to lie in the same horizontal plane. Center
the clavicle to the.
Respiration: Suspend at the end of exhalation to obtain a
more uniform density image.
Central ray : Perpendicular to the mid shaft of the
clavicle.
Clavicle
Clavicle
PA PROJECTION
The PA projection is generally well accepted by the patient
who is able to stand, and it is most useful when
improved recorded detail is desired. The advantage of
the PA projection is that the clavicle is closer to the
image receptor, thus reducing the OlD.
Positioning is similar to that of the AP projection. The
differences are as follows:
• The patient is standing upright (back toward the x-ray
tube) or prone .
• The perpendicular central ray exits midshaft of the
clavicle .
• Structures shown and evaluation criteria are the same
as for the AP projection.
Clavicle
Clavicle
Clavicle
AP AXIAL PROJECTION
Lordotic Position
Image receptor : 24 x 30 cm Crosswise
• Position of patient : Stand or seat the patient I foot in
front of the vertical IR device, with the patient facing the
x-ray tube.
• Alternatively, if the patient is unable to stand and
assume the lordotic position, place the patient supine on
the table
Position of part :
(Standing lordotic position )
• Have the patient lean backward in a position of extreme
lordosis, and rest the neck and shoulder against the
vertical grid device.
• The neck will be in extreme flexion. Center the clavicle
to the center of the IR.
(Supine position)
• Center the IR to the clavicle.
Respiration: Suspend at the end of full inspiration to further
elevate and angle the clavicle.
Clavicle
Clavicle
Central ray :
Directed to enter the midshaft of the clavicle.
• For the standing lordotic position, 0 to 15 degrees is
recommended.
• For the supine position, 15 to 30 degrees is
recommended
 Thinner patients require more angulation to project the
clavicle off the scapula and ribs.
Clavicle
PA AXIAL PROJECTION
• Positioning of the PA axial clavicle is similar to the AP
axial projection just described. The differences are as
follows:
• The patient is prone or standing, facing the vertical grid
device.
• The central ray is angled 15 to 30 degrees caudal .
Clavicle
Clavicle
TANGENTIAL PROJECTION (IS)
Image receptor : 8 x 10 inch (18 X 24 cm) crosswise
Position of patient : With the patient in the supine position,
place the arms along the sides of the body.
Positionof part :
• If possible, depress the shoulder to place the clavicle in
a horizontal plane .
• Have the patient turn the head away from the side being
examined.
• Place the IR on edge at the top of the shoulder and
support it in position.
• The IR should be as close to the neck as possible .
Respiration: Suspend.
Central ray :
• Angled so that the central ray will pass between the
clavicle and the chest wall, perpendicular to the plane of
the IR.
• The angulation will be about 25 to 40 degrees from the
horizontal. If the medial third of the clavicle is in
question, it is also necessary to angle the central ray
laterally; 15 to 25 degrees is usually sufficient.
Clavicle
Clavicle
Clavicle
TANGENTIAL PROJECTION (SI)
Tarrant method
Image receptor : (24 x 30 cm) crosswise
Position of patient : Place the patient in a seated position.
Positionof part :
• Adjust a sheet of leaded rubber over the gonad area. A
folded pillow or blankets may be placed on the patient's
lap to support the horizontally placed IR if needed.
• Using the collimator light as the indicator, center the IR
to the projected clavicle area, and have the patient hold
the IR in position.
• Ask the patient to lean slightly forward
Respiration: Suspend.
Central ray :
• Directed anterior and inferior to the midshaft of the
clavicle at a 25- to 35-degree angle. It should pass
perpendicular to the longitudinal axis of the clavicle.
• Because of the considerable OlD, an increased SID is
recommended to reduce magnificat
 The clavicle above the thoracic cage IS demonstrated.
Clavicle
Clavicle
Radiography
Scapula
Scapula
AP PROJECTION
Image receptor : (24 x 30 cm) lengthwise
• Position of patient : Place the patient in the upright or
supine position. The upright position is preferred if the
shoulder is tender.
Positionof part :
• Adjust the patient's body, and center the affected scapula
to the midline of the grid.
• Abduct the arm to a right angle with the body to draw
the scapula laterally. Then flex the elbow, and support
the hand in a comfortable position
Scapula
• Position the top of the IR 2 inches (5 cm) above the top
of the shoulder.
Respiration: Make this exposure during slow breathing to
obliterate lung detail.
Central ray : Perpendicular to the midscapular area at a
point approximately 2 inches (5 cm) inferior to the
coracoid process.
Scapula
Scapula
LATERAL PROJECTION
(RAO or LAO body position)
Image receptor : (24 x 30 cm) lengthwise
Position of patient : Place the patient in the upright
position, standing or seated, facing a vertical grid
device.
Positionof part :
• Adjust the patient in an RAO or LAO position, with the
affected scapula centered to the grid. The average
patient requires a 45- to 60-degree rotation from the
plane of the IR.
• Place the arm in one of two positions according to the
area of the scapula to be demonstrated :
1. For delineation of the acromion and coracoid
processes of the scapula, have the patient flex the
elbow and place the back of the hand on the posterior
thorax at a level sufficient to prevent the humerus from
overlapping the scapula .
Scapula
• Mazujian' suggested that the patient place the arm
across the upper chest by grasping the opposite
shoulder.
• For demonstration of the body of the scapula, ask the
patient to extend the arm upward and rest the forearm
on the head or across the upper chest by grasping the
opposite shoulder.
Central ray :
Perpendicular to the mid medial border of the protruding
scapula.
Scapula
Coracoids Process
AP AXIAL PROJECTION
Image receptor : (24 x 30 cm) lengthwise
Position of patient : Place the patient in the supine position
with the arms along the sides of the body.
Position of part :
• Adjust the position of the body, and center the affected
coracoid process to the midline of the grid.
• Adjust the shoulders to lie in the same horizontal plane.
Scapula
• Abduct the arm of the affected side slightly, and supinate
the hand, immobilizing it with a sandbag across the
palm.
Respiration: Suspend at the end of exhalation for a more
uniform density.
Central ray :
• Directed to enter the coracoid process at an angle of 15
to 45 degrees cephalad.
• Kwak, Espiniella, and Kattan recommend 30 degrees.
 The degree of angulation depends on the shape of the
patient's back. Round-shouldered patient" require a
greater angulation than those with a straight back.
Scapula
Scapula

More Related Content

What's hot

Radiography Positioning Spine
Radiography Positioning SpineRadiography Positioning Spine
Radiography Positioning Spine
Deepak Prasath
 
X ray imaging of forearm and elbow
X ray imaging of forearm and elbowX ray imaging of forearm and elbow
X ray imaging of forearm and elbow
Maajid Mohi ud din
 
Technique 1 Lower limbs 1
Technique 1 Lower limbs 1Technique 1 Lower limbs 1
Technique 1 Lower limbs 1
Behzad Ommani
 
X-RAY PELVIS PROJECTIONS
X-RAY PELVIS PROJECTIONSX-RAY PELVIS PROJECTIONS
X-RAY PELVIS PROJECTIONS
Jai Kumar
 
9. radiography of shoulder
9. radiography of shoulder9. radiography of shoulder
9. radiography of shoulder
drdharmendra8648
 
SKULL: Radiologic Positioning (Non-contrast)
SKULL: Radiologic Positioning (Non-contrast)SKULL: Radiologic Positioning (Non-contrast)
SKULL: Radiologic Positioning (Non-contrast)
Marona Ysabel Julabar
 
Skull Radiography techniques and reporting
Skull  Radiography techniques and reportingSkull  Radiography techniques and reporting
Skull Radiography techniques and reporting
Bhavana Krishnaiah
 
Radiographic views of sacrum and coccyx
Radiographic views of sacrum and coccyxRadiographic views of sacrum and coccyx
Radiographic views of sacrum and coccyx
Chandan Prasad
 
Upper limb
Upper limbUpper limb
Upper limb
Rituraj Mishra
 
Radiographic technique of skull
Radiographic technique of skullRadiographic technique of skull
Radiographic technique of skull
SaruGosain
 
Anatomy and Radiography of shoulder and arm
Anatomy and Radiography of shoulder and armAnatomy and Radiography of shoulder and arm
Anatomy and Radiography of shoulder and arm
Prasanta Nath
 
Radiographic positioning of Upper limb (ELBOW & HUMERUS)
Radiographic positioning of Upper limb (ELBOW & HUMERUS)Radiographic positioning of Upper limb (ELBOW & HUMERUS)
Radiographic positioning of Upper limb (ELBOW & HUMERUS)
Nasir Mohiudin
 
Positions
PositionsPositions
Positions
Abdellah Nazeer
 
Lumbo sacral,coccyx sacrum anatomy and positioning
Lumbo sacral,coccyx sacrum anatomy and positioningLumbo sacral,coccyx sacrum anatomy and positioning
Lumbo sacral,coccyx sacrum anatomy and positioning
dypradio
 
Projections of carpal tunnel and wrist
Projections of  carpal tunnel and wristProjections of  carpal tunnel and wrist
Projections of carpal tunnel and wrist
DonBenny2
 
Shoulder radiography avinesh shrestha
Shoulder radiography avinesh shresthaShoulder radiography avinesh shrestha
Shoulder radiography avinesh shrestha
Avinesh Shrestha
 
Various X-ray views of Knee Joint
Various X-ray views of Knee JointVarious X-ray views of Knee Joint
Various X-ray views of Knee Joint
Vinayak Sharad Abhishek Punuganti
 
Sella Turcica (RAD31)
Sella Turcica (RAD31)Sella Turcica (RAD31)
Sella Turcica (RAD31)
Louella Jamora
 
Radiographic views of lumbar spine
Radiographic views of lumbar spineRadiographic views of lumbar spine
Radiographic views of lumbar spine
Chandan Prasad
 
Technique 1 Upper limbs 1
Technique 1 Upper limbs 1Technique 1 Upper limbs 1
Technique 1 Upper limbs 1
Behzad Ommani
 

What's hot (20)

Radiography Positioning Spine
Radiography Positioning SpineRadiography Positioning Spine
Radiography Positioning Spine
 
X ray imaging of forearm and elbow
X ray imaging of forearm and elbowX ray imaging of forearm and elbow
X ray imaging of forearm and elbow
 
Technique 1 Lower limbs 1
Technique 1 Lower limbs 1Technique 1 Lower limbs 1
Technique 1 Lower limbs 1
 
X-RAY PELVIS PROJECTIONS
X-RAY PELVIS PROJECTIONSX-RAY PELVIS PROJECTIONS
X-RAY PELVIS PROJECTIONS
 
9. radiography of shoulder
9. radiography of shoulder9. radiography of shoulder
9. radiography of shoulder
 
SKULL: Radiologic Positioning (Non-contrast)
SKULL: Radiologic Positioning (Non-contrast)SKULL: Radiologic Positioning (Non-contrast)
SKULL: Radiologic Positioning (Non-contrast)
 
Skull Radiography techniques and reporting
Skull  Radiography techniques and reportingSkull  Radiography techniques and reporting
Skull Radiography techniques and reporting
 
Radiographic views of sacrum and coccyx
Radiographic views of sacrum and coccyxRadiographic views of sacrum and coccyx
Radiographic views of sacrum and coccyx
 
Upper limb
Upper limbUpper limb
Upper limb
 
Radiographic technique of skull
Radiographic technique of skullRadiographic technique of skull
Radiographic technique of skull
 
Anatomy and Radiography of shoulder and arm
Anatomy and Radiography of shoulder and armAnatomy and Radiography of shoulder and arm
Anatomy and Radiography of shoulder and arm
 
Radiographic positioning of Upper limb (ELBOW & HUMERUS)
Radiographic positioning of Upper limb (ELBOW & HUMERUS)Radiographic positioning of Upper limb (ELBOW & HUMERUS)
Radiographic positioning of Upper limb (ELBOW & HUMERUS)
 
Positions
PositionsPositions
Positions
 
Lumbo sacral,coccyx sacrum anatomy and positioning
Lumbo sacral,coccyx sacrum anatomy and positioningLumbo sacral,coccyx sacrum anatomy and positioning
Lumbo sacral,coccyx sacrum anatomy and positioning
 
Projections of carpal tunnel and wrist
Projections of  carpal tunnel and wristProjections of  carpal tunnel and wrist
Projections of carpal tunnel and wrist
 
Shoulder radiography avinesh shrestha
Shoulder radiography avinesh shresthaShoulder radiography avinesh shrestha
Shoulder radiography avinesh shrestha
 
Various X-ray views of Knee Joint
Various X-ray views of Knee JointVarious X-ray views of Knee Joint
Various X-ray views of Knee Joint
 
Sella Turcica (RAD31)
Sella Turcica (RAD31)Sella Turcica (RAD31)
Sella Turcica (RAD31)
 
Radiographic views of lumbar spine
Radiographic views of lumbar spineRadiographic views of lumbar spine
Radiographic views of lumbar spine
 
Technique 1 Upper limbs 1
Technique 1 Upper limbs 1Technique 1 Upper limbs 1
Technique 1 Upper limbs 1
 

Similar to Technique 1 Upper limbs 3

Technique 1 Upper limbs 2
Technique 1 Upper limbs 2Technique 1 Upper limbs 2
Technique 1 Upper limbs 2
Behzad Ommani
 
Digestive system imaging 3 class
Digestive system imaging 3 classDigestive system imaging 3 class
Digestive system imaging 3 class
Behzad Ommani
 
SHOULDER JOINT
SHOULDER JOINTSHOULDER JOINT
SHOULDER JOINT
SharmaRajan4
 
UPPER LIMB CONT.pptx
UPPER LIMB CONT.pptxUPPER LIMB CONT.pptx
UPPER LIMB CONT.pptx
FELECIANAMOS
 
(4-M) 301 - A Shoulder to Clavicle.pptx
(4-M) 301 - A  Shoulder to Clavicle.pptx(4-M) 301 - A  Shoulder to Clavicle.pptx
(4-M) 301 - A Shoulder to Clavicle.pptx
ShiennaRoseAnnManalo1
 
(4-M) 301 - A Shoulder to Clavicle.pptx
(4-M) 301 - A  Shoulder to Clavicle.pptx(4-M) 301 - A  Shoulder to Clavicle.pptx
(4-M) 301 - A Shoulder to Clavicle.pptx
ShiennaRoseAnnManalo1
 
ANATOMY AND POSITIONING OF KNEE.pptx
ANATOMY AND POSITIONING OF KNEE.pptxANATOMY AND POSITIONING OF KNEE.pptx
ANATOMY AND POSITIONING OF KNEE.pptx
dypradio
 
Seminar new
Seminar newSeminar new
Seminar new
Ganesh Gadag
 
Basic views of scaphoid and wrist
Basic views of  scaphoid and wristBasic views of  scaphoid and wrist
Basic views of scaphoid and wrist
Maajid Mohi ud din
 
X ray views of shoulder joint and related structures
X ray views of shoulder joint and related structuresX ray views of shoulder joint and related structures
X ray views of shoulder joint and related structures
Chandan Prasad
 
upper limb
upper limbupper limb
upper limb
VanshikaGarg76
 
RADIOGRAPHIC TECHNIQUE 1 pelvic.pptx
RADIOGRAPHIC TECHNIQUE 1 pelvic.pptxRADIOGRAPHIC TECHNIQUE 1 pelvic.pptx
RADIOGRAPHIC TECHNIQUE 1 pelvic.pptx
ARNKadunaState
 
Radiographic evaluation of shoulder
Radiographic evaluation of shoulderRadiographic evaluation of shoulder
Radiographic evaluation of shoulder
mrinal joshi
 
Shoulderclavicleribs.pptx
Shoulderclavicleribs.pptxShoulderclavicleribs.pptx
Shoulderclavicleribs.pptx
NishanthRajan7
 
Shoulder girdle presentation
Shoulder girdle presentationShoulder girdle presentation
Shoulder girdle presentation
Emmie Macabiog
 
Radiographic views of proximal femur and pelvis
Radiographic views of proximal femur and pelvisRadiographic views of proximal femur and pelvis
Radiographic views of proximal femur and pelvis
Chandan Prasad
 
Presentation (7).pdf
Presentation (7).pdfPresentation (7).pdf
Presentation (7).pdf
DilshanDillu1
 
radiograpicviewsforshoulderjoint-180322063116 (2).pdf
radiograpicviewsforshoulderjoint-180322063116 (2).pdfradiograpicviewsforshoulderjoint-180322063116 (2).pdf
radiograpicviewsforshoulderjoint-180322063116 (2).pdf
sudheendrapv
 
RADIOGRAPHIC VIEWS FOR HIP JOINT
RADIOGRAPHIC VIEWS FOR HIP JOINTRADIOGRAPHIC VIEWS FOR HIP JOINT
RADIOGRAPHIC VIEWS FOR HIP JOINT
Ganesan Yogananthem
 
Elbow joint
Elbow joint Elbow joint
Elbow joint
Jino Justin
 

Similar to Technique 1 Upper limbs 3 (20)

Technique 1 Upper limbs 2
Technique 1 Upper limbs 2Technique 1 Upper limbs 2
Technique 1 Upper limbs 2
 
Digestive system imaging 3 class
Digestive system imaging 3 classDigestive system imaging 3 class
Digestive system imaging 3 class
 
SHOULDER JOINT
SHOULDER JOINTSHOULDER JOINT
SHOULDER JOINT
 
UPPER LIMB CONT.pptx
UPPER LIMB CONT.pptxUPPER LIMB CONT.pptx
UPPER LIMB CONT.pptx
 
(4-M) 301 - A Shoulder to Clavicle.pptx
(4-M) 301 - A  Shoulder to Clavicle.pptx(4-M) 301 - A  Shoulder to Clavicle.pptx
(4-M) 301 - A Shoulder to Clavicle.pptx
 
(4-M) 301 - A Shoulder to Clavicle.pptx
(4-M) 301 - A  Shoulder to Clavicle.pptx(4-M) 301 - A  Shoulder to Clavicle.pptx
(4-M) 301 - A Shoulder to Clavicle.pptx
 
ANATOMY AND POSITIONING OF KNEE.pptx
ANATOMY AND POSITIONING OF KNEE.pptxANATOMY AND POSITIONING OF KNEE.pptx
ANATOMY AND POSITIONING OF KNEE.pptx
 
Seminar new
Seminar newSeminar new
Seminar new
 
Basic views of scaphoid and wrist
Basic views of  scaphoid and wristBasic views of  scaphoid and wrist
Basic views of scaphoid and wrist
 
X ray views of shoulder joint and related structures
X ray views of shoulder joint and related structuresX ray views of shoulder joint and related structures
X ray views of shoulder joint and related structures
 
upper limb
upper limbupper limb
upper limb
 
RADIOGRAPHIC TECHNIQUE 1 pelvic.pptx
RADIOGRAPHIC TECHNIQUE 1 pelvic.pptxRADIOGRAPHIC TECHNIQUE 1 pelvic.pptx
RADIOGRAPHIC TECHNIQUE 1 pelvic.pptx
 
Radiographic evaluation of shoulder
Radiographic evaluation of shoulderRadiographic evaluation of shoulder
Radiographic evaluation of shoulder
 
Shoulderclavicleribs.pptx
Shoulderclavicleribs.pptxShoulderclavicleribs.pptx
Shoulderclavicleribs.pptx
 
Shoulder girdle presentation
Shoulder girdle presentationShoulder girdle presentation
Shoulder girdle presentation
 
Radiographic views of proximal femur and pelvis
Radiographic views of proximal femur and pelvisRadiographic views of proximal femur and pelvis
Radiographic views of proximal femur and pelvis
 
Presentation (7).pdf
Presentation (7).pdfPresentation (7).pdf
Presentation (7).pdf
 
radiograpicviewsforshoulderjoint-180322063116 (2).pdf
radiograpicviewsforshoulderjoint-180322063116 (2).pdfradiograpicviewsforshoulderjoint-180322063116 (2).pdf
radiograpicviewsforshoulderjoint-180322063116 (2).pdf
 
RADIOGRAPHIC VIEWS FOR HIP JOINT
RADIOGRAPHIC VIEWS FOR HIP JOINTRADIOGRAPHIC VIEWS FOR HIP JOINT
RADIOGRAPHIC VIEWS FOR HIP JOINT
 
Elbow joint
Elbow joint Elbow joint
Elbow joint
 

More from Behzad Ommani

Digestive system imaging 2 class
Digestive system imaging 2 classDigestive system imaging 2 class
Digestive system imaging 2 class
Behzad Ommani
 
Digestive system imaging 1 class
Digestive system imaging 1 classDigestive system imaging 1 class
Digestive system imaging 1 class
Behzad Ommani
 
Dental Imaging
Dental ImagingDental Imaging
Dental Imaging
Behzad Ommani
 
Technique 1 inroduction
Technique 1 inroductionTechnique 1 inroduction
Technique 1 inroduction
Behzad Ommani
 
Contrast media 8
Contrast media 8 Contrast media 8
Contrast media 8
Behzad Ommani
 
Contrast media 6
Contrast media 6 Contrast media 6
Contrast media 6
Behzad Ommani
 
Contrast media 4
Contrast media 4 Contrast media 4
Contrast media 4
Behzad Ommani
 
Contrast media 3
Contrast media 3 Contrast media 3
Contrast media 3
Behzad Ommani
 
Contrast media 2
Contrast media 2 Contrast media 2
Contrast media 2
Behzad Ommani
 
Contrast media 1
Contrast media 1 Contrast media 1
Contrast media 1
Behzad Ommani
 
Portable Learning
Portable LearningPortable Learning
Portable Learning
Behzad Ommani
 
Dr Learning
Dr LearningDr Learning
Dr Learning
Behzad Ommani
 
Darkroom Learning
Darkroom LearningDarkroom Learning
Darkroom Learning
Behzad Ommani
 
BMD Learning
BMD LearningBMD Learning
BMD Learning
Behzad Ommani
 

More from Behzad Ommani (14)

Digestive system imaging 2 class
Digestive system imaging 2 classDigestive system imaging 2 class
Digestive system imaging 2 class
 
Digestive system imaging 1 class
Digestive system imaging 1 classDigestive system imaging 1 class
Digestive system imaging 1 class
 
Dental Imaging
Dental ImagingDental Imaging
Dental Imaging
 
Technique 1 inroduction
Technique 1 inroductionTechnique 1 inroduction
Technique 1 inroduction
 
Contrast media 8
Contrast media 8 Contrast media 8
Contrast media 8
 
Contrast media 6
Contrast media 6 Contrast media 6
Contrast media 6
 
Contrast media 4
Contrast media 4 Contrast media 4
Contrast media 4
 
Contrast media 3
Contrast media 3 Contrast media 3
Contrast media 3
 
Contrast media 2
Contrast media 2 Contrast media 2
Contrast media 2
 
Contrast media 1
Contrast media 1 Contrast media 1
Contrast media 1
 
Portable Learning
Portable LearningPortable Learning
Portable Learning
 
Dr Learning
Dr LearningDr Learning
Dr Learning
 
Darkroom Learning
Darkroom LearningDarkroom Learning
Darkroom Learning
 
BMD Learning
BMD LearningBMD Learning
BMD Learning
 

Recently uploaded

Superficial & Deep Fascia of the NECK.pptx
Superficial & Deep Fascia of the NECK.pptxSuperficial & Deep Fascia of the NECK.pptx
Superficial & Deep Fascia of the NECK.pptx
Dr. Rabia Inam Gandapore
 
KDIGO 2024 guidelines for diabetologists
KDIGO 2024 guidelines for diabetologistsKDIGO 2024 guidelines for diabetologists
KDIGO 2024 guidelines for diabetologists
د.محمود نجيب
 
Ozempic: Preoperative Management of Patients on GLP-1 Receptor Agonists
Ozempic: Preoperative Management of Patients on GLP-1 Receptor Agonists  Ozempic: Preoperative Management of Patients on GLP-1 Receptor Agonists
Ozempic: Preoperative Management of Patients on GLP-1 Receptor Agonists
Saeid Safari
 
basicmodesofventilation2022-220313203758.pdf
basicmodesofventilation2022-220313203758.pdfbasicmodesofventilation2022-220313203758.pdf
basicmodesofventilation2022-220313203758.pdf
aljamhori teaching hospital
 
Evaluation of antidepressant activity of clitoris ternatea in animals
Evaluation of antidepressant activity of clitoris ternatea in animalsEvaluation of antidepressant activity of clitoris ternatea in animals
Evaluation of antidepressant activity of clitoris ternatea in animals
Shweta
 
Surat @ℂall @Girls ꧁❤8527049040❤꧂@ℂall @Girls Service Vip Top Model Safe
Surat @ℂall @Girls ꧁❤8527049040❤꧂@ℂall @Girls Service Vip Top Model SafeSurat @ℂall @Girls ꧁❤8527049040❤꧂@ℂall @Girls Service Vip Top Model Safe
Surat @ℂall @Girls ꧁❤8527049040❤꧂@ℂall @Girls Service Vip Top Model Safe
Savita Shen $i11
 
BENIGN PROSTATIC HYPERPLASIA.BPH. BPHpdf
BENIGN PROSTATIC HYPERPLASIA.BPH. BPHpdfBENIGN PROSTATIC HYPERPLASIA.BPH. BPHpdf
BENIGN PROSTATIC HYPERPLASIA.BPH. BPHpdf
DR SETH JOTHAM
 
Prix Galien International 2024 Forum Program
Prix Galien International 2024 Forum ProgramPrix Galien International 2024 Forum Program
Prix Galien International 2024 Forum Program
Levi Shapiro
 
POST OPERATIVE OLIGURIA and its management
POST OPERATIVE OLIGURIA and its managementPOST OPERATIVE OLIGURIA and its management
POST OPERATIVE OLIGURIA and its management
touseefaziz1
 
New Drug Discovery and Development .....
New Drug Discovery and Development .....New Drug Discovery and Development .....
New Drug Discovery and Development .....
NEHA GUPTA
 
HOT NEW PRODUCT! BIG SALES FAST SHIPPING NOW FROM CHINA!! EU KU DB BK substit...
HOT NEW PRODUCT! BIG SALES FAST SHIPPING NOW FROM CHINA!! EU KU DB BK substit...HOT NEW PRODUCT! BIG SALES FAST SHIPPING NOW FROM CHINA!! EU KU DB BK substit...
HOT NEW PRODUCT! BIG SALES FAST SHIPPING NOW FROM CHINA!! EU KU DB BK substit...
GL Anaacs
 
Ocular injury ppt Upendra pal optometrist upums saifai etawah
Ocular injury  ppt  Upendra pal  optometrist upums saifai etawahOcular injury  ppt  Upendra pal  optometrist upums saifai etawah
Ocular injury ppt Upendra pal optometrist upums saifai etawah
pal078100
 
Are There Any Natural Remedies To Treat Syphilis.pdf
Are There Any Natural Remedies To Treat Syphilis.pdfAre There Any Natural Remedies To Treat Syphilis.pdf
Are There Any Natural Remedies To Treat Syphilis.pdf
Little Cross Family Clinic
 
Knee anatomy and clinical tests 2024.pdf
Knee anatomy and clinical tests 2024.pdfKnee anatomy and clinical tests 2024.pdf
Knee anatomy and clinical tests 2024.pdf
vimalpl1234
 
Flu Vaccine Alert in Bangalore Karnataka
Flu Vaccine Alert in Bangalore KarnatakaFlu Vaccine Alert in Bangalore Karnataka
Flu Vaccine Alert in Bangalore Karnataka
addon Scans
 
ARTHROLOGY PPT NCISM SYLLABUS AYURVEDA STUDENTS
ARTHROLOGY PPT NCISM SYLLABUS AYURVEDA STUDENTSARTHROLOGY PPT NCISM SYLLABUS AYURVEDA STUDENTS
ARTHROLOGY PPT NCISM SYLLABUS AYURVEDA STUDENTS
Dr. Vinay Pareek
 
TEST BANK for Operations Management, 14th Edition by William J. Stevenson, Ve...
TEST BANK for Operations Management, 14th Edition by William J. Stevenson, Ve...TEST BANK for Operations Management, 14th Edition by William J. Stevenson, Ve...
TEST BANK for Operations Management, 14th Edition by William J. Stevenson, Ve...
kevinkariuki227
 
Alcohol_Dr. Jeenal Mistry MD Pharmacology.pdf
Alcohol_Dr. Jeenal Mistry MD Pharmacology.pdfAlcohol_Dr. Jeenal Mistry MD Pharmacology.pdf
Alcohol_Dr. Jeenal Mistry MD Pharmacology.pdf
Dr Jeenal Mistry
 
263778731218 Abortion Clinic /Pills In Harare ,
263778731218 Abortion Clinic /Pills In Harare ,263778731218 Abortion Clinic /Pills In Harare ,
263778731218 Abortion Clinic /Pills In Harare ,
sisternakatoto
 
Ophthalmology Clinical Tests for OSCE exam
Ophthalmology Clinical Tests for OSCE examOphthalmology Clinical Tests for OSCE exam
Ophthalmology Clinical Tests for OSCE exam
KafrELShiekh University
 

Recently uploaded (20)

Superficial & Deep Fascia of the NECK.pptx
Superficial & Deep Fascia of the NECK.pptxSuperficial & Deep Fascia of the NECK.pptx
Superficial & Deep Fascia of the NECK.pptx
 
KDIGO 2024 guidelines for diabetologists
KDIGO 2024 guidelines for diabetologistsKDIGO 2024 guidelines for diabetologists
KDIGO 2024 guidelines for diabetologists
 
Ozempic: Preoperative Management of Patients on GLP-1 Receptor Agonists
Ozempic: Preoperative Management of Patients on GLP-1 Receptor Agonists  Ozempic: Preoperative Management of Patients on GLP-1 Receptor Agonists
Ozempic: Preoperative Management of Patients on GLP-1 Receptor Agonists
 
basicmodesofventilation2022-220313203758.pdf
basicmodesofventilation2022-220313203758.pdfbasicmodesofventilation2022-220313203758.pdf
basicmodesofventilation2022-220313203758.pdf
 
Evaluation of antidepressant activity of clitoris ternatea in animals
Evaluation of antidepressant activity of clitoris ternatea in animalsEvaluation of antidepressant activity of clitoris ternatea in animals
Evaluation of antidepressant activity of clitoris ternatea in animals
 
Surat @ℂall @Girls ꧁❤8527049040❤꧂@ℂall @Girls Service Vip Top Model Safe
Surat @ℂall @Girls ꧁❤8527049040❤꧂@ℂall @Girls Service Vip Top Model SafeSurat @ℂall @Girls ꧁❤8527049040❤꧂@ℂall @Girls Service Vip Top Model Safe
Surat @ℂall @Girls ꧁❤8527049040❤꧂@ℂall @Girls Service Vip Top Model Safe
 
BENIGN PROSTATIC HYPERPLASIA.BPH. BPHpdf
BENIGN PROSTATIC HYPERPLASIA.BPH. BPHpdfBENIGN PROSTATIC HYPERPLASIA.BPH. BPHpdf
BENIGN PROSTATIC HYPERPLASIA.BPH. BPHpdf
 
Prix Galien International 2024 Forum Program
Prix Galien International 2024 Forum ProgramPrix Galien International 2024 Forum Program
Prix Galien International 2024 Forum Program
 
POST OPERATIVE OLIGURIA and its management
POST OPERATIVE OLIGURIA and its managementPOST OPERATIVE OLIGURIA and its management
POST OPERATIVE OLIGURIA and its management
 
New Drug Discovery and Development .....
New Drug Discovery and Development .....New Drug Discovery and Development .....
New Drug Discovery and Development .....
 
HOT NEW PRODUCT! BIG SALES FAST SHIPPING NOW FROM CHINA!! EU KU DB BK substit...
HOT NEW PRODUCT! BIG SALES FAST SHIPPING NOW FROM CHINA!! EU KU DB BK substit...HOT NEW PRODUCT! BIG SALES FAST SHIPPING NOW FROM CHINA!! EU KU DB BK substit...
HOT NEW PRODUCT! BIG SALES FAST SHIPPING NOW FROM CHINA!! EU KU DB BK substit...
 
Ocular injury ppt Upendra pal optometrist upums saifai etawah
Ocular injury  ppt  Upendra pal  optometrist upums saifai etawahOcular injury  ppt  Upendra pal  optometrist upums saifai etawah
Ocular injury ppt Upendra pal optometrist upums saifai etawah
 
Are There Any Natural Remedies To Treat Syphilis.pdf
Are There Any Natural Remedies To Treat Syphilis.pdfAre There Any Natural Remedies To Treat Syphilis.pdf
Are There Any Natural Remedies To Treat Syphilis.pdf
 
Knee anatomy and clinical tests 2024.pdf
Knee anatomy and clinical tests 2024.pdfKnee anatomy and clinical tests 2024.pdf
Knee anatomy and clinical tests 2024.pdf
 
Flu Vaccine Alert in Bangalore Karnataka
Flu Vaccine Alert in Bangalore KarnatakaFlu Vaccine Alert in Bangalore Karnataka
Flu Vaccine Alert in Bangalore Karnataka
 
ARTHROLOGY PPT NCISM SYLLABUS AYURVEDA STUDENTS
ARTHROLOGY PPT NCISM SYLLABUS AYURVEDA STUDENTSARTHROLOGY PPT NCISM SYLLABUS AYURVEDA STUDENTS
ARTHROLOGY PPT NCISM SYLLABUS AYURVEDA STUDENTS
 
TEST BANK for Operations Management, 14th Edition by William J. Stevenson, Ve...
TEST BANK for Operations Management, 14th Edition by William J. Stevenson, Ve...TEST BANK for Operations Management, 14th Edition by William J. Stevenson, Ve...
TEST BANK for Operations Management, 14th Edition by William J. Stevenson, Ve...
 
Alcohol_Dr. Jeenal Mistry MD Pharmacology.pdf
Alcohol_Dr. Jeenal Mistry MD Pharmacology.pdfAlcohol_Dr. Jeenal Mistry MD Pharmacology.pdf
Alcohol_Dr. Jeenal Mistry MD Pharmacology.pdf
 
263778731218 Abortion Clinic /Pills In Harare ,
263778731218 Abortion Clinic /Pills In Harare ,263778731218 Abortion Clinic /Pills In Harare ,
263778731218 Abortion Clinic /Pills In Harare ,
 
Ophthalmology Clinical Tests for OSCE exam
Ophthalmology Clinical Tests for OSCE examOphthalmology Clinical Tests for OSCE exam
Ophthalmology Clinical Tests for OSCE exam
 

Technique 1 Upper limbs 3

  • 1. Radiographic Technique 1 September, 2011 Prepared by: Behzad Ommani Bachelor of Radiology Master of Medical Engineering
  • 4. Shoulder AP PROJECTION (External, Neutral, Internal rotation humerus) Image receptor: 24 x 30 cm crosswise Position at patient: Examine the patient in the upright or the supine position • NOTE: Do not have the patient rotate the arm if fracture or dislocation is suspected. Position of part : • Center the shoulder joint to the midline of the grid. • Adjust the position of the IR so that its center is I inch (2.5 cm) inferior to the coracoid process.
  • 5. • If necessary to overcome the curve of the back and the resultant obliquity of the shoulder structures, slightly rotate the patient enough to place the body of the scapula parallel with the plane of the IR. Central ray : Perpendicular to a point I inch (2.5 cm) inferior to the coracoid process. Respiration: Suspend. Shoulder
  • 7. External Rotation Humerus • Ask the patient to supinate the hand, unless contraindicated . • Abduct the arm slightly, and rotate it so that the epicondyles are parallel with the plane of the IR. • Externally rotating the entire arm from the neutral position places the shoulder and entire humerus in the true anatomic position.  The greater tubercle of the humerus and the site of insertion of the supraspinatus tendon are visualized. Shoulder
  • 8. Neutral Rotation Humerus • Ask the patient to rest the palm of the hand against the thigh . This position of the arm rolls the humerus slightly internal into a neutral position. placing the epicondyles at an angle of about 45 degrees with the plane of the IR.  The posterior part of the supraspinatus insertion, which sometimes profiles small calcific deposits not otherwise visualized Shoulder
  • 9. Internal Rotation Humerus • Ask the patient to flex the elbow somewhat, rotate the arm internally. and rest the back of the hand on the hip. Adjust the arm to place the epicondyles perpendicular to the plane of the IR.  The proximal humerus is seen in a true lateral position. When the arm can be abducted enough to clear the lesser tubercle of the head of the scapula, a profile image of the site of the insertion of the subscapular tendon is seen. Shoulder
  • 10. Shoulder TRANSTHORACIC LATERAL PROJECTION (R or L position) LAWRENCE METHOD Image receptor: 24 x 30 cm lengthwise Position at patient: • For upright positioning. seat or stand the patient in the lateral position before a vertical grid device. If an upright position is not possible. • place the patient in a recumbent position on the table with radiolucent pads elevating the head and shoulders.
  • 11. • Have the patient raise the uninjured arm, rest the forearm on the head. And elevate the shoulder as much as possible. • Center the IR to the surgical neck area of the affected humerus. Respiration: Full inspiration. Having the lungs full of air improves the contrast and decreases the exposure necessary to penetrate the body.  A minimum exposure time of 3 seconds (4 to 5 seconds is desirable) will give excellent results when a low milliamperage is used Shoulder
  • 12. Central ray : Perpendicular to the IR. entering the midcoronal plane at the level of the surgical neck. If the patient cannot elevate the unaffected shoulder. angle the central ray 10 to 15 degrees cephalad to obtain a comparable radiograph. Shoulder
  • 15. Shoulder Joint SUPEROINFERIOR AXIAL PROJECTION Image receptor: 18 x 24 cm placed lengthwise for accurate centering to the shoulder joint. Positionof patient : Seat the patient at the end of the table on a stool or chair high enough to enable extension of the shoulder under examination well over the IR. Position at patient: • Place the IR near the end of the table and parallel with its long axis. • Have the patient lean laterally over the IR until the shoulder joint is over the midpoint of the IR.
  • 16. • Bring the elbow to rest on the table. Flex the patient's elbow 90 degrees, and place the hand in the prone position. • Have the patient tilt the head toward the unaffected shoulder. Respiration: Suspend. Central ray : Angled 5 to 15 degrees through the shoulder joint and toward the elbow. Shoulder Joint
  • 18. AP AXIAL PROJECTION • Image receptor: 8 x 10 inch (18 x 24 cm) crosswise Position at patient: Position the patient in the upright or supine body position. Position of part : Center the scapulohumeral joint of the shoulder being examined to the midline of the grid . Respiration: Suspend Shoulder Joint
  • 19. Central ray : Directed through the scapulohumeral joint at a cephalic angle of 35 degrees.  The axial image shows the relationship of the head of the humerus to the glenoid cavity. This is useful in diagnosing cases of posterior dislocation. Shoulder Joint
  • 20. PA OBLIQUE PROJECTION (RAO or LAO position) Scapular Y Image receptor: (24 x 30 cm) • This projection, described by Rubin, Gray, and Green, I obtained its name as a result of the appearance of the scapula. • The body of the scapula forms the vertical component of the Y, and the acromion and coracoid processes form the upper limbs. • The projection is useful in the evaluation of suspected shoulder dislocations. Shoulder Joint
  • 21. Position at patient : the upright position is preferred. RAO or LAO position Position of part : • Position the anterior surface of the shoulder being examined against the upright table. • Rotate the patient so that the midcoronal plane forms an angle of 45 to 60 degrees to the IR. • Palpate the scapula, and place its flat surface perpendicular to the IR. Position the center of the IR at the level. Respiration: Suspend Central ray : Perpendicular to the scapulohumeral joint. Shoulder Joint
  • 23. • In anterior (subcoracoid) dislocations, the humeral head is beneath the coracoid process. Shoulder Joint In posterior (subacromial) dislocations, it is projected beneath the acromion process.
  • 24. AP OBLIQUE PROJECTION (Glenoid Cavity) (RPO or LPO position) GRASHEY METHOD Image receptor : 8 x 10 inch (18 x 24 cm) crosswise Position of patient : Achieve this position with the patient in the supine or upright position. Position of part : • Center the IR to the scapulohumeral joint. • Rotate the body approximately 35 to 45 degrees toward the affected side. Shoulder Joint
  • 25. • Adjust the degree of rotation to place the scapula parallel with the plane of the IR. • This allows the head of the humerus to be in contact with the IR. • If the patient is in the supine position, the body may need to be rotated more than 45 degrees to place the scapula parallel to the IR. • In addition, support the elevated shoulder and hip on sandbags . • Abduct the arm slightly in internal rotation, and place palm of the hand on the abdomen. Respiration: Suspend. Shoulder Joint
  • 26. Shoulder Joint Central ray : Perpendicular to the glenoid cavity at a point 2 inches (5 cm) medial and 2 inches (5 cm) inferior to the superolateral border of the shoulder.
  • 27. Shoulder Joint AP AXIAL PROJECTION (Proximal Humerus) STRYKER "NOTCH" METHOD • Dislocations of the shoulder are frequently caused by posterior defects involving the posterolateral head of the humerus. Such defects, called Hill-Sachs defects, are often not demonstrated using conventional radiographic positions. • Hall. Isaac. and Booth' described the notch projection.
  • 28. Image receptor : 24 x 30 cm Position of patient : Place the patient on the radiographic table in the supine position. Position of part : • With the coracoid process of the affected shoulder centered to the table. • Ask the patient to flex the arm slightly beyond 90 degrees and place the palm of the hand on top of the head with fingertips resting on the head. Respiration: Suspend Shoulder Joint
  • 29. Central ray : Angled 10 degrees cephalad, entering the coracoid process. Shoulder Joint
  • 30. Shoulder Joint AP OBLIQUE PROJECTION (Glenoid Cavity) (RPO or LPO position) APPLE METHOD This projection is similar to the Grashey Method but uses weighted abduction to demonstrate a loss of articular cartilage in the scapulohumeral joint. Image receptor : 24 x 30 cm crosswise Position of patient : Achieve this position with the patient seated or upright. Position of part : Similar Grashey.
  • 31. • The patient should hold a 1 pound weight in his or her hand on the same side as the affected shoulder in a neutral position. • While holding the weight have the patient abduct the arm 90 degrees from the midline of the body . Respiration : Suspend. Central ray : Perpendicular to the IR at the level of the coracoid process. Shoulder Joint
  • 33. Shoulder Joint AP AXIAL OBLIQUE PROJECTION (Glenoid Cavity) (RPO or LPO position) GARTH METHOD This projection is recommended for acute shoulder trauma and for identifying posterior scapulohumeral dislocations, glenoid fractures, Hill-Sachs lesions, and soft tissue calcifications. Image receptor : 24 x 30 cm lengthwise Position of patient : Achieve this position with the patient seated or upright. Position of part : Similar Grashey.
  • 34. • Flex the elbow of the affected arm and place arm across the chest. Respiration: Suspend. Central ray : Angled 45 degrees caudad through the scapulohumeral joint. Shoulder Joint
  • 36. Acromioclavicular Articulations AP PROJECTION (Bilateral) PEARSON METHOD Image receptor : 18 x 43 cm or two 8 X 10 inch (18 x 24 cm), as needed to fit the patient SID: 72 inches (183 cm). A longer SID reduces magnification, which enables both joints to be included on one image. • It also reduces the distortion of the joint space resulting from central ray divergence. Position of patient : Achieve this position with the patient seated or upright.
  • 37. • Center the midline of the body to the midline of the grid. • Ensure that the weight of the body is equally distributed on the feet to avoid rotation. • With the patient's arms hanging by the sides, adjust the shoulders to lie in the same horizontal plane. • It is important that the arms hang unsupported. Make two exposures: • one in which the patient is standing upright without weights attached, and a second in which the patient has equal weights (5 to 8 Ib) affixed to each wrist Acromioclavicular Articulations
  • 39. Acromioclavicular Articulations AP AXIAL PROJECTION ALEXANDER METHOD Alexander' suggested that both AP and PA axial oblique projections be used in cases of suspected acromioclavicular subluxation or dislocation. Each side is examined separately. Image receptor : 8 x 10 inch (18 x 24 cm) lengthwise Position of patient : Achieve this position with the patient seated or upright.
  • 40. Positionof part : • Center the affected shoulder under examination to the grid. • Adjust the height of the IR so that the midpoint of the film is at the level of the acromioclavicular joint. • Adjust the patient's position to center the coracoid process to the IR. Respiration: Suspend. Central ray : Directed to the coracoid process at a cephalic angle of 15 degrees . This angulation projects the acromioclavicular joint above the acromion. Acromioclavicular Articulations
  • 42. Acromioclavicular Articulations PA AXIAL OBLIQUE PROJECTION (RAO or LAO position) ALEXANDER METHOD Image receptor : 8 x 10 inch (18 x 24 cm) lengthwise Position of patient : Achieve this position with the patient seated or upright. Positionof part : • Stand or sit the patient facing the IR, and place the hand of the affected side under the opposite axilla. • Rotate the patient so the midcoronal plane forms an angle of 45 to 60 degrees from the IR to place the scapula perpendicular to the IR.
  • 43. • Adjust the patient's position to center the acromioclavicular joint to the midline of the grid. Central ray : Directed through the acromioclavicular joint at an angle of 15 degrees caudad. Acromioclavicular Articulations
  • 45. Clavicle AP PROJECTION Image receptor : 24 x 30 cm Crosswise Position of patient : Place the patient in the supine or upright position.  If the clavicle is being examined for a fracture or a destructive disease or if the patient cannot be placed in the upright position, use the supine position to reduce the possibility of fragment displacement or additional injury.
  • 46. Position of part : • Adjust the body to center the clavicle to the midline of the table or vertical grid device. • Place the arms along the sides of the body, and adjust the shoulders to lie in the same horizontal plane. Center the clavicle to the. Respiration: Suspend at the end of exhalation to obtain a more uniform density image. Central ray : Perpendicular to the mid shaft of the clavicle. Clavicle
  • 48. PA PROJECTION The PA projection is generally well accepted by the patient who is able to stand, and it is most useful when improved recorded detail is desired. The advantage of the PA projection is that the clavicle is closer to the image receptor, thus reducing the OlD. Positioning is similar to that of the AP projection. The differences are as follows: • The patient is standing upright (back toward the x-ray tube) or prone . • The perpendicular central ray exits midshaft of the clavicle . • Structures shown and evaluation criteria are the same as for the AP projection. Clavicle
  • 50. Clavicle AP AXIAL PROJECTION Lordotic Position Image receptor : 24 x 30 cm Crosswise • Position of patient : Stand or seat the patient I foot in front of the vertical IR device, with the patient facing the x-ray tube. • Alternatively, if the patient is unable to stand and assume the lordotic position, place the patient supine on the table
  • 51. Position of part : (Standing lordotic position ) • Have the patient lean backward in a position of extreme lordosis, and rest the neck and shoulder against the vertical grid device. • The neck will be in extreme flexion. Center the clavicle to the center of the IR. (Supine position) • Center the IR to the clavicle. Respiration: Suspend at the end of full inspiration to further elevate and angle the clavicle. Clavicle
  • 53. Central ray : Directed to enter the midshaft of the clavicle. • For the standing lordotic position, 0 to 15 degrees is recommended. • For the supine position, 15 to 30 degrees is recommended  Thinner patients require more angulation to project the clavicle off the scapula and ribs. Clavicle
  • 54. PA AXIAL PROJECTION • Positioning of the PA axial clavicle is similar to the AP axial projection just described. The differences are as follows: • The patient is prone or standing, facing the vertical grid device. • The central ray is angled 15 to 30 degrees caudal . Clavicle
  • 55. Clavicle TANGENTIAL PROJECTION (IS) Image receptor : 8 x 10 inch (18 X 24 cm) crosswise Position of patient : With the patient in the supine position, place the arms along the sides of the body. Positionof part : • If possible, depress the shoulder to place the clavicle in a horizontal plane . • Have the patient turn the head away from the side being examined. • Place the IR on edge at the top of the shoulder and support it in position.
  • 56. • The IR should be as close to the neck as possible . Respiration: Suspend. Central ray : • Angled so that the central ray will pass between the clavicle and the chest wall, perpendicular to the plane of the IR. • The angulation will be about 25 to 40 degrees from the horizontal. If the medial third of the clavicle is in question, it is also necessary to angle the central ray laterally; 15 to 25 degrees is usually sufficient. Clavicle
  • 58. Clavicle TANGENTIAL PROJECTION (SI) Tarrant method Image receptor : (24 x 30 cm) crosswise Position of patient : Place the patient in a seated position. Positionof part : • Adjust a sheet of leaded rubber over the gonad area. A folded pillow or blankets may be placed on the patient's lap to support the horizontally placed IR if needed. • Using the collimator light as the indicator, center the IR to the projected clavicle area, and have the patient hold the IR in position.
  • 59. • Ask the patient to lean slightly forward Respiration: Suspend. Central ray : • Directed anterior and inferior to the midshaft of the clavicle at a 25- to 35-degree angle. It should pass perpendicular to the longitudinal axis of the clavicle. • Because of the considerable OlD, an increased SID is recommended to reduce magnificat  The clavicle above the thoracic cage IS demonstrated. Clavicle
  • 62. Scapula AP PROJECTION Image receptor : (24 x 30 cm) lengthwise • Position of patient : Place the patient in the upright or supine position. The upright position is preferred if the shoulder is tender. Positionof part : • Adjust the patient's body, and center the affected scapula to the midline of the grid. • Abduct the arm to a right angle with the body to draw the scapula laterally. Then flex the elbow, and support the hand in a comfortable position
  • 63. Scapula • Position the top of the IR 2 inches (5 cm) above the top of the shoulder. Respiration: Make this exposure during slow breathing to obliterate lung detail. Central ray : Perpendicular to the midscapular area at a point approximately 2 inches (5 cm) inferior to the coracoid process.
  • 65. Scapula LATERAL PROJECTION (RAO or LAO body position) Image receptor : (24 x 30 cm) lengthwise Position of patient : Place the patient in the upright position, standing or seated, facing a vertical grid device. Positionof part : • Adjust the patient in an RAO or LAO position, with the affected scapula centered to the grid. The average patient requires a 45- to 60-degree rotation from the plane of the IR.
  • 66. • Place the arm in one of two positions according to the area of the scapula to be demonstrated : 1. For delineation of the acromion and coracoid processes of the scapula, have the patient flex the elbow and place the back of the hand on the posterior thorax at a level sufficient to prevent the humerus from overlapping the scapula . Scapula
  • 67. • Mazujian' suggested that the patient place the arm across the upper chest by grasping the opposite shoulder. • For demonstration of the body of the scapula, ask the patient to extend the arm upward and rest the forearm on the head or across the upper chest by grasping the opposite shoulder. Central ray : Perpendicular to the mid medial border of the protruding scapula. Scapula
  • 68. Coracoids Process AP AXIAL PROJECTION Image receptor : (24 x 30 cm) lengthwise Position of patient : Place the patient in the supine position with the arms along the sides of the body. Position of part : • Adjust the position of the body, and center the affected coracoid process to the midline of the grid. • Adjust the shoulders to lie in the same horizontal plane. Scapula
  • 69. • Abduct the arm of the affected side slightly, and supinate the hand, immobilizing it with a sandbag across the palm. Respiration: Suspend at the end of exhalation for a more uniform density. Central ray : • Directed to enter the coracoid process at an angle of 15 to 45 degrees cephalad. • Kwak, Espiniella, and Kattan recommend 30 degrees.  The degree of angulation depends on the shape of the patient's back. Round-shouldered patient" require a greater angulation than those with a straight back. Scapula