
Recommended
More Related Content
What's hot
What's hot (20)
Similar to Step by step construction of the Double Page Spread - Music Magazine
Similar to Step by step construction of the Double Page Spread - Music Magazine (20)
More from Chantelle_L
More from Chantelle_L (8)
Recently uploaded
Recently uploaded (16)
Step by step construction of the Double Page Spread - Music Magazine
- 1. Step by Step construction of Double Page Spread By Chantelle Locsin
- 2. First, I opened a new page on Microsoft Publisher. I did half of the DPS on publisher.
- 3. Next, I created the designs that are going to be used as the background template. The colour scheme for the DPS doesn’t follow the exact magazine’s main colour scheme as this is a main feature so it’s meant to stand out in the magazine.
- 4. After completing the designs, I pasted the headline in the arrow.
- 5. Then, I added and positioned the sub-heading under the headline.
- 6. Next, I added a pulled out quote from the interview and positioned it in the centre underneath the sub-heading.
- 7. After I finished positioning the quote, I added the article which is an interview with an pop-singer. I highlighted the questions in purple and the pop-singer’s responses are in black.
- 8. After I finished adding the interview, I added another pulled out quote from the interview because I wanted it to fill in the white space that was remaining in the bottom right corner.
- 9. The last thing I added to this part of the DPS was the bottom bit where I have inputted the page number and social media relating to the magazine. This is now half of the DPS is complete.
- 10. For the next half, I had to move the file into photoshop so that I can create the other half of the DPS and put them both together. Firstly, I had to crop it out since it was a layer and I couldn’t move it. Then I copied it so I can paste it onto a new page.
- 11. I had to use a blank A3 template to construct the DPS all together since an A3 size sheet is the same size as two A2 sheets put together. This will make it easier for when I have to put together both halves to create the DPS overall.
- 12. So next, I pasted the article side of the DPS onto the right side of the A3 sheet. I positioned it on the right side because it’s how I planned it in the draft plan and sketch.
- 13. After that, I added four purple arrows and one orange arrow on the left side. I did this because I wanted it to be used as a background design for the main image.
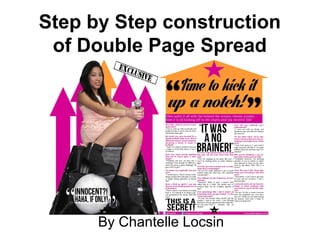
- 14. The last thing I did before my DPS was complete, I added the main image and adjusted it so that it fit the size of an A4. I also added another pulled out quote onto the image so it doesn’t look too bland. The ‘Exclusive’ was also added so that it made the page look a bit more busy and look more quantitative.
- 15. This is the final outcome for the double page spread final draft.
- 16. The End