The document outlines the step-by-step process for constructing a contents page for a magazine. First, the author opens Microsoft Publisher and establishes the layout and design to match the front cover. Templates and backgrounds are added using different colors from the color scheme. Images are positioned according to a drafting plan and contents table. Text is filled in including quotes, features, and a message from the writer. The last steps include adding page numbers, a writer's signature, and an 'x' to represent a kiss and relate to the target audience.
3. Next, I added the layout for the headline. The layout is the same layout and design
used for the masthead on the front cover. I did this because I wanted to establish a
house-theme which links the contents page to the front cover.
4. After that, I added a template by using trapeziums which act as a background design.
5. The next step I did, I added the other templates that was going to be used as part of
the main background and a background for other features. I used the main colours
from the colour scheme such as blue, pink, purple and yellow for the backgrounds.
6. Next, I pasted the headline onto the page. The font was obtained from dafont.com and I
had to edit it on photoshop so that I could change the colour of the font from white to
black.
7. I added the template for the contents table as well as adding last decision-made
designs around it because I realised from my drafting plan that there would be white
space there so I wanted to fill it in by adding a border around the contents table.
8. The next thing I added to the contents page was the images. I positioned them by
following my contents page drafting plan and sketch.
9. I also added borrowed images (source: google images) from the internet to act as
posters included in the magazine. This will enhance the look of my magazine since
its what actual existing pop magazines would include in theirs, making it seem more
professional.
10. For the features at the bottom of the contents page, I filled in the text that was required
and also included information for the social media of the magazine.
11. Next, I added the page numbers and heading in the contents table.
12. The next step I did was adding all the text onto the contents page. This includes the
quotes for the images with writer commentary as to make it sound colloquial rather
than completely formal. I’ve also added the features that’s included in the magazine
in the contents table and a message from the main writer for this issue.
13. The last thing I added was the writer’s signature. I did this by inputting the writer’s
name and used a signature-style font. I also included an ‘x’ at the end to represent
a kiss in text-language which is meant to relate to the target audience of how they
text their friends.
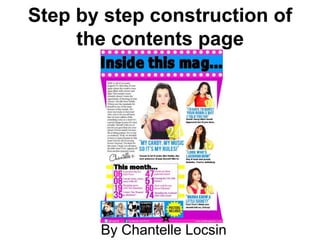
14. This is the final outcome for the final draft of the contents page.