This document provides instructions for using Google Slides effectively for team recaps. It outlines the basic requirements of permission to edit slides, the Drive and Slides applications, and basic and advanced functions. Key requirements include having editing permission, using the correct Google account, uploading photos to Drive to access on desktop, and refreshing the Drive app when on mobile. Basic functions covered are adding photos, text, resizing and moving objects. Advanced functions include duplicating, copying and pasting slides. Formatting is best done on desktop, and there is no need to manually save as it is automatic.


![Basic Functions Desktop
The basics work the same on desktop version
but look different than the mobile version
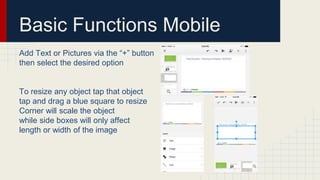
To add text click the [T] button
To add an image clike the “mountain button” next to the [T] button
Select Google Drive to add a photo previously uploaded on the drive
Be sure to choose the folder where you uploaded your photo](https://image.slidesharecdn.com/2ed8614e-4640-4e1b-a8b7-11039f48f675-150926214353-lva1-app6891/85/Slides-Introduction-7-320.jpg)