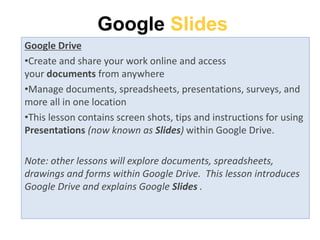
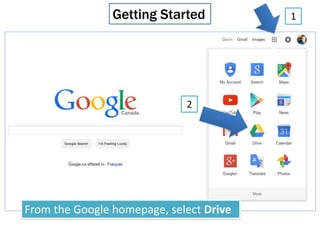
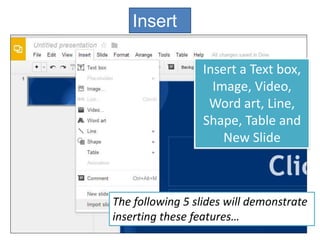
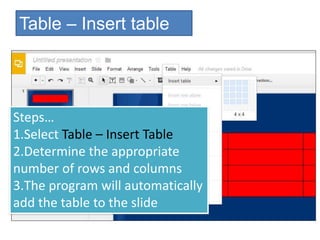
Google
Drive
Slides
Google Slides
Google Drive
•Create and share your work online and access
your documents from anywhere
•Manage documents, spreadsheets, presentations, surveys, and
more all in one location
•This lesson contains screen shots, tips and instructions for using
Presentations (now known as Slides) within Google Drive.
Note: other lessons will explore documents, spreadsheets,
drawings and forms within Google Drive. This lesson introduces
Google Drive and explains Google Slides .
Getting Started
From the Google homepage, select Drive
1
2
1. Click on New
2. Select your desired program
(Docs, Sheets, Slides)
Note: Click on More for Forms
and Drawings
Getting Started
Select Slides
Theme
• Select a Theme and press OK
• Note: The Theme can be changed
anytime under the Theme tab
Theme
Background
Layout
Transitions
New Slide
New Slide with Layout
The next slides will investigate
the Menu Bar
File
Edit
Select Undo to
delete a previous
mistake
View
Zoom in to
examine a small
area of the slide
Full Screen to view the
presentation in
Presentation mode
Insert
Insert a Text box,
Image, Video,
Word art, Line,
Shape, Table and
New Slide
The following 5 slides will demonstrate
inserting these features…
Insert - Shape
Select from a variety
of shapes for the
presentation
Insert - Image
• Drag or upload an image
into this area
• It will automatically be
uploaded into your
document
Insert - Video
• The words Google Drive were typed
into the YouTube search area
• A series of videos are displayed below
to select for the presentation
Insert – Word art
Word Art is great for Titles
Insert – New Slide
• The slides are displayed in this location
• There are currently 3 slides in the
presentation
Slide - Transition
Select Type of Transition –
Example Fade and apply settings
Slide – Apply Layout
Select from a variety of
layouts for your slides
Format • Format Text
• Add Bulleted
or Numbered
lists
Arrange - Order
Move a shape in front or behind
another shape, text or image
Tools
1. Check Spelling
2. Research a Topic
• The topic hockey was entered
into the search area
• A list of web results is created
including images and information
Table – Insert table
Steps…
1.Select Table – Insert Table
2.Determine the appropriate
number of rows and columns
3.The program will automatically
add the table to the slide
Help
Type what you are
trying to find into
the help box
Further Lessons
Other lessons will explore…
oDocs (Word Processing)
oSheets (Spreadsheets)
oForms
oDrawings
Activity #1 –All About You
• The Best way to learn is to teach.
• You will be creating a slide show about you!
• You will be putting together your
information into a 5 slide Google Slides
presentation.
• Be creative and use the tools we’ve talked
about.

Google SLIDES.ppt

  • 1.
  • 2.
    Google Slides Google Drive •Createand share your work online and access your documents from anywhere •Manage documents, spreadsheets, presentations, surveys, and more all in one location •This lesson contains screen shots, tips and instructions for using Presentations (now known as Slides) within Google Drive. Note: other lessons will explore documents, spreadsheets, drawings and forms within Google Drive. This lesson introduces Google Drive and explains Google Slides .
  • 3.
    Getting Started From theGoogle homepage, select Drive 1 2
  • 4.
    1. Click onNew 2. Select your desired program (Docs, Sheets, Slides) Note: Click on More for Forms and Drawings Getting Started
  • 5.
  • 6.
    Theme • Select aTheme and press OK • Note: The Theme can be changed anytime under the Theme tab
  • 7.
  • 8.
  • 9.
  • 10.
  • 11.
  • 12.
    The next slideswill investigate the Menu Bar
  • 13.
  • 14.
    Edit Select Undo to deletea previous mistake
  • 15.
    View Zoom in to examinea small area of the slide Full Screen to view the presentation in Presentation mode
  • 16.
    Insert Insert a Textbox, Image, Video, Word art, Line, Shape, Table and New Slide The following 5 slides will demonstrate inserting these features…
  • 17.
    Insert - Shape Selectfrom a variety of shapes for the presentation
  • 18.
    Insert - Image •Drag or upload an image into this area • It will automatically be uploaded into your document
  • 19.
    Insert - Video •The words Google Drive were typed into the YouTube search area • A series of videos are displayed below to select for the presentation
  • 20.
    Insert – Wordart Word Art is great for Titles
  • 21.
    Insert – NewSlide • The slides are displayed in this location • There are currently 3 slides in the presentation
  • 22.
    Slide - Transition SelectType of Transition – Example Fade and apply settings
  • 23.
    Slide – ApplyLayout Select from a variety of layouts for your slides
  • 24.
    Format • FormatText • Add Bulleted or Numbered lists
  • 25.
    Arrange - Order Movea shape in front or behind another shape, text or image
  • 26.
    Tools 1. Check Spelling 2.Research a Topic • The topic hockey was entered into the search area • A list of web results is created including images and information
  • 27.
    Table – Inserttable Steps… 1.Select Table – Insert Table 2.Determine the appropriate number of rows and columns 3.The program will automatically add the table to the slide
  • 28.
    Help Type what youare trying to find into the help box
  • 29.
    Further Lessons Other lessonswill explore… oDocs (Word Processing) oSheets (Spreadsheets) oForms oDrawings
  • 30.
    Activity #1 –AllAbout You • The Best way to learn is to teach. • You will be creating a slide show about you! • You will be putting together your information into a 5 slide Google Slides presentation. • Be creative and use the tools we’ve talked about.