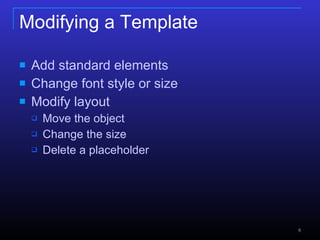
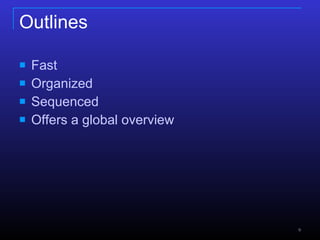
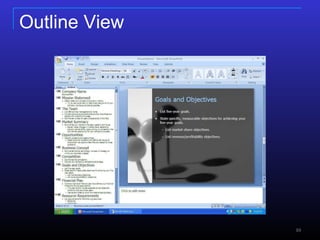
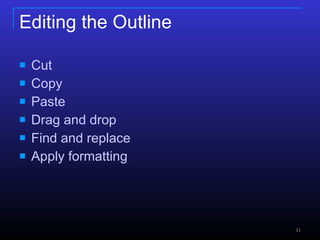
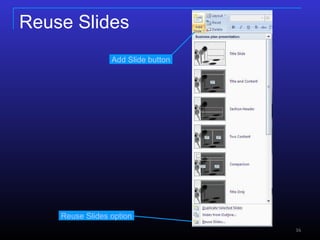
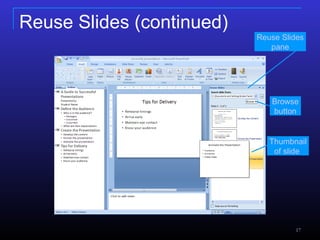
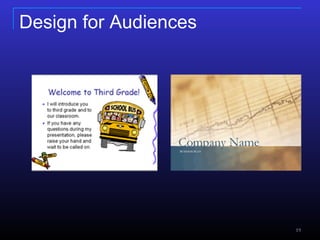
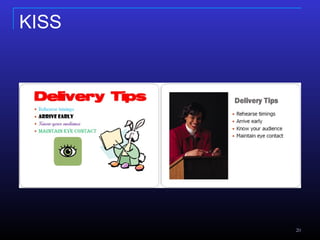
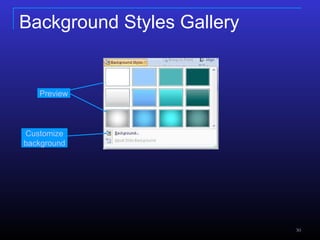
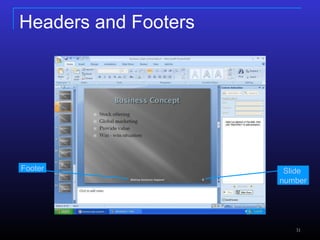
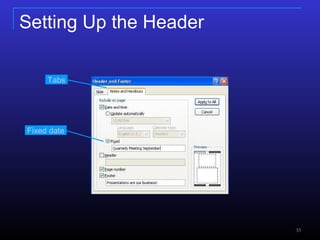
Ribbon Toolbar & Formatting
Inserting and Adding Objects
Creating Theme Color
Creating a Hyperlink
Slide Transitions
Slide Animation
Starting a Slide Show
Printing Slide
Microsoft Office Templates
Ribbon Toolbar & Formatting
Inserting and Adding Objects
Creating Theme Color
Creating a Hyperlink
Slide Transitions
Slide Animation
Starting a Slide Show
Printing Slide
Microsoft Office Templates
DevOps and Testing slides at DASA ConnectKari Kakkonen
My and Rik Marselis slides at 30.5.2024 DASA Connect conference. We discuss about what is testing, then what is agile testing and finally what is Testing in DevOps. Finally we had lovely workshop with the participants trying to find out different ways to think about quality and testing in different parts of the DevOps infinity loop.
Epistemic Interaction - tuning interfaces to provide information for AI supportAlan Dix
Paper presented at SYNERGY workshop at AVI 2024, Genoa, Italy. 3rd June 2024
https://alandix.com/academic/papers/synergy2024-epistemic/
As machine learning integrates deeper into human-computer interactions, the concept of epistemic interaction emerges, aiming to refine these interactions to enhance system adaptability. This approach encourages minor, intentional adjustments in user behaviour to enrich the data available for system learning. This paper introduces epistemic interaction within the context of human-system communication, illustrating how deliberate interaction design can improve system understanding and adaptation. Through concrete examples, we demonstrate the potential of epistemic interaction to significantly advance human-computer interaction by leveraging intuitive human communication strategies to inform system design and functionality, offering a novel pathway for enriching user-system engagements.
Encryption in Microsoft 365 - ExpertsLive Netherlands 2024Albert Hoitingh
In this session I delve into the encryption technology used in Microsoft 365 and Microsoft Purview. Including the concepts of Customer Key and Double Key Encryption.
Why You Should Replace Windows 11 with Nitrux Linux 3.5.0 for enhanced perfor...SOFTTECHHUB
The choice of an operating system plays a pivotal role in shaping our computing experience. For decades, Microsoft's Windows has dominated the market, offering a familiar and widely adopted platform for personal and professional use. However, as technological advancements continue to push the boundaries of innovation, alternative operating systems have emerged, challenging the status quo and offering users a fresh perspective on computing.
One such alternative that has garnered significant attention and acclaim is Nitrux Linux 3.5.0, a sleek, powerful, and user-friendly Linux distribution that promises to redefine the way we interact with our devices. With its focus on performance, security, and customization, Nitrux Linux presents a compelling case for those seeking to break free from the constraints of proprietary software and embrace the freedom and flexibility of open-source computing.
UiPath Test Automation using UiPath Test Suite series, part 6DianaGray10
Welcome to UiPath Test Automation using UiPath Test Suite series part 6. In this session, we will cover Test Automation with generative AI and Open AI.
UiPath Test Automation with generative AI and Open AI webinar offers an in-depth exploration of leveraging cutting-edge technologies for test automation within the UiPath platform. Attendees will delve into the integration of generative AI, a test automation solution, with Open AI advanced natural language processing capabilities.
Throughout the session, participants will discover how this synergy empowers testers to automate repetitive tasks, enhance testing accuracy, and expedite the software testing life cycle. Topics covered include the seamless integration process, practical use cases, and the benefits of harnessing AI-driven automation for UiPath testing initiatives. By attending this webinar, testers, and automation professionals can gain valuable insights into harnessing the power of AI to optimize their test automation workflows within the UiPath ecosystem, ultimately driving efficiency and quality in software development processes.
What will you get from this session?
1. Insights into integrating generative AI.
2. Understanding how this integration enhances test automation within the UiPath platform
3. Practical demonstrations
4. Exploration of real-world use cases illustrating the benefits of AI-driven test automation for UiPath
Topics covered:
What is generative AI
Test Automation with generative AI and Open AI.
UiPath integration with generative AI
Speaker:
Deepak Rai, Automation Practice Lead, Boundaryless Group and UiPath MVP
A tale of scale & speed: How the US Navy is enabling software delivery from l...sonjaschweigert1
Rapid and secure feature delivery is a goal across every application team and every branch of the DoD. The Navy’s DevSecOps platform, Party Barge, has achieved:
- Reduction in onboarding time from 5 weeks to 1 day
- Improved developer experience and productivity through actionable findings and reduction of false positives
- Maintenance of superior security standards and inherent policy enforcement with Authorization to Operate (ATO)
Development teams can ship efficiently and ensure applications are cyber ready for Navy Authorizing Officials (AOs). In this webinar, Sigma Defense and Anchore will give attendees a look behind the scenes and demo secure pipeline automation and security artifacts that speed up application ATO and time to production.
We will cover:
- How to remove silos in DevSecOps
- How to build efficient development pipeline roles and component templates
- How to deliver security artifacts that matter for ATO’s (SBOMs, vulnerability reports, and policy evidence)
- How to streamline operations with automated policy checks on container images
UiPath Test Automation using UiPath Test Suite series, part 5DianaGray10
Welcome to UiPath Test Automation using UiPath Test Suite series part 5. In this session, we will cover CI/CD with devops.
Topics covered:
CI/CD with in UiPath
End-to-end overview of CI/CD pipeline with Azure devops
Speaker:
Lyndsey Byblow, Test Suite Sales Engineer @ UiPath, Inc.
zkStudyClub - Reef: Fast Succinct Non-Interactive Zero-Knowledge Regex ProofsAlex Pruden
This paper presents Reef, a system for generating publicly verifiable succinct non-interactive zero-knowledge proofs that a committed document matches or does not match a regular expression. We describe applications such as proving the strength of passwords, the provenance of email despite redactions, the validity of oblivious DNS queries, and the existence of mutations in DNA. Reef supports the Perl Compatible Regular Expression syntax, including wildcards, alternation, ranges, capture groups, Kleene star, negations, and lookarounds. Reef introduces a new type of automata, Skipping Alternating Finite Automata (SAFA), that skips irrelevant parts of a document when producing proofs without undermining soundness, and instantiates SAFA with a lookup argument. Our experimental evaluation confirms that Reef can generate proofs for documents with 32M characters; the proofs are small and cheap to verify (under a second).
Paper: https://eprint.iacr.org/2023/1886
Threats to mobile devices are more prevalent and increasing in scope and complexity. Users of mobile devices desire to take full advantage of the features
available on those devices, but many of the features provide convenience and capability but sacrifice security. This best practices guide outlines steps the users can take to better protect personal devices and information.
Generative AI Deep Dive: Advancing from Proof of Concept to ProductionAggregage
Join Maher Hanafi, VP of Engineering at Betterworks, in this new session where he'll share a practical framework to transform Gen AI prototypes into impactful products! He'll delve into the complexities of data collection and management, model selection and optimization, and ensuring security, scalability, and responsible use.
Sudheer Mechineni, Head of Application Frameworks, Standard Chartered Bank
Discover how Standard Chartered Bank harnessed the power of Neo4j to transform complex data access challenges into a dynamic, scalable graph database solution. This keynote will cover their journey from initial adoption to deploying a fully automated, enterprise-grade causal cluster, highlighting key strategies for modelling organisational changes and ensuring robust disaster recovery. Learn how these innovations have not only enhanced Standard Chartered Bank’s data infrastructure but also positioned them as pioneers in the banking sector’s adoption of graph technology.
GridMate - End to end testing is a critical piece to ensure quality and avoid...ThomasParaiso2
End to end testing is a critical piece to ensure quality and avoid regressions. In this session, we share our journey building an E2E testing pipeline for GridMate components (LWC and Aura) using Cypress, JSForce, FakerJS…
Securing your Kubernetes cluster_ a step-by-step guide to success !KatiaHIMEUR1
Today, after several years of existence, an extremely active community and an ultra-dynamic ecosystem, Kubernetes has established itself as the de facto standard in container orchestration. Thanks to a wide range of managed services, it has never been so easy to set up a ready-to-use Kubernetes cluster.
However, this ease of use means that the subject of security in Kubernetes is often left for later, or even neglected. This exposes companies to significant risks.
In this talk, I'll show you step-by-step how to secure your Kubernetes cluster for greater peace of mind and reliability.
GraphSummit Singapore | The Art of the Possible with Graph - Q2 2024Neo4j
Neha Bajwa, Vice President of Product Marketing, Neo4j
Join us as we explore breakthrough innovations enabled by interconnected data and AI. Discover firsthand how organizations use relationships in data to uncover contextual insights and solve our most pressing challenges – from optimizing supply chains, detecting fraud, and improving customer experiences to accelerating drug discoveries.
In this chapter we will focus on the skills necessary to develop a presentation. We will discuss how to use the software and touch on presentation design principles.
The objectives of this chapter are: Create a presentation using a template Modify a template Create a presentation in Outline view Modify an outline structure Print an outline Import an outline
Additional objectives of this chapter are: Add existing content to a presentation Examine slide show design principles Apply and modify a design theme Insert a header or footer
Staring at a blank presentation and making the first keystrokes are often the hardest part of the development of the presentation. Microsoft has planned to assist you through the “presentation block” by providing templates that contain both professional-looking designs and content to help you decide what to say. A theme consists of the color combinations, backgrounds, graphic symbols (such as bullets), and font selections for titles and text placeholders. The layout of the theme slides determines where the placeholders are for the different elements of each slide. Later we will discuss how these can be changed. The templates might also include suggestions on what your slides should say for the types of presentations. For instance, the Business Plan template provides content slides such as Mission Statement, Market Summary, and Business Concept. The slide shown here suggests listing the five-year goals, and the objectives that will lead to meeting that goal. Of course, you can decide not to use the content suggestions and just delete them from the presentation.
Presentations can be developed in many ways. Templates are available from two main sources. PowerPoint comes with built-in templates. Some examples of these are Corporate Presentation, Quiz Show, and Photo Albums. These templates can be accessed without a connection to the Internet. Microsoft Office Online also has a wide variety of templates available for you to download and use in creating your presentation. You can find templates for academic, business, healthcare, and training uses. Some of the templates in the business category are for a business plan, financial performance, project overview, a marketing plan, and a sales proposal. At the time this text was written there were 30 templates available in the business category alone. Often templates will have great looking graphics for the title page and background. The other options for creating presentations are based on your skills as a designer. You may begin with a blank presentation with just layout placeholders. You will be in control of everything this way. You can also create templates based on presentations you have made in the past. In fact, that is how this presentation was developed. You can also create a new presentation based on an existing presentation. Remember, templates can be revised to fit your tastes or your needs. It is suggested that you modify templates so that your audience doesn’t “recognize” the presentation template as the same one used by another presenter. Changes you can make include altering the color scheme, changing fonts, and changing the theme.
To begin a presentation with a template, you will start with the Office Button in the upper left corner of the window and select New. The dialog box that opens gives you access to the templates that are available on your local computer and the Microsoft Office Online resources. Keep in mind that if you work in a computer lab you may not be able to download Office Online templates. Check with your instructor for more information.
This template example was downloaded from Office Online. The purpose of this template is to introduce a business plan. In the Outline view, you can see the sample content suggestions that are a part of the template. Using these suggestions, you would key information that relates to your company business plan. Remember, you can always delete slides or content suggestions that do not fit your needs. In the document window, notice the interesting graphic. Other slides in the presentation include this graphic with some modifications.
So the next question you should ask is, “How do I make modifications to the template?” You may wish to add elements to the template such as your company logo or perhaps the mission or slogan of the company. In the sample business plan there is a placeholder that says, “Your logo here.” Therefore, adding elements is as easy as using the Insert tab and selecting the elements to add. The font style or size can be changed by selecting the text you wish to change and making choices in the font and size boxes. You also have control of the size and location of the placeholders and objects. Select the placeholder you wish to move and drag it to the new position. For instance, if you wanted to see what the slide would look like with the title along the bottom of the slide, you could drag the title placeholder to the location. Placeholder size can be changed by selecting the placeholder and moving the handles in or out. You can also change the rotation of the placeholder, orienting the text on its side. This might be useful if you were using large titles and wanted to experiment with putting them down the side of the slide for a designer’s effect. You should use this idea sparingly as your audience will not appreciate having to read your information while turning their heads sideways! You may also delete placeholders that you do not wish to use. Just select the placeholder and use the Delete key to remove it from the slide.
Using outlines puts your information into an organized sequence fast. When you are working with outlines you are concentrating only on the information you are trying to convey in the presentation. You create the titles as the highest level of each slide and add lower levels as the content. You can have as many as 9 levels of information on a slide. Adding a new slide is simple; you only have to press the Enter key. To add lower levels, press the Tab key. To move an item to a higher level, press the Shift key plus the Tab key. While working in the Outline view you can see the sequence of your information develop. This global overview is a great way to organize your content. A little later, we will discuss how to change the sequencing of the information.
In the Outline View, notice that there is a small icon of a slide with a slide number. The words next to the icon are the title content. Look at slide 8 in the outline to see two levels below the title noted by bullets and dashes. Look at the document window to see how that slide is represented.
When working with outlines it is easy to see what information you have to work with and to move it from one part of the outline to another. The Copy, Cut, and Paste commands work as they do in other Microsoft applications. Select the text you wish to move. Using the Clipboard group on the Home tab, select the Copy or Cut icon. Copy will put the same information in another location. Cut will remove the information from one location and put it somewhere else. After you have the information on the Clipboard (through using Copy or Cut), click where you want that information to be and use the Paste icon to place it in a new location. You may also drag and drop information in your outline. Select the text and drag it to a new location. It is, in effect, a cut and paste motion, removing the text from one place and putting it somewhere else. Find and replace commands allow you to isolate a certain word or phrase and take action on it. For instance, you may have used a co-worker’s name in a few locations in your presentation, but unfortunately it is incorrectly spelled. Using the find and replace options from the Editing group on the Home tab, you can locate all occurrences of the misspelling and replace them with the correct spelling. While working in the Outline view you can also make decisions regarding the formatting of the text and apply it by selecting the text and making the formatting changes from the Font gallery on the Home tab. This might be useful if you wanted to have the name of your company in a bold font every time it appeared in the presentation.
The outline can be collapsed to show only the titles of each slide. This is useful if you have a long presentation and you want to follow the flow from slide to slide. It can also be helpful if you wish to move whole slides from one location to another, as you can drag and drop in this view. To collapse the whole outline, select text in the outline, right click, and select the Collapse option from the shortcut menu. You will be offered the opportunity to Collapse All (which will collapse the whole outline) or just the slide where you selected text. To expand, select text in the outline, right click, and select the Expand option from the shortcut menu.
You may want to share the content of your presentation with co-workers or others by printing the outline. Using the Office button to select the Print option, change the Print what: drop box to Outline View in the Print dialog box and click OK.
The ability to import outlines into PowerPoint means that you can use word processing applications, such as Microsoft Word, WordPad, and Notepad to create the outlines. If you use other word processing applications, save the files as Rich Text Format (.rtf) or Plain Text format (.txt) so that they may be imported into PowerPoint. Rich Text format will retain most of the outline formatting while Plain Text Format will only retain the text. In the latter case, you will also lose the structure of the outline and each line of text will become a separate slide.
When you have completed the outline in the word processing program, you import it into the PowerPoint application by clicking the Office button. Select Open then click the All PowerPoint Presentations drop-down arrow and select All Outlines.. Note that in the example shown here, the Insert Outline dialog box displays all three types of files available for importing. Double click the file you wish to use.
It is very time efficient to use content from other presentations in building a new presentation. Select the Add Slide button in the Slides gallery. Rather than add a slide by selecting from the layout gallery, use the Reuse Slides command from the bottom of the gallery. This opens a pane on the right side of the window. The next slide shows the Reuse Slides pane.
In this graphic you can see the Reuse Slides pane contains a browse button for locating the file that contains the slides you wish to reuse. When you have selected a file and loaded the slides into the Reuse Slide pane, you see thumbnails of the slides as you move your mouse over each. Click on the thumbnail you wish to insert into your current presentation. You can continue to select slides from the Reuse Slide pane. You may also browse for another file to reuse slides from another presentation. Sometimes a group of people will work on different parts of a presentation and the parts will be combined for the final slide show. This method would be used to join all of the parts together.
Once you have completed the content of the slides, you will turn your attention to visual design. Remember discussing the audience in the first chapter? This comes into play when making decisions about visual design too. The following slides will discuss each of these visual design topics.
Consider the audience in the design and overall feel of the presentation. Are you planning a professional presentation? Is it a fun presentation for a family reunion? Is the presentation planned for young children? The visual design should be planned to increase the appeal to the audience. Notice the difference between the color schemes on the two slides shown. Right away you can identify the slide for kids. Not only does the school bus give it away, but the bright colors and font style clearly say this is a presentation for children. The muted colors work well with professional presentations as shown on the right. Matching the colors to the logo or team colors is another way to appeal to the audience. College presentations often feature the school colors, logos, and photographs of the campus or students.
Remember that simpler is better. Select one font and stick to it. Select a group of colors that work well together and use them throughout the presentation. Avoid cluttering the slides with extra graphics that really don’t convey the message of the presentation. Even at a distance, you can tell that the slide on the left is too busy. The slide on the right makes good use of white space, unity in fonts, and organizers such as bullet points. Keep It Simple, Sweetie!
Slides should contain one focal point. Photographs are more compelling than other types of graphics. Use photographs when they are available. If photographs are not available, graphics such as clip art and charts that fit the message can add visual appeal and a focal point to the slide. Both slides shown have exactly the same content and visual design, but one is better than the other. Can you guess which one? The slide design on the right draws people into the text because it appears as if the speaker in the photograph is looking at that text. When photographs of people face the message, the message is more believable. Start looking carefully at advertisements and you will notice that this same principle applies to print.
Selecting the proper font style is another consideration. There are two styles used most often. Sans serif is good for short text blocks. Arial, Comic Sans, Eras, and Veranda are all sans serif fonts. They do not have the extra lines at the end of the letters (called serifs). Sans serif is appropriate for presentations that will be projected on a screen. Serif styles are better for printouts. Serifs are the lines at the ends of the letters. The serifs form a visual line that keeps you on the right line when you are reading large blocks of text. Examples of serif are Times New Roman, Century Schoolbook, and Bookman Old Style. There is a third style of font – decorative. Since readability is important to your audience, it is best to avoid decorative fonts because they can be very hard to read. You might consider using decorative fonts when you are going for a certain effect in your presentation. If you decide to use decorative fonts, use a large font size, limit the use to just a few words, and make sure it is readable.
When selecting elements to include on your slides, strive for unity. Repeat colors and shapes and styles of art work. Notice that the slide shown on the left has clip art that has backgrounds (two different ones, in fact), heavy outlines, no outlines, realistic looking animals and icon type animals. On the right, the animals are similar in color, are outlined in the same fashion, and have a similar cartoon feel. These clip art animals would work well in the same presentation.
Text is definitely a large design element in your presentations. It says it all. There are guidelines that help you to increase the readability of your slides. Avoid underlined text. With the advent of the Web, underlined text means a hyperlink to most people. All capital letters give the impression that you are yelling at the audience. All caps are much harder to read than mixed case letters. Bold and italicized text can be very hard to read on a presentation. As a matter of fact, people tend to skip text that is in an italic font. It is better to emphasize your message with focal points on the slides. A word left on a line by itself is considered an orphan word. It sometimes is not read, or it is read alone and the meaning within the context of the sentence is lost. This is to be avoided. In the old days of typewriters, we were trained to put two spaces after a period. This sometimes gives us a river of white space that moves the eye to the bottom of the text without giving you a chance to read it all. I once used a book that had steps clearly laid out. I always wondered why students kept missing one step on the same page over and over. I finally realized that I had a river flowing them to the bottom too quickly. With projected presentations, a single space is sufficient after a period.
Titles on slides should contain a capital letter at the beginning of major words. This presentation features titles with title case. The size of the font should be 36 points or larger. Limit the titles to one line whenever possible. Bullet points should be written as if they were sentences without the period at the end. For the best readability, use font sizes of 28 points or larger. Readability improves if you remember to put no more than 7 words on a line, and no more than 7 lines on a slide.
Themes were discussed in the previous chapter. It is easy to modify the theme and make your presentation unique. Colors, fonts, effects, and background styles are all opportunities for changing. The Design tab contains galleries for changing each of these items. On the next several slides we will look at each of the galleries.
The Colors gallery, much like the Fonts and Effects galleries, gives an example of each of the possibilities. After selecting the theme design, you can select color themes. If you do not find a color set that appeals to you or fits the needs of your presentation, you can select individual colors for each of the objects in the theme. This means that if you don’t like the bullet color, you can change it!
The Fonts gallery offers suggestions for the title and body font. When you select a pair, all titles and text will change on all slides. Notice that in some cases the fonts are different but in others the same font is used for both the title and the body font.
The Effects gallery contains effects which can be applied to shapes. Soft glow, soft edges, shadows, and 3-D effects can make your shapes look unique in appearance. The gallery shows how these effects work together. Notice that the Deluxe effect has a 3-D appearance, where the Urban has a dark line and appears flatter.
The Background Styles gallery contains solid colors and background styles for themes. The styles will be consistent with the color scheme on the slide. Background options include subtle, moderate, and intense. Subtle selections will be solid colored. Intense backgrounds will be patterned with dots, blocks, or stripes. The Hide Background button is useful when background shapes don’t mix well with other objects on the slide. The background can be turned off on single slides as needed. There is also an option to customize the background to your own specifications.
Headers are useful for putting consistent information on the top of outline and handout printouts. They do not show when the slides are projected. Footers, on the other hand, display on the slides. The information will be consistent on all slides. You can turn the footer off on the title slide. Typically, slide numbers, the time and date, the company logo, copyright information, or the presenter’s information appears in the footer. You can even show the number of slides in the presentation, with 4 of 20 being an example. This might not be the best of ideas, because the audience will start to pay attention to how many slides are left rather than the message. Have you ever attended a presentation where the audience audibly groans when the first slide footer says “1 of 60?” In the title slide displayed here you can see the date, company logo, and slide number.
The Insert tab contains the Header and Footer settings in the Text group. You can set the date and time to update automatically or not. There is a drop-down box for selecting the style for the date. Note that there is a check box for the slide number. The following check box and dialog box allows you to set a custom footer. For example, you may want to display the company motto, slogan, or mission on each slide. You would check the checkbox for the Footer and key the text in the dialog box. In a typical presentation, you would not want the footer displayed on the title slide. The default setting in PowerPoint is to have the footer on the title slide. If you do not want the footer to appear on this slide, you click on the check box which says “Don’t show on title slide.” Use the Apply to All to put the footer on every slide. The Apply option will put the footer on only the selected slide.
The Header is applied in the same way as the footer. The Insert tab contains the Header and Footer settings in the Text group. The Notes and Handouts tab is used to make select the elements that will appear on the outline and handout pages. A fixed Date and time is useful if you know the date you are giving the presentation because you can apply it to the header or footer. Audience members might appreciate having this information on their handouts. Note that it does not actually have to be in a date format, but rather it can be other information as shown here.