Integration and Automation in Practice: CI/CD in Mule Integration and Automat...
Passports in-boardmaker
1. Passports in BoardMaker Quick Guide
Created
Updated
BoardMaker is designed to make low tech or paper materials, using symbols or photographs. With this in
mind, it is fairly easy to make personal passports using BoardMaker. This sheet will give you some hints
and tips about how to make a passport using BoardMaker. There are now three different versions of
BoardMaker available, old (version 2) and new (version 5) for PC and a version 3 for Mac. Like most
software all the versions do some things slightly differently!
On the floppy disc that is included in your pack, there are BoardMaker templates for
A5 Display book
7” x 5” (18 x 13 cm) photo album
A4 Display book
There is a full template for the A5 display book. It covers general pages, communication, getting around,
eating, school, hearing and sight. There are text boxes and symbols on each page, though that template is
unlikely to suit all ages.
Before you start
Make a list of page headings. Then on a separate sheet for each page, write down the points you think
should be included. By planning the content of the pages beforehand, it makes it much easier to see how
many boxes you need to draw on a page.
Now decide on the book that you are going to put the passport into and measure the page size.
Creating and saving a blank page
Now you are ready to open up BoardMaker, firstly you need to make a blank board the size of the book
you are using. If you leave this till the end, you’ll be in trouble!
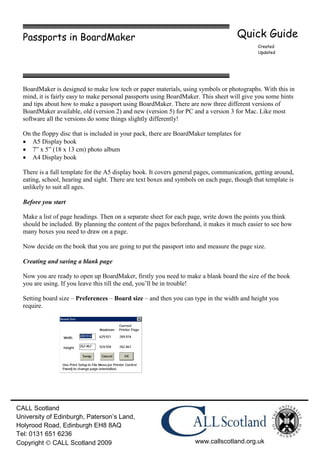
Setting board size – Preferences – Board size – and then you can type in the width and height you
require.
CALL Scotland
University of Edinburgh, Paterson’s Land,
Holyrood Road, Edinburgh EH8 8AQ
Tel: 0131 651 6236
Copyright CALL Scotland 2009 www.callscotland.org.uk
2. BoardMaker lets you work in either inches or millimetres. To change to the one you find easiest go to
Preferences – Ruler/ Grid/ Gap
Now that you have created the board that fits the page size, save it as something you’ll remember e.g.
blank or template. Remember that you can only save 8 characters within BoardMaker (Mac or old PC).
New PC version 5 lets you name the file with spaces.
At this point it is also important to print out a copy of the board to make sure that it actually does fit the
book! If you are printing on A4 paper and the board is smaller, remember to draw a large box around the
whole page so that there is a border you can cut round. Otherwise you will get a blank sheet of paper!
Boxes
All symbols/ pictures and text in BoardMaker must be within a cell, drawn by the rectangle tool on the
drawing screen. So every point that you want on the page, it’s easier if you think about it being a separate
box.
Amount of text in a box
With the older PC version and version 3 for the Mac you are limited with the amount of text that can be in
a box. This are approximately 190 characters that can be contained in a box.
In the new BoardMaker for PC (version 5) you can have as much text as you want in the cell.
BoardMaker does not work like a word processor. When you are typing and get to the end of a line, the
text will not automatically go to the next line. You need to press return: otherwise the text will become
invisible and you’re likely to lose a part of a word.
Invisible boxes
It is possible to have a symbol and text that doesn’t have a box around it. Though it’s not advisable to do
this until you are satisfied with the layout of the whole page and the text size. To make the box invisible
you’ll need to change the line thickness.
PC version 3 and Mac
Go to Preferences
Line thickness
And change to none
Page 2 of 4
3. PC Version 5
In the drawing screen, click on the line- thickening tool.
This box will appear, click to highlight the top left hand box (broken
line). Now when you draw a box it will have a broken line around it,
though when printed out no line will appear.
Colour
Passports should be attractive and eye-catching to the reader. So make sure that colour
symbols are used. Also you might want to have some coloured text or backgrounds. Any
really important points could be highlighted, for example a safety point could have a red
background.
To colour the background of a box. In the drawing window, click on the rectangle in the
toolbar, it will highlight (turn black). Now click on the colour required from the palette
below, a thin black line should appear around the chosen colour.
To change the colour of the text, highlight the box with ‘A’ and choose the colour from
the palette.
To change the colour of the lines around a box, highlight the line tool and choose a colour
from the palette.
Photographs
Photographs are likely to play an important part in any passport. So unless you are going to
be making lots of highly personalised resources for a client, a tip is just to copy and paste
the picture into the box. Old BoardMaker (version 2) and Mac will take JPEGS (digital
photos) without having to convert them.
This is particularly true for new BoardMaker, as it take ages to import pictures into the
symbol finder. It’s much quicker just to import direct into a cell. That’s to say that your
photographs are in the right format! There is a separate sheet that tells you how to do
this.
Page 3 of 4
4. Auto resize
Auto resize is how you can adjust the text and the symbol with the square. This is only
relevant to old BoardMaker PC and the Mac version, auto resize has disappeared with
Version 5.
Adjusting symbols
Once the symbol has been transferred into the grid, with Auto
Resize ON, it can be resized once only within it’s square. If
you want to do more adjustments, go to Preferences
menu and turn Auto Resize OFF.
When Auto Resize is on (in the Preferences Menu) it adjusts the whole section (e.g. the
text as well as symbols) if you want to adjust the text and the symbol separately, it can be
a problem. If you are having problems, it’s often because Auto resize is ON when it should
be OFF and vice versa.
Adjusting text
With the Auto Resize OFF, text size and font can be altered by clicking on the text. This
should create a box around the text. This can be moved and fonts and size (from the Text
menu) altered independently of the symbol.
And finally……
Don’t forget to have an index page and also to put the date somewhere on the passport!
Page 4 of 4