Downloaded 1,587 times


![166
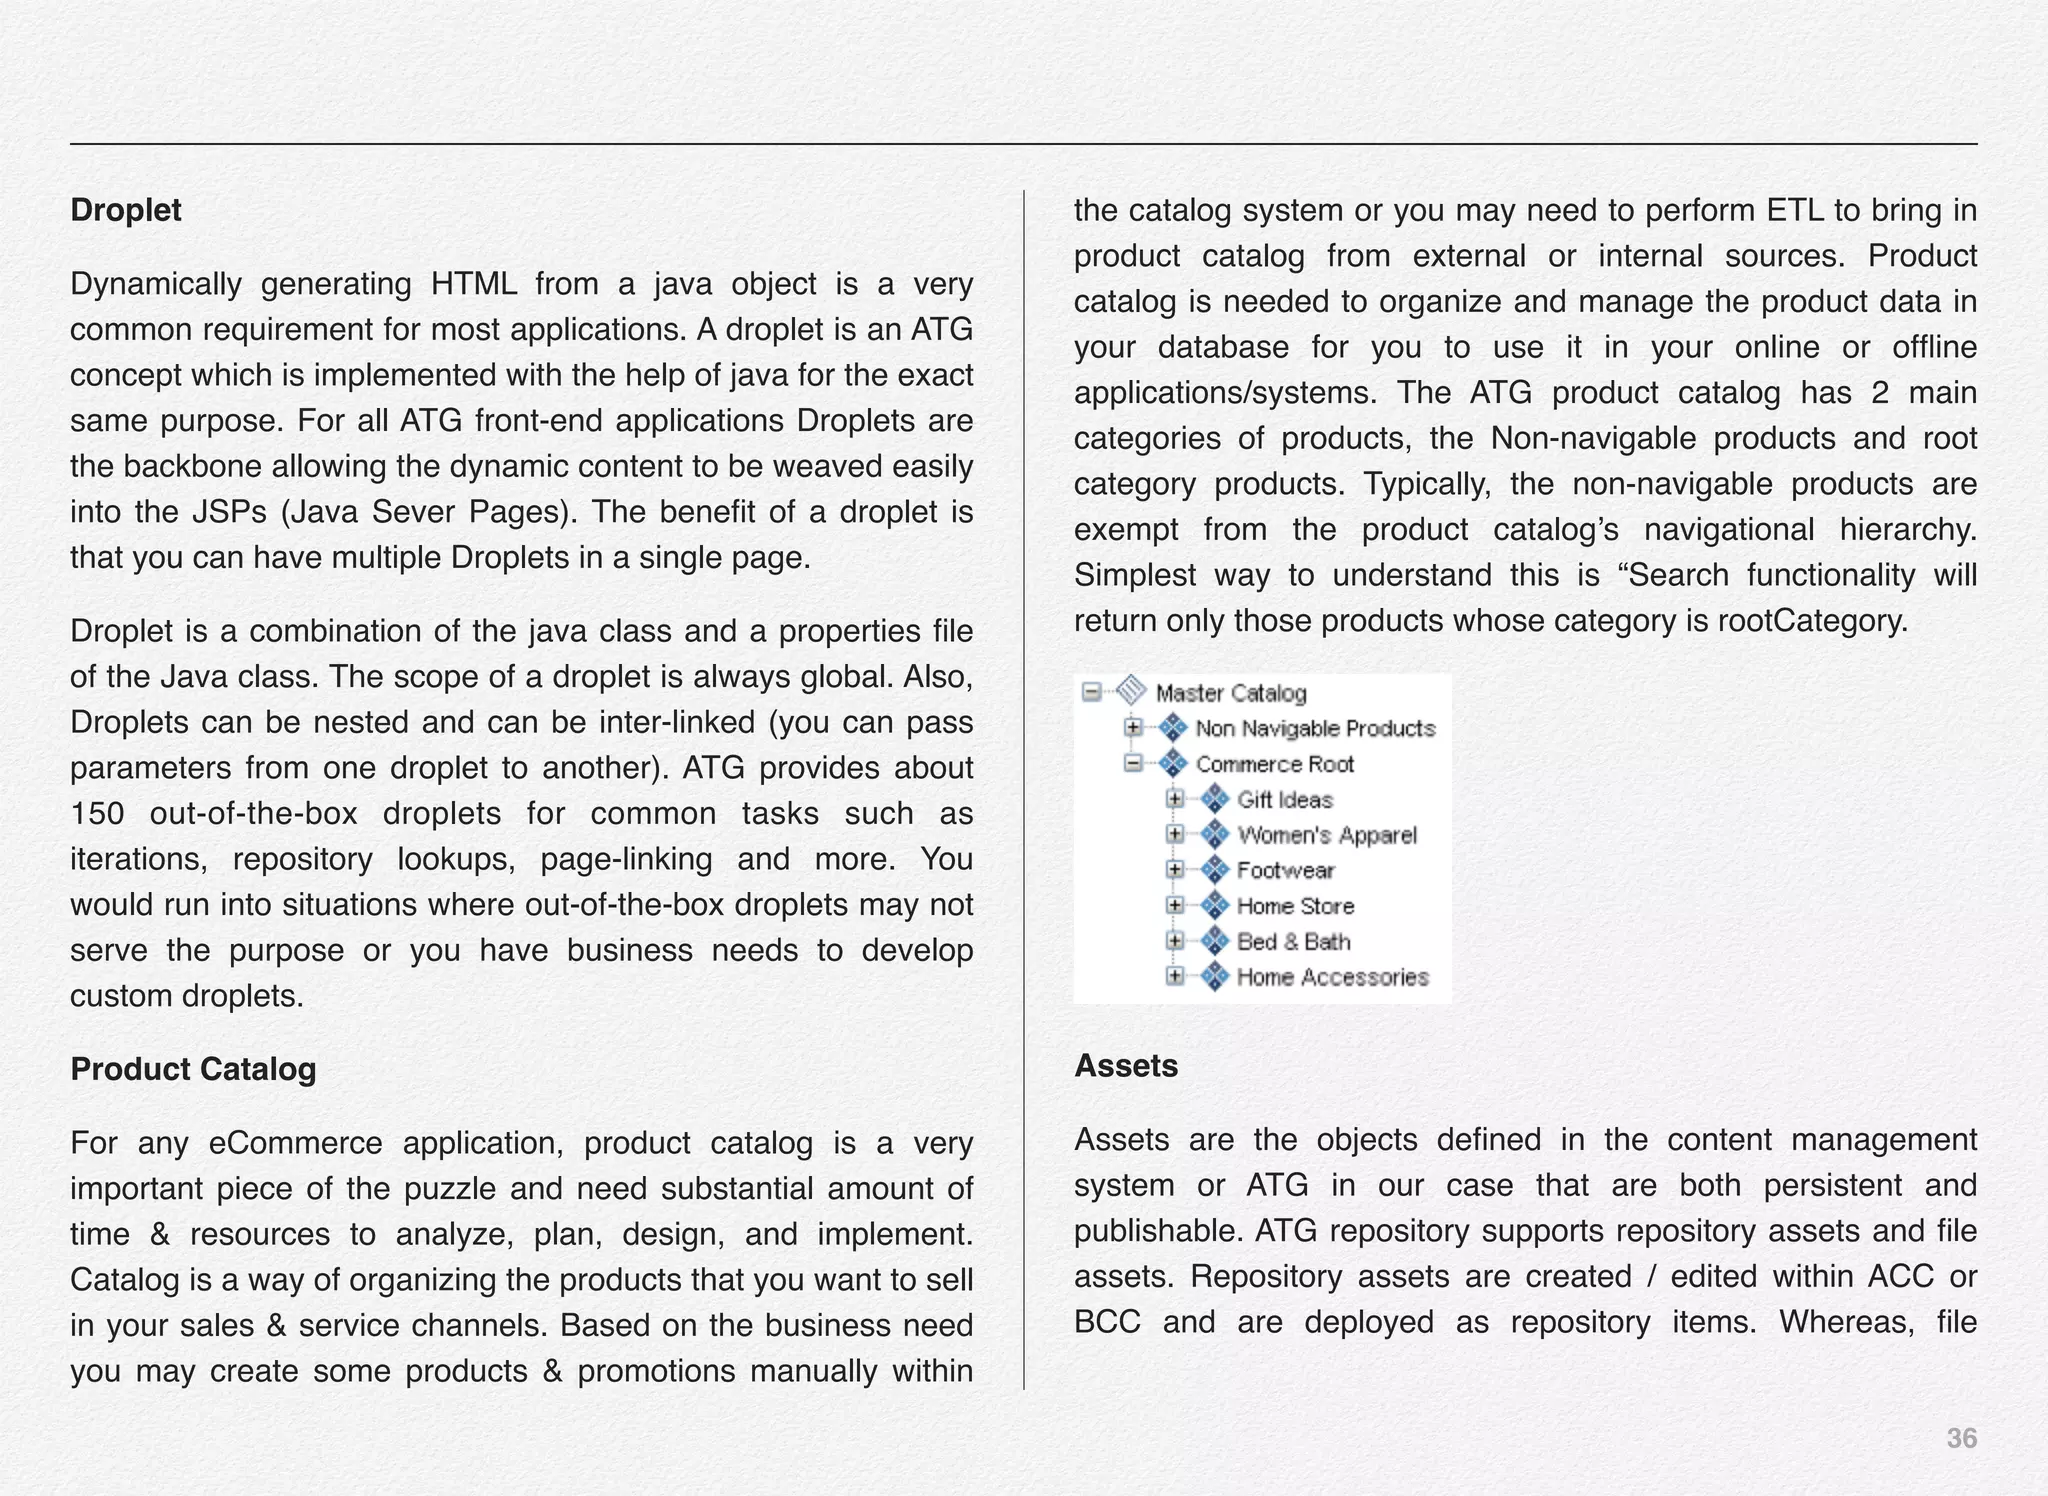
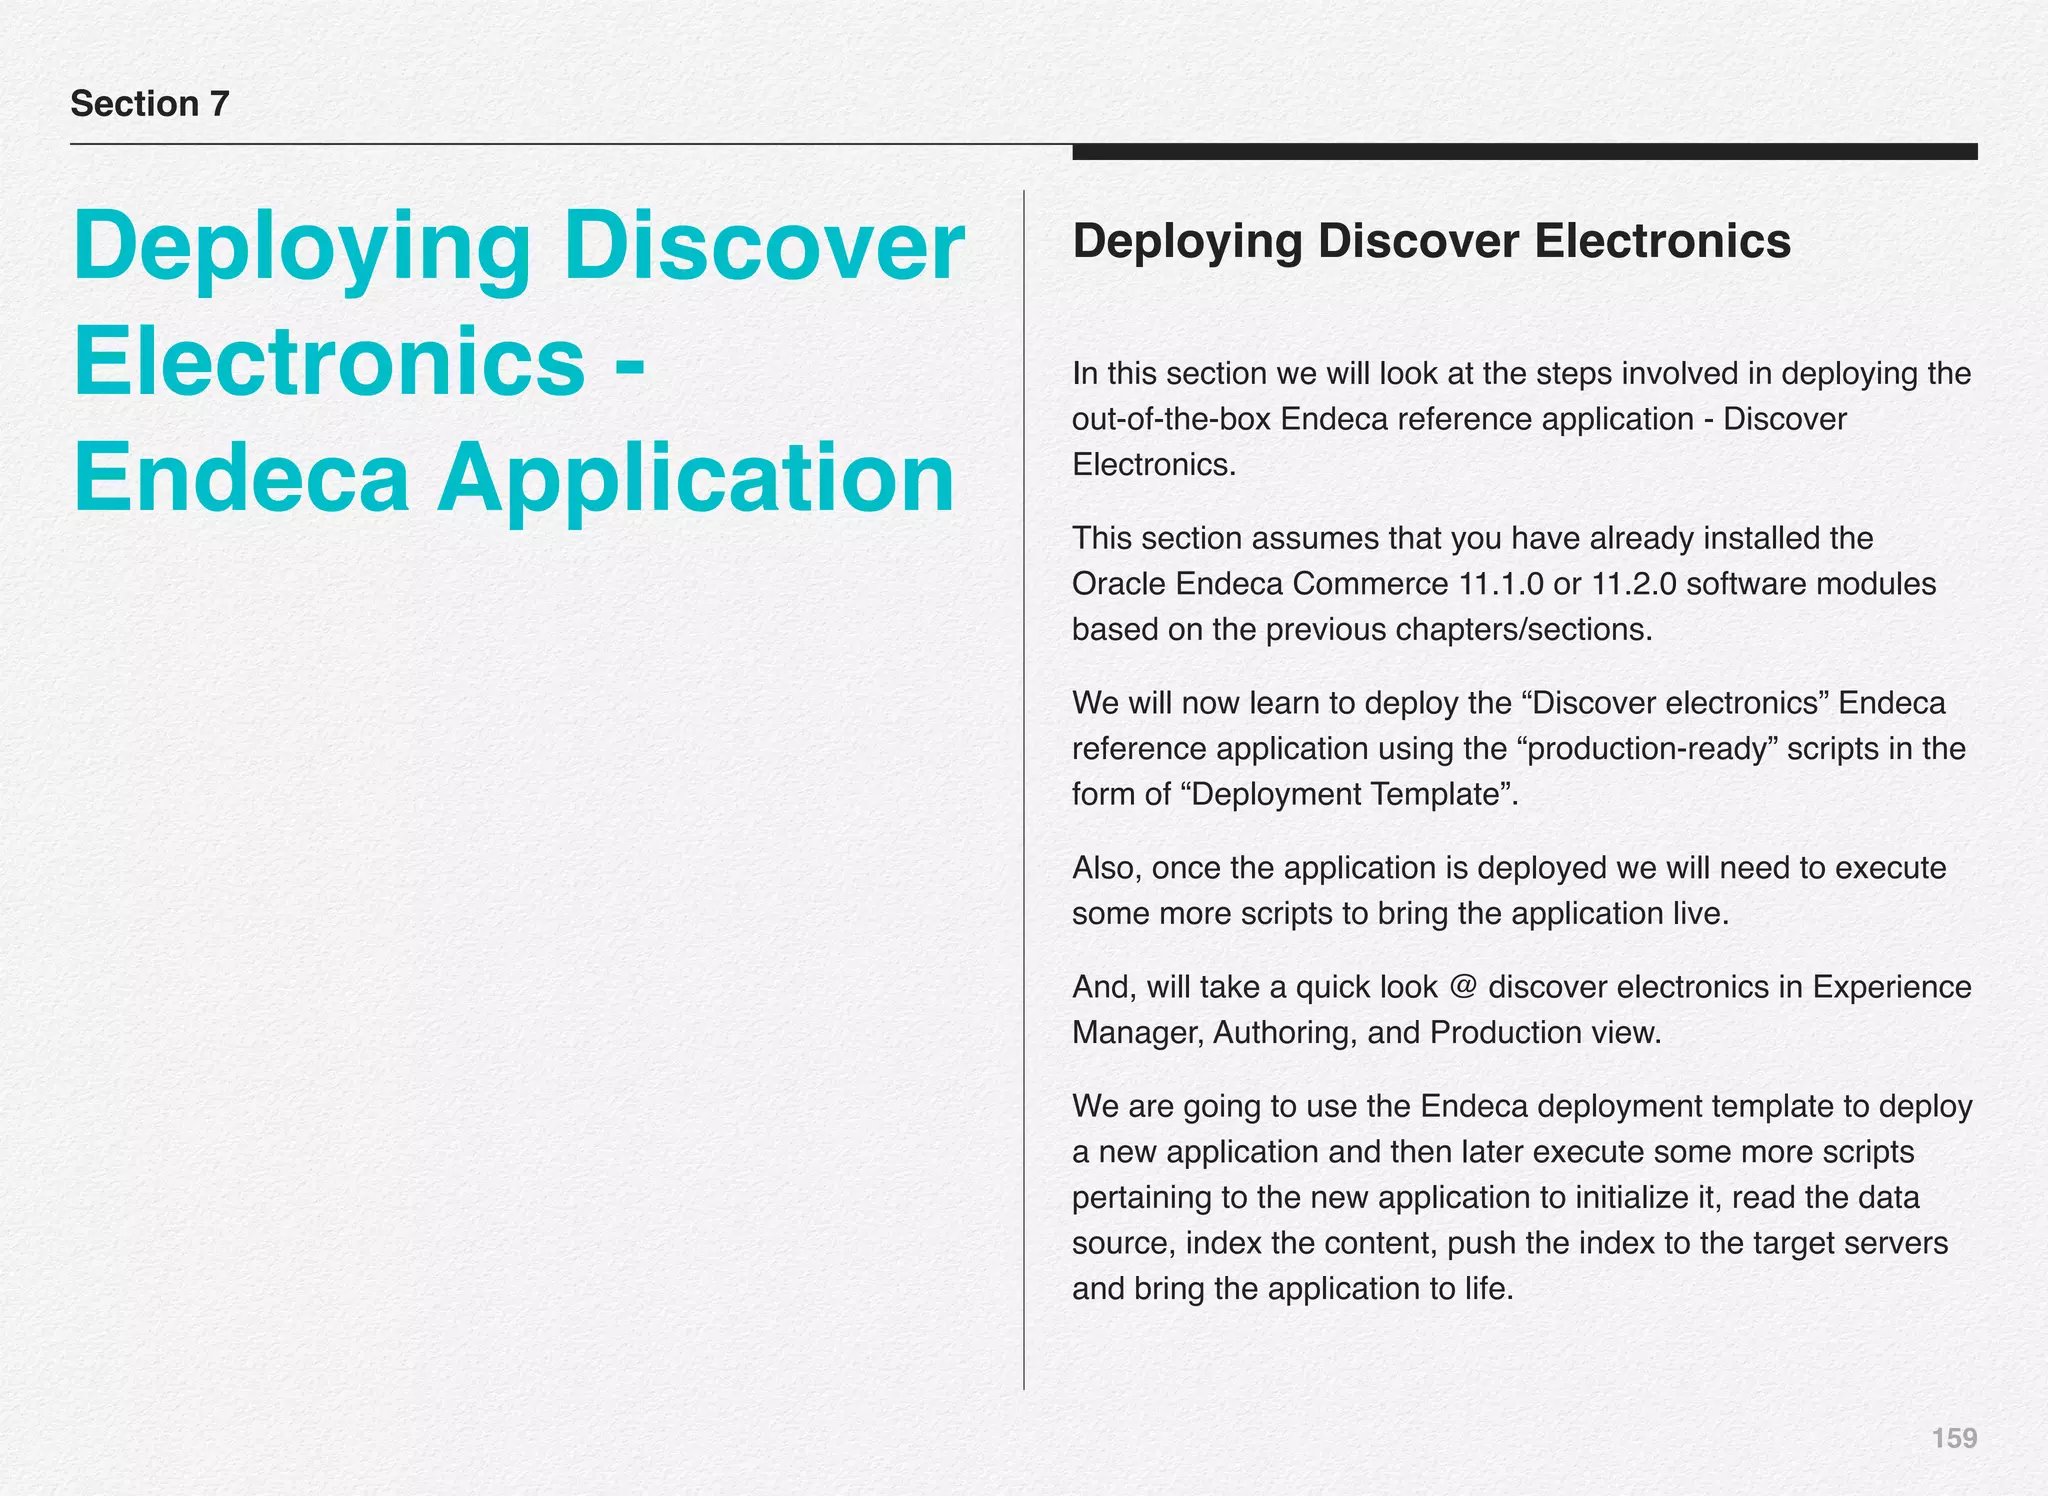
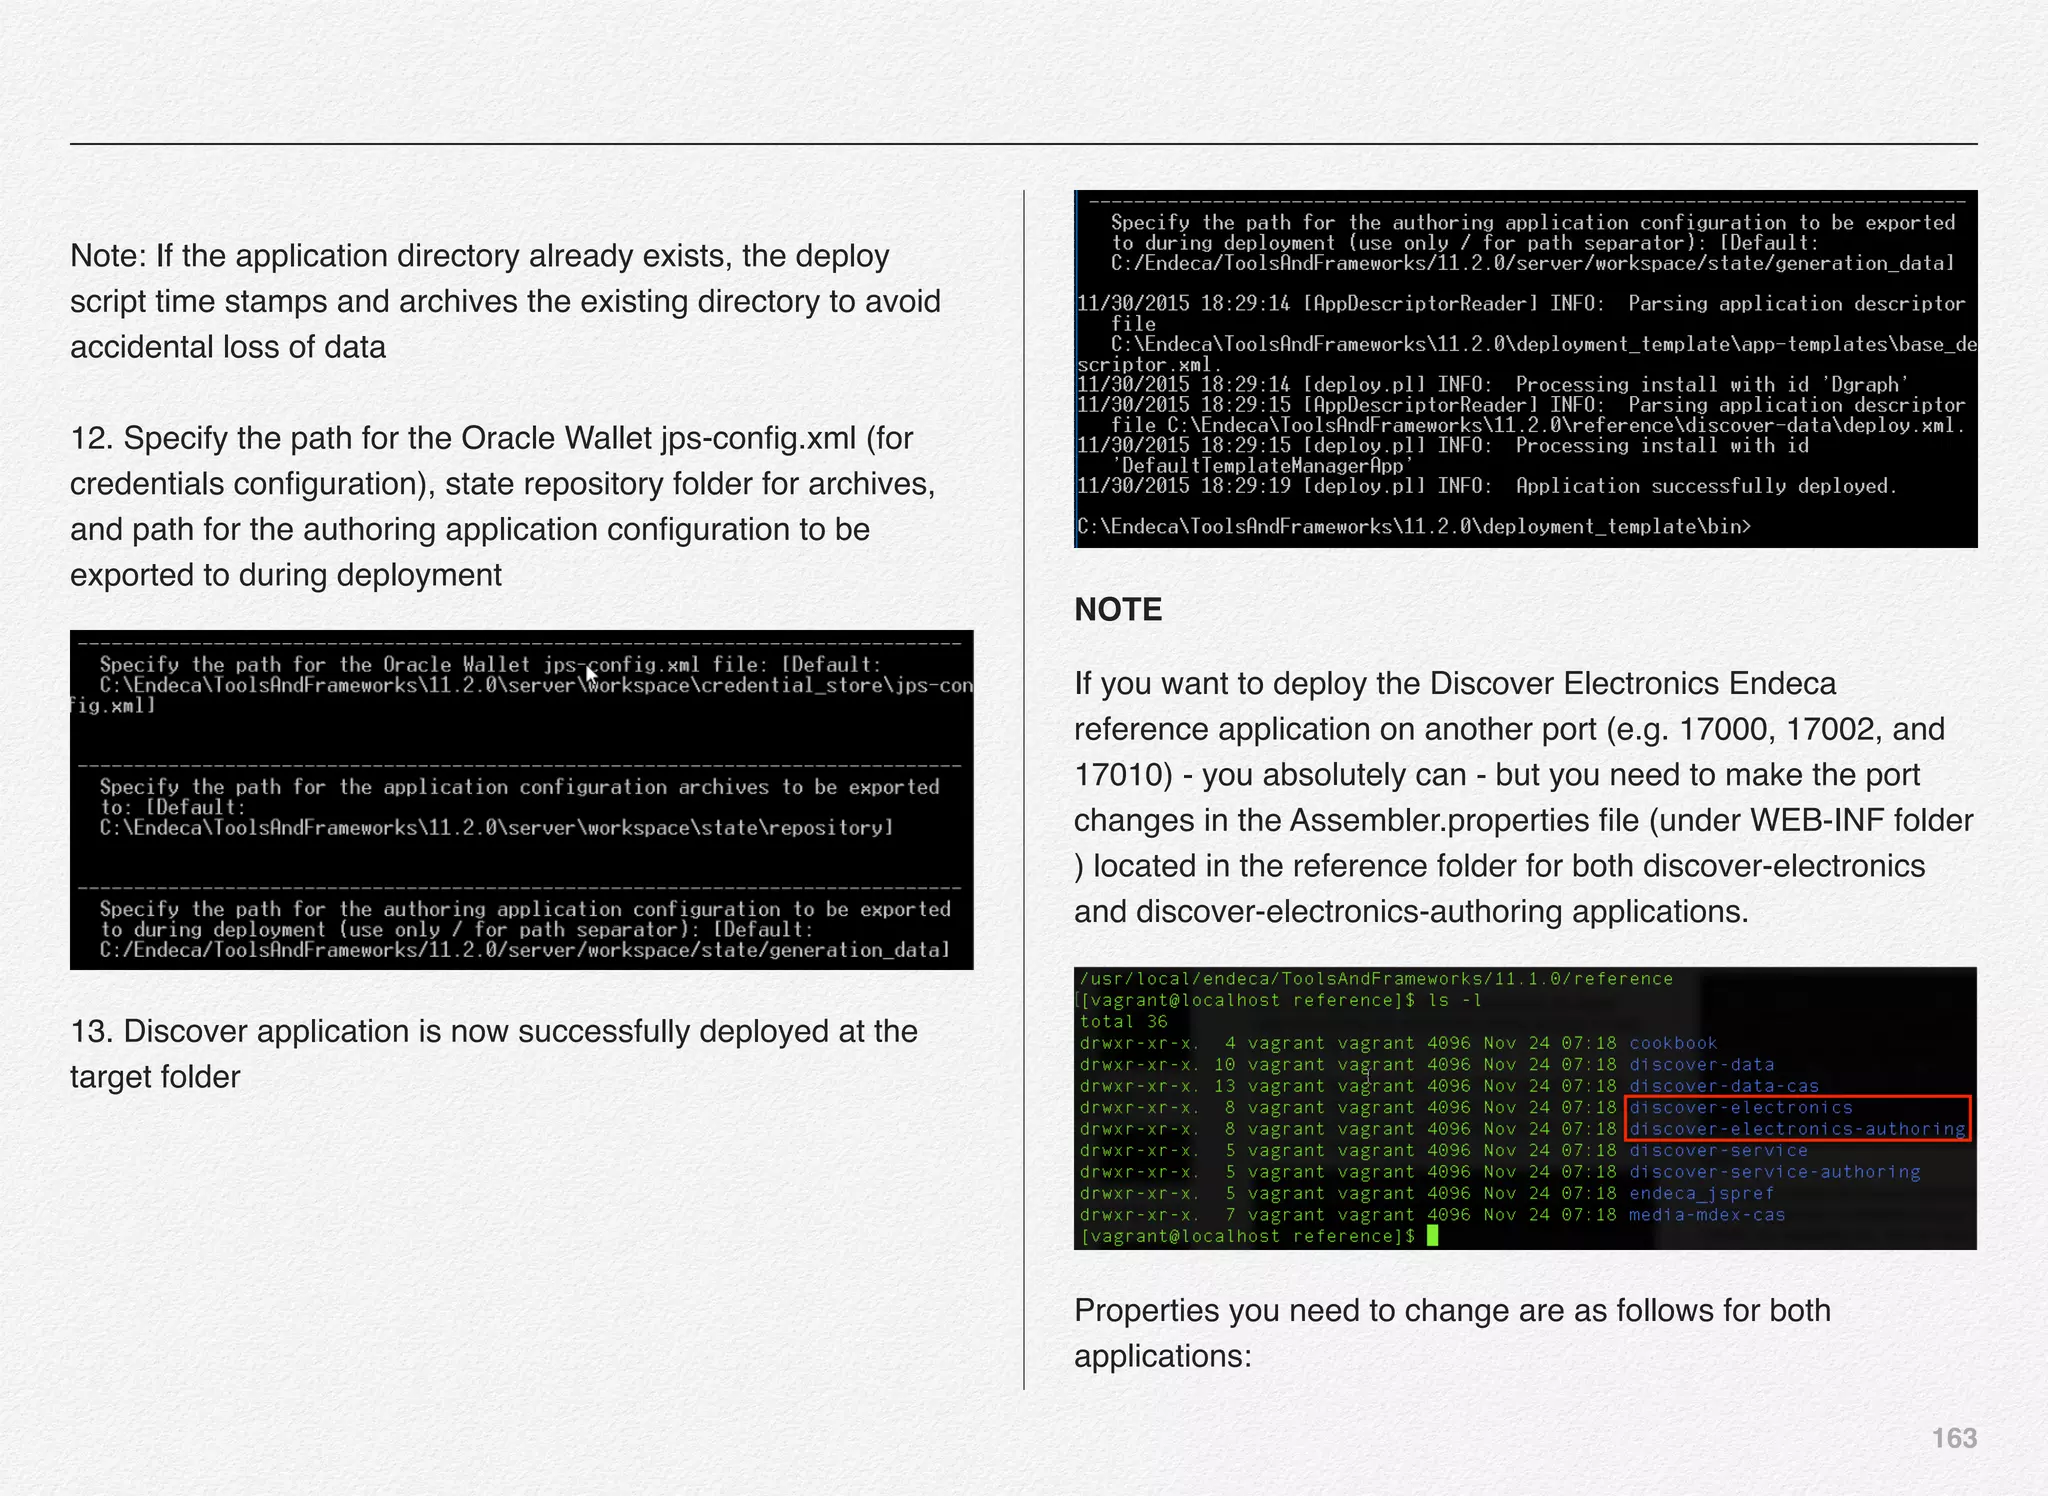
Initialize_services Response
C:EndecaappsDiscovercontrol>initialize_services.bat
C:EndecaappsDiscovercontrol>initialize_services.bat
Setting EAC provisioning and performing initial setup...
[11.30.15 18:36:09] INFO: Checking definition from
AppConfig.xml against existin
g EAC provisioning.
[11.30.15 18:36:09] INFO: Setting definition for application
'Discover'.
[11.30.15 18:36:11] INFO: Setting definition for host
'AuthoringMDEXHost'.
[11.30.15 18:36:12] INFO: Setting definition for host
'LiveMDEXHostA'.
[11.30.15 18:36:12] INFO: Setting definition for host
'ReportGenerationHost'.
[11.30.15 18:36:12] INFO: Setting definition for host
'WorkbenchHost'.
[11.30.15 18:36:12] INFO: Setting definition for host 'ITLHost'.
[11.30.15 18:36:12] INFO: Setting definition for component
'AuthoringDgraph'.
[11.30.15 18:36:13] INFO: [AuthoringMDEXHost] Starting shell
utility 'mkpath_-data-dgidx-output'.
[11.30.15 18:36:14] INFO: [AuthoringMDEXHost] Starting shell
utility 'mkpath_-data-partials-forge-output'.
[11.30.15 18:36:16] INFO: [AuthoringMDEXHost] Starting shell
utility 'mkpath_-data-partials-cumulative-partials'.
[11.30.15 18:36:17] INFO: [AuthoringMDEXHost] Starting shell
utility 'mkpath_-data-workbench-dgraph-config'.
[11.30.15 18:36:18] INFO: [AuthoringMDEXHost] Starting shell
utility 'mkpath_-data-dgraphs-local-dgraph-input'.
[11.30.15 18:36:19] INFO: [AuthoringMDEXHost] Starting shell
utility 'mkpath_-data-dgraphs-local-cumulative-partials'.
[11.30.15 18:36:20] INFO: [AuthoringMDEXHost] Starting shell
utility 'mkpath_-data-dgraphs-local-dgraph-config'.
[11.30.15 18:36:22] INFO: Setting definition for component
'DgraphA1'.
[11.30.15 18:36:22] INFO: Setting definition for script
'PromoteAuthoringToLive'.](https://image.slidesharecdn.com/oraclecommerce-doityourselfseries-160129151710/75/Oracle-Commerce-Using-ATG-Endeca-Do-It-Yourself-Series-167-2048.jpg)
![167
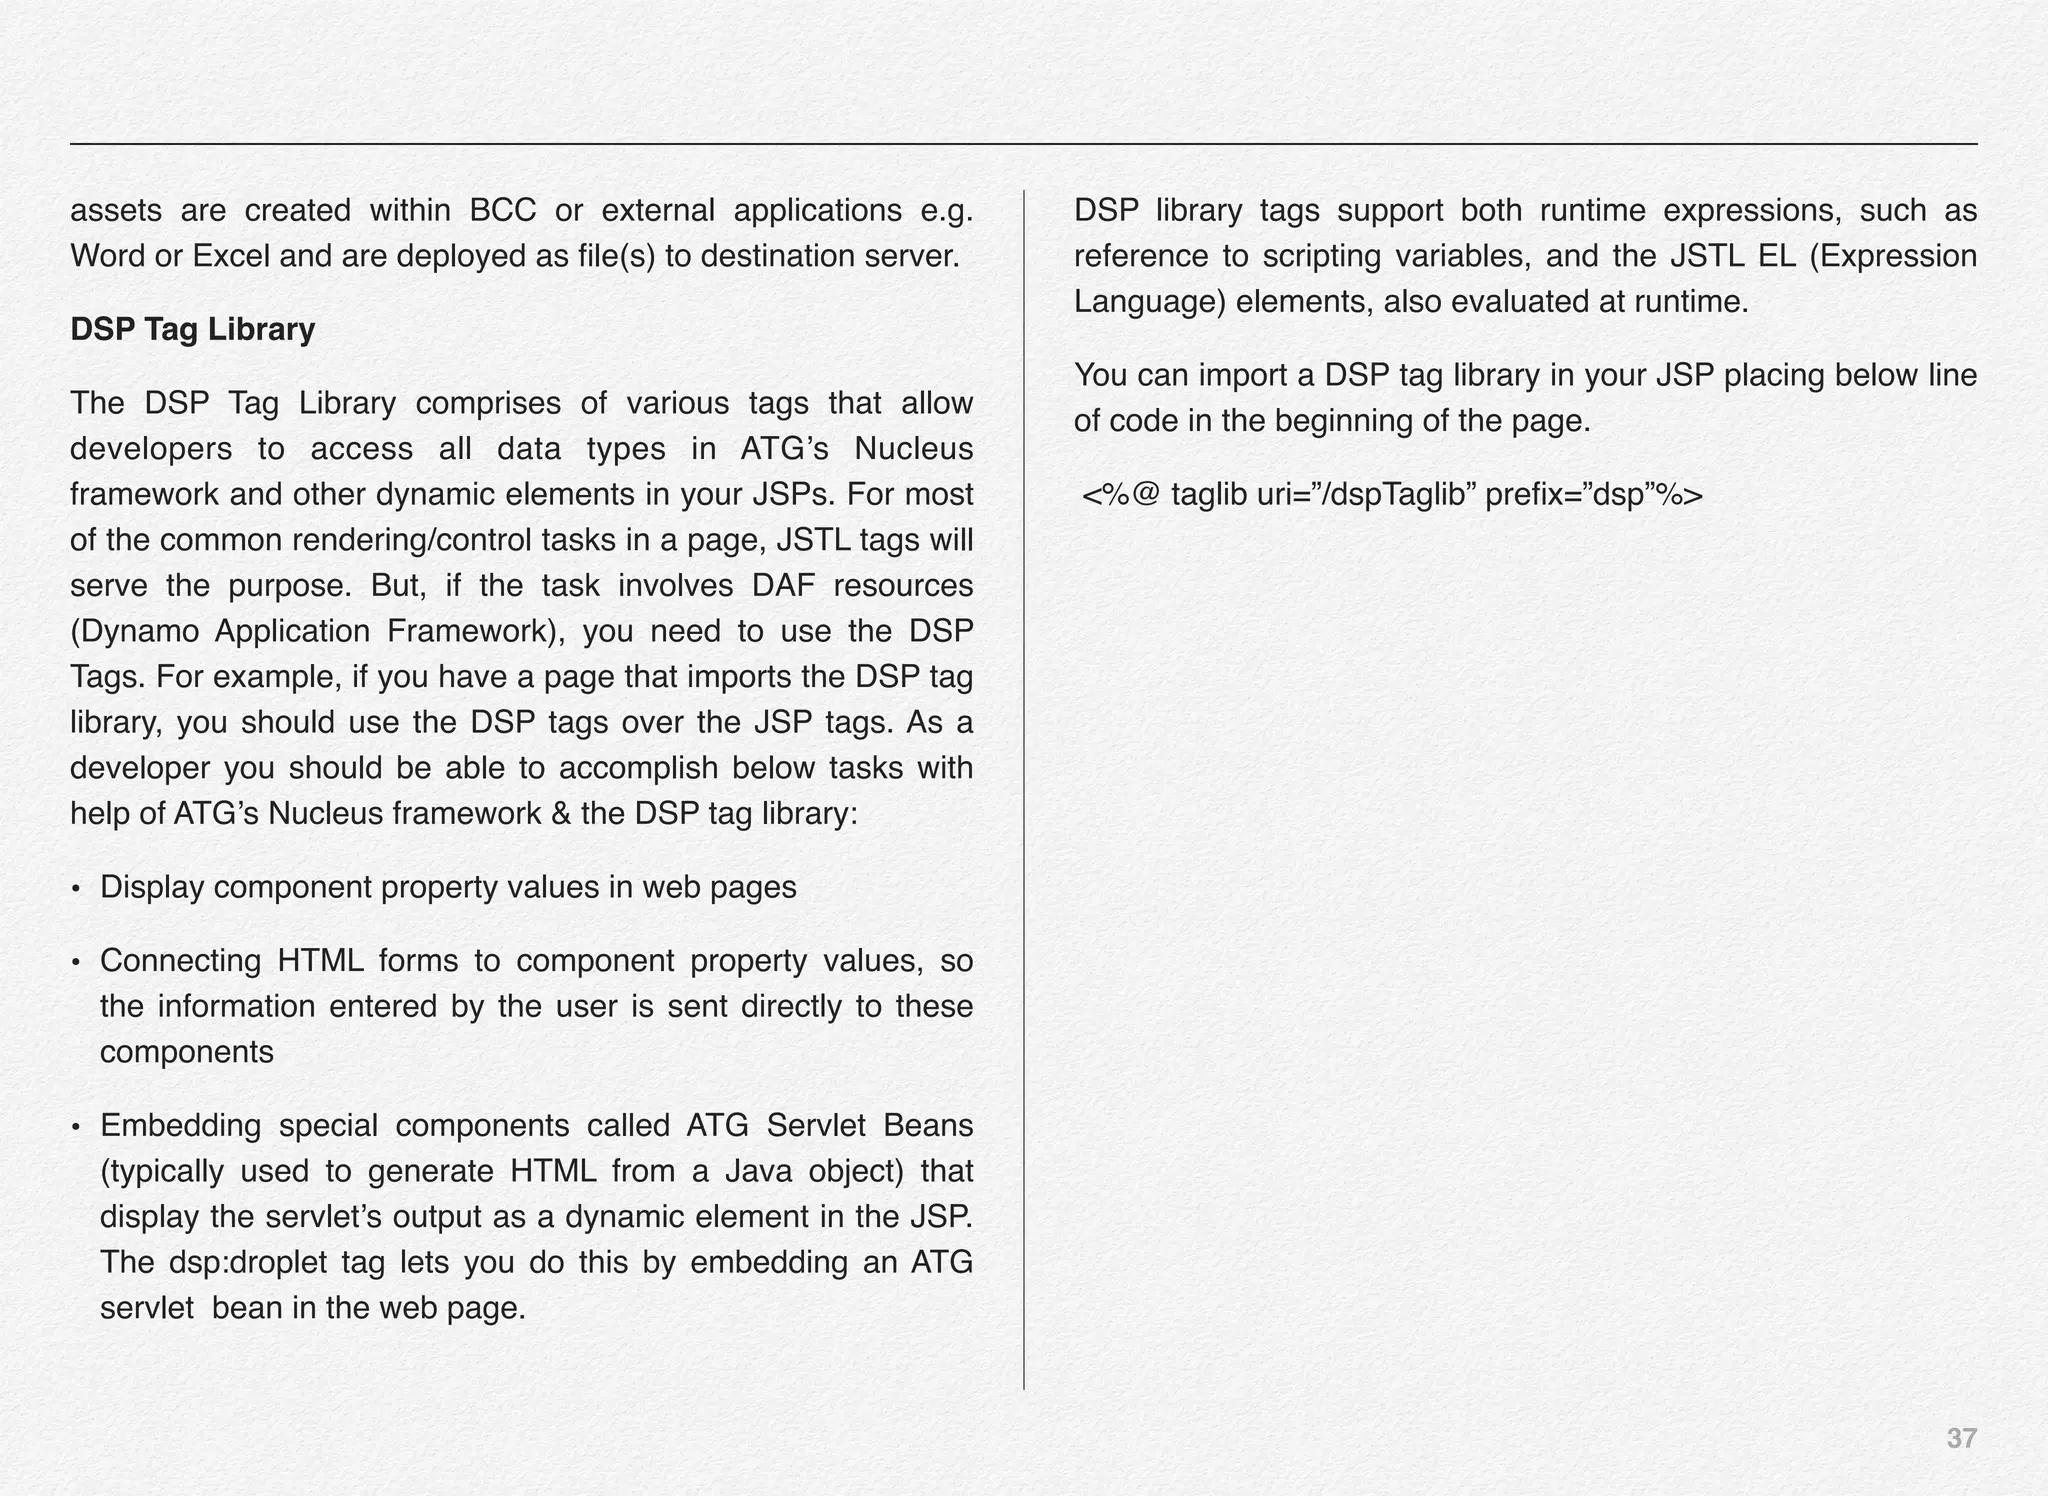
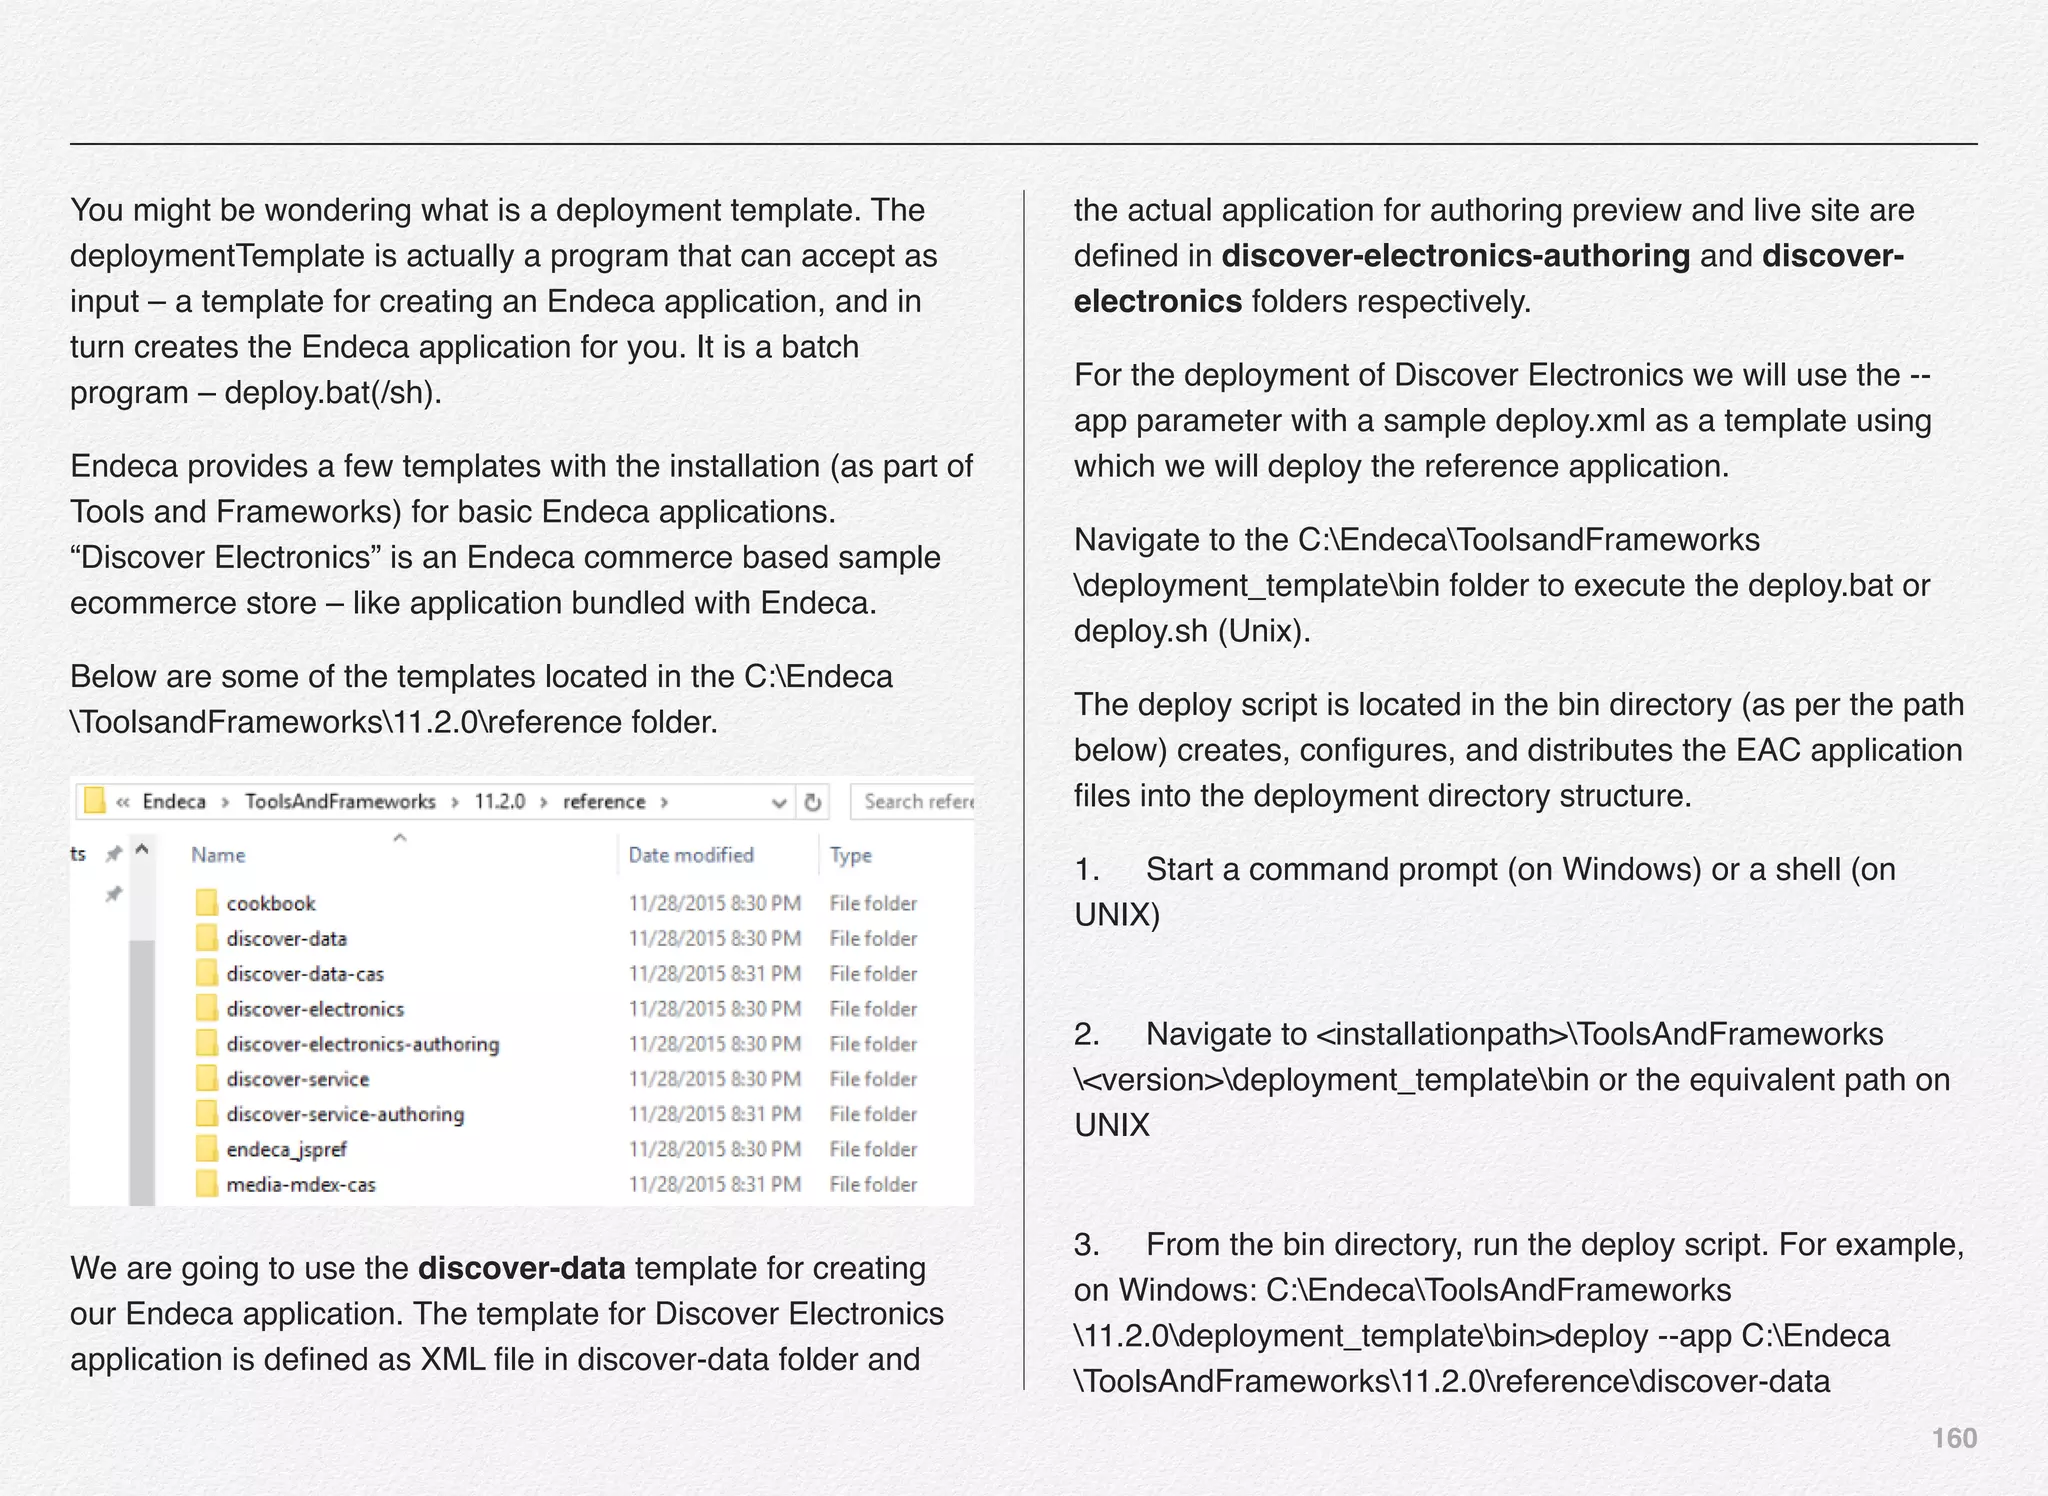
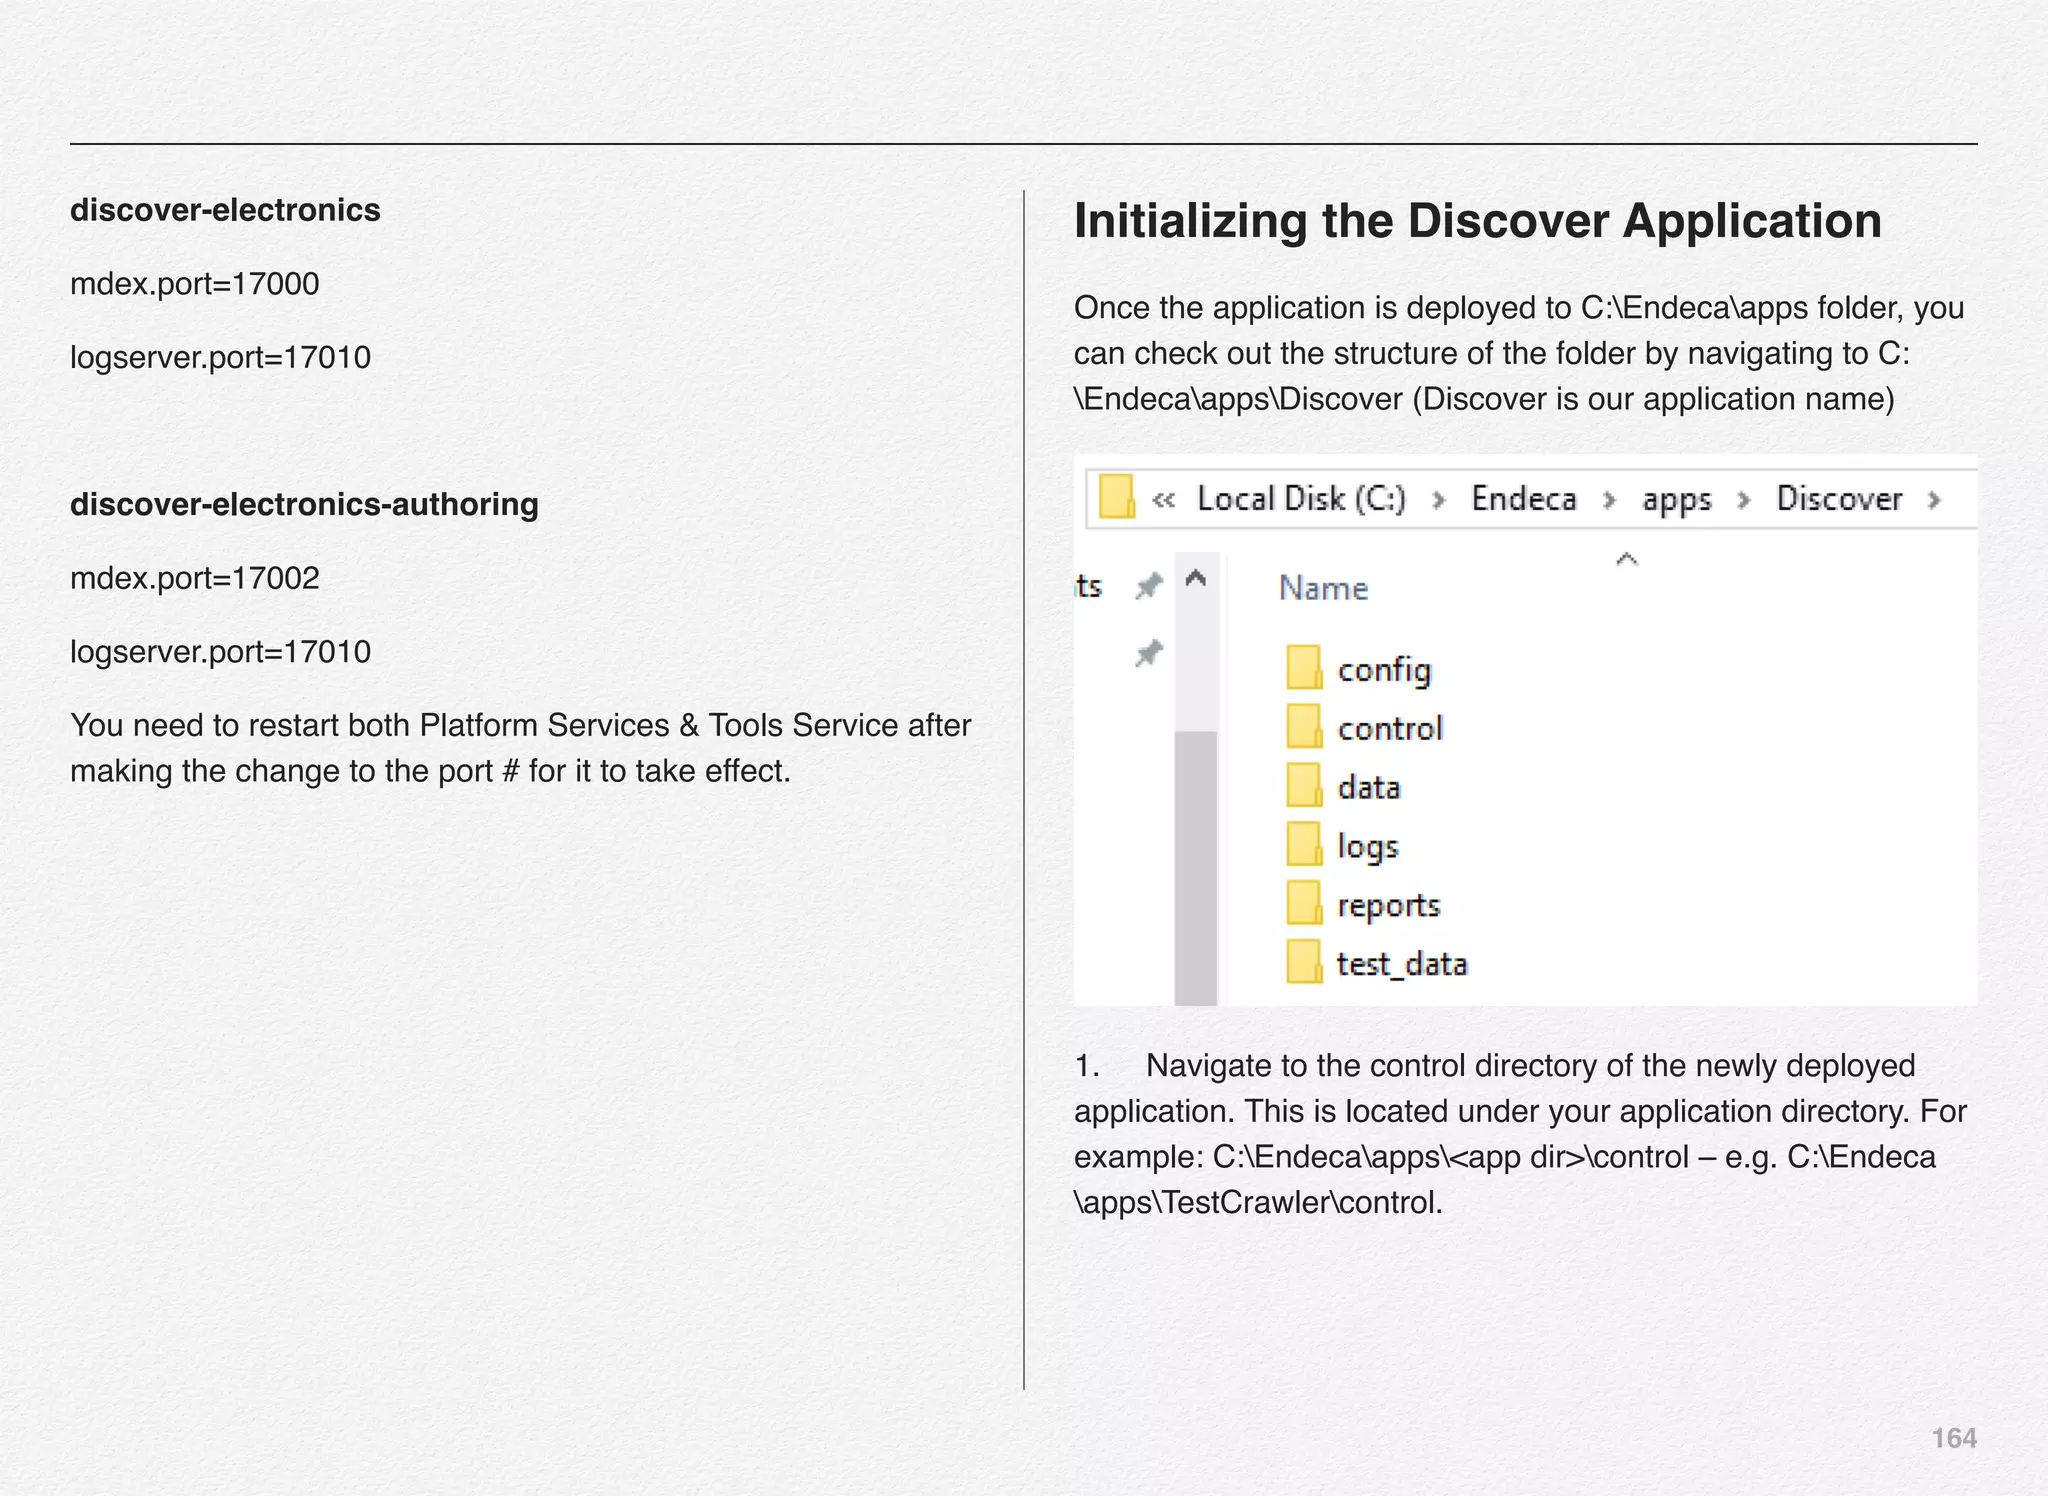
[11.30.15 18:36:22] INFO: Setting definition for custom
component 'IFCR'.
[11.30.15 18:36:22] INFO: Updating provisioning for host
'ITLHost'.
[11.30.15 18:36:22] INFO: Updating definition for host 'ITLHost'.
[11.30.15 18:36:22] INFO: [ITLHost] Starting shell utility
'mkpath_-'.
[11.30.15 18:36:24] INFO: Setting definition for component
'LogServer'.
[11.30.15 18:36:24] INFO: [ReportGenerationHost] Starting
shell utility 'mkpath_-reports-input'.
[11.30.15 18:36:25] INFO: Setting definition for script
'DaySoFarReports'.
[11.30.15 18:36:25] INFO: Setting definition for script
'DailyReports'.
[11.30.15 18:36:25] INFO: Setting definition for script
'WeeklyReports'.
[11.30.15 18:36:25] INFO: Setting definition for script
'DaySoFarHtmlReports'.
[11.30.15 18:36:25] INFO: Setting definition for script
'DailyHtmlReports'.
[11.30.15 18:36:25] INFO: Setting definition for script
'WeeklyHtmlReports'.
[11.30.15 18:36:26] INFO: Setting definition for component
'WeeklyReportGenerator'.
[11.30.15 18:36:26] INFO: Setting definition for component
'DailyReportGenerator'.
[11.30.15 18:36:26] INFO: Setting definition for component
'DaySoFarReportGenerator'.
[11.30.15 18:36:26] INFO: Setting definition for component
'WeeklyHtmlReportGenerator'.
[11.30.15 18:36:26] INFO: Setting definition for component
'DailyHtmlReportGenerator'.
[11.30.15 18:36:27] INFO: Setting definition for component
'DaySoFarHtmlReportGenerator'.
[11.30.15 18:36:27] INFO: Setting definition for script
'BaselineUpdate'.
[11.30.15 18:36:27] INFO: Setting definition for script
'PartialUpdate'.](https://image.slidesharecdn.com/oraclecommerce-doityourselfseries-160129151710/75/Oracle-Commerce-Using-ATG-Endeca-Do-It-Yourself-Series-168-2048.jpg)
![168
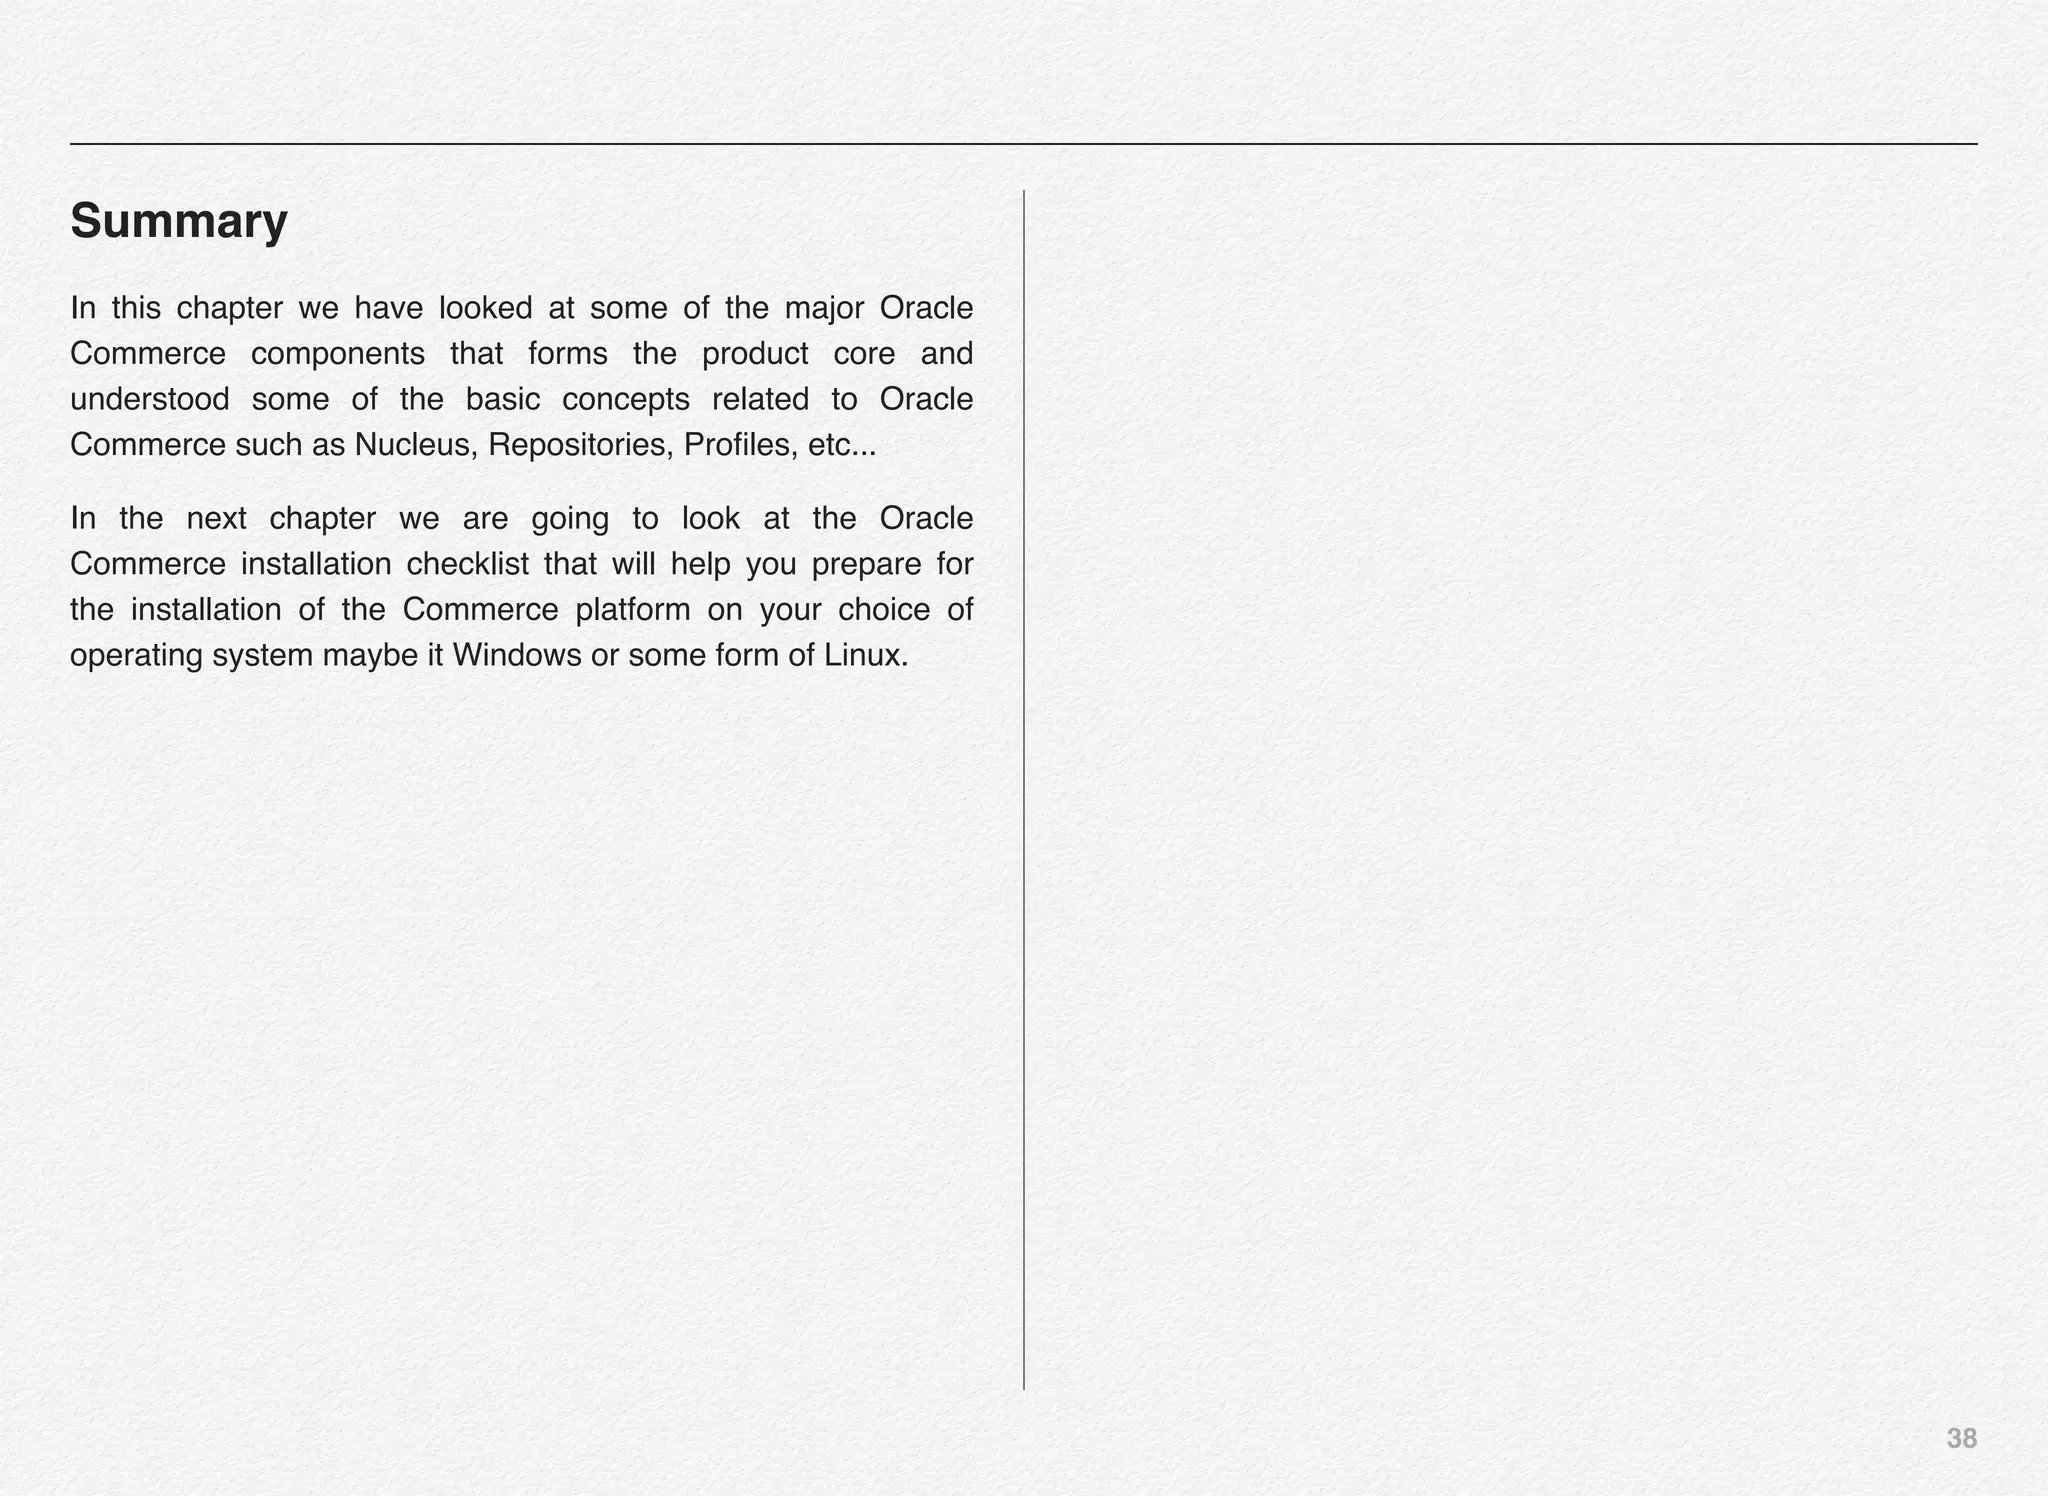
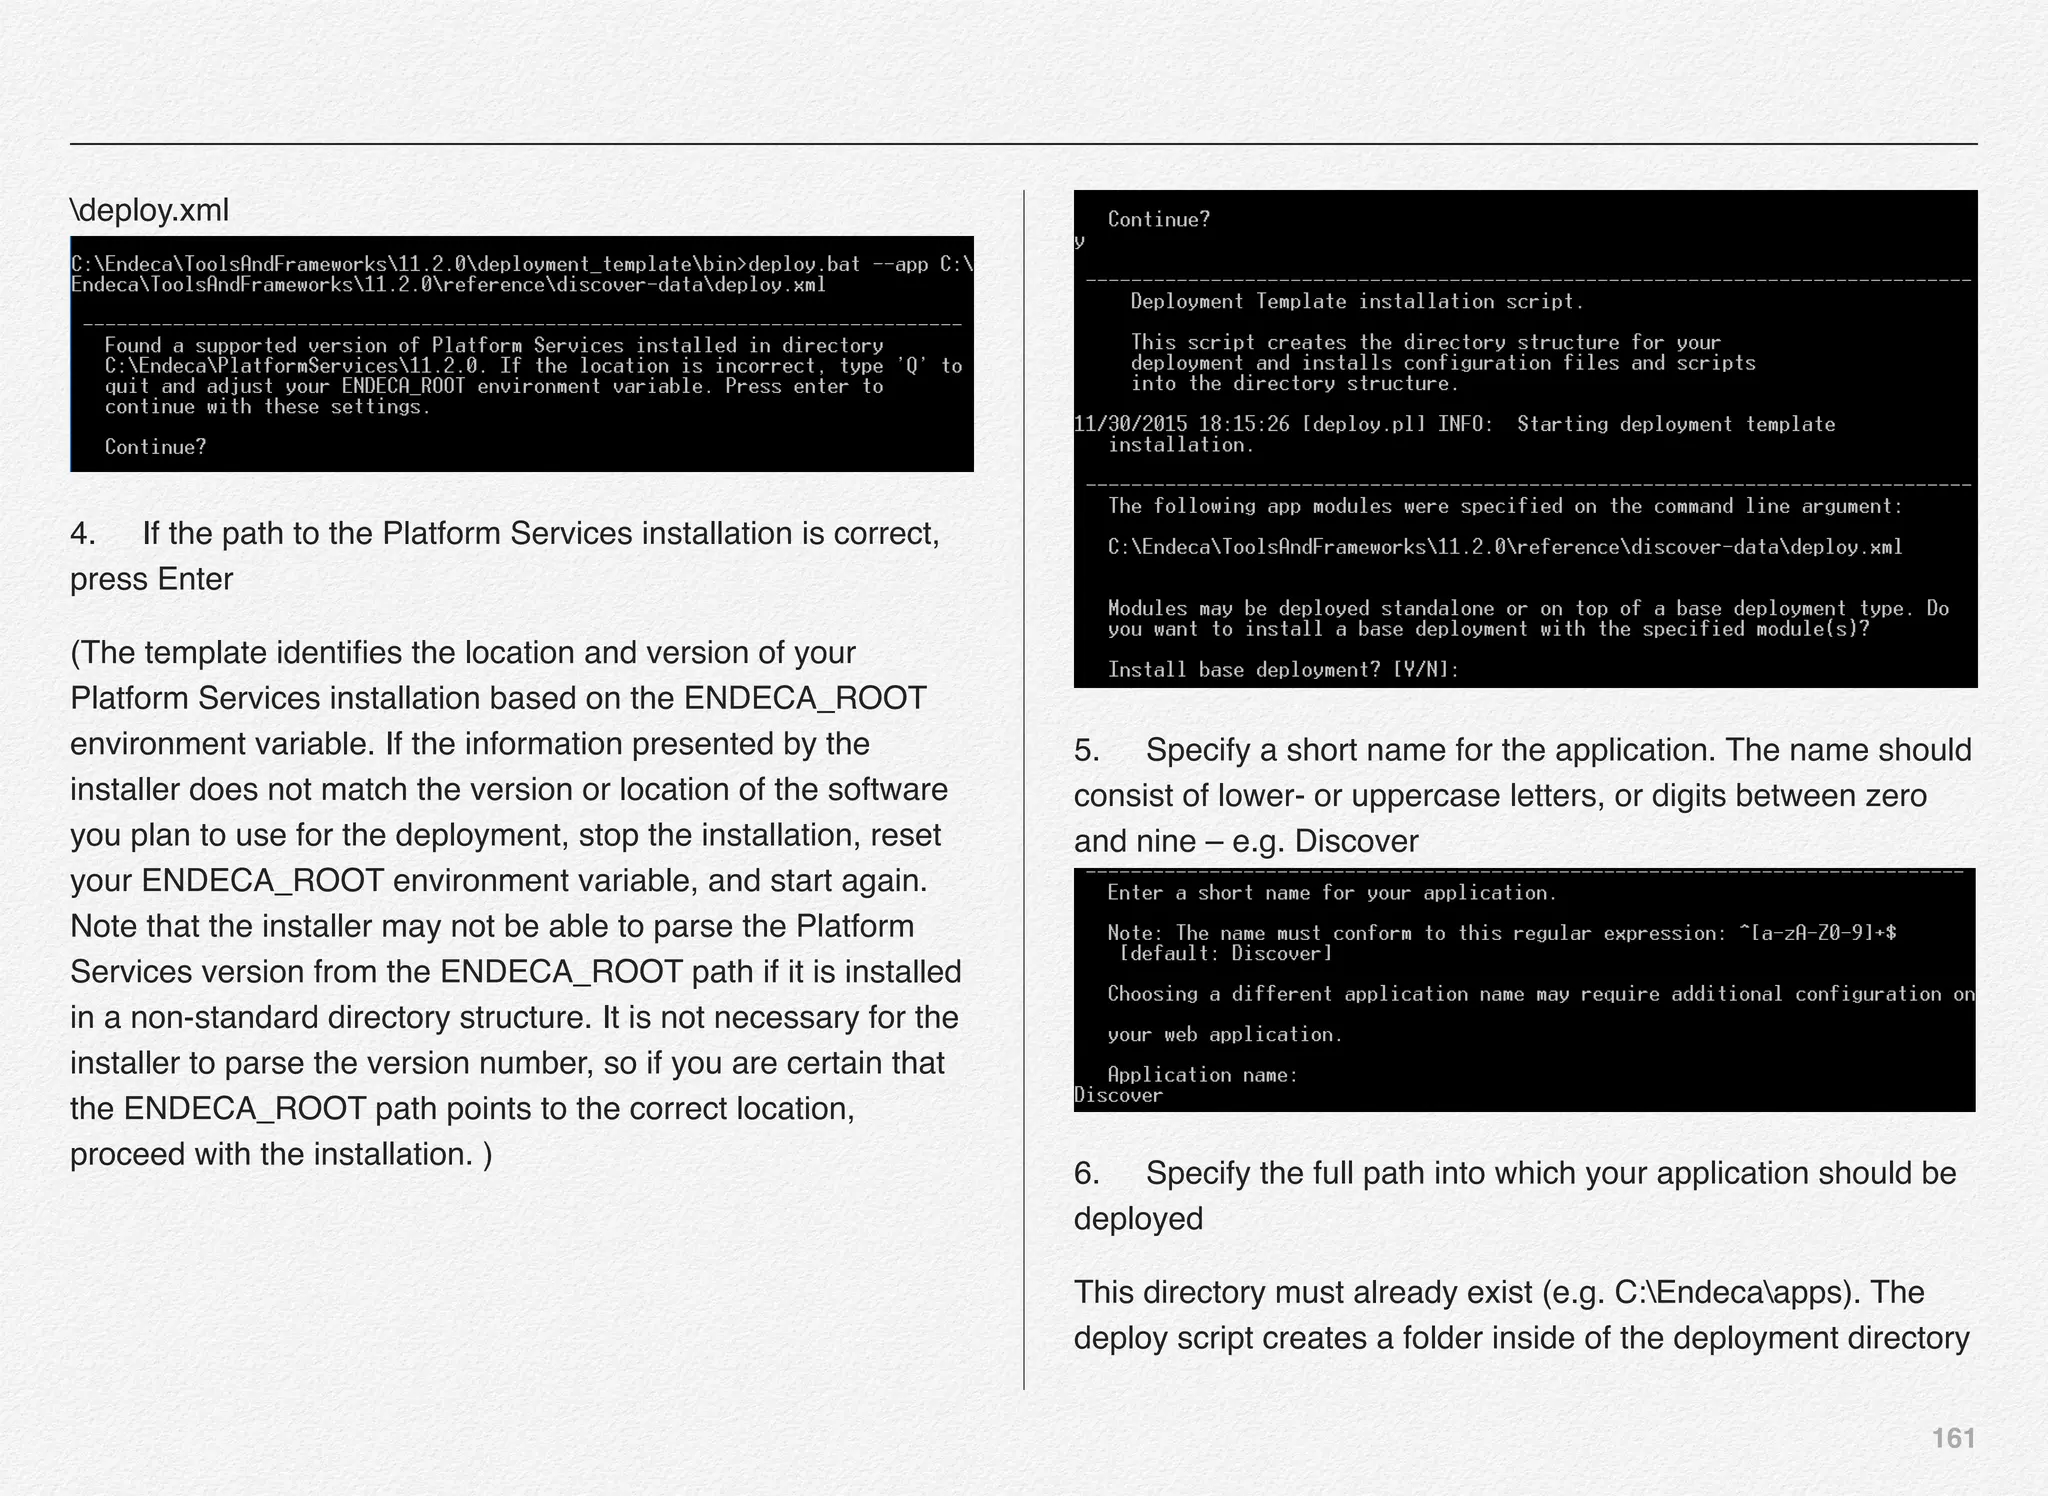
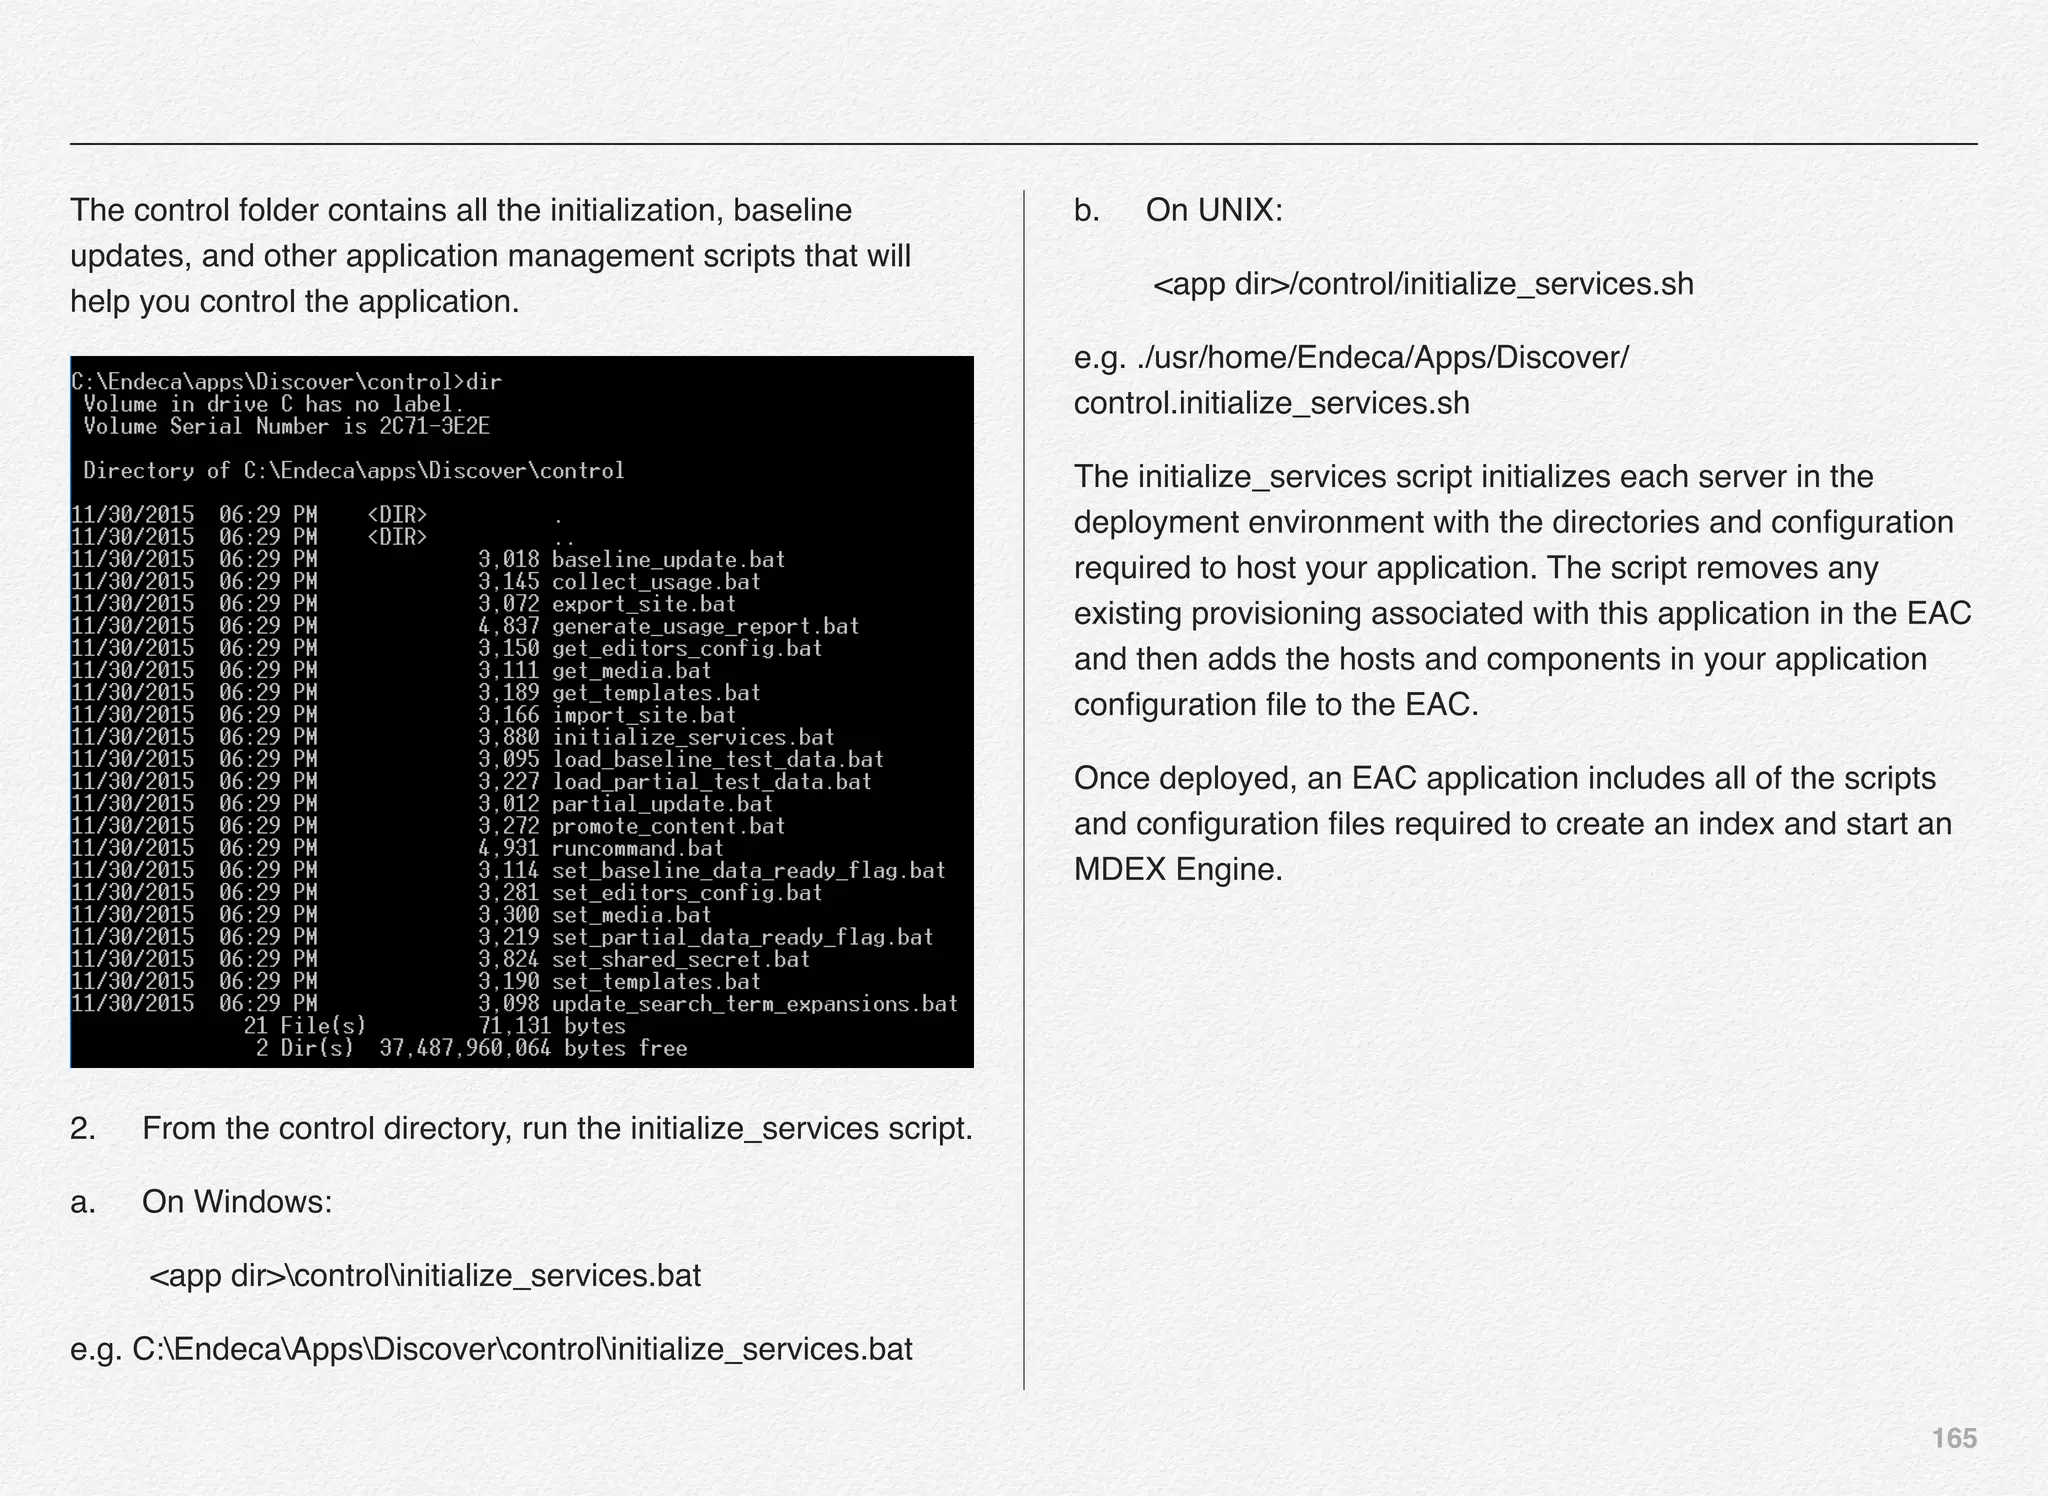
[11.30.15 18:36:27] INFO: Setting definition for component
'Forge'.
[11.30.15 18:36:27] INFO: [ITLHost] Starting shell utility
'mkpath_-data-incoming'.
[11.30.15 18:36:28] INFO: [ITLHost] Starting shell utility
'mkpath_-data-workbench-temp'.
[11.30.15 18:36:30] INFO: Setting definition for component
'PartialForge'.
[11.30.15 18:36:30] INFO: [ITLHost] Starting shell utility
'mkpath_-data-partials-incoming'.
[11.30.15 18:36:31] INFO: Setting definition for component
'Dgidx'.
[11.30.15 18:36:31] INFO: Definition updated.
[11.30.15 18:36:31] INFO: Provisioning site from prototype...
[11.30.15 18:36:34] INFO: Finished provisioning site from
prototype.
Finished updating EAC.
Importing content...
[11.30.15 18:36:40] INFO: Checking definition from
AppConfig.xml against existing EAC provisioning.
[11.30.15 18:36:41] INFO: Definition has not changed.
[11.30.15 18:36:42] INFO: Packaging contents for upload...
[11.30.15 18:36:43] INFO: Finished packaging contents.
[11.30.15 18:36:43] INFO: Uploading contents to: http://
DESKTOP-11BE6VH:8006/ifcr/sites/Discover
[11.30.15 18:36:56] INFO: Finished uploading contents.
[11.30.15 18:36:59] INFO: Checking definition from
AppConfig.xml against existing EAC provisioning.
[11.30.15 18:37:01] INFO: Definition has not changed.
[11.30.15 18:37:01] INFO: Packaging contents for upload...
[11.30.15 18:37:02] INFO: Finished packaging contents.
[11.30.15 18:37:02] INFO: Uploading contents to: http://
DESKTOP-11BE6VH:8006/ifcr/sites/Discover
[11.30.15 18:37:04] INFO: Finished uploading contents.
Finished importing content
C:EndecaappsDiscovercontrol>](https://image.slidesharecdn.com/oraclecommerce-doityourselfseries-160129151710/75/Oracle-Commerce-Using-ATG-Endeca-Do-It-Yourself-Series-169-2048.jpg)
![170
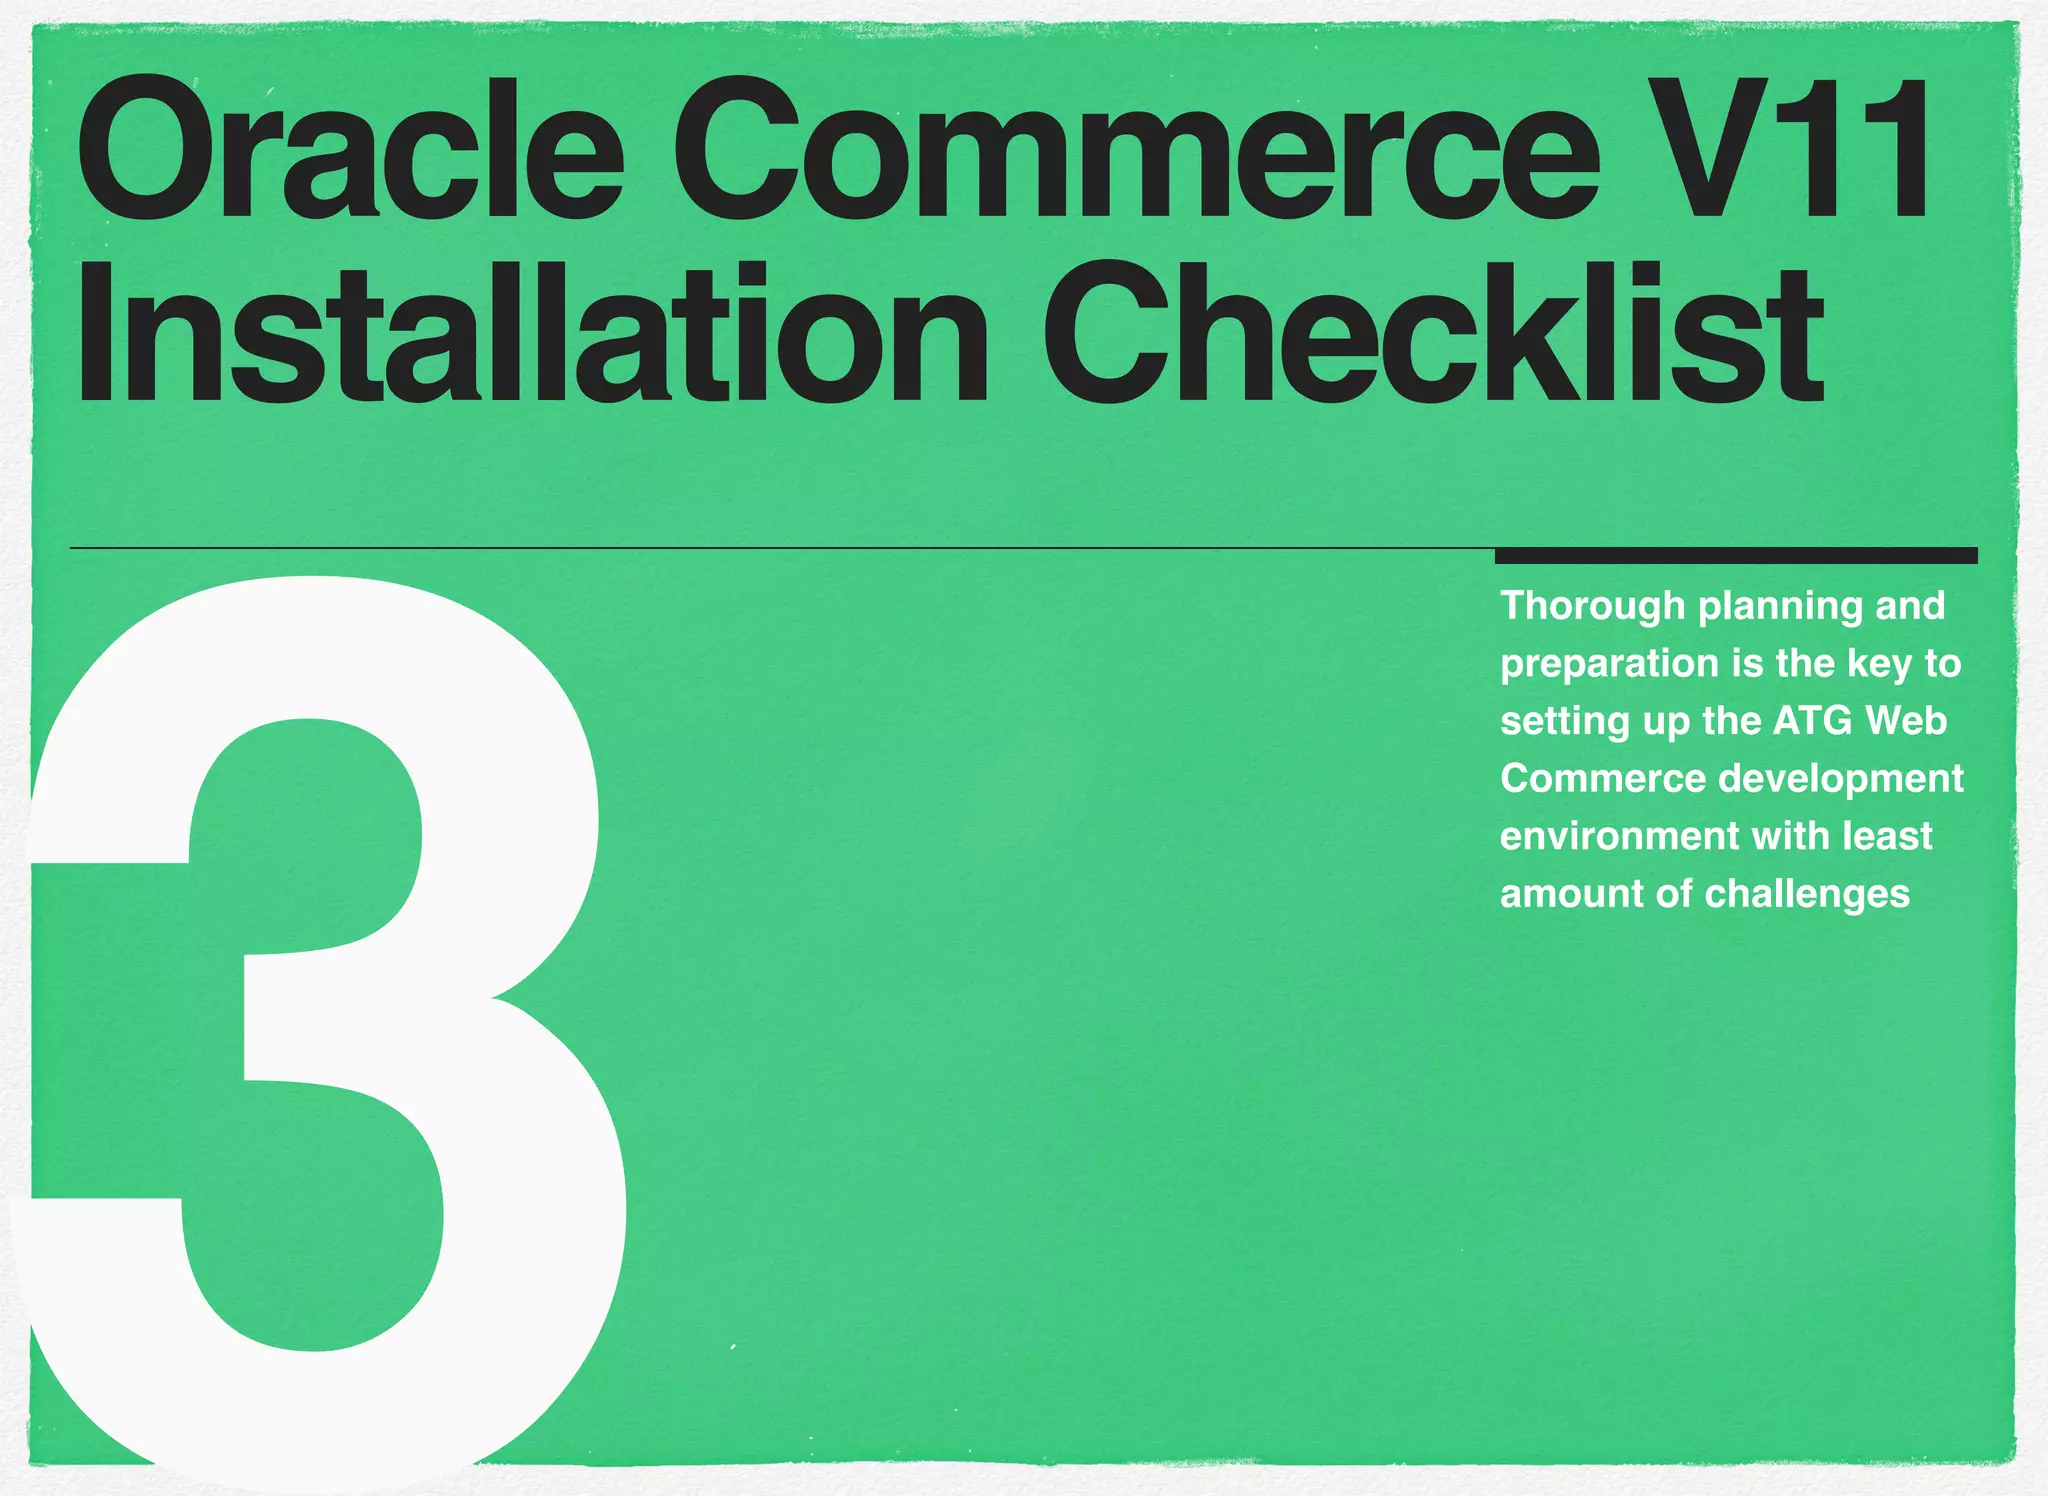
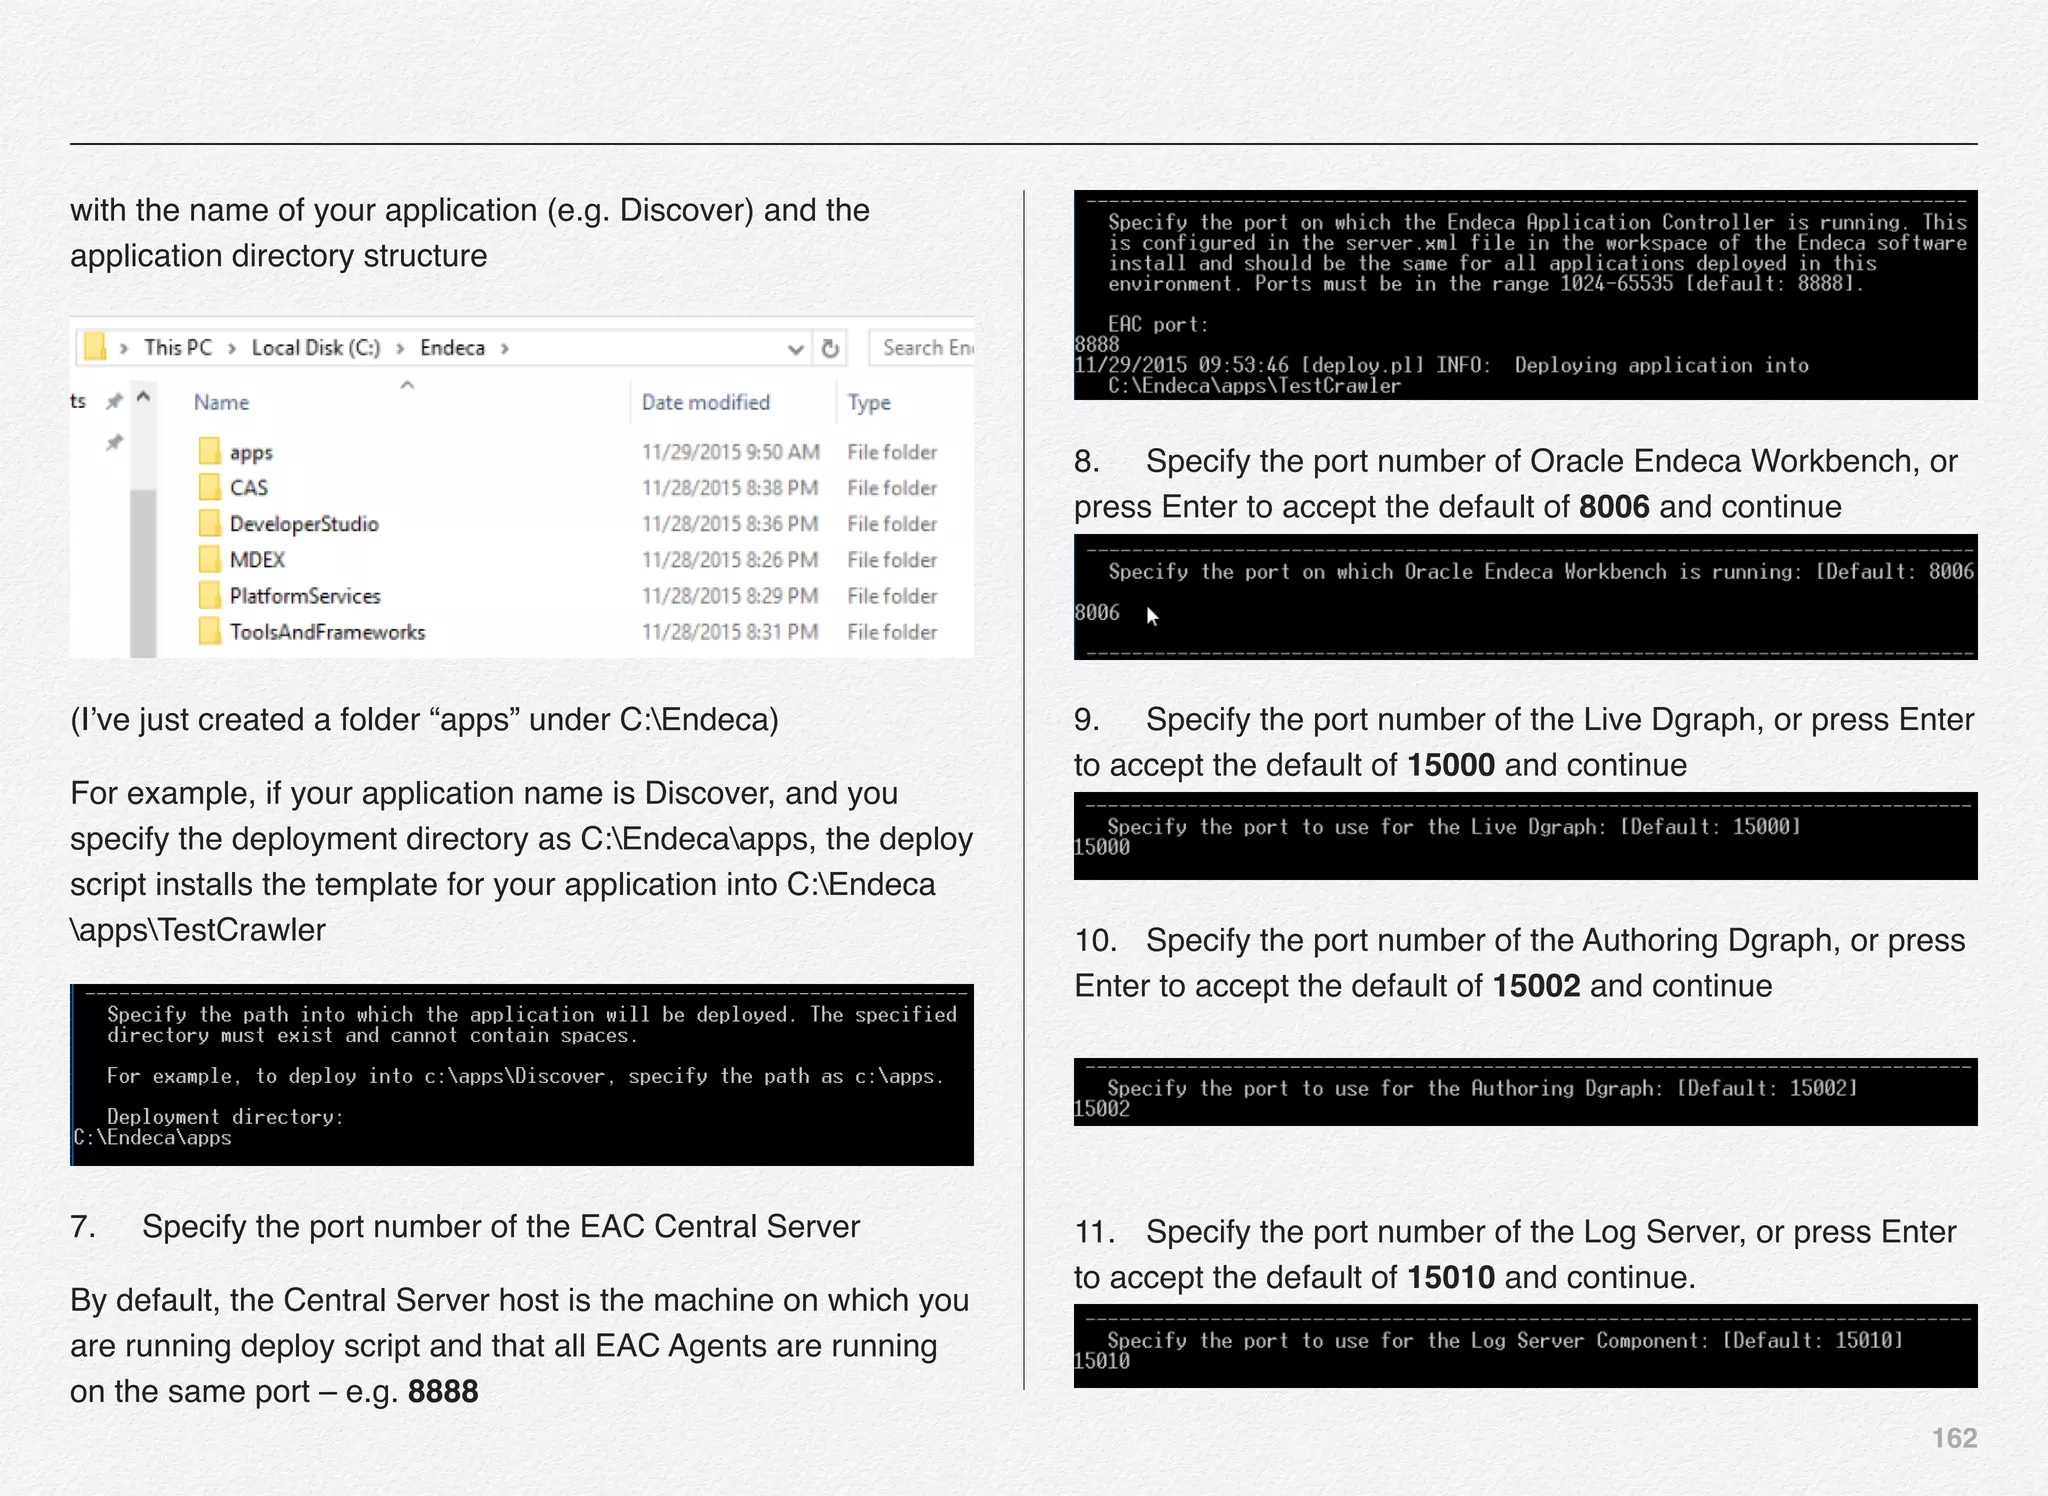
16.Cycle LogServer. The LogServer is stopped and restarted.
During the downtime, the LogServer's error and output logs
are archived.
17.Release lock
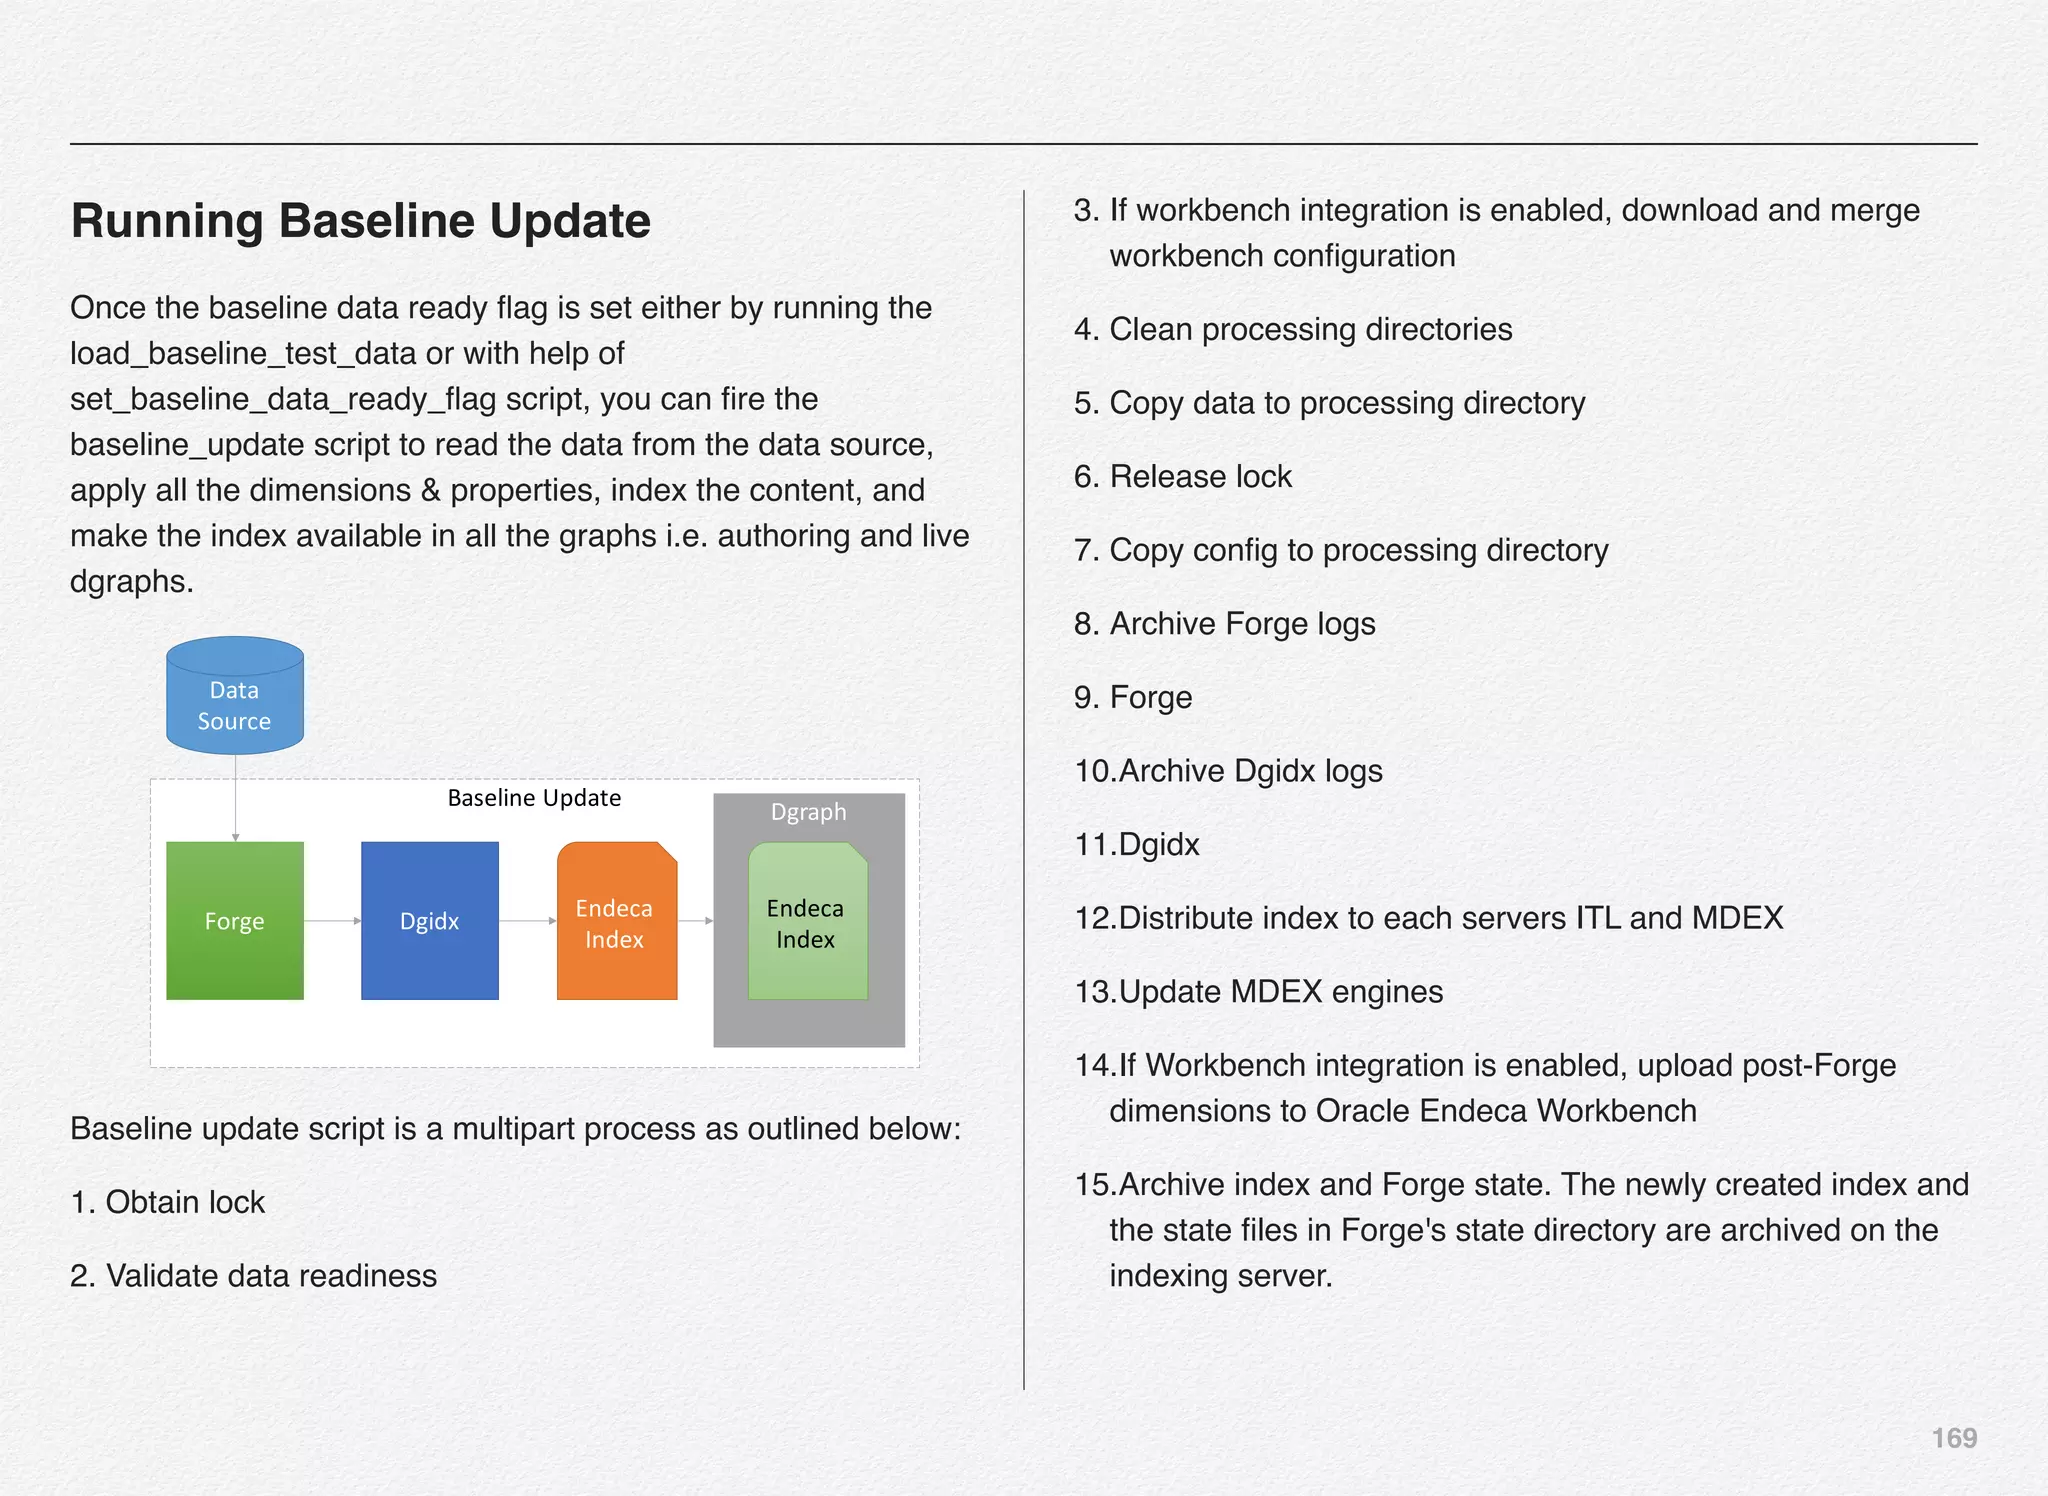
Let us now fire both the scripts to load the data into incoming
folder followed by executing the baseline update script.
C:EndecaappsTestCrawler
control>load_baseline_test_data.bat
C:EndecaappsTestCrawlerconfigscript....test_data
baselinepolite-crawl.xml
1 file(s) copied.
Setting flag 'baseline_data_ready' in the EAC.
C:EndecaappsTestCrawlercontrol>baseline_update.bat
[11.30.15 18:44:01] INFO: Checking definition from
AppConfig.xml against existing EAC provisioning.
[11.30.15 18:44:02] INFO: Definition has not changed.
[11.30.15 18:44:02] INFO: Starting baseline update script.
[11.30.15 18:44:02] INFO: Acquired lock 'update_lock'.
[11.30.15 18:44:02] INFO: [ITLHost] Starting shell utility 'move_-
_to_processing'.
[11.30.15 18:44:04] INFO: [ITLHost] Starting copy utility
'fetch_config_to_input_for_forge_Forge'.
[11.30.15 18:44:05] INFO: [ITLHost] Starting backup utility
'backup_log_dir_for_component_Forge'.
[11.30.15 18:44:06] INFO: [ITLHost] Starting component
'Forge'.
[11.30.15 18:44:09] INFO: [ITLHost] Starting backup utility
'backup_log_dir_for_component_Dgidx'.
[11.30.15 18:44:11] INFO: [ITLHost] Starting component 'Dgidx'.
[11.30.15 18:44:29] INFO: [AuthoringMDEXHost] Starting copy
utility
'copy_index_to_host_AuthoringMDEXHost_AuthoringDgraph'.
[11.30.15 18:44:30] INFO: Applying index to dgraphs in restart
group 'A'.
[11.30.15 18:44:30] INFO: [AuthoringMDEXHost] Starting shell
utility 'mkpath_dgraph-input-new'.](https://image.slidesharecdn.com/oraclecommerce-doityourselfseries-160129151710/75/Oracle-Commerce-Using-ATG-Endeca-Do-It-Yourself-Series-171-2048.jpg)
![171
[11.30.15 18:44:31] INFO: [AuthoringMDEXHost] Starting copy
utility
'copy_index_to_temp_new_dgraph_input_dir_for_AuthoringDgr
aph'.
[11.30.15 18:44:33] INFO: [AuthoringMDEXHost] Starting shell
utility 'move_dgraph-input_to_dgraph-input-old'.
[11.30.15 18:44:34] INFO: [AuthoringMDEXHost] Starting shell
utility 'move_dgraph-input-new_to_dgraph-input'.
[11.30.15 18:44:35] INFO: [AuthoringMDEXHost] Starting
backup utility
'backup_log_dir_for_component_AuthoringDgraph'.
[11.30.15 18:44:36] INFO: [AuthoringMDEXHost] Starting
component 'AuthoringDgraph'.
[11.30.15 18:44:42] INFO: Publishing Workbench 'authoring'
configuration to MDEX 'AuthoringDgraph'
[11.30.15 18:44:42] INFO: Pushing authoring content to dgraph:
AuthoringDgraph
[11.30.15 18:44:44] INFO: Finished pushing content to dgraph.
[11.30.15 18:44:44] INFO: [AuthoringMDEXHost] Starting shell
utility 'rmdir_dgraph-input-old'.
[11.30.15 18:44:46] INFO: [LiveMDEXHostA] Starting shell
utility 'cleanDir_local-dgraph-input'.
[11.30.15 18:44:47] INFO: [LiveMDEXHostA] Starting copy
utility 'copy_index_to_host_LiveMDEXHostA_DgraphA1'.
[11.30.15 18:44:48] INFO: Applying index to dgraphs in restart
group '1'.
[11.30.15 18:44:48] INFO: [LiveMDEXHostA] Starting shell
utility 'mkpath_dgraph-input-new'.
[11.30.15 18:44:49] INFO: [LiveMDEXHostA] Starting copy
utility
'copy_index_to_temp_new_dgraph_input_dir_for_DgraphA1'.
[11.30.15 18:44:50] INFO: [LiveMDEXHostA] Starting shell
utility 'move_dgraph-input_to_dgraph-input-old'.
[11.30.15 18:44:52] INFO: [LiveMDEXHostA] Starting shell
utility 'move_dgraph-input-new_to_dgraph-input'.
[11.30.15 18:44:53] INFO: [LiveMDEXHostA] Starting backup
utility 'backup_log_dir_for_component_DgraphA1'.
[11.30.15 18:44:54] INFO: [LiveMDEXHostA] Starting
component 'DgraphA1'.
[11.30.15 18:45:00] INFO: Publishing Workbench 'live'
configuration to MDEX 'DgraphA1'](https://image.slidesharecdn.com/oraclecommerce-doityourselfseries-160129151710/75/Oracle-Commerce-Using-ATG-Endeca-Do-It-Yourself-Series-172-2048.jpg)
![172
[11.30.15 18:45:00] INFO: 'LiveDgraphCluster': no available
config to apply at this time, config is created by exporting a
config snapshot.
[11.30.15 18:45:00] INFO: [LiveMDEXHostA] Starting shell
utility 'rmdir_dgraph-input-old'.
[11.30.15 18:45:01] INFO: [ITLHost] Starting copy utility
'fetch_post_forge_dimensions_to_config_postforgedims_dir_C-
Endeca-apps-Discover-config-script-config-pipeline-
postforgedims'.
[11.30.15 18:45:01] INFO: [ITLHost] Starting backup utility
'backup_state_dir_for_component_Forge'.
[11.30.15 18:45:03] INFO: [ITLHost] Starting backup utility
'backup_index_Dgidx'
.
[11.30.15 18:45:04] INFO: [ReportGenerationHost] Starting
backup utility 'backup_log_dir_for_component_LogServer'.
[11.30.15 18:45:05] INFO: [ReportGenerationHost] Starting
component 'LogServer'.
[11.30.15 18:45:06] INFO: Released lock 'update_lock'.
[11.30.15 18:45:06] INFO: Baseline update script finished.
C:EndecaappsDiscovercontrol>
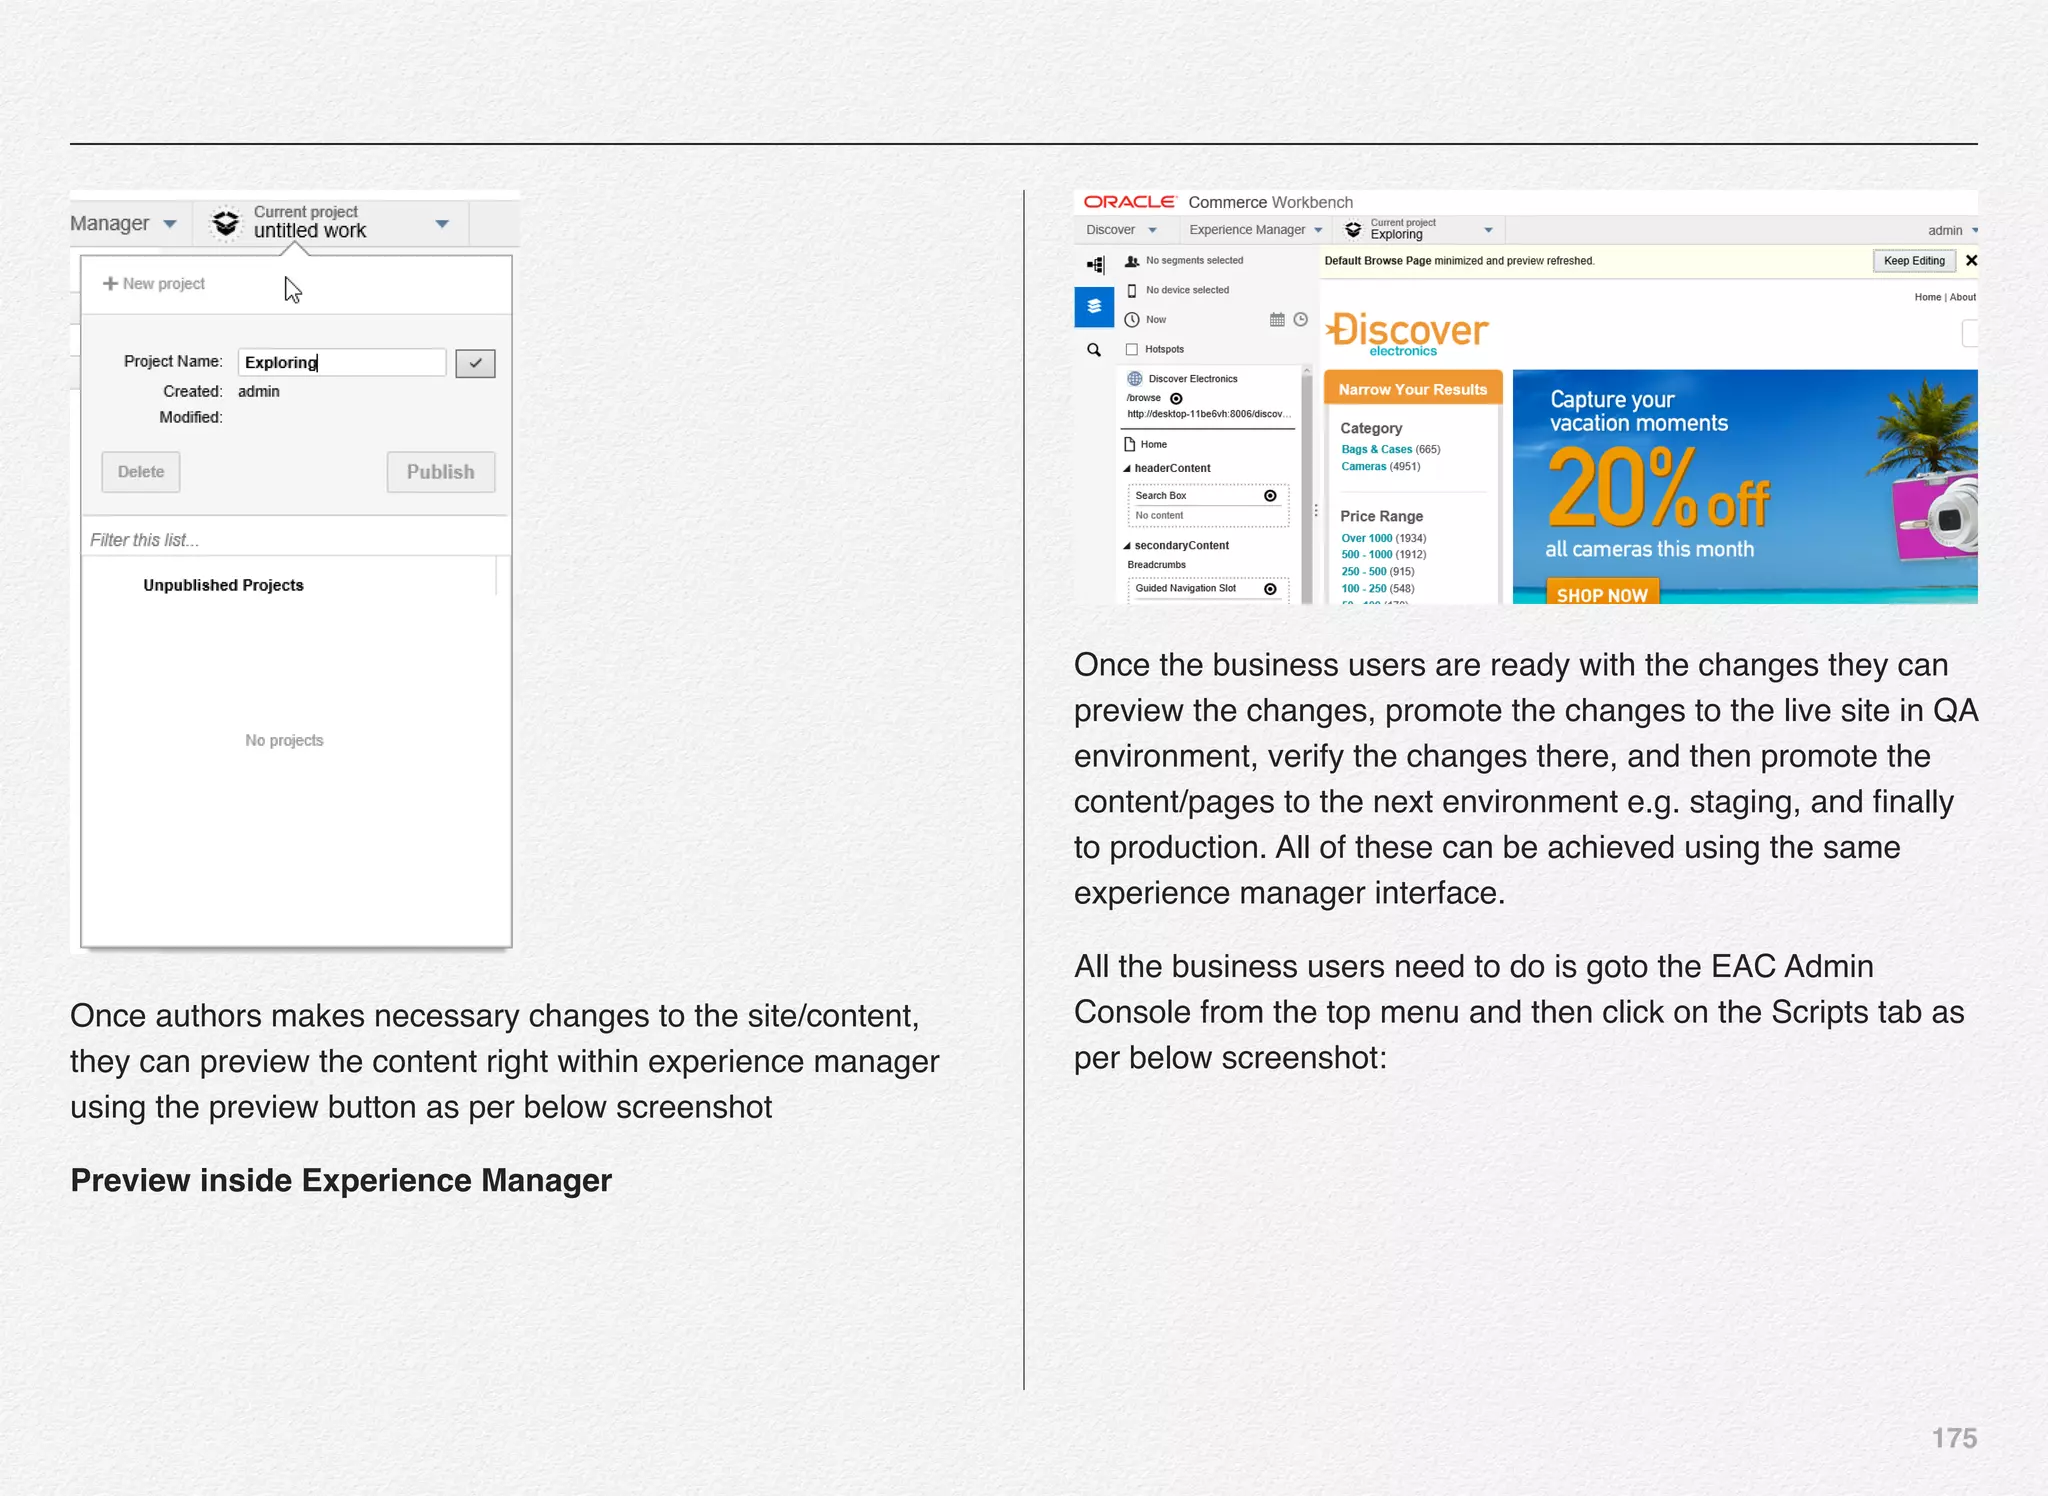
Promoting the Content to Live Site
With this the Endeca Discover Application is now registered in
EAC (Endeca Application Controller) and the authoring
application is up and running. Also, we need to push the index
to live application and not just the authoring application.
For that all the content in the authoring index must be promoted
to the live index - index being used by the live site using the
promote_content script.
C:EndecaappsDiscovercontrol>promote_content.bat
[11.30.15 18:51:21] INFO: Checking definition from
AppConfig.xml against existing EAC provisioning.
[11.30.15 18:51:22] INFO: Definition has not changed.
[11.30.15 18:51:22] INFO: Exporting MDEX tool contents to file
Discover.mdex.2015-11-30_18-51-22.zip
[11.30.15 18:51:23] INFO: Exporting resource 'http://
DESKTOP-11BE6VH:8006/ifcr/sites/Discover' to 'C:Endeca
ToolsAndFrameworks11.2.0serverworkspacestaterepository
DiscoverDiscover2015-11-30_18-51-23.zip'](https://image.slidesharecdn.com/oraclecommerce-doityourselfseries-160129151710/75/Oracle-Commerce-Using-ATG-Endeca-Do-It-Yourself-Series-173-2048.jpg)
![173
[11.30.15 18:51:26] INFO: Finished exporting resource.
[11.30.15 18:51:26] INFO: Job #: update-
dgraph-1448938286589 Sending update to server - file: C:
UserssoftwAppDataLocalTempsoap-
mdex589856330515823330.xml
[11.30.15 18:51:26] INFO: The request to the Dgraph at
DESKTOP-11BE6VH:17000 was successfully sent. The return
code was : 200
[11.30.15 18:51:26] INFO: Begin updating Assemblers.
[11.30.15 18:51:26] INFO: Calling Assemblers to update
contents.
[11.30.15 18:51:27] INFO: Updated Assembler at URL: http://
DESKTOP-11BE6VH:8006/discover/admin
[11.30.15 18:51:27] INFO: Updated Assembler at URL: http://
DESKTOP-11BE6VH:8006/assembler/admin
[11.30.15 18:51:27] INFO: Finished updating Assemblers.
Updating reference file.
C:EndecaappsDiscovercontrol>
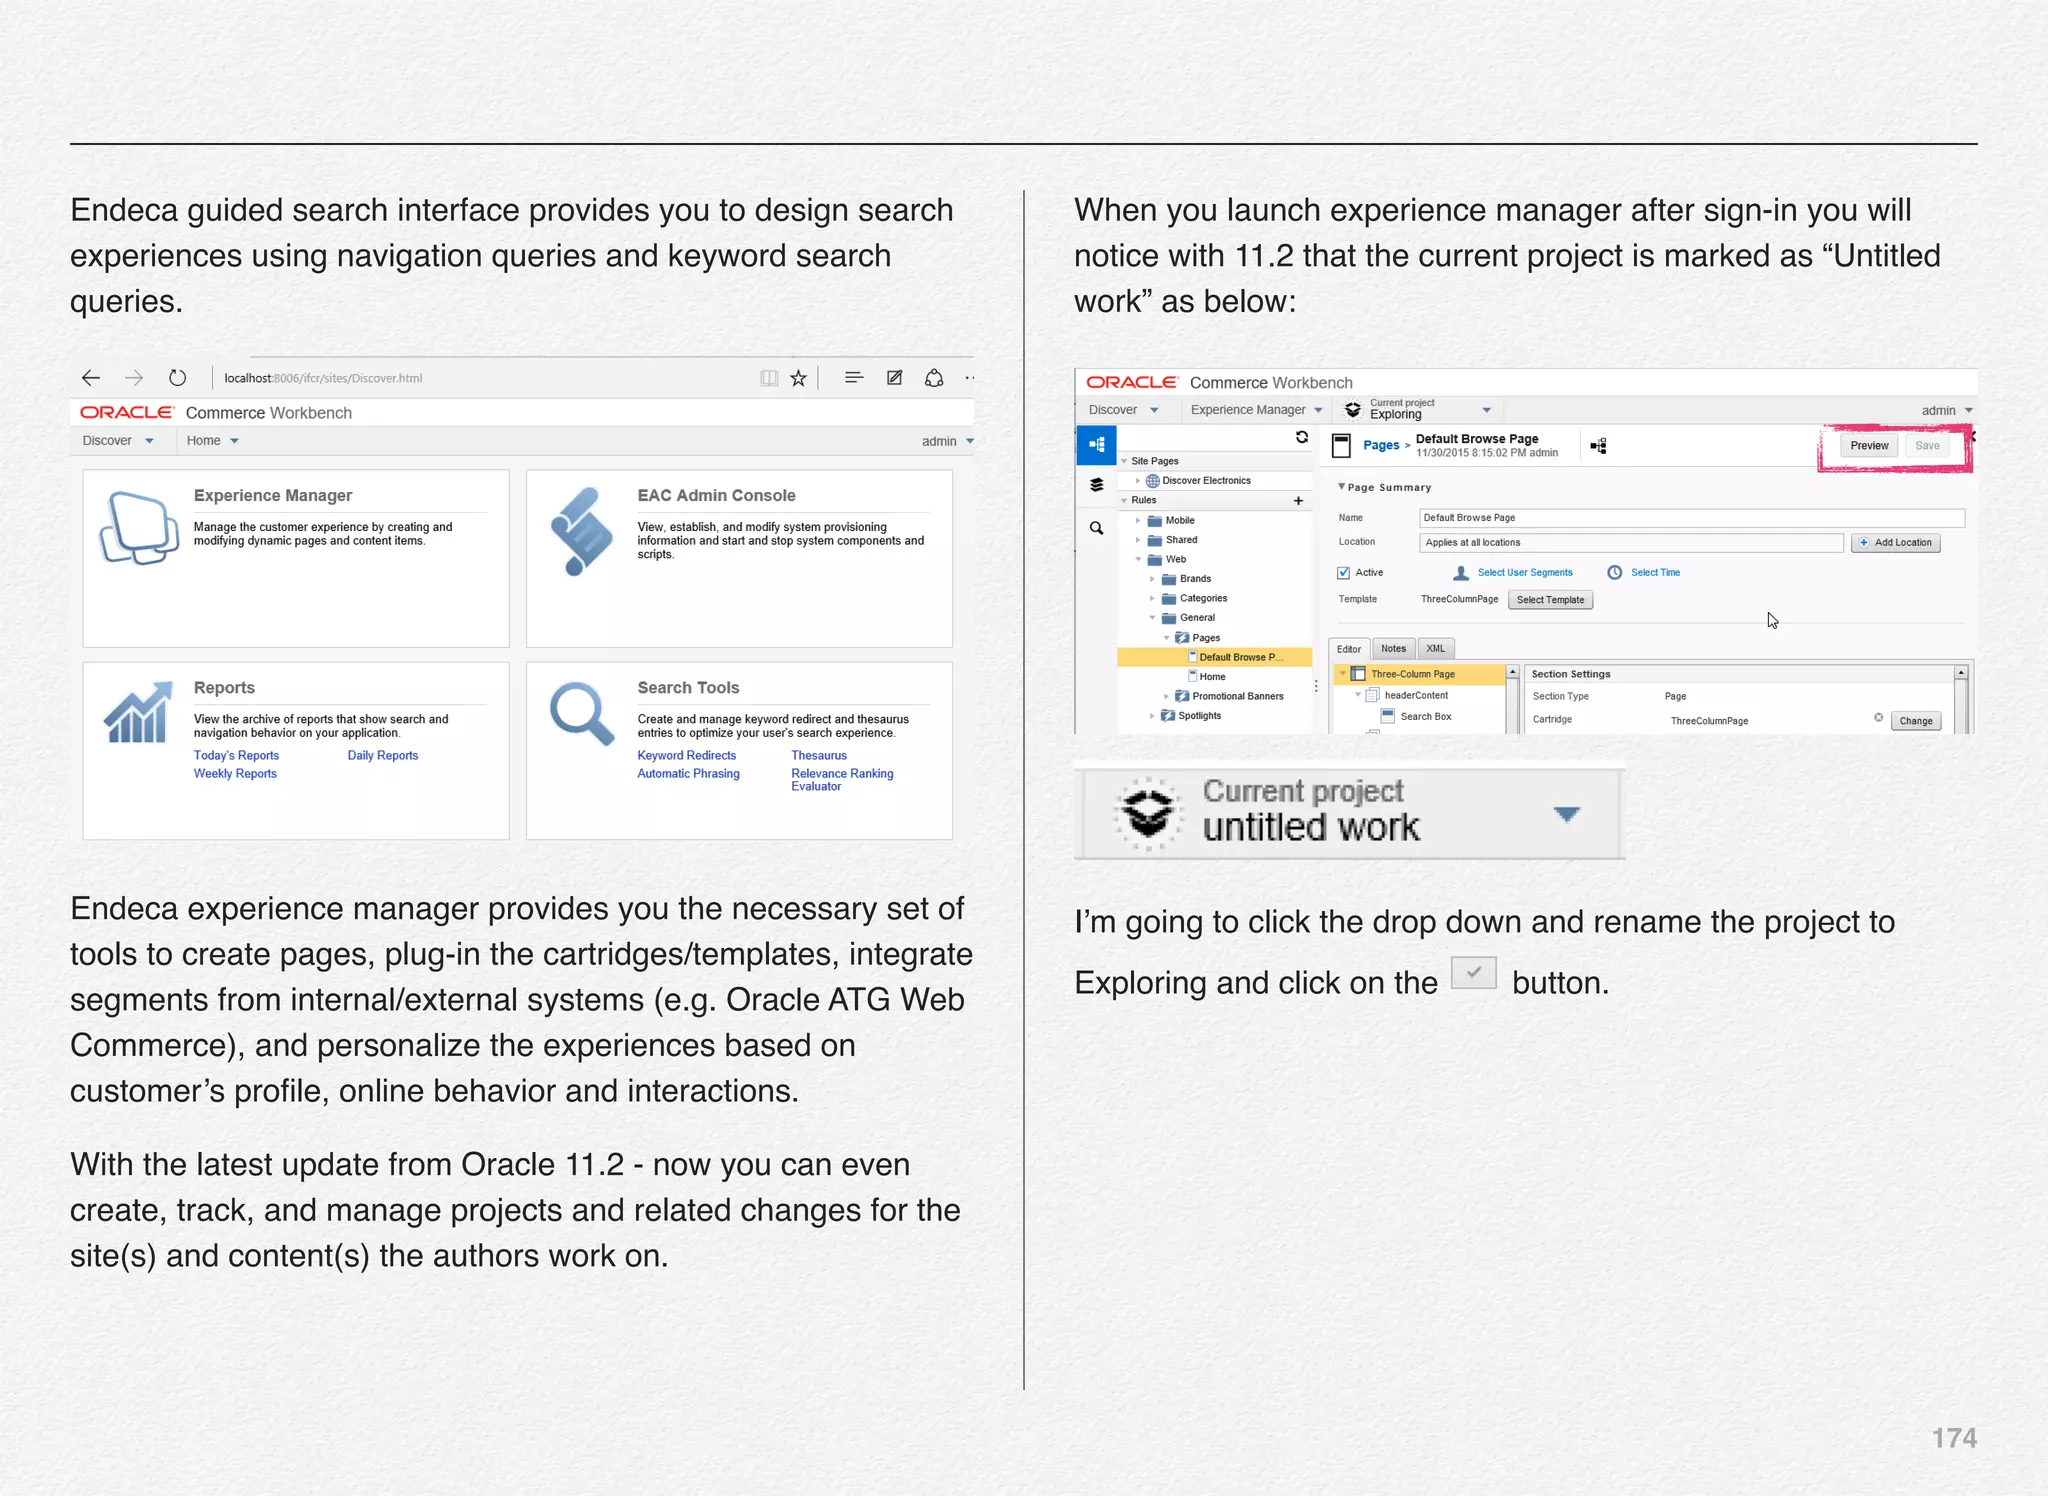
Oracle Endeca Workbench for Discover
Electronics
Oracle Endeca Workbench is the authoring tool that enables
business uses to deliver personalized search & shopping
experiences across multiple channels i.e. Web, call centers,
and Mobile. Also, the Endeca platform can be used to integrate
the experiences in any other non-traditional channels using
RESTful APIs. Also, Endeca supports modules for SEO (Search
Engine Optimization), Social connectors, and Mobile
experience support for iOS, android, and mobile web.](https://image.slidesharecdn.com/oraclecommerce-doityourselfseries-160129151710/75/Oracle-Commerce-Using-ATG-Endeca-Do-It-Yourself-Series-174-2048.jpg)
![182
// To promote using a direct connection, as in prior
versions (3.X) of Tools
// and Frameworks, comment out the prior lines and
uncomment the following line.
// IFCR.promoteFromAuthoringToLive();
]]>
</bean-shell-script>
</script>
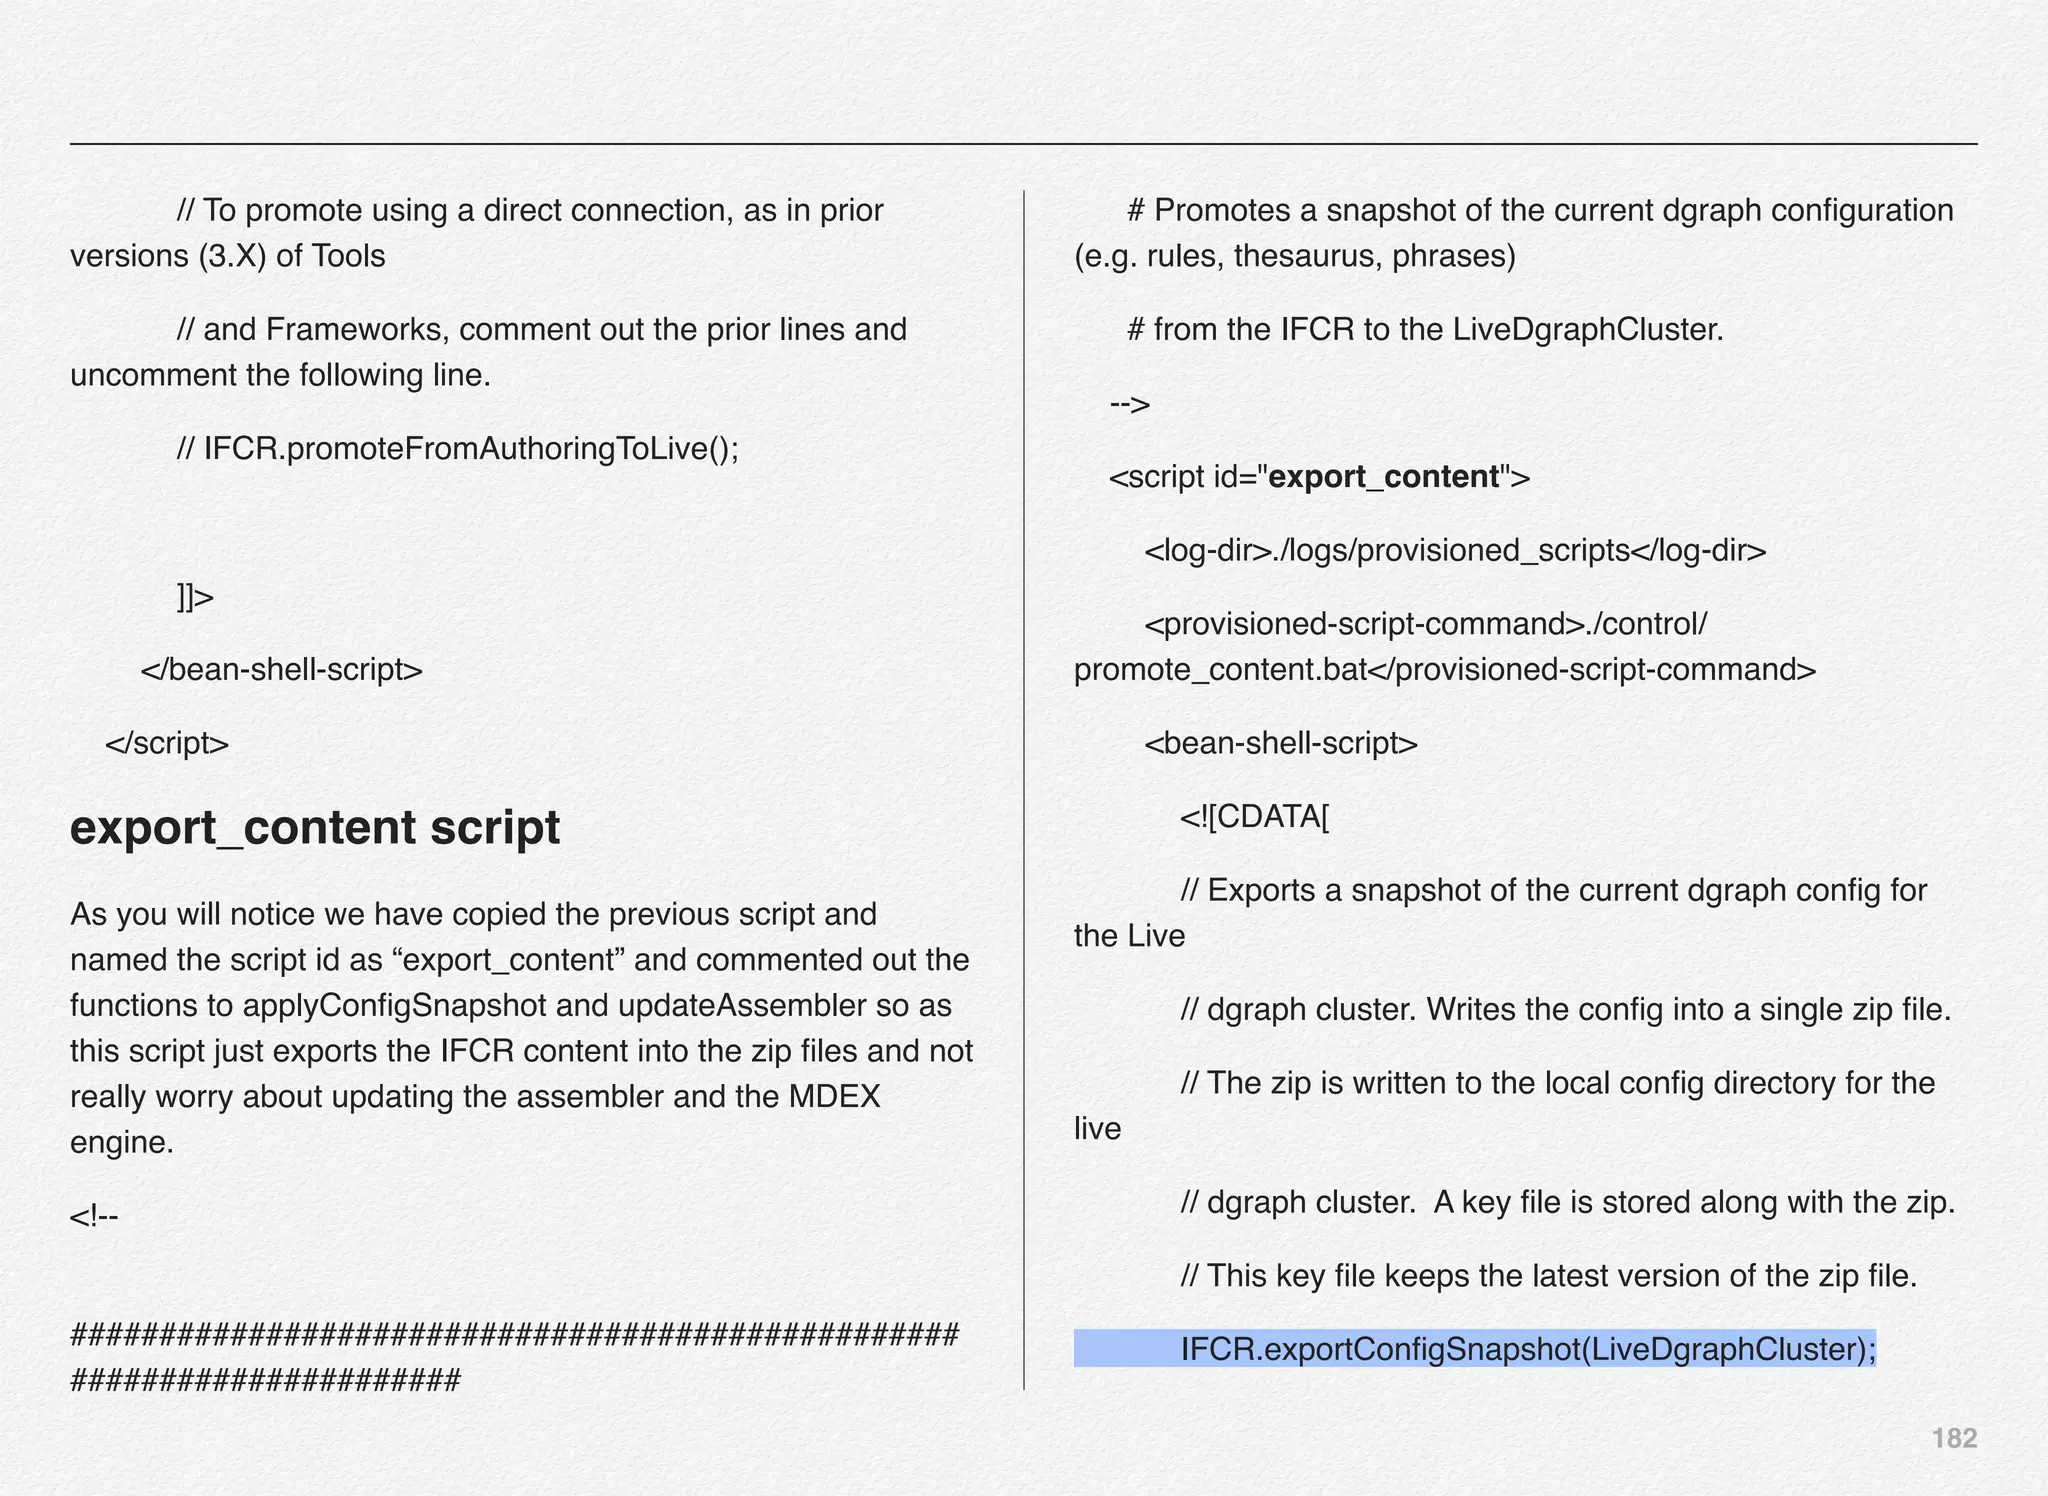
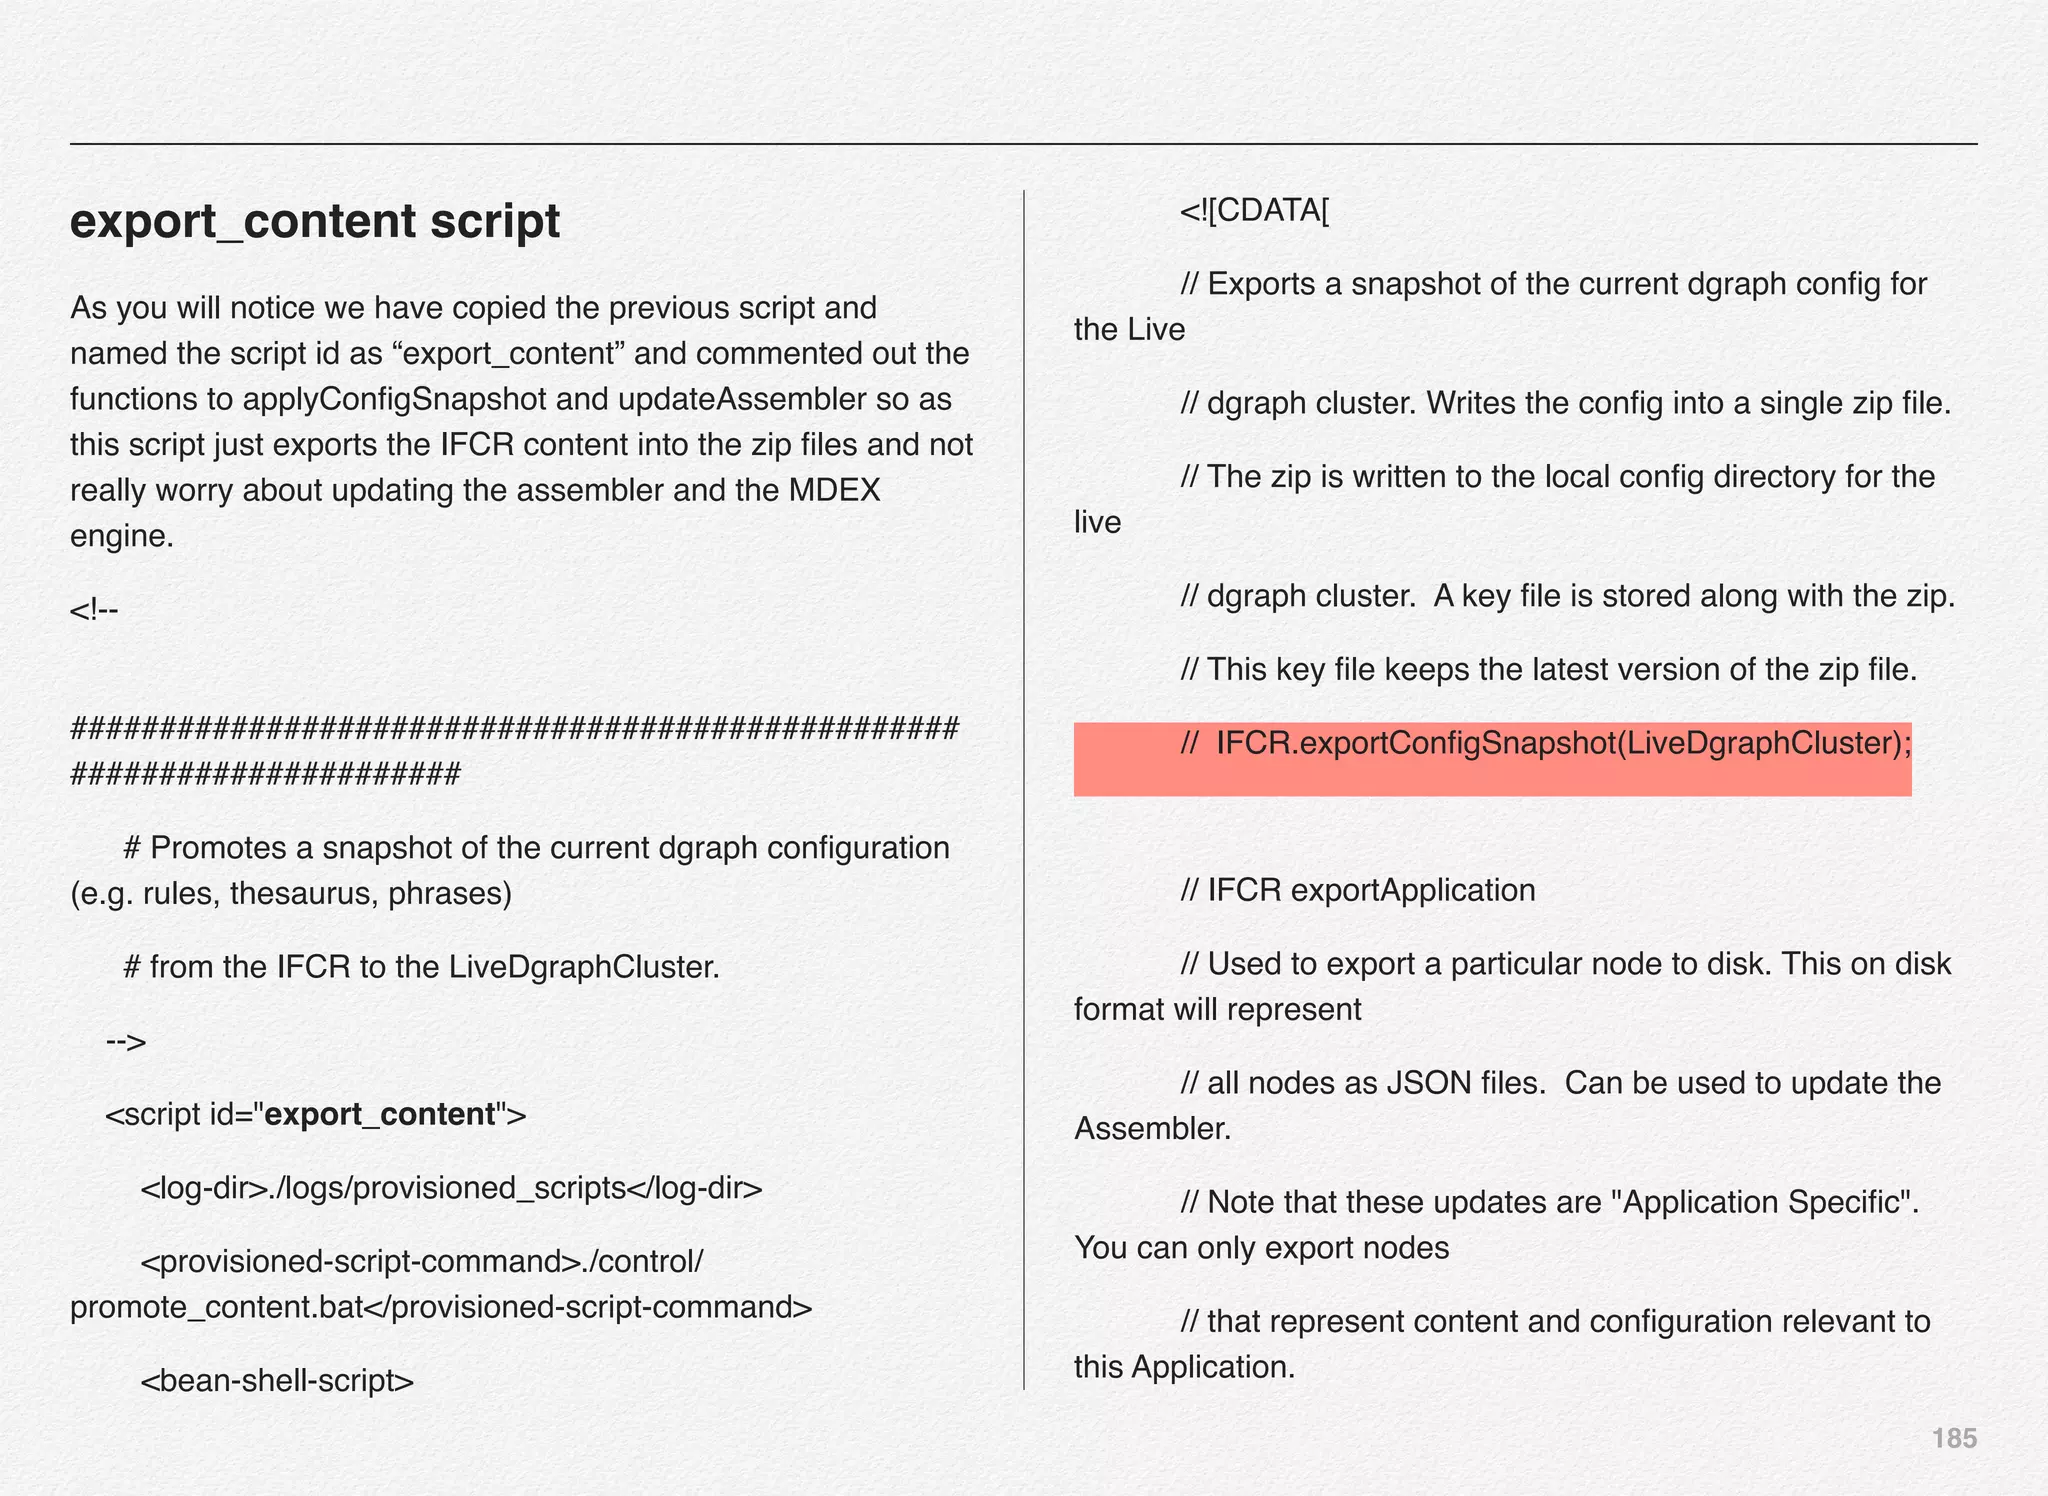
export_content script
As you will notice we have copied the previous script and
named the script id as “export_content” and commented out the
functions to applyConfigSnapshot and updateAssembler so as
this script just exports the IFCR content into the zip files and not
really worry about updating the assembler and the MDEX
engine.
<!--
##################################################
######################
# Promotes a snapshot of the current dgraph configuration
(e.g. rules, thesaurus, phrases)
# from the IFCR to the LiveDgraphCluster.
-->
<script id="export_content">
<log-dir>./logs/provisioned_scripts</log-dir>
<provisioned-script-command>./control/
promote_content.bat</provisioned-script-command>
<bean-shell-script>
<
![184
// and Frameworks, comment out the prior lines and
uncomment the following line.
// IFCR.promoteFromAuthoringToLive();
]]>
</bean-shell-script>
</script>
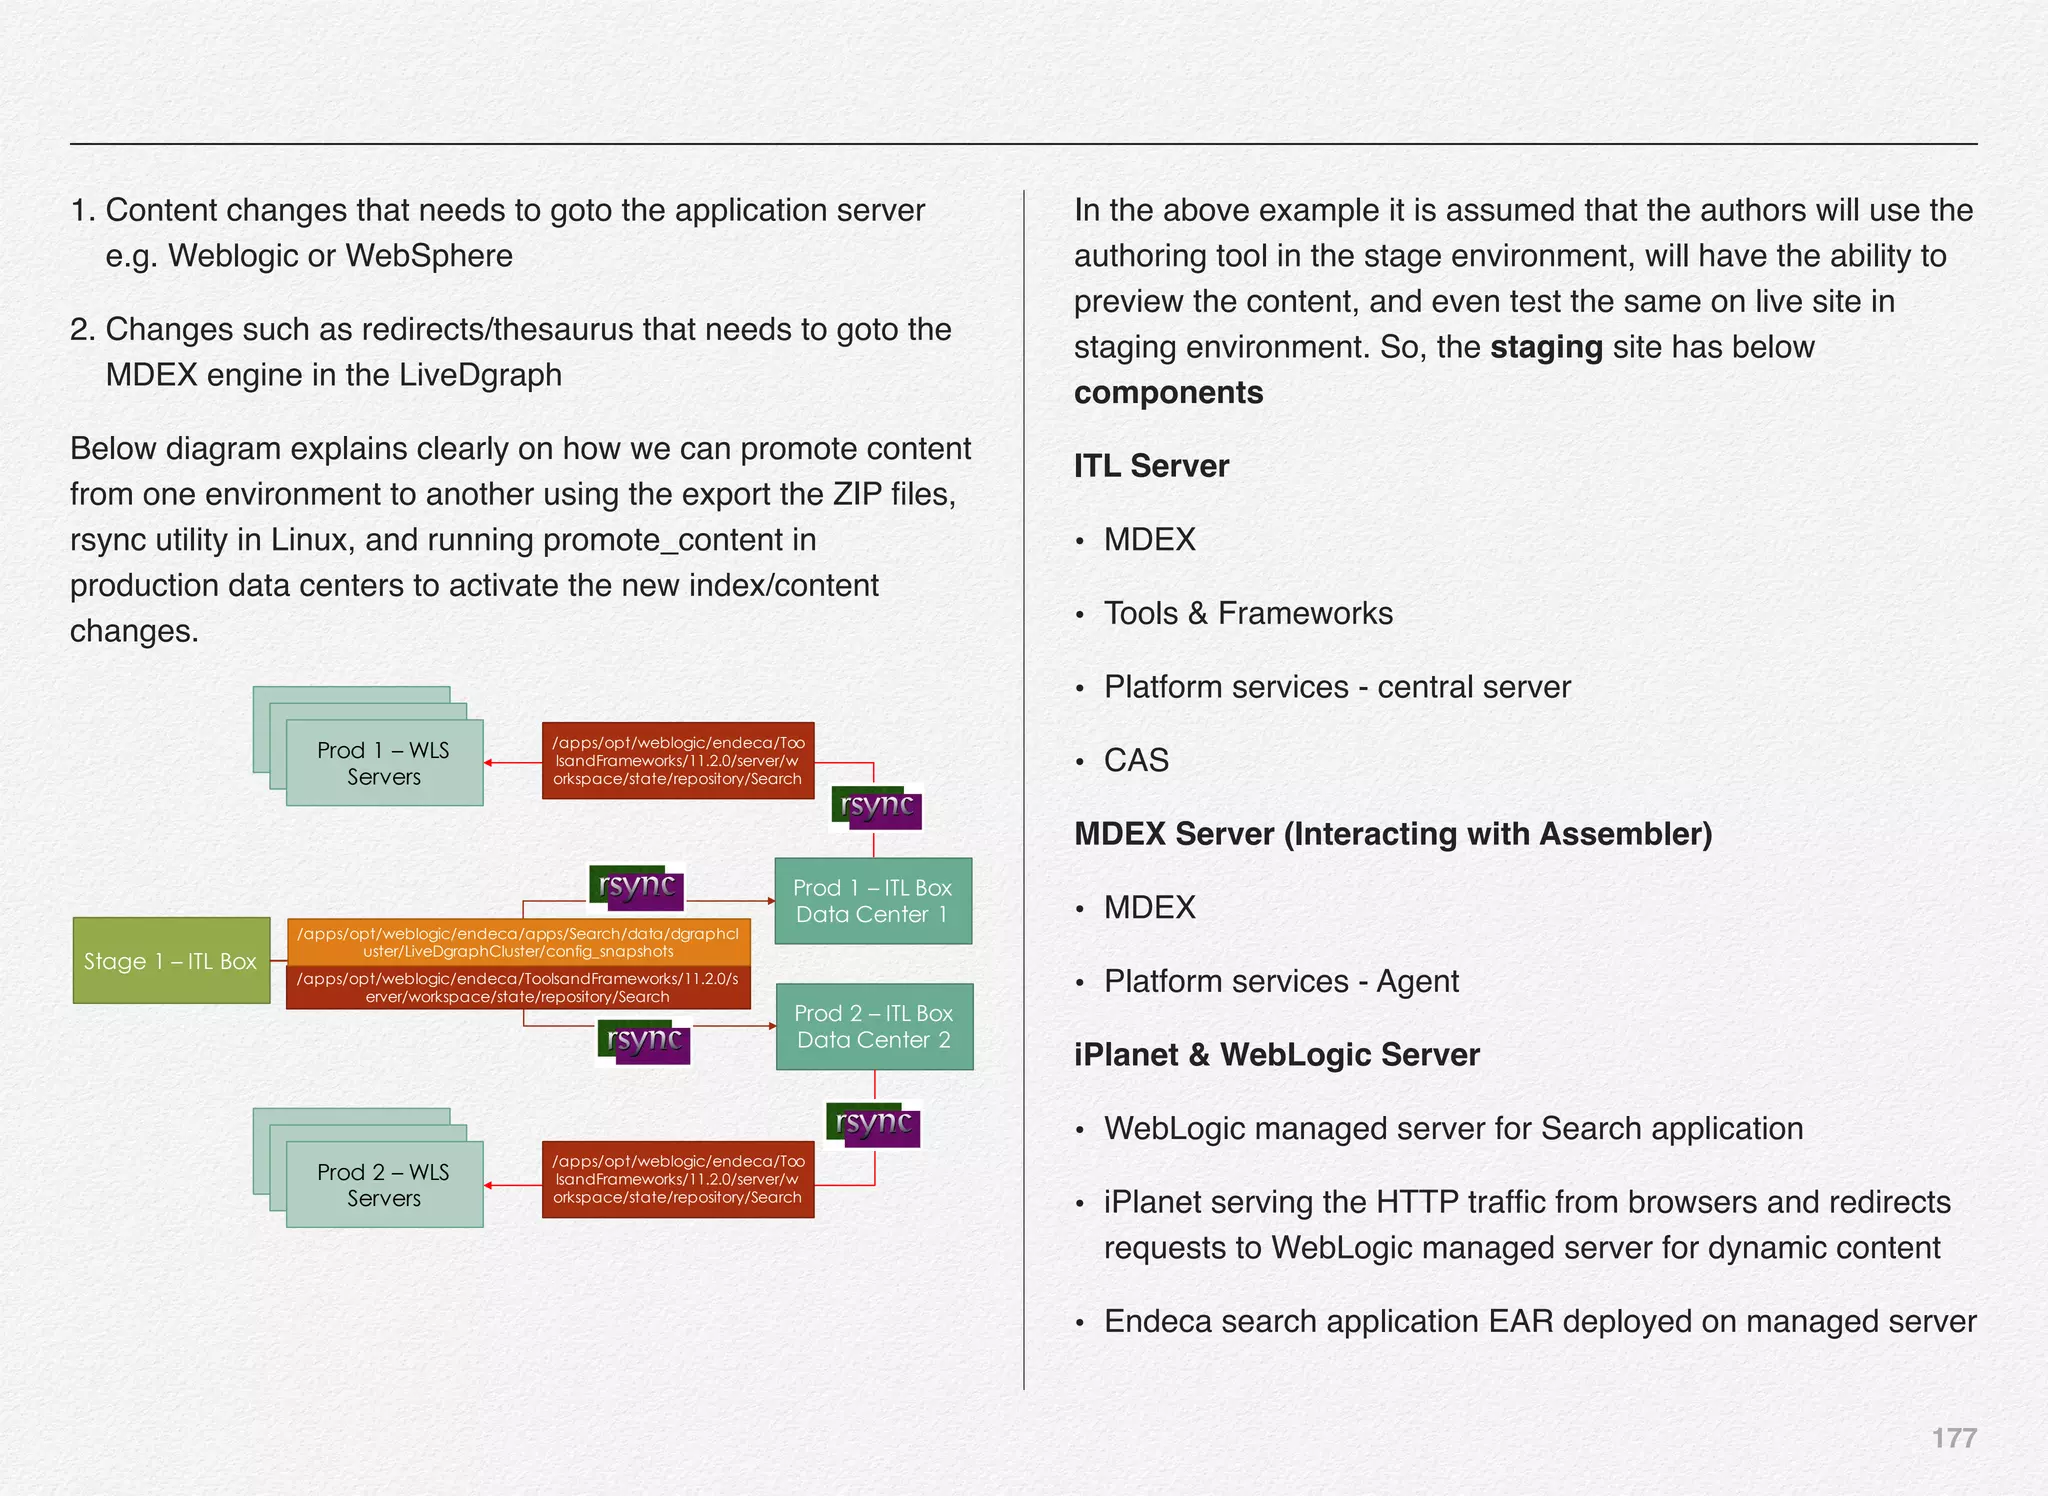
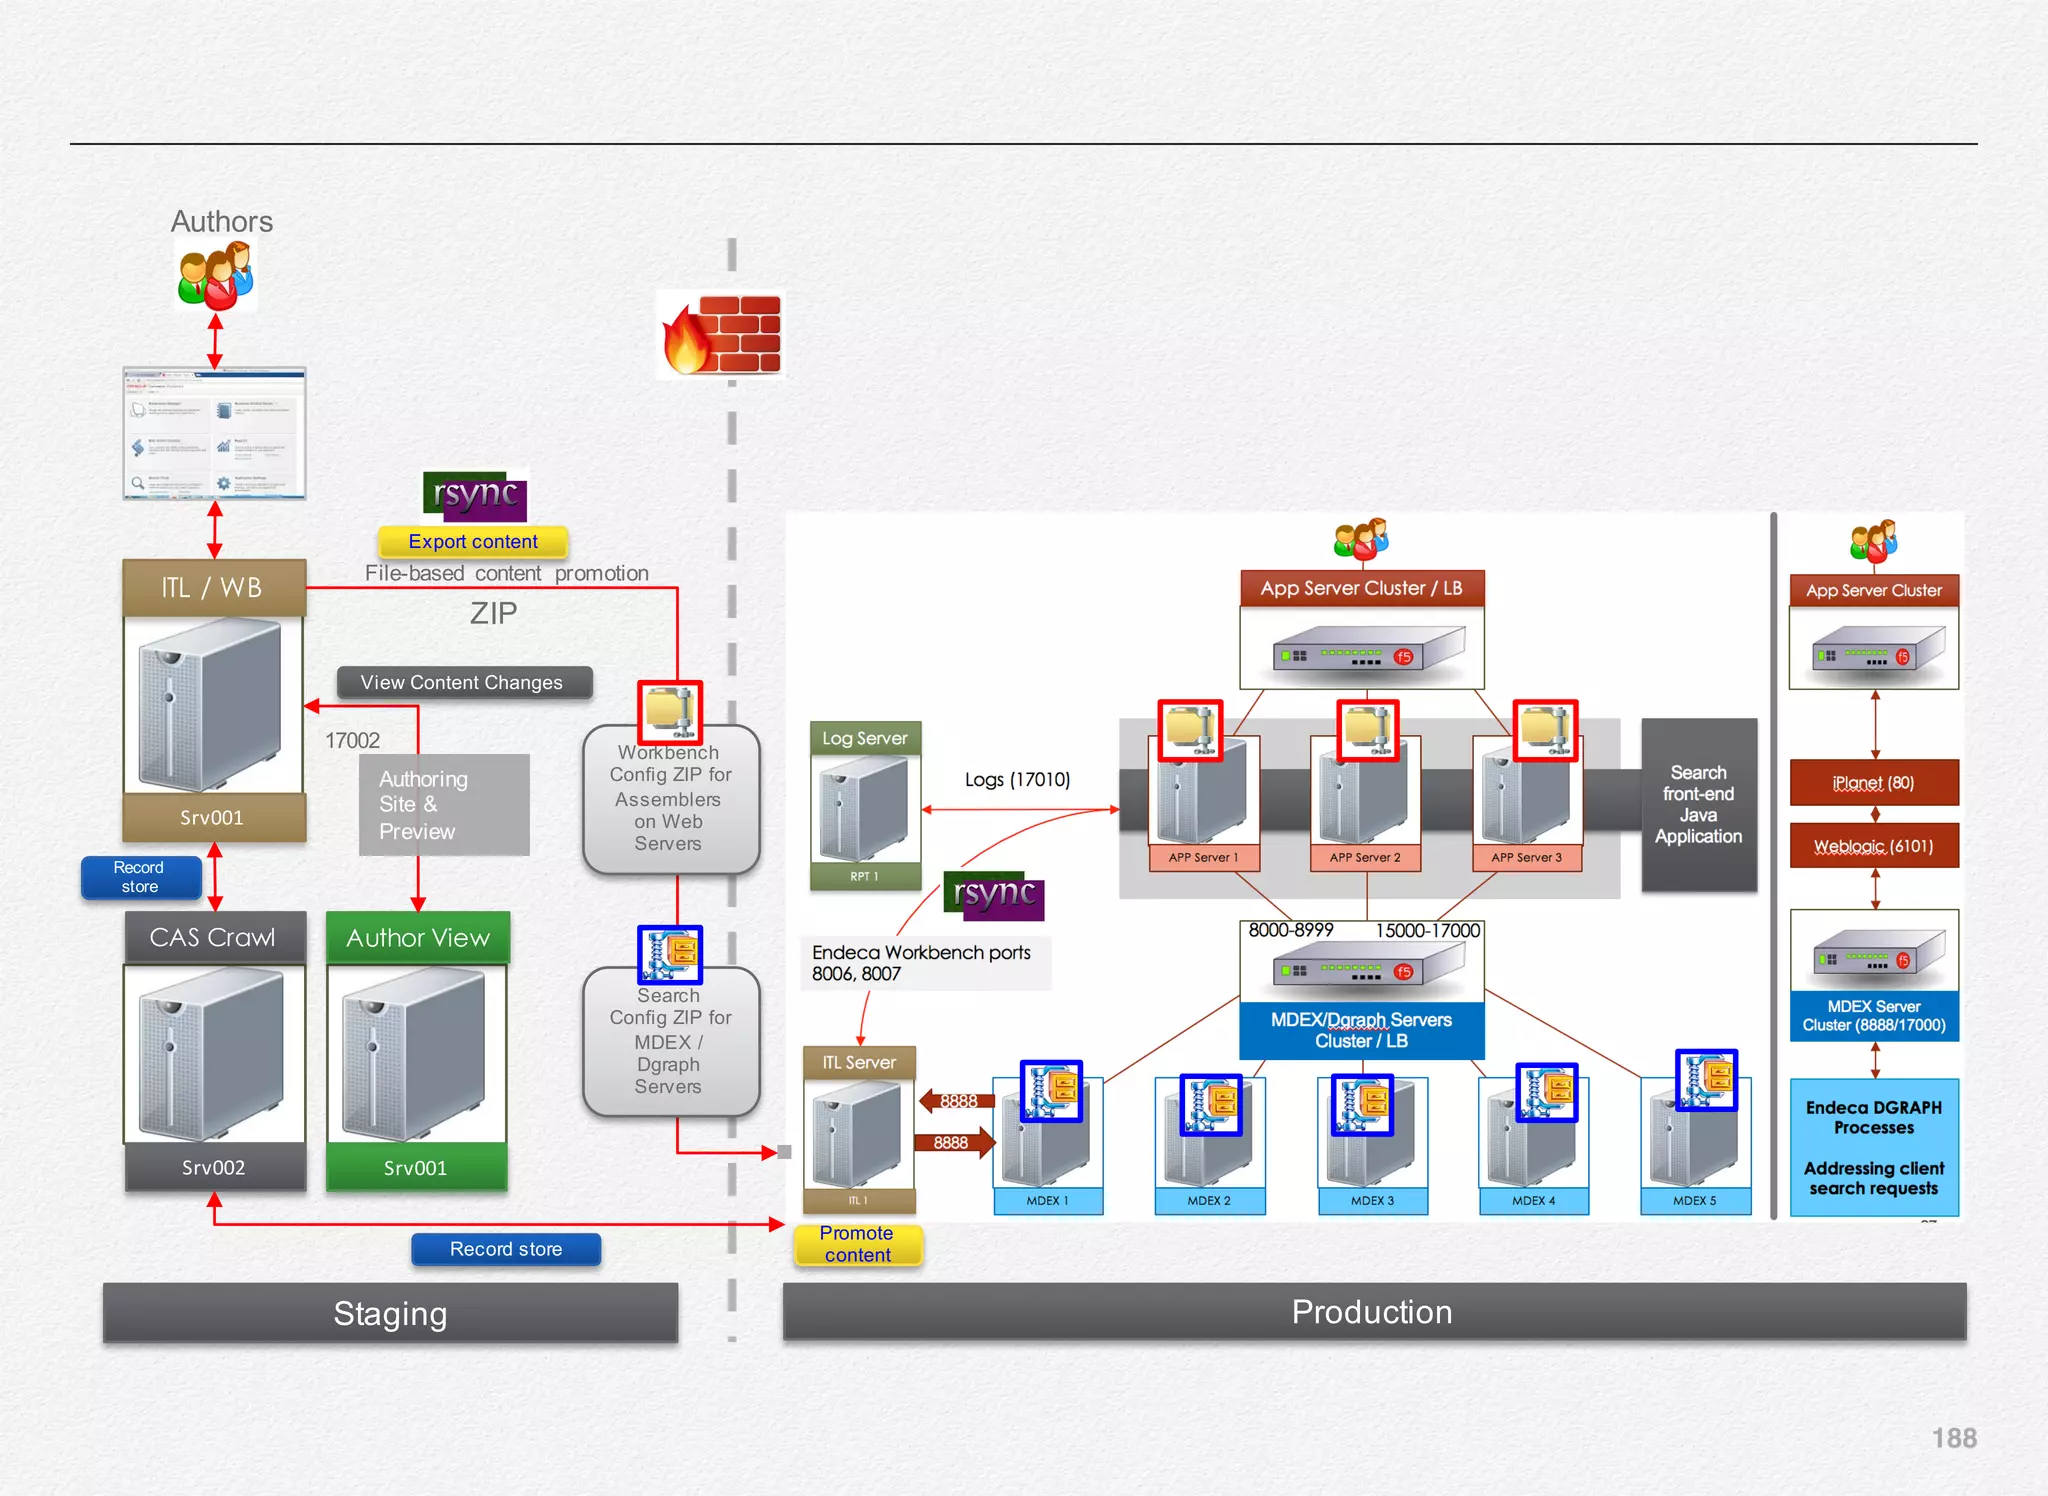
Promote to Production ITL using
RSYNC and running Promote_content
in Production environment
Once the IFCR content is exported to the ZIP files in destination
folders, next step is to have a RSYNC script that synchronizes
any new files from both destination folders in staging
environment to the production ITL box and then from there
synchronize the experience manager config zip file to the
WebLogic server where the Assembler application is running.
For simplicity sake, we will create the exact same folder
structure on WebLogic server(s) i.e. /apps/opt/weblogic/endeca/
ToolsandFrameworks/11.2.0/server/workspace/state/repository/
Discover
This folder location must be also added in the
assembler.properties file for your front-end Java project so as
the Assembler knows the where to read the ZIP files from when
the promote_content is triggered in production on the ITL box.
So, mechanically here is what will happen:
1. export_content in staging - creates the zip files
2. rsync - synchronizes both the ZIP files from staging
environment to production ITL server
3. another rsync - synchronizes the Workbench content ZIP file
from /apps/opt/weblogic/endeca/ToolsandFrameworks/
11.2.0/server/workspace/state/repository/Discover location
on ITL server to the same folder location on WebLogic
Server running the web application
4. run promote_content script in production which will update all
the MDEX Servers and also all the application servers
running the Assembler application
In the production environment you need to configure the
promoteAuthoringToLive script in the WorkbenchConfig.xml file
to comment out the export functions and leave the
applyConfigSnapshot & updateAssembler functions
uncommented as per this script:](https://image.slidesharecdn.com/oraclecommerce-doityourselfseries-160129151710/75/Oracle-Commerce-Using-ATG-Endeca-Do-It-Yourself-Series-185-2048.jpg)
![187
// To promote using a direct connection, as in prior versions (3.X) of Tools
// and Frameworks, comment out the prior lines and uncomment the following line.
// IFCR.promoteFromAuthoringToLive();
]]>
</bean-shell-script>
</script>](https://image.slidesharecdn.com/oraclecommerce-doityourselfseries-160129151710/75/Oracle-Commerce-Using-ATG-Endeca-Do-It-Yourself-Series-188-2048.jpg)


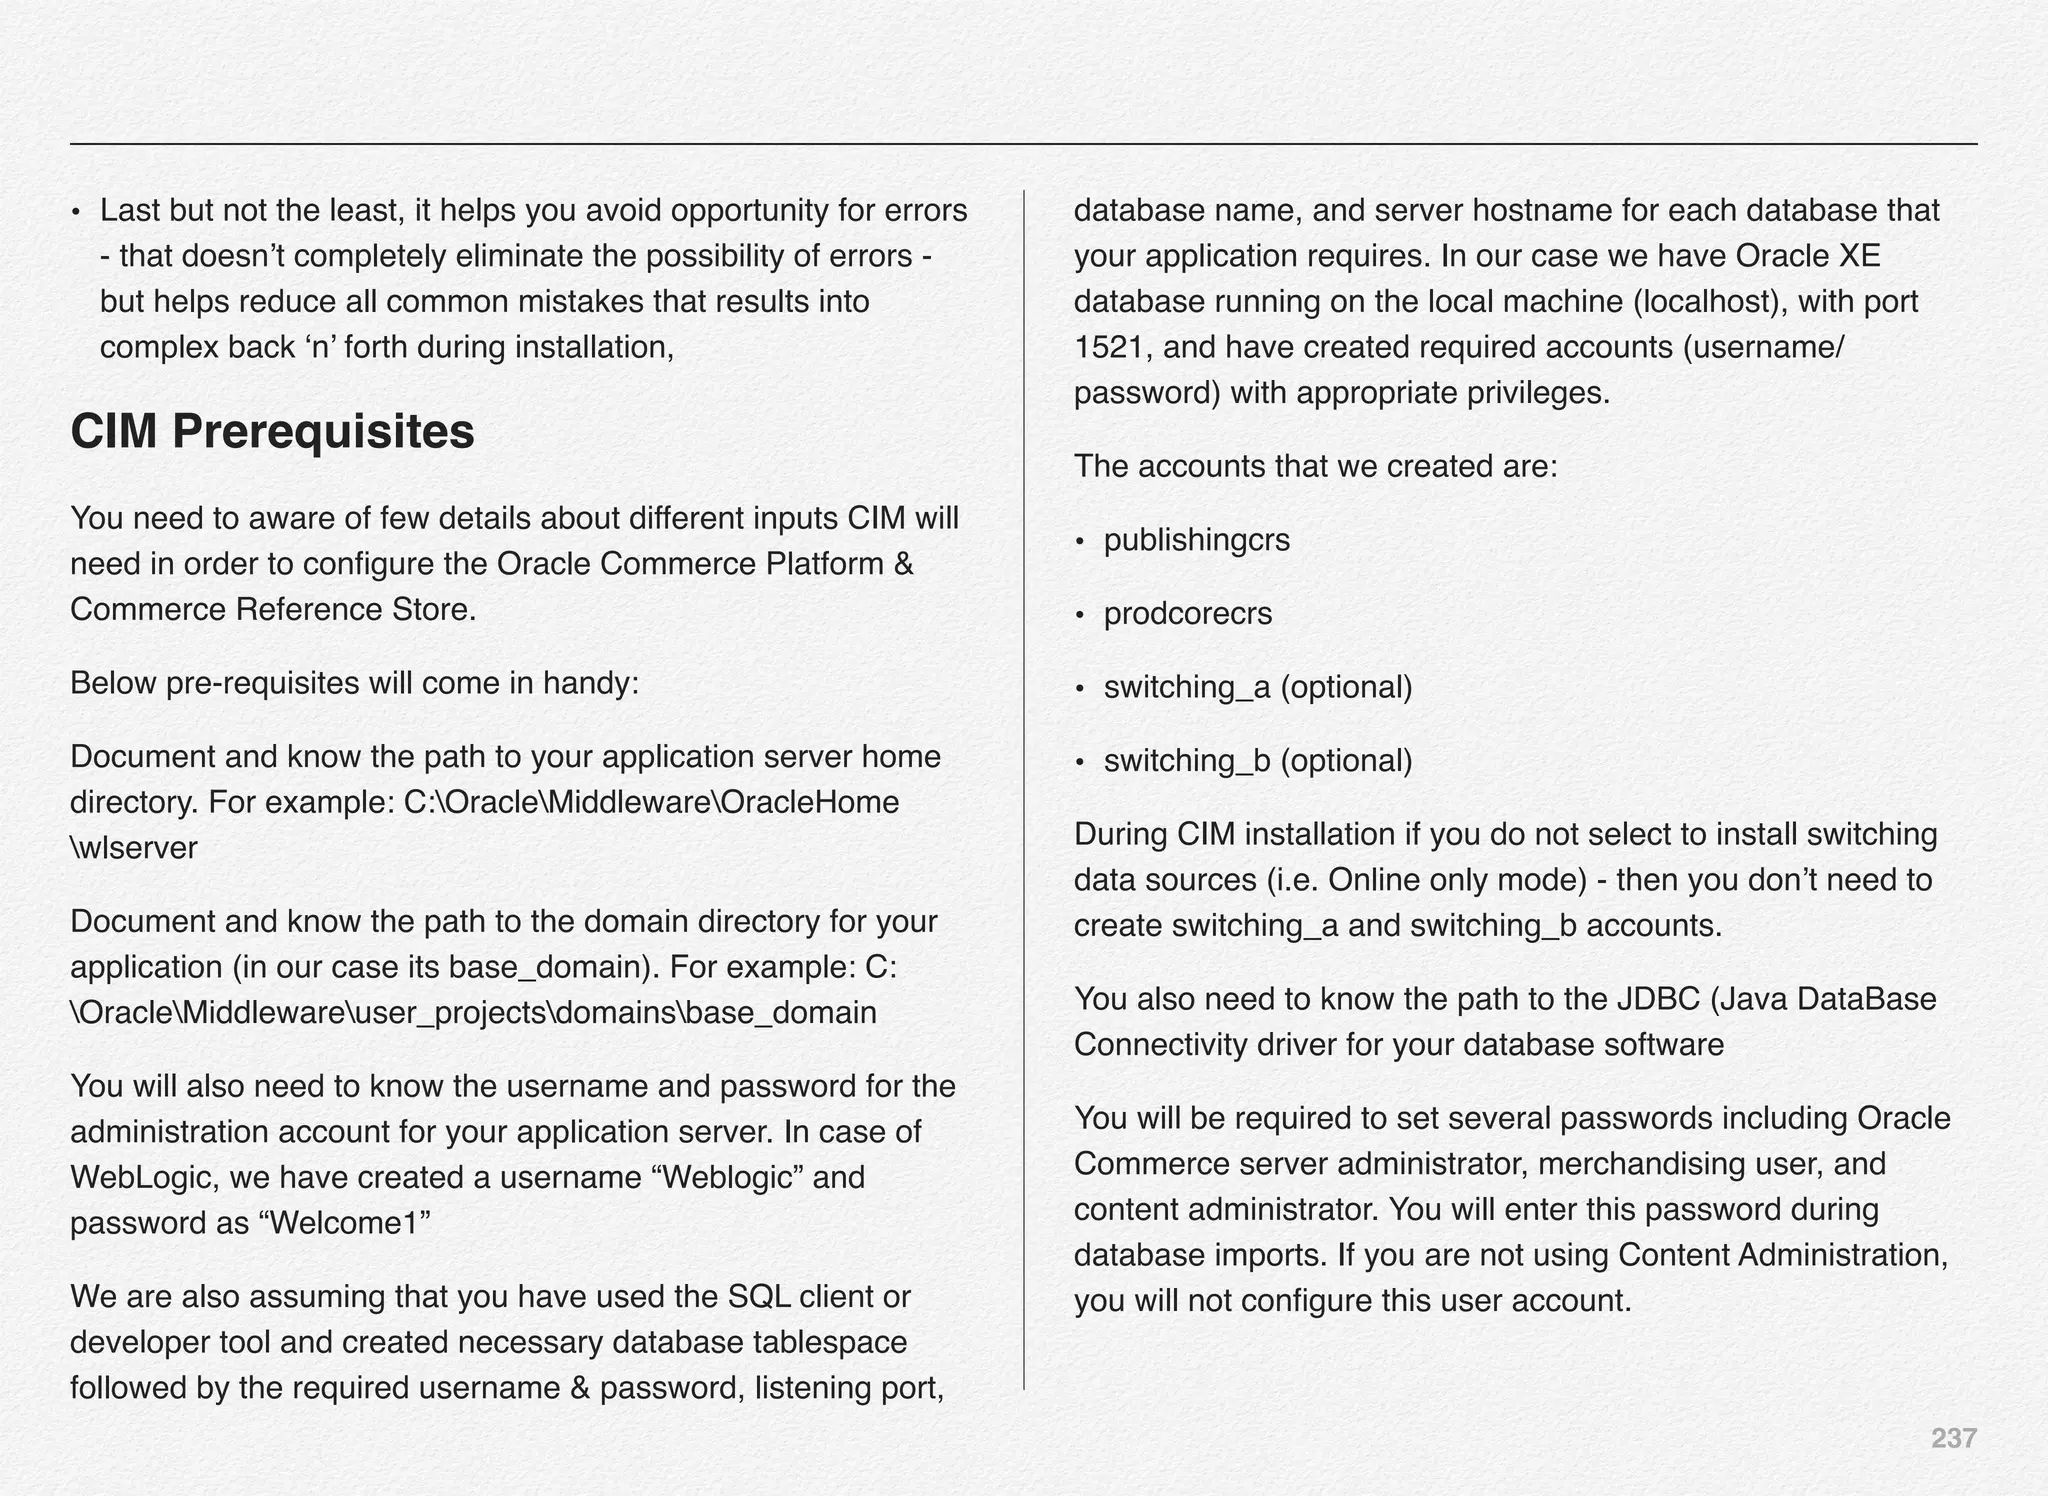
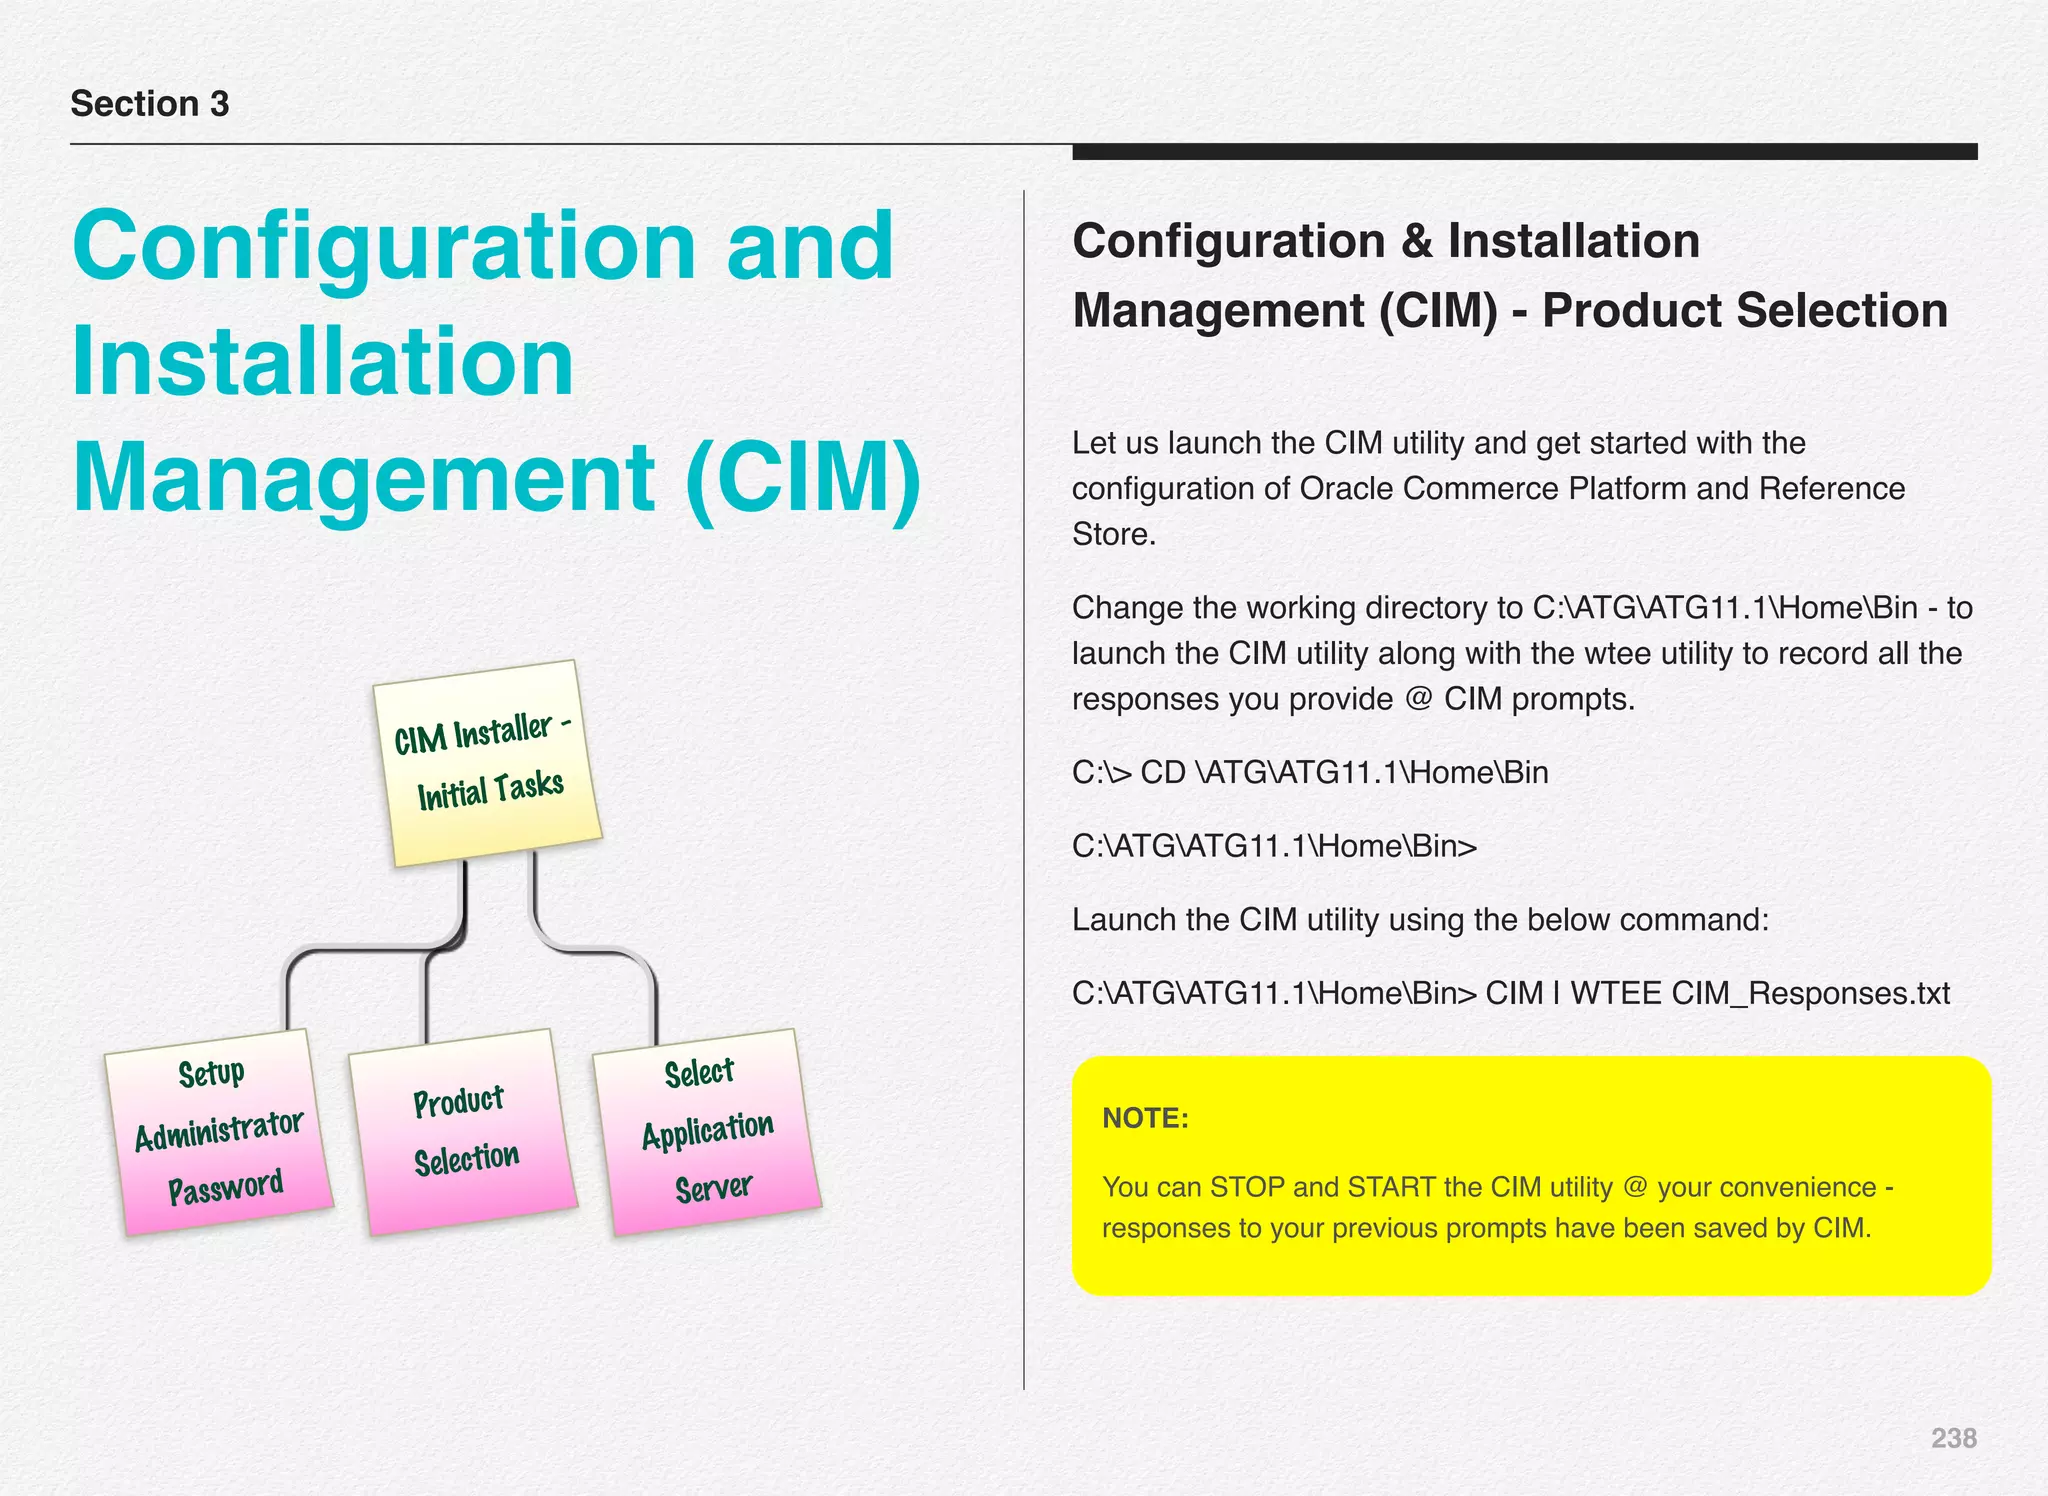
![239
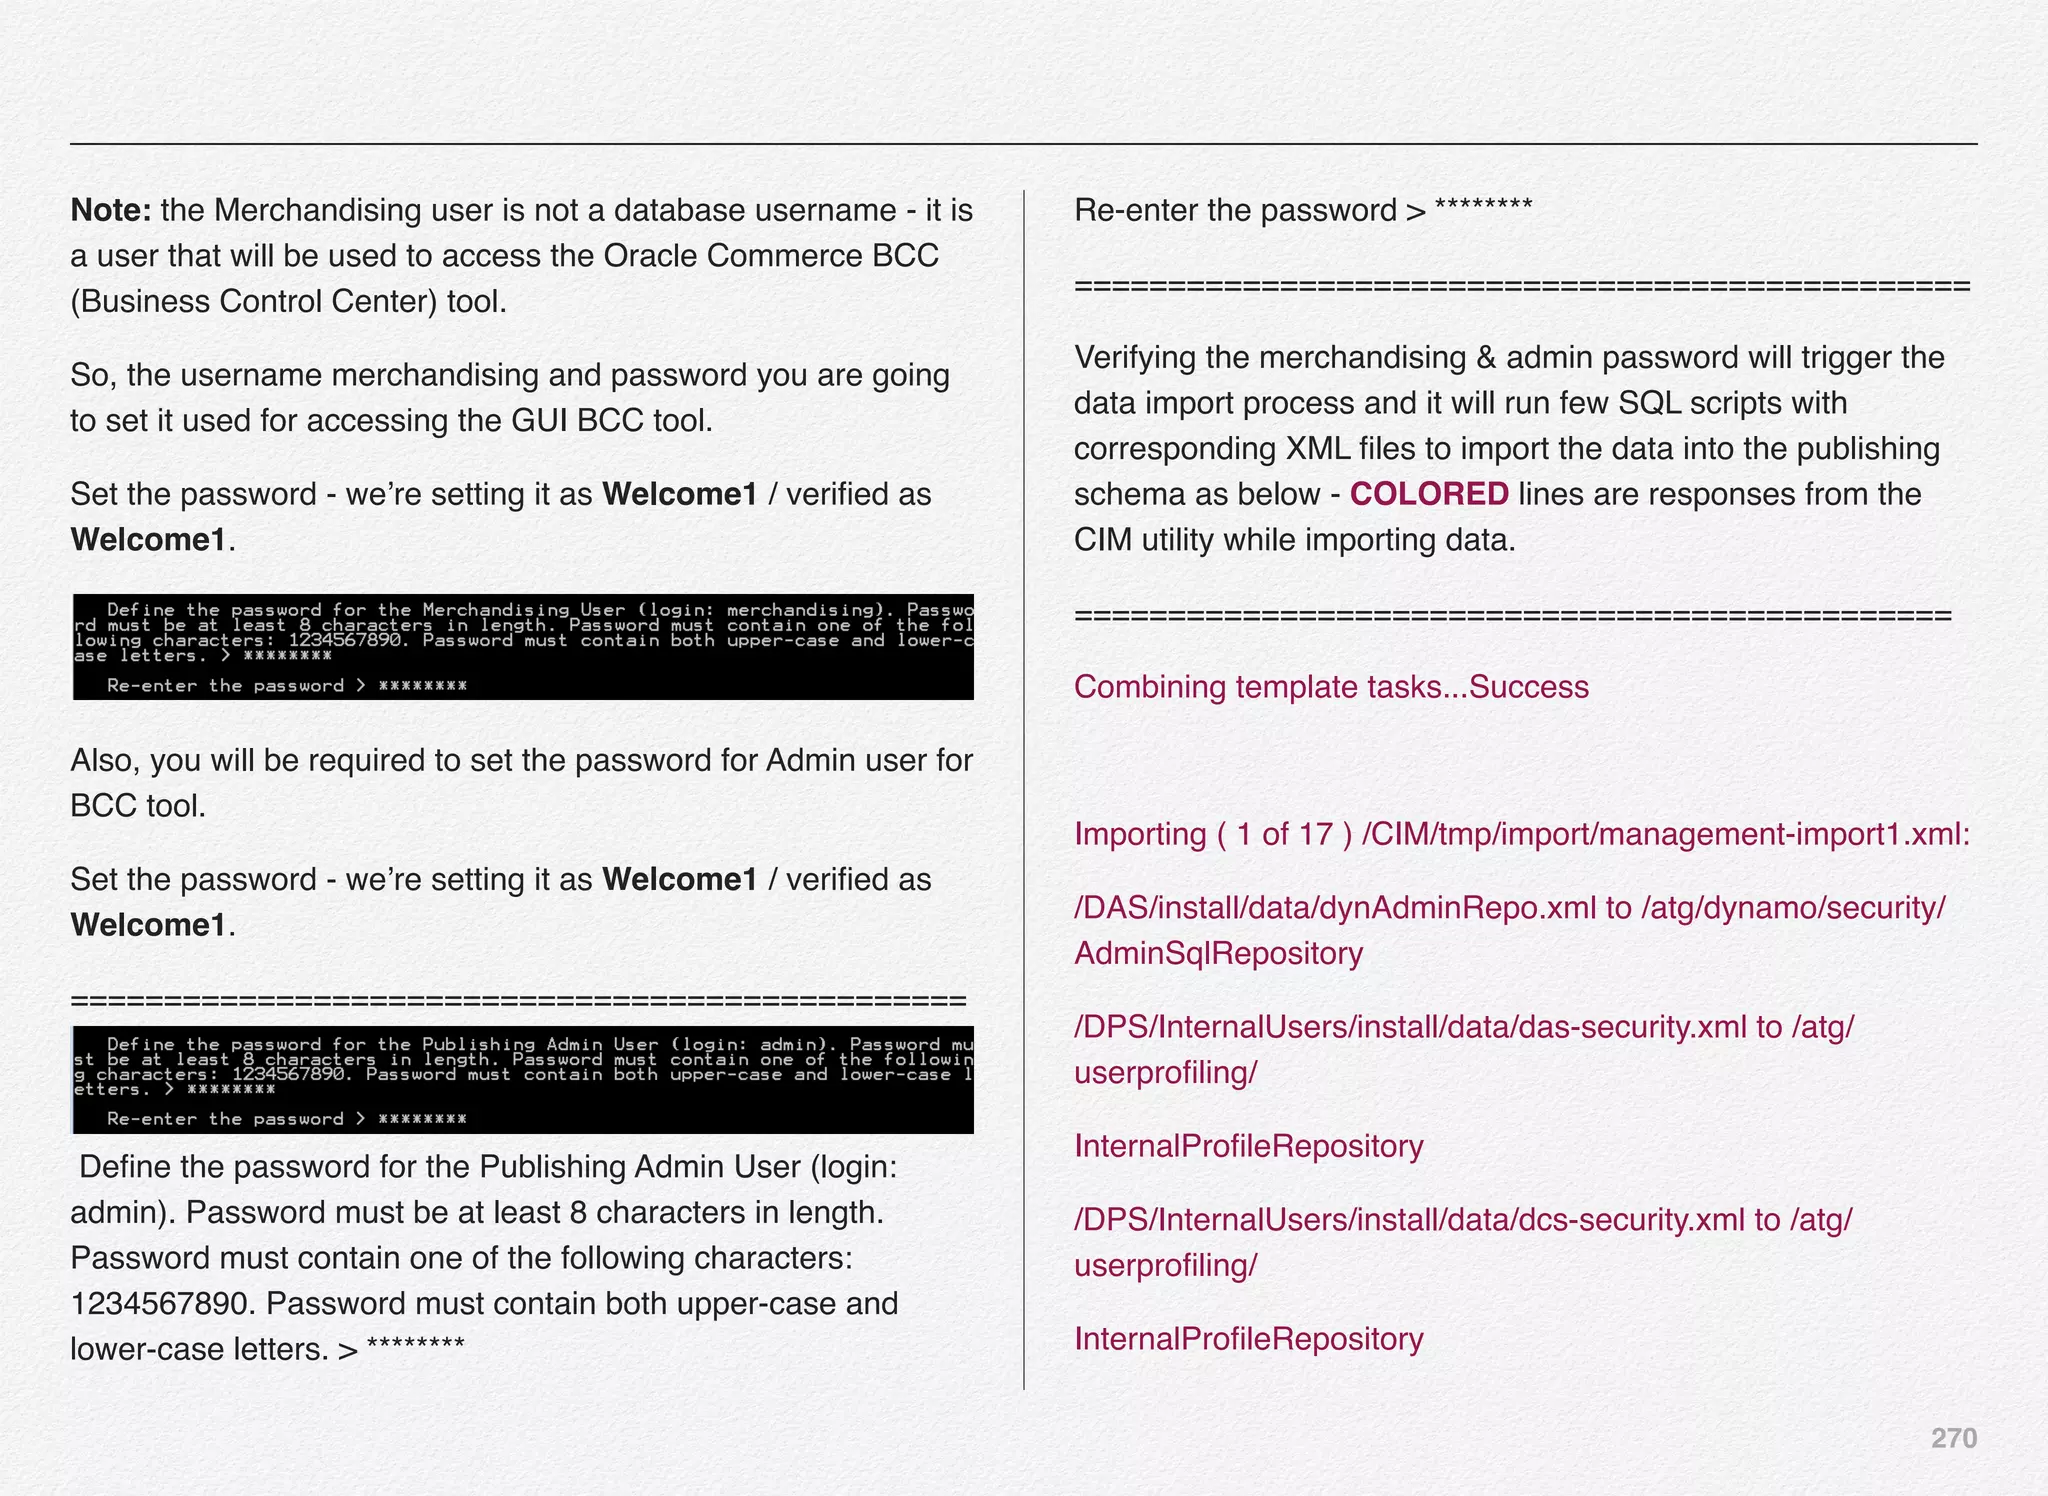
Once you launch the CIM you will se
some initial messages e.g. Nucleus
running and Starting the Oracle
Platform Security Services (OPSS) -
and will present you with the CIM Main
Menu.
You are now required to set the Oracle
Commerce Platform Administrator
Password. We will set it to Welcome1
for this installation.
The option [R] is already selected for
you to set the administrator password.
Make sure to follow the rules for setting
the password for the Administrator
account.
We decided to use Welcome1 - and will
use the same password for all of our
admin & merchandising accounts for
this setup.](https://image.slidesharecdn.com/oraclecommerce-doityourselfseries-160129151710/75/Oracle-Commerce-Using-ATG-Endeca-Do-It-Yourself-Series-240-2048.jpg)
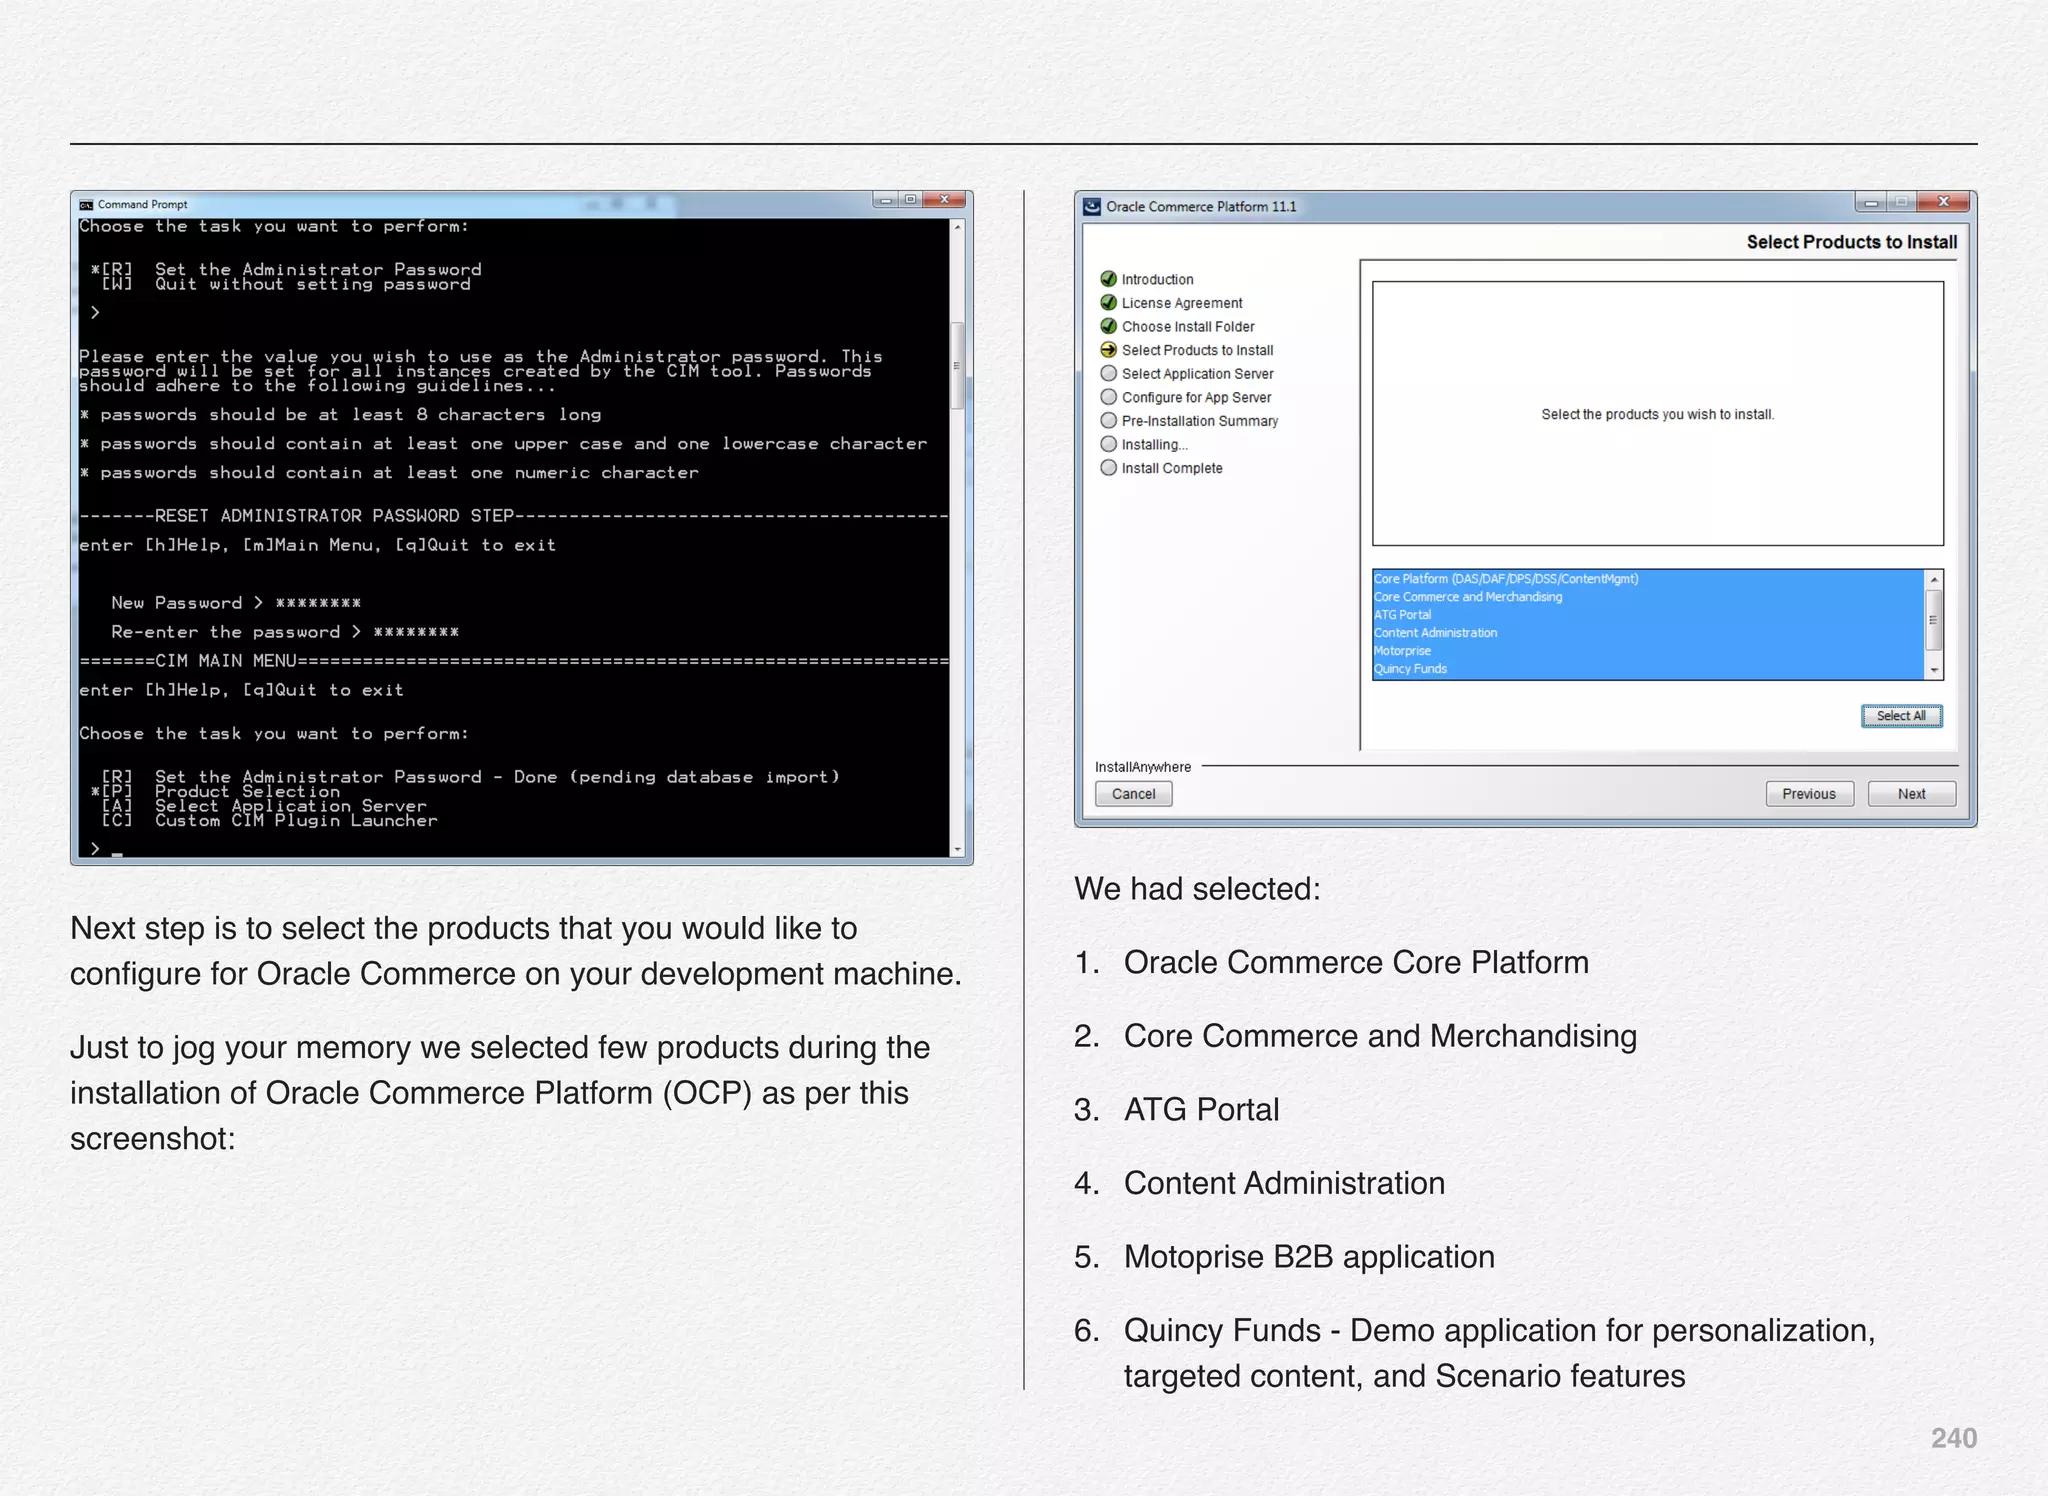
![241
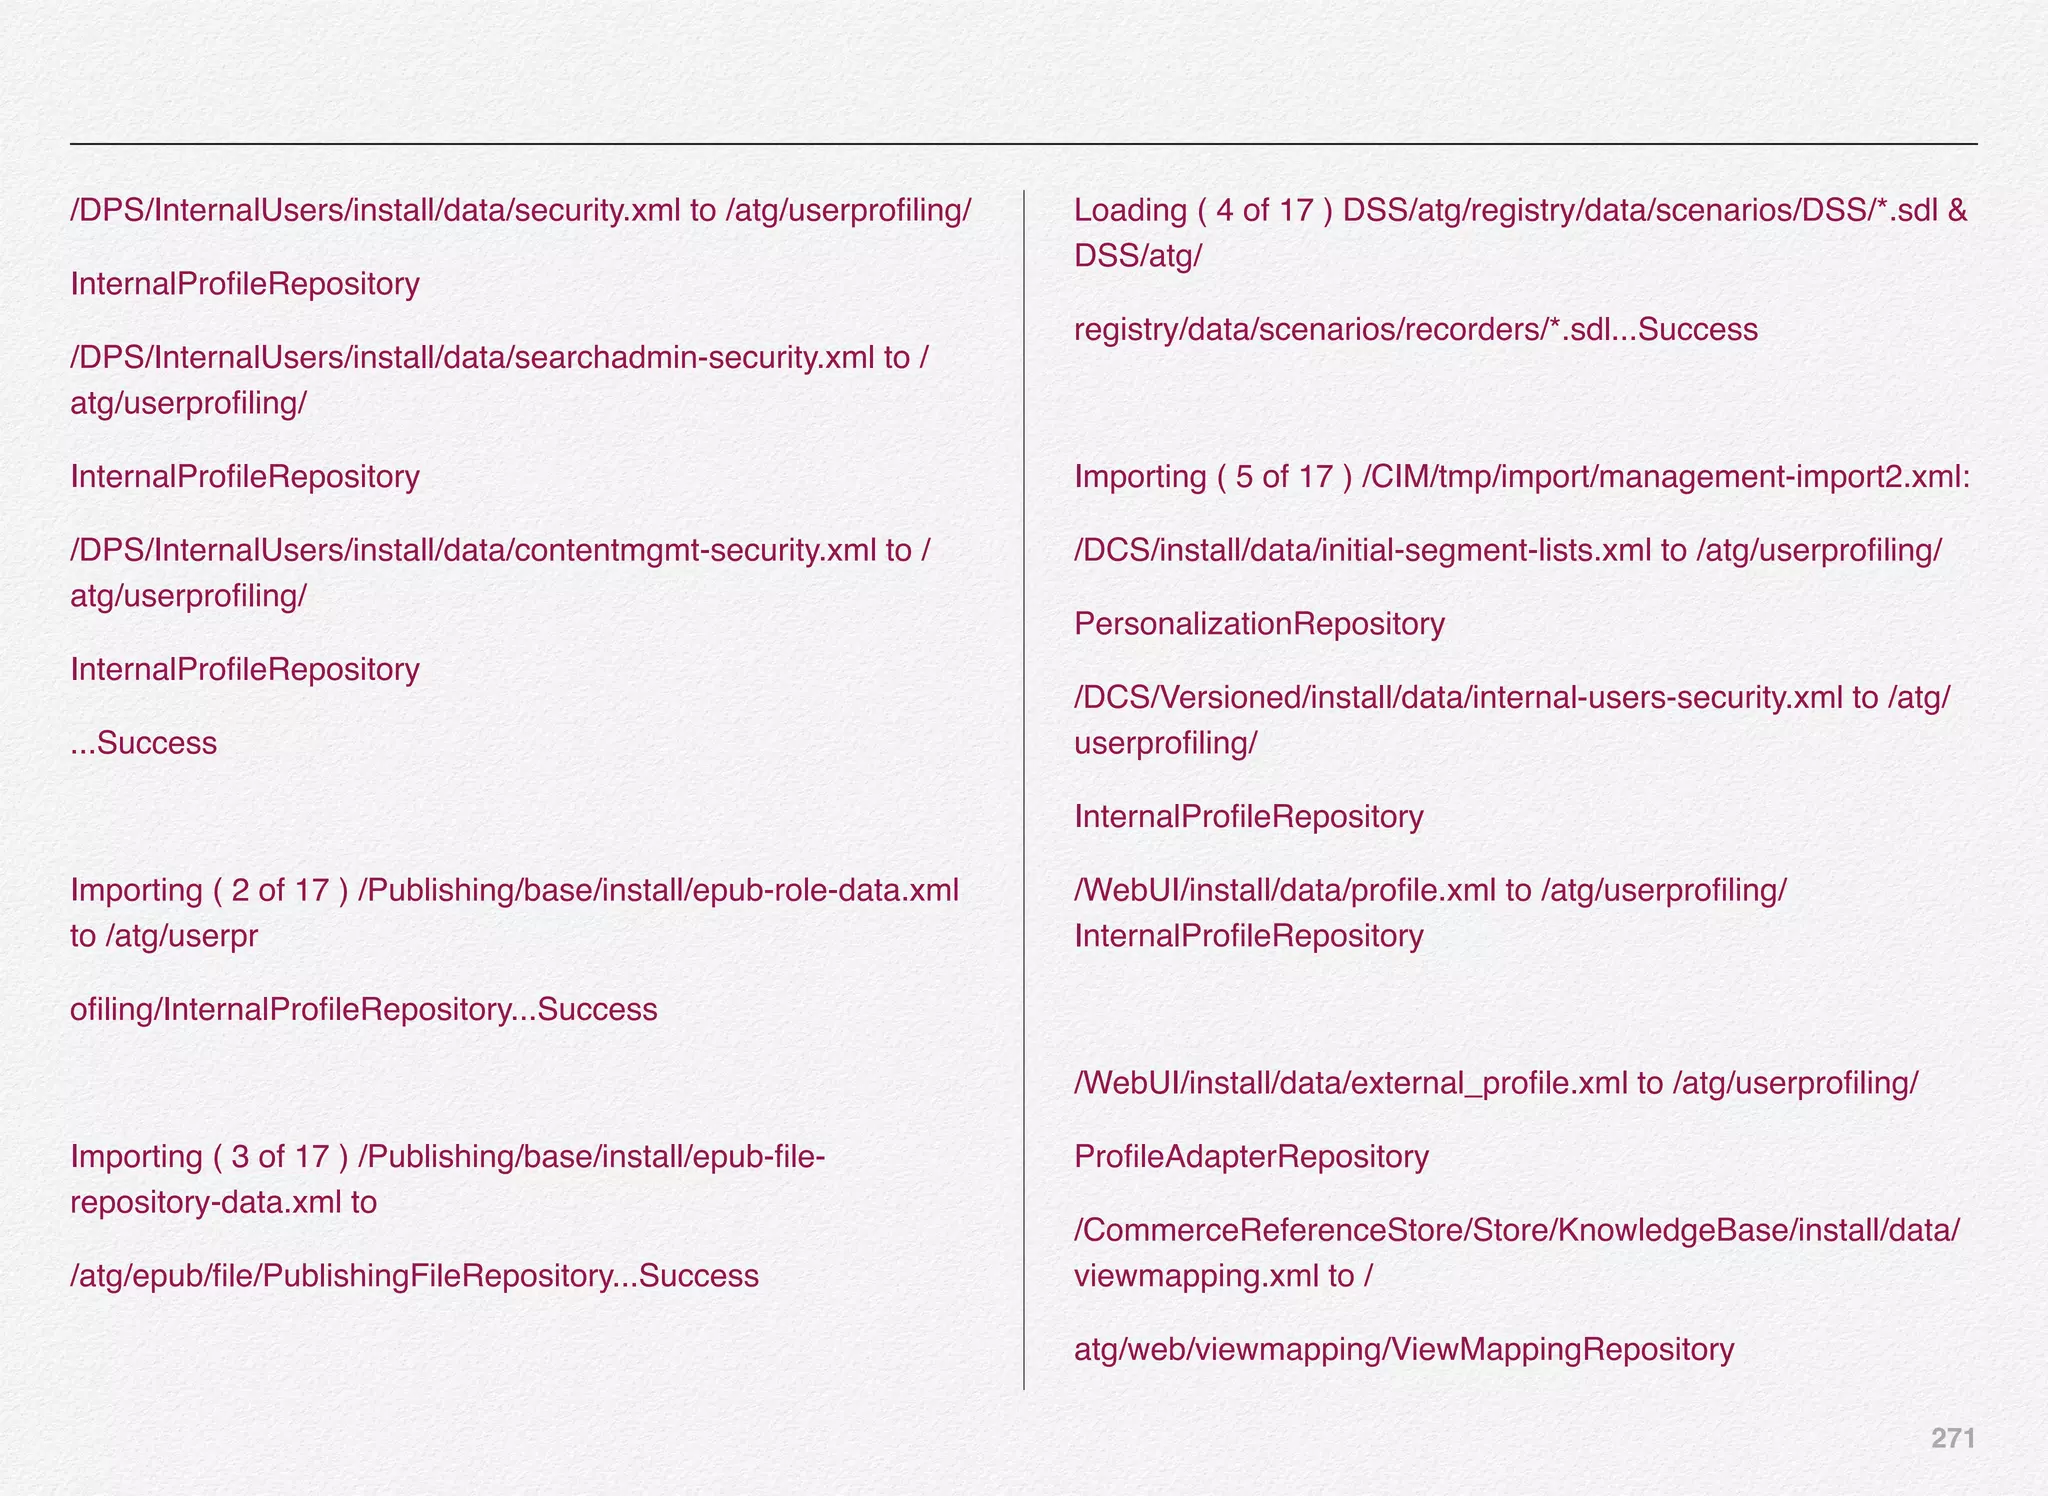
CIM then tries to verify the product folders
and presents you with the screen full of
options to choose from. Each option has
one or more products selected to be
configured as a part of the CIM guided
process.
For example, Option [9] includes:
1. Oracle Commerce Platform
2. Oracle Commerce Platform-guided
Search Integration
3. Content Administration
4. Site Administration
5. Core Commerce
6. Merchandising
7. Data warehouse components
8. Preview
Select Option [9] followed by the option [D] to continue with the configuration.](https://image.slidesharecdn.com/oraclecommerce-doityourselfseries-160129151710/75/Oracle-Commerce-Using-ATG-Endeca-Do-It-Yourself-Series-242-2048.jpg)
![242
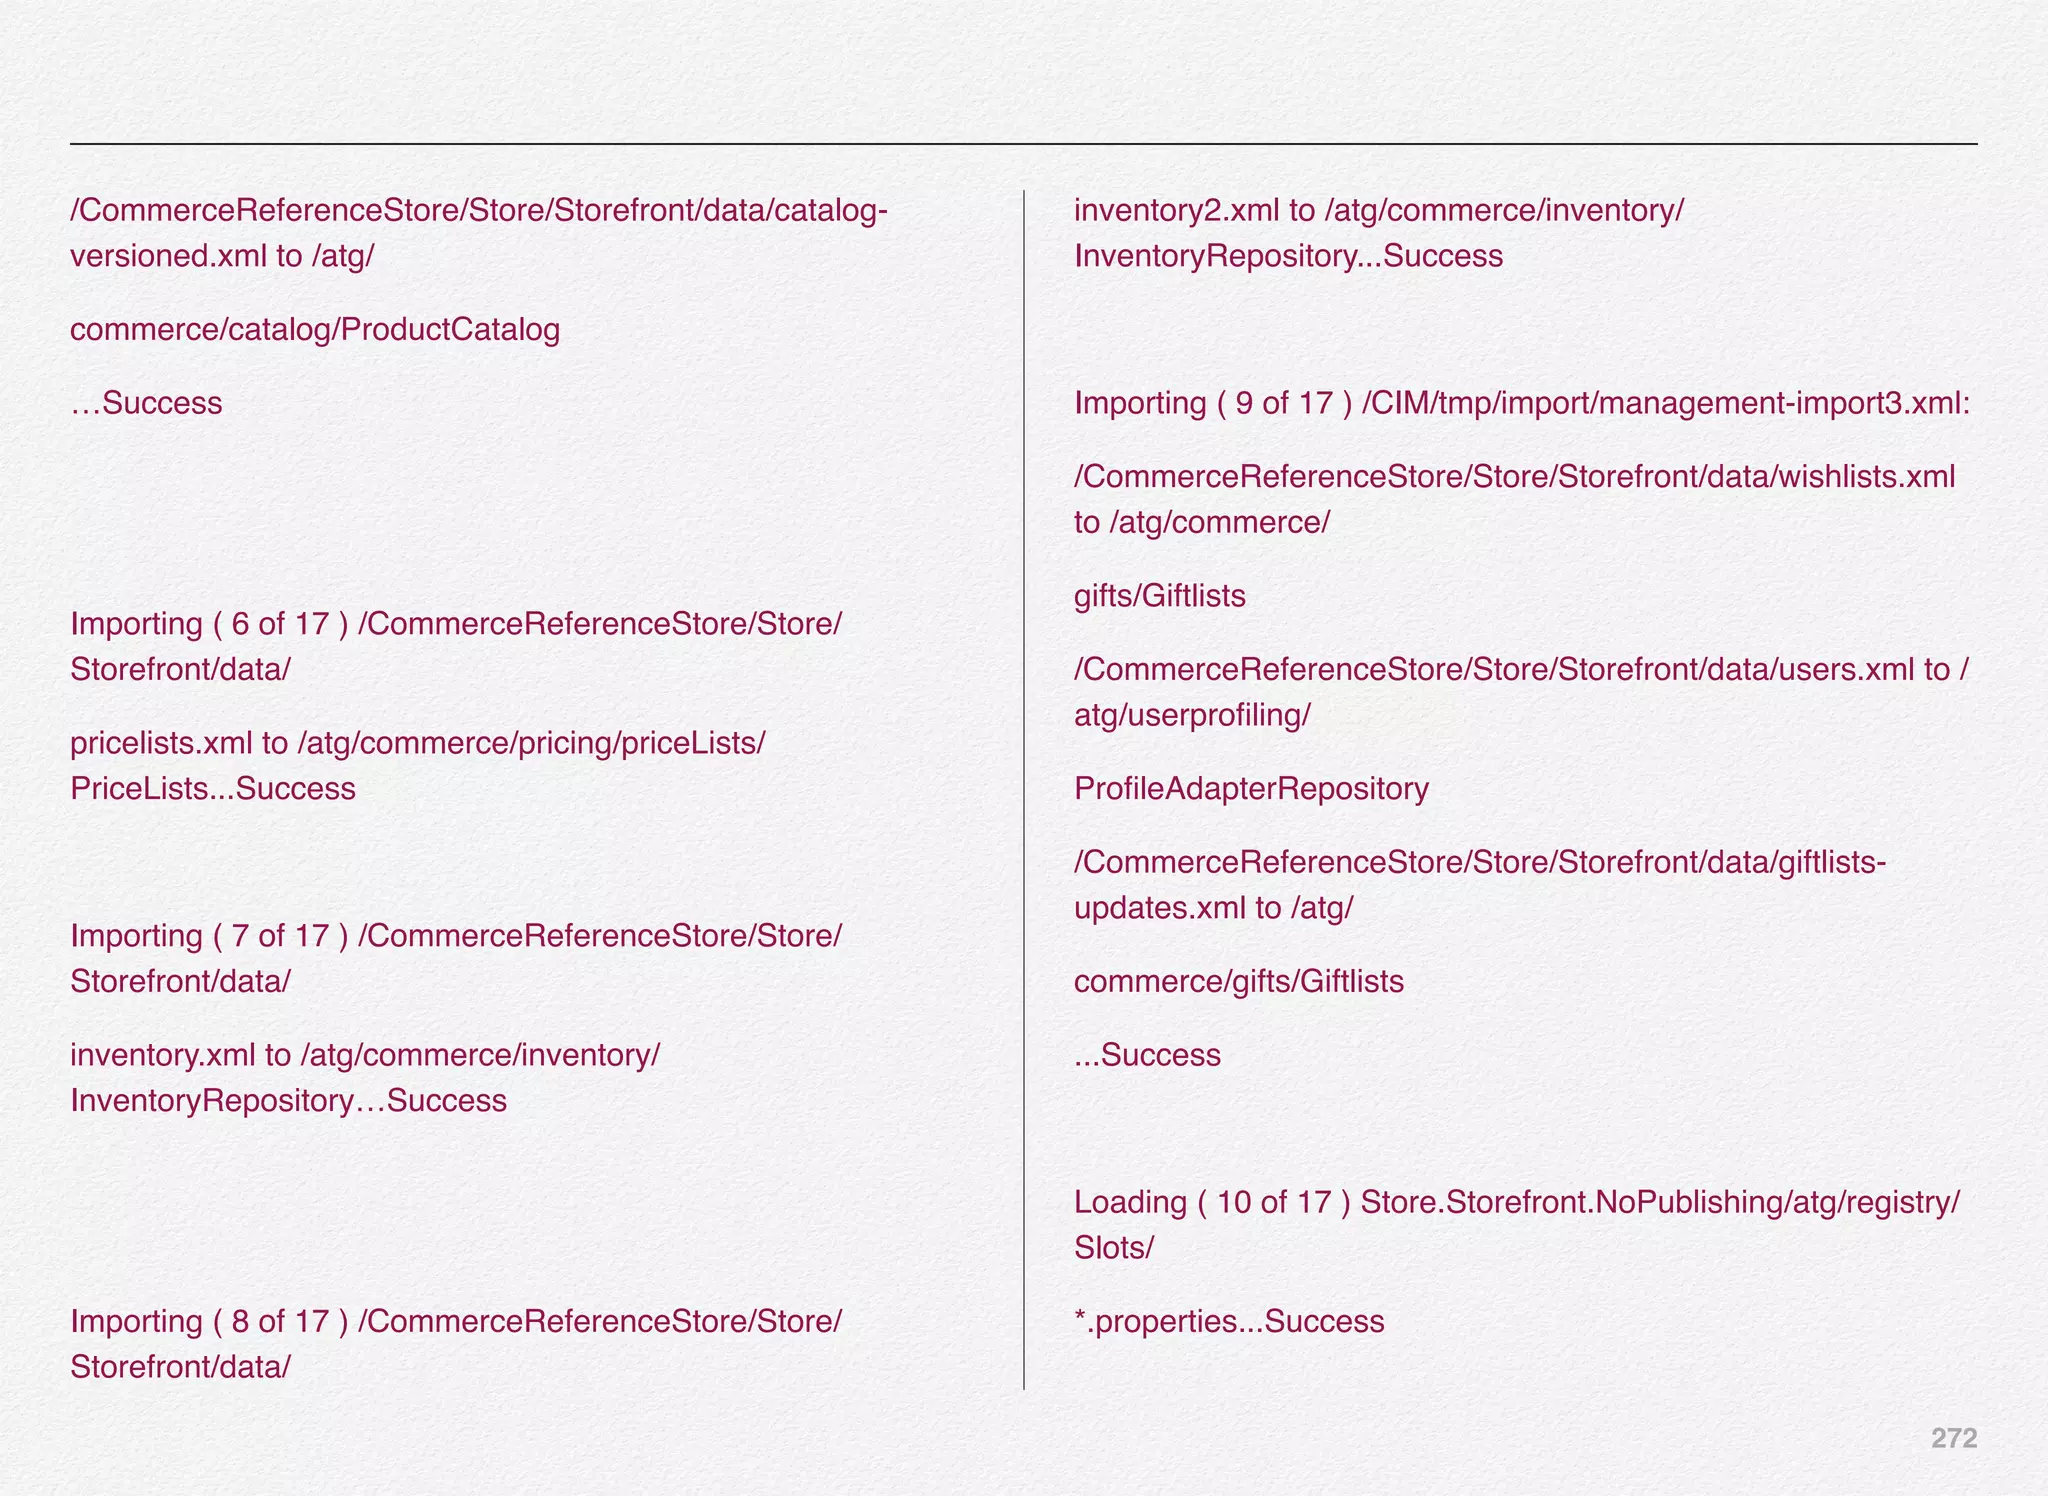
Once you select the option [D] to
continue, the CIM utility
automatically selects some of the
add-ons to be installed/configured
based on the choice of product
selection in previous step.
You will notice that the add-ons
Commerce Search & Merchandising
UI have been automatically included.
You have few more add-ons
available to pick from the AddOns
menu.
We will select options [2] [4] [5] [6].
Select [D] to continue](https://image.slidesharecdn.com/oraclecommerce-doityourselfseries-160129151710/75/Oracle-Commerce-Using-ATG-Endeca-Do-It-Yourself-Series-243-2048.jpg)
![243
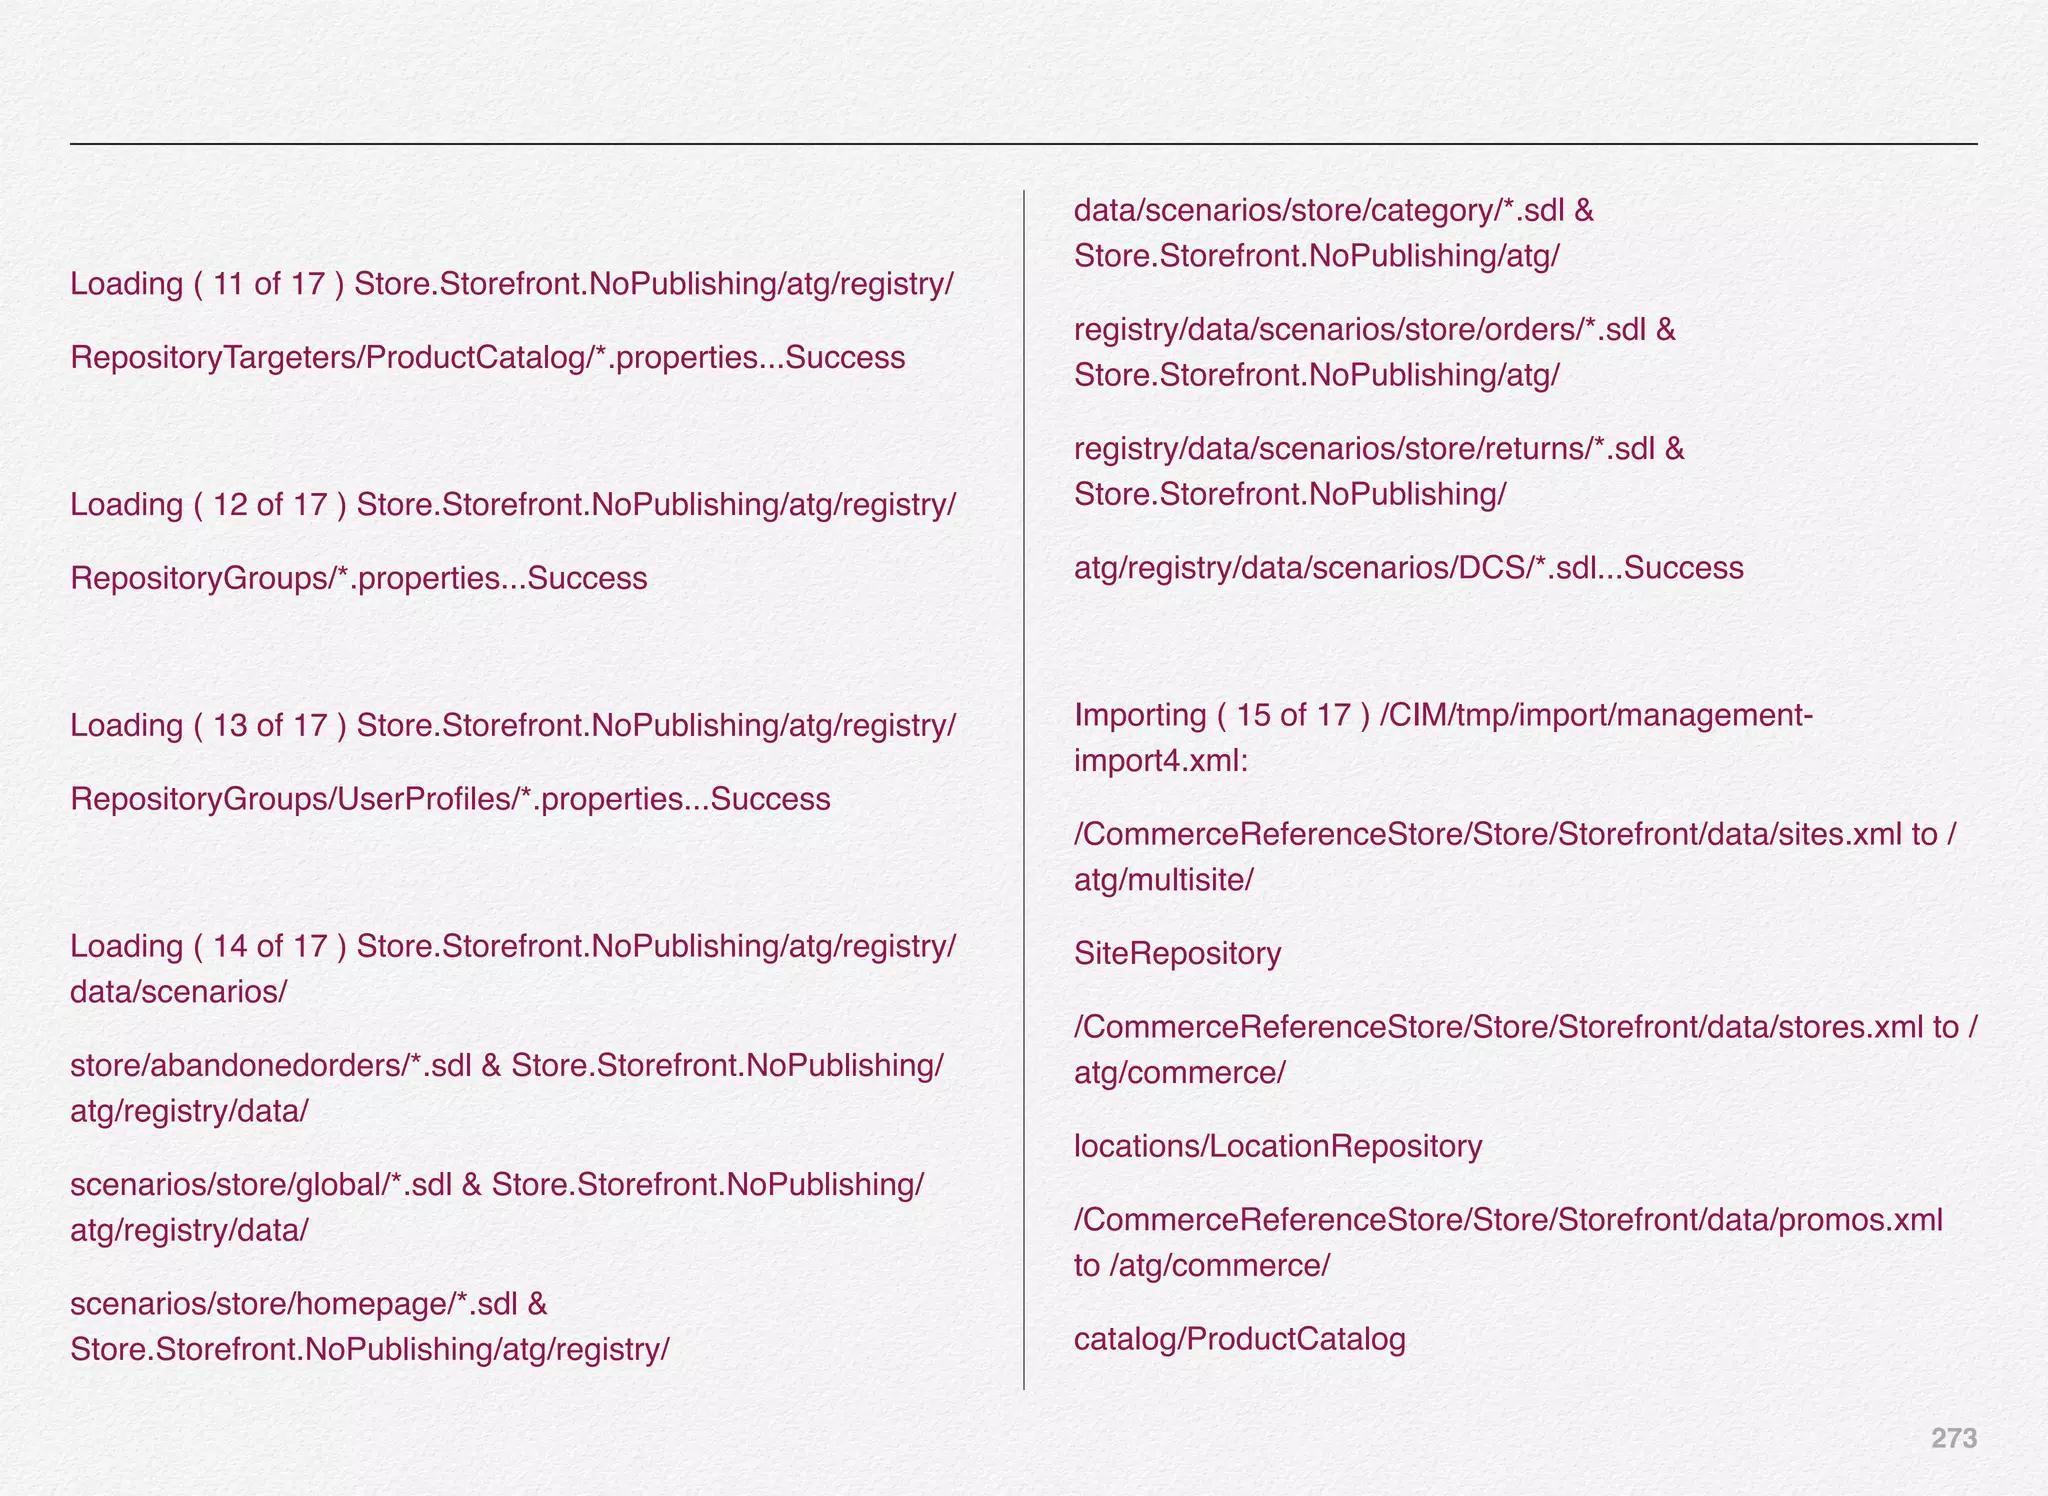
We will select optional Addons such as Staging Server, SSO,
Preview Server, and Abandoned Order Services.
Select [D] to continue
Staging Server - Most companies in the real world have
several environments for code deployment and validations, e.g
DIT (development), SIT (system test), Staging (pre-production),
and Live/Production. The staging environment in a way mimics
the production environment. In Oracle Commerce world - the
stating server is going to mimic the production EAR - while
pointing to its own non-versioned data source / repository.
SSO - Single Sign-on Server to establish links between the
sign-in process for BCC and Experience Manager.
Preview Server - If you want to provide preview capabilities to
the authors / business owners / content creators - you will have
to configure and setup preview server.
Abandoned Order Services - Visitors and customers tend to
abandon order or shopping cart during the process of learn/
explore/order - where they adds items to the order/cart but
never check out. Instead, the customer simply exits the Web
site, thus “abandoning” the incomplete order.
Oracle Commerce’s Abandoned Order Services is a module
designed specifically to address this use case and provides you
with a collection of services and tools that enable you to detect,
respond to, and report on the abandoned orders or shopping
carts.
This module helps business owners / marketers use their
marketing dollars more effectively by providing them
opportunity to carryout effective campaigns and help these
visitors/customers close the orders by completing them with
special offers/discounts.](https://image.slidesharecdn.com/oraclecommerce-doityourselfseries-160129151710/75/Oracle-Commerce-Using-ATG-Endeca-Do-It-Yourself-Series-244-2048.jpg)
![244
Since we selected Option [4] in previous menu we need to
select our mechanism for SSO authentication. Oracle
Commerce supports 2 types of SSO authentication
mechanisms:
1) Commerce Only SSO Authentication - which is basically
single sign-on just between Oracle Commerce ATG & Oracle
Commerce Guided Search / Experience Manager (Endeca).
2) OAM (Oracle Access Manager) authentication - Oracle
Access Management (OAM) is a component of the Oracle
Identity and Access Management (OIM) software suite, is an
enterprise-level security application that allows you to
configure a number of security functions, including Single
Sign On (SSO). If your organization is using the OAM for
various applications (internal) - you can use the SSO
function of the OAM to authenticate the users
Select [1] to select the “Commerce Only SSO Authentication”
option.
Also, select if you are planning to use internal LDAP Server
based SSO Authentication. If you don’t have LDAP Server
Authentication or don’t want to setup at this time - Select [D] to
mark this option done and continue.](https://image.slidesharecdn.com/oraclecommerce-doityourselfseries-160129151710/75/Oracle-Commerce-Using-ATG-Endeca-Do-It-Yourself-Series-245-2048.jpg)
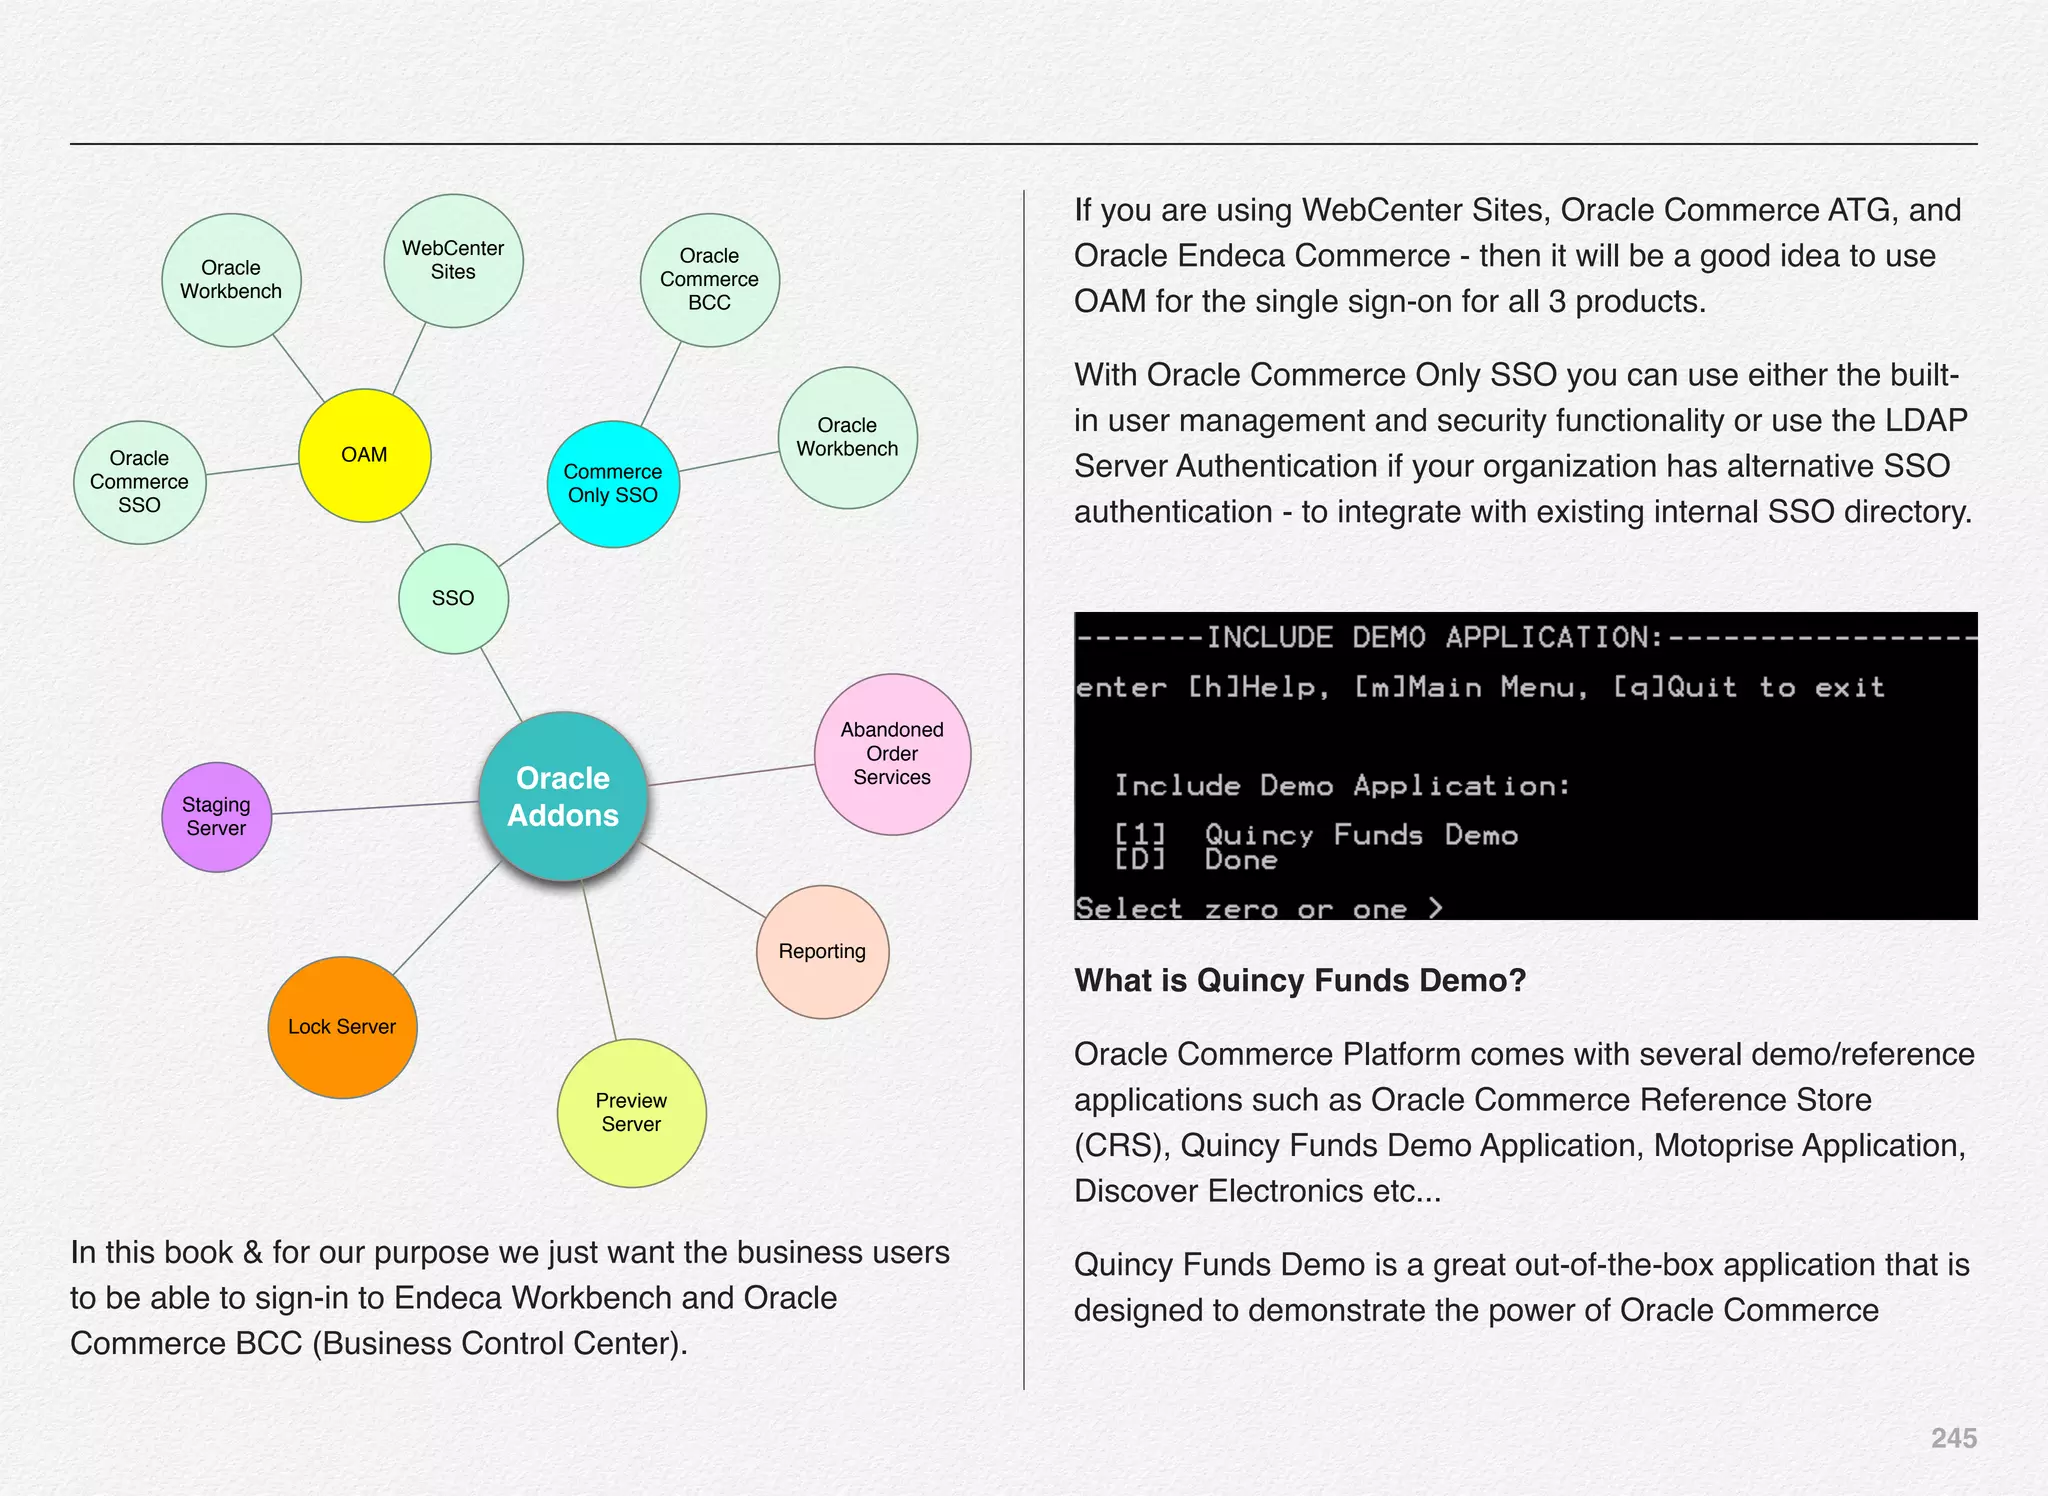
![246
Platform web site capabilities - specifically in the area of
personalization and scenarios.
Following are some of the areas that are @ the center of focus
in this application:
• Real-time Profiling Features
• User Segmentation
• Content Targeting
• Scenarios
We will select the Quincy Funds Demo application to be
installed/configured as a part of this process and come back
later in the book to review above features.
Select [1] and [D] to continue
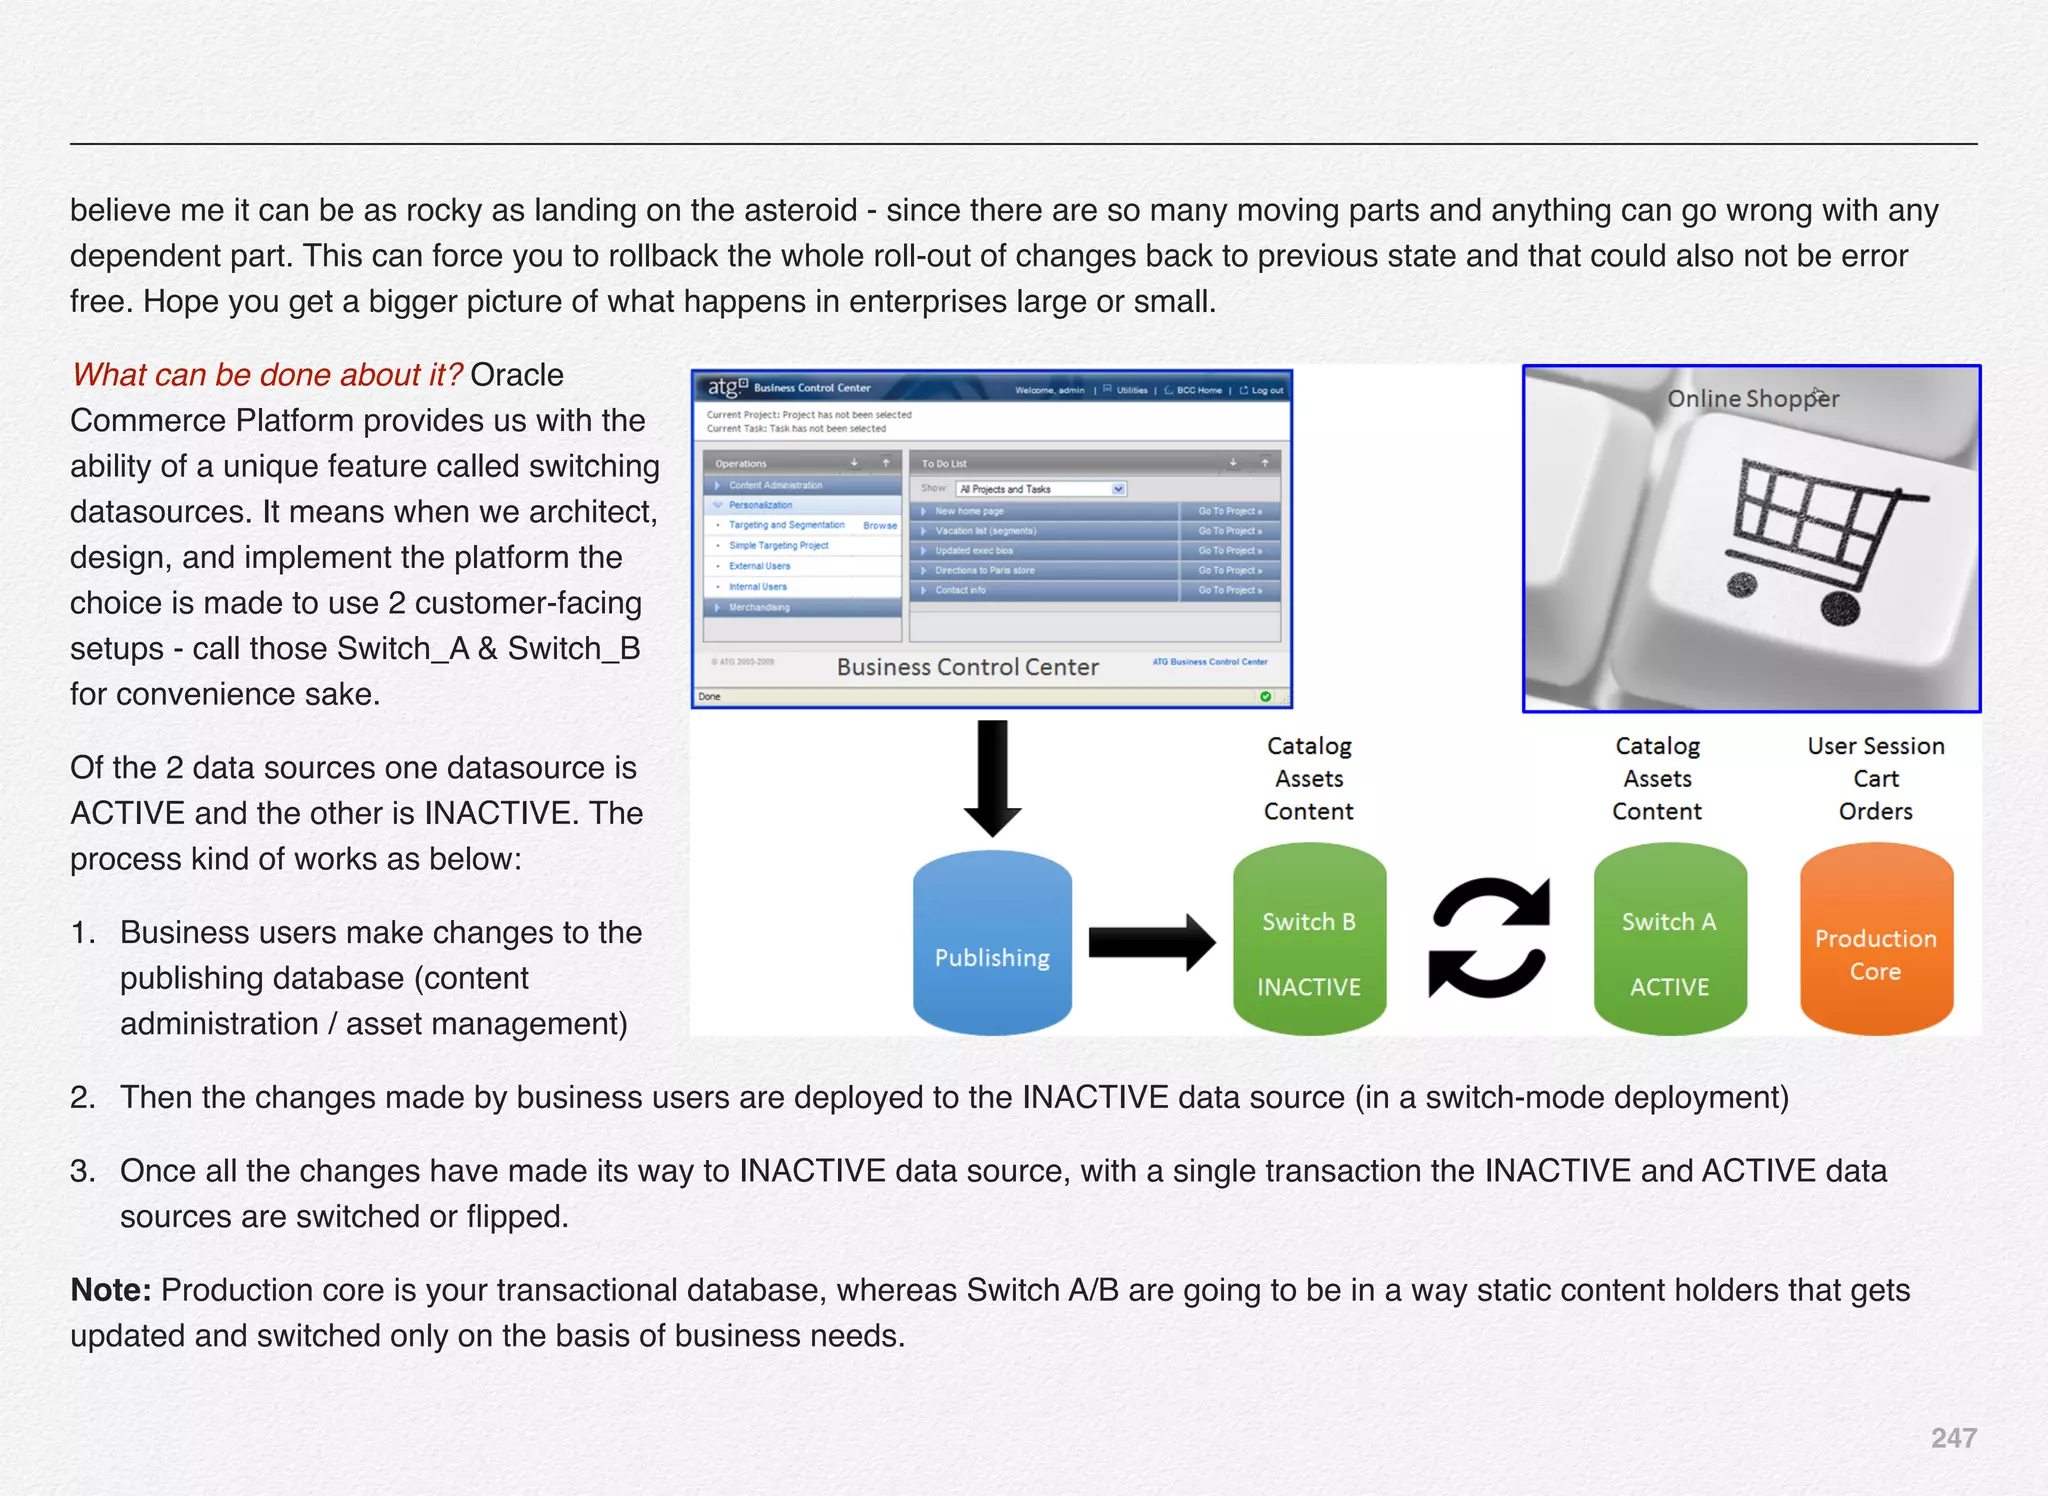
Next step is a decision point for you to pick between Switching
and Non-Switching Data Source.
You might wonder about the terminology and its role in the way
we configure our deployment.
Let me give some background here - most of the enterprise
application would face the challenge on what to do when there
is a new release going live especially in the area of application
and database.
How do we keep the site running for 24x7 and still go ahead
with deploying the changes without impacting the customer
experience. When to flip the switch?
Most of the cases what we’ve observed is we keep some DB or
APP server in cluster - deploy the new code/db on others and
then once these APP/DB servers are ready we move them in
and out of cluster. This is all done in a traditional way.
With tools that business uses today - they could be engaged in
rolling out thousands of changes at a time from the content
management systems to the live sites (customer facing). And,](https://image.slidesharecdn.com/oraclecommerce-doityourselfseries-160129151710/75/Oracle-Commerce-Using-ATG-Endeca-Do-It-Yourself-Series-247-2048.jpg)
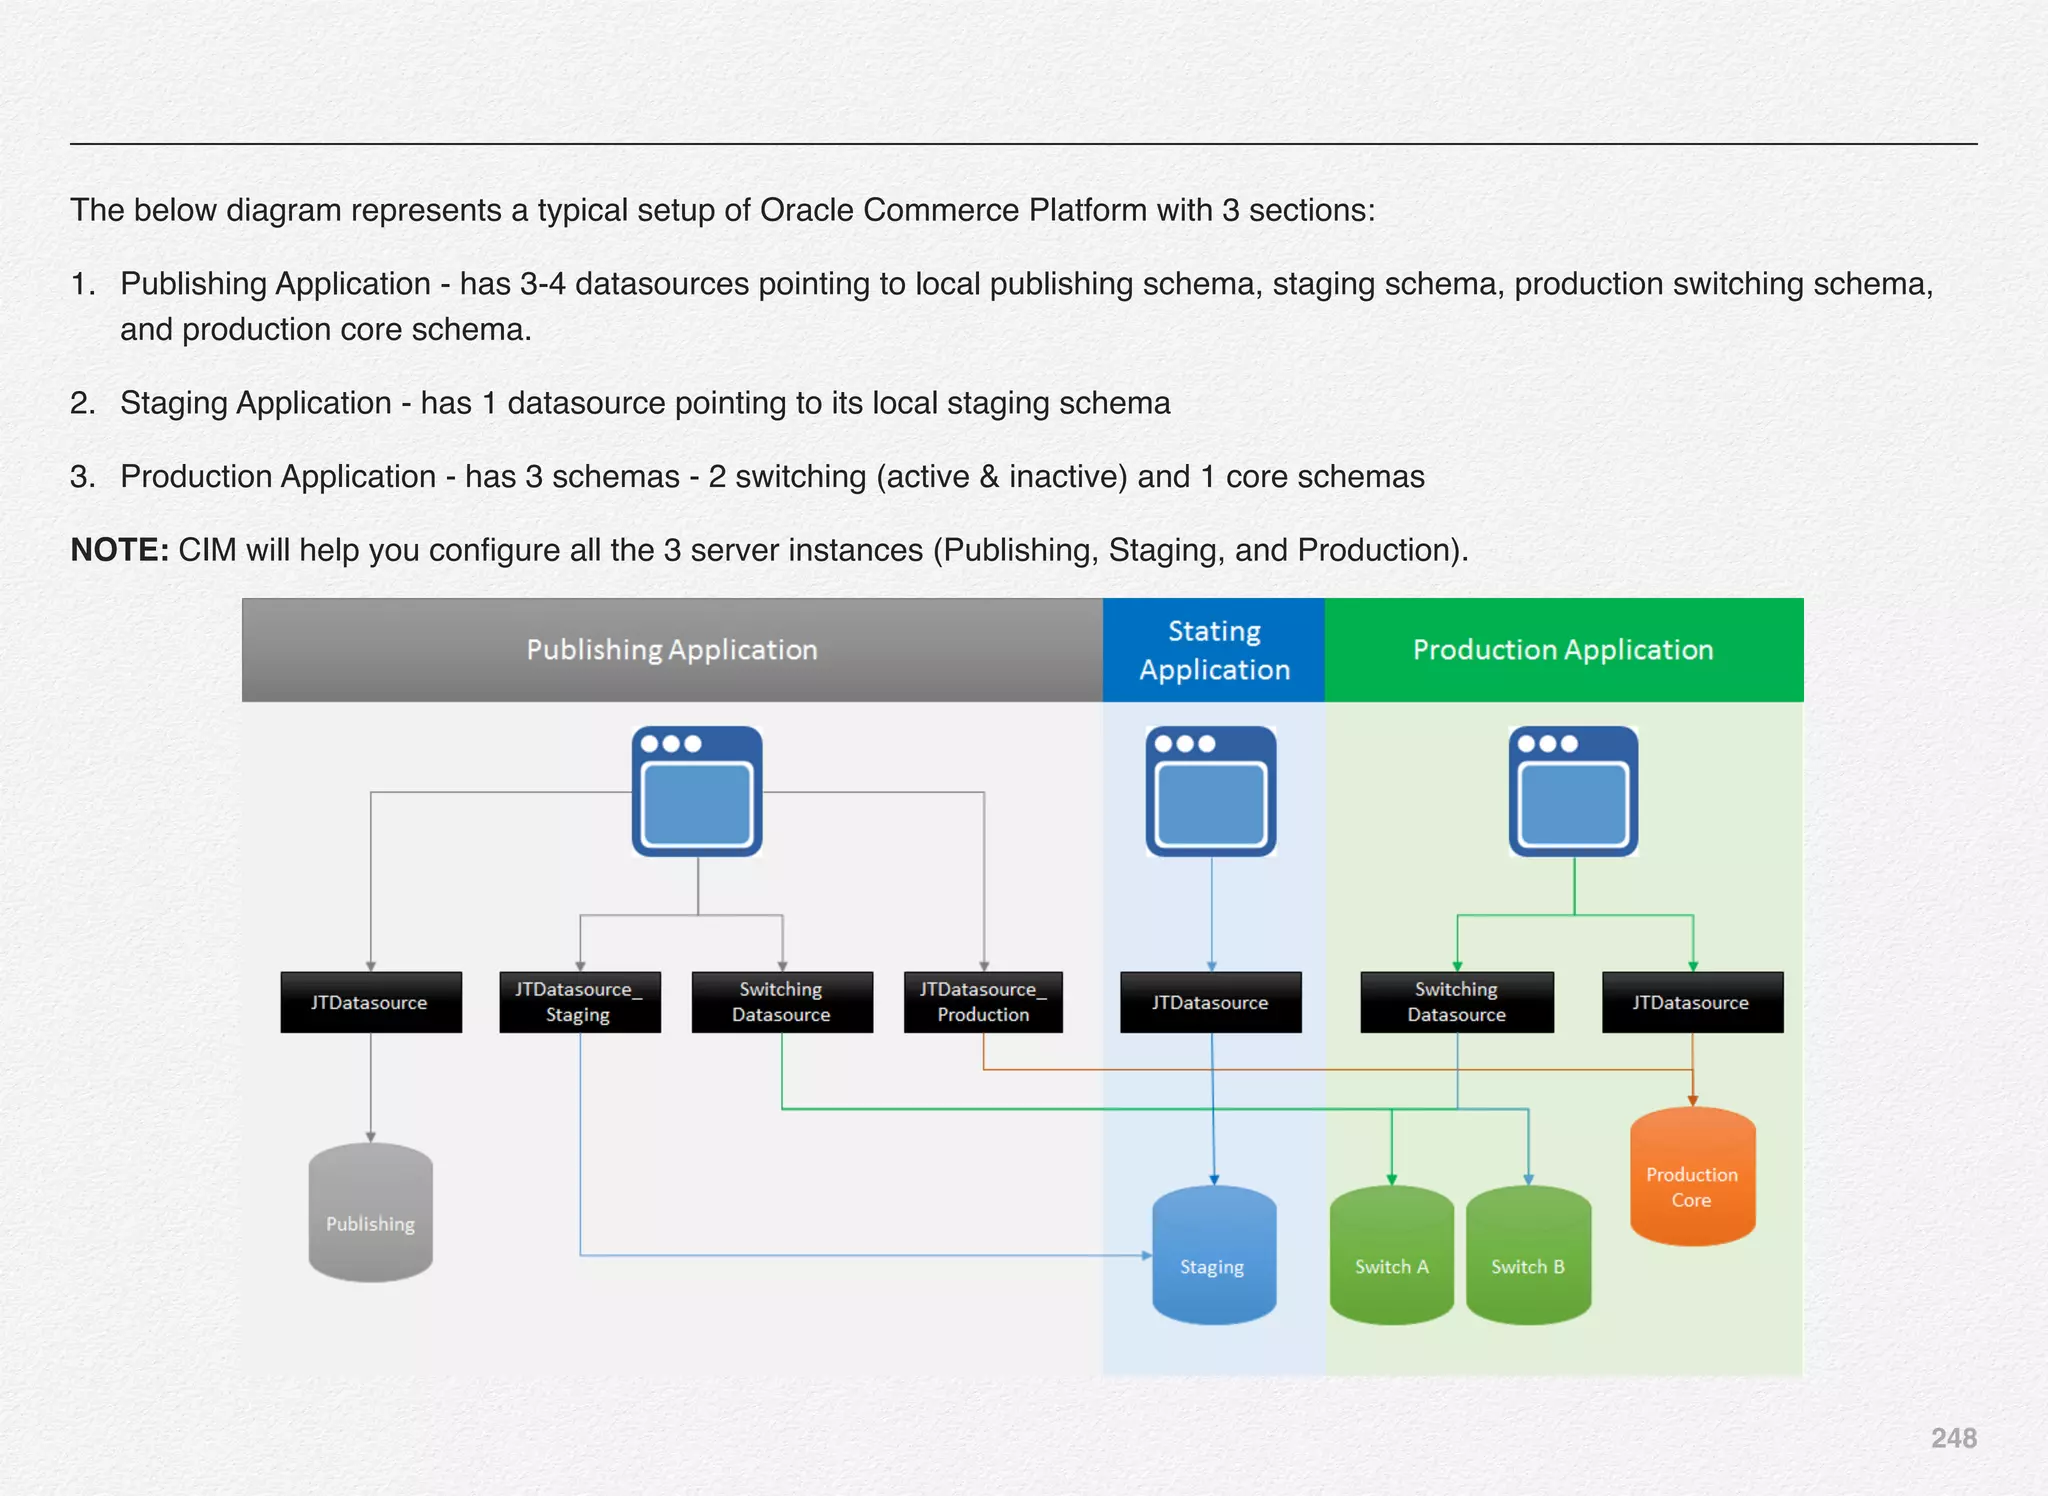
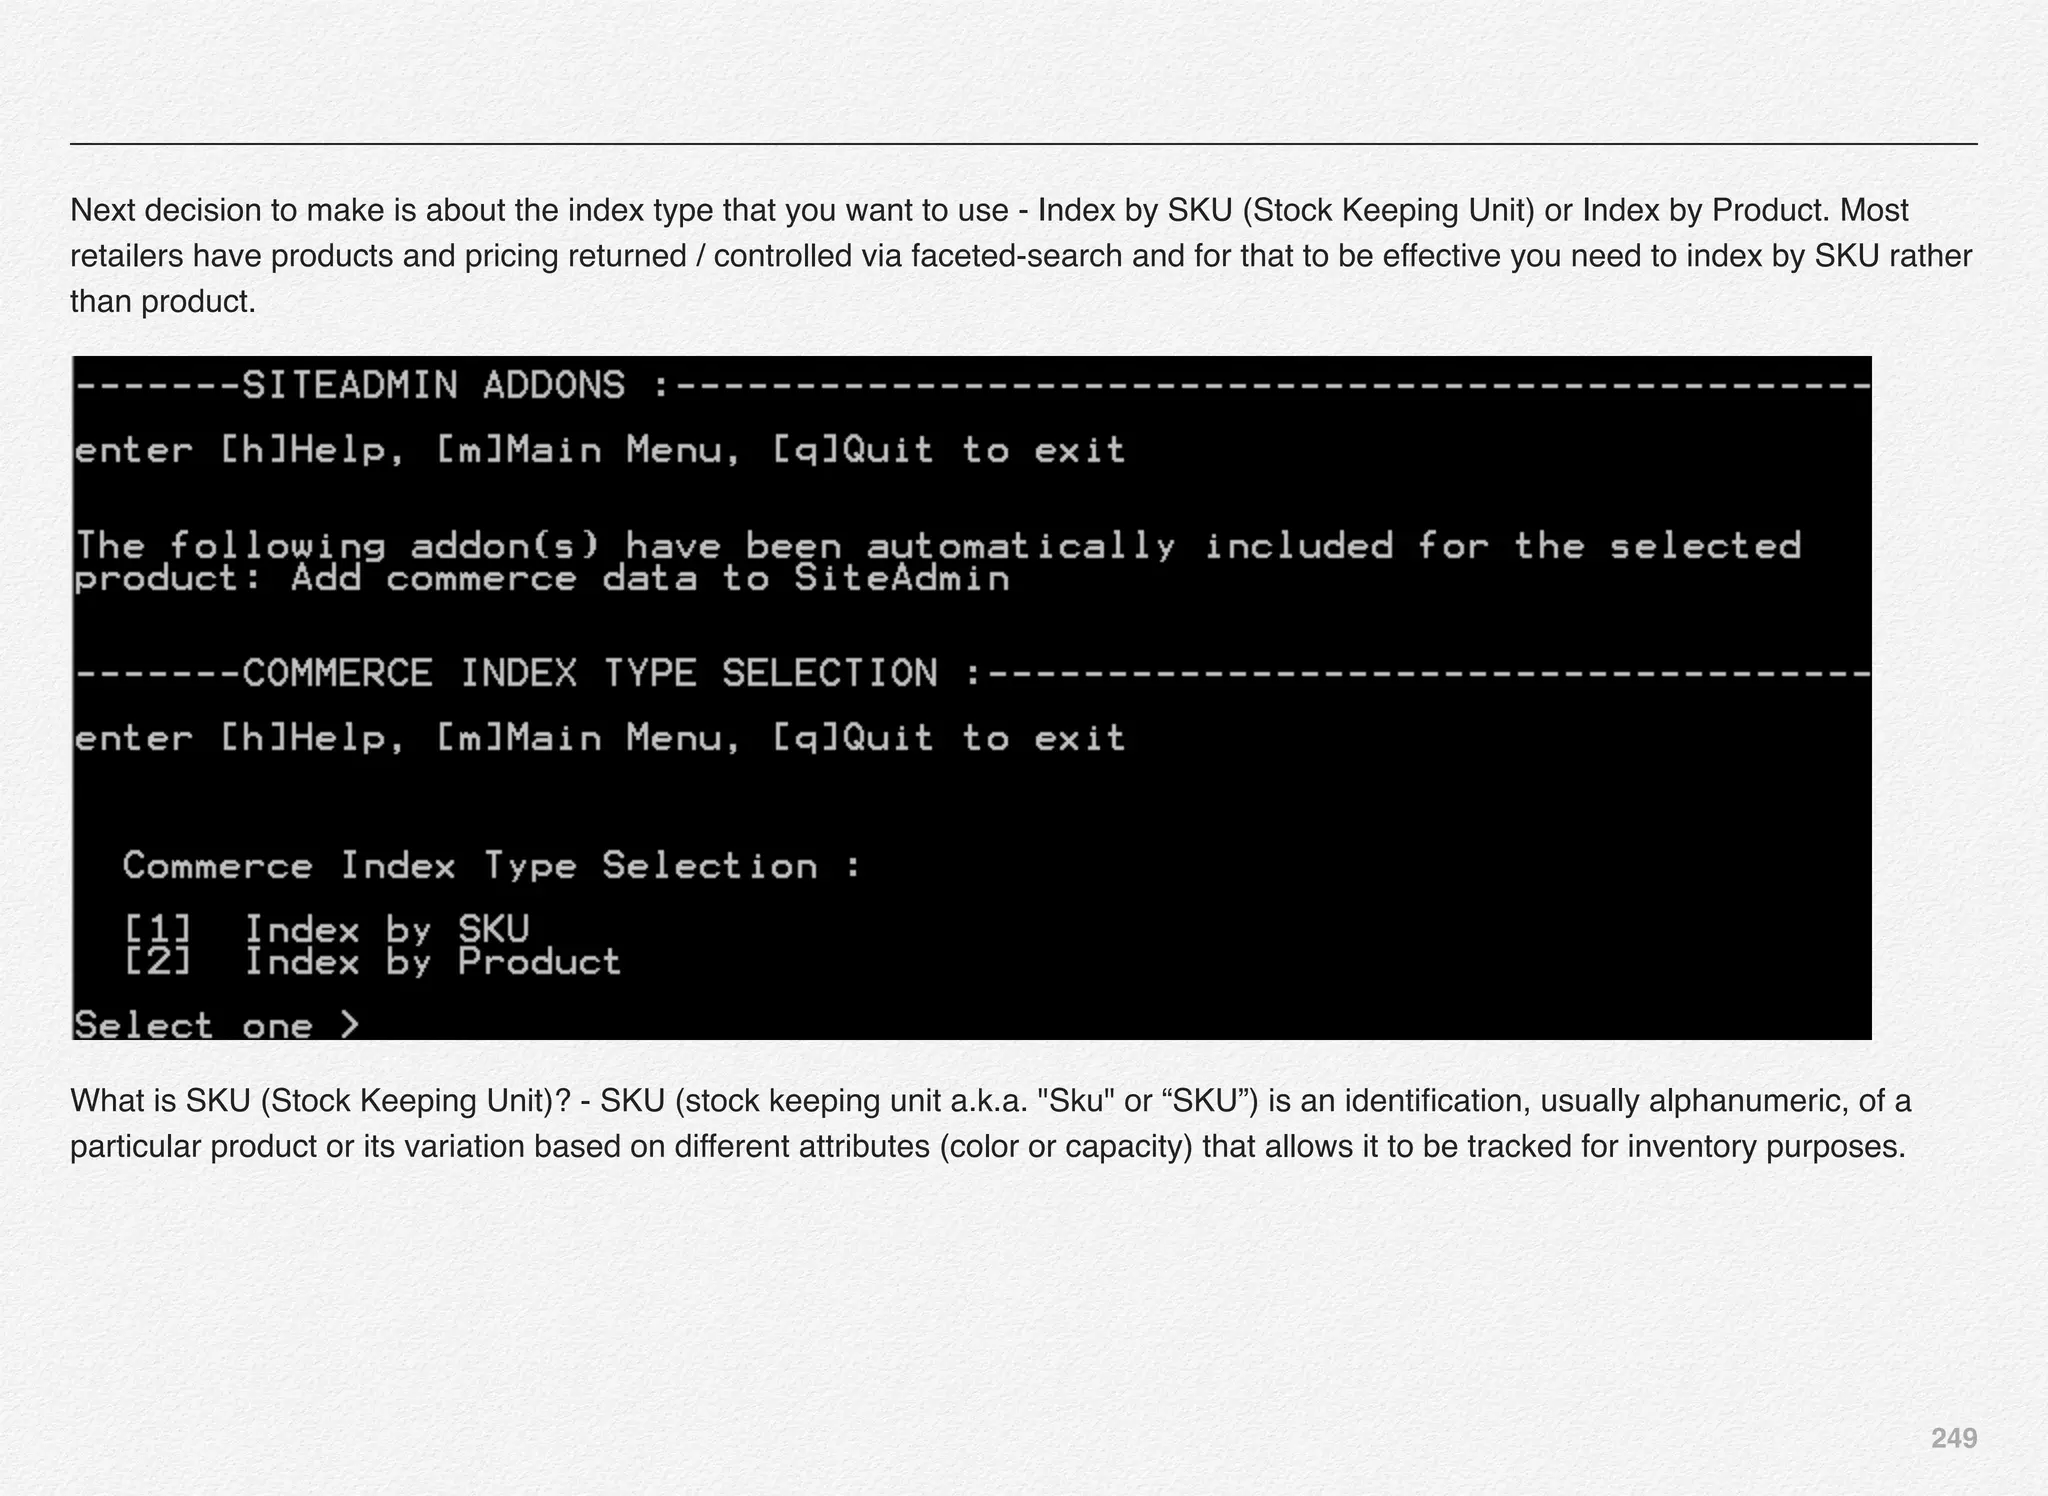
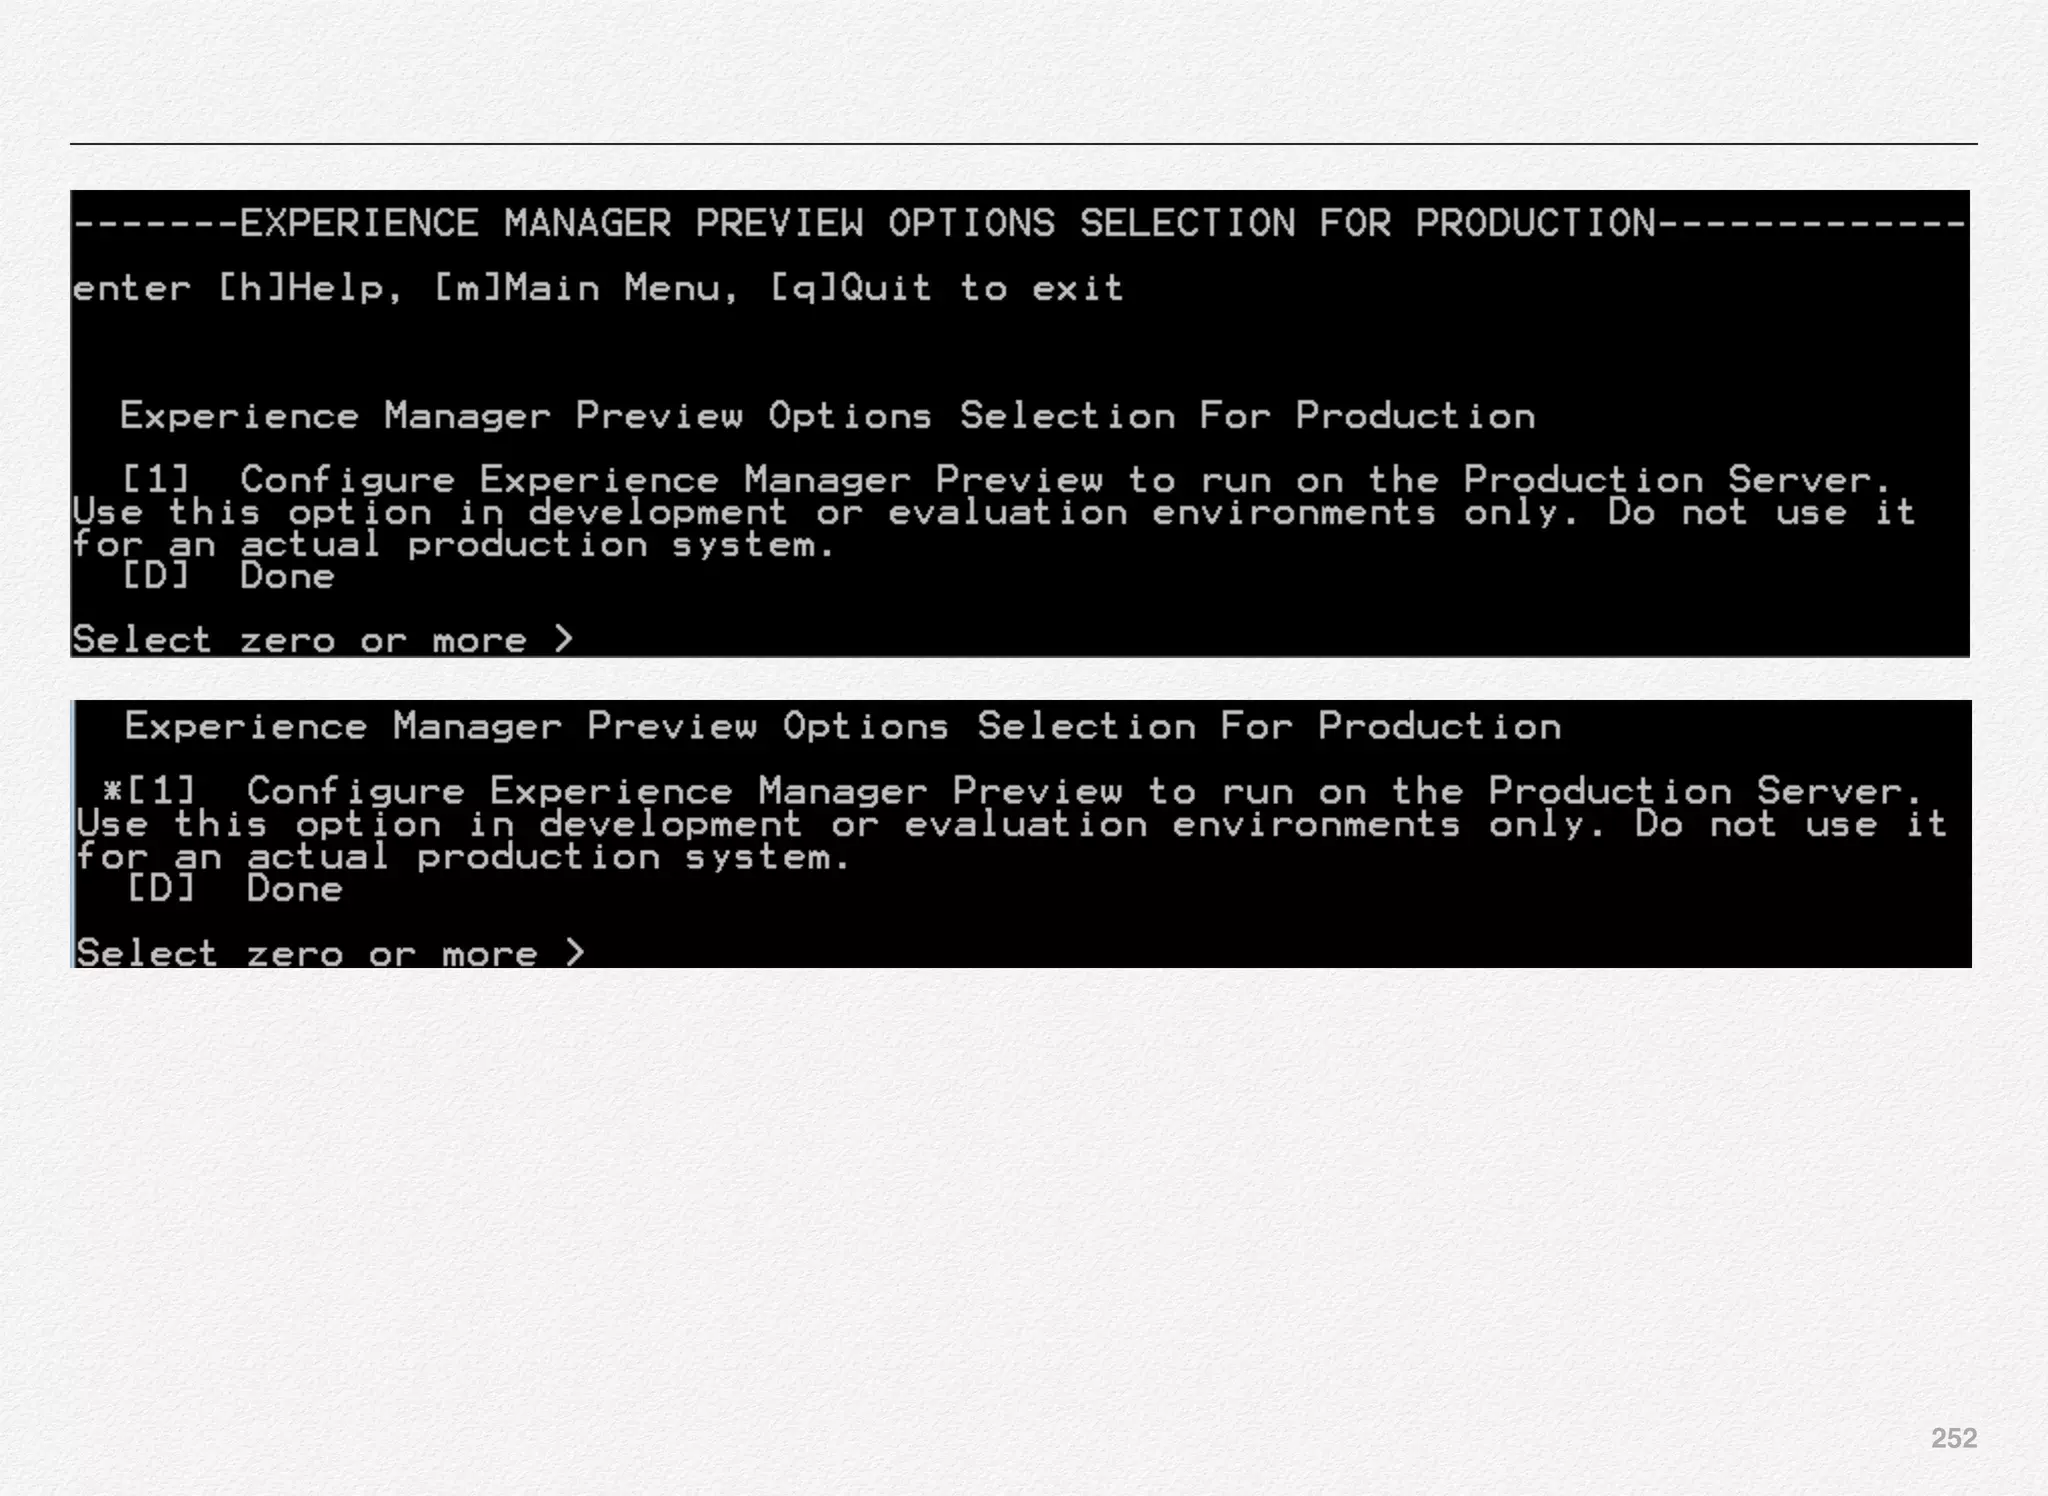
![251
Select the Commerce Index Type (SKU or Product) and further select Experience Manager Preview options for staging server. In this
case we will select Option [1] - Index by SKU.](https://image.slidesharecdn.com/oraclecommerce-doityourselfseries-160129151710/75/Oracle-Commerce-Using-ATG-Endeca-Do-It-Yourself-Series-252-2048.jpg)
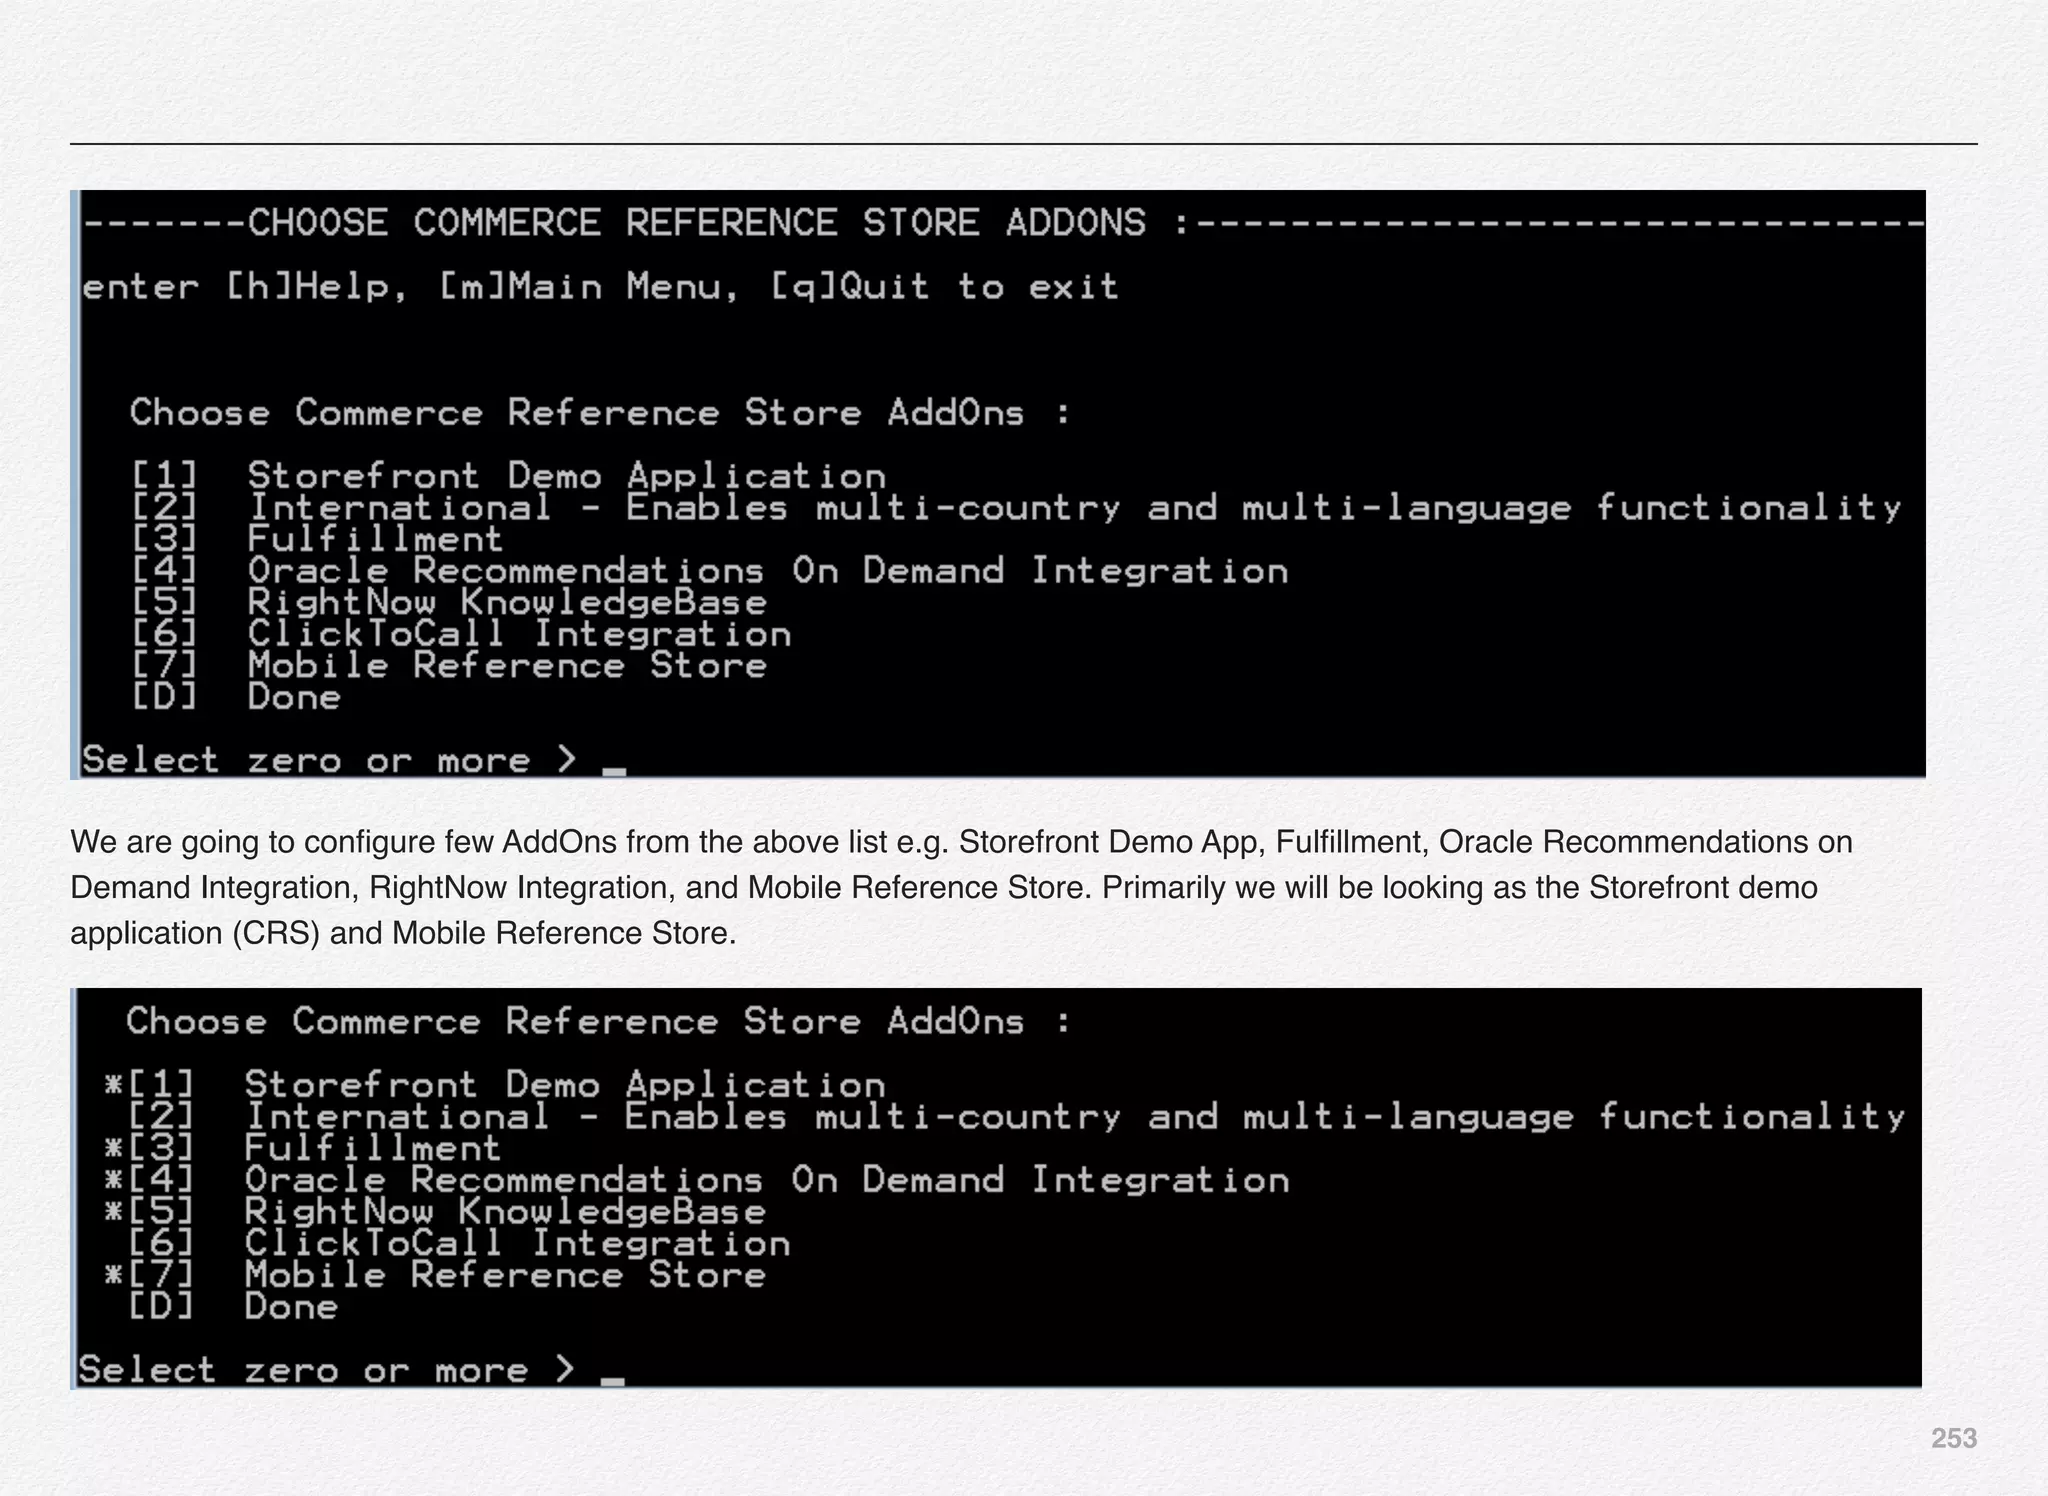
![254
Select Inspect Application [2] and [D] to return to the previous menu options.](https://image.slidesharecdn.com/oraclecommerce-doityourselfseries-160129151710/75/Oracle-Commerce-Using-ATG-Endeca-Do-It-Yourself-Series-255-2048.jpg)
![255
You have the option to either create a Storefront populated with
all the data about product catalog, users, orders, promotions,
etc... or just deploy the schema with empty data structures. This
is useful if you intend to load your own product catalogs, user
accounts, orders, promotions etc... If you want to use out-of-
the-box data then go with option [1].
Select option [1] Full data set and continue.
If you opt-in for Oracle Recommendations for Oracle
Commerce then you would need an Oracle Recommendations
on-demand account. We will select option [1] Use
Recommendations demonstration account and continue.
Select the only option [1] REST Web Services for Native
Applications and continue. Oracle Commerce provides out-of-
the-box example of the Commerce Reference Store for Mobile
Web and iOS and its integration with the Oracle Commerce
Platform using the RESTFul API for which you need to create
the key/password etc..
Selection of Mobile Reference Store Web Services
automatically includes below modules based on mobile
recommendations:
1. Publishing Management Group
2. Publishing Staging Server
3. Choose Non-Switching Publishing Datasource](https://image.slidesharecdn.com/oraclecommerce-doityourselfseries-160129151710/75/Oracle-Commerce-Using-ATG-Endeca-Do-It-Yourself-Series-256-2048.jpg)
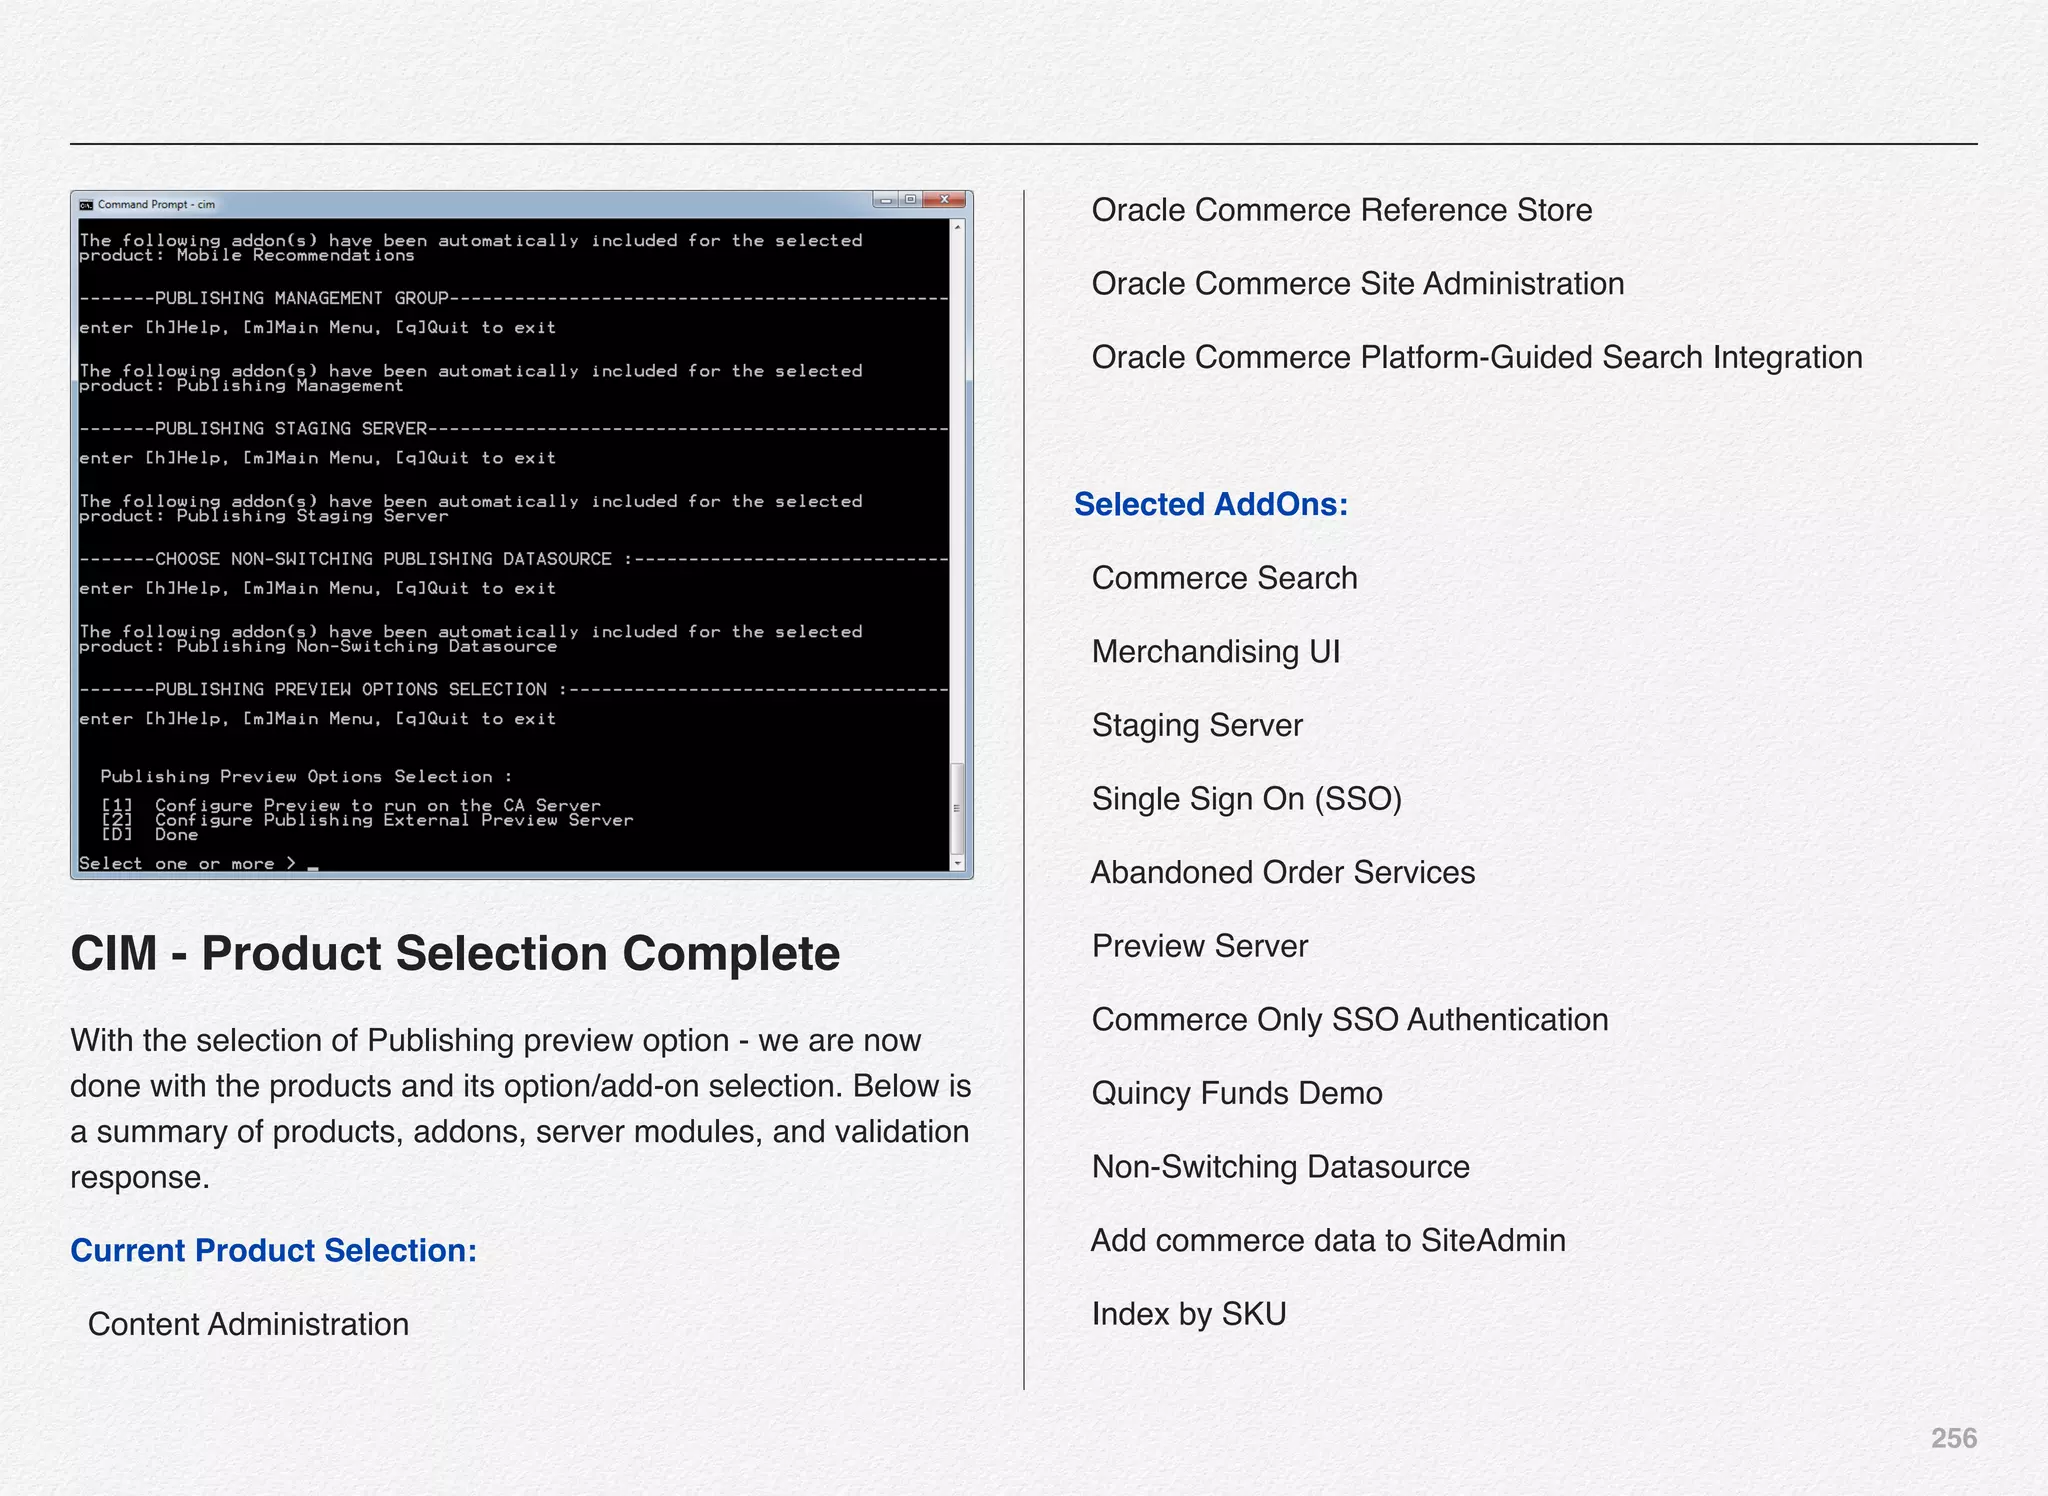
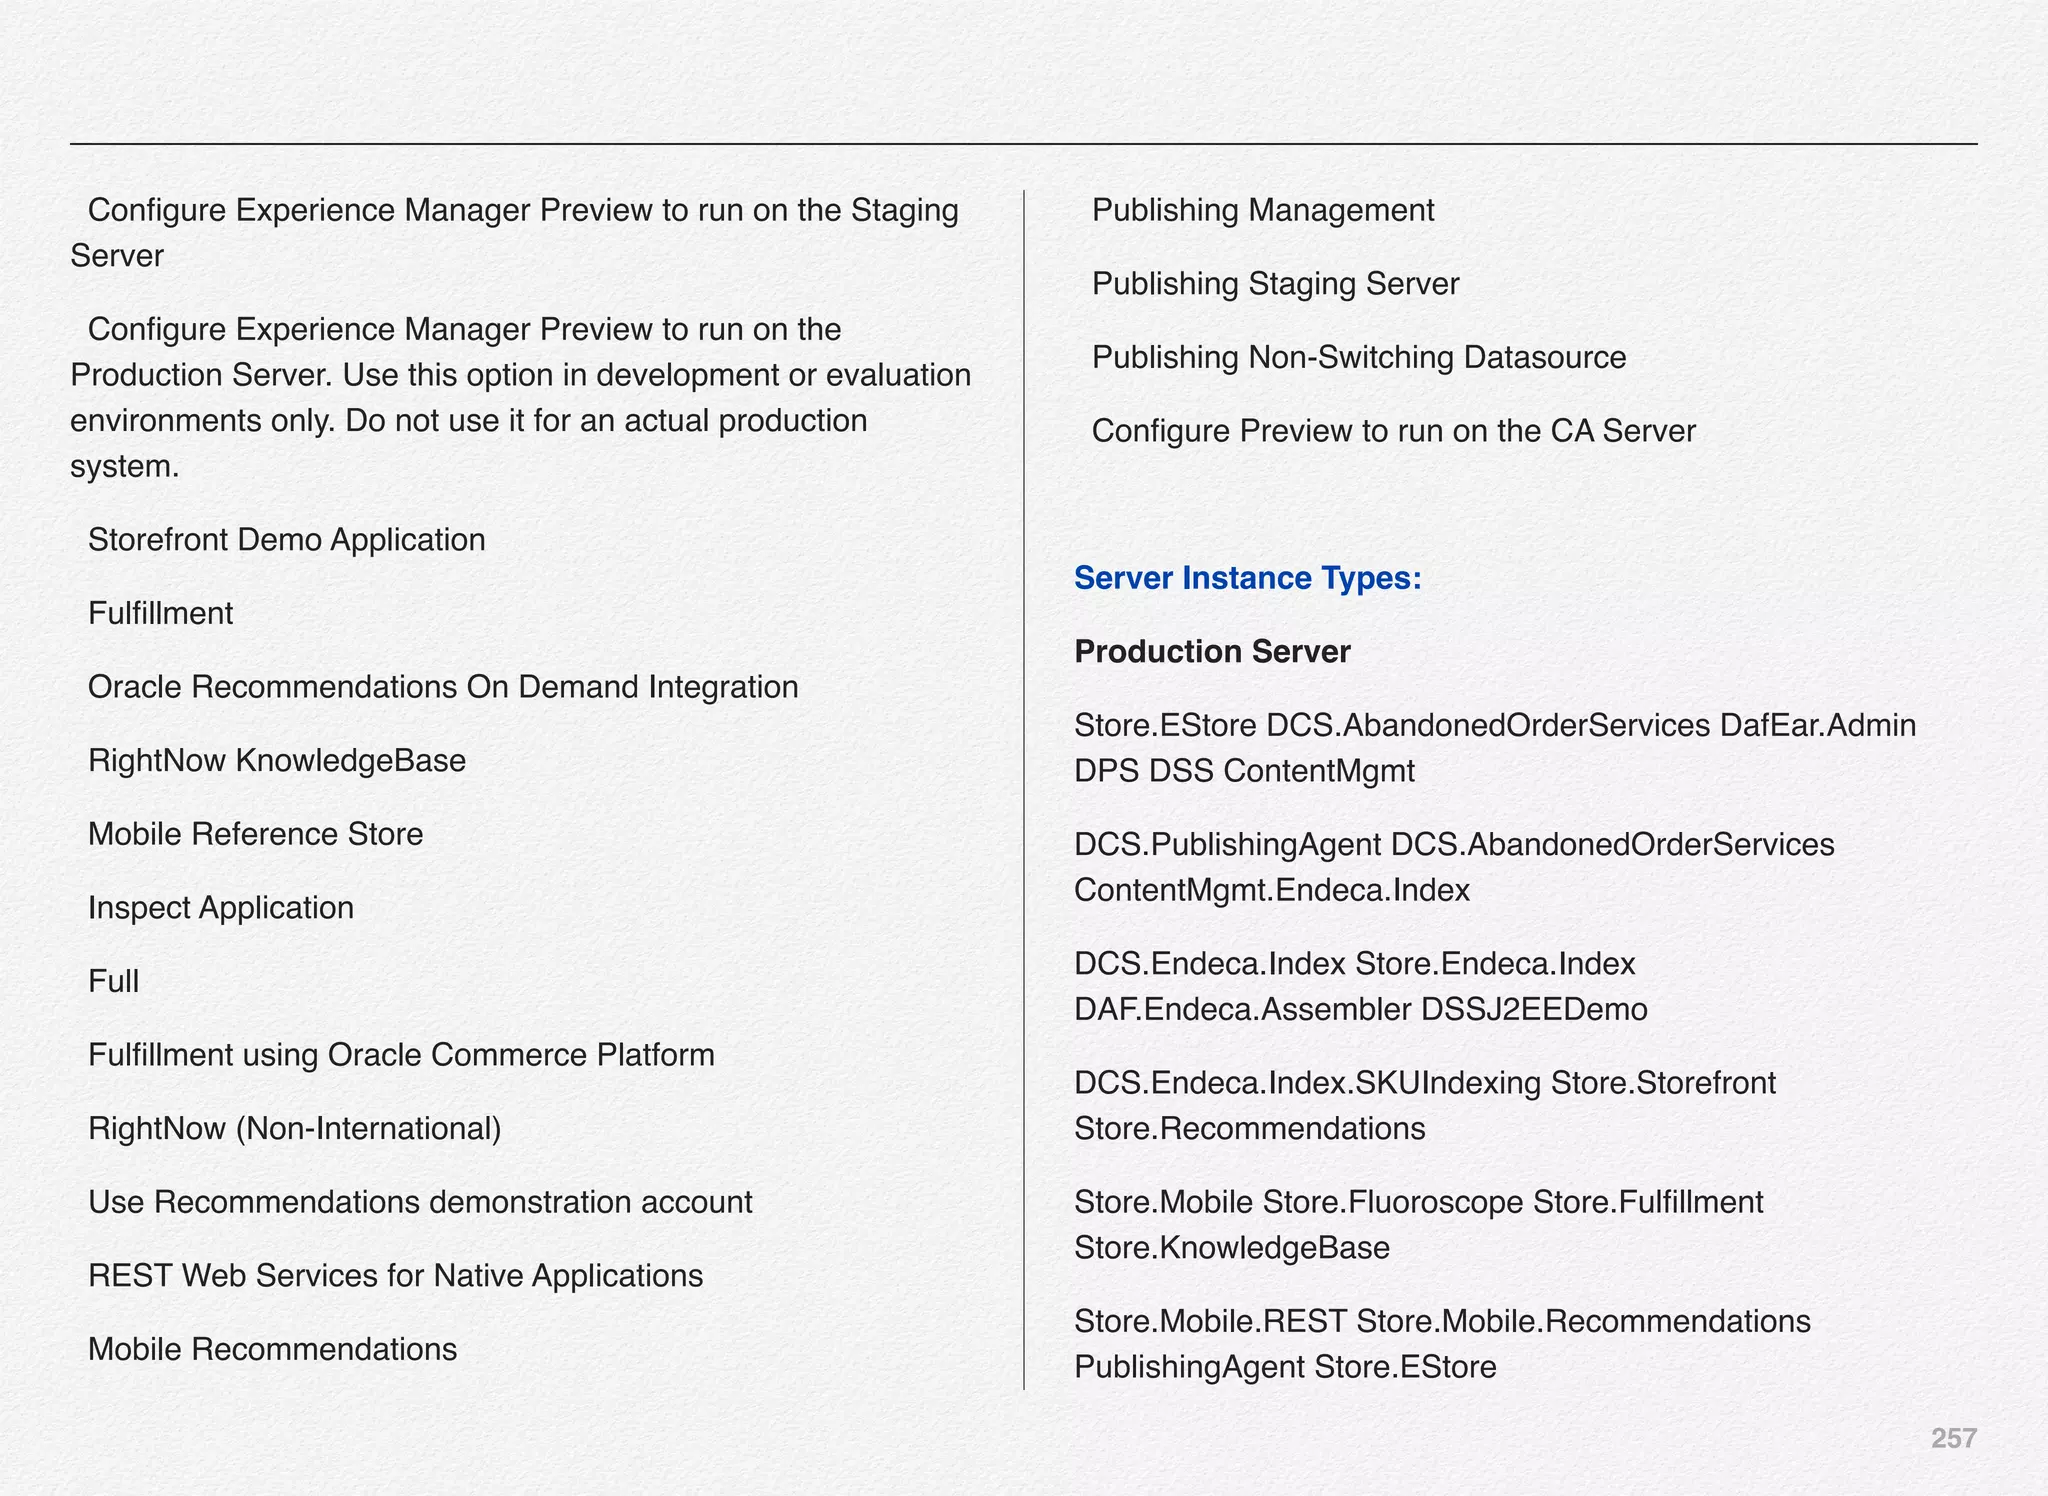
![258
Publishing Server
DCS-UI.Versioned BIZUI PubPortlet DafEar.Admin
ContentMgmt.Versioned
DCS-UI.SiteAdmin.Versioned SiteAdmin.Versioned
DCS.Versioned DCS-UI
Store.EStore.Versioned Store.Storefront
ContentMgmt.Endeca.Index.Versioned
DCS.Endeca.Index.Versioned Store.Endeca.Index.Versioned
DCS.Endeca.Index.SKUIndexing Store.Mobile
Store.Mobile.Versioned
Store.KnowledgeBase Store.Mobile.REST.Versioned
Staging Server
Store.EStore DafEar.Admin ContentMgmt
DCS.PublishingAgent
DCS.AbandonedOrderServices ContentMgmt.Endeca.Index
DCS.Endeca.Index
Store.Endeca.Index DAF.Endeca.Assembler
DCS.Endeca.Index.SKUIndexing
Store.Storefront Store.Recommendations Store.Mobile
Store.Fluoroscope
Store.Fulfillment Store.KnowledgeBase Store.Mobile.REST
Store.Mobile.Recommendations Store.EStore
Commerce Only SSO Server
DafEar.Admin SSO DafEar
-------VALIDATING INSTALLATION----------------------------------
enter [h]Help, [m]Main Menu, [q]Quit to exit
CIM is validating your Product Selection against your current
installation.
>> All required modules exist - passed
=======CIM MAIN MENU===========================
enter [h]Help, [q]Quit to exit](https://image.slidesharecdn.com/oraclecommerce-doityourselfseries-160129151710/75/Oracle-Commerce-Using-ATG-Endeca-Do-It-Yourself-Series-259-2048.jpg)
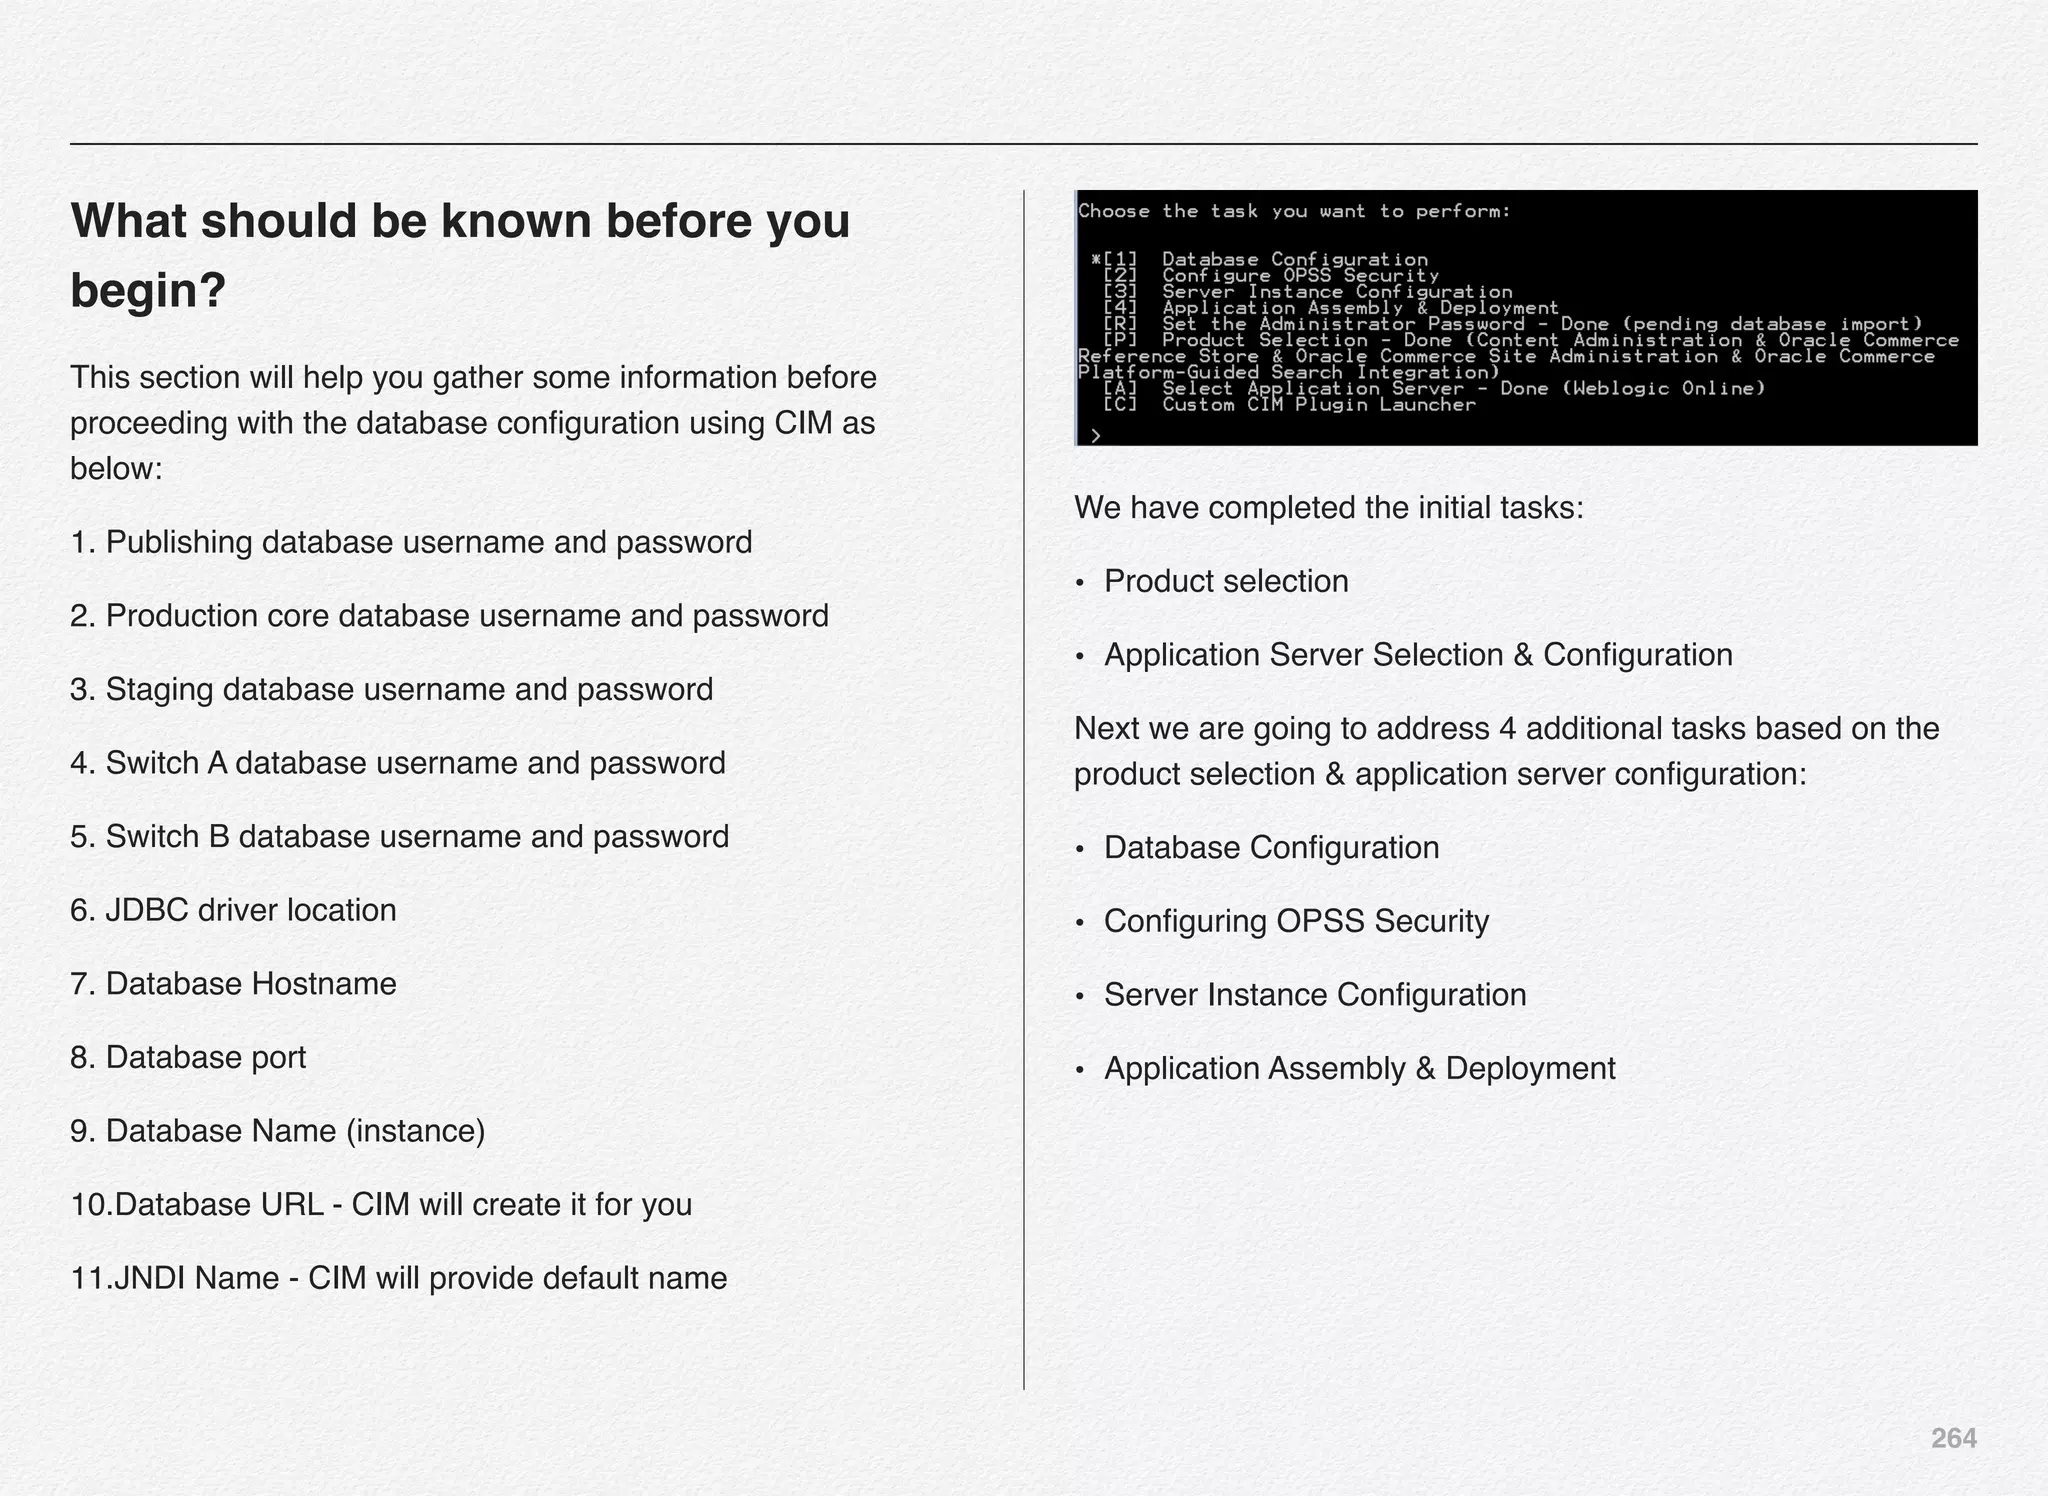
![259
CIM - Application Server Selection &
Configuration
We have completed the necessary steps to set the
administrator password and product selection in previous
section of this chapter. Also, you can notice on below
screenshot a message “pending database import” - which
means we are yet to configure our database, create necessary
schema, and import the data into the database schema. These
actions will happen in upcoming sections/chapters.
In this section we are going to take a look at the steps involved
in selecting the application server for our Oracle Commerce
Platform setup with Reference Store.
select option [A] to select and configure the Application Server
where you will be deploying the Oracle commerce Authoring
and Display applications. The default option here is [1] Jboss
Application Server. We will select option [2] to perform the
Section 4
CIM - Application
Server Selection &
Configuration](https://image.slidesharecdn.com/oraclecommerce-doityourselfseries-160129151710/75/Oracle-Commerce-Using-ATG-Endeca-Do-It-Yourself-Series-260-2048.jpg)
![260
installation and configuration using the Oracle WebLogic Server
- primarily using the Developer Mode in this book.
Select option [2]
Next you need to provide WebLogic server path to the CIM
script which will be further validated along with the version of
WebLogic.
Also, you need to provide the path to the domain folder that you
want to use. For this setup we will go with the default
base_domain folder under the Oracle WebLogic Home.
Note: Make sure you have started the WebLogic admin server
before moving forward since the next step will try to validate the
username/password and connectivity to the WebLogic admin
server](https://image.slidesharecdn.com/oraclecommerce-doityourselfseries-160129151710/75/Oracle-Commerce-Using-ATG-Endeca-Do-It-Yourself-Series-261-2048.jpg)
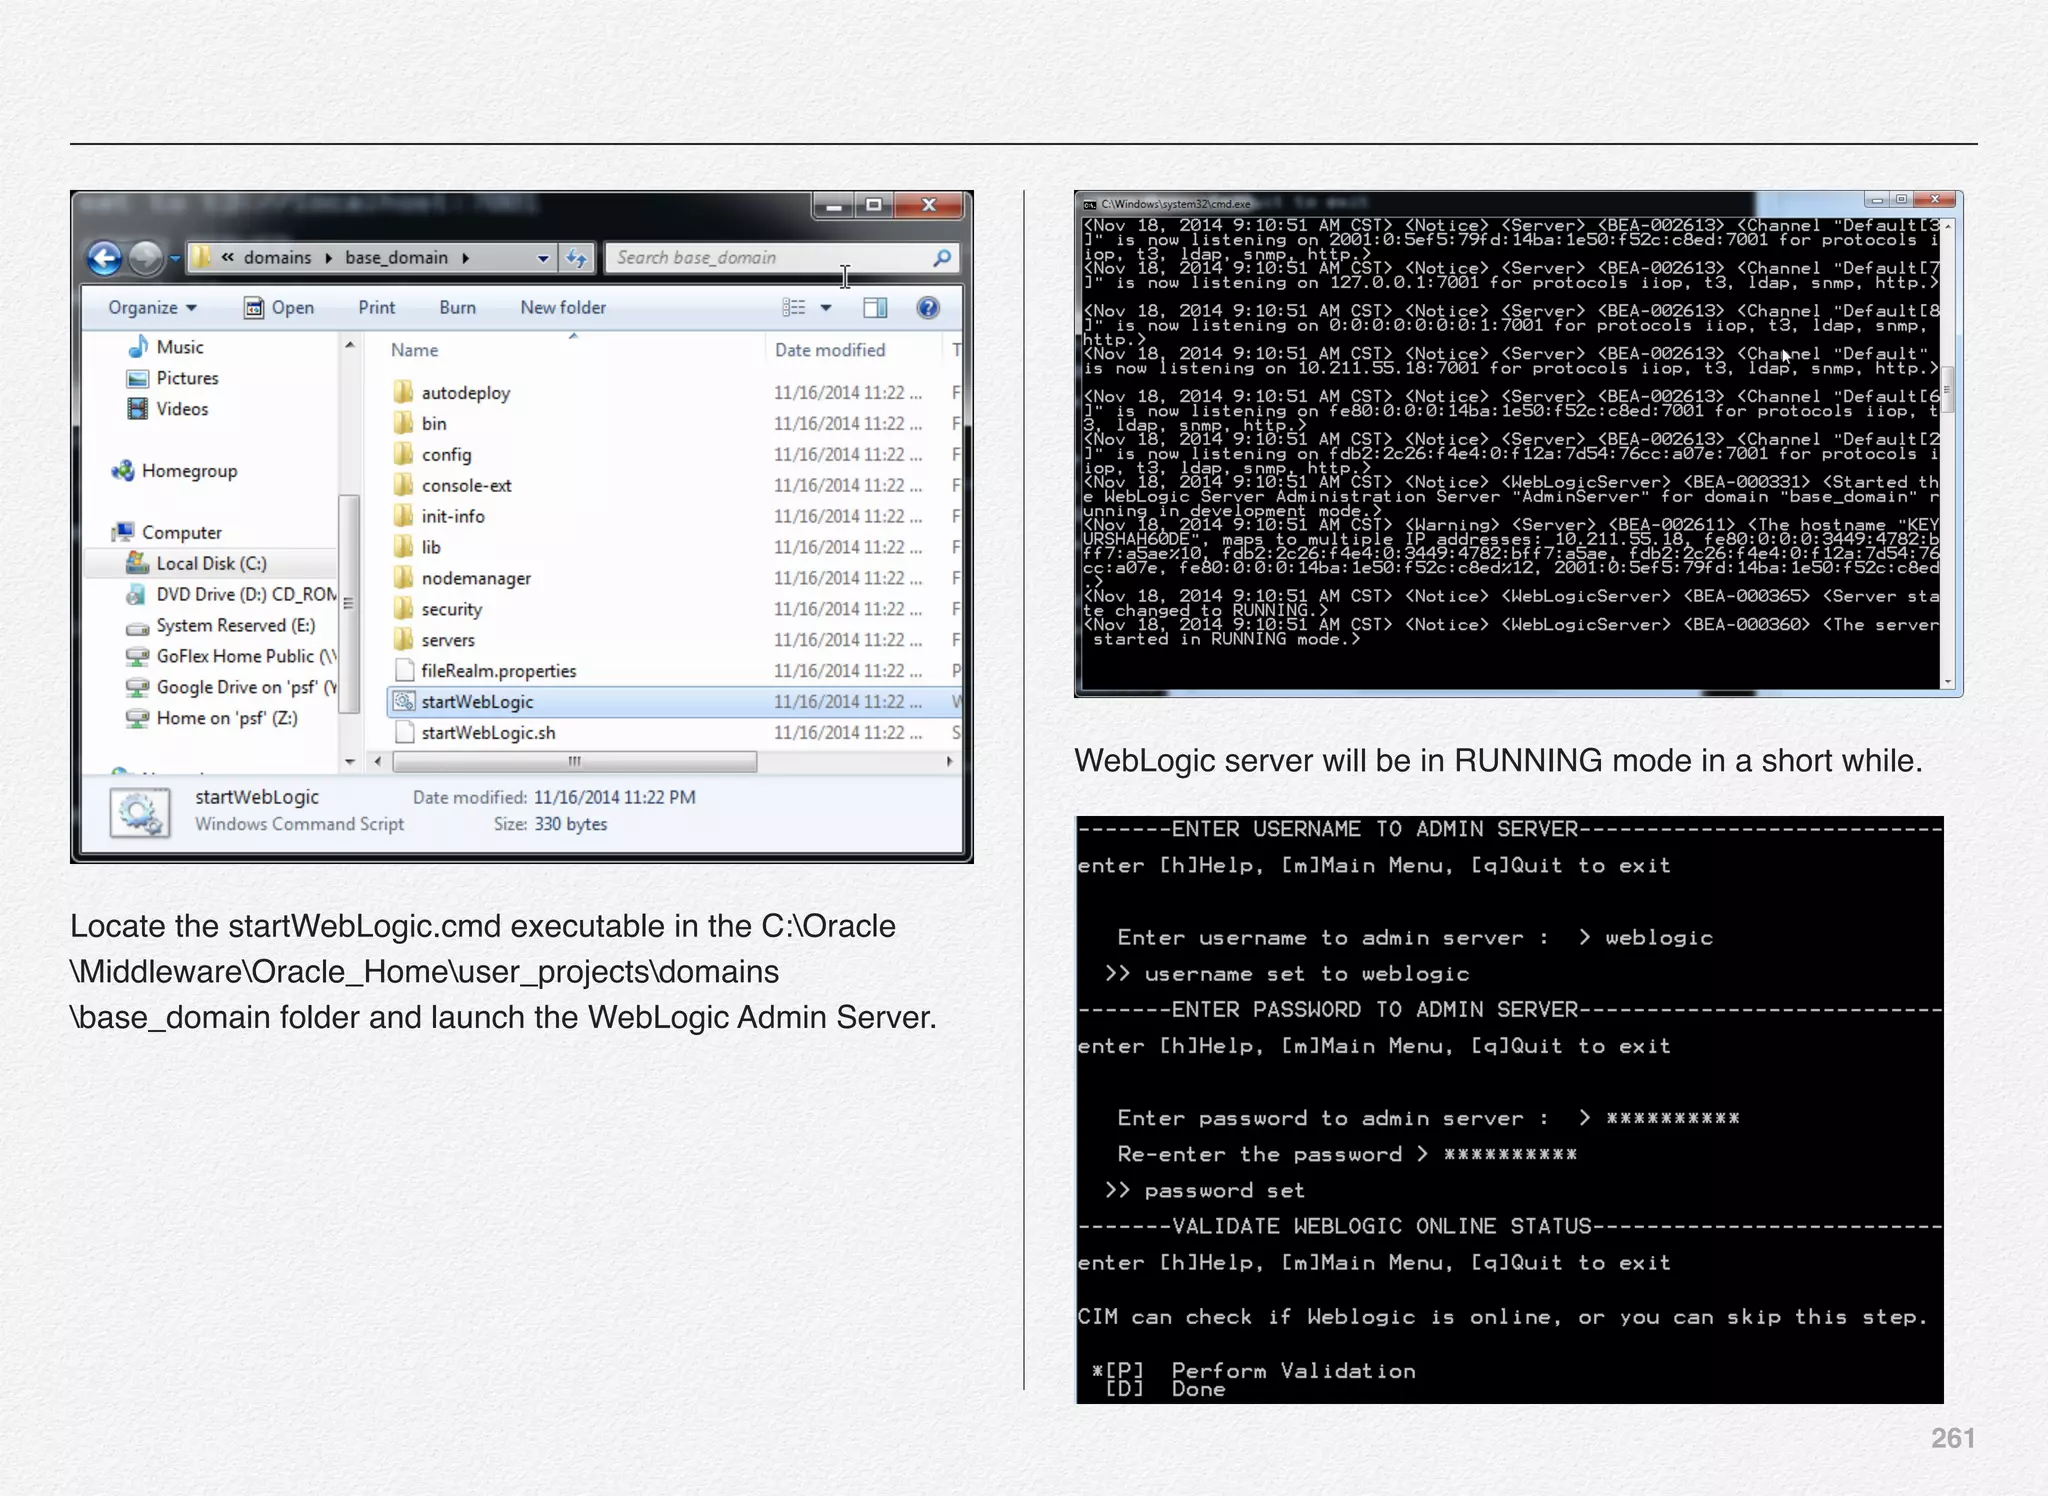
![262
Once the WebLogic Admin Server is up and running you can
select the option [P] to perform validation of the connectivity to
WebLogic Admin Server using the username and password
provided.
CIM is not able to connect to the WebLogic server at the admin
port 7001.
With this we have completed the selection and configuration of
application server for our Oracle ATG Commerce application.](https://image.slidesharecdn.com/oraclecommerce-doityourselfseries-160129151710/75/Oracle-Commerce-Using-ATG-Endeca-Do-It-Yourself-Series-263-2048.jpg)
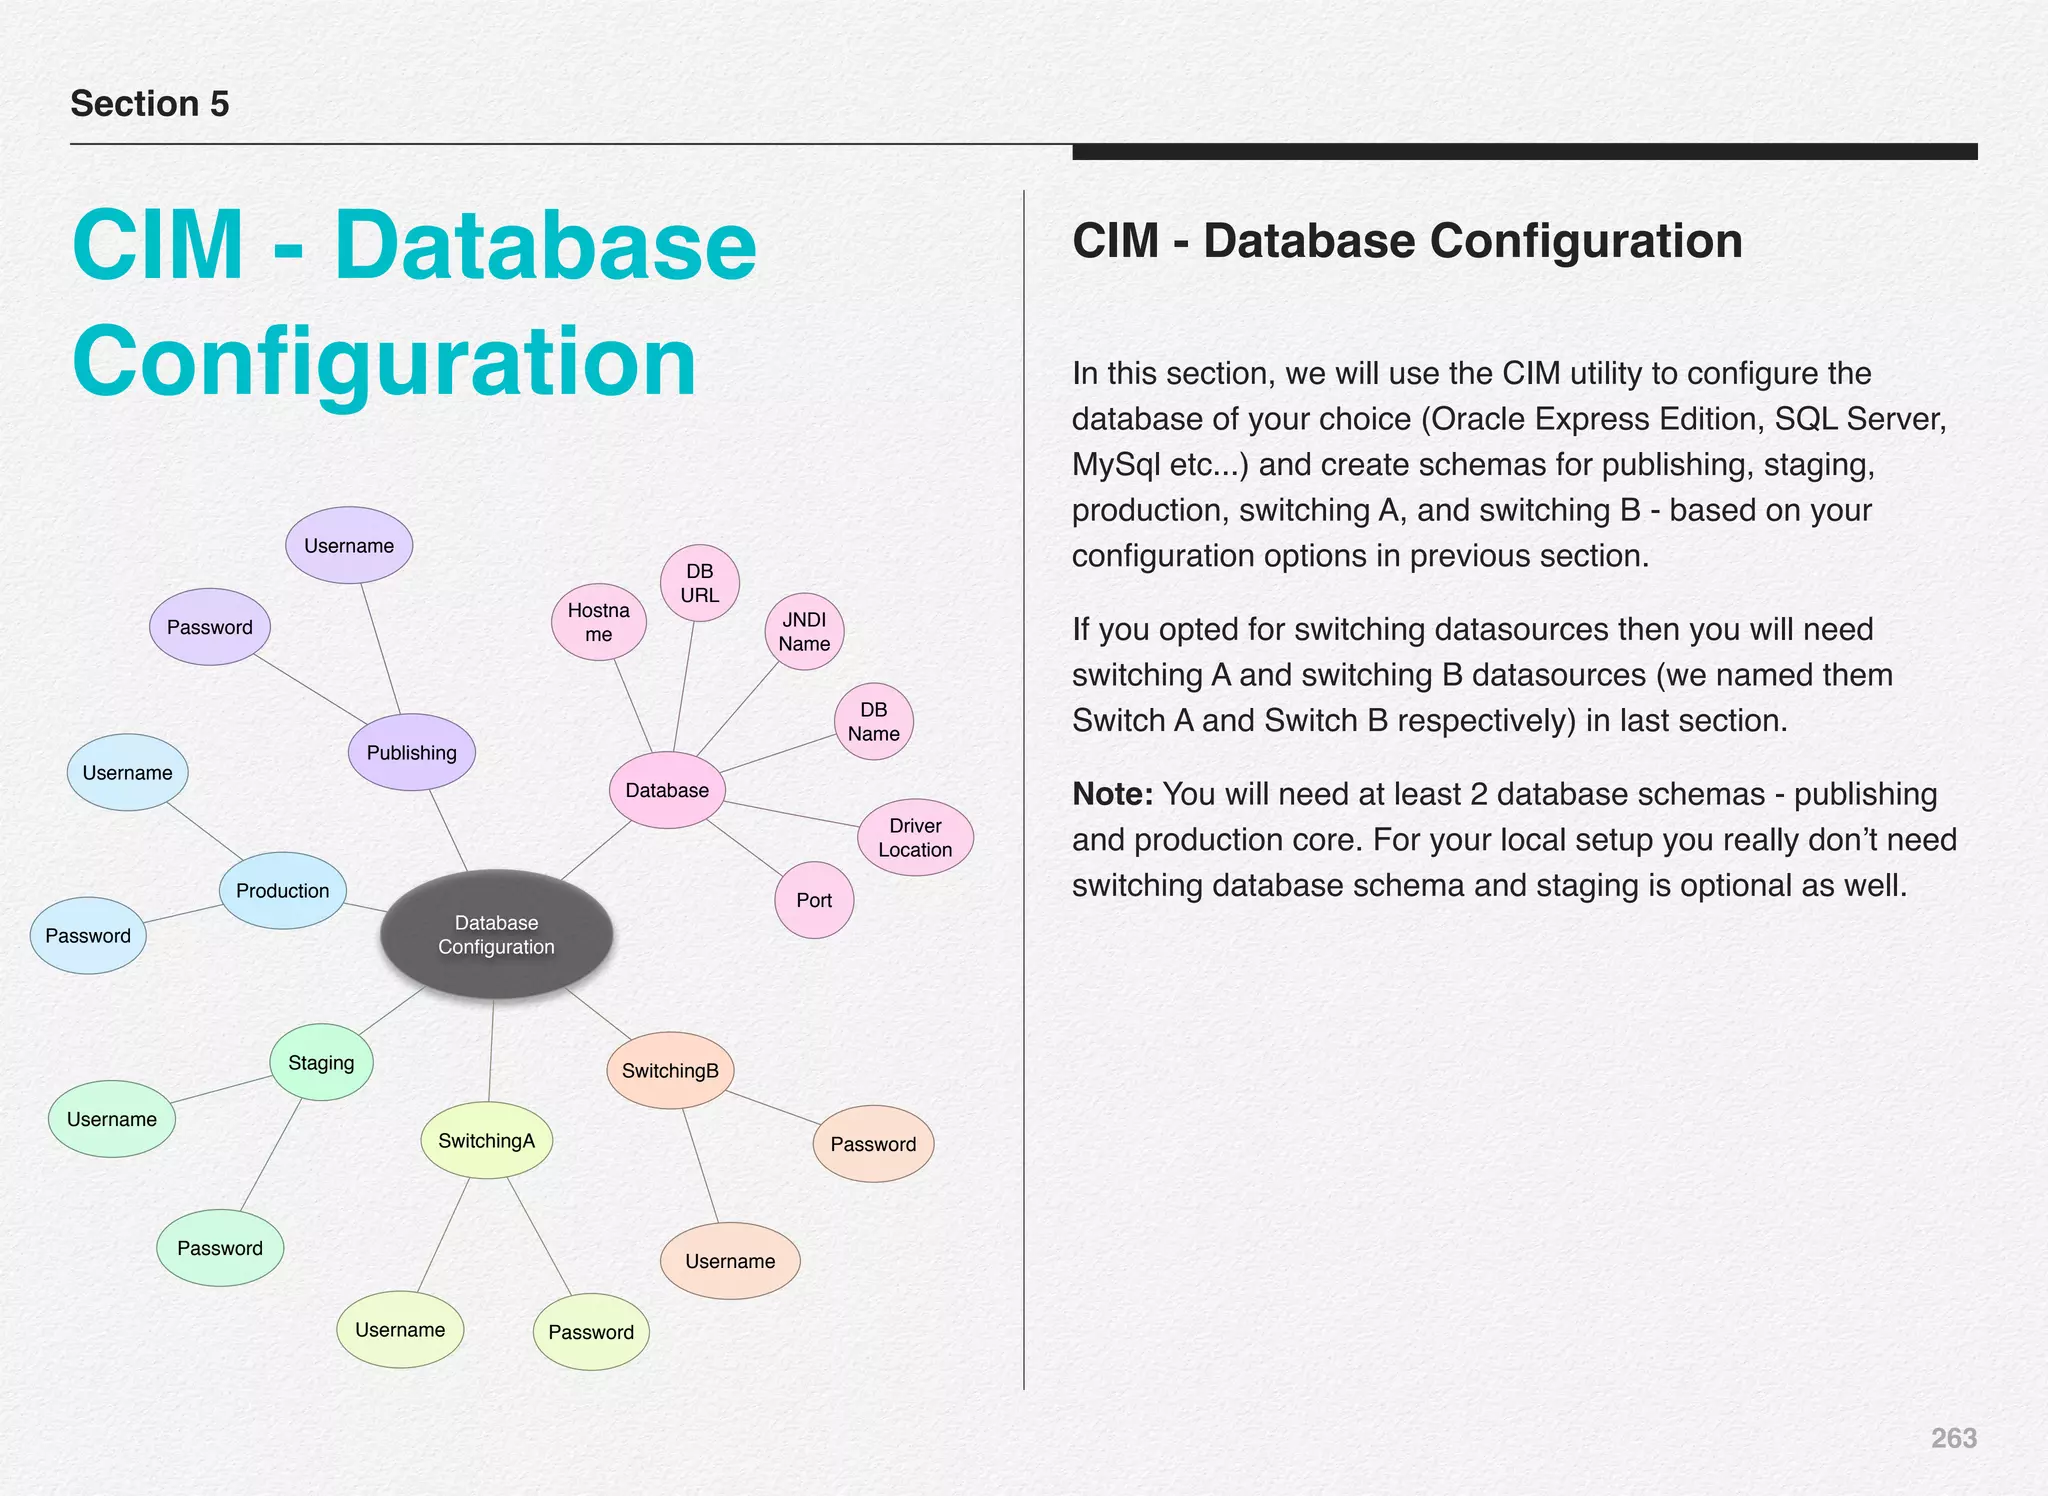
![265
Publishing Data Source Configuration
Based on the product and the respective add-ons selection we
made in previous sections - CIM performs necessary checks on
exactly what type of data sources we need to configure.
For this installation - we are going to need 3 users created for
publishing, production core, and staging respectively. If you
recollect we have already created 3 users (publishingcrs,
productioncrs, and stagingcrs) in pre-requisite chapter.
Let us now configure the datasources required to be mapped to
the server instances later using CIM prompts. We will start with
publishing datasource configuration:
You need to provide connection details as discussed earlier in
this section. Select [C] for connection details and continue:](https://image.slidesharecdn.com/oraclecommerce-doityourselfseries-160129151710/75/Oracle-Commerce-Using-ATG-Endeca-Do-It-Yourself-Series-266-2048.jpg)
![266
Select the database type of your choice and continue. We have
already installed Oracle Express Edition (XE instance) in the
pre-requisites chapter.
For the CRS (Commerce Reference Store) datasource
configuration - we will use Oracle Thin as our database type.
Select [1] to continue:
You are now required to provide additional information to the
CIM prompts such as:
• User name
• Password
• Re-enter password
• Host name
• Port number
• Database Name
• Database URL (automatically constructed by CIM)
• Driver Path
Driver path is in C:oracleexeappsoracleproduct11.2.0server
jdbclib folder. The file name you need is ojdbc.jar.
Also, you will notice the CIM utility constructs the JNDI name
for you as ATGPublishingDS - we will use the default - if you
want to change you can.](https://image.slidesharecdn.com/oraclecommerce-doityourselfseries-160129151710/75/Oracle-Commerce-Using-ATG-Endeca-Do-It-Yourself-Series-267-2048.jpg)
![267
This is an important step:
Make sure the database instance is up and running - you can
verify in the services using control panel.
Optionally, verify that you are able to connect to it using sql
developer client utility.
Otherwise you can test the connection details using the CIM
utility using the [T] - Test Connection prompt.
We will use the CIM utility to test the connection to our data
source. Select [T] to continue with the database connectivity
test.
As you can notice, the connection to the database publishingcrs
was successful @ jdbc:oracle:thin:@localhost:1521:xe.
Next, we need to create the schema for publishing datasource
(publishingcrs).
CIM have been designed to select the next step in some cases
e.g. once you test the connection, it auto-selects [S] to provide
you guidance on what should be the next natural step.](https://image.slidesharecdn.com/oraclecommerce-doityourselfseries-160129151710/75/Oracle-Commerce-Using-ATG-Endeca-Do-It-Yourself-Series-268-2048.jpg)
![268
Select [S] to continue with the creation of schema for publishing
server & data source.
You might wonder why did you get Create Schema option again
with an option to Skip this step. Remember, CIM utility is not the
only way to install and configure Oracle Commerce Products
and its add-ons. You can do this even manually.
In some cases you would like your database administration
team (DBA) or system administrator to perform certain
activities.
Assume, you want your DBA team to manage & create
schemas for you & on various servers (Development, Testing,
Staging, QA, Training, and Production) - then how would the
DBA team create the needed schema for a given server
instance.
Oracle Commerce comes well-equipped with several DDL
scripts and supporting XML files to load the data from directly
into the database with using CIM - so the CIM utility provides
you an option to skip this step - if you so wish your DBA team to
perform this task for you.
For more information about using the SQL/DDL scripts for
creating database schemas you can refer to the users guide -
“ATG Installation and Configuration Guide” - chapter -
“Configure Databases and Database Access - Section - Create
Database Tables using SQL Scripts.
In the book we will continue our journey with the CIM utility to
create database schemas & import the sample data for
commerce reference stores using the same.](https://image.slidesharecdn.com/oraclecommerce-doityourselfseries-160129151710/75/Oracle-Commerce-Using-ATG-Endeca-Do-It-Yourself-Series-269-2048.jpg)
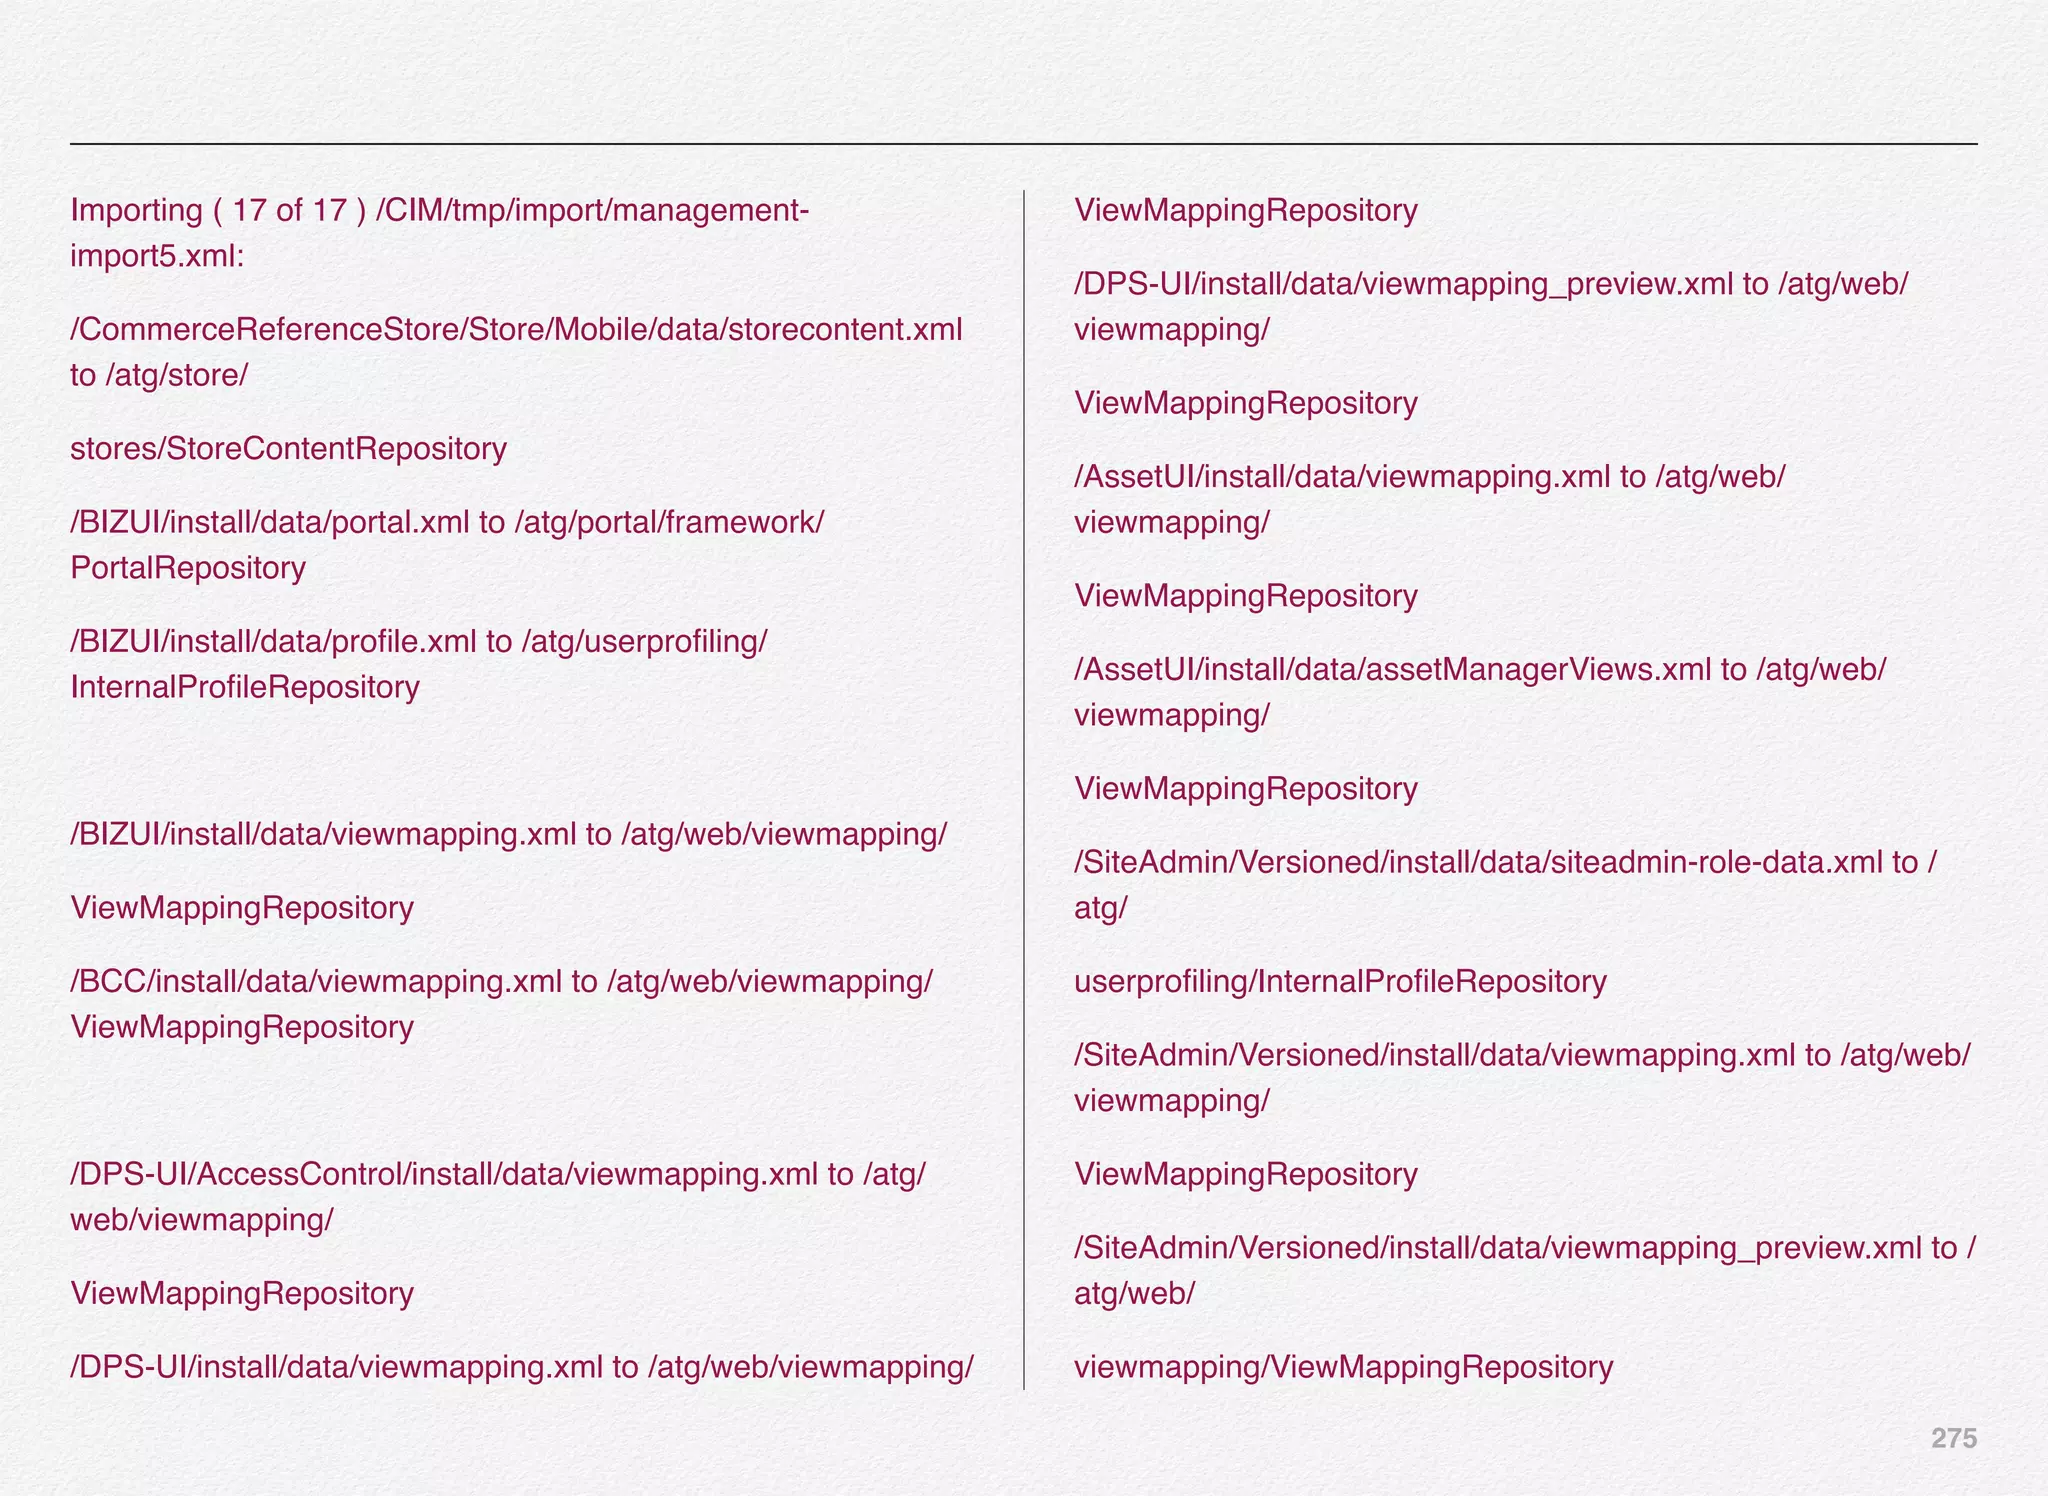

![277
/DCS-UI/Versioned/install/data/viewmapping.xml to /atg/web/
viewmapping/
ViewMappingRepository
/DCS-UI/SiteAdmin/Versioned/install/data/viewmapping.xml to /
atg/web/
viewmapping/ViewMappingRepository
...Success
Update administrator password (1 of 1). The administrator
password was
successfully updated in the database.
All imports completed successfully.
================================================
With this we have completed the schema creation and data
import for publishing datasource.
Select [O] to configure another datasource (e.g. Production or
Staging).](https://image.slidesharecdn.com/oraclecommerce-doityourselfseries-160129151710/75/Oracle-Commerce-Using-ATG-Endeca-Do-It-Yourself-Series-278-2048.jpg)
![278
Production Data Source Configuration
Let us now configure the datasources required to be mapped to
the server instances later using CIM prompts. We will start with
production core datasource configuration:
You need to provide connection details as discussed earlier in
this section. Select [C] for connection details and continue:
CIM remembers your choices to the prompts made earlier -
these comes handy, especially if you are re-configuring your
data sources - if something goes wrong - and you want to start
over again.
Since, we don’t have any existing production connection details
- we will select [2] and continue.
Select the database type of your choice and continue. We have
already installed Oracle Express Edition (XE instance) in the
pre-requisites chapter.](https://image.slidesharecdn.com/oraclecommerce-doityourselfseries-160129151710/75/Oracle-Commerce-Using-ATG-Endeca-Do-It-Yourself-Series-279-2048.jpg)
![279
For the CRS (Commerce Reference Store) datasource
configuration - we will use Oracle Thin as our database type.
Select [1] to continue:
You are now required to provide additional information to the
CIM prompts such as:
• User name
• Password
• Re-enter password
• Host name
• Port number
• Database Name
• Database URL (automatically constructed by CIM)
• Driver Path
As you will notice, we’ve made a mistake in providing the JDBC
driver file/path - CIM quickly checked if the file existed at the
given location - which it didn’t find in this case.
CIM will continue to next step once you provide correct location
for the JDBC jar file.
Driver path is in C:oracleexeappsoracleproduct11.2.0server
jdbclib folder. The file name you need is ojdbc.jar.
Also, you will notice the CIM utility constructs the JNDI name
for you as ATGProductionDS - we will use the default - if you
want to change you can.
This is an important step:](https://image.slidesharecdn.com/oraclecommerce-doityourselfseries-160129151710/75/Oracle-Commerce-Using-ATG-Endeca-Do-It-Yourself-Series-280-2048.jpg)
![280
Make sure the database instance is up and running - you can
verify in the services using control panel.
Optionally, verify that you are able to connect to it using sql
developer client utility.
Otherwise you can test the connection details using the CIM
utility using the [T] - Test Connection prompt.
We will use the CIM utility to test the connection to our data
source. Select [T] to continue with the database connectivity
test.
As you can notice, the connection to the database
productioncrs was successful @ jdbc:oracle:thin:@localhost:
1521:xe.
Next, we need to create the schema for production datasource
(productioncrs).
CIM have been designed to select the next step in some cases
e.g. once you test the connection, it auto-selects [S] to provide
you guidance on what should be the next natural step.
Select [S] to continue with the creation of schema for
production server & data source.](https://image.slidesharecdn.com/oraclecommerce-doityourselfseries-160129151710/75/Oracle-Commerce-Using-ATG-Endeca-Do-It-Yourself-Series-281-2048.jpg)

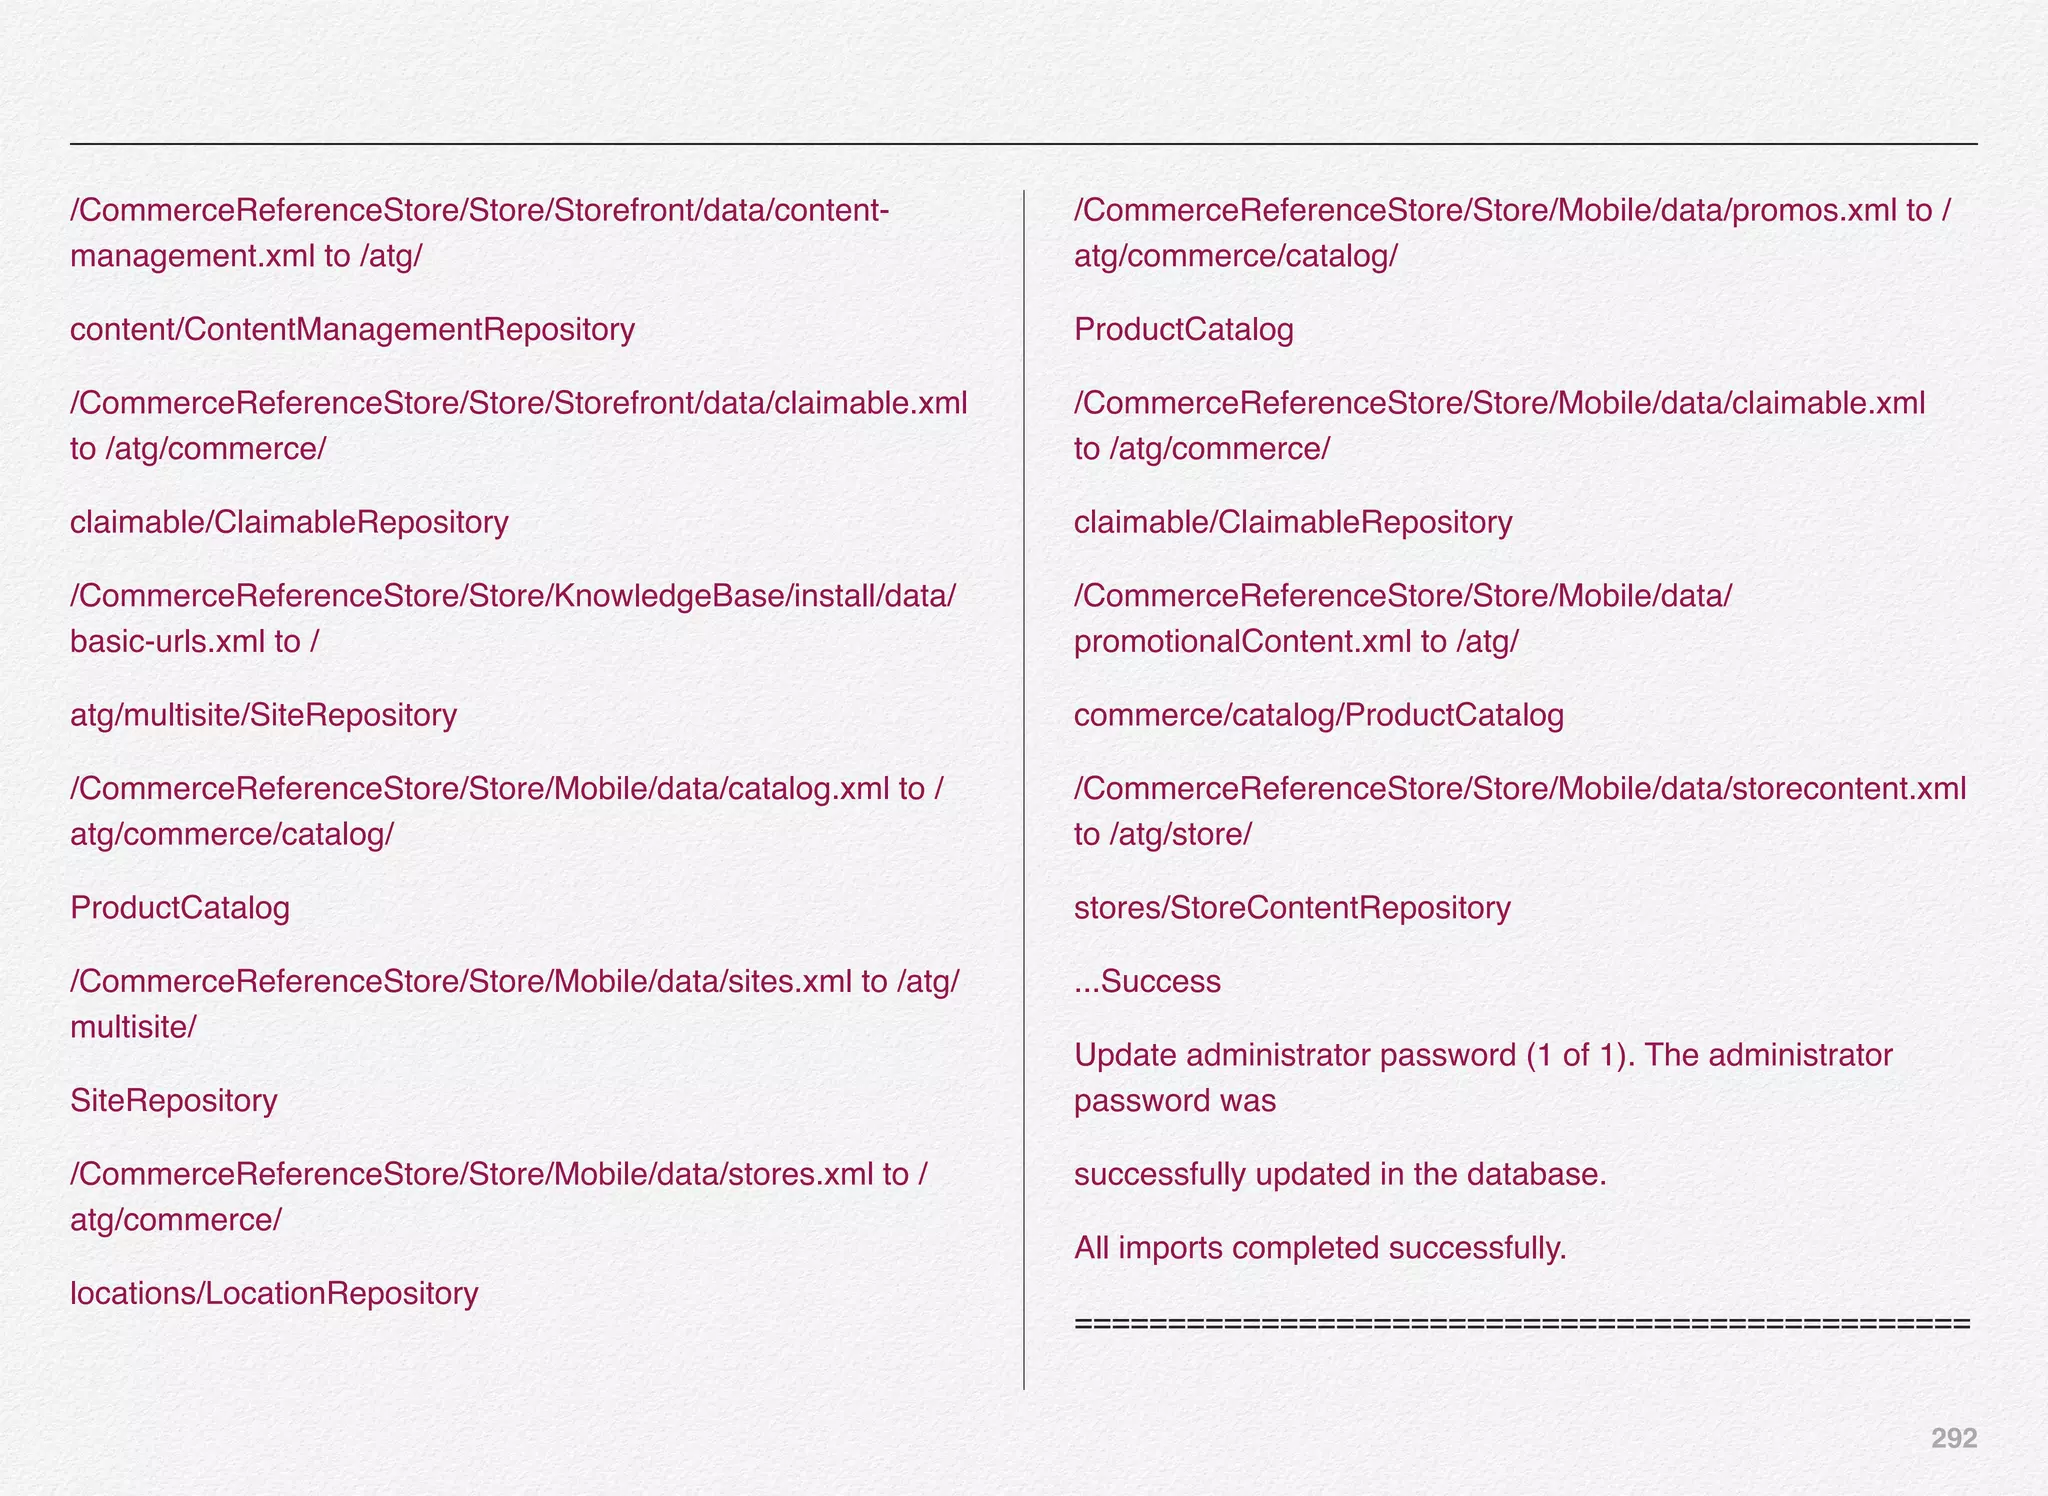
![285
Update administrator password (1 of 1). The administrator
password was
successfully updated in the database.
All imports completed successfully.
================================================
With this we have completed the schema creation and data
import for production datasource.
Select [O] to configure our last datasource (e.g. Staging).
Staging Data Source Configuration
Let us now configure the staging datasource required to be
mapped to the staging server instances later using CIM
prompts.
Select [S] for staging data source configuration and continue.
You need to provide connection details as discussed earlier in
this section. Select [C] for connection details and continue:](https://image.slidesharecdn.com/oraclecommerce-doityourselfseries-160129151710/75/Oracle-Commerce-Using-ATG-Endeca-Do-It-Yourself-Series-286-2048.jpg)
![286
You may re-use one of the above data source configuration
values if you intend to - since most of the settings will remain
the same except username and password.
In this case we will continue by selection option [3] - None/Use
Existing option to provide fresh set of values for staging
datasource.
Select the database type of your choice and continue. We have
already installed Oracle Express Edition (XE instance) in the
pre-requisites chapter.
For the CRS (Commerce Reference Store) datasource
configuration - we will use Oracle Thin as our database type.
Select [1] to continue:
You are now required to provide additional information to the
CIM prompts such as:
• User name
• Password](https://image.slidesharecdn.com/oraclecommerce-doityourselfseries-160129151710/75/Oracle-Commerce-Using-ATG-Endeca-Do-It-Yourself-Series-287-2048.jpg)
![287
• Re-enter password
• Host name
• Port number
• Database Name
• Database URL (automatically constructed by CIM)
• Driver Path
CIM will continue to next step once you provide correct location
for the JDBC jar file.
Driver path is in C:oracleexeappsoracleproduct11.2.0server
jdbclib folder. The file name you need is ojdbc.jar.
Also, you will notice the CIM utility constructs the JNDI name
for you as ATGStagingDS - we will use the default - if you want
to change you can.
This is an important step:
Make sure the database instance is up and running - you can
verify in the services using control panel.
Optionally, verify that you are able to connect to it using sql
developer client utility.
Otherwise you can test the connection details using the CIM
utility using the [T] - Test Connection prompt.
We will use the CIM utility to test the connection to our data
source. Select [T] to continue with the database connectivity
test.](https://image.slidesharecdn.com/oraclecommerce-doityourselfseries-160129151710/75/Oracle-Commerce-Using-ATG-Endeca-Do-It-Yourself-Series-288-2048.jpg)
![288
As you can notice, the connection to the database stagingcrs
was successful @ jdbc:oracle:thin:@localhost:1521:xe.
Next, we need to create the schema for staging datasource
(stagingcrs).
CIM have been designed to select the next step in some cases
e.g. once you test the connection, it auto-selects [S] to provide
you guidance on what should be the next natural step.
Select [S] to continue with the creation of schema for staging
server & data source.
You might wonder why did you get Create Schema option again
with an option to Skip this step. Remember, CIM utility is not the
only way to install and configure Oracle Commerce Products
and its add-ons. You can do this even manually.
In some cases you would like your database administration
team (DBA) or system administrator to perform certain
activities.
Assume, you want your DBA team to manage & create
schemas for you & on various servers (Development, Testing,
Staging, QA, Training, and Production) - then how would the
DBA team create the needed schema for a given server
instance.](https://image.slidesharecdn.com/oraclecommerce-doityourselfseries-160129151710/75/Oracle-Commerce-Using-ATG-Endeca-Do-It-Yourself-Series-289-2048.jpg)

![290
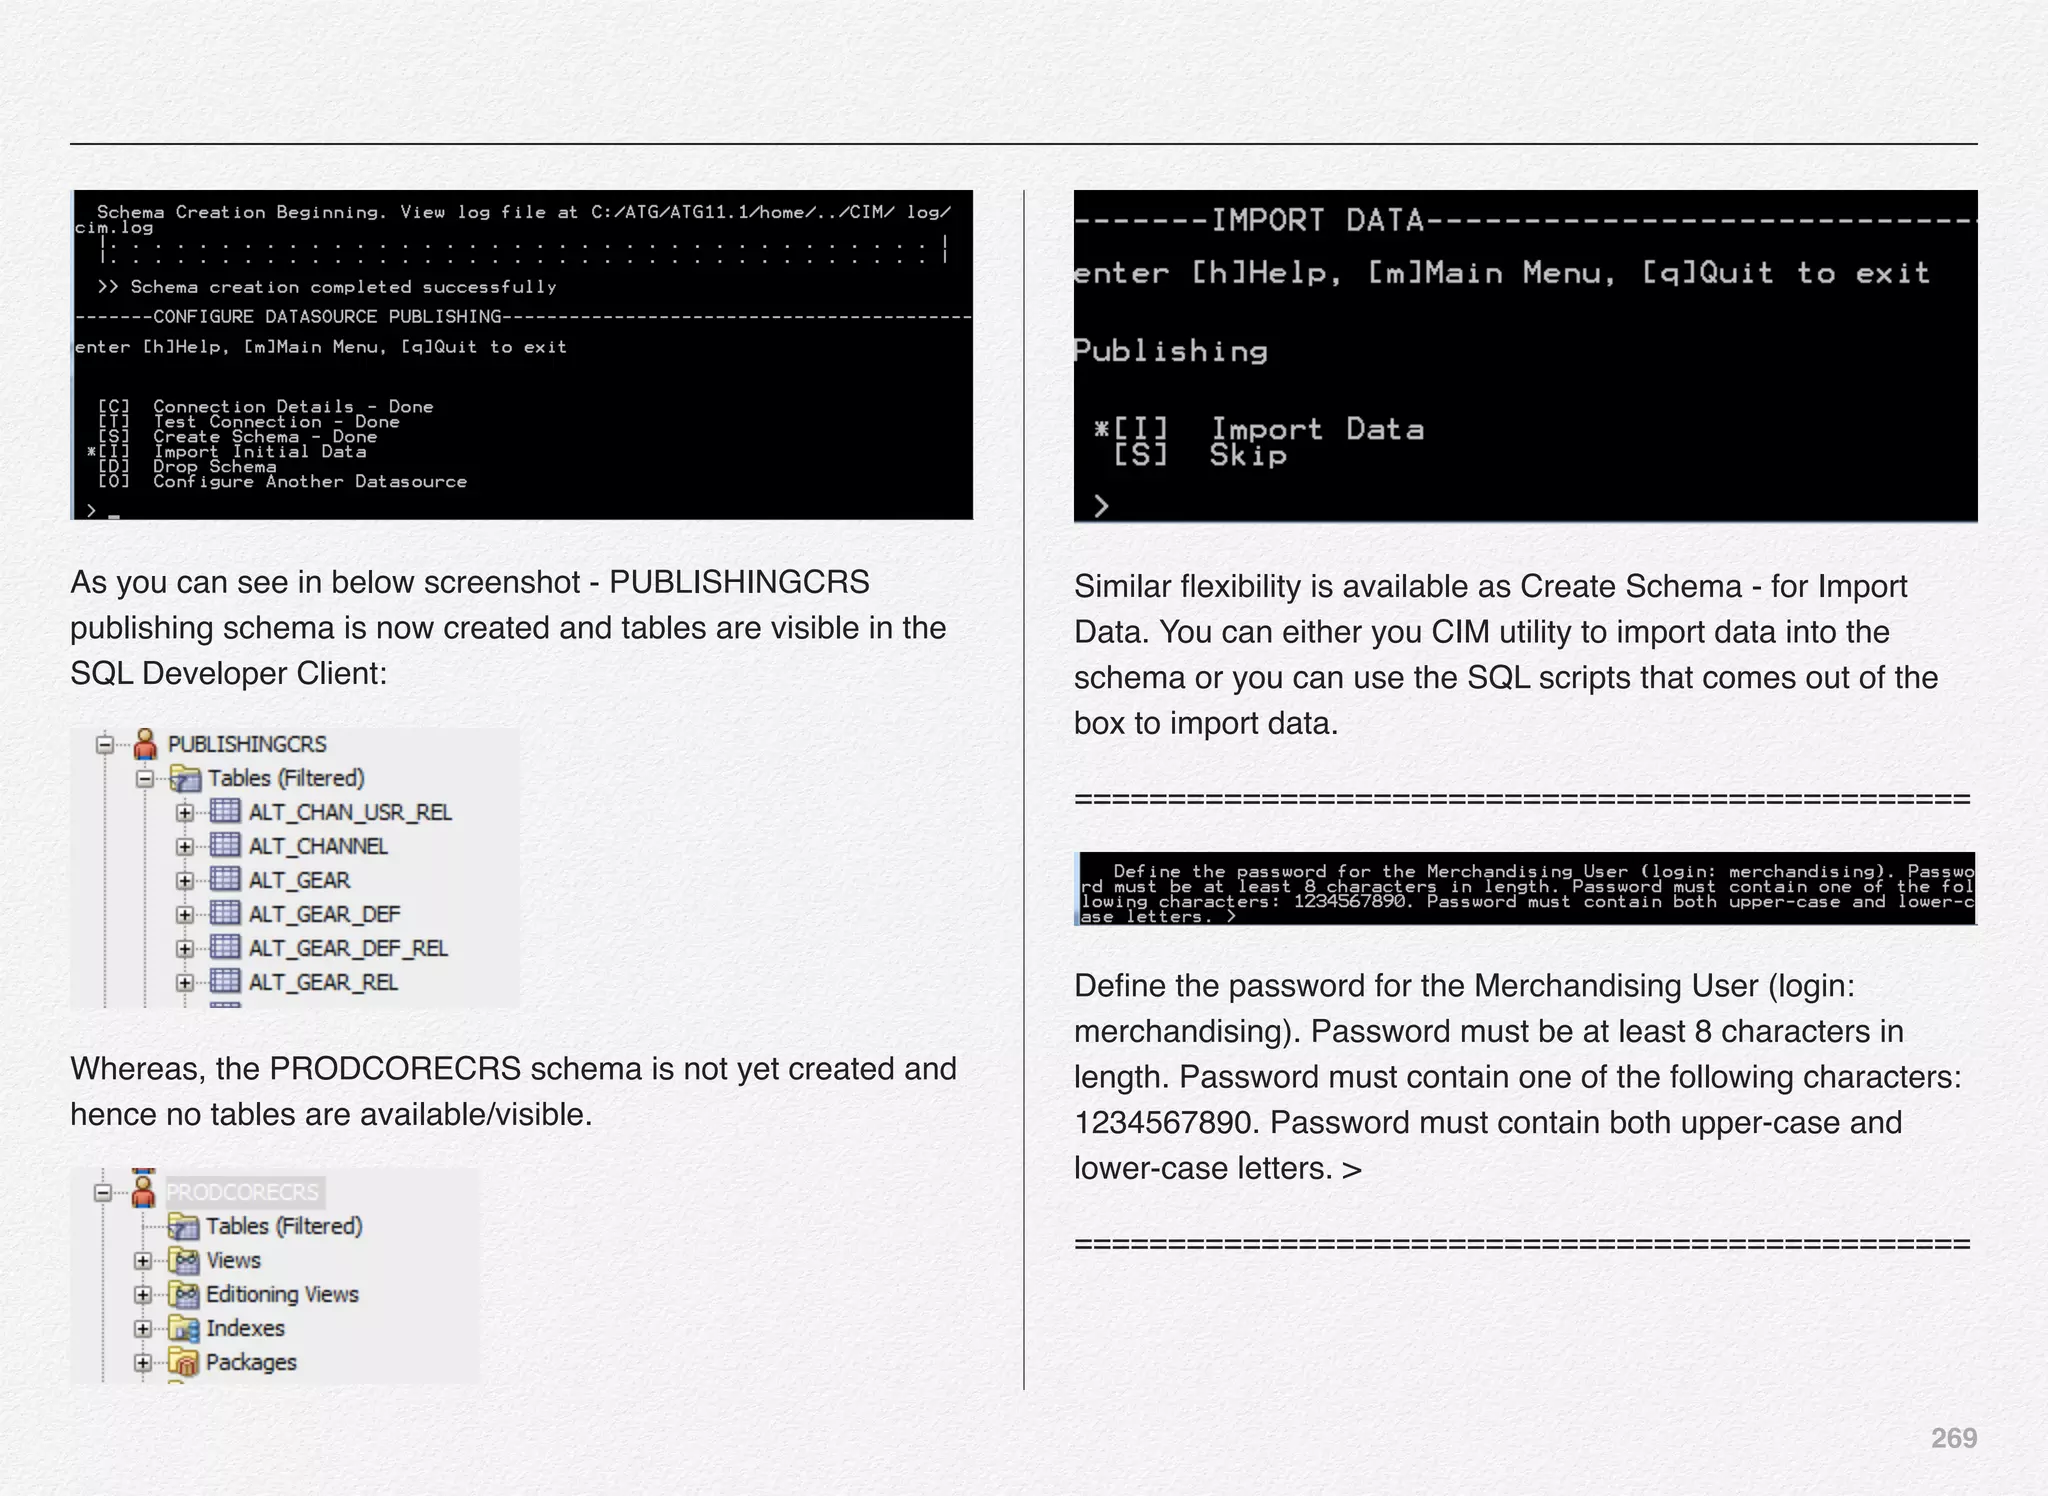
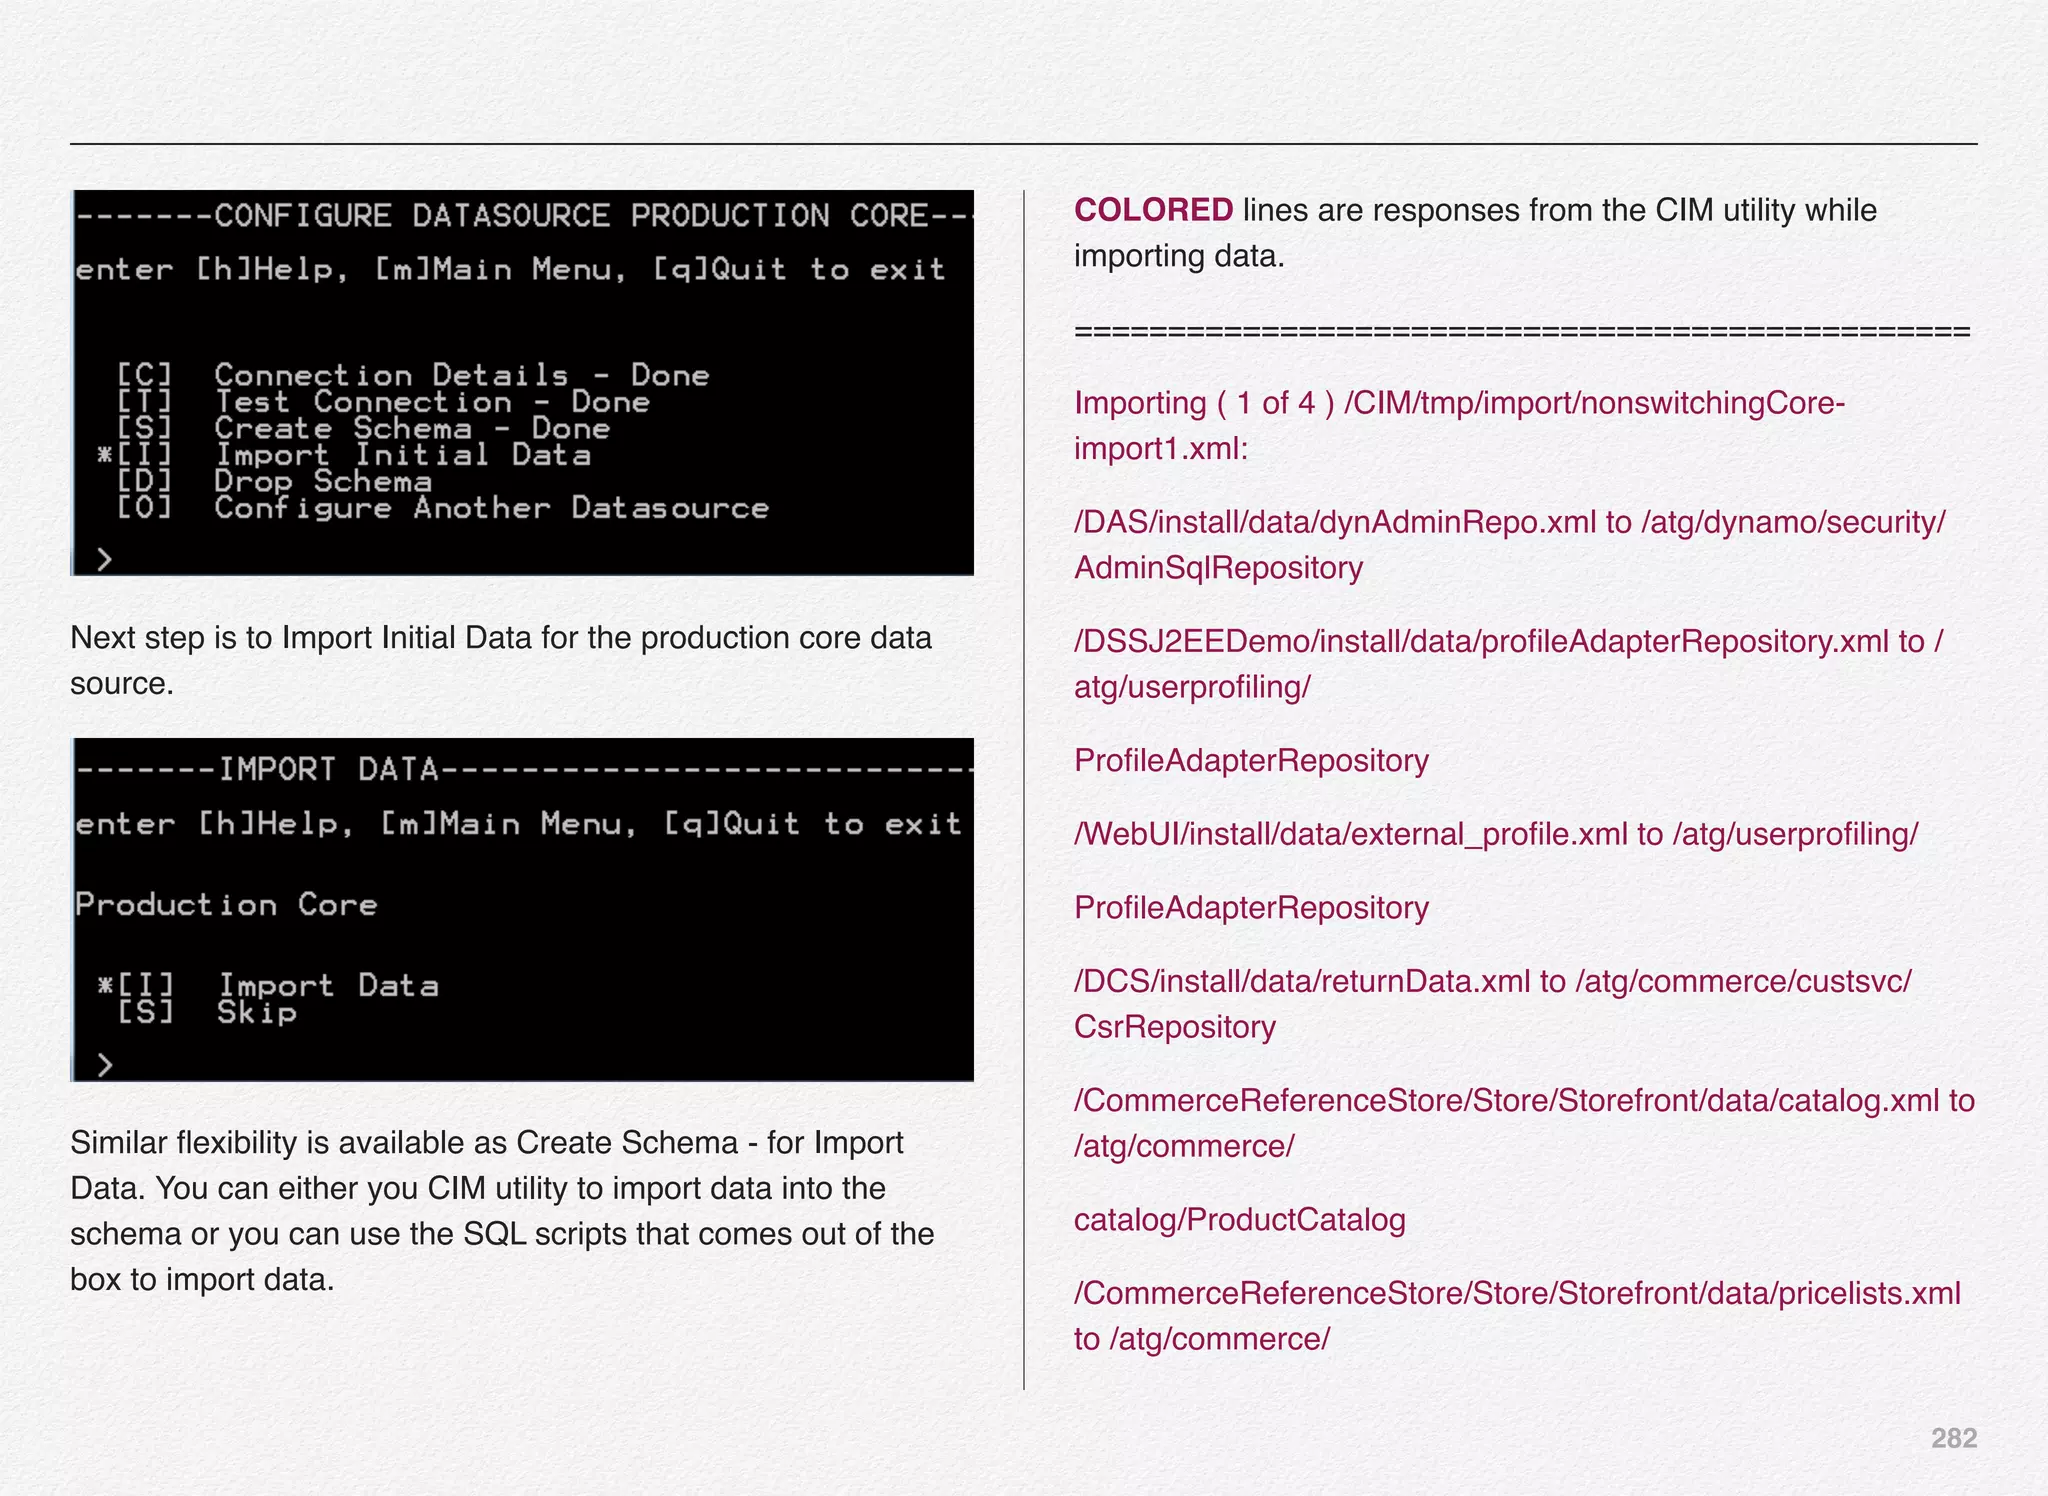
Similar flexibility is available as Create Schema - for Import
Data. You can either you CIM utility to import data into the
schema or you can use the SQL scripts that comes out of the
box to import data.
COLORED lines are responses from the CIM utility while
importing data.
================================================
-------DATA IMPORT STAGING-------------------------------------------
enter [h]Help, [m]Main Menu, [q]Quit to exit
Combining template tasks...Success
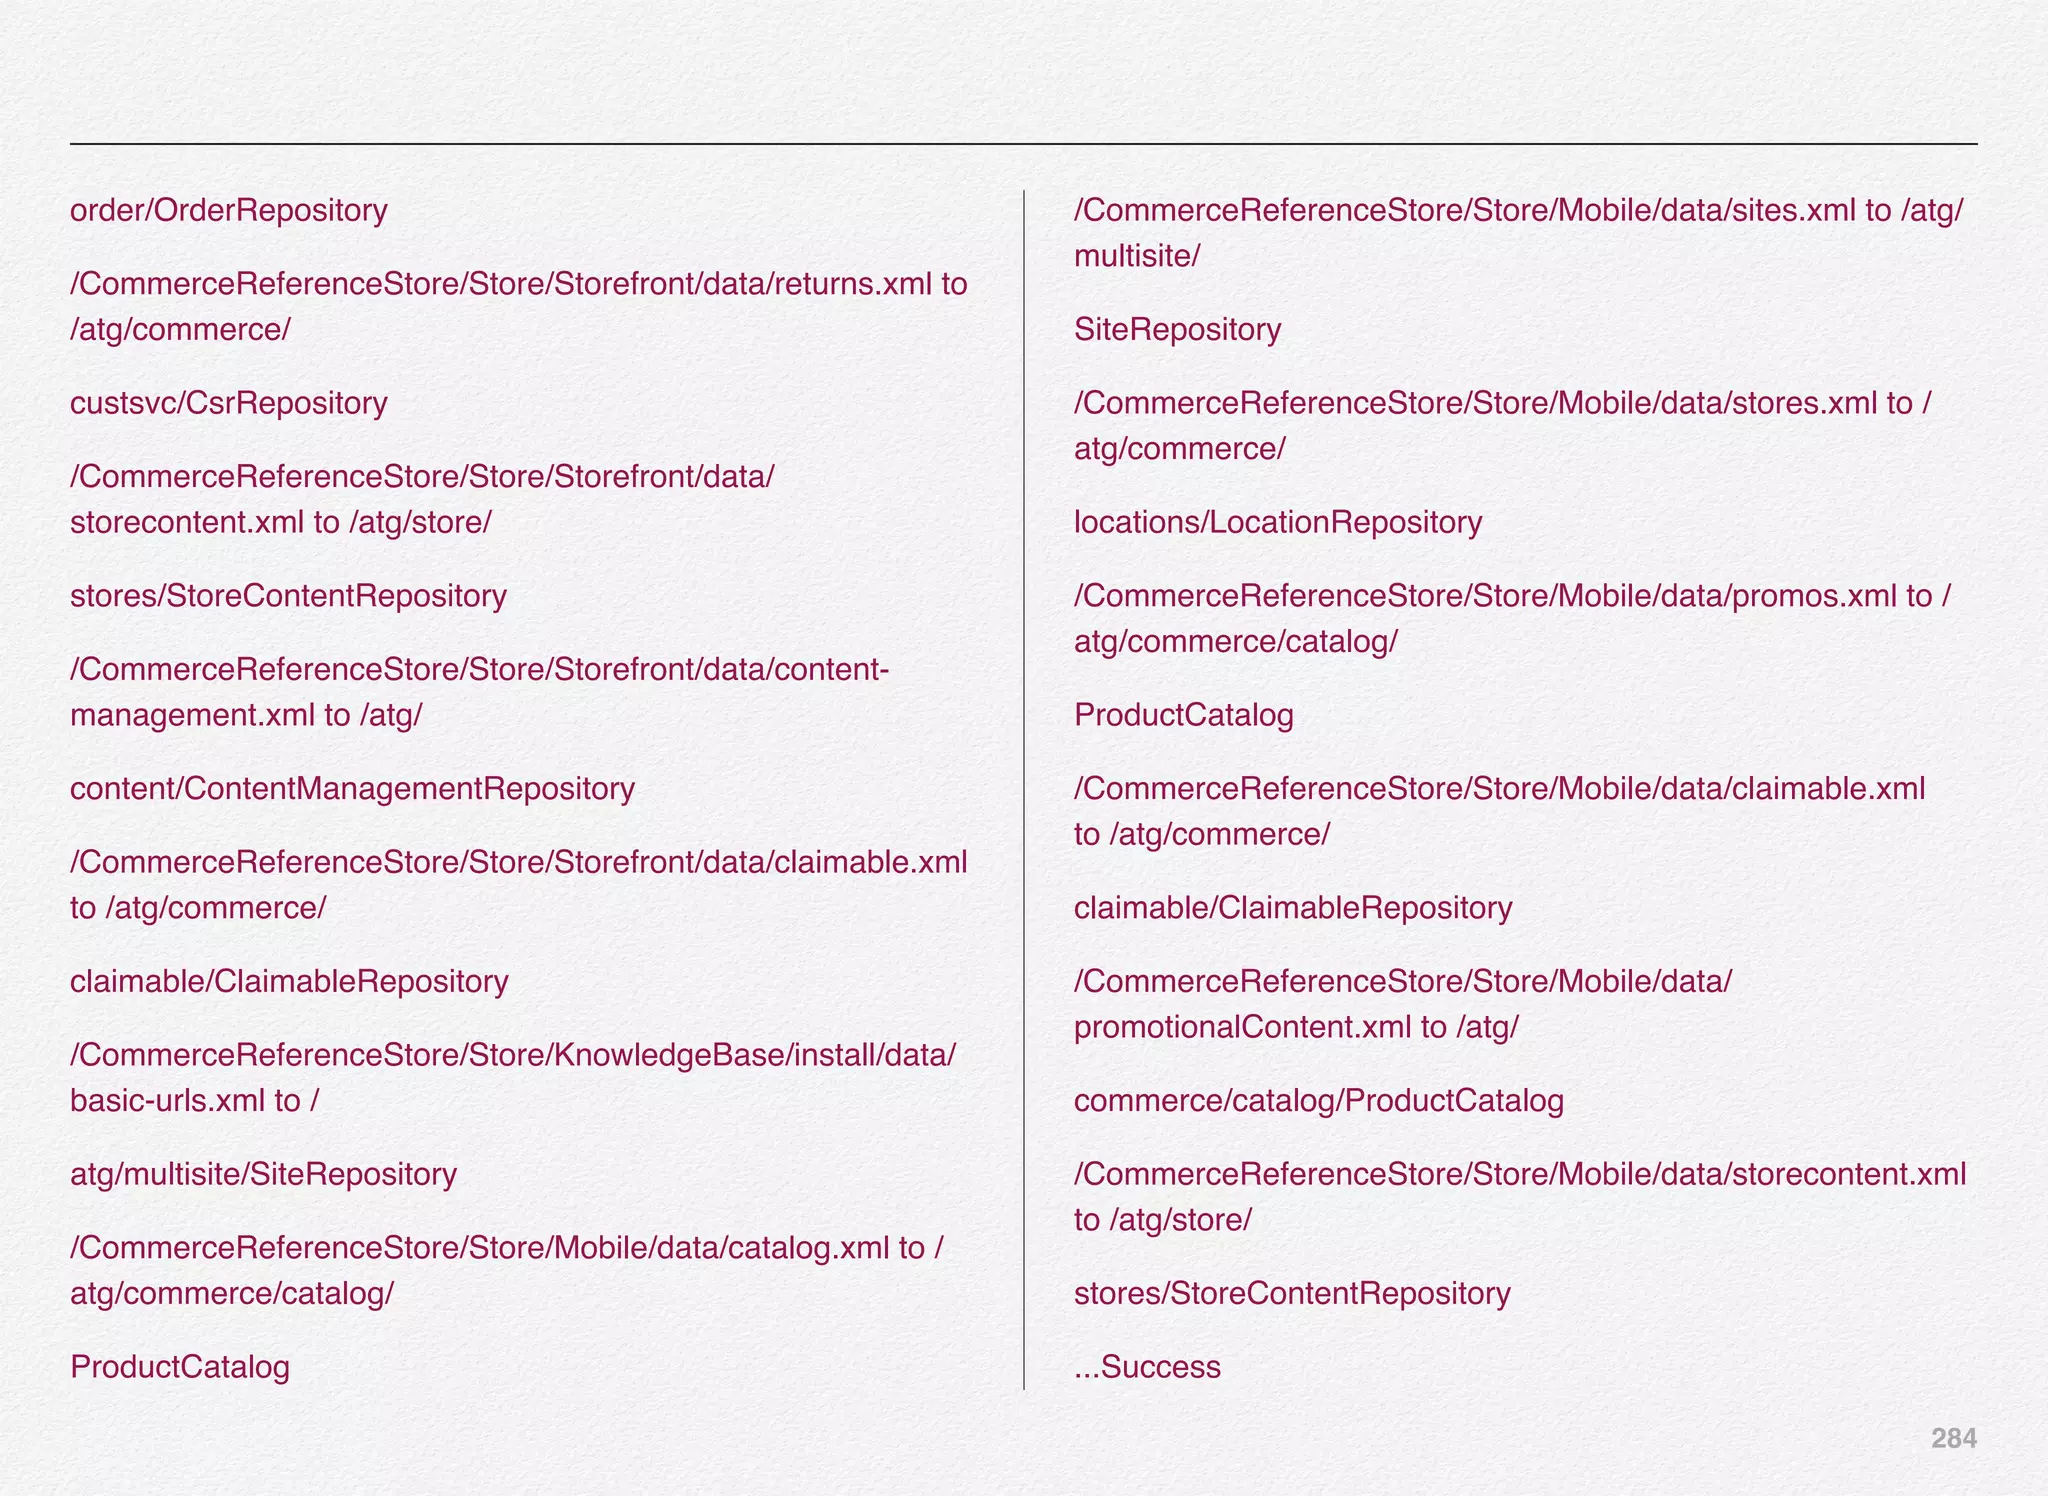
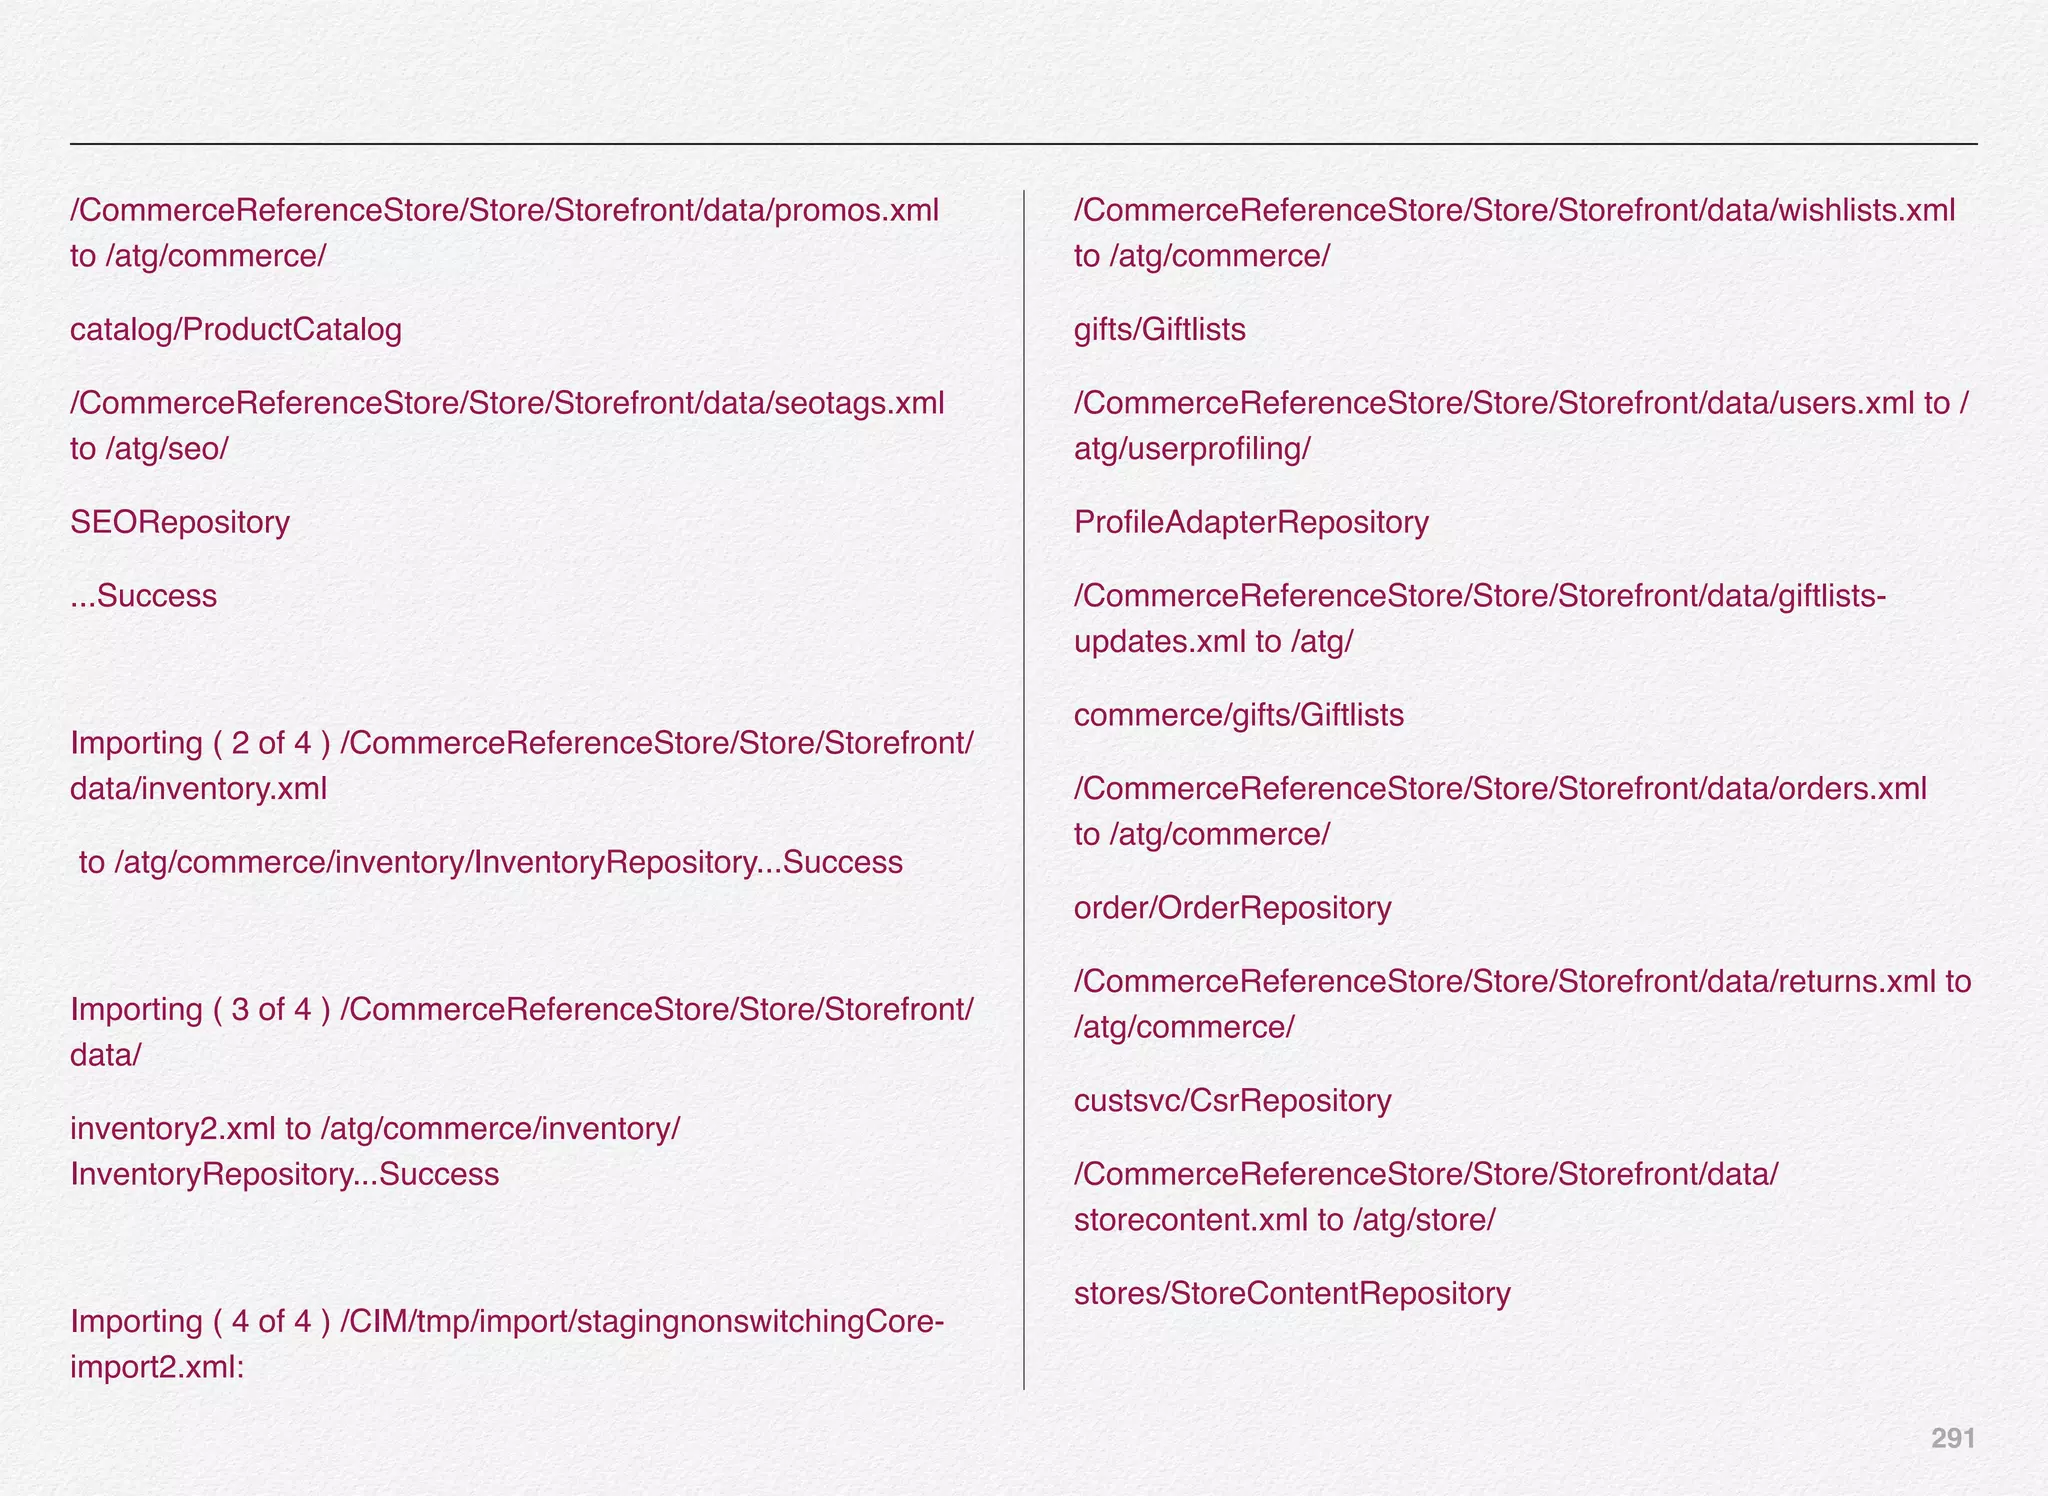
Importing ( 1 of 4 ) /CIM/tmp/import/stagingnonswitchingCore-
import1.xml:
/DAS/install/data/dynAdminRepo.xml to /atg/dynamo/security/
AdminSqlRepository
/WebUI/install/data/external_profile.xml to /atg/userprofiling/
ProfileAdapterRepository
/DCS/install/data/returnData.xml to /atg/commerce/custsvc/
CsrRepository
/CommerceReferenceStore/Store/Storefront/data/catalog.xml to
/atg/commerce/
catalog/ProductCatalog
/CommerceReferenceStore/Store/Storefront/data/pricelists.xml
to /atg/commerce/
pricing/priceLists/PriceLists
/CommerceReferenceStore/Store/Storefront/data/sites.xml to /
atg/multisite/
SiteRepository
/CommerceReferenceStore/Store/Storefront/data/stores.xml to /
atg/commerce/
locations/LocationRepository](https://image.slidesharecdn.com/oraclecommerce-doityourselfseries-160129151710/75/Oracle-Commerce-Using-ATG-Endeca-Do-It-Yourself-Series-291-2048.jpg)
![293
With this we now have successfully configured all the 3 data
sources:
1. Publishing
2. Production Core
3. Staging
Select [O] to continue
We don’t have any other data source to be configured at this
time - hence we will select [D] to return to previous CIM menu.
You will notice this brings us back to CIM main menu.
With this we have completed the database selection and
configuration. Also, we have created schema for our target
Oracle ATG Commerce application and imported the data into
the tables. In next section, we will configure the Oracle security
for the Commerce application.](https://image.slidesharecdn.com/oraclecommerce-doityourselfseries-160129151710/75/Oracle-Commerce-Using-ATG-Endeca-Do-It-Yourself-Series-294-2048.jpg)
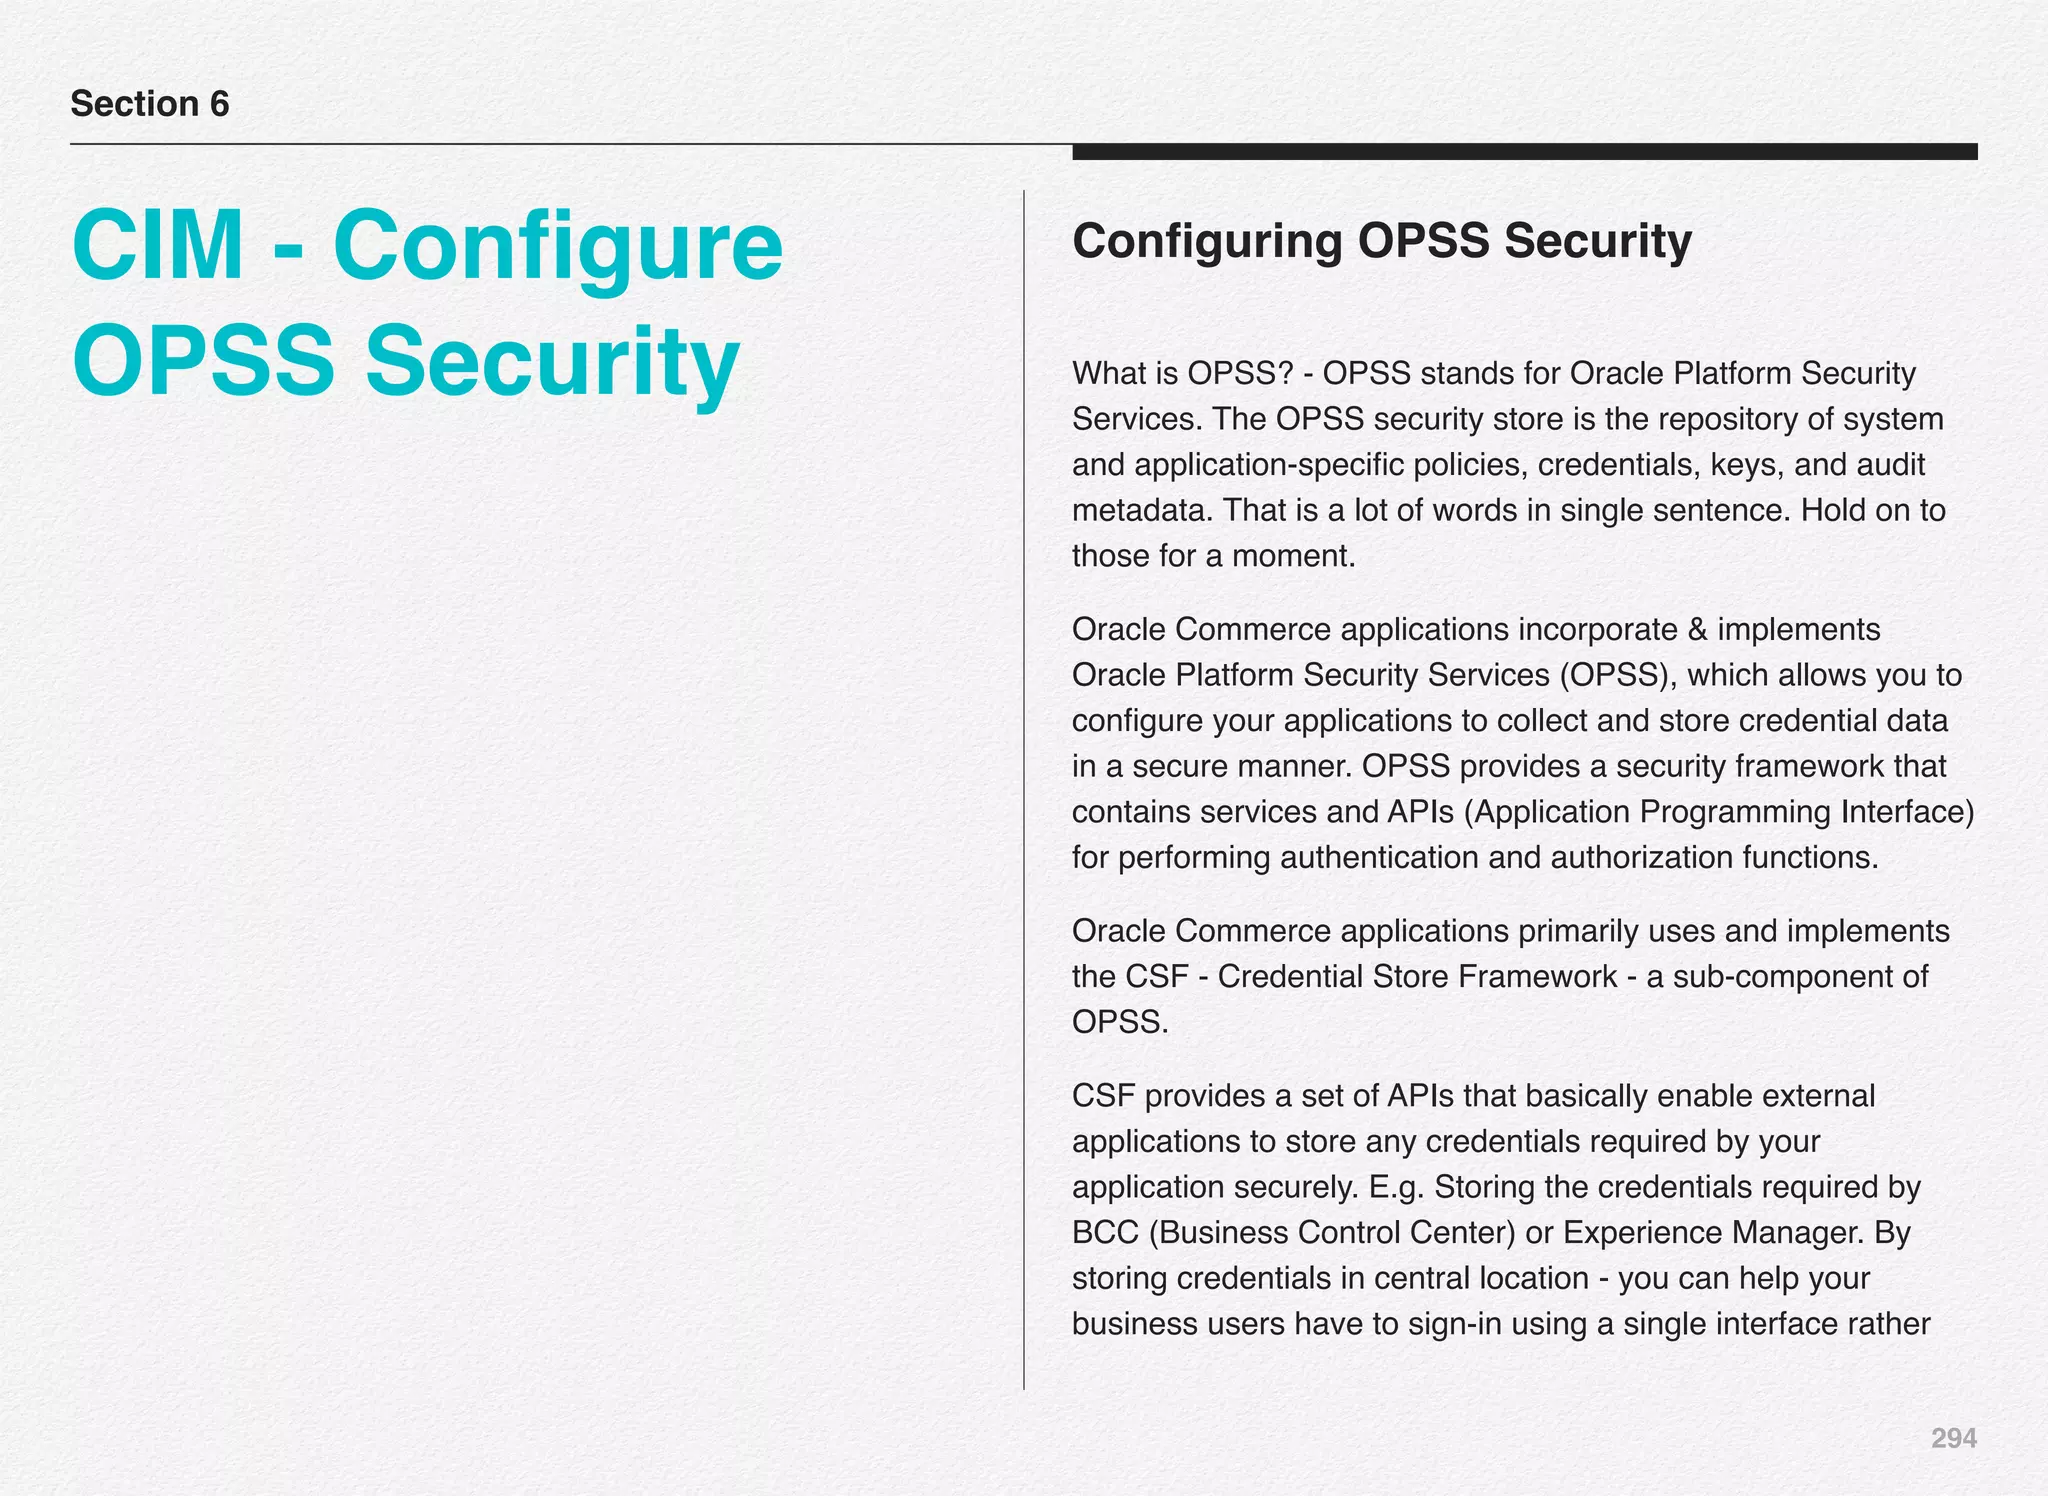
![295
than signing into BCC and Experience Manager separately. All
of us agree multiple accounts and sign-in methods are painful.
We will now get on to step [2] of the installation and
configuration of Commerce Reference Store (CRS) - i.e.
Configure OPSS Security.
Select [1] to enter the location where the OPSS files will be
deployed - also, you will notice additional instructions/
information specific to Windows and (*)nix based systems -
especially if you have multiple servers that need to access the
same security credentials.
Since, we are installing on Windows bases system - we will
continue with default path for shared location of the OPSS
security files.](https://image.slidesharecdn.com/oraclecommerce-doityourselfseries-160129151710/75/Oracle-Commerce-Using-ATG-Endeca-Do-It-Yourself-Series-296-2048.jpg)
![296
CIM was successfully able to store the shared path for OPSS
security files.
You will notice, that CIM automatically selected [3] instead of [2]
- since [2] - Enter the security credentials for REST Services is
kind of optional if you are just installing Oracle Commerce BCC
components (ATG) and not going to work with Oracle
Commerce Experience Manager (Endeca).
Since we are going to install and use both Oracle Commerce
BCC and Experience Manager components - we will opt for [2]
and setup credentials to be used for REST API communication
between Oracle Commerce BCC and Experience Manager - to
share User Segments.
In this case we are understanding that the business users will
create / review the user segments in Oracle Commerce BCC
tool and then the user segments will be pushed to Oracle
Commerce Experience Manager tool - where the business
users will be able to use those segments to design segment
specific experiences.
Oracle'
Commerce'BCC'
Oracle'Commerce'
Experience'Manager'
Business'User'
Creates'
Segments'
Share'Segments'
REST'API'
Business'User'
Use'
Segments'
OPSS'
Select [2] to continue setting up the credentials for REST API.](https://image.slidesharecdn.com/oraclecommerce-doityourselfseries-160129151710/75/Oracle-Commerce-Using-ATG-Endeca-Do-It-Yourself-Series-297-2048.jpg)
![297
COLORED note below is from CIM response - explanation to
what the REST service helps with and why it is important
secure the segment sharing mechanism.
================================================
Workbench accesses user segment data via REST services.
These REST services are protected by a shared security
credential which is used during machine-to-machine
communication. The credential you specify here must also must
be added to the Workbench configuration using the
manage_credentials script. Administrators should use a
complex, long, machine-generated credential.
================================================
As you have noticed - there are 2 parts to setting up the
credentials:
1. Oracle Commerce (ATG) side - Completed with CIM
2. Oracle Commerce Workbench Access using
Manage_Credentials script (Endeca)
Next step is to deploy the OPSS configuration files to the
destination folder.
Select [3] to continue with deployment of configuration files
CIM utility copies required OPSS files to the deploy directory -
C:ATGATG11.1CIMdeploy folder in this case.](https://image.slidesharecdn.com/oraclecommerce-doityourselfseries-160129151710/75/Oracle-Commerce-Using-ATG-Endeca-Do-It-Yourself-Series-298-2048.jpg)
![298
Select [D] to validate the destination folder exists and copy the
credentials to shared directory.
You can notice the copy of credentials to shared directory was
successful to C:ATGATG11.1homesecurity.
We are back to the security deployment menu - all the 3 options
have bee marked DONE.
Select [D] to return to previous main (CIM Main Menu).
With this we have completed the OPSS security configuration,
setting up the REST API credentials, and deploying of shared
credentials to the shared directory.
Let us now move on to next step - Server Instance
Configuration.](https://image.slidesharecdn.com/oraclecommerce-doityourselfseries-160129151710/75/Oracle-Commerce-Using-ATG-Endeca-Do-It-Yourself-Series-299-2048.jpg)
![299
CIM - Server Instance Configuration
As discussed in previous section - we have completed the
database configuration [Done] and the OPSS security [Done].
Next step is to configure server instances. If you recollect we
have already configured our data sources for 3 servers:
• publishing - publishingcrs
• production - prodcorecrs
• staging - stagingcrs
We need to now configure the server instances
Section 7
CIM - Server
Instance
Configuration
Server Instance
Configuration
Publishing
Server Instance
Production
Server Instance
Oracle Only
SSO Server
Staging Server
Instance](https://image.slidesharecdn.com/oraclecommerce-doityourselfseries-160129151710/75/Oracle-Commerce-Using-ATG-Endeca-Do-It-Yourself-Series-300-2048.jpg)
![300
You would notice that we have 4 server instances to configure -
one extra compared to the data sources we configured.
We need a server instance created and running to manage
SSO (Single Sign-On) in addition to publishing, production, and
staging server instances.
Configure SSO Server Instance
Oracle provides out-of-the-box implementation of OPSS -
Oracle Product Security framework and APIs - part of which is
configuring the SSO server instance using the CIM.
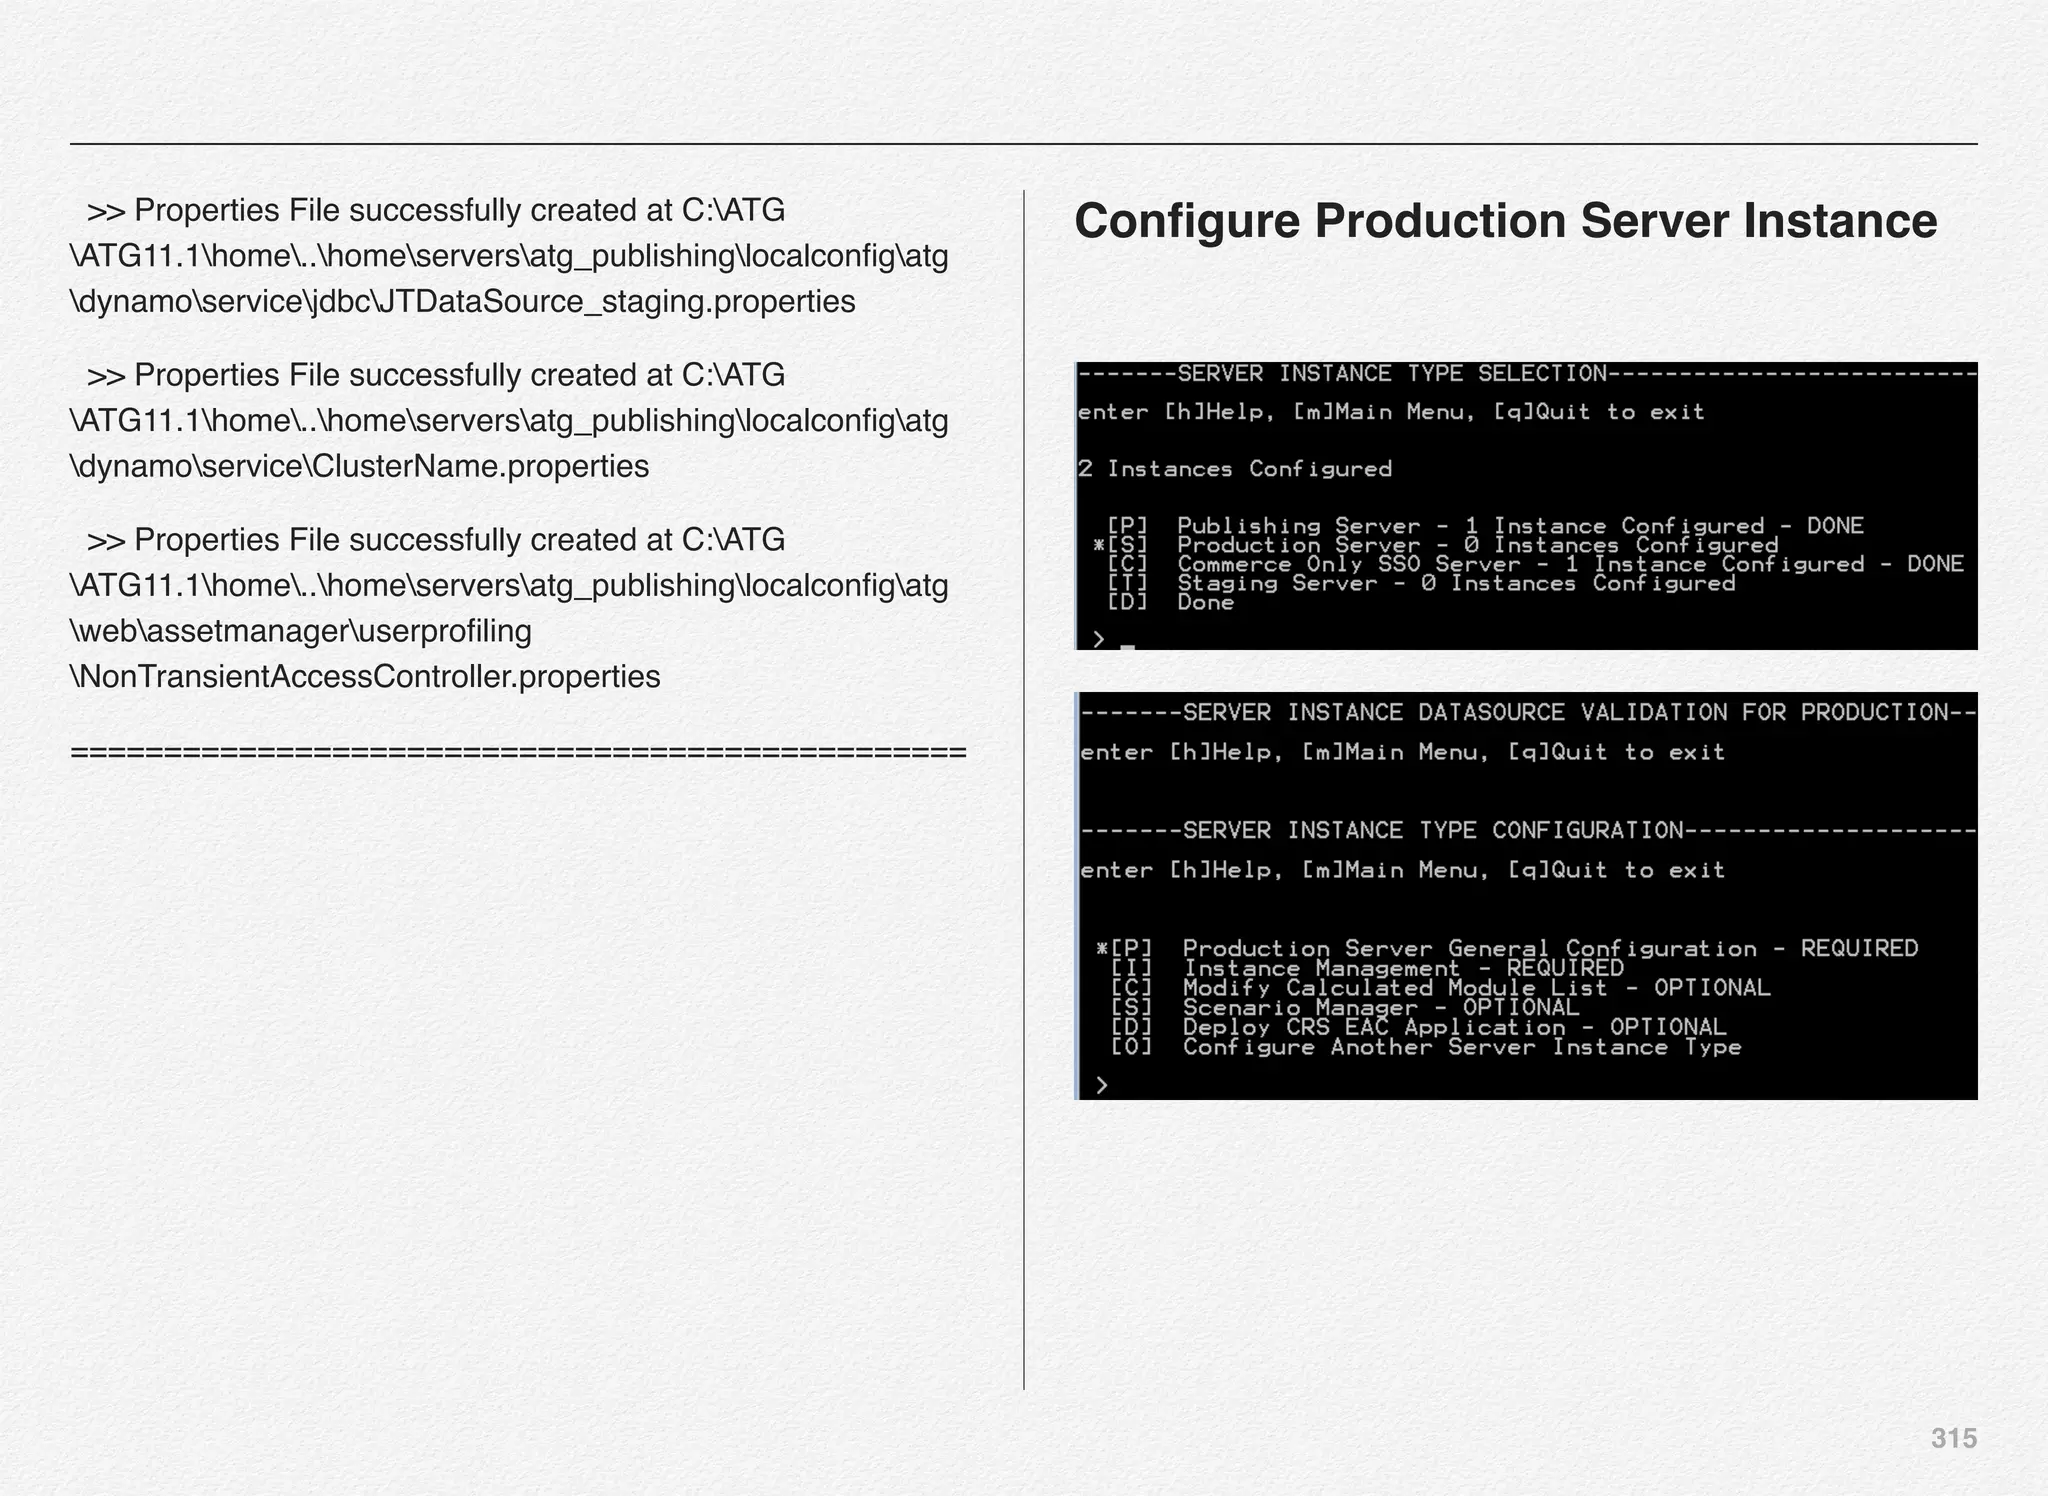
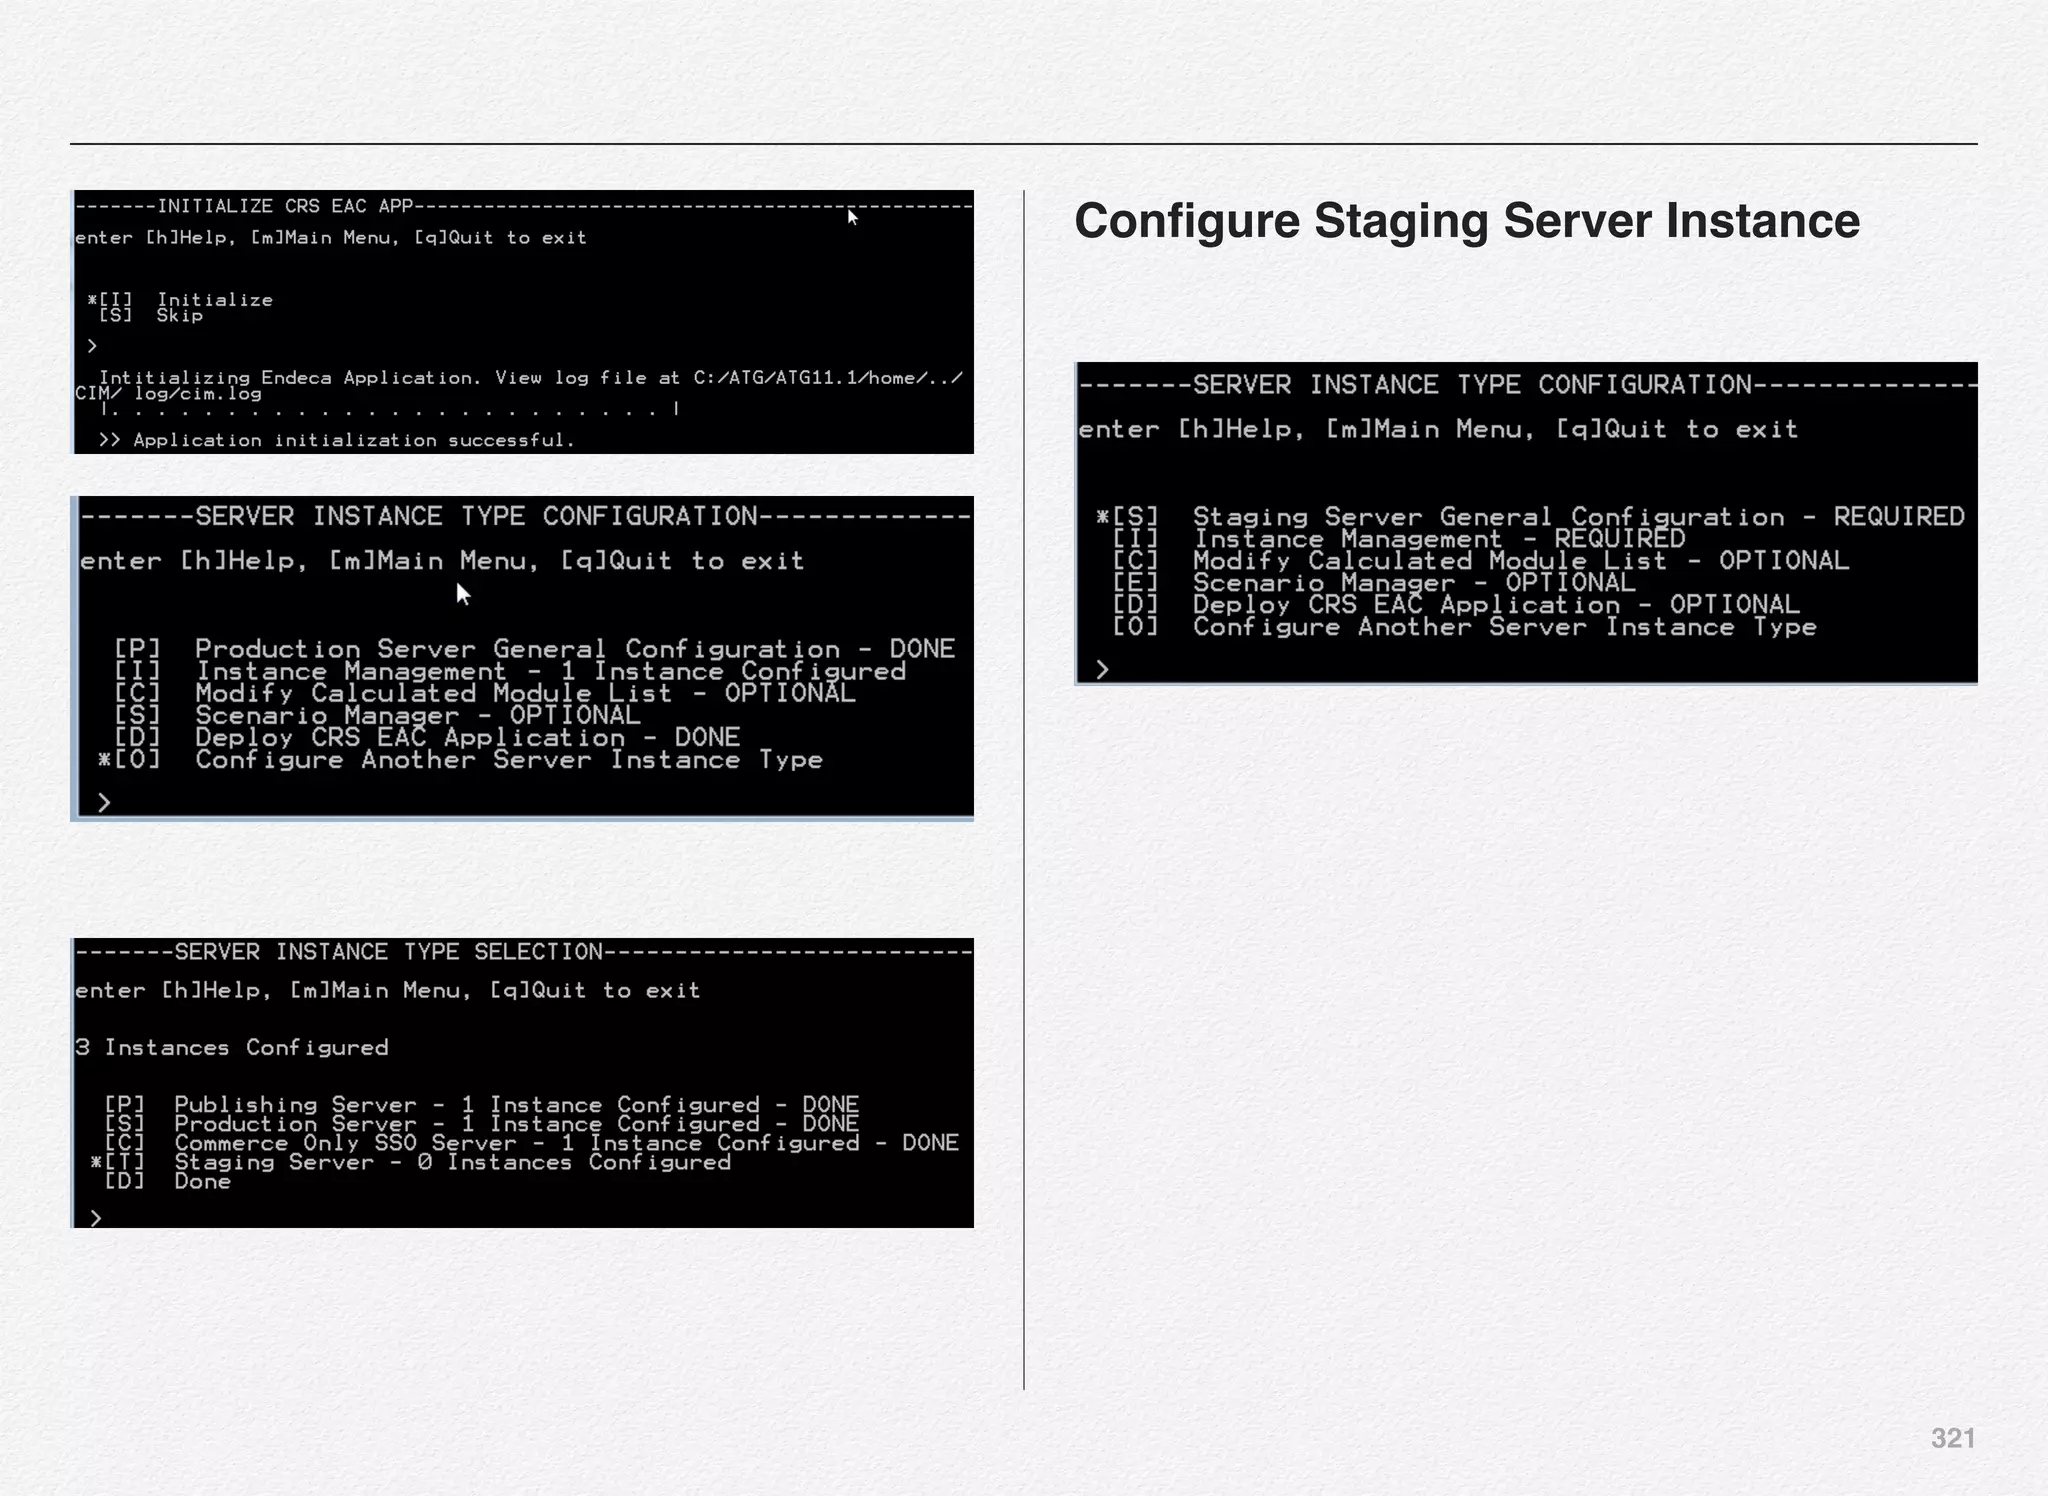
Once you launch the server instance type selection menu - you
will see several options to configure the server instance type. In
this case, we selected the server instance type to be SSO.
You have 3 options for the SSO server instance type
configuration - 2 options are mandatory and 1 optional.
You will notice the 1st 2 options (Server general configuration
and Instance management) are required for all the server
instance types that we are going to configure (SSO, Publishing,
Staging, and Production).
Select [C] to configure the Commerce Only SSO server general
details for this instance. General configuration details are](https://image.slidesharecdn.com/oraclecommerce-doityourselfseries-160129151710/75/Oracle-Commerce-Using-ATG-Endeca-Do-It-Yourself-Series-301-2048.jpg)
![301
applied from the template of the server instance that is provided
by Oracle. In some cases you need to customize these settings
and not in others.
For Commerce Only SSO Server Instance, we were not
required to make any changes or respond to any prompts
during the general configuration.
Marked as [DONE]. Let us now select [I] for instance
management - where you can add, edit or remove instances.
Select [A] to add a new server instance for Commerce Only
SSO server - Oracle will provide default values to some/most of
these prompts (feel free to override).
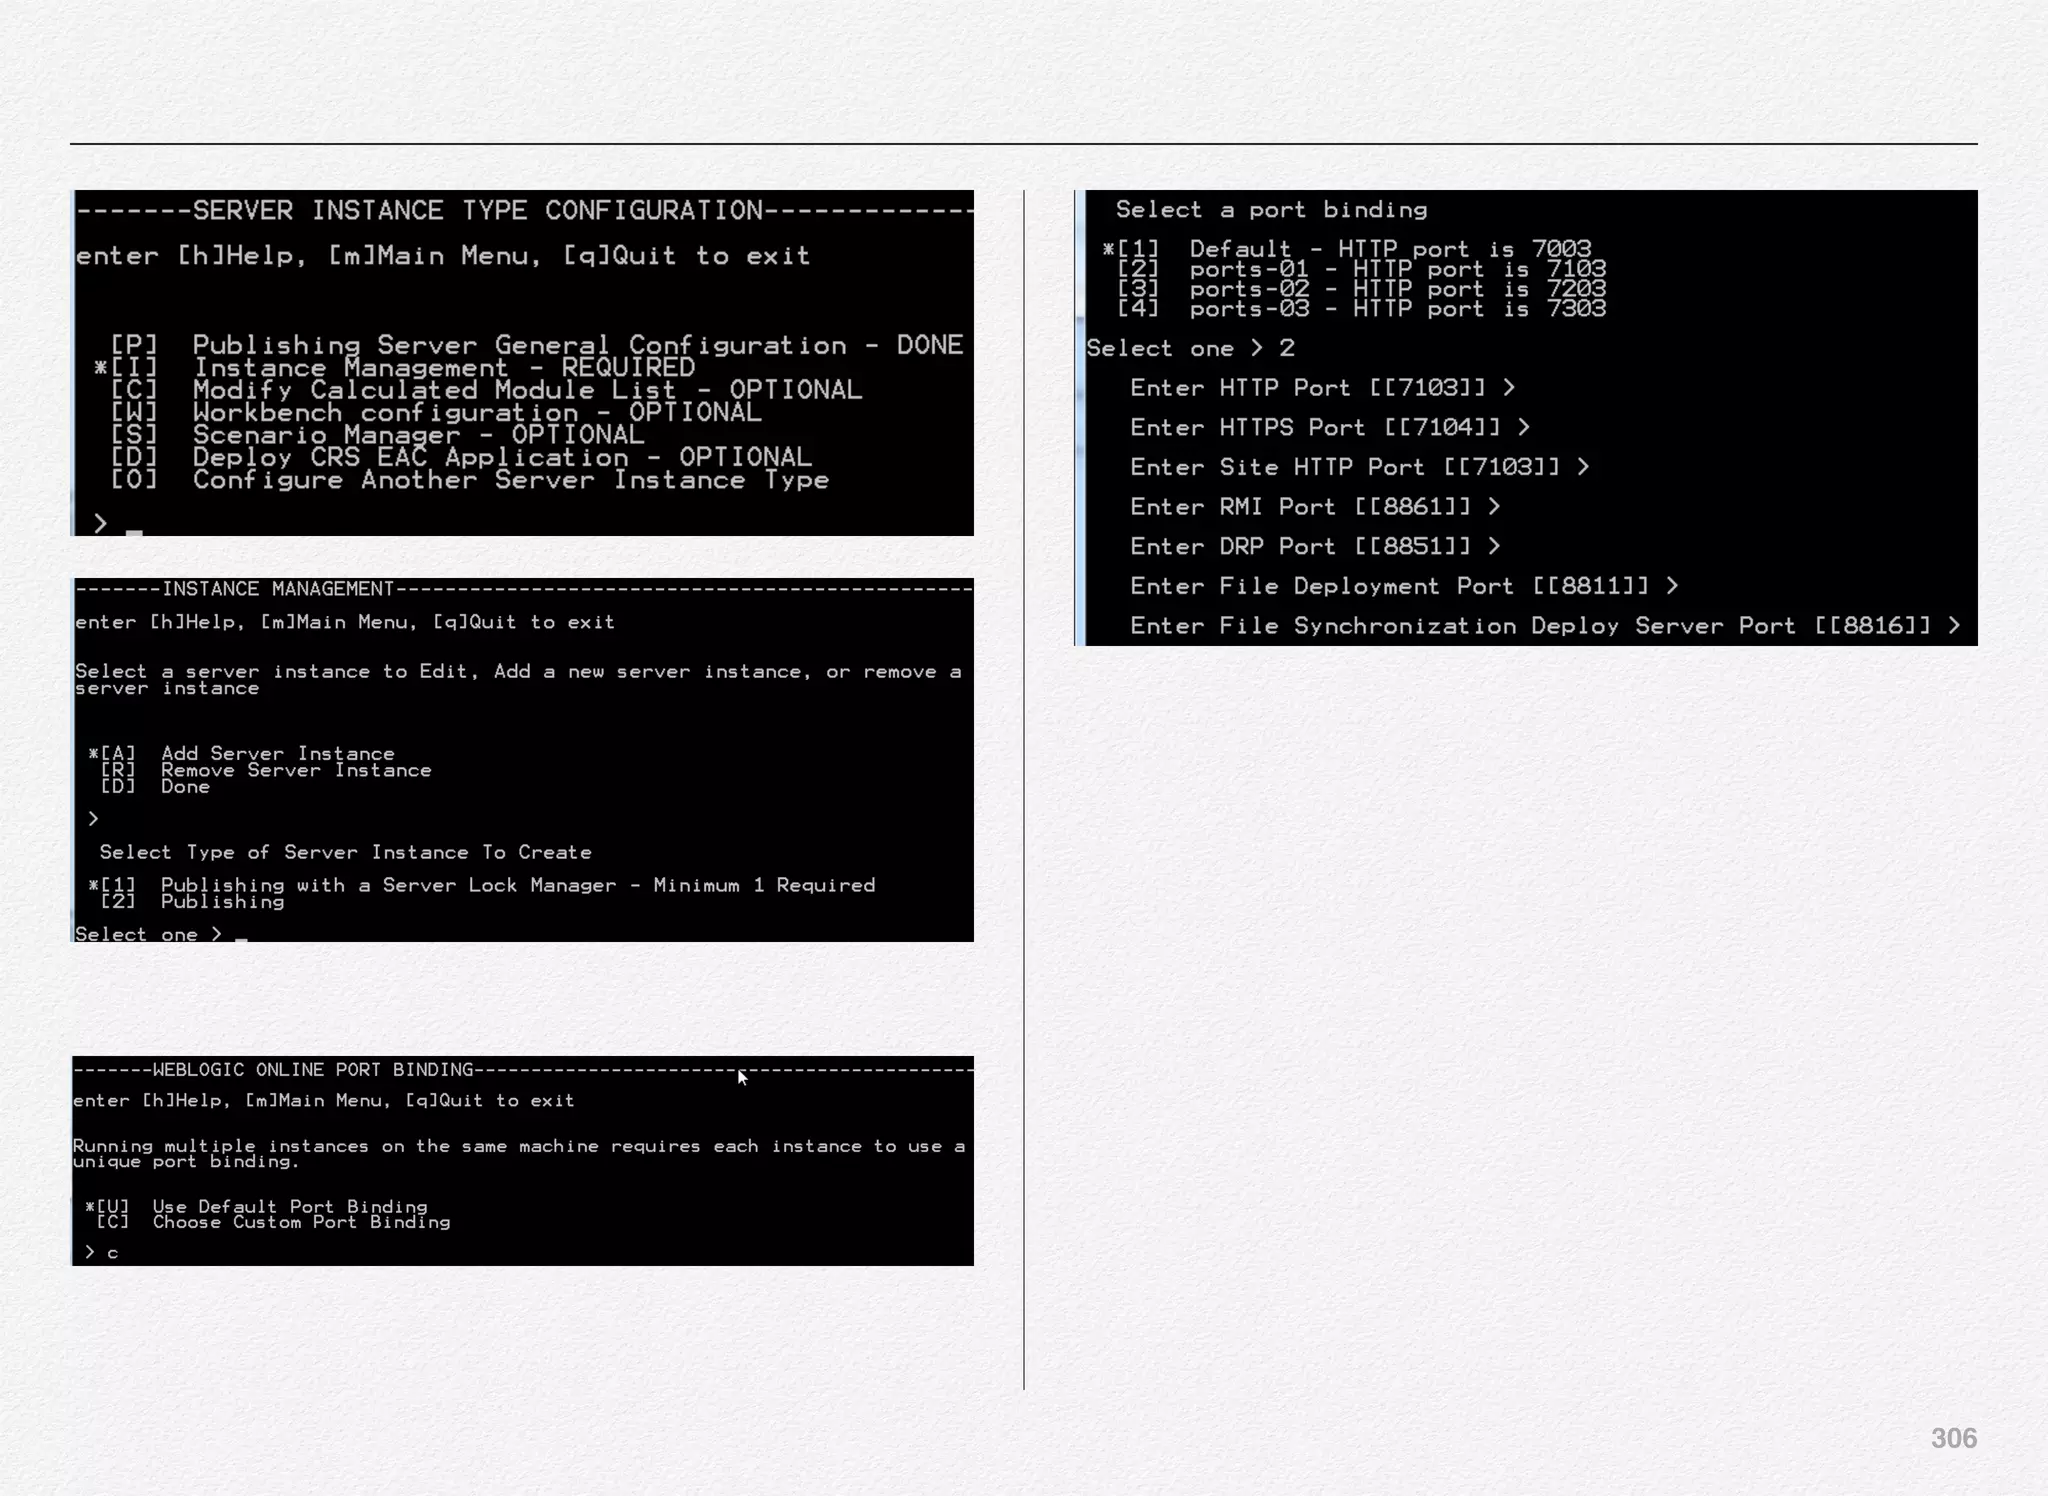
It is possible you might be running multiple instances of Oracle
Commerce (ATG) managed servers running on the same
physical machine. This idea forces us to bind the WebLogic
server (application server) to dedicated port numbers.
CIM provides 4 out-of-the-box configuration set of values - but
that doesn’t limit us from creating even 10 or 15 or even 100
instances. We can create as many server instances of different
types based on our deployment topology and business
requirement and use CIM to manually assign those port
numbers to each application.
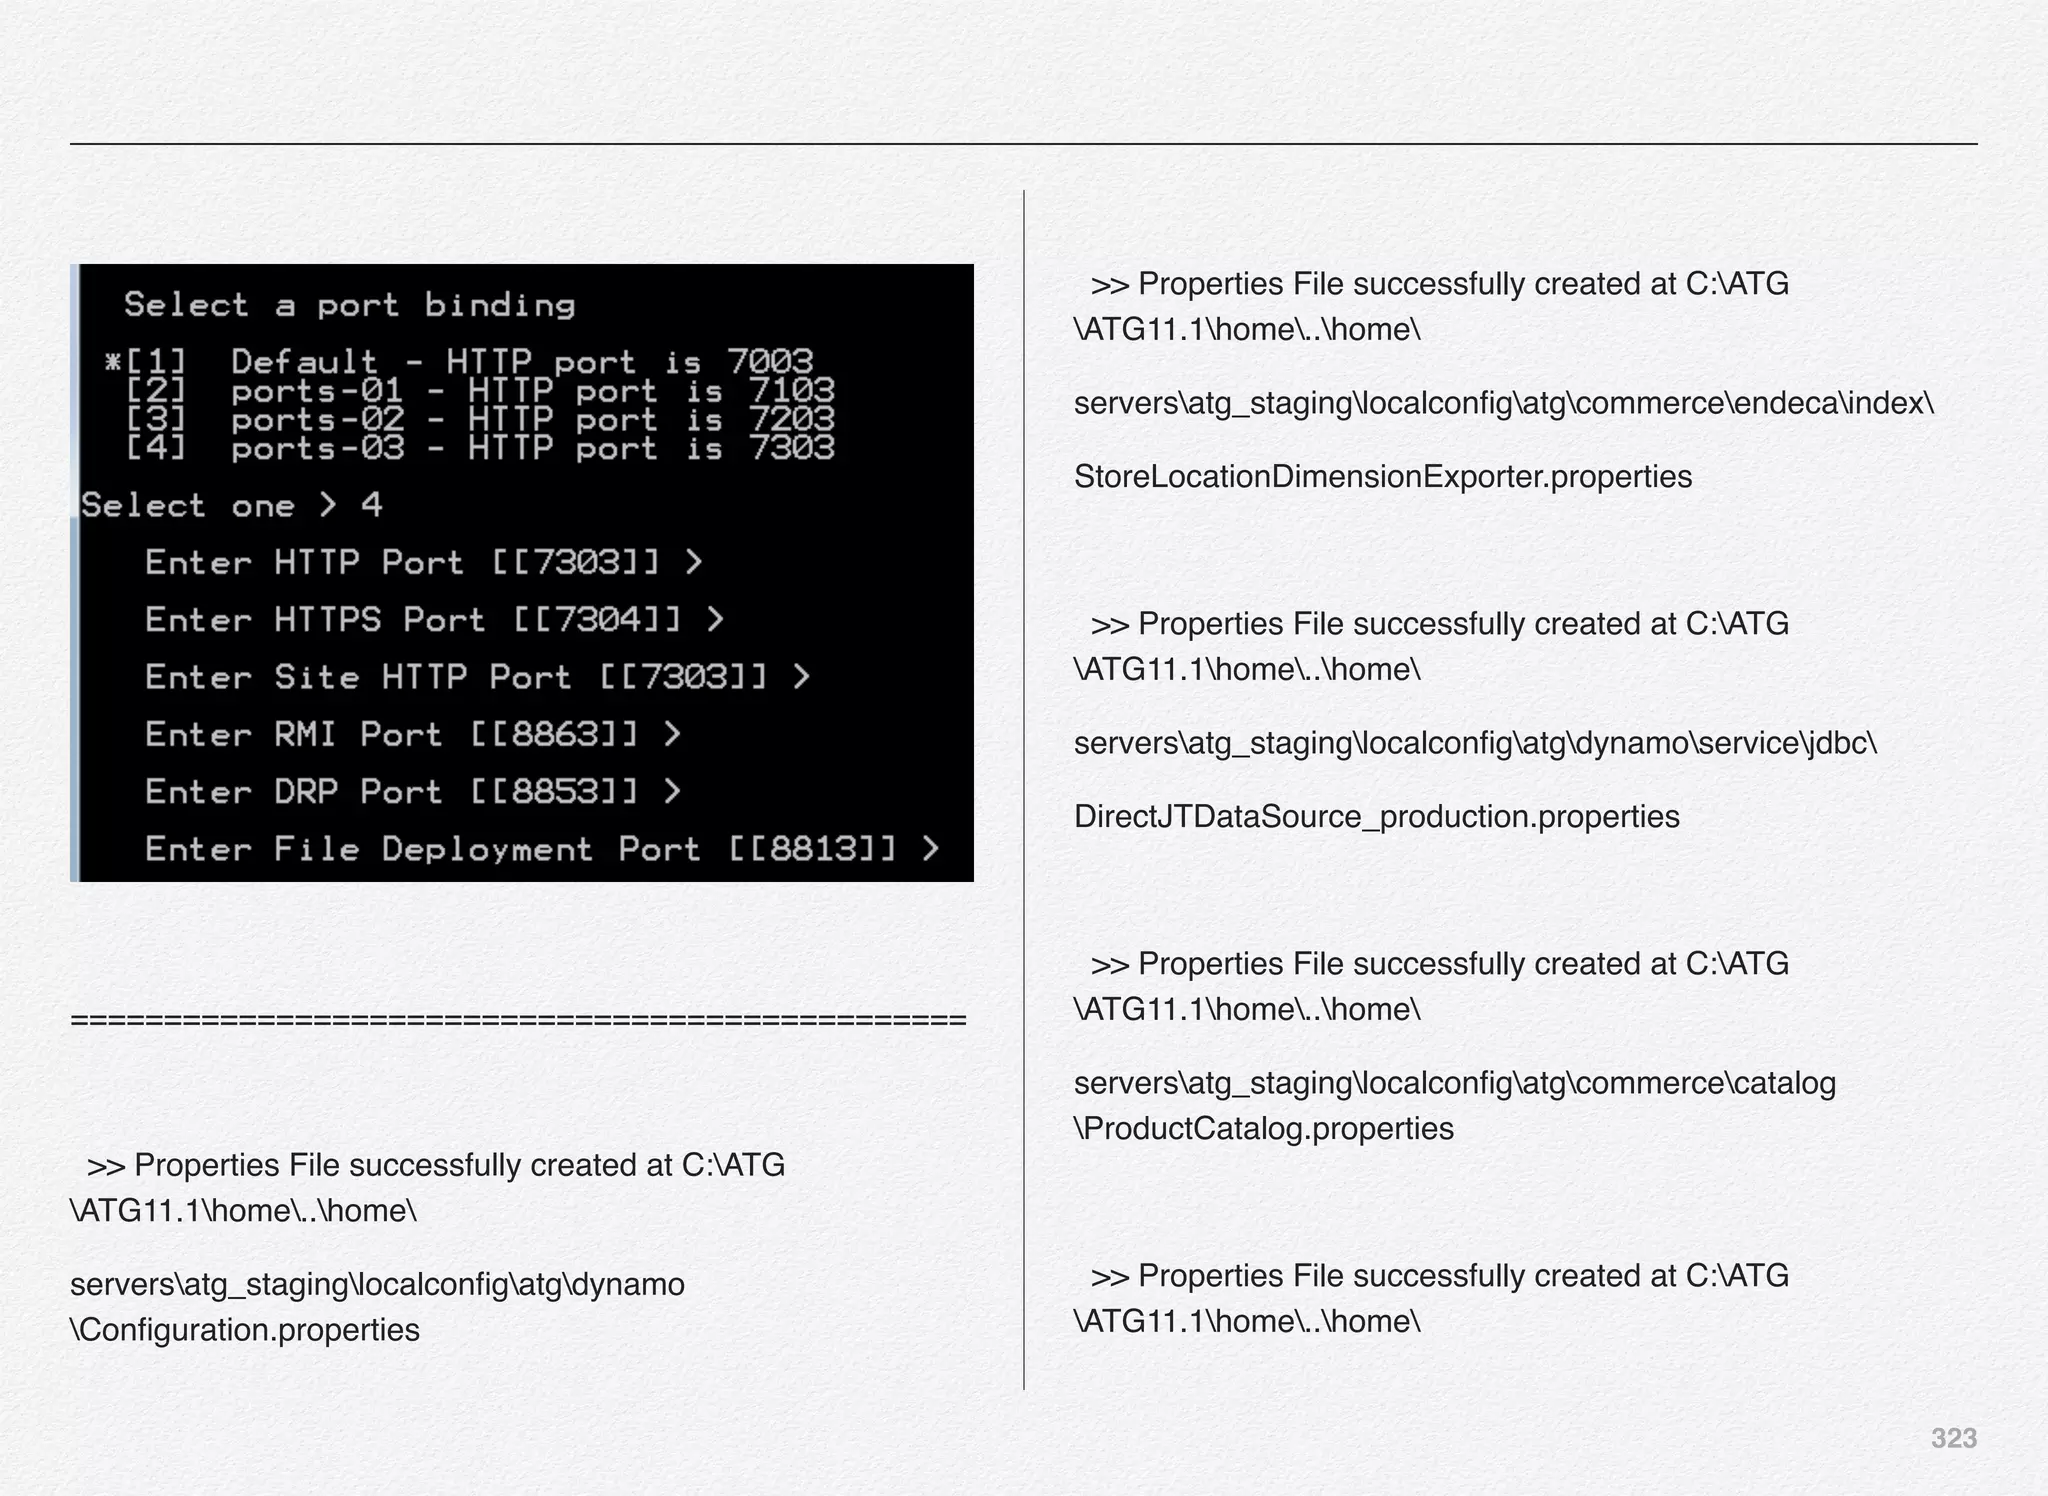
At this stage, you can either pick and use the default port
binding that CIM provides or you can provide customer port
binding (including out-of-the-box bindings).](https://image.slidesharecdn.com/oraclecommerce-doityourselfseries-160129151710/75/Oracle-Commerce-Using-ATG-Endeca-Do-It-Yourself-Series-302-2048.jpg)
![302
We are going to use the port bindings 03 with the set of values
for each of below:
• HTTP Port - Your WebLogic server port to receive HTTP
requests
• HTTPS Port - Secure version of HTTP port to receive
requests
• RMI Port - The RMI port allows various components of ATG
Service to communicate
• DRP Port - The DRP port number identifies each server as a
unique ATG server instance. The DRP port number must be
unique on a given host. The port itself is not used for
communication
• Lock Server Port - [Not Applicable] in case of SSO server
• File Deployment Port - Port used by ATG to deploy file assets
from the asset management server to the target server
• File Synchronization Deploy Server Port - Useful in case if
you have multiple asset management servers running on
different hosts and if you are not using any solutions such as
SAN or NFS or RSync - ATG provides you with a mechanism
known as FileSynchronizationDeplotServer component that
helps in synchronizing file assets spread across different
asset management servers running on different hosts.
Above are the port bindings we have selected for the Oracle
Commerce Only SSO Server Instance.](https://image.slidesharecdn.com/oraclecommerce-doityourselfseries-160129151710/75/Oracle-Commerce-Using-ATG-Endeca-Do-It-Yourself-Series-303-2048.jpg)

![304
This concludes the Oracle Commerce Only SSO server
instance configuration.
Select [D] to return to the Server Instance Type Configuration
menu
Select [O] to return back to Server Instance Type Selection
menu, which indicates 1 instance is configured.
[C] Commerce Only SSO Server - 1 instance configured -
DONE](https://image.slidesharecdn.com/oraclecommerce-doityourselfseries-160129151710/75/Oracle-Commerce-Using-ATG-Endeca-Do-It-Yourself-Series-305-2048.jpg)
![305
Configure Publishing Server Instance
Oracle Commerce Publishing server instance contains below
modules
DCS-UI.Versioned BIZUI PubPortlet DafEar.Admin
ContentMgmt.Versioned
DCS-UI.SiteAdmin.Versioned SiteAdmin.Versioned
DCS.Versioned DCS-UI
Store.EStore.Versioned Store.Storefront
ContentMgmt.Endeca.Index.Versioned
DCS.Endeca.Index.Versioned Store.Endeca.Index.Versioned
DCS.Endeca.Index.SKUIndexing Store.Mobile
Store.Mobile.Versioned
Store.KnowledgeBase Store.Mobile.REST.Versioned
Primarily, it contains necessary modules that provides you with
business UI for content administration, asset management,
merchandising, workflow, and versioning.
Select [P] to configure general settings for publishing server
instance.](https://image.slidesharecdn.com/oraclecommerce-doityourselfseries-160129151710/75/Oracle-Commerce-Using-ATG-Endeca-Do-It-Yourself-Series-306-2048.jpg)
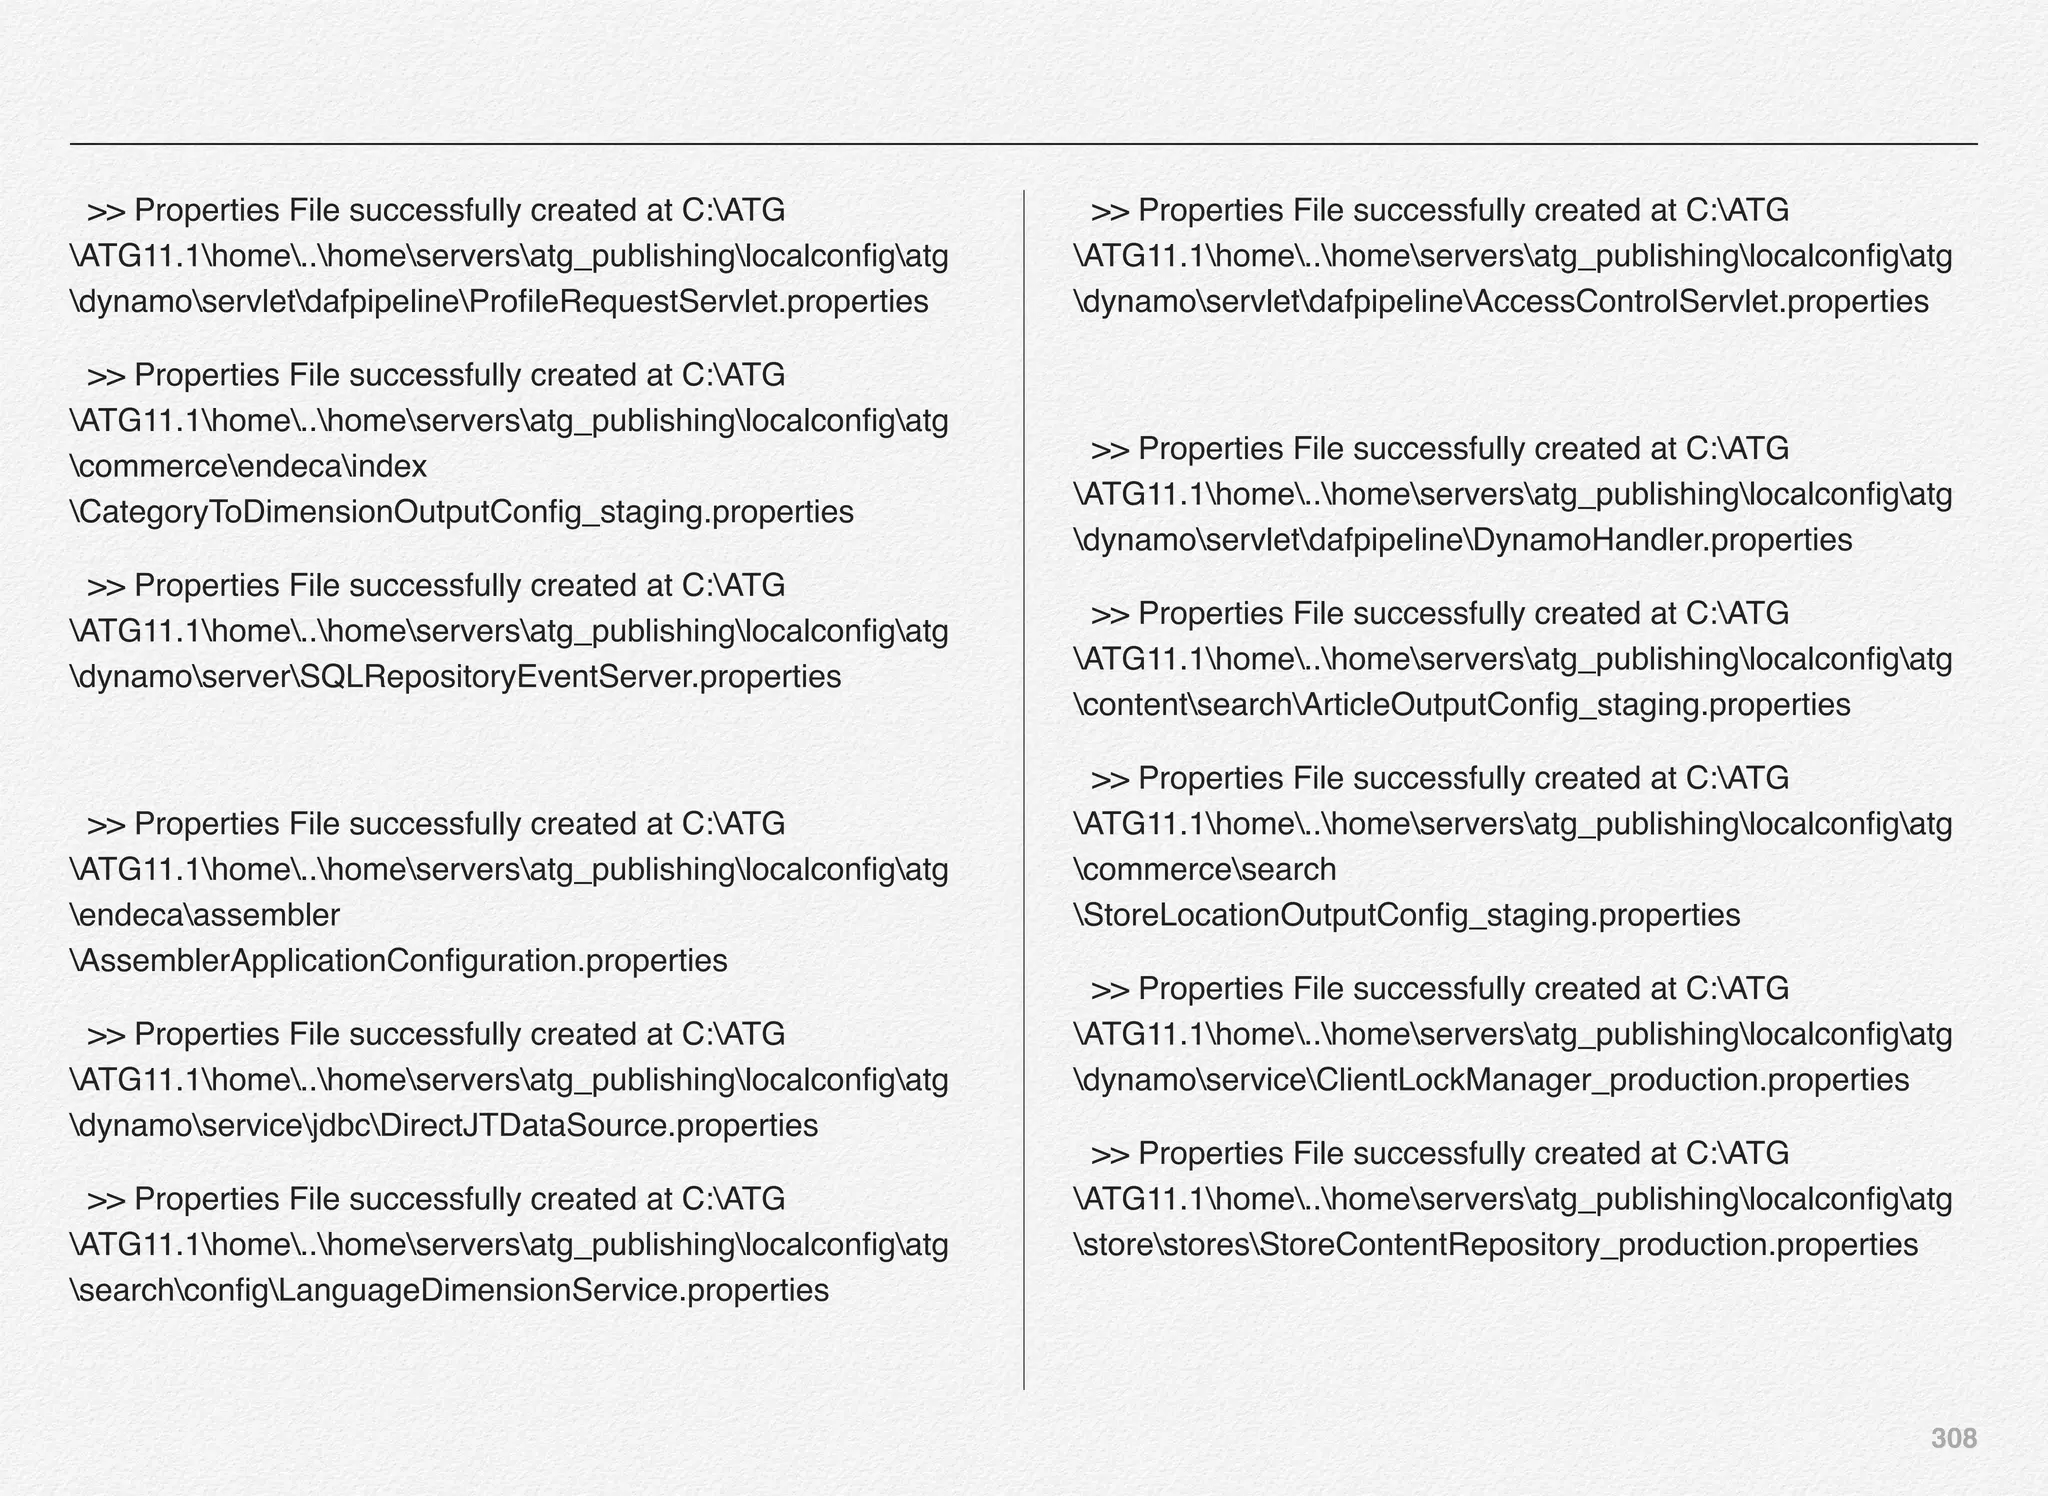
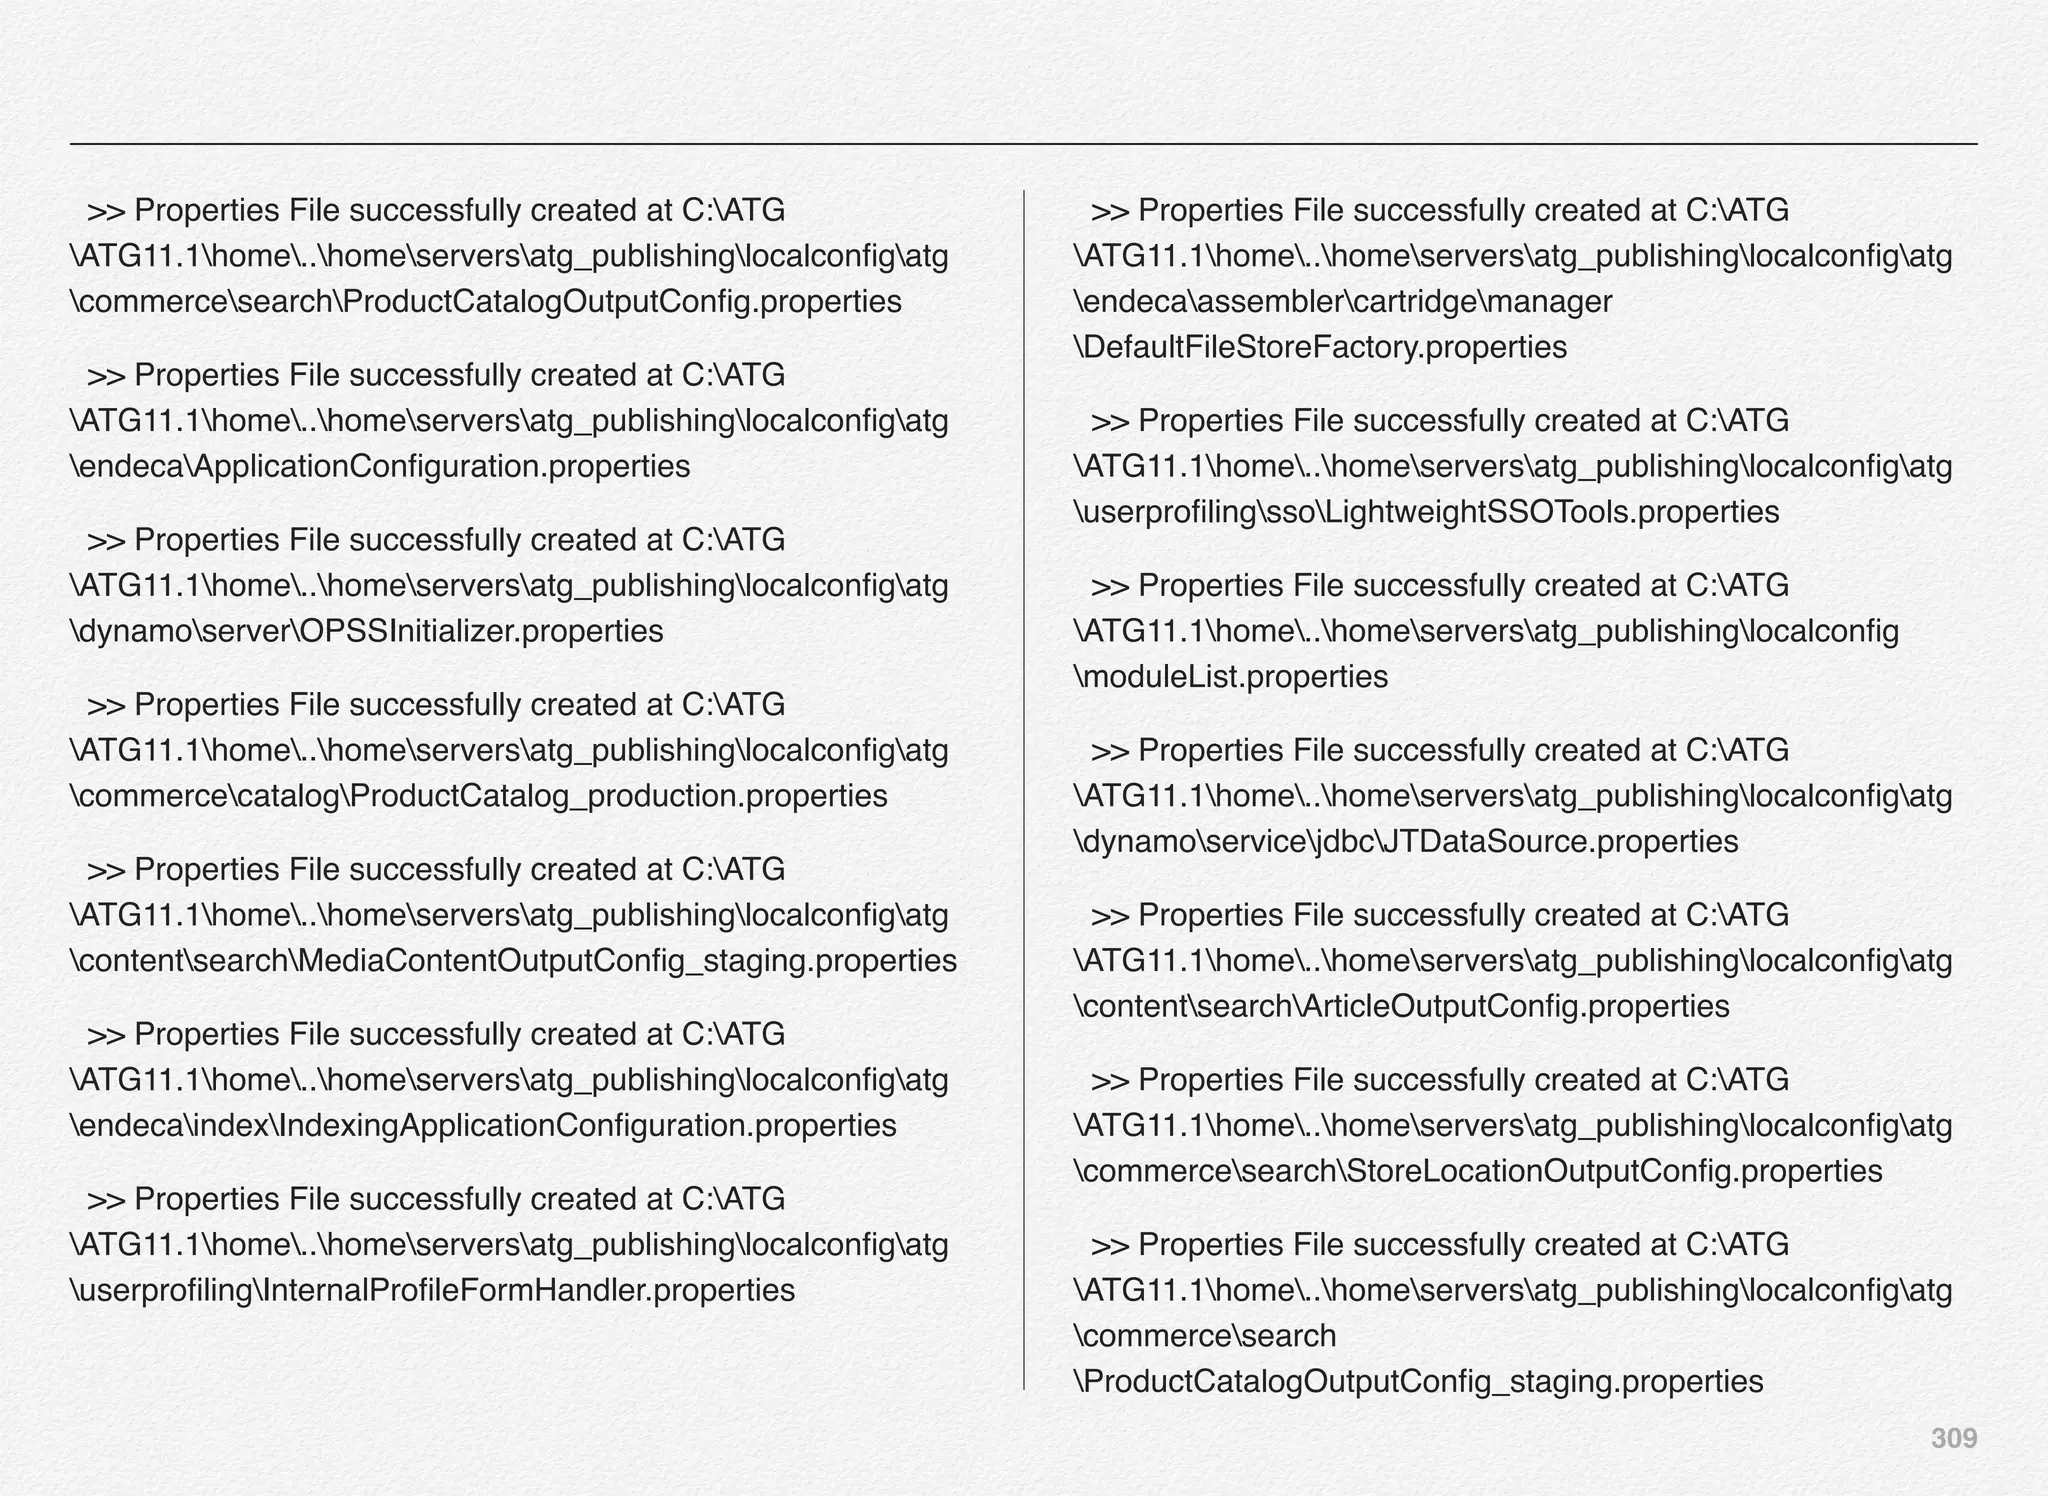
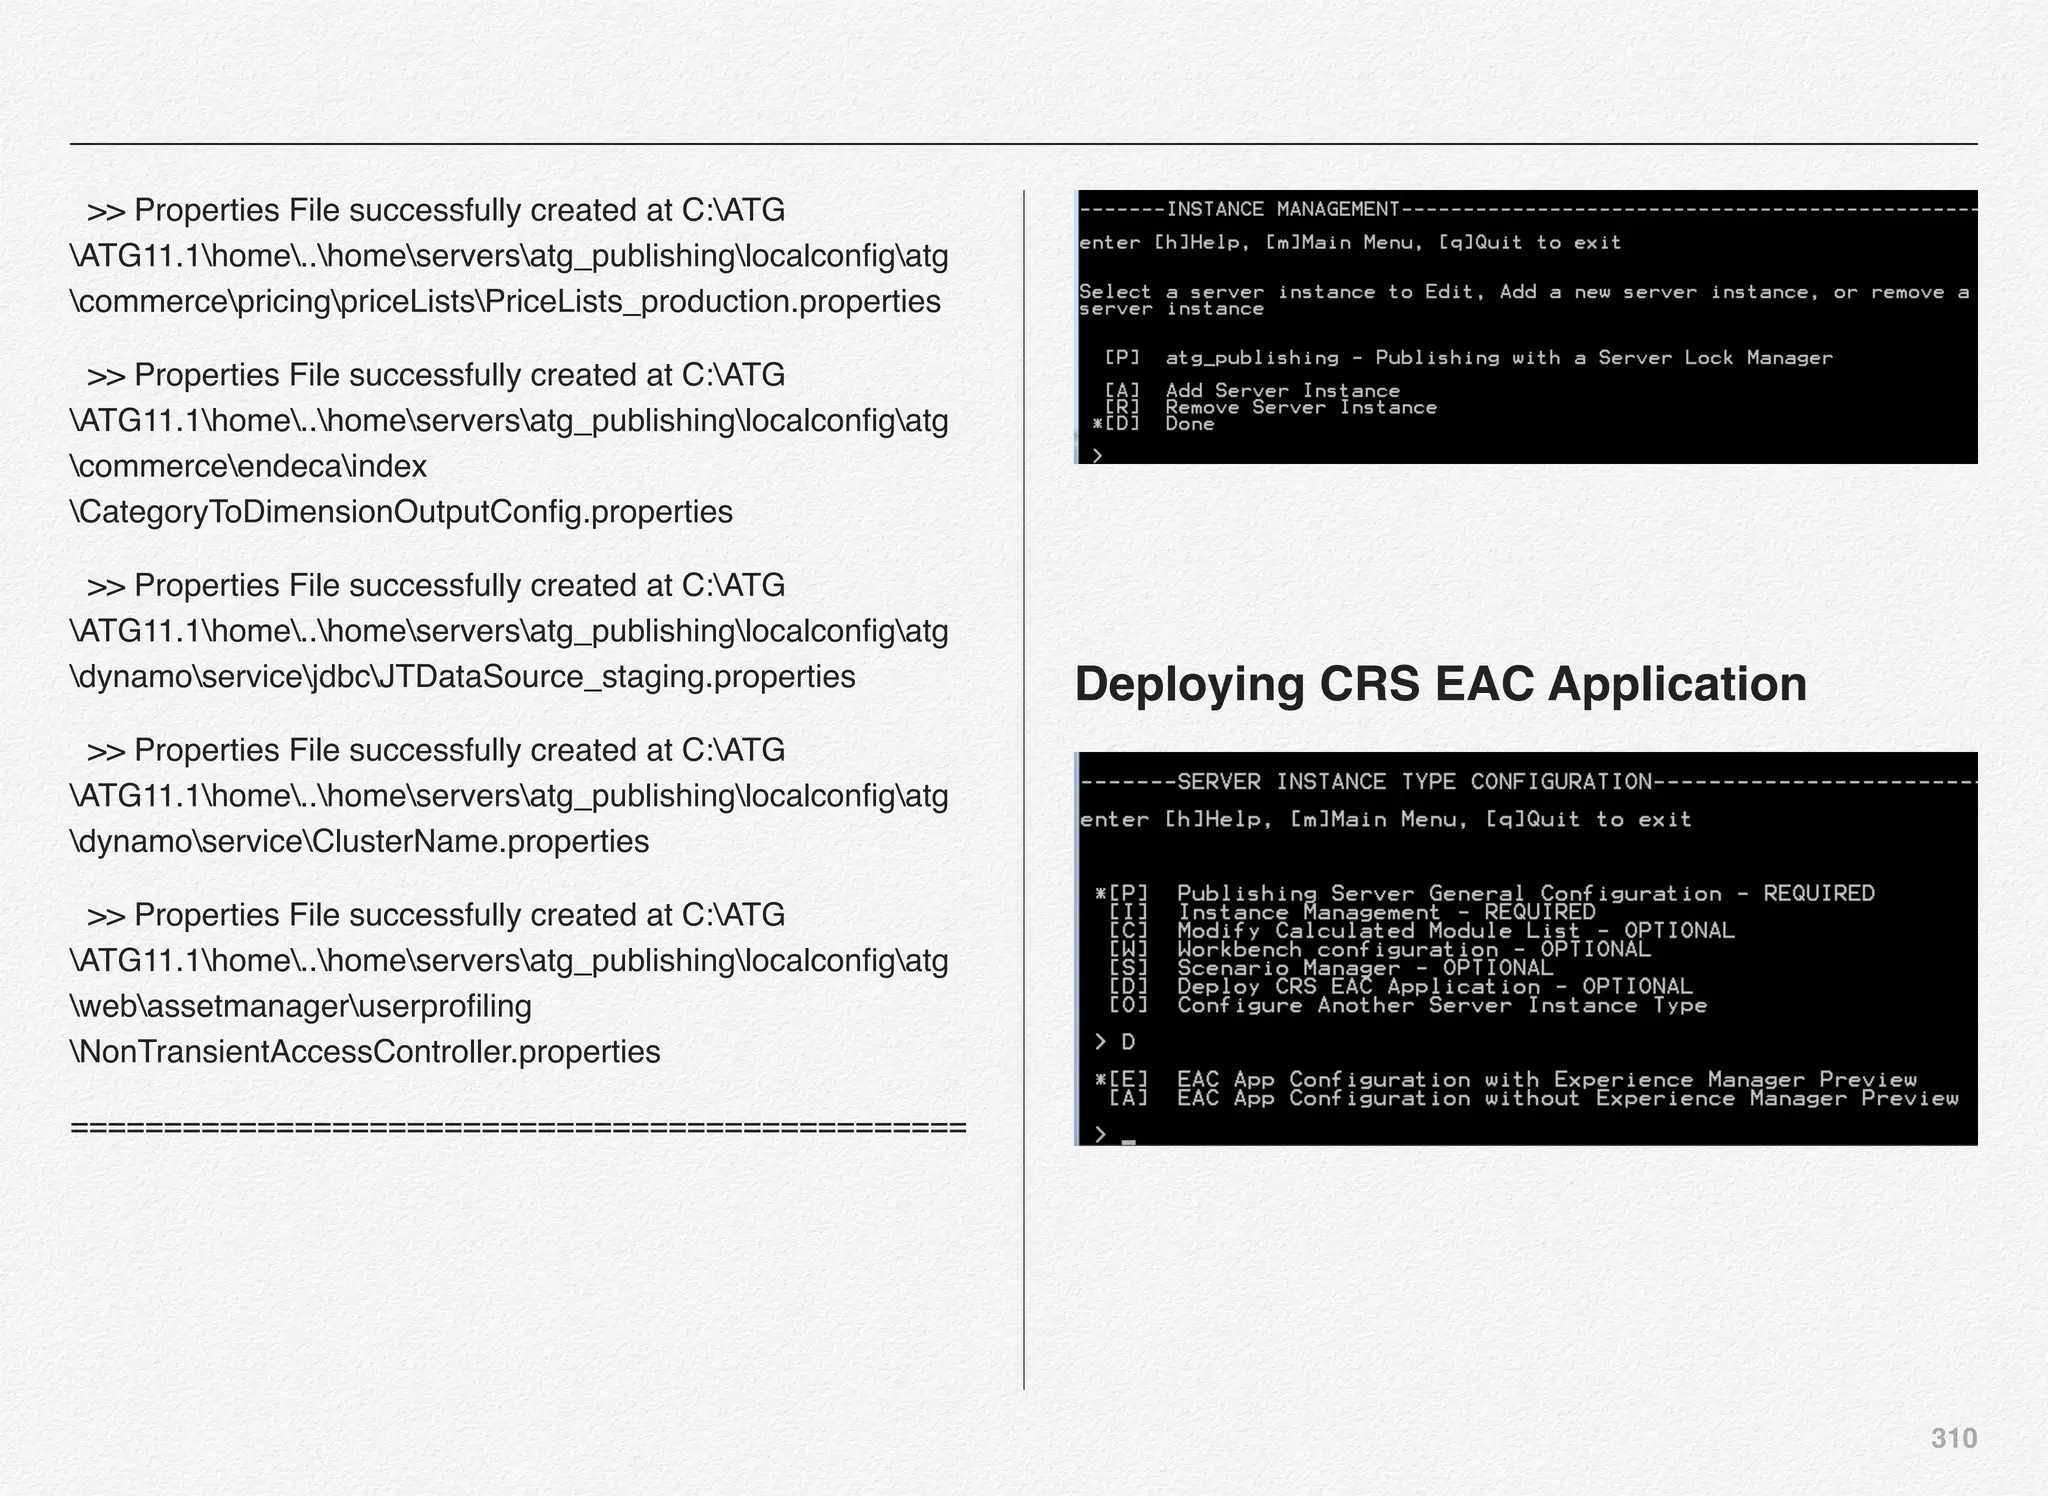
![307
================================================
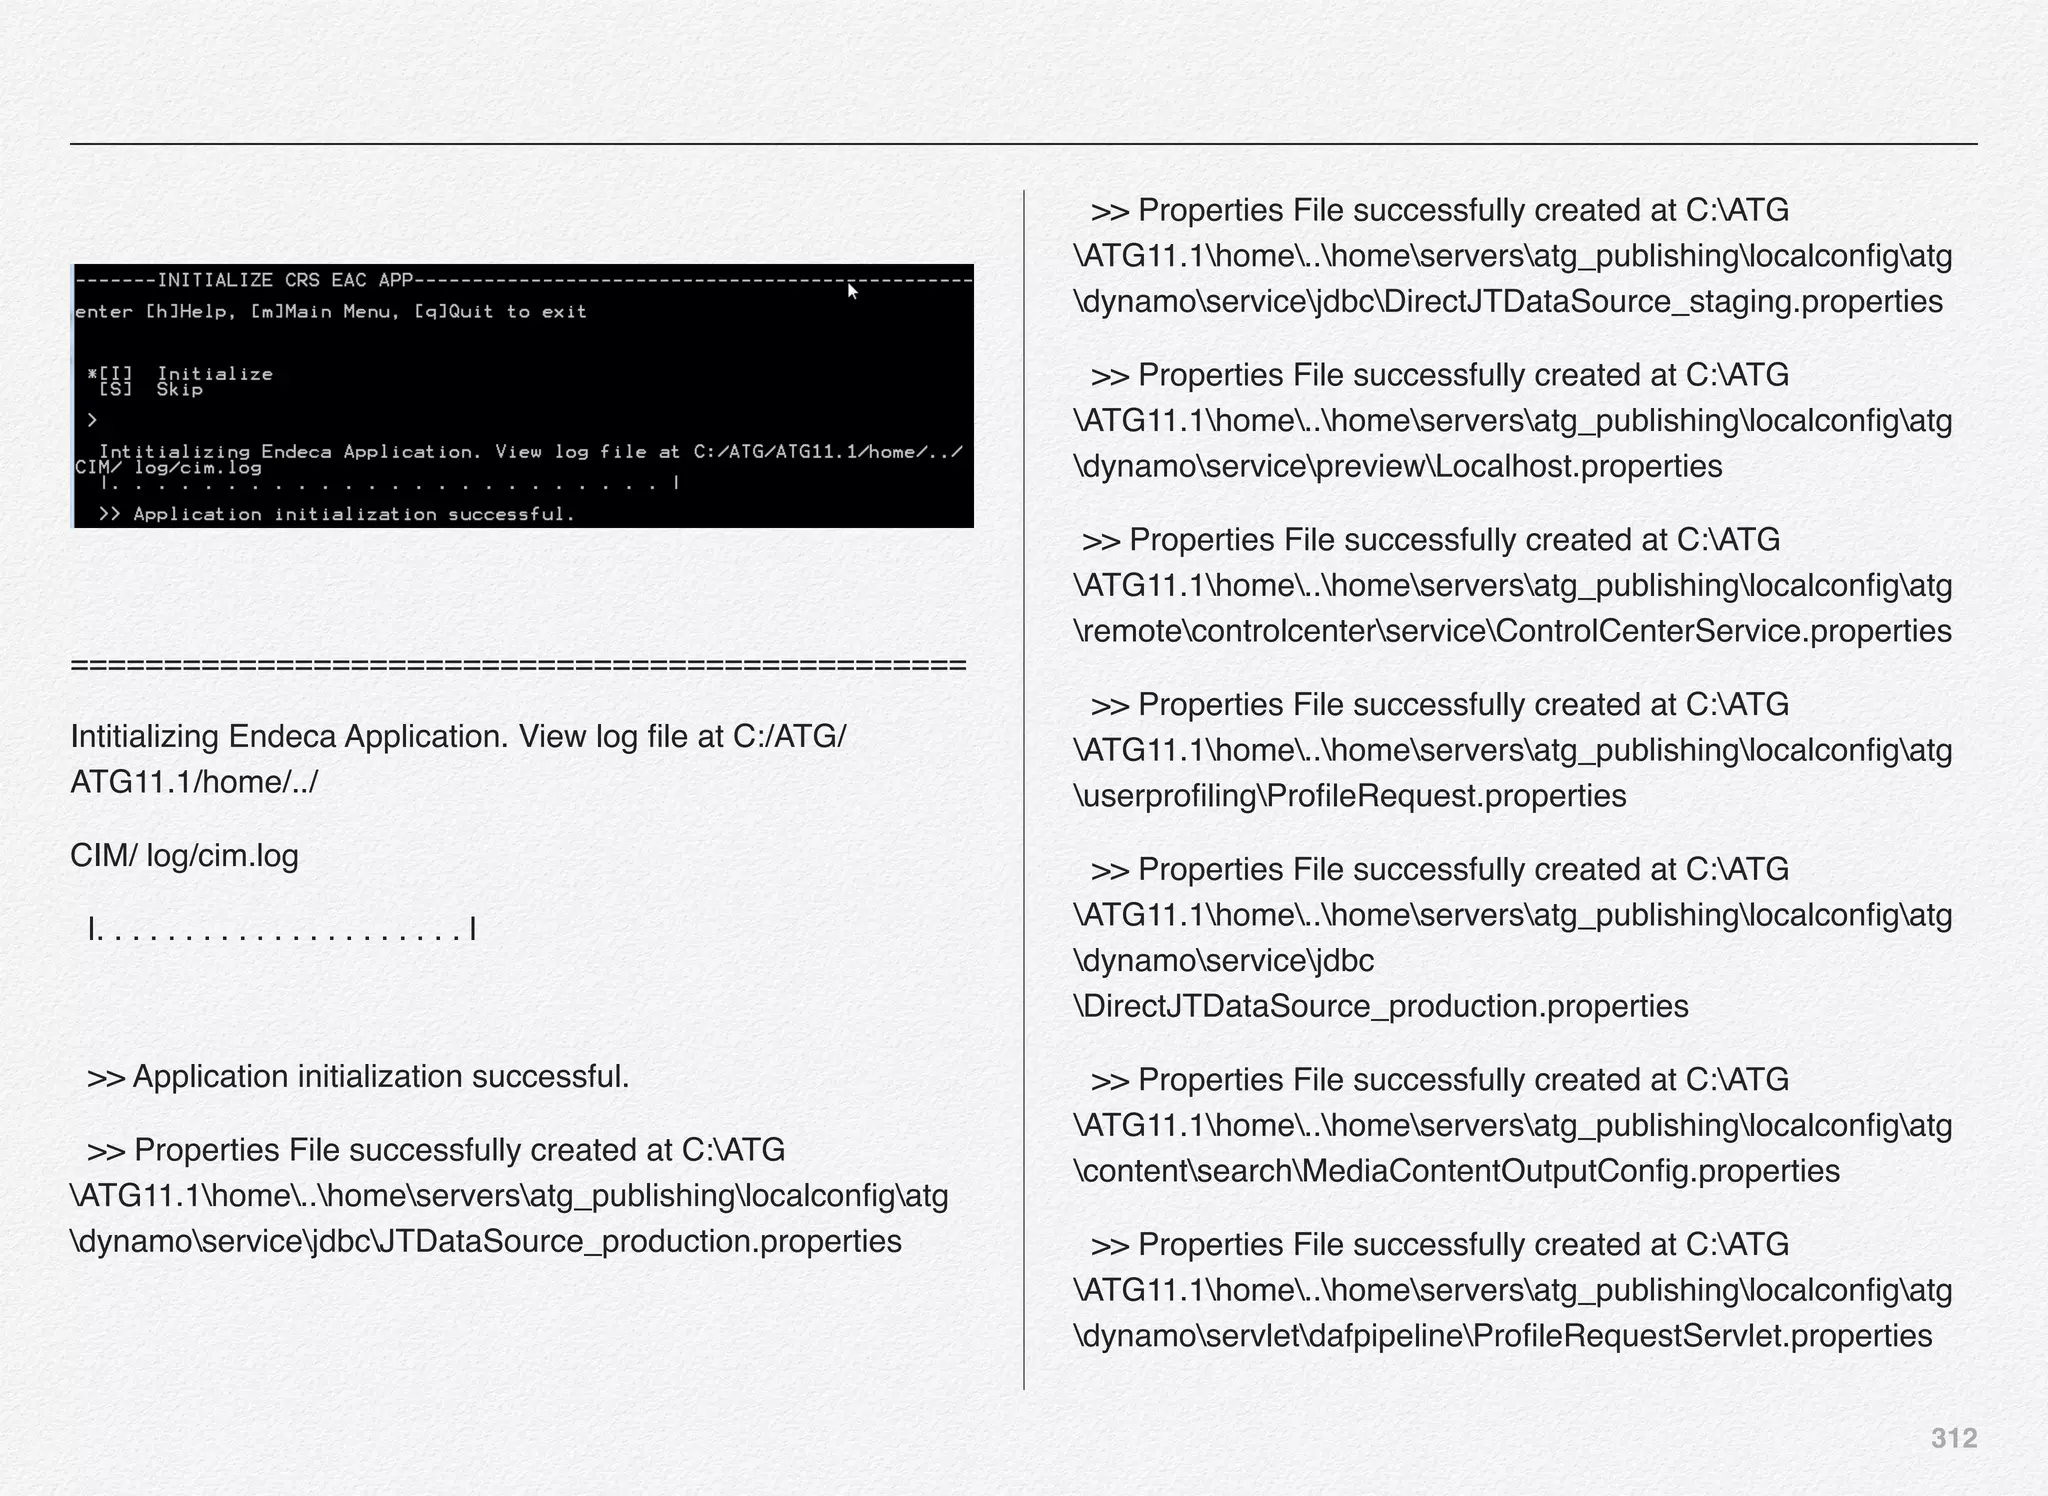
>> Properties File successfully created at C:ATG
ATG11.1home..homeserversatg_publishinglocalconfigatg
dynamoConfiguration.properties
>> Properties File successfully created at C:ATG
ATG11.1home..homeserversatg_publishinglocalconfigatg
dynamoInitial.properties
Enter Lock Server Port [[9010]] >
>> Properties File successfully created at C:ATG
ATG11.1home..homeserversatg_publishinglocalconfigatg
dynamoservice
ServerLockManager.properties
>> Properties File successfully created at C:ATG
ATG11.1home..homeserversatg_publishinglocalconfigatg
dynamoservice
ClientLockManager.properties
>> Properties File successfully created at C:ATG
ATG11.1home..homeserversatg_publishinglocalconfigatg
dynamoservicejdbcJTDataSource_production.properties
>> Properties File successfully created at C:ATG
ATG11.1home..homeserversatg_publishinglocalconfigatg
dynamoservicejdbcDirectJTDataSource_staging.properties
>> Properties File successfully created at C:ATG
ATG11.1home..homeserversatg_publishinglocalconfigatg
dynamoservicepreviewLocalhost.properties
>> Properties File successfully created at C:ATG
ATG11.1home..homeserversatg_publishinglocalconfigatg
remotecontrolcenterserviceControlCenterService.properties
>> Properties File successfully created at C:ATG
ATG11.1home..homeserversatg_publishinglocalconfigatg
userprofilingProfileRequest.properties
>> Properties File successfully created at C:ATG
ATG11.1home..homeserversatg_publishinglocalconfigatg
dynamoservicejdbc
DirectJTDataSource_production.properties
>> Properties File successfully created at C:ATG
ATG11.1home..homeserversatg_publishinglocalconfigatg
contentsearchMediaContentOutputConfig.properties](https://image.slidesharecdn.com/oraclecommerce-doityourselfseries-160129151710/75/Oracle-Commerce-Using-ATG-Endeca-Do-It-Yourself-Series-308-2048.jpg)

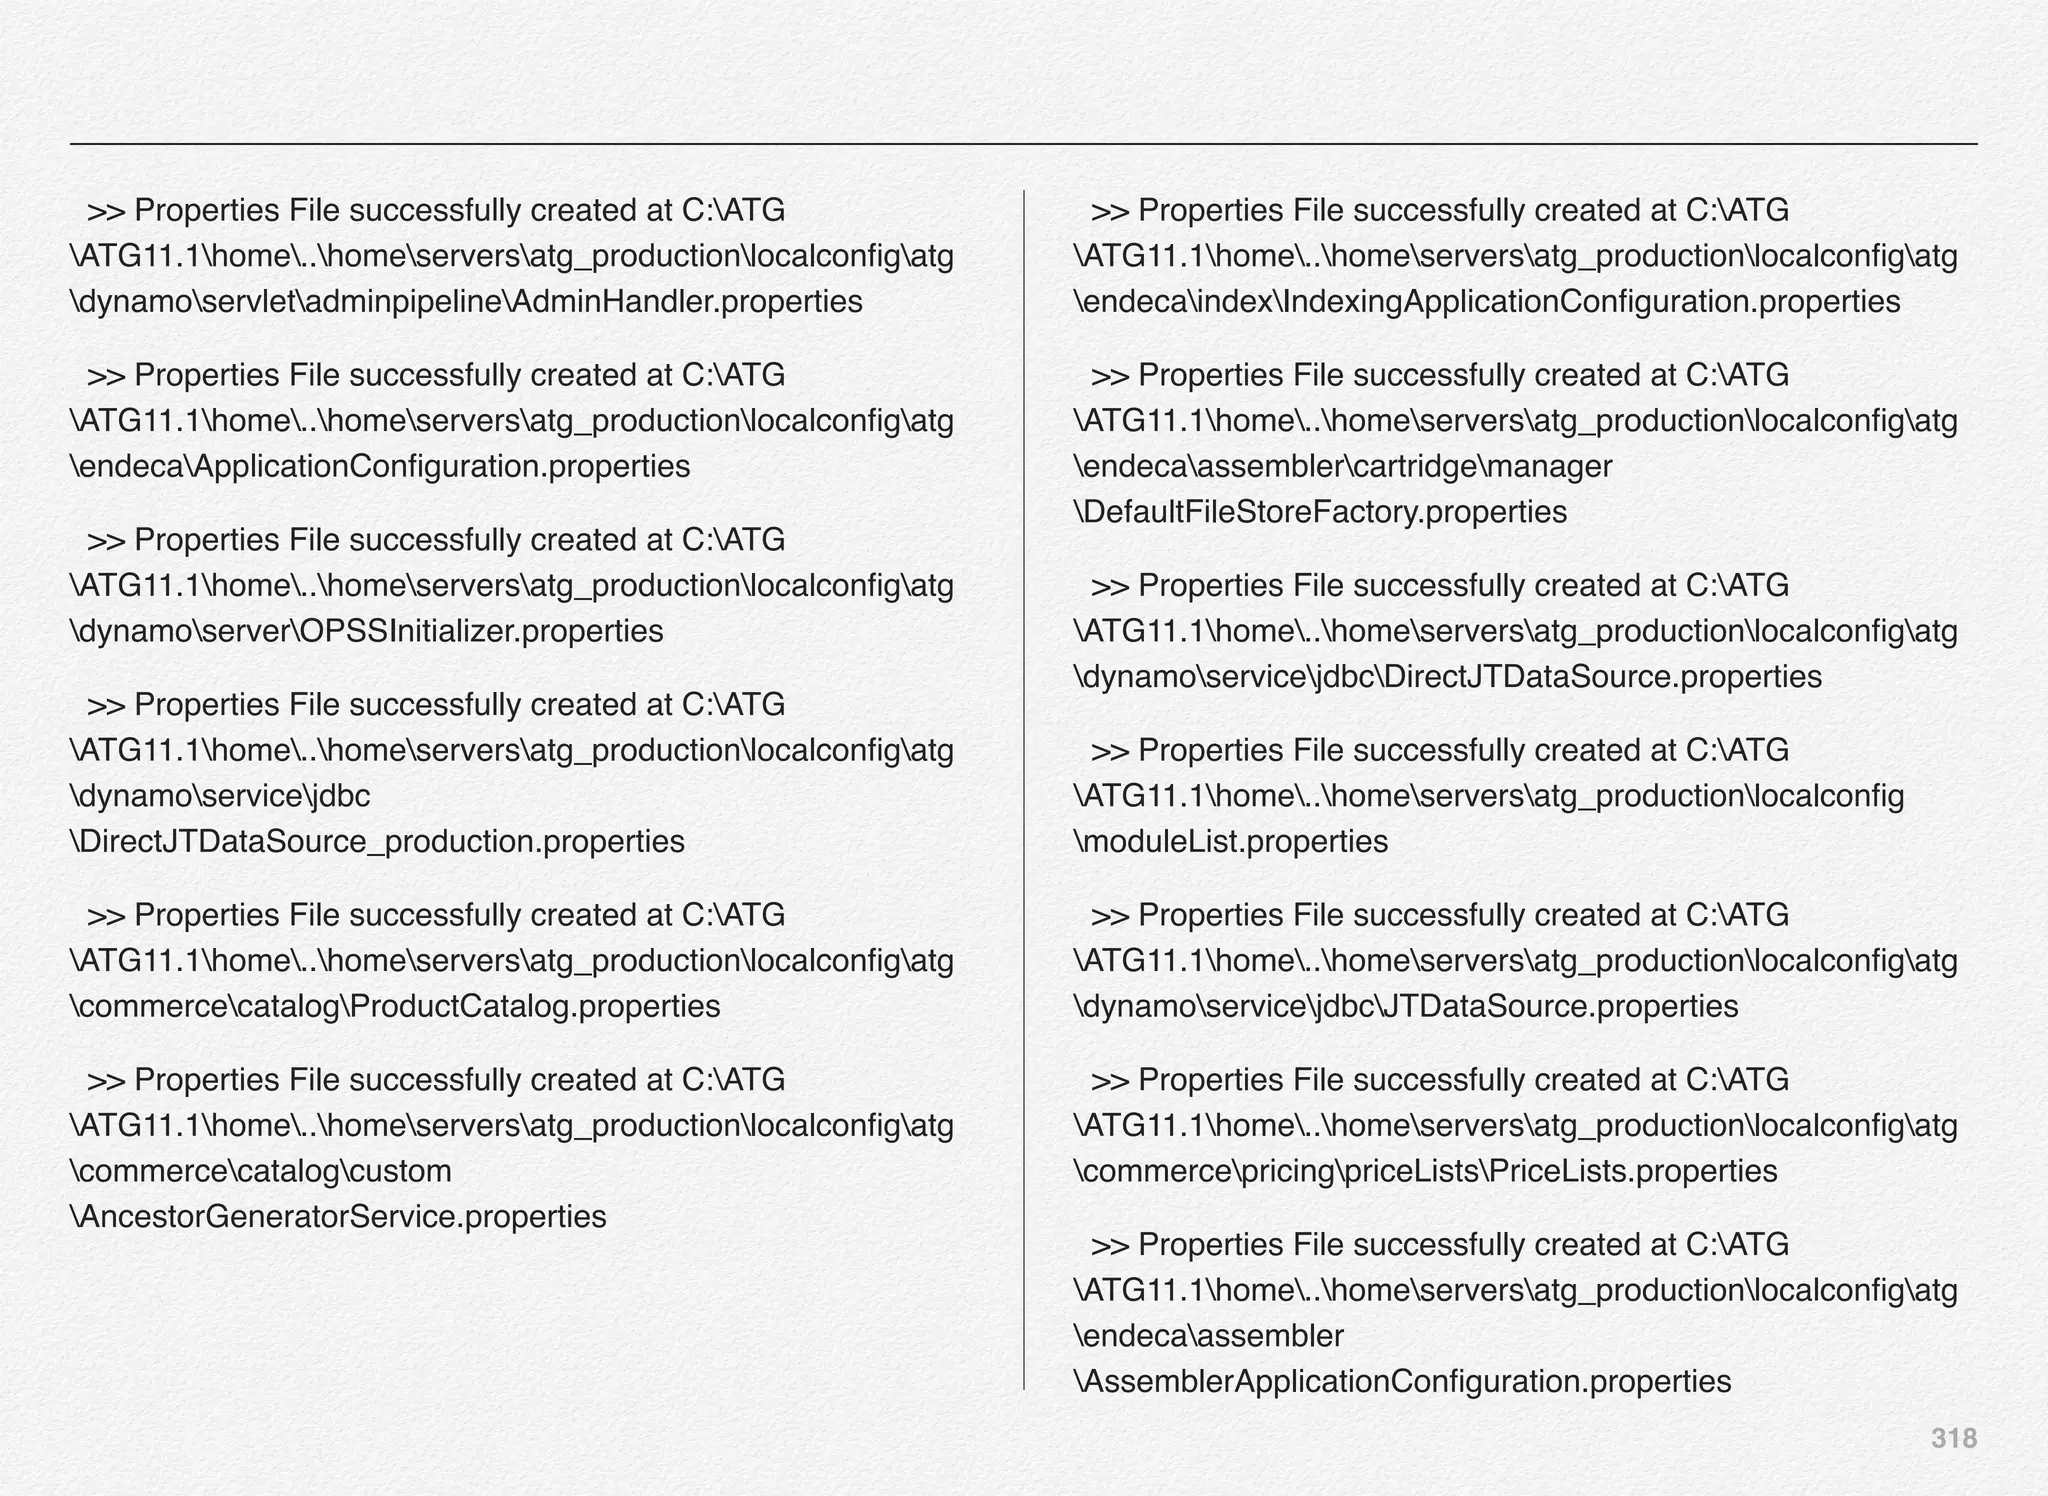
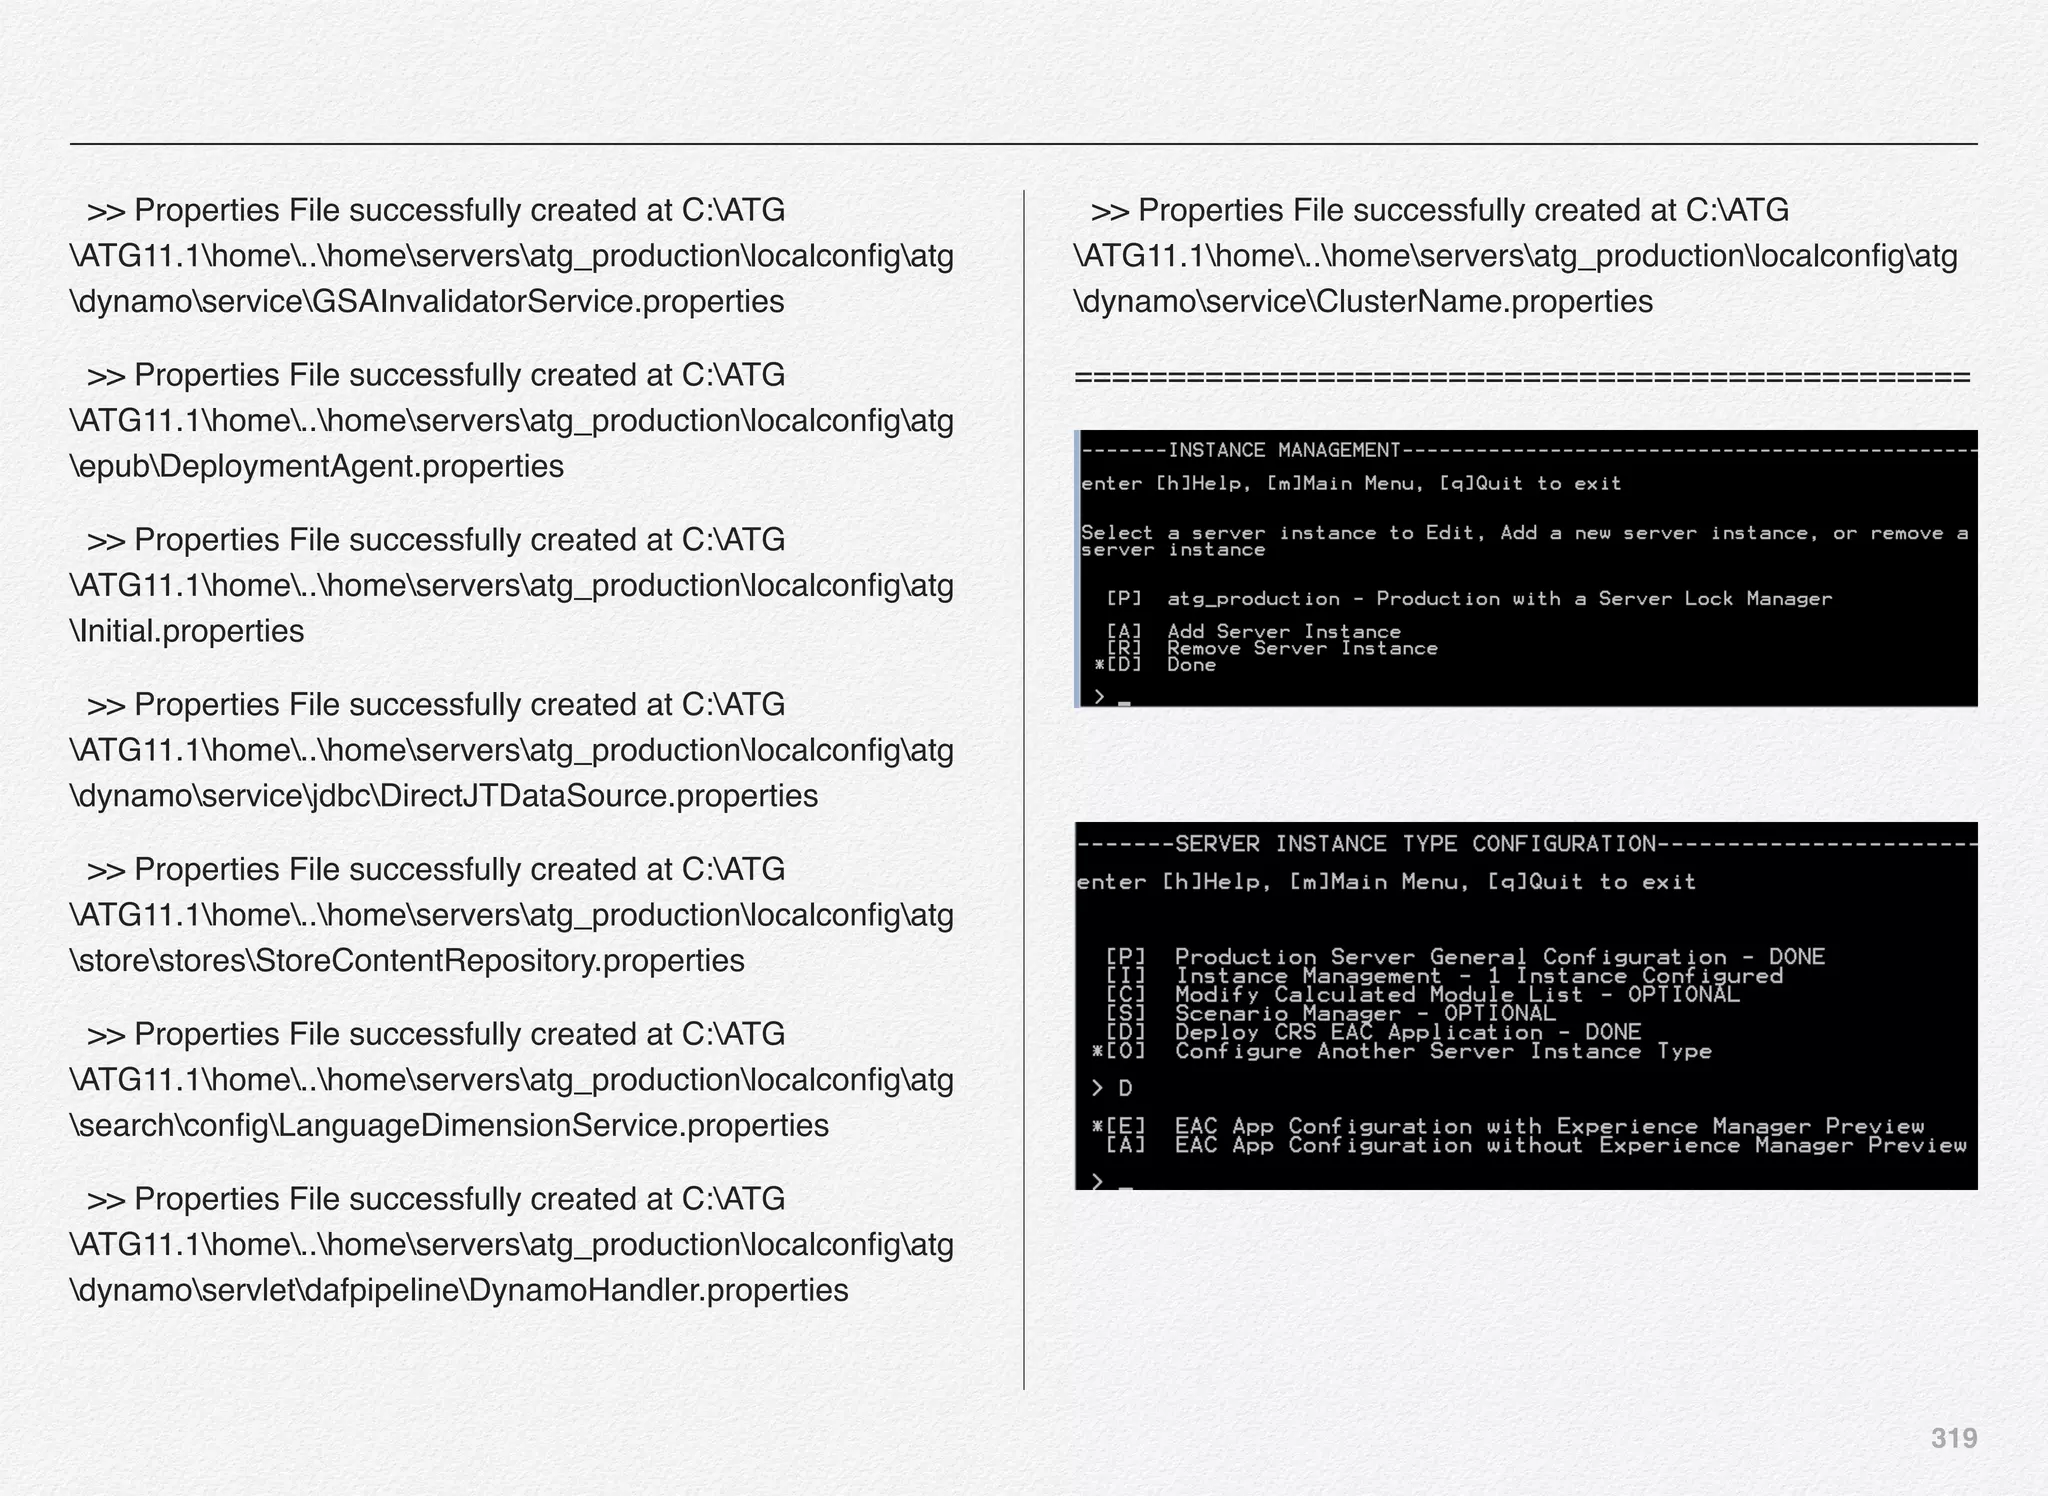
![317
================================================
>> Properties File successfully created at C:ATG
ATG11.1home..homeserversatg_productionlocalconfigatg
dynamoConfiguration.properties
>> Properties File successfully created at C:ATG
ATG11.1home..homeserversatg_productionlocalconfigatg
dynamoInitial.properties
Enter Lock Server Port [[9012]] >
>> Properties File successfully created at C:ATG
ATG11.1home..homeserversatg_productionlocalconfigatg
dynamoserviceServerLockManager.properties
>> Properties File successfully created at C:ATG
ATG11.1home..homeserversatg_productionlocalconfigatg
dynamoserviceClientLockManager.properties
>> Properties File successfully created at C:ATG
ATG11.1home..homeserversatg_productionlocalconfigatg
dynamoserviceClientLockManager_production.properties
>> Properties File successfully created at C:ATG
ATG11.1home..homeserversatg_productionlocalconfigatg
trackingUsageTrackingService.properties](https://image.slidesharecdn.com/oraclecommerce-doityourselfseries-160129151710/75/Oracle-Commerce-Using-ATG-Endeca-Do-It-Yourself-Series-318-2048.jpg)

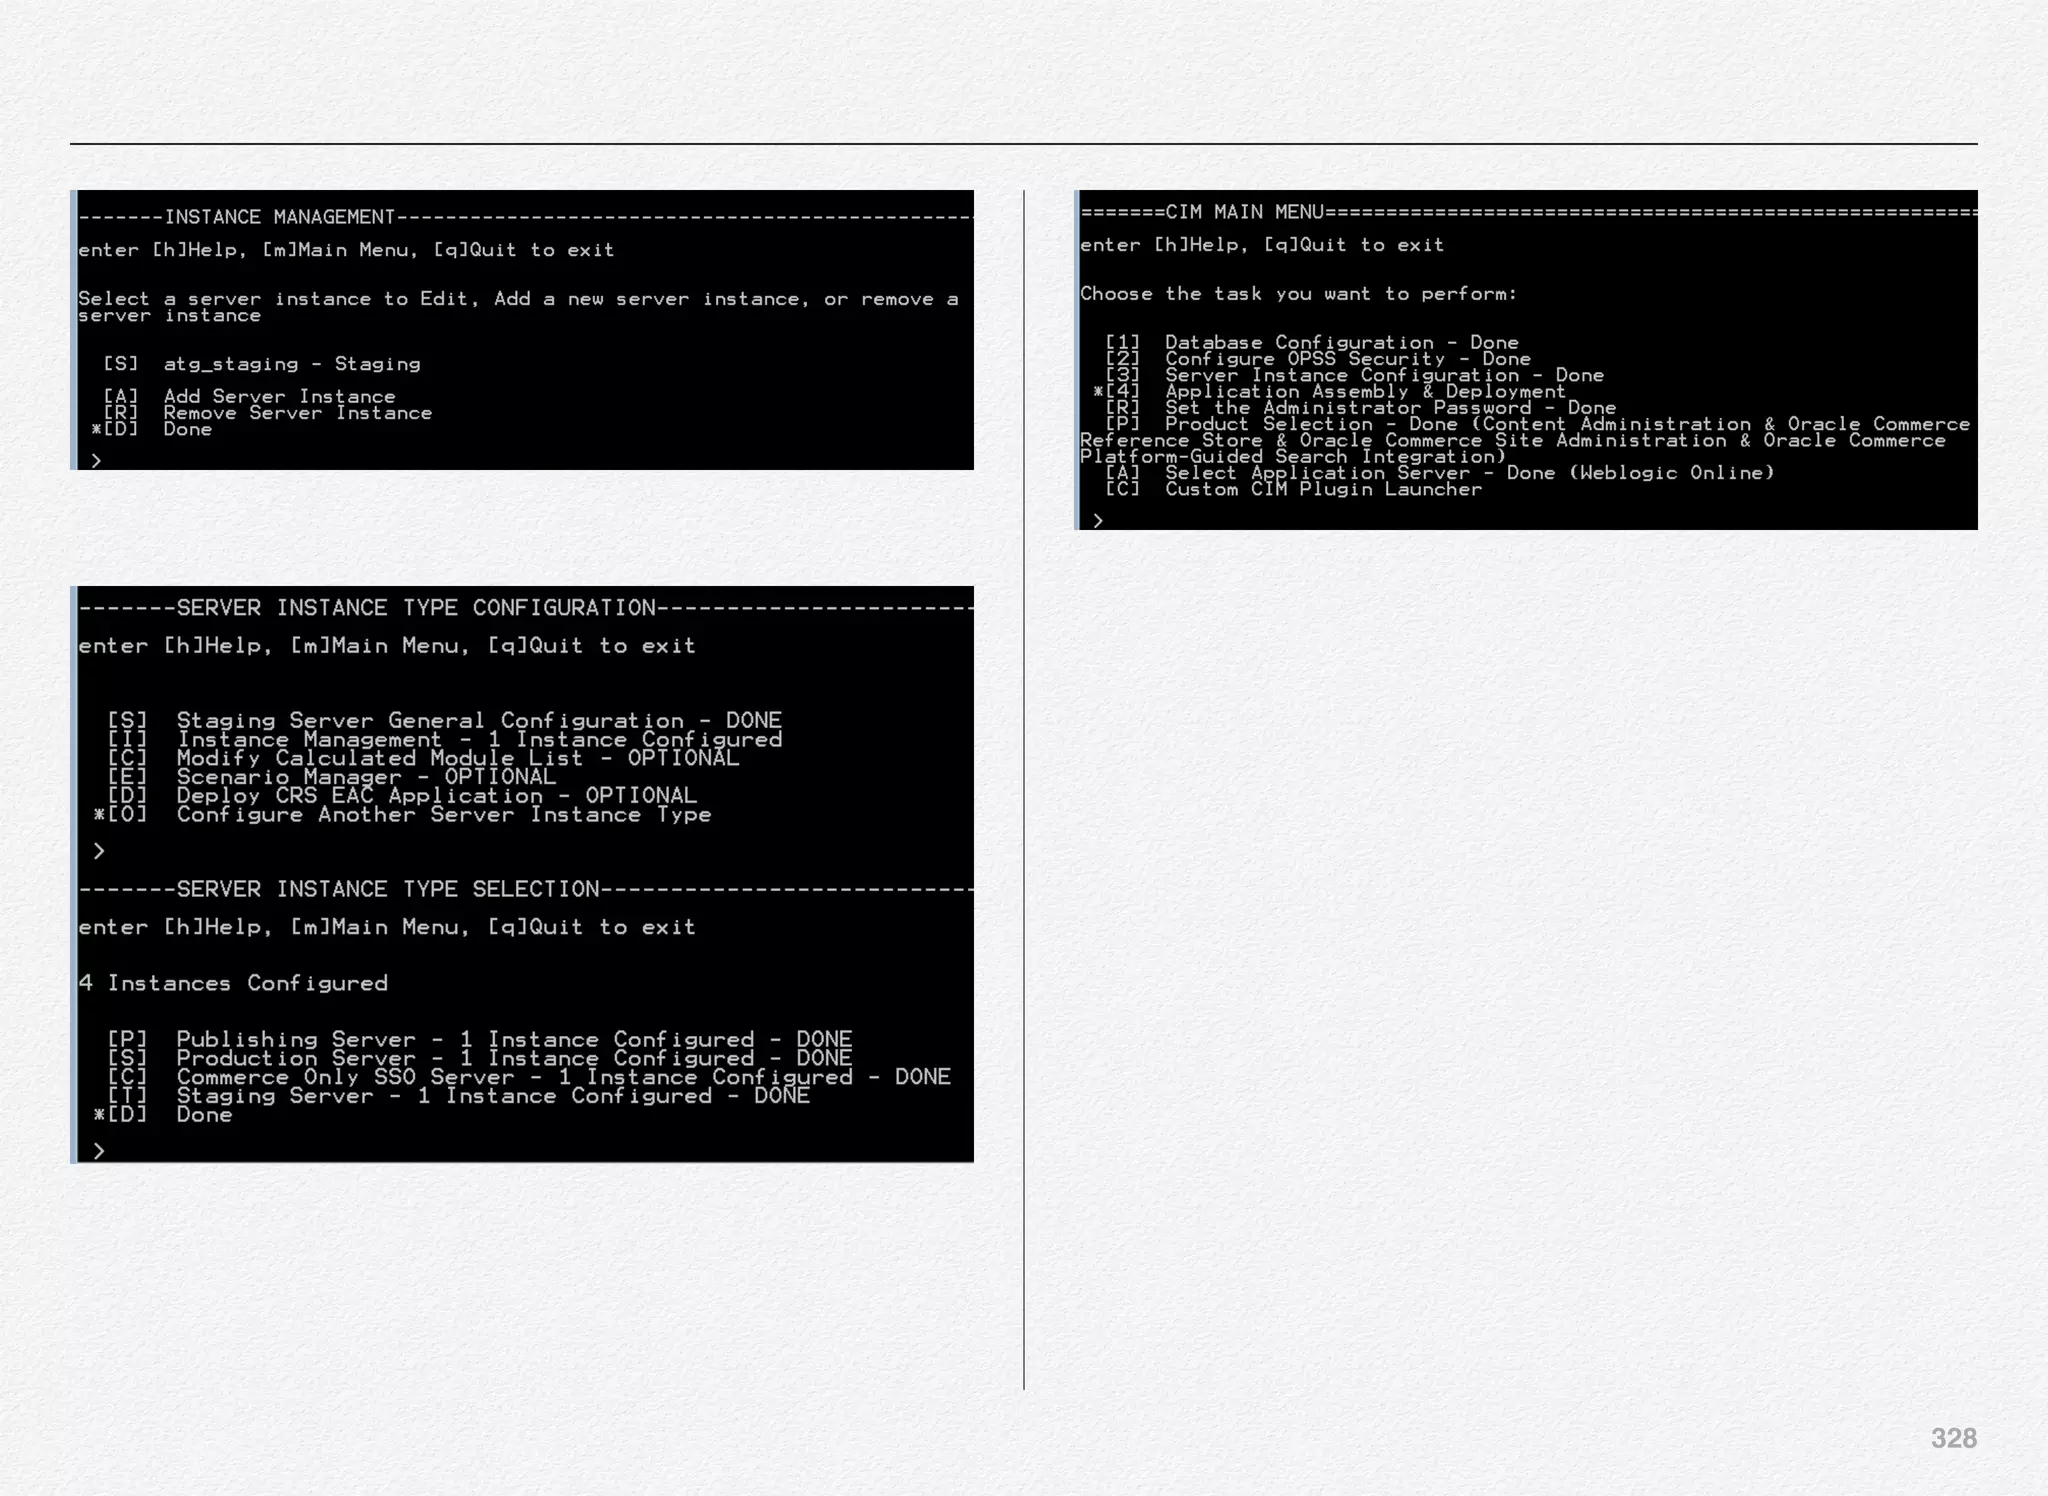
![329
Application Assembly & Deployment
We have completed the configuration of server instances in
previous section.
In this section, we will use CIM to build the EARs for respective
server instances, deploying the EARs to respective managed
servers on the WebLogic server, registering the data sources,
add database driver to application server class path, and
perform some post deployment cleanup activities.
Select option [4] - Application Assembly & Deployment from the
CIM main menu.
Note: We have created 4 server instances in the previous
option [3] - Server Instance Configuration as below:
1. atg_production
Section 8
CIM - Application
Assembly &
Deployment](https://image.slidesharecdn.com/oraclecommerce-doityourselfseries-160129151710/75/Oracle-Commerce-Using-ATG-Endeca-Do-It-Yourself-Series-330-2048.jpg)
![330
2. atg_publishing
3. atg_sso_server
4. atg_staging
Deploy Production Server Instance
We can start with deployment of atg_production - Production
server instance with a Server Lock Manager (SLM).
Select [A] to continue with deployment of atg_production
You are now required to provide the EAR name for Production
server instance with a Server Lock Manager. We have entered
atg_production.ear as the EAR name for the production
instance.
You will notice some runassembler arguments:
- server atg_production
- layer EndecaPreview](https://image.slidesharecdn.com/oraclecommerce-doityourselfseries-160129151710/75/Oracle-Commerce-Using-ATG-Endeca-Do-It-Yourself-Series-331-2048.jpg)
![331
Select option [D] to deploy the atg_production.ear to weblogic
server
If you notice the Online Deployment failed for the
atg_production.ear. What could have caused it to fail? By
checking the details in the log file - it was noticed that the
WebLogic admin server was not running at the time of
deployment and hence the failure.
Start the WebLogic admin server and select the option [D] to go
back to deployment menu and try to re-deploy the managed
server EAR for atg_production.](https://image.slidesharecdn.com/oraclecommerce-doityourselfseries-160129151710/75/Oracle-Commerce-Using-ATG-Endeca-Do-It-Yourself-Series-332-2048.jpg)
![332
And, from the screenshot above we have the managed server
instance for atg_production created on WebLogic online - the
ear was created and deployed successfully to WebLogic server.
Also, you will notice the location of the atg_production managed
server batch file location C:/ATG/ATG11.1/home/servers/
atg_production/startServerOnWeblogic.sh / bat - basically it
writes both files .sh (*nix) and .bat (Windows).
You can then visit the WebLogic admin console using the
console URL http://localhost:7001/console and navigate to the
deployment link in the left navigation menu.
Next step is to register the ATG production DS (data source)
on the WebLogic server online. Select option [R] to register the
data source.
Below is the response from CIM about registering the data
source by the name ATGProductionDS for the atg_production
managed server instance.](https://image.slidesharecdn.com/oraclecommerce-doityourselfseries-160129151710/75/Oracle-Commerce-Using-ATG-Endeca-Do-It-Yourself-Series-333-2048.jpg)
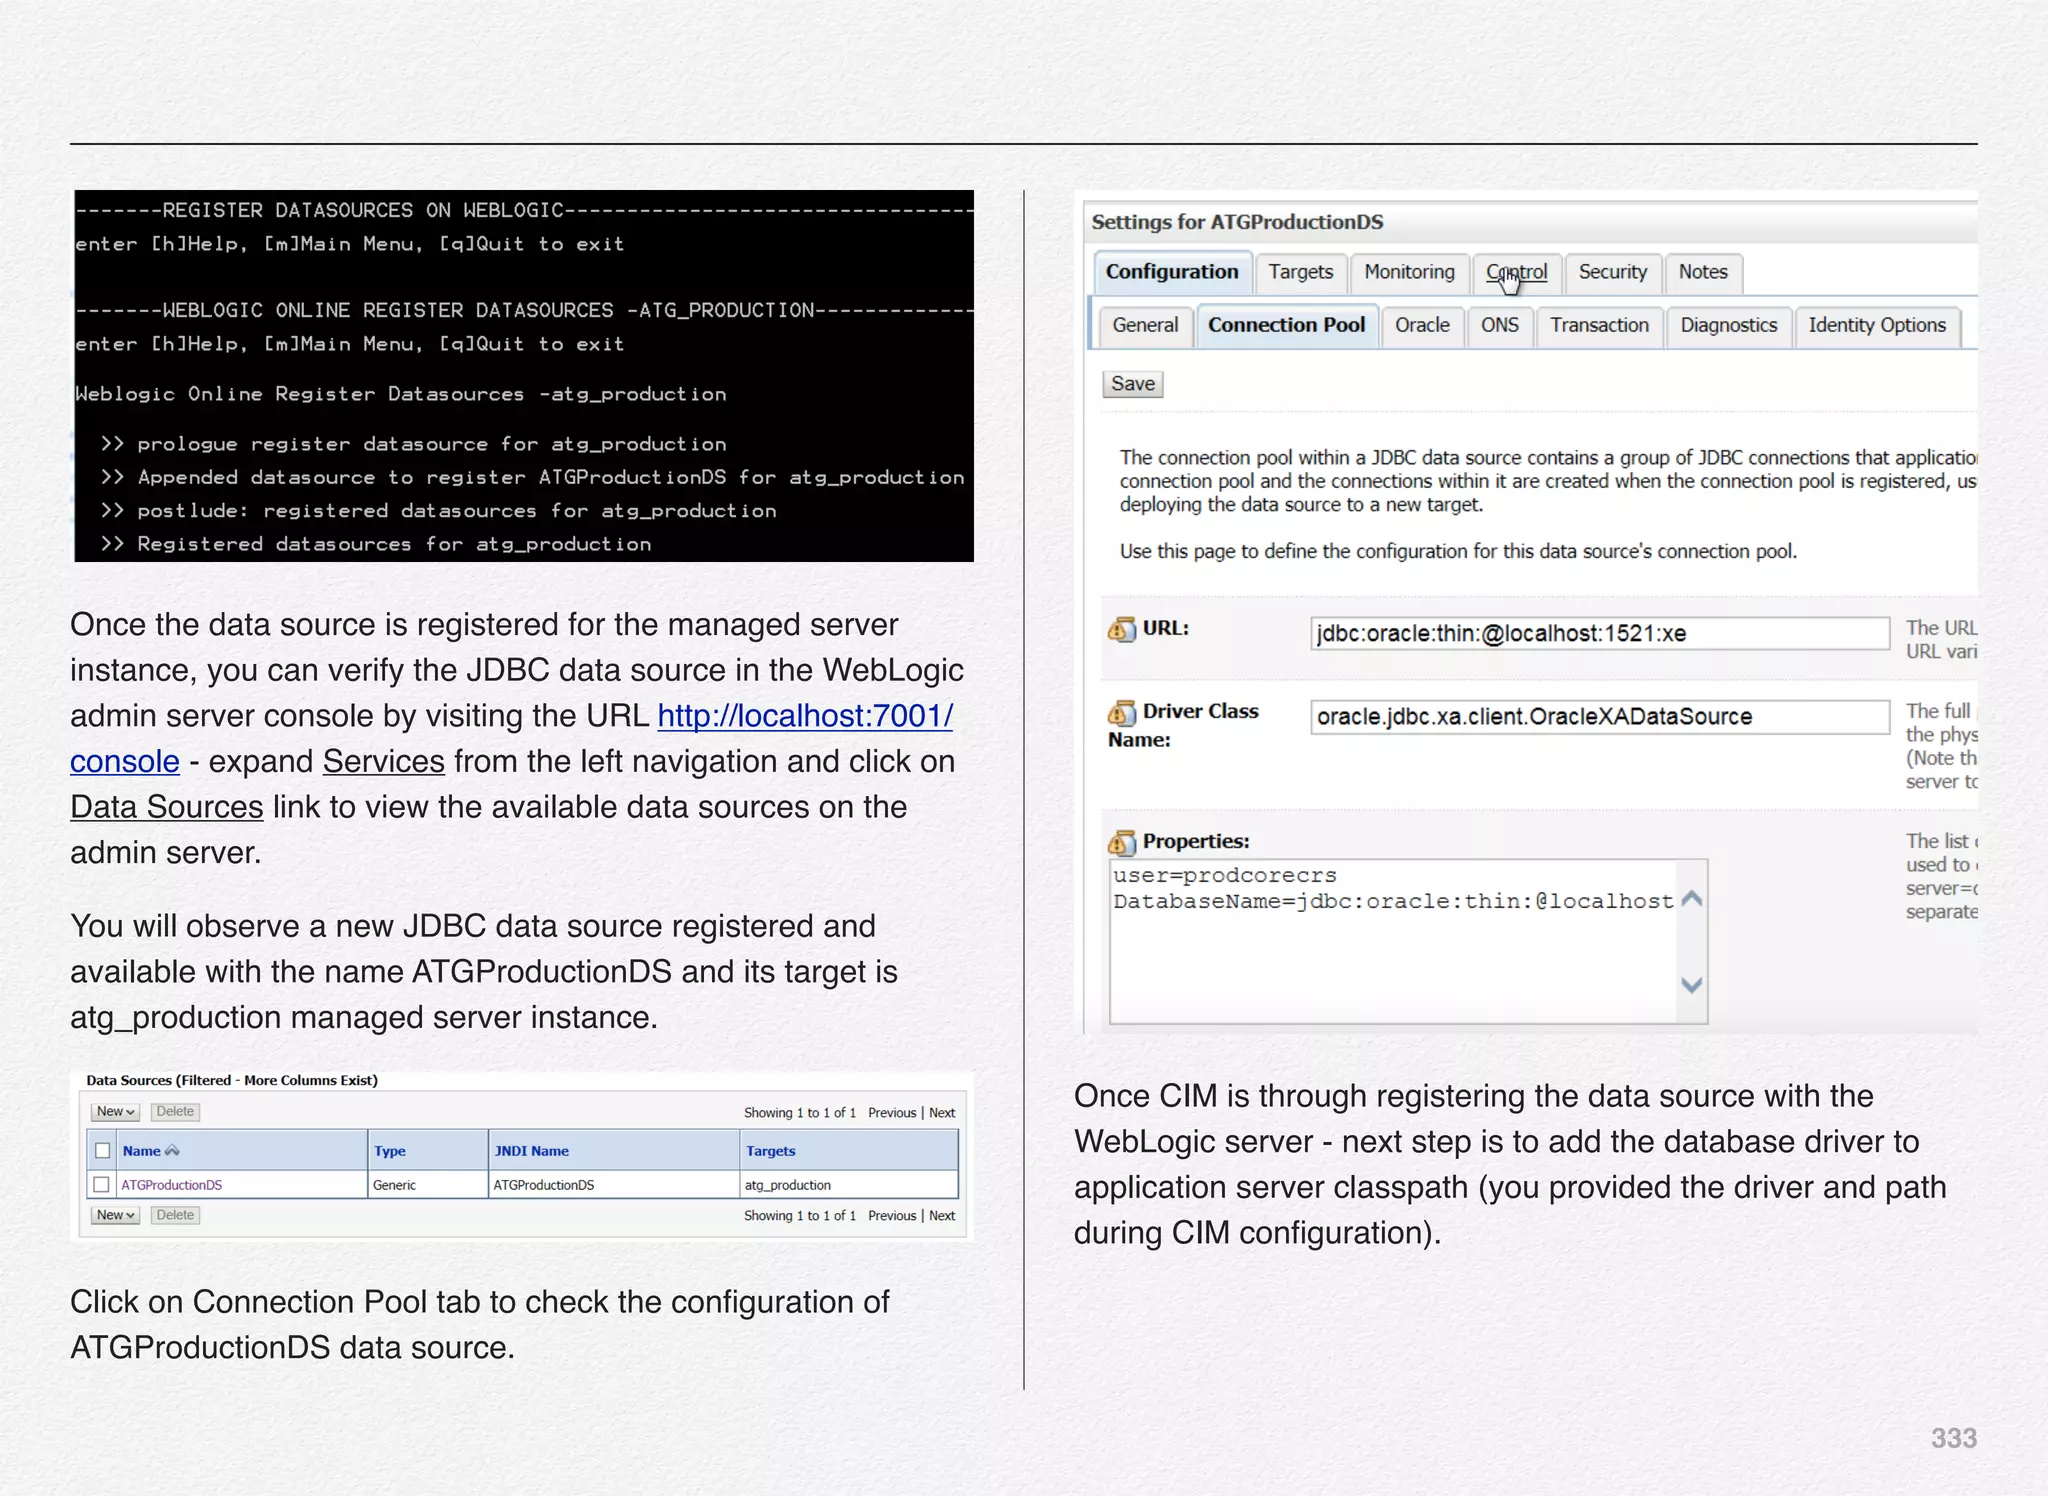
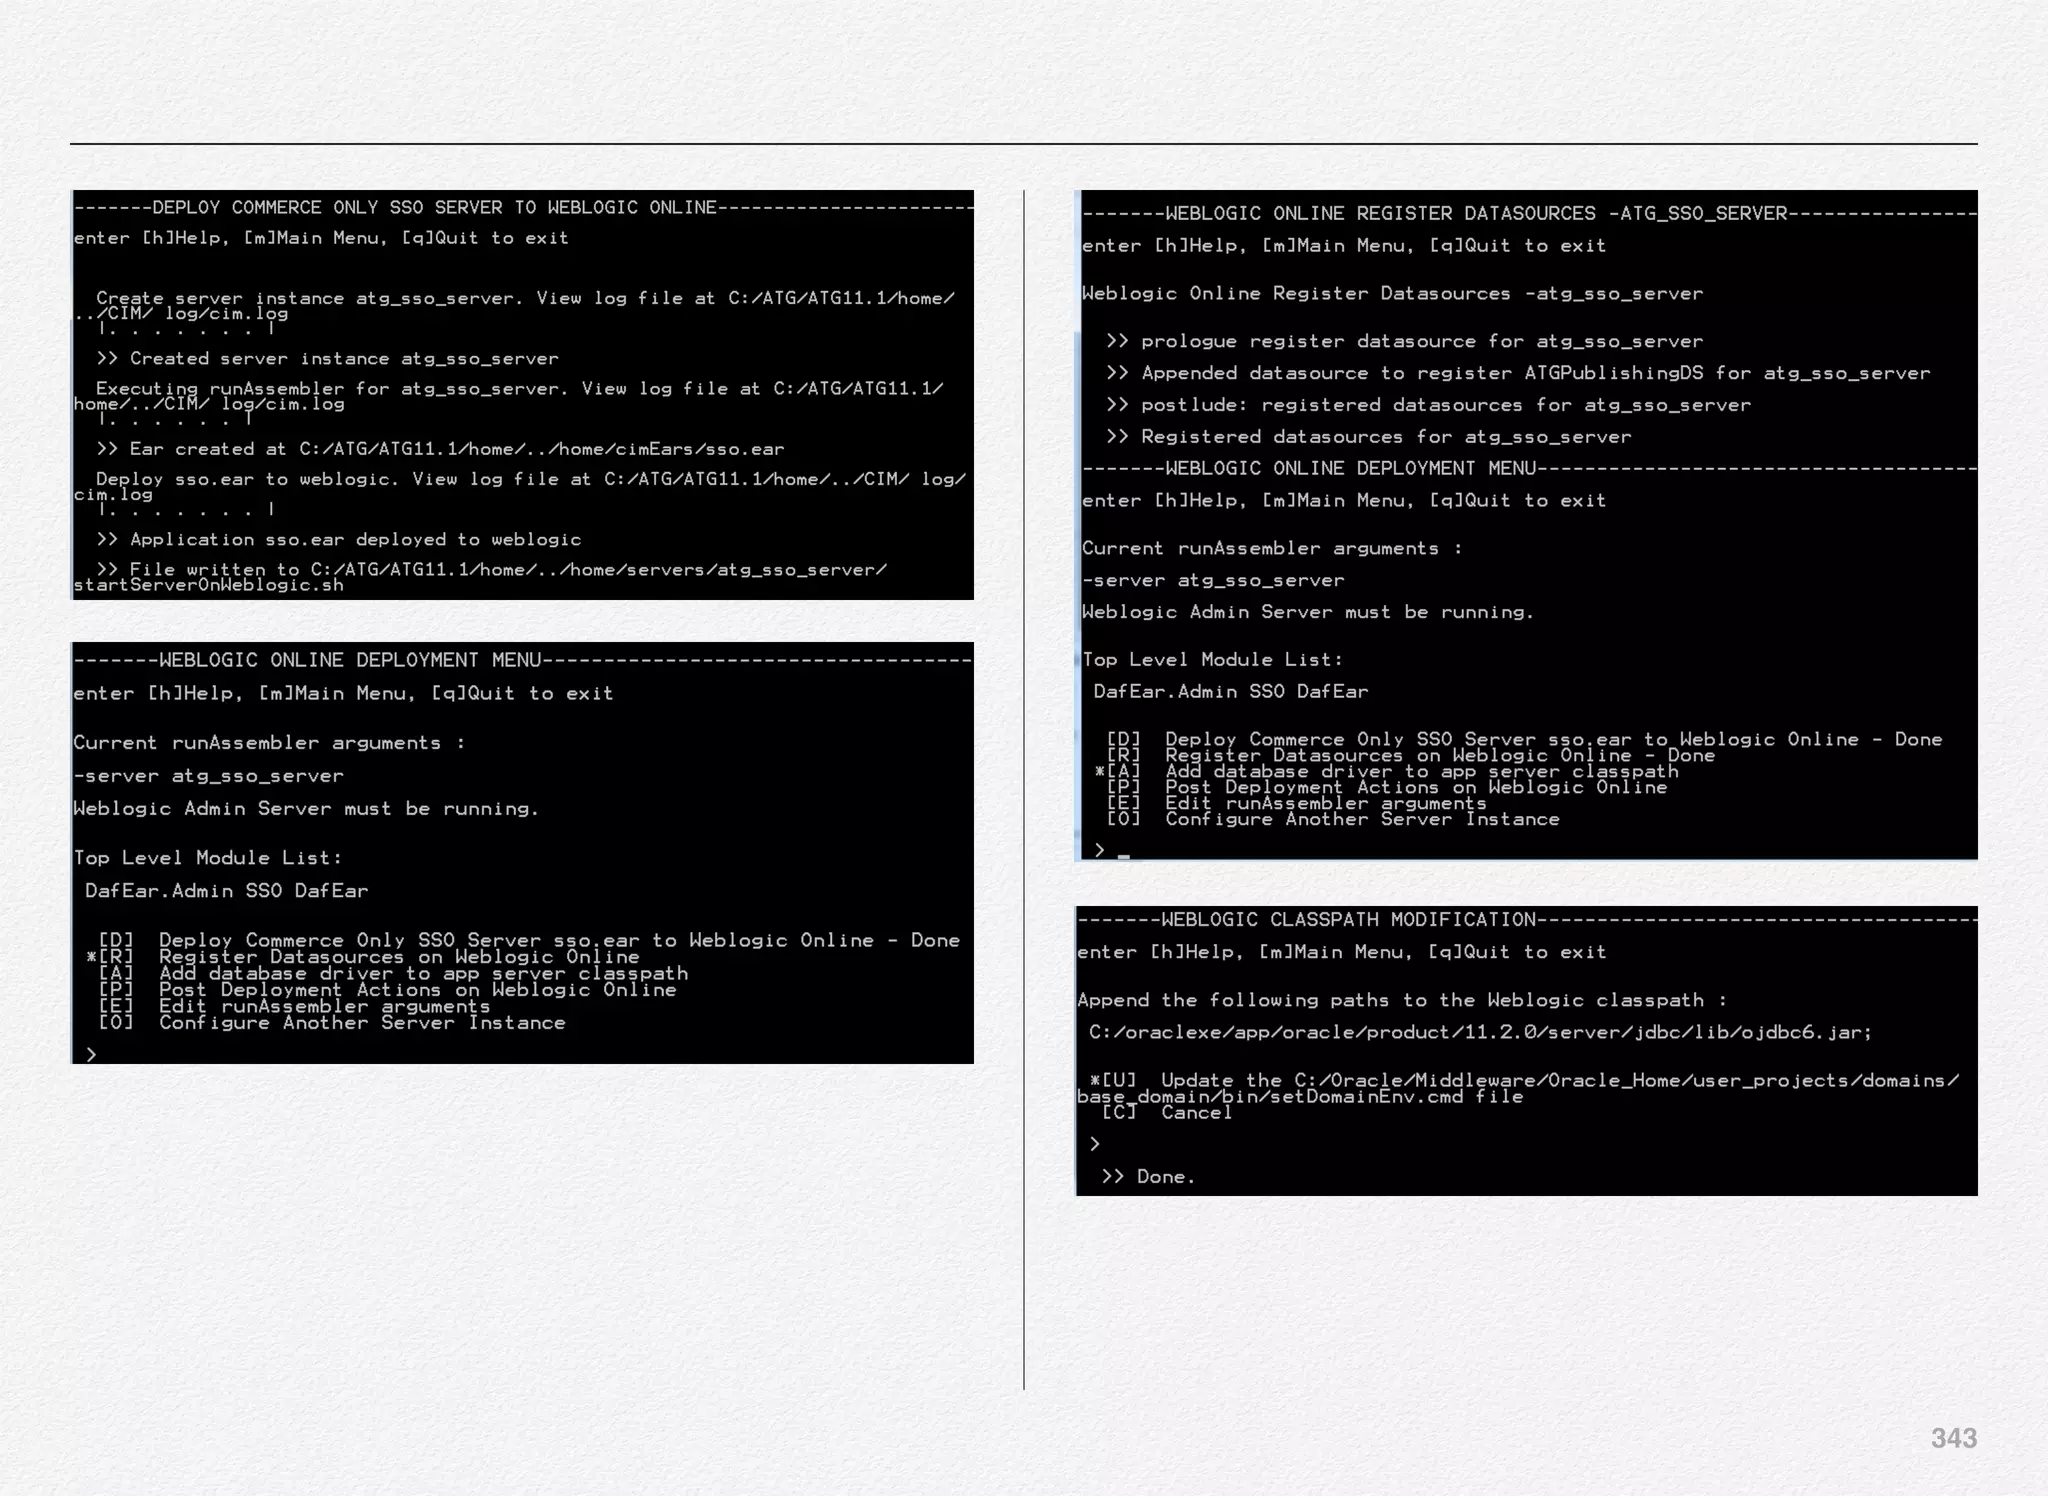
![334
During the Oracle Commerce configuration using CIM we
provided the database driver details - JAR file + the physical
path e.g. C:/oraclexe/app/oracle/product/11.2.0/server/jdbc/lib/
ojdbc6.jar.
Selecting CIM option [A] will append the above path to the
Weblogic classpath - results into updating the classpath in C:/
oracle/Middleware/Oracle_Home/user_projects/domains/
base_domain/bin/setDomainEnv.cmd file.
The database driver path have been successfully appended to
the Weblogic classpath. In the next step we will perform the
post deployment tasks on the WebLogic server.
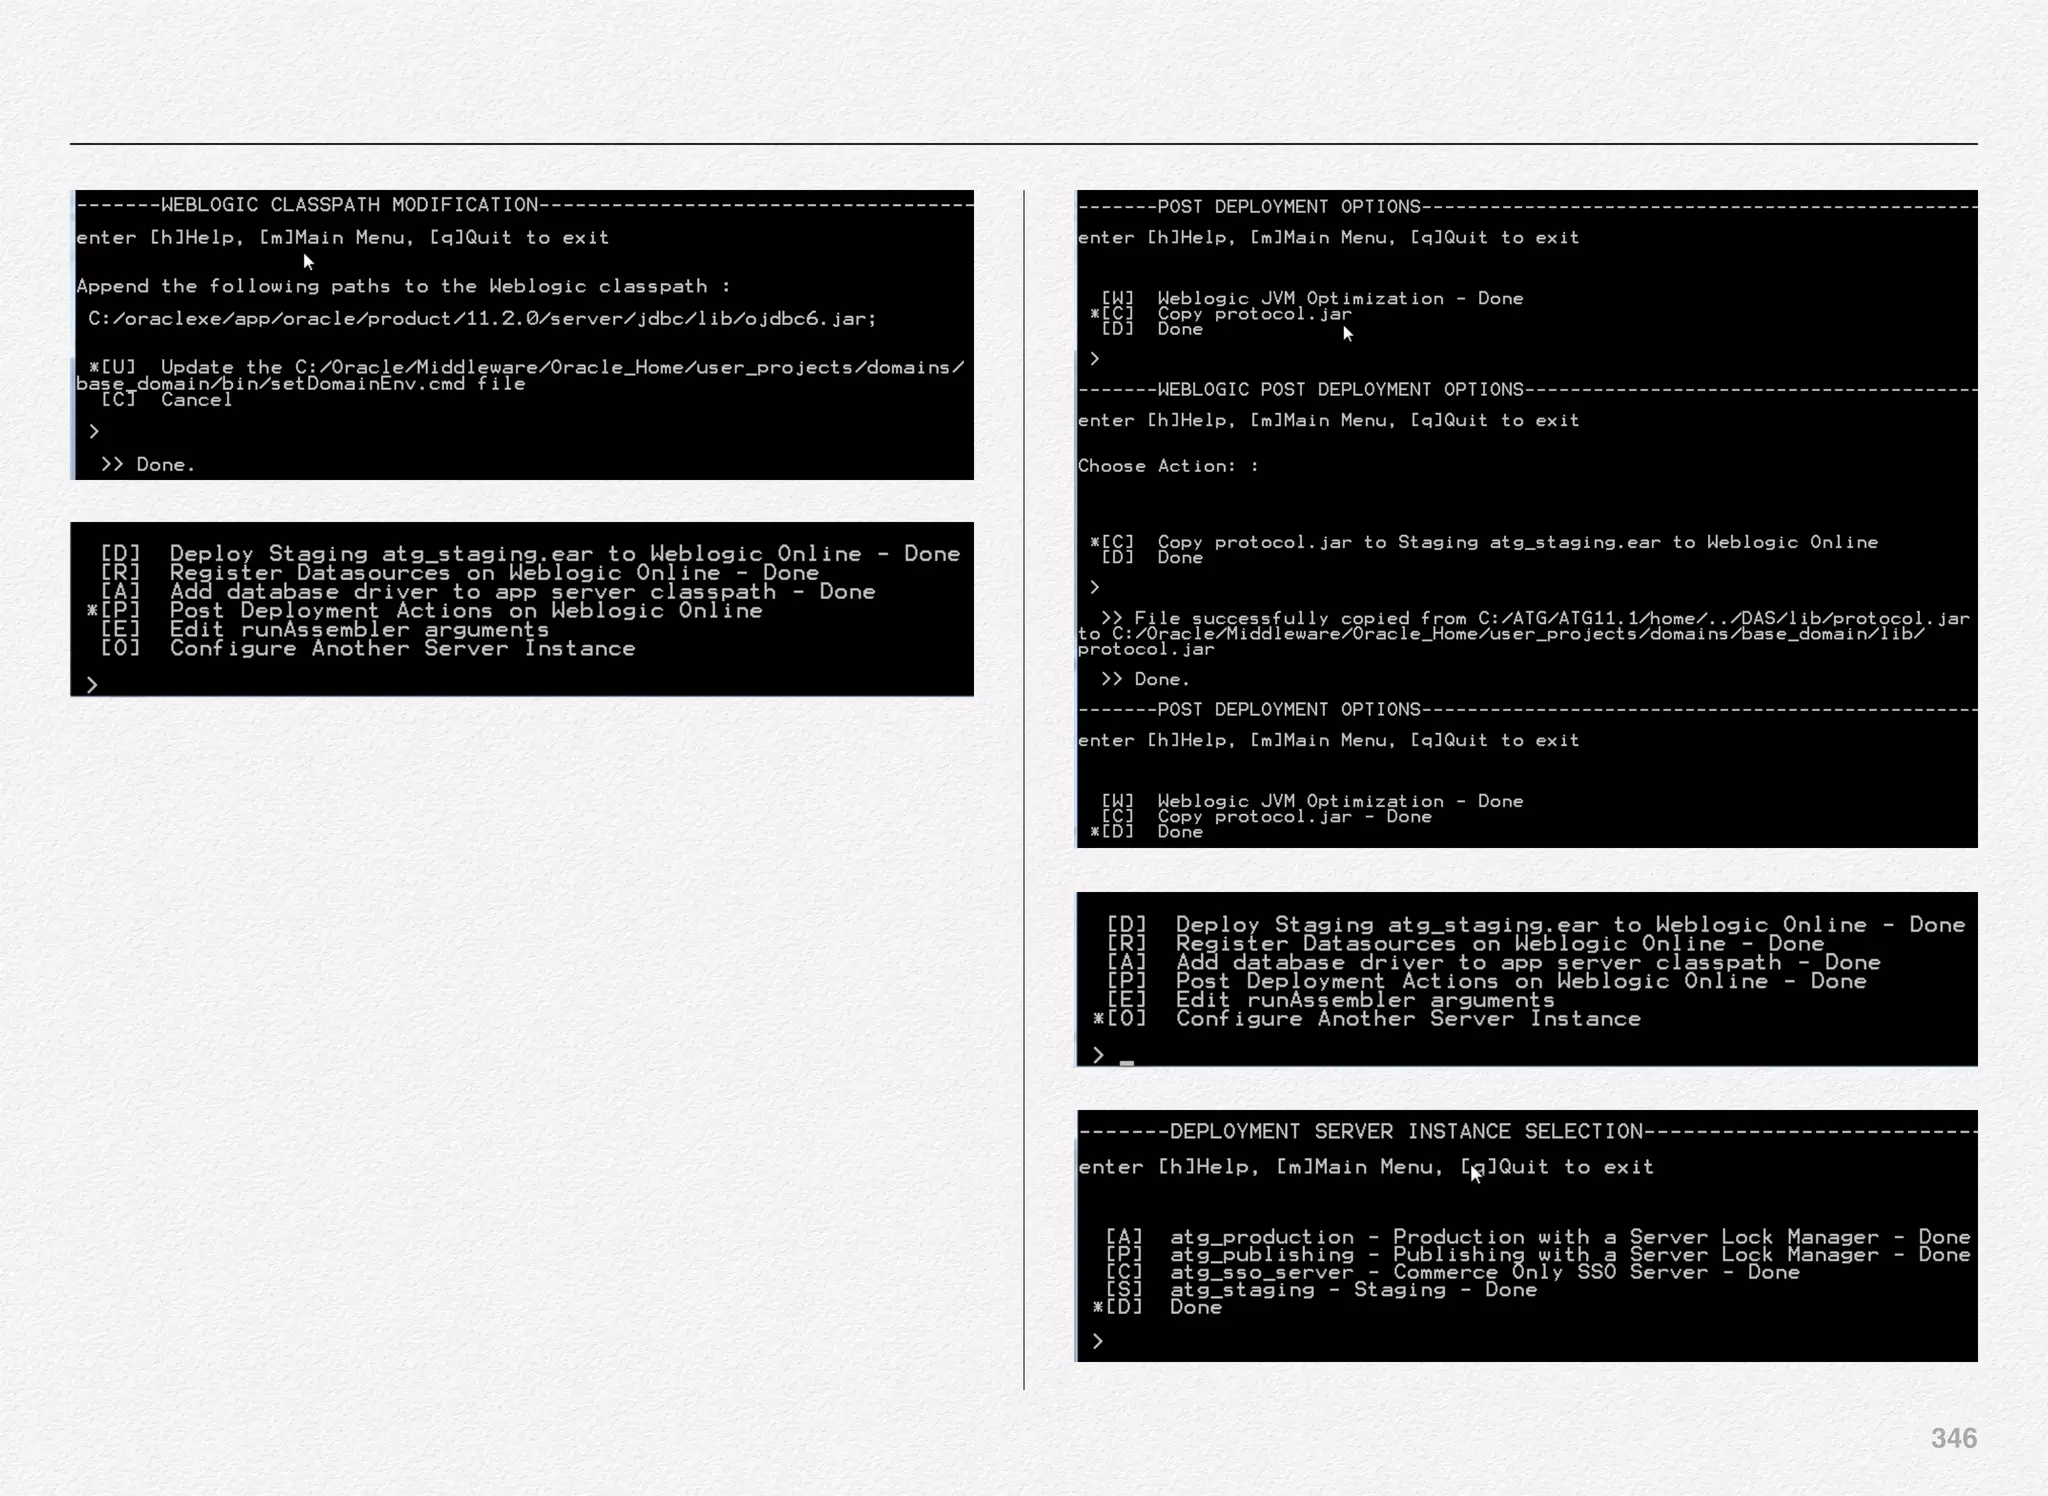
As a part of post deployment activities, we are going to make
changes to the WebLogic JVM (Java Virtual Machine)
optimization and copy the protocol.jar.](https://image.slidesharecdn.com/oraclecommerce-doityourselfseries-160129151710/75/Oracle-Commerce-Using-ATG-Endeca-Do-It-Yourself-Series-335-2048.jpg)
![335
Selecting [U] update startup script will add necessary
parameters to the managed server startup script C:/ATG/
ATG11.1/home/servers/atg_production/
startServerOnWeblogic.sh / bat
In the next step we will copy the protocol.jar file to production
instance with a server lock manager (SLM).
Protocol.jar file is copied to the domain lib directory for example
- C:OracleMiddlewareOracle_Homeuser_projectsdomains
base_domainlib directory,
This is the domain library directory and is usually located at
$DOMAIN_DIR/lib. Since, you might have your domain name
different than the default (base_domain - in this book) - you can
check the location of your domain based on the DOMAIN_DIR
variable - check for the file protocol.jar under the lib directory.
The jars located in this directory will be picked up and added
dynamically to the end of the server classpath at server startup.
The jars will be ordered lexically in the classpath. The domain
library directory is one mechanism that can be used for adding
application libraries to the server classpath.](https://image.slidesharecdn.com/oraclecommerce-doityourselfseries-160129151710/75/Oracle-Commerce-Using-ATG-Endeca-Do-It-Yourself-Series-336-2048.jpg)
![336
It is possible to override the $DOMAIN_DIR/lib directory using
the -Dweblogic.ext.dirs system property during startup. This
property specifies a list of directories to pick up jars from and
dynamically append to the end of the server classpath using
java.io.File.pathSeparator as the delimiter between path
entries.
With the above steps marked as “Done” - we have now
completed the configuration and deployment of the
atg_production server instance - the managed server is now
created and registered with the WebLogic domain and the
Select [O] to configure another server instance e.,g. publishing
or staging.
Deploy Publishing Server Instance
We can start with deployment of atg_publishing - Publishing
server instance with a Server Lock Manager (SLM).
Select [P] to continue with deployment of atg_publishing
You are now required to provide the EAR name for Publishing
server instance with a Server Lock Manager. We have entered
atg_publishing.ear as the EAR name for the publishing
instance.
You will notice some runassembler arguments:
- server atg_publishing
- layer Staging preview
Basically, we are configuring this managed server as publishing
server and it automatically includes Staging and ATG preview
layers.](https://image.slidesharecdn.com/oraclecommerce-doityourselfseries-160129151710/75/Oracle-Commerce-Using-ATG-Endeca-Do-It-Yourself-Series-337-2048.jpg)
![337
We need to include Staging layer since we want to configure
Staging site and agent using the BCC (Business Control
Center) tool.
Below is the list of modules automatically included for the
publishing server.
Top Level Module List:
DCS-UI.Versioned BIZUI PubPortlet DafEar.Admin
ContentMgmt.Versioned
DCS-UI.SiteAdmin.Versioned SiteAdmin.Versioned
DCS.Versioned DCS-UI
Store.EStore.Versioned Store.Storefront
ContentMgmt.Endeca.Index.Versioned
DCS.Endeca.Index.Versioned Store.Endeca.Index.Versioned
DCS.Endeca.Index.SKUIndexing Store.Mobile
Store.Mobile.Versioned
Store.KnowledgeBase Store.Mobile.REST.Versioned
Next step is to register the data source with the WebLogic
Server - selecting the option [R] will do the job. CIM will register
the data source you have defined in previous steps with the
WebLogic server.](https://image.slidesharecdn.com/oraclecommerce-doityourselfseries-160129151710/75/Oracle-Commerce-Using-ATG-Endeca-Do-It-Yourself-Series-338-2048.jpg)

![339
Top Level Module List:
DCS-UI.Versioned BIZUI PubPortlet DafEar.Admin
ContentMgmt.Versioned
DCS-UI.SiteAdmin.Versioned SiteAdmin.Versioned
DCS.Versioned DCS-UI
Store.EStore.Versioned Store.Storefront
ContentMgmt.Endeca.Index.Versioned
DCS.Endeca.Index.Versioned Store.Endeca.Index.Versioned
DCS.Endeca.Index.SKUIndexing Store.Mobile
Store.Mobile.Versioned
Store.KnowledgeBase Store.Mobile.REST.Versioned
Select the option [A] to add the database driver to the
application server classpath.](https://image.slidesharecdn.com/oraclecommerce-doityourselfseries-160129151710/75/Oracle-Commerce-Using-ATG-Endeca-Do-It-Yourself-Series-340-2048.jpg)
![340
Select [U] to update the classpath in the setDomainEnv.cmd file
in the domain/bin folder.
Select the option [P] to perform the post deployment actions on
the application server - including the Weblogic JVM
optimization, copying the protocol.jar file, and some cleanup as
well.
Select both the options [W] and [C] to let CIM instruct to
perform the actions to let WebLogic JVM optimization and copy
the protocol.jar.
Selecting option [C] will copy the protocol.jar to the publishing
with a Server Lock Manager atg_publishing.ear to the Weblogic
managed server.](https://image.slidesharecdn.com/oraclecommerce-doityourselfseries-160129151710/75/Oracle-Commerce-Using-ATG-Endeca-Do-It-Yourself-Series-341-2048.jpg)
![341
Above screenshot shows you the location of the protocol.jar
where CIM will send the copy.
This completes the deployment of publishing managed server
to the WebLogic online.
Let us now configure another server instance by selecting the
option [O]
The steps and the description is going to remain the same for
all the other servers except the server name. Hence, we will
just have the screenshots for your reference. By now you must
have got an understanding of what does CIM do for deployment
and how - hence we will not need to repeat all the description in
remaining 2 sections.](https://image.slidesharecdn.com/oraclecommerce-doityourselfseries-160129151710/75/Oracle-Commerce-Using-ATG-Endeca-Do-It-Yourself-Series-342-2048.jpg)
![342
Deploy SSO Server Instance
We can start with deployment of atg_sso_server - SSO server
instance - Commerce Only SSO Server.
Select [C] to continue with deployment of atg_sso_server
You are now required to provide the EAR name for SSO server
instance. We have entered sso.ear as the EAR name for the
SSO server instance.
You will notice some runassembler arguments:
- server atg_sso_server
Basically, we are configuring this managed server as SSO
server for Commerce Only SSO Server.
We are now presented with the familiar deployment menu
options as experienced in the Production and Publishing server
instance deployment.](https://image.slidesharecdn.com/oraclecommerce-doityourselfseries-160129151710/75/Oracle-Commerce-Using-ATG-Endeca-Do-It-Yourself-Series-343-2048.jpg)
![344
Deploy Staging Server Instance
We can start with deployment of atg_staging - staging server
instance - for ATG staging environment.
Select [C] to continue with deployment of atg_staging server](https://image.slidesharecdn.com/oraclecommerce-doityourselfseries-160129151710/75/Oracle-Commerce-Using-ATG-Endeca-Do-It-Yourself-Series-345-2048.jpg)

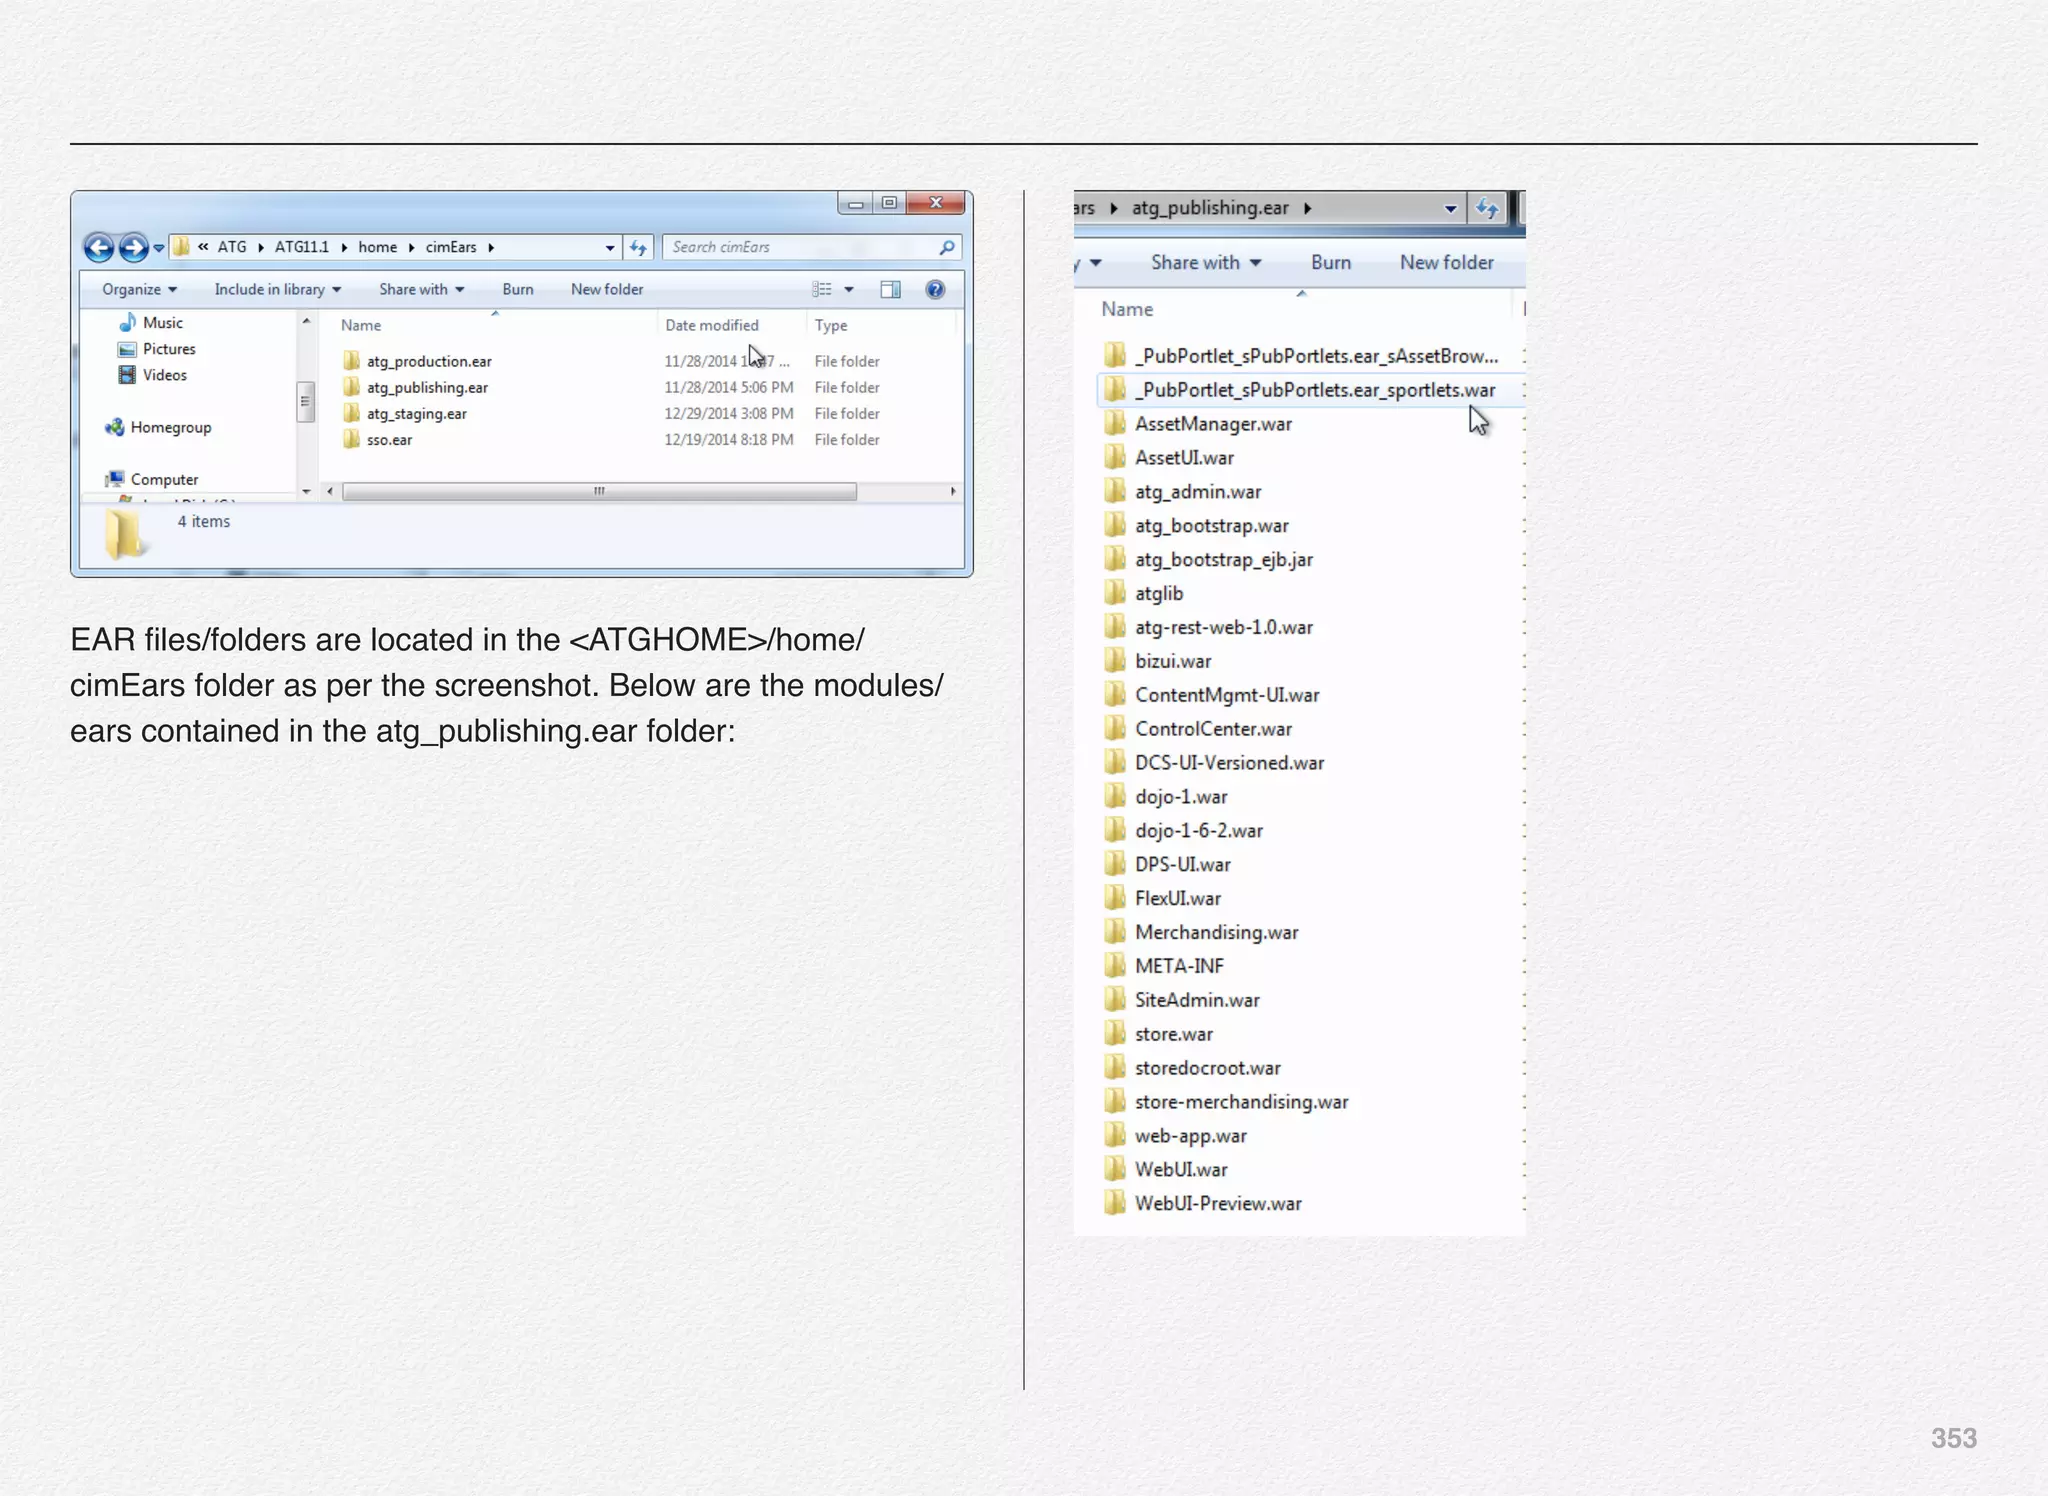


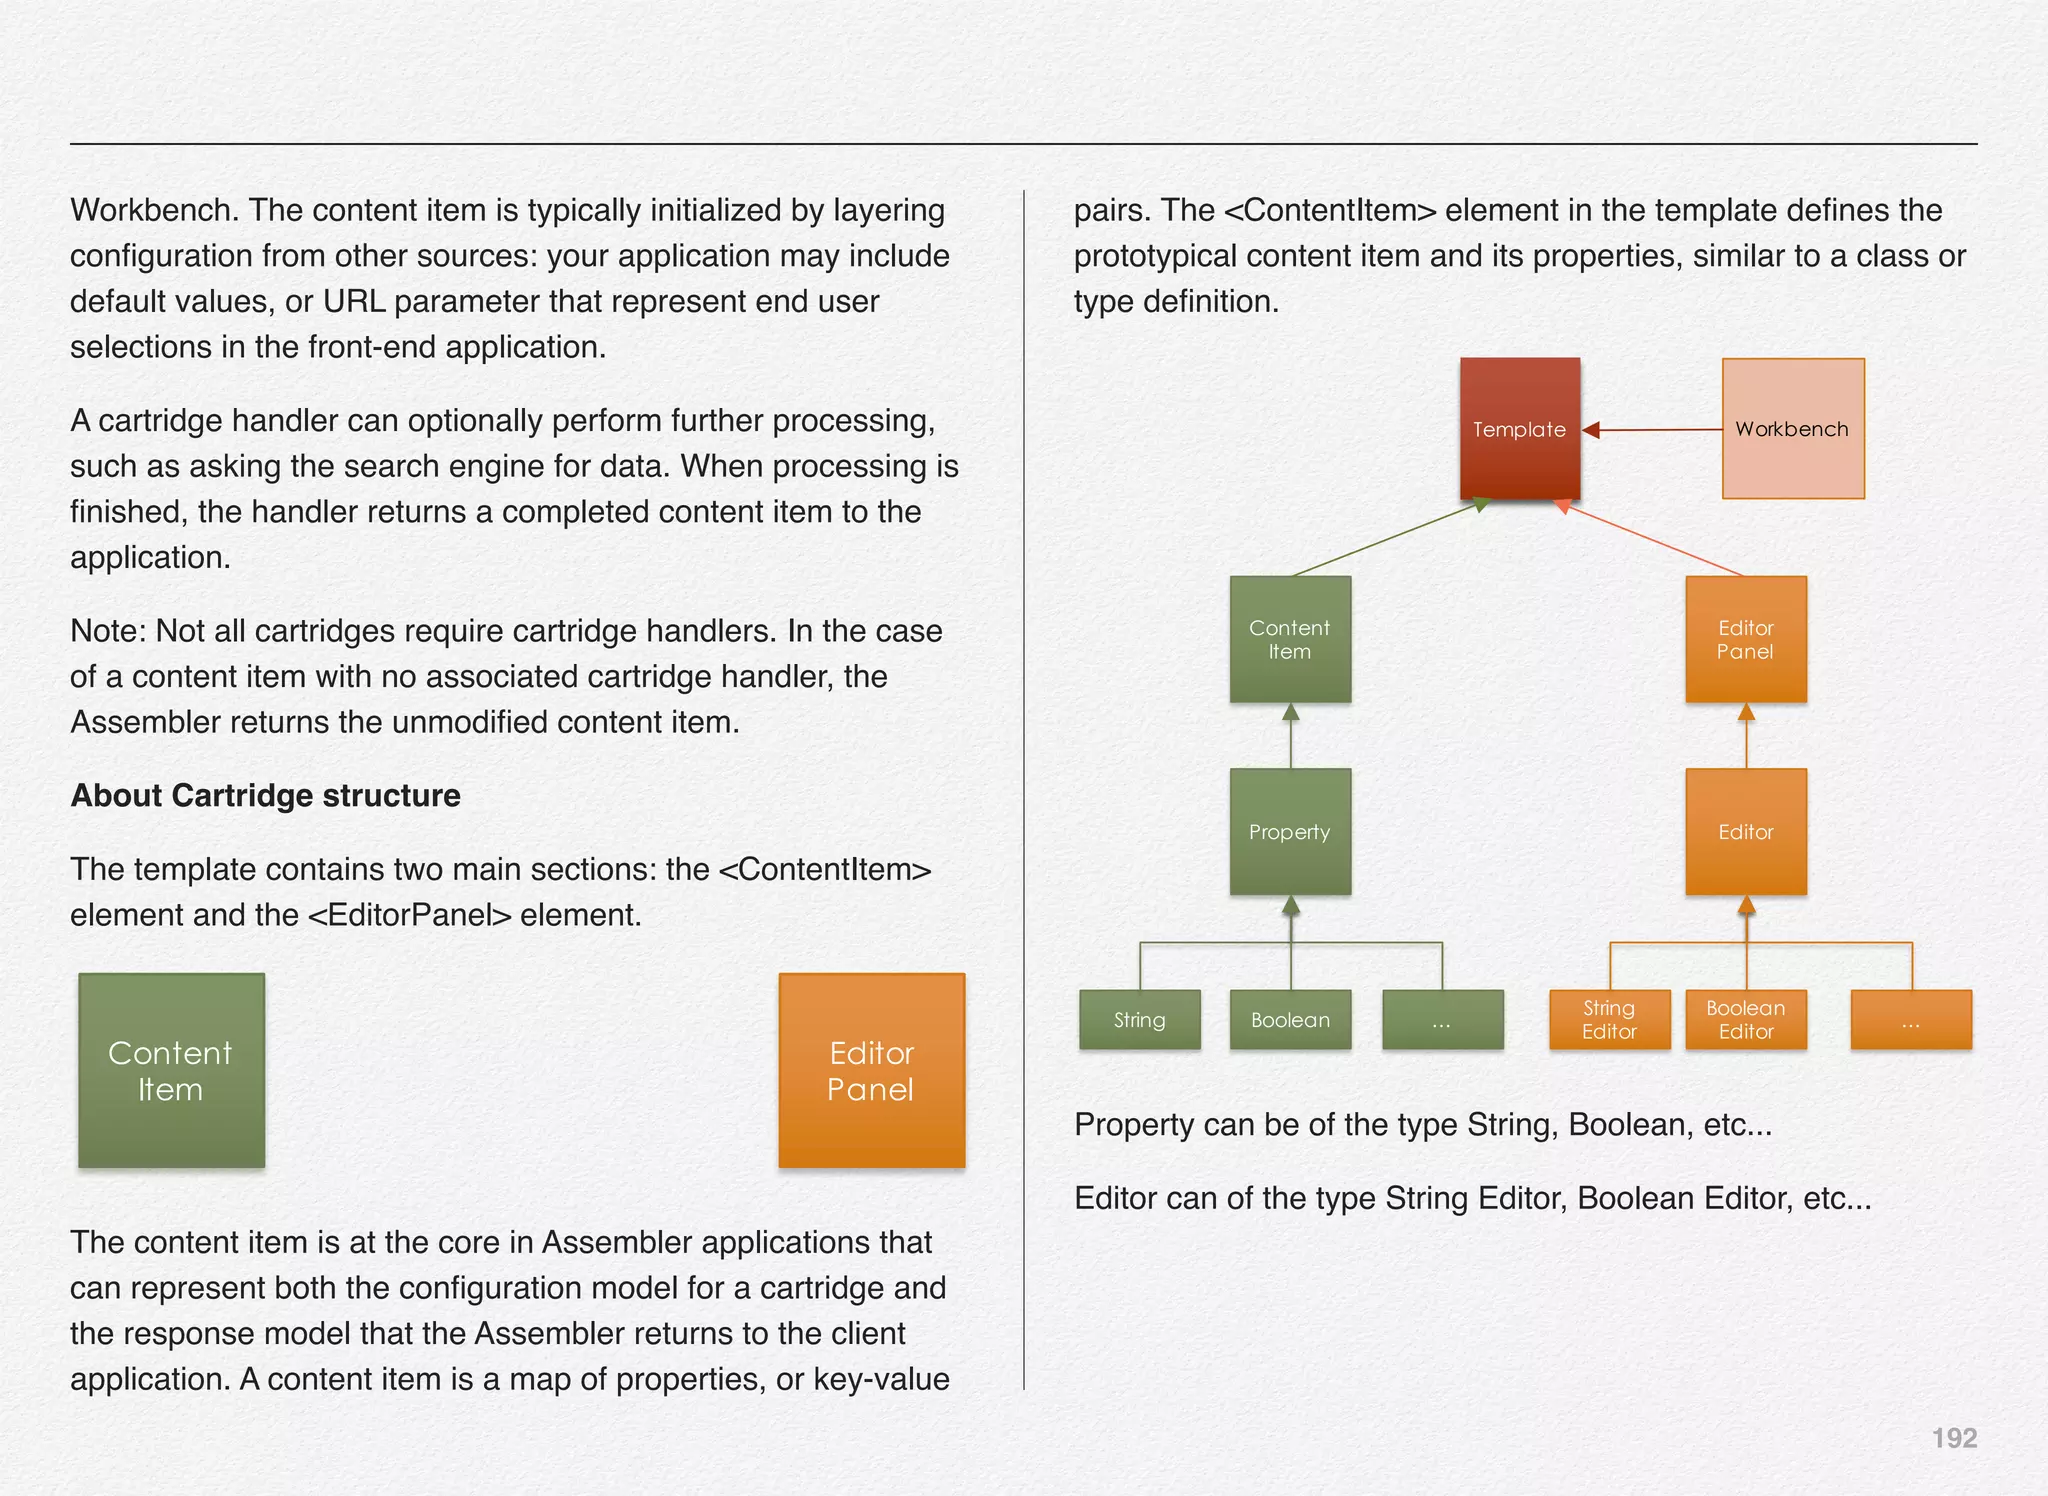
![394
PROMOTE_CONTENT.SH
[vagrant@localhost control]$ cat promote_content.sh
#!/bin/sh
WORKING_DIR=`dirname ${0} 2>/dev/null`
. "${WORKING_DIR}/../config/script/set_environment.sh"
# "PromoteAuthoringToLive" can be used to promote the
application.
# "PromoteAuthoringToLive" exports configuration for dgraphs
and for assemblers as files. These files are then applied to the
live dgraph cluster(s) and assemblers.
"${WORKING_DIR}/runcommand.sh"
PromoteAuthoringToLive run 2>&1
WORKBENCHCONFIG.XML
WorkbenchConfig.xml file is available in /usr/local/endeca/
Apps/Discover/config/script folder or C:EndecaAppsDiscover
configscripts folder.
This file contains the bean shell script function known as
PromoteAuthoringToLive. This function makes 4 calls
1. to Export Workbench content as ZIP file with help of
IFCR.exportApplication();
Used to export a particular node to disk. This on disk format
will represent all nodes as JSON files. Can be used to
update the Assembler. Note that these updates are
"Application Specific". You can only export nodes that
represent content and configuration relevant to this
Application.
2. to Export Search config in Workbench as ZIP file with help of
IFCR.exportConfigSnapshot(LiveDgraphCluster);
Exports a snapshot of the current dgraph config for the Live
dgraph cluster. Writes the config into a single zip file. The zip
is written to the local config directory for the live dgraph
cluster. A key file is stored along with the zip. This key file
keeps the latest version of the zip file.
3. to apply the ZIP file export to the live dgraph cluster (MDEX
Servers) with help of](https://image.slidesharecdn.com/oraclecommerce-doityourselfseries-160129151710/75/Oracle-Commerce-Using-ATG-Endeca-Do-It-Yourself-Series-395-2048.jpg)
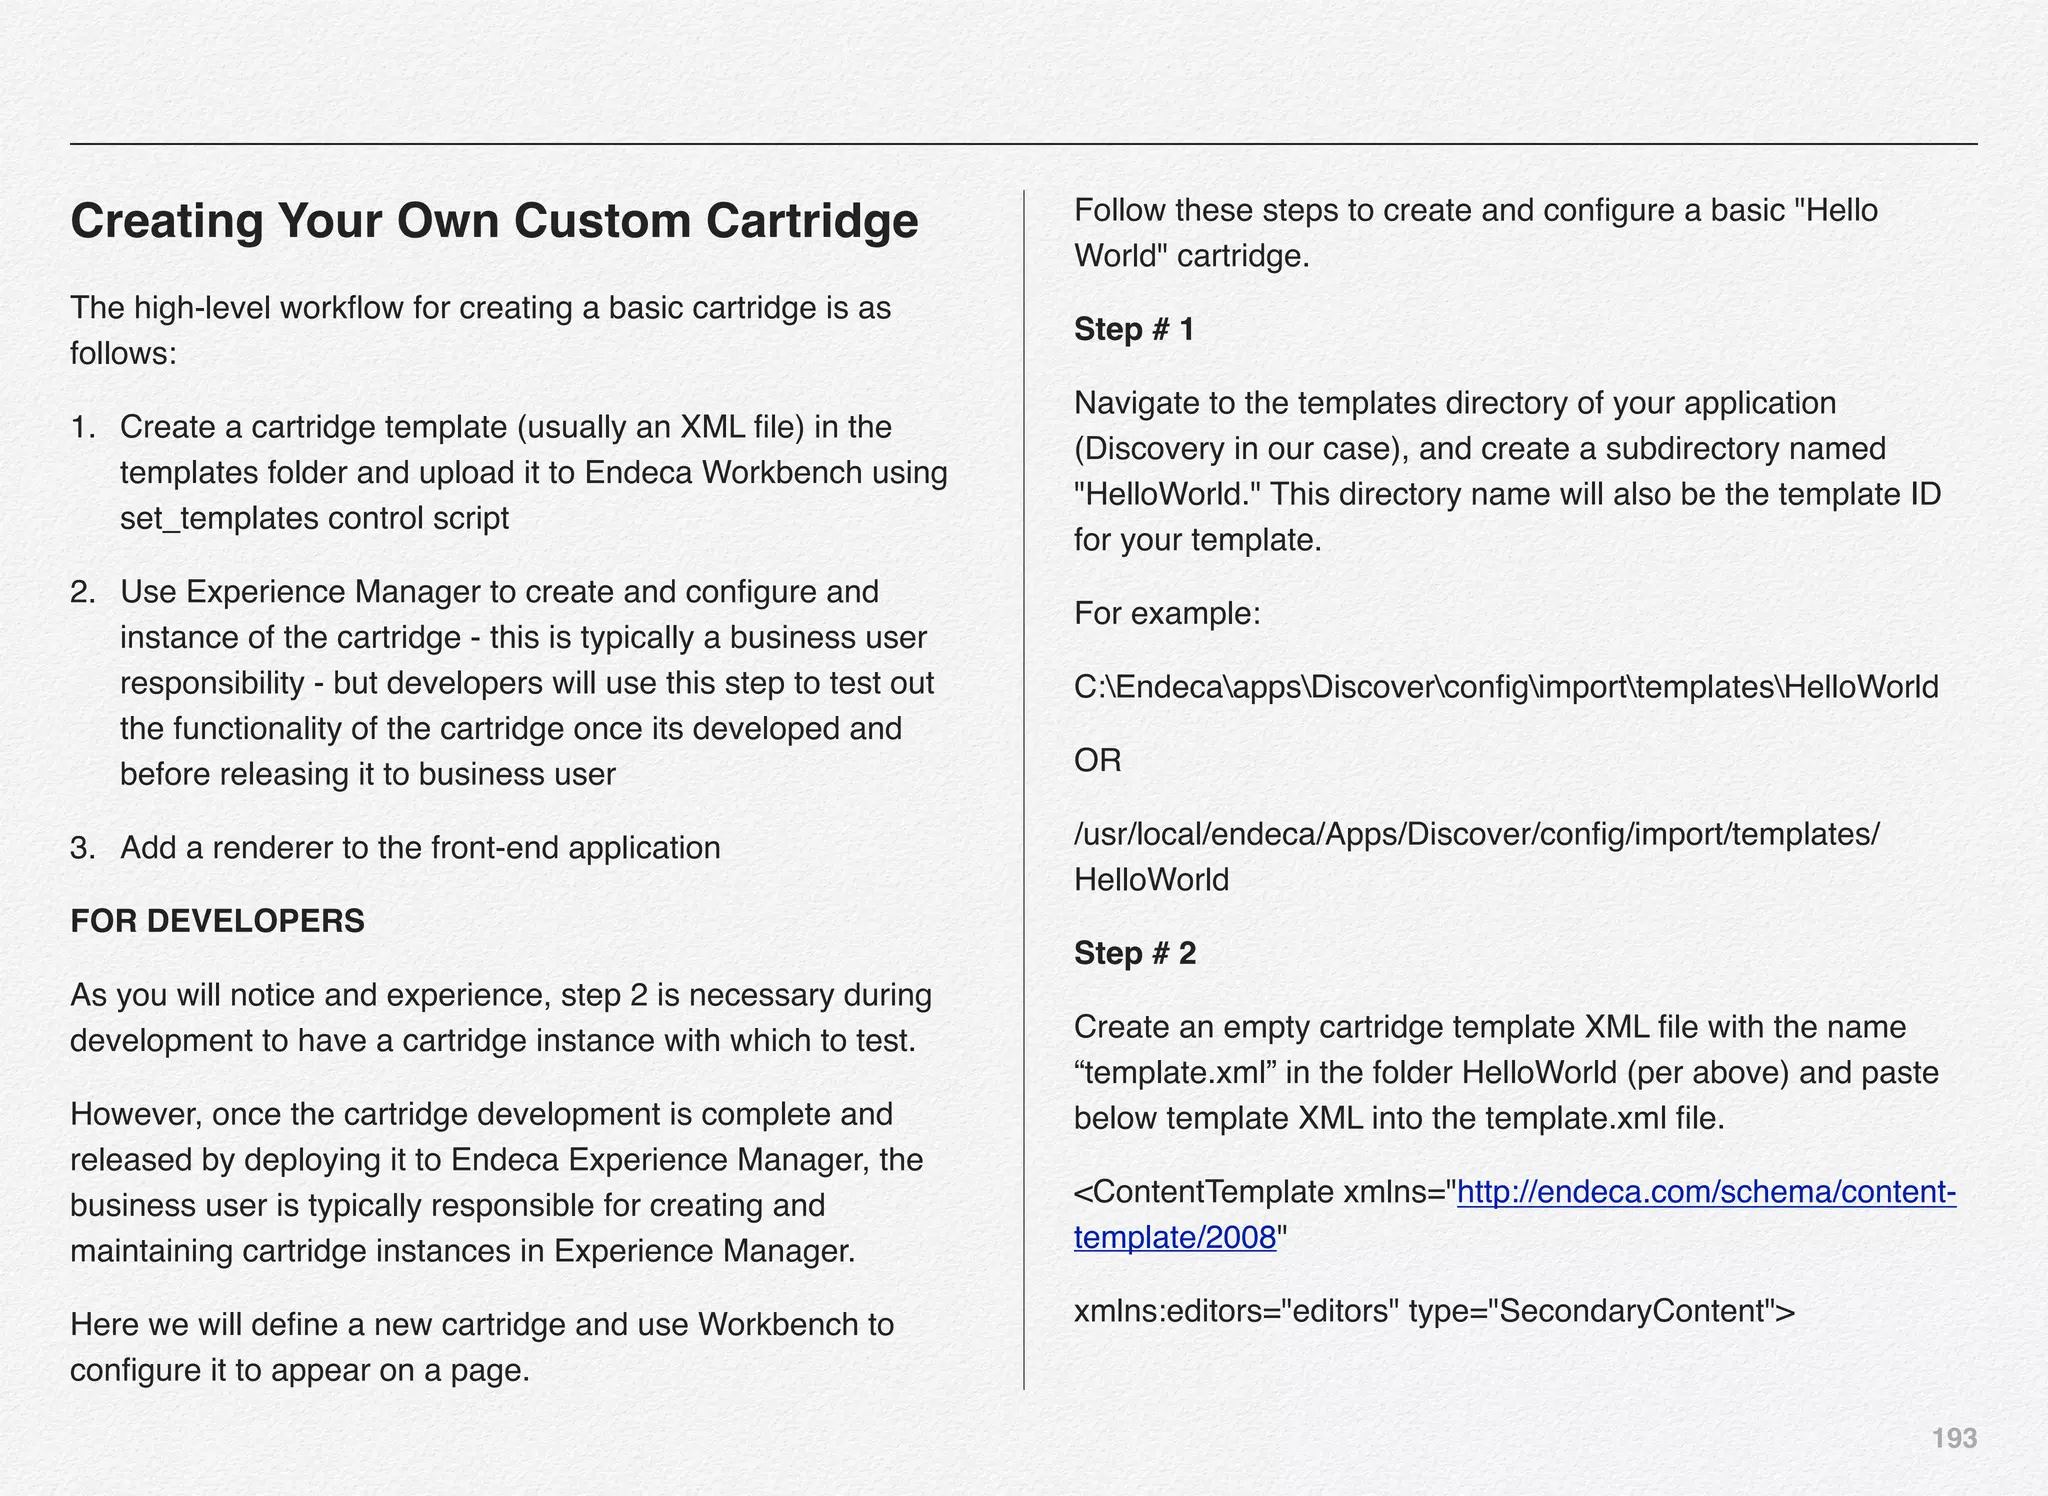
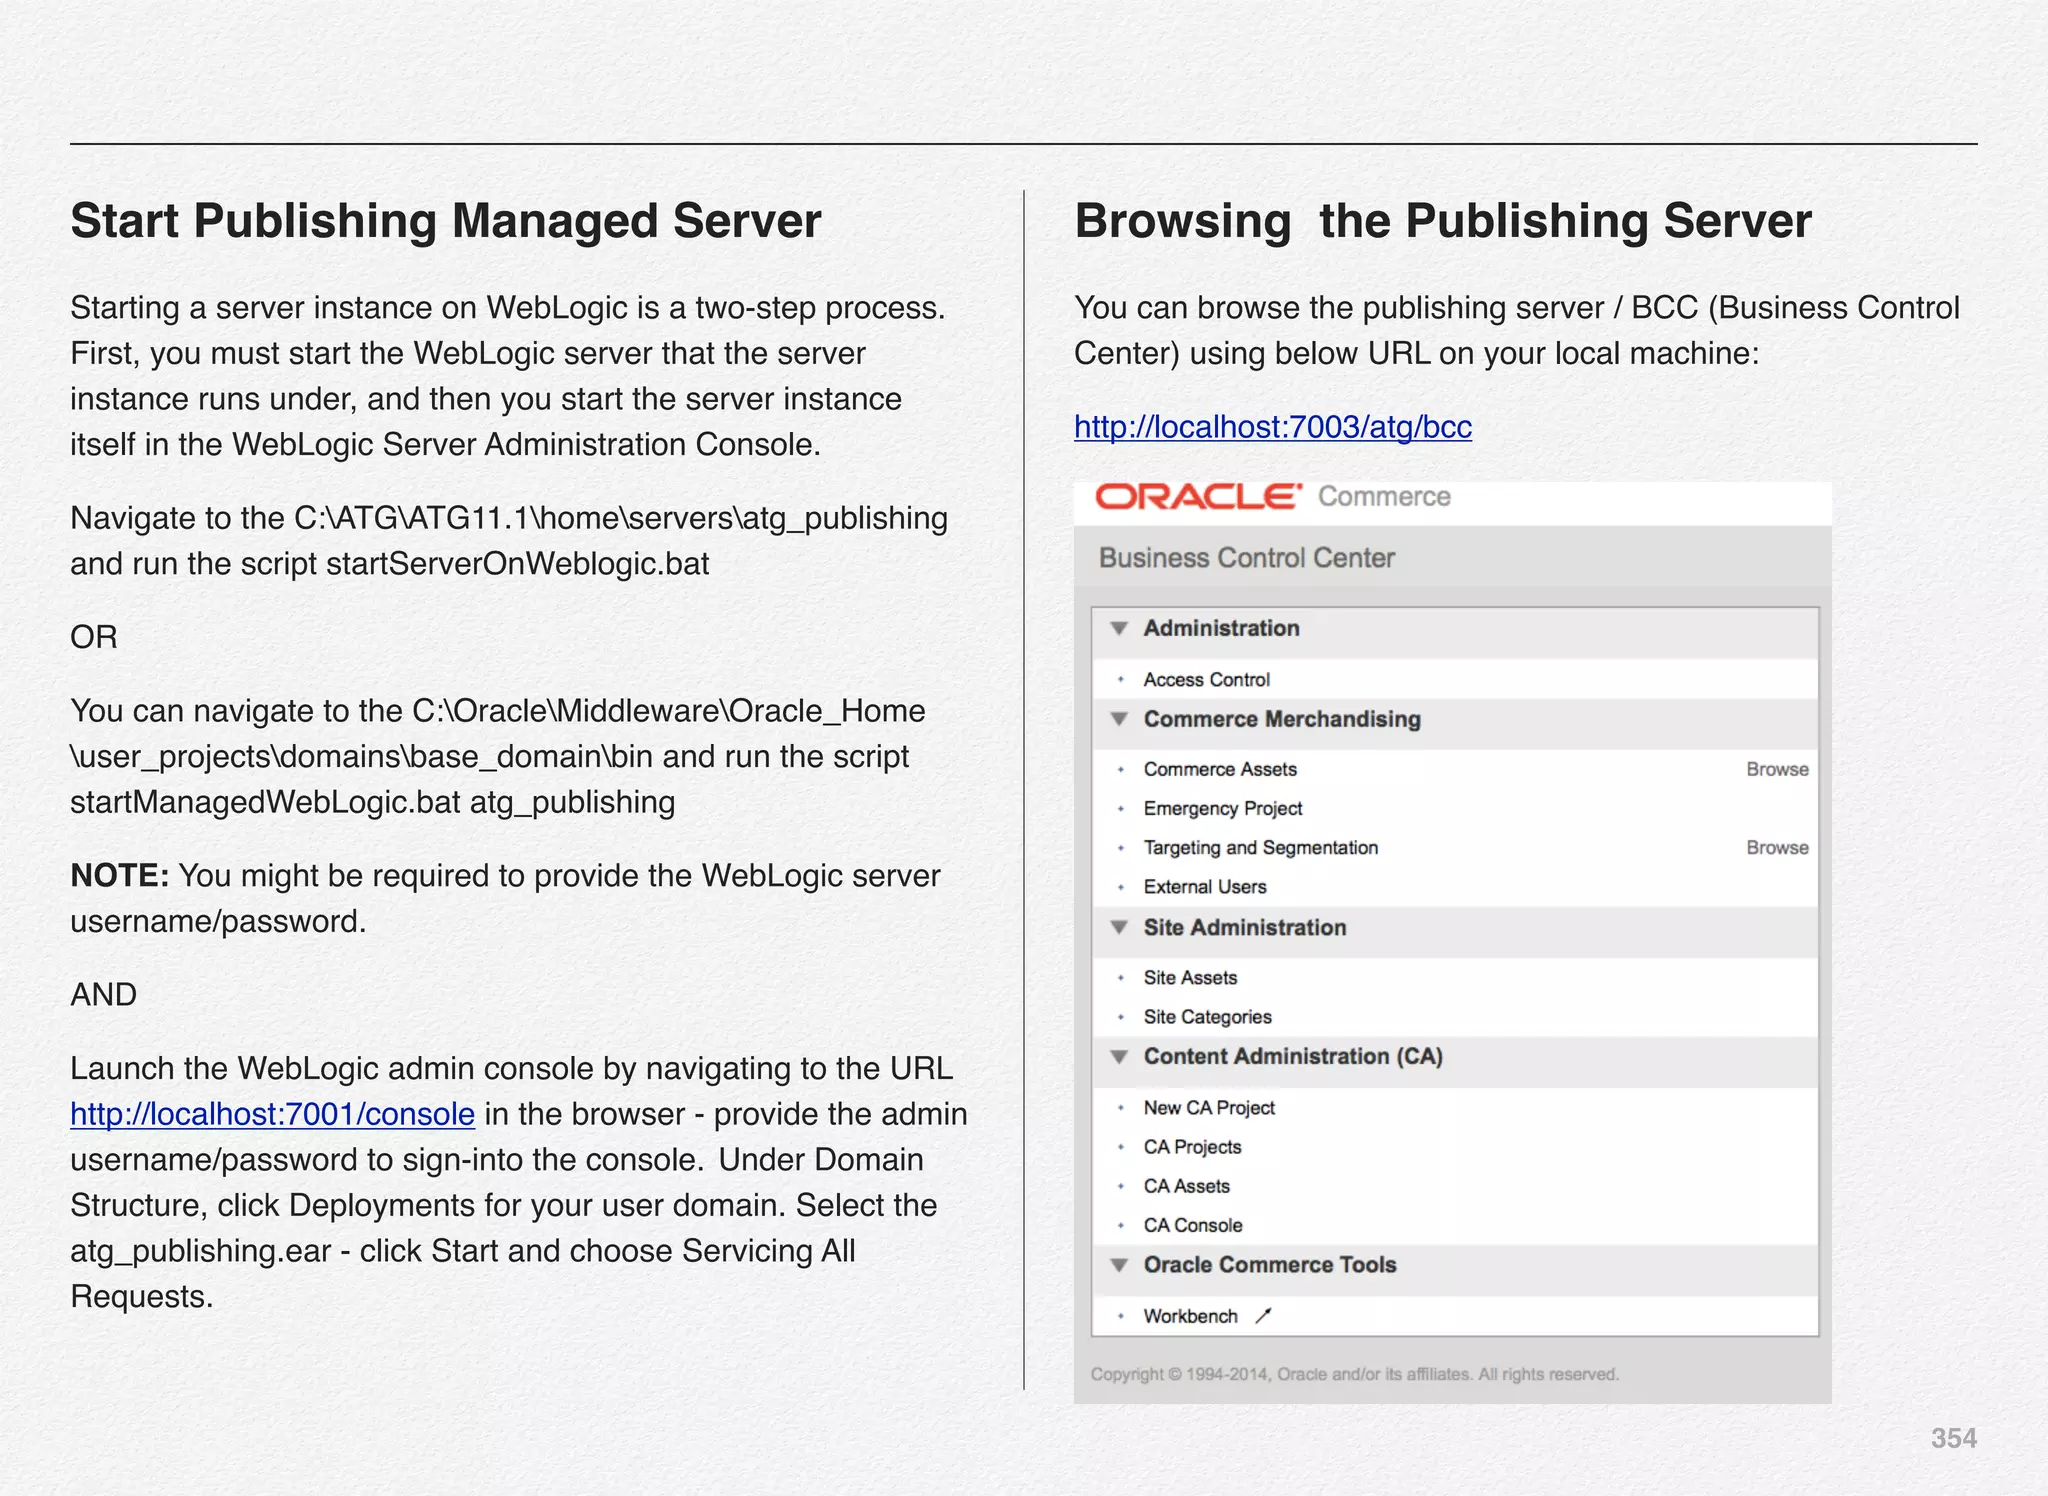
![395
LiveDgraphCluster.applyConfigSnapshot();
Applies the latest config of each dgraph in the Live Dgraph
cluster using the zip file written in a previous step. The
LiveDgraphCluster is the name of a defined dgraph-cluster in
the application config. If the name of the cluster is different or
there are multiple clusters, You will need to add a line for
each cluster defined.
4. to apply the ZIP file export to the assembler application
running on WebLogic or WebSphere or JBoss server with
help of AssemblerUpdate.updateAssemblers();
Updates all the assemblers configured for your deployment
template application. The AssemblerUpdate component can
take a list of Assembler Clusters which it should work
against, and will build URLs and POST requests accordingly
for each in order to update them with the contents of the
given directory.
Minimalist code for PromoteAuthoringToLive is as below:
<script id="PromoteAuthoringToLive">
<log-dir>./logs/provisioned_scripts</log-dir>
<provisioned-script-command>./control/
promote_content.sh</provisioned-script-command>
<bean-shell-script>
<![CDATA[
IFCR.exportConfigSnapshot(LiveDgraphCluster);
IFCR.exportApplication();
LiveDgraphCluster.applyConfigSnapshot();
AssemblerUpdate.updateAssemblers();
]]>
</bean-shell-script>
</script>](https://image.slidesharecdn.com/oraclecommerce-doityourselfseries-160129151710/75/Oracle-Commerce-Using-ATG-Endeca-Do-It-Yourself-Series-396-2048.jpg)
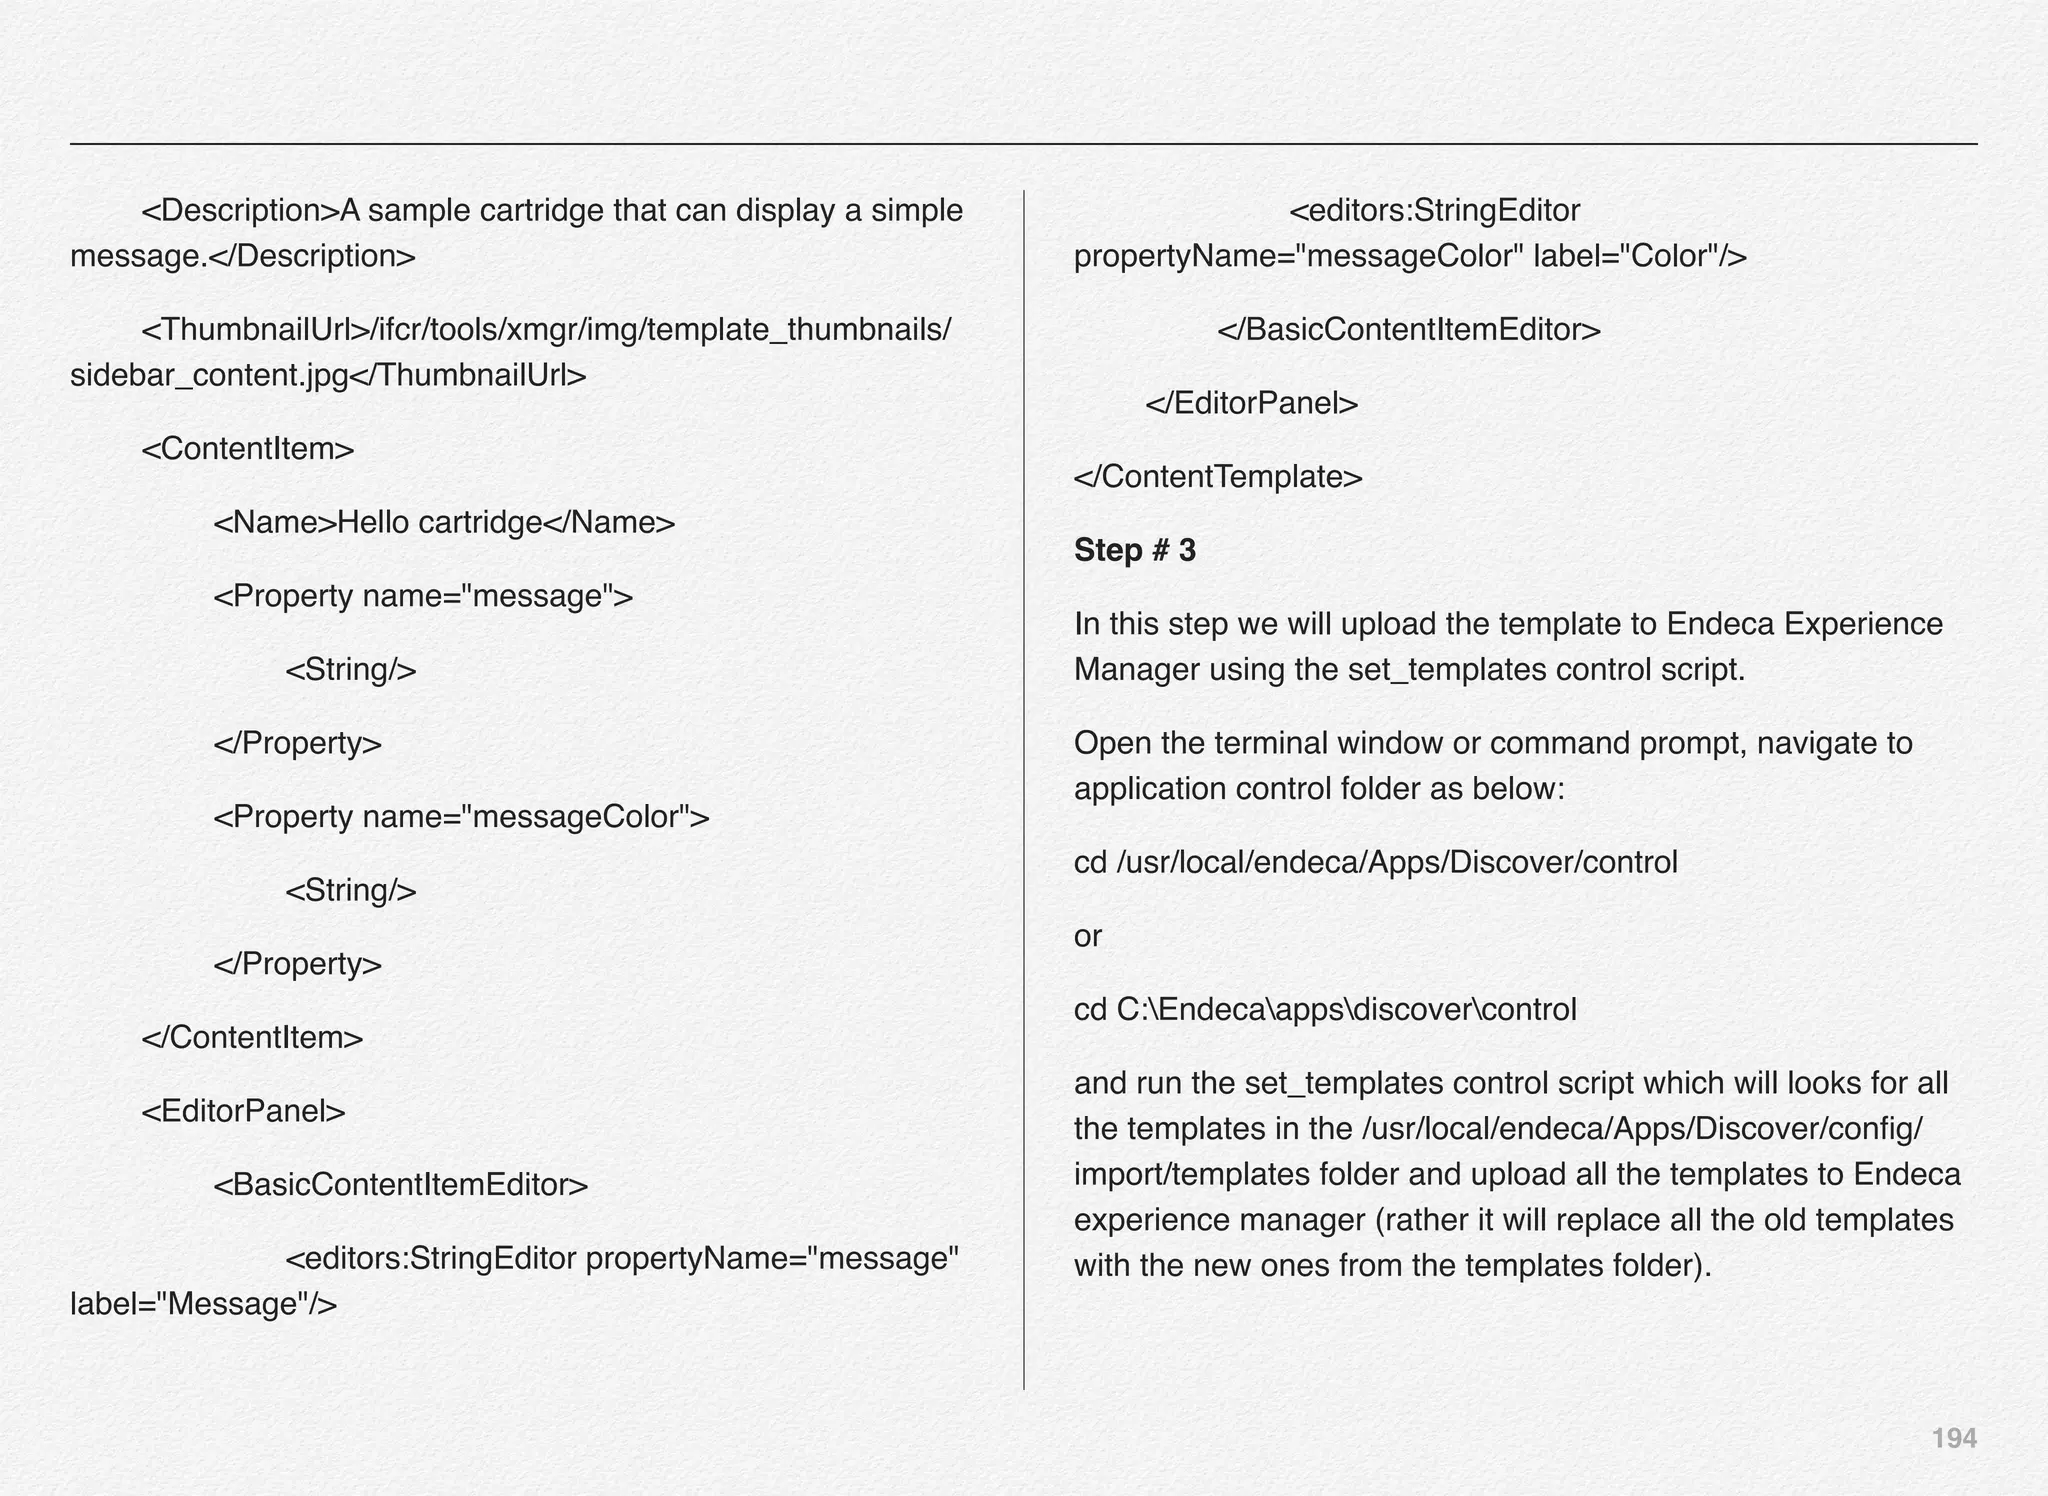
![396
COPYING PromoteAuthoringToLive to
ExportContent
In WorkbenchConfig.xml you can copy and paste the script id
“PromoteAuthoringToLive” and rename the script id to
“Export_Content” and then have only 2 functions out of the 4 to
do the job i.e. is to export the content and config to ZIP files.
Minimalist code for ExportContent is as below:
<script id="ExportContent">
<log-dir>./logs/provisioned_scripts</log-dir>
<provisioned-script-command>./control/
promote_content.sh</provisioned-script-command>
<bean-shell-script>
<![CDATA[
IFCR.exportConfigSnapshot(LiveDgraphCluster);
IFCR.exportApplication();
// LiveDgraphCluster.applyConfigSnapshot();
// AssemblerUpdate.updateAssemblers();
]]>
</bean-shell-script>
</script>
As you will notice we have commented 2 functions to update
the live dgraph cluster and assembers. We will use this function
in a separate script called export_content.sh which will refer to
ExportContent script id as below:
WORKING_DIR=`dirname ${0} 2>/dev/null`
. "${WORKING_DIR}/../config/script/set_environment.sh"
# "PromoteAuthoringToLive" can be used to promote the
application.
# "PromoteAuthoringToLive" exports configuration for dgraphs
and for assemblers as files. These files are then applied to the
live dgraph cluster(s) and assemblers.
"${WORKING_DIR}/runcommand.sh" ExportContent run 2>&1](https://image.slidesharecdn.com/oraclecommerce-doityourselfseries-160129151710/75/Oracle-Commerce-Using-ATG-Endeca-Do-It-Yourself-Series-397-2048.jpg)
![397
PROMOTE_CONTENT IN PRODUCTION
Similarly, once these ZIP files are RSYNC’d in production ITL
server we can run a customized version of promote_content.sh
with the 2 export functions commented and just the apply
snapshot and update assembler.
Minimalist code for PromoteAuthoringToLive in production
environment is as below:
<script id="PromoteAuthoringToLive">
<log-dir>./logs/provisioned_scripts</log-dir>
<provisioned-script-command>./control/
promote_content.sh</provisioned-script-command>
<bean-shell-script>
<![CDATA[
// IFCR.exportConfigSnapshot(LiveDgraphCluster);
// IFCR.exportApplication();
LiveDgraphCluster.applyConfigSnapshot();
AssemblerUpdate.updateAssemblers();
]]>
</bean-shell-script>
</script>](https://image.slidesharecdn.com/oraclecommerce-doityourselfseries-160129151710/75/Oracle-Commerce-Using-ATG-Endeca-Do-It-Yourself-Series-398-2048.jpg)
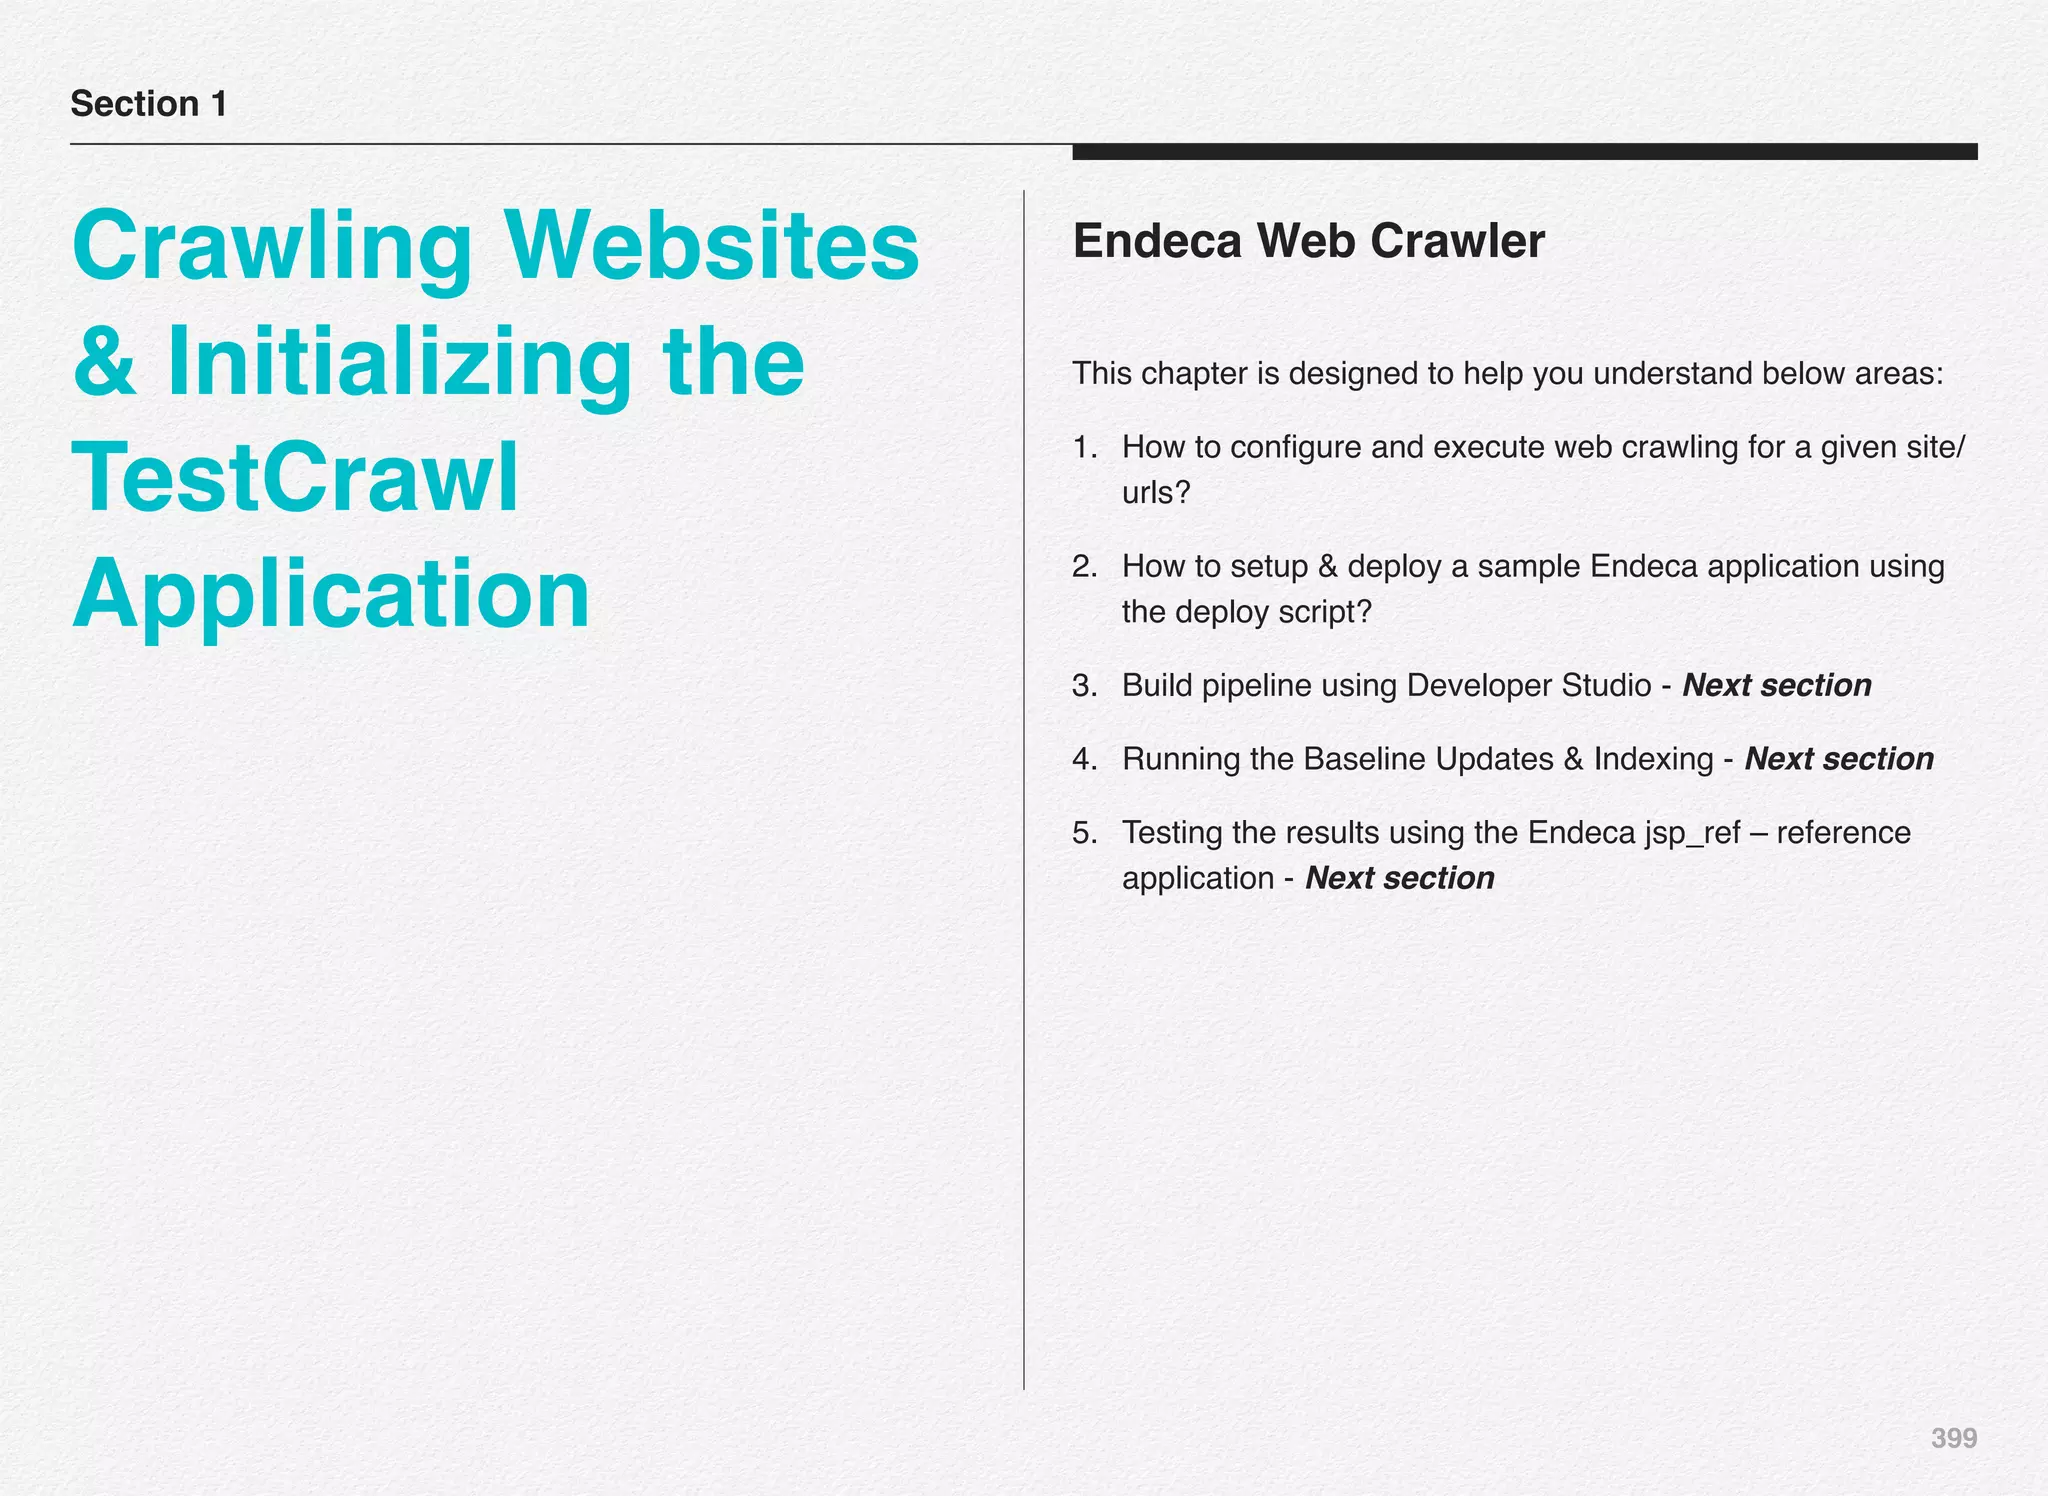
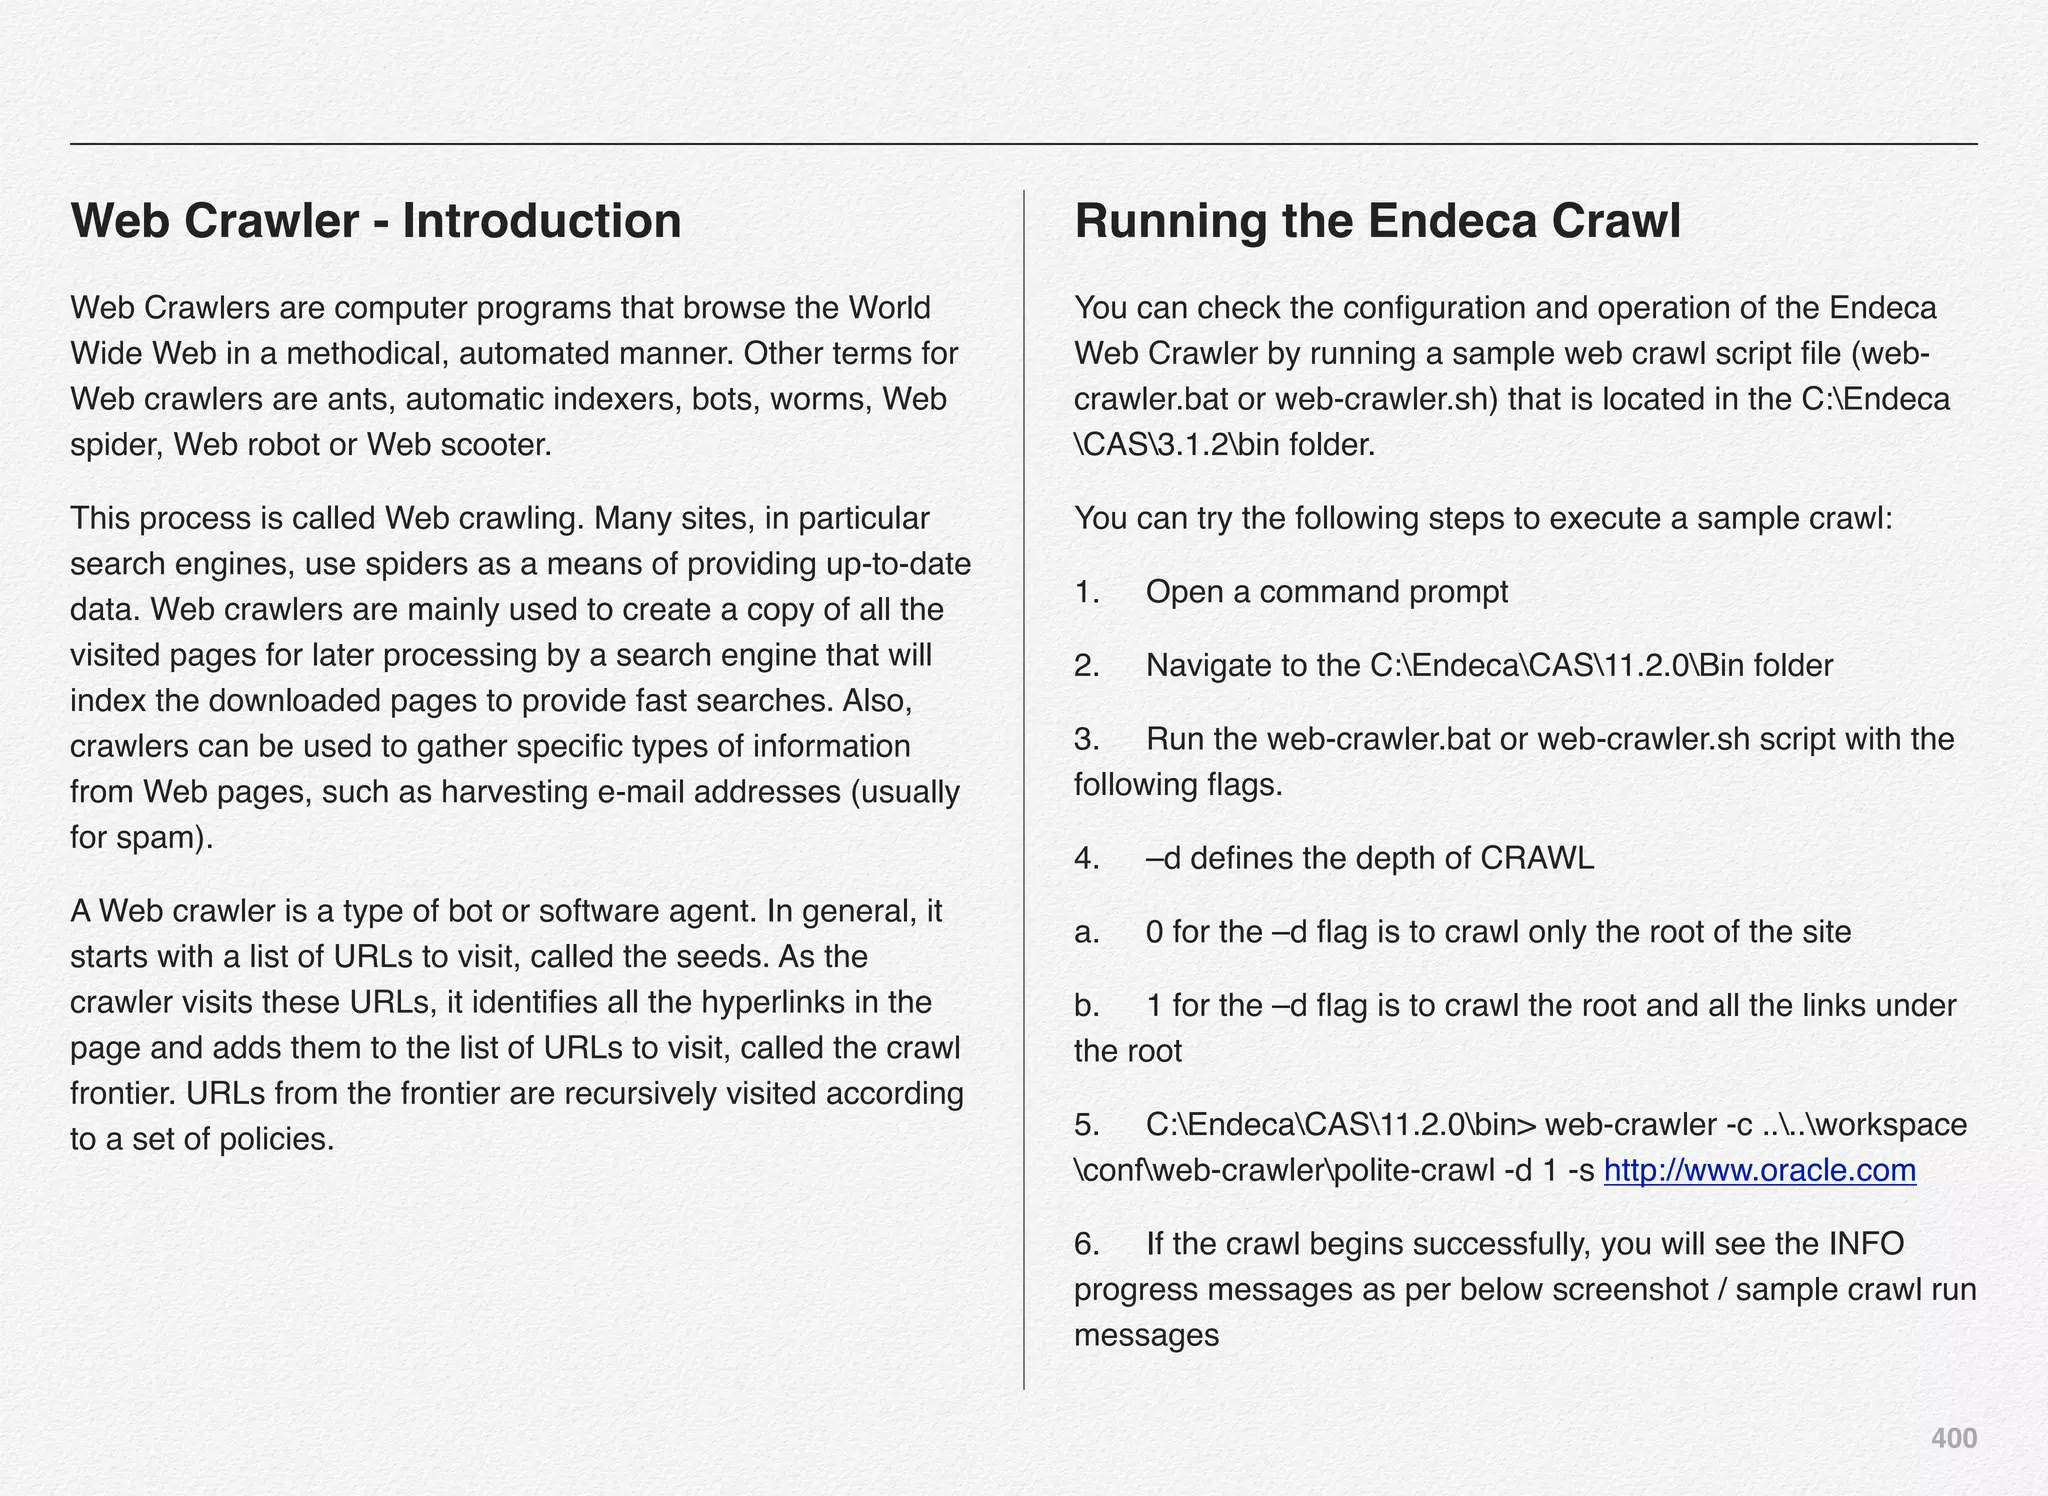
![401
INFO! 2015-11-29 01:02:42,726!0!
com.endeca.itl.web.Main![main]! Adding seed: http://
www.oracle.com
INFO! 2015-11-29 01:02:42,726!0!
com.endeca.itl.web.Main![main]! Seed URLs: [http://
www.oracle.com]
INFO! 2015-11-29 01:02:43,617!891!
com.endeca.itl.web.db.CrawlDbFactory! [main]! Initialized
crawldb: com.endeca.itl.web.db.BufferedDerbyCrawlDb
INFO! 2015-11-29 01:02:43,617!891!
com.endeca.itl.web.Crawler! [main]! Using executor
settings: numThreads = 100, maxThreadsPerHost=1
INFO! 2015-11-29 01:02:44,539!1813!
com.endeca.itl.web.Crawler! [main]! Fetching seed URLs.
INFO! 2015-11-29 01:02:45,977!3251!
com.endeca.itl.web.Crawler! [main]! Seeds complete.
INFO! 2015-11-29 01:03:43,923!61197!
com.endeca.itl.web.Crawler! [Timer-2]! Progress: Perf: Level 0
(interval) 60.0s. 0.9 Pages/s. 44.5 kB/s. 57 fetched. 2.6 mB. 56
records. 1 redirected. 0 retried. 0 gone. 2892 filtered.
INFO! 2015-11-29 01:03:43,923!61197!
com.endeca.itl.web.Crawler! [Timer-2]! Progress: Perf: All
(cumulative) 60.0s. 0.9 Pages/s. 44.5 kB/s. 57 fetched. 2.6 mB.
56 records. 1 redirected. 0 retried. 0 gone. 2892 filtered.
INFO! 2015-11-29 01:03:43,923!61197!
com.endeca.itl.web.Crawler! [Timer-2]! Progress: Queue: .
active requests: 1 on 1 host(s) (www.oracle.com). pending
requests: 42 on 1 host(s) (www.oracle.com). 1 host(s) visited
INFO! 2015-11-29 01:04:28,426!105700!
com.endeca.itl.web.Crawler! [pool-1-thread-70]! Finished
level: host: www.oracle.com, depth: 1, max depth reached
INFO! 2015-11-29 01:04:28,426!105700!
com.endeca.itl.web.Crawler! [main]! Starting crawler shut
down
INFO! 2015-11-29 01:04:28,442!105716!
com.endeca.itl.web.Crawler! [main]! Waiting for running
threads to complete
INFO! 2015-11-29 01:04:28,520!105794!
com.endeca.itl.web.Crawler! [main]! Progress: Level:
Cumulative crawl summary (level)
INFO! 2015-11-29 01:04:28,520!105794!
com.endeca.itl.web.Crawler! [main]! host-summary:
www.oracle.com to depth 2
host!depth! completed! total!blocks](https://image.slidesharecdn.com/oraclecommerce-doityourselfseries-160129151710/75/Oracle-Commerce-Using-ATG-Endeca-Do-It-Yourself-Series-402-2048.jpg)
![402
www.oracle.com! 0! 1! 1! 1
www.oracle.com! 1! 100! 100! 1
www.oracle.com! 2! 0! 2457!5
www.oracle.com! all! 101! 2558!7
INFO! 2015-11-29 01:04:28,520!105794!
com.endeca.itl.web.Crawler! [main]! host-summary: total
crawled: 101 completed. 2558 total.
INFO! 2015-11-29 01:04:28,520!105794!
com.endeca.itl.web.Crawler! [main]! Shutting down
CrawlDb
INFO! 2015-11-29 01:04:28,629!105903!
com.endeca.itl.web.Crawler! [main]! Progress: Host:
Cumulative crawl summary (host)
INFO! 2015-11-29 01:04:28,629!105903!
com.endeca.itl.web.Crawler! [main]! Host: www.oracle.com:
100 fetched. 4.4 mB. 97 records. 1 redirected. 0 retried. 0 gone.
4701 filtered.
INFO! 2015-11-29 01:04:28,629!105903!
com.endeca.itl.web.Crawler! [main]! Progress: Perf: All
(cumulative) 104.7s. 1.0 Pages/s. 43.1 kB/s. 100 fetched. 4.4
mB. 97 records. 1 redirected. 0 retried. 0 gone. 4701 filtered.
INFO! 2015-11-29 01:04:28,629!105903!
com.endeca.itl.web.Crawler! [main]! Crawl complete.](https://image.slidesharecdn.com/oraclecommerce-doityourselfseries-160129151710/75/Oracle-Commerce-Using-ATG-Endeca-Do-It-Yourself-Series-403-2048.jpg)
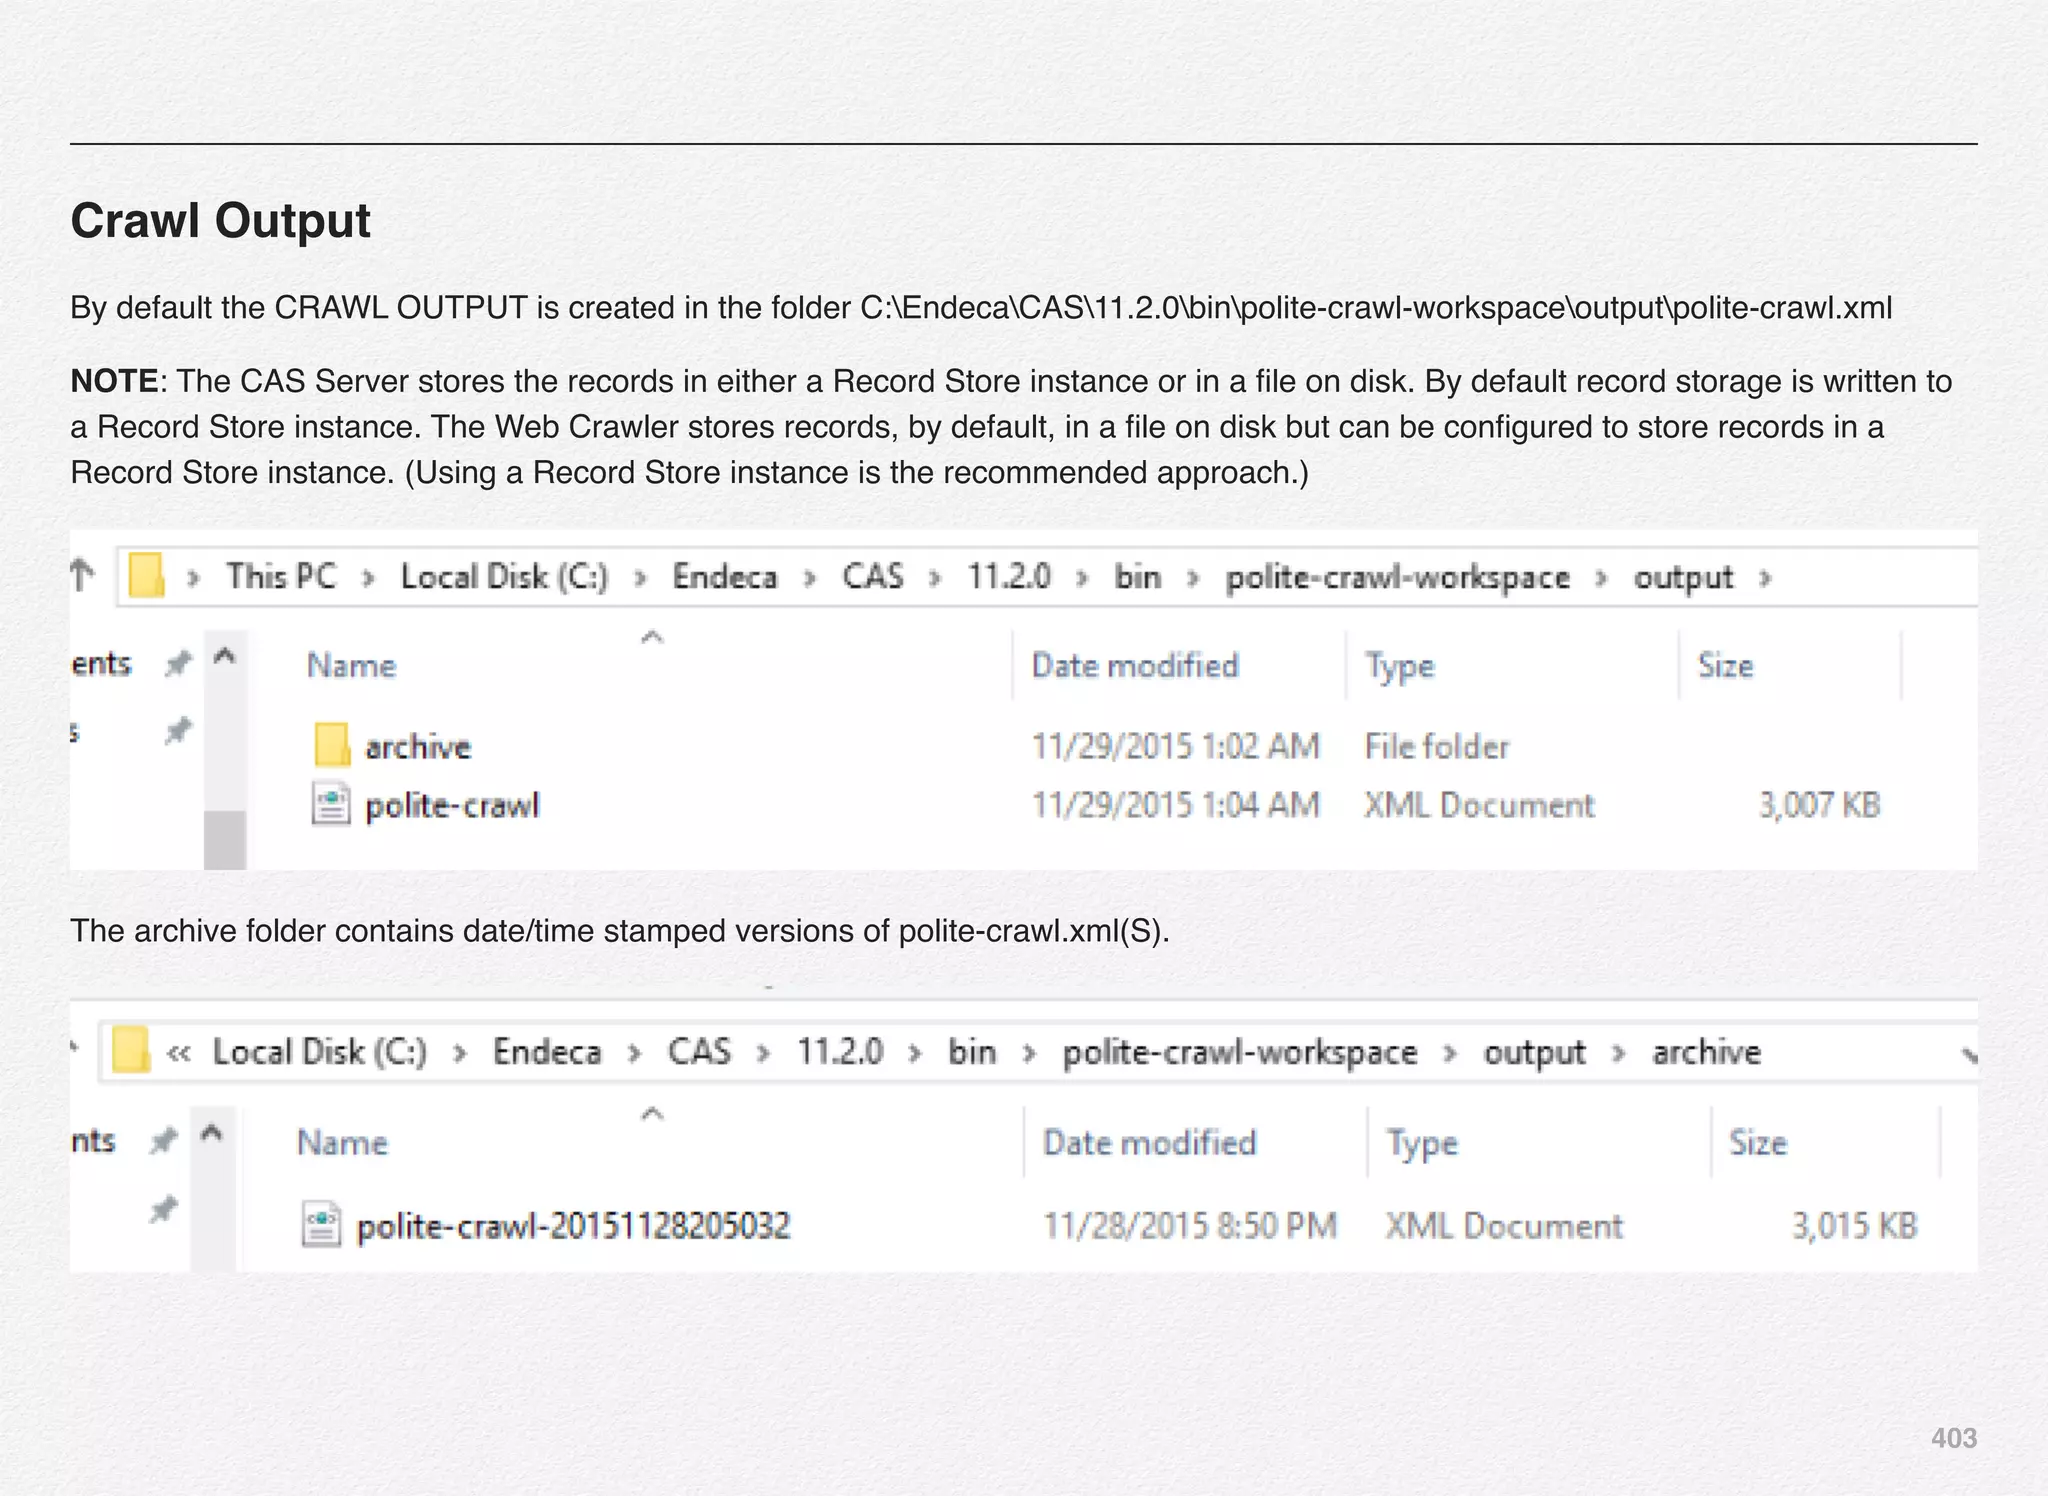
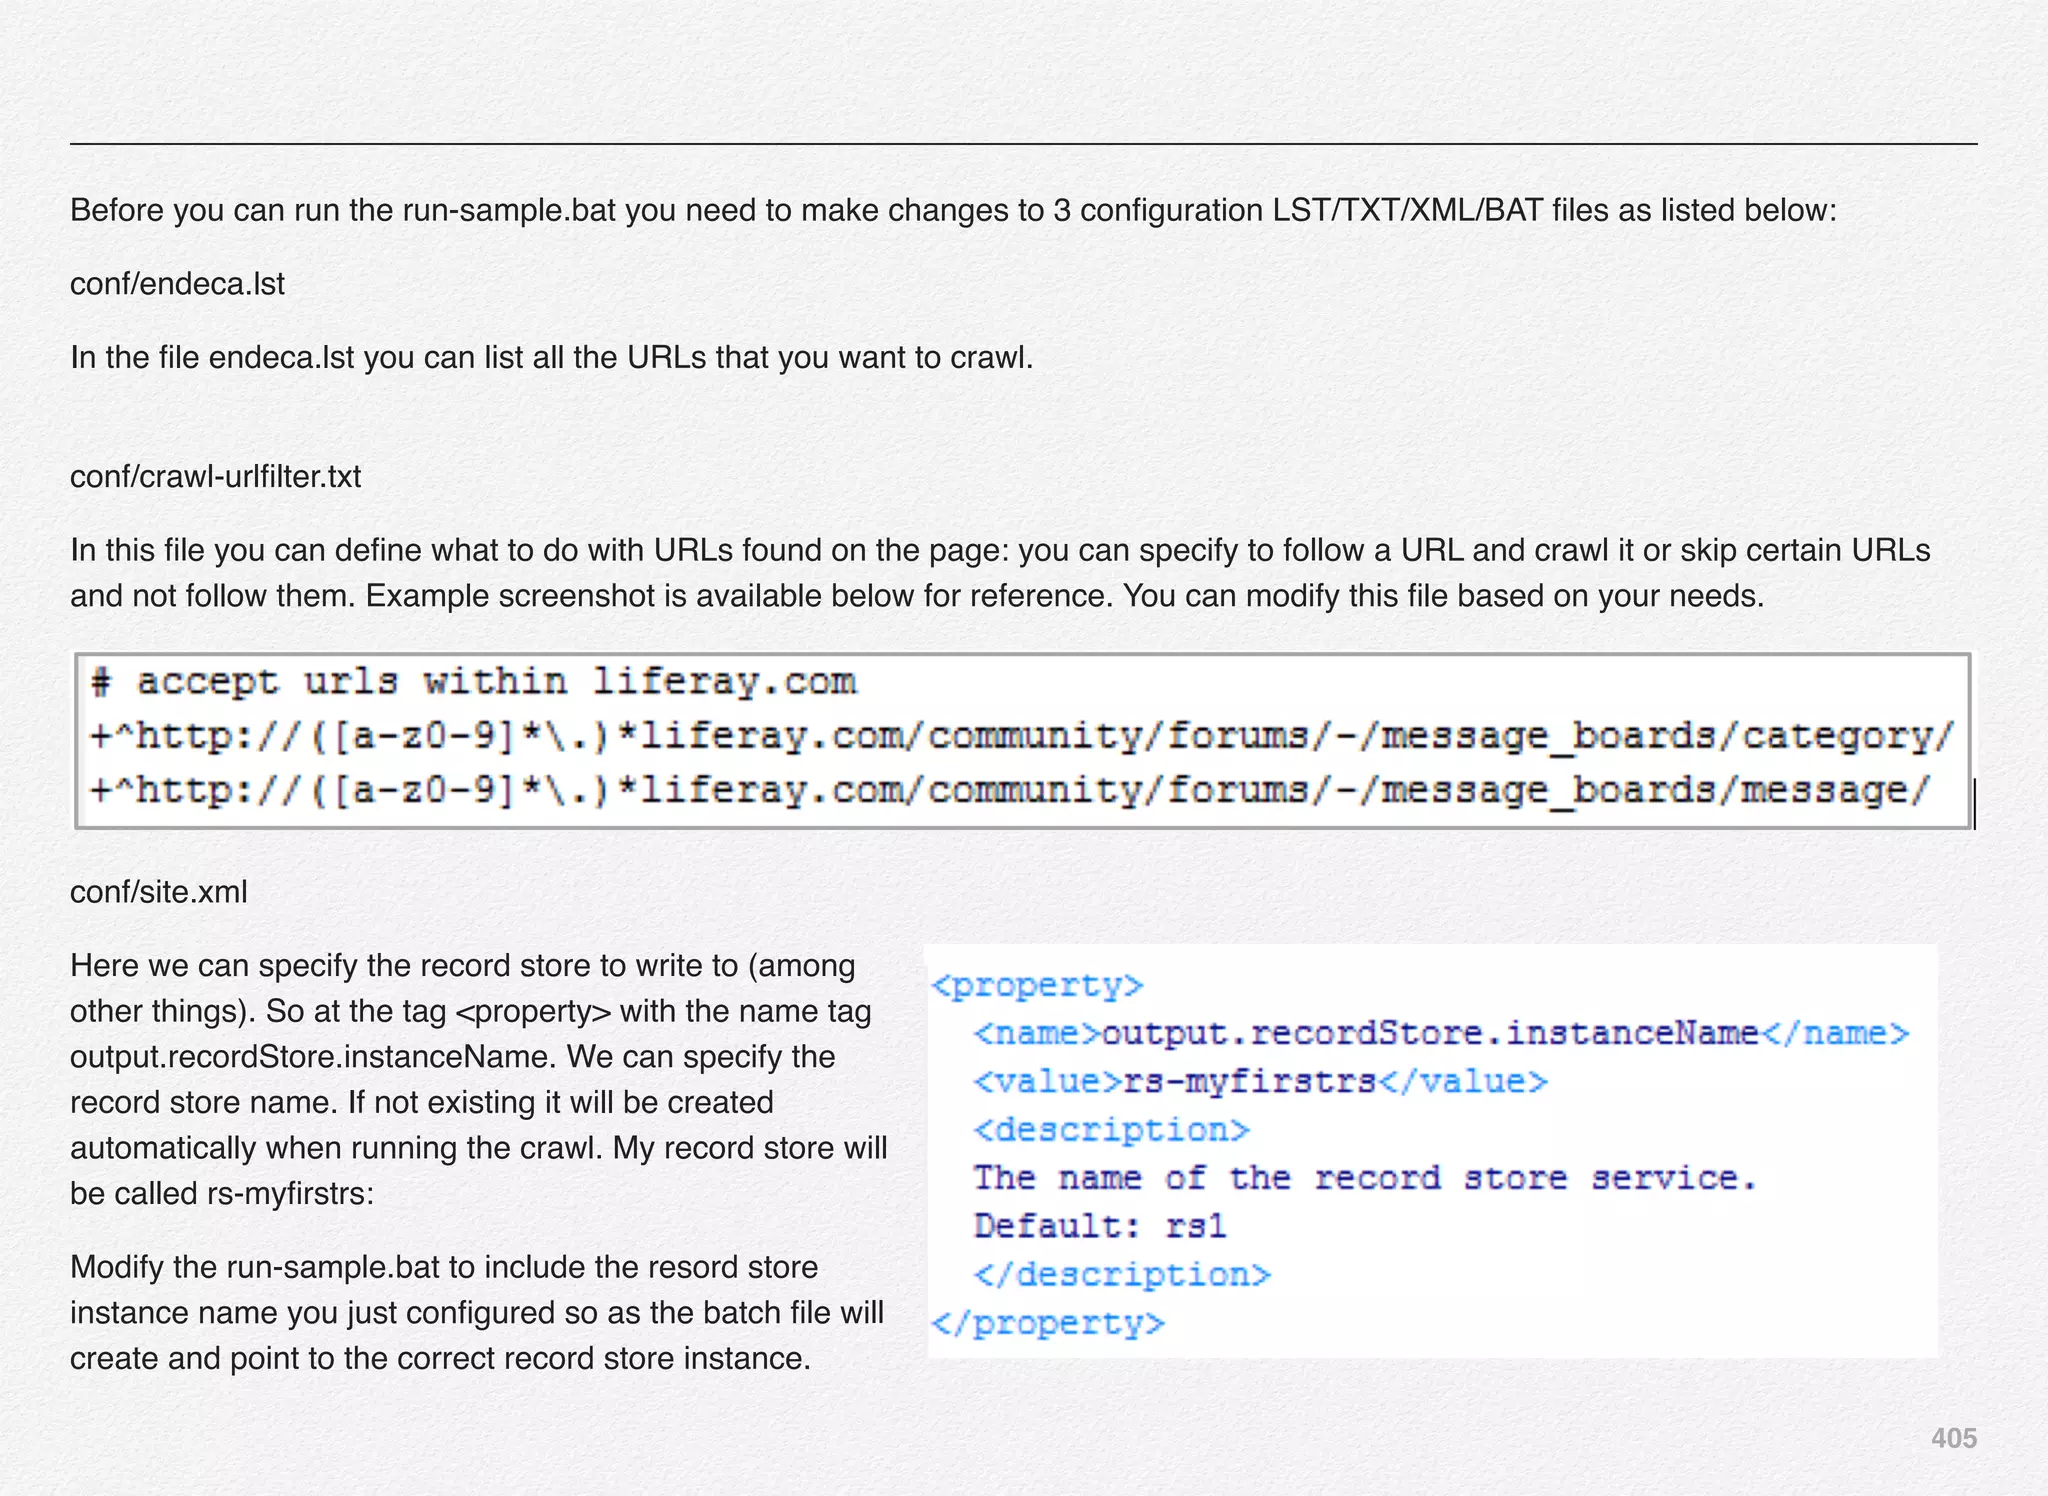
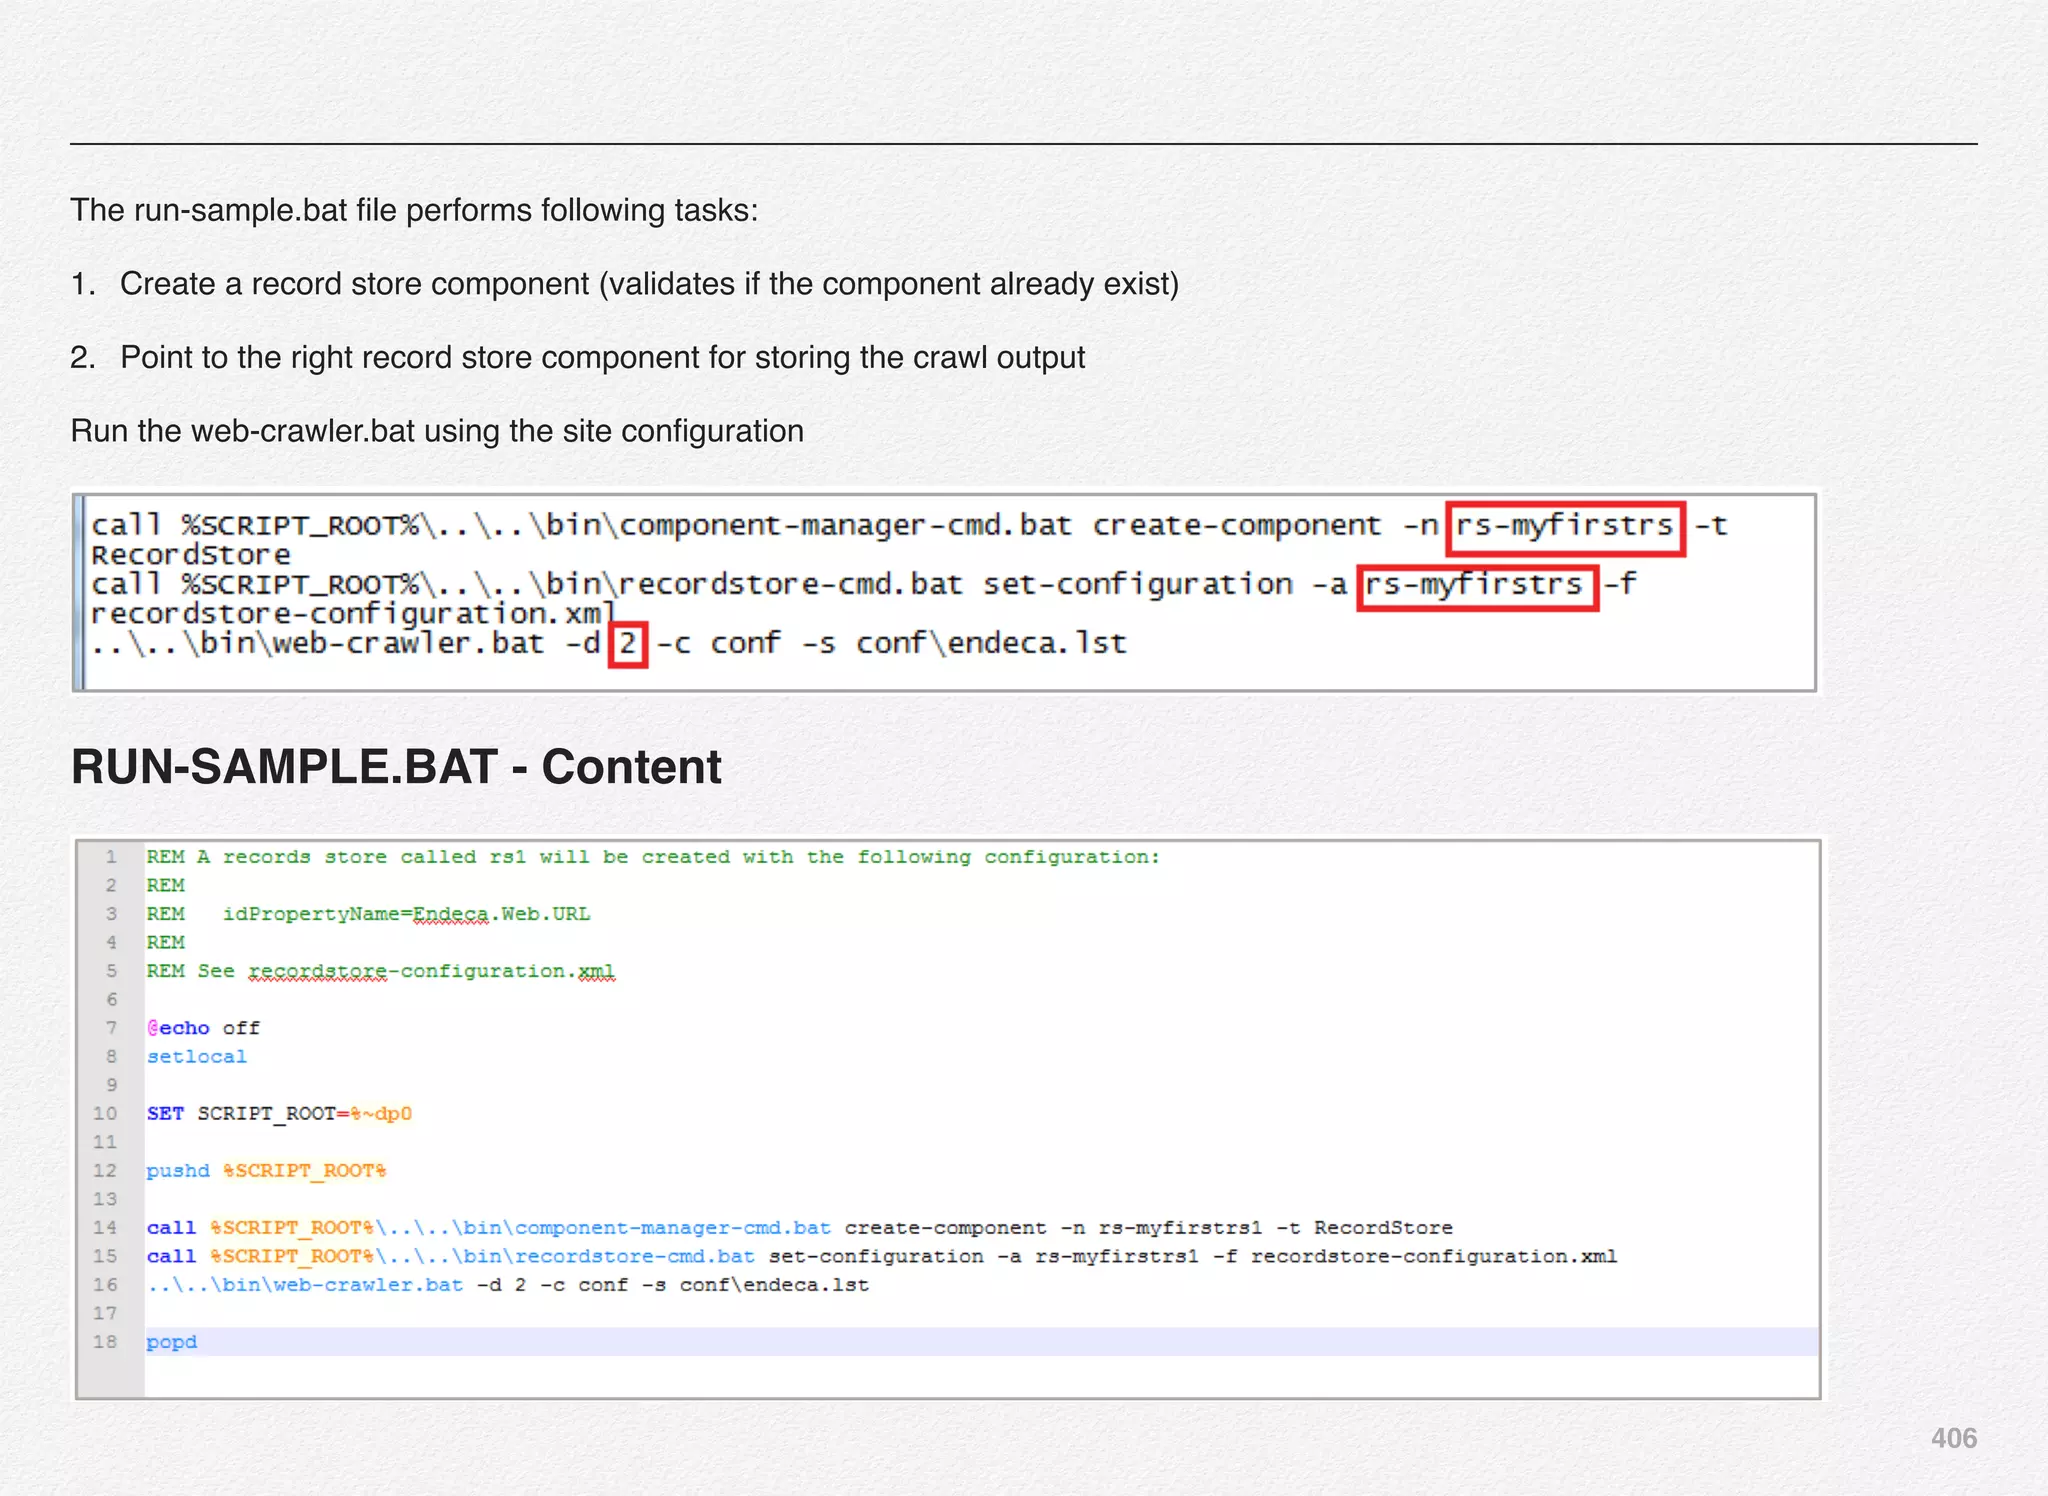
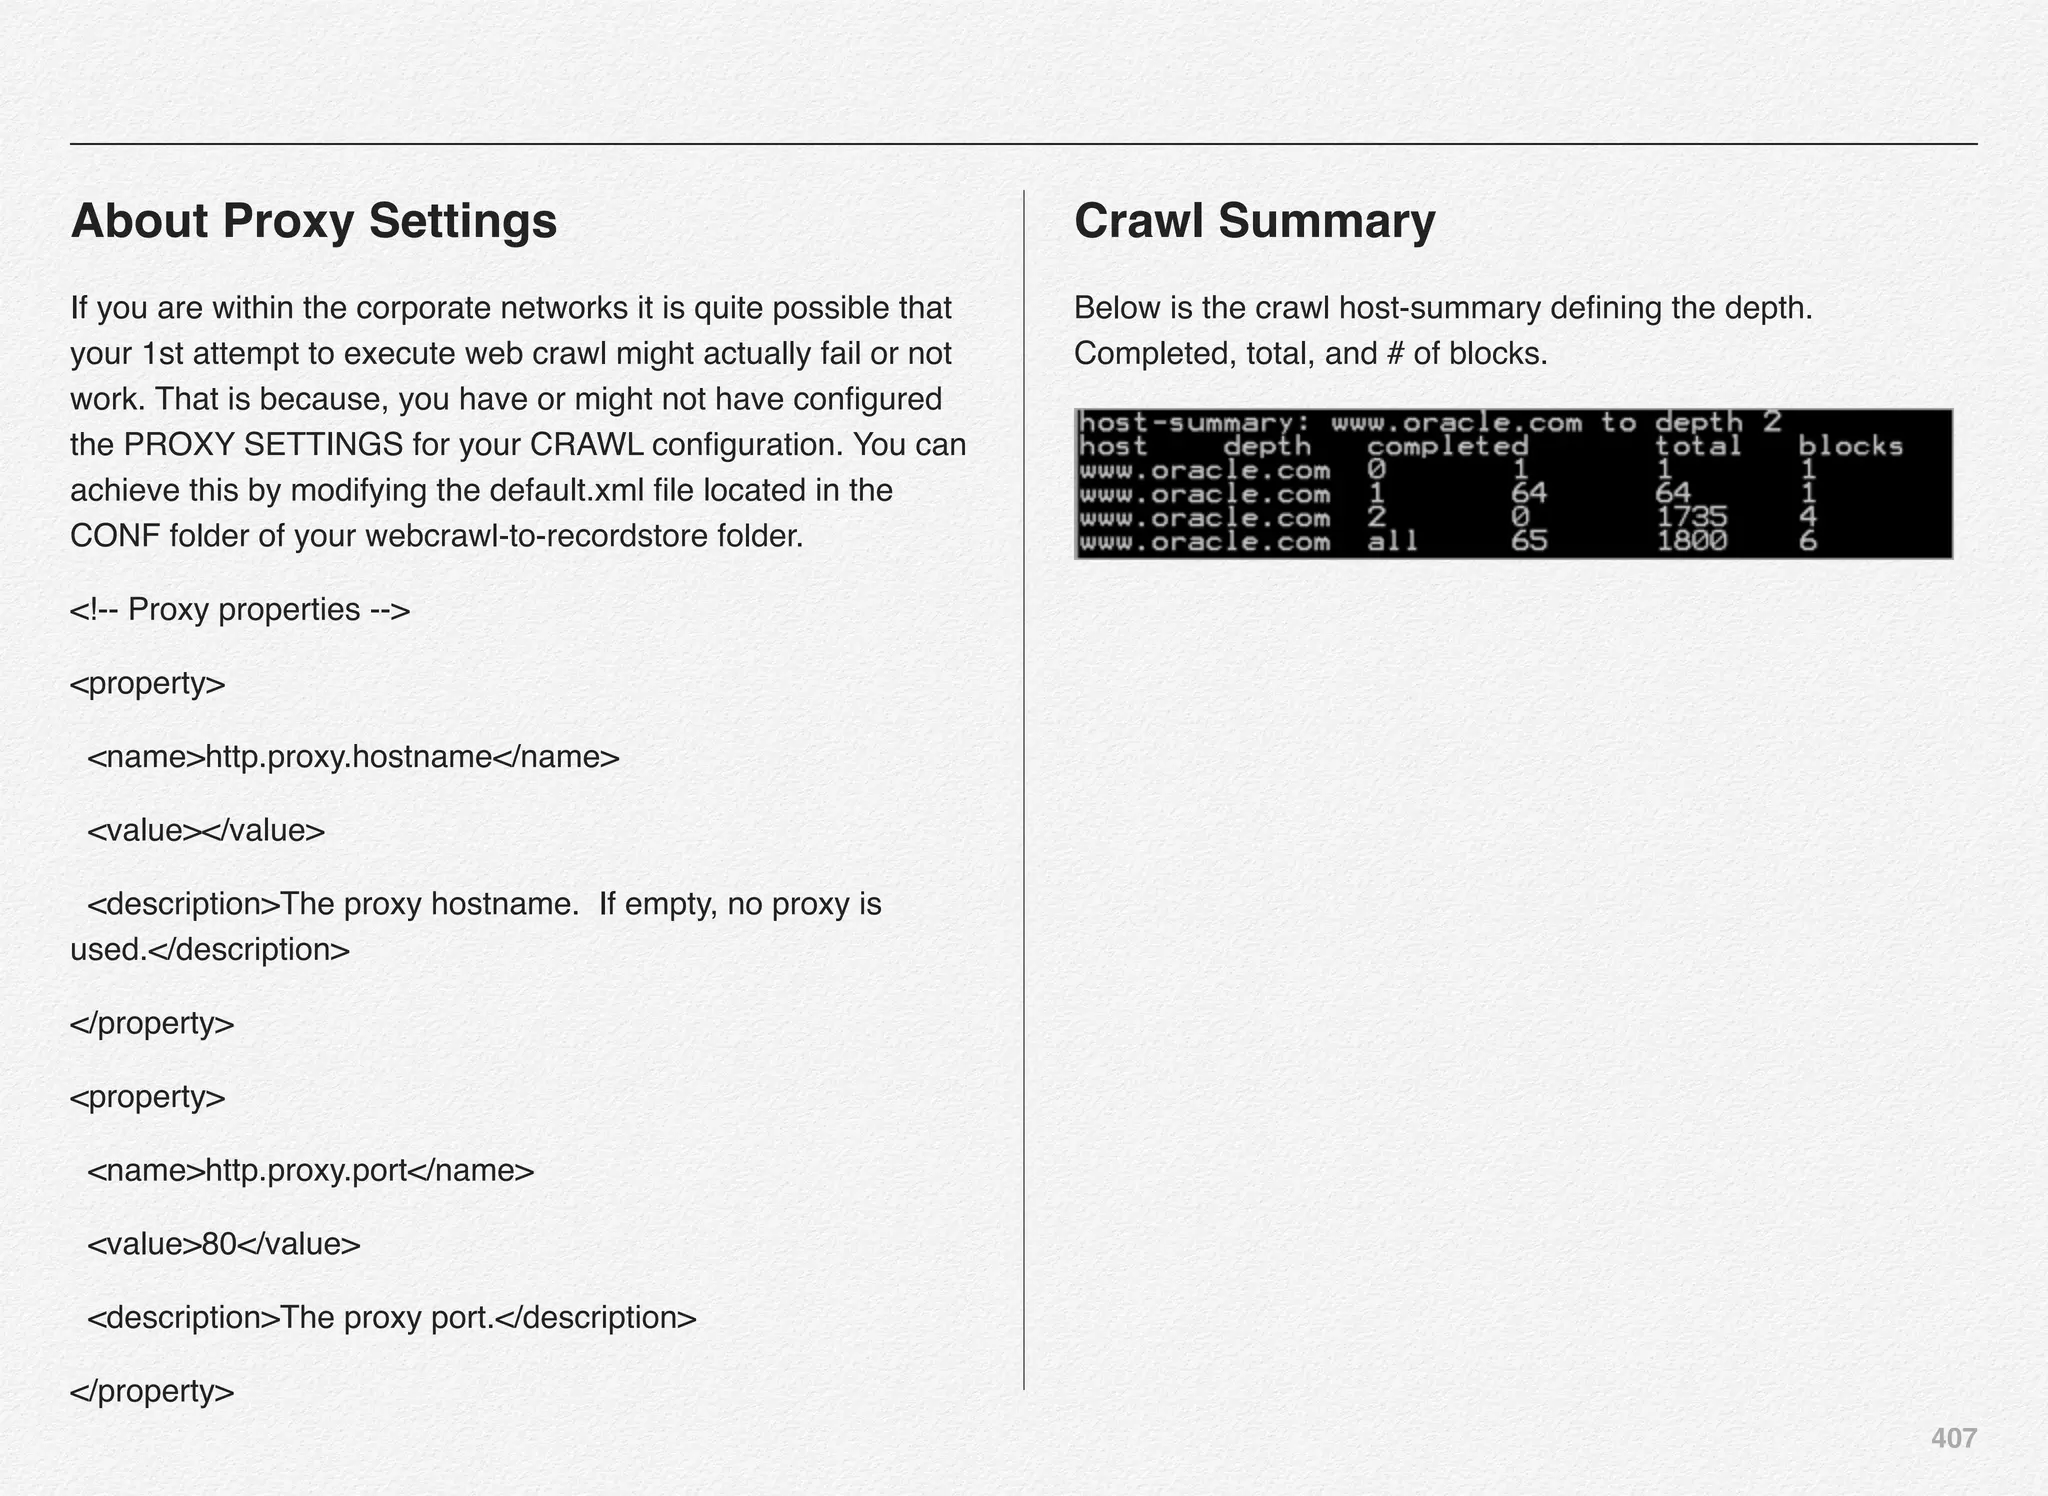
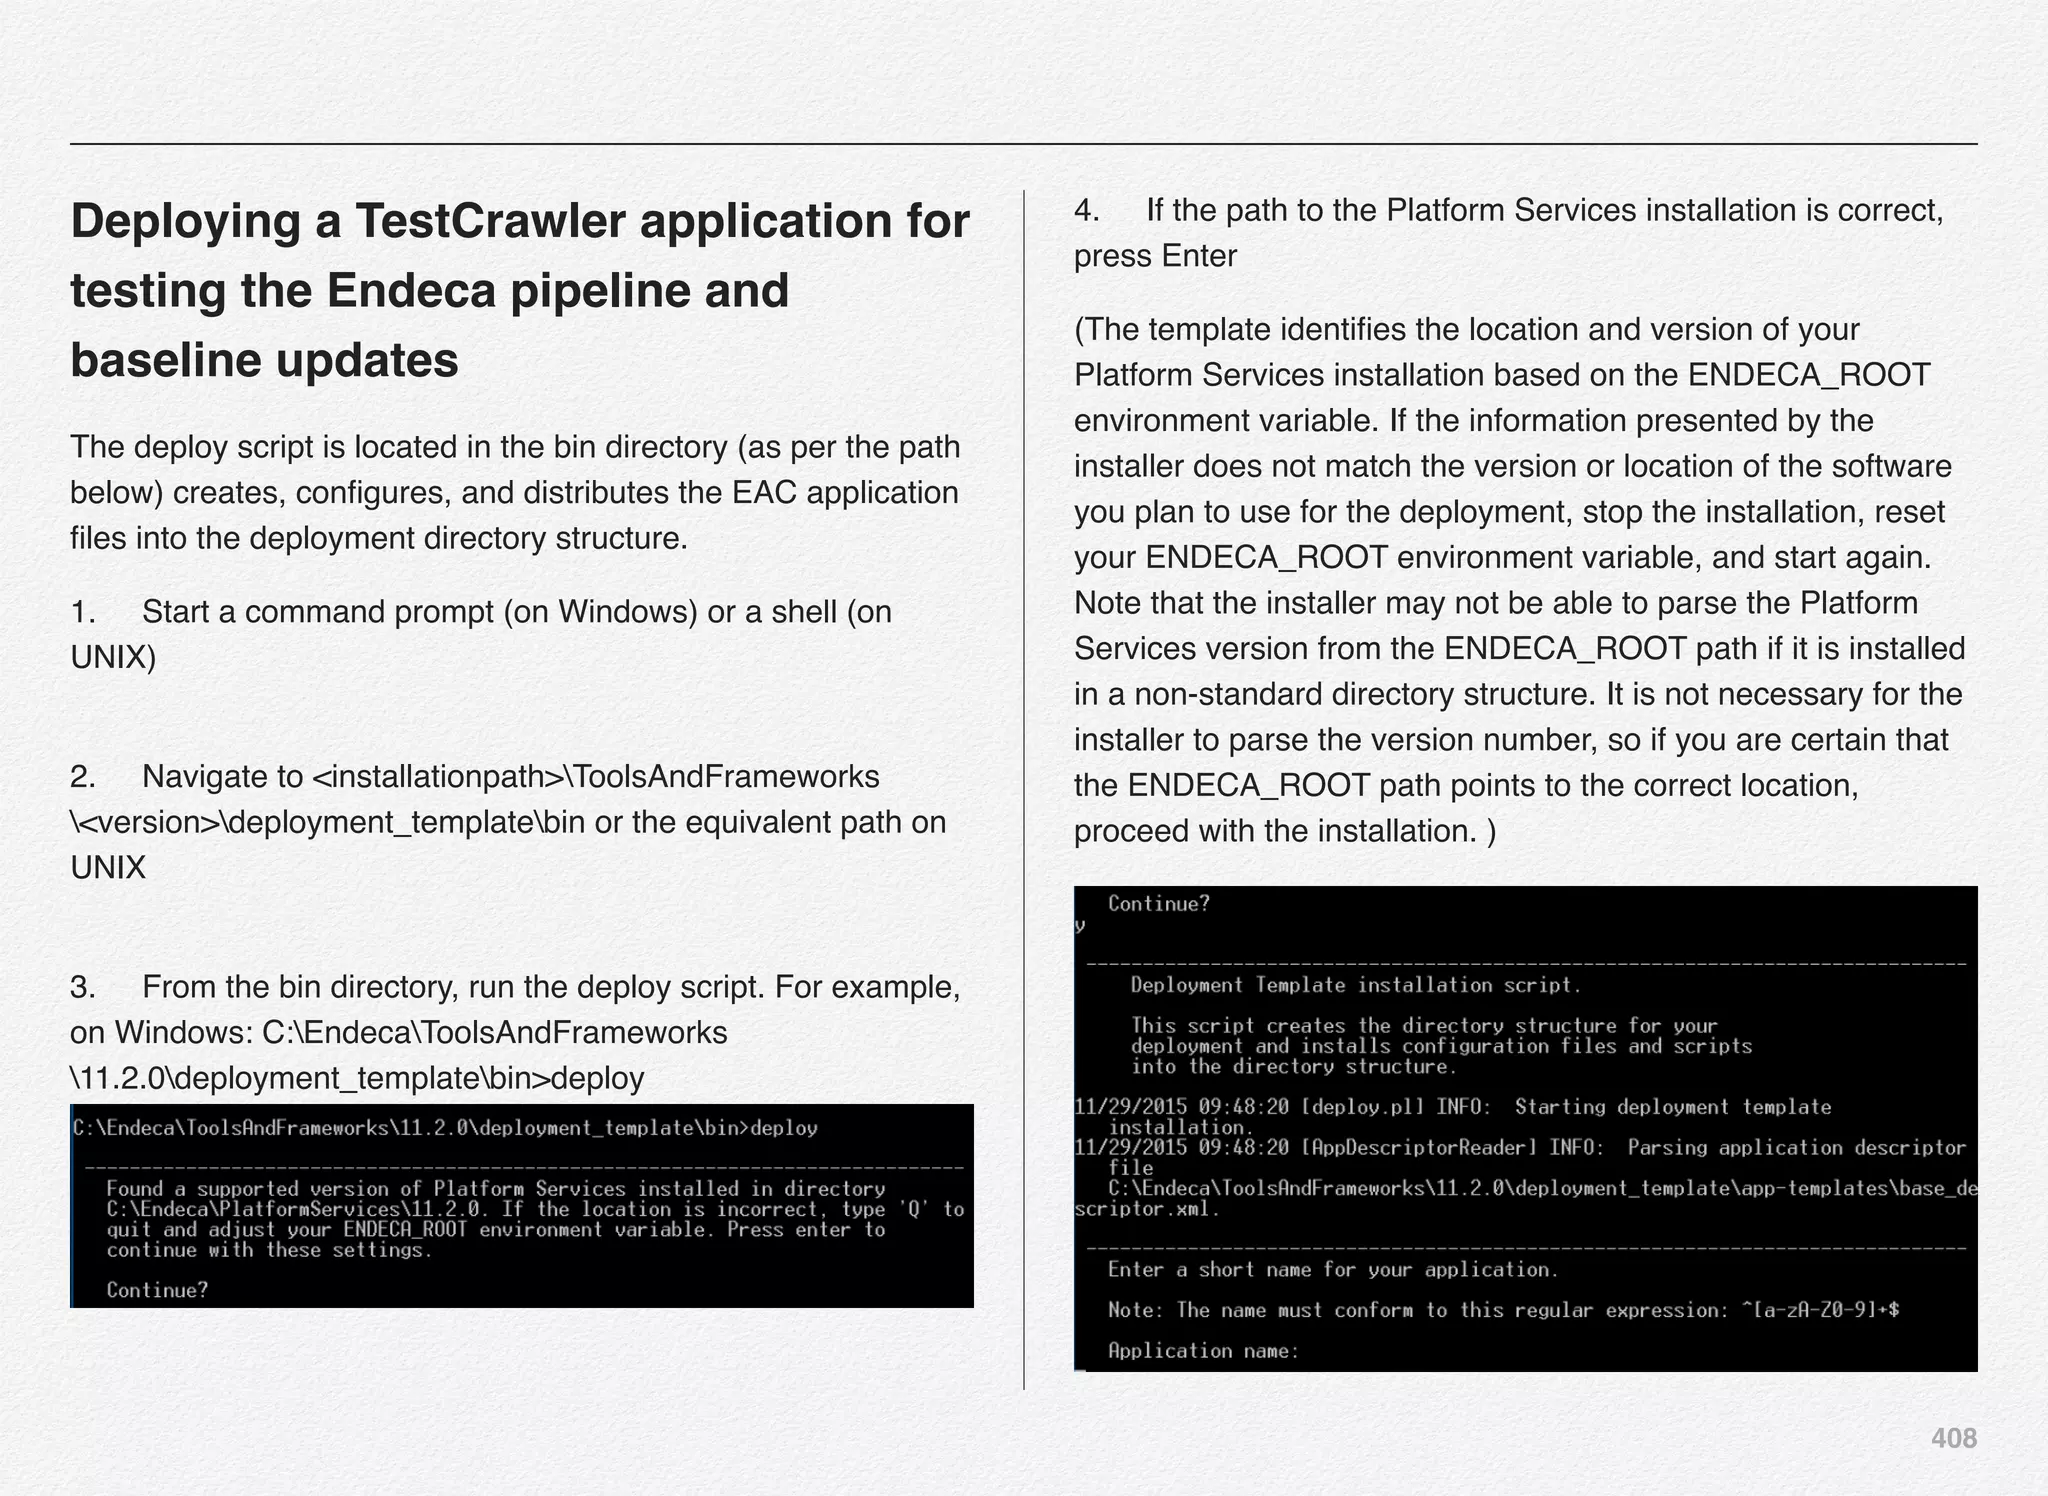
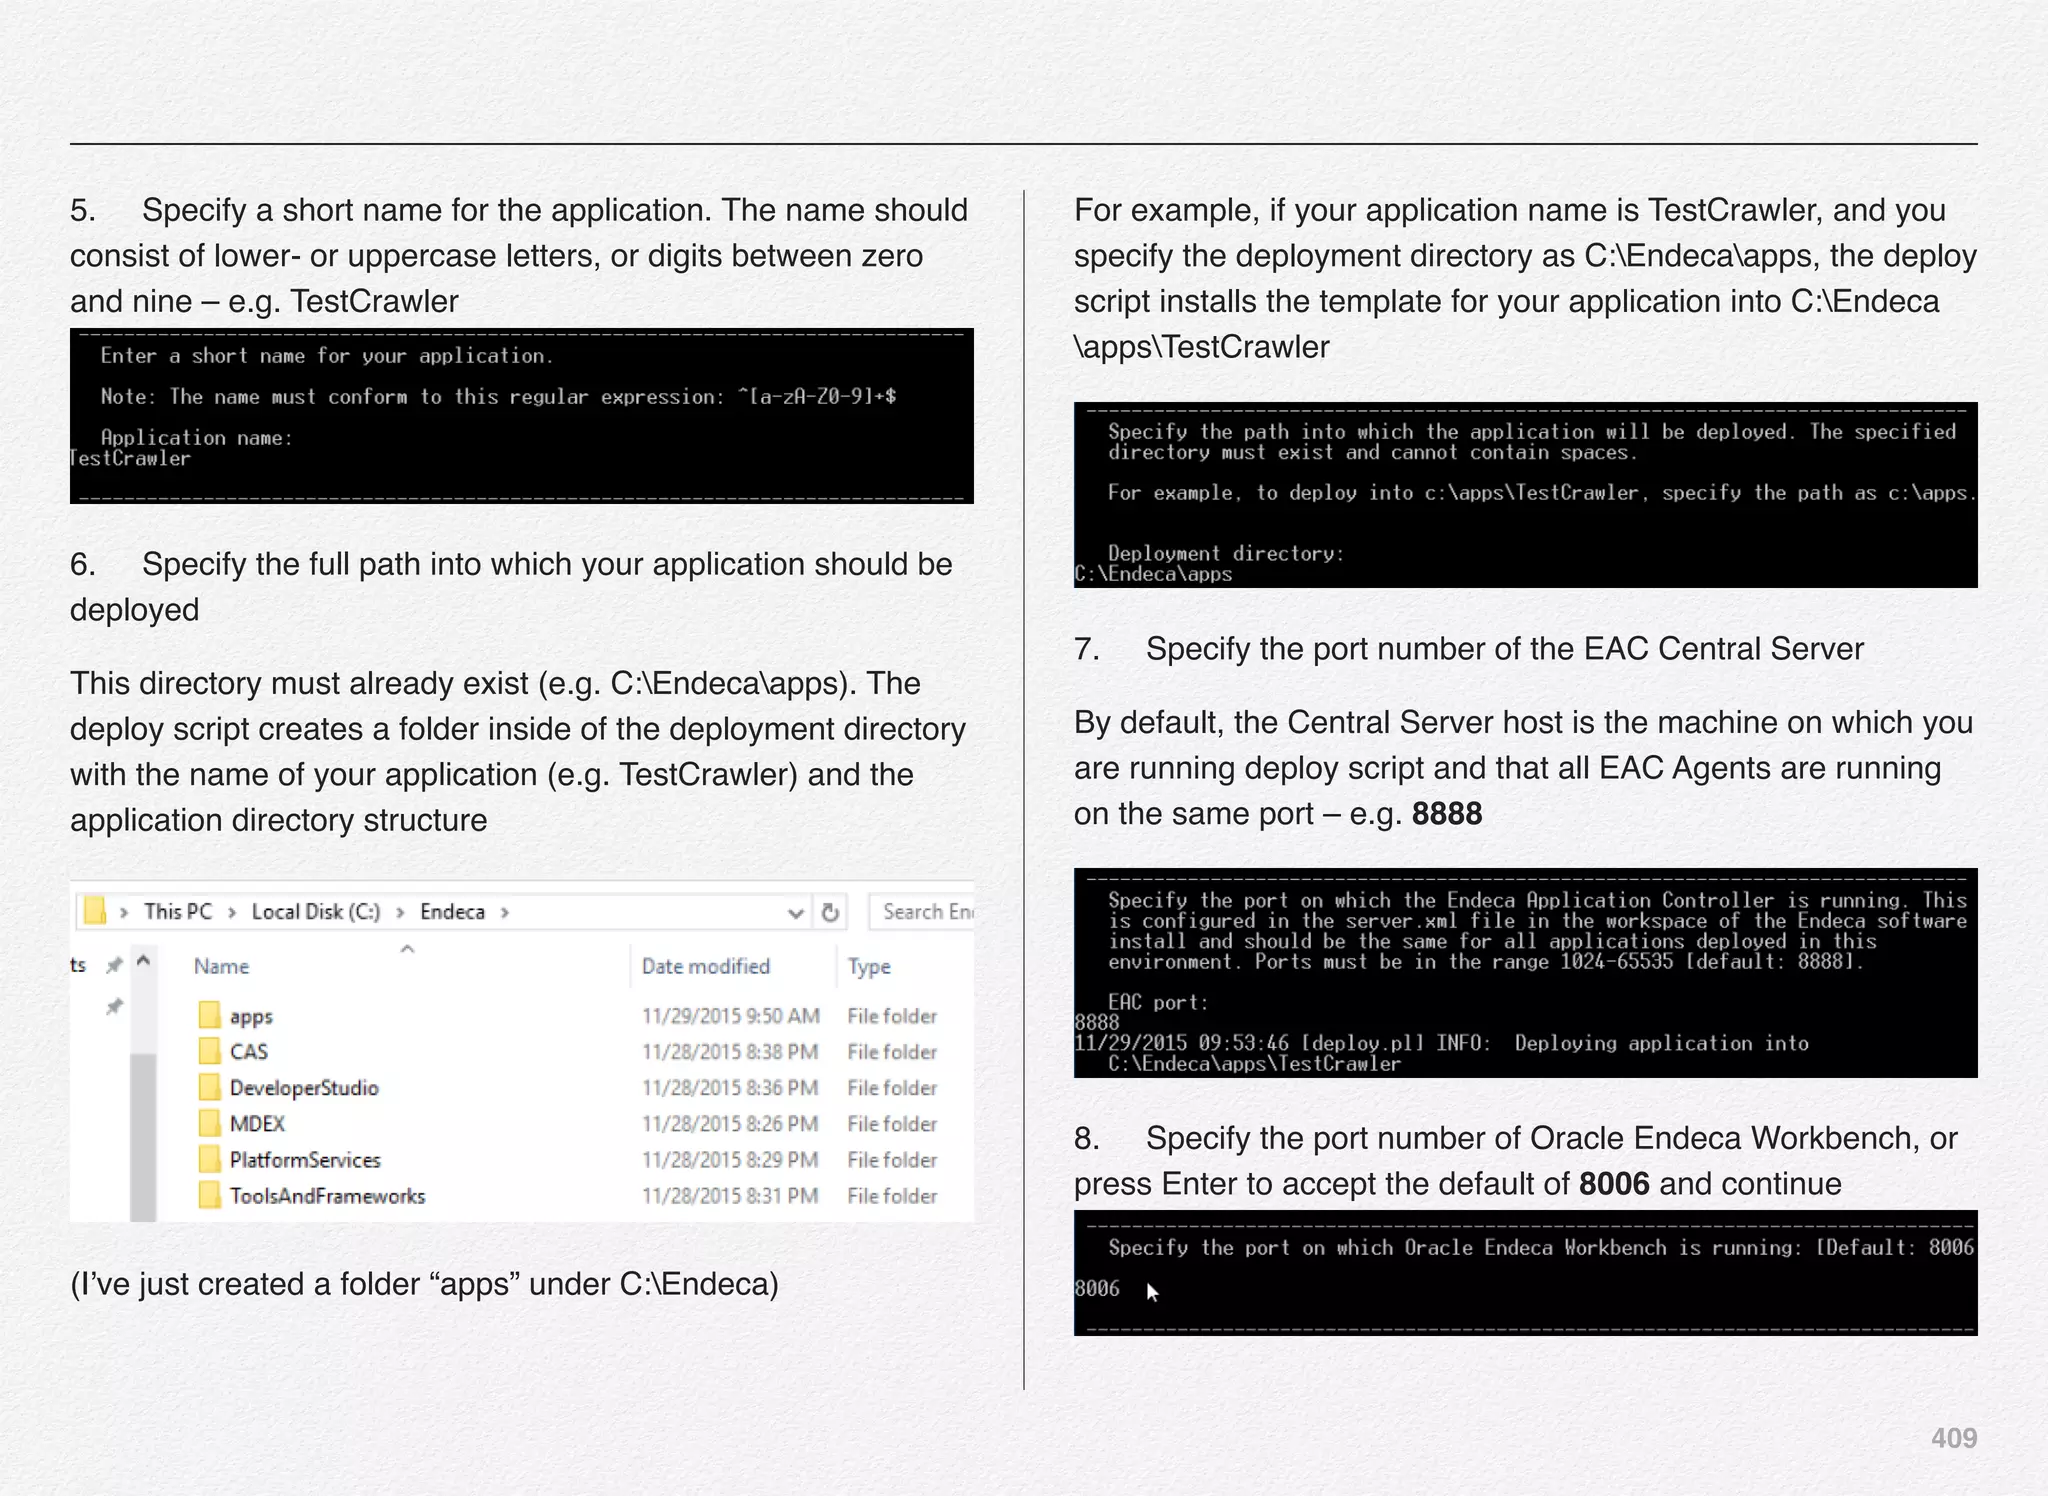

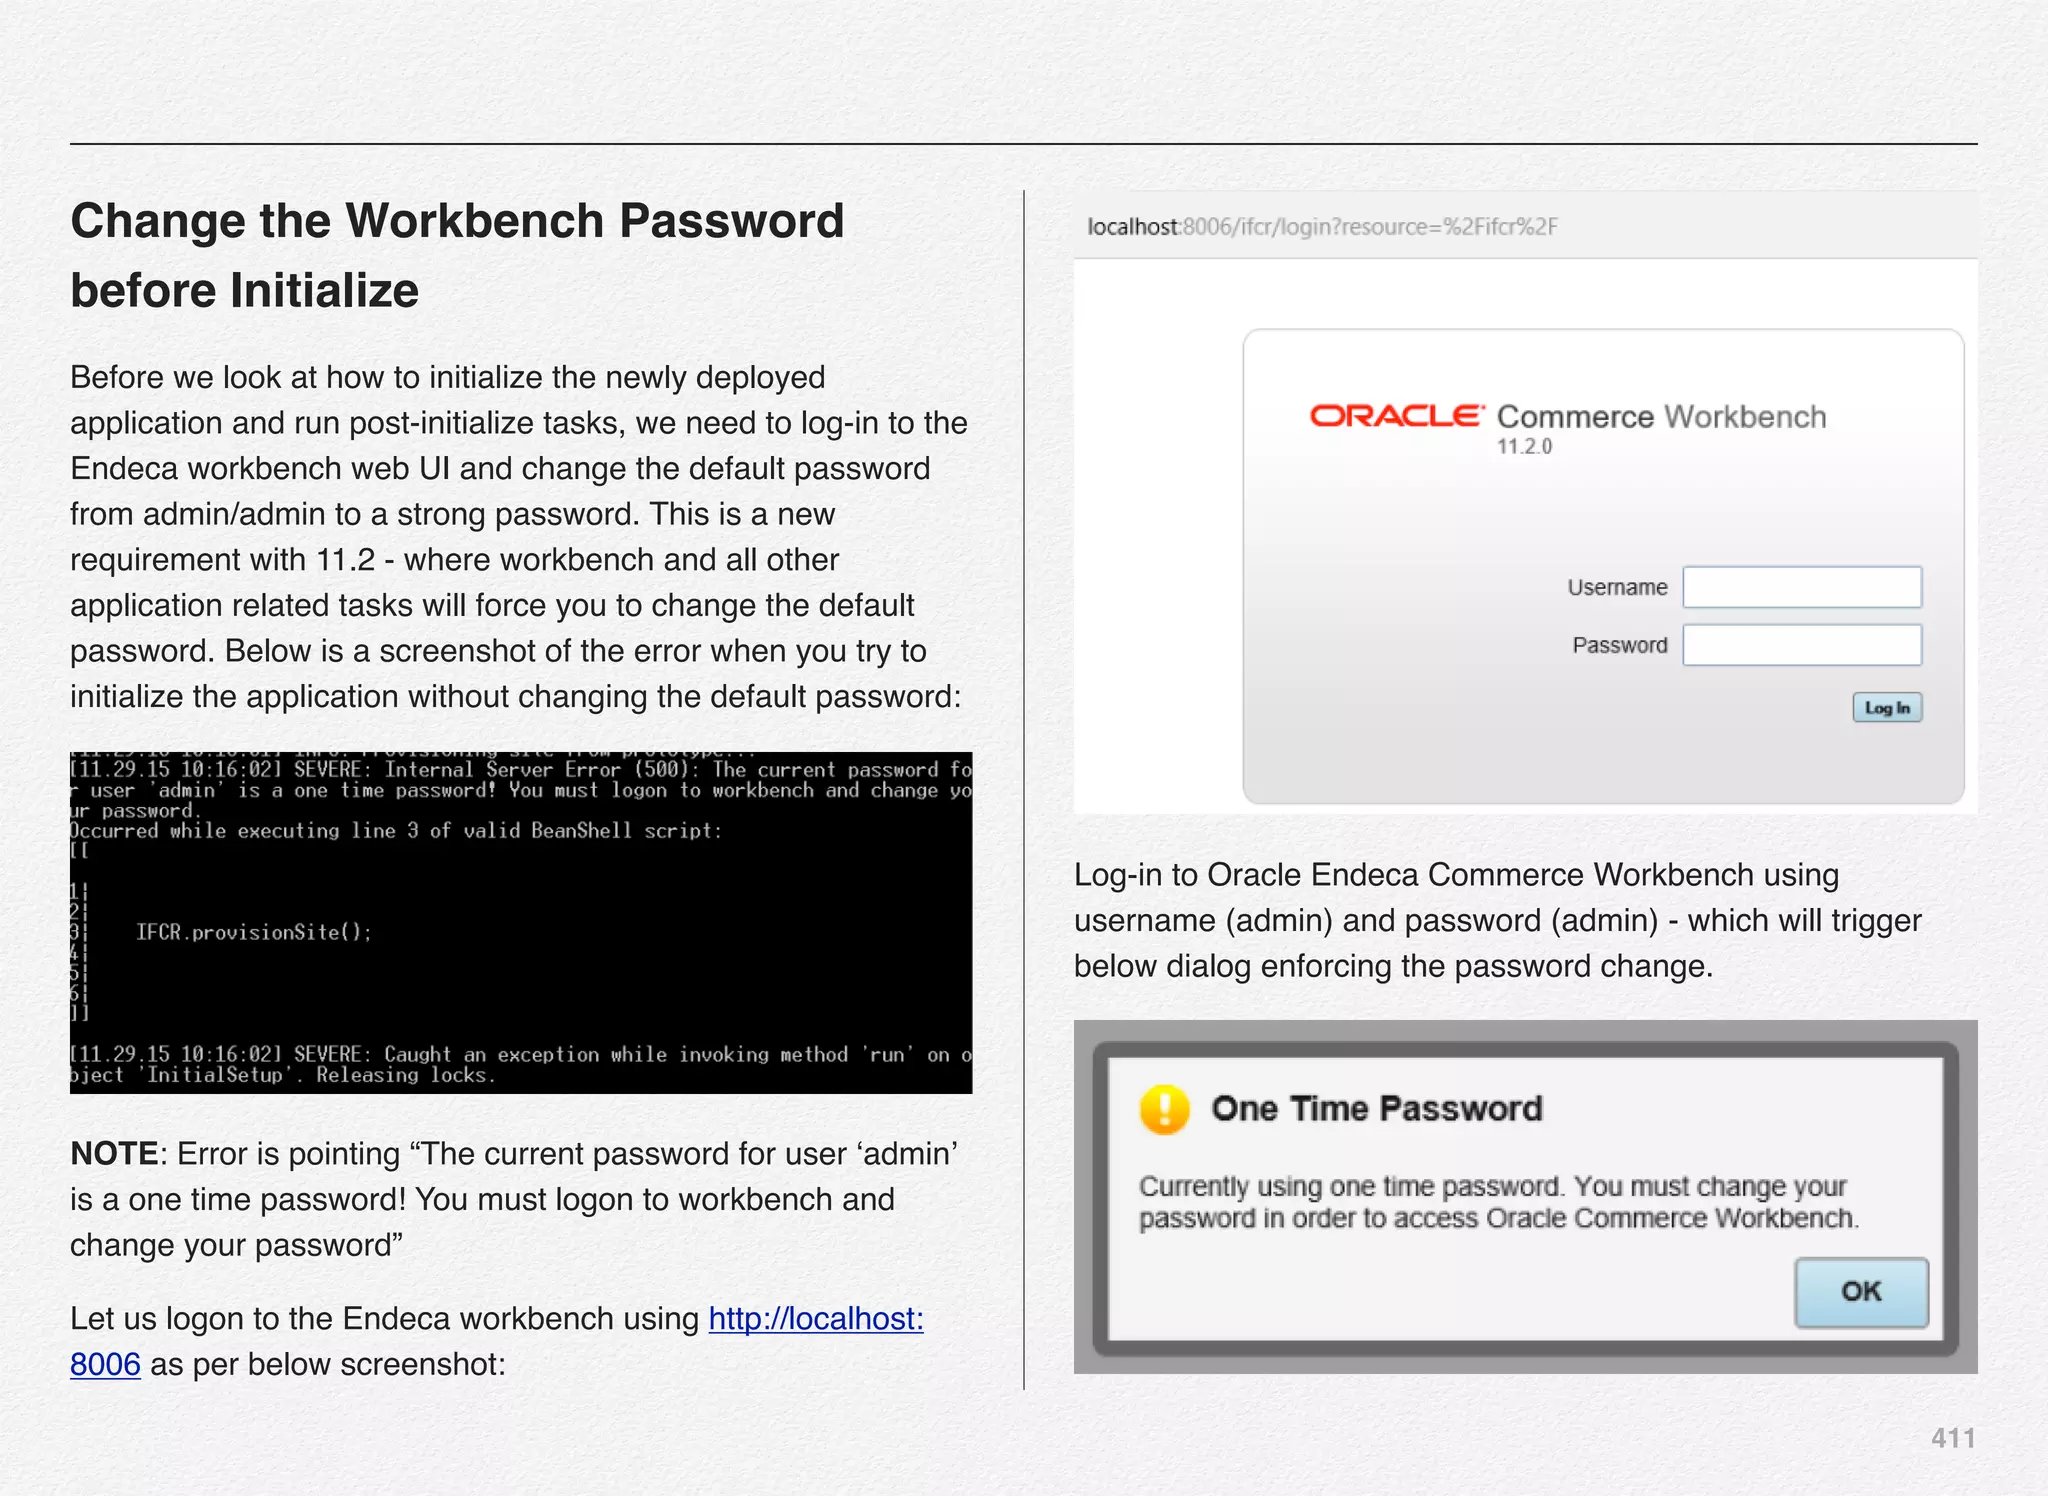
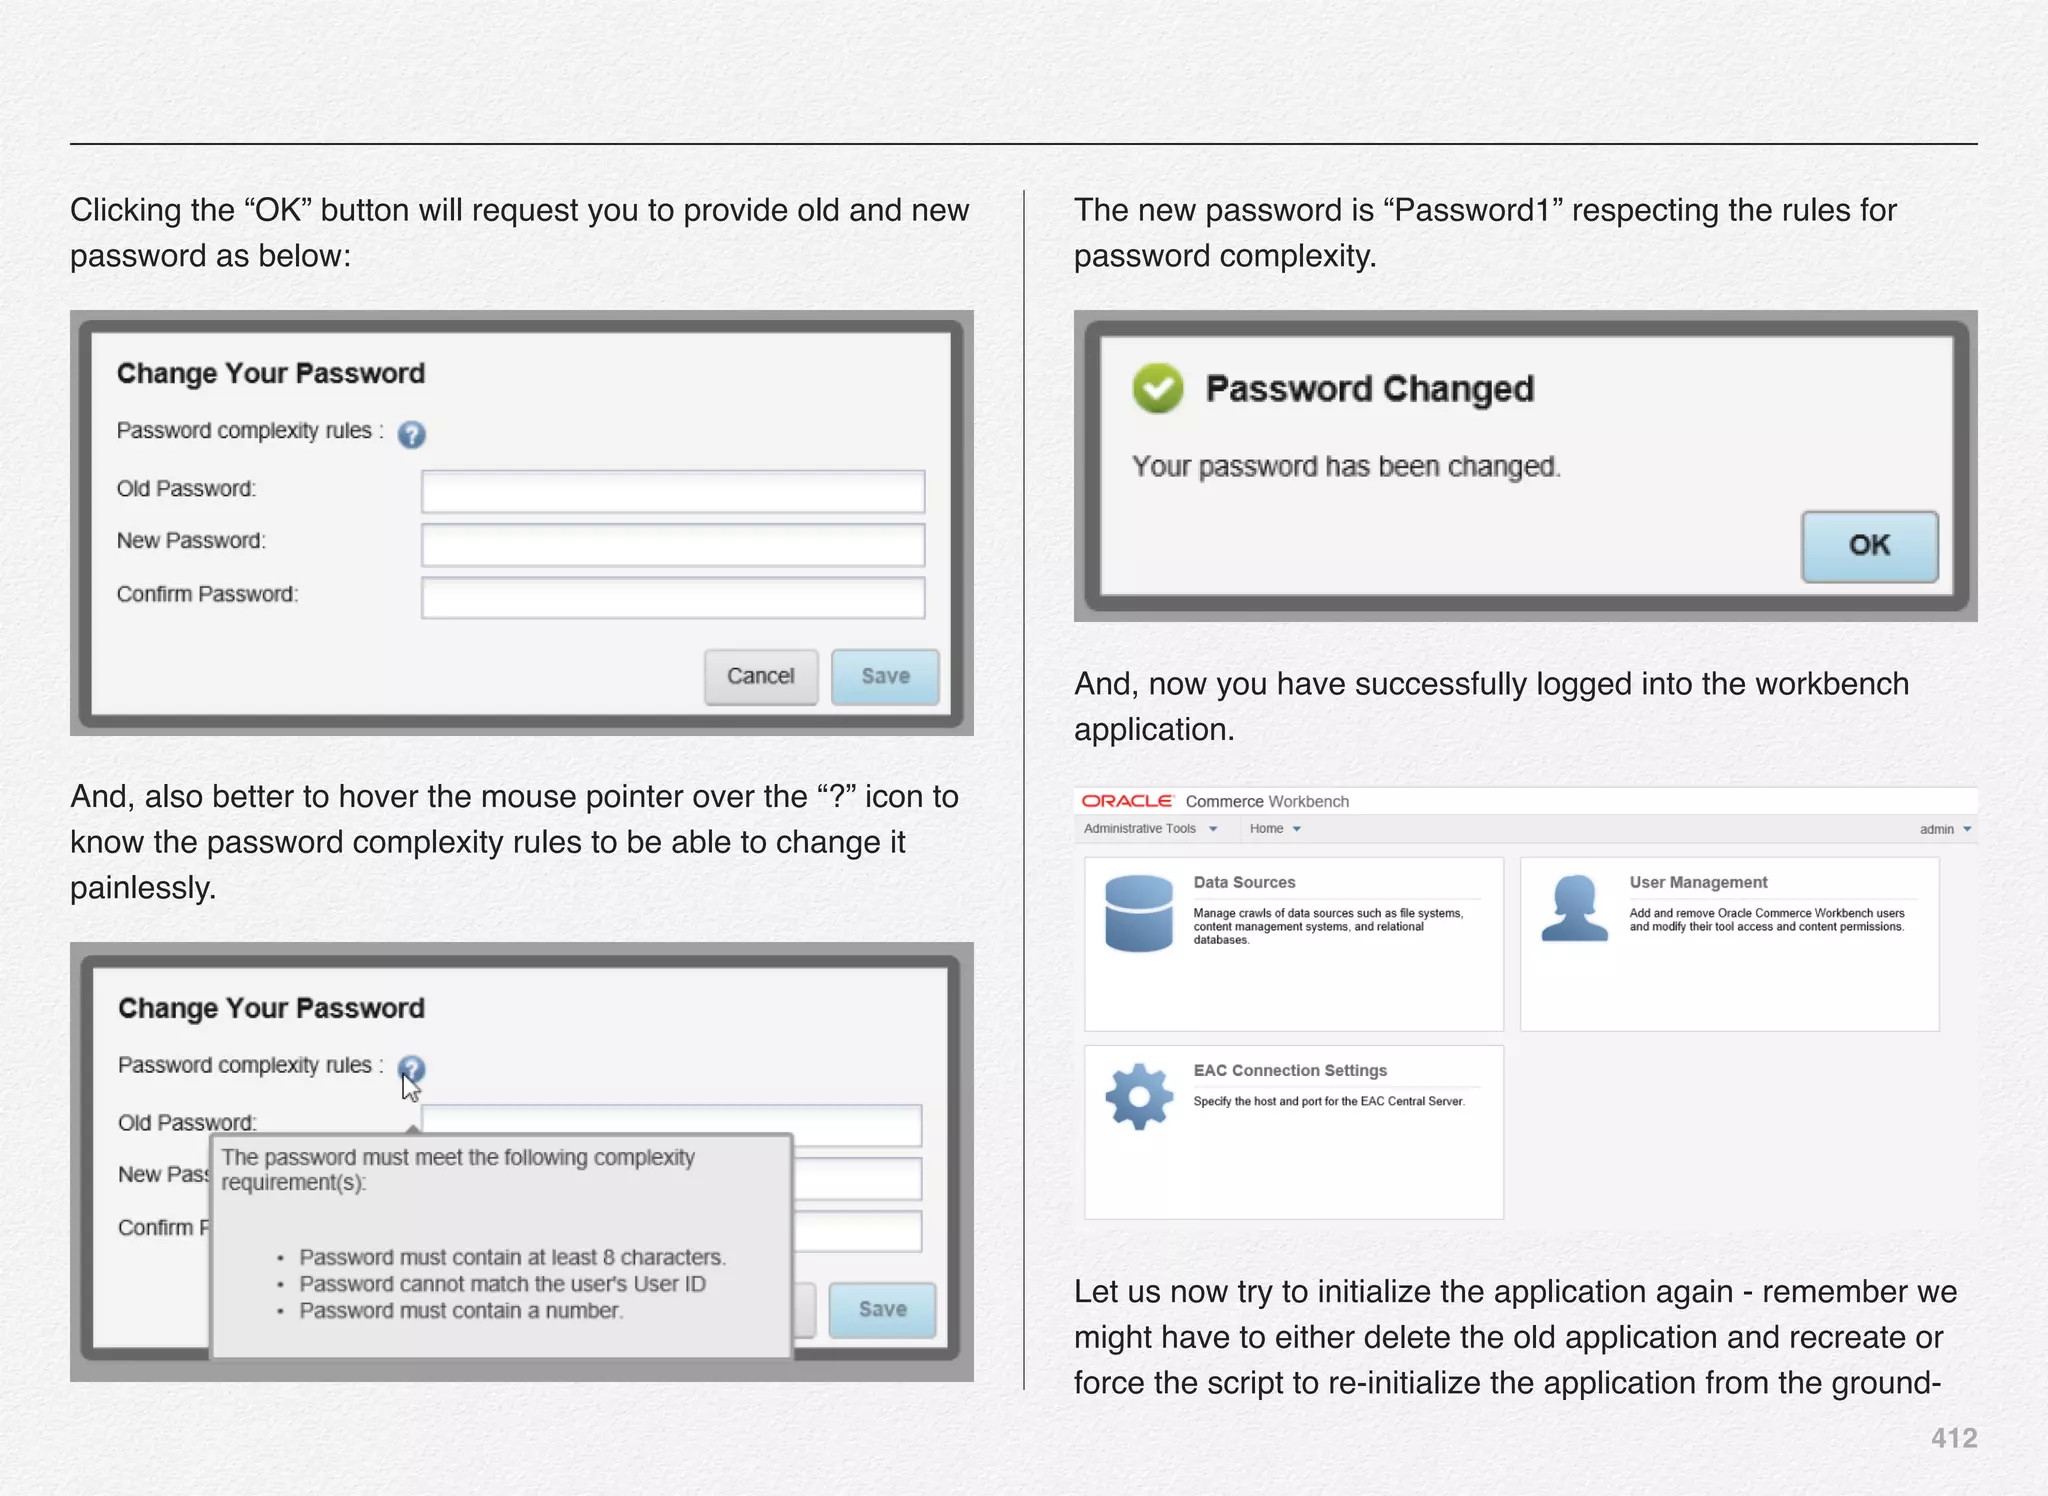
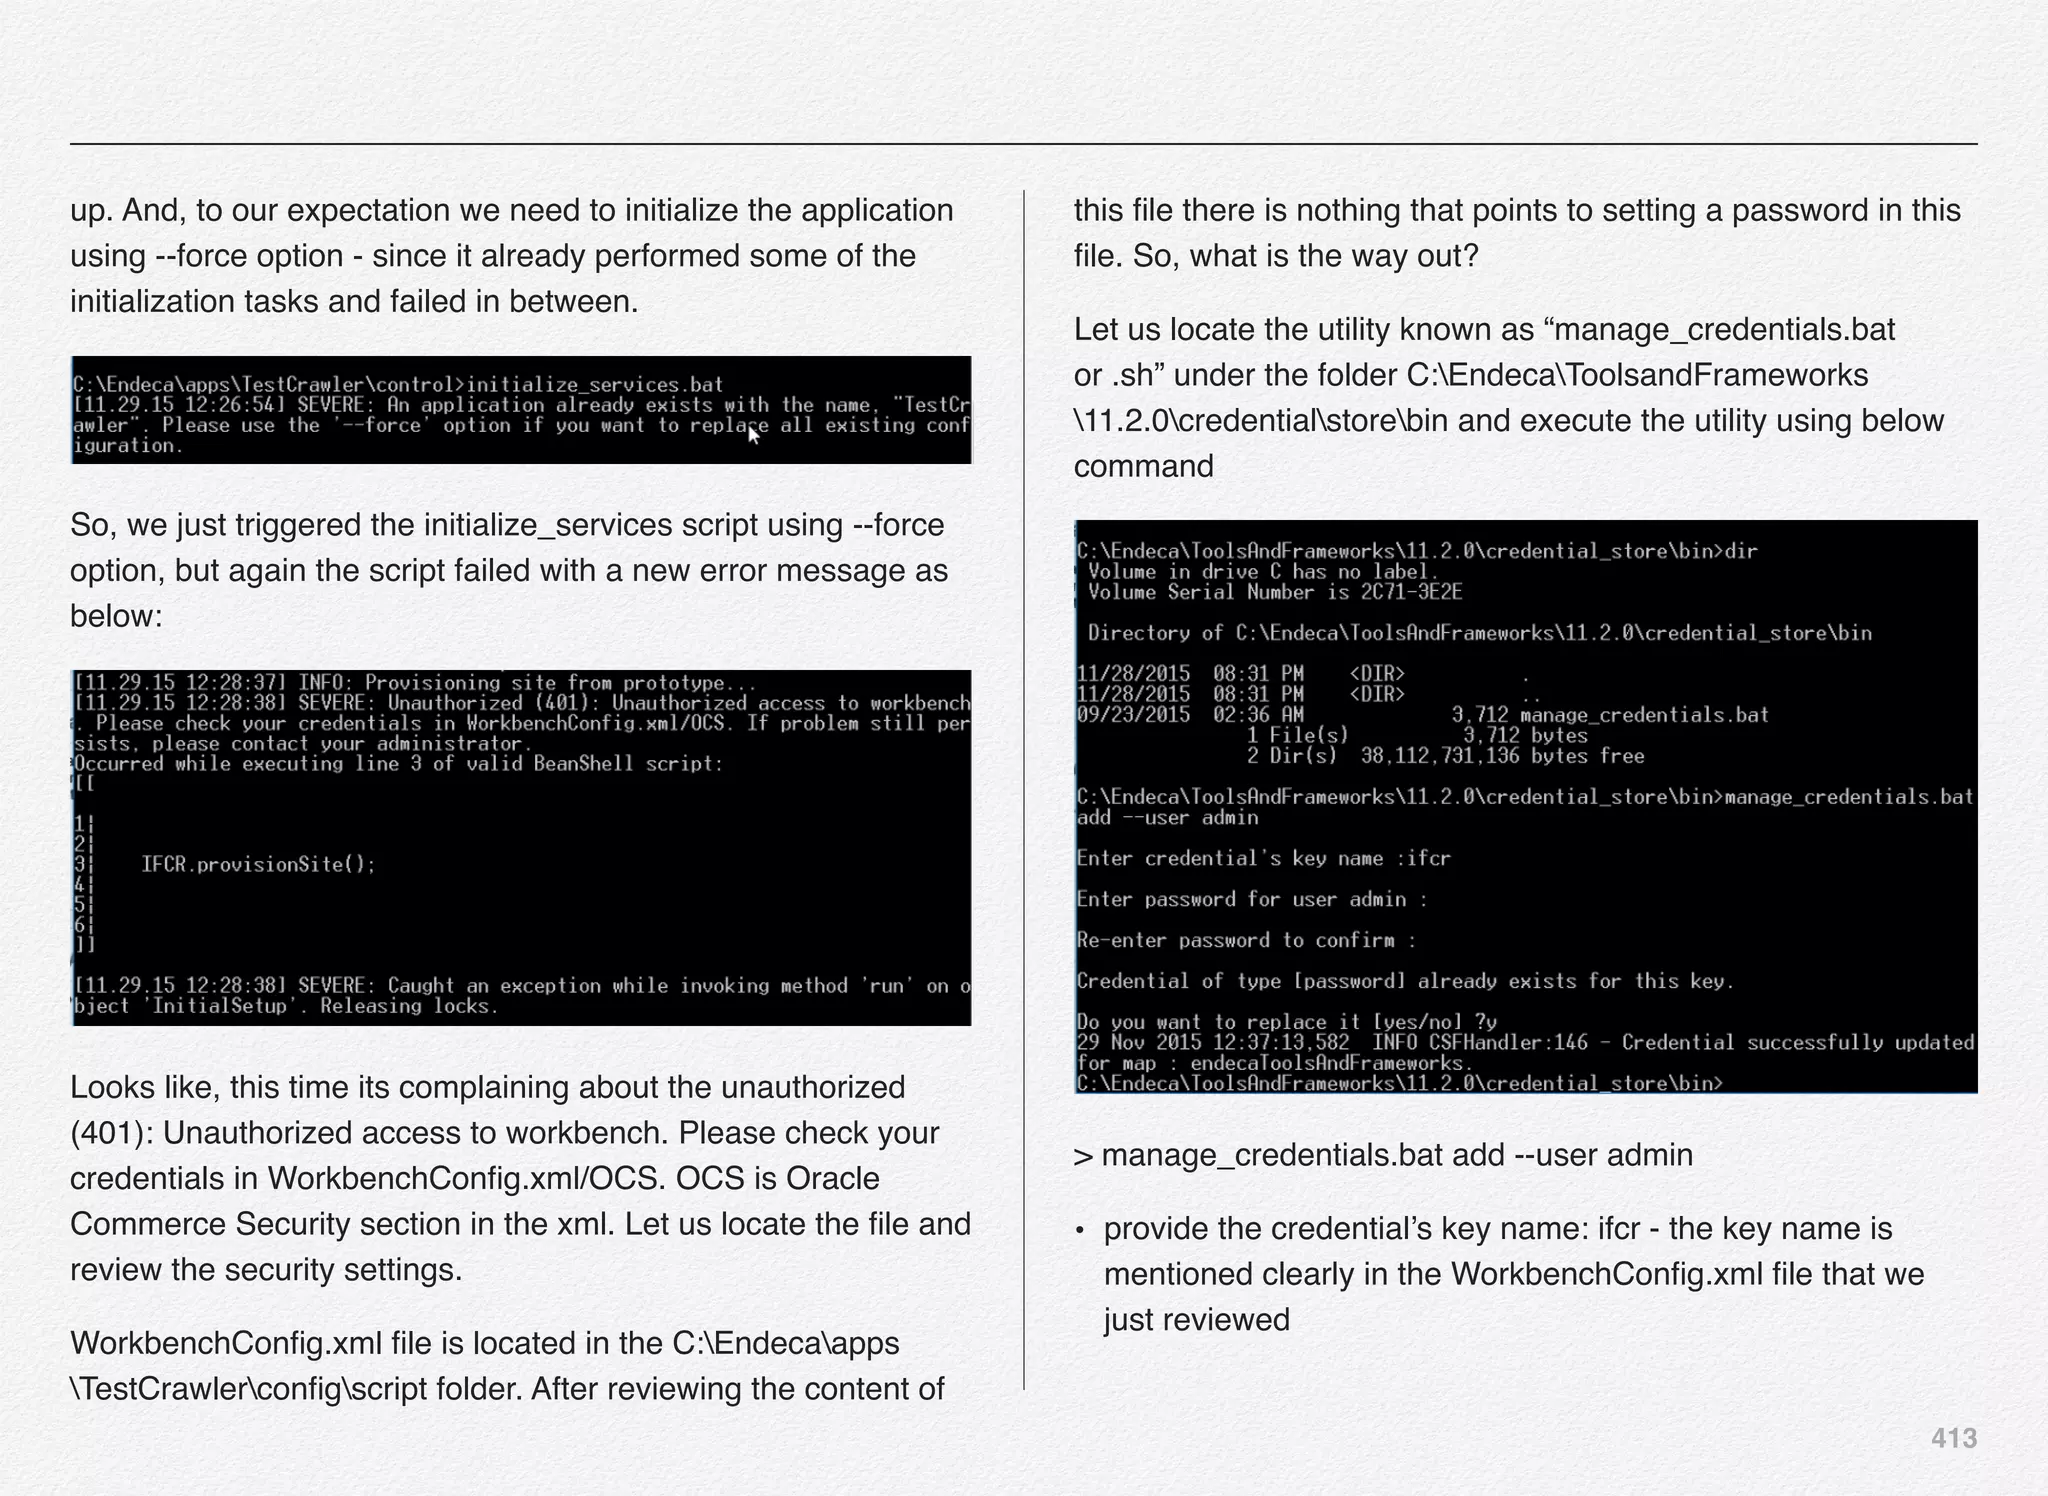
![414
• provide the new password for user admin
• re-enter the password to confirm for user admin
The utility messages that the credential of type [password]
already exists for this key. Do you want to replace it [yes/no]?
Respond “y” to the prompt which will replace the password for
the ifcr key in the credential store.
Initializing the TestCrawler Application
Once the application is deployed to C:Endecaapps folder, you
can check out the structure of the folder by navigating to C:
EndecaappsTestCrawler (TestCrawler is our application
name)
1.! Navigate to the control directory of the newly deployed
application. This is located under your application directory. For
example: C:Endecaapps<app dir>control – e.g. C:Endeca
appsTestCrawlercontrol.
The control folder contains all the initialization, baseline
updates, and other application management scripts that will
help you control the application.](https://image.slidesharecdn.com/oraclecommerce-doityourselfseries-160129151710/75/Oracle-Commerce-Using-ATG-Endeca-Do-It-Yourself-Series-415-2048.jpg)
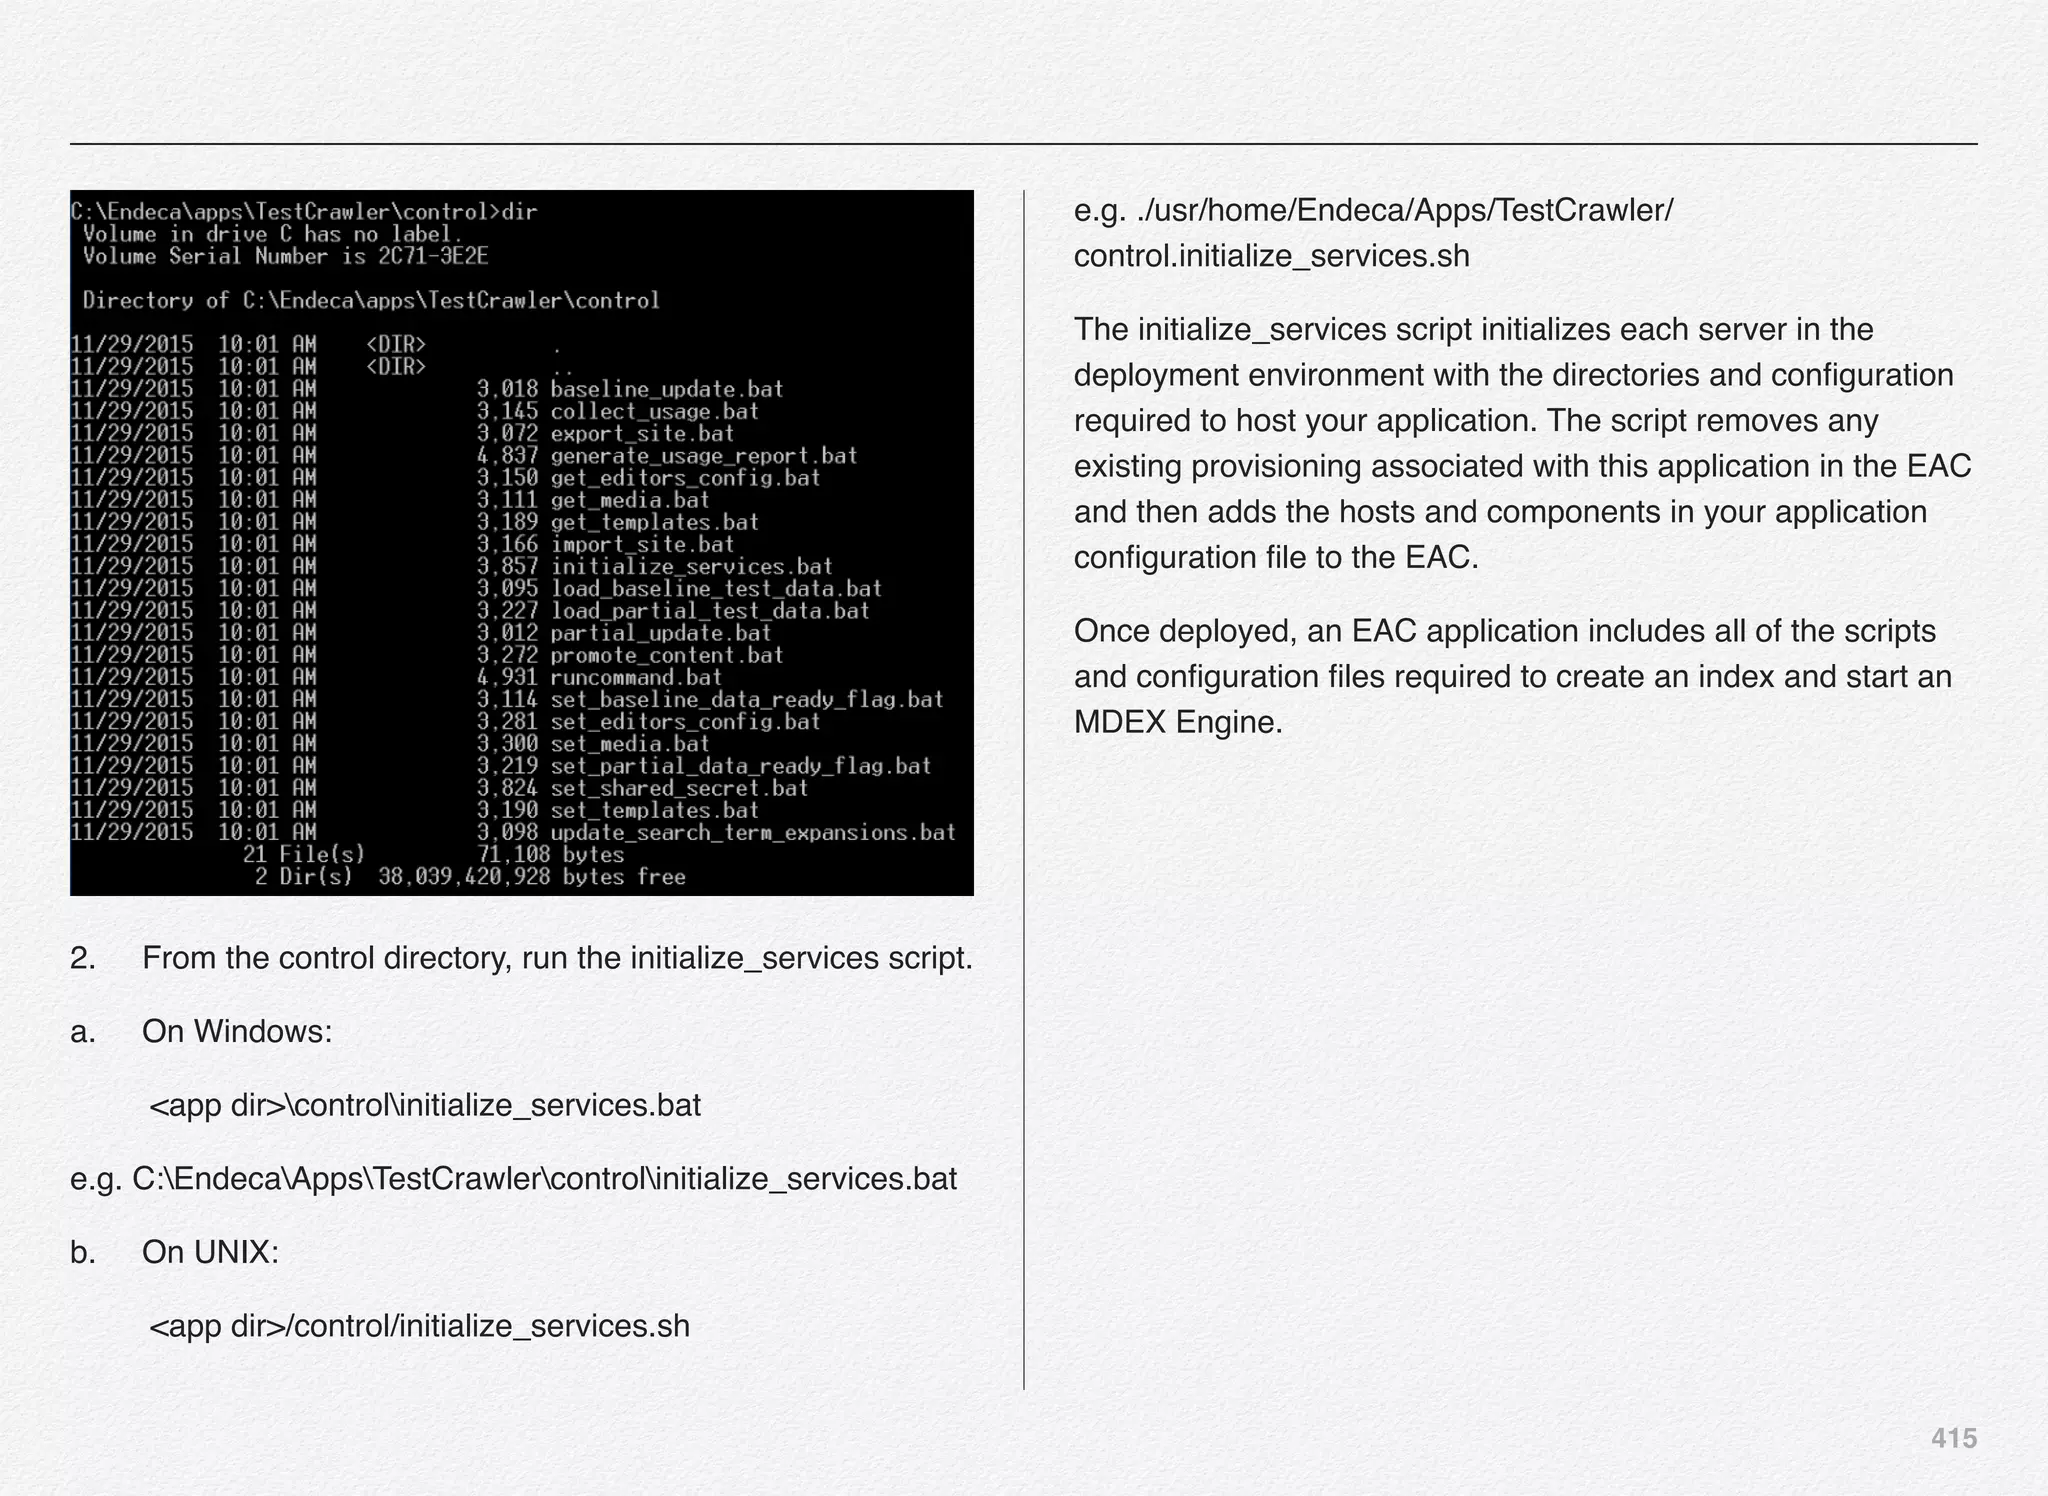
![416
Initialize_services Response
C:EndecaappsTestCrawlercontrol>initialize_services.bat --
force
Removing existing application provisioning...
[11.29.15 12:41:53] INFO: Removing application. Any active
components will be fo
rced to stop.
[11.29.15 12:41:54] INFO: Removing definition for custom
component 'IFCR'.
[11.29.15 12:41:54] INFO: Updating provisioning for host
'ITLHost'.
[11.29.15 12:41:54] INFO: Updating definition for host 'ITLHost'.
[11.29.15 12:41:58] INFO: Removing definition for application
'TestCrawler'.
[11.29.15 12:42:00] INFO: Application 'TestCrawler' removed.
Setting EAC provisioning and performing initial setup...
[11.29.15 12:42:04] INFO: Checking definition from
AppConfig.xml against existin
g EAC provisioning.
[11.29.15 12:42:04] INFO: Setting definition for application
'TestCrawler'.
[11.29.15 12:42:05] INFO: Setting definition for host
'AuthoringMDEXHost'.
[11.29.15 12:42:05] INFO: Setting definition for host
'LiveMDEXHostA'.
[11.29.15 12:42:05] INFO: Setting definition for host
'ReportGenerationHost'.
[11.29.15 12:42:05] INFO: Setting definition for host
'WorkbenchHost'.
[11.29.15 12:42:05] INFO: Setting definition for host 'ITLHost'.
[11.29.15 12:42:05] INFO: Setting definition for component
'AuthoringDgraph'.
[11.29.15 12:42:07] INFO: Setting definition for component
'DgraphA1'.
[11.29.15 12:42:07] INFO: Setting definition for script
'PromoteAuthoringToLive'
.
[11.29.15 12:42:07] INFO: Setting definition for custom
component 'IFCR'.](https://image.slidesharecdn.com/oraclecommerce-doityourselfseries-160129151710/75/Oracle-Commerce-Using-ATG-Endeca-Do-It-Yourself-Series-417-2048.jpg)
![417
[11.29.15 12:42:07] INFO: Updating provisioning for host
'ITLHost'.
[11.29.15 12:42:07] INFO: Updating definition for host 'ITLHost'.
[11.29.15 12:42:07] INFO: [ITLHost] Starting shell utility
'mkpath_-'.
[11.29.15 12:42:09] INFO: Setting definition for component
'LogServer'.
[11.29.15 12:42:09] INFO: Setting definition for script
'DaySoFarReports'.
[11.29.15 12:42:09] INFO: Setting definition for script
'DailyReports'.
[11.29.15 12:42:09] INFO: Setting definition for script
'WeeklyReports'.
[11.29.15 12:42:09] INFO: Setting definition for script
'DaySoFarHtmlReports'.
[11.29.15 12:42:09] INFO: Setting definition for script
'DailyHtmlReports'.
[11.29.15 12:42:09] INFO: Setting definition for script
'WeeklyHtmlReports'.
[11.29.15 12:42:09] INFO: Setting definition for component
'WeeklyReportGenerato
r'.
[11.29.15 12:42:09] INFO: Setting definition for component
'DailyReportGenerator
'.
[11.29.15 12:42:10] INFO: Setting definition for component
'DaySoFarReportGenera
tor'.
[11.29.15 12:42:10] INFO: Setting definition for component
'WeeklyHtmlReportGene
rator'.
[11.29.15 12:42:10] INFO: Setting definition for component
'DailyHtmlReportGener
ator'.
[11.29.15 12:42:10] INFO: Setting definition for component
'DaySoFarHtmlReportGe
nerator'.](https://image.slidesharecdn.com/oraclecommerce-doityourselfseries-160129151710/75/Oracle-Commerce-Using-ATG-Endeca-Do-It-Yourself-Series-418-2048.jpg)
![418
[11.29.15 12:42:10] INFO: Setting definition for script
'BaselineUpdate'.
[11.29.15 12:42:10] INFO: Setting definition for script
'PartialUpdate'.
[11.29.15 12:42:10] INFO: Setting definition for component
'Forge'.
[11.29.15 12:42:11] INFO: Setting definition for component
'PartialForge'.
[11.29.15 12:42:11] INFO: Setting definition for component
'Dgidx'.
[11.29.15 12:42:11] INFO: Definition updated.
[11.29.15 12:42:11] INFO: Provisioning site from prototype...
[11.29.15 12:42:13] INFO: Finished provisioning site from
prototype.
Finished updating EAC.
Importing content using public format...
[11.29.15 12:42:16] INFO: Checking definition from
AppConfig.xml against existin
g EAC provisioning.
[11.29.15 12:42:18] INFO: Definition has not changed.
[11.29.15 12:42:19] INFO: Packaging contents for upload...
[11.29.15 12:42:20] INFO: Finished packaging contents.
[11.29.15 12:42:20] INFO: Uploading contents to: http://
DESKTOP-11BE6VH:8006/ifc
r/sites/TestCrawler/pages
[11.29.15 12:42:21] INFO: Finished uploading contents.
Importing content using legacy format...
[11.29.15 12:42:24] INFO: Checking definition from
AppConfig.xml against existin
g EAC provisioning.
[11.29.15 12:42:25] INFO: Definition has not changed.
[11.29.15 12:42:26] INFO: Packaging contents for upload...
[11.29.15 12:42:26] INFO: Finished packaging contents.
[11.29.15 12:42:26] INFO: Uploading contents to: http://
DESKTOP-11BE6VH:8006/ifc
r/sites/TestCrawler
[11.29.15 12:42:27] INFO: Finished uploading contents.](https://image.slidesharecdn.com/oraclecommerce-doityourselfseries-160129151710/75/Oracle-Commerce-Using-ATG-Endeca-Do-It-Yourself-Series-419-2048.jpg)
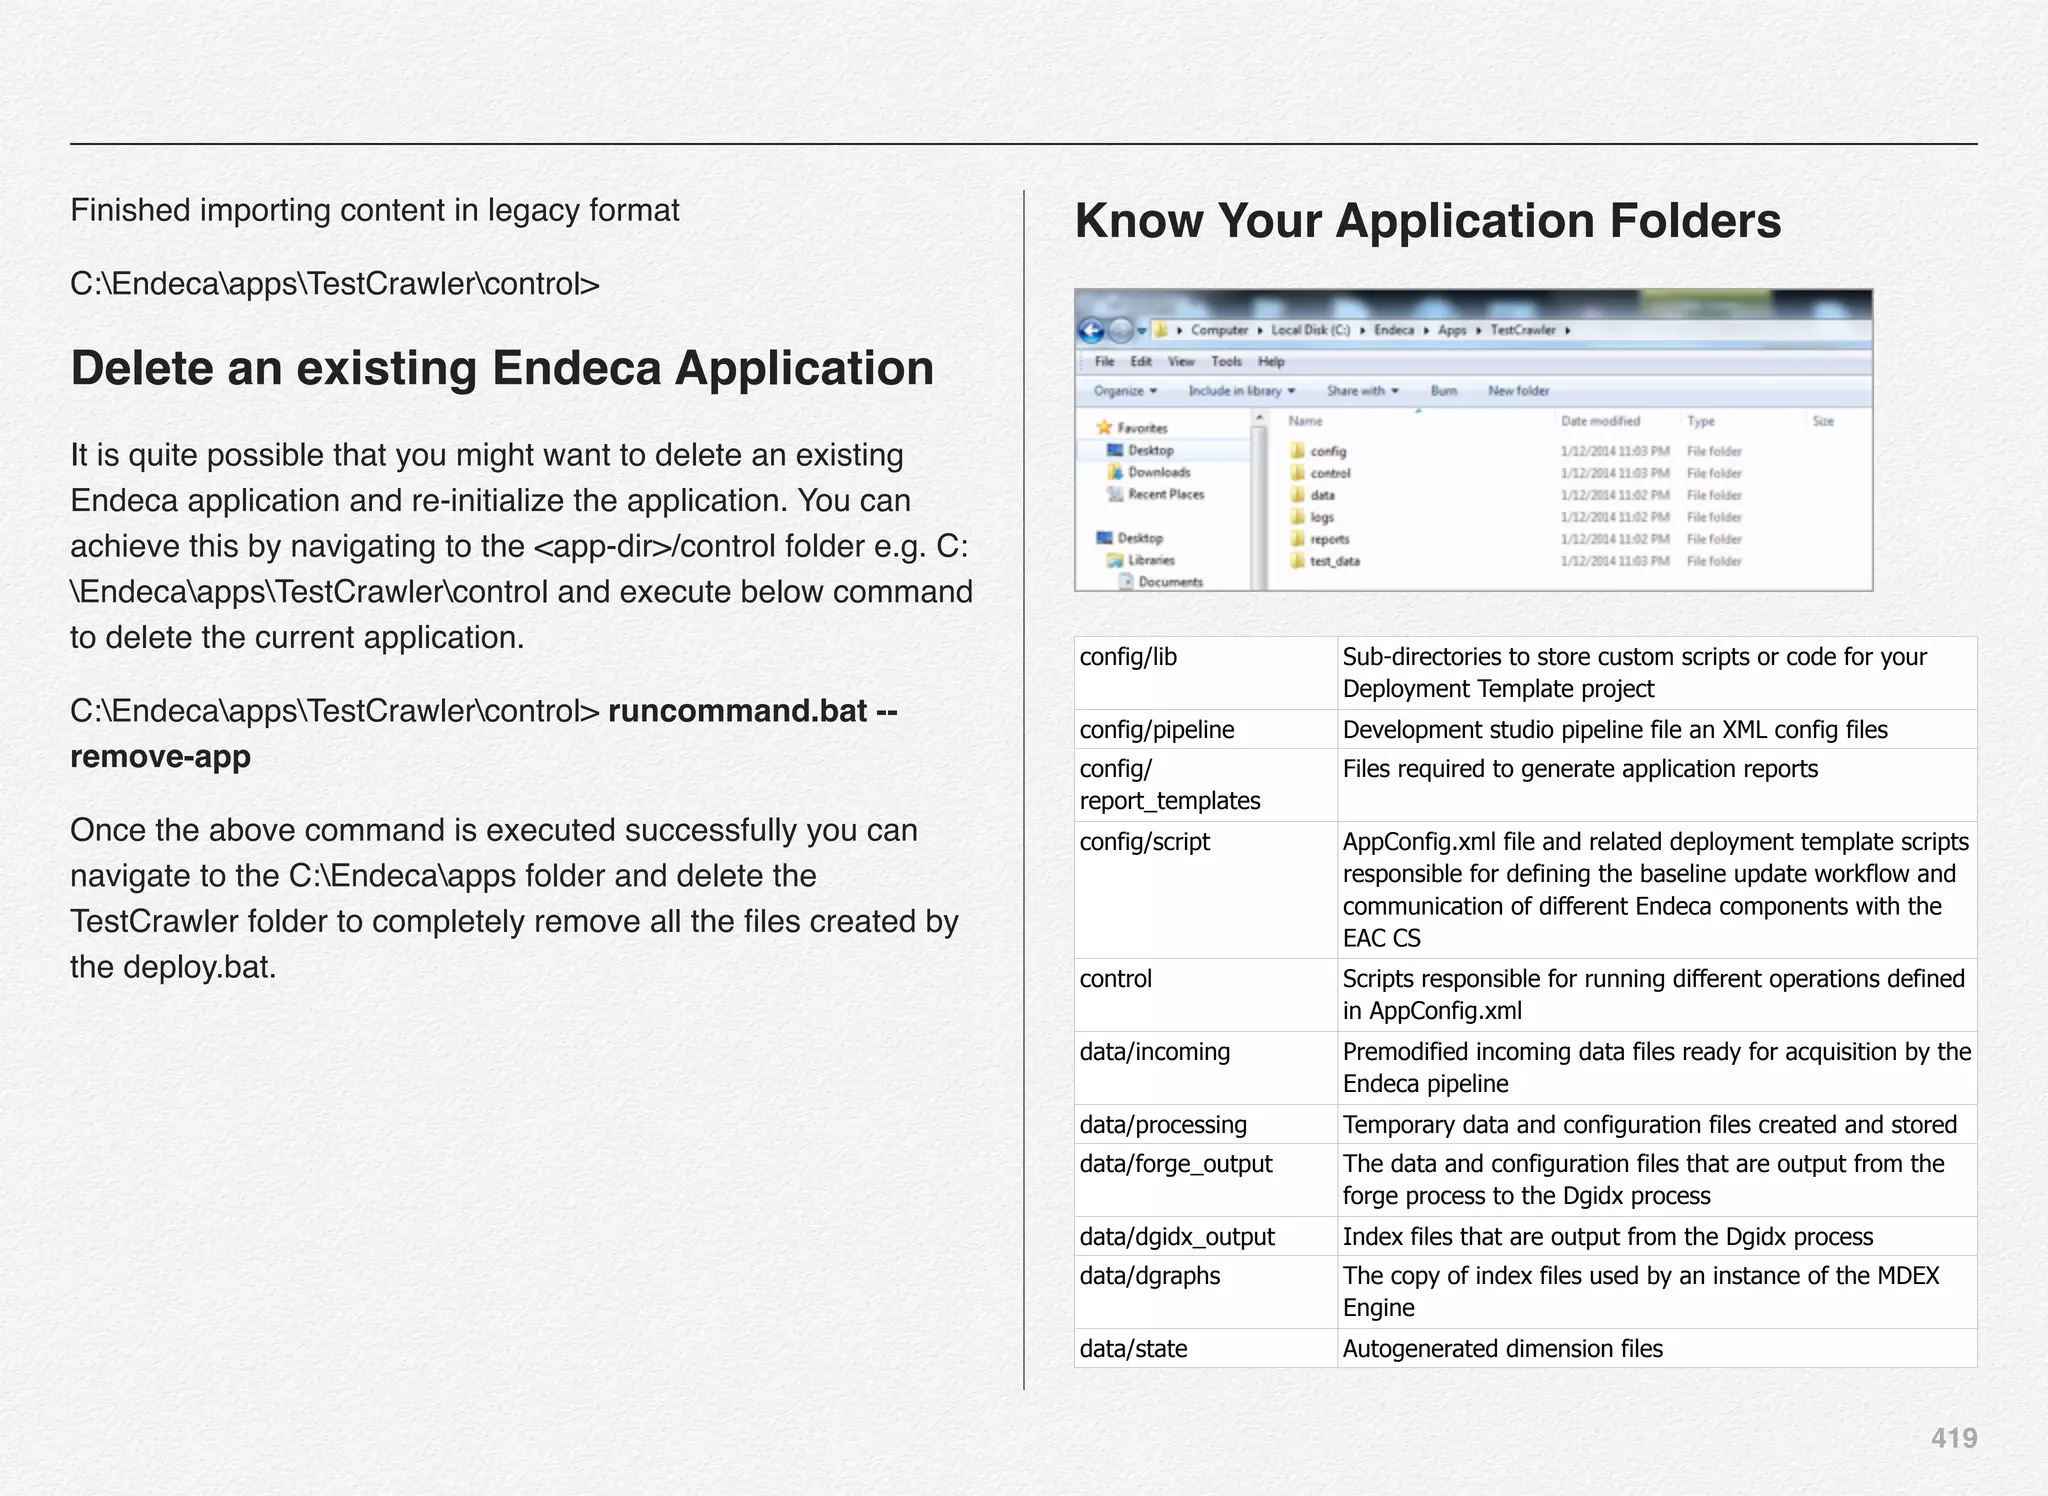
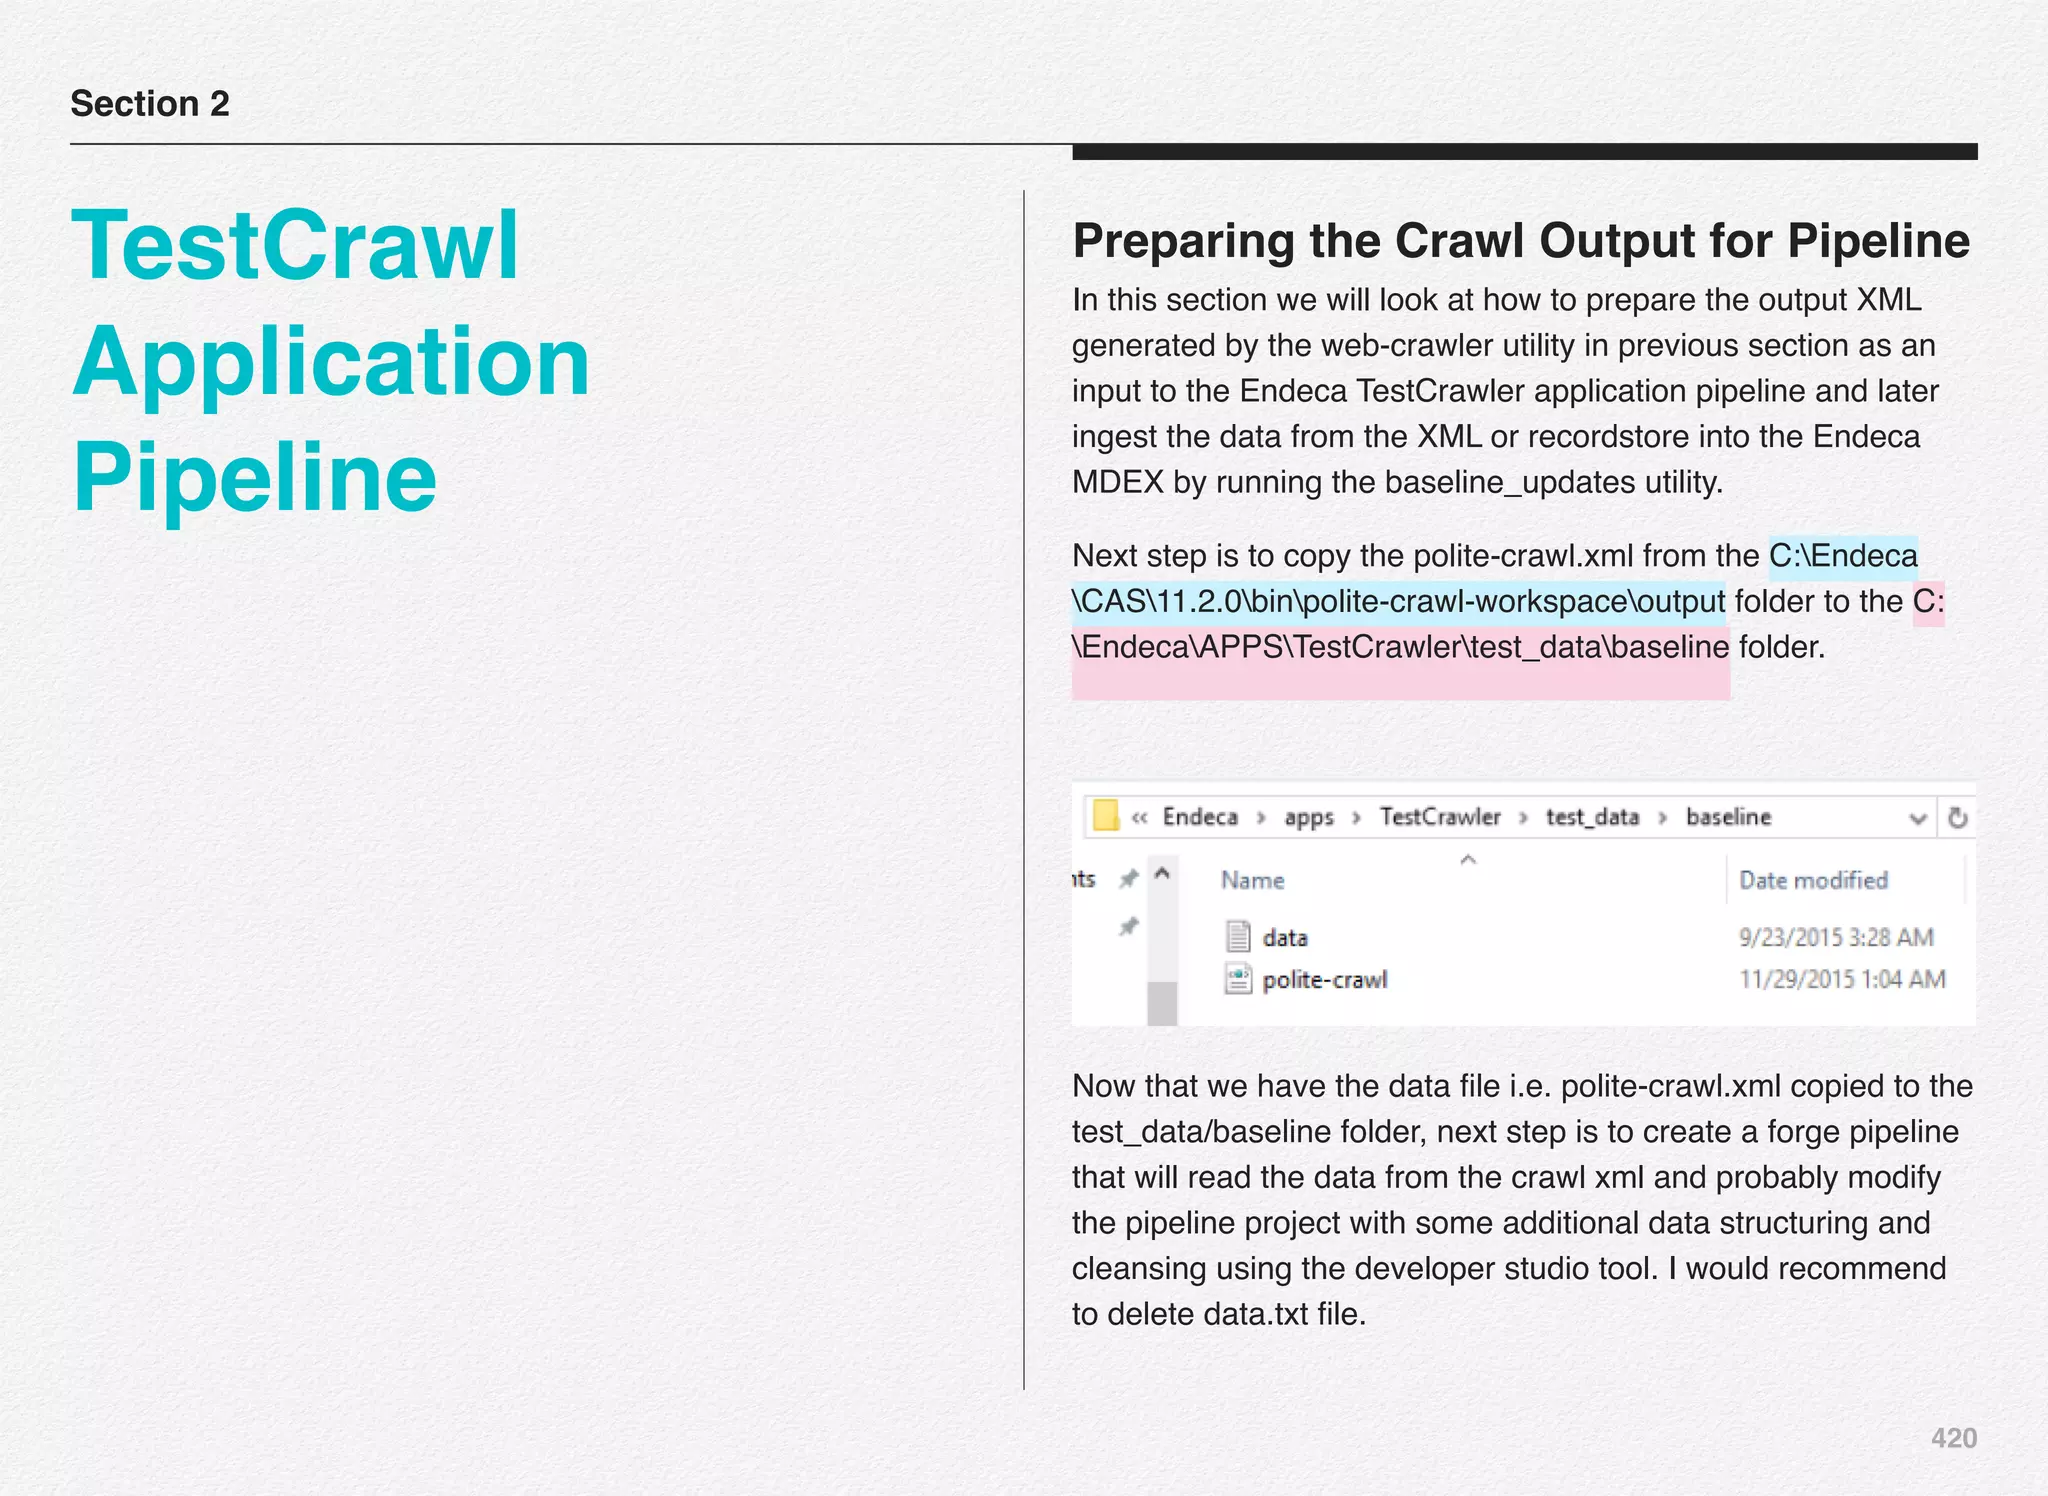
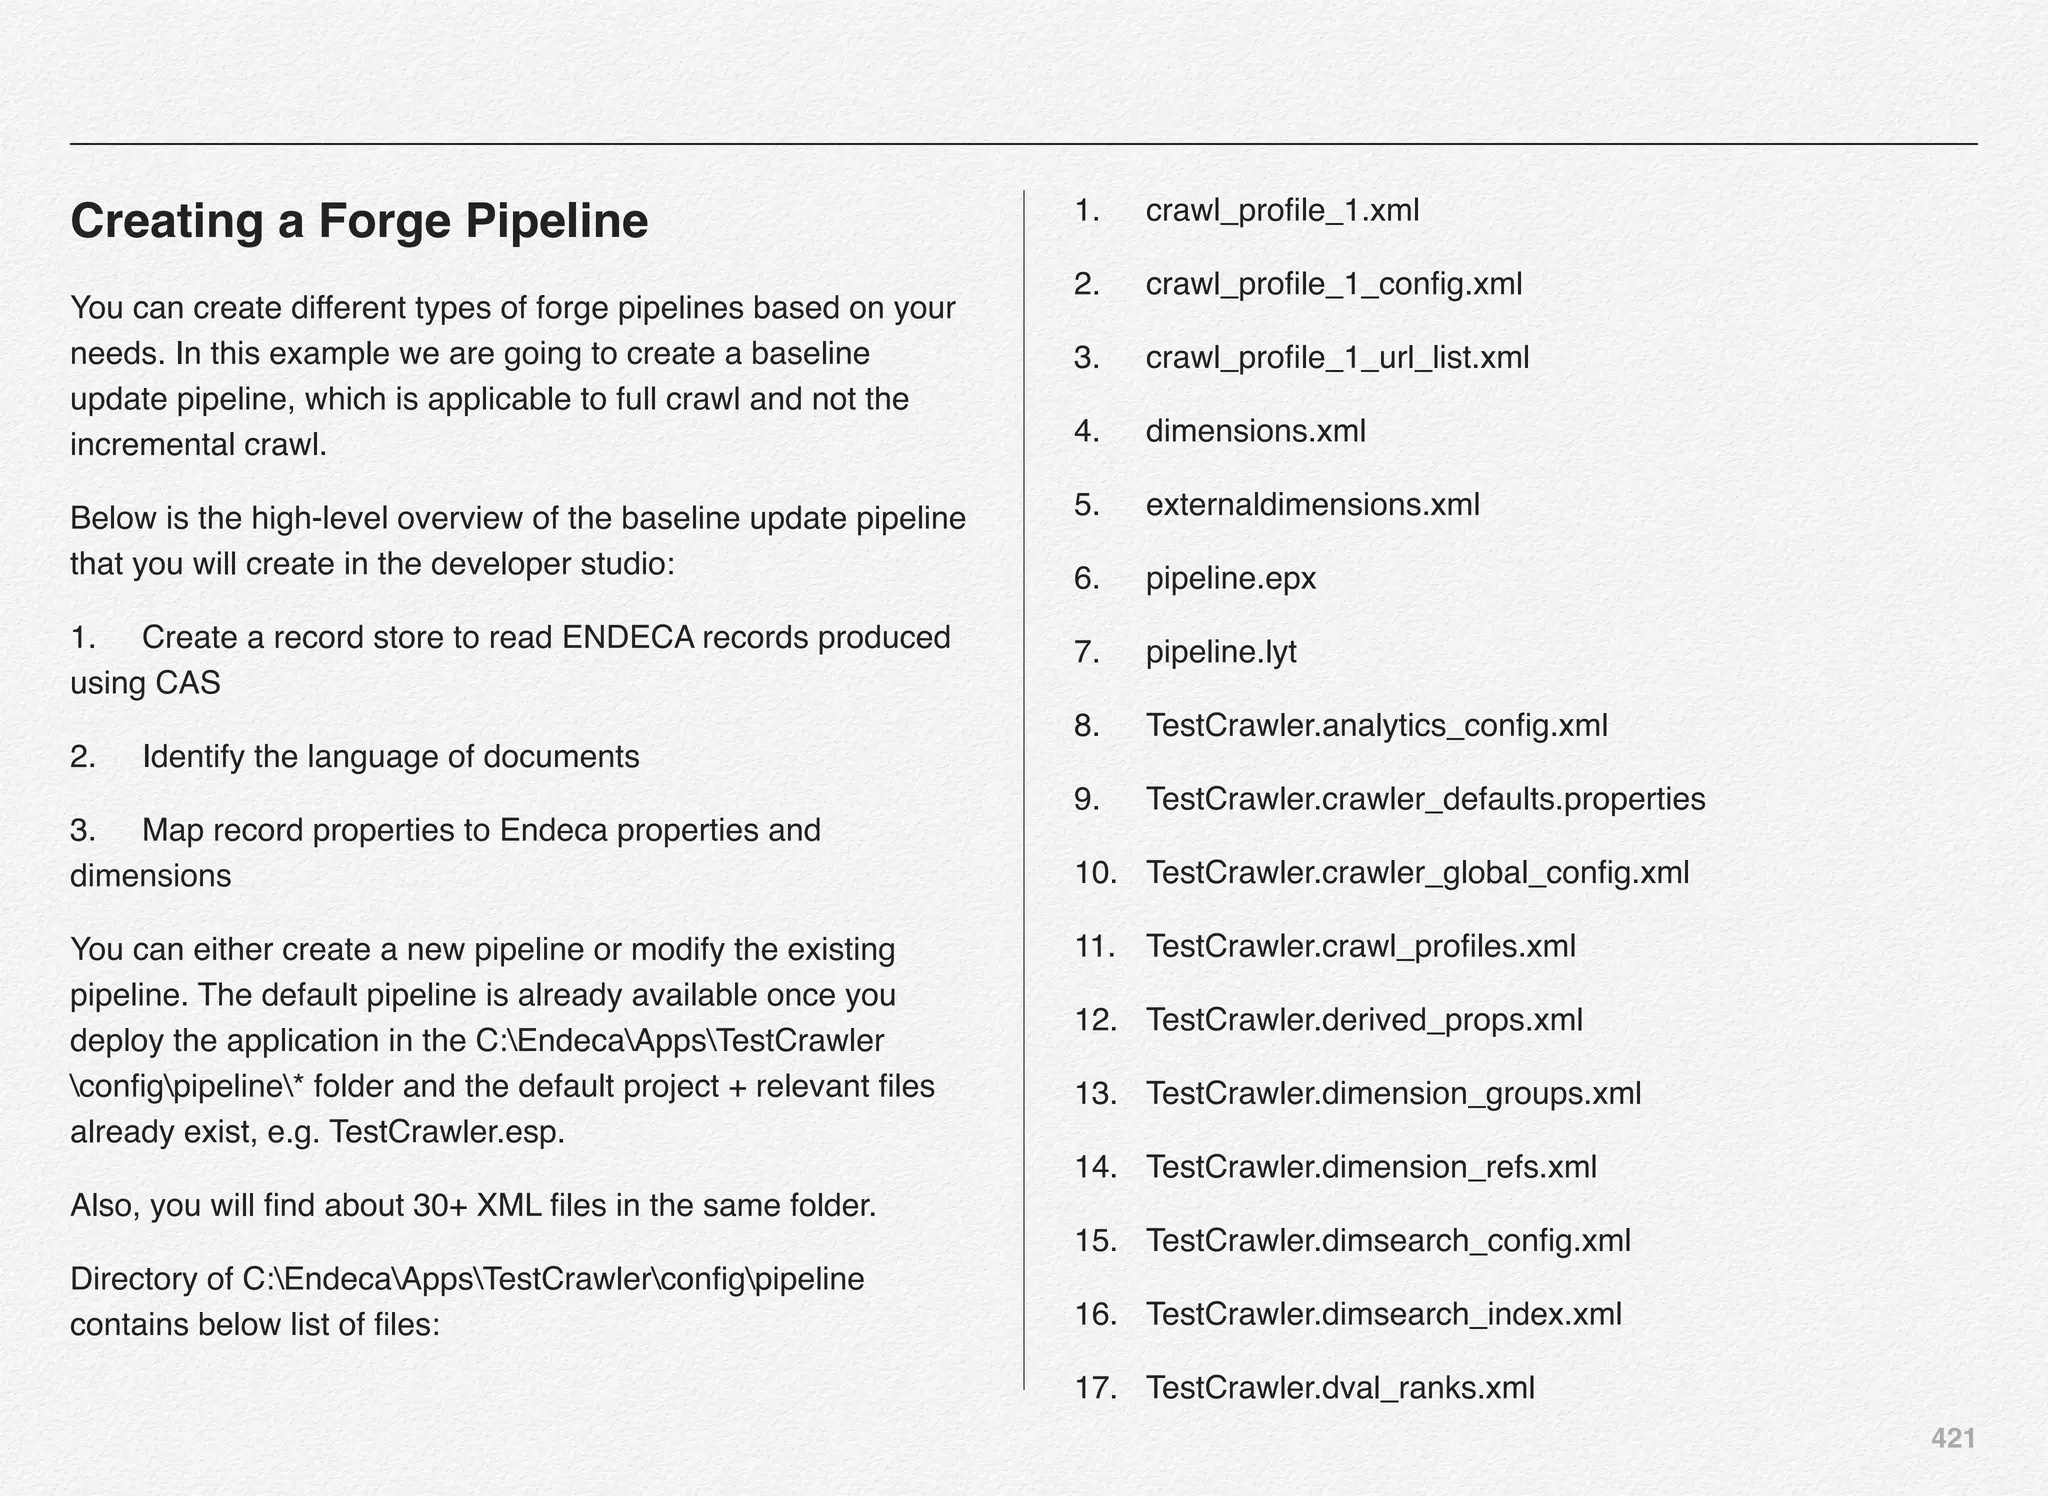
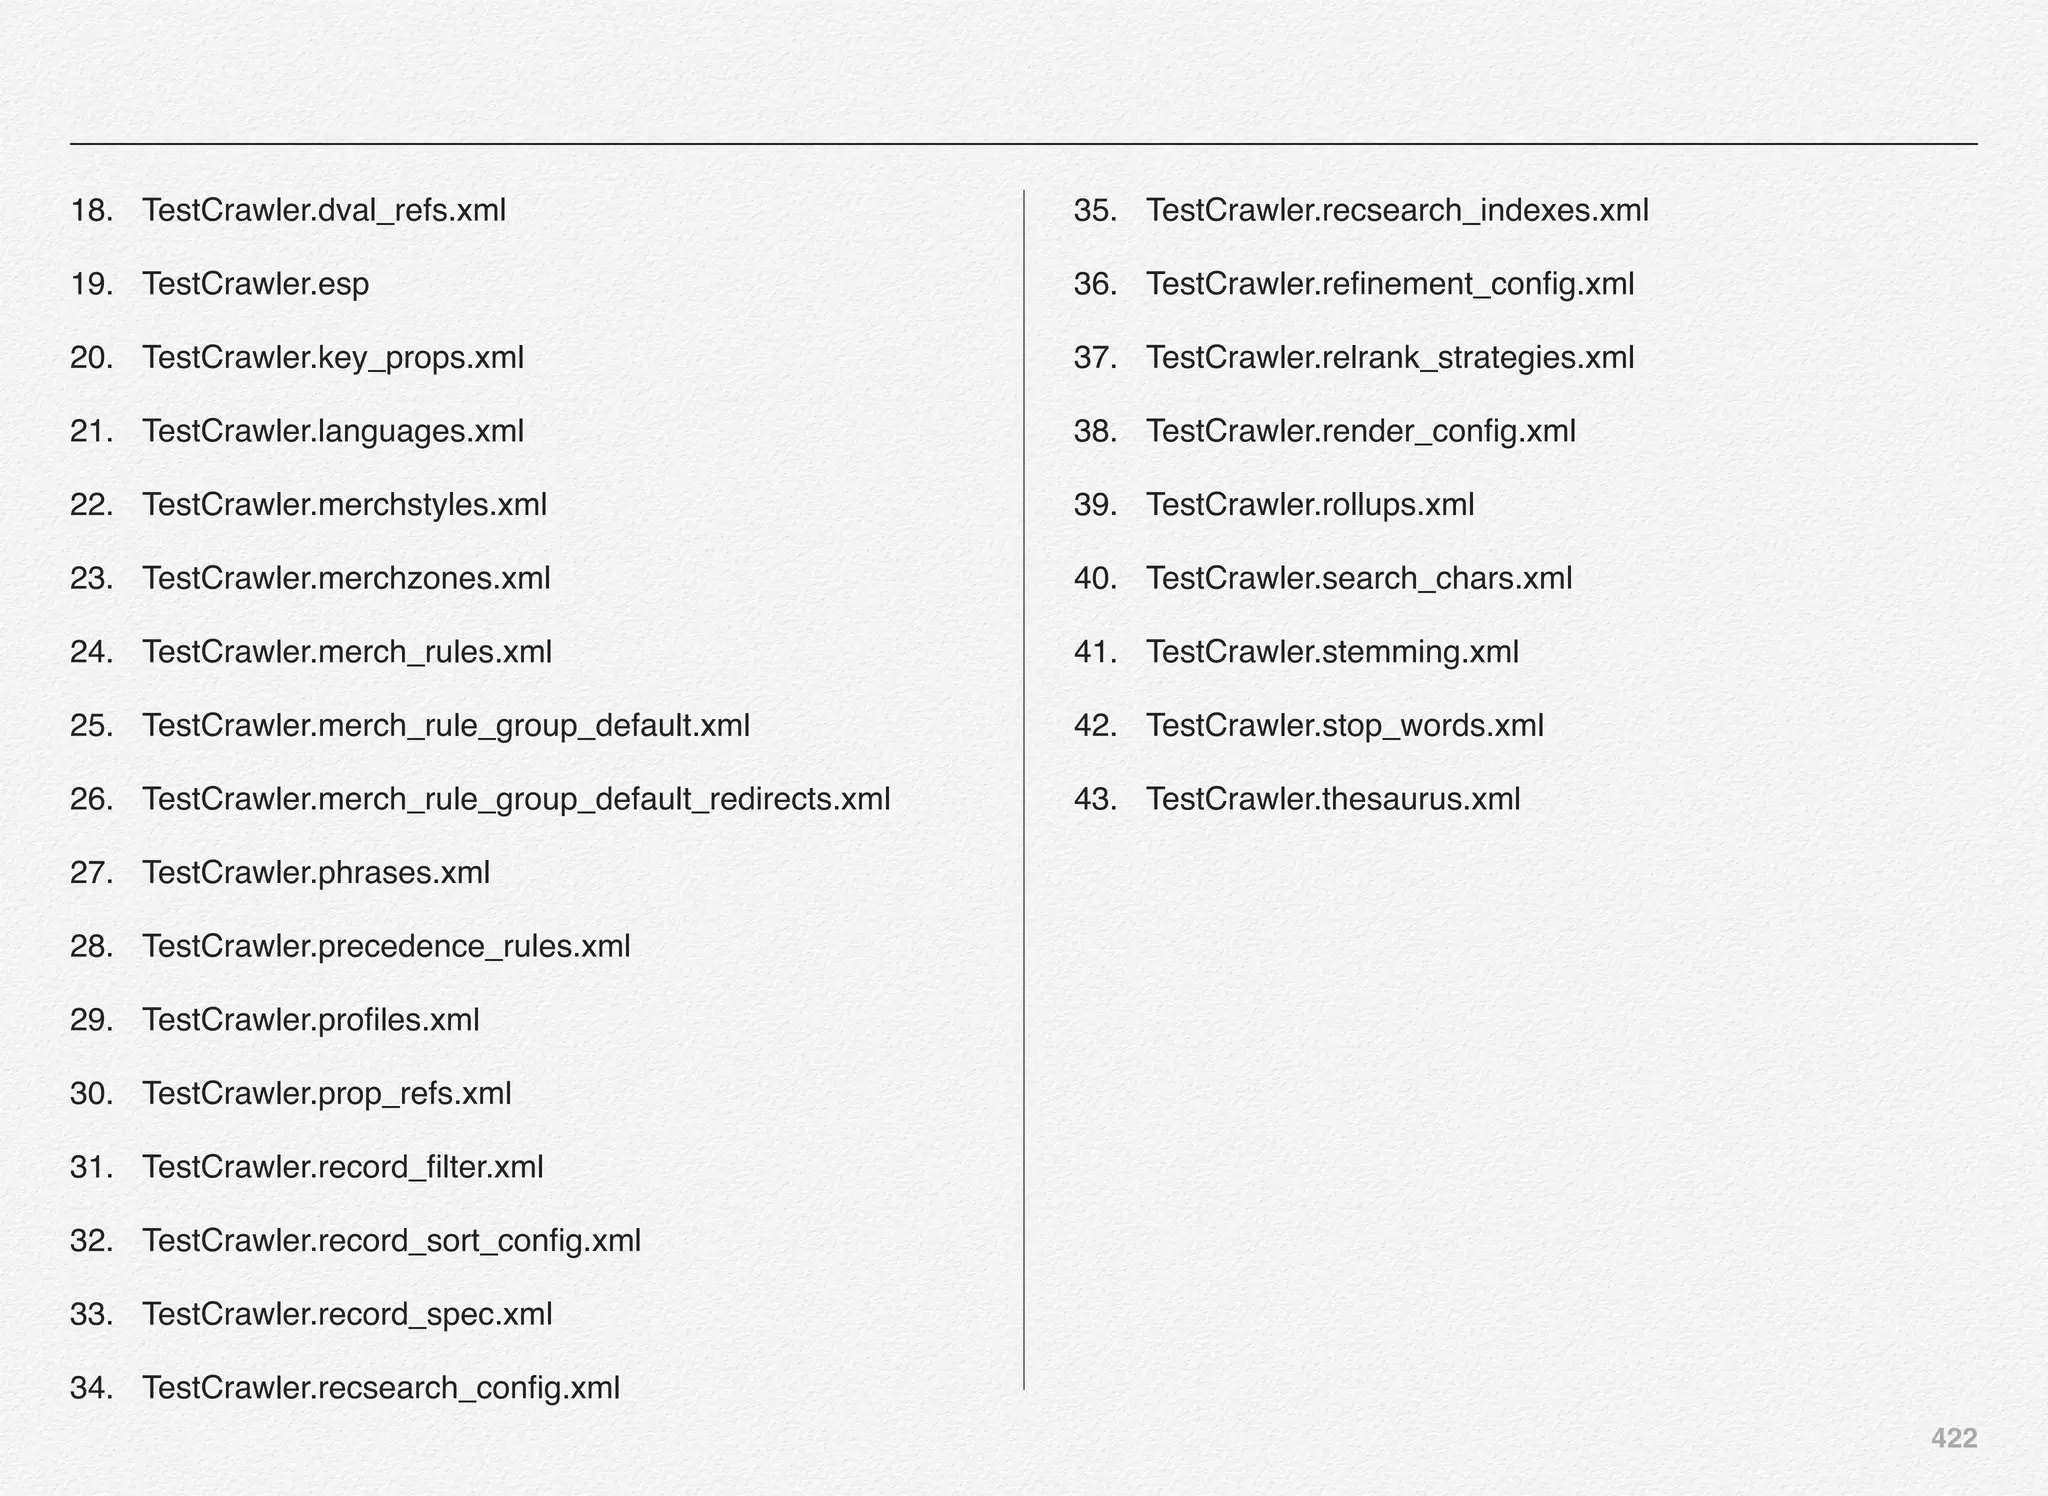
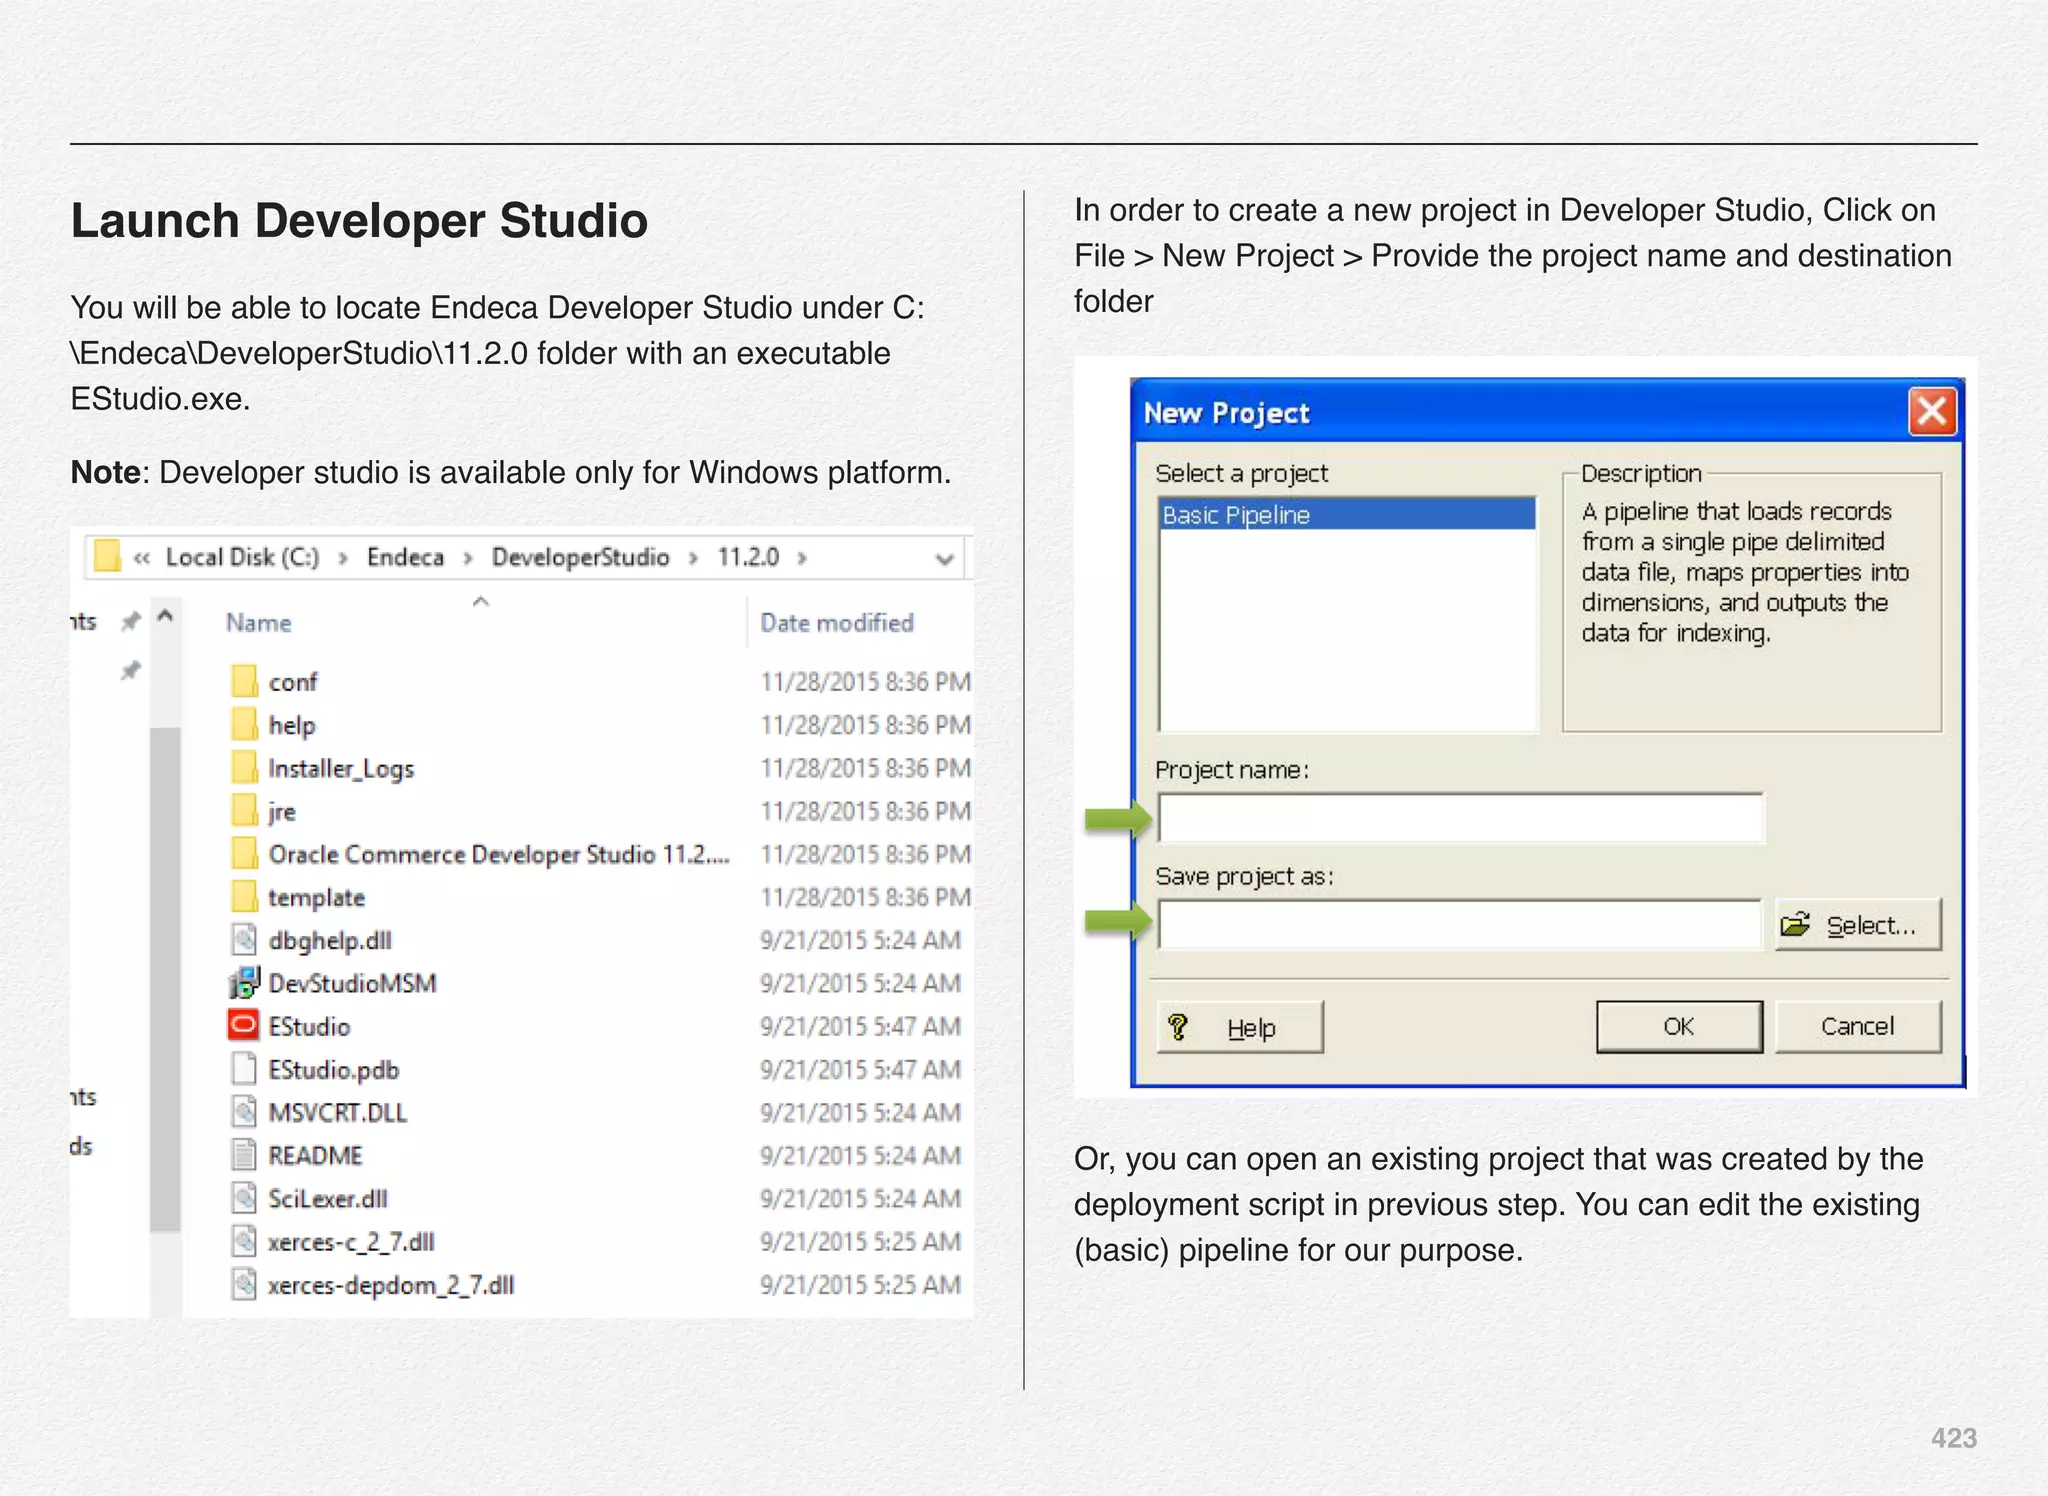
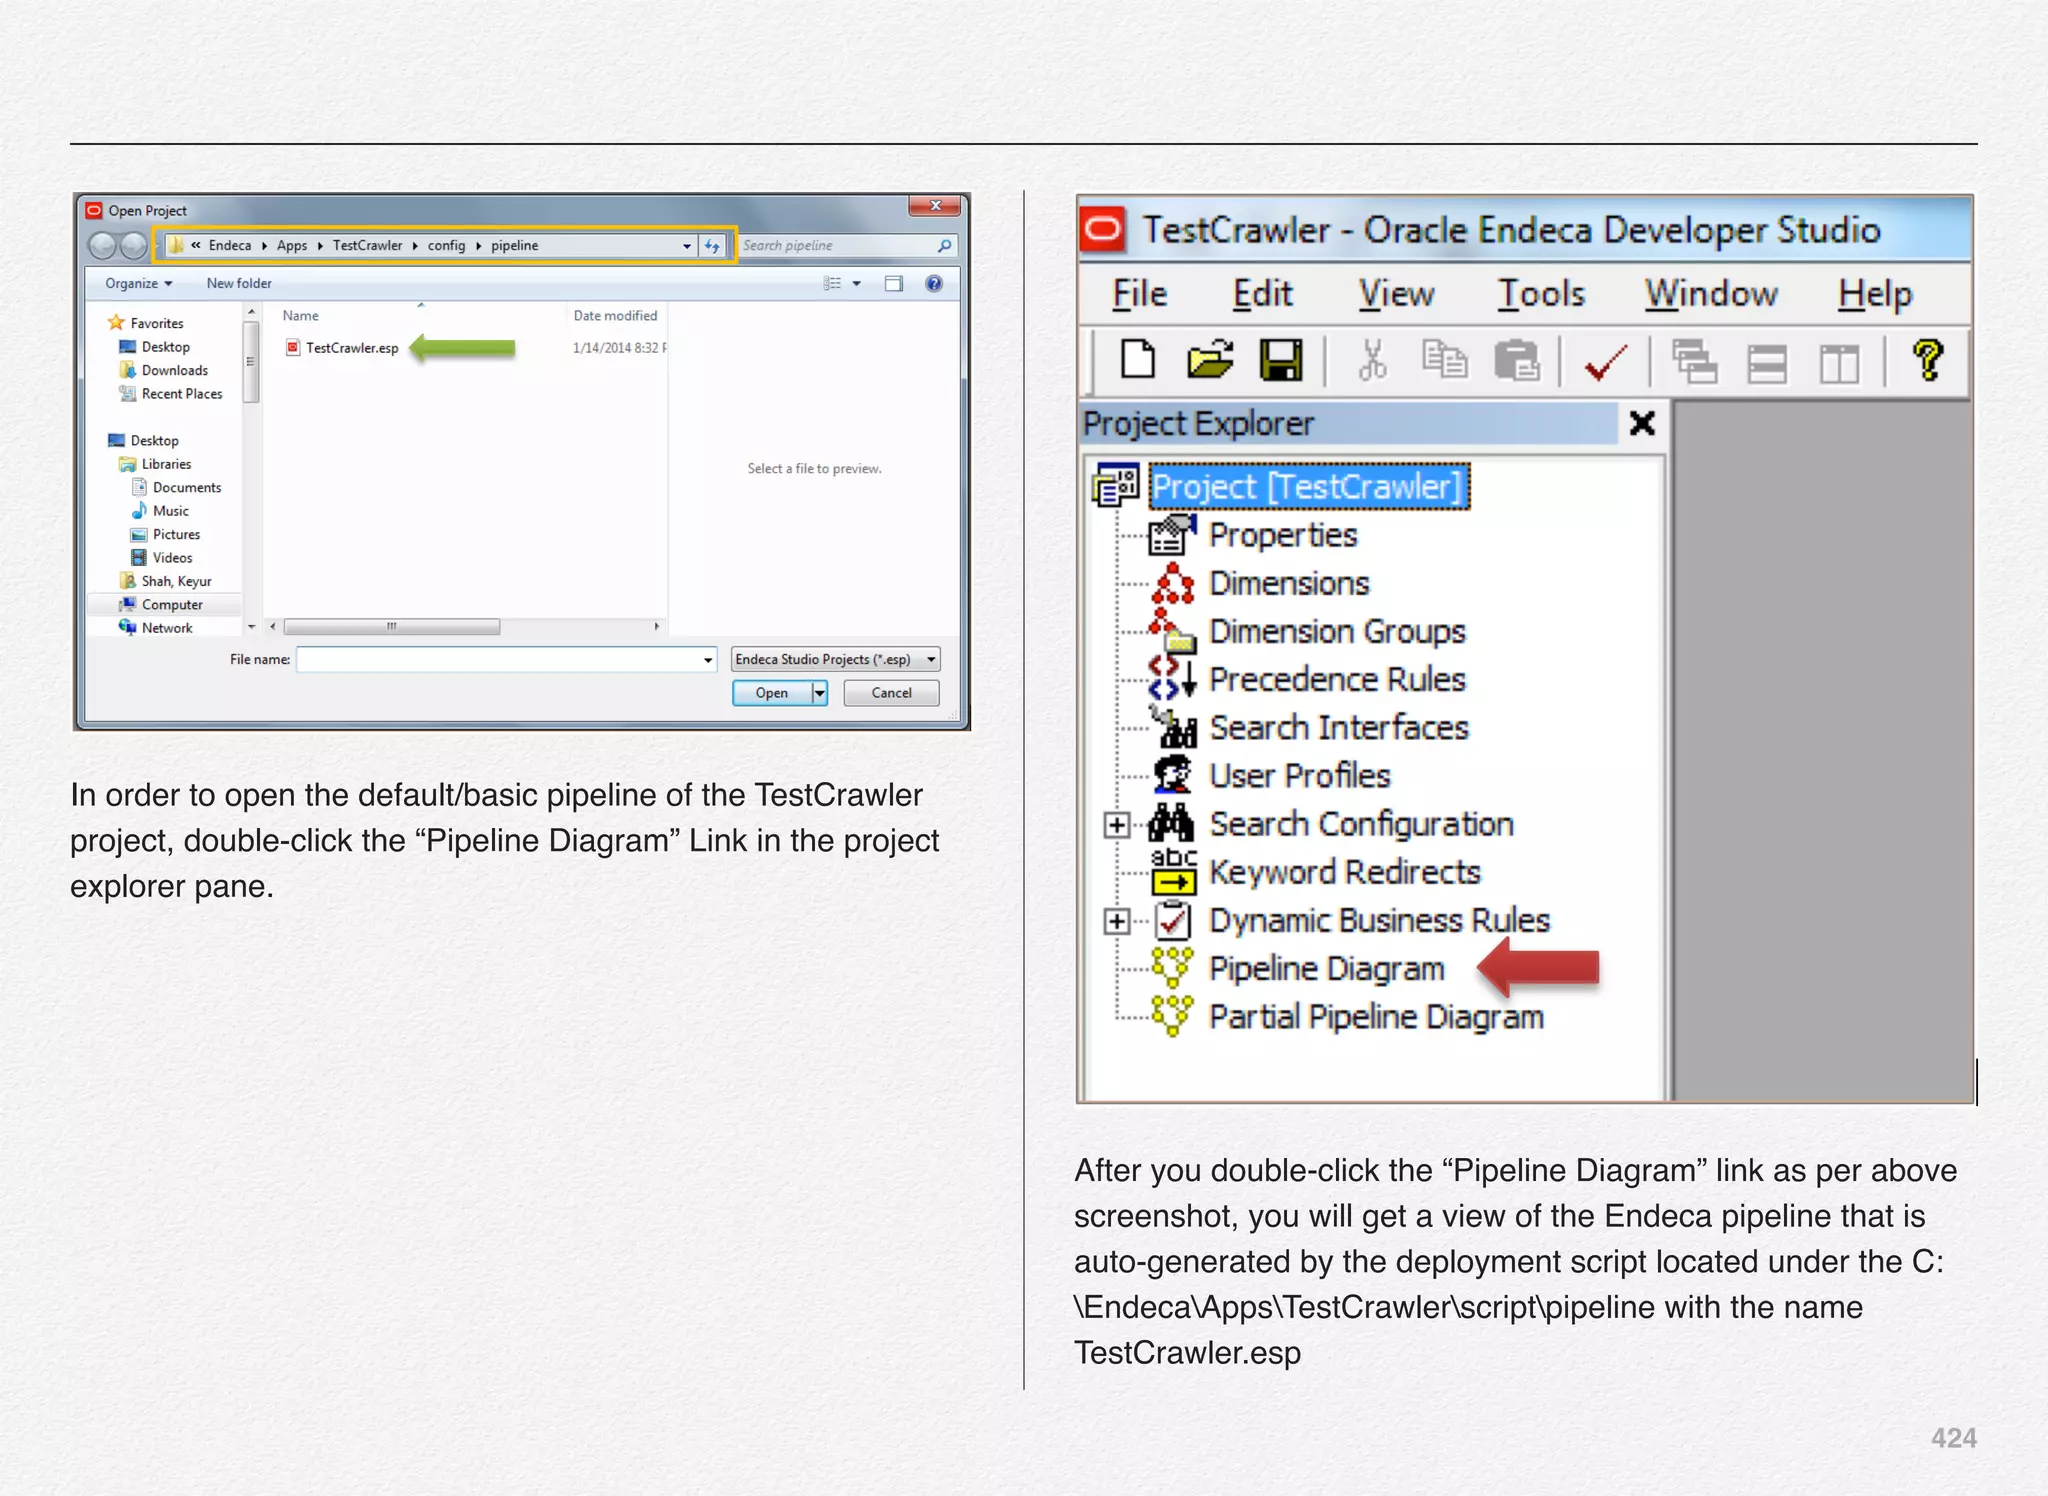
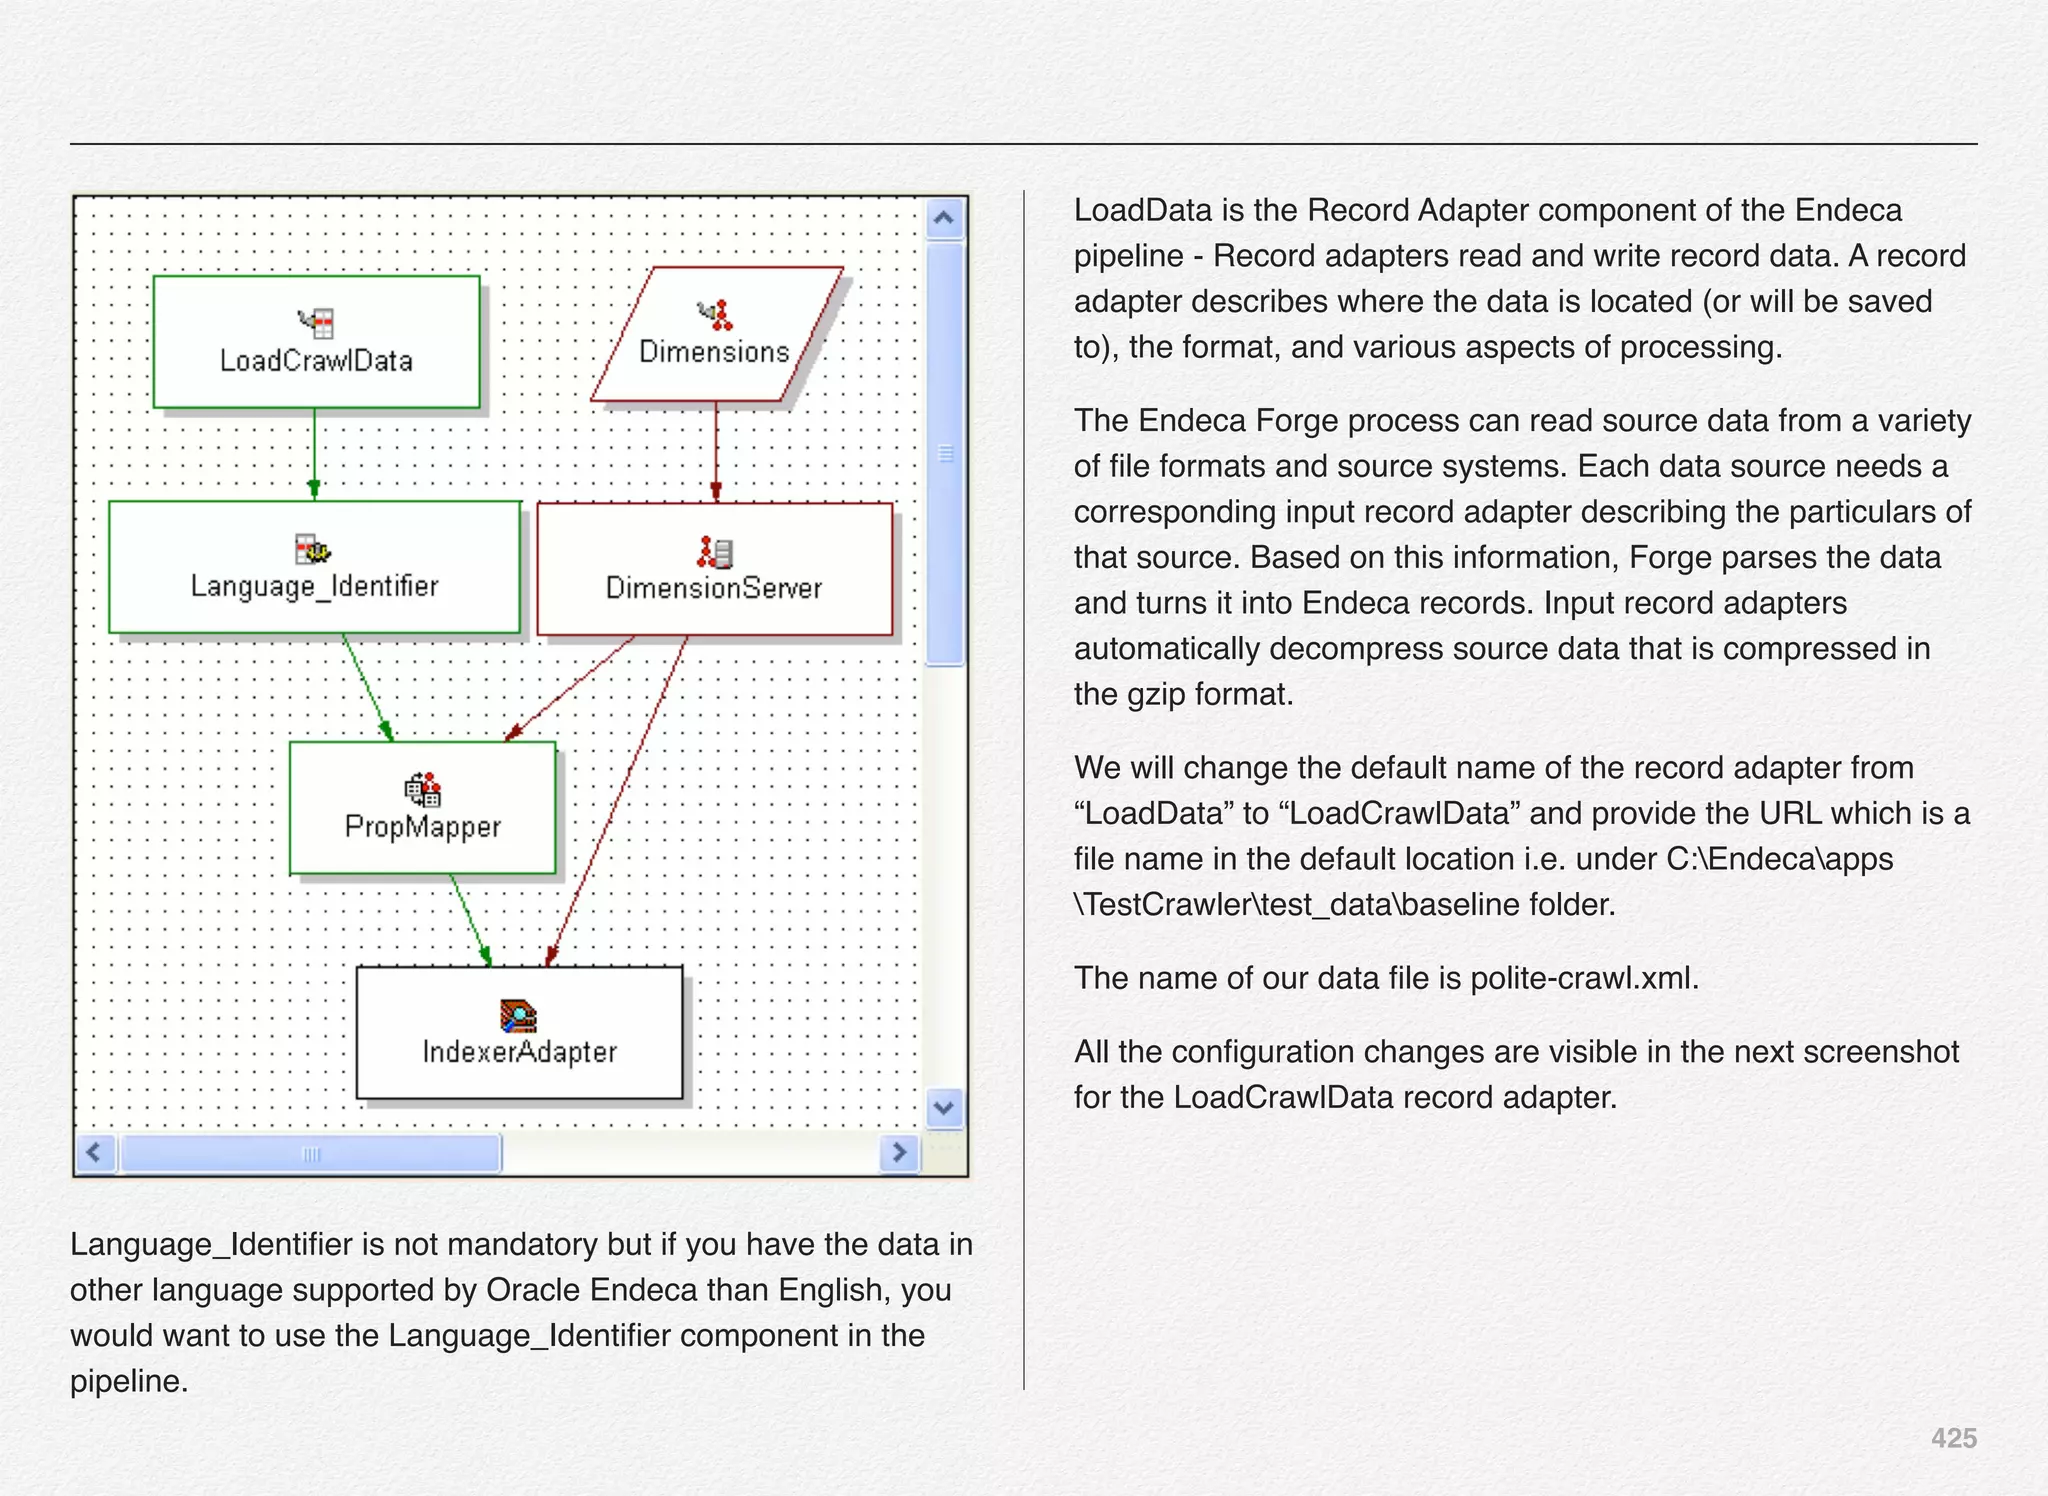
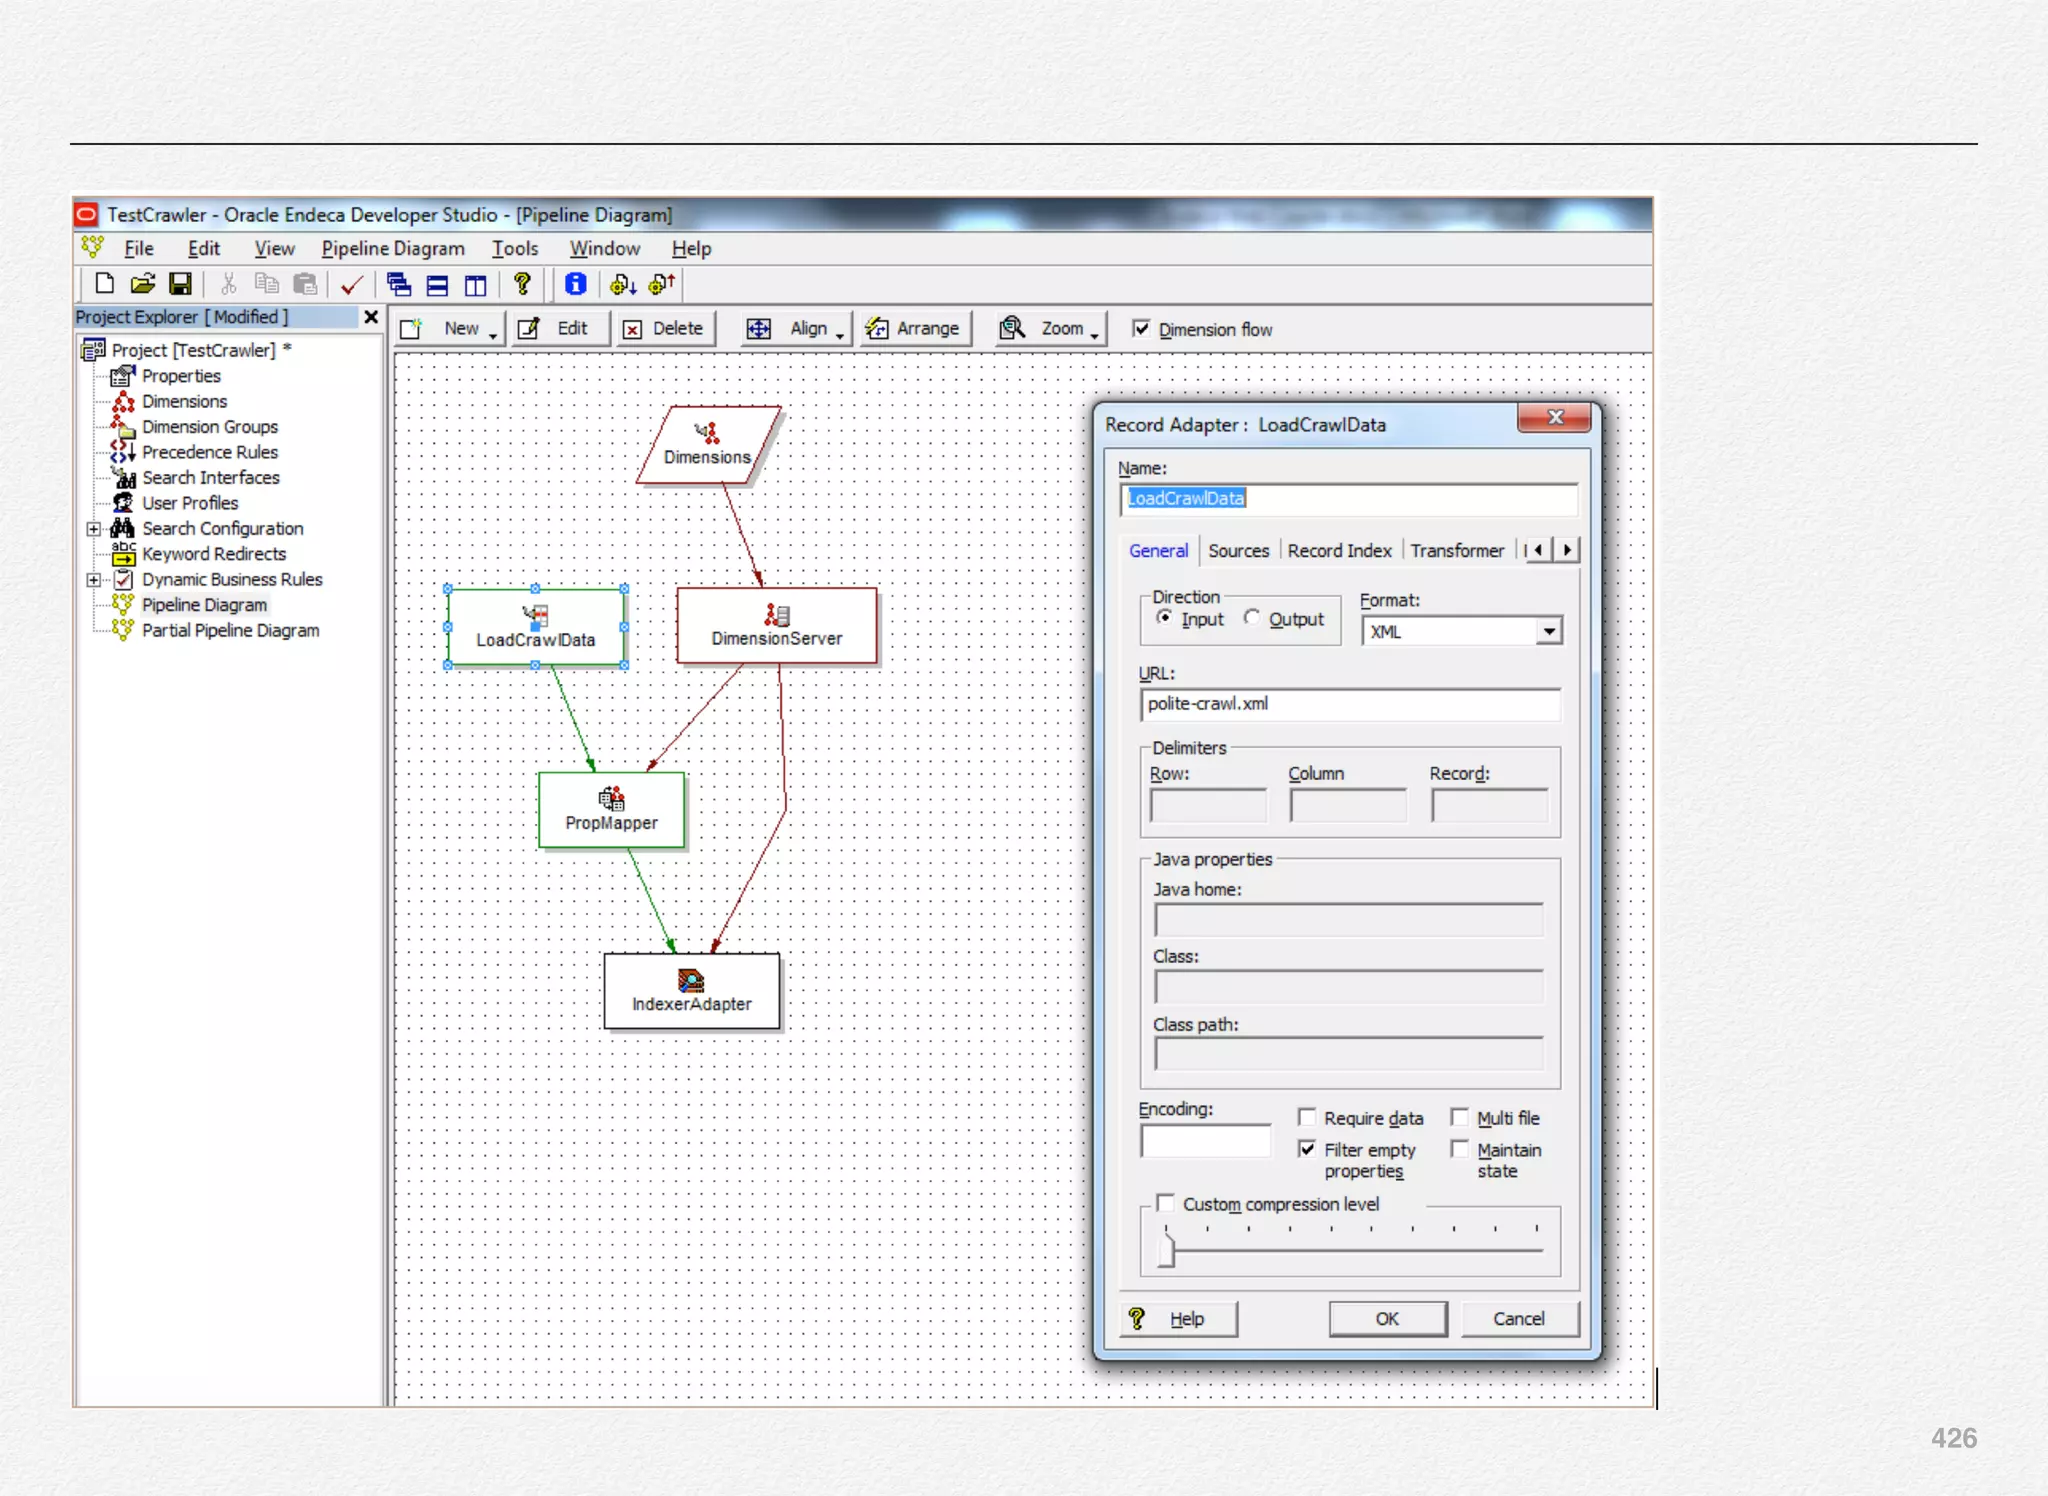
![427
Save the Developer Studio project and next step is to run the
load_baseline_test_data script followed by the baseline_update
script in the <app-dir>/control folder.
Load BaseLine Test Data
During Endeca application development, use the
load_baseline_test_data script to simulate the data extraction
process (or data readiness signal, in the case of an application
that uses a non-extract data source).
This script delivers the data extract in [appdir]/test_data/
baseline and runs the set_baseline_data_ready_flag script,
which sets a flag in the EAC indicating that data has been
extracted and is ready for baseline update processing.
Typically in production environment if the data extract is
happening as a part of web crawler output or using some other
process and if you just want to baseline index the data then you
can customize your baseline_update script to add the line to set
the baseline data ready flag and avoid calling the
load_baseline_test_data scripot.
In production, this step should be replaced with a data
extraction process that delivers extracts into the incoming
directory and sets the "baseline_data_ready" flag in the EAC.
This flag can be set by making a Web service call to the EAC or
by running the provided set_baseline_data_ready_flag script.
Once the Polite-crawl.xml has been copied to the baseline
folder, you can run the script the
LOAD_BASELINE_TEST_DATA.BAT to move this file to the C:
EndecaAppTestCrawlerdataincoming folder.
C:EndecaAppsTestCrawler
control>load_baseline_test_data.bat
C:EndecaAppsTestCrawlerconfigscript....test_data
baselinepolite-crawl.xml
1 file(s) copied.
Setting flag 'baseline_data_ready' in the EAC (Endeca
Application Controller).](https://image.slidesharecdn.com/oraclecommerce-doityourselfseries-160129151710/75/Oracle-Commerce-Using-ATG-Endeca-Do-It-Yourself-Series-428-2048.jpg)
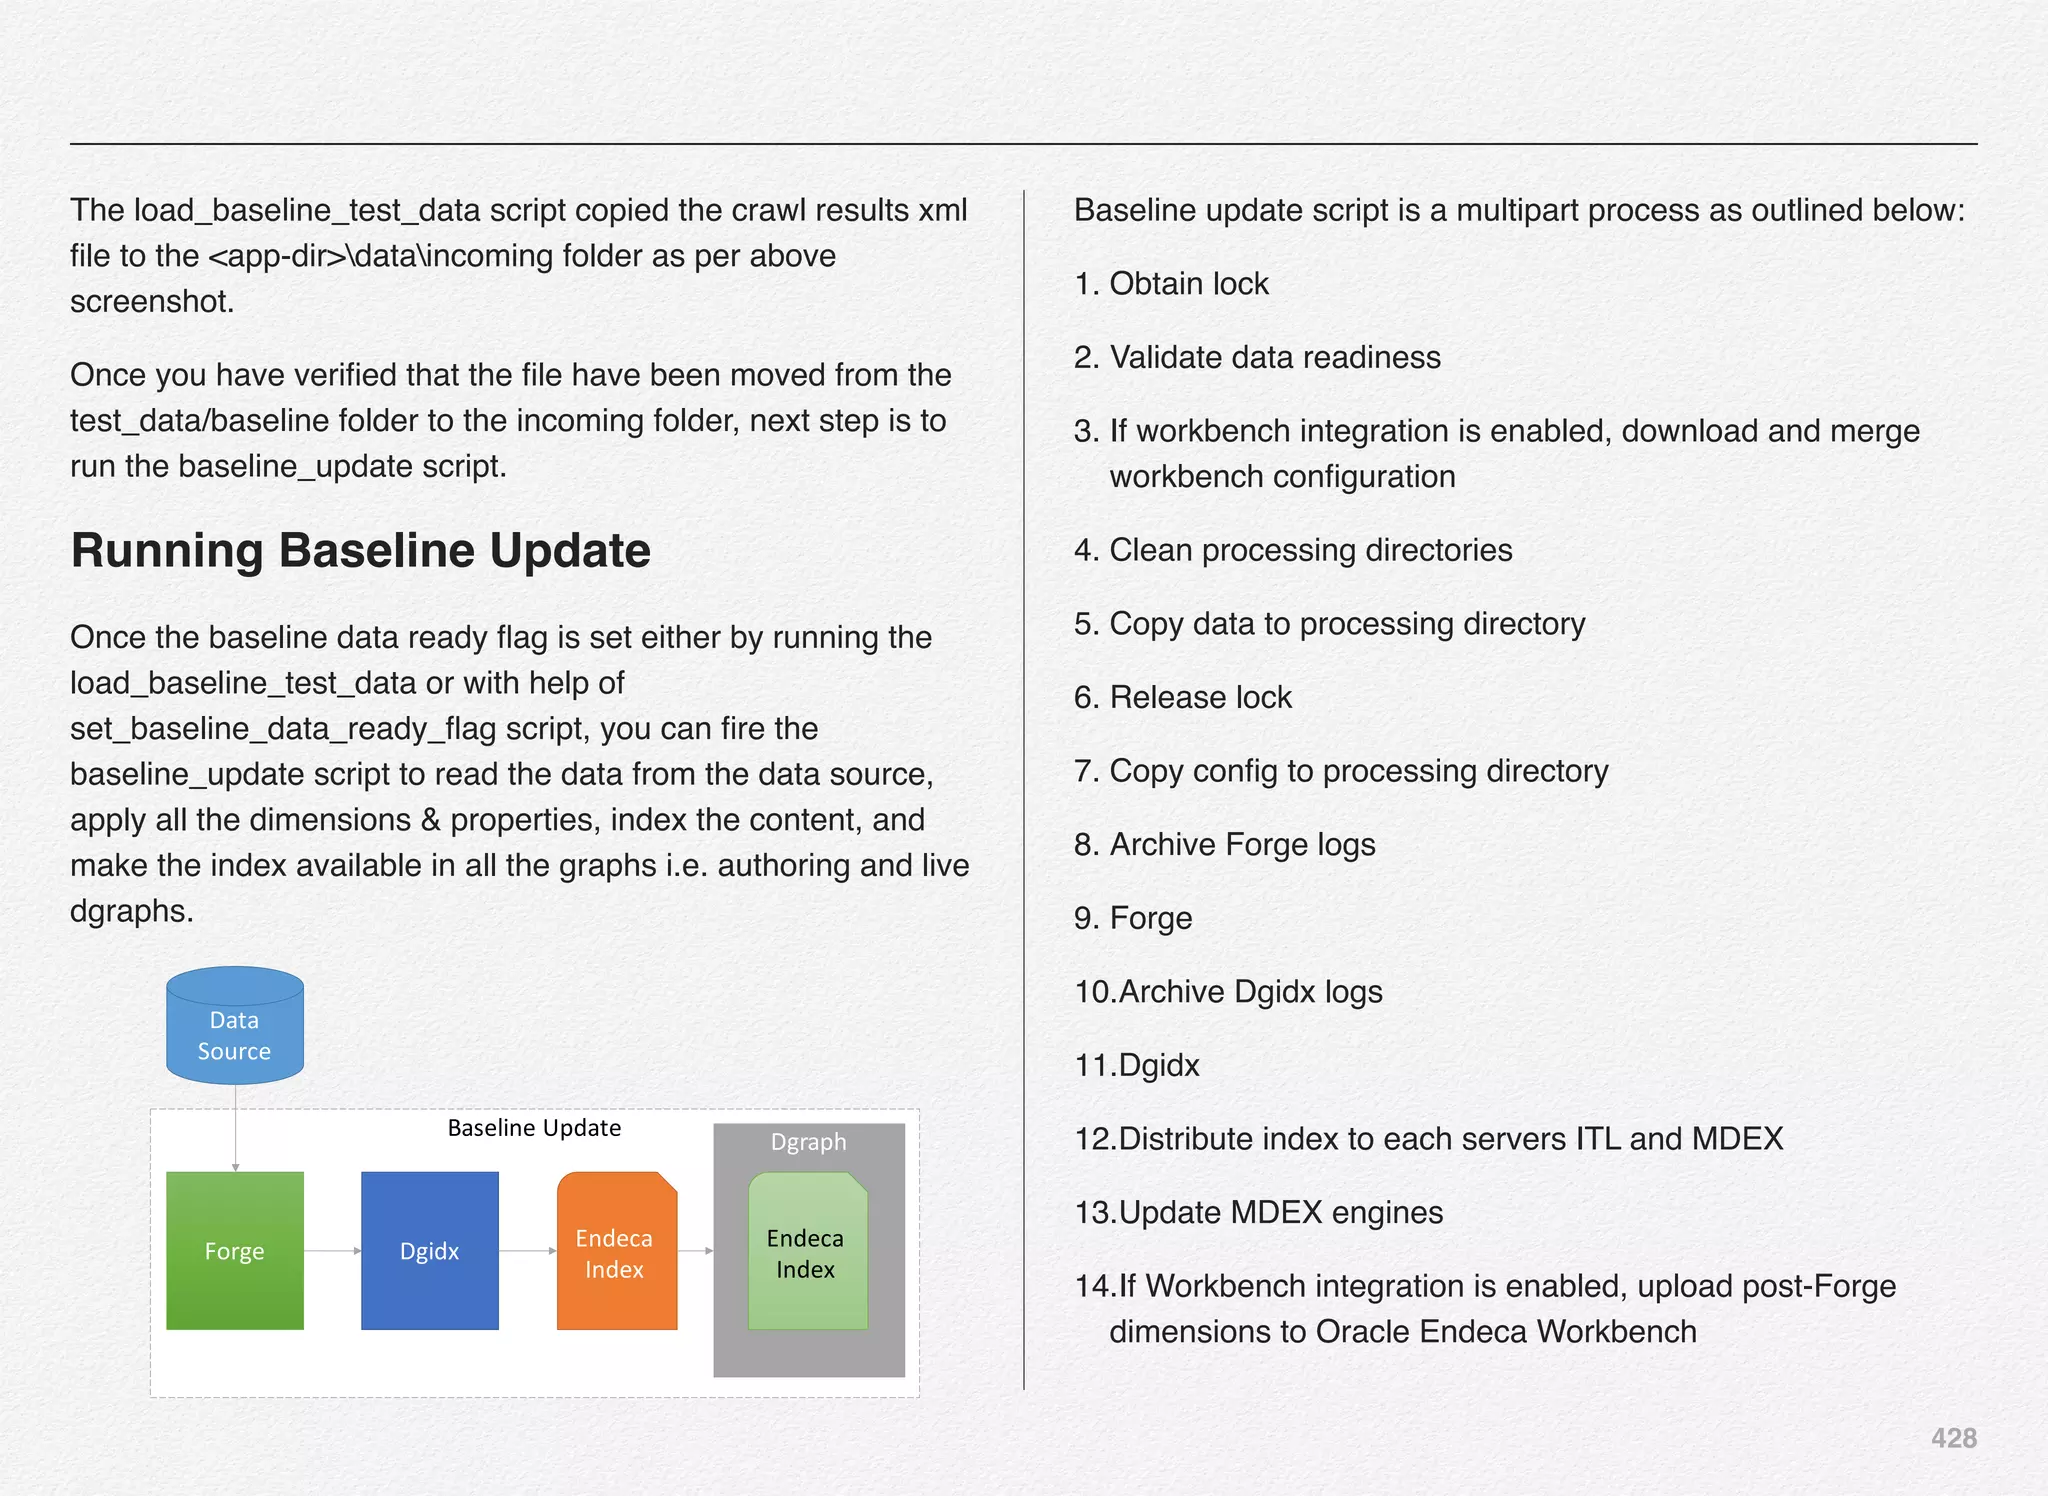
![429
15.Archive index and Forge state. The newly created index and
the state files in Forge's state directory are archived on the
indexing server.
16.Cycle LogServer. The LogServer is stopped and restarted.
During the downtime, the LogServer's error and output logs
are archived.
17.Release lock
Let us now fire both the scripts to load the data into incoming
folder followed by executing the baseline update script.
C:EndecaappsTestCrawler
control>load_baseline_test_data.bat
C:EndecaappsTestCrawlerconfigscript....test_data
baselinepolite-crawl.xml
1 file(s) copied.
Setting flag 'baseline_data_ready' in the EAC.
C:EndecaappsTestCrawlercontrol>baseline_update.bat
[11.29.15 15:34:23] INFO: Checking definition from
AppConfig.xml against existing EAC provisioning.
[11.29.15 15:34:24] INFO: Definition has not changed.
[11.29.15 15:34:24] INFO: Starting baseline update script.
[11.29.15 15:34:24] INFO: Acquired lock 'update_lock'.
[11.29.15 15:34:24] INFO: [ITLHost] Starting shell utility
'cleanDir_processing'.
[11.29.15 15:34:26] INFO: [ITLHost] Starting shell utility 'move_-
_to_processing'.
[11.29.15 15:34:27] INFO: [ITLHost] Starting copy utility
'fetch_config_to_input_for_forge_Forge'.
[11.29.15 15:34:28] INFO: [ITLHost] Starting backup utility
'backup_log_dir_for_component_Forge'.
[11.29.15 15:34:29] INFO: [ITLHost] Starting component
'Forge'.
[11.29.15 15:34:31] INFO: [ITLHost] Starting backup utility
'backup_log_dir_for_component_Dgidx'.
[11.29.15 15:34:32] INFO: [ITLHost] Starting component
'Dgidx'.
[11.29.15 15:34:46] INFO: [AuthoringMDEXHost] Starting copy
utility
'copy_index_to_host_AuthoringMDEXHost_AuthoringDgraph'.
[11.29.15 15:34:47] INFO: Applying index to dgraphs in restart
group 'A'.](https://image.slidesharecdn.com/oraclecommerce-doityourselfseries-160129151710/75/Oracle-Commerce-Using-ATG-Endeca-Do-It-Yourself-Series-430-2048.jpg)
![430
[11.29.15 15:34:47] INFO: [AuthoringMDEXHost] Starting shell
utility 'mkpath_dgraph-input-new'.
[11.29.15 15:34:48] INFO: [AuthoringMDEXHost] Starting copy
utility
'copy_index_to_temp_new_dgraph_input_dir_for_AuthoringDgr
aph'.
[11.29.15 15:34:50] INFO: [AuthoringMDEXHost] Starting shell
utility 'move_dgraph-input_to_dgraph-input-old'.
[11.29.15 15:34:51] INFO: [AuthoringMDEXHost] Starting shell
utility 'move_dgraph-input-new_to_dgraph-input'.
[11.29.15 15:34:52] INFO: [AuthoringMDEXHost] Starting
backup utility
'backup_log_dir_for_component_AuthoringDgraph'.
[11.29.15 15:34:53] INFO: [AuthoringMDEXHost] Starting
component 'AuthoringDgraph'.
[11.29.15 15:35:02] INFO: Publishing Workbench 'authoring'
configuration to MDEX 'AuthoringDgraph'
[11.29.15 15:35:02] INFO: Pushing authoring content to dgraph:
AuthoringDgraph
[11.29.15 15:35:05] INFO: Finished pushing content to dgraph.
[11.29.15 15:35:06] INFO: [AuthoringMDEXHost] Starting shell
utility 'rmdir_dgraph-input-old'.
[11.29.15 15:35:07] INFO: [LiveMDEXHostA] Starting shell
utility 'cleanDir_local-dgraph-input'.
[11.29.15 15:35:09] INFO: [LiveMDEXHostA] Starting copy
utility 'copy_index_to_host_LiveMDEXHostA_DgraphA1'.
[11.29.15 15:35:10] INFO: Applying index to dgraphs in restart
group '1'.
[11.29.15 15:35:10] INFO: [LiveMDEXHostA] Starting shell
utility 'mkpath_dgraph-input-new'.
[11.29.15 15:35:11] INFO: [LiveMDEXHostA] Starting copy
utility
'copy_index_to_temp_new_dgraph_input_dir_for_DgraphA1'.
[11.29.15 15:35:12] INFO: [LiveMDEXHostA] Starting shell
utility 'move_dgraph-input_to_dgraph-input-old'.
[11.29.15 15:35:13] INFO: [LiveMDEXHostA] Starting shell
utility 'move_dgraph-input-new_to_dgraph-input'.
[11.29.15 15:35:14] INFO: [LiveMDEXHostA] Starting backup
utility 'backup_log_dir_for_component_DgraphA1'.
[11.29.15 15:35:16] INFO: [LiveMDEXHostA] Starting
component 'DgraphA1'.](https://image.slidesharecdn.com/oraclecommerce-doityourselfseries-160129151710/75/Oracle-Commerce-Using-ATG-Endeca-Do-It-Yourself-Series-431-2048.jpg)
![431
[11.29.15 15:35:23] INFO: Publishing Workbench 'live'
configuration to MDEX 'DgraphA1'
[11.29.15 15:35:23] INFO: 'LiveDgraphCluster': no available
config to apply at this time, config is created by exporting a
config snapshot.
[11.29.15 15:35:23] INFO: [LiveMDEXHostA] Starting shell
utility 'rmdir_dgraph-input-old'.
[11.29.15 15:35:25] INFO: [ITLHost] Starting copy utility
'fetch_post_forge_dimensions_to_config_postforgedims_dir_C-
Endeca-apps-TestCrawler-config-script-config-pipeline-
postforgedims'.
[11.29.15 15:35:25] INFO: [ITLHost] Starting backup utility
'backup_state_dir_for_component_Forge'.
[11.29.15 15:35:26] INFO: [ITLHost] Starting backup utility
'backup_index_Dgidx'.
[11.29.15 15:35:27] INFO: [ReportGenerationHost] Starting
backup utility 'backup_log_dir_for_component_LogServer'.
[11.29.15 15:35:28] INFO: [ReportGenerationHost] Starting
component 'LogServer'.
[11.29.15 15:35:29] INFO: Released lock 'update_lock'.
[11.29.15 15:35:29] INFO: Baseline update script finished.
C:EndecaappsTestCrawlercontrol>](https://image.slidesharecdn.com/oraclecommerce-doityourselfseries-160129151710/75/Oracle-Commerce-Using-ATG-Endeca-Do-It-Yourself-Series-432-2048.jpg)

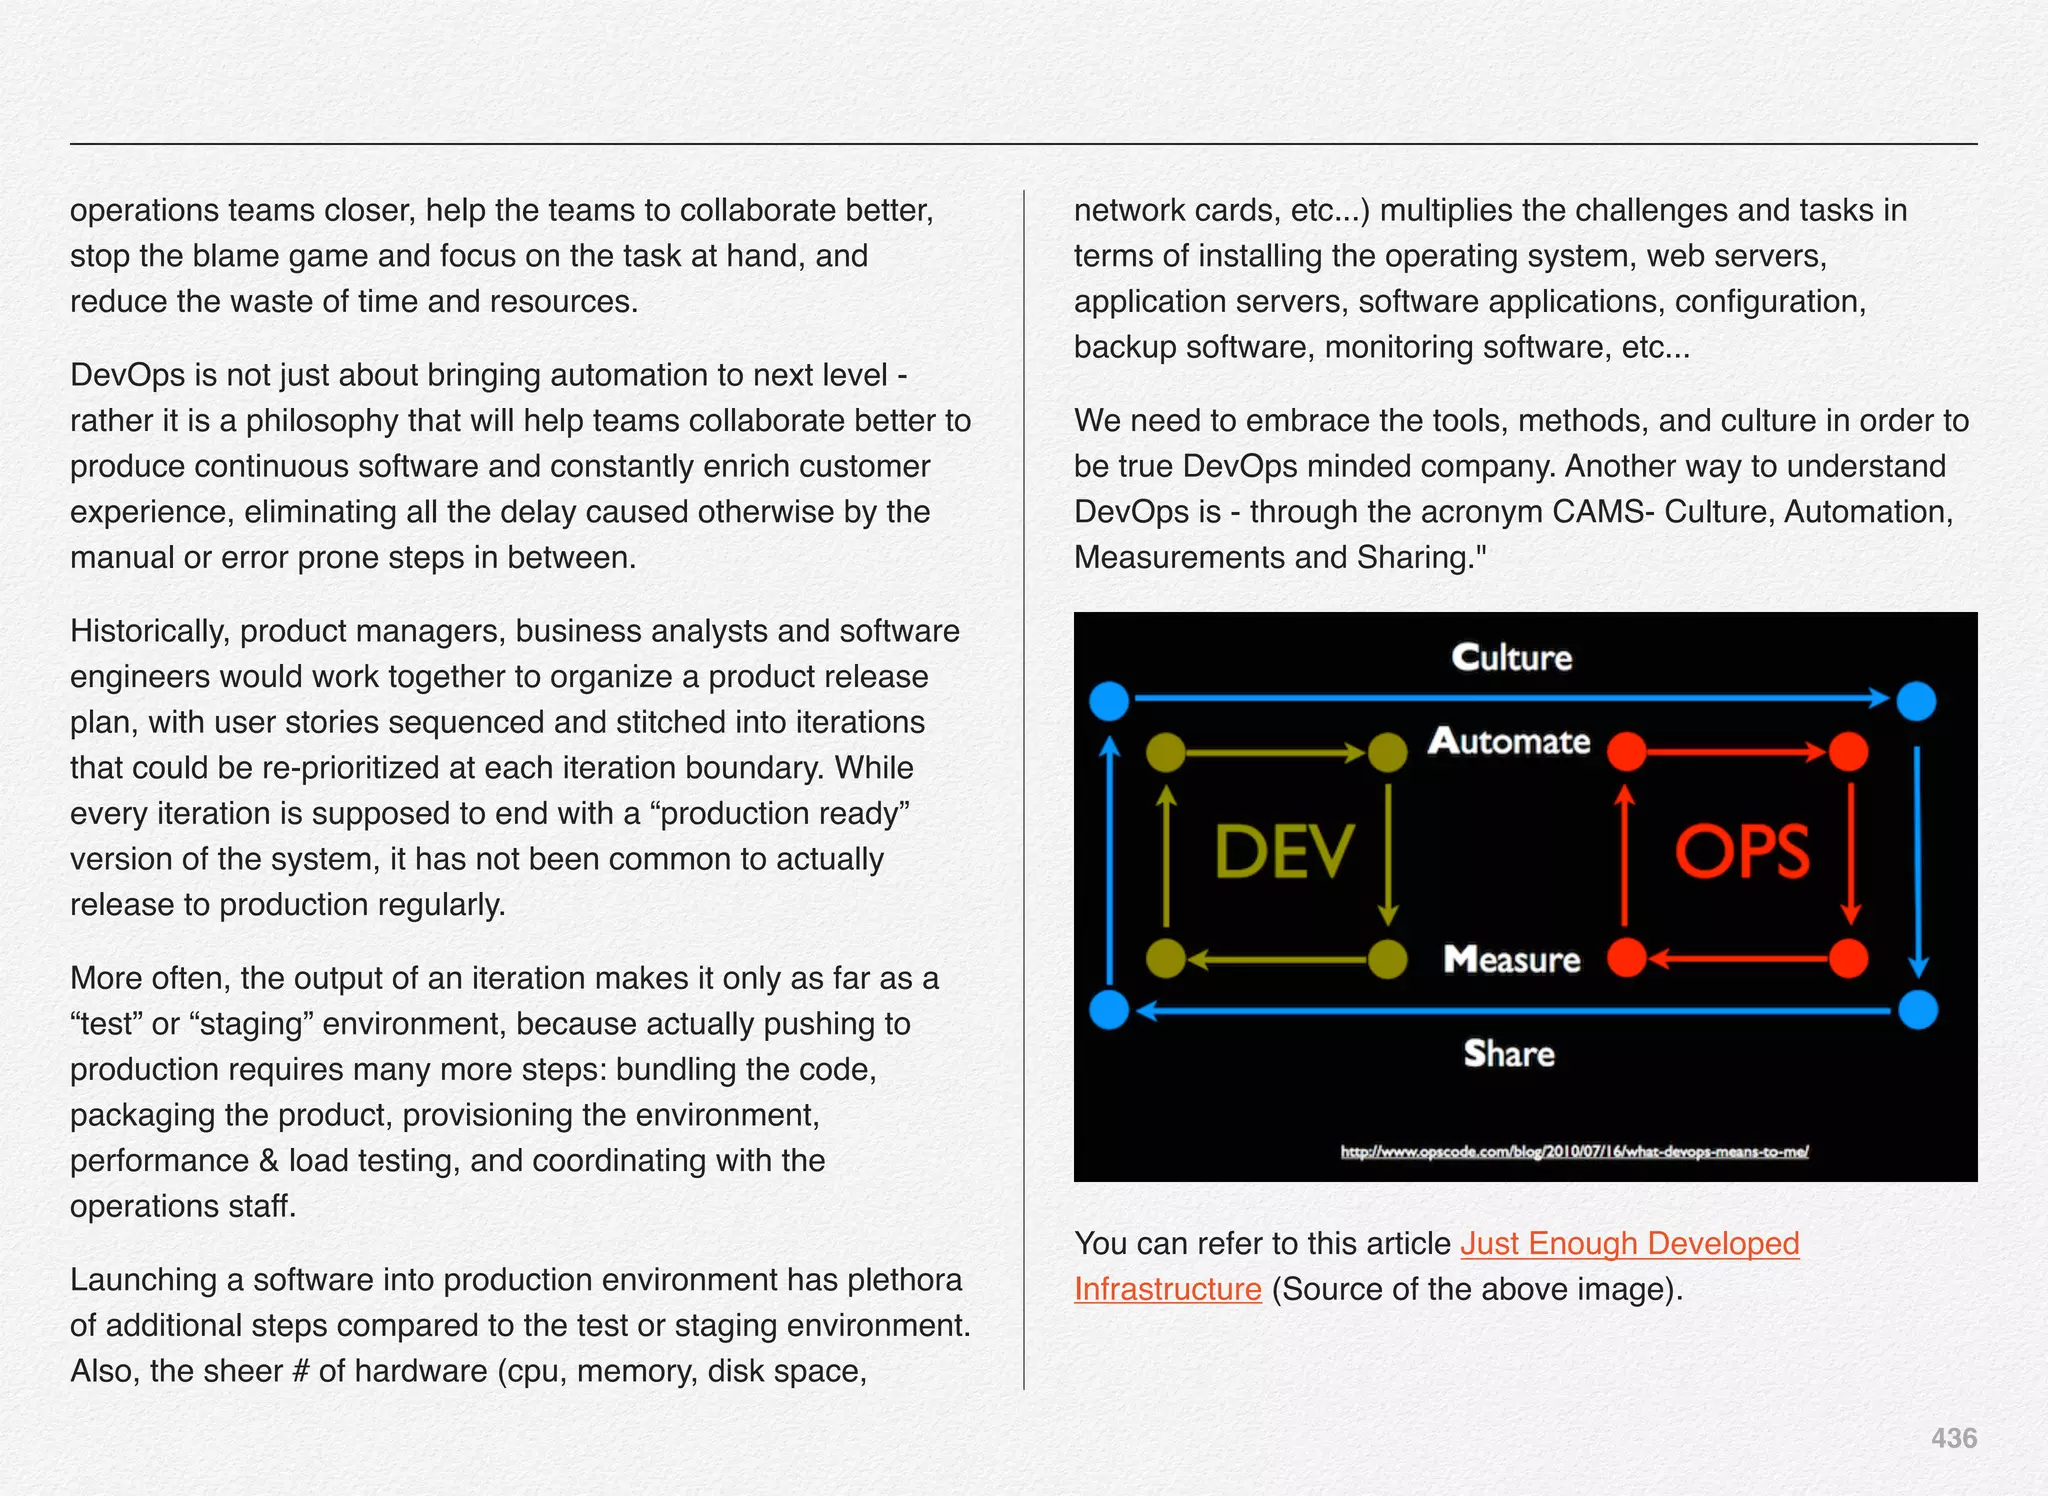
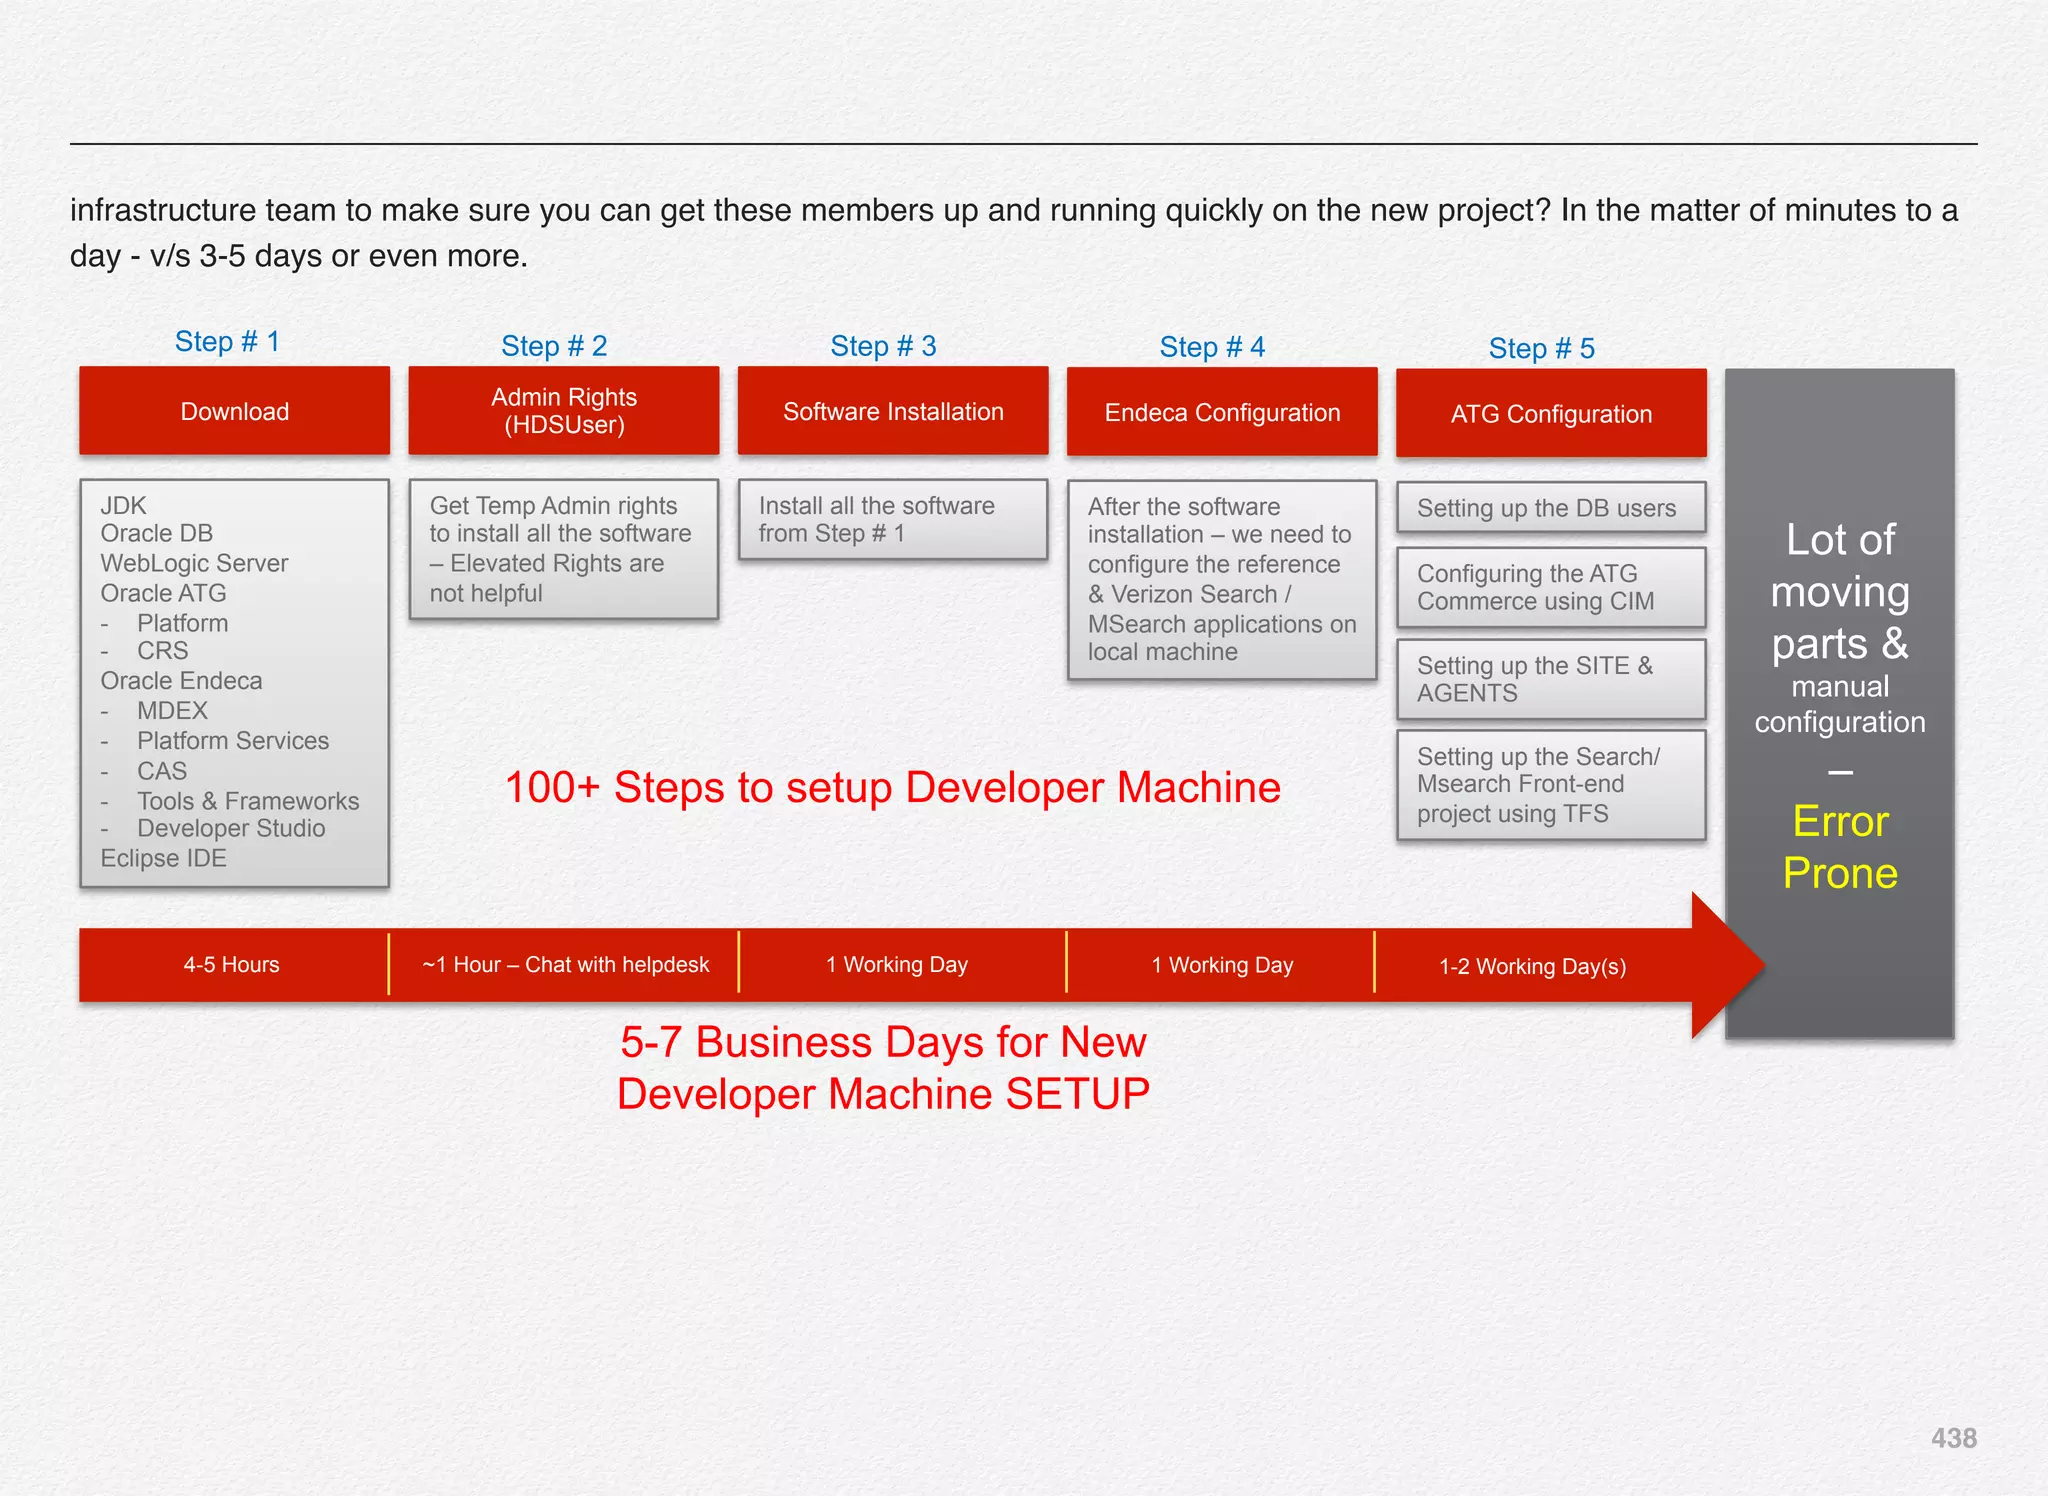
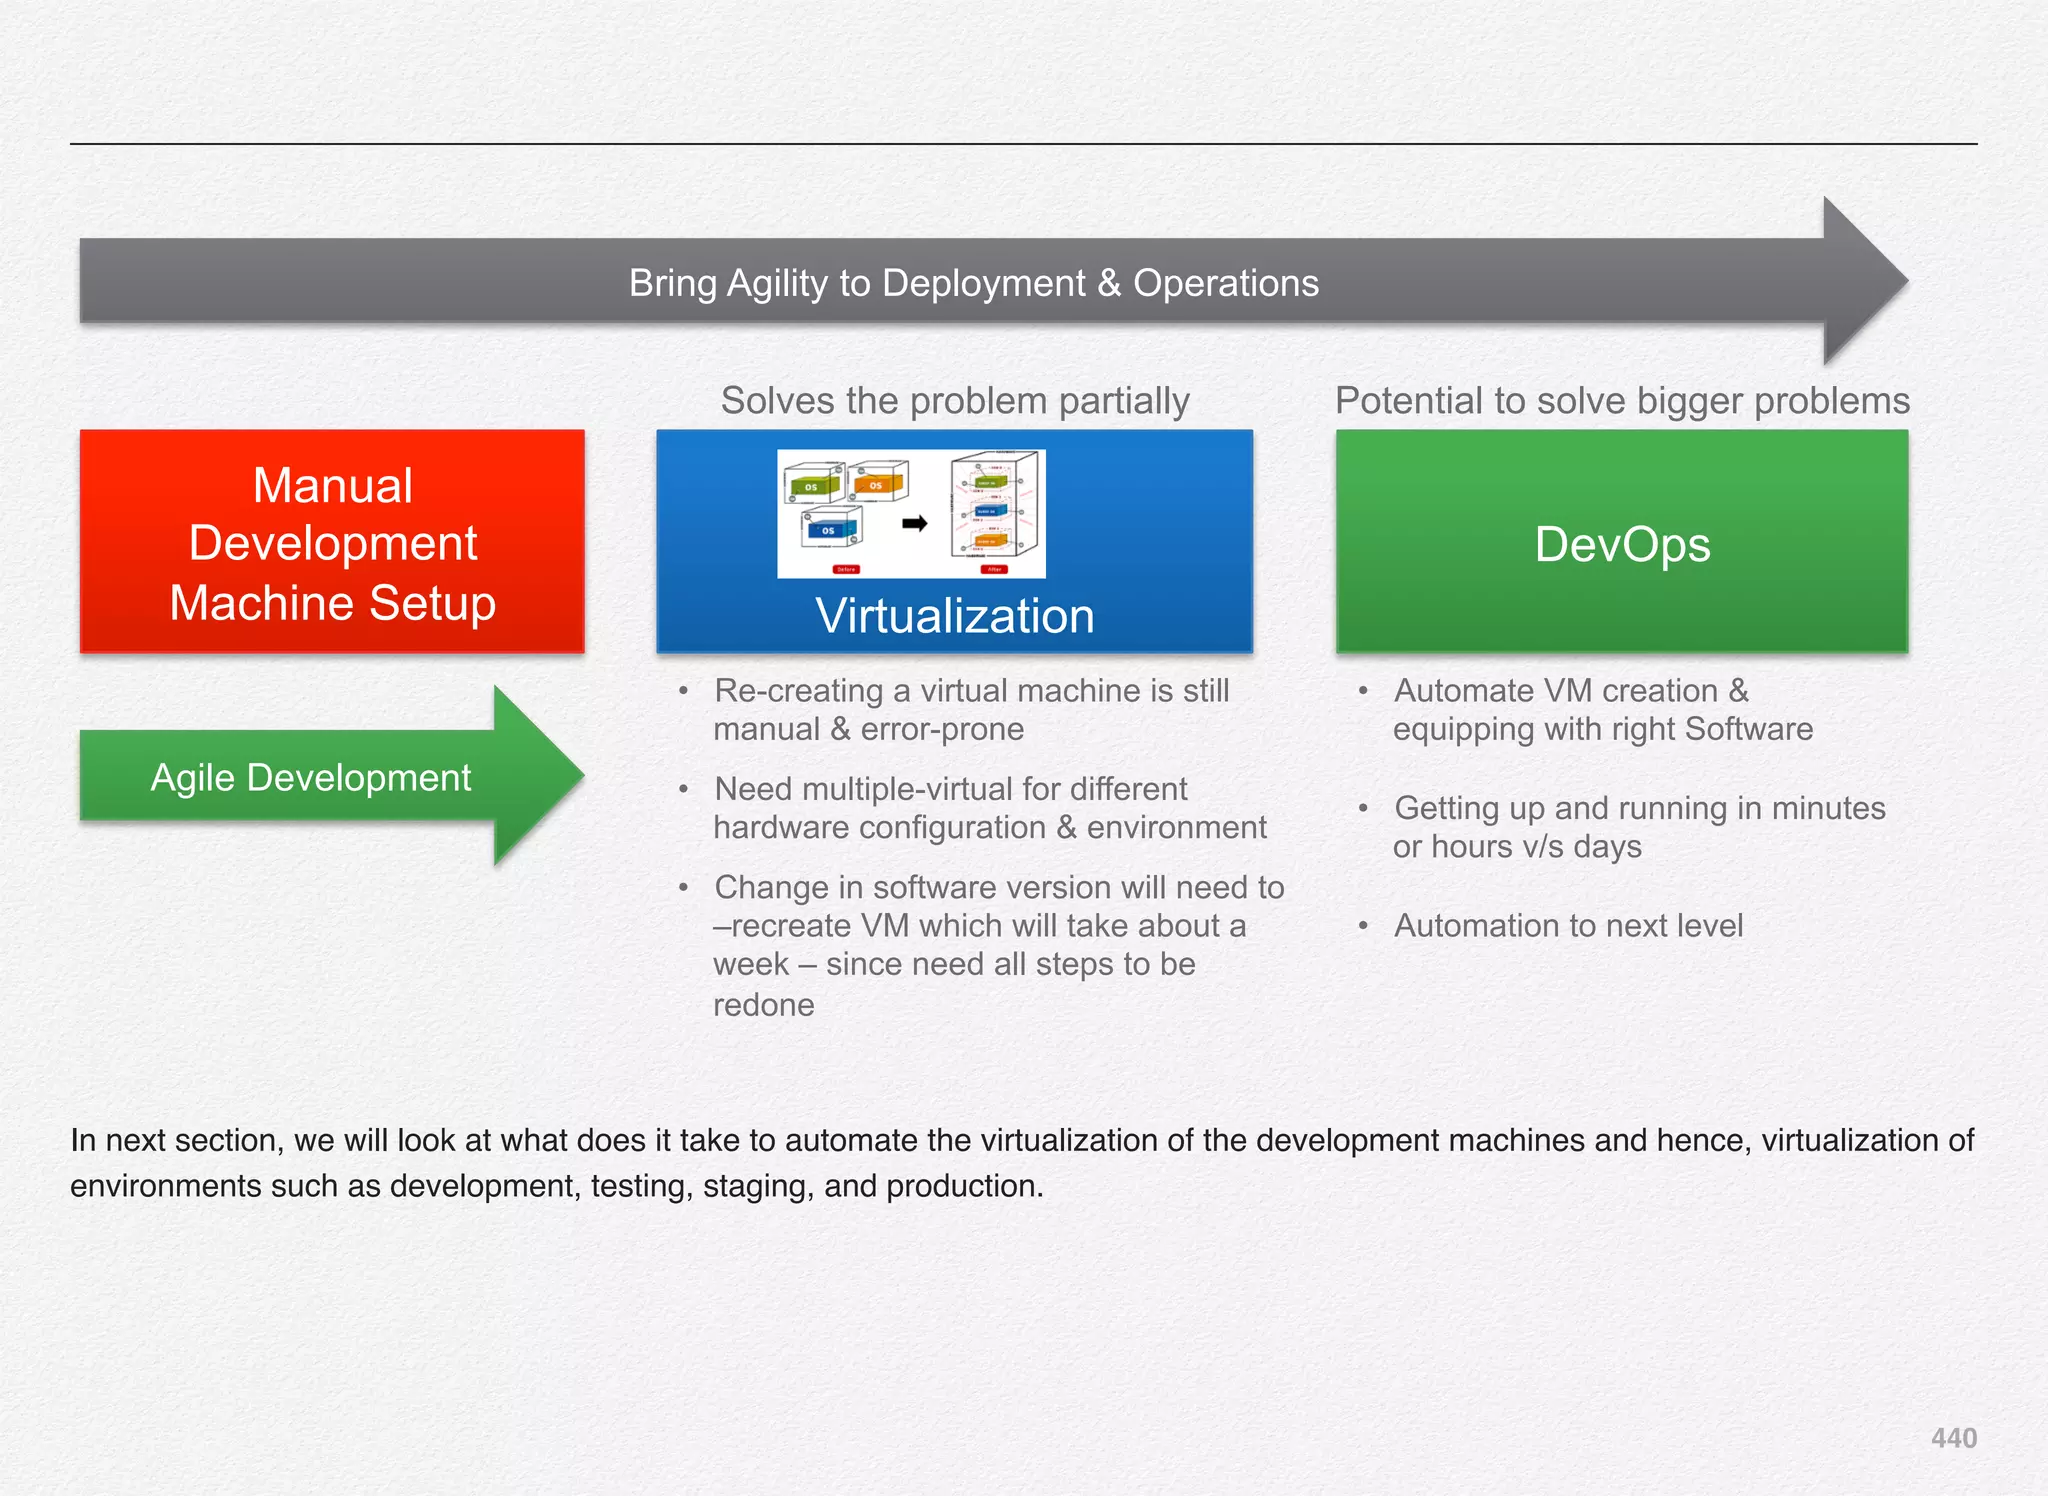
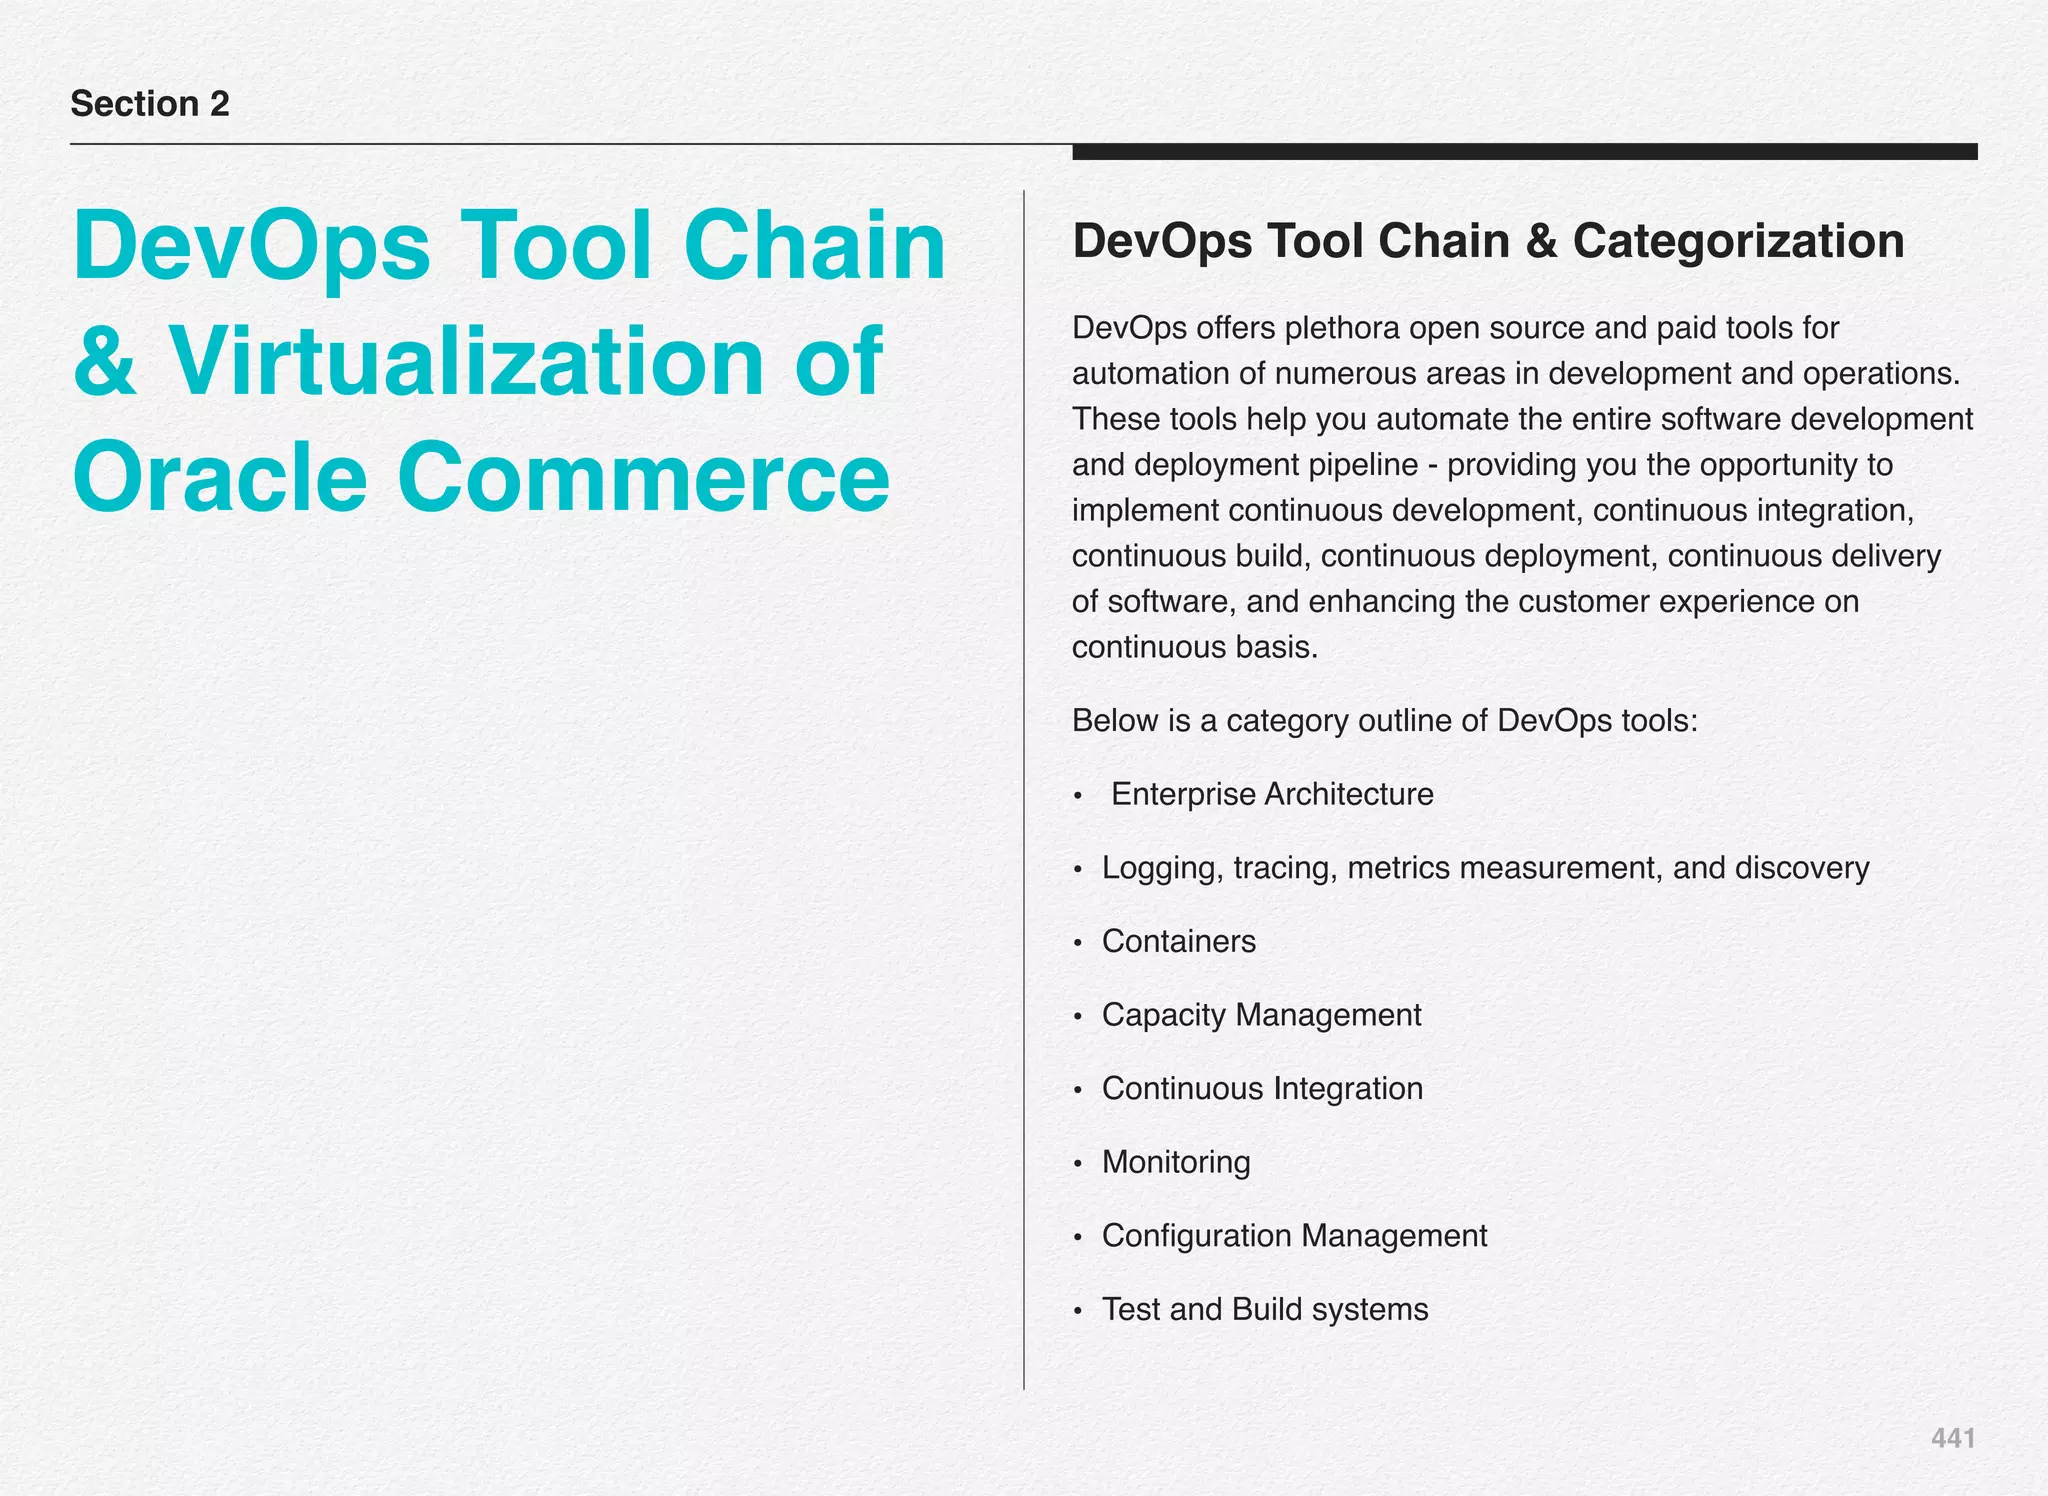
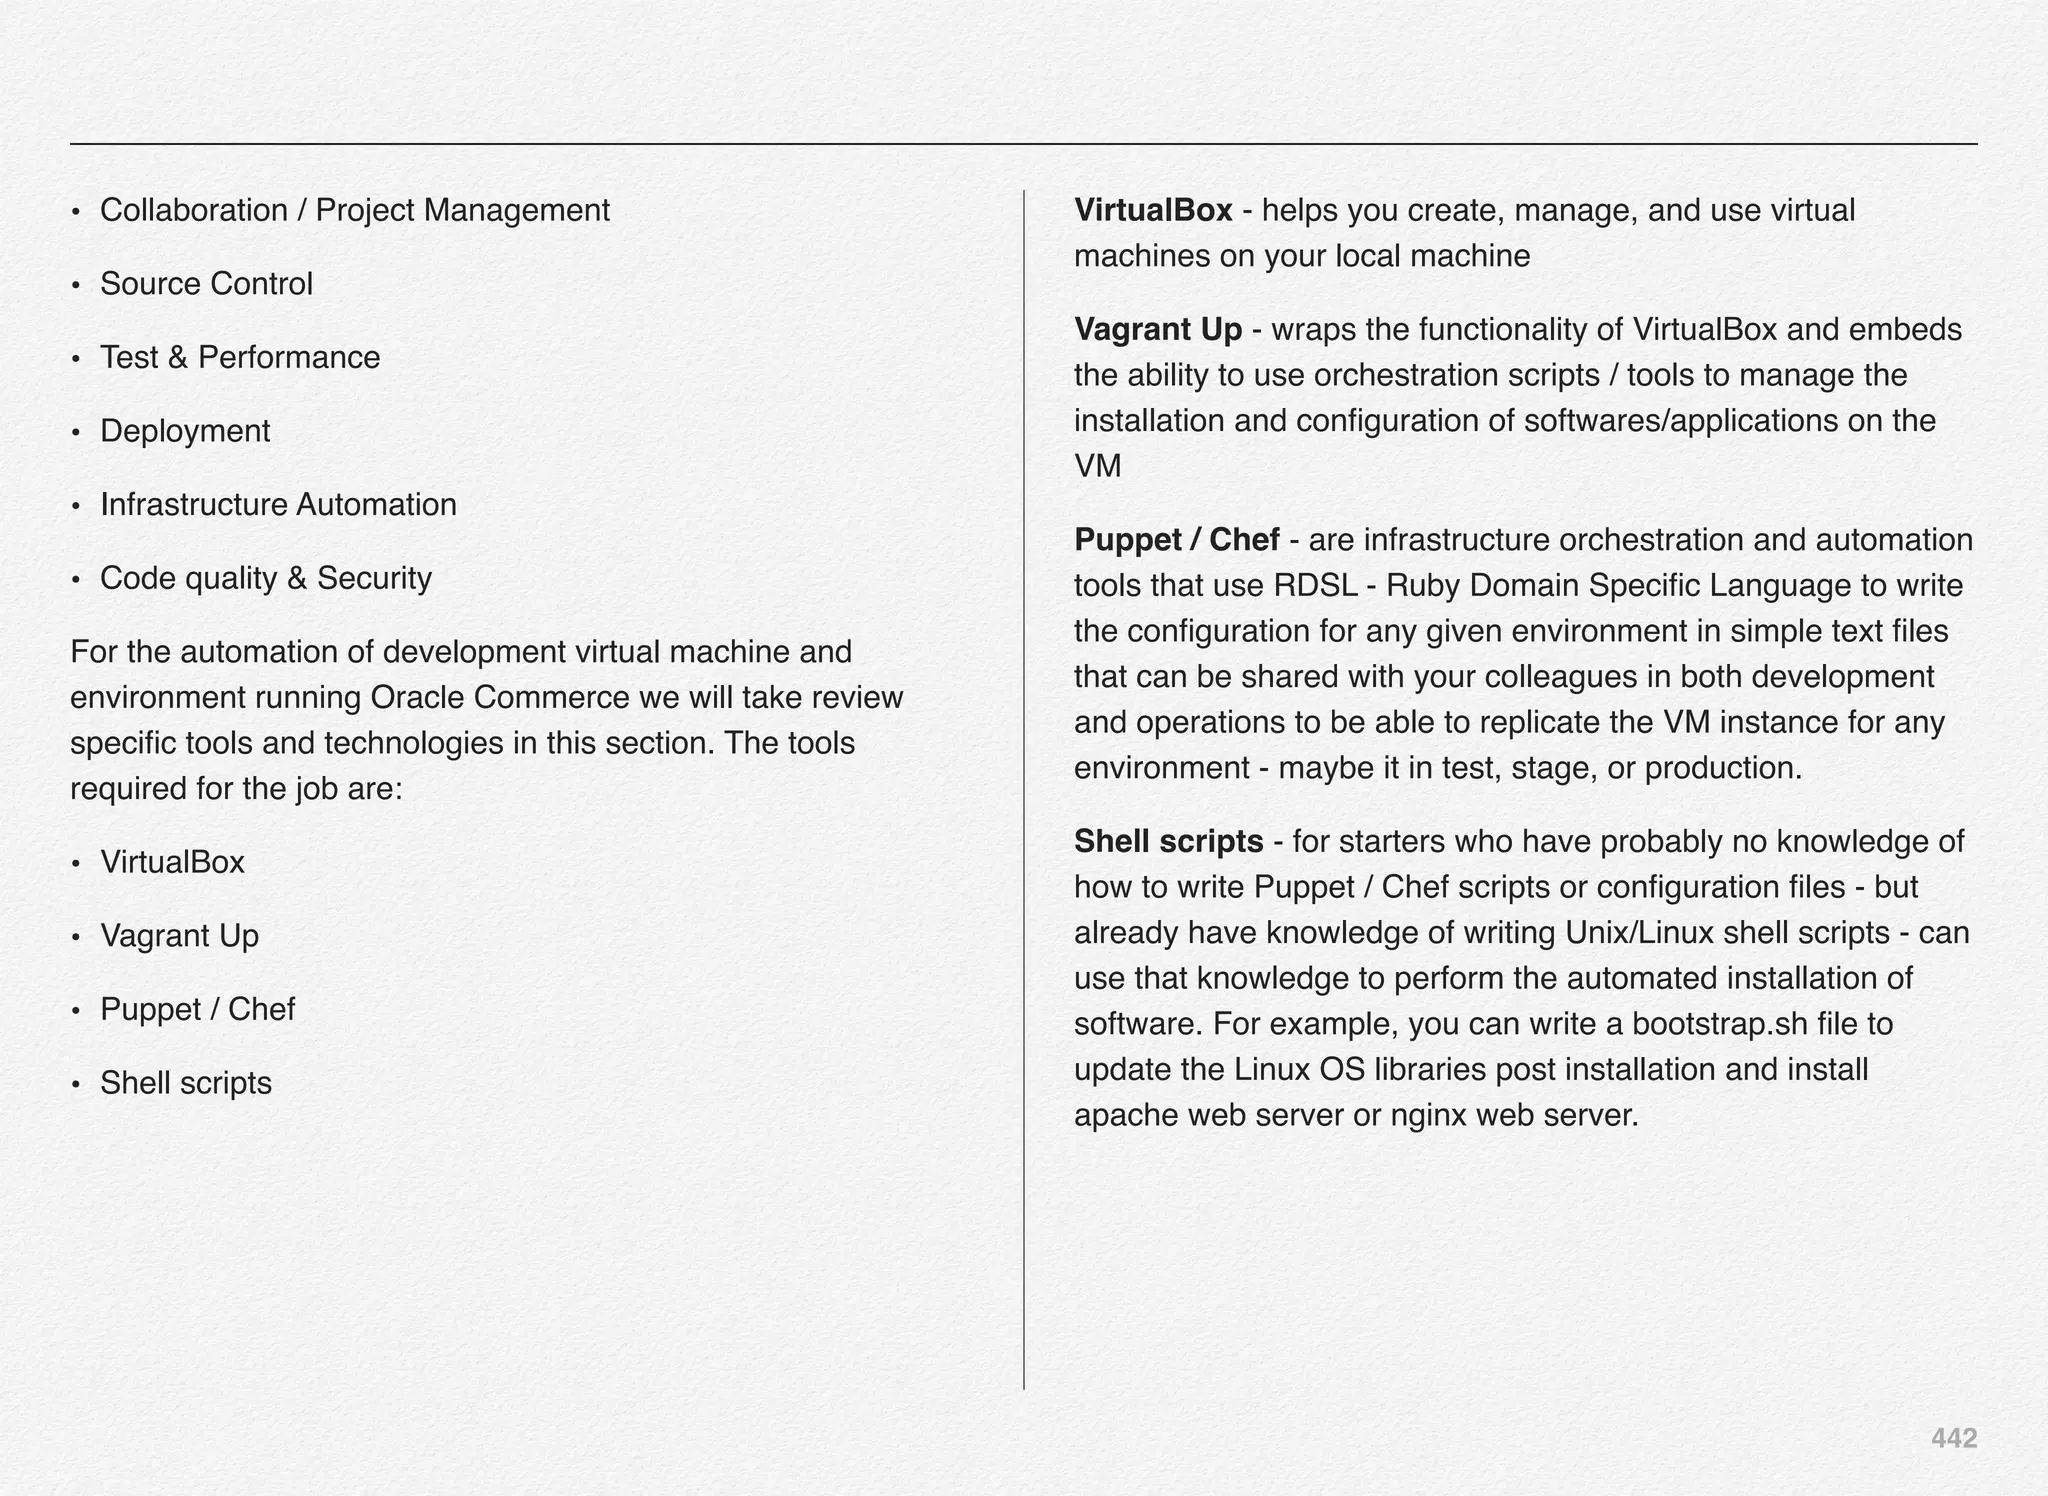
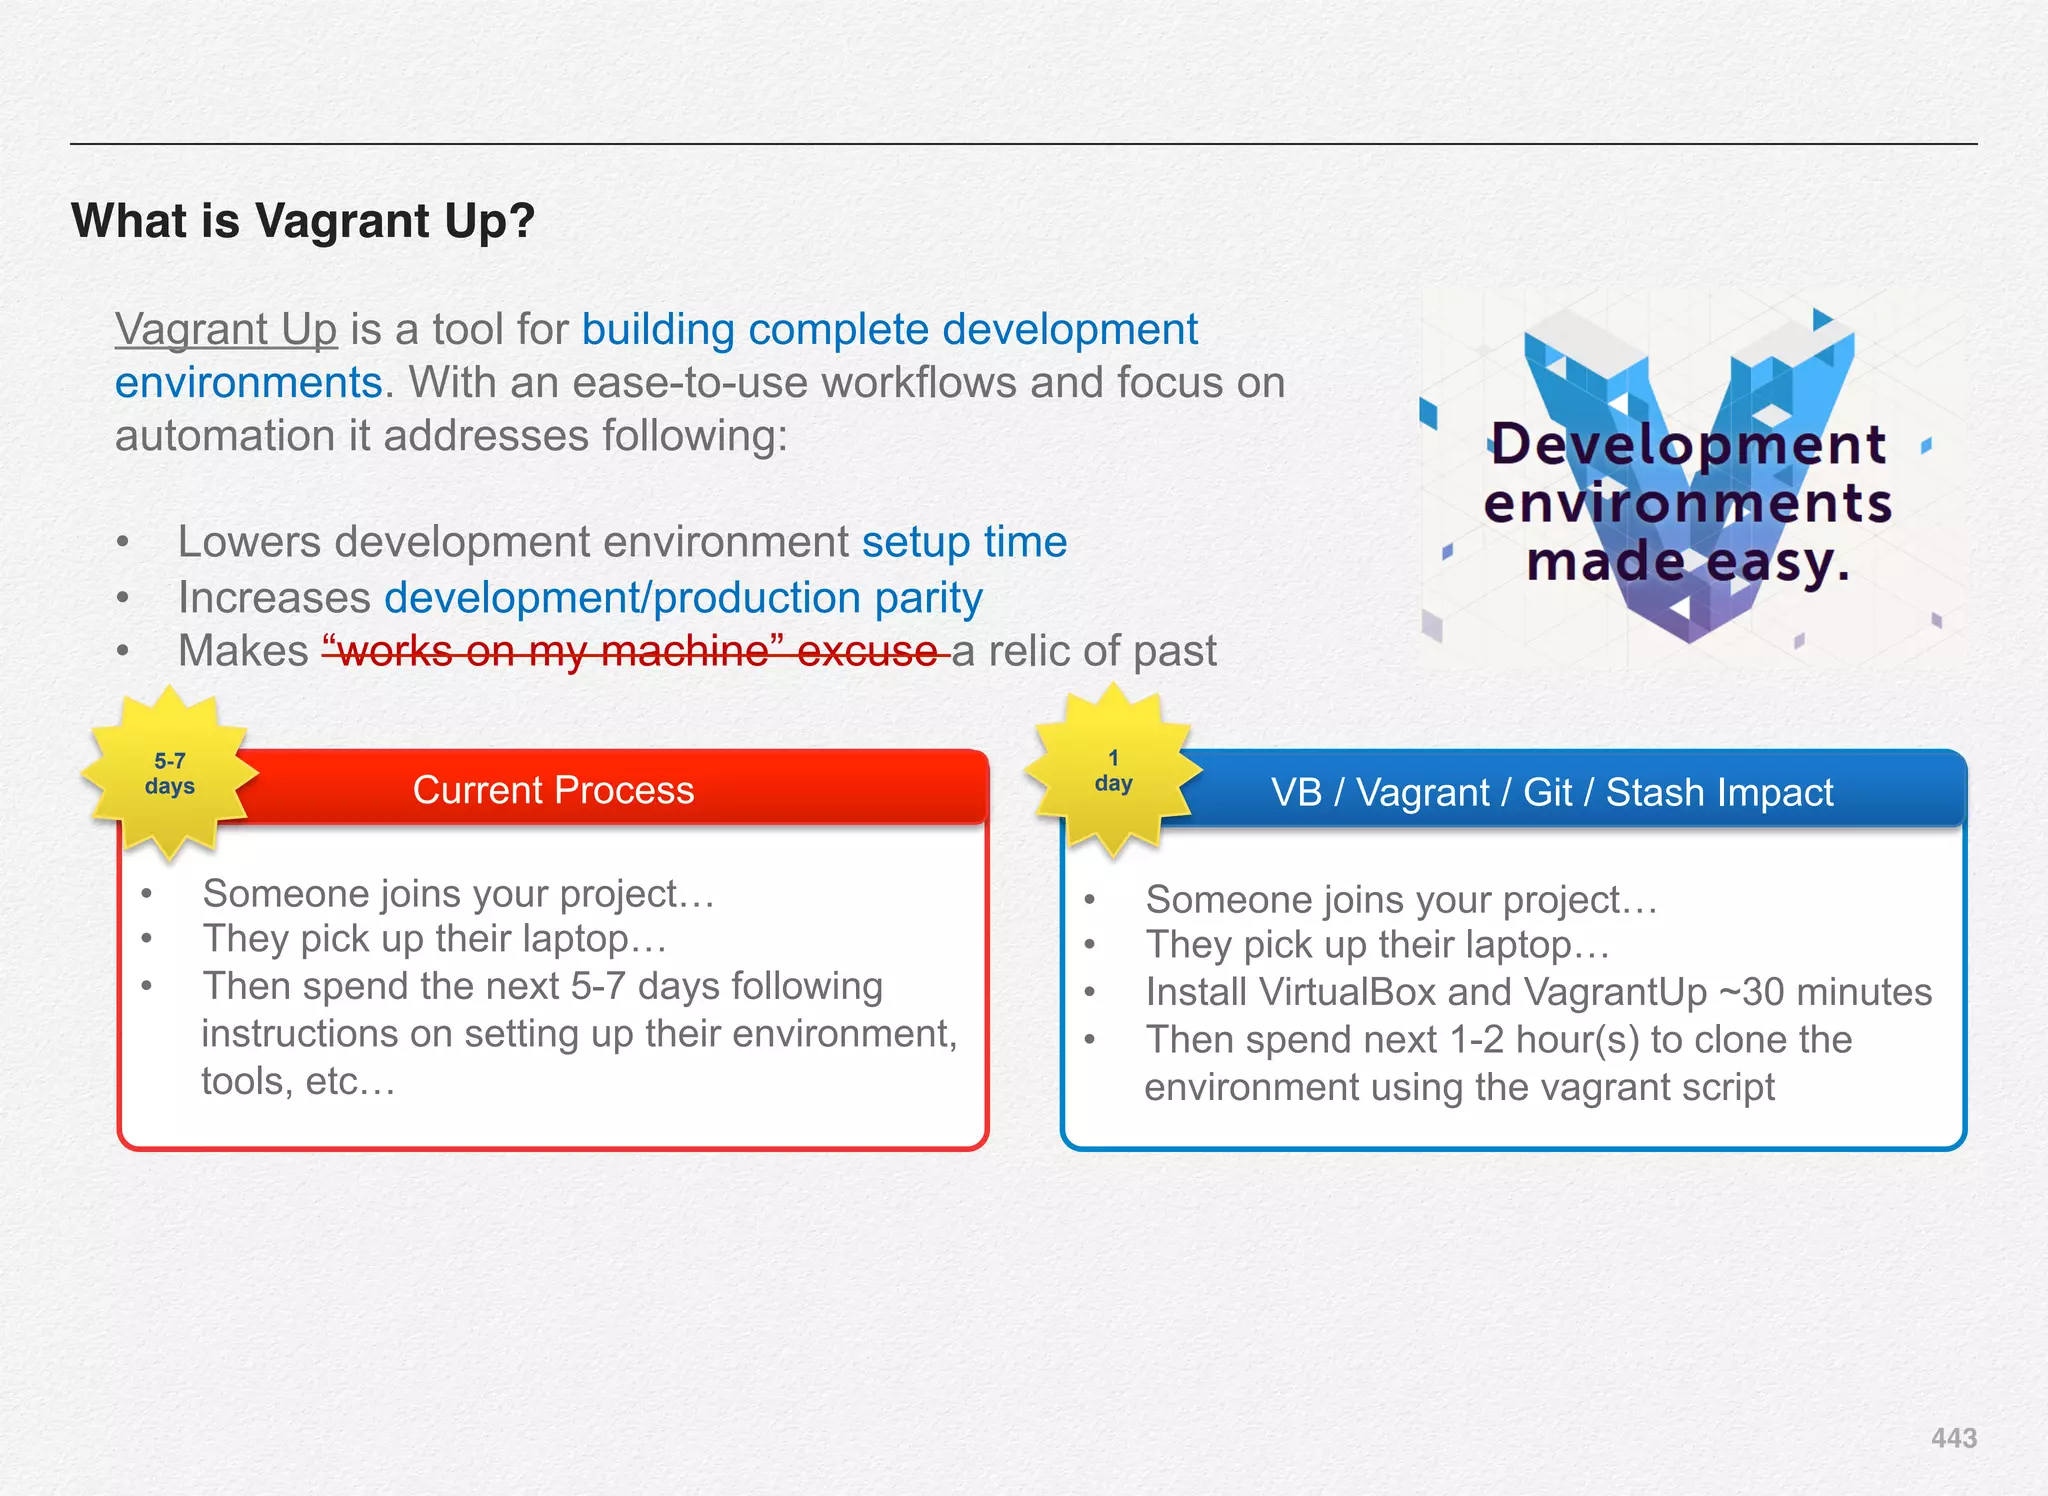
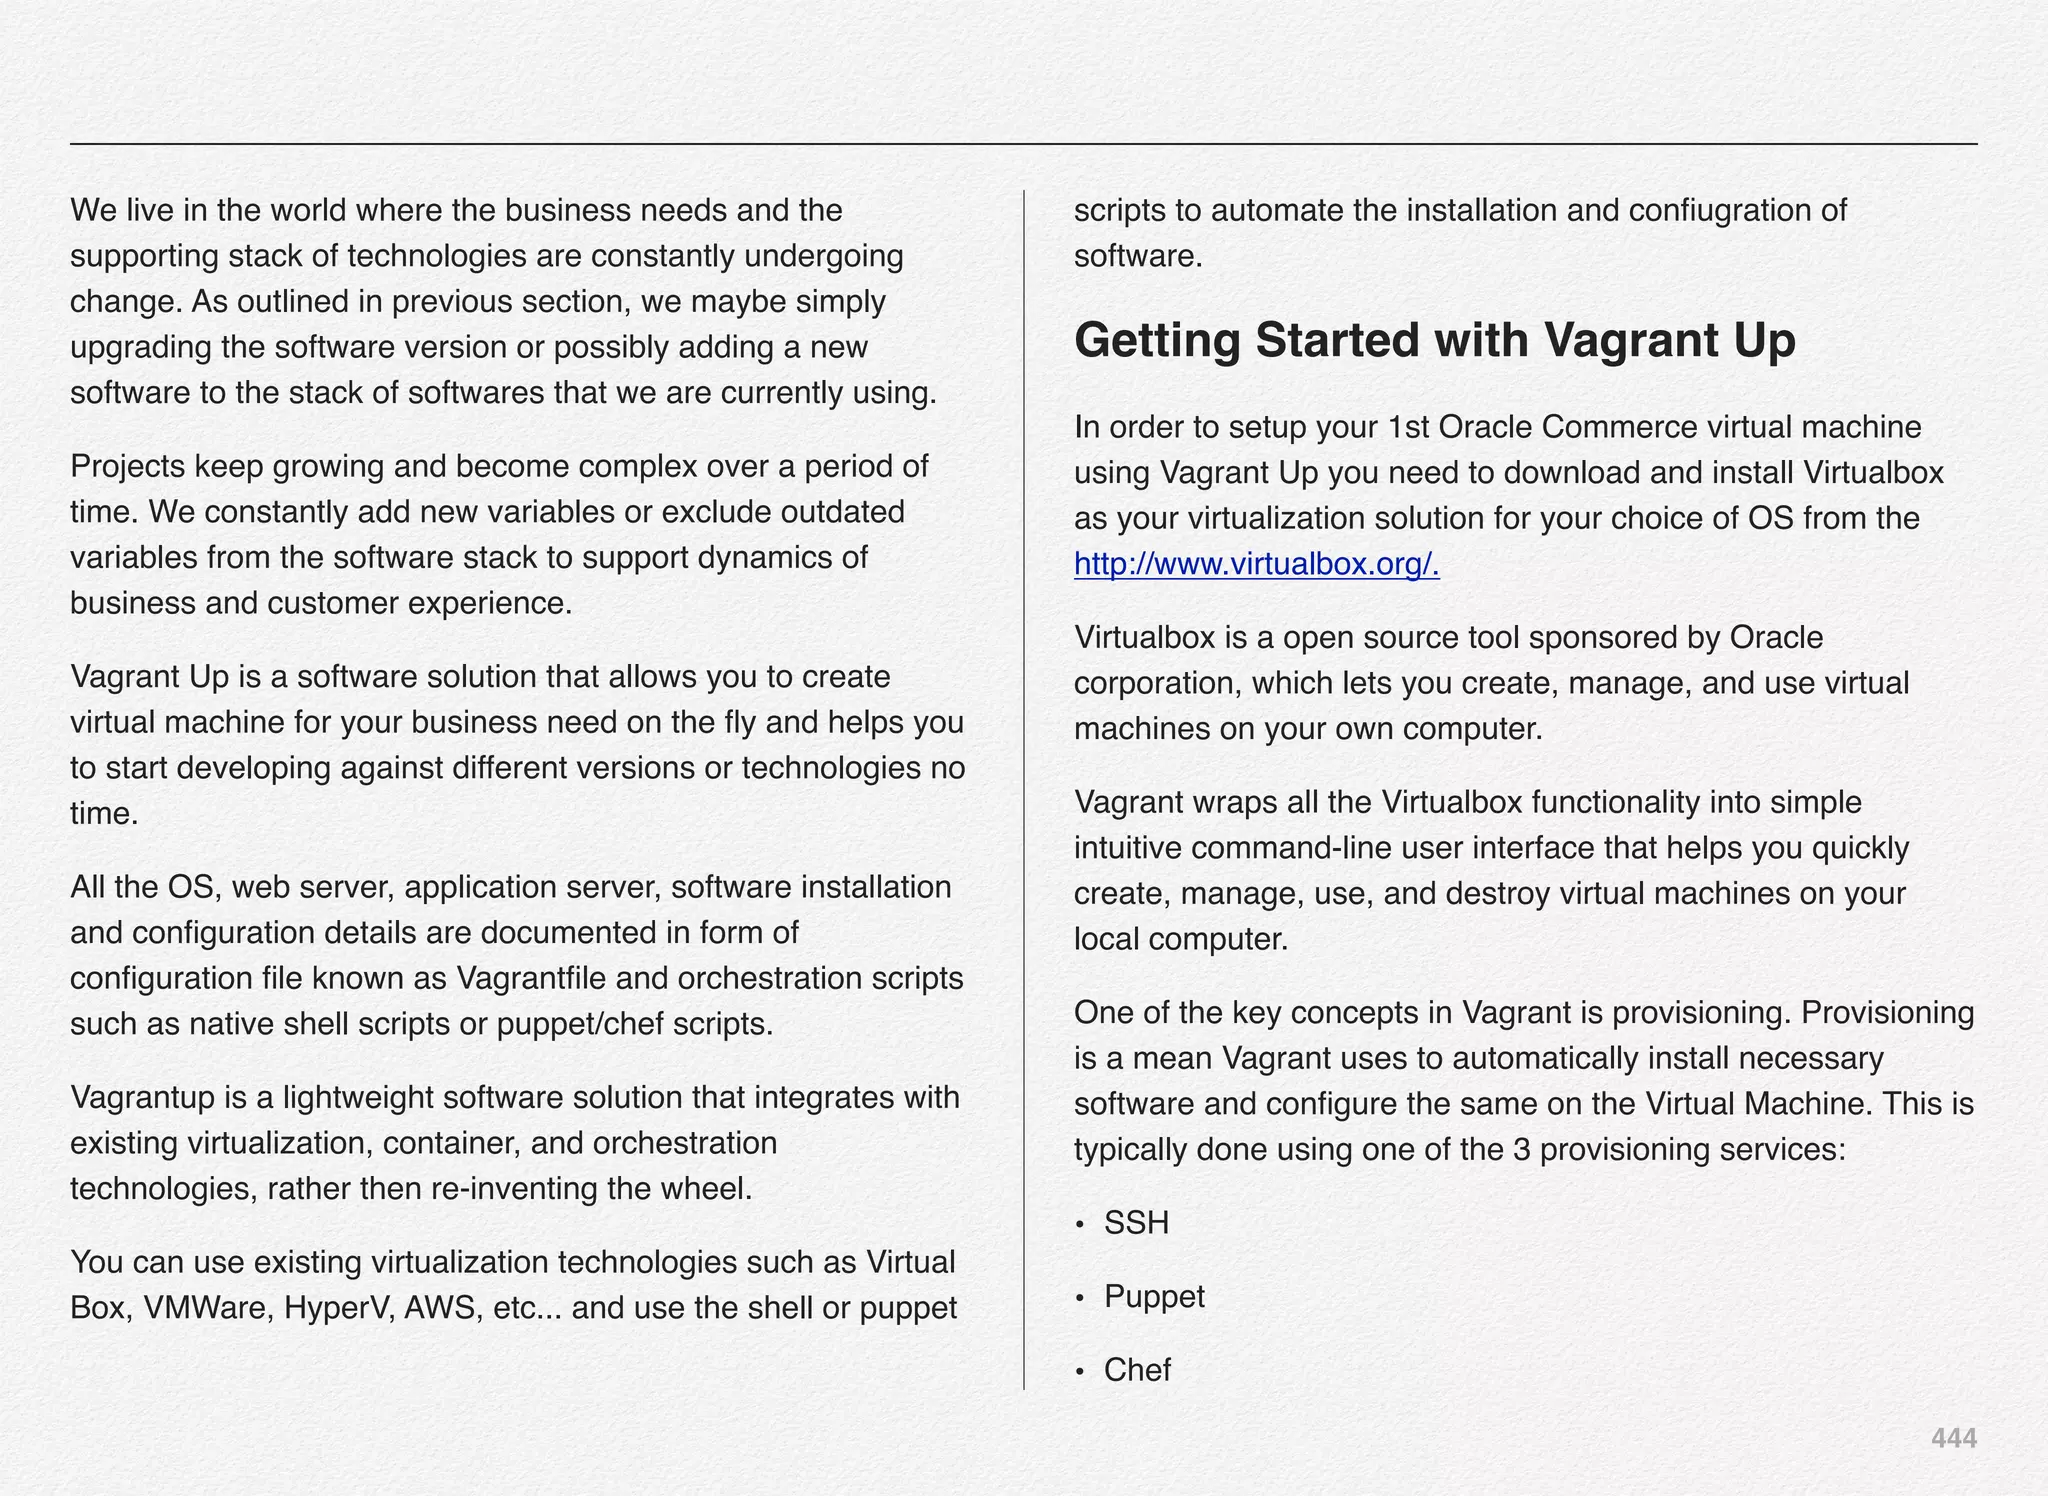
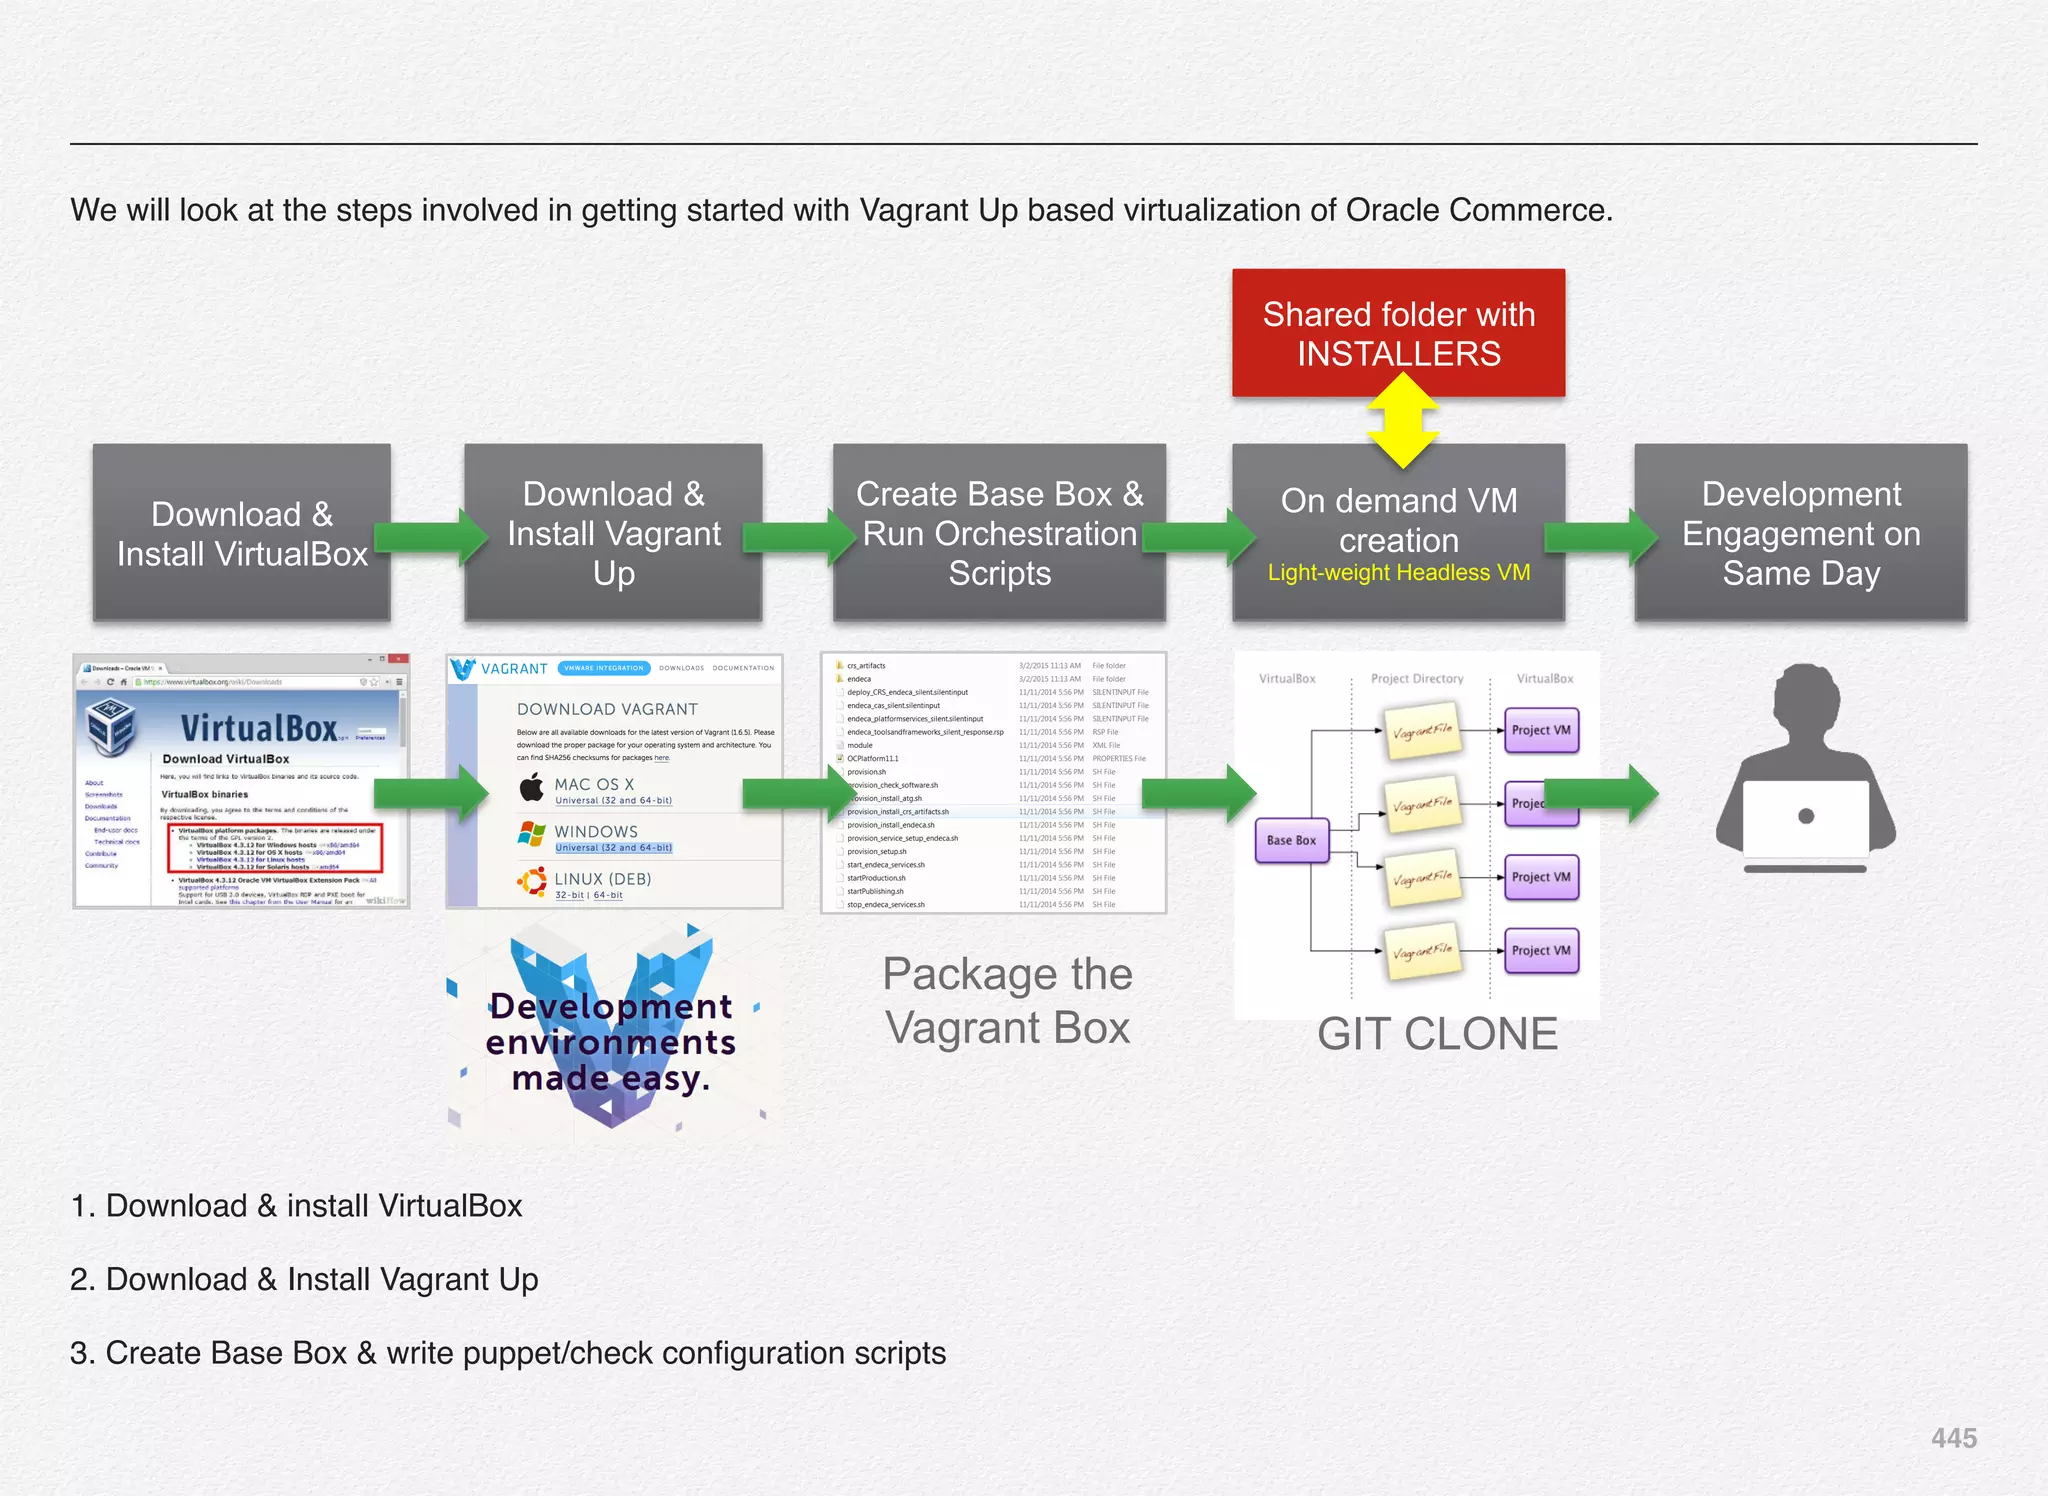
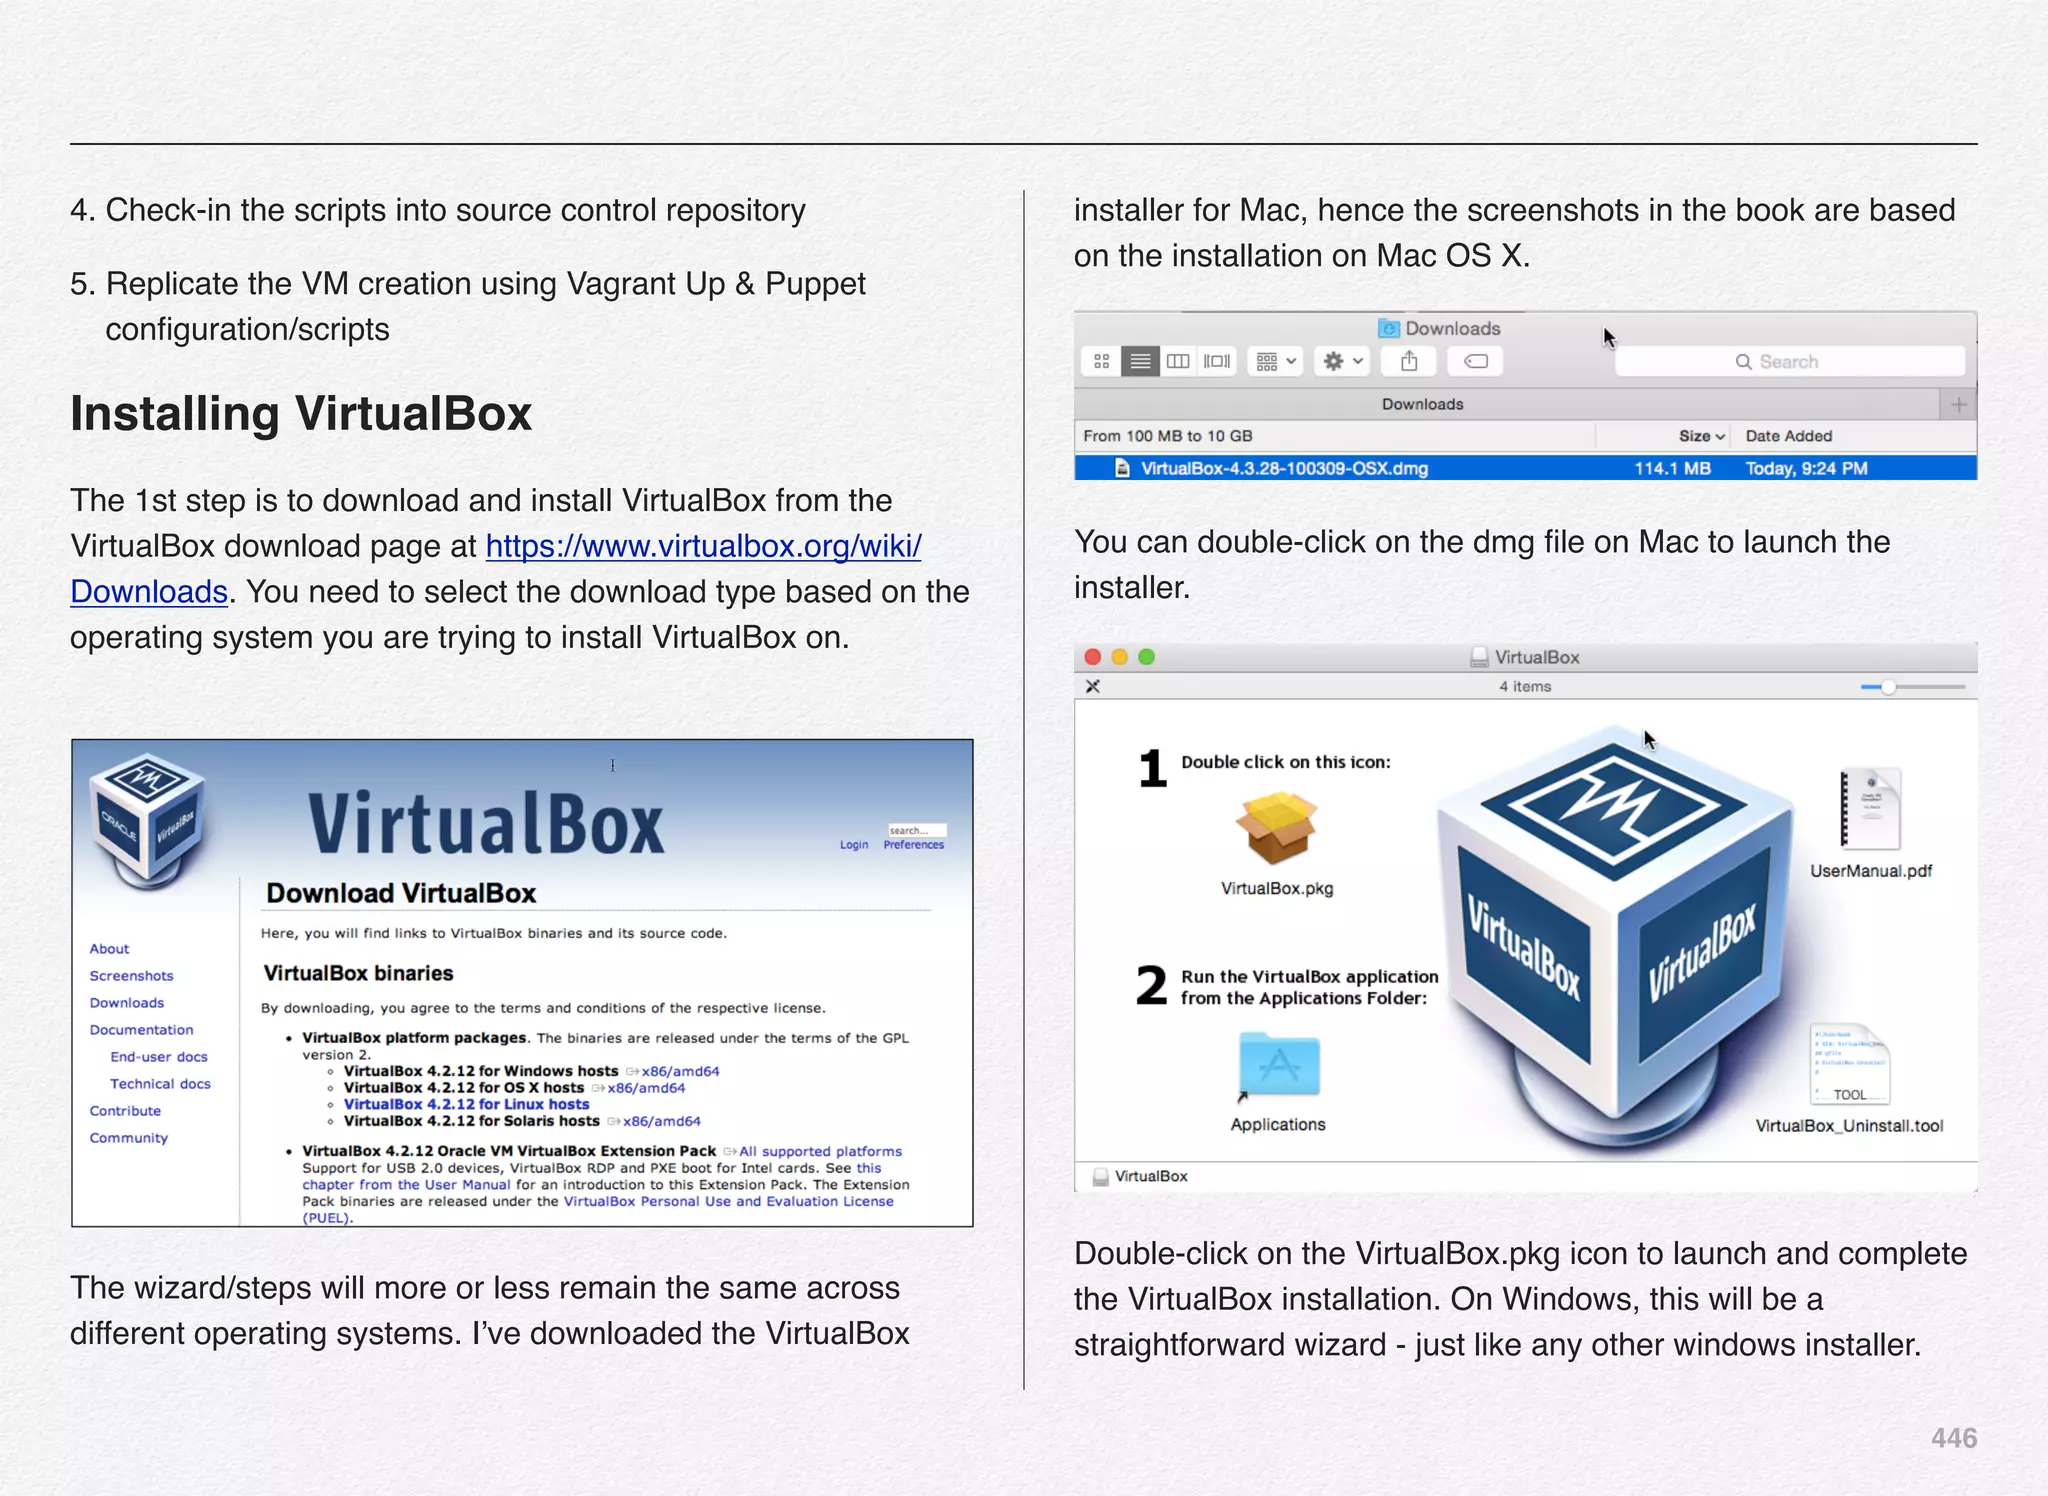
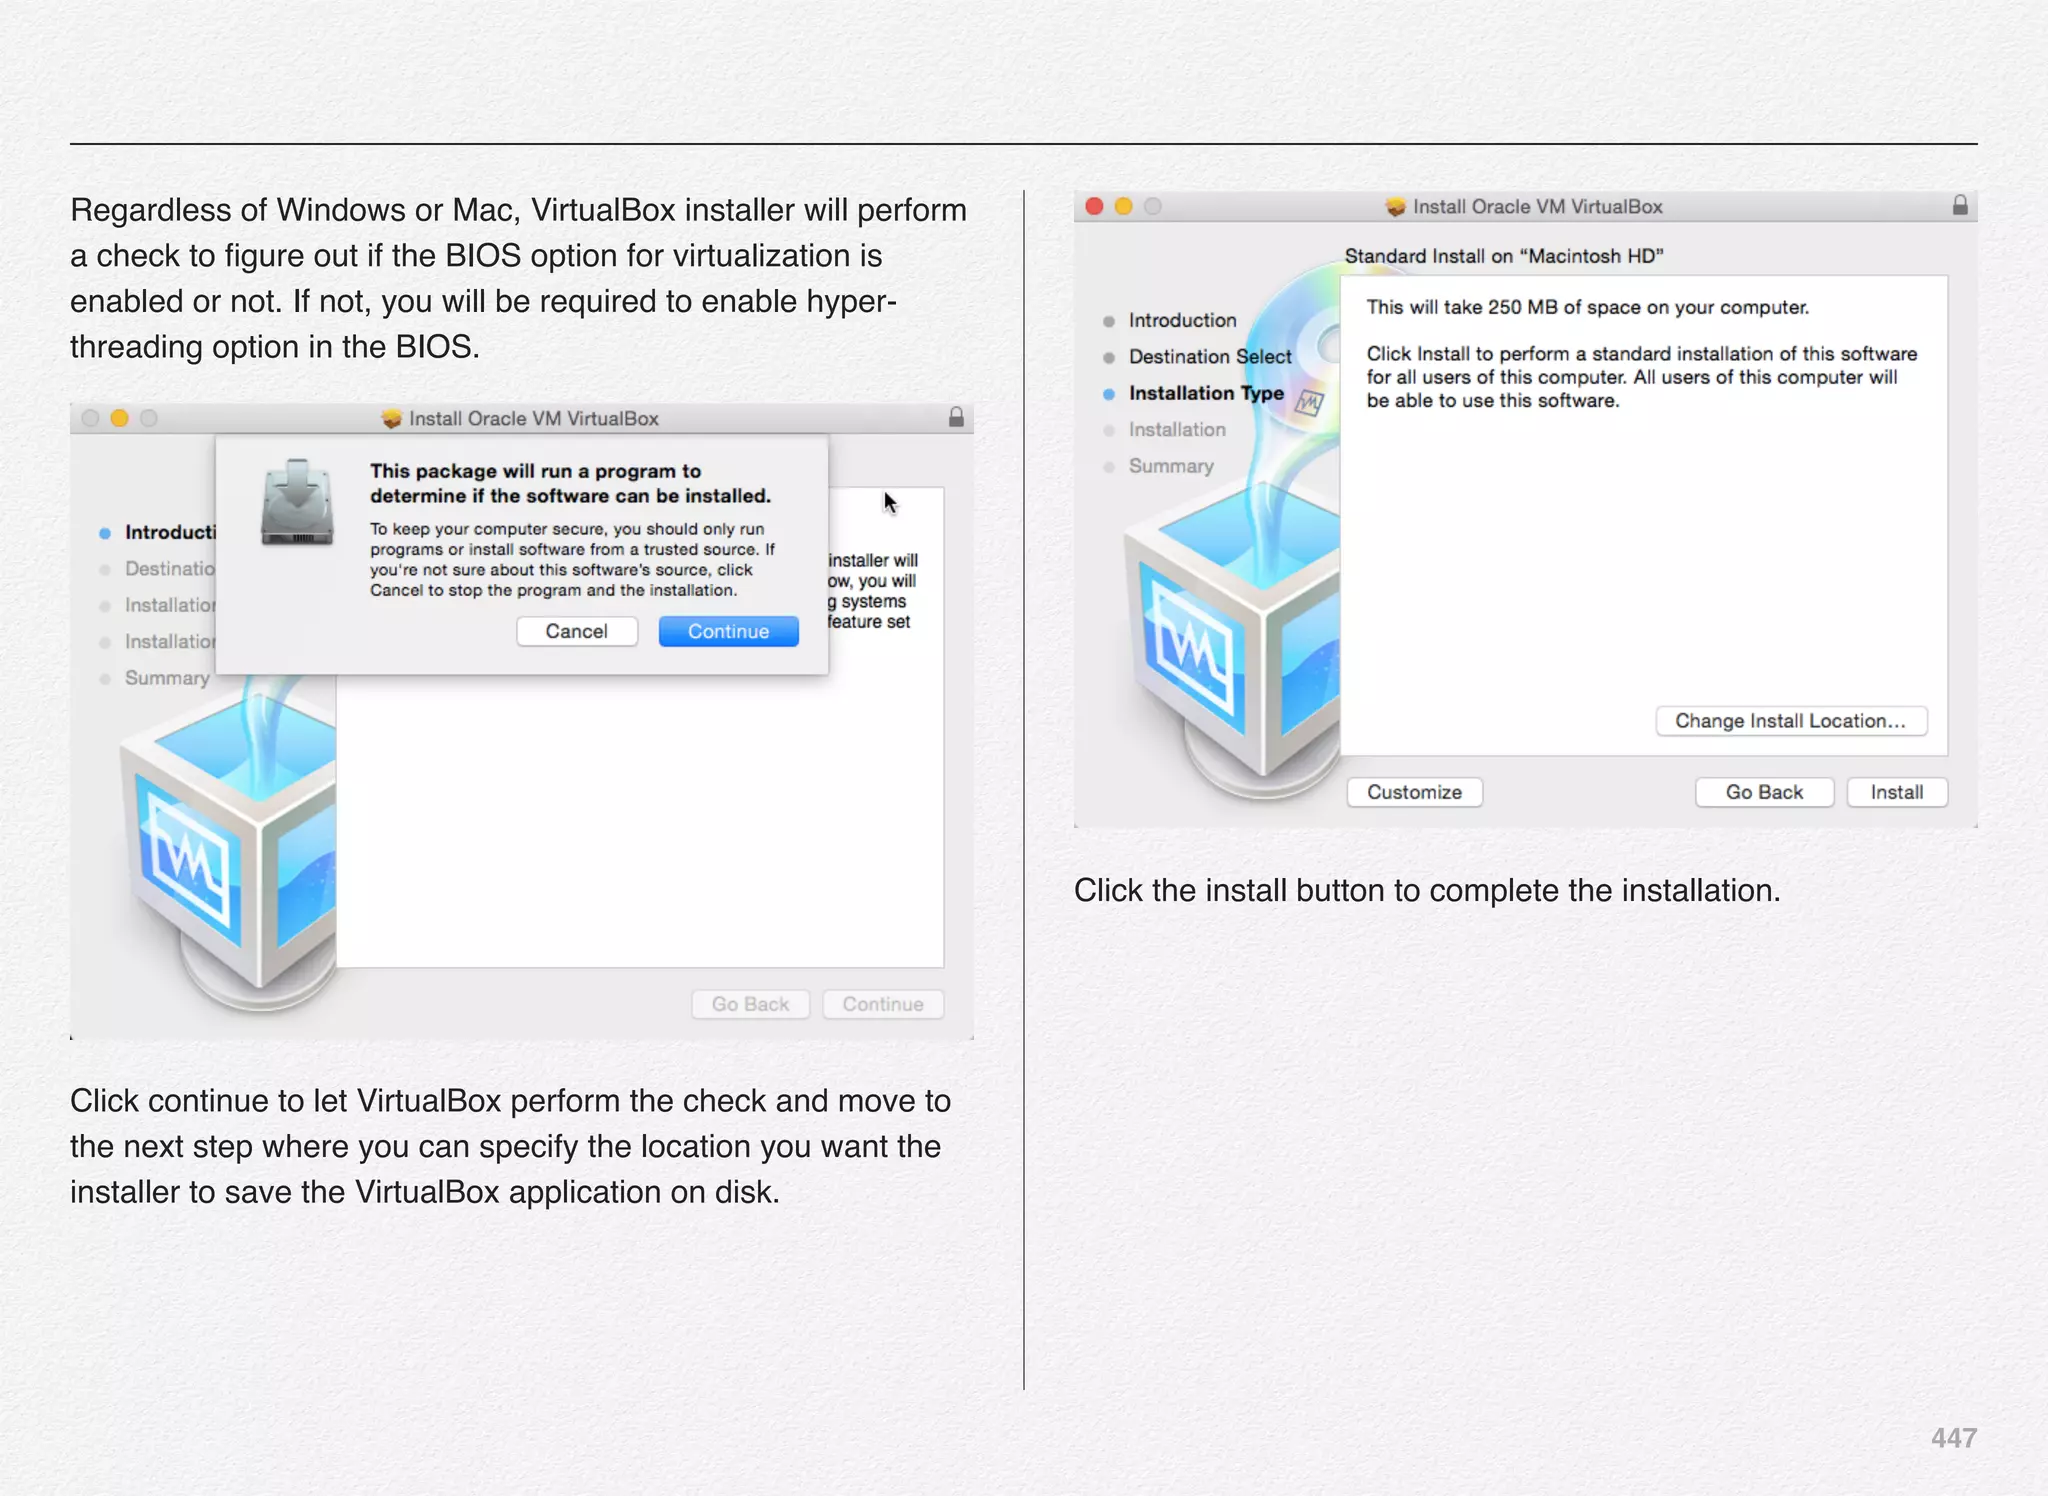
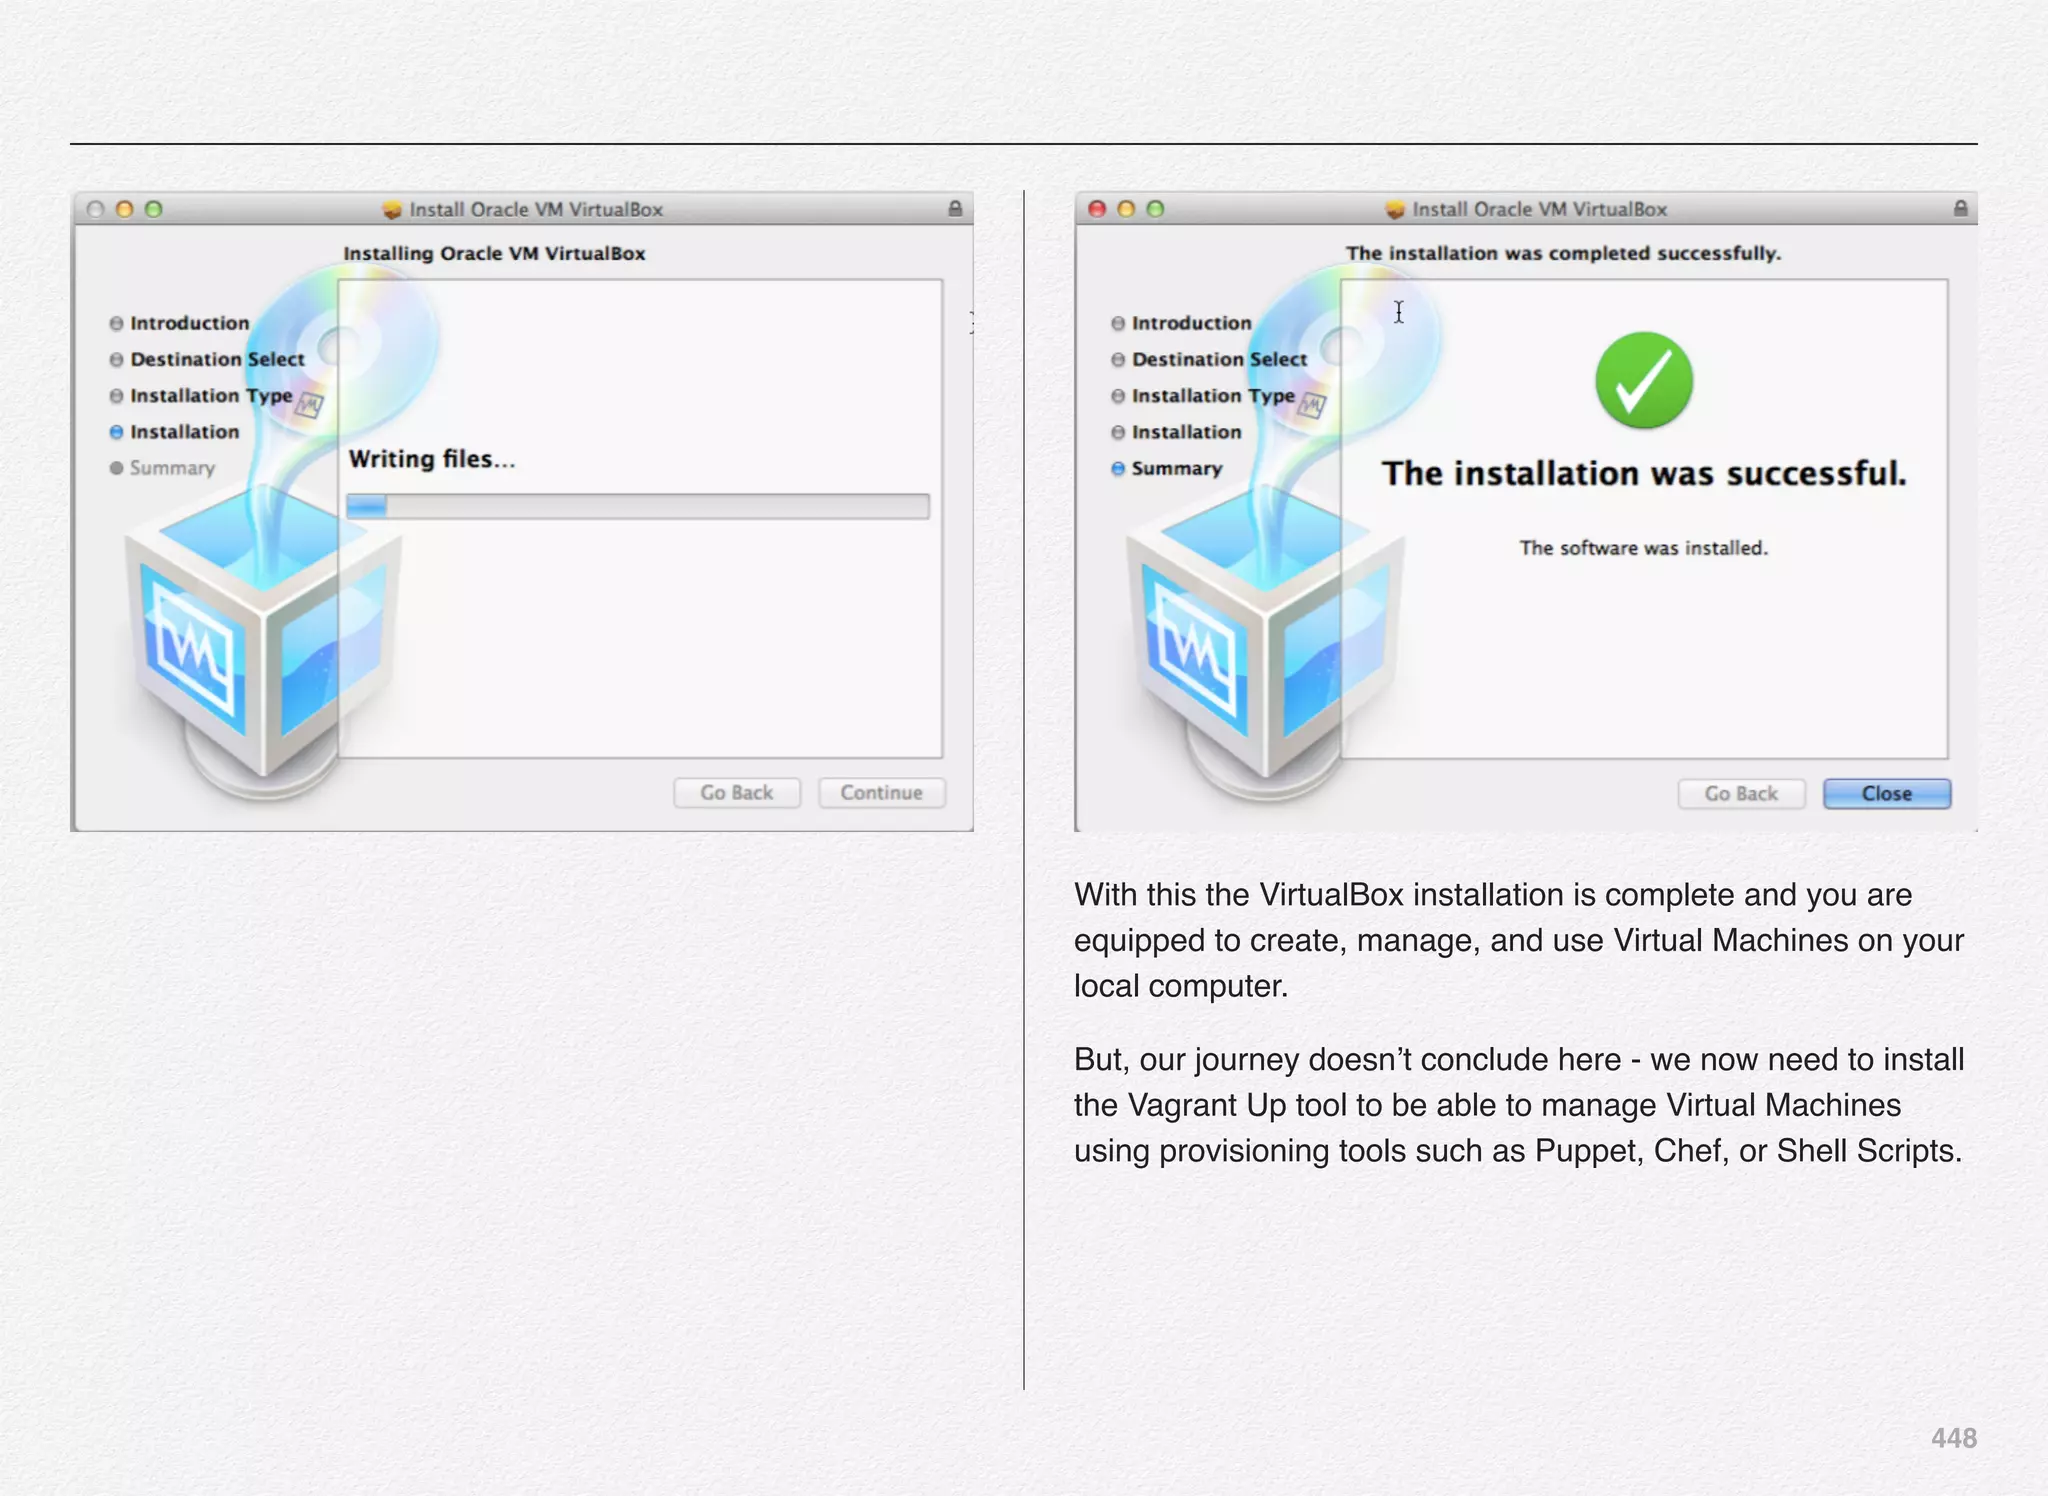
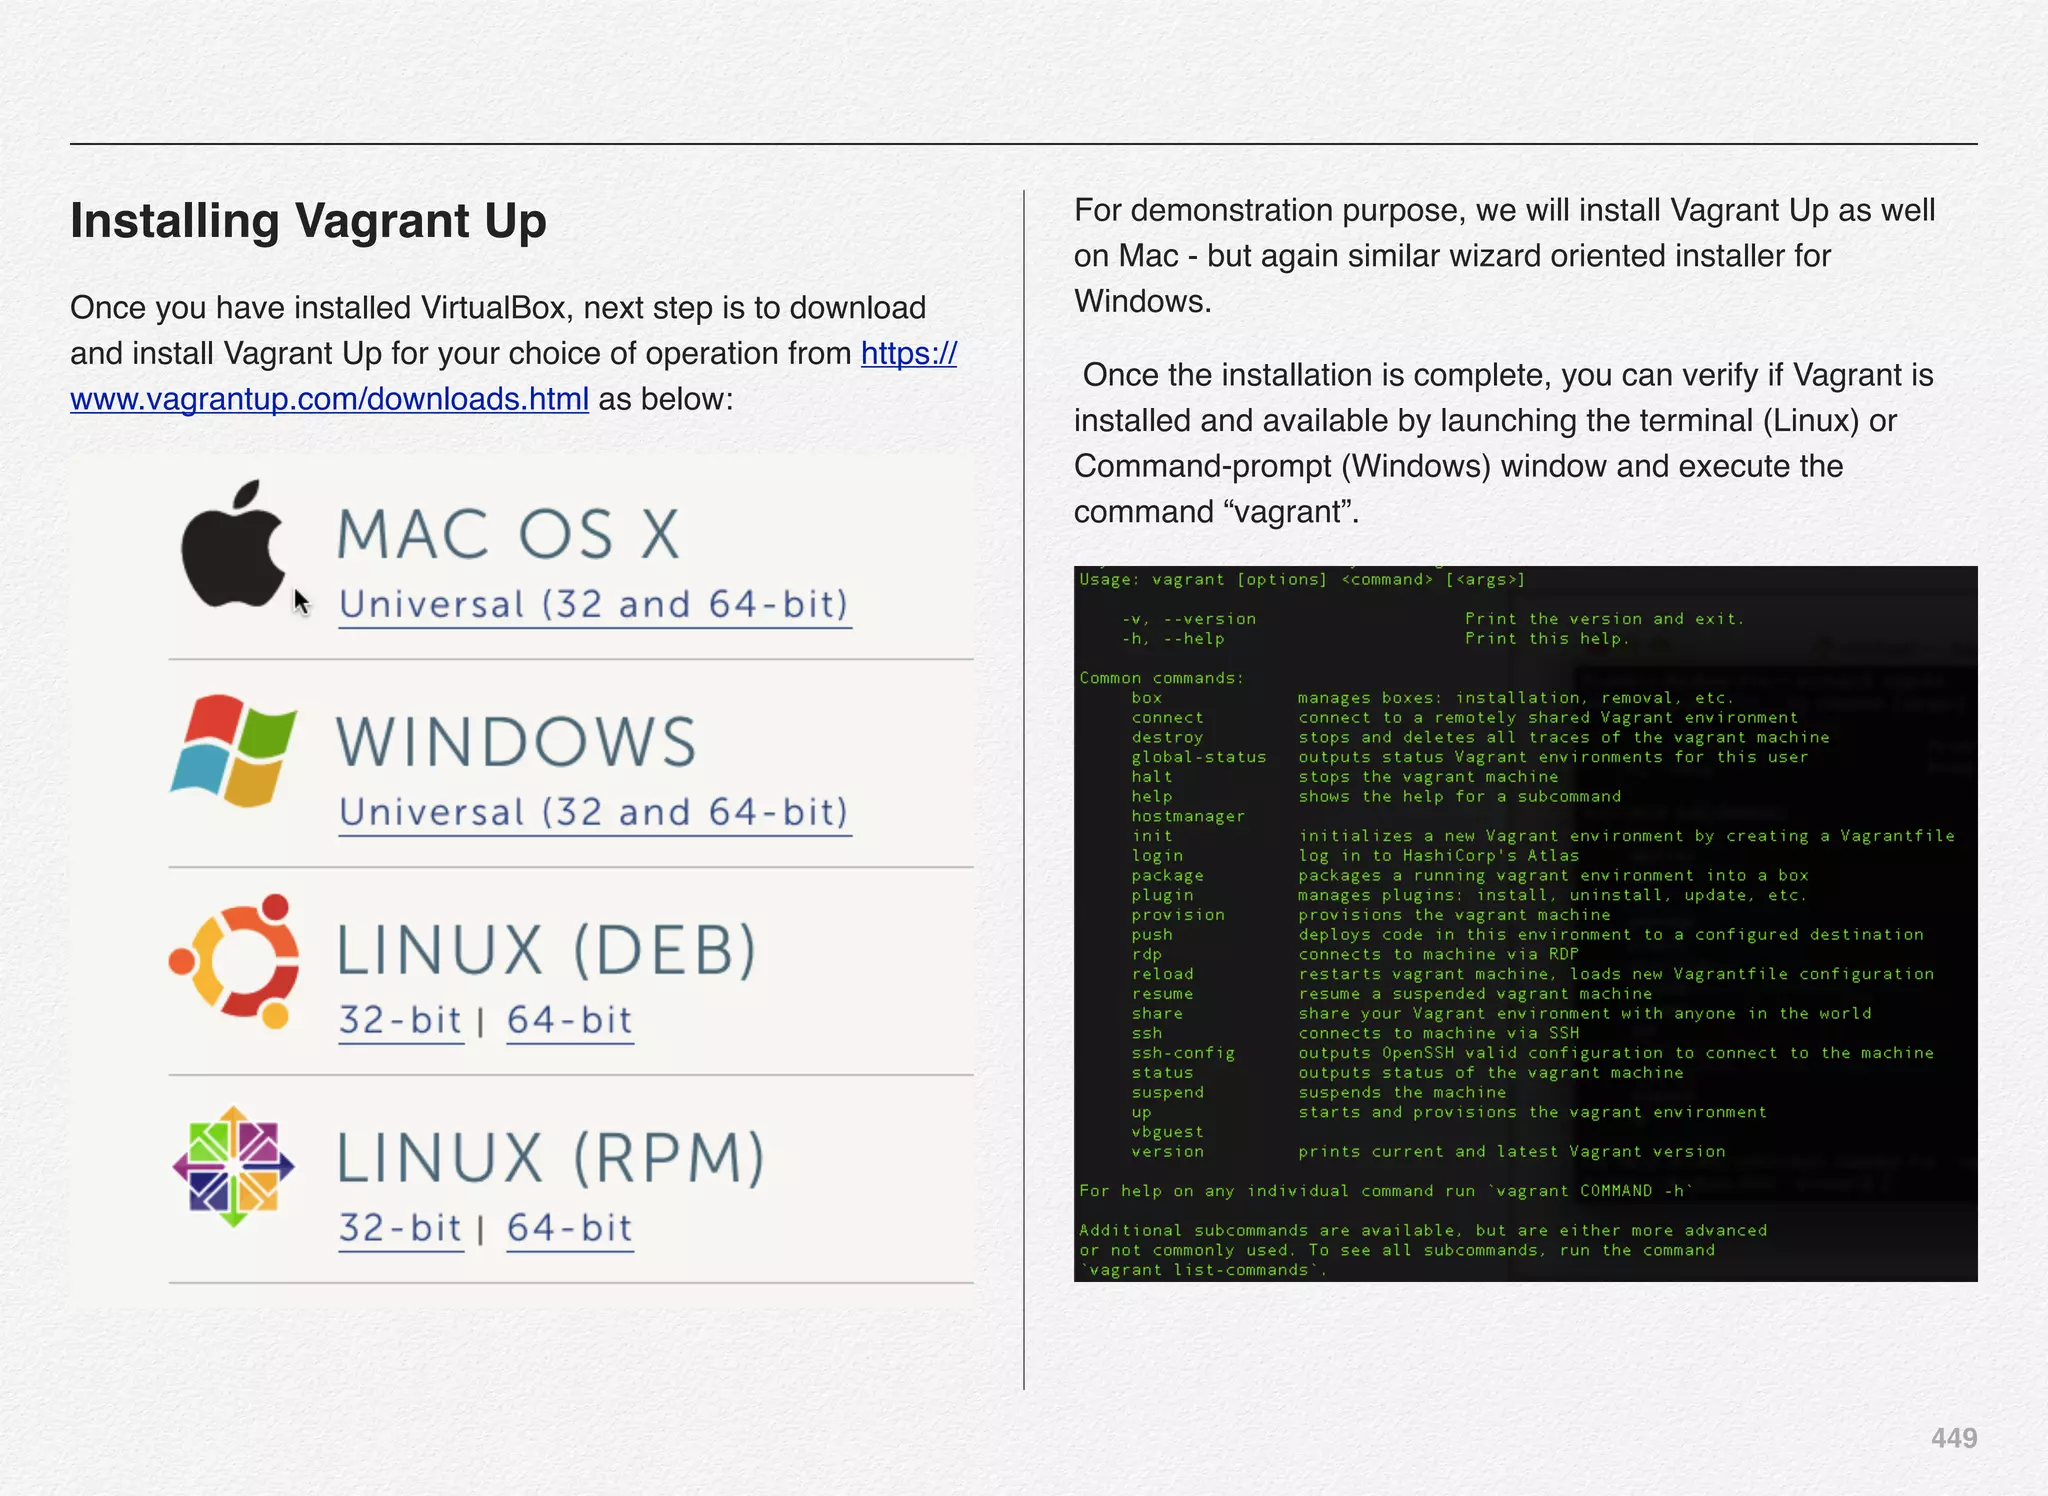
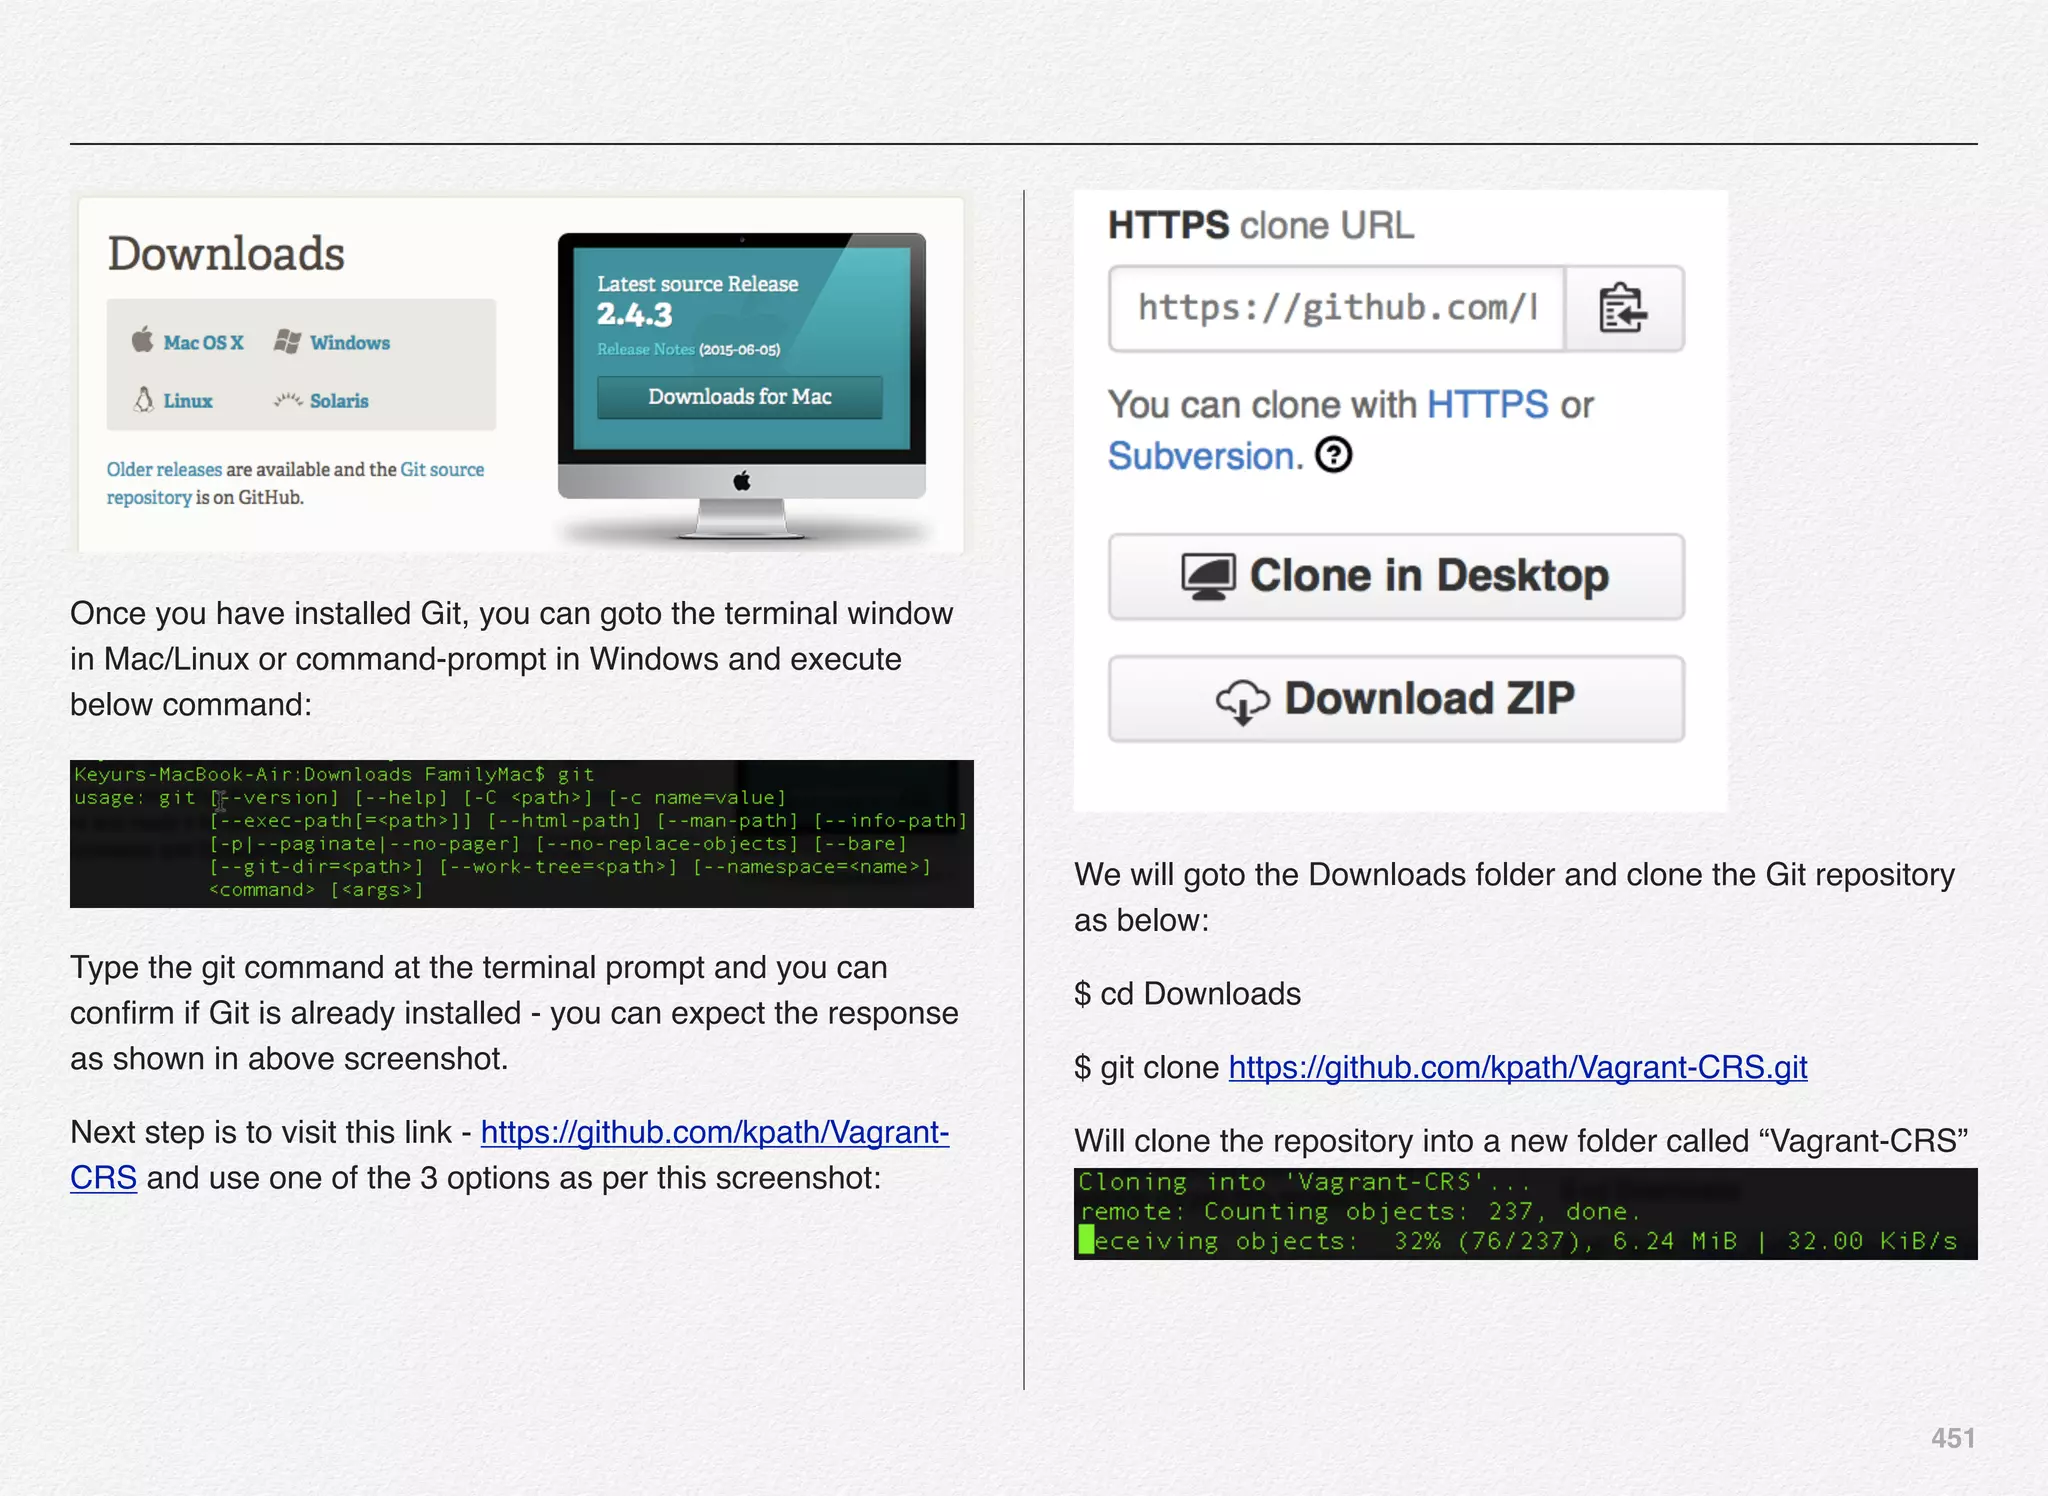
 for help.
### Conventions
Throughout this document, the top-level directory that you
checked out from git will be referred to as `{ATG-CRS}`
### Product versions used in this guide:
• Oracle Linux Server release 6.5 (Operating System) - [All
Licenses](https://oss.oracle.com/linux/legal/pkg-list.html)](https://image.slidesharecdn.com/oraclecommerce-doityourselfseries-160129151710/75/Oracle-Commerce-Using-ATG-Endeca-Do-It-Yourself-Series-453-2048.jpg)
![453
• Oracle Database (choose either 11g or 12c)
• Oracle Database 11.2.0.4.0 Enterprise Edition - [license]
(http://docs.oracle.com/cd/E11882_01/license.112/e47877/
toc.htm)
• Oracle Database 12.1.0.2.0 Enterprise Edition - [license]
(http://docs.oracle.com/database/121/DBLIC/toc.htm)
• Oracle ATG Web Commerce 11.1 - [license](http://
docs.oracle.com/cd/E52191_02/Platform.11-1/
ATGLicenseGuide/html/index.html)
• JDK 1.7 - [Oracle BCL license](http://www.oracle.com/
technetwork/java/javase/terms/license/index.html)
• ojdbc7.jar - driver [OTN license](http://www.oracle.com/
technetwork/licenses/distribution-license-152002.html)
• Jboss EAP 6.1 - [LGPL license](http://en.wikipedia.org/wiki/
GNU_Lesser_General_Public_License)
### Other software dependencies
• Vagrant - [MIT license](https://github.com/mitchellh/vagrant/
blob/master/LICENSE)
• VirtualBox - [License FAQ](https://www.virtualbox.org/wiki/
Licensing_FAQ) - [GPL](http://www.gnu.org/licenses/old-
licenses/gpl-2.0.html)
• vagrant-vbguest plugin - [MIT license](https://github.com/
dotless-de/vagrant-vbguest/blob/master/LICENSE)
• Oracle SQL Developer - [license](http://www.oracle.com/
technetwork/licenses/sqldev-license-152021.html)
### Technical Requirements
This product stack is quite heavy. It's a DB, three endeca
services and two ATG servers. You're going to need:
• 16 gigs RAM
### Download Required Database Software
The CRS demo works with either Oracle 11g or Oracle 12c.
Pick one and follow the download and provisioning instructions
for the one you picked.](https://image.slidesharecdn.com/oraclecommerce-doityourselfseries-160129151710/75/Oracle-Commerce-Using-ATG-Endeca-Do-It-Yourself-Series-454-2048.jpg)

• Click the "patches and updates" tab
• On the left of the page look for "patching quick links". If it's
not expanded, expand it.
• Within that tab, under "Oracle Server and Tools", click "Latest
Patchsets"
• This should bring up a popup window. Mouse over Product-
>Oracle Database->Linux x86-64 and click on 11.2.0.4.0
• At the bottom of that page, click the link "13390677" within
the table, which is the patch number
• Only download parts 1 and 2.
Even though it says it's a patchset, it's actually a full product
installer.
**IMPORTANT:** Put the zip files parts 1 and 2, in the `{ATG-
CRS}/software`directory at the top level of this project (it's the
directory that has a `readme.txt`file telling you how to use the
directory).
### Oracle 12c (12.1.0.2.0) Enterprise Edition
• Go to [Oracle Database Software Downloads](http://
www.oracle.com/technetwork/database/enterprise-edition/
downloads/index-092322.html)
• Accept the license agreement
• Under the section "(12.1.0.2.0) - Enterprise Edition" download
parts 1 and 2 for Linux x86-64
**IMPORTANT:** Put the zip files parts 1 and 2, in the `{ATG-
CRS}/software`directory at the top level of this project (it's the
directory that has a `readme.txt`file telling you how to use the
directory).](https://image.slidesharecdn.com/oraclecommerce-doityourselfseries-160129151710/75/Oracle-Commerce-Using-ATG-Endeca-Do-It-Yourself-Series-455-2048.jpg)
.
### Download required ATG server software
### ATG 11.1
• Go to [Oracle Edelivery](http://edelivery.oracle.com)
• Accept the restrictions
• On the search page Select the following options:
• Product Pack -> ATG Web Commerce
• Platform -> Linux x86-64
• Click Go
• Click the top search result "Oracle Commerce (11.1.0), Linux"
• Download the following parts:
• Oracle Commerce Platform 11.1 for UNIX
• Oracle Commerce Reference Store 11.1 for UNIX
• Oracle Commerce MDEX Engine 6.5.1 for Linux
• Oracle Commerce Content Acquisition System 11.1 for
Linux
• Oracle Commerce Experience Manager Tools and
Frameworks 11.1 for Linux
• Oracle Commerce Guided Search Platform Services 11.1
for Linux
**NOTE** The Experience Manager Tools and Frameworks
zipfile (V46389-01.zip) expands to a `cd` directory containing
an installer. It's not strictly required to unzip this file. If you
don't unzip V46389-01.zip the provisioner will do it for you.
### JDK 1.7
• Go to the [Oracle JDK 7 Downloads Page](http://
www.oracle.com/technetwork/java/javase/downloads/jdk7-
downloads-1880260.html)
• Download "jdk-7u72-linux-x64.rpm"
### JBoss EAP 6.1](https://image.slidesharecdn.com/oraclecommerce-doityourselfseries-160129151710/75/Oracle-Commerce-Using-ATG-Endeca-Do-It-Yourself-Series-456-2048.jpg)

• Click "View older downloads"
• Click on the zip downloader for 6.1.0.GA
### OJDBC Driver
• Go to the [Oracle 12c driver downloads page](http://
www.oracle.com/technetwork/database/features/jdbc/jdbc-
drivers-12c-download-1958347.html)
• Download ojdbc7.jar
All oracle drivers are backwards compatible with the officially
supported database versions at the time of the driver's release.
You can use ojdbc7 to connect to either 12c or 11g databases.
**IMPORTANT:** Move everything you downloaded to the
`{ATG-CRS}/software`directory at the top level of this project.
### Software Check
Before going any further, make sure your software directory
looks like one of the following:
If you seclected Oracle 11g:
software/
── OCPlatform11.1.bin
── OCReferenceStore11.1.bin
── OCcas11.1.0-Linux64.sh
── OCmdex6.5.1-Linux64_829811.sh
── OCplatformservices11.1.0-Linux64.bin
── V46389-01.zip
── jboss-eap-6.1.0.zip
── jdk-7u72-linux-x64.rpm
── ojdbc7.jar
── p13390677_112040_Linux-x86-64_1of7.zip
── p13390677_112040_Linux-x86-64_2of7.zip](https://image.slidesharecdn.com/oraclecommerce-doityourselfseries-160129151710/75/Oracle-Commerce-Using-ATG-Endeca-Do-It-Yourself-Series-457-2048.jpg)
 and [Vagrant](http://
www.vagrantup.com/downloads.html). Also get the [vagrant-
vbguest plugin](https://github.com/dotless-de/vagrant-vbguest).
You install it by typing from the command line:
`vagrant plugin install vagrant-vbguest`
### Create the database vm
This project comes with two databases vm definitions. Pick
either Oracle 11g or 12c. They both run on the same private IP
address, so ATG will connect to either one the same way.
For 11g, type
`vagrant up db11g`
For 12c type
`vagrant up db12c`](https://image.slidesharecdn.com/oraclecommerce-doityourselfseries-160129151710/75/Oracle-Commerce-Using-ATG-Endeca-Do-It-Yourself-Series-458-2048.jpg)
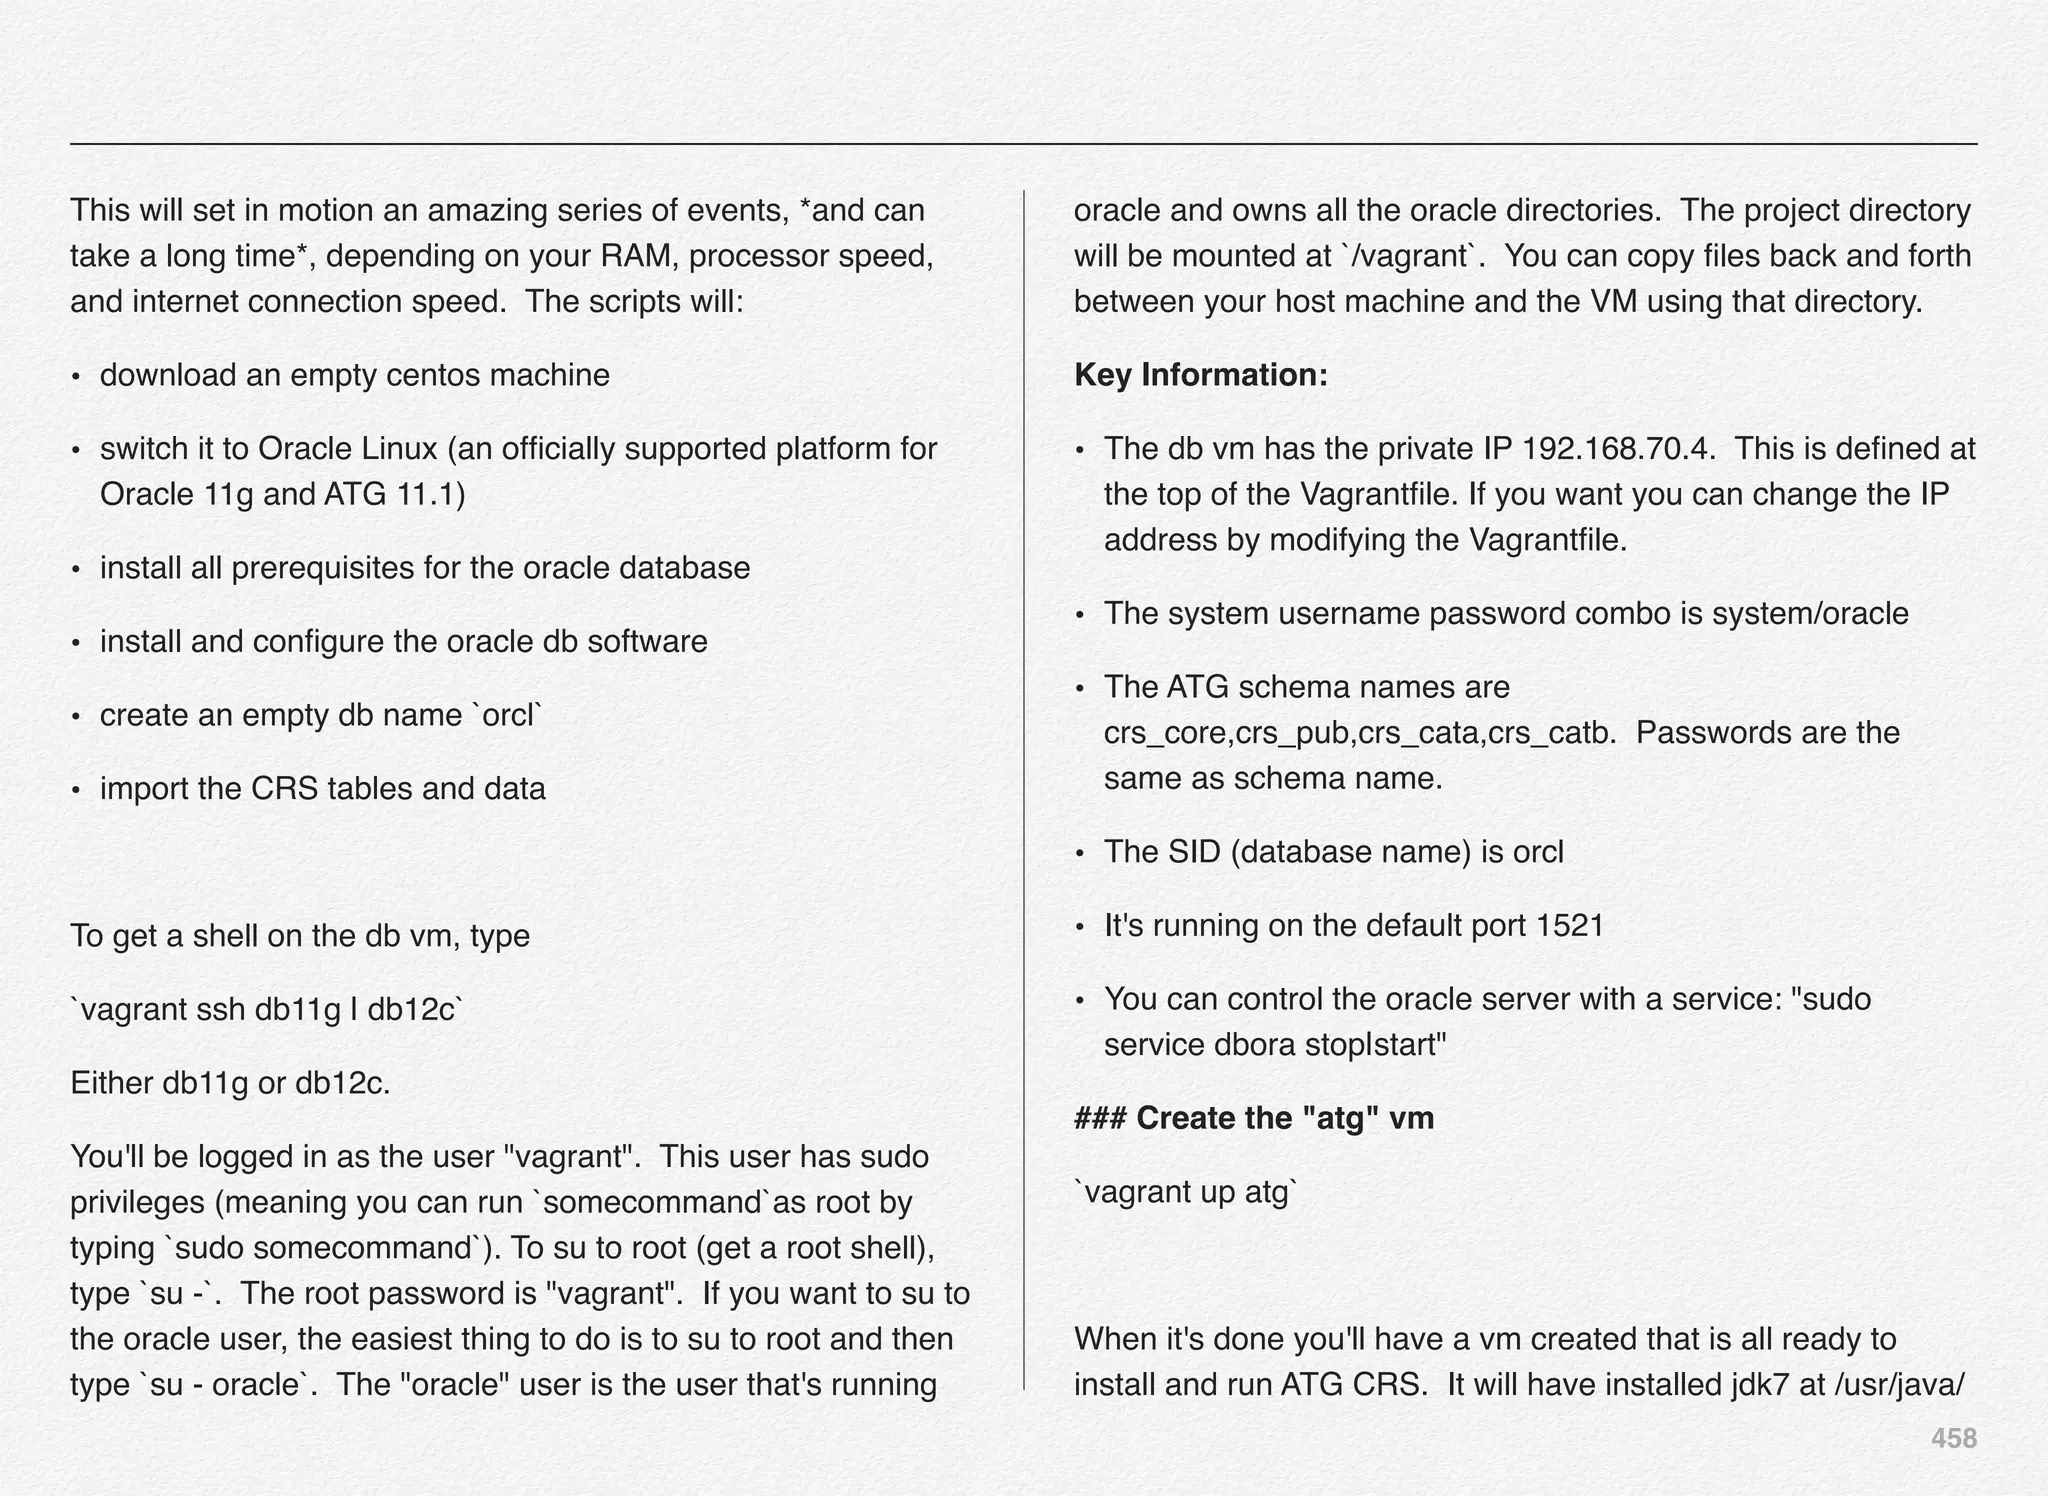
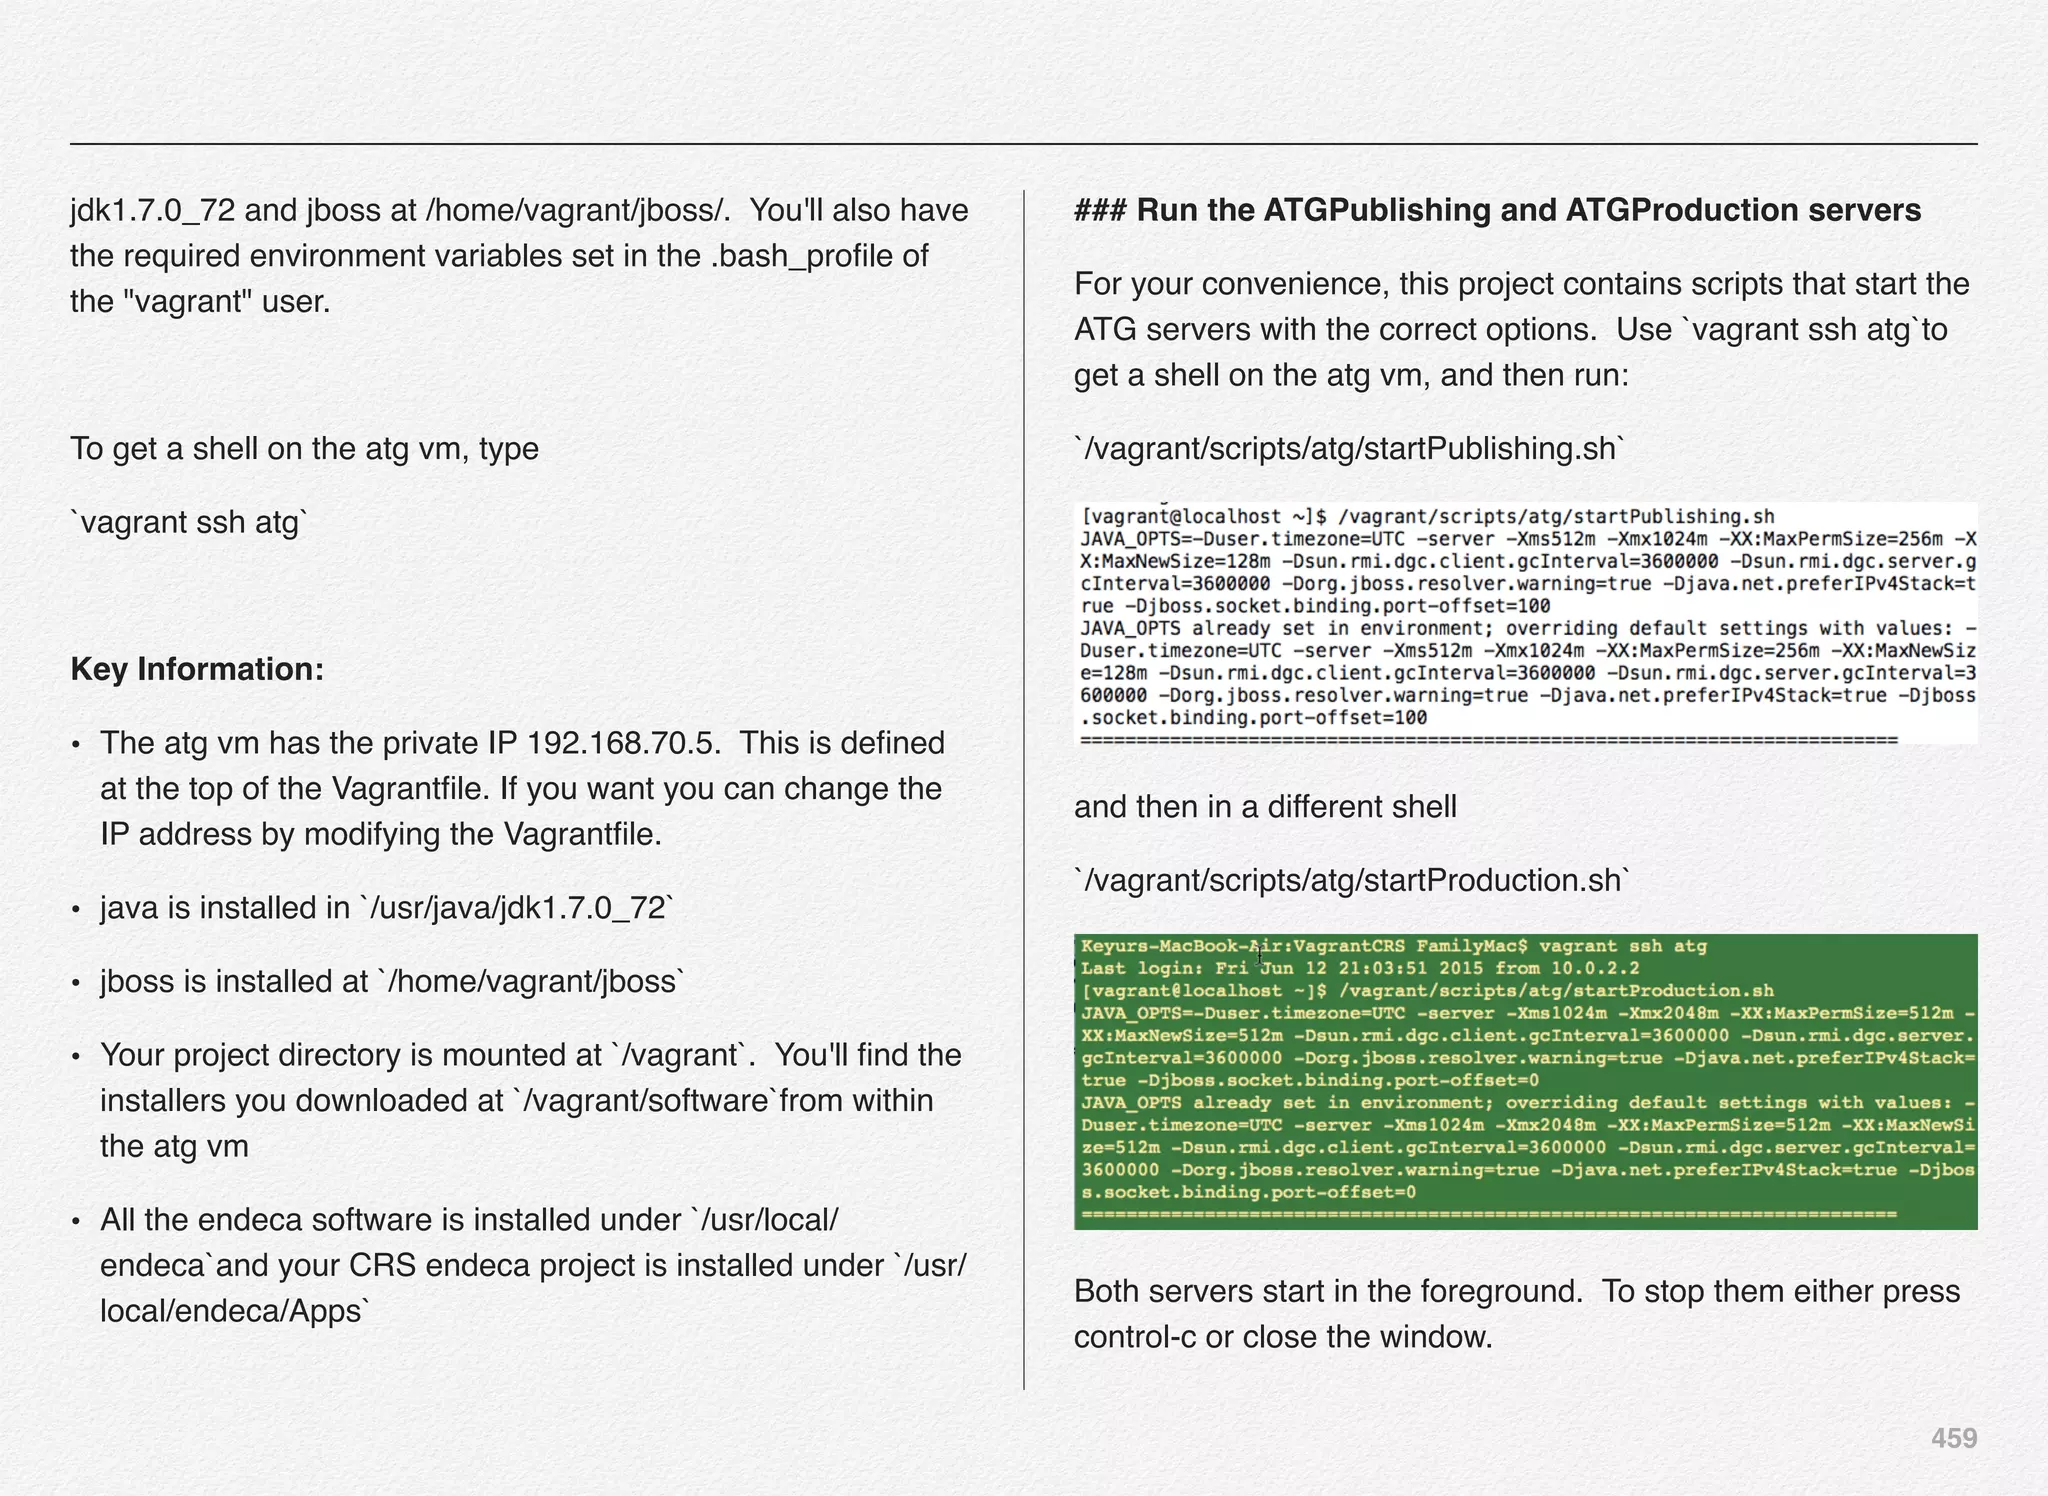
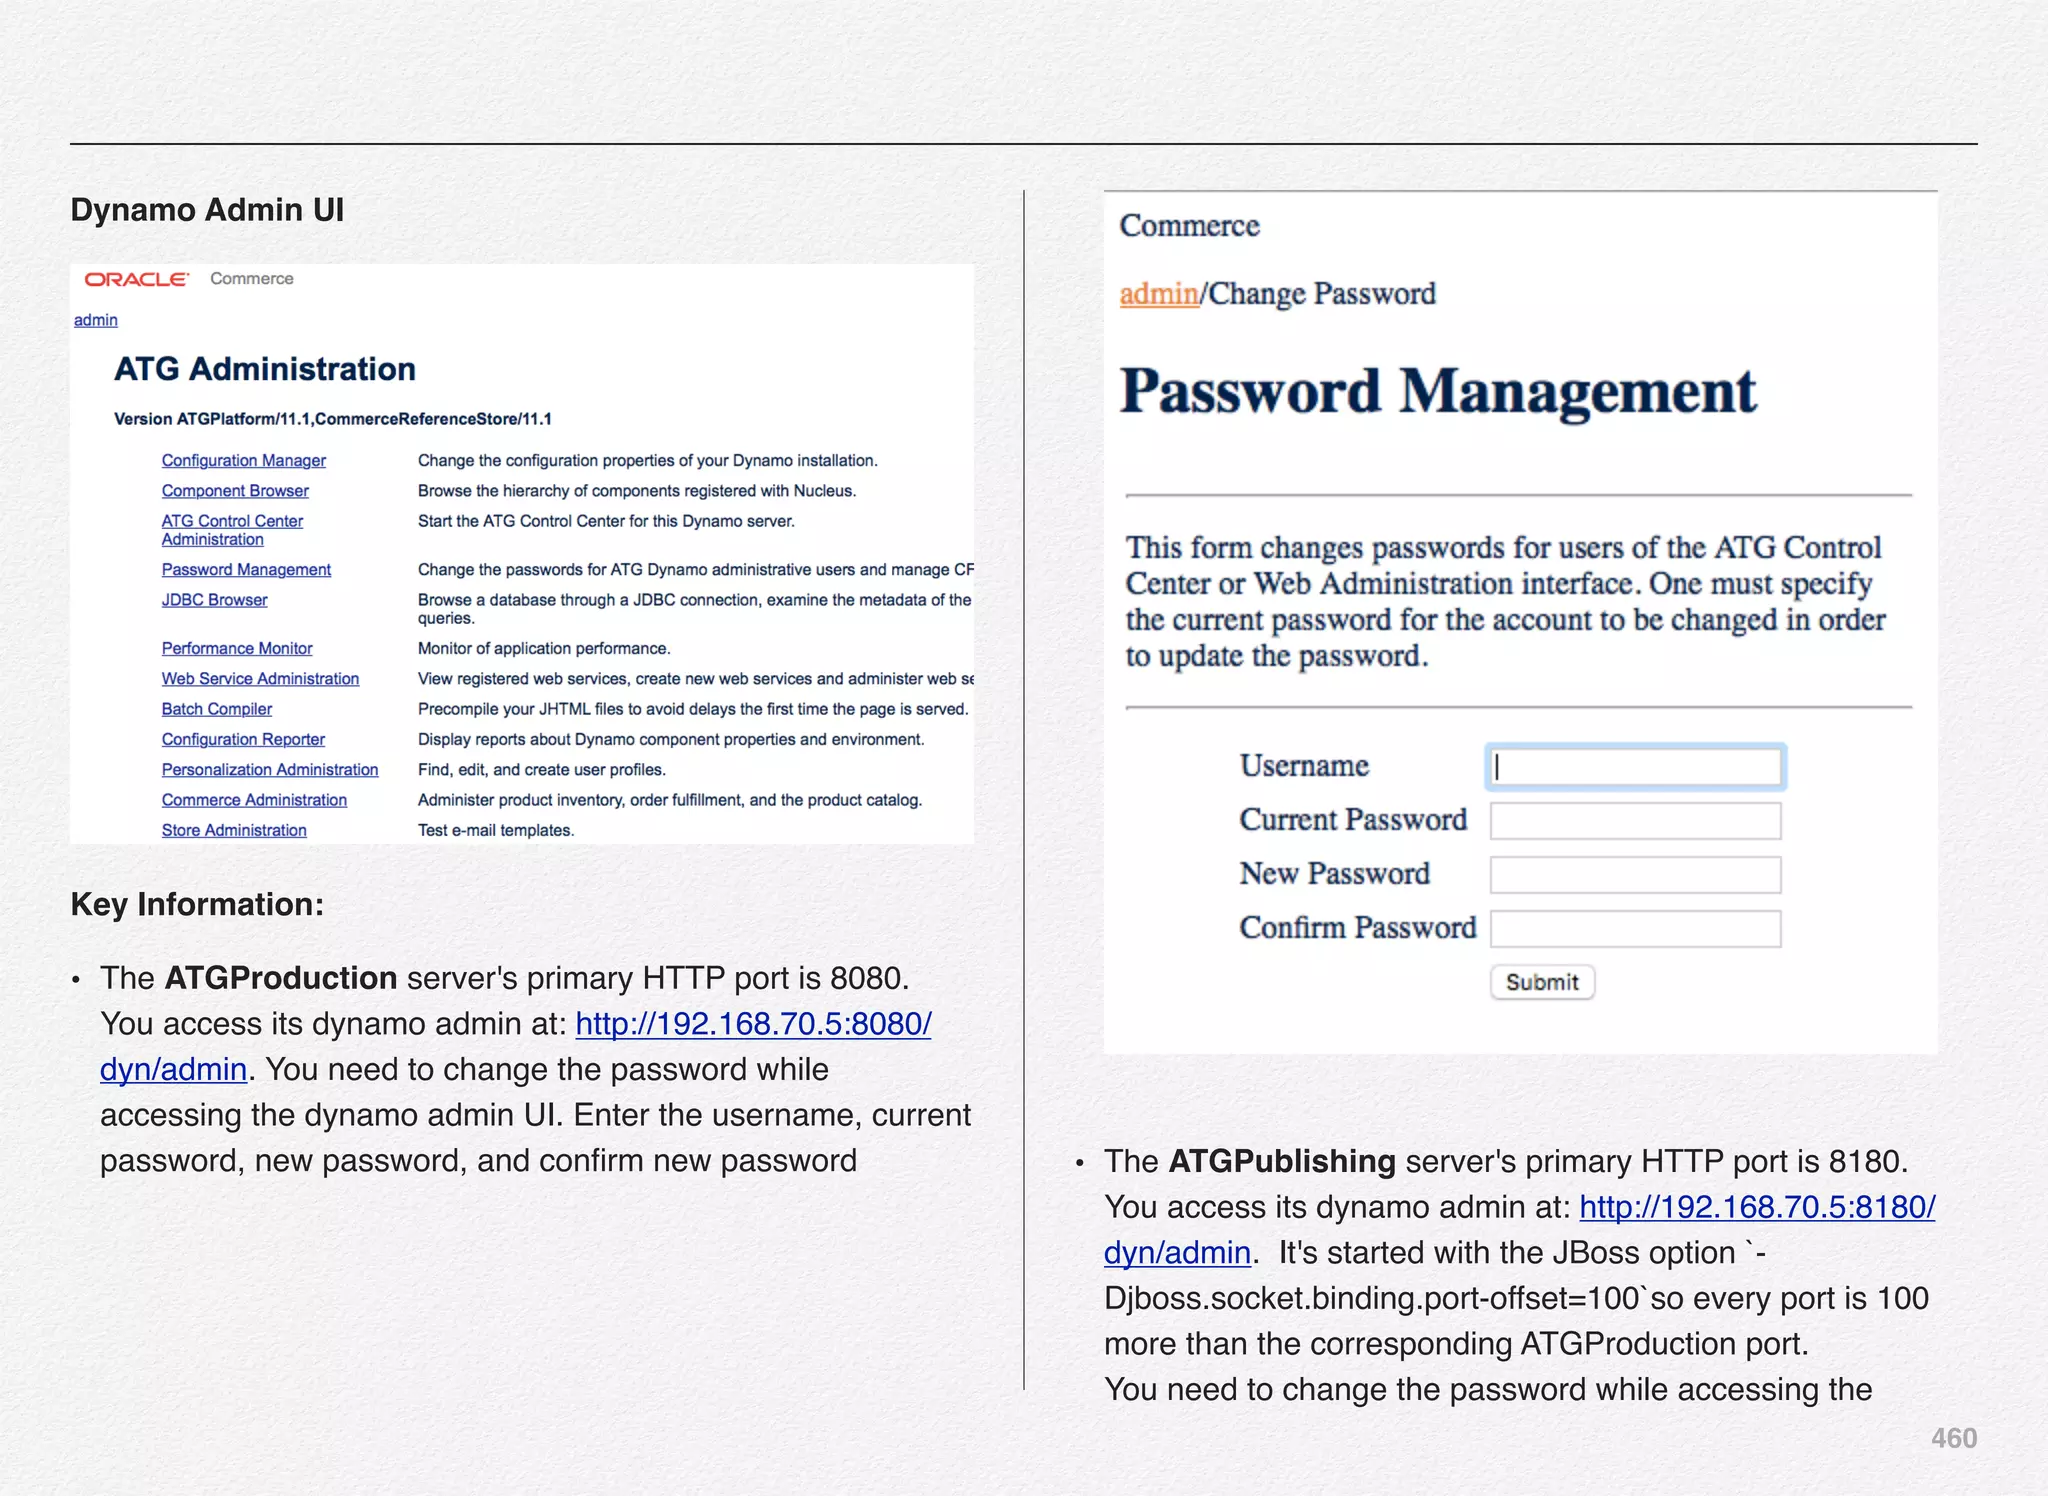
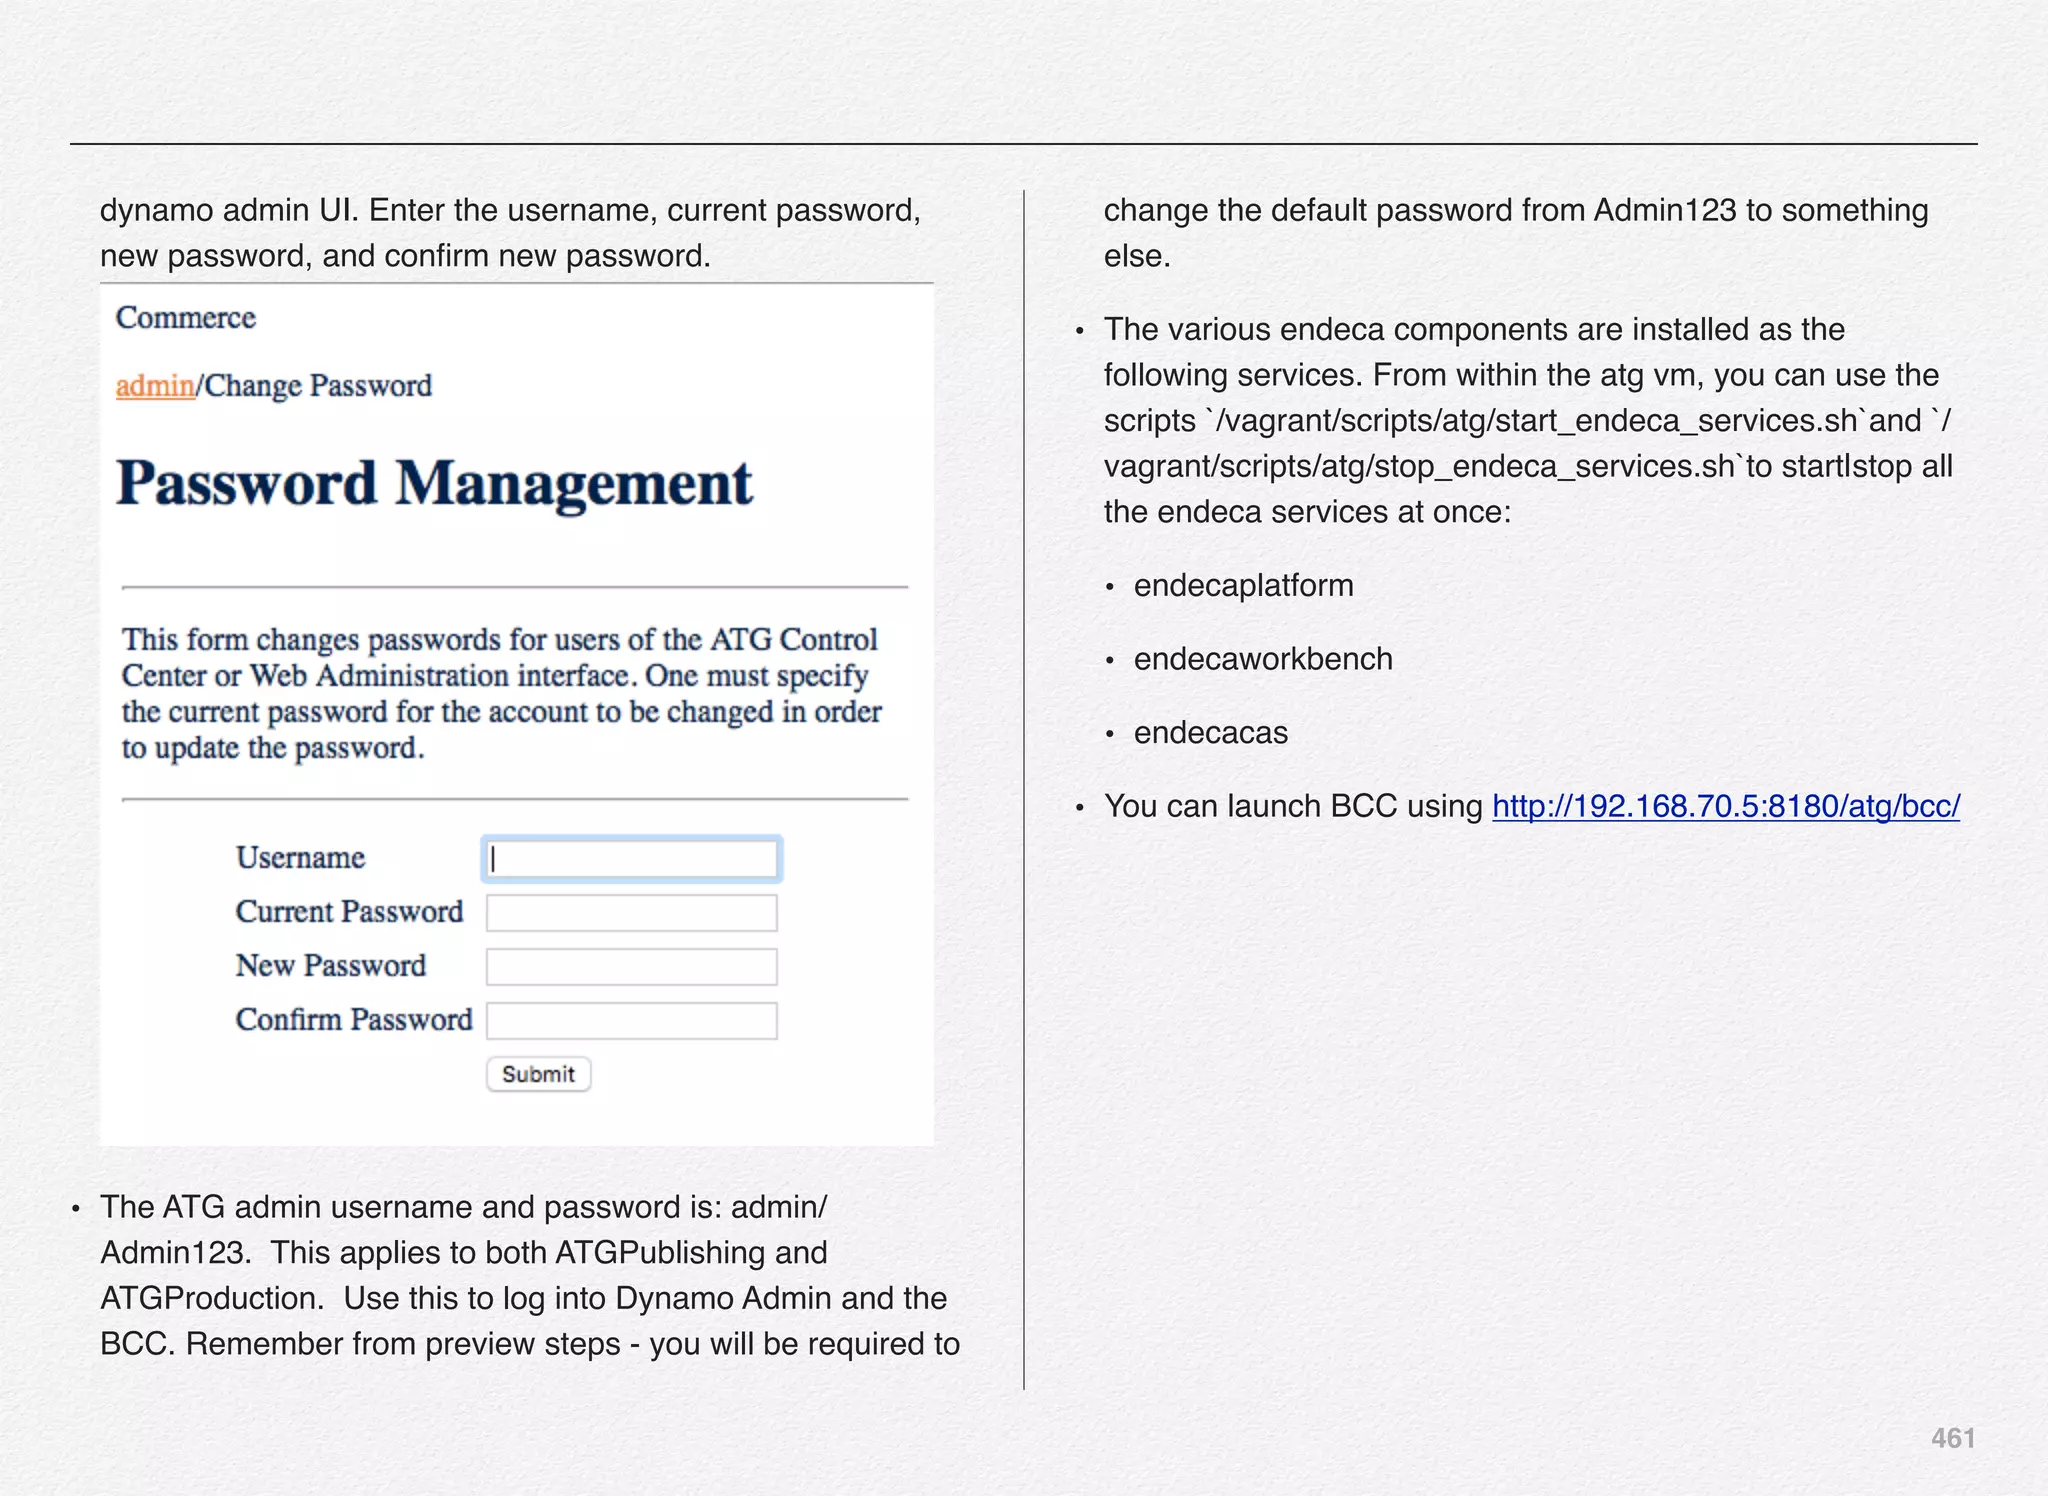
![462
### Run initial full deployment
At this point, you can pick up the ATG CRS documentation from
the [Configuring and Running a Full Deployment]
(http://docs.oracle.com/cd/E52191_01/CRS.11-1/
ATGCRSInstall/html/
s0214configuringandrunningafulldeploy01.html) section.
Your publishing server has all the CRS data, but nothing has
been deployed to production. You need to:
• Deploy the crs data
• Check the Endeca baseline index status
• Promote the CRS content from the command line
You have already started the publishing server successfully
potentially without any errors - When you see the message
“Server started in RUNNING mode” continue with the next step
- which is to launch BCC using http://192.168.70.5:8180/atg/
bcc/](https://image.slidesharecdn.com/oraclecommerce-doityourselfseries-160129151710/75/Oracle-Commerce-Using-ATG-Endeca-Do-It-Yourself-Series-463-2048.jpg)

• Log onto the Business Control Center - http://
192.168.70.5:8180/atg/bcc/
• Expand Content Administration (CA), and then click CA
Console
• Click Configuration, and then click Add Site [if the site doesn’t
already exist]
• Enter the following details:
• Site Name: Production
• Site Initialization Options: Do a full deployment
• Site Type: Workflow target
• Add the following repository mappings. To add a repository
mapping, select a Source Repository and Destination
Repository, then click Add
" Source Repository
• /atg/commerce/catalog/SecureProductCatalog
• /atg/commerce/claimable/SecureClaimableRepository
• /atg/commerce/locations/SecureLocationRepository
• /atg/commerce/pricing/priceLists/SecurePriceLists
• /atg/content/SecureContentManagementRepository
• /atg/multisite/SecureSiteRepository
• /atg/seo/SecureSEORepository
• /atg/store/stores/SecureStoreContentRepository
• /atg/userprofiling/PersonalizationRepository
" Destination Repository
• /atg/commerce/catalog/ProductCatalog_production
• /atg/commerce/claimable/
ClaimableRepository_production
• /atg/commerce/locations/
LocationRepository_production
• /atg/commerce/pricing/priceLists/
PriceLists_production](https://image.slidesharecdn.com/oraclecommerce-doityourselfseries-160129151710/75/Oracle-Commerce-Using-ATG-Endeca-Do-It-Yourself-Series-464-2048.jpg)
![464
• /atg/content/
ContentManagementRepository_production
• /atg/multisite/SiteRepository_production
• /atg/seo/SEORepository_production
• /atg/store/stores/StoreContentRepository_production
• /atg/userprofiling/
PersonalizationRepository_production
• Click Save Changes to save your changes and enable the
Agents tab.
• Click the Agents tab, and then click Add Agent to Site.
• Enter the following details:
• Agent Name: ProdAgent
• Transport URL: rmi://
<ATGProduction_host>:<ATGProduction_rmi_port>/atg/
epub/AgentTransport
• Click the button with the double-right arrow to include both
the /atg/epub/file/WWWFileSystem and /atg/epub/file/
ConfigFileSystem file systems in the configuration.
• Click Save Changes.
• Click the Back to deployment administration configuration
link.
• Click Make changes live.
• Accept the default, Do a full deployment (data NOT
imported), then click Make changes live.
• To view your deployment’s progress, under Deployment
Administration, click Overview, then click Production to see
the percent complete.
• After the deployment has finished, proceed to the next
section, Checking the Baseline Index Status, to verify that the
baseline index initiated after the deployment completes
successfully.
### Check the baseline index status
Do this from within the Dynamo Admin by following the [docs]
(http://docs.oracle.com/cd/E52191_01/CRS.11-1/
ATGCRSInstall/html/
s0215checkingthebaselineindexstatus01.html)
After a full deployment, a baseline index is automatically
initiated. Follow the steps below to ensure that the baseline
index has completed and you can move on to promoting
content.](https://image.slidesharecdn.com/oraclecommerce-doityourselfseries-160129151710/75/Oracle-Commerce-Using-ATG-Endeca-Do-It-Yourself-Series-465-2048.jpg)
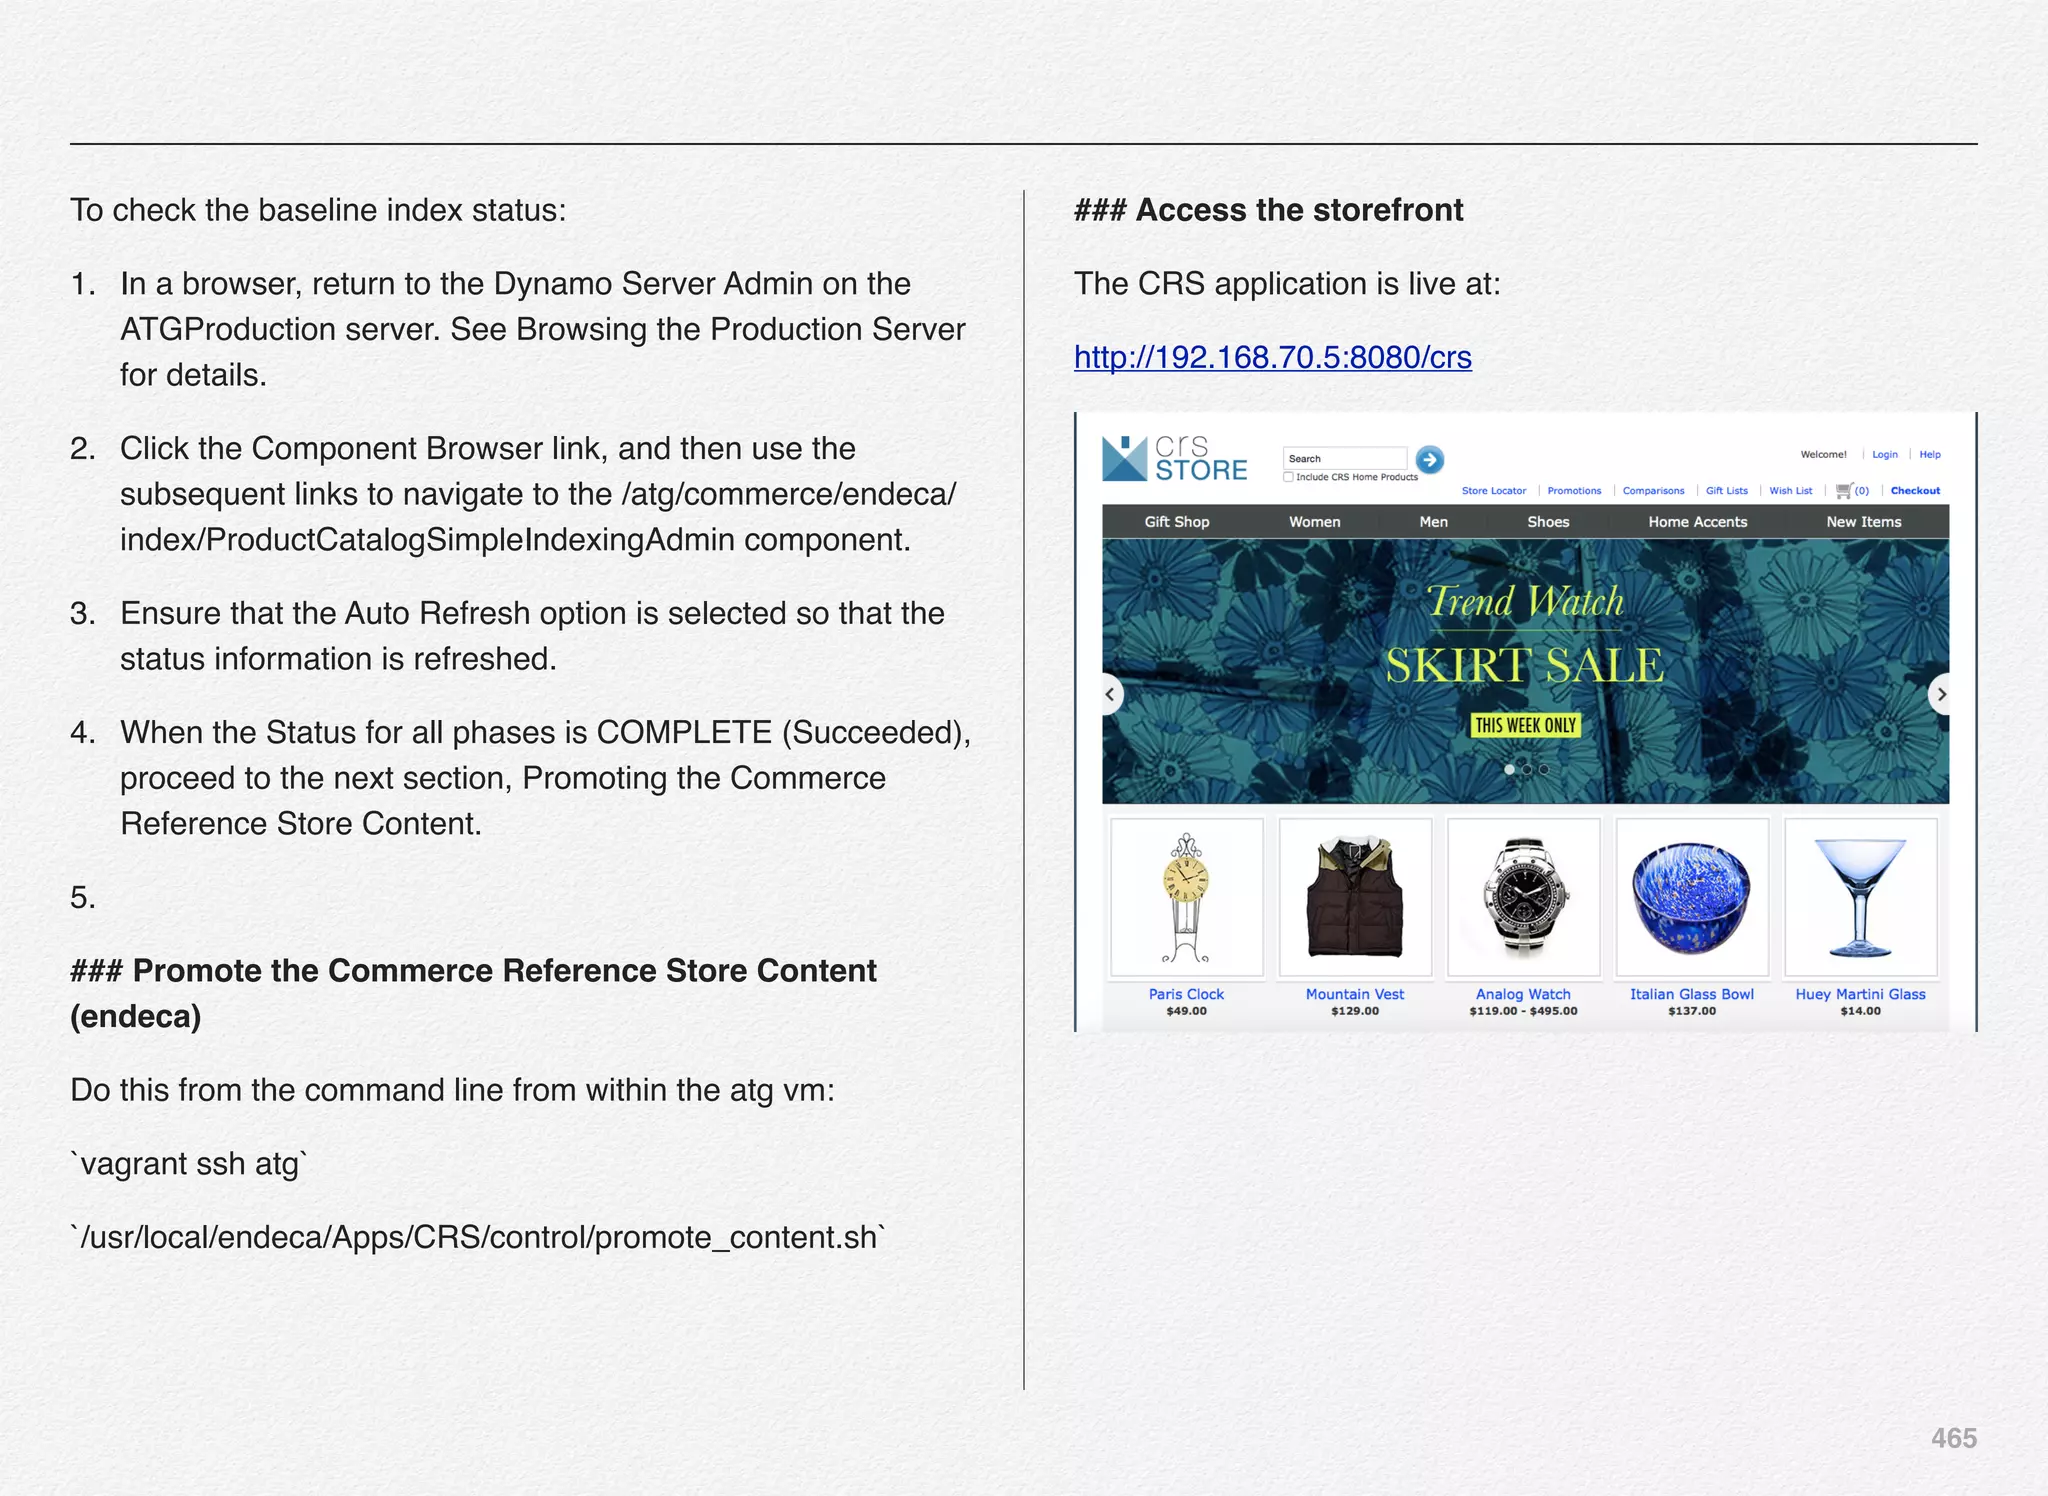
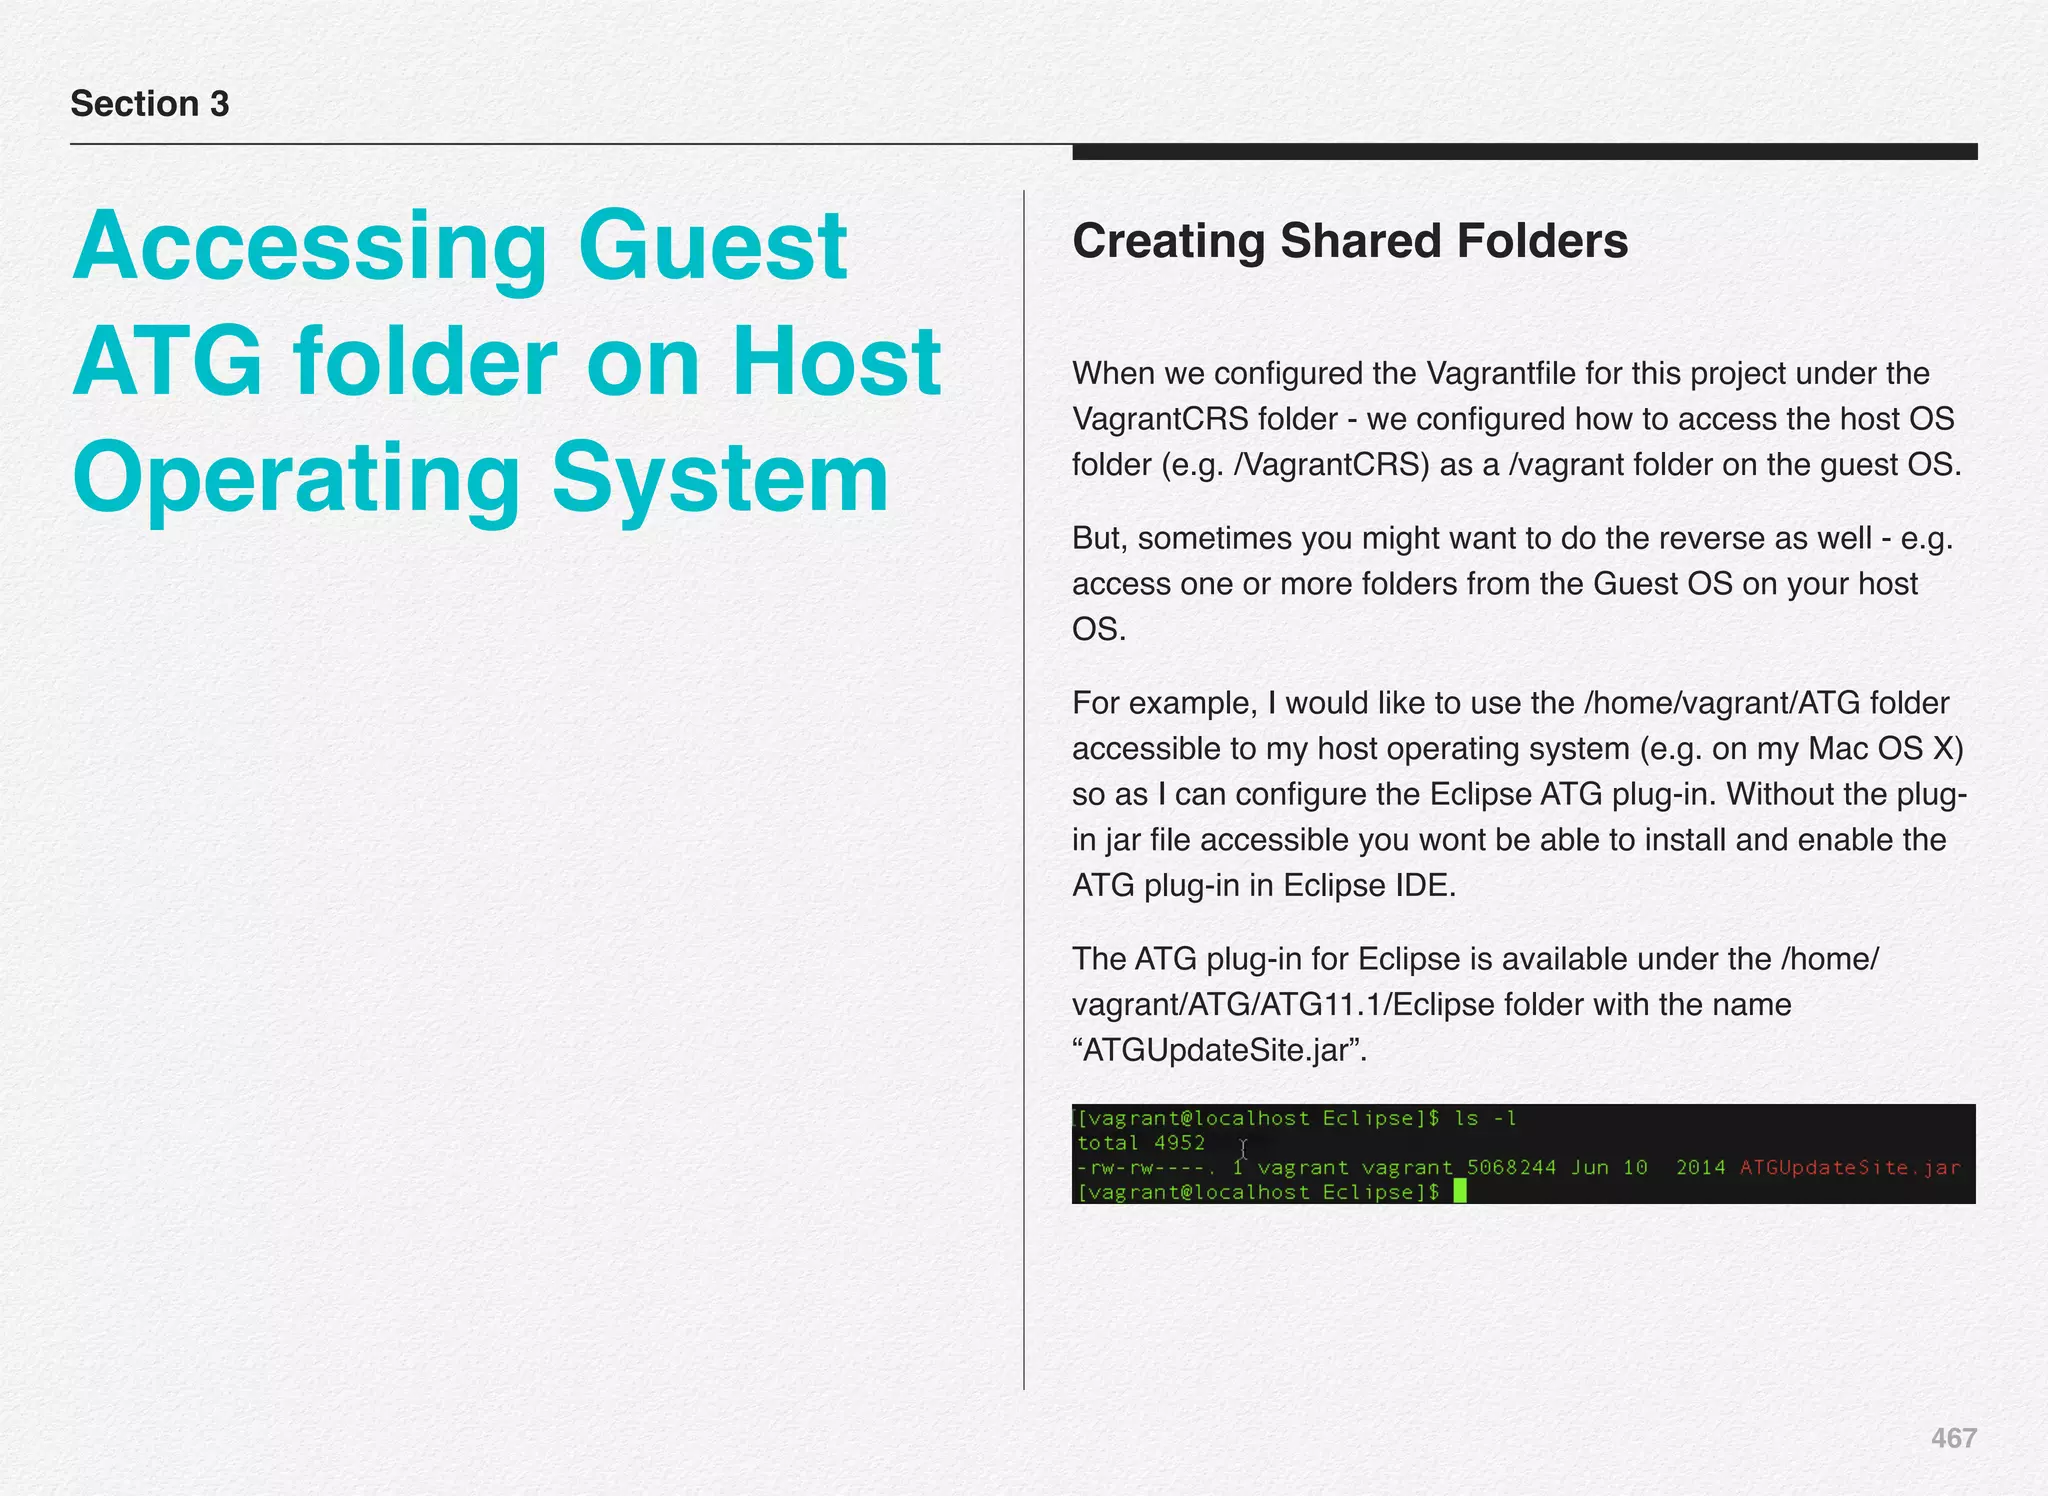
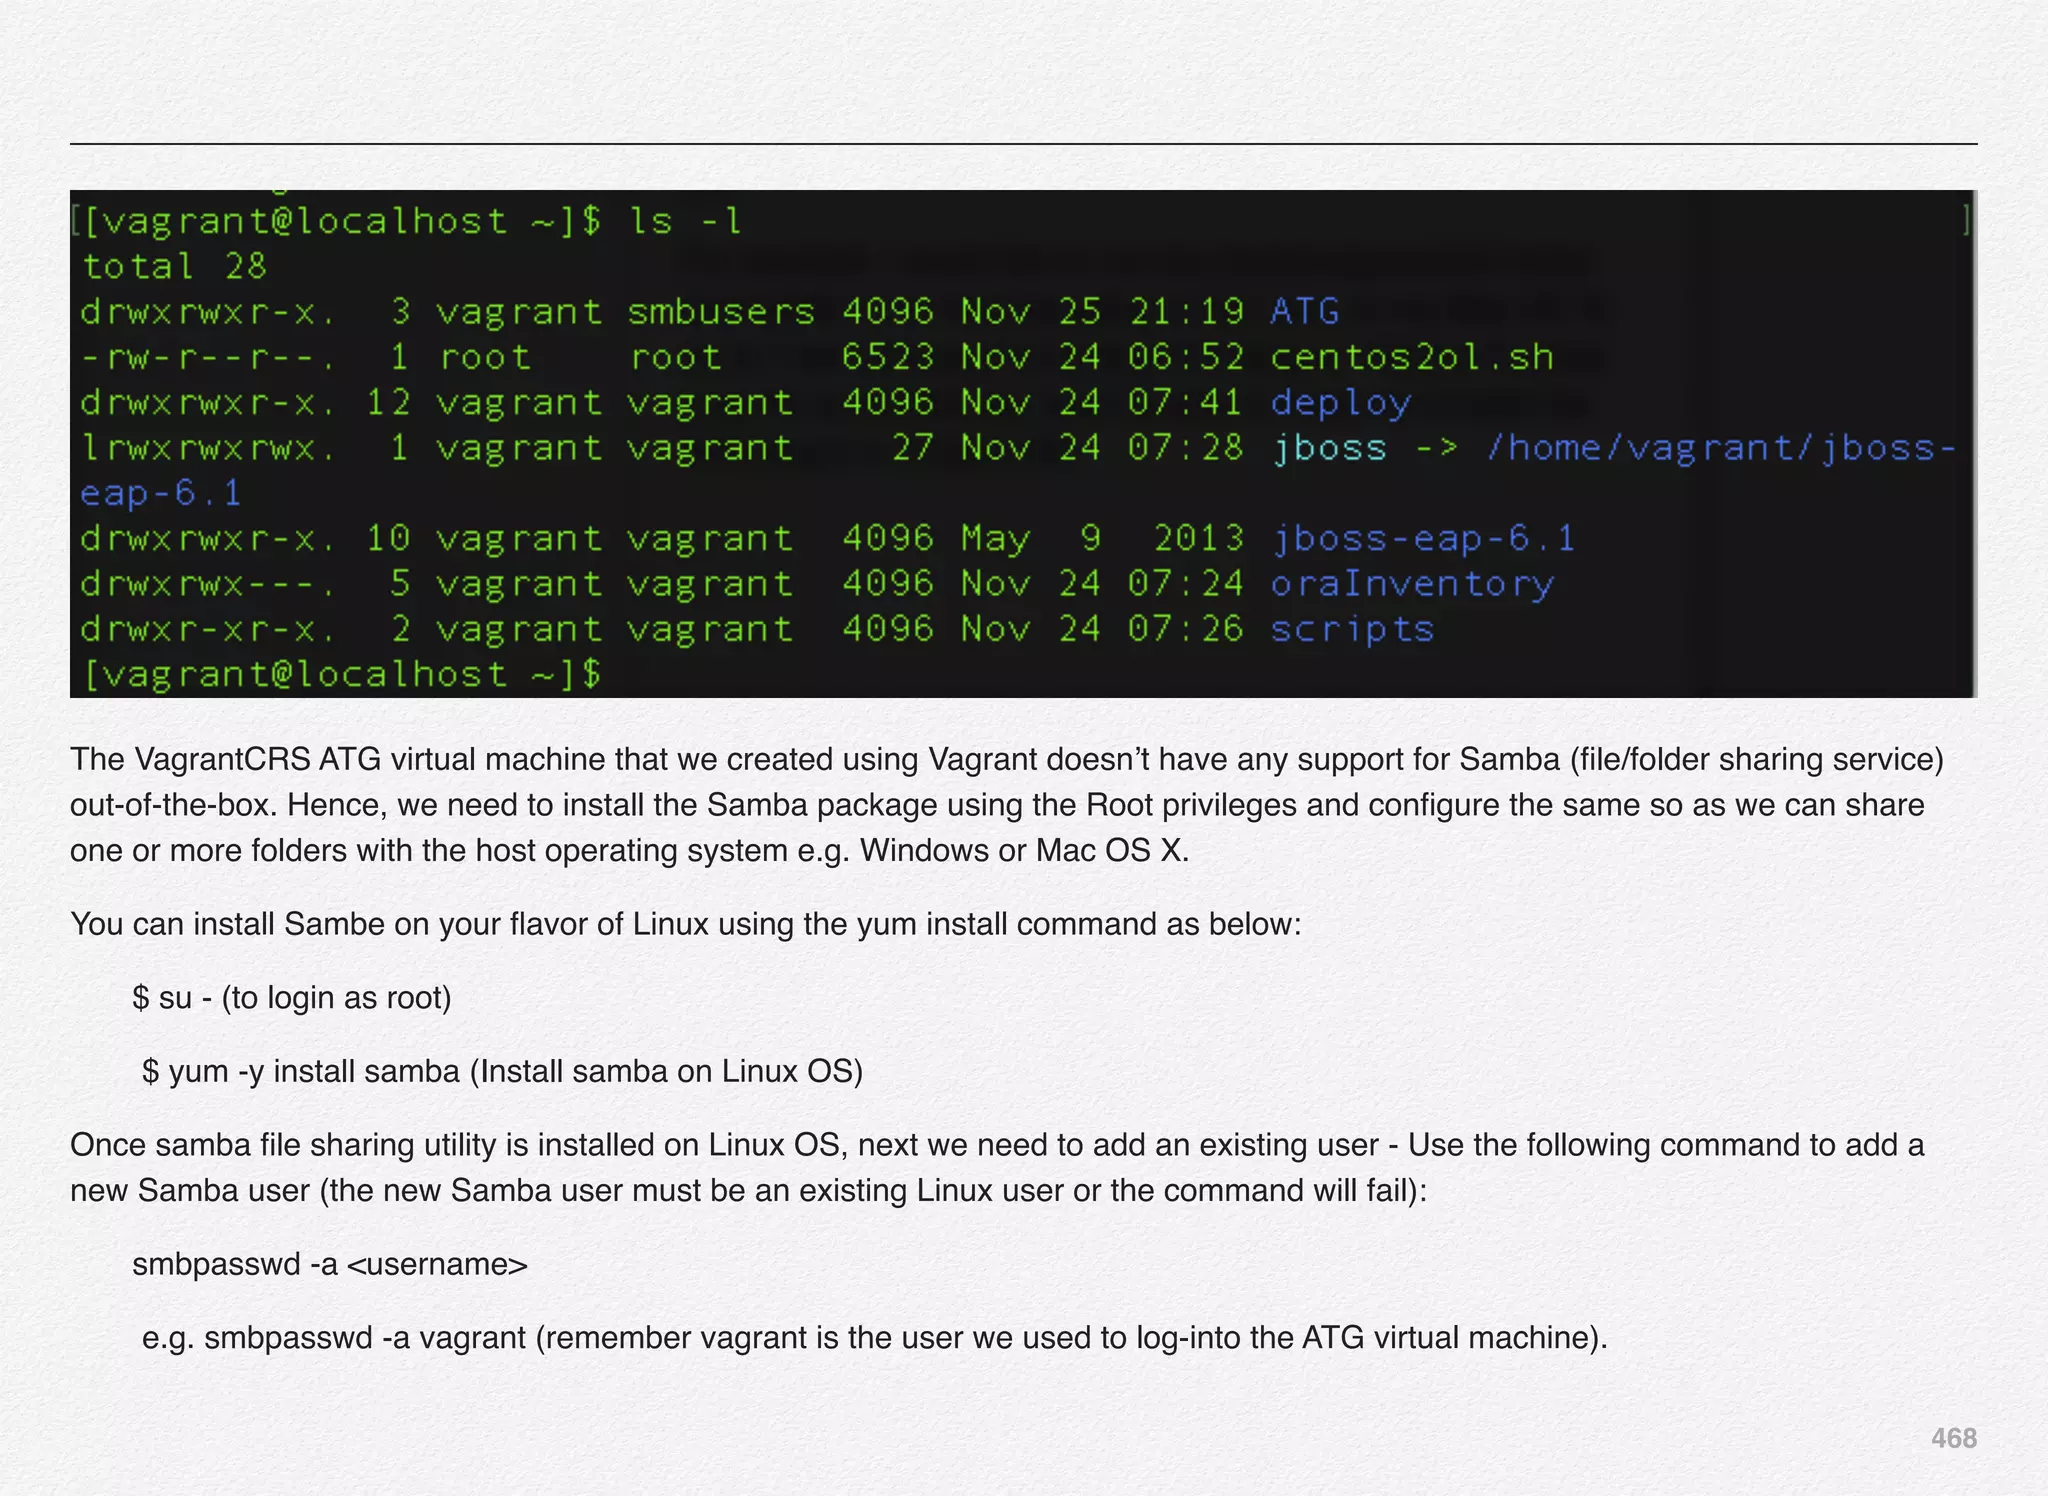
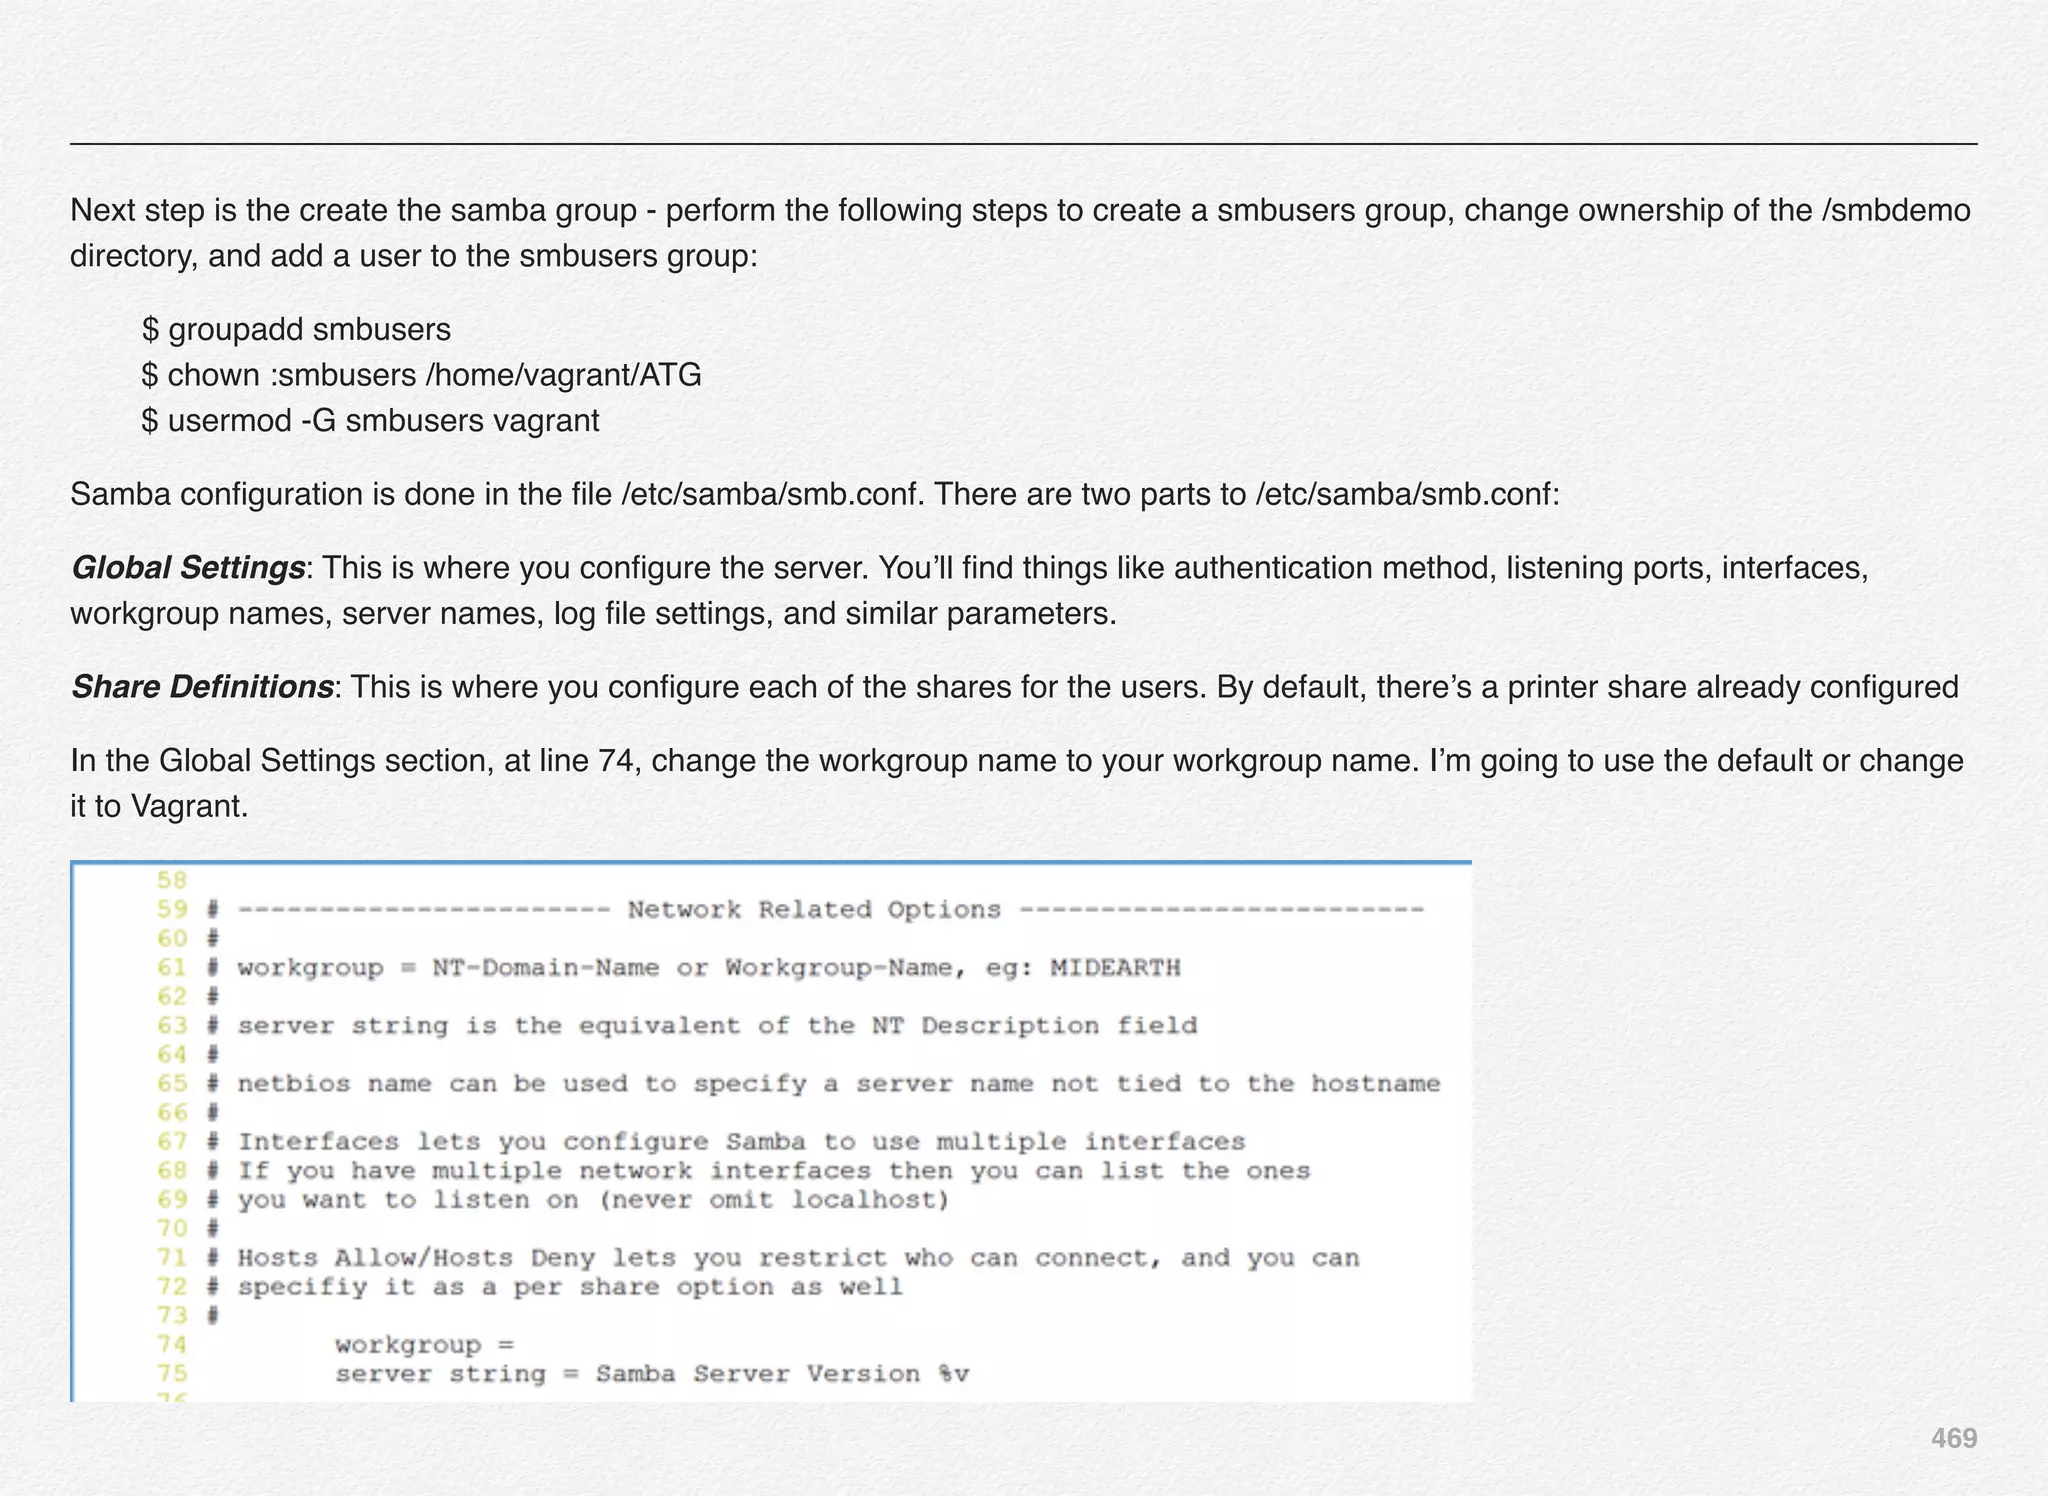
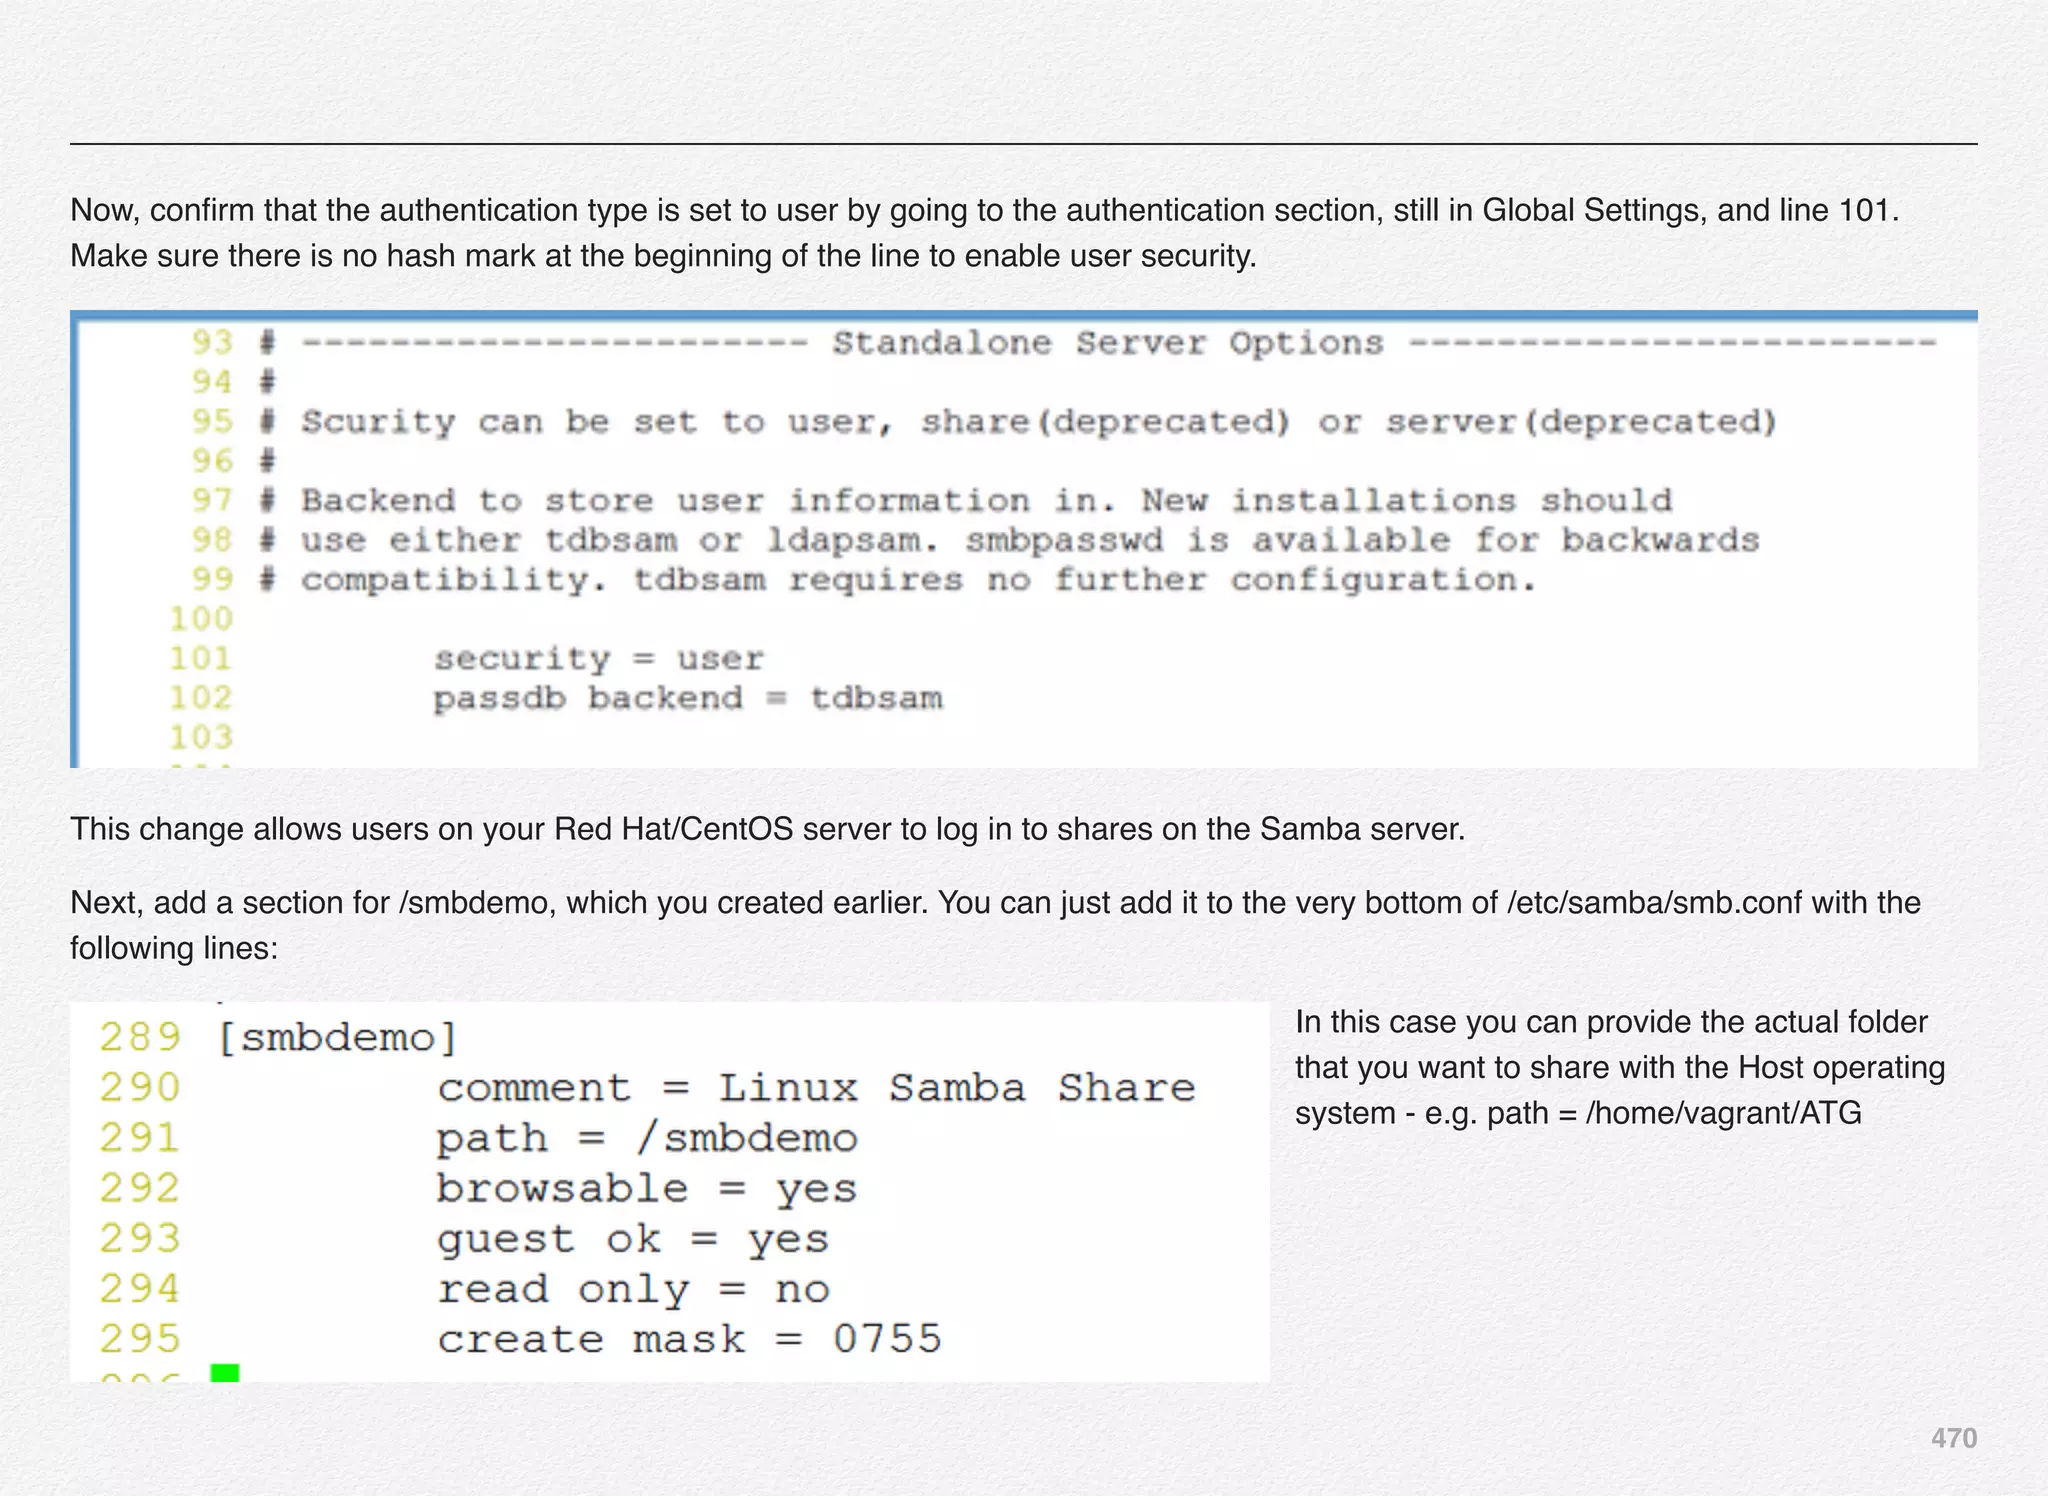
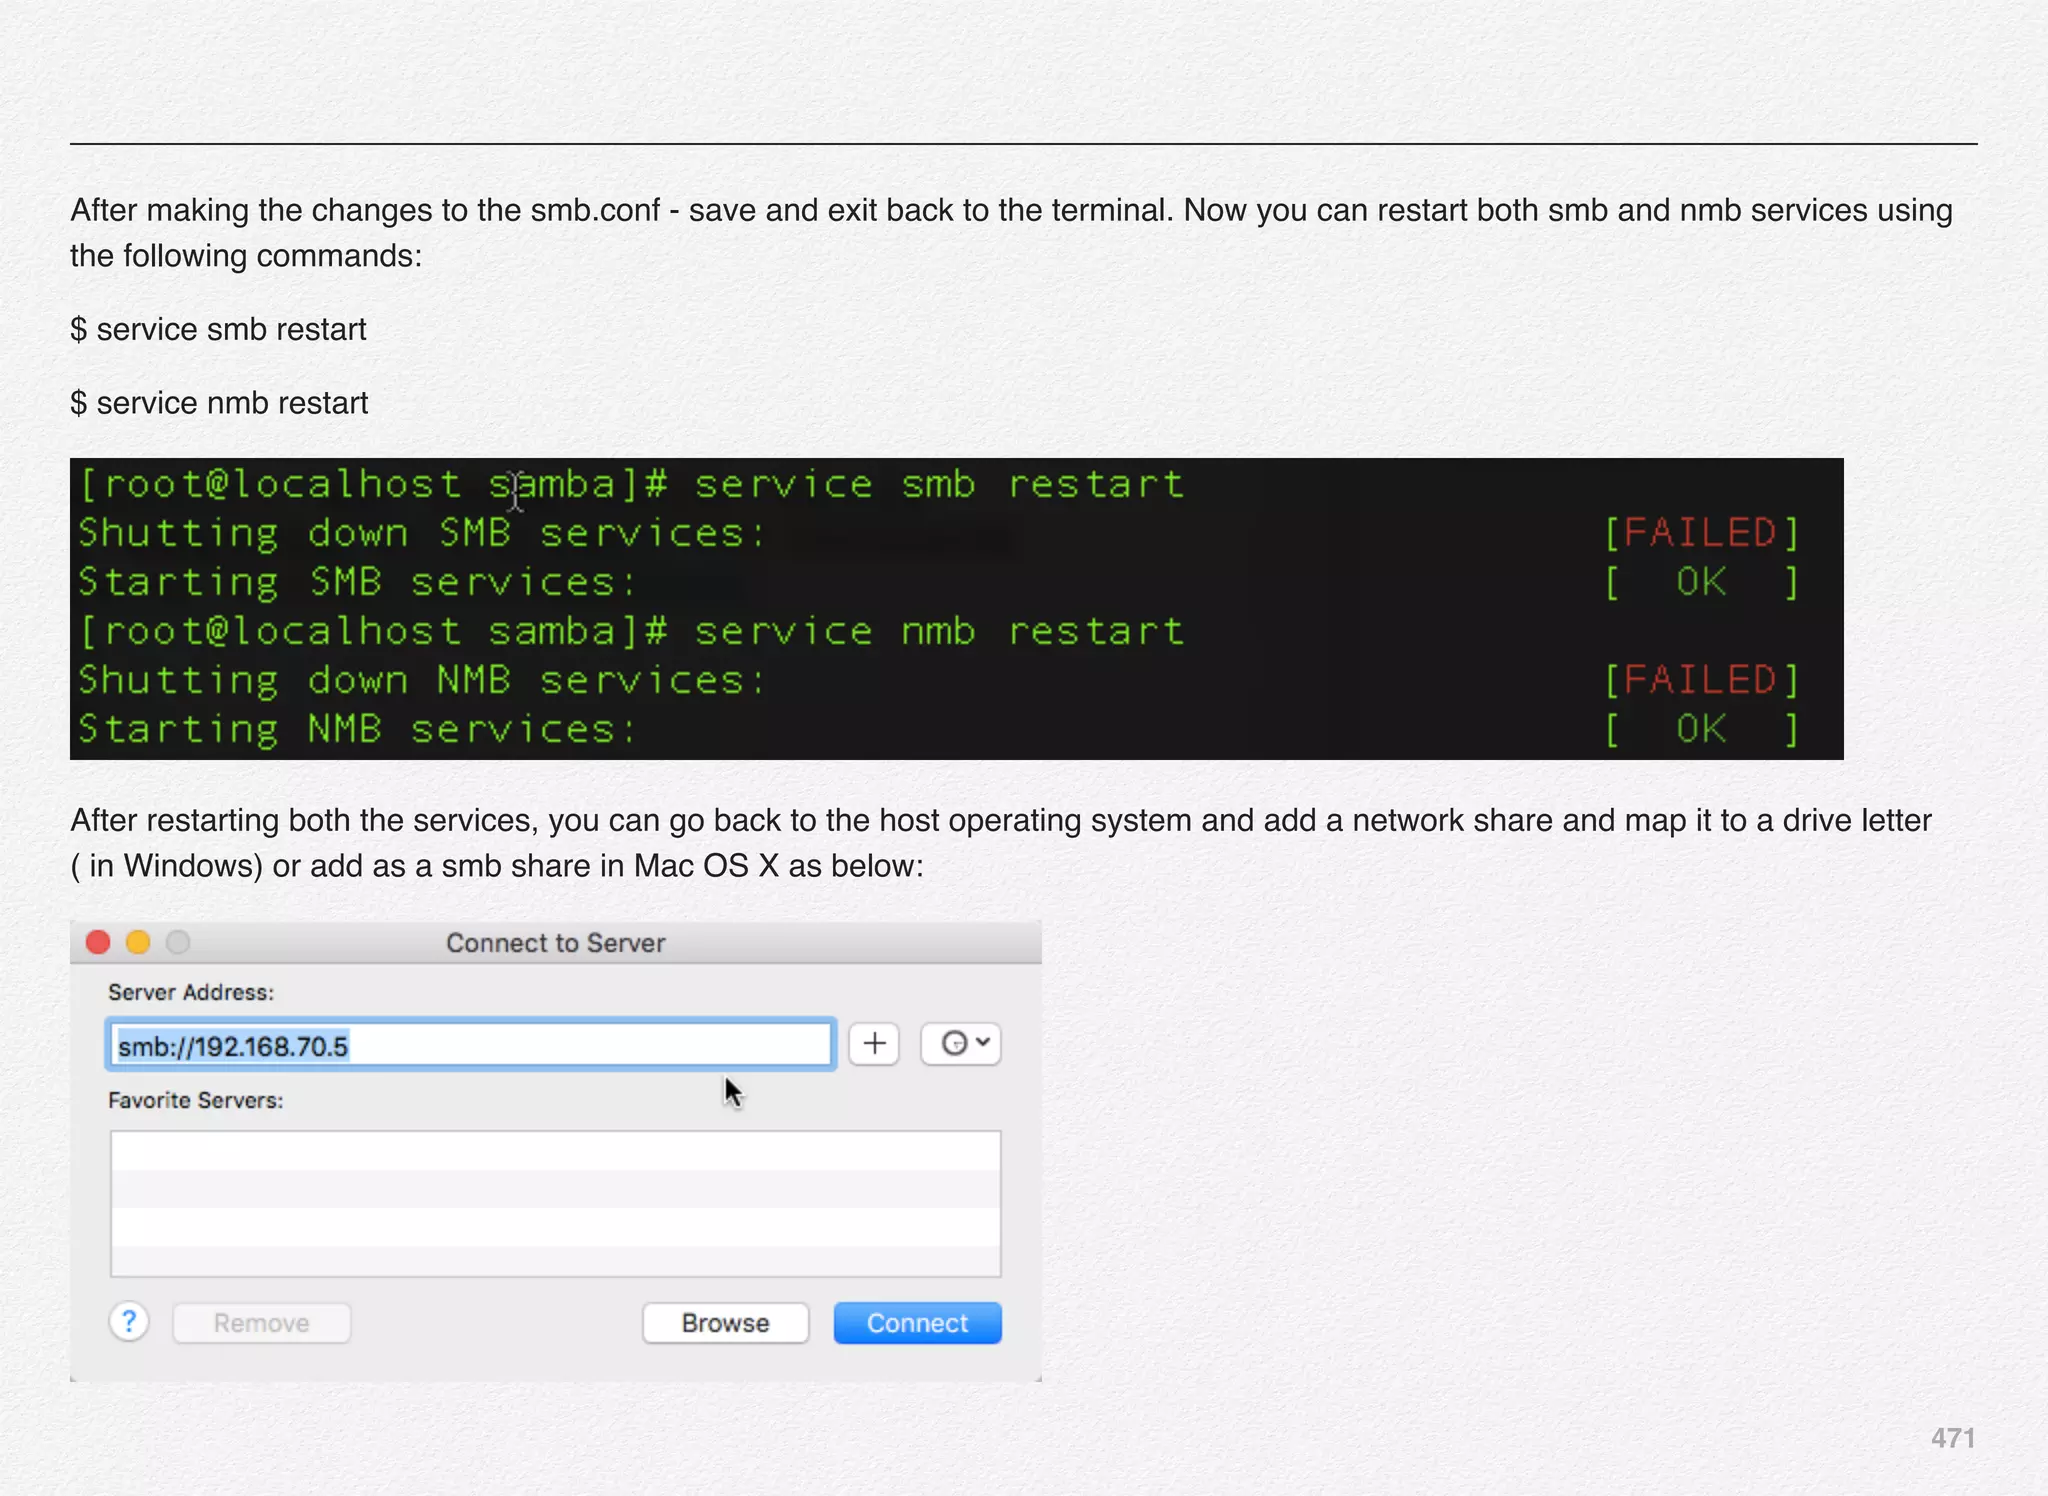
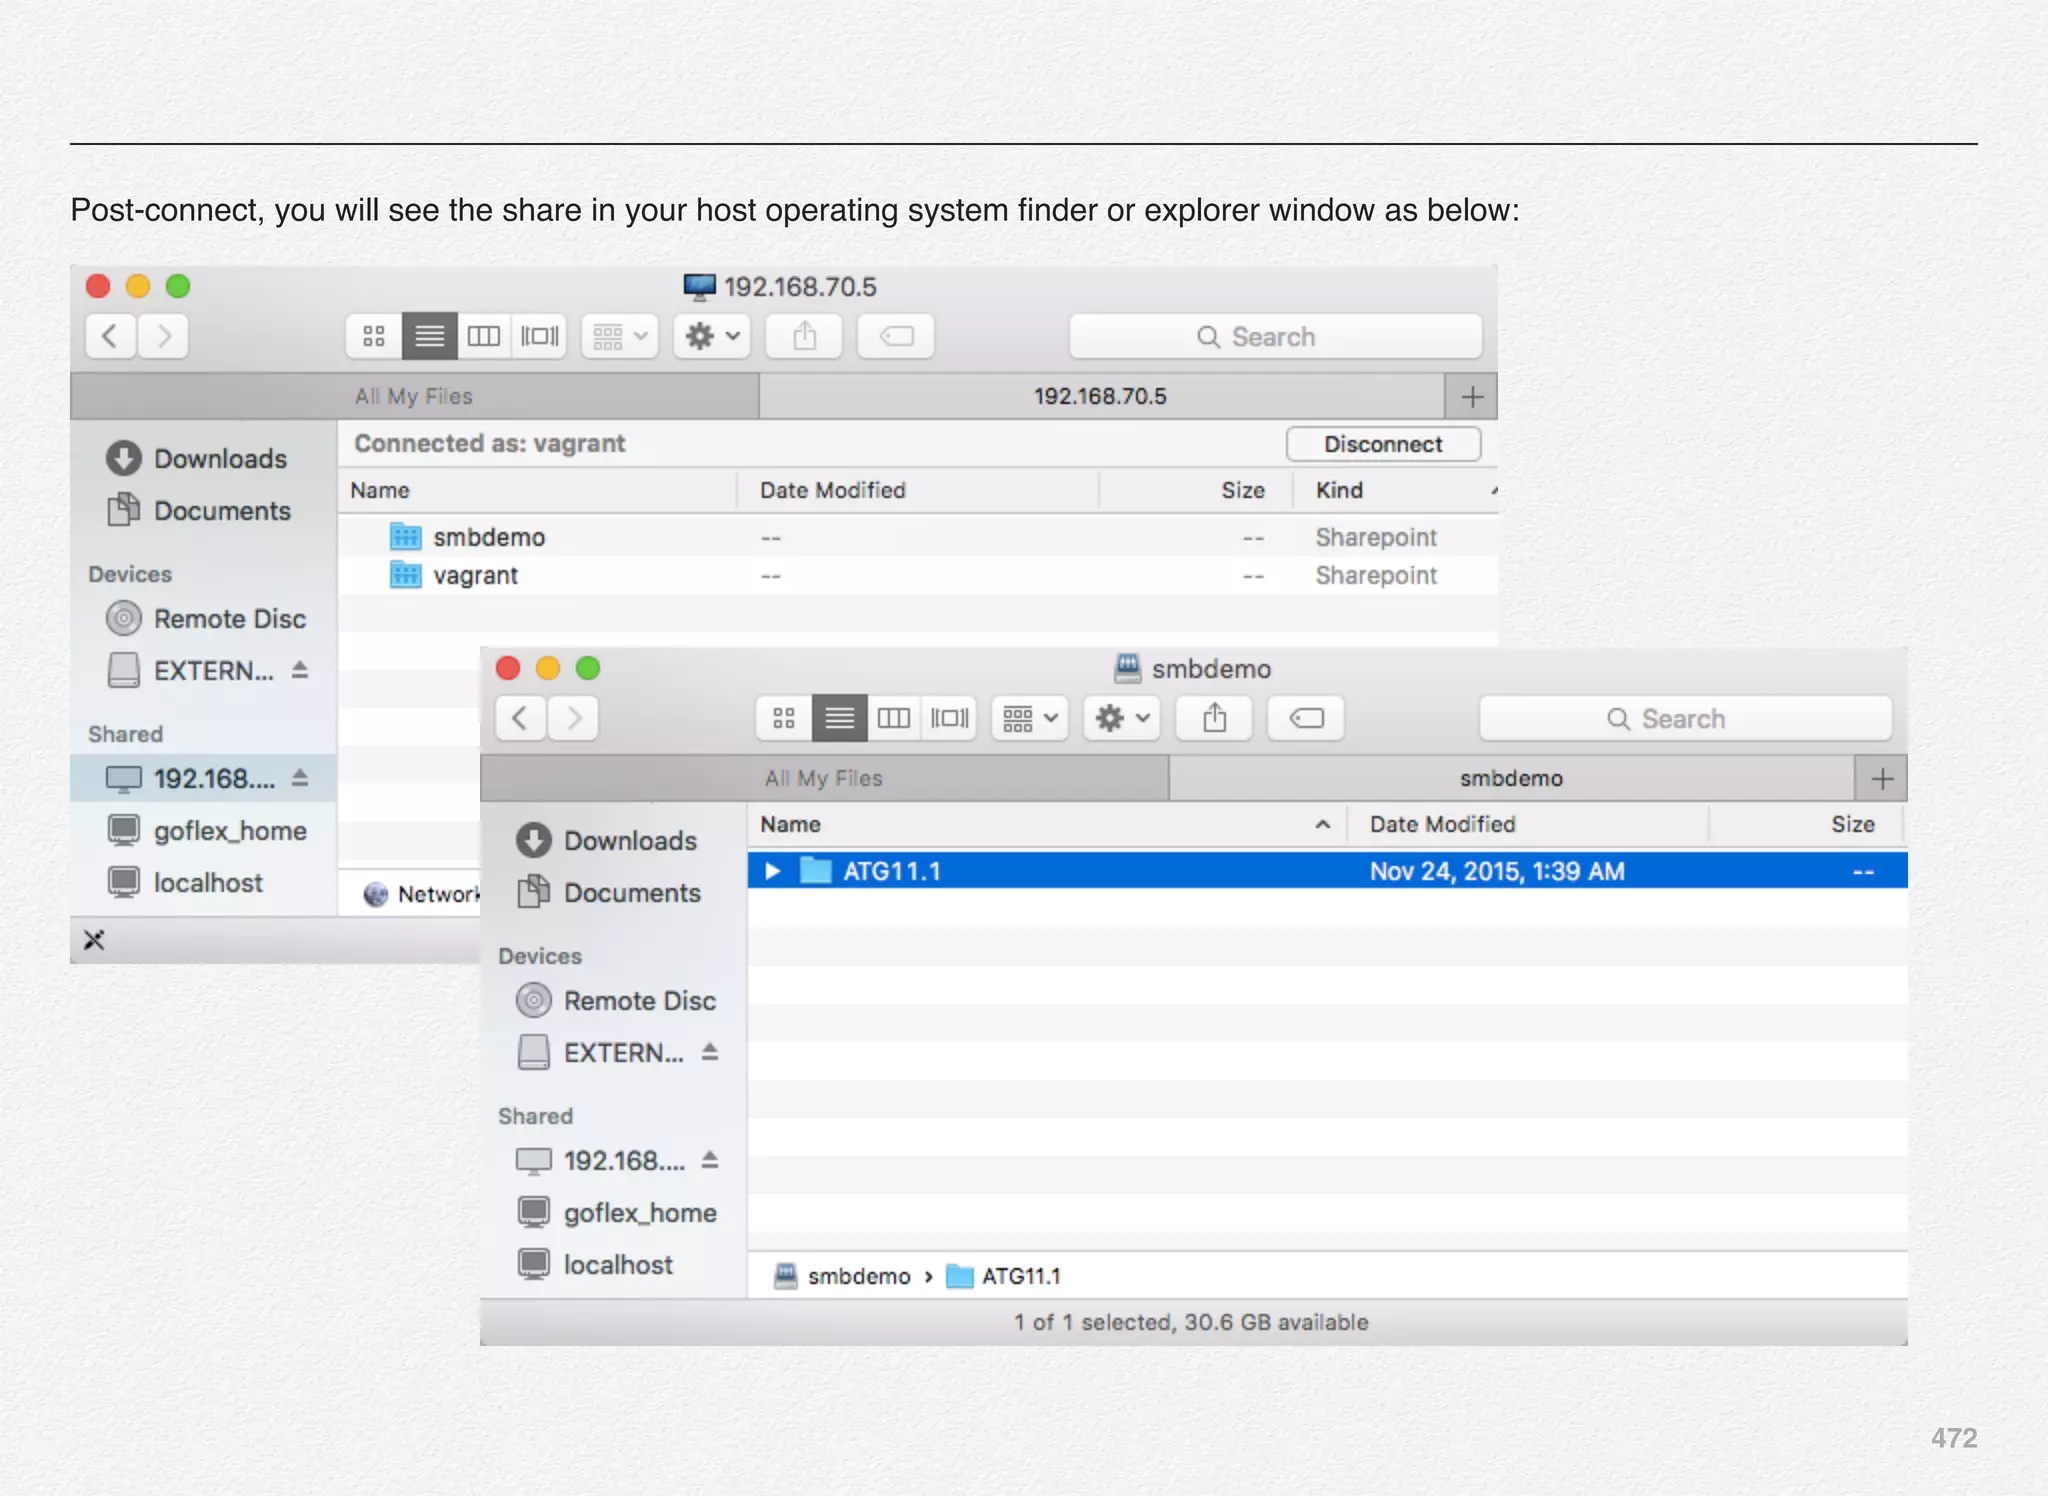
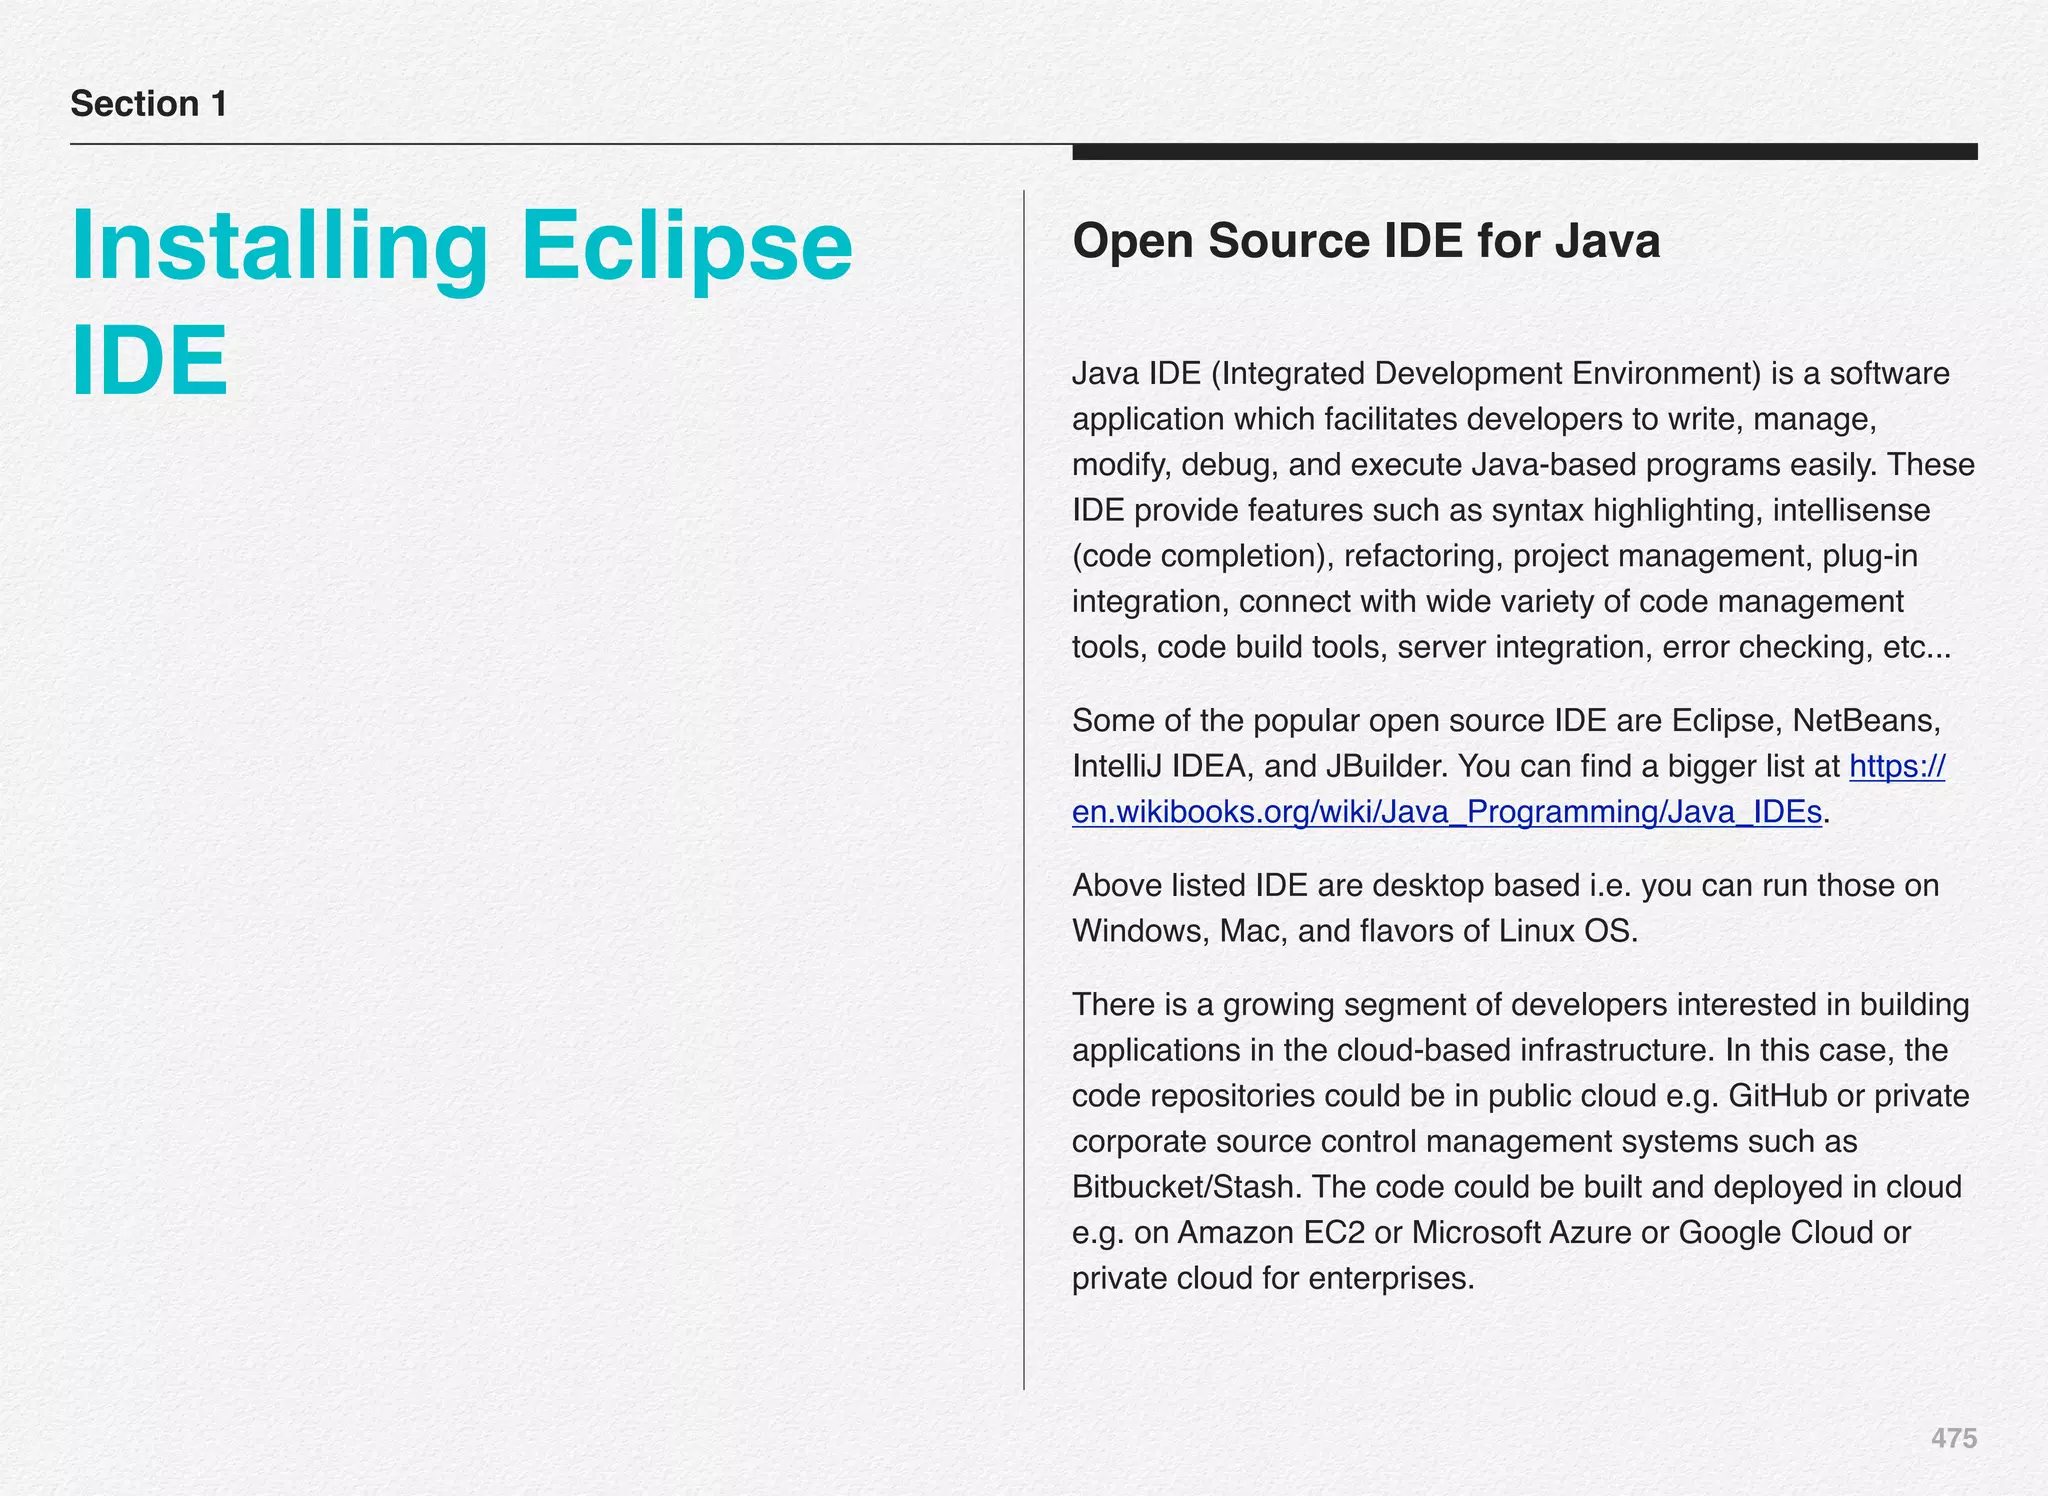
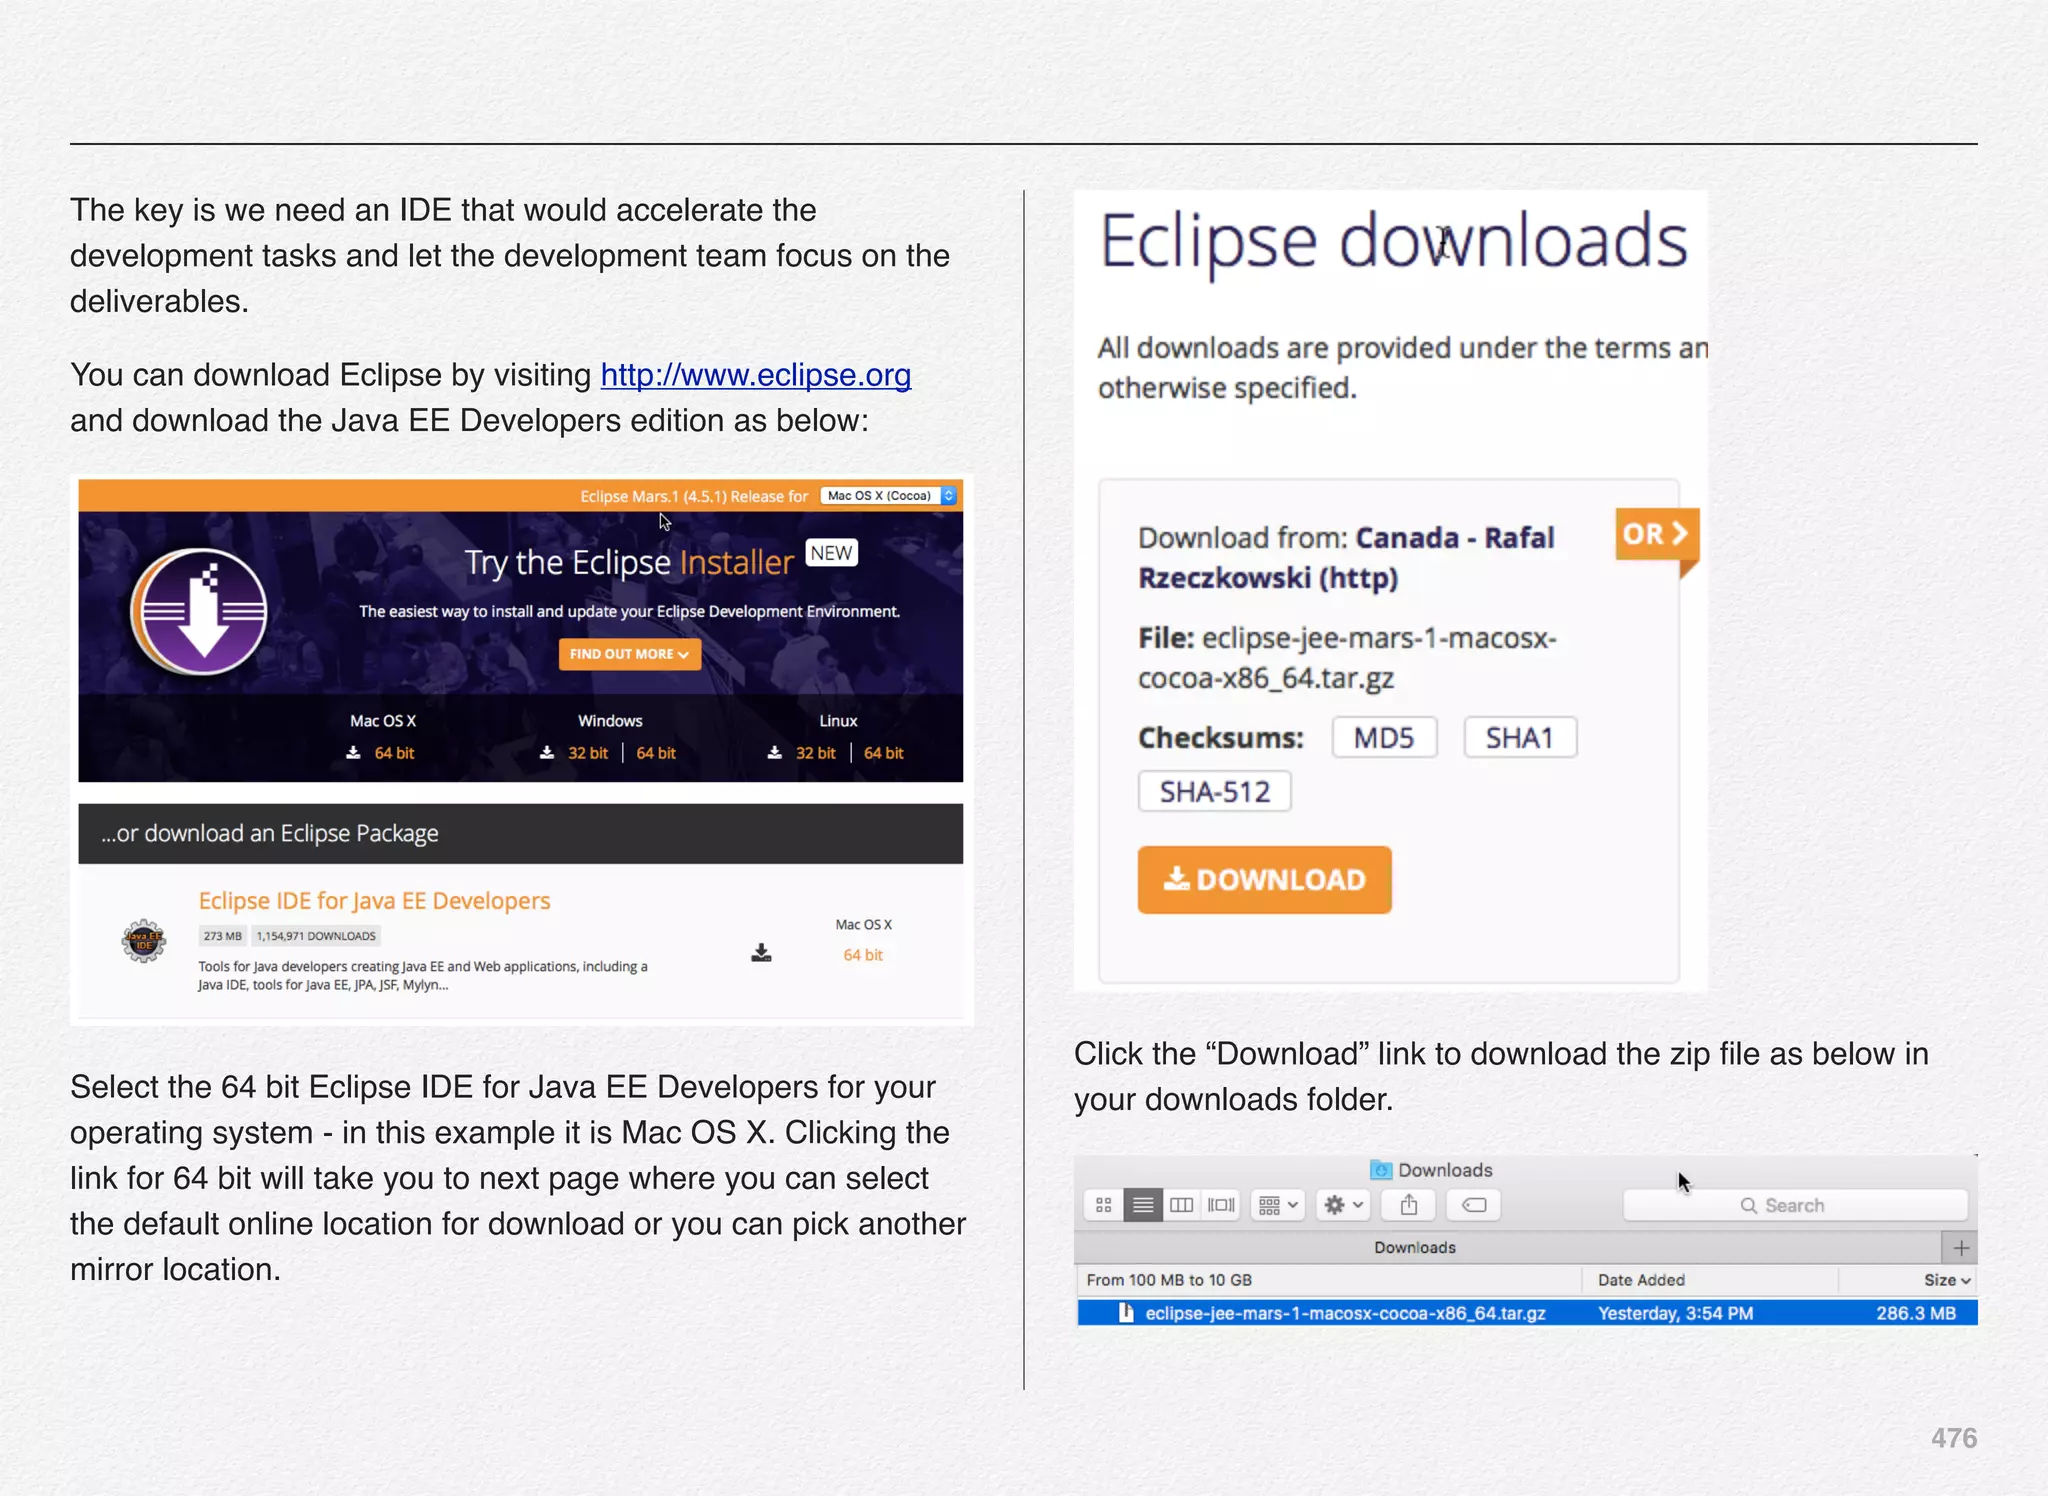
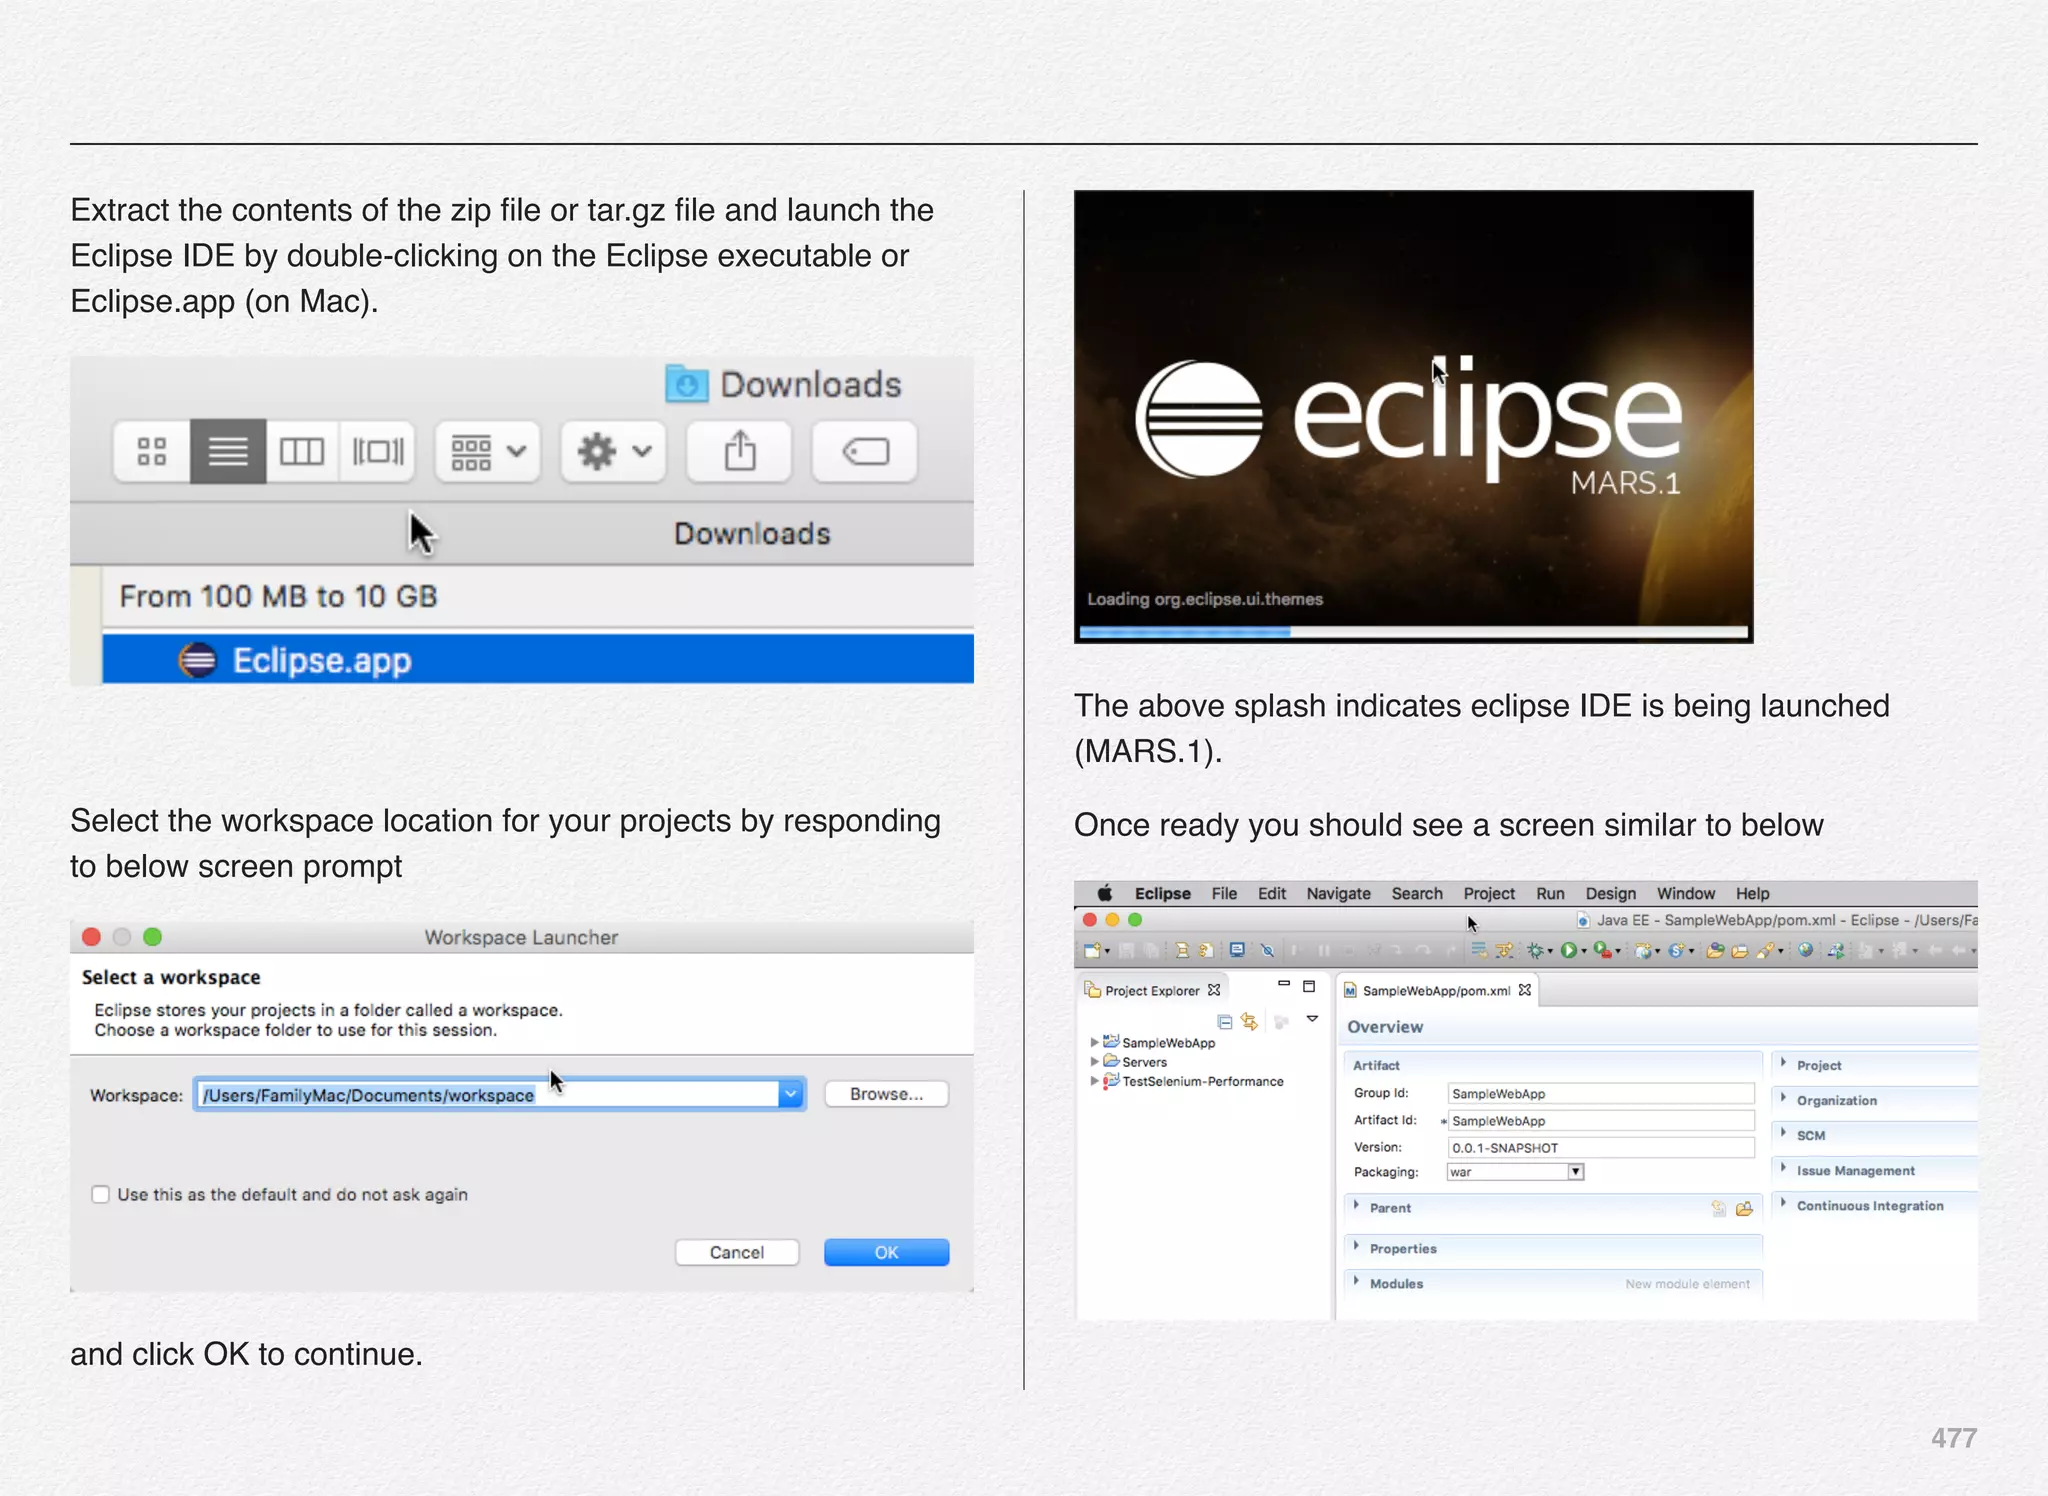


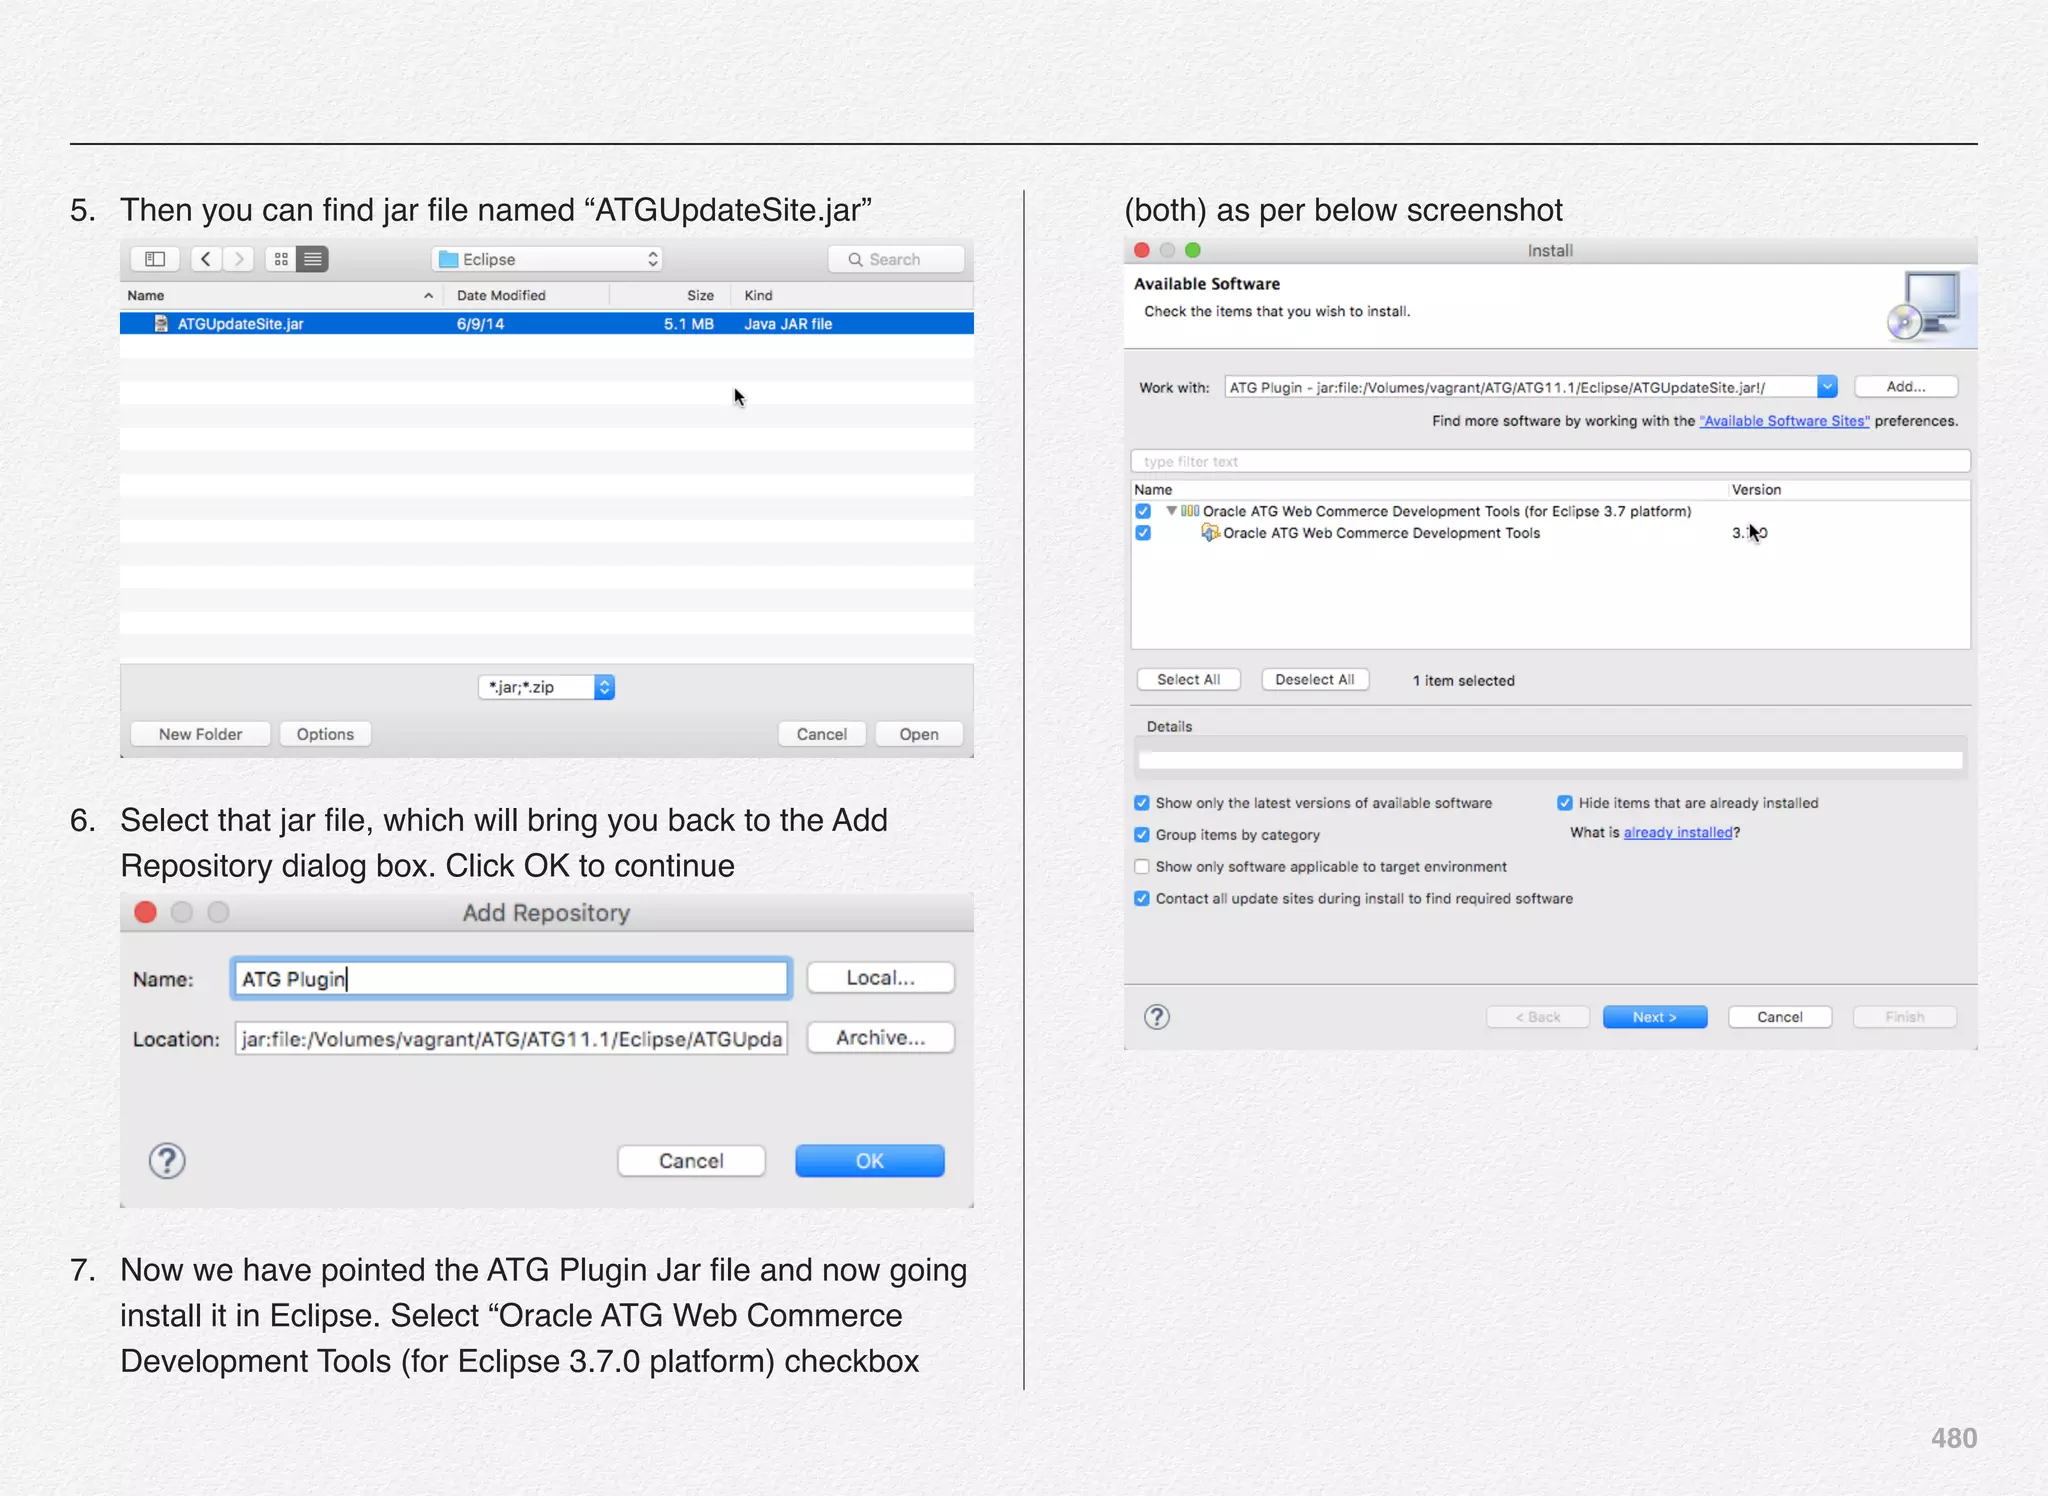
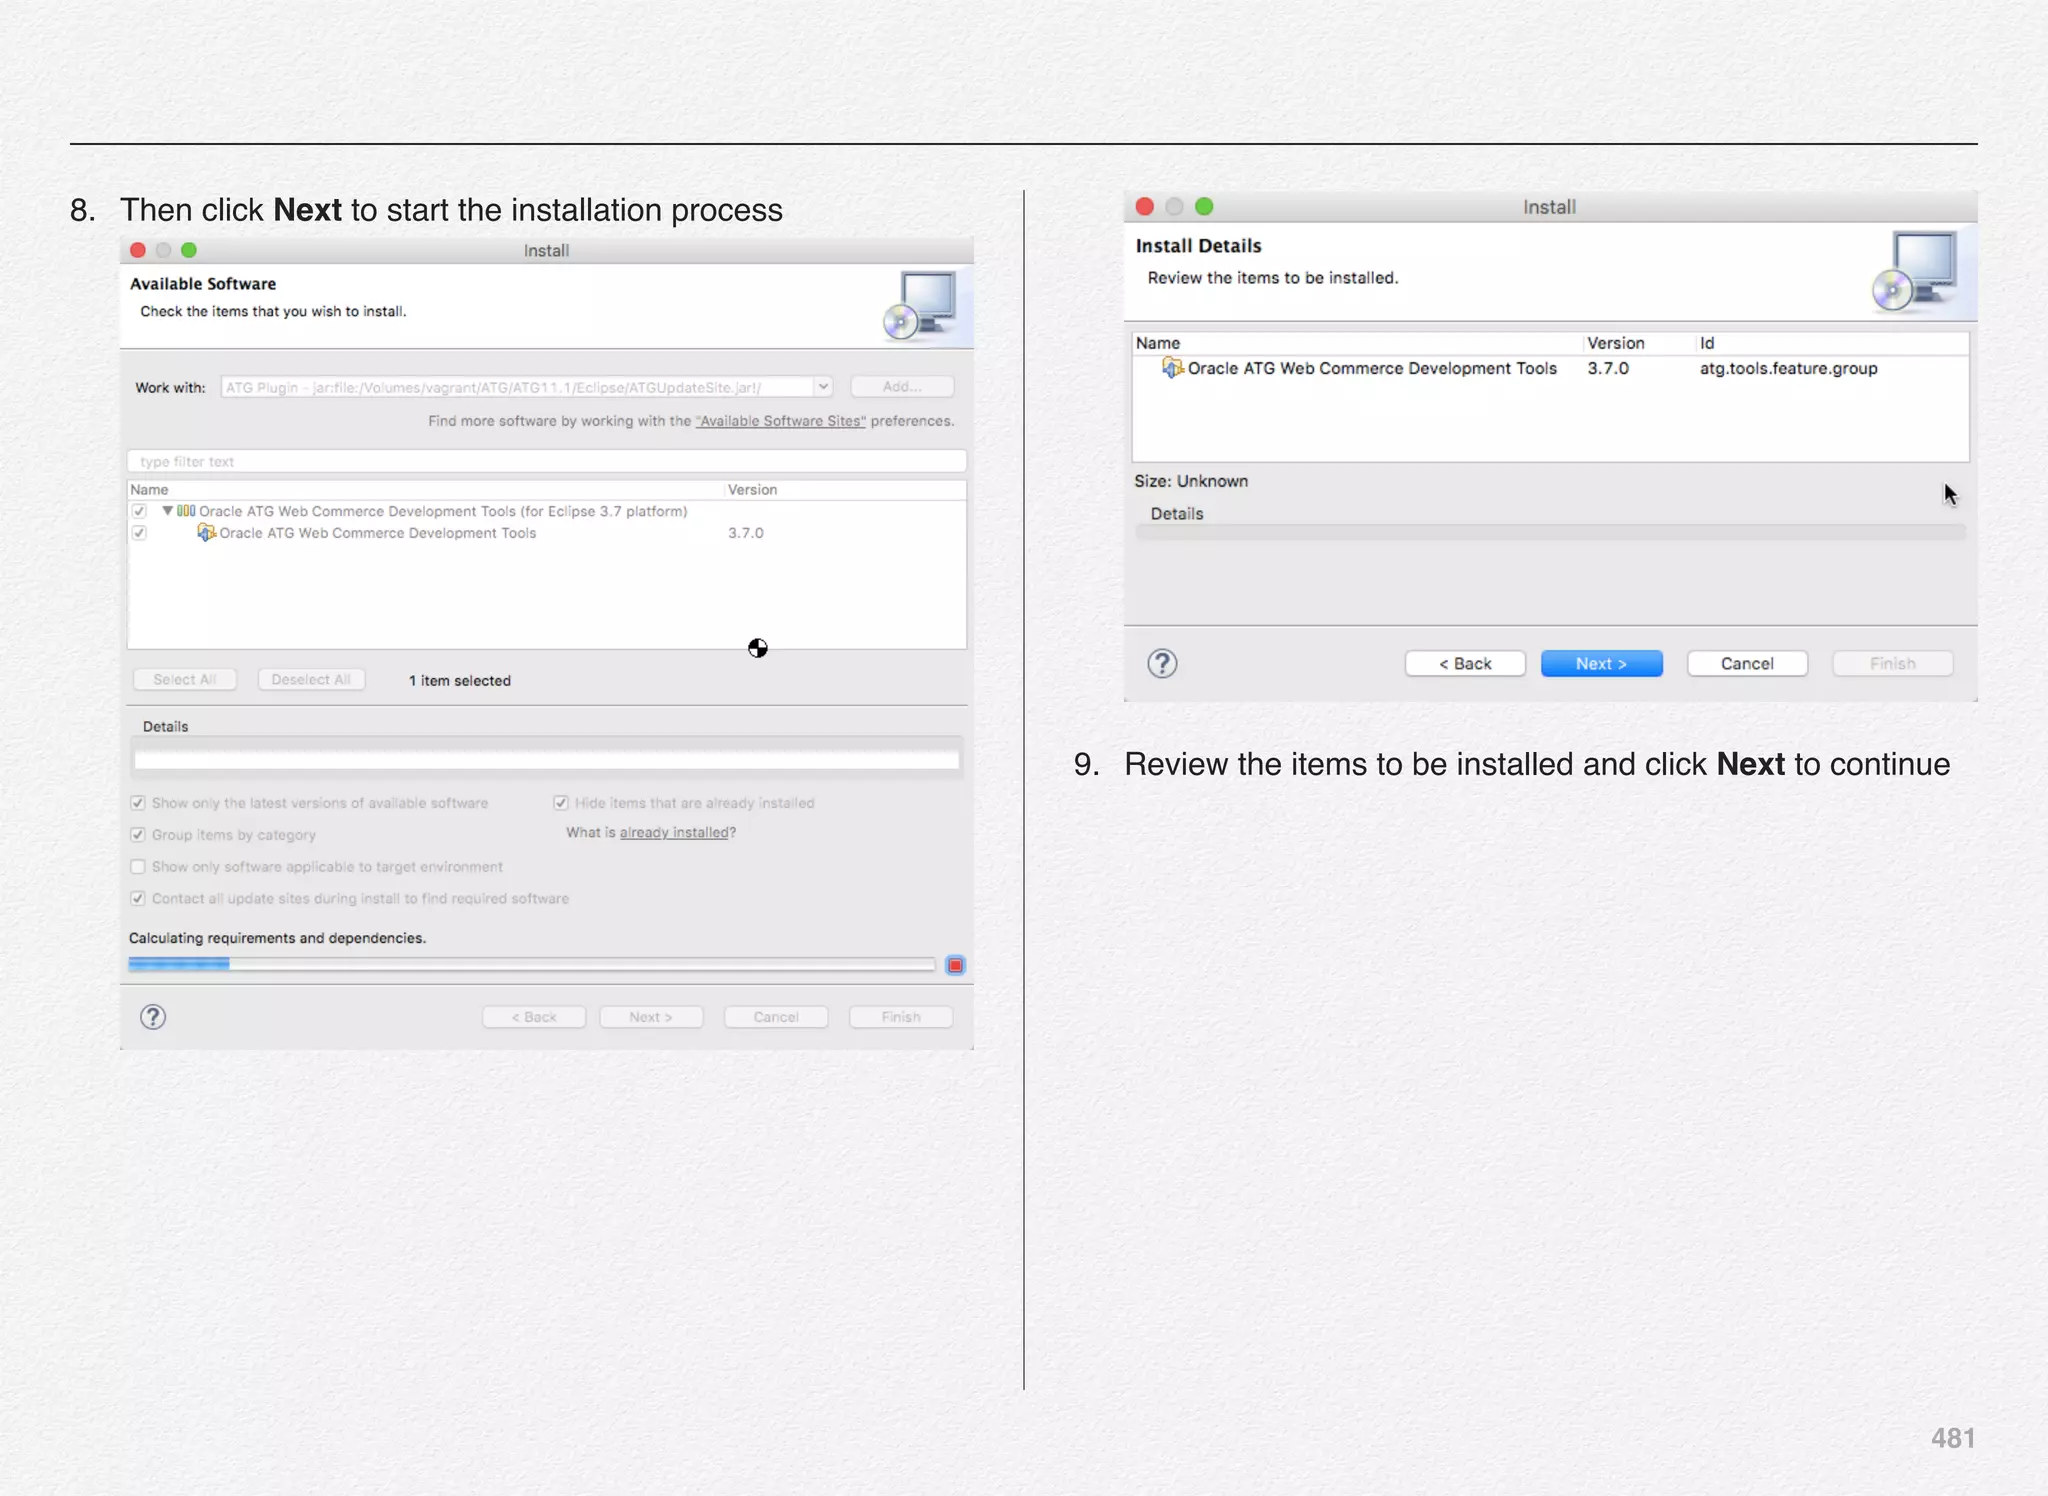
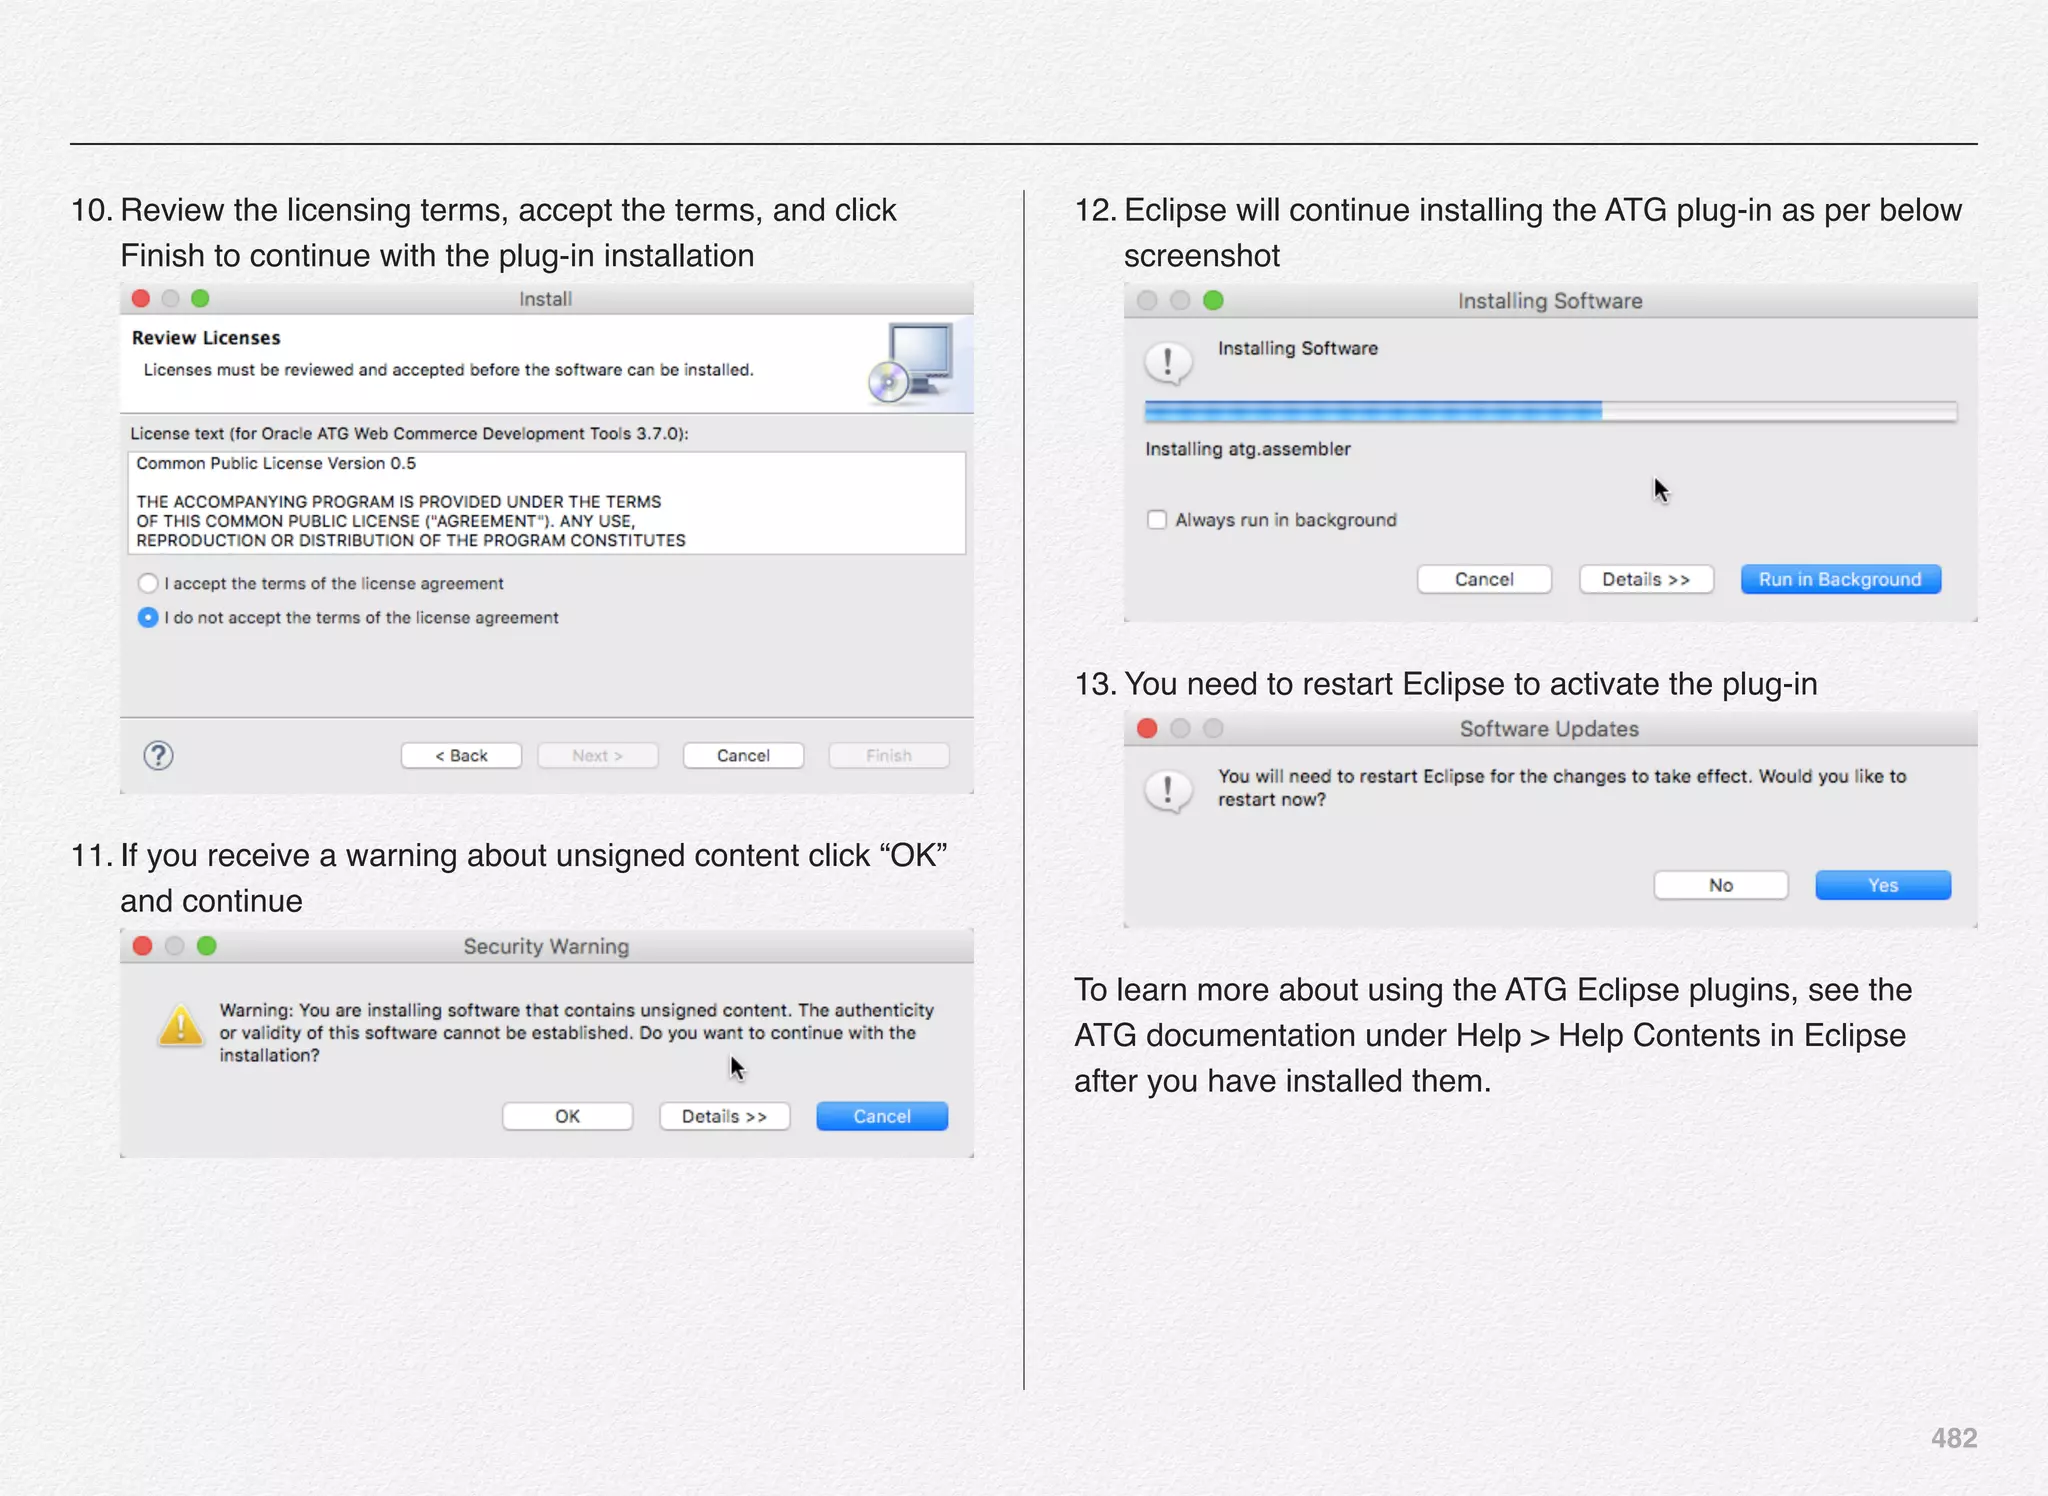
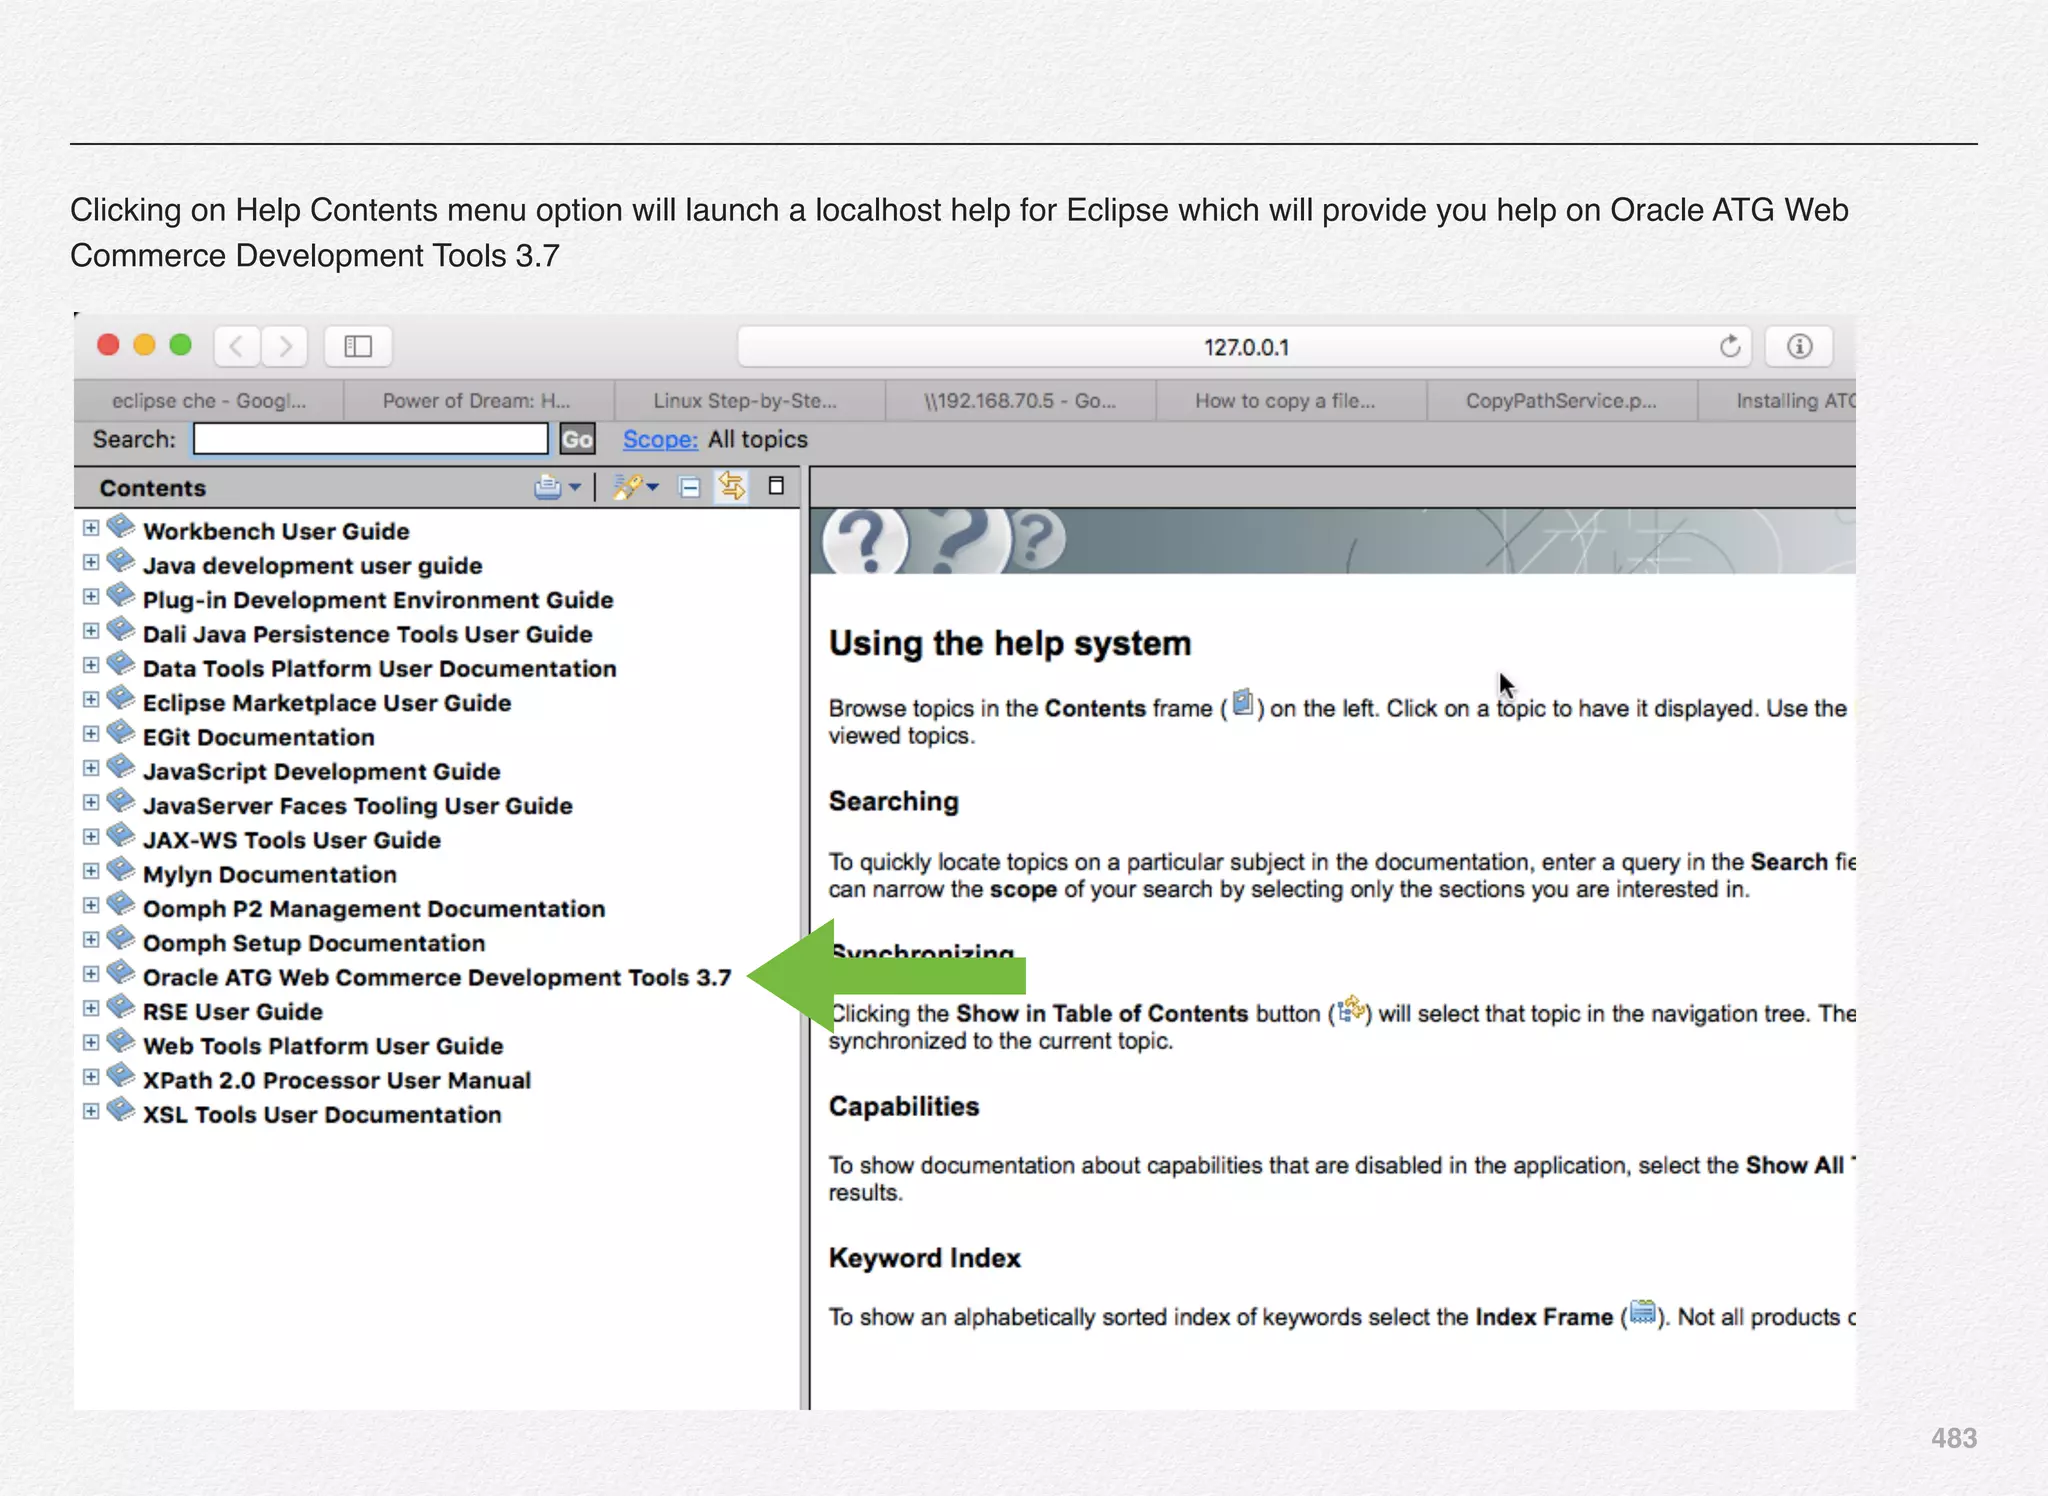
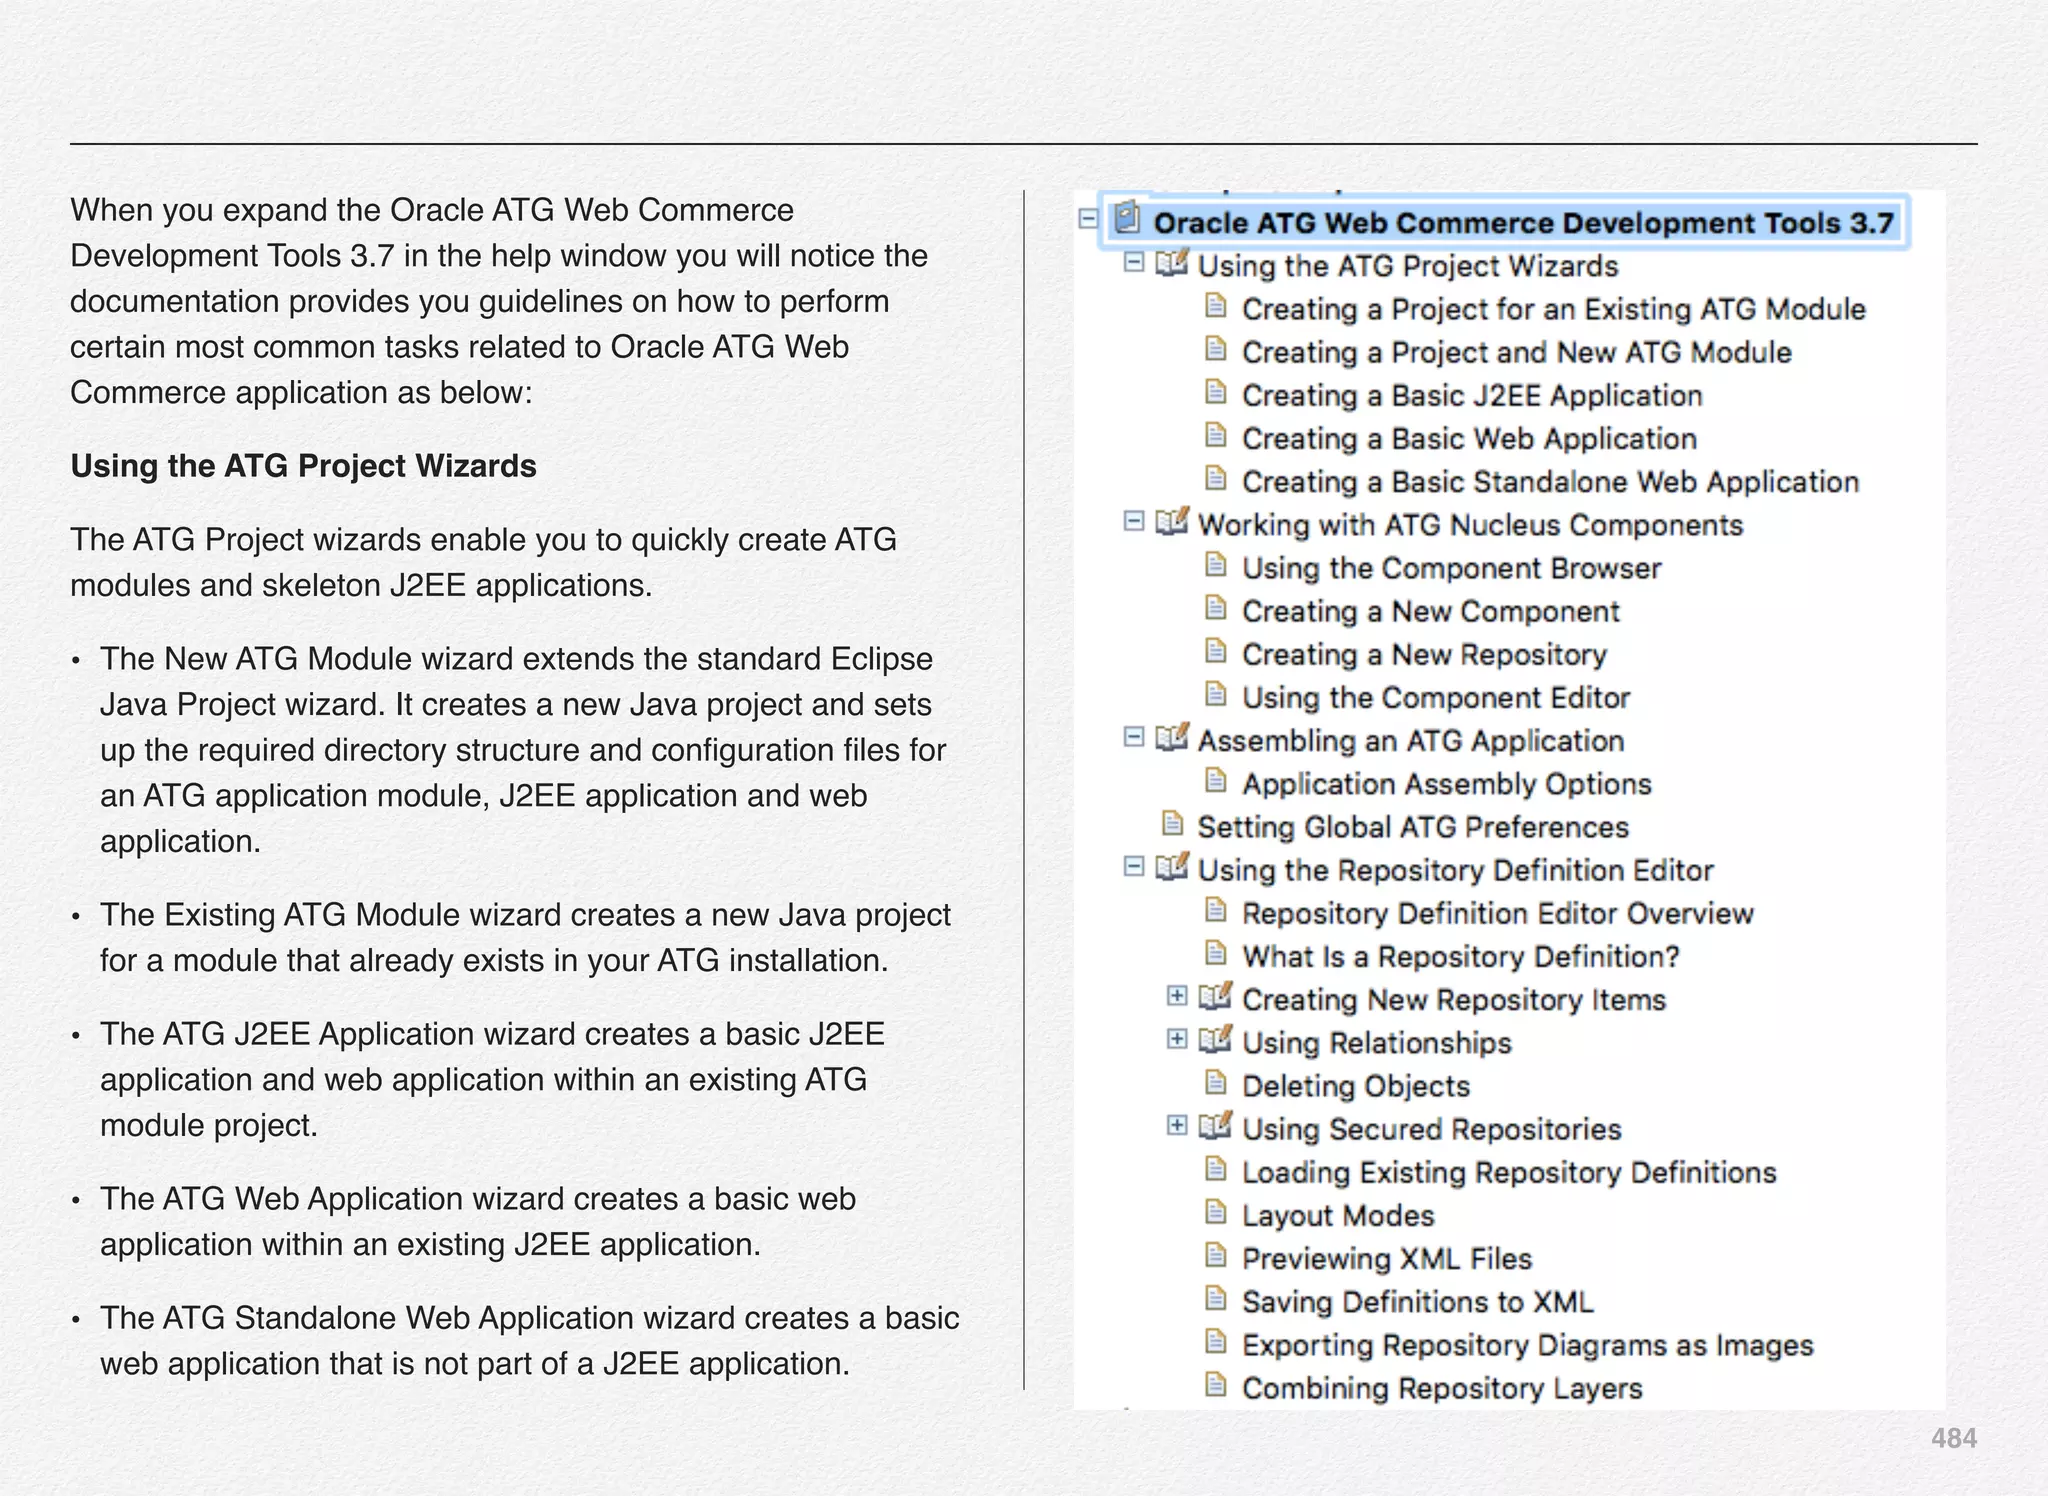
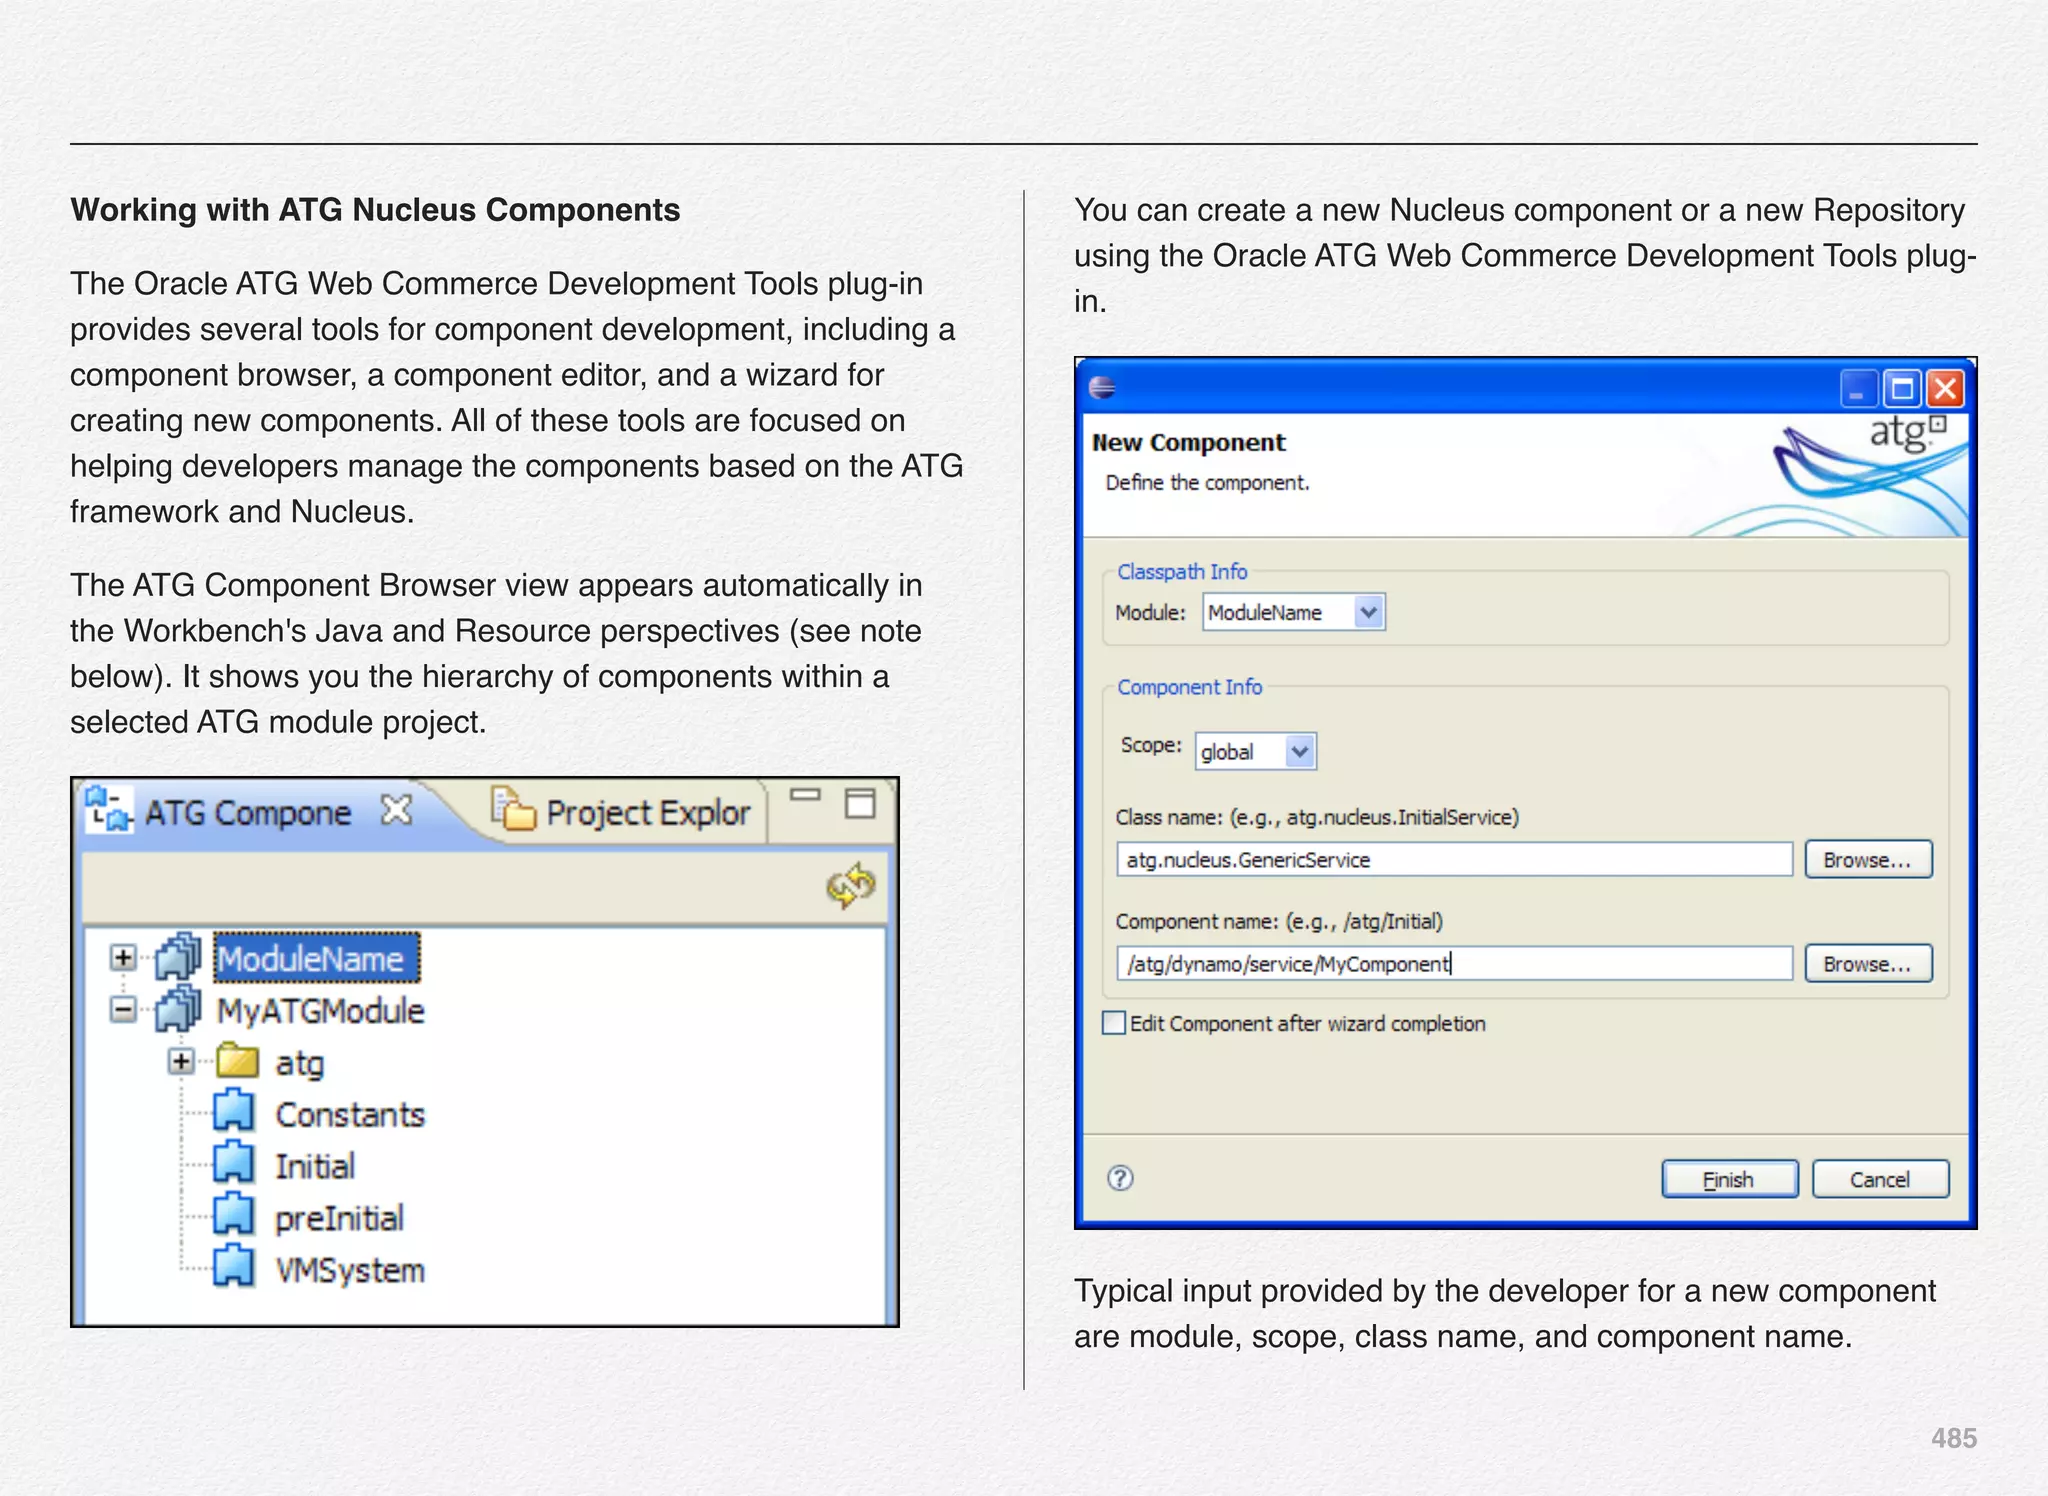

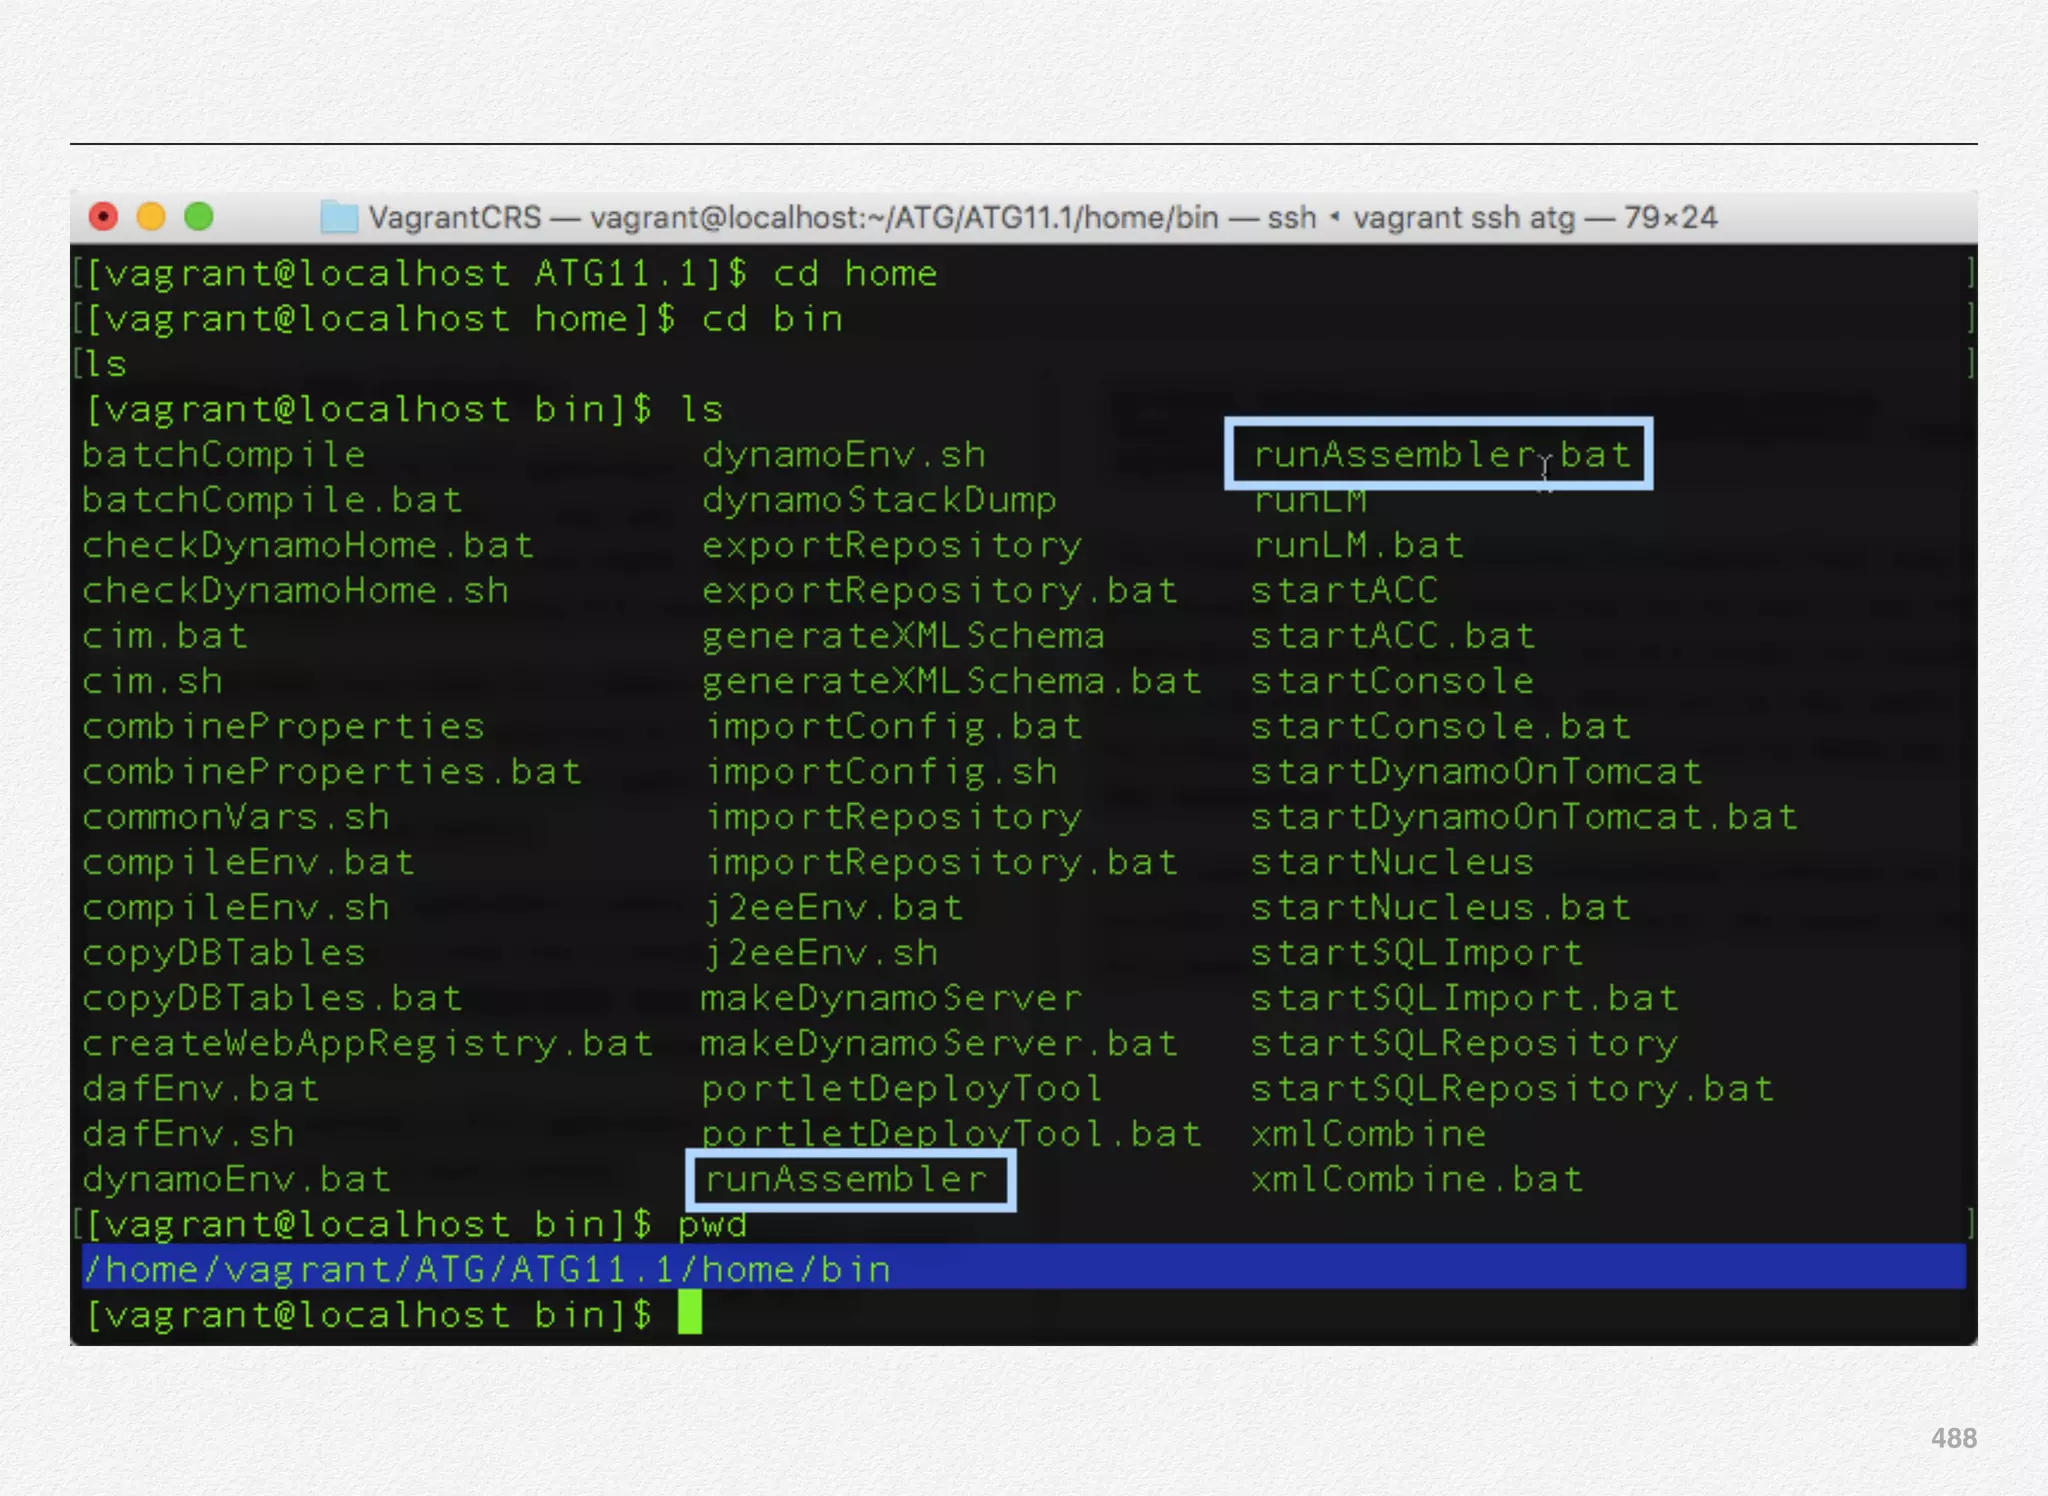
![489
The basic usage is:
Below are some of the most relevant and useful arguments that
you would potentially use on regular-basis:
-usage
Prints out usage instructions, including syntax and options
The following installed Oracle Commerce components are
being used to launch:
ATGPlatform version 11.1 installed at /home/vagrant/ATG/
ATG11.1
Usage: runAssembler [option*] output-file-name [-layer config-
layer-list] -m dynamo-module-list
For extended information on options, use the -usage flag.
The runAssembler command assembles Dynamo Application
Modules into a single ear file.
J2EE modules contained within a Dynamo Application Module
are declared by adding one or more of the
following attributes to a given module's META-INF/
MANIFEST.MF:
ATG-EAR-Module: path/to_your/earfile
ATG-Web-Module: path/to_your/warfile
ATG-EJB-Module: path/to_your/ejb.jar
Replace path/to_your/XXXX with the relative path to a j2ee
module.
See the Installation and Configuration guides specific to your
appserver on http://www.atg.com/
-liveconfig
This flag instructs the application to use a special layer of
configuration only appropriate for production environments.
This needs to be the first argument after runAssembler.](https://image.slidesharecdn.com/oraclecommerce-doityourselfseries-160129151710/75/Oracle-Commerce-Using-ATG-Endeca-Do-It-Yourself-Series-490-2048.jpg)
![490
-overwrite
Use this to completely overwrite the previous ear file. By
default, only the newest files are overwritten and the
unchanged are unchanged.
-pack
By default, ATG ears are assembled into ‘exploded’ directory.
This option packs the ear down into an ear file.
-server [server]
If you’re building out an ear for a specific server, i.e publishing
or storefront etc, you can include the ATG server name to
include a server-specific configuration layer. These are the
servers that will be in $DYNAMO_HOME/servers.
-standalone
This must be after the -layer flag and before -m flag. This puts
everything required into the ear file and does not refer back to
the ATG installation at runtime (much preferred in a production
environment). Without this, configuration isn’t included in the
ear, but instead referenced from the ATG installation.
-m <module-1 module-2..>
A list of modules to include in the application. This is very
important and will be discussed further down.
The Oracle ATG Web Commerce Development Tools plug-in
also provides you with a wizard that can be used to take the
application modules specified in the ATG project and assemble
these modules into an EAR file, which you can then deploy to
the enterprise class application servers such as WebLogic or
IBM WebSphere - of course even JBoss.
If you have already used the runAssembler command-line utility
provided by Oracle ATG Web Commerce - this wizard is the
GUI version of the same utility.
-liveconfig
configure the production level caching](https://image.slidesharecdn.com/oraclecommerce-doityourselfseries-160129151710/75/Oracle-Commerce-Using-ATG-Endeca-Do-It-Yourself-Series-491-2048.jpg)
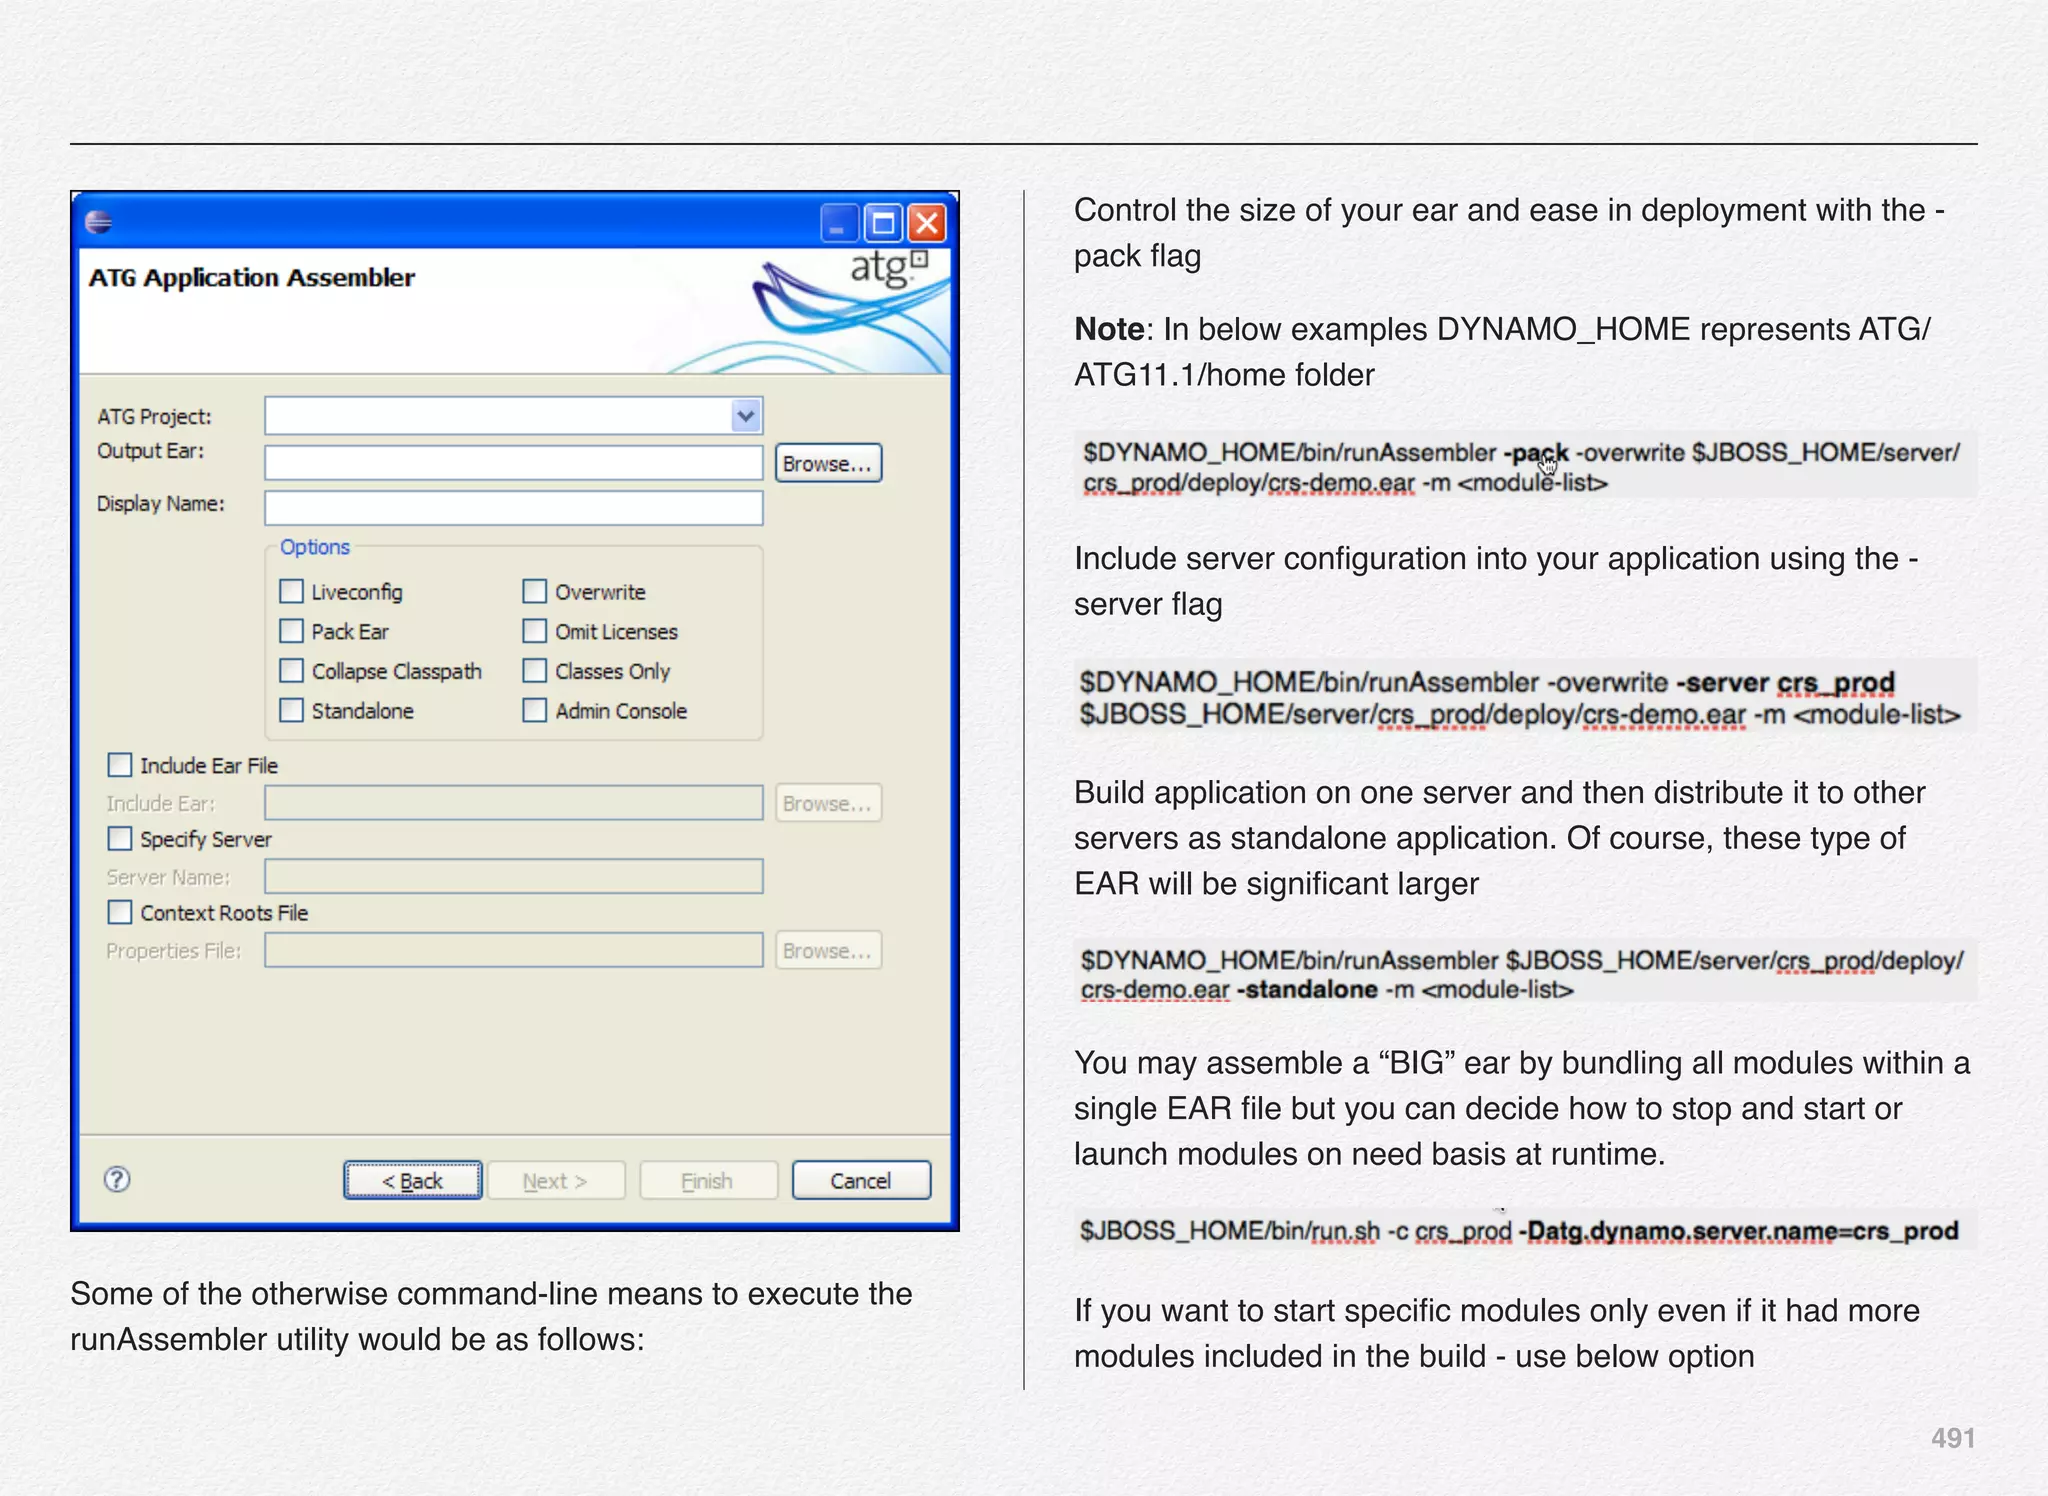
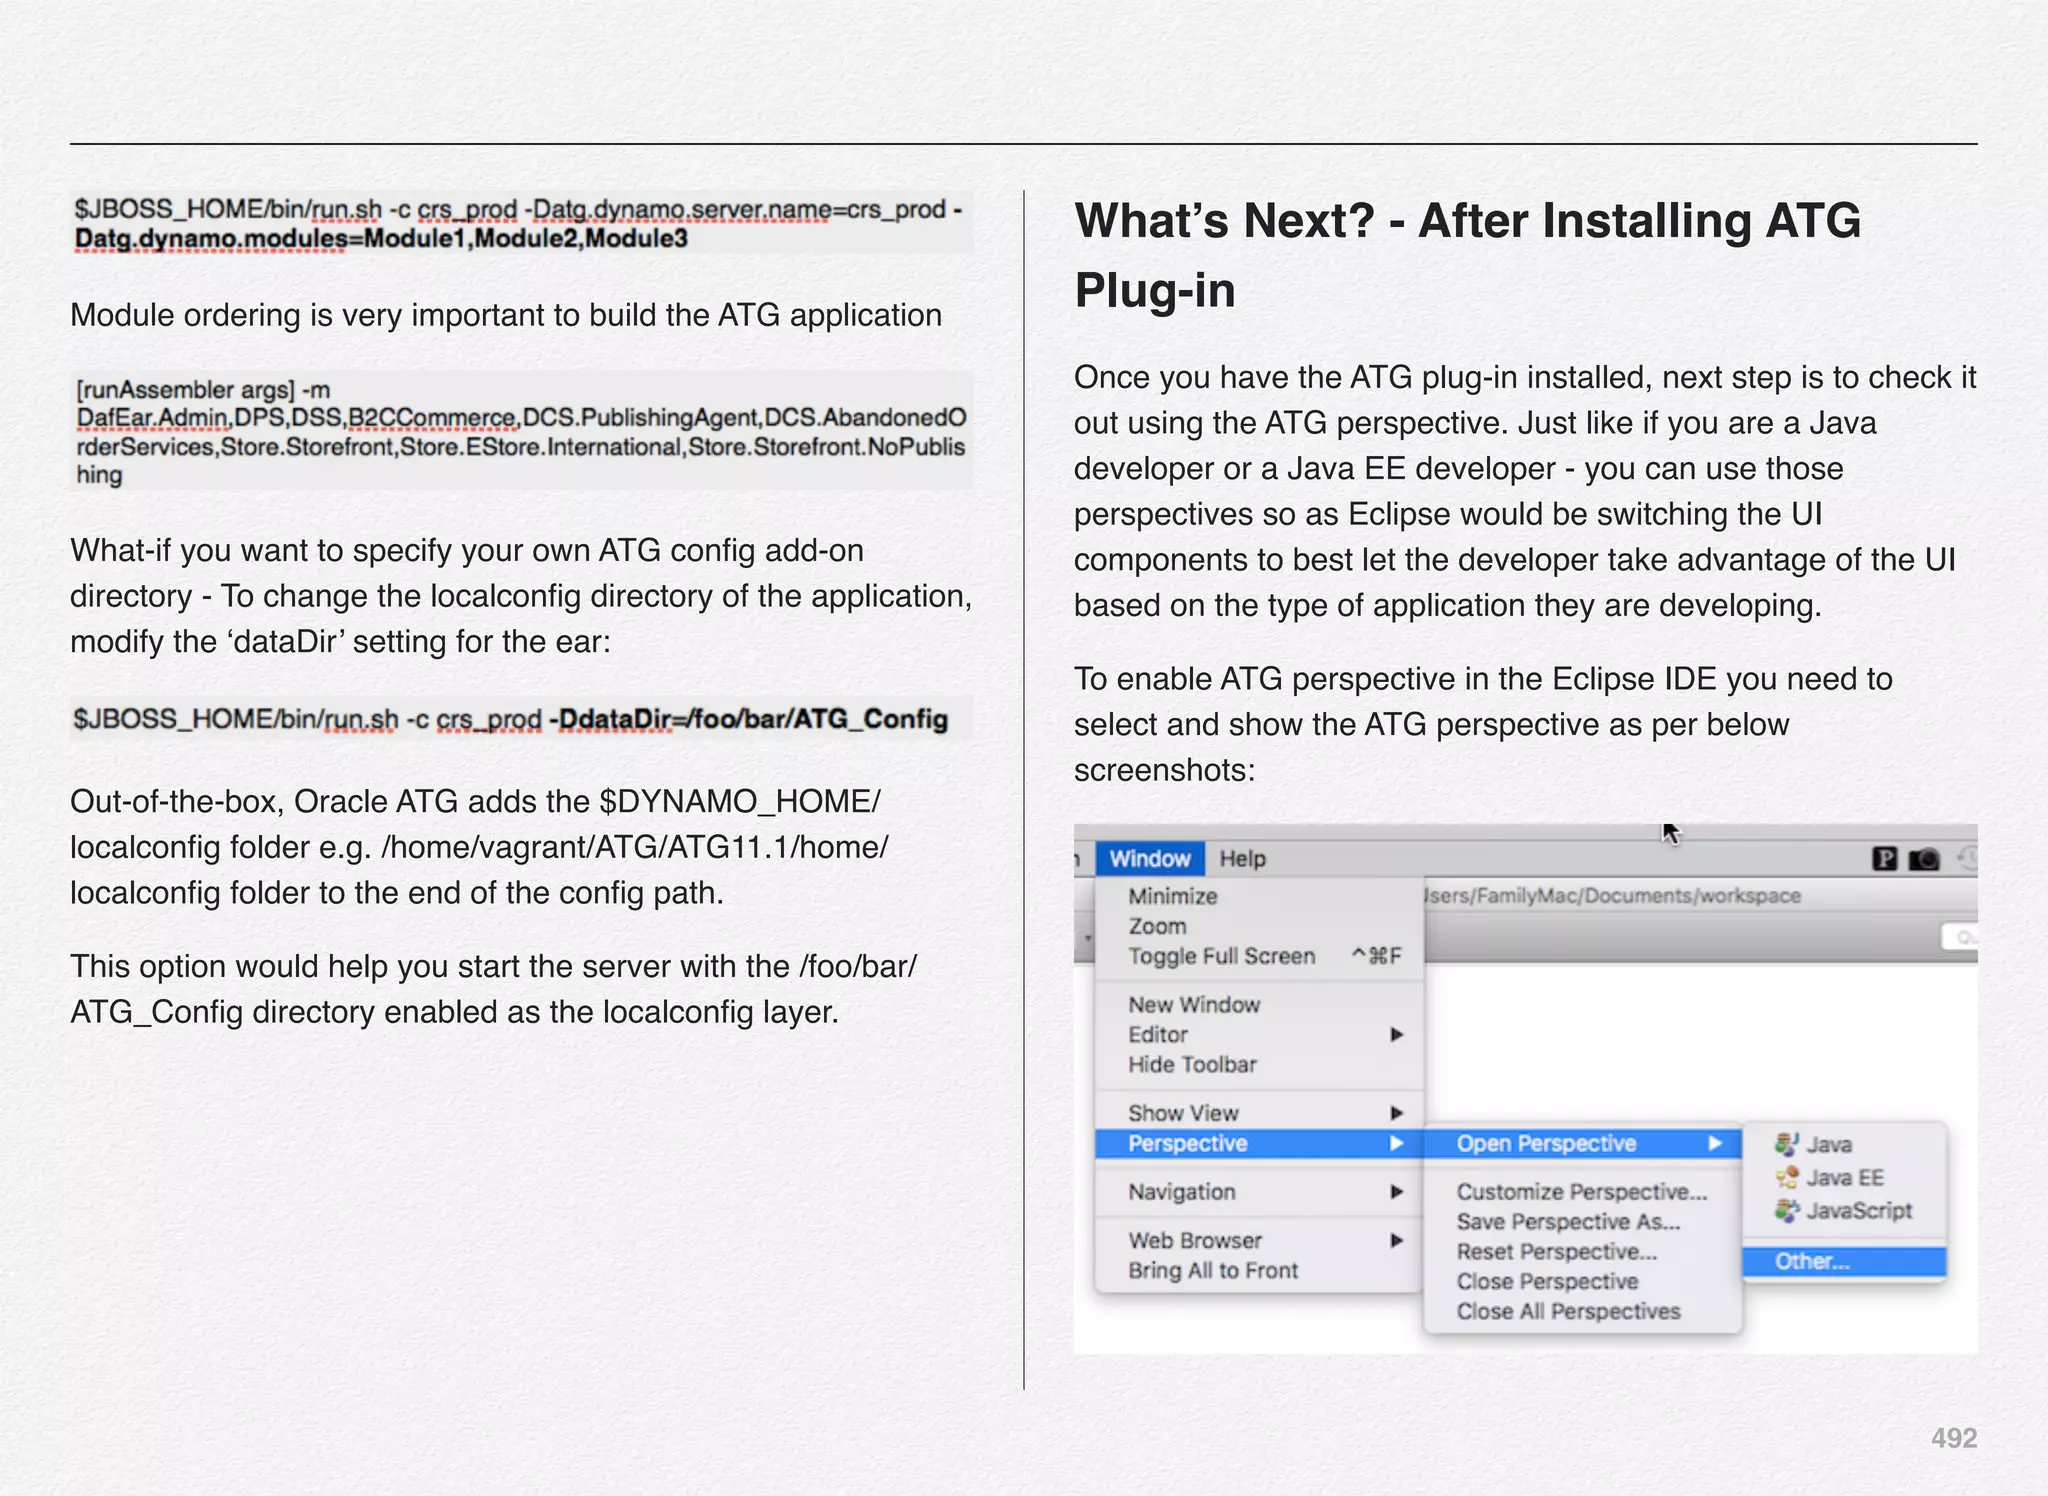
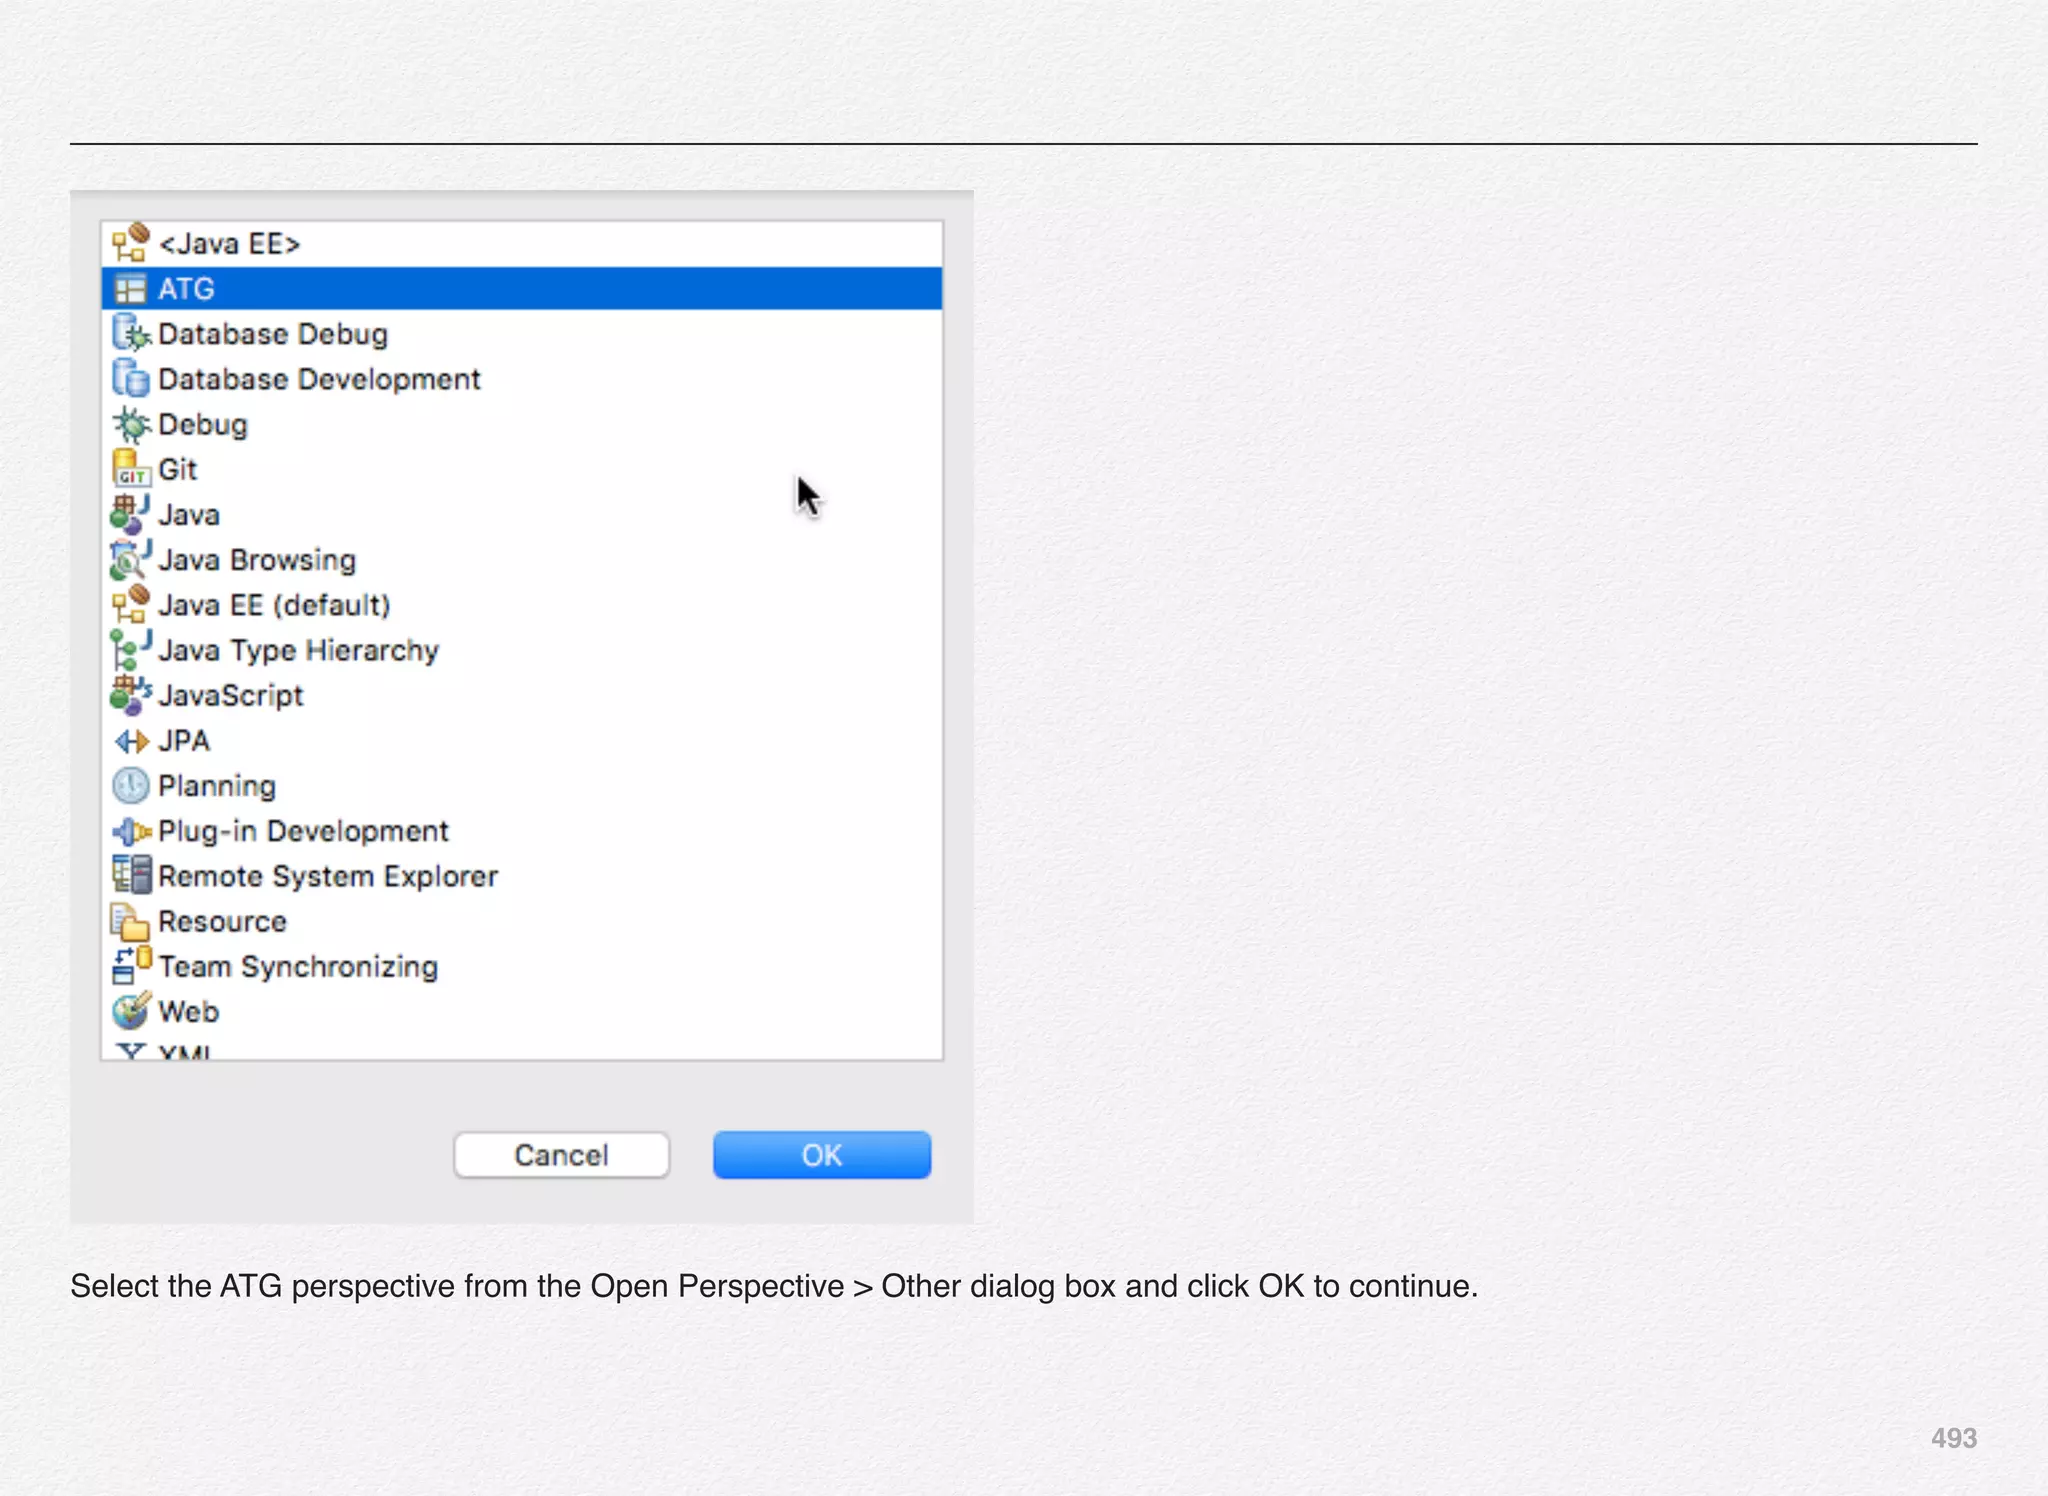
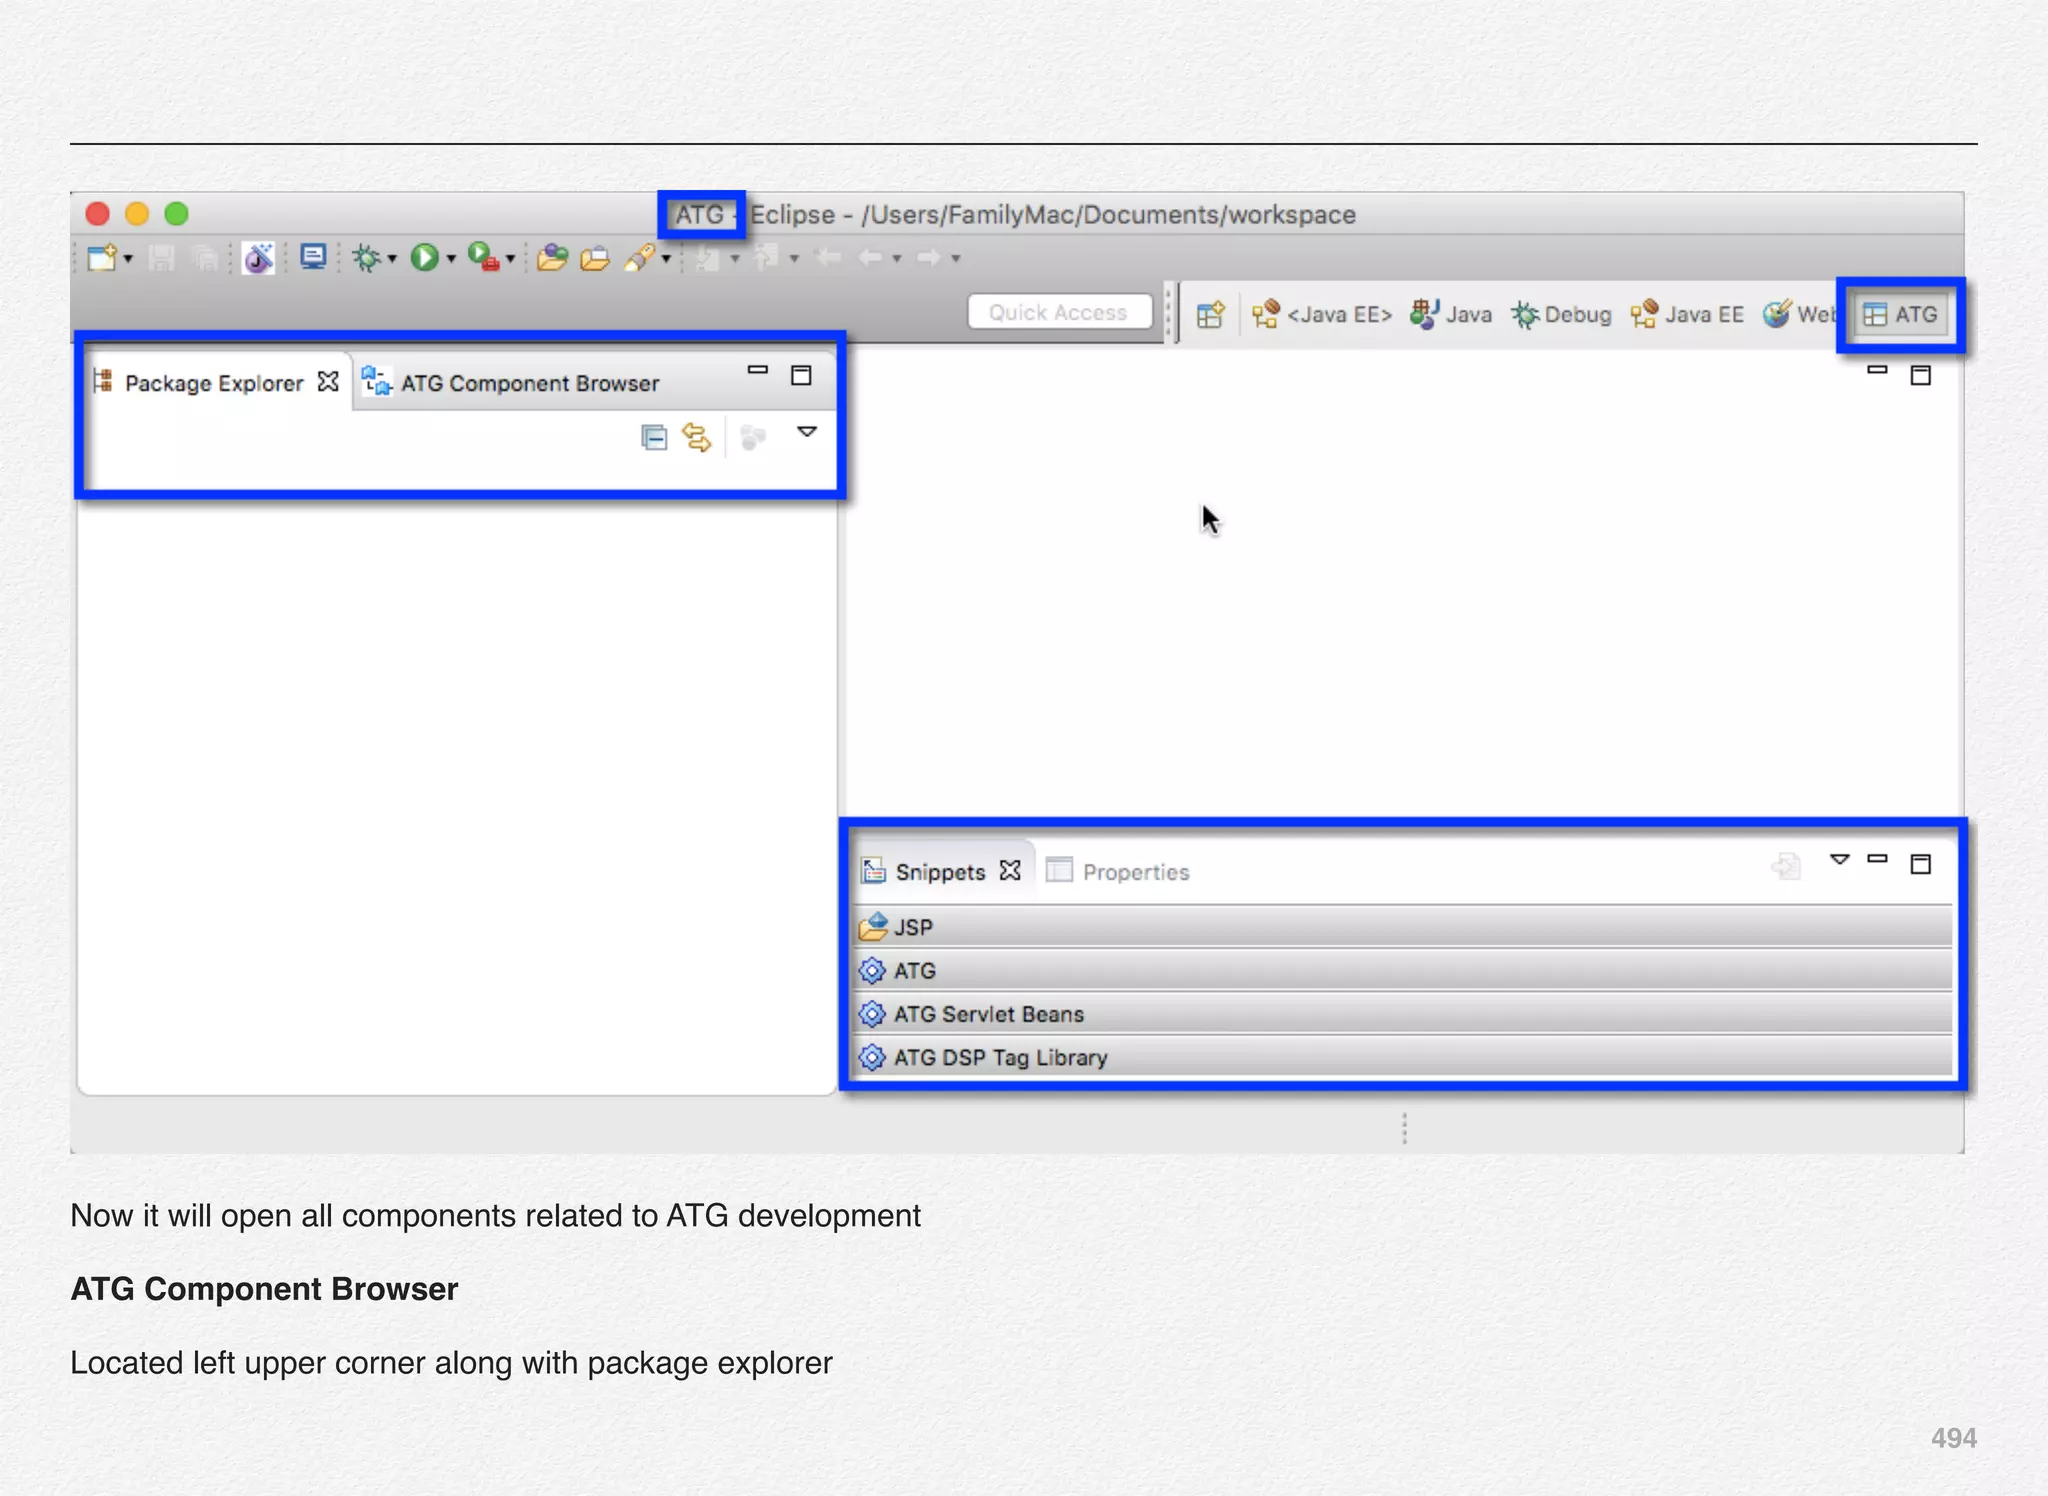
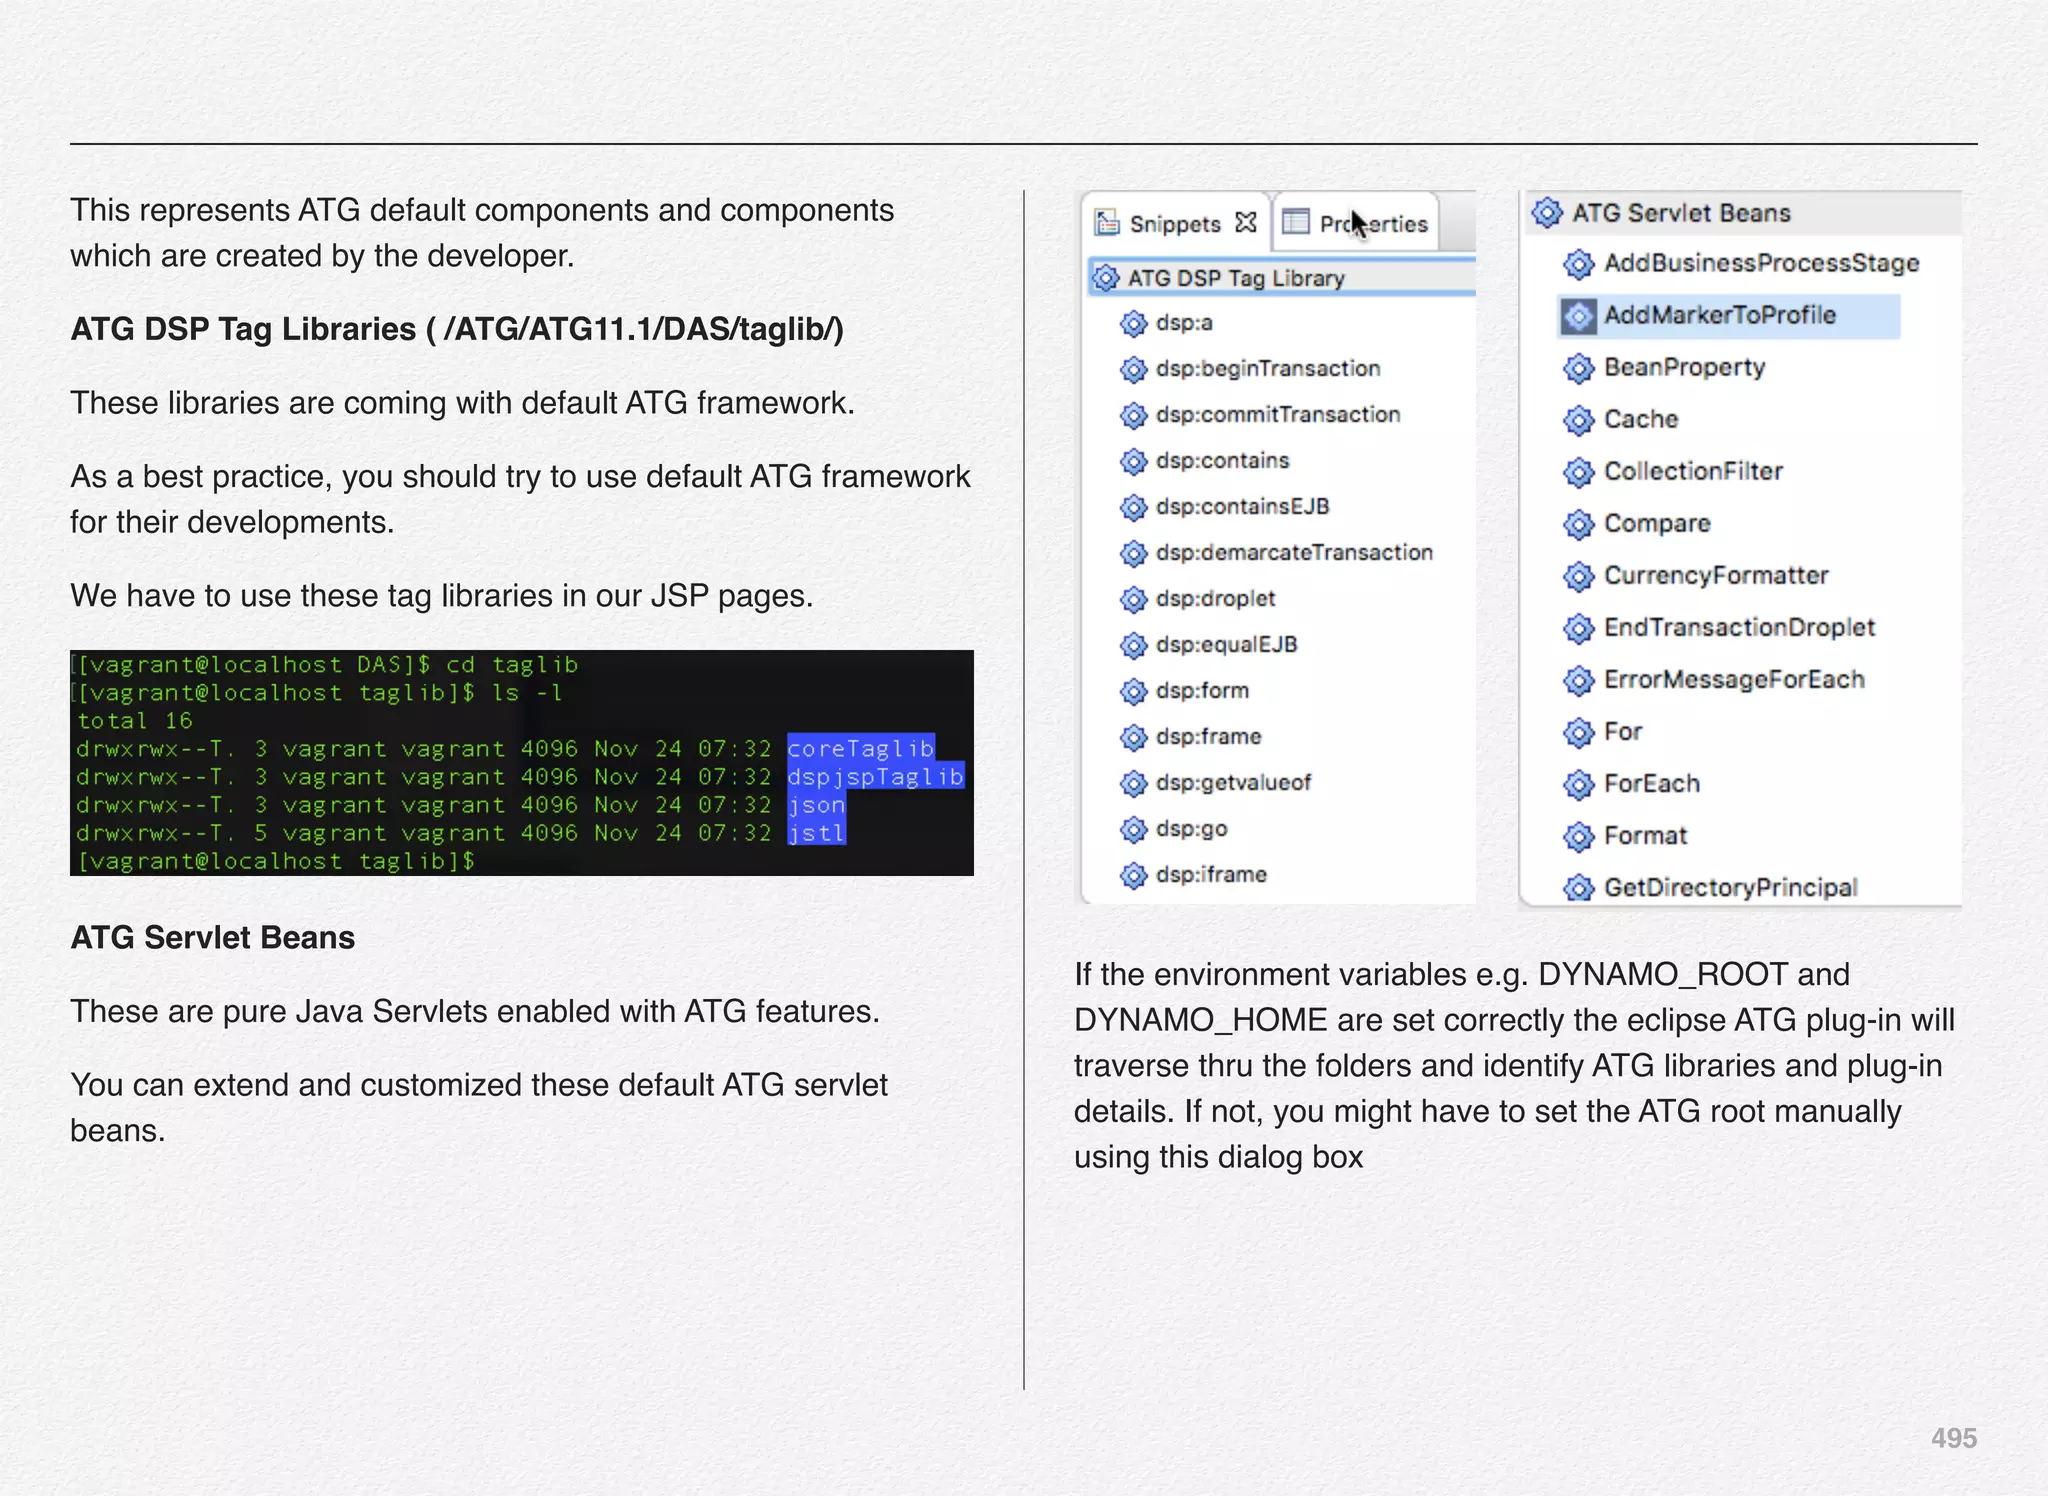
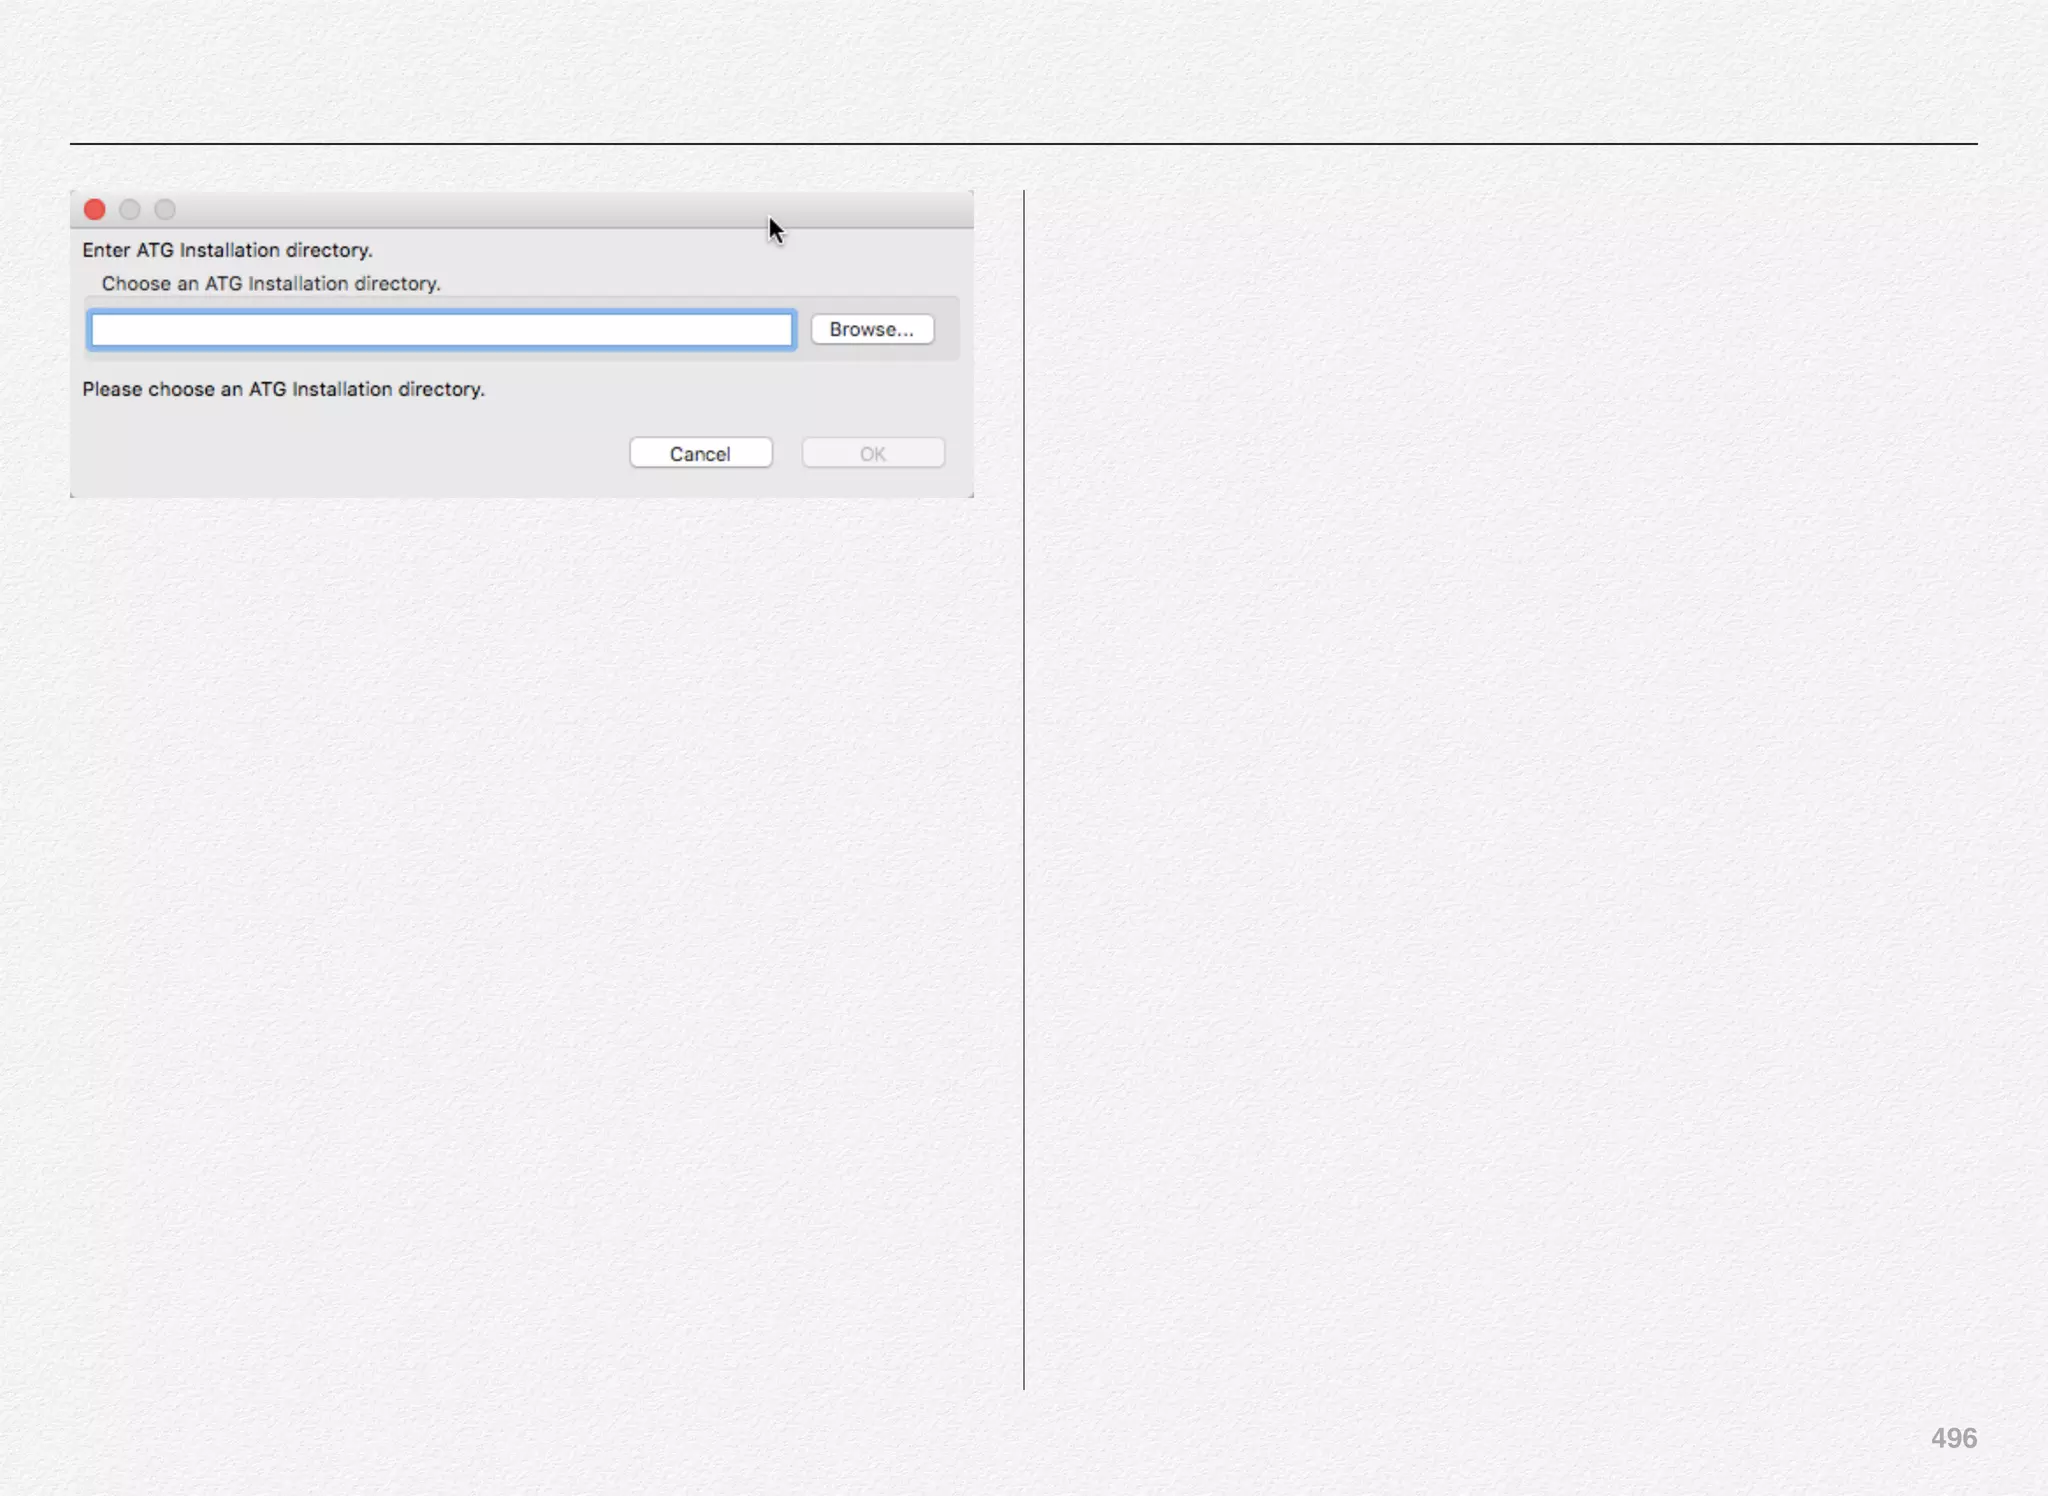
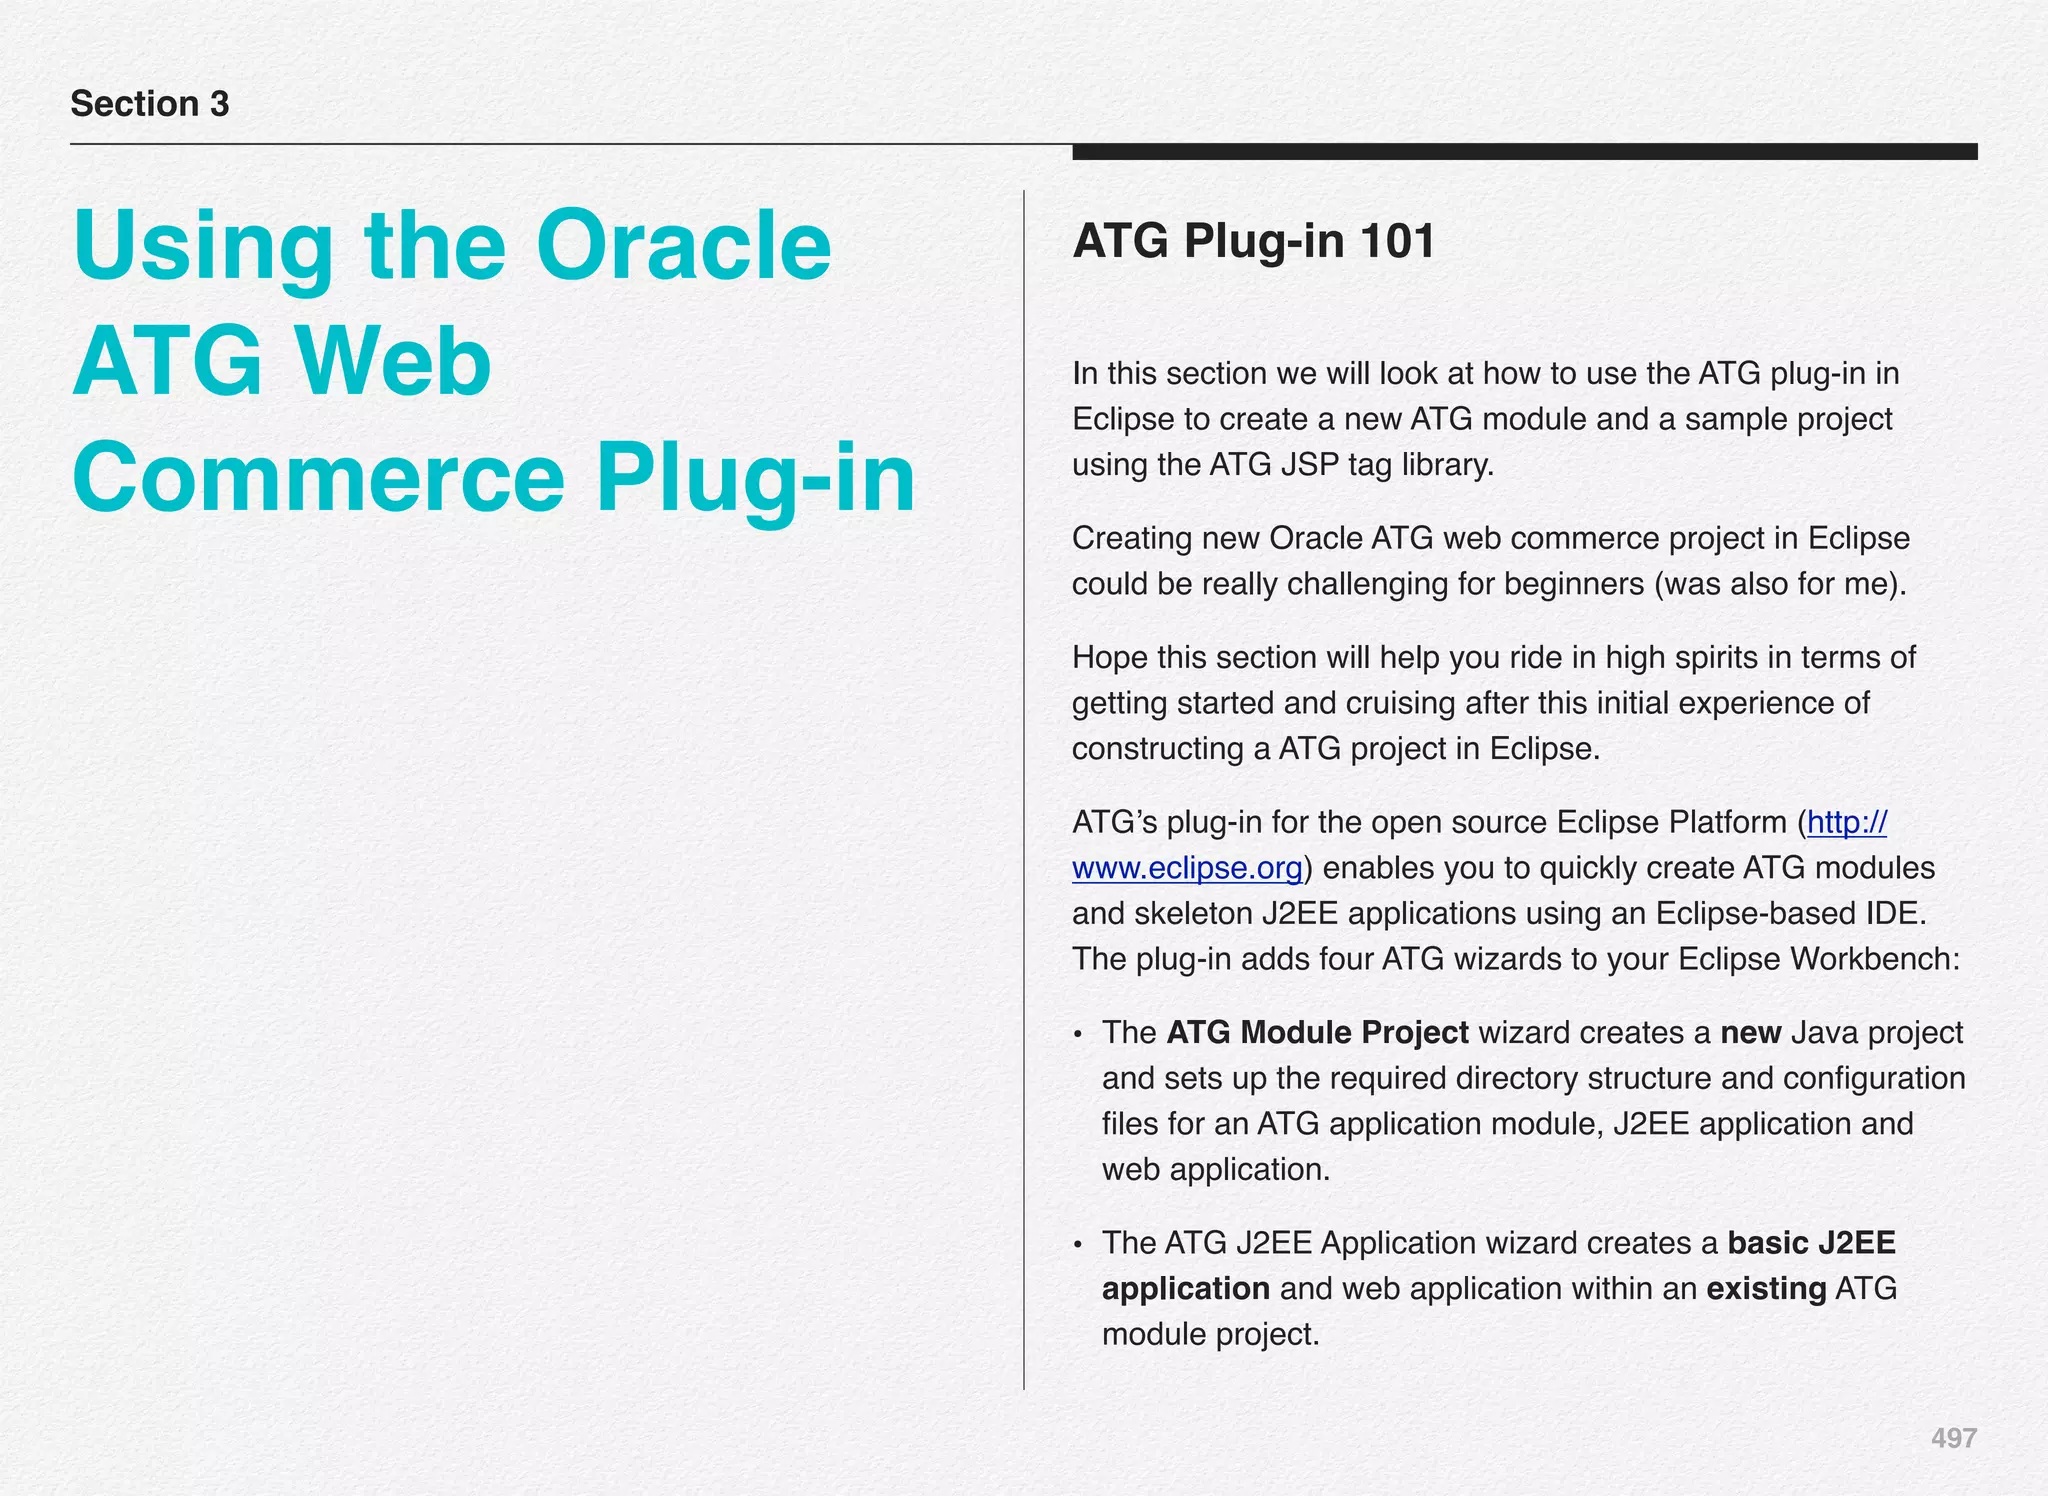
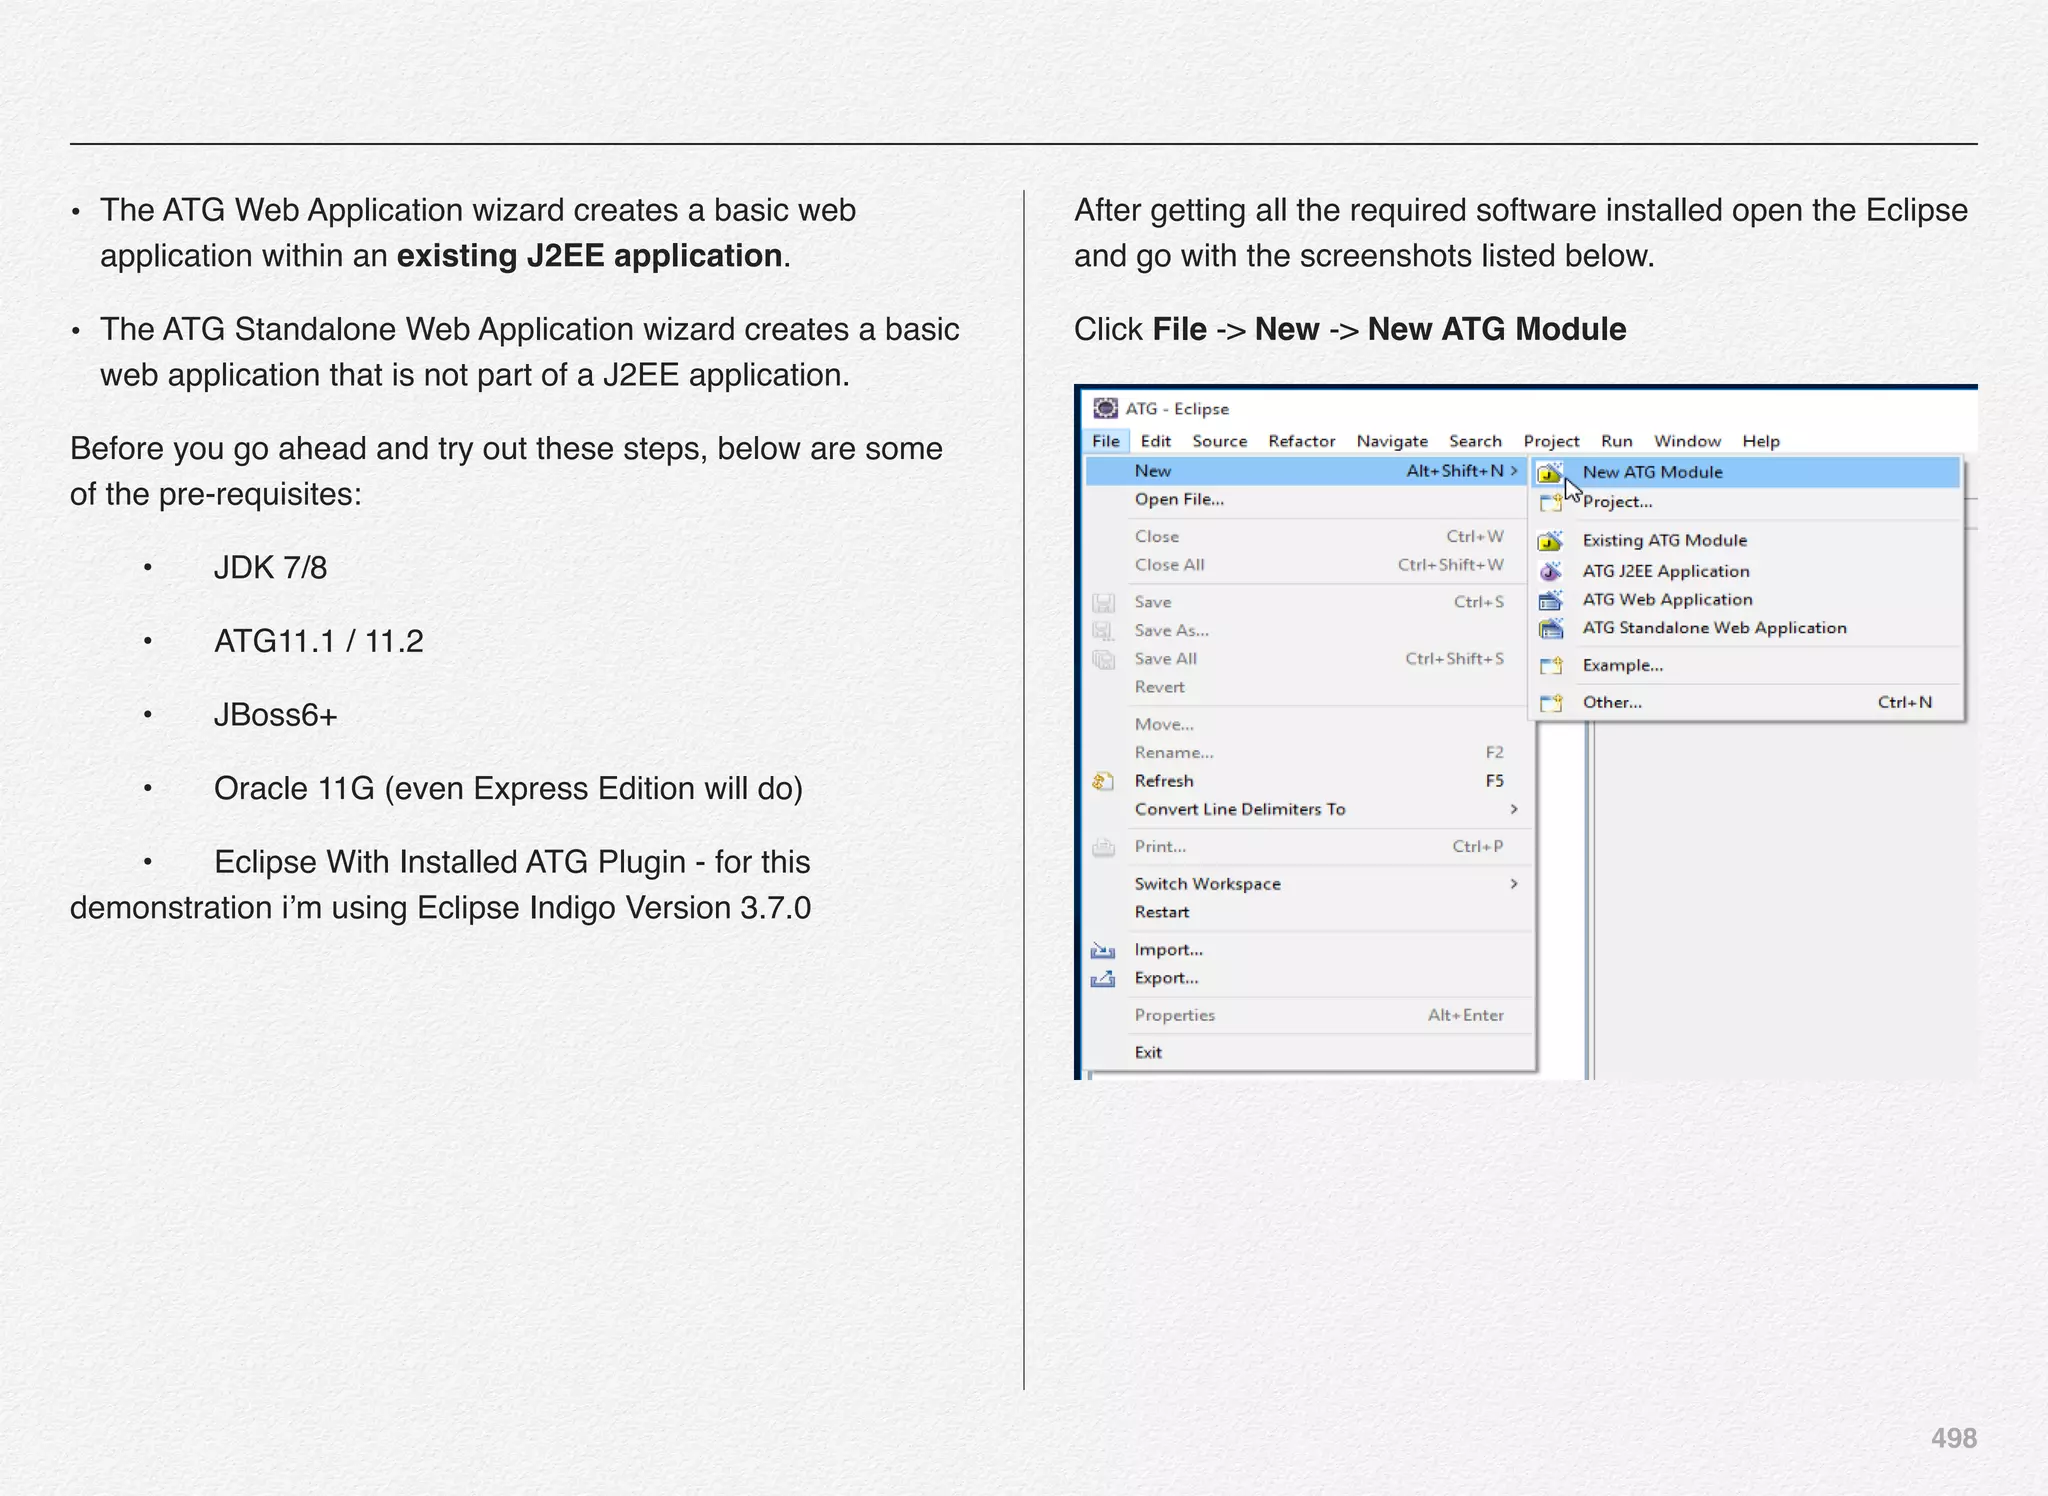
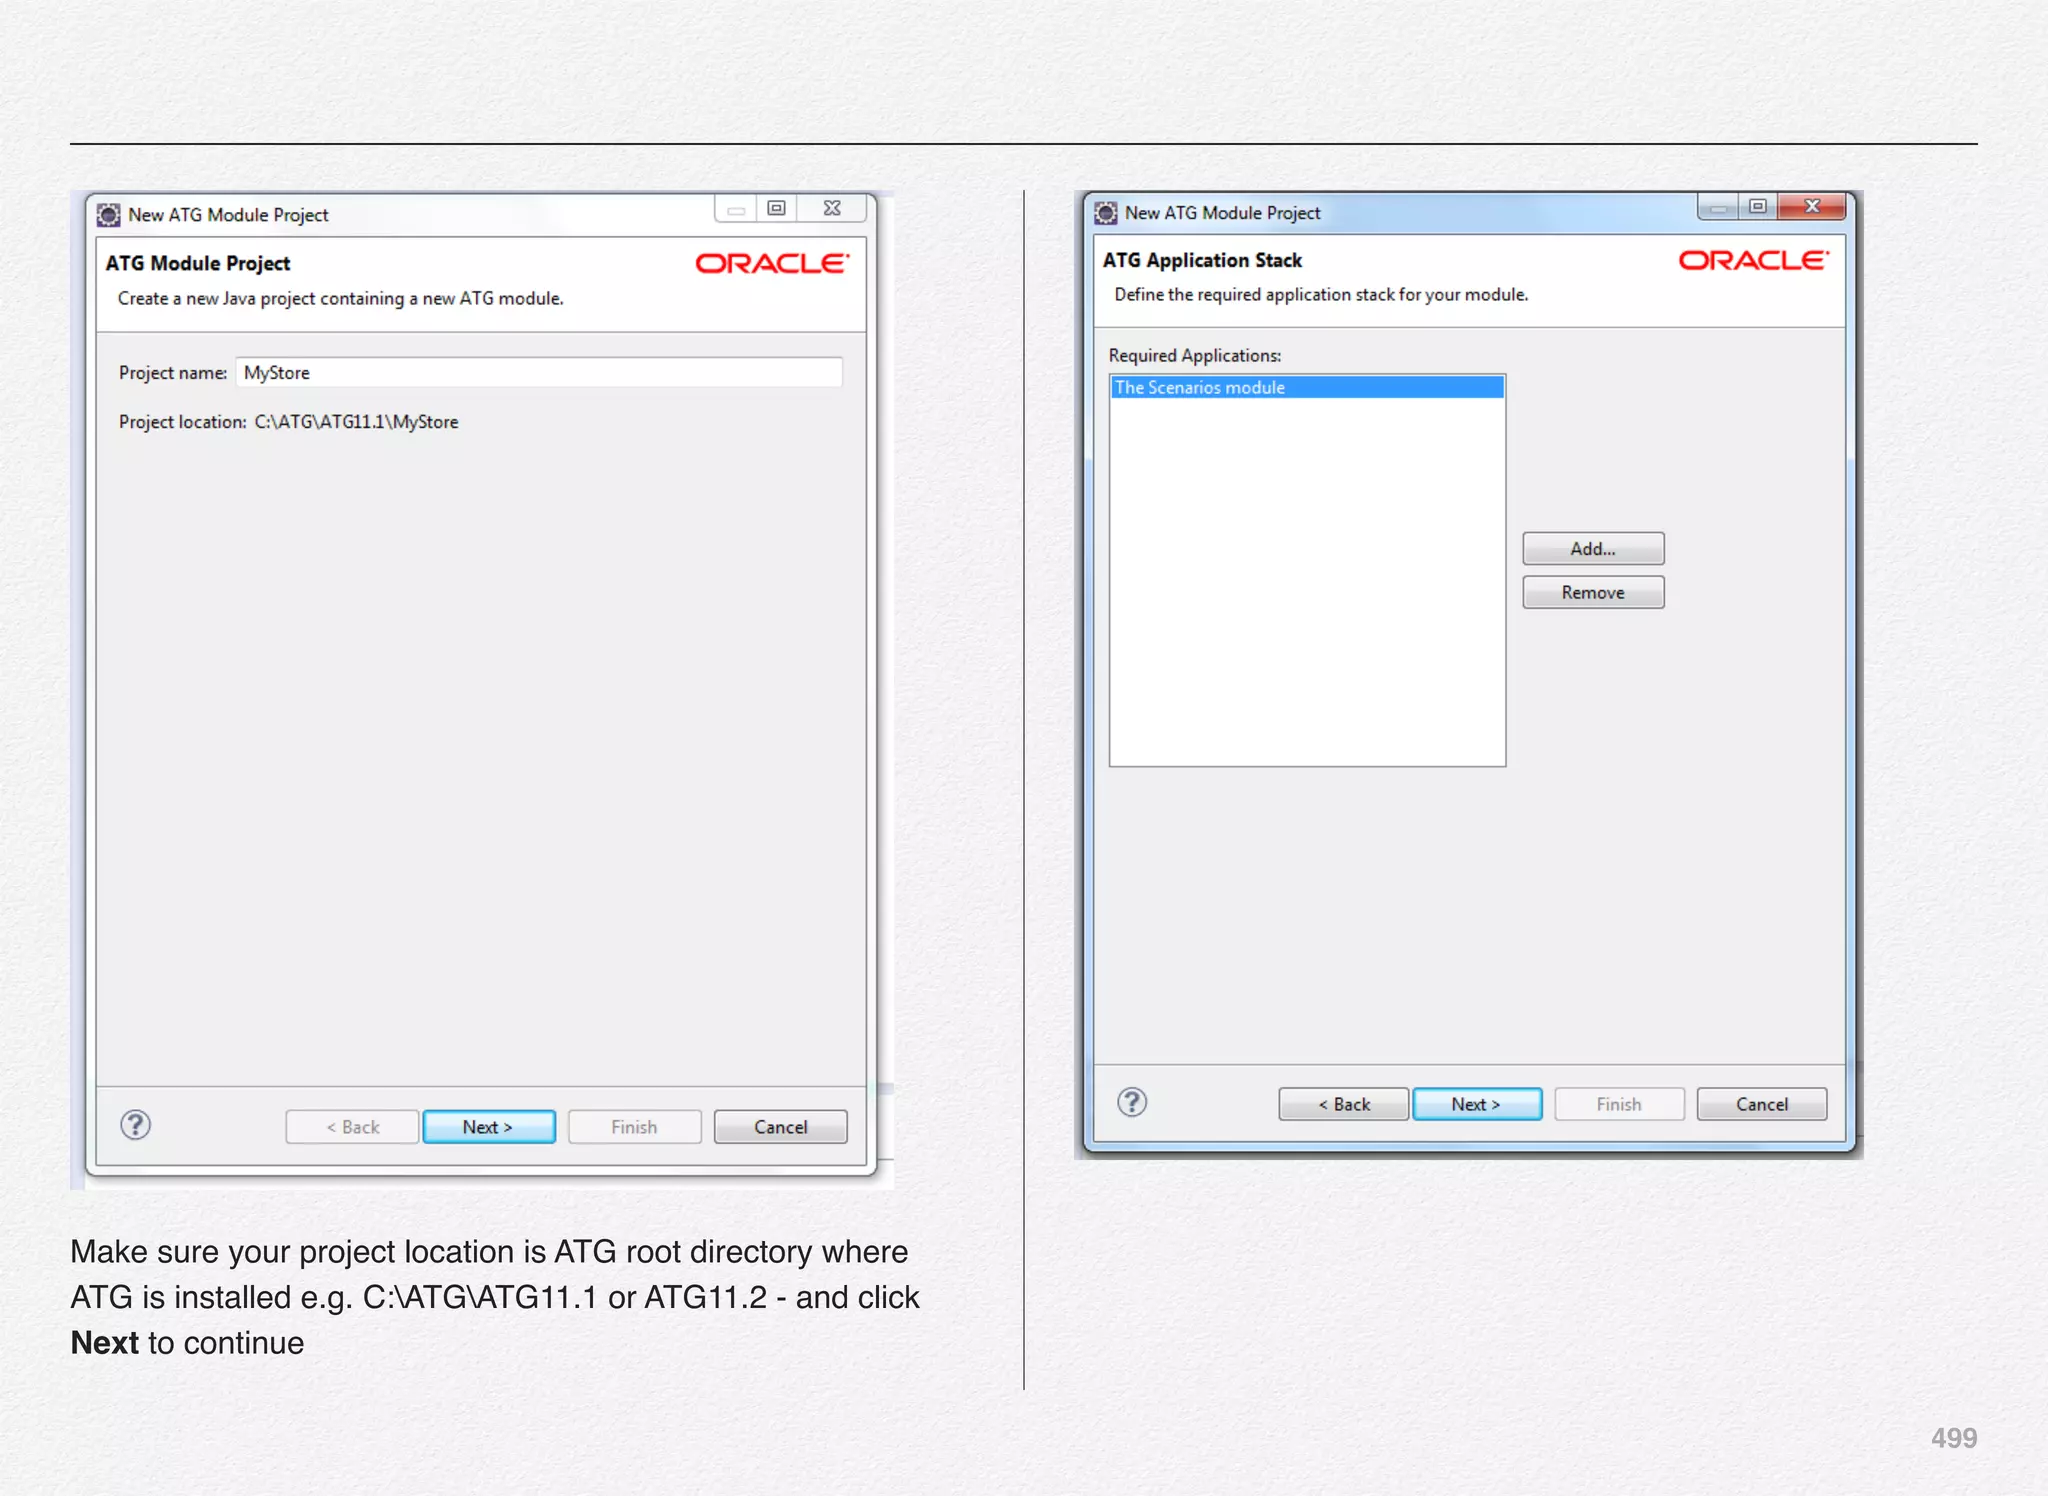
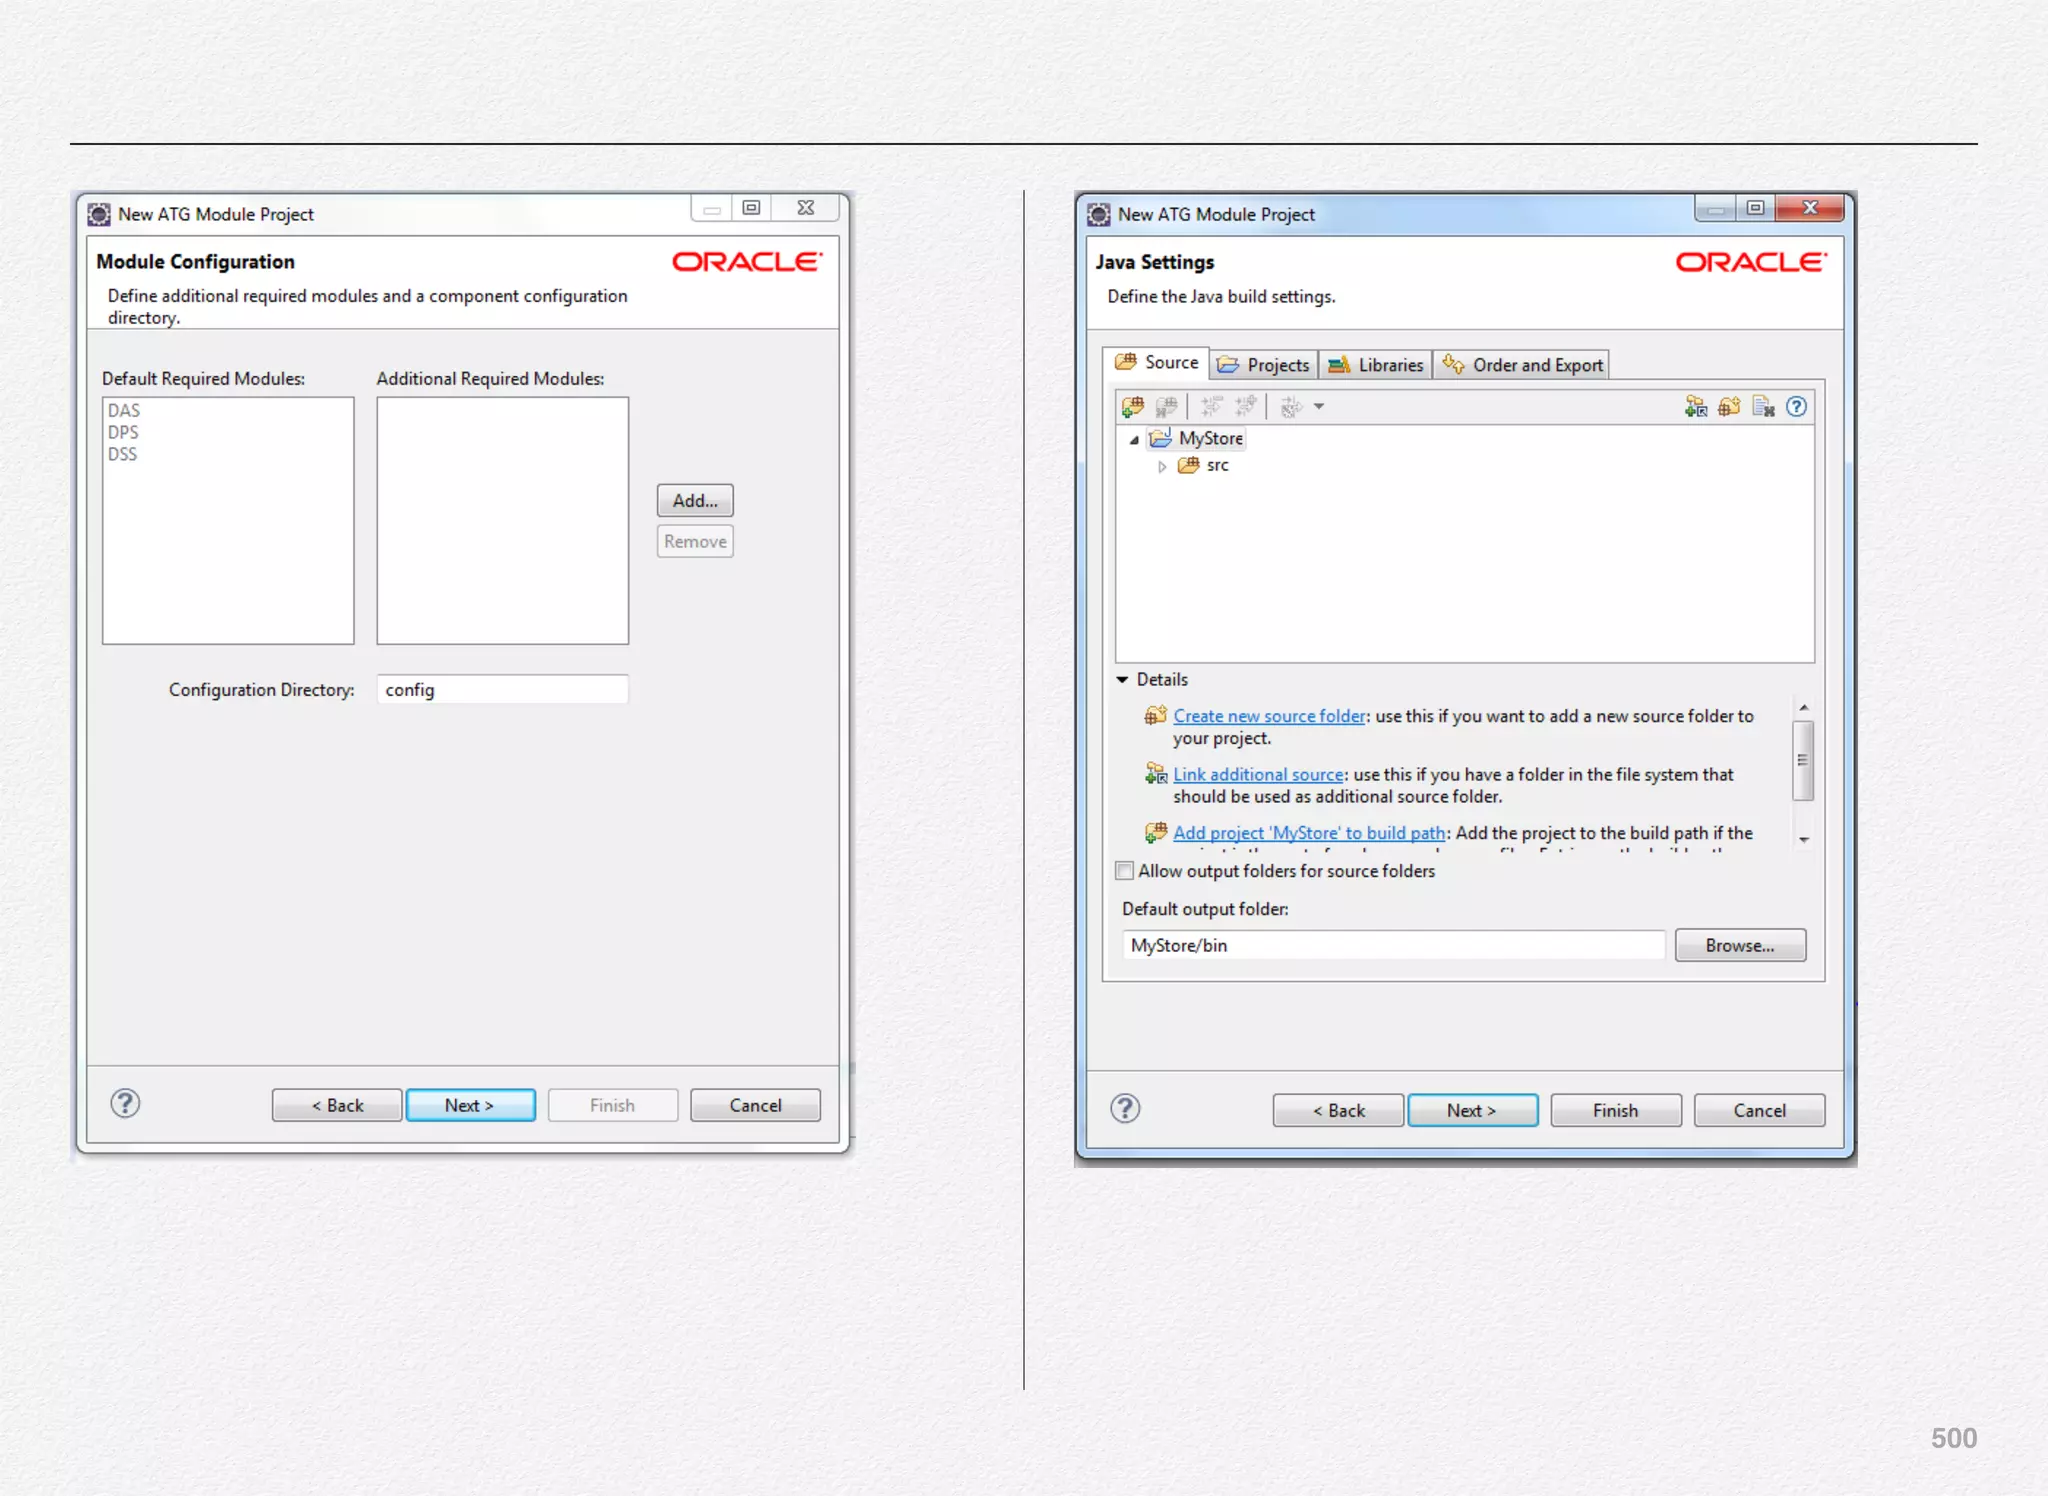
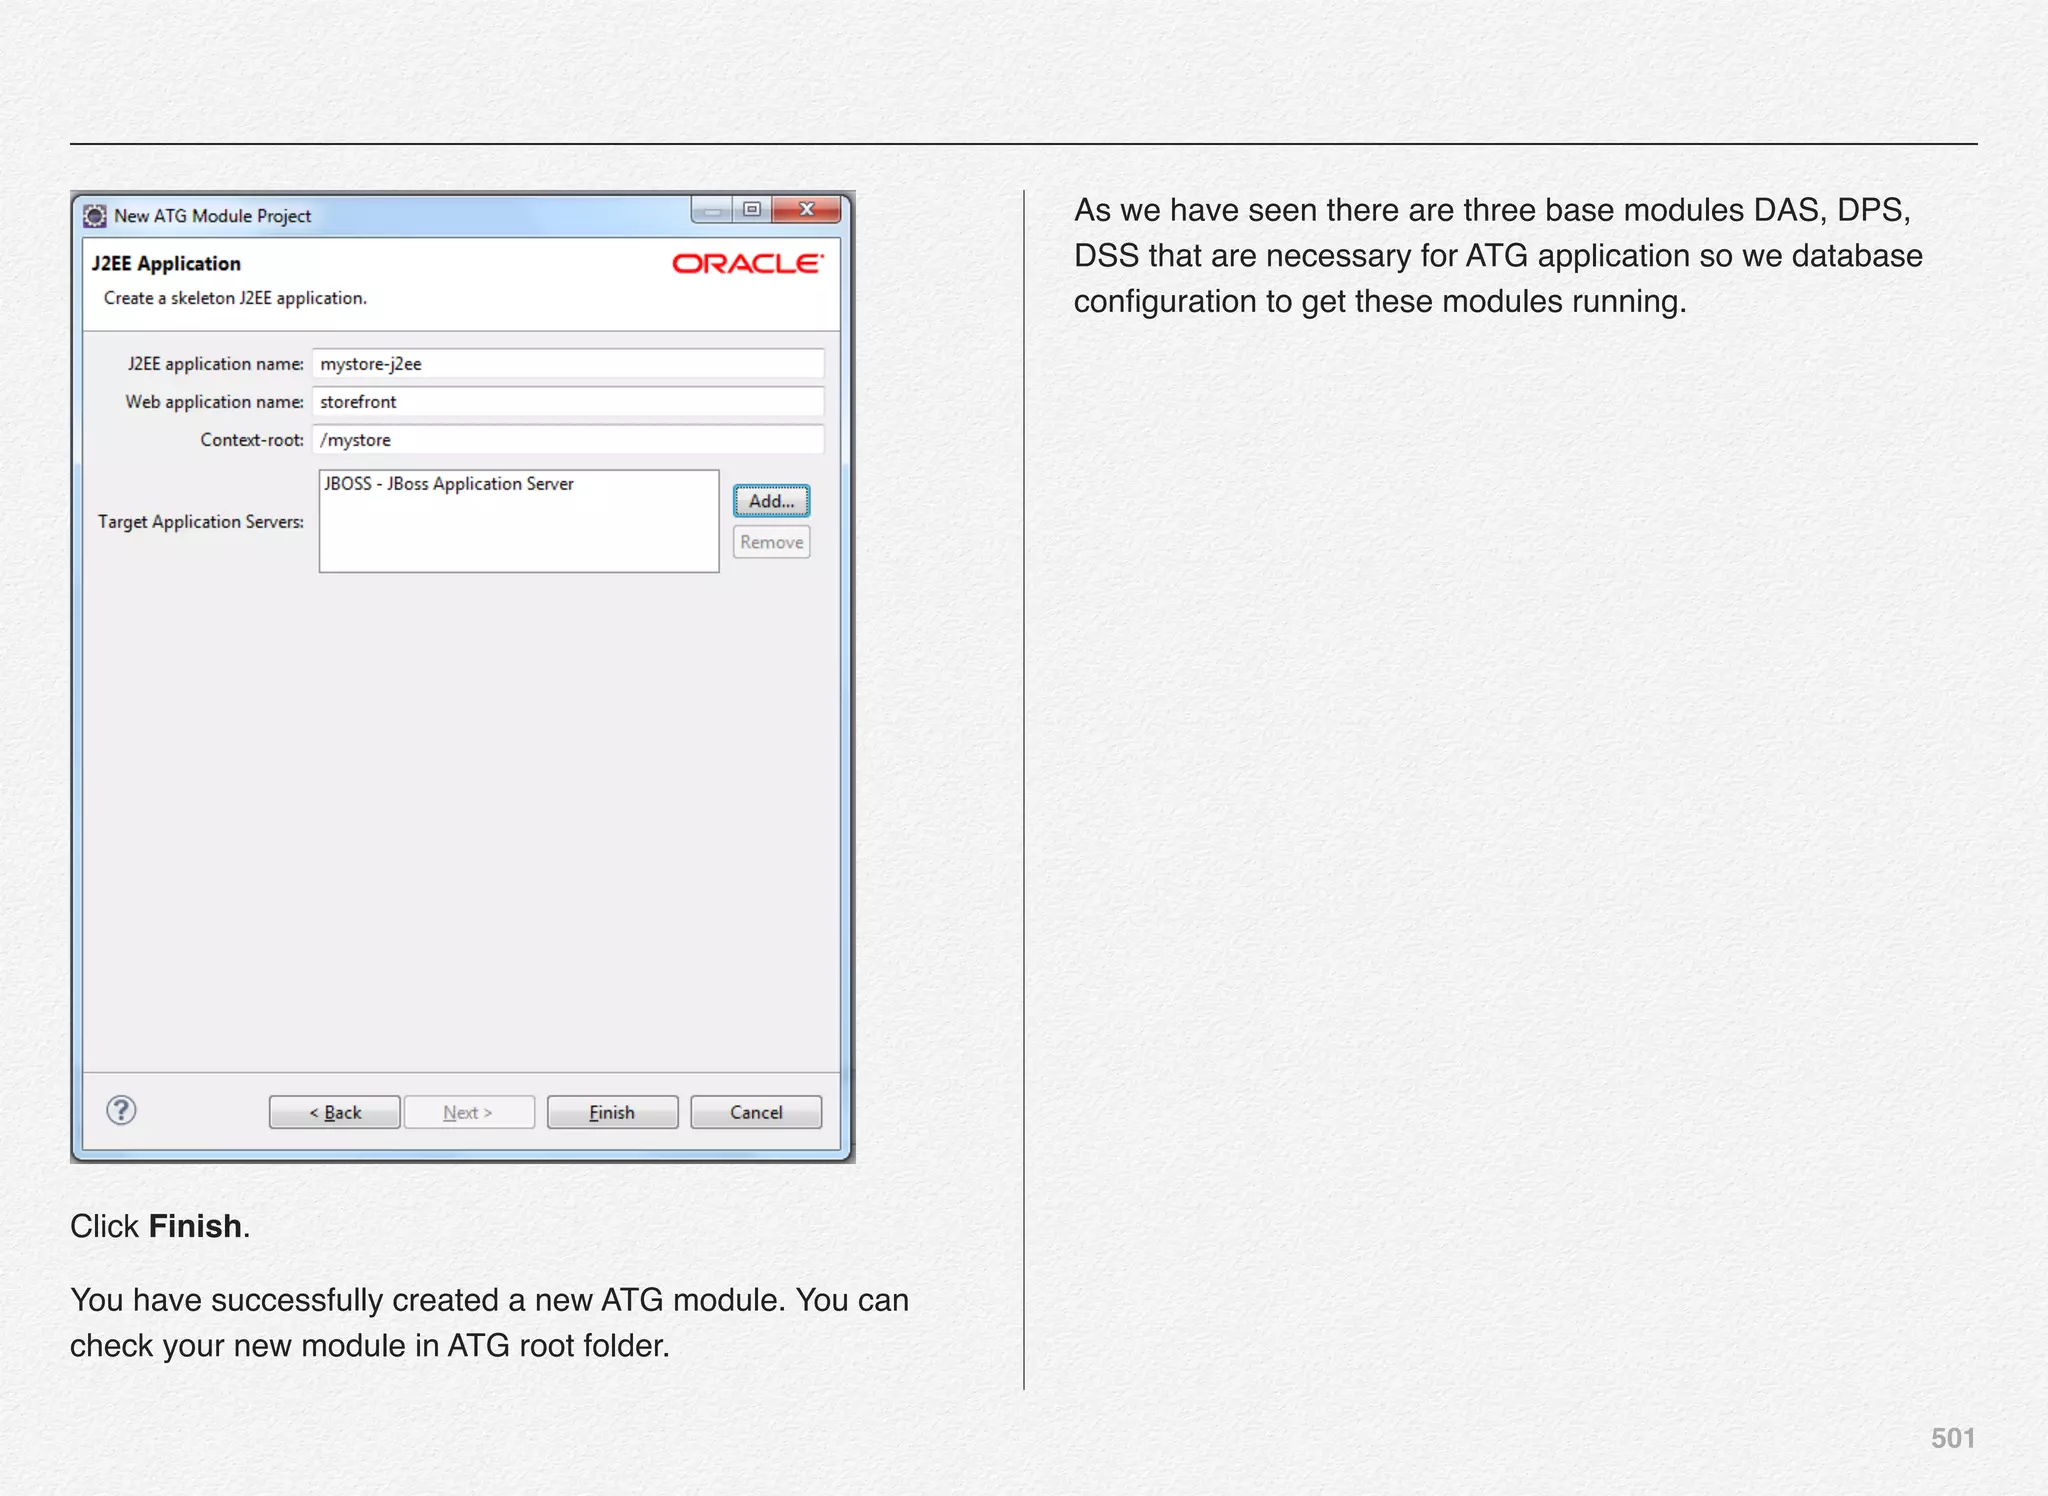

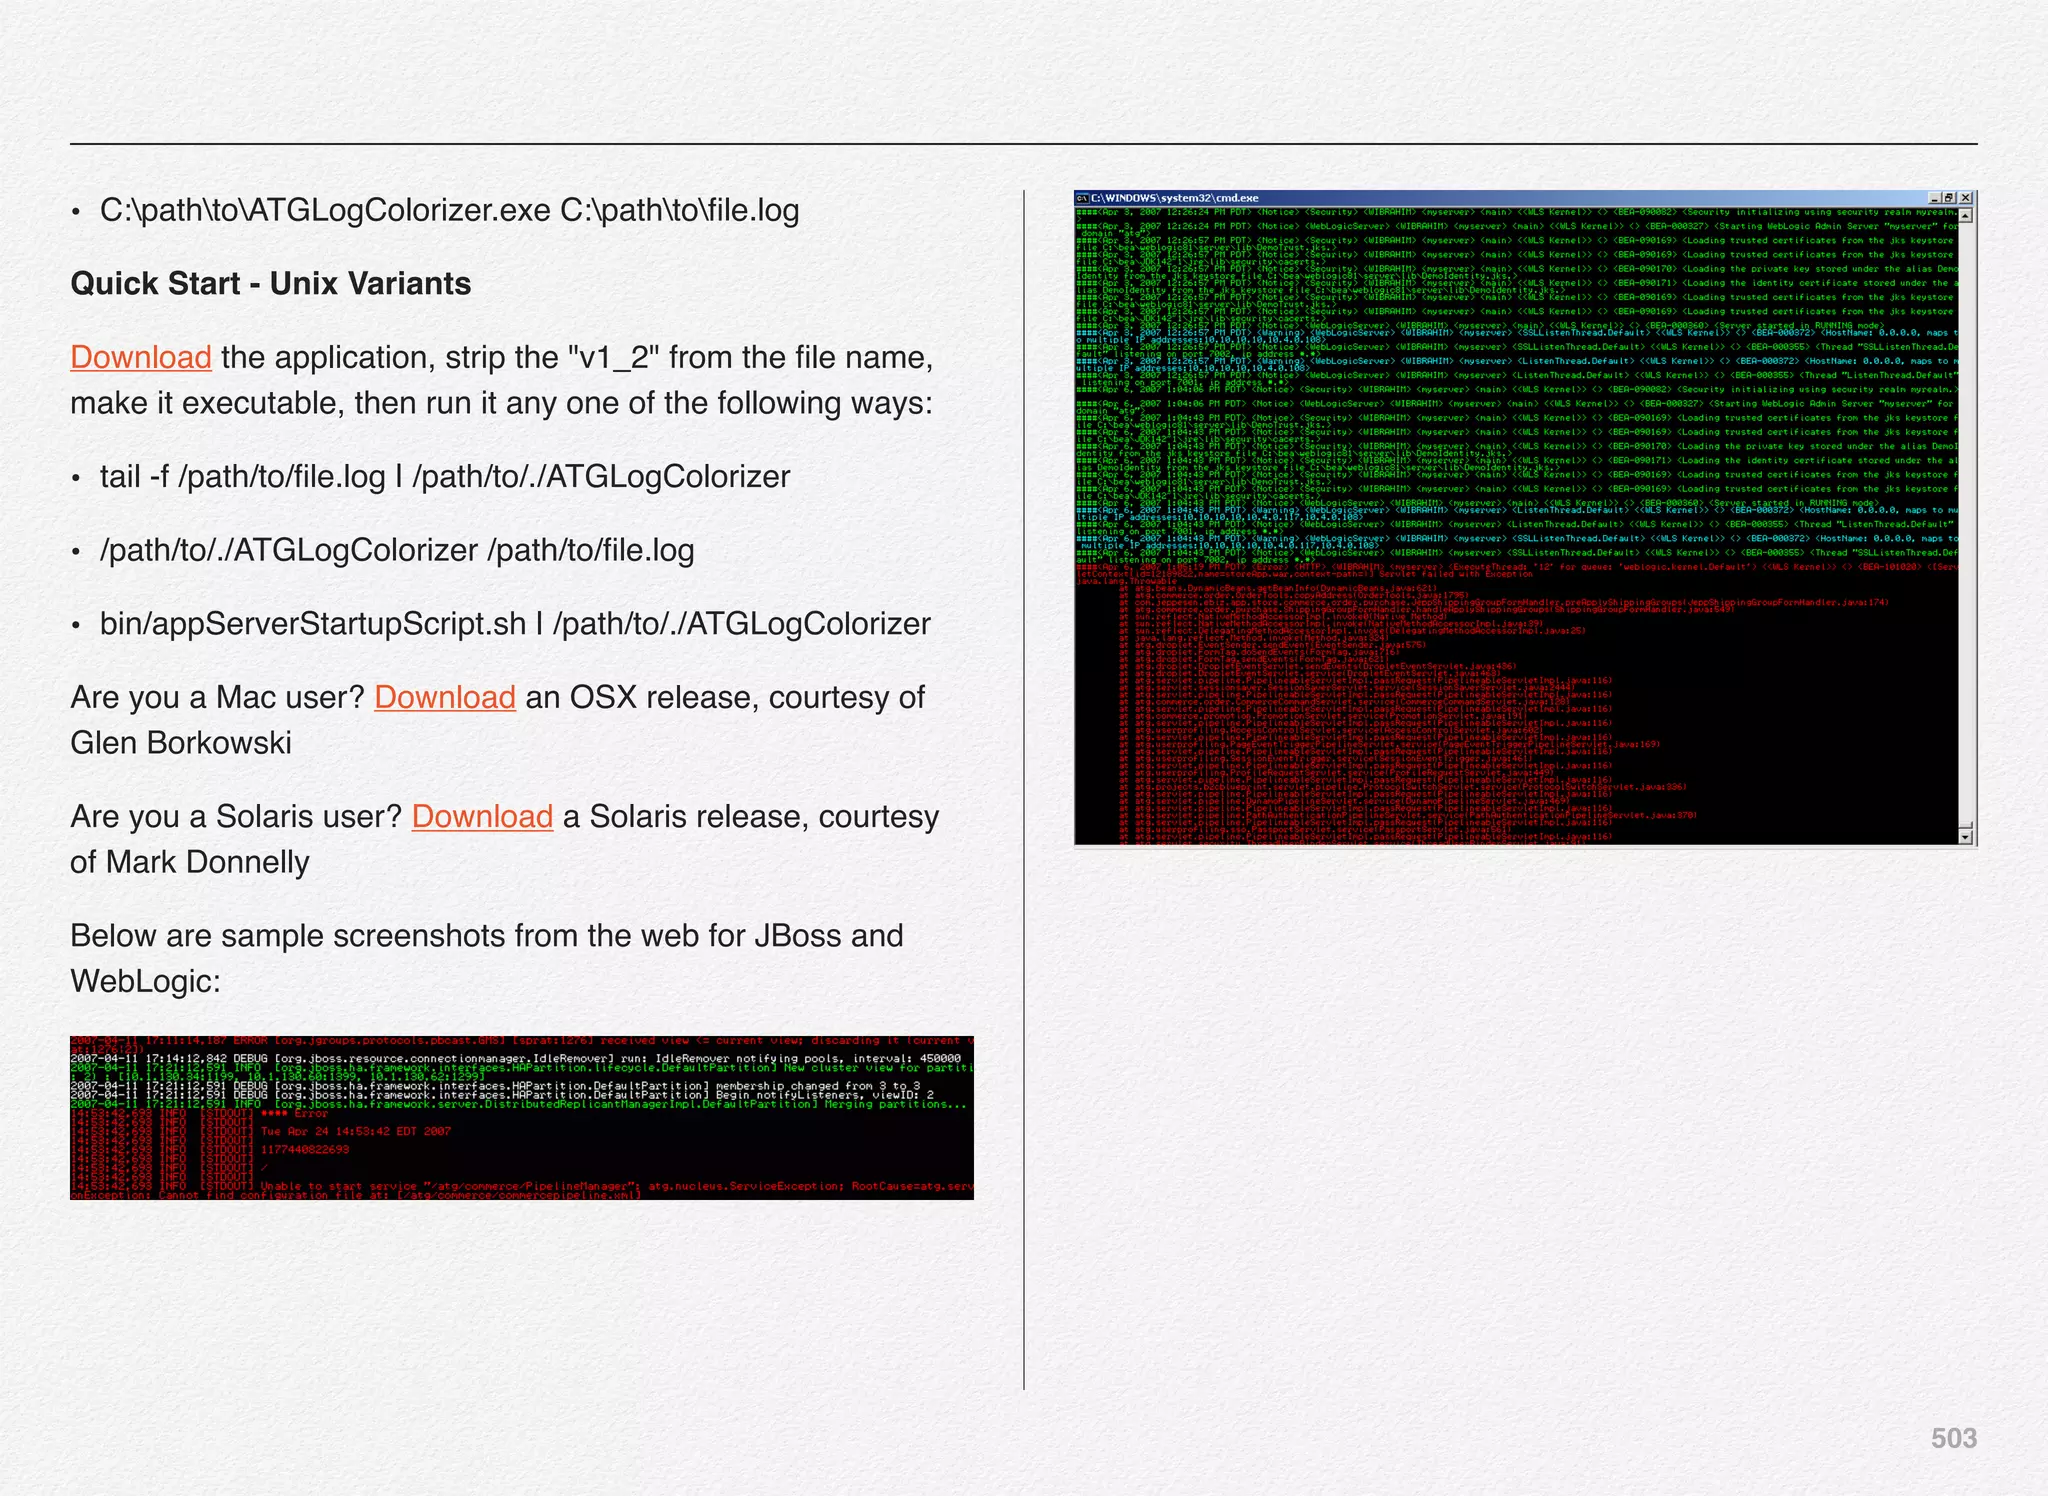
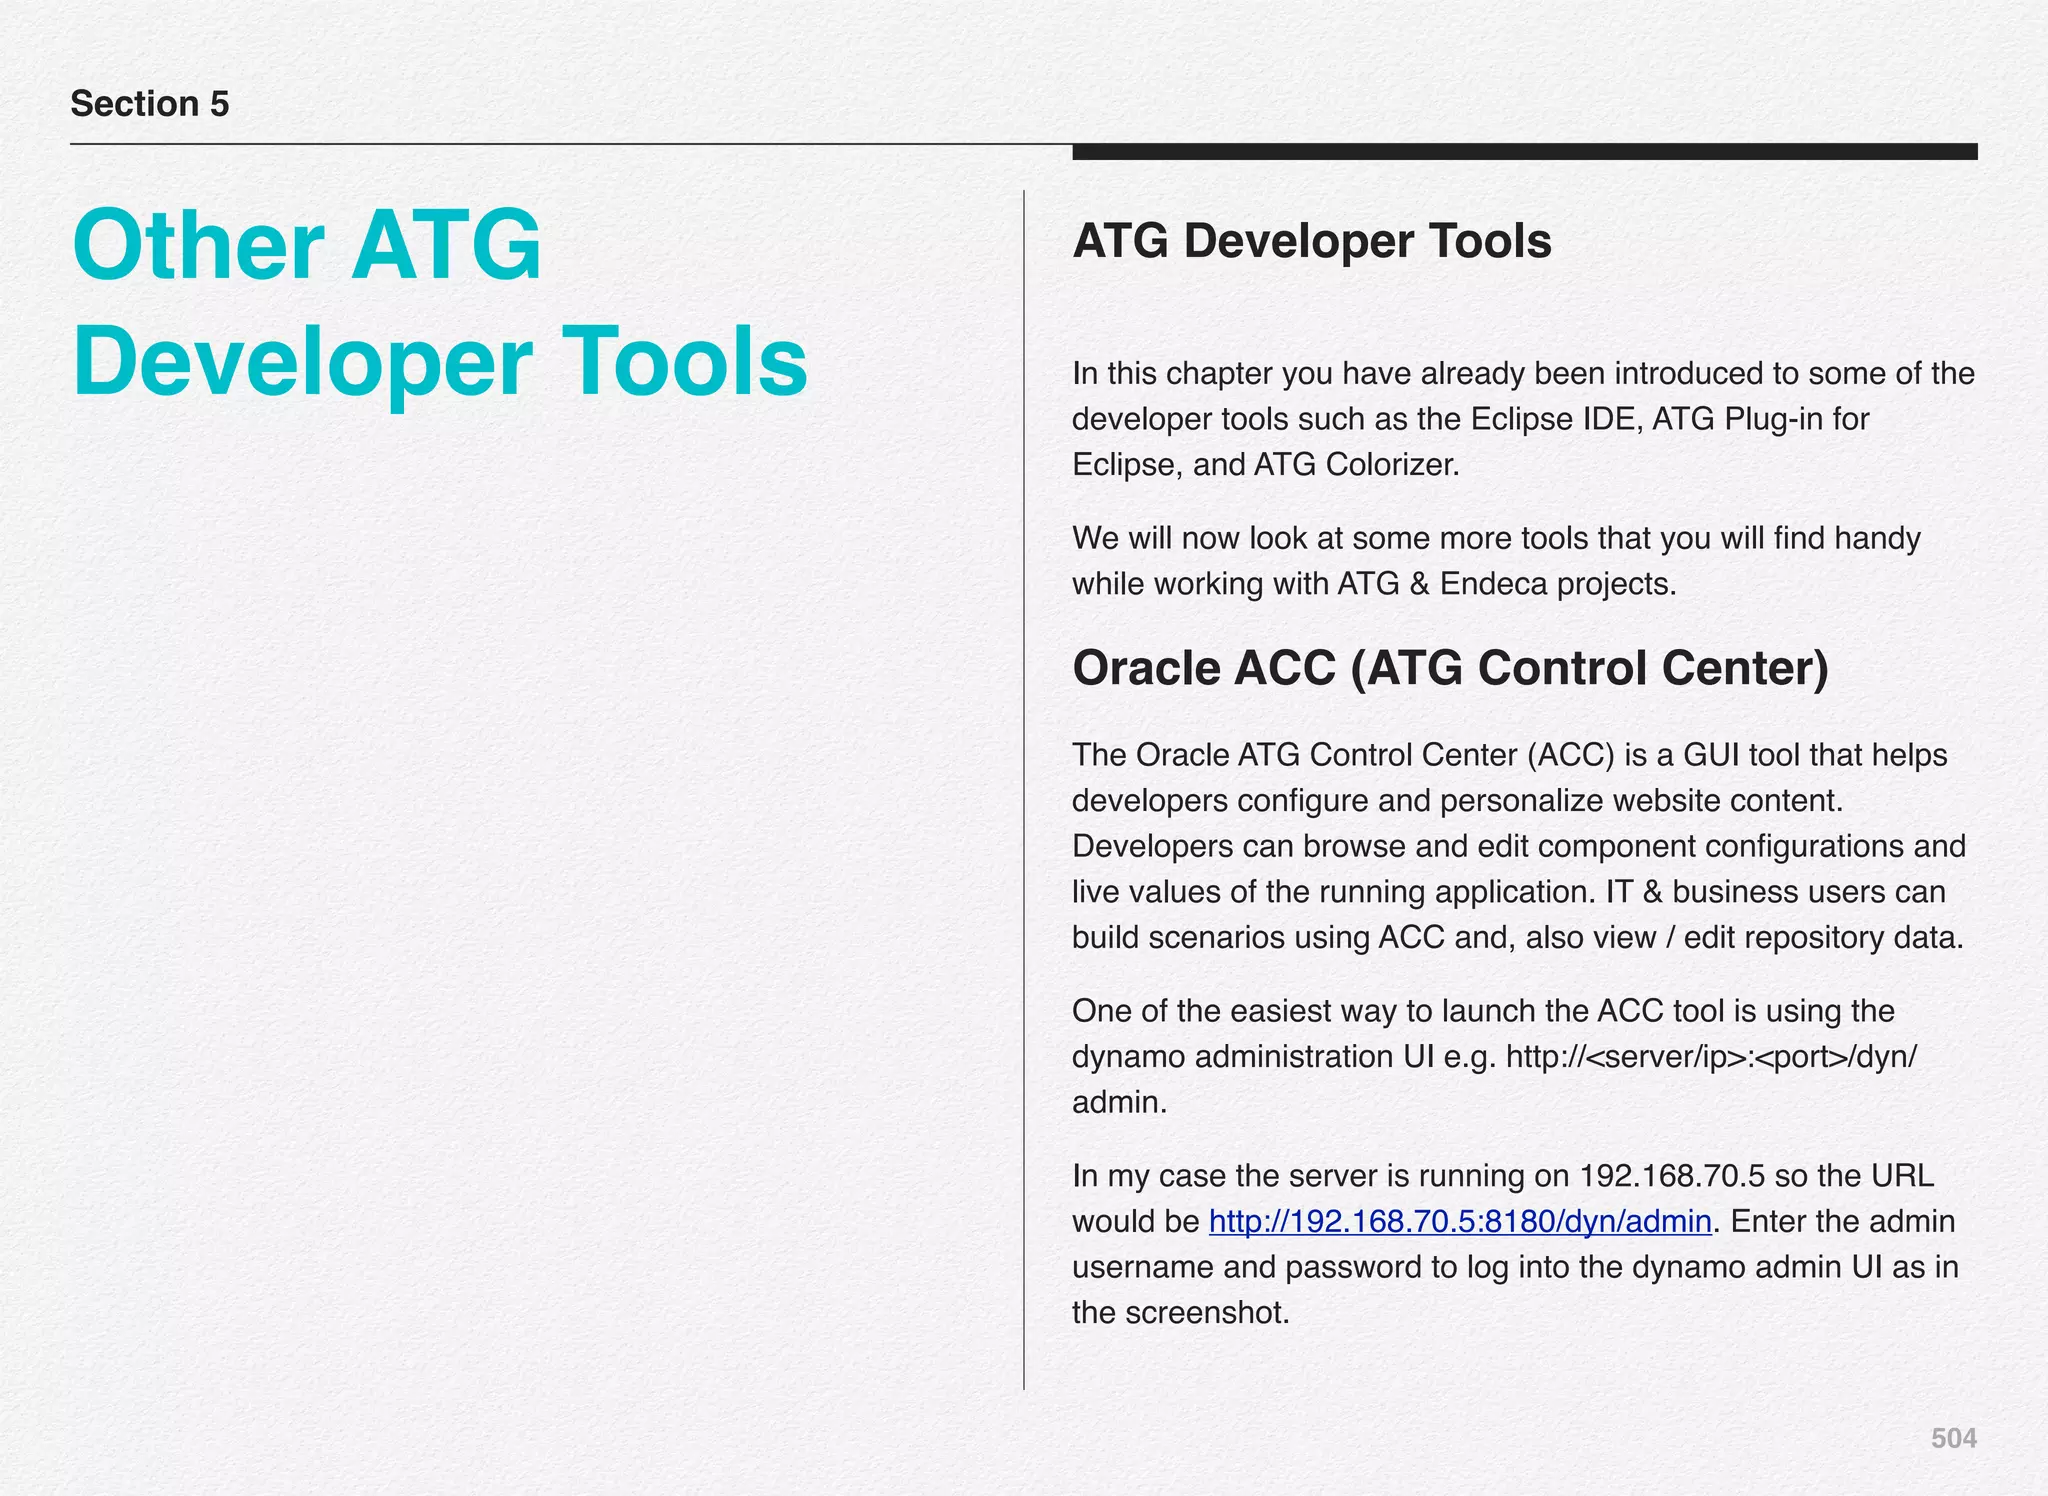
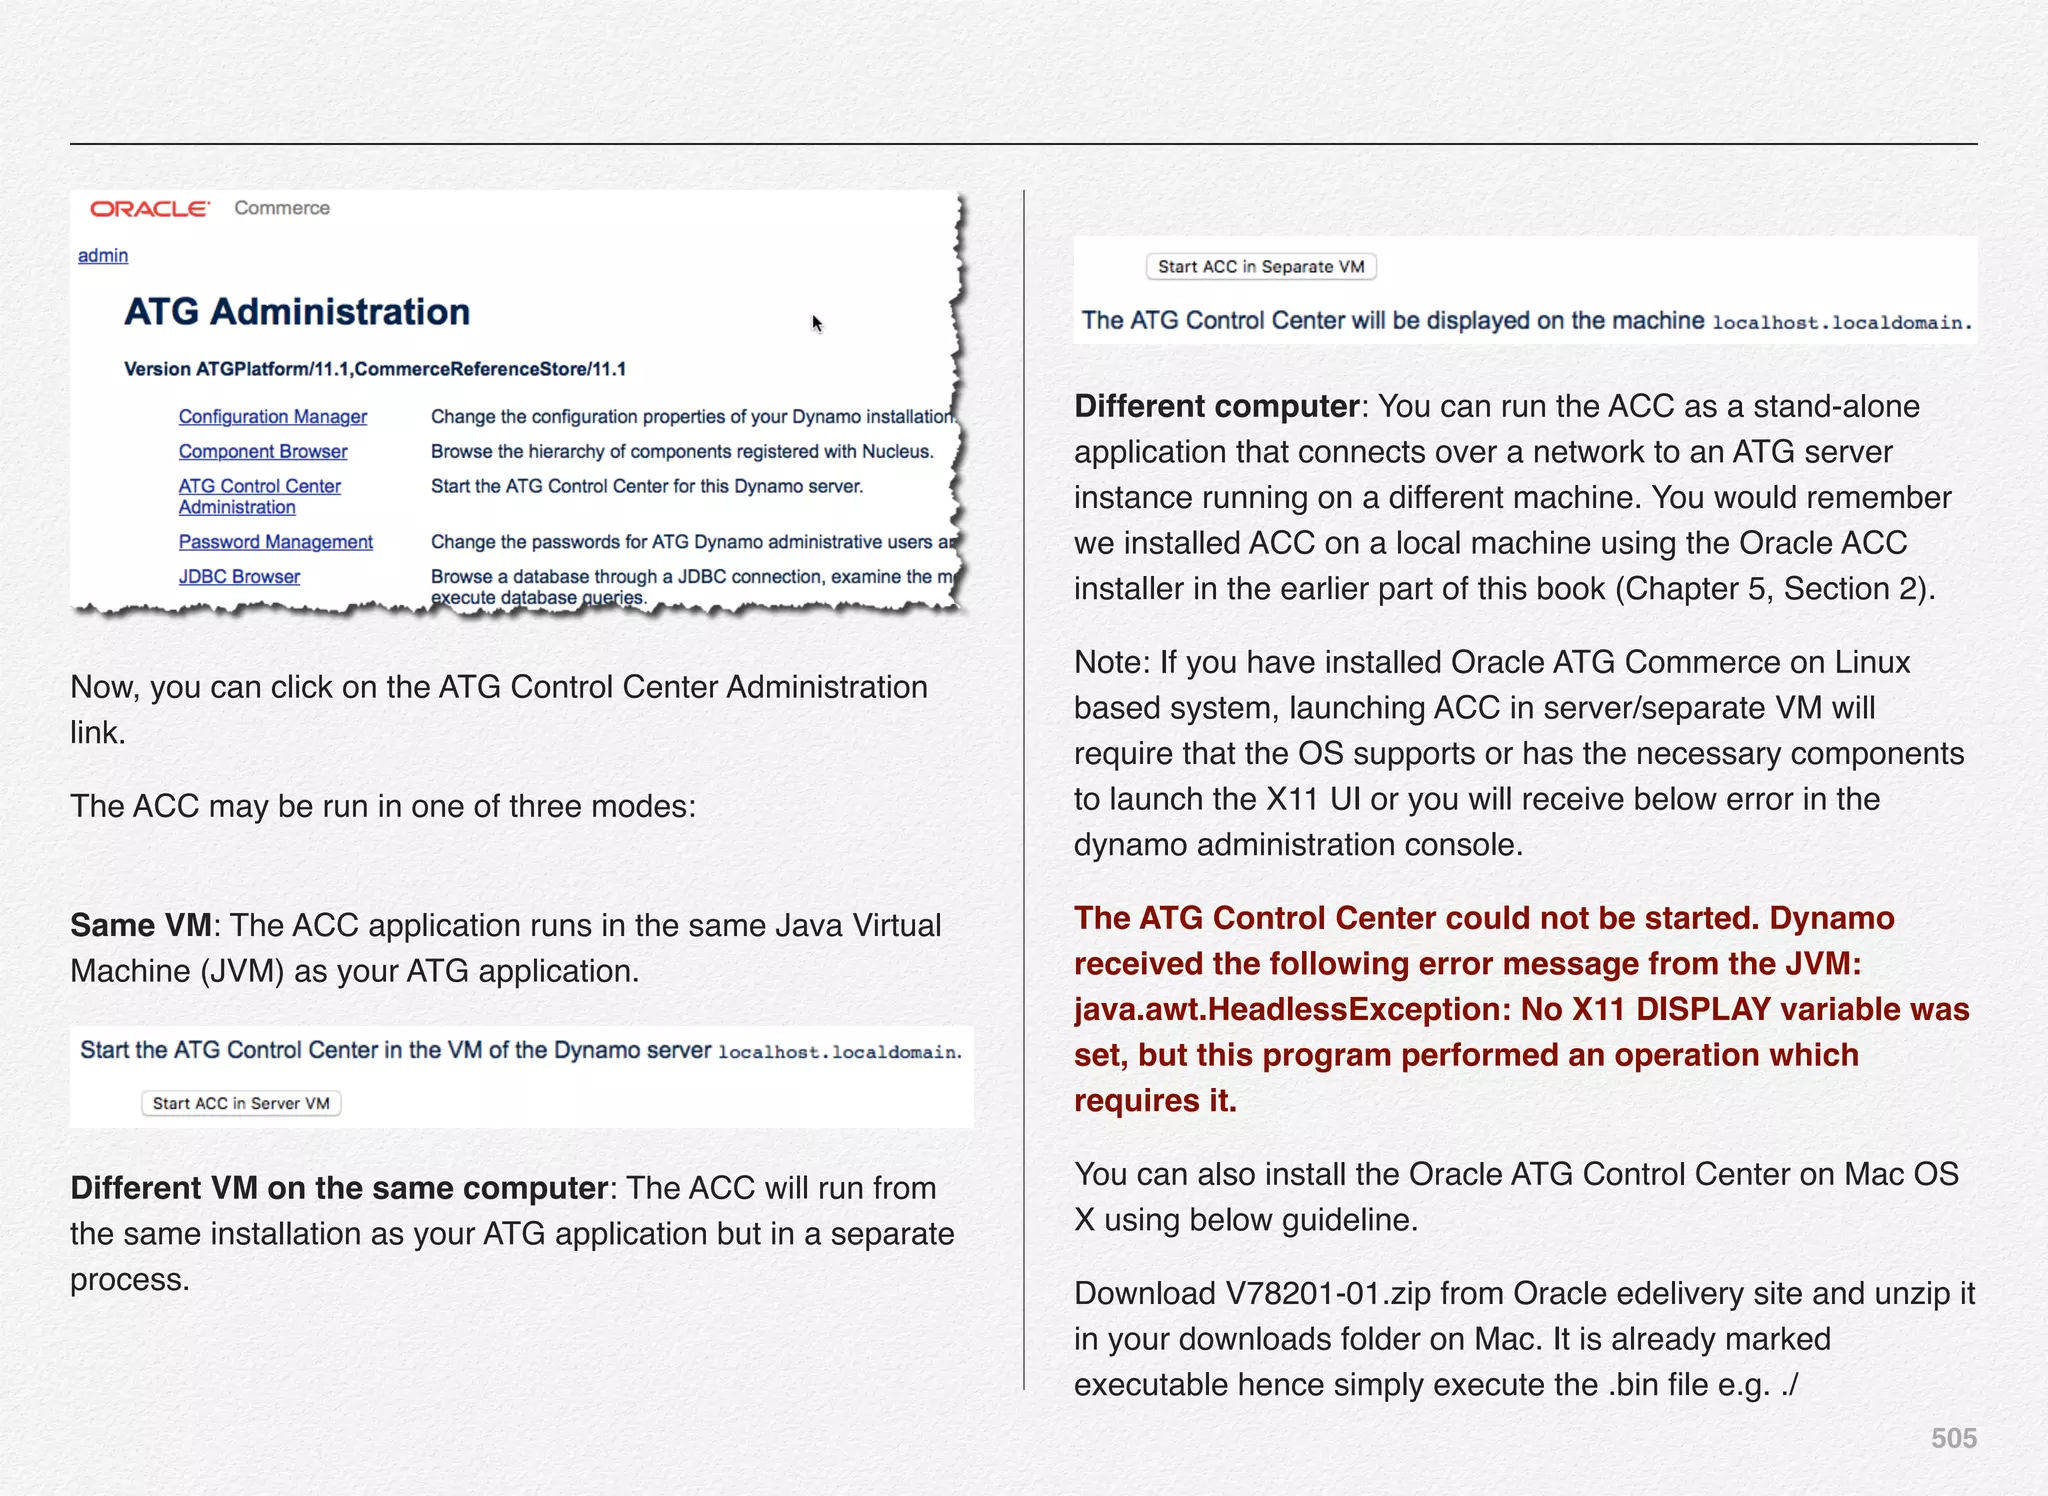

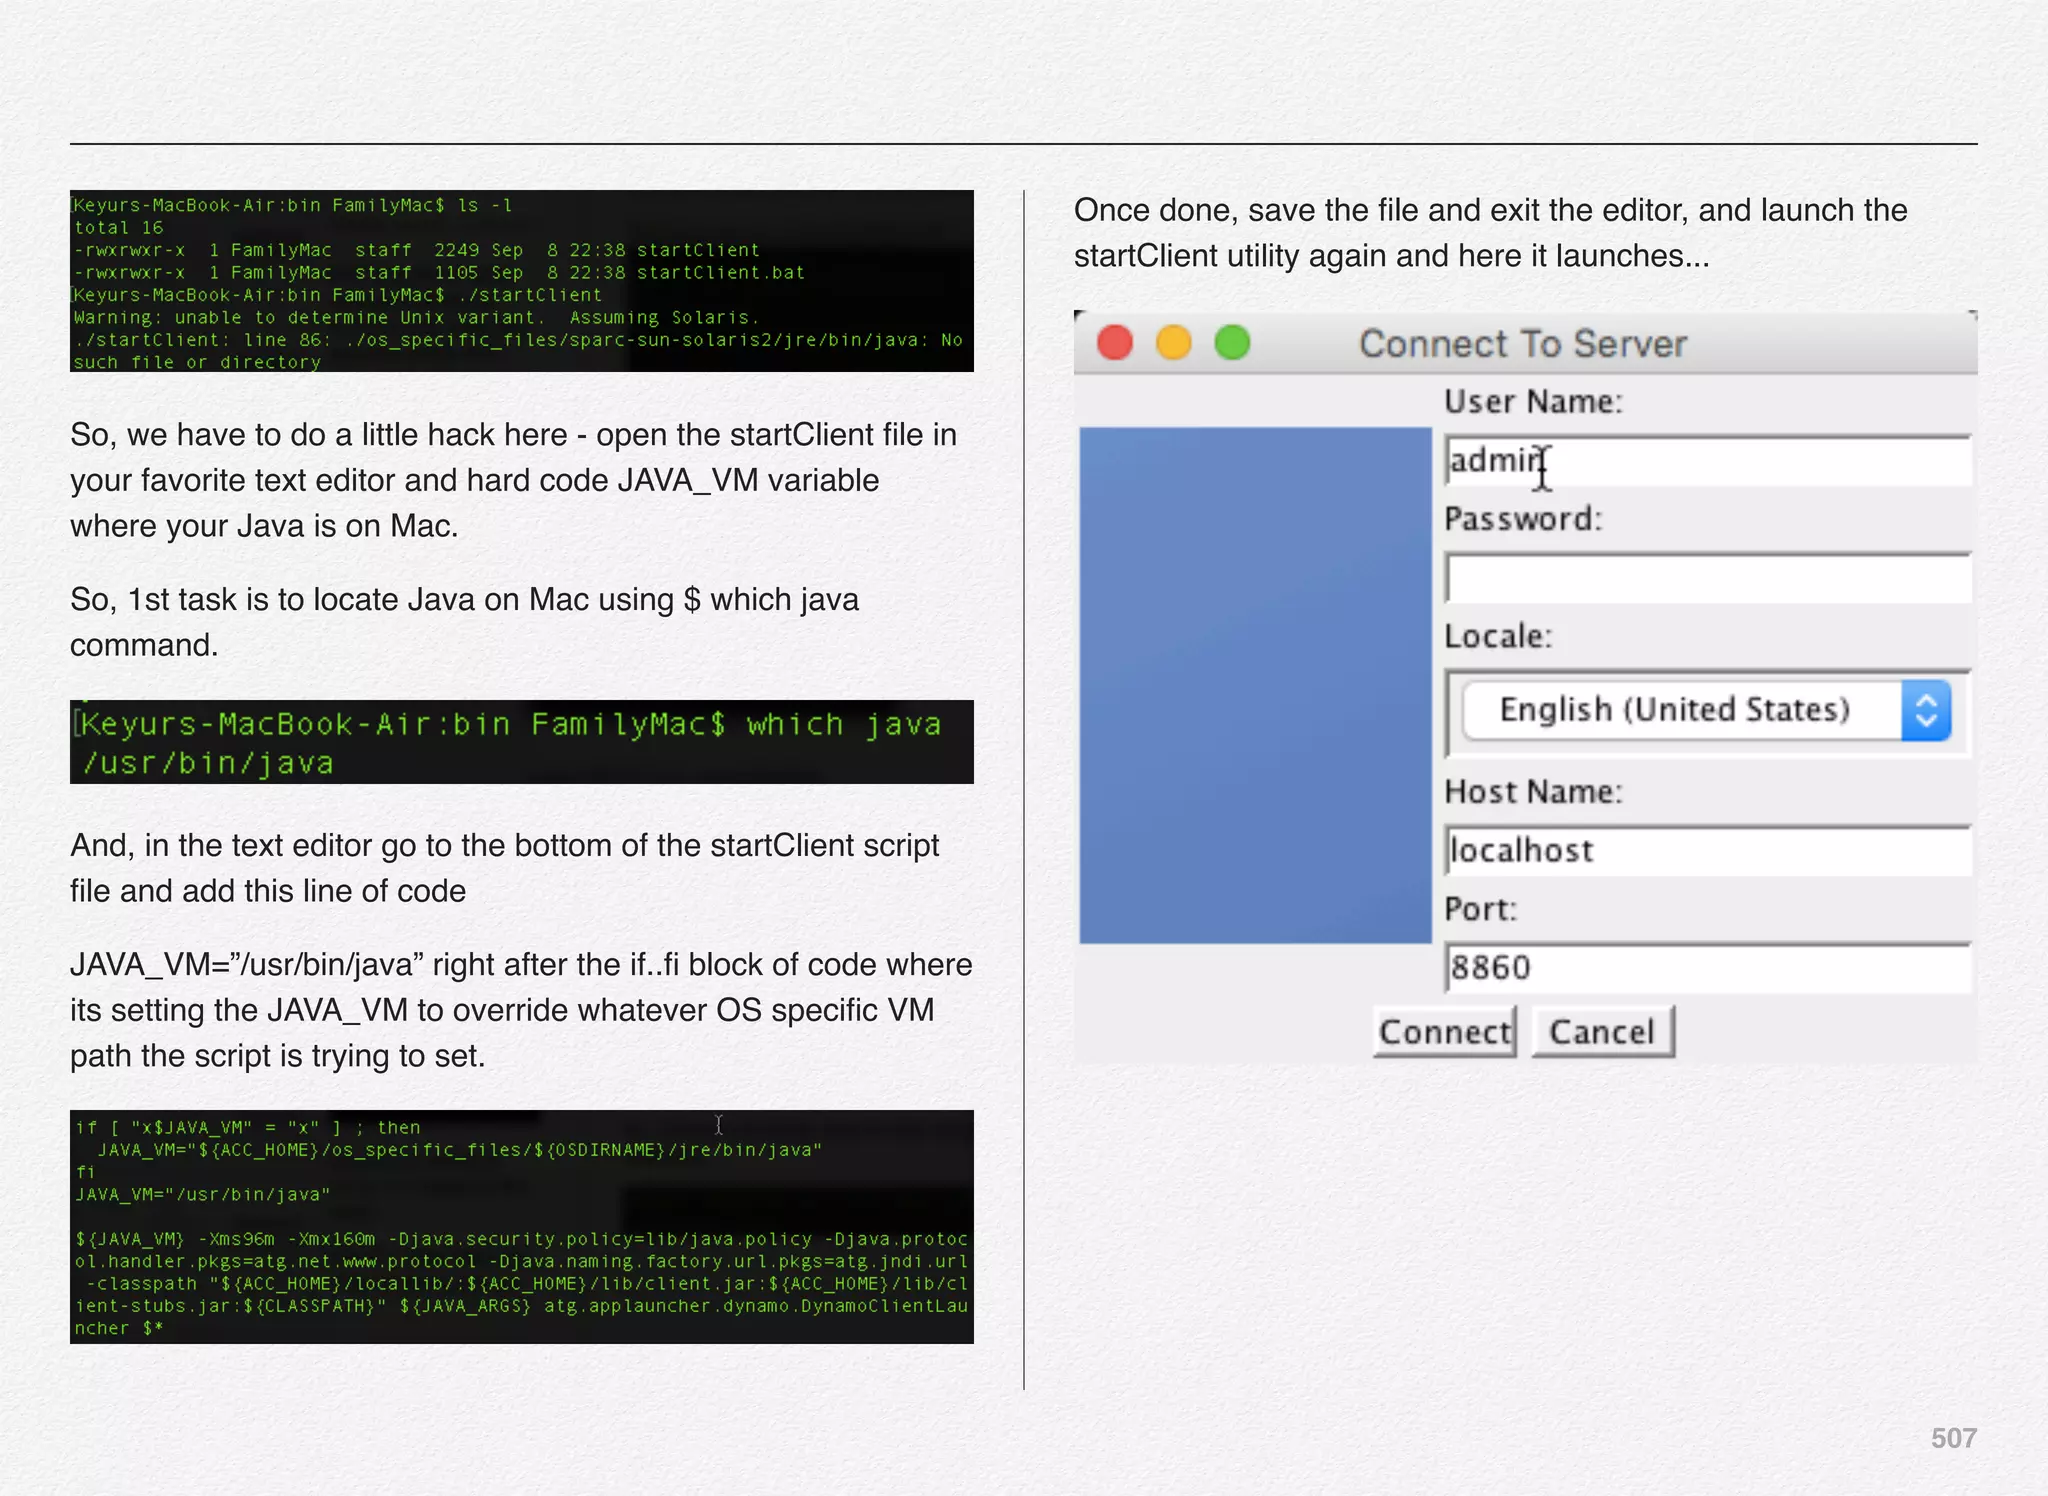
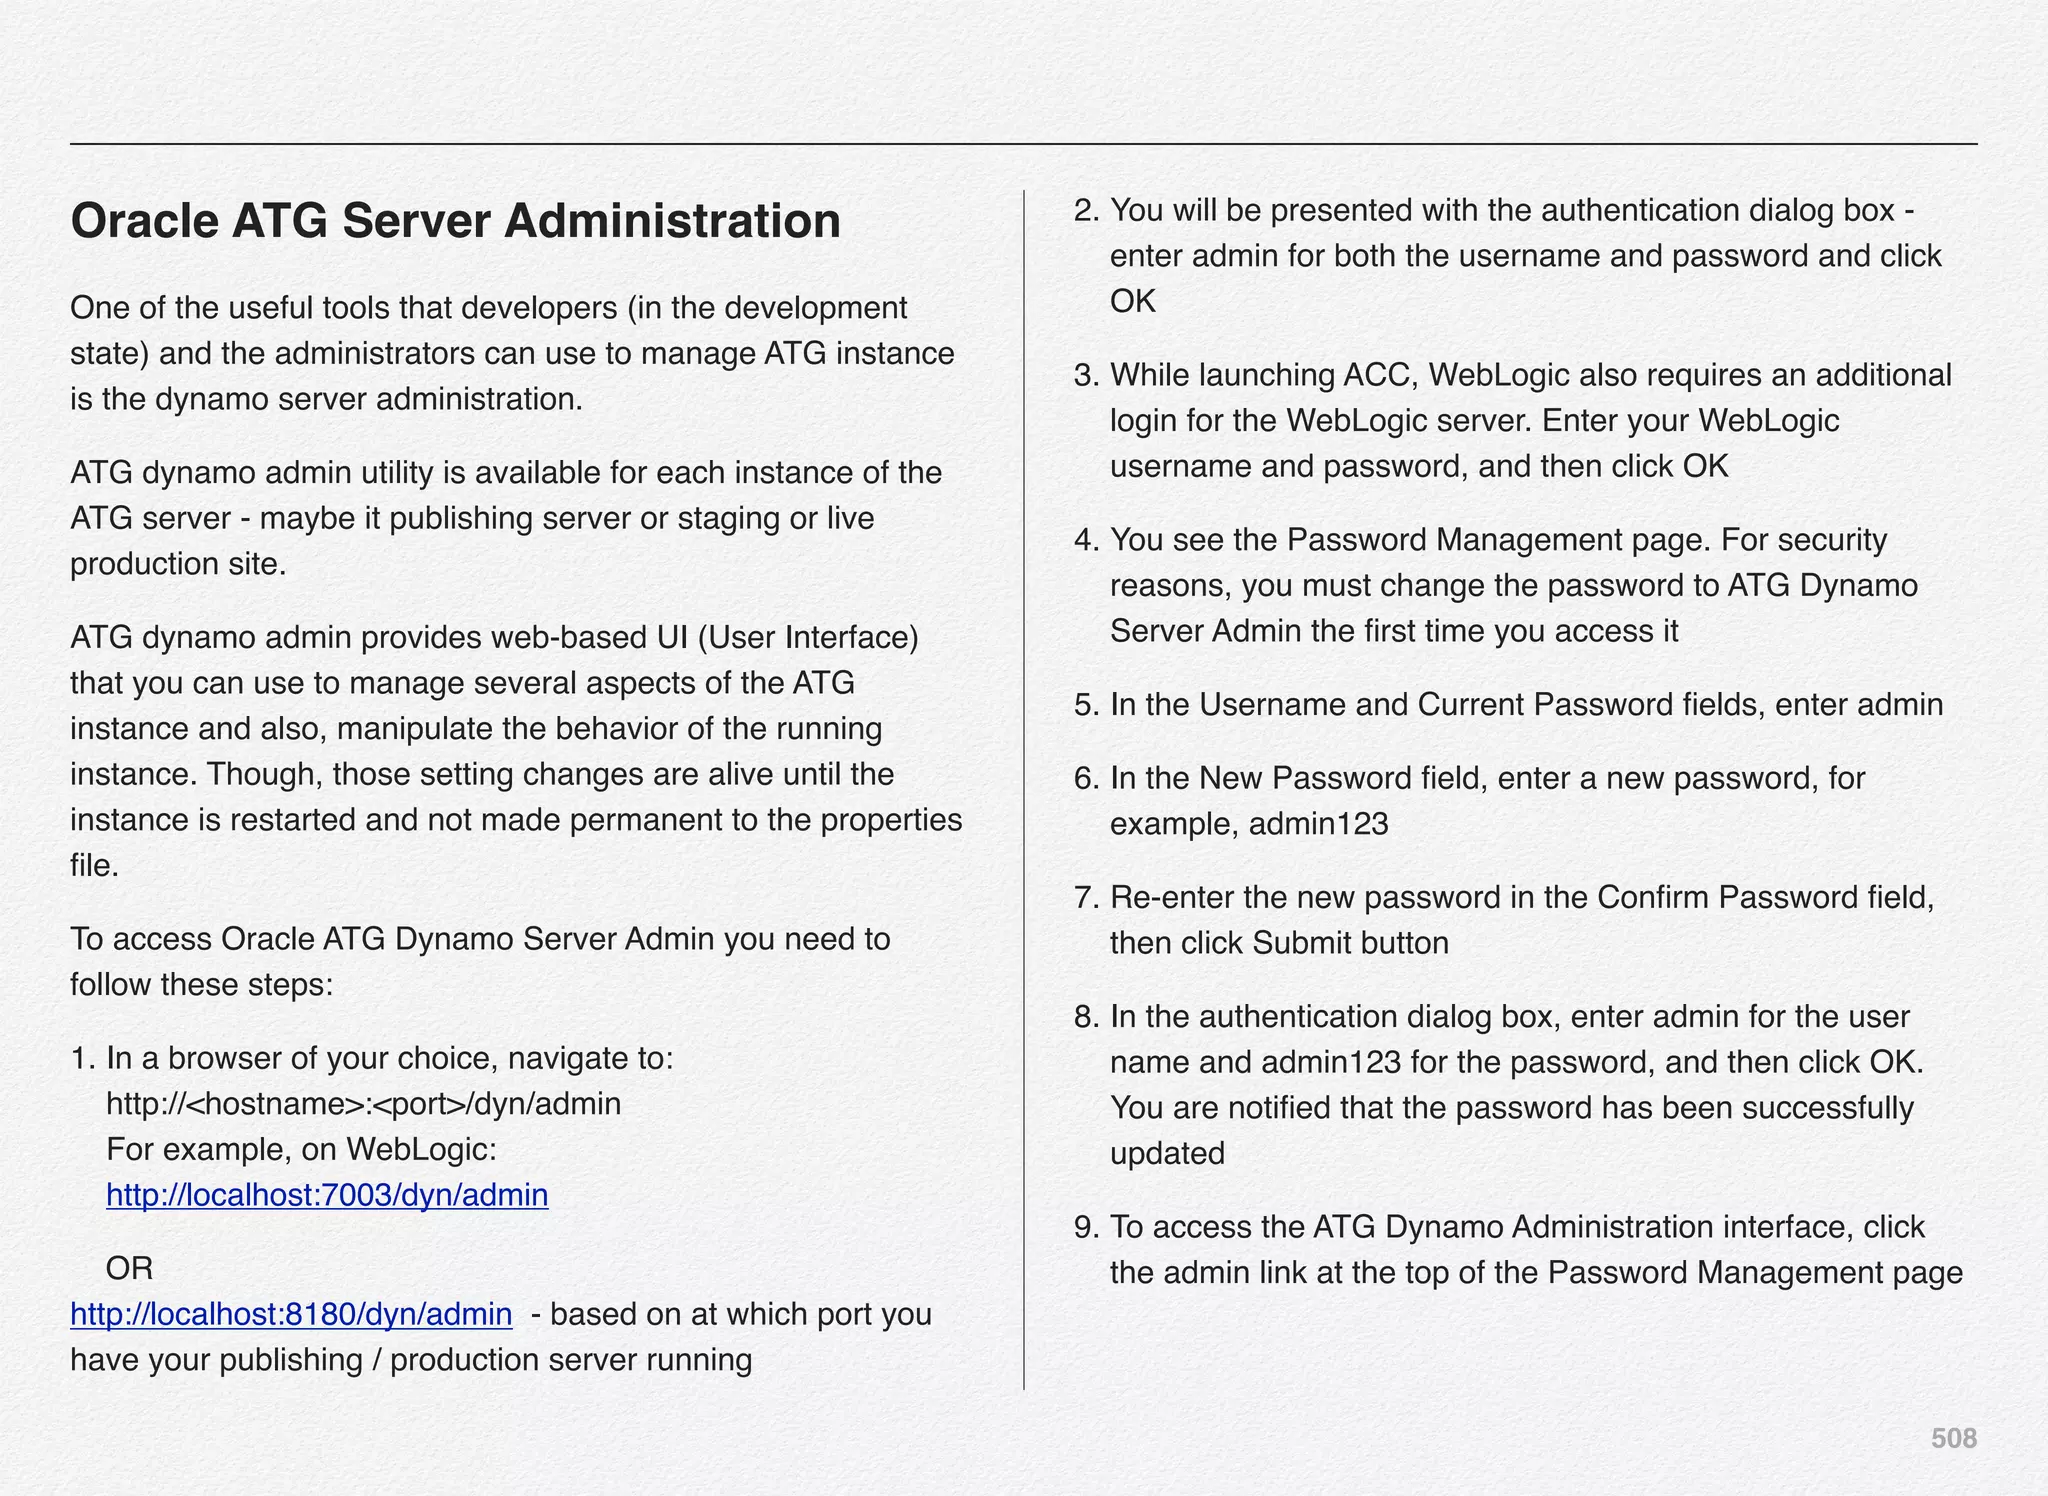
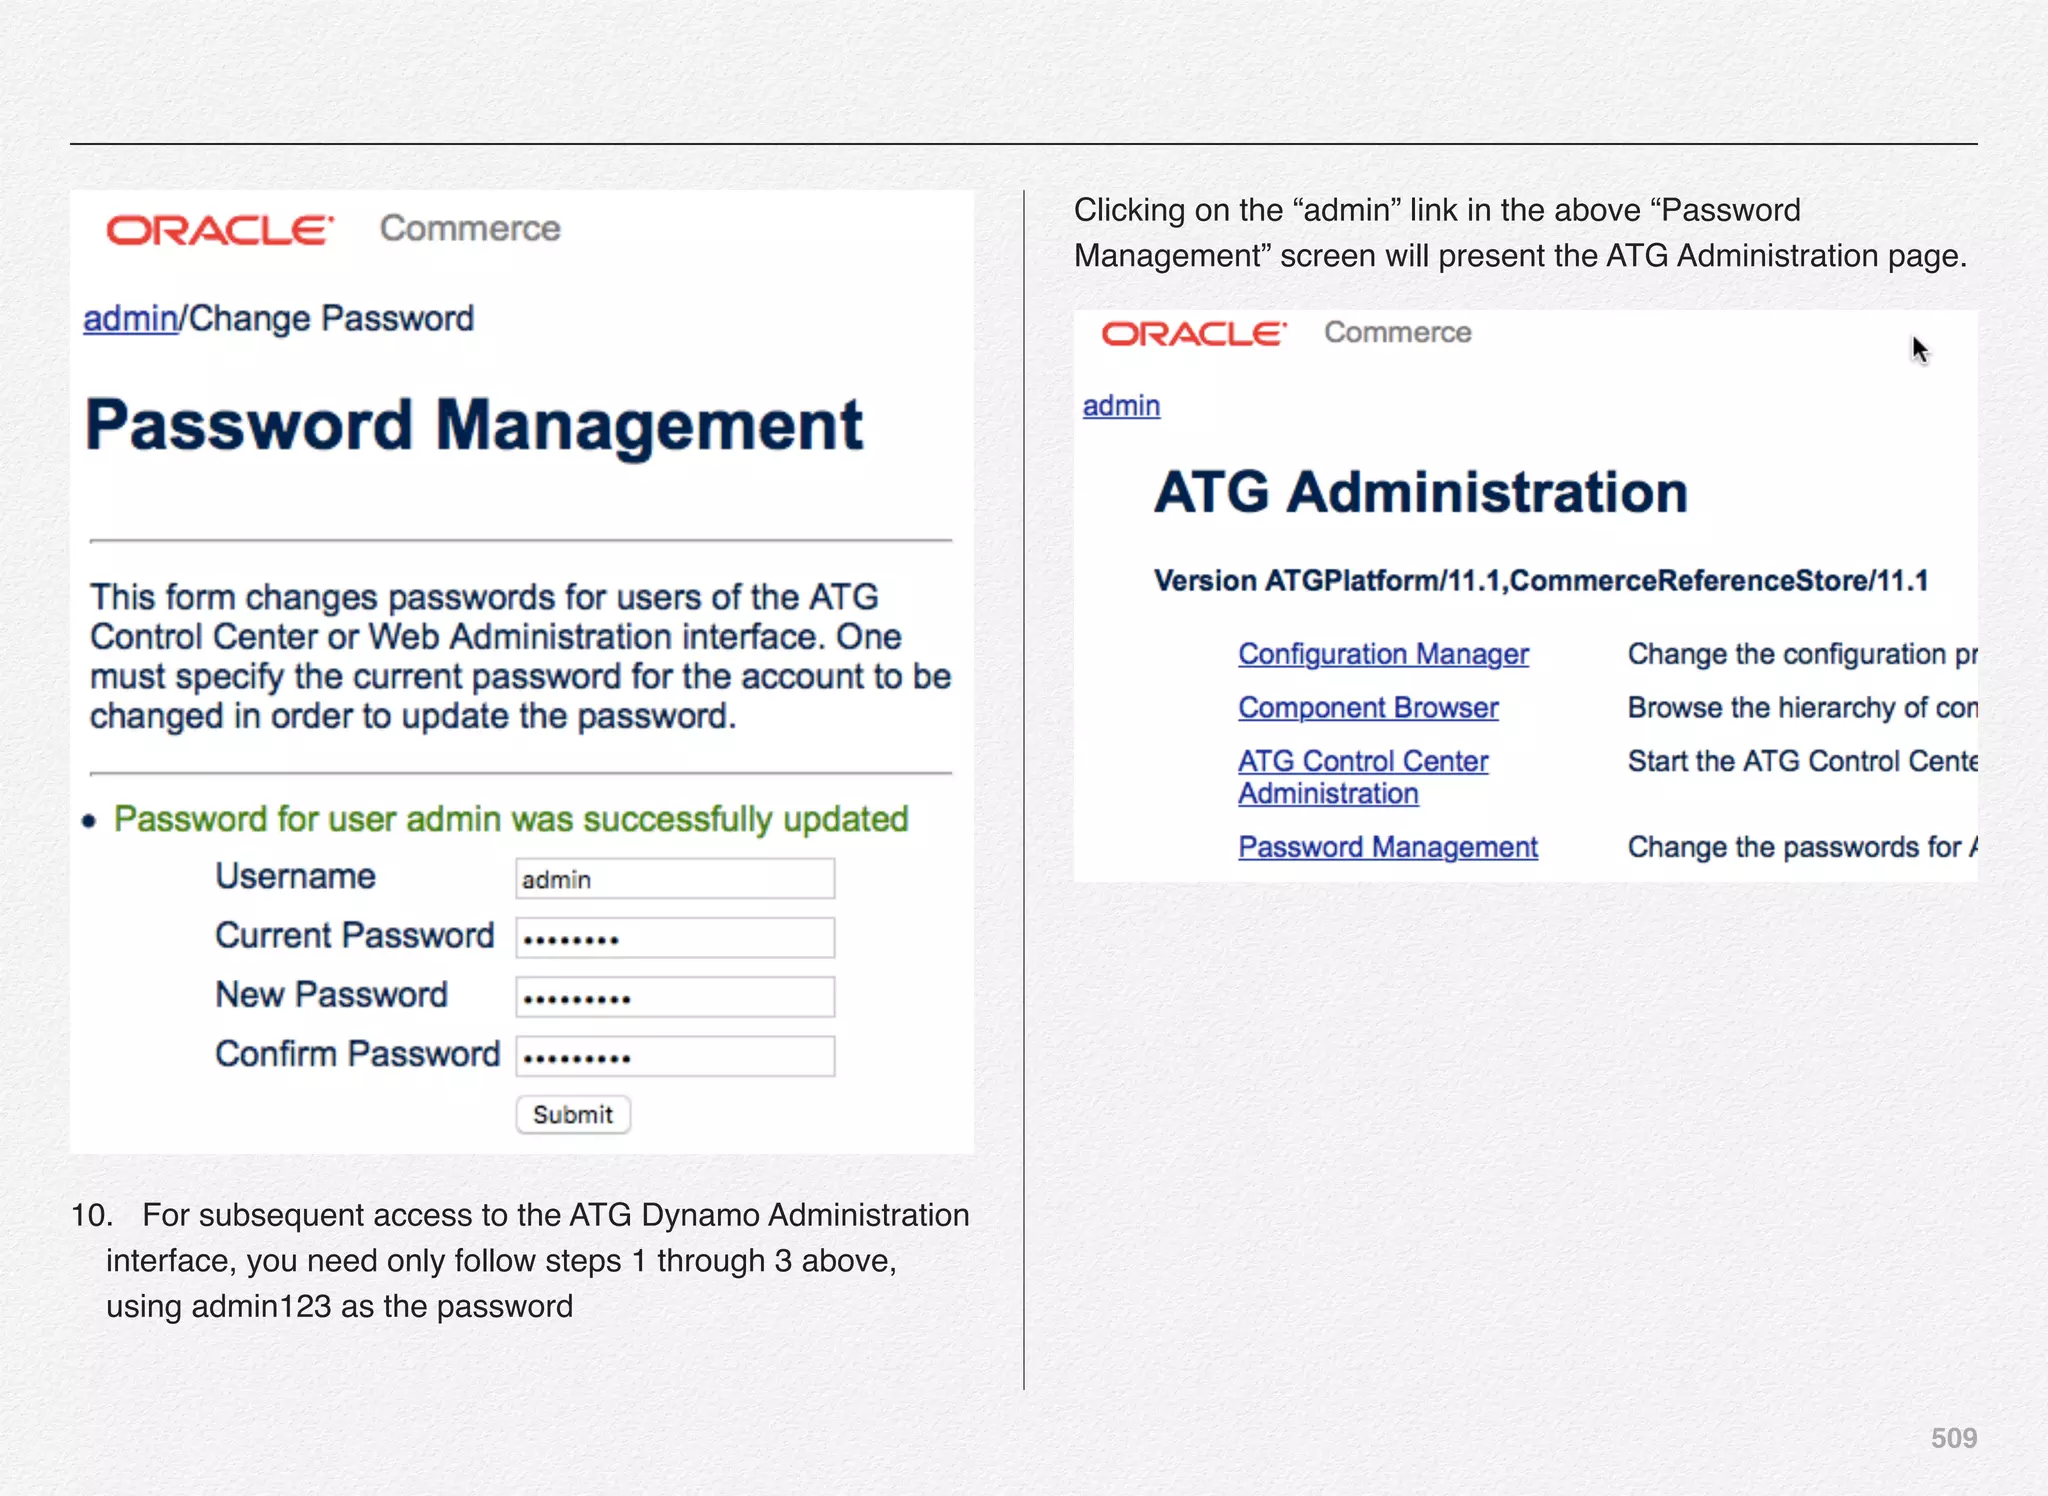
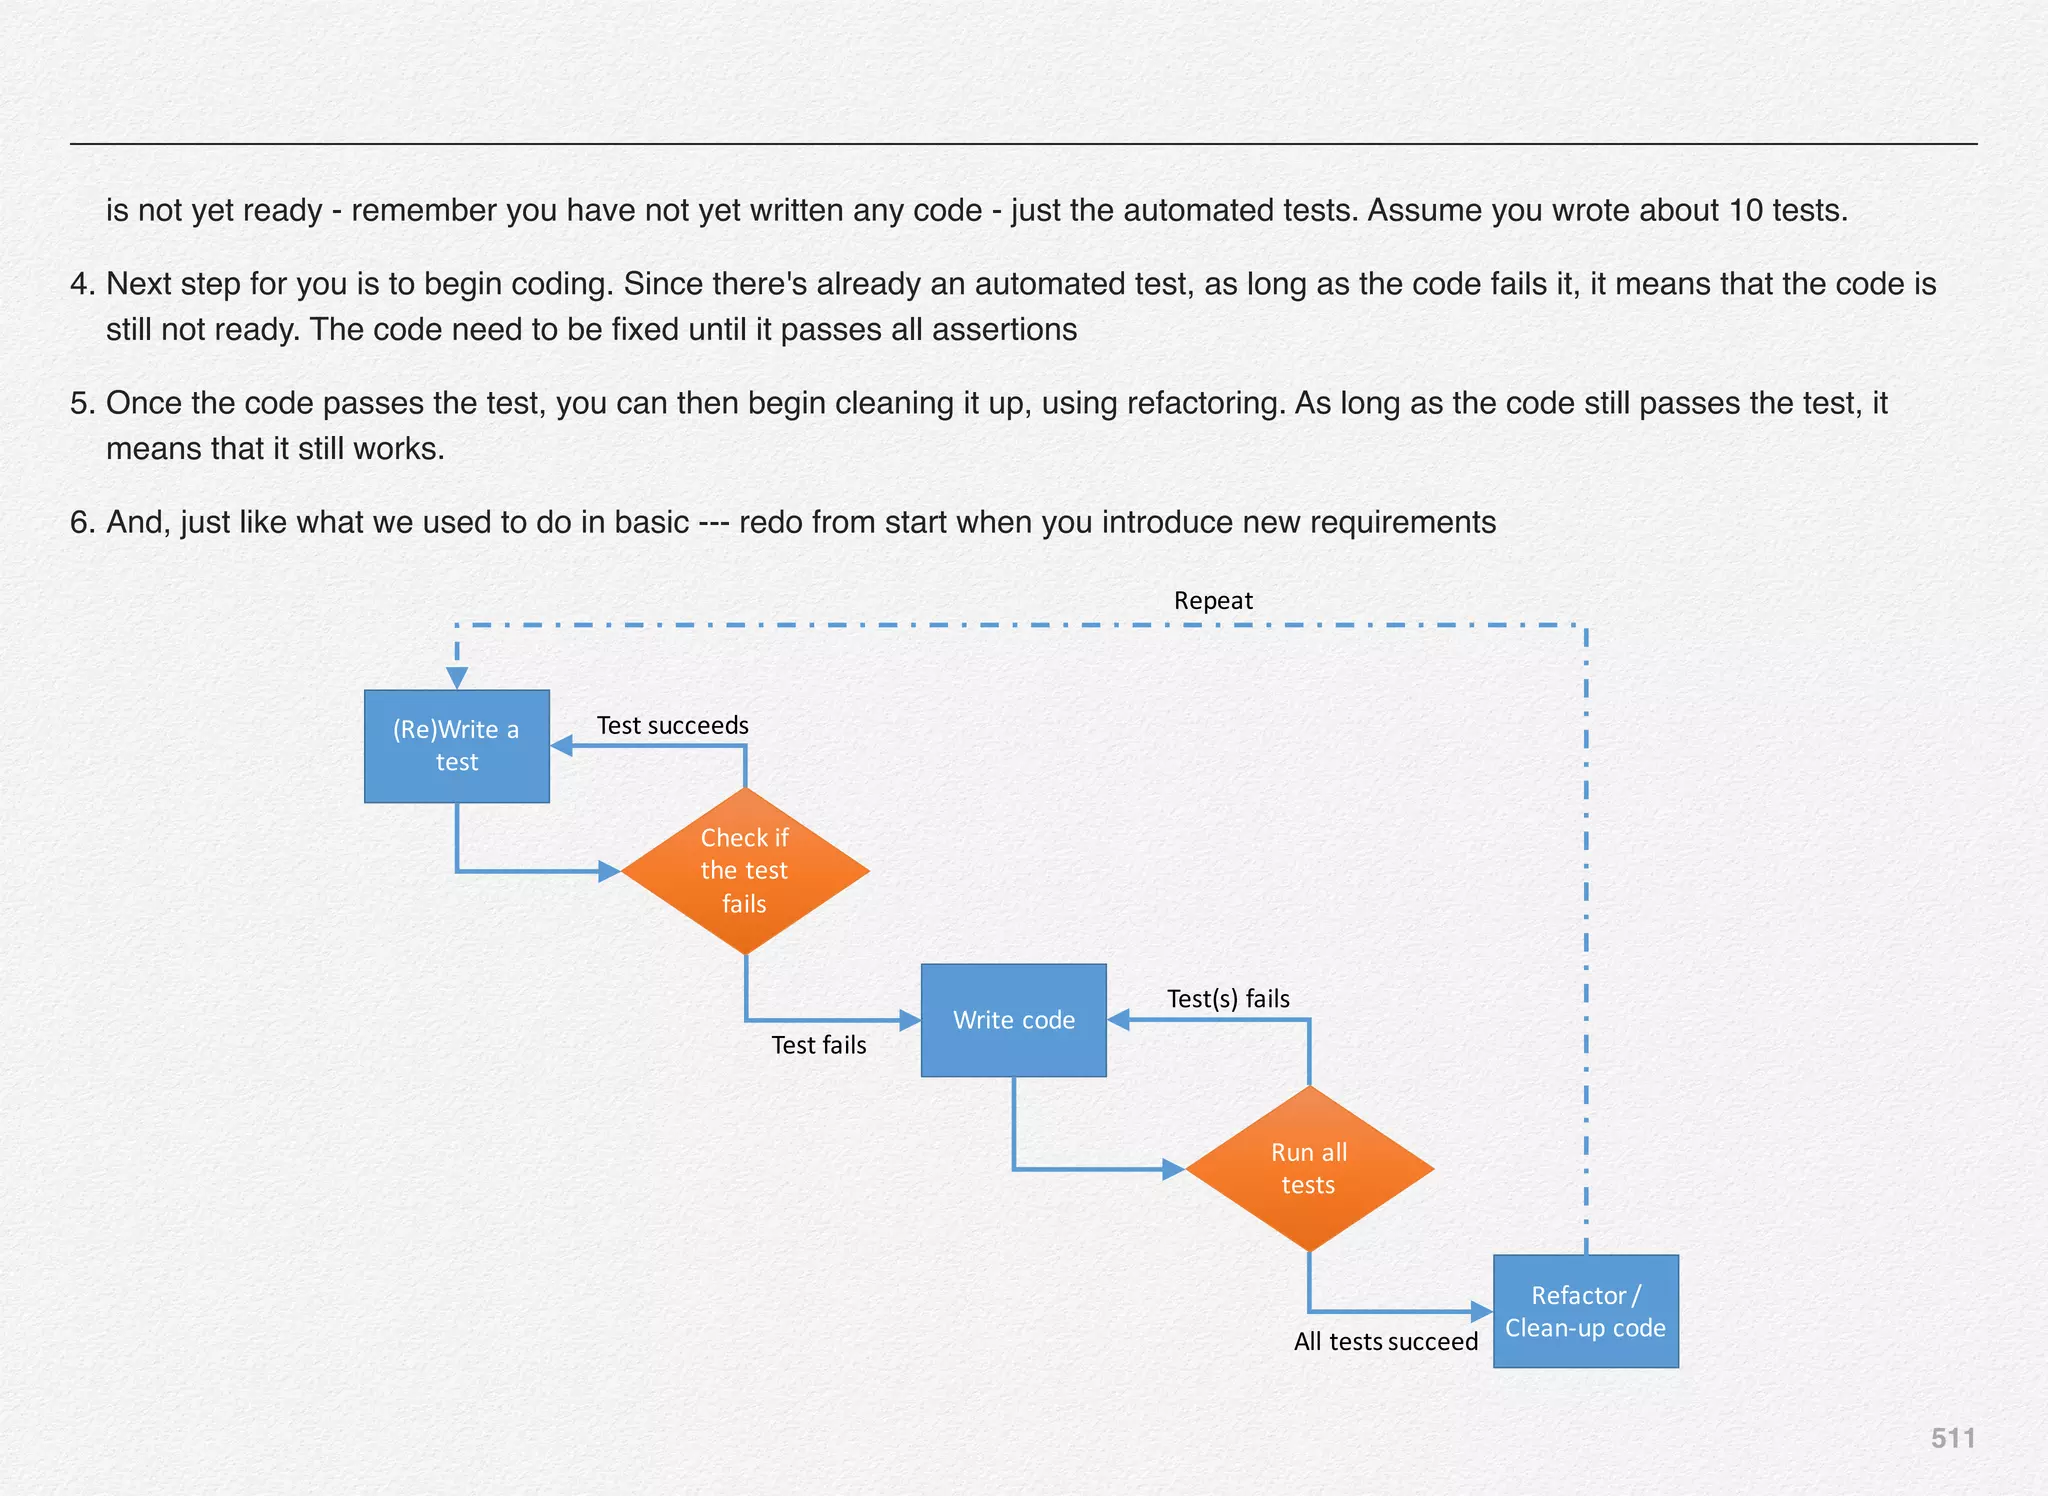
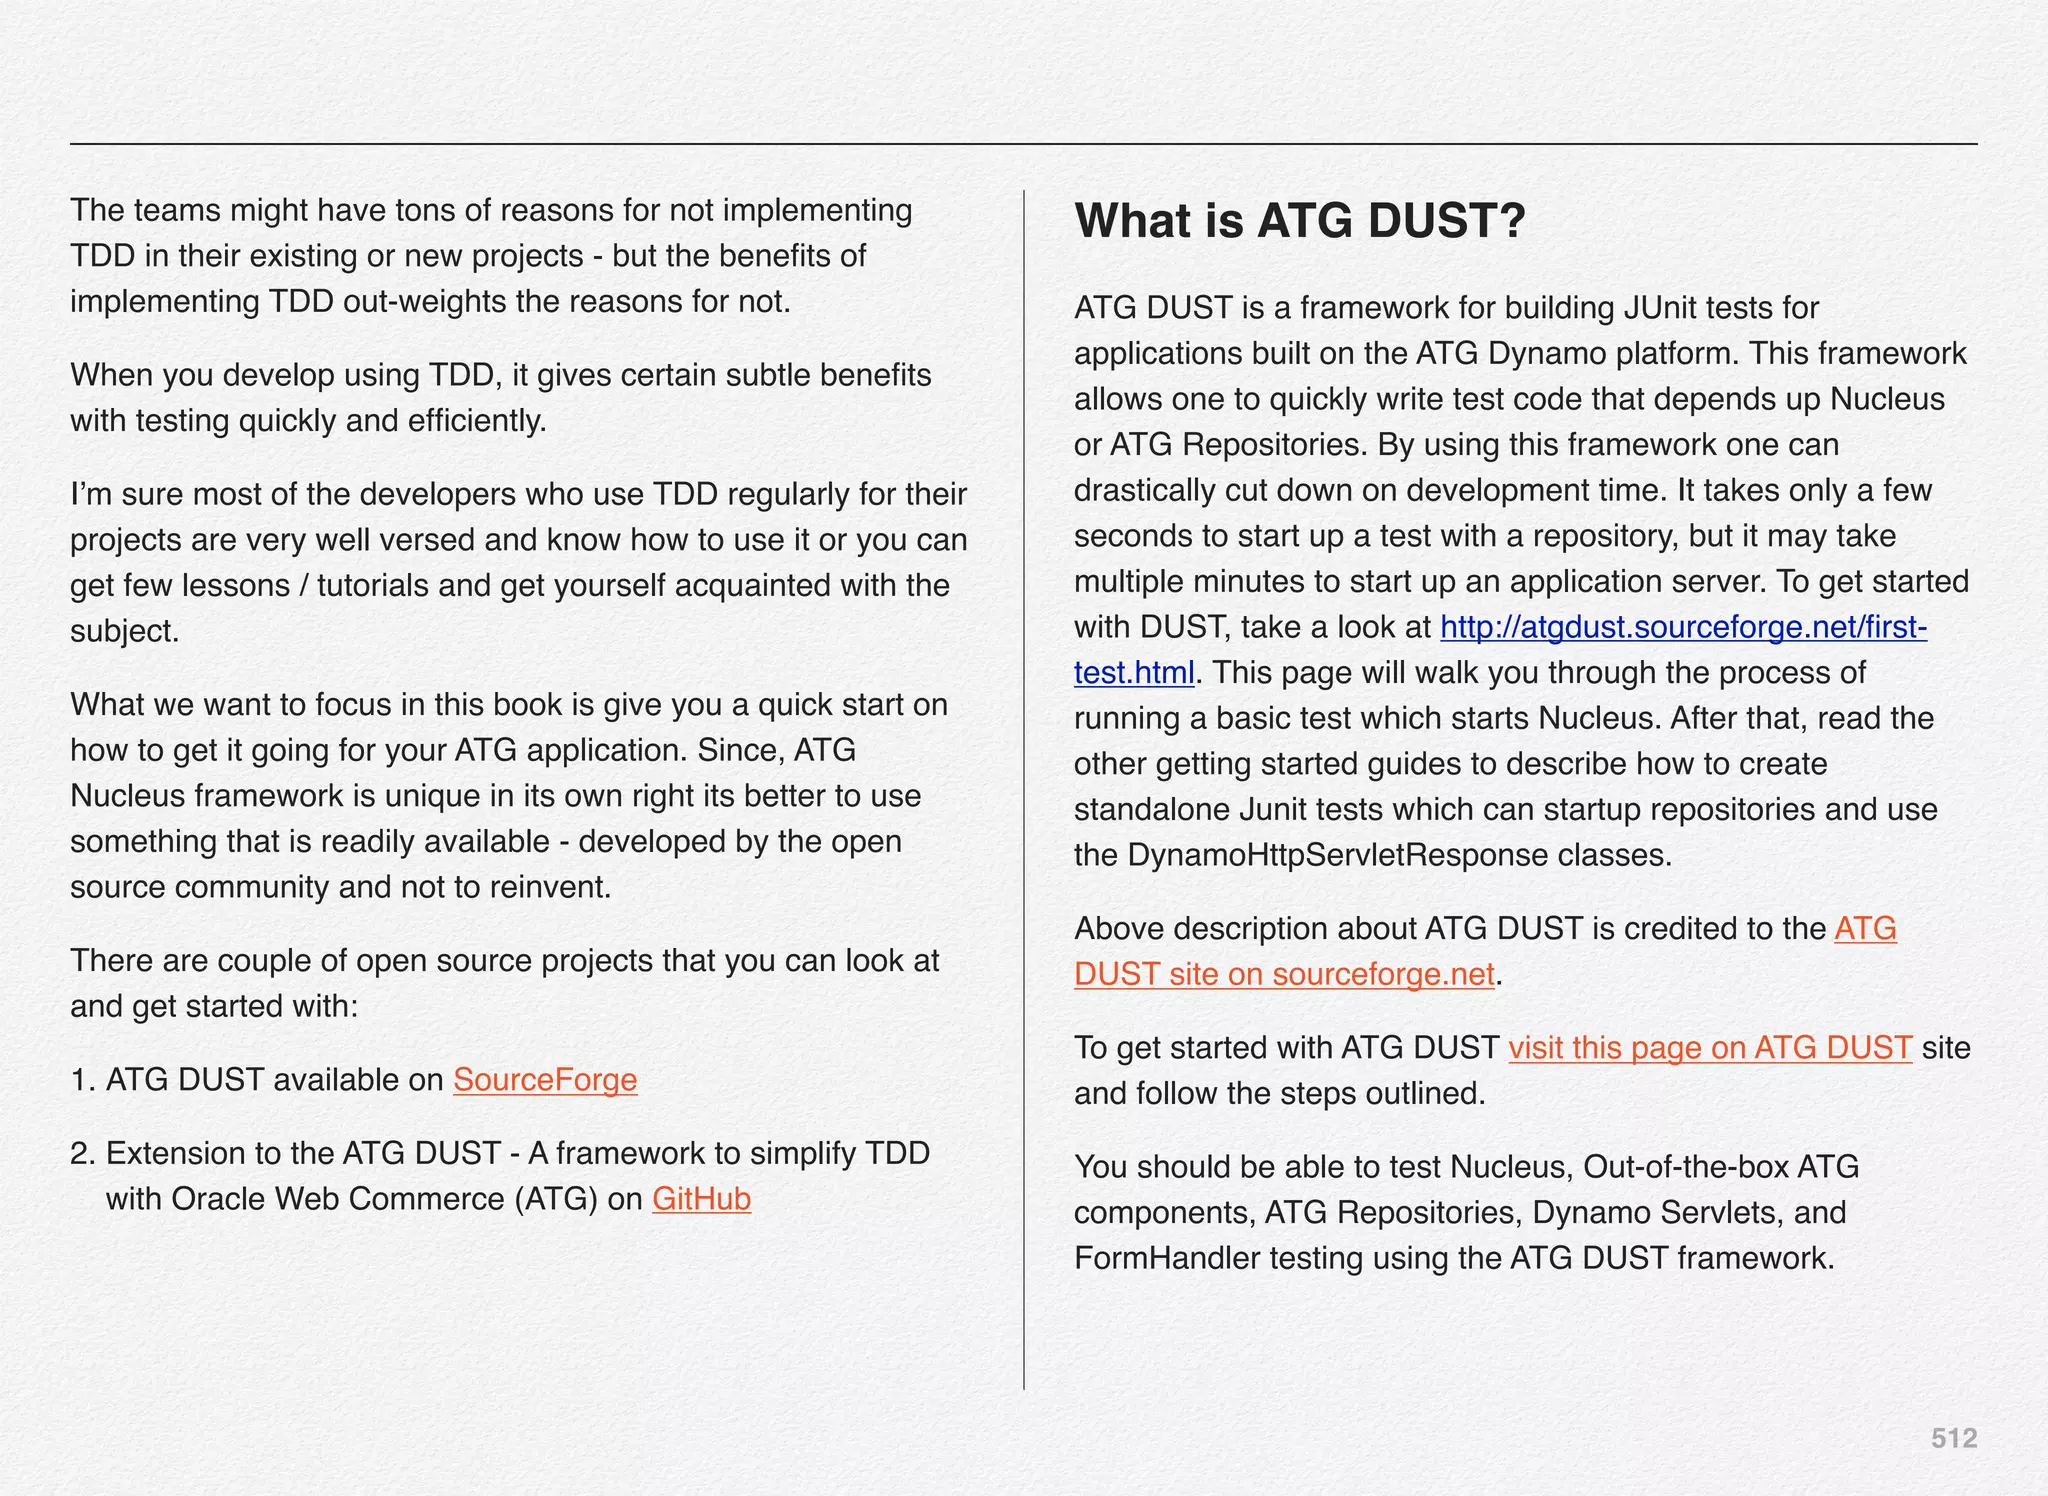
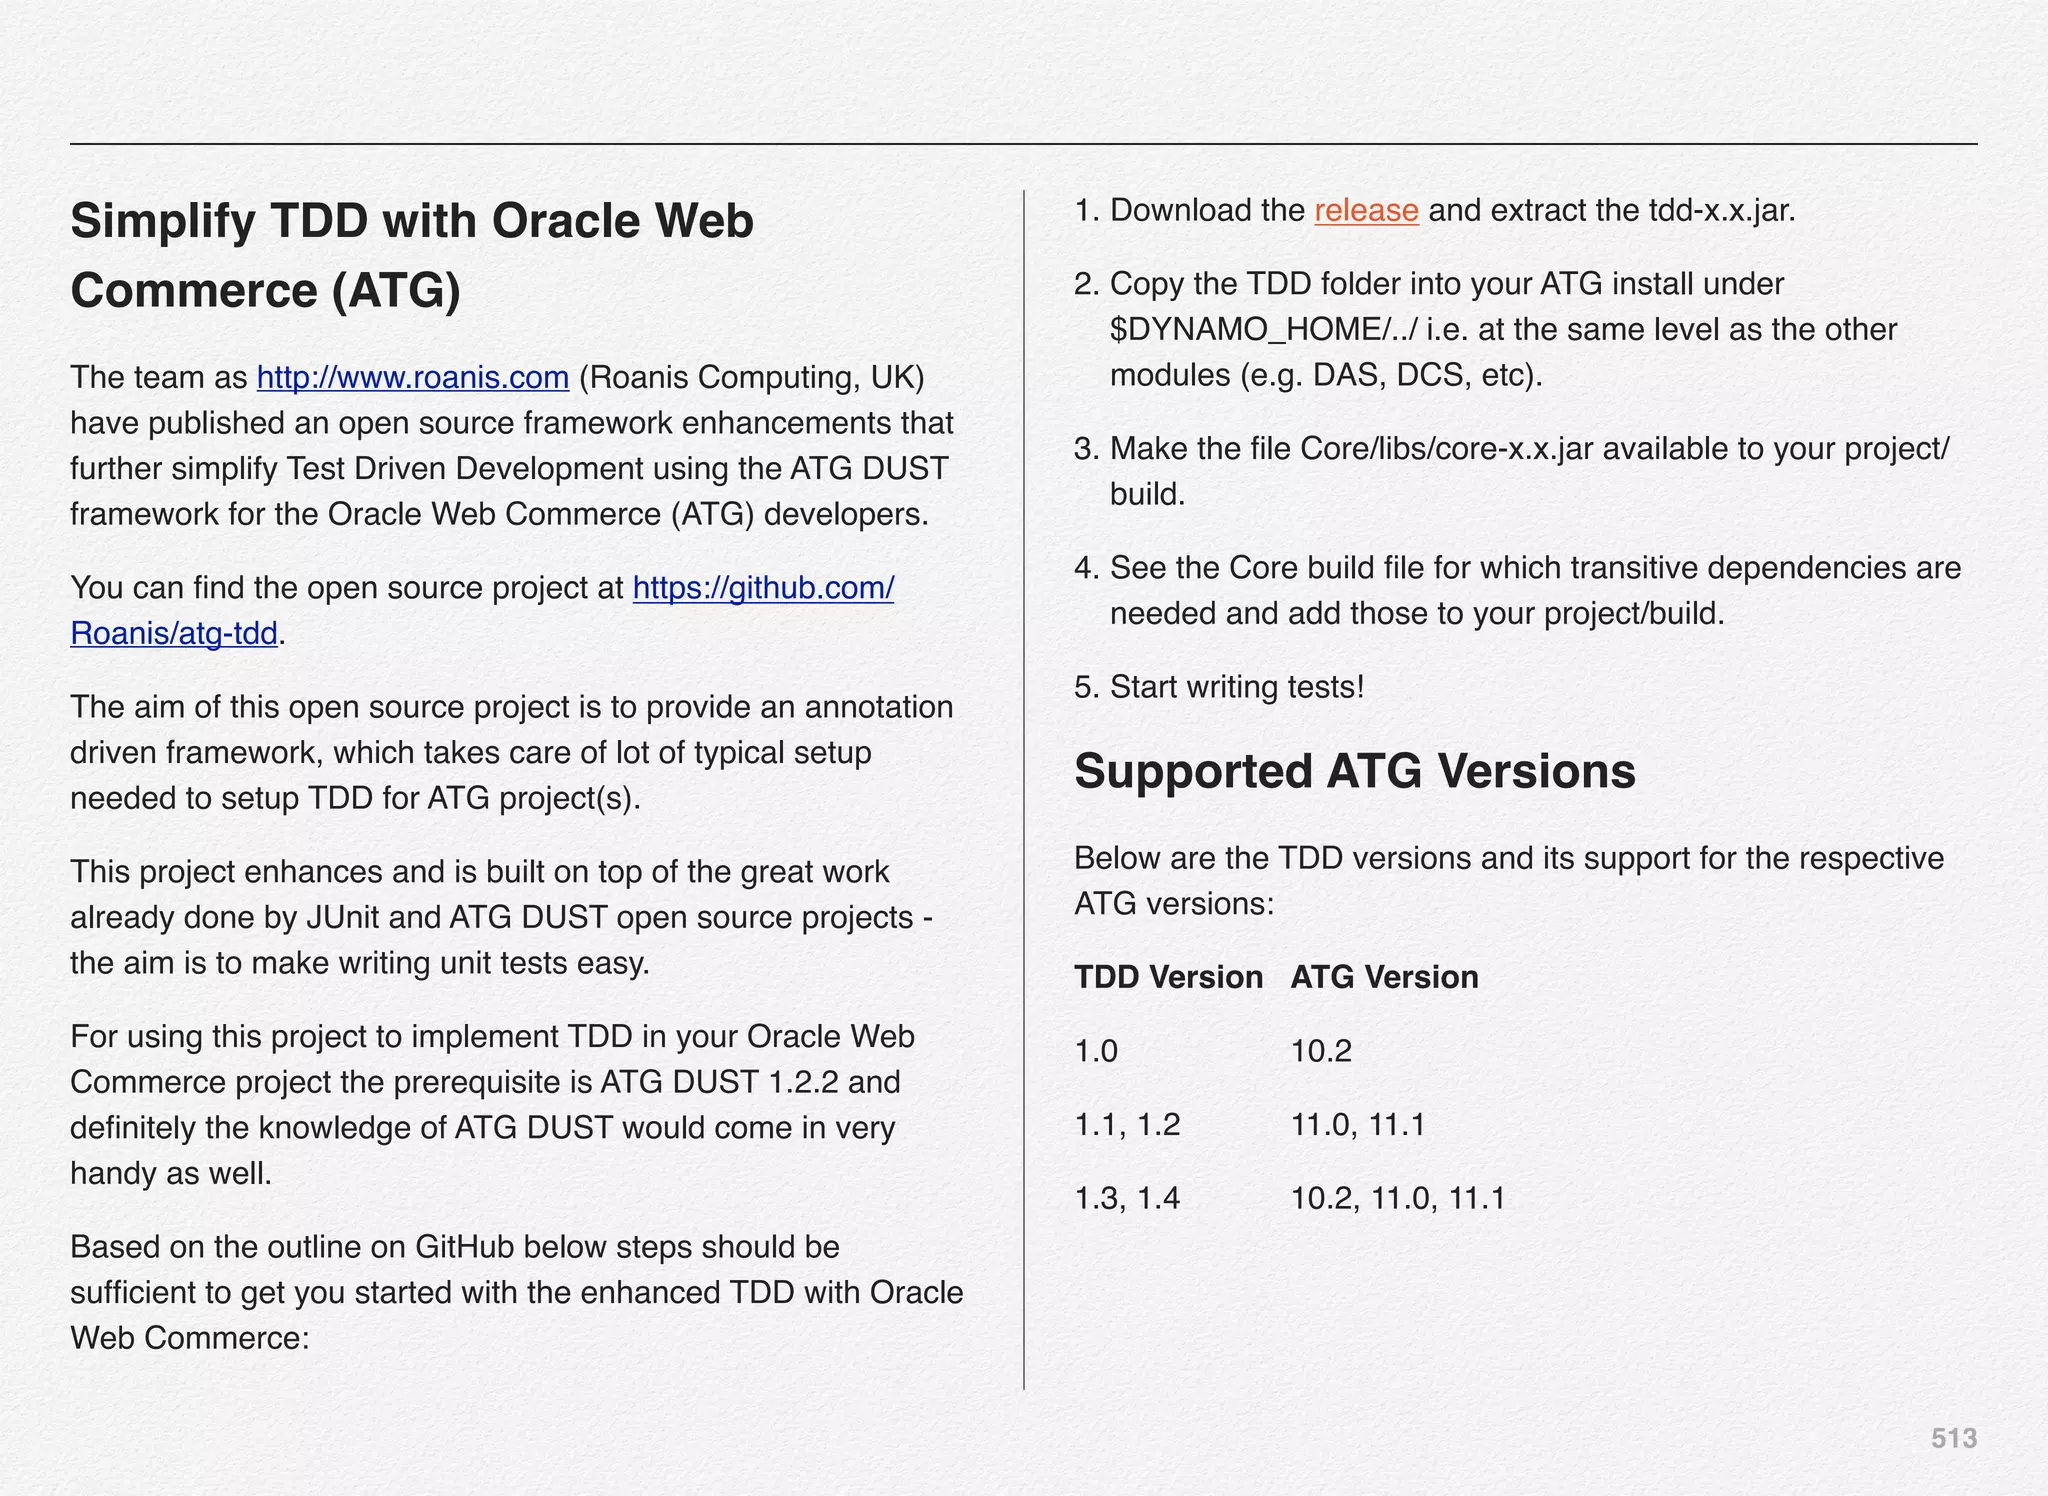
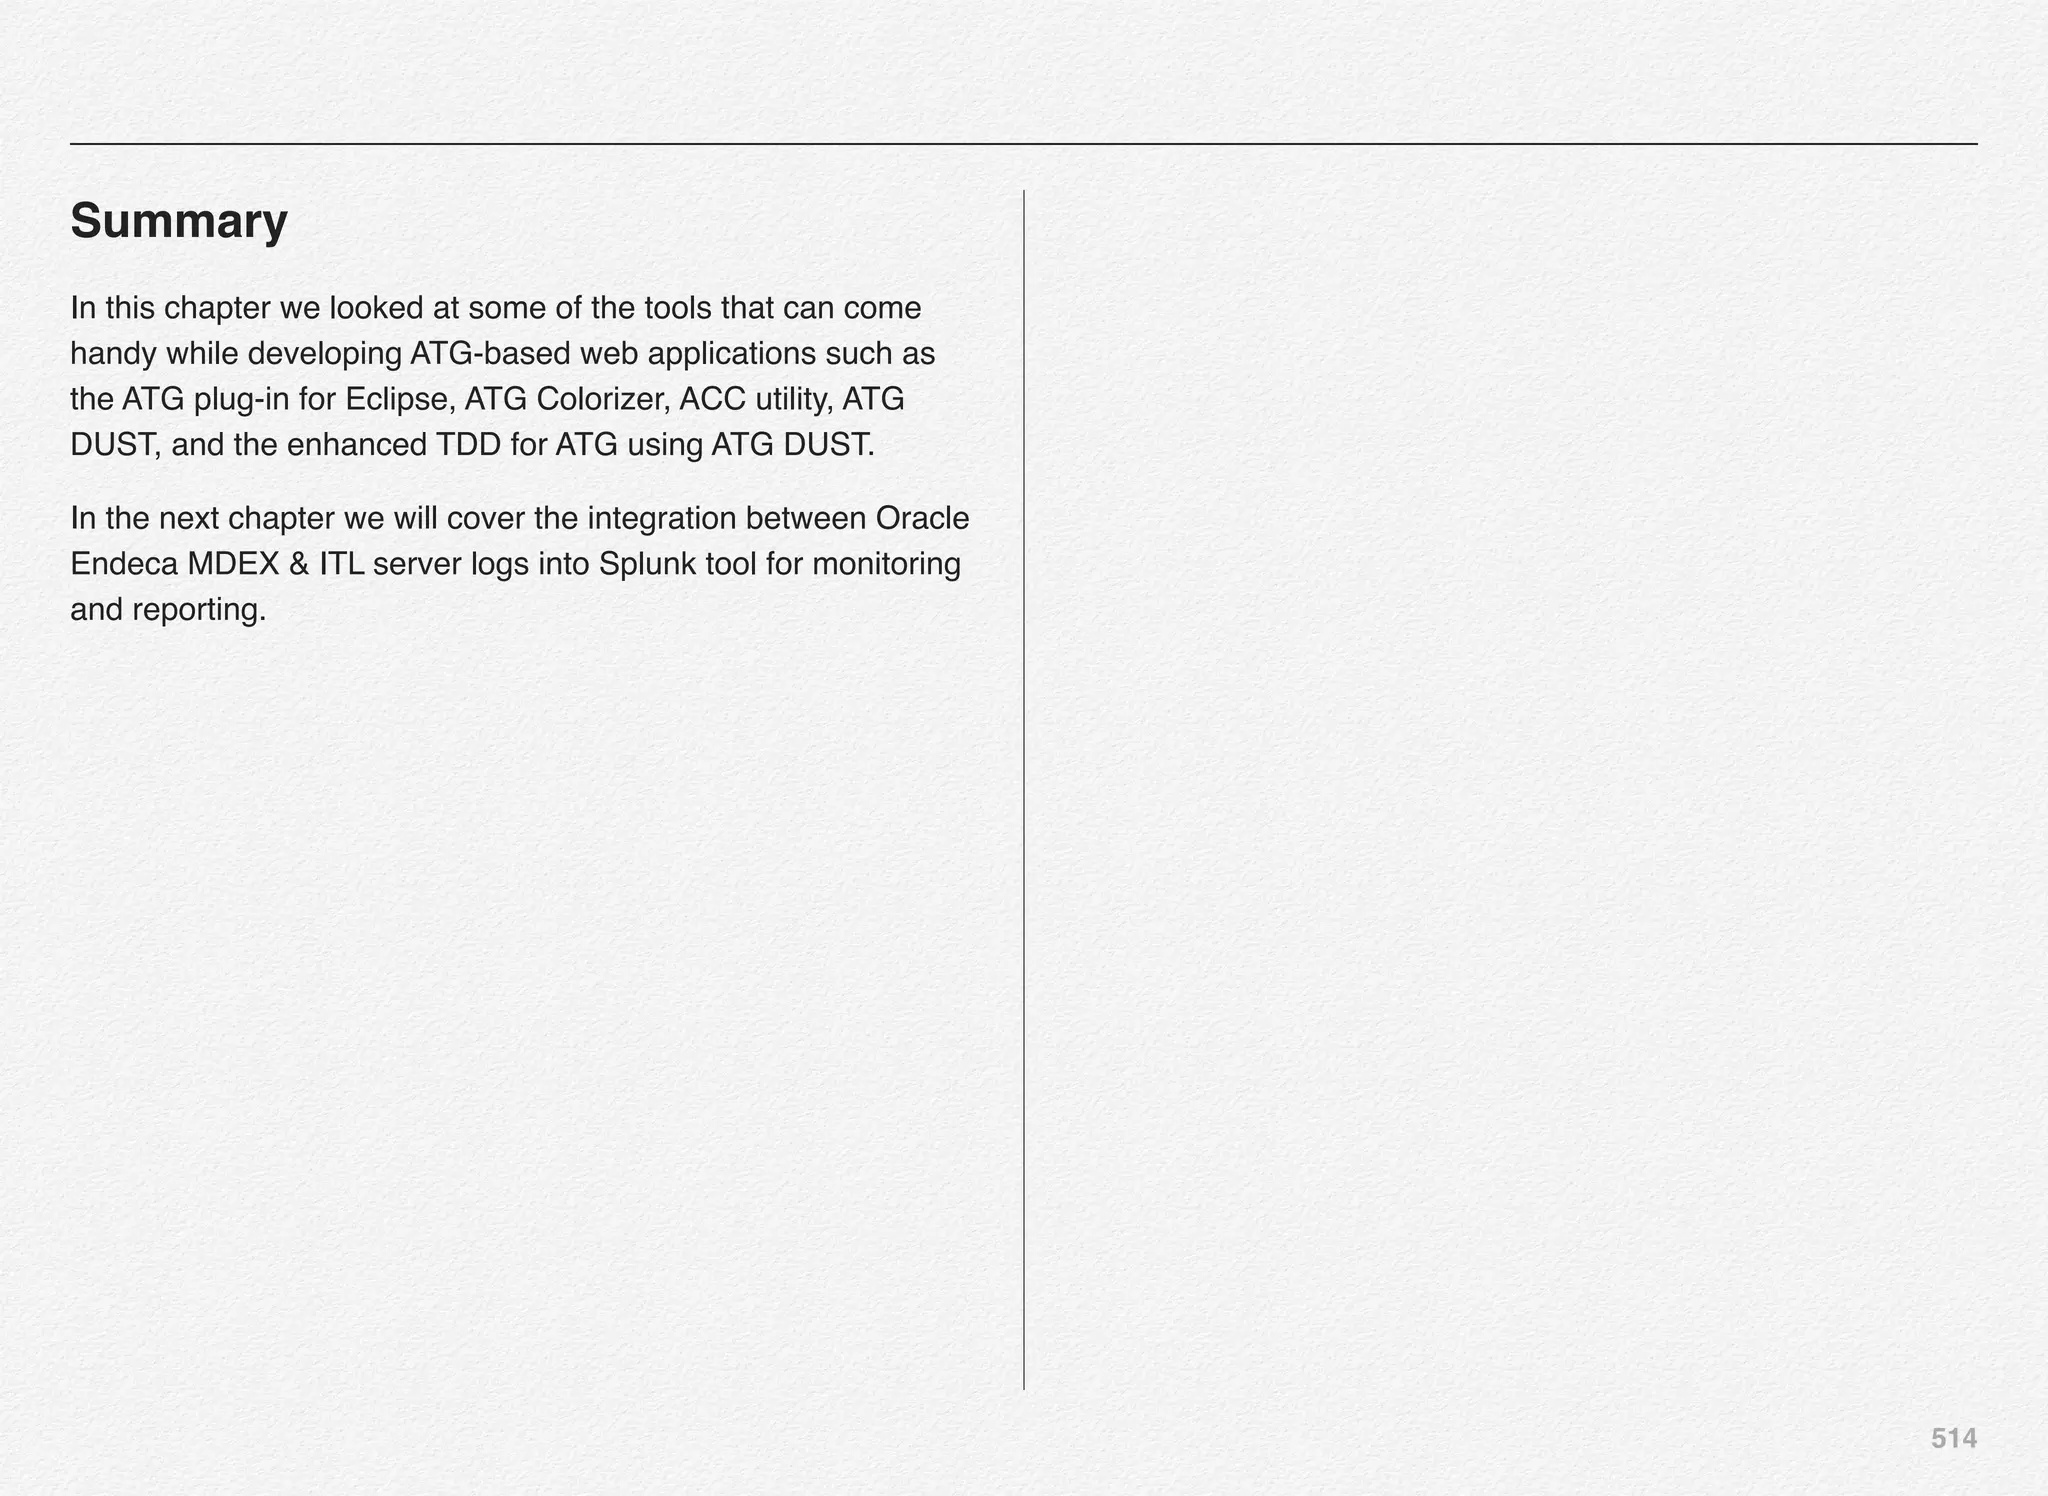
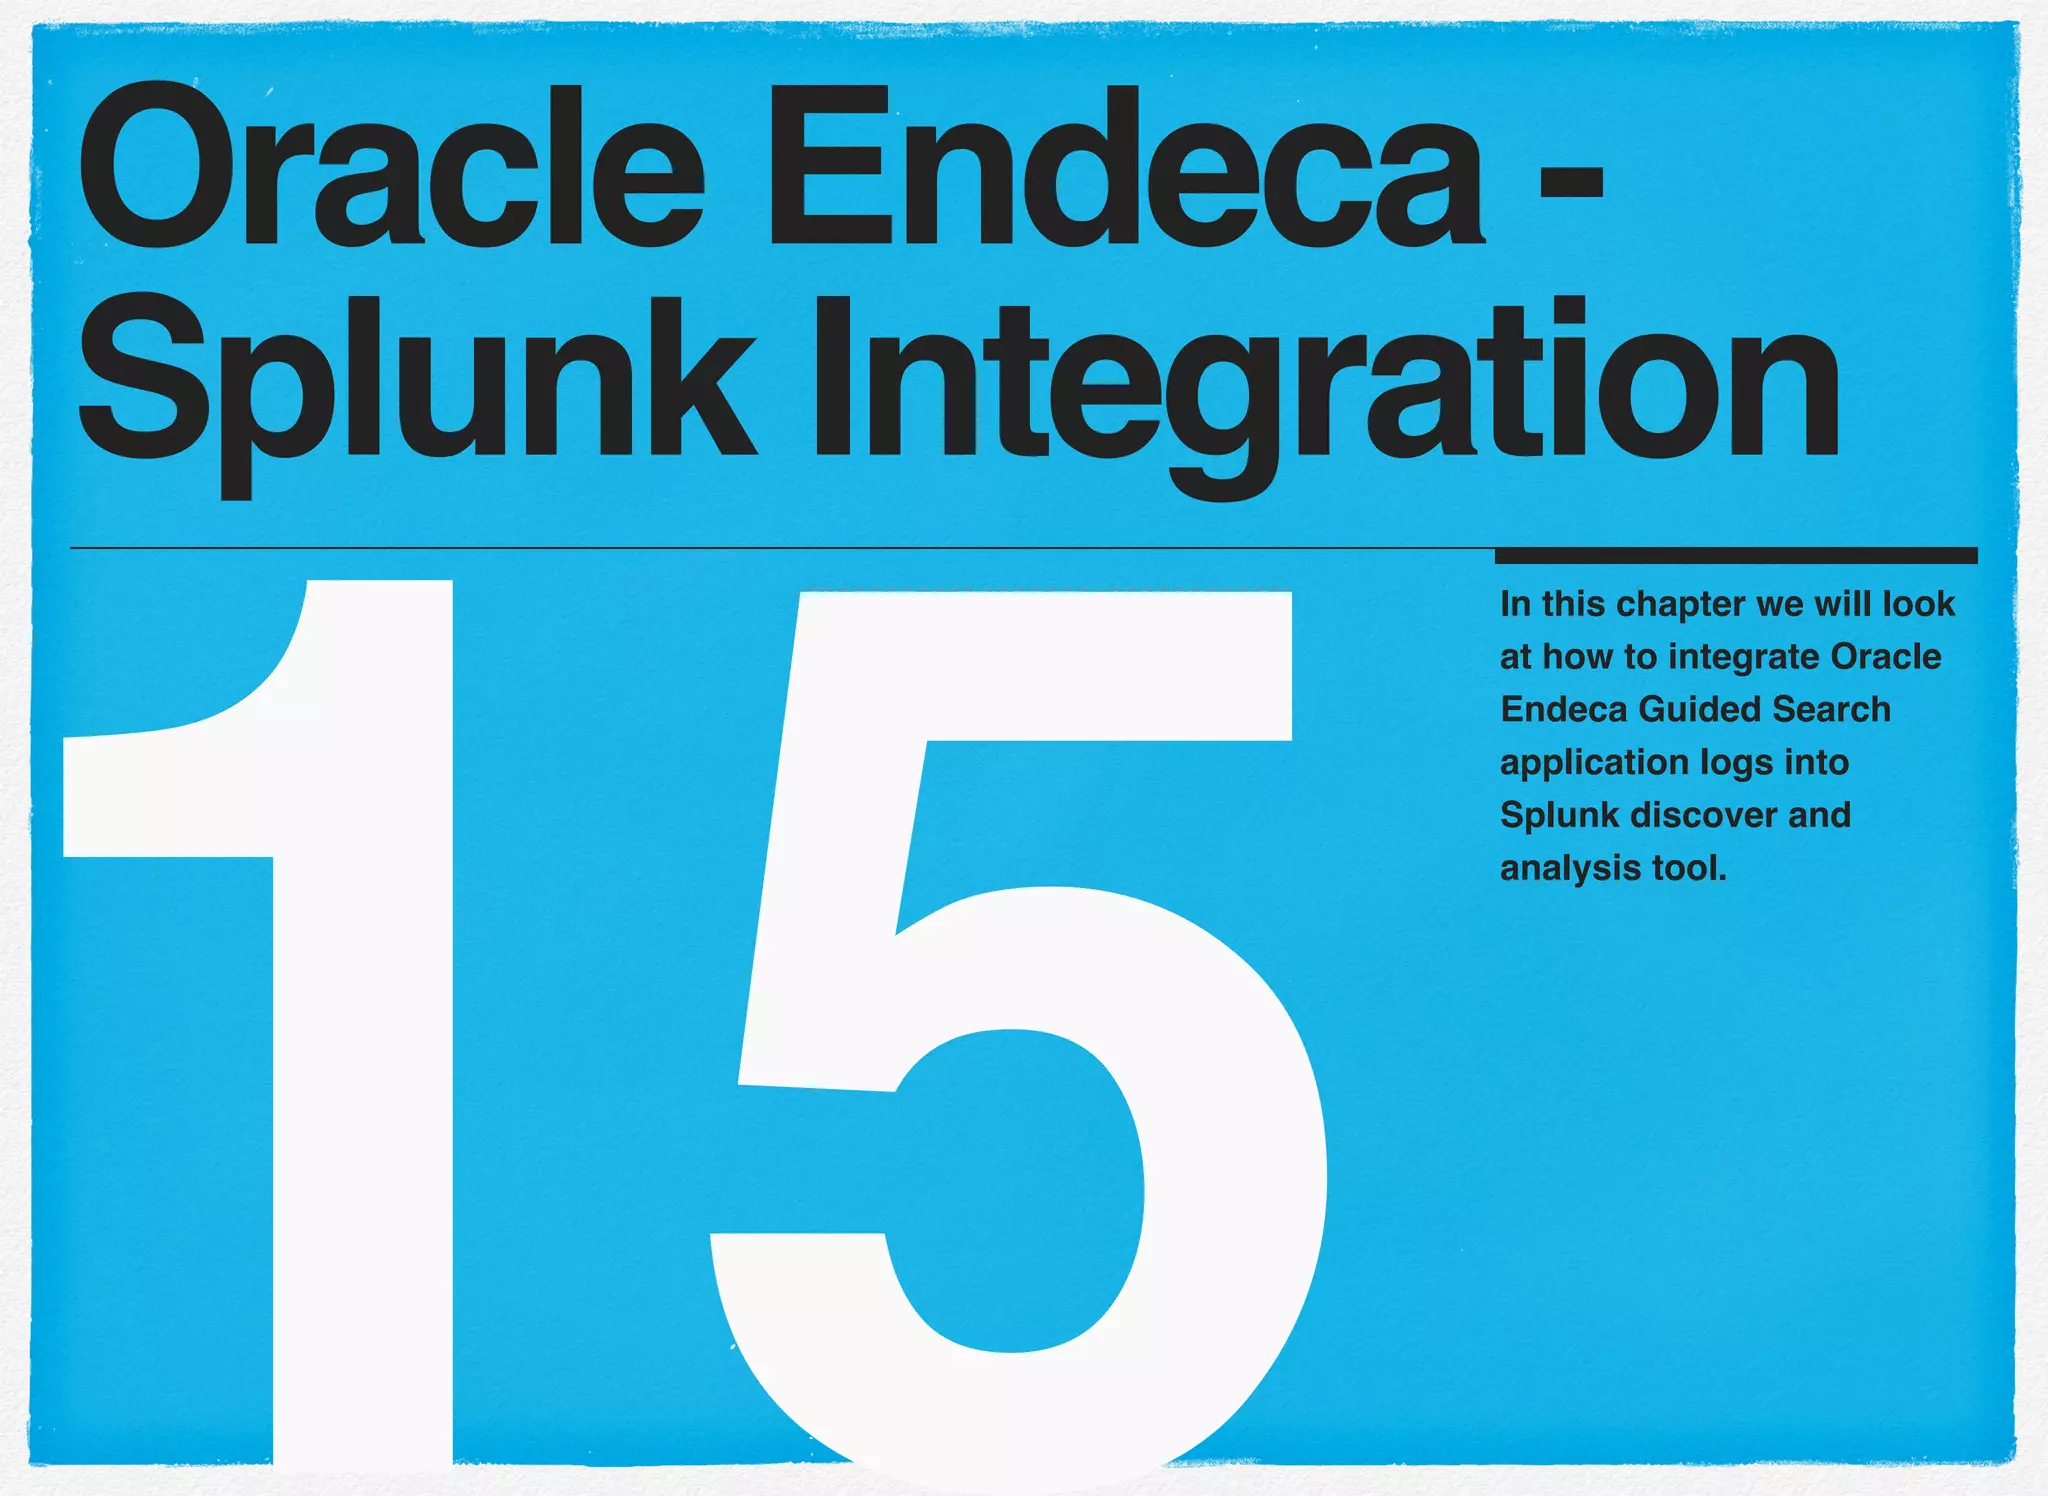
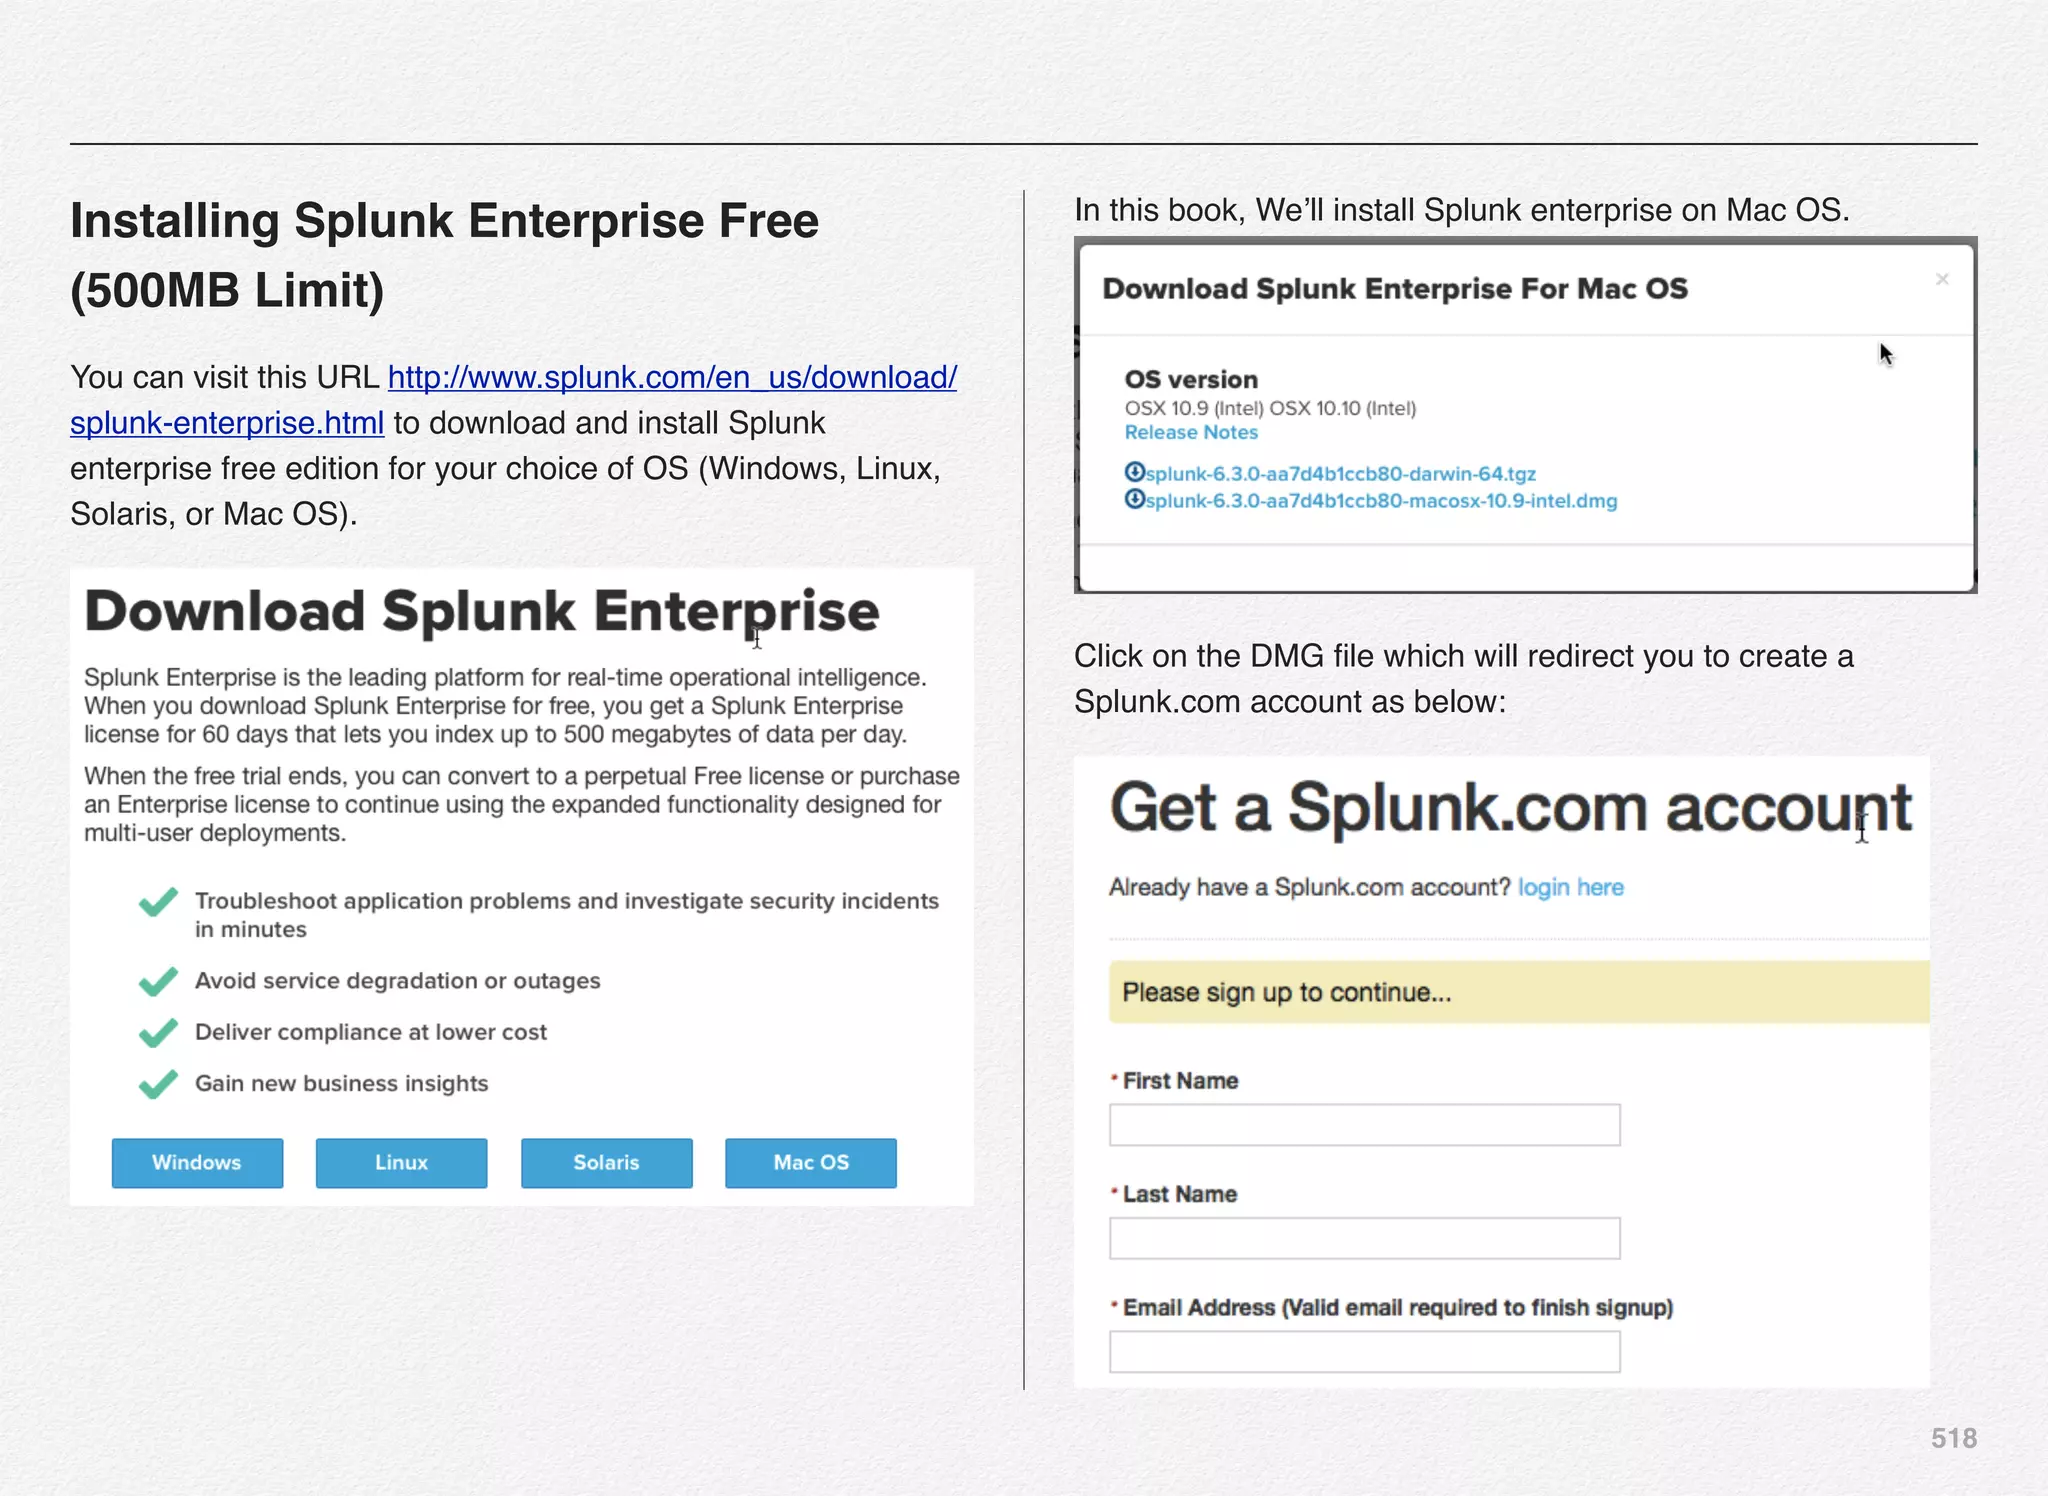
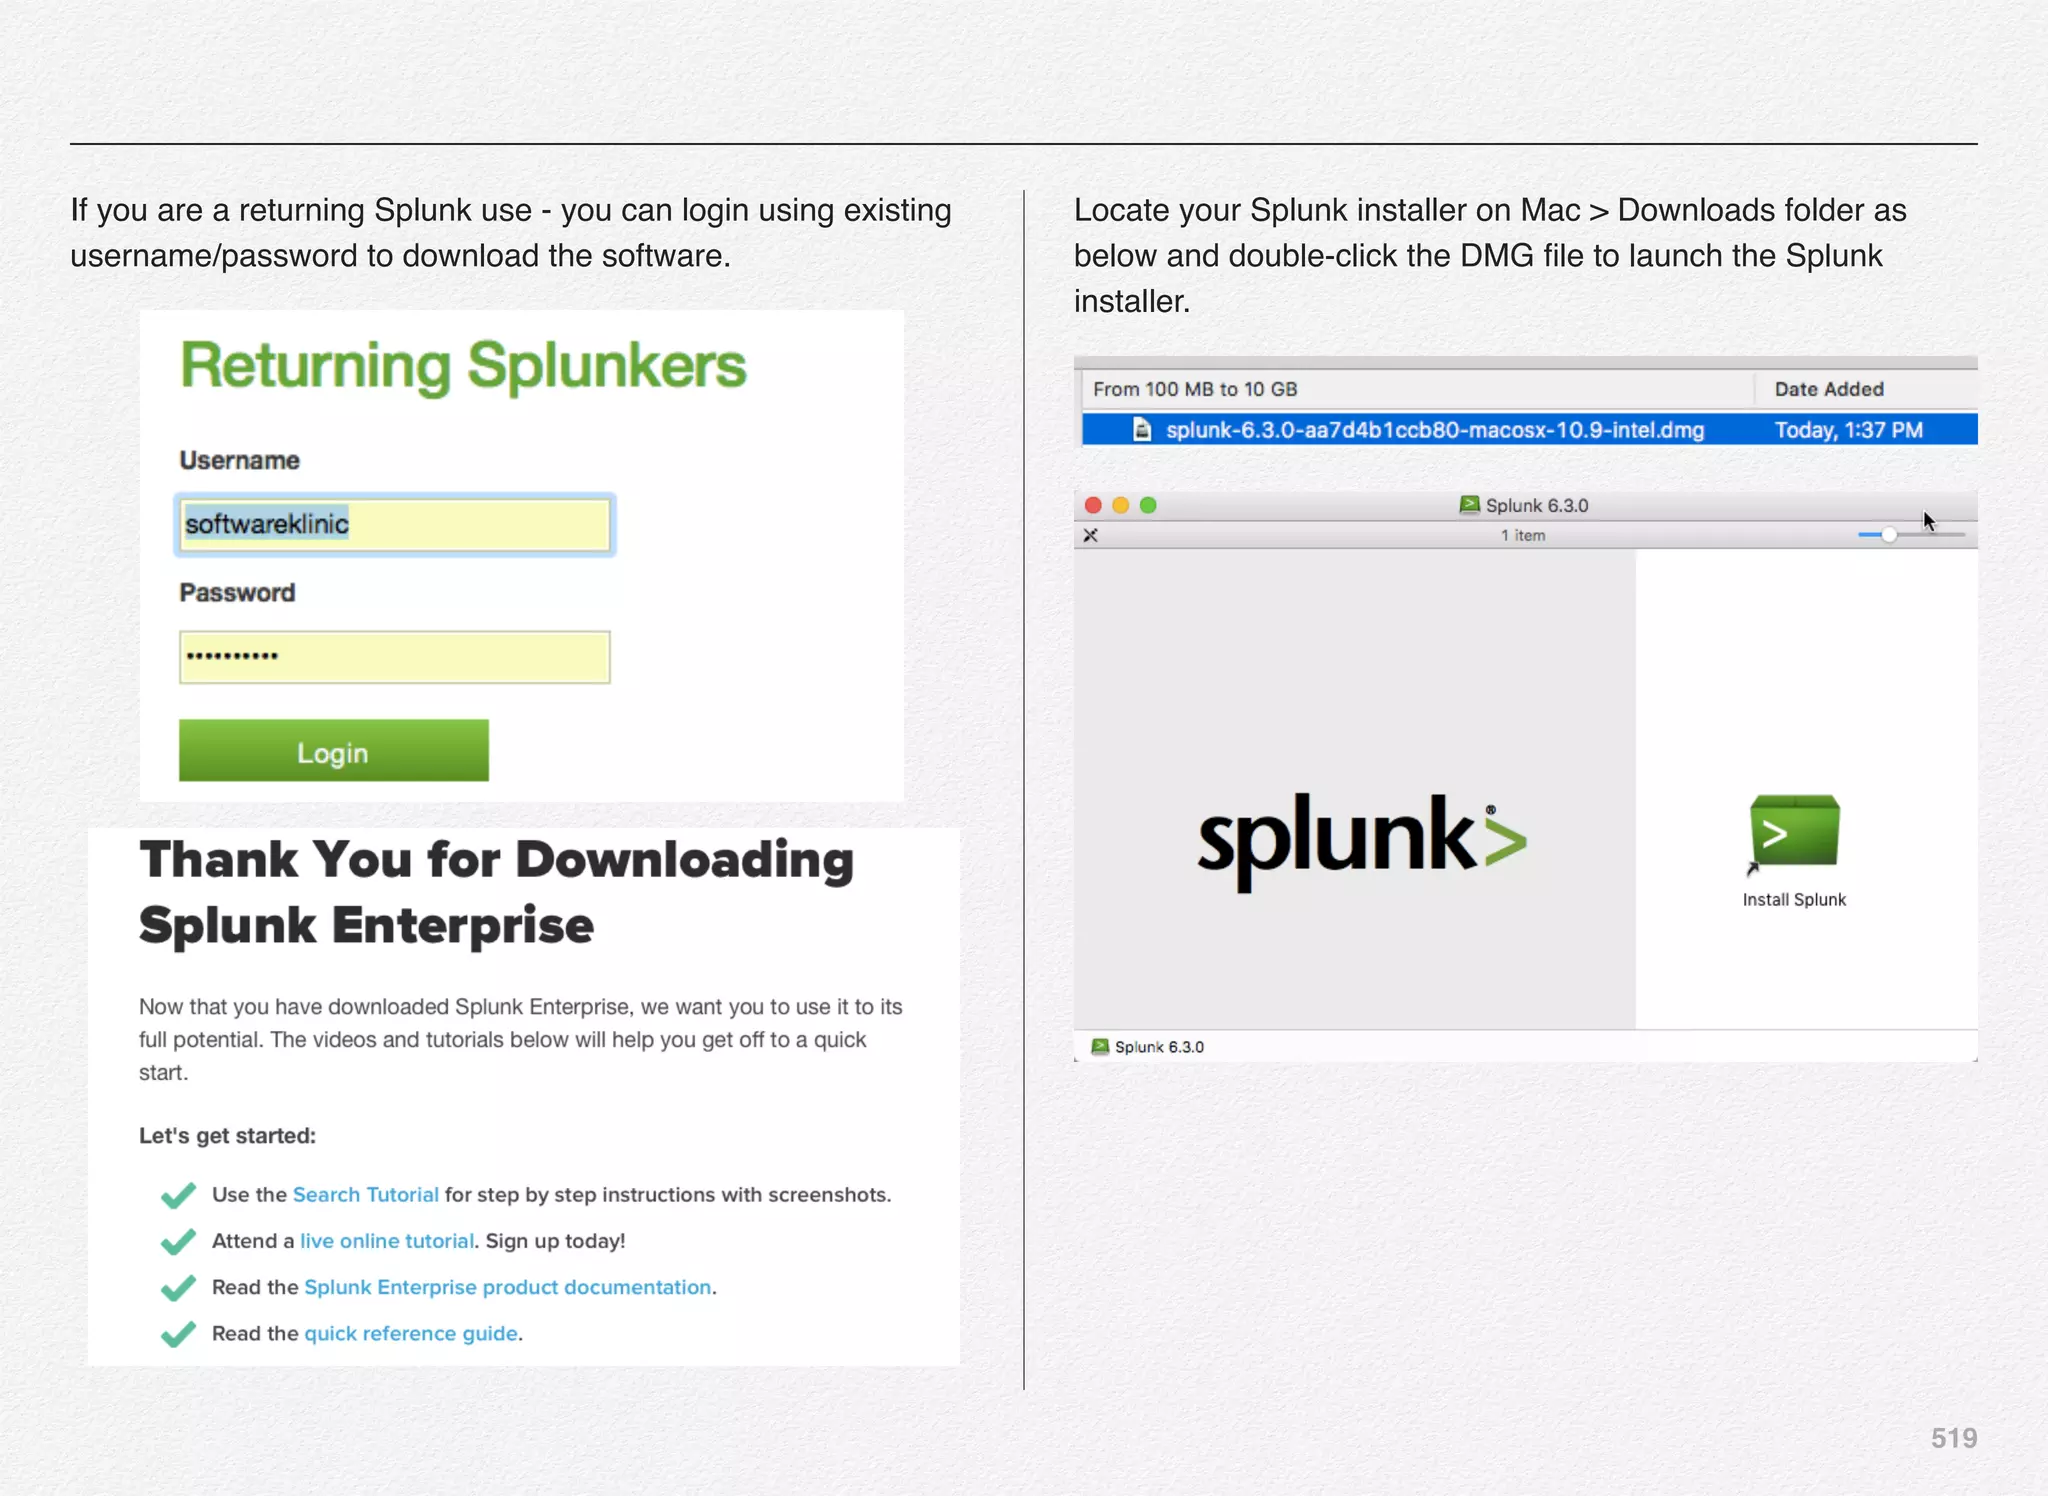
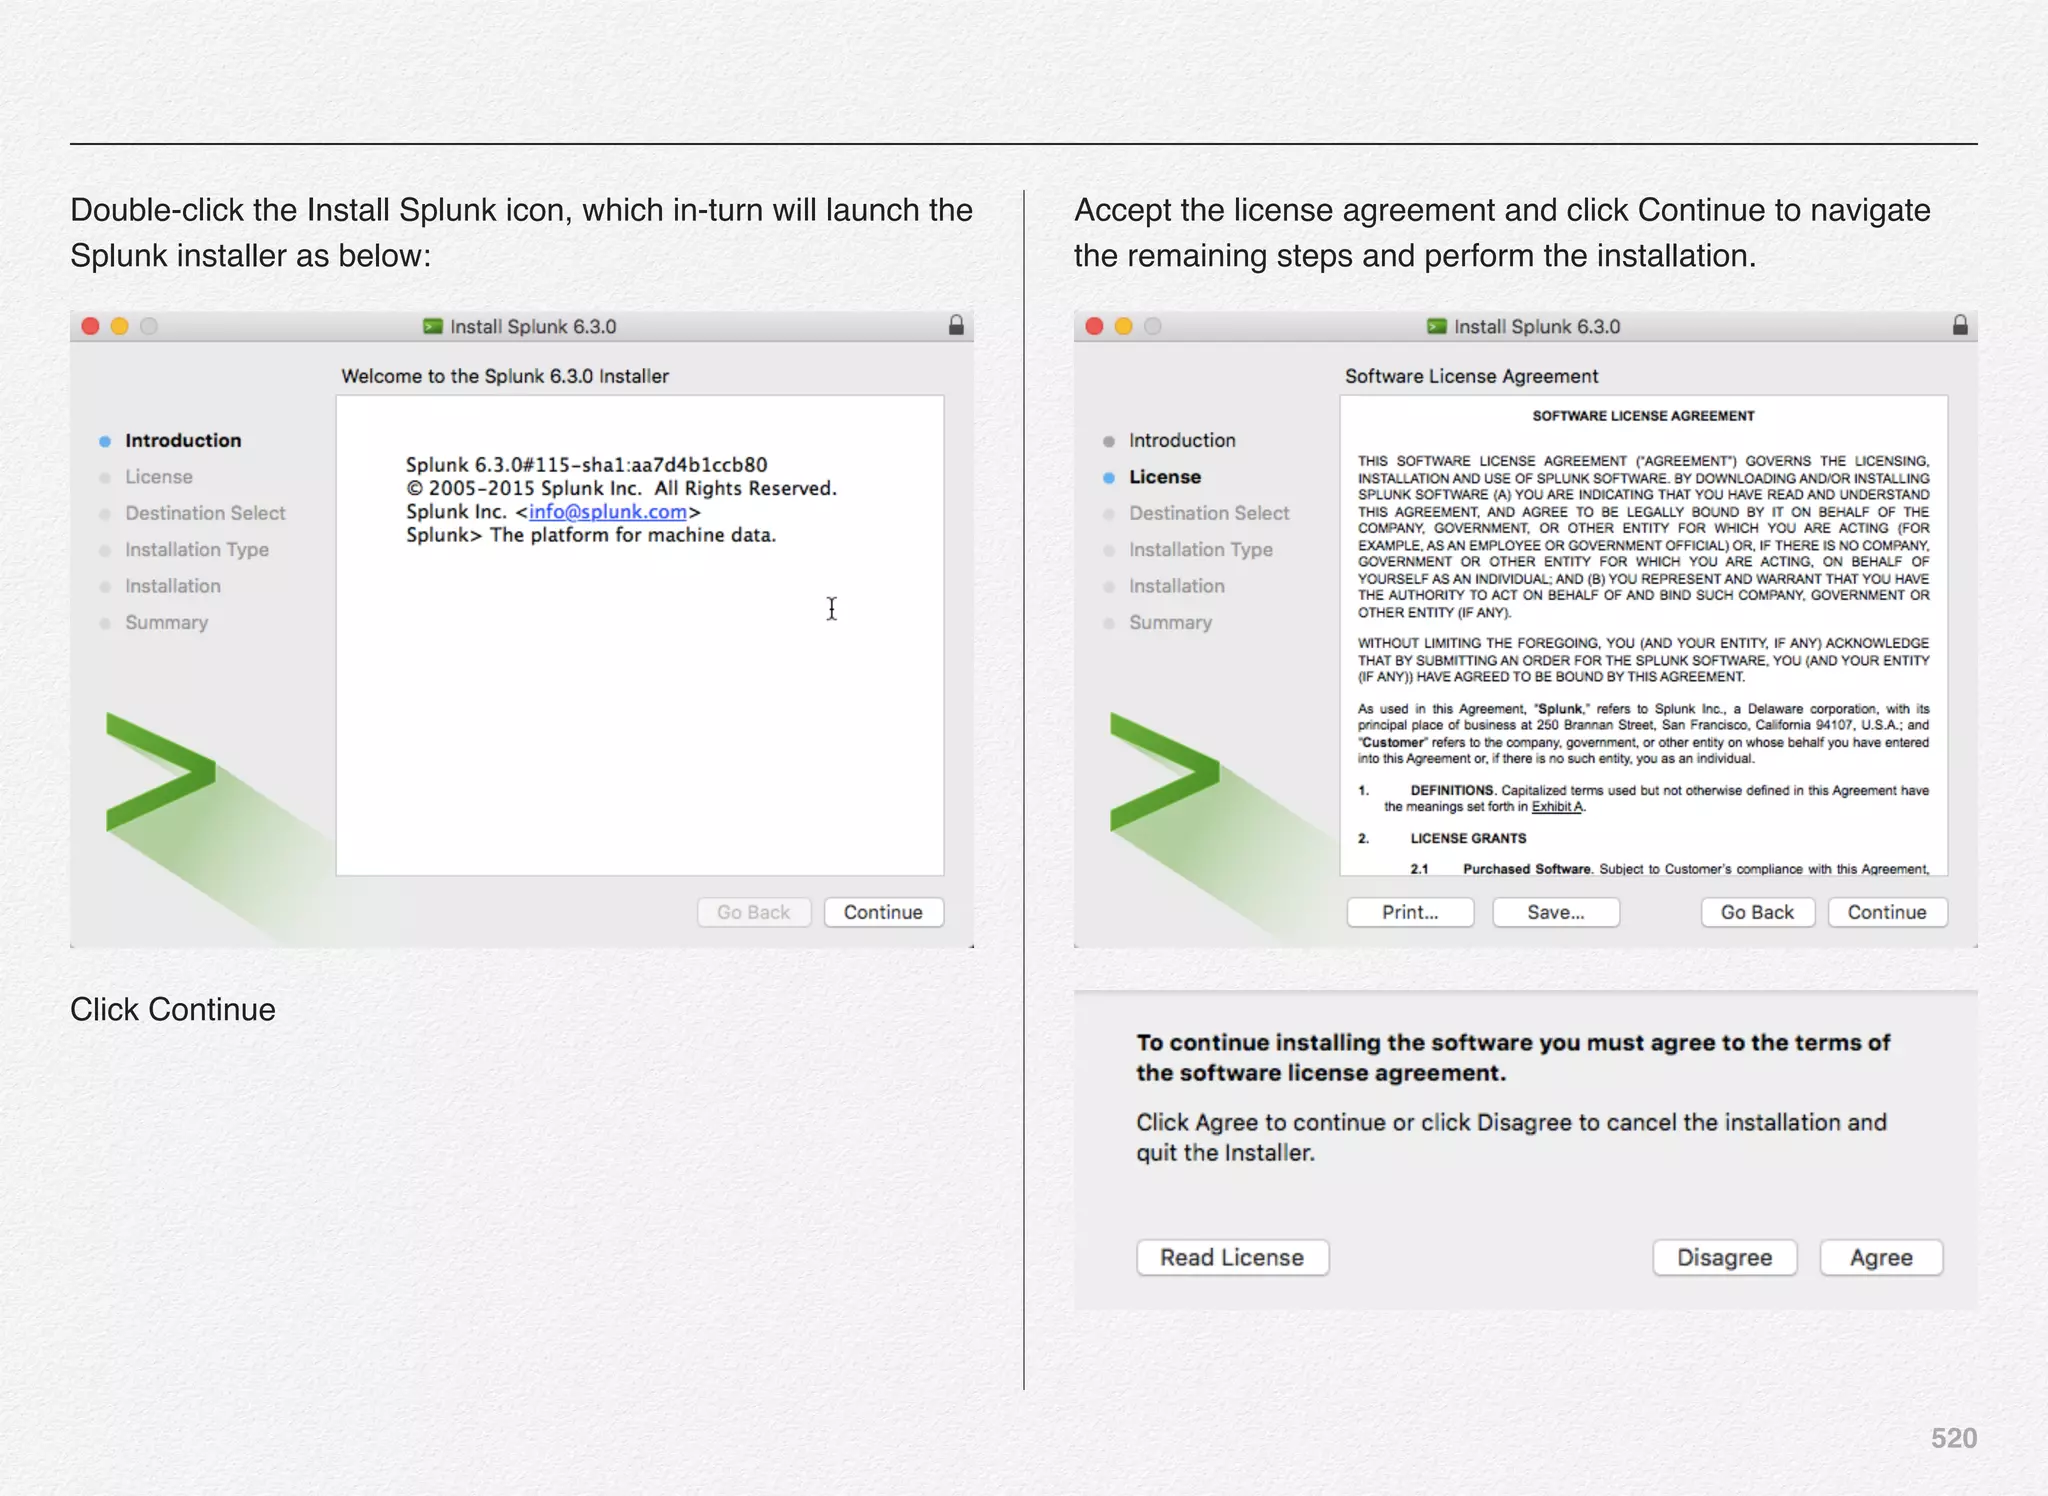
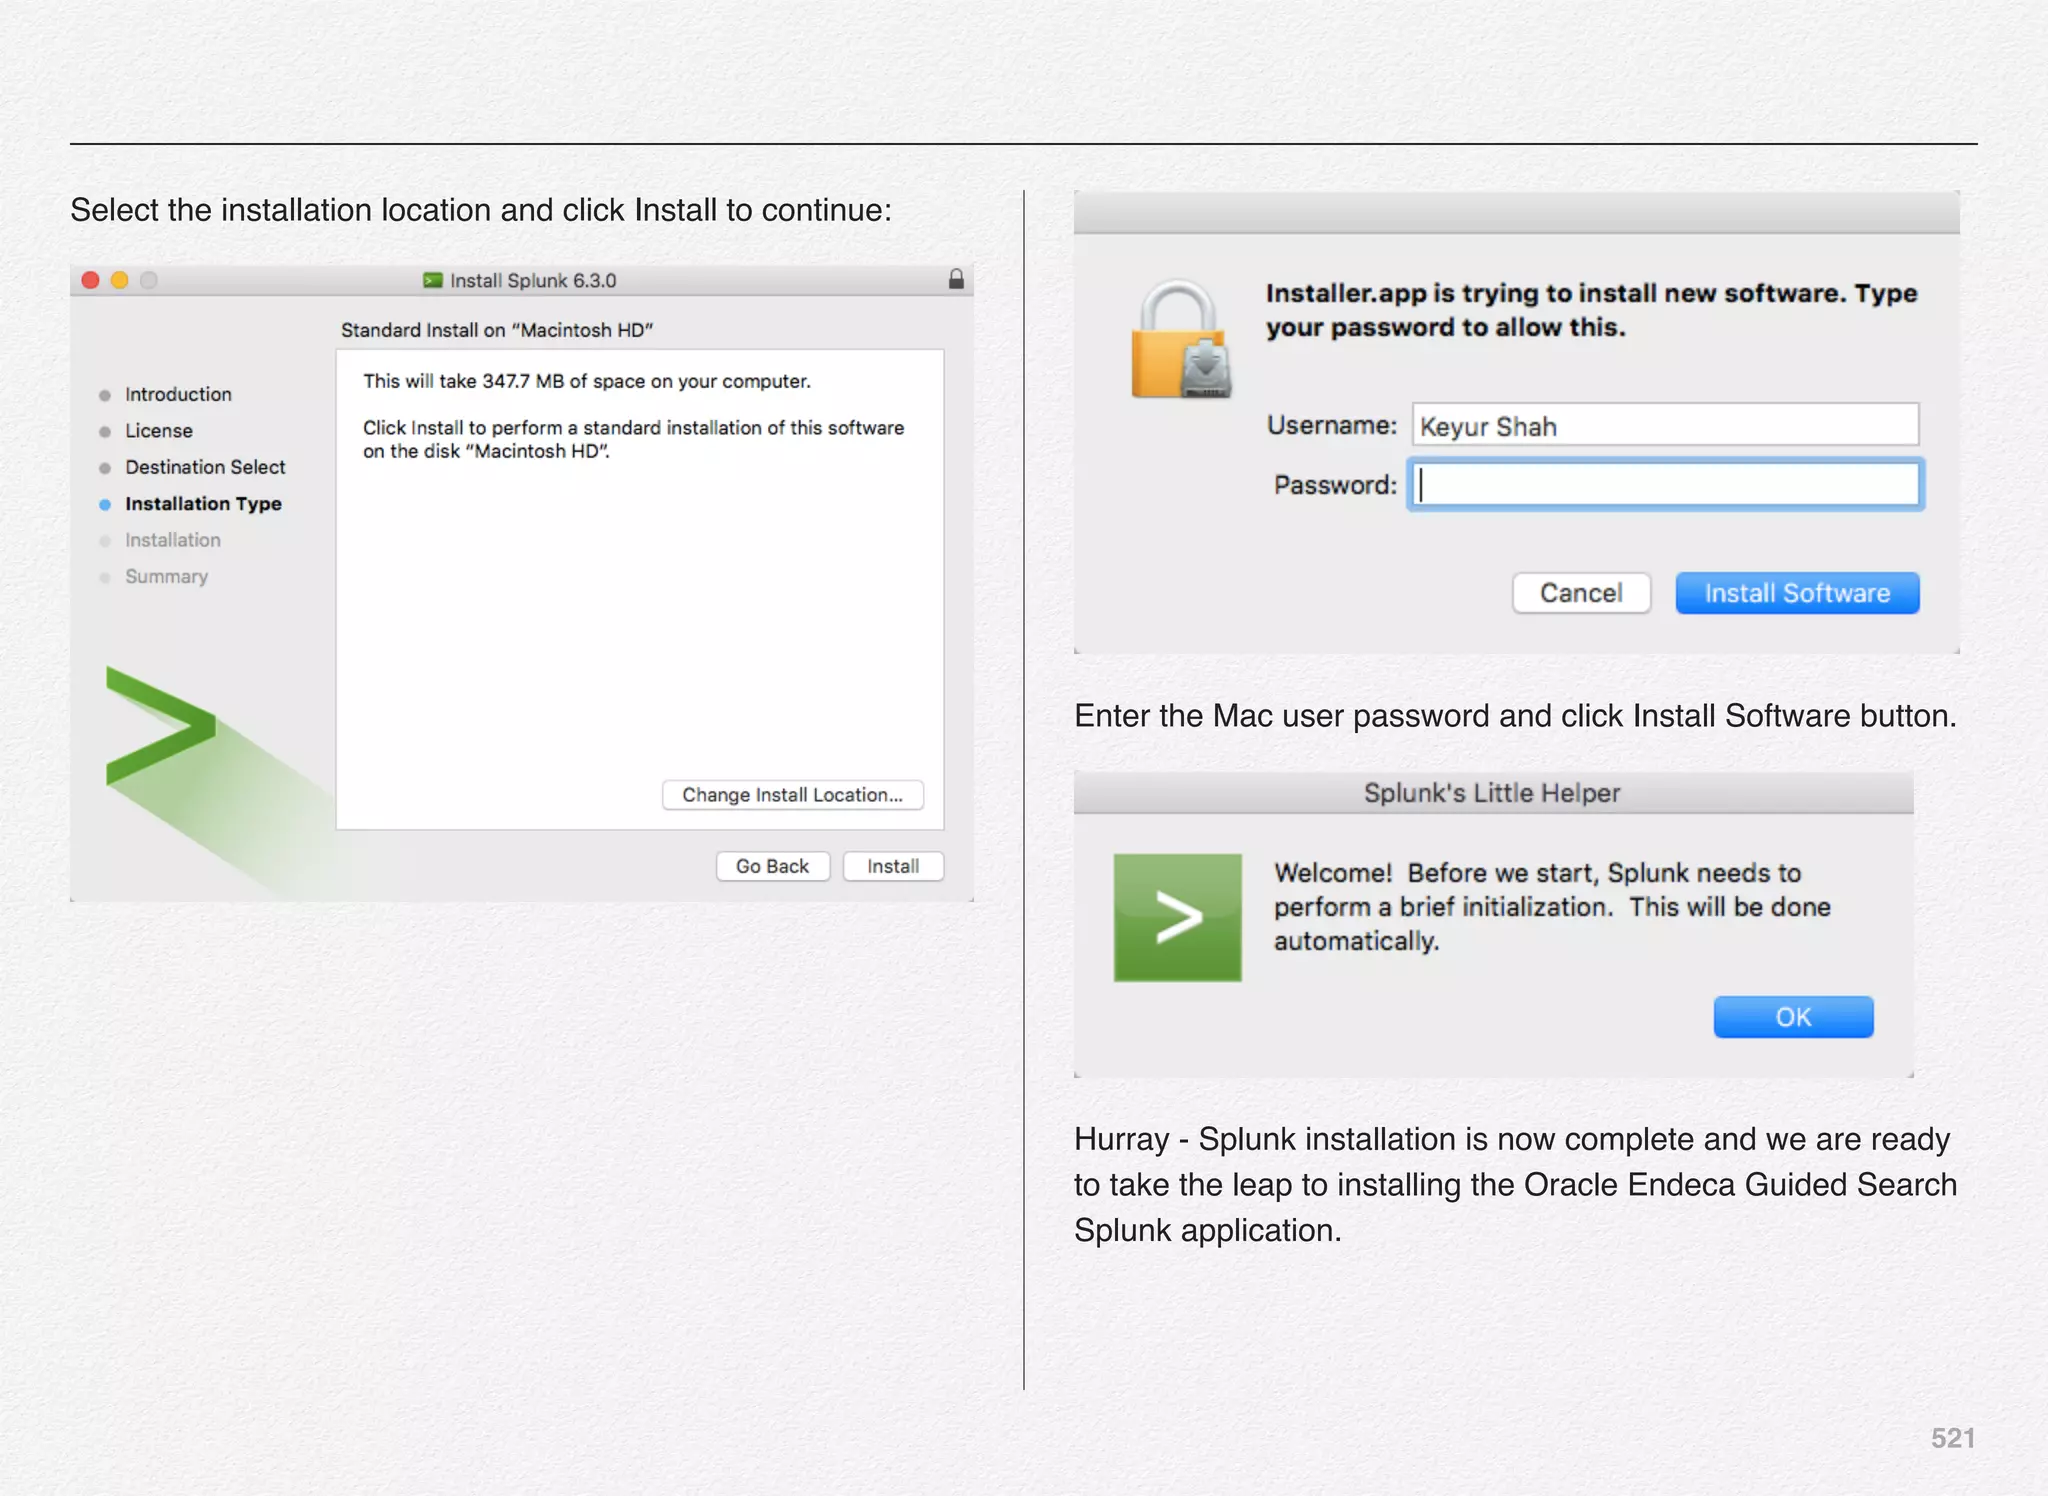
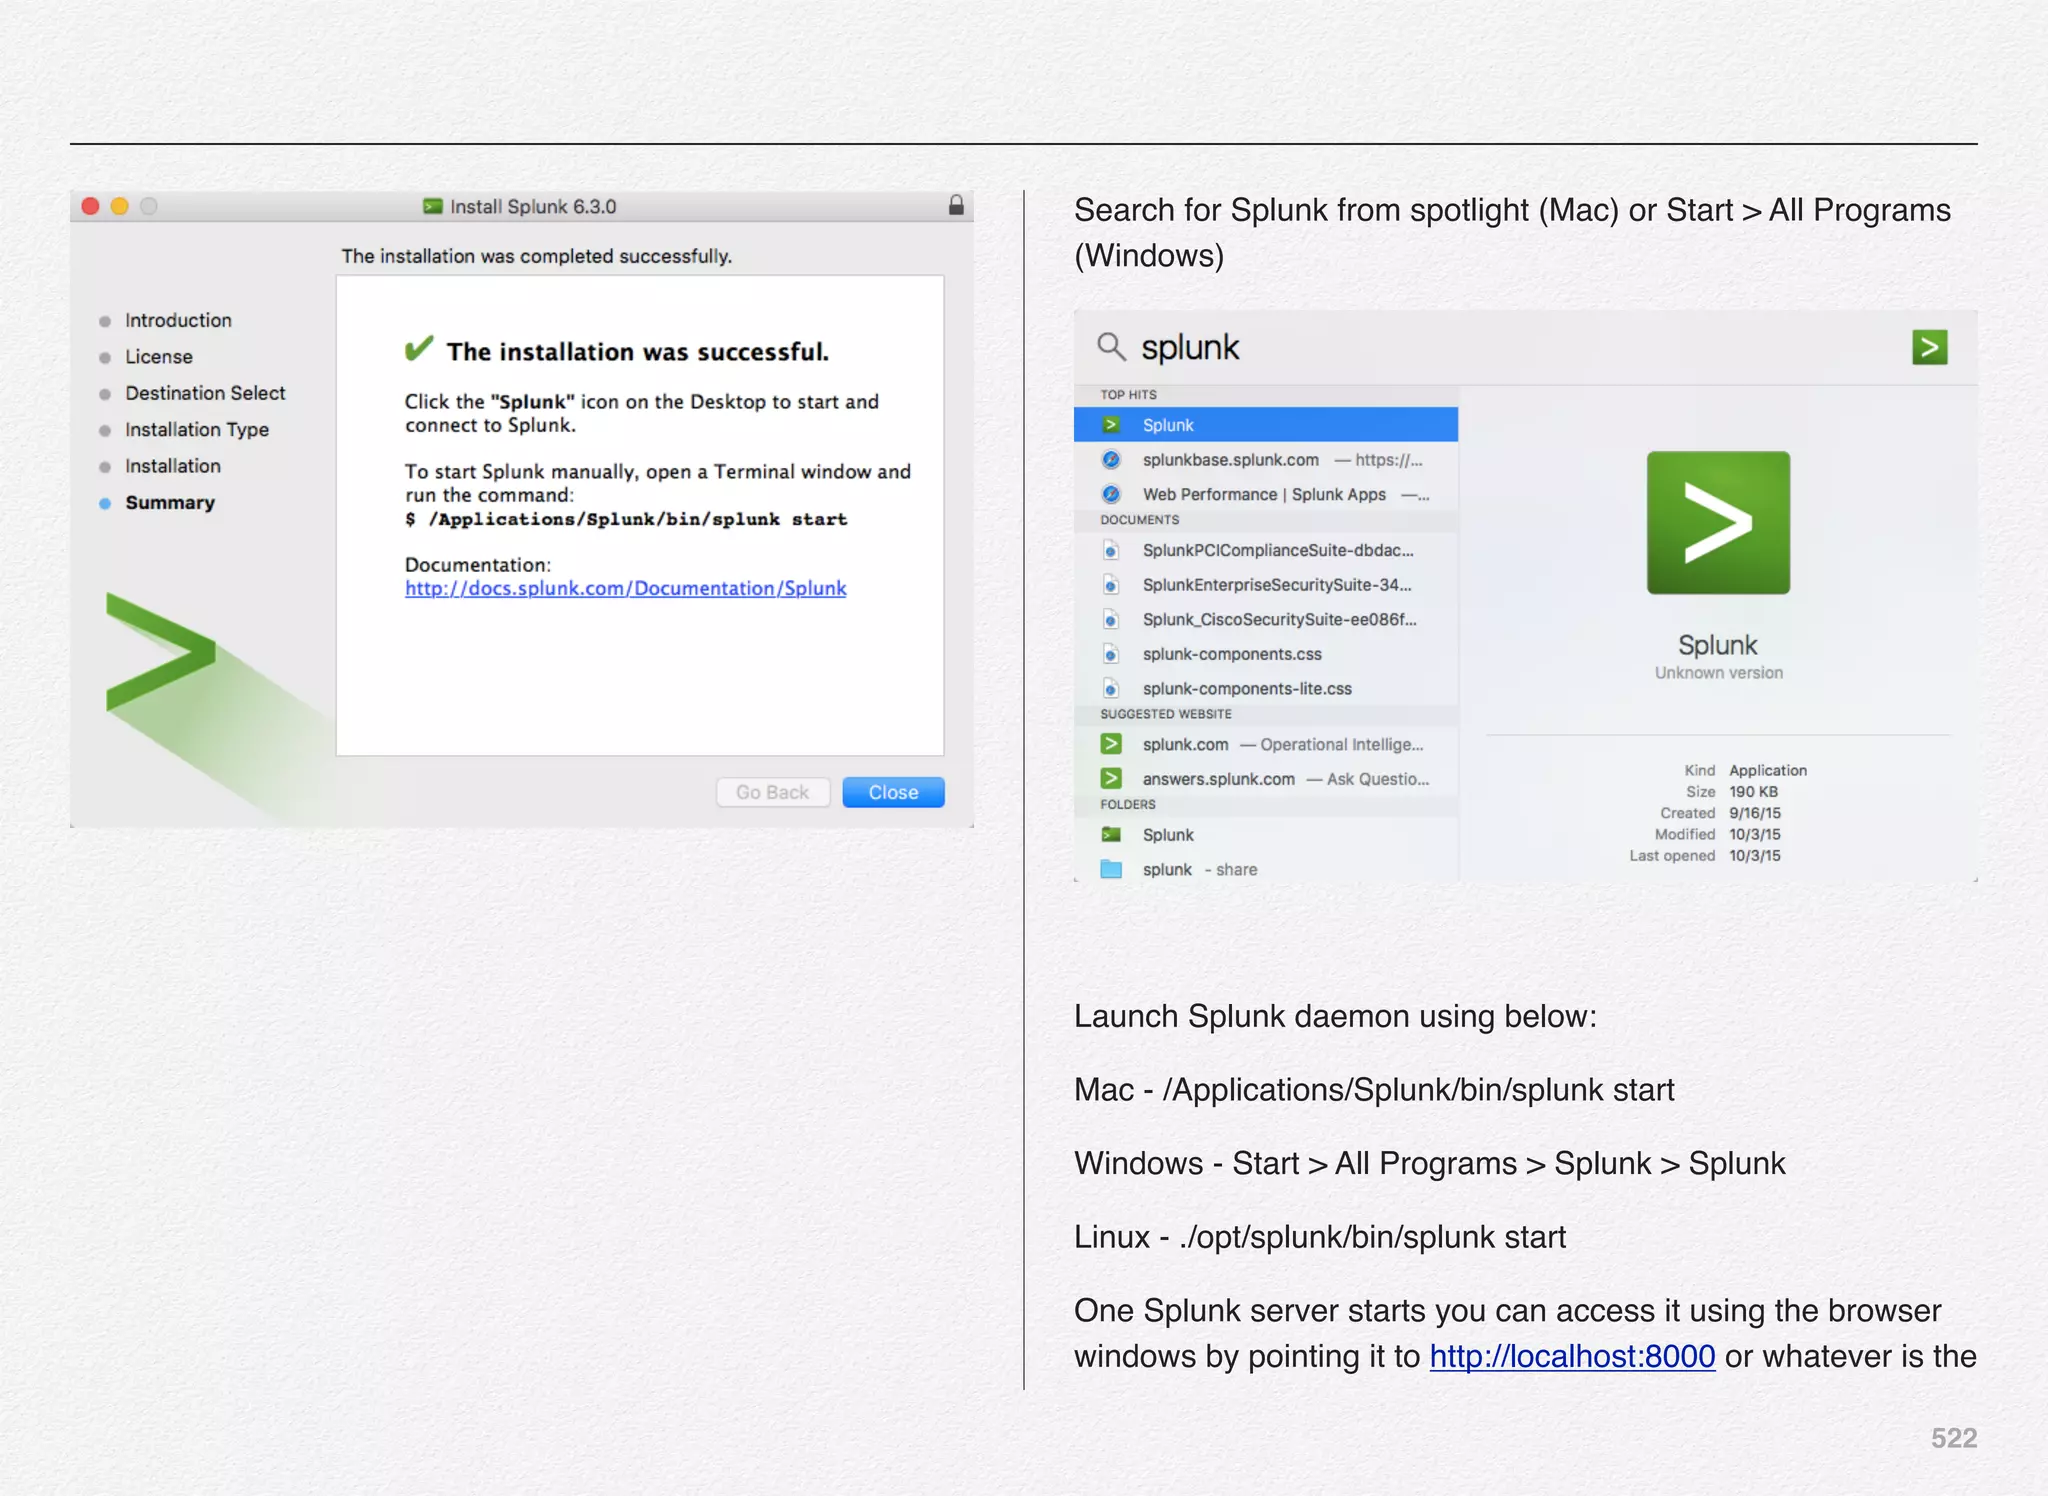
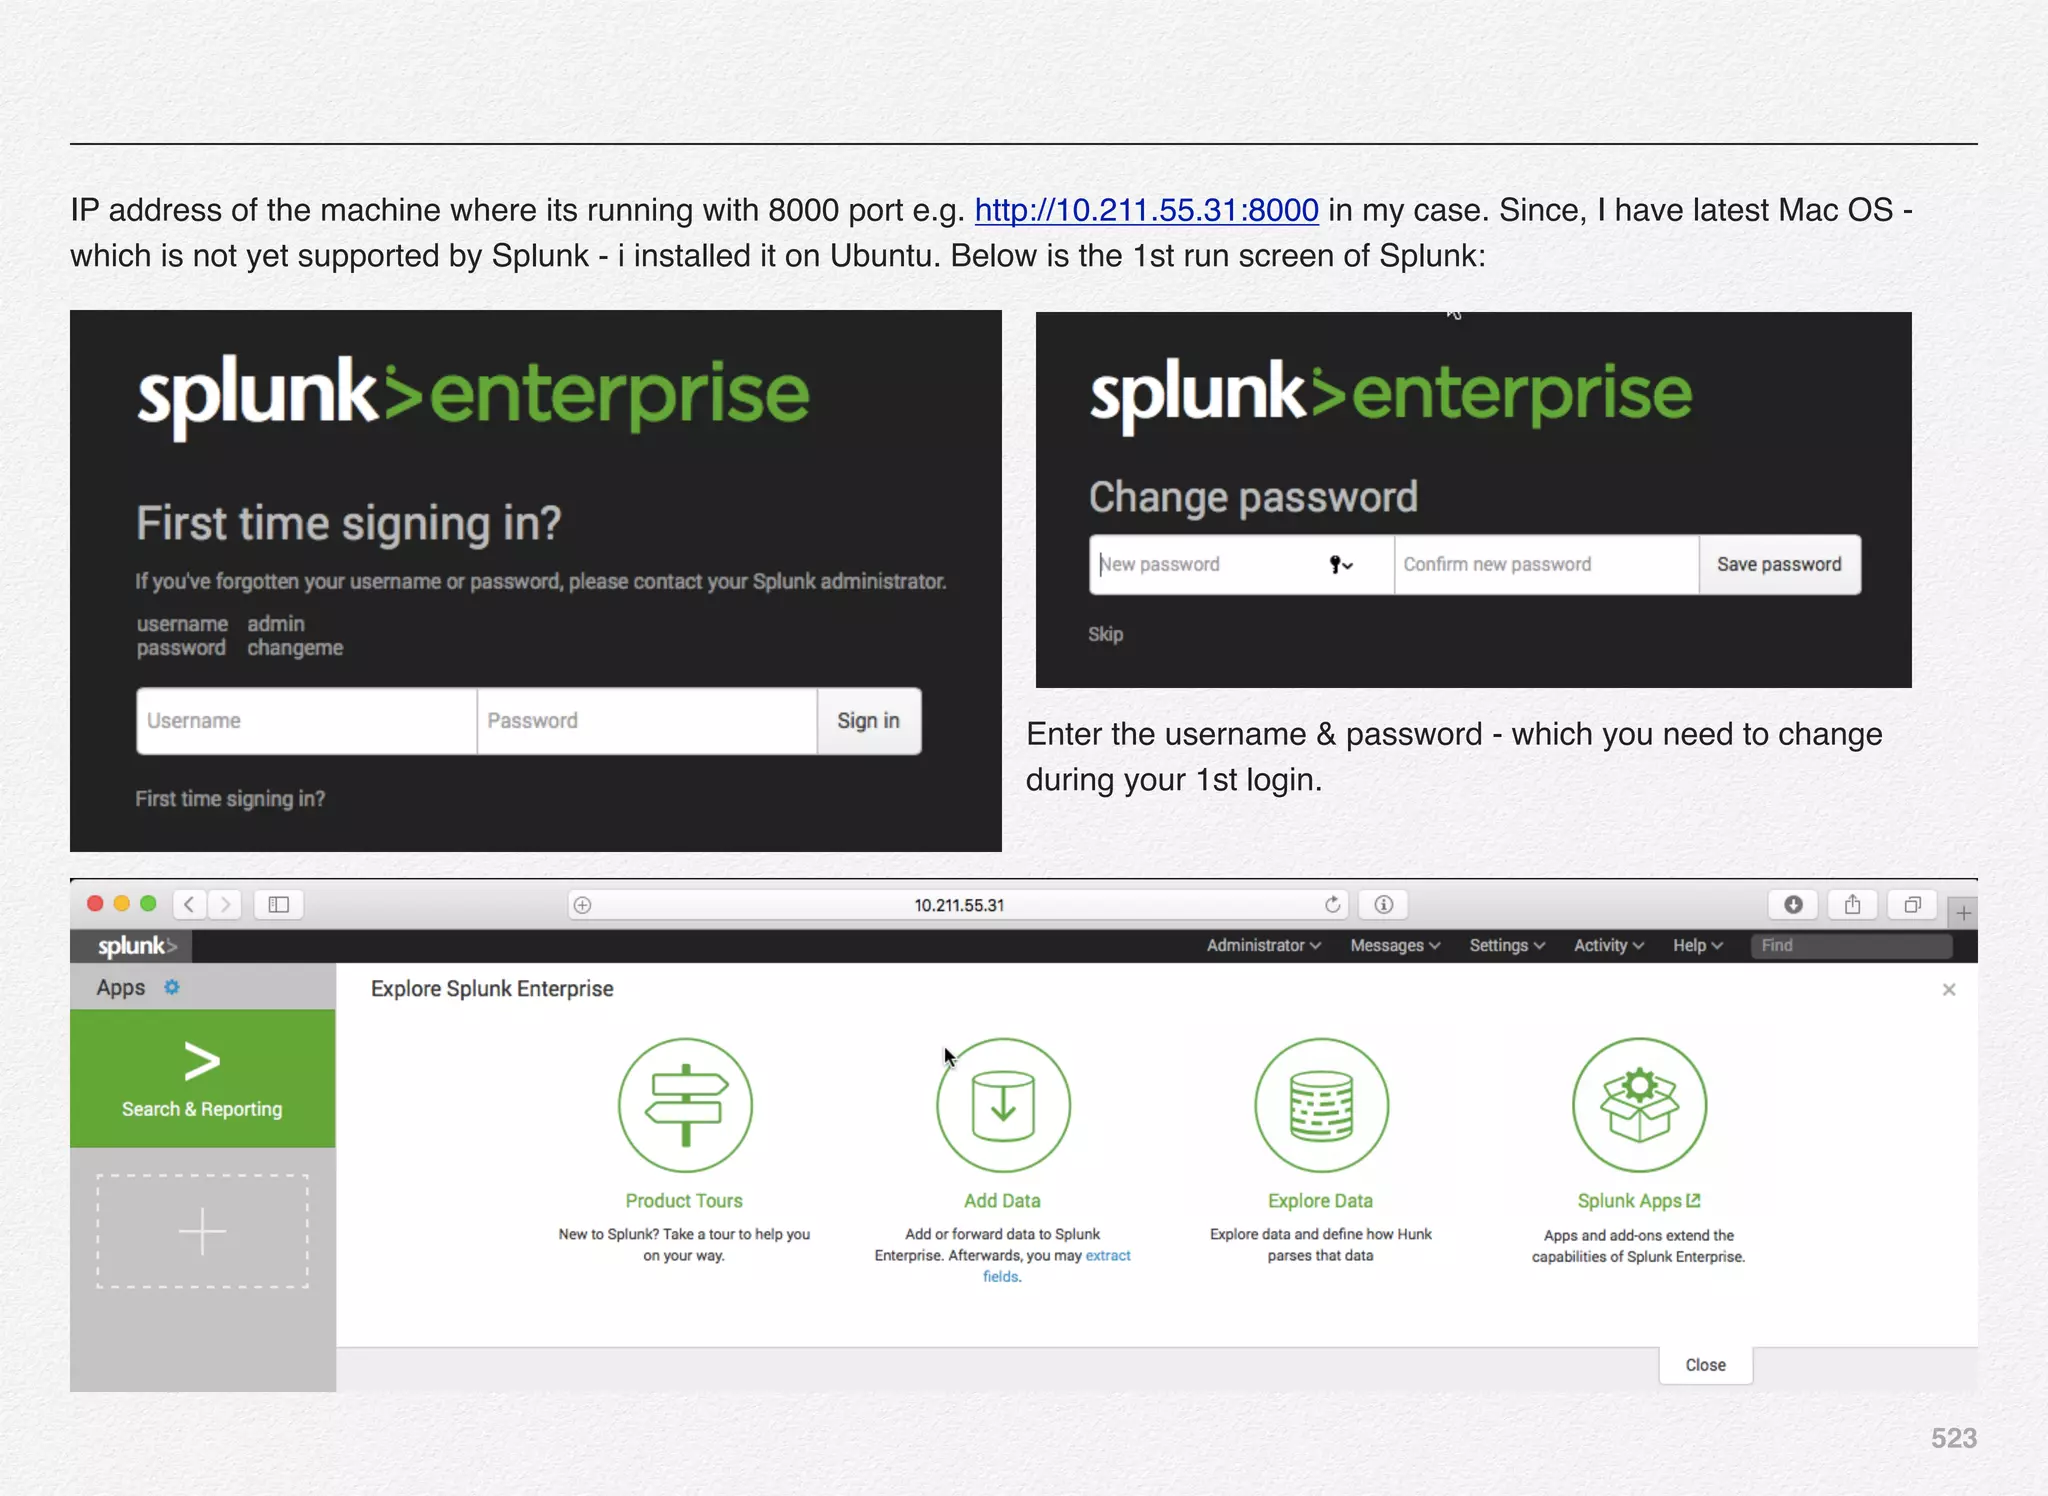
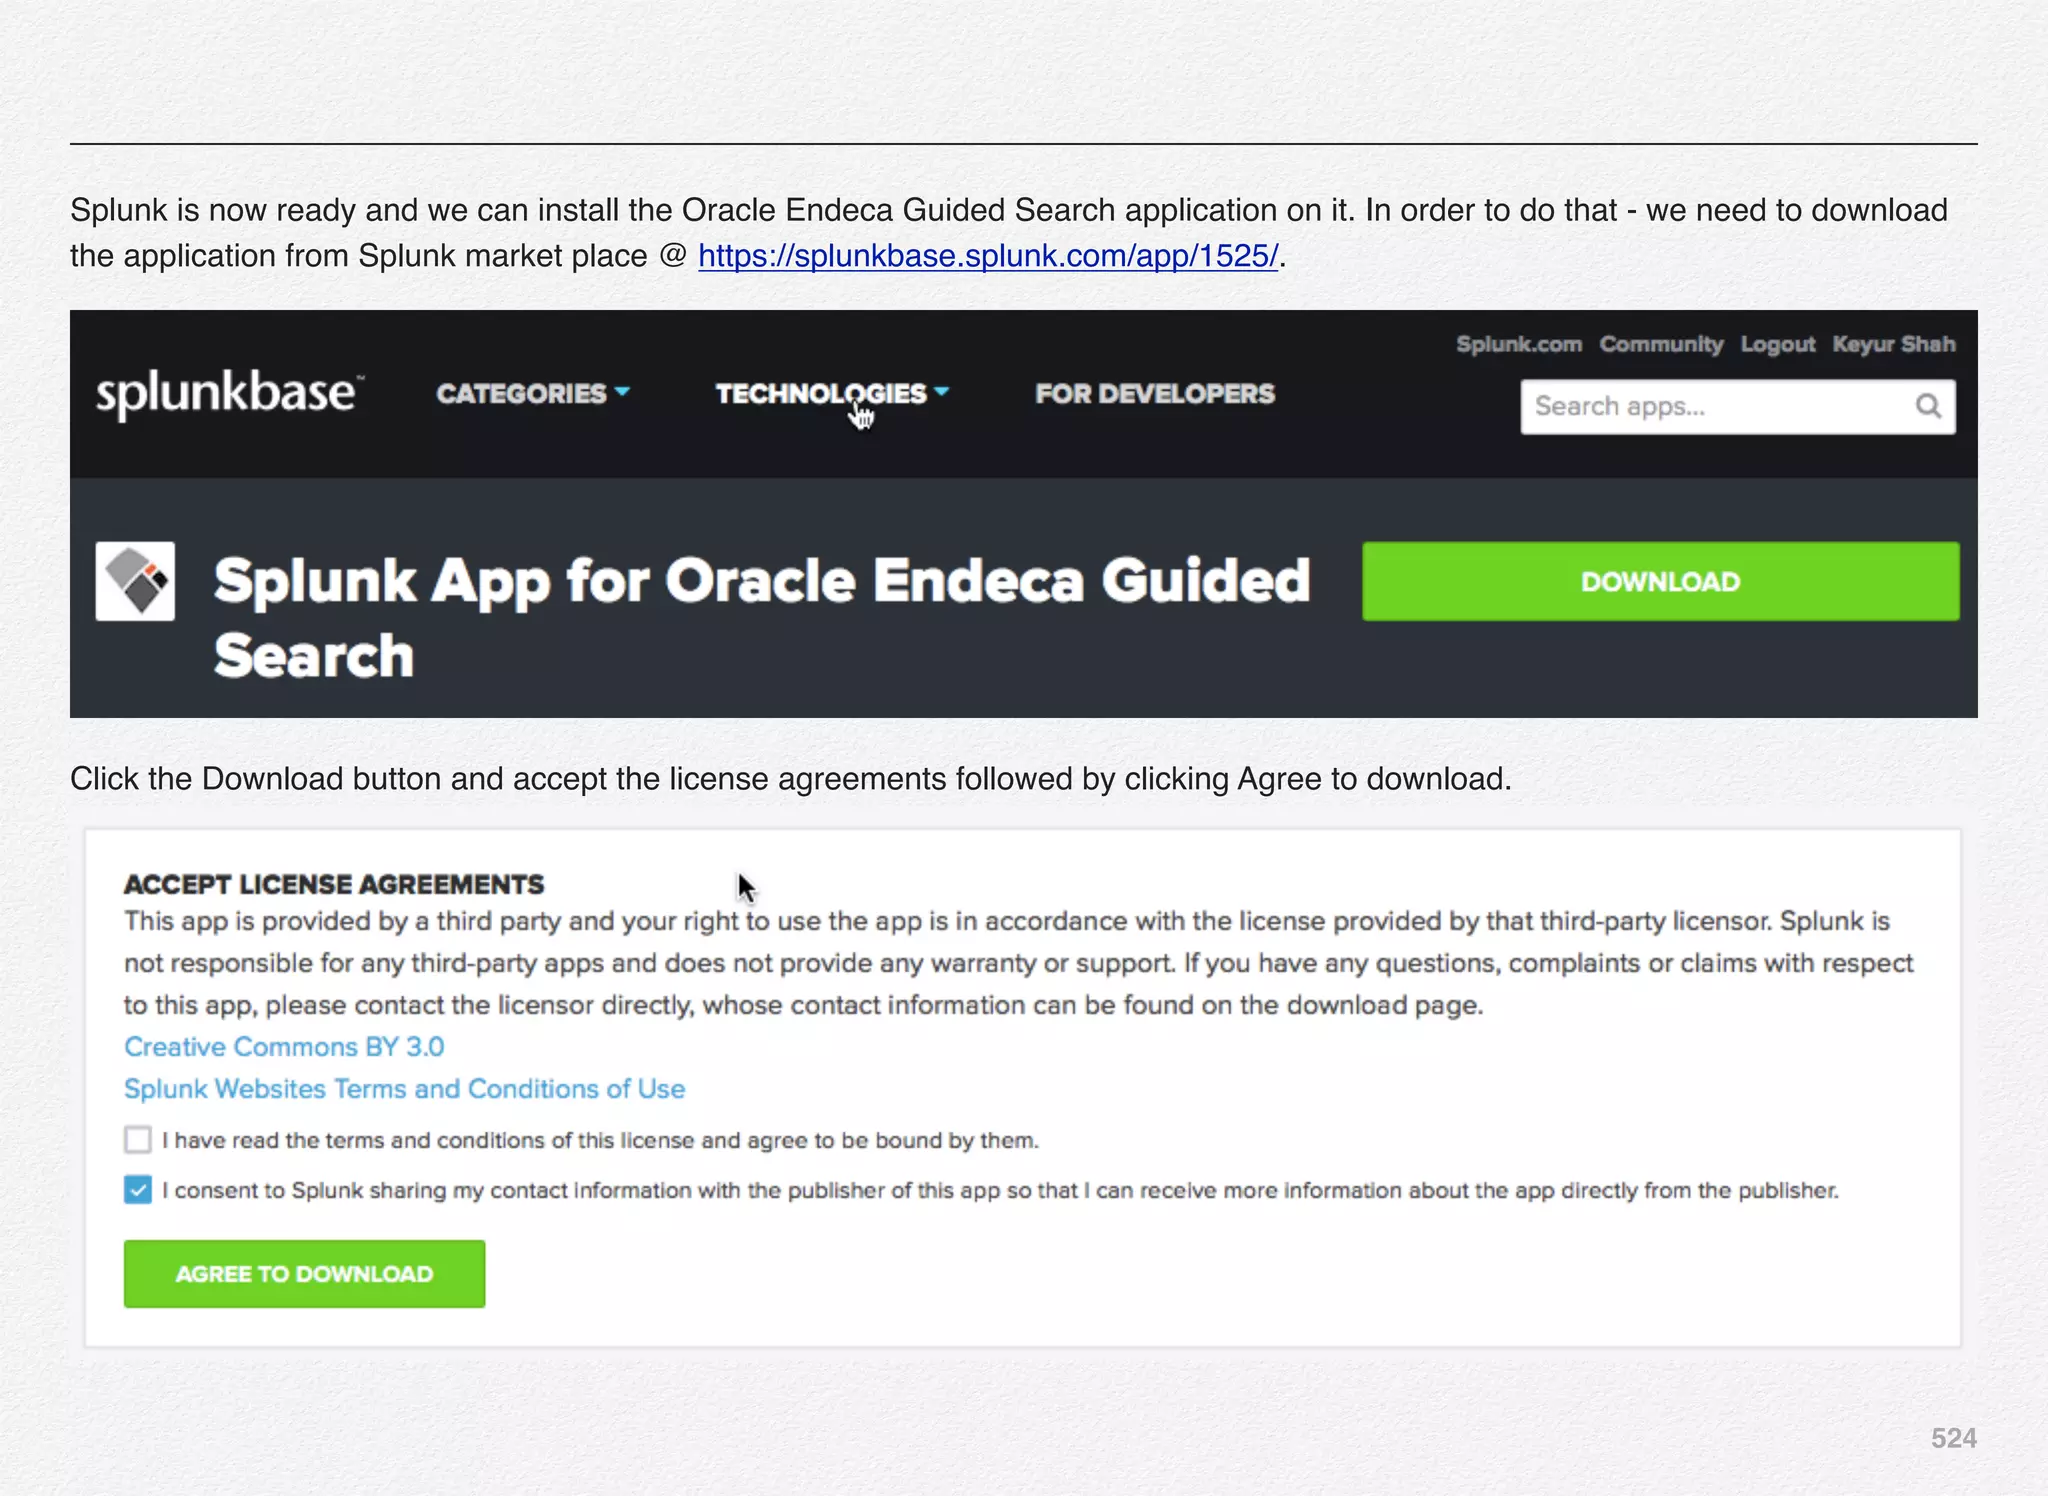
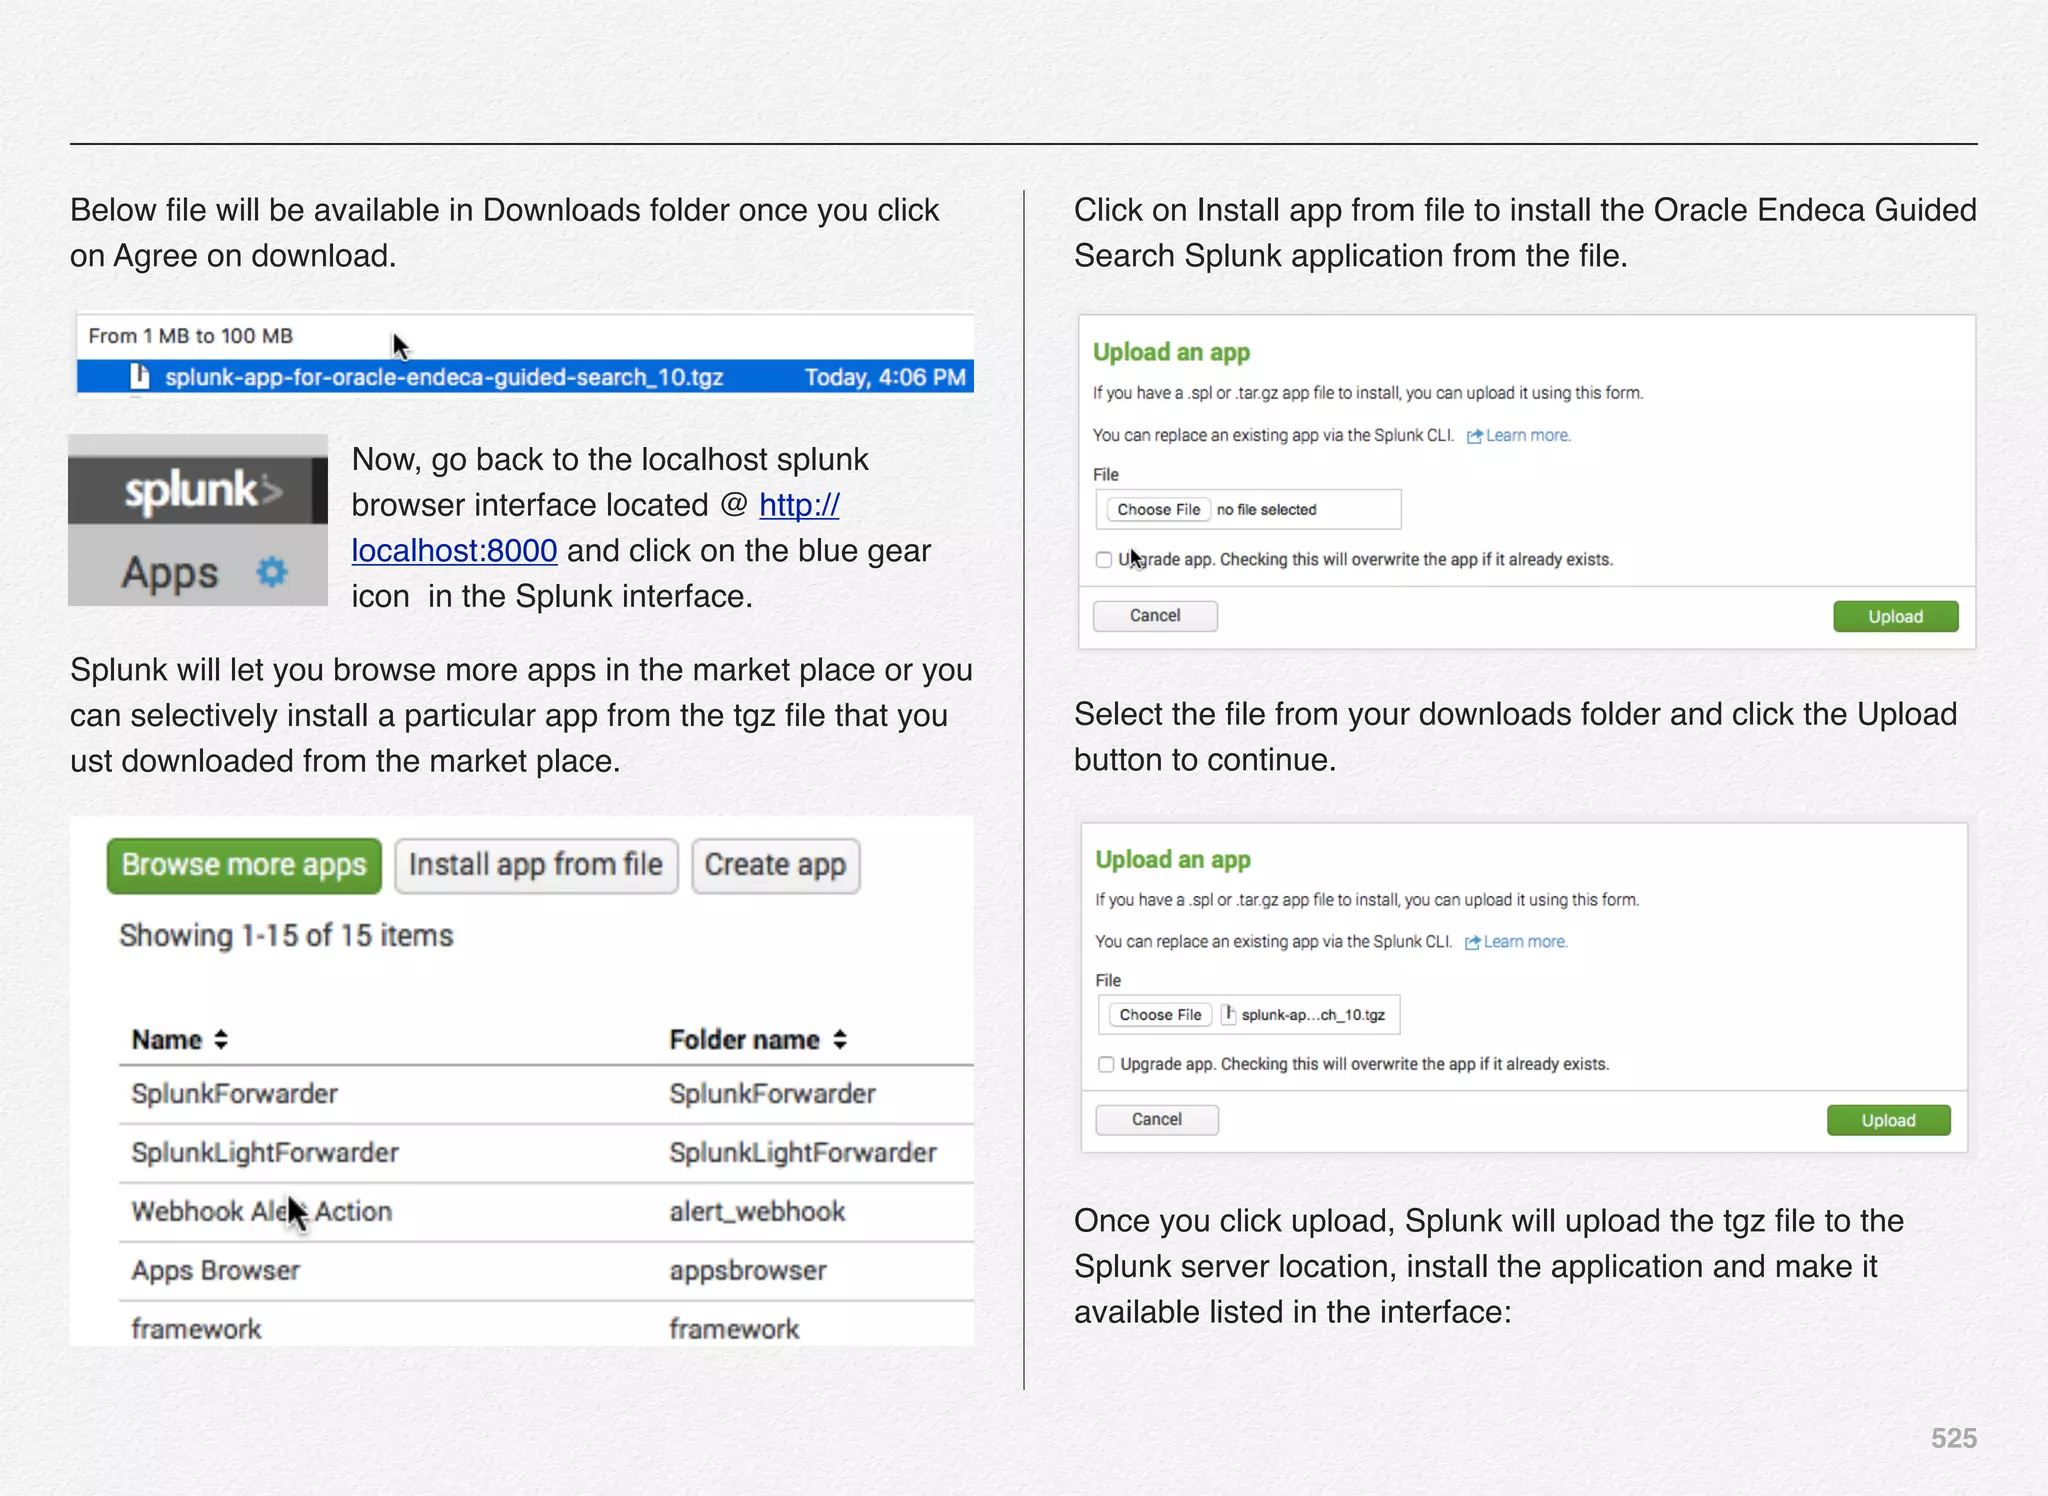
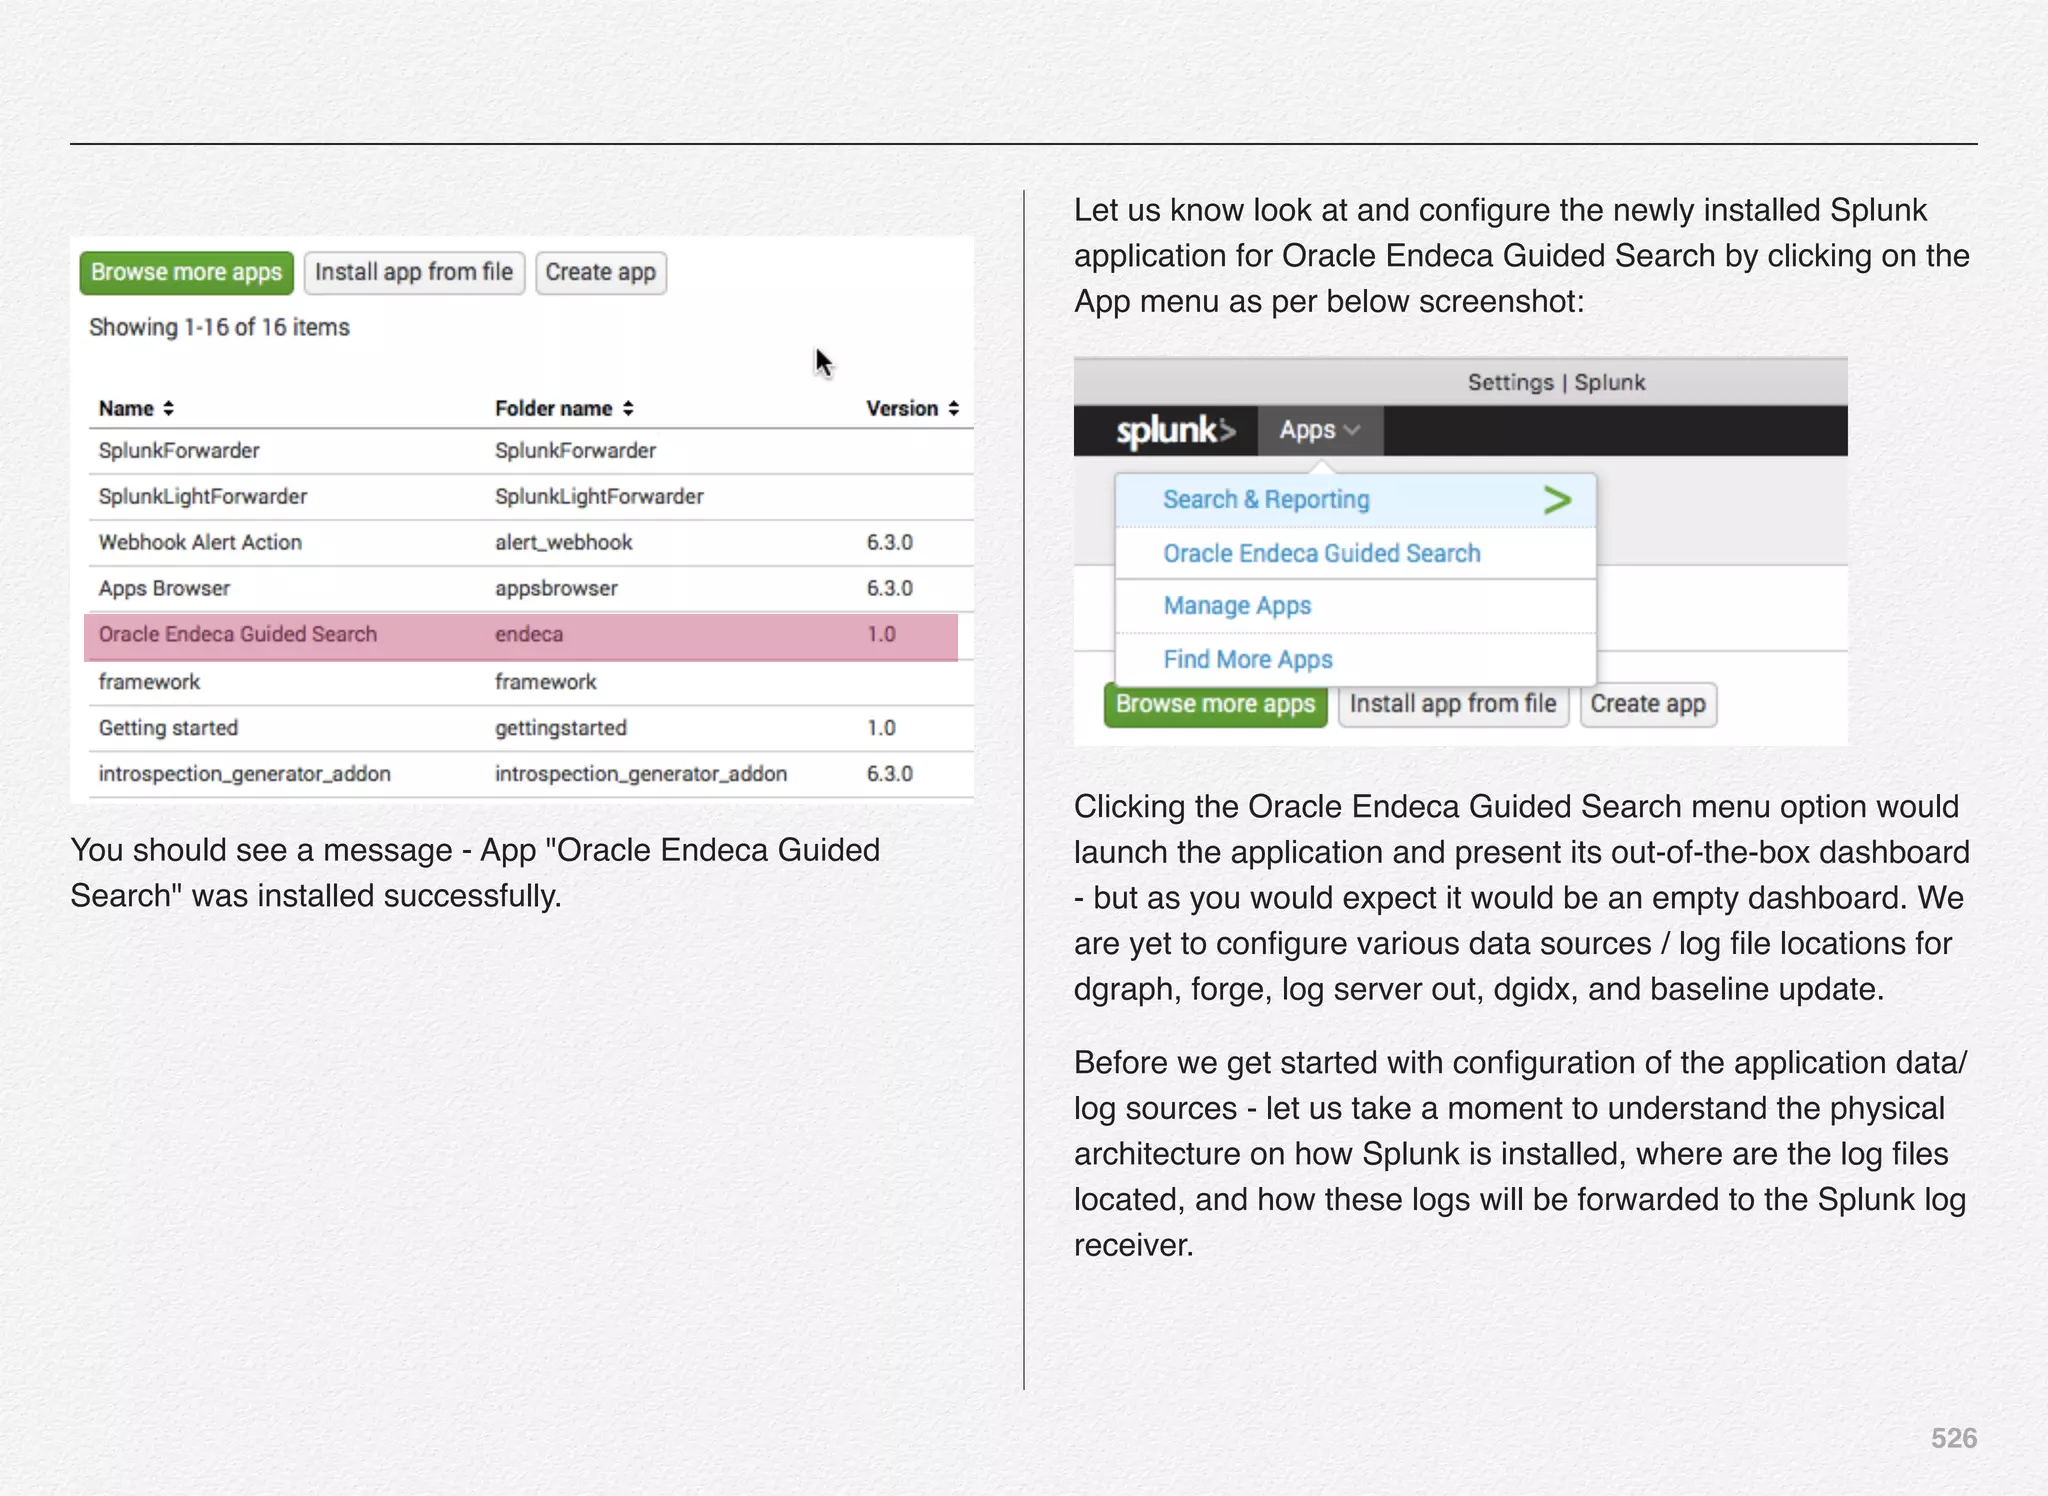
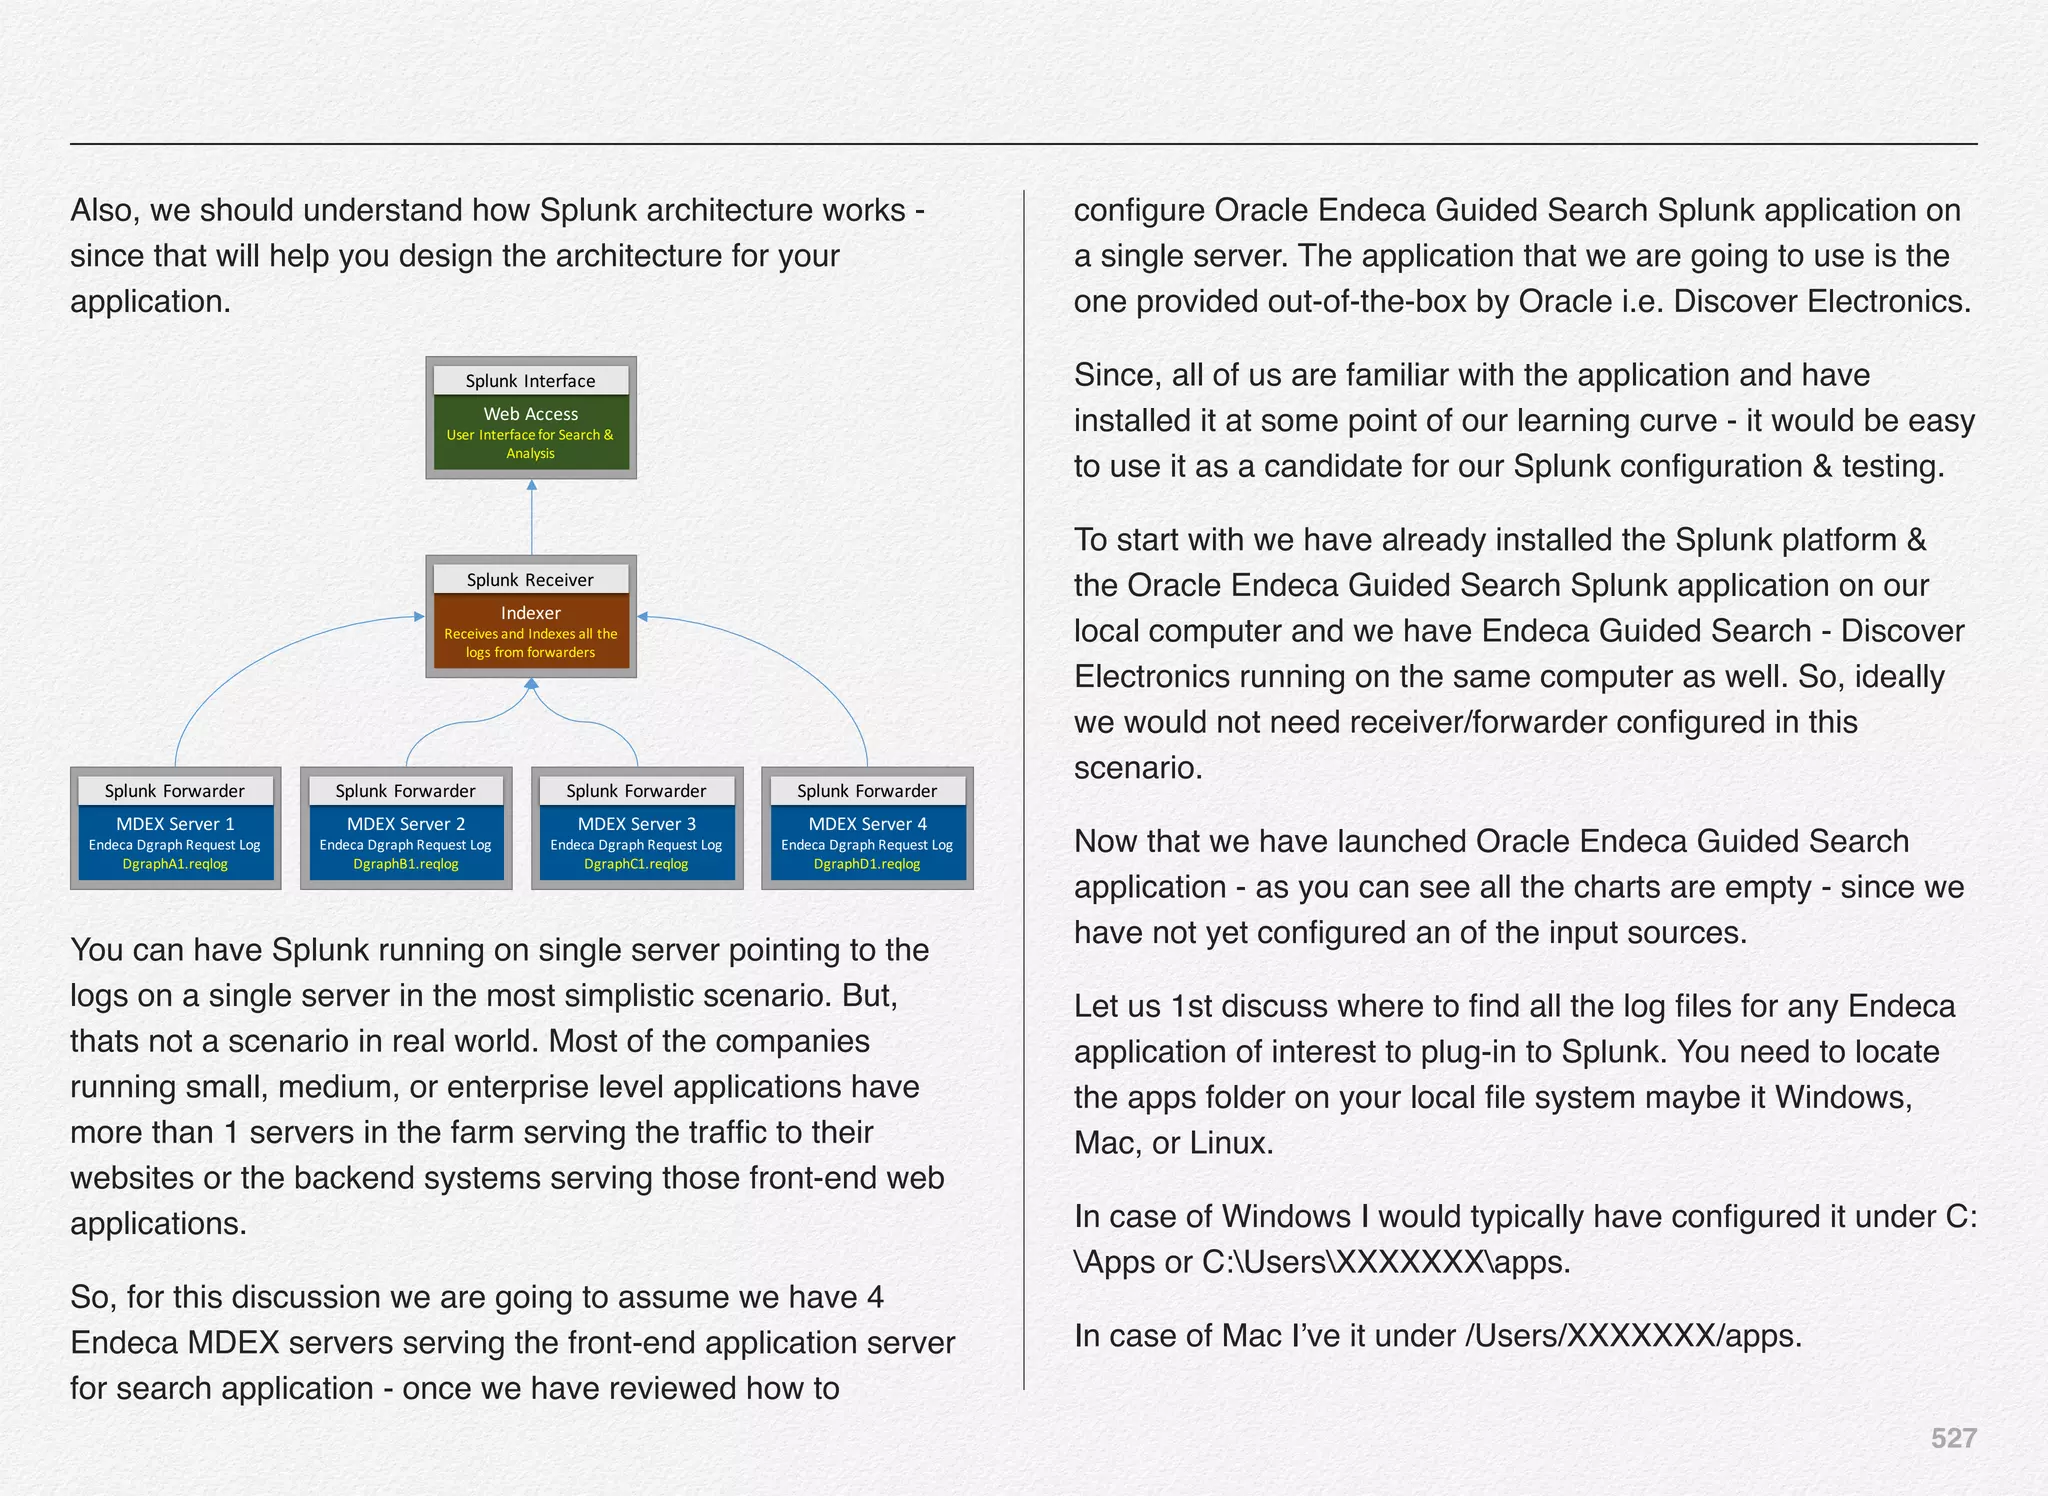
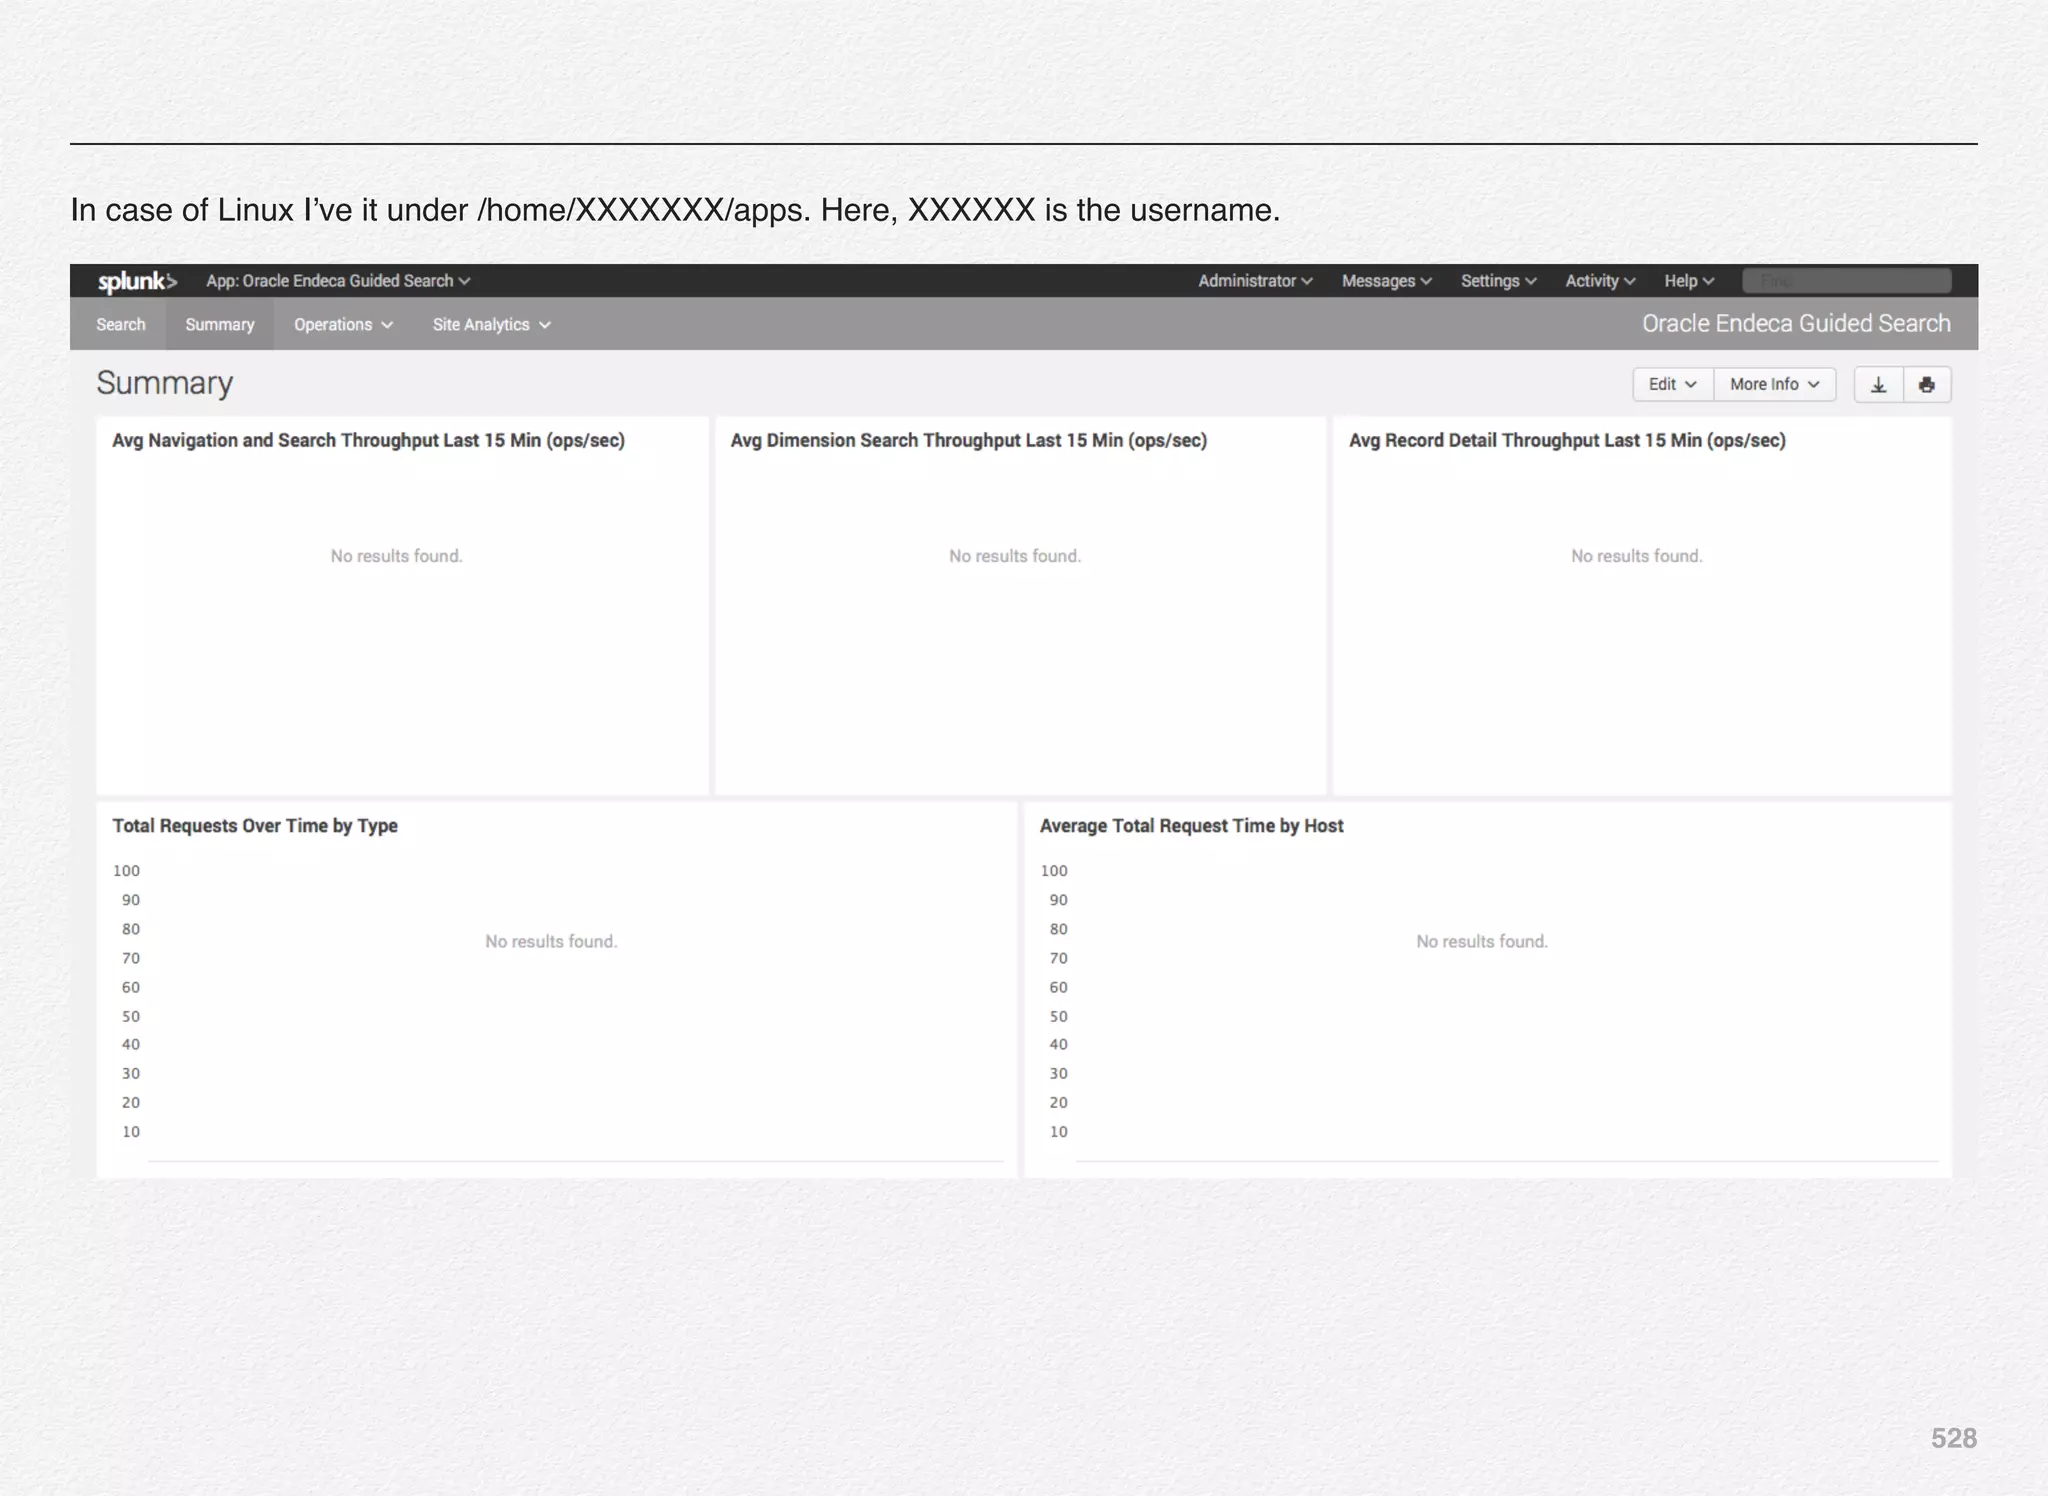
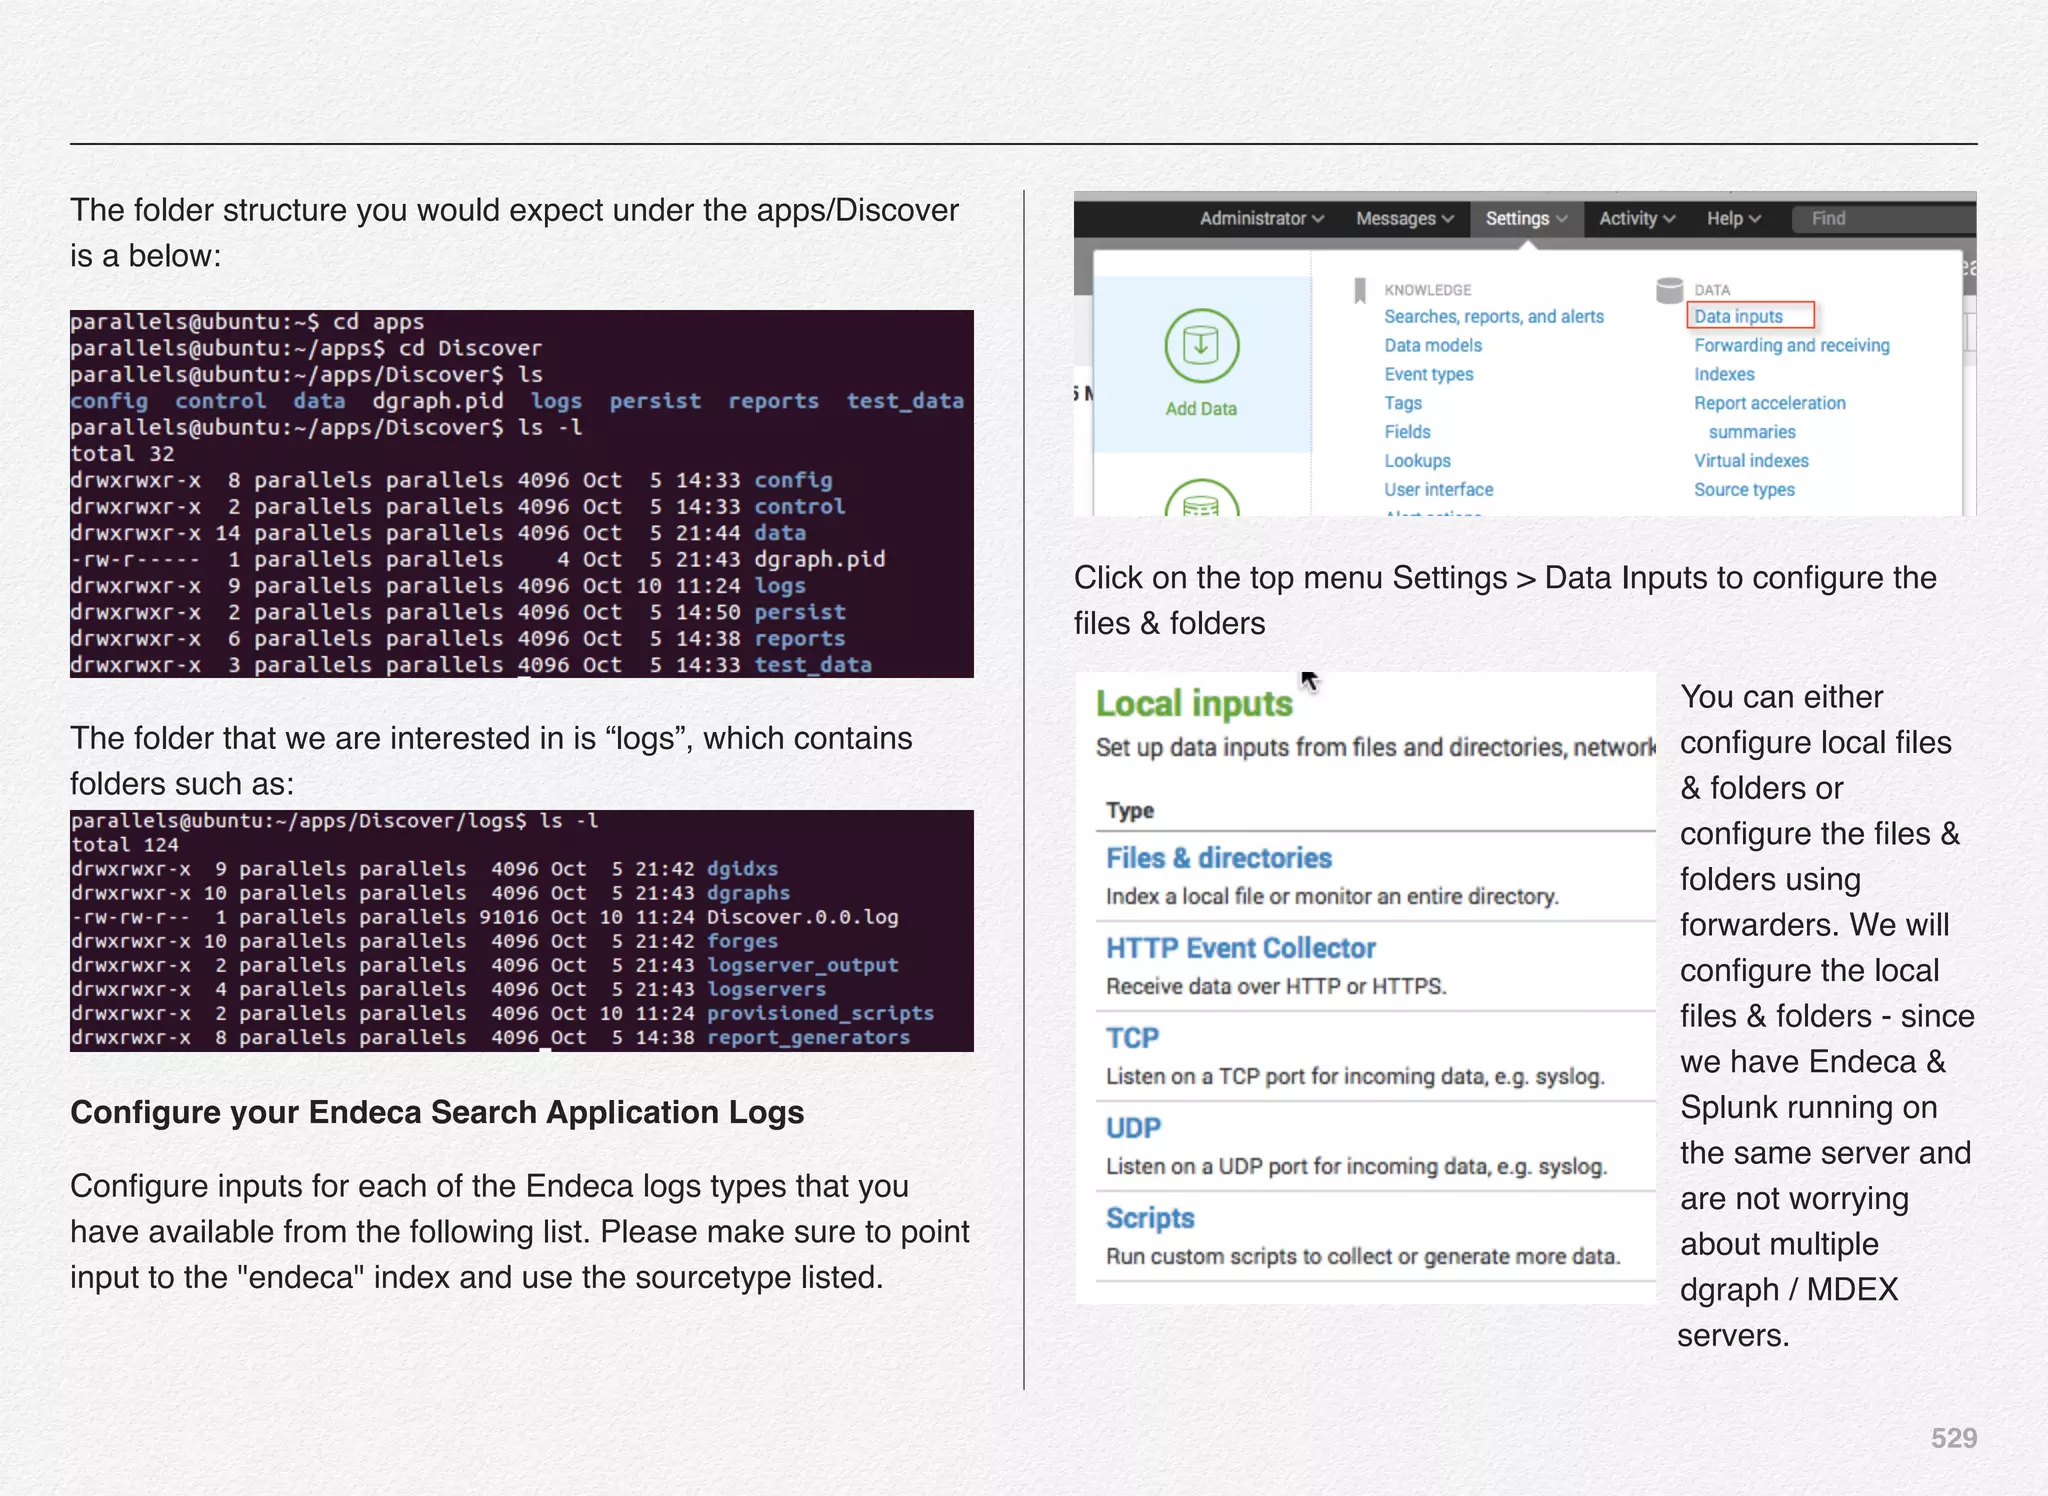
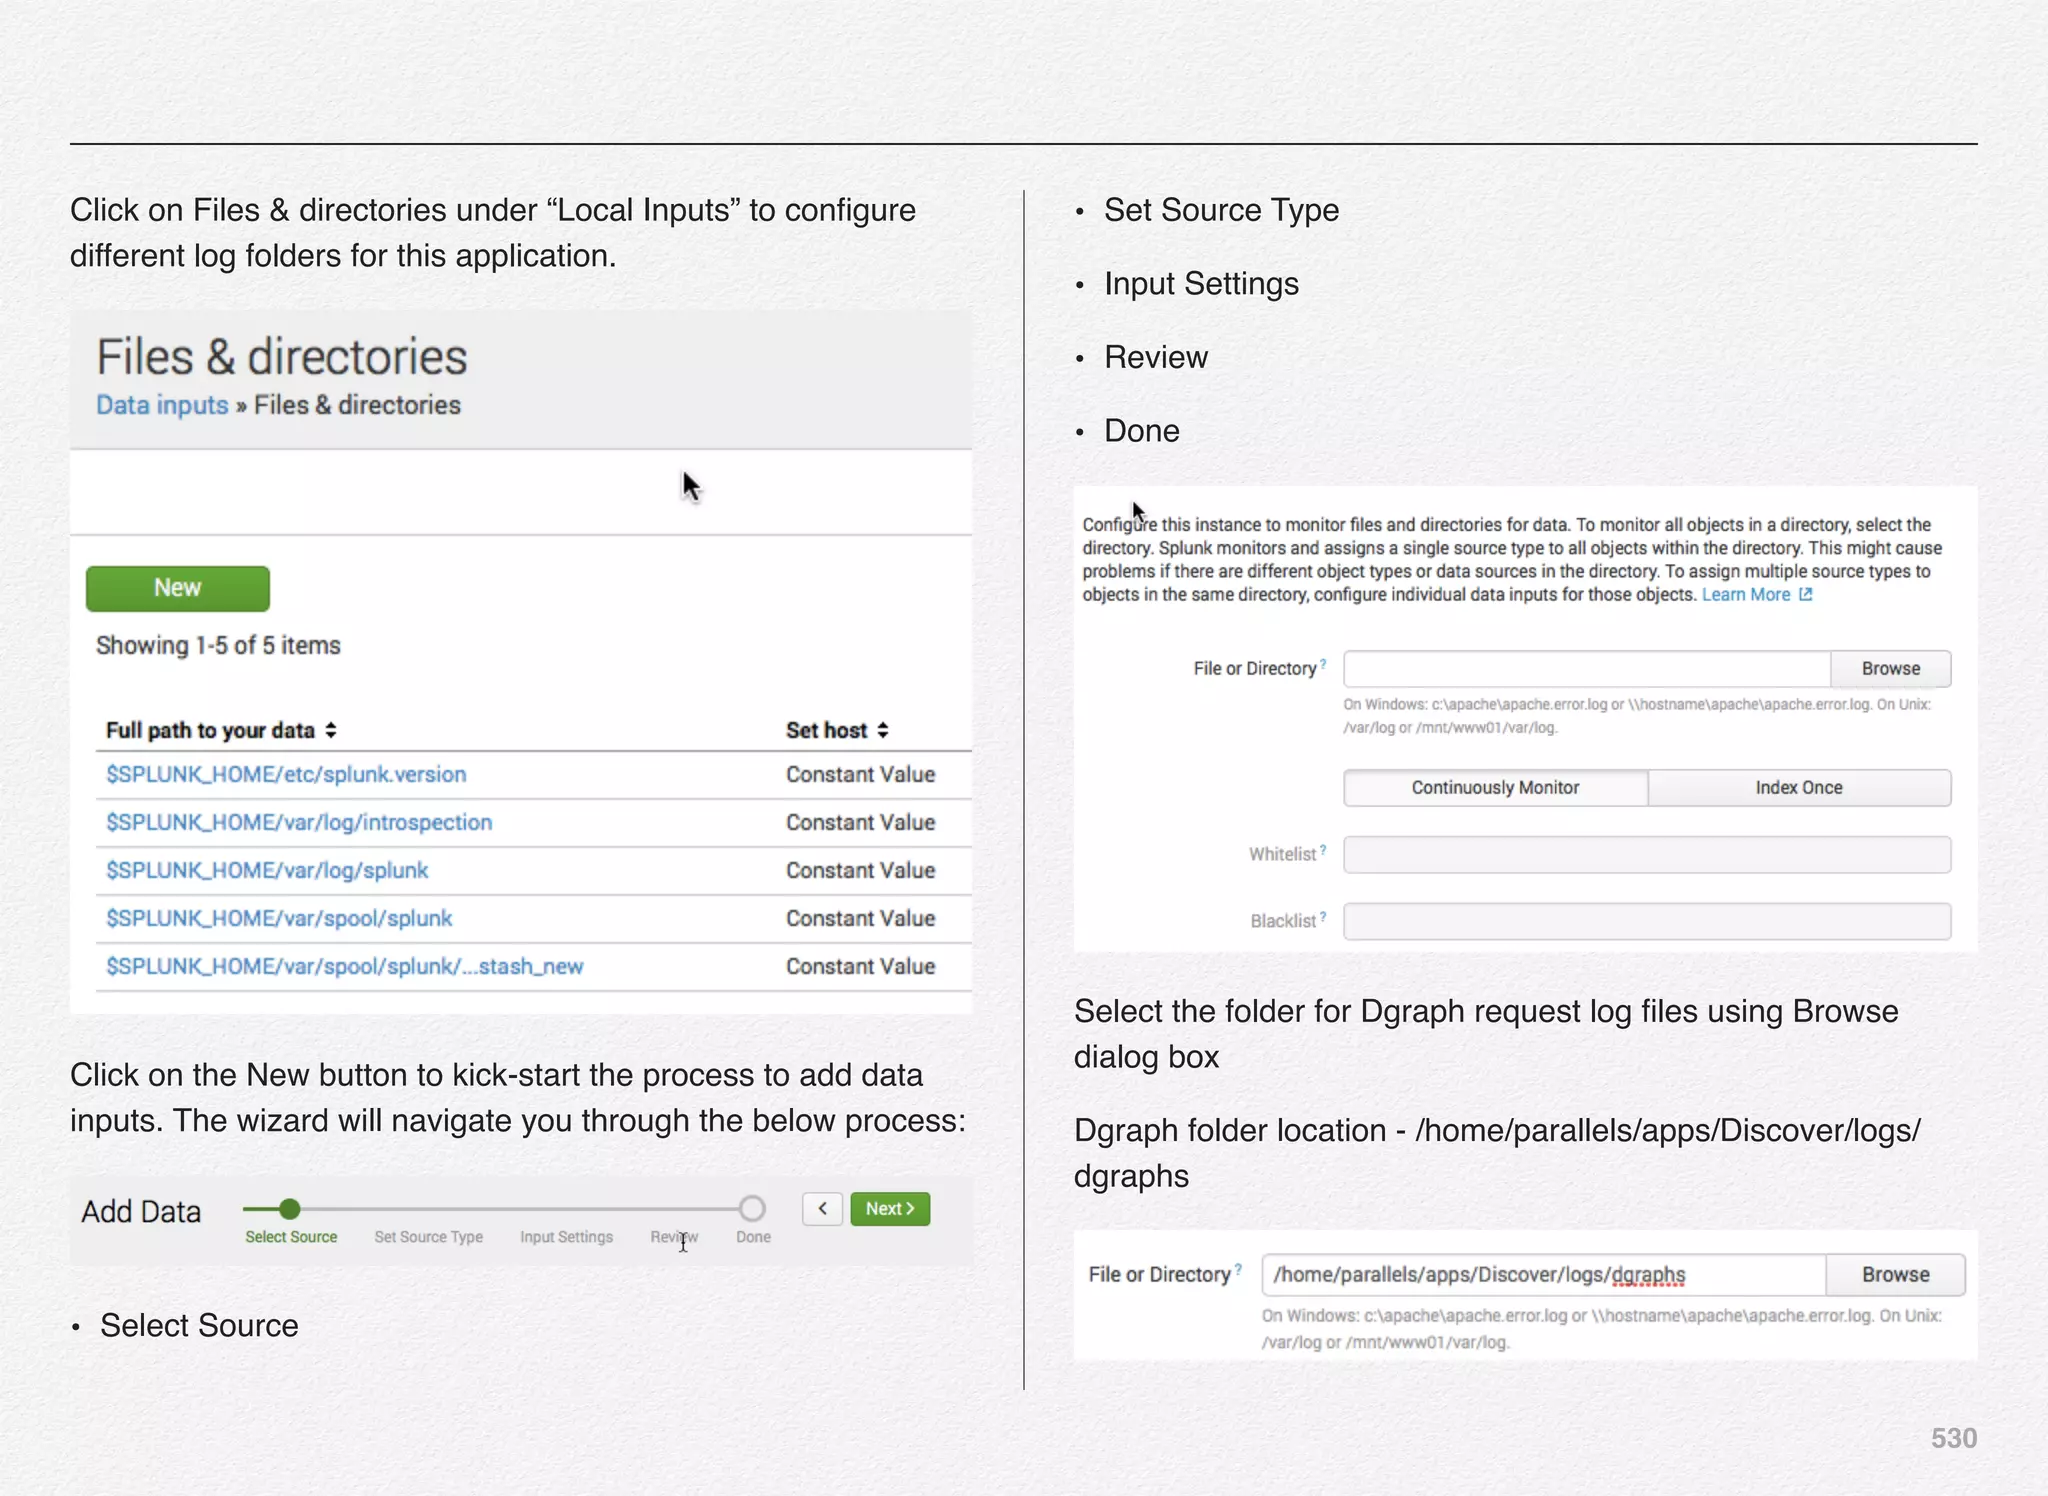
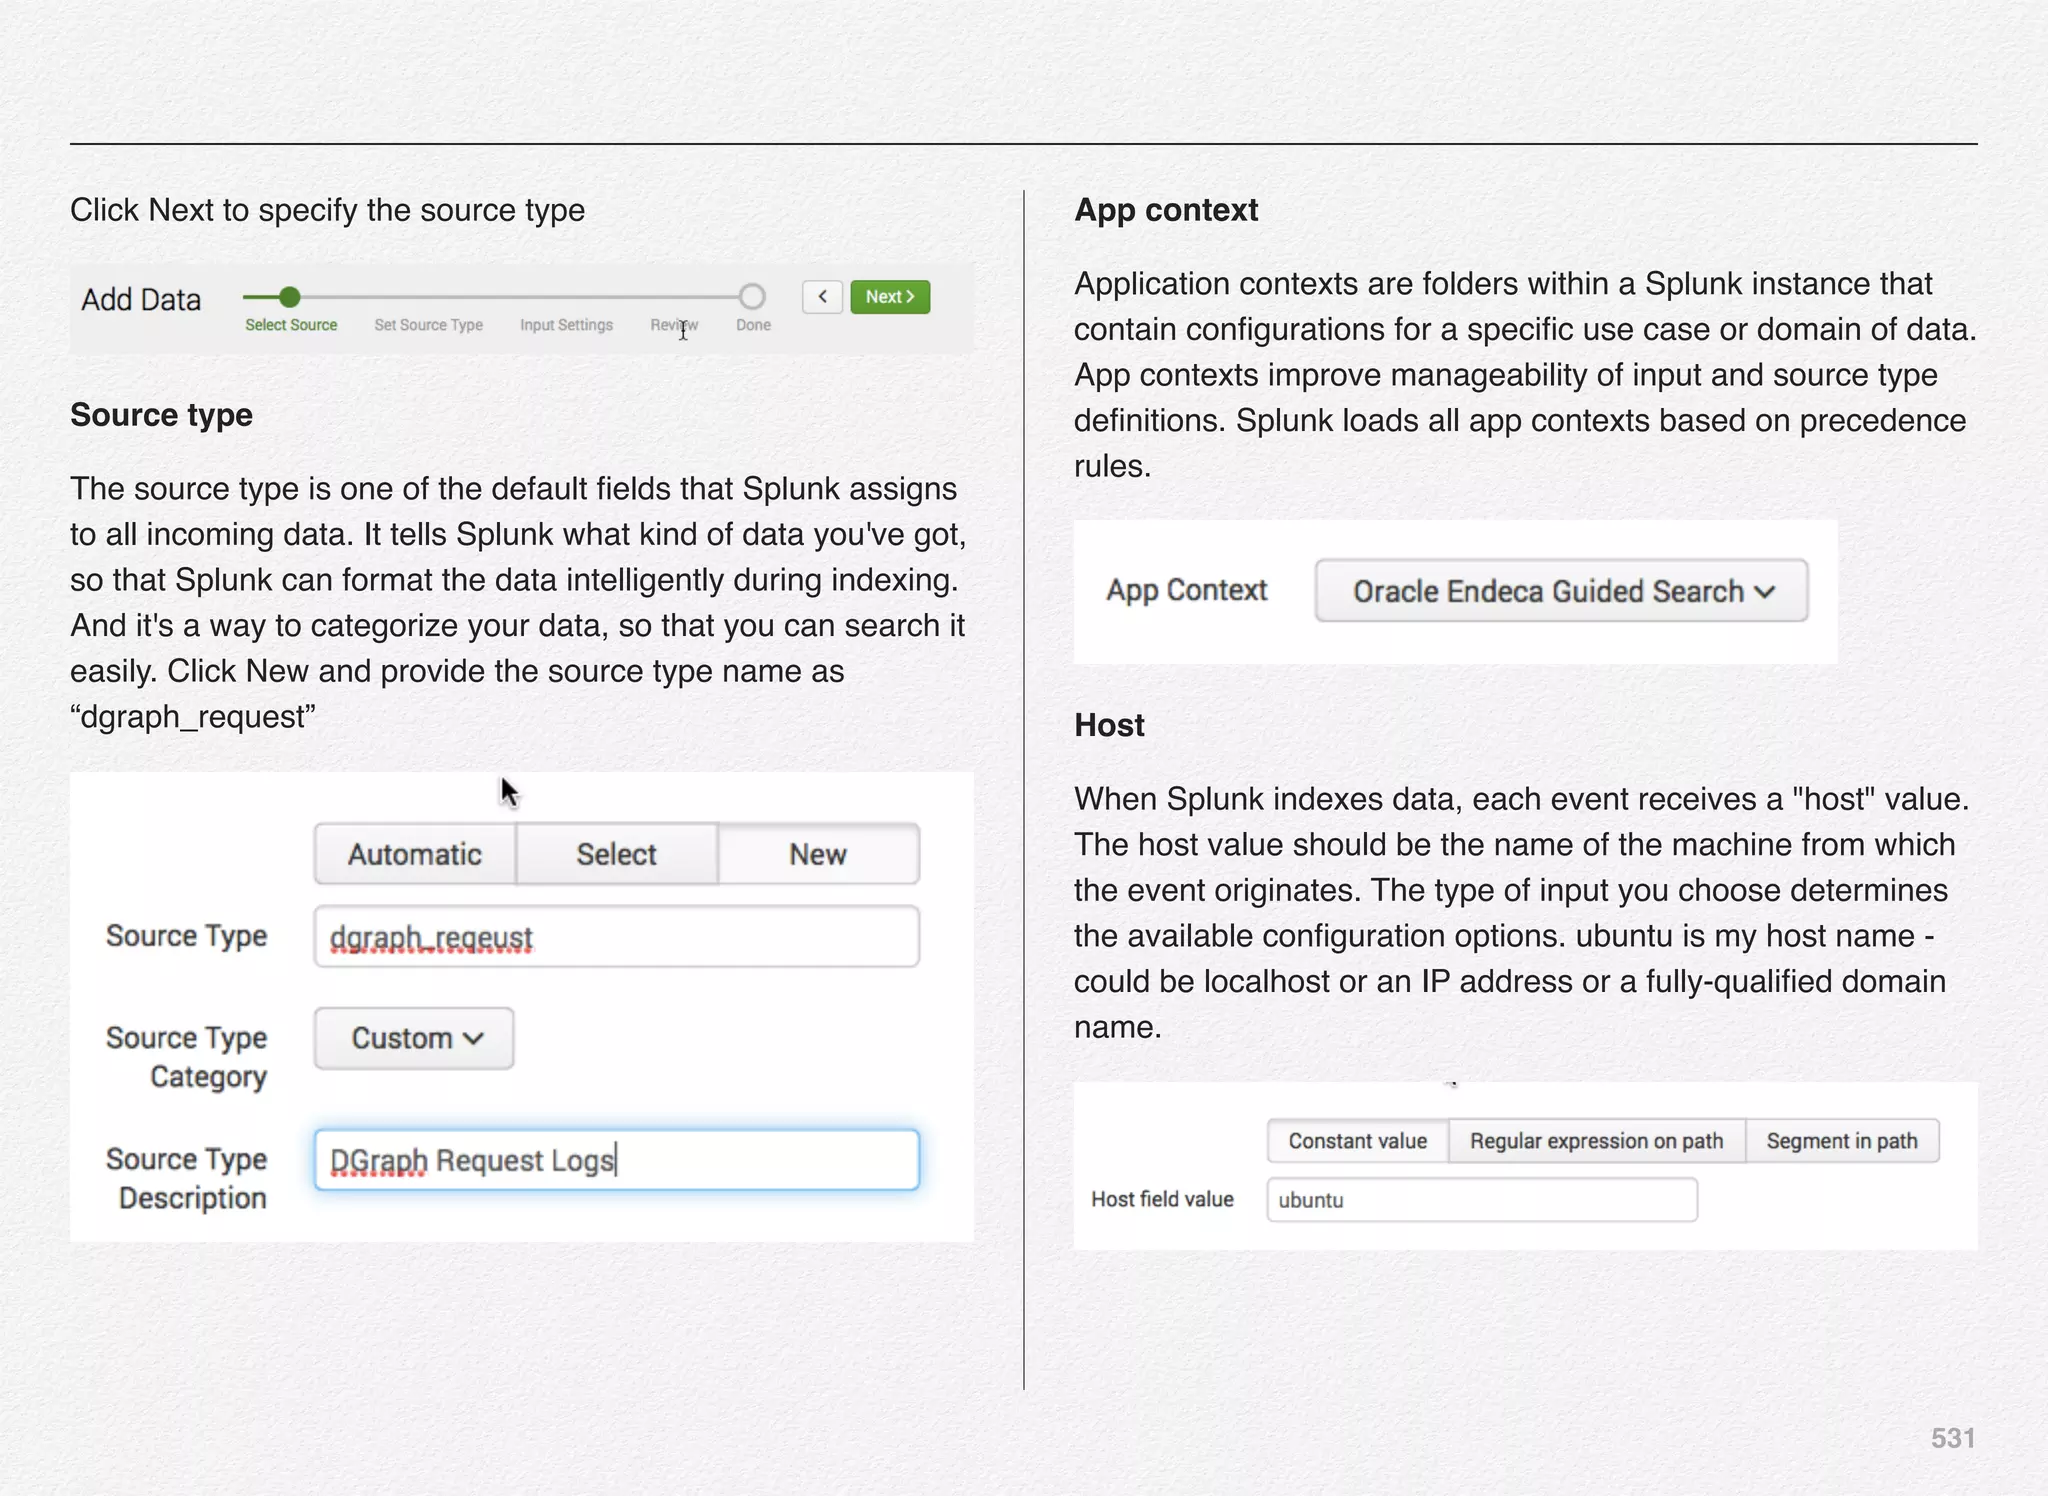
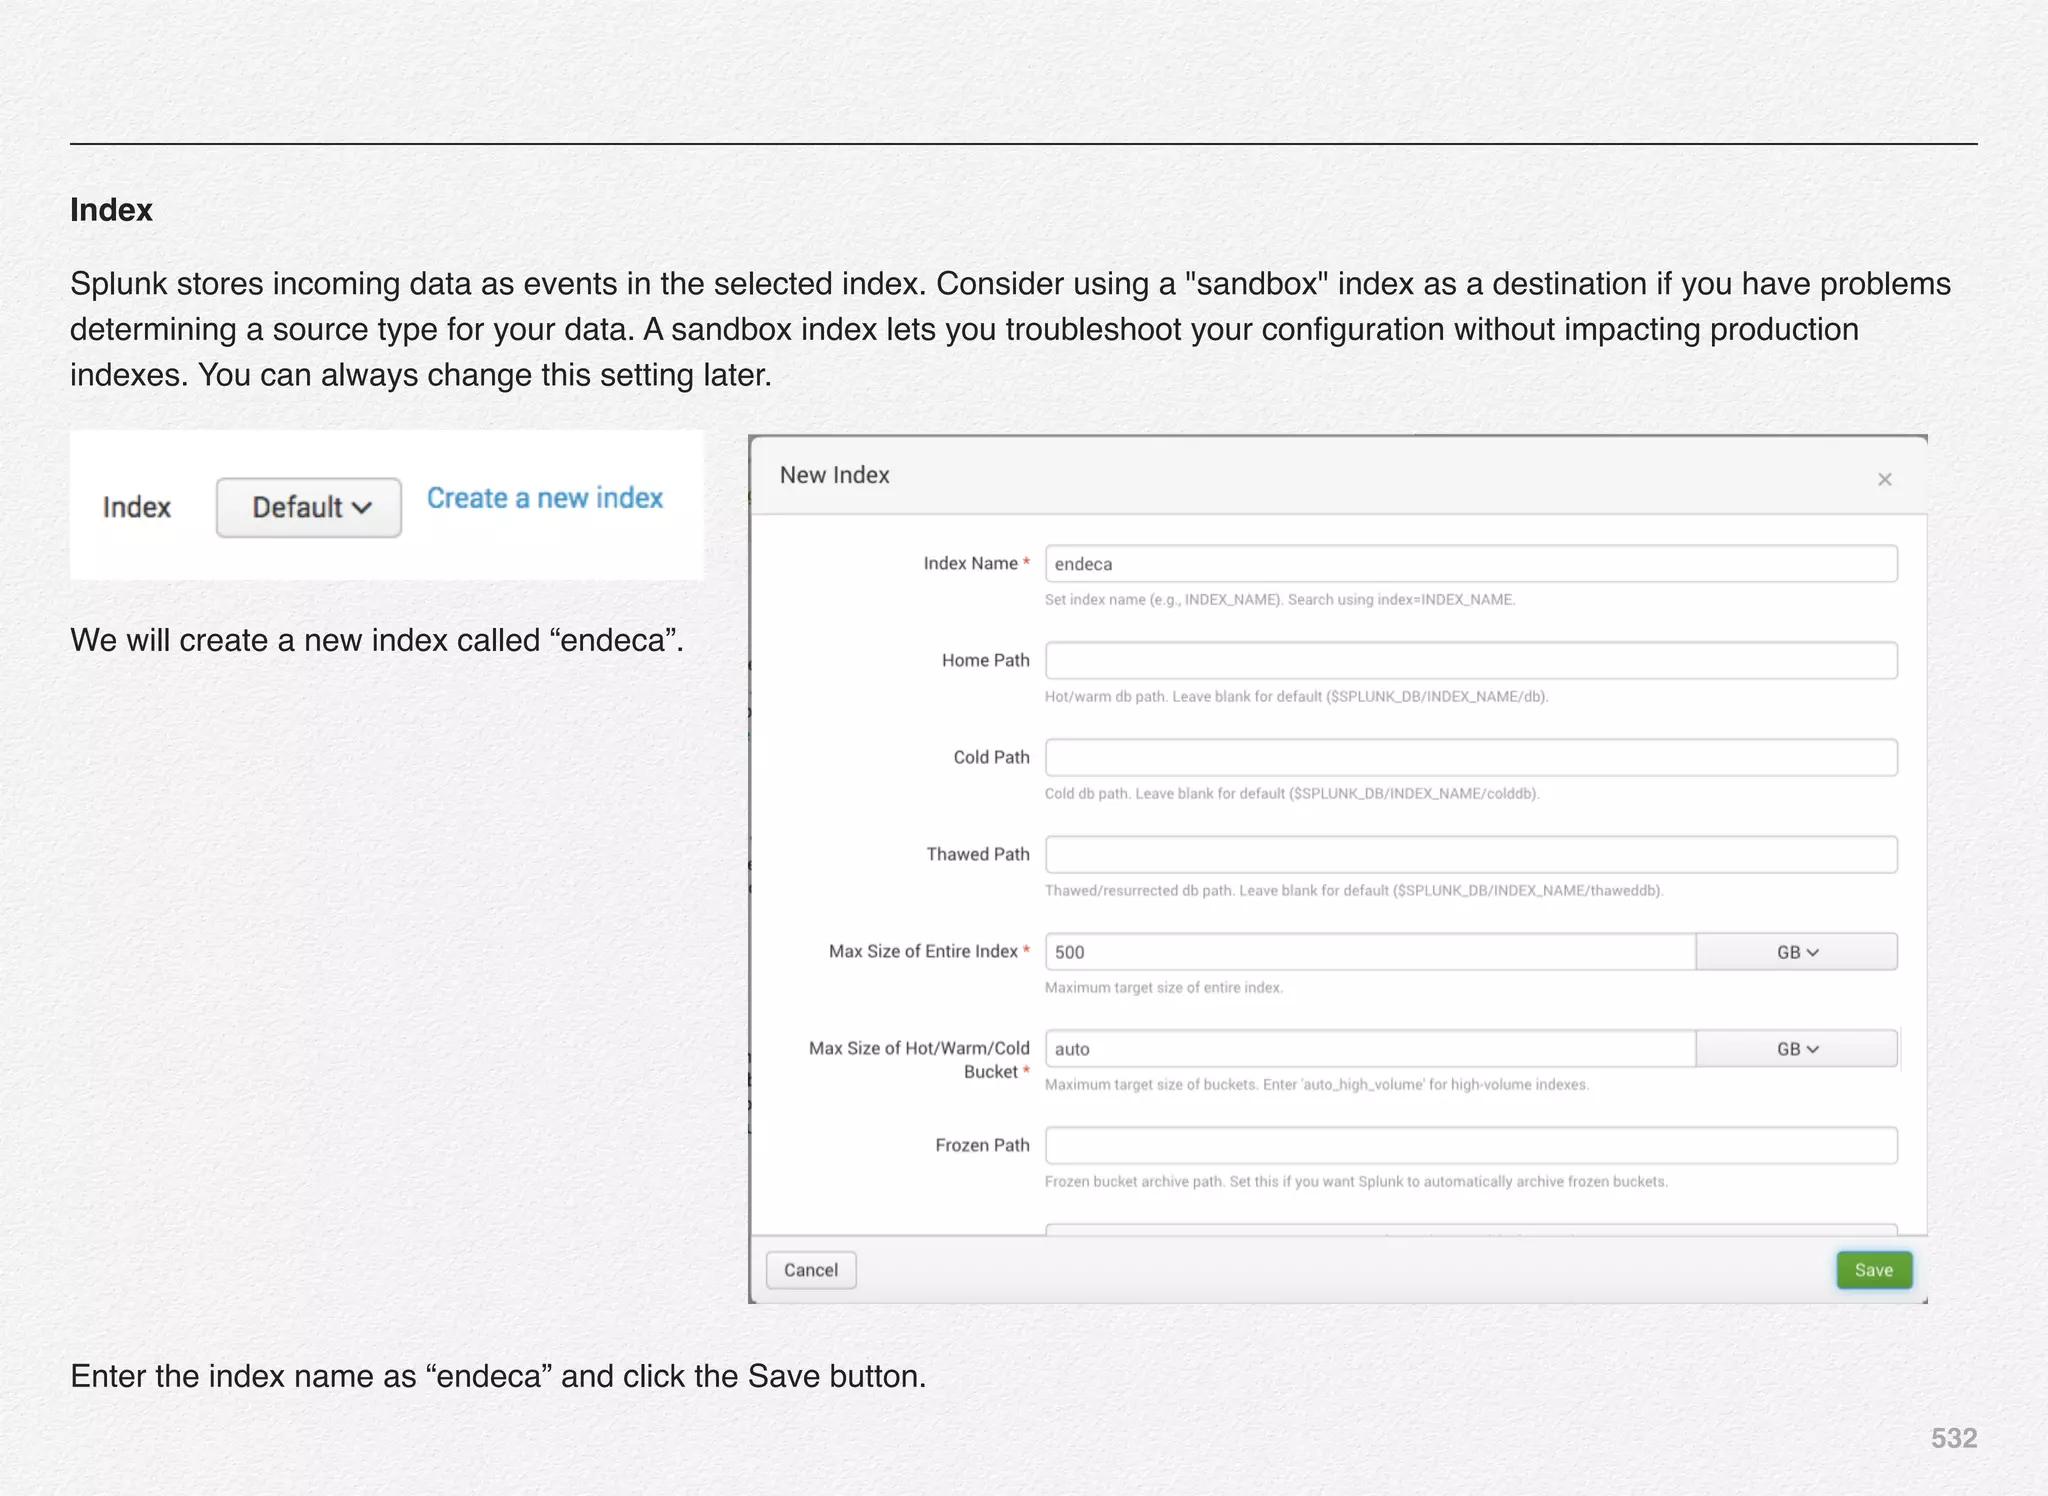
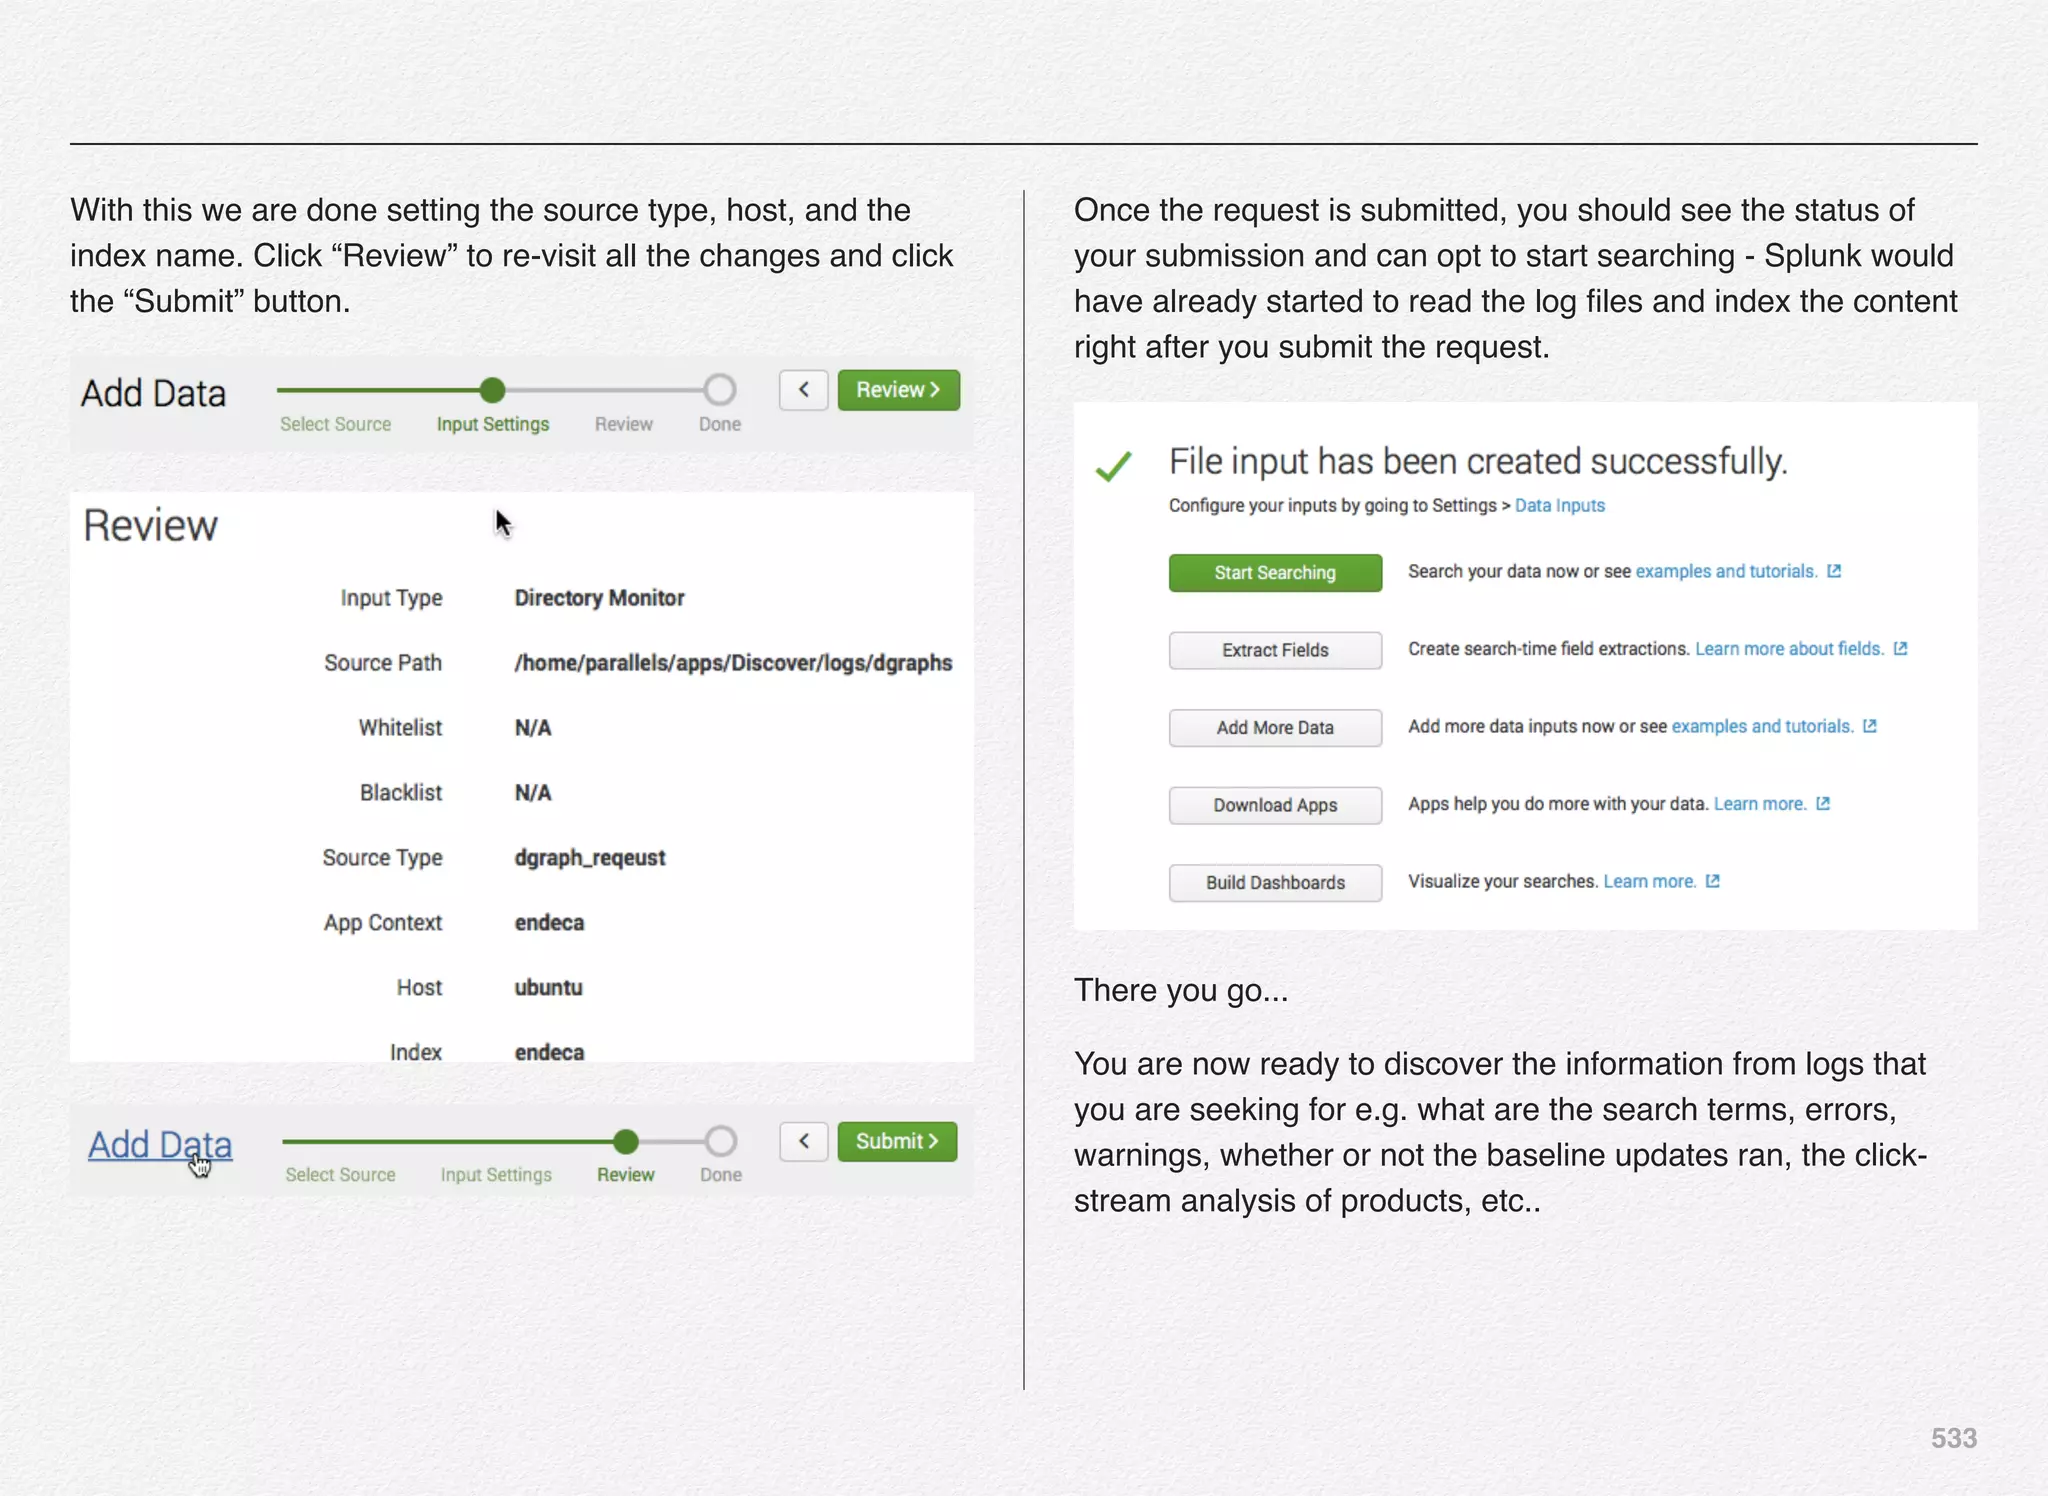
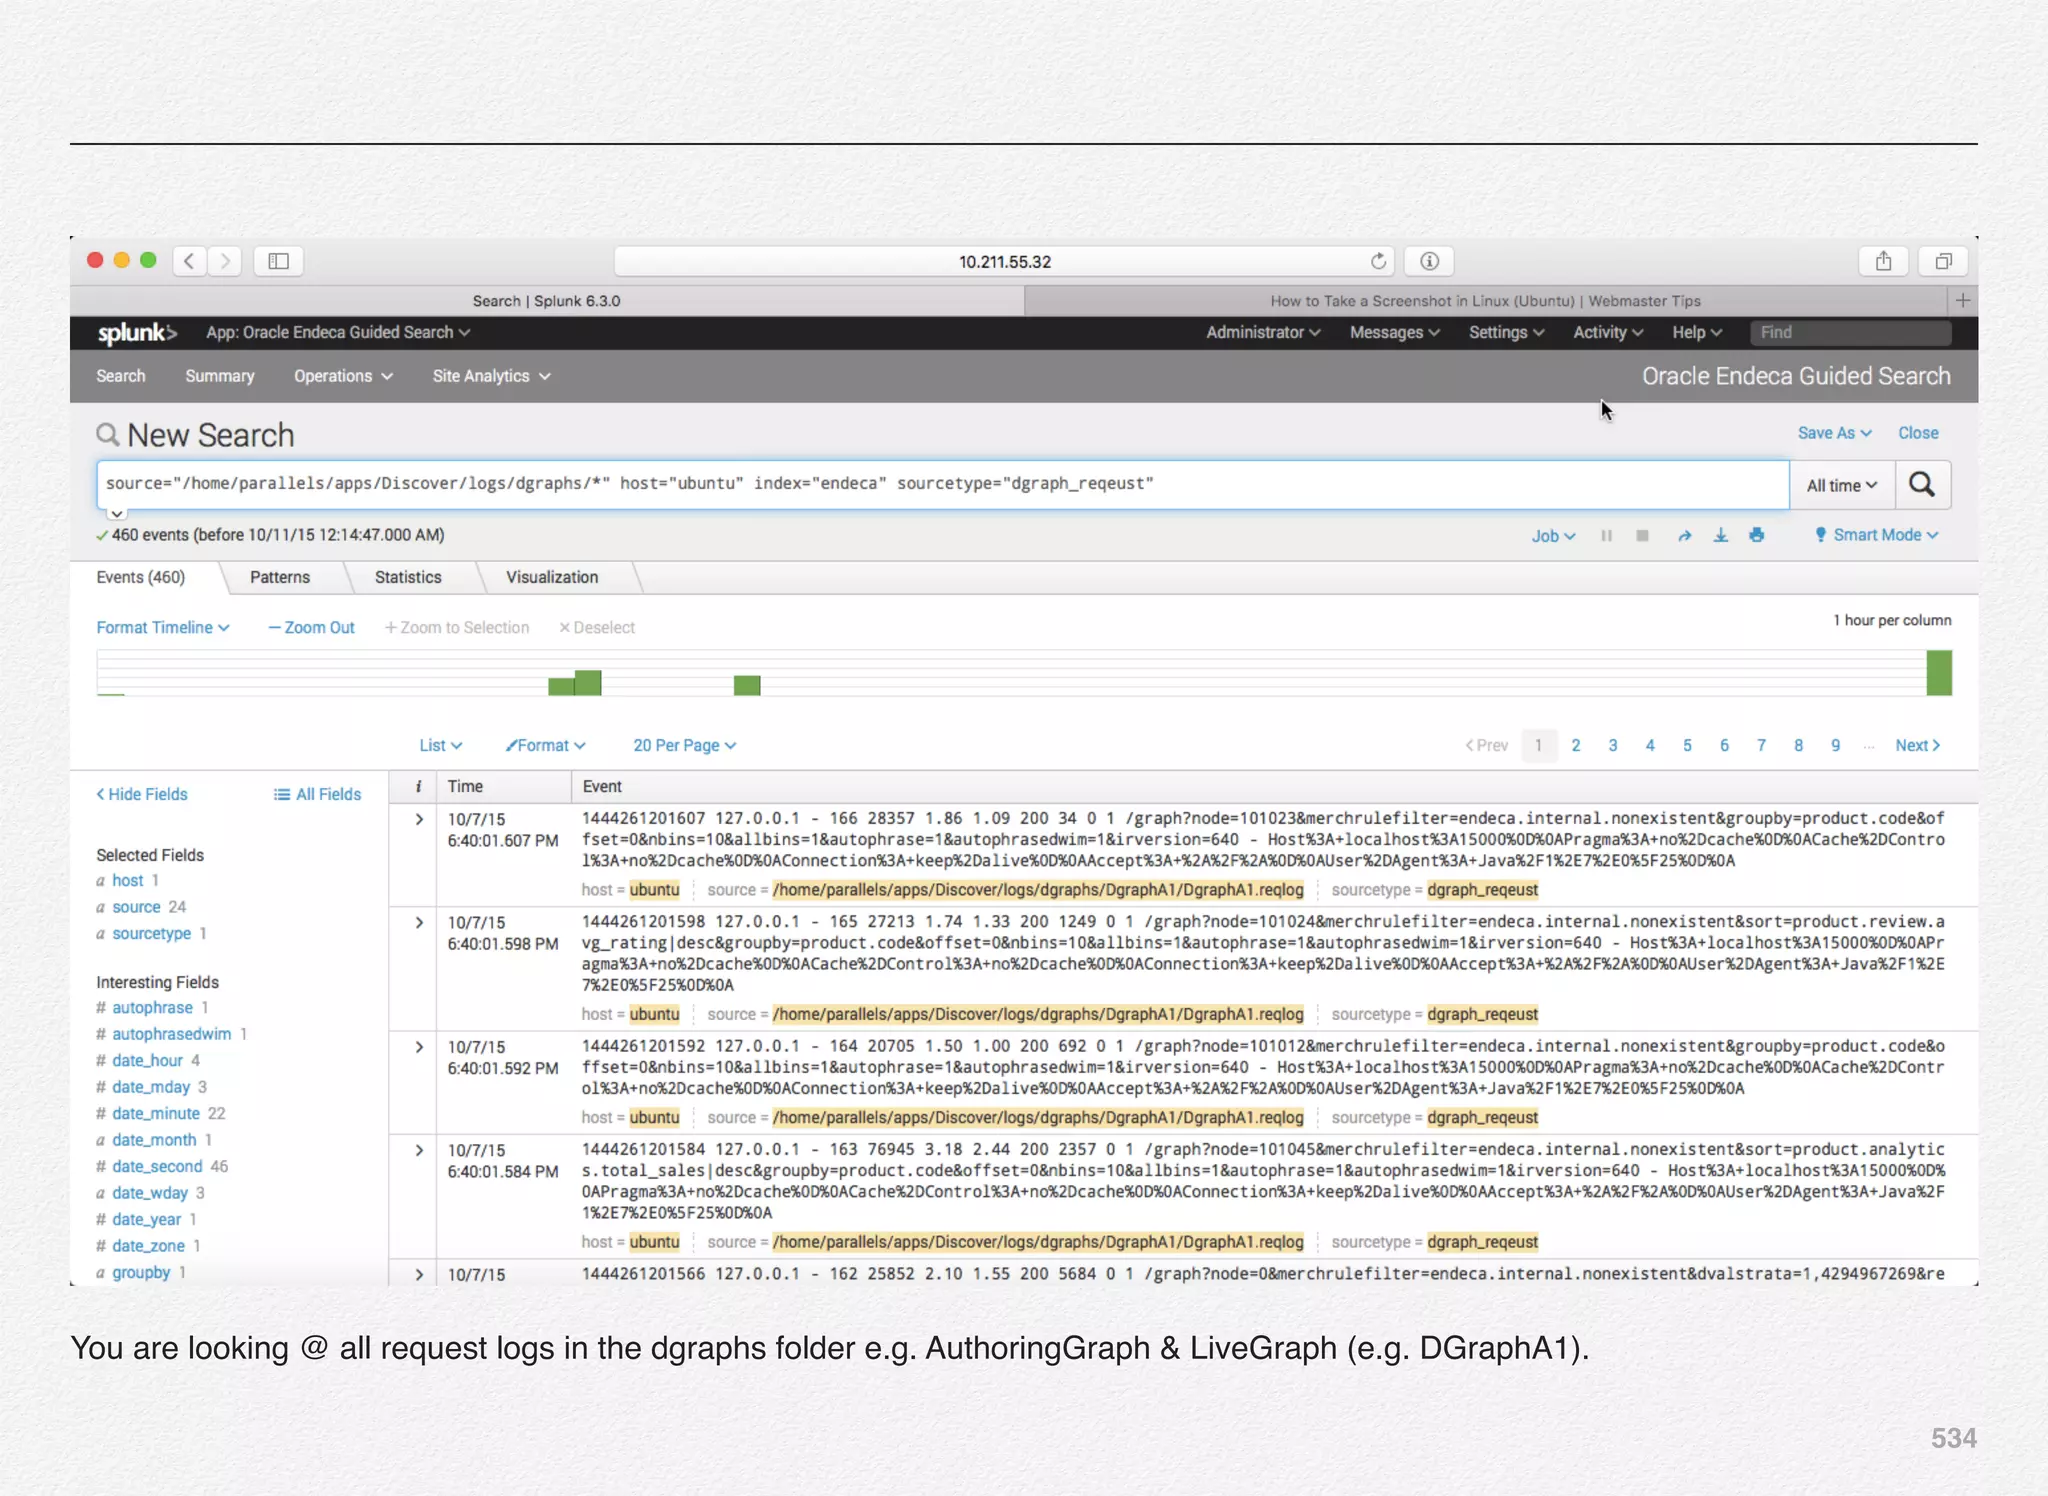
![535
Similarly, configure all the 5 data inputs e.g. Dgraph quest, Endeca Logserver Output, Forge, Dgidx, and Provisioned Scripts. For the
1st time you need to select “Create new index” e.g. endeca, but for the rest of the 4 requests you need to select from the drop-down
and pick endeca as existing index - since it was already created during 1st step.
Dgraph Request
• Standard monitor location (update as appropriate)=[HTML_REMOVED]/logs/dgraphs/.../*.reqlog
• index = endeca
• sourcetype = dgraph_request
Endeca Logserver Output
• Standard monitor location (update as appropriate)=[HTML_REMOVED]/logs/logserver_output
• index = endeca
• sourcetype = logserver_output
Forge
• Standard monitor location (update as appropriate)=[HTML_REMOVED]/logs/forges/.../Forge.log
• index = endeca
• sourcetype = forge
Dgidx
• Standard monitor location (update as appropriate)=[HTML_REMOVED]/logs/dgidxs/.../Dgidx.log](https://image.slidesharecdn.com/oraclecommerce-doityourselfseries-160129151710/75/Oracle-Commerce-Using-ATG-Endeca-Do-It-Yourself-Series-536-2048.jpg)
![536
• index = endeca
• sourcetype = dgidx
Baseline Update
• Standard monitor location (update as appropriate)=[HTML_REMOVED]/logs/provisioned_scripts/BaselineUpdate*.log
• index = endeca
• sourcetype = baseline_update
Verify data is flowing by executing a search query over all time of ... index=endeca and start using the application.
At the end of creating all 5 data inputs, you would see below inputs created in Files & Directories:
So, now your Splunk instance is monitoring the activities happening on the local files & directories under above configured folders and
as you can see its showing # of files it has identified and read from each folder and its sub-folders (recursively).](https://image.slidesharecdn.com/oraclecommerce-doityourselfseries-160129151710/75/Oracle-Commerce-Using-ATG-Endeca-Do-It-Yourself-Series-537-2048.jpg)
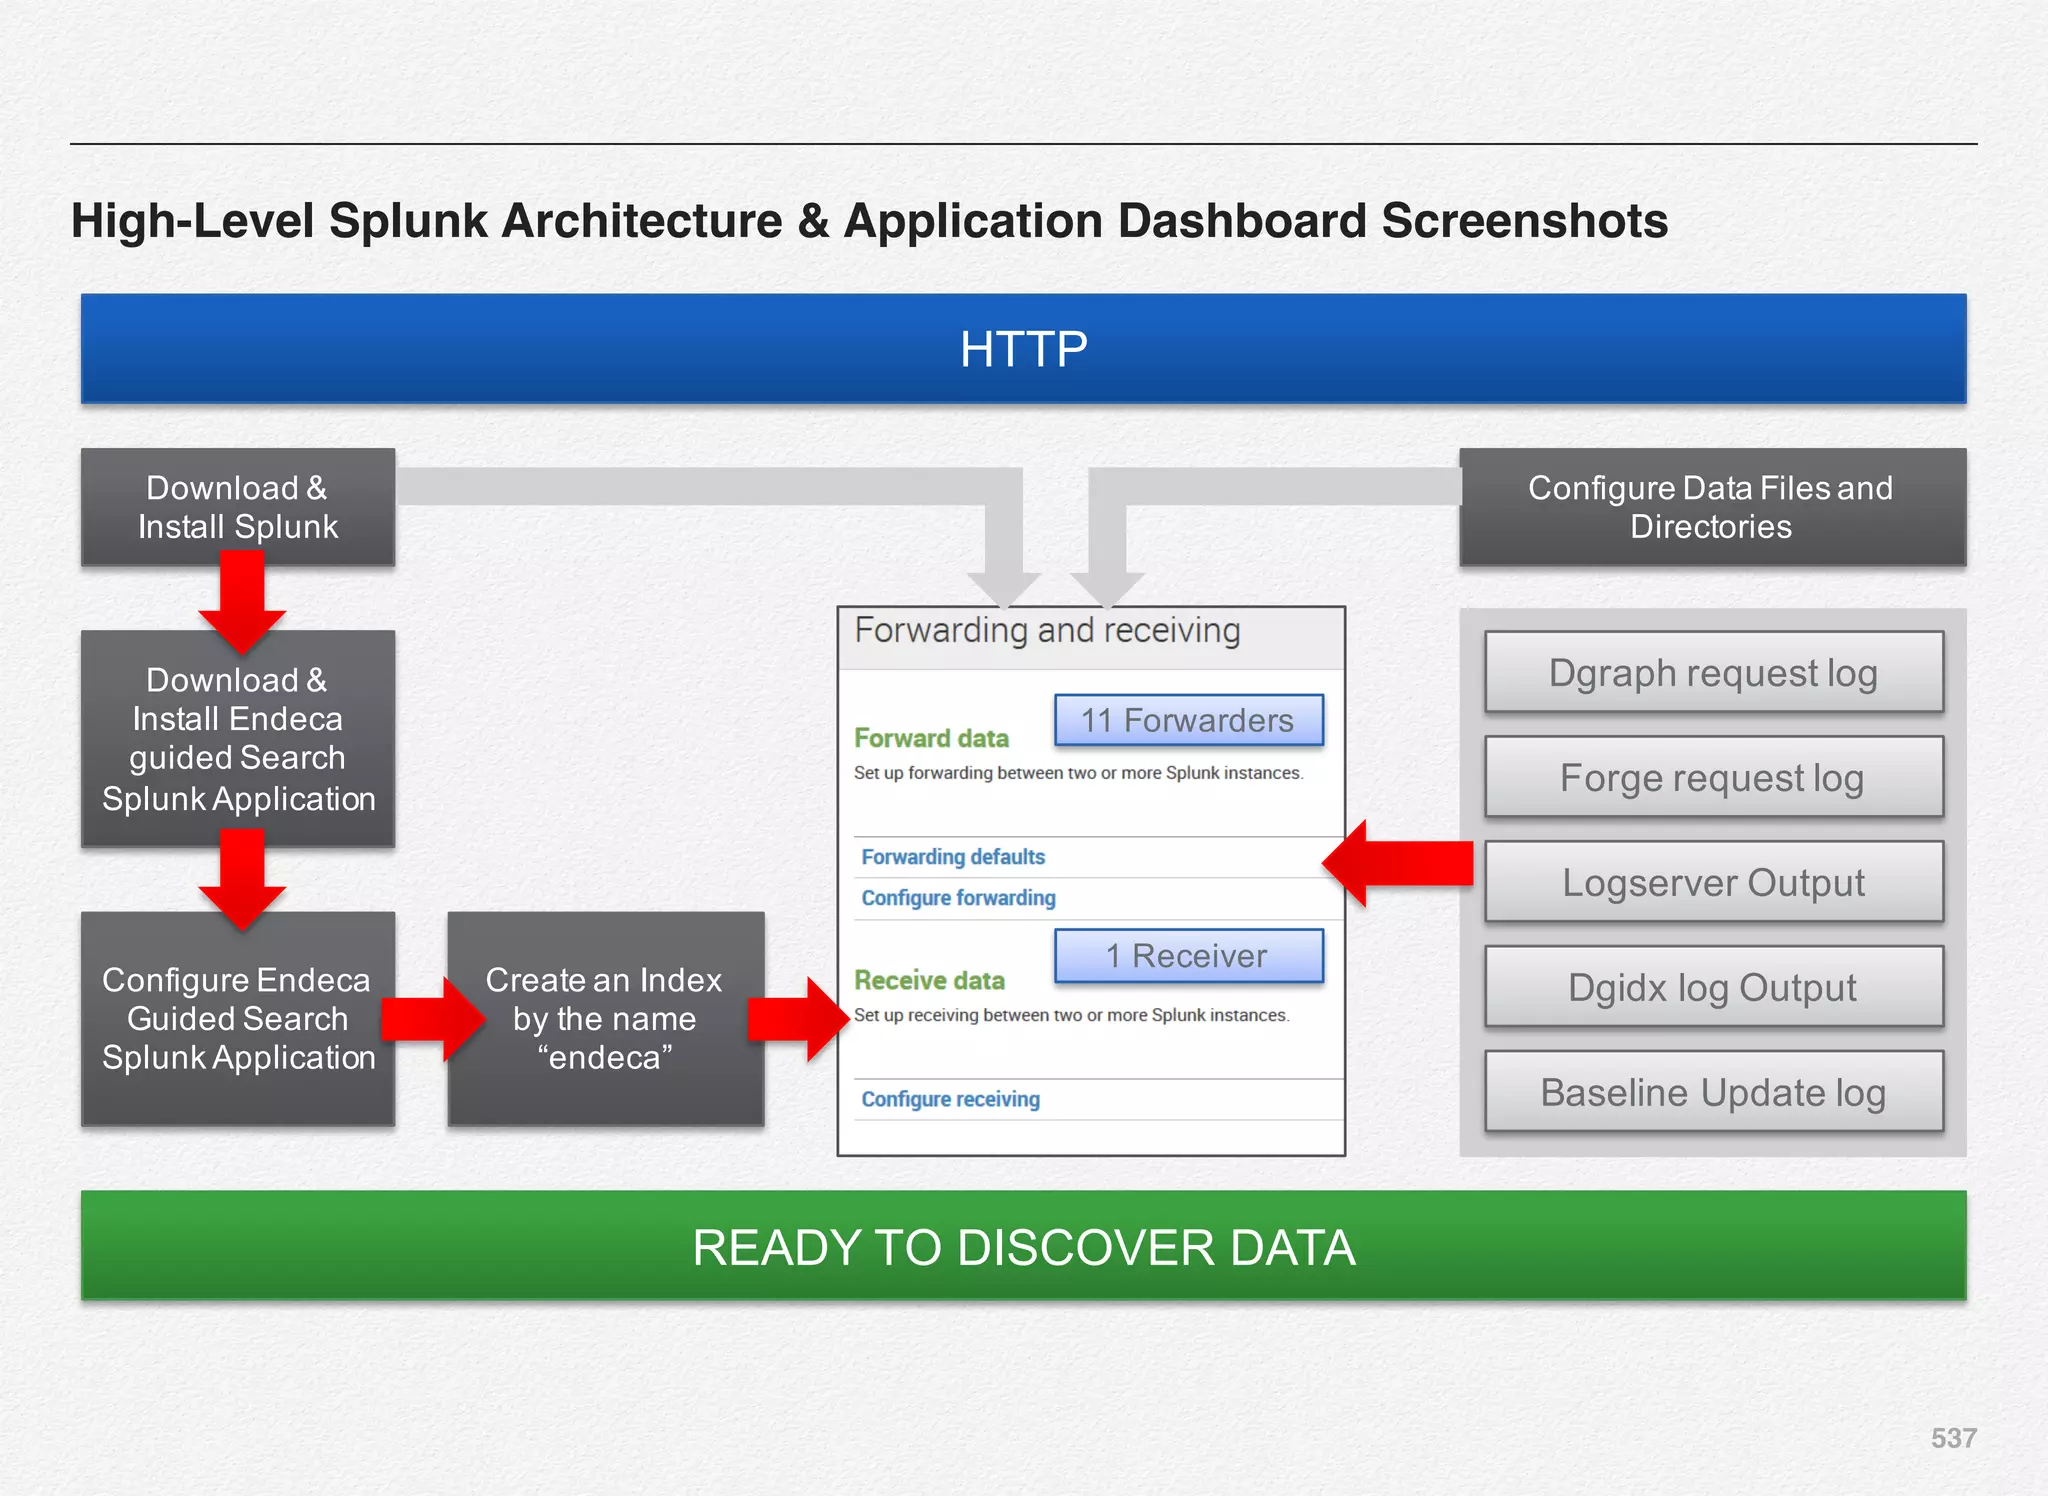
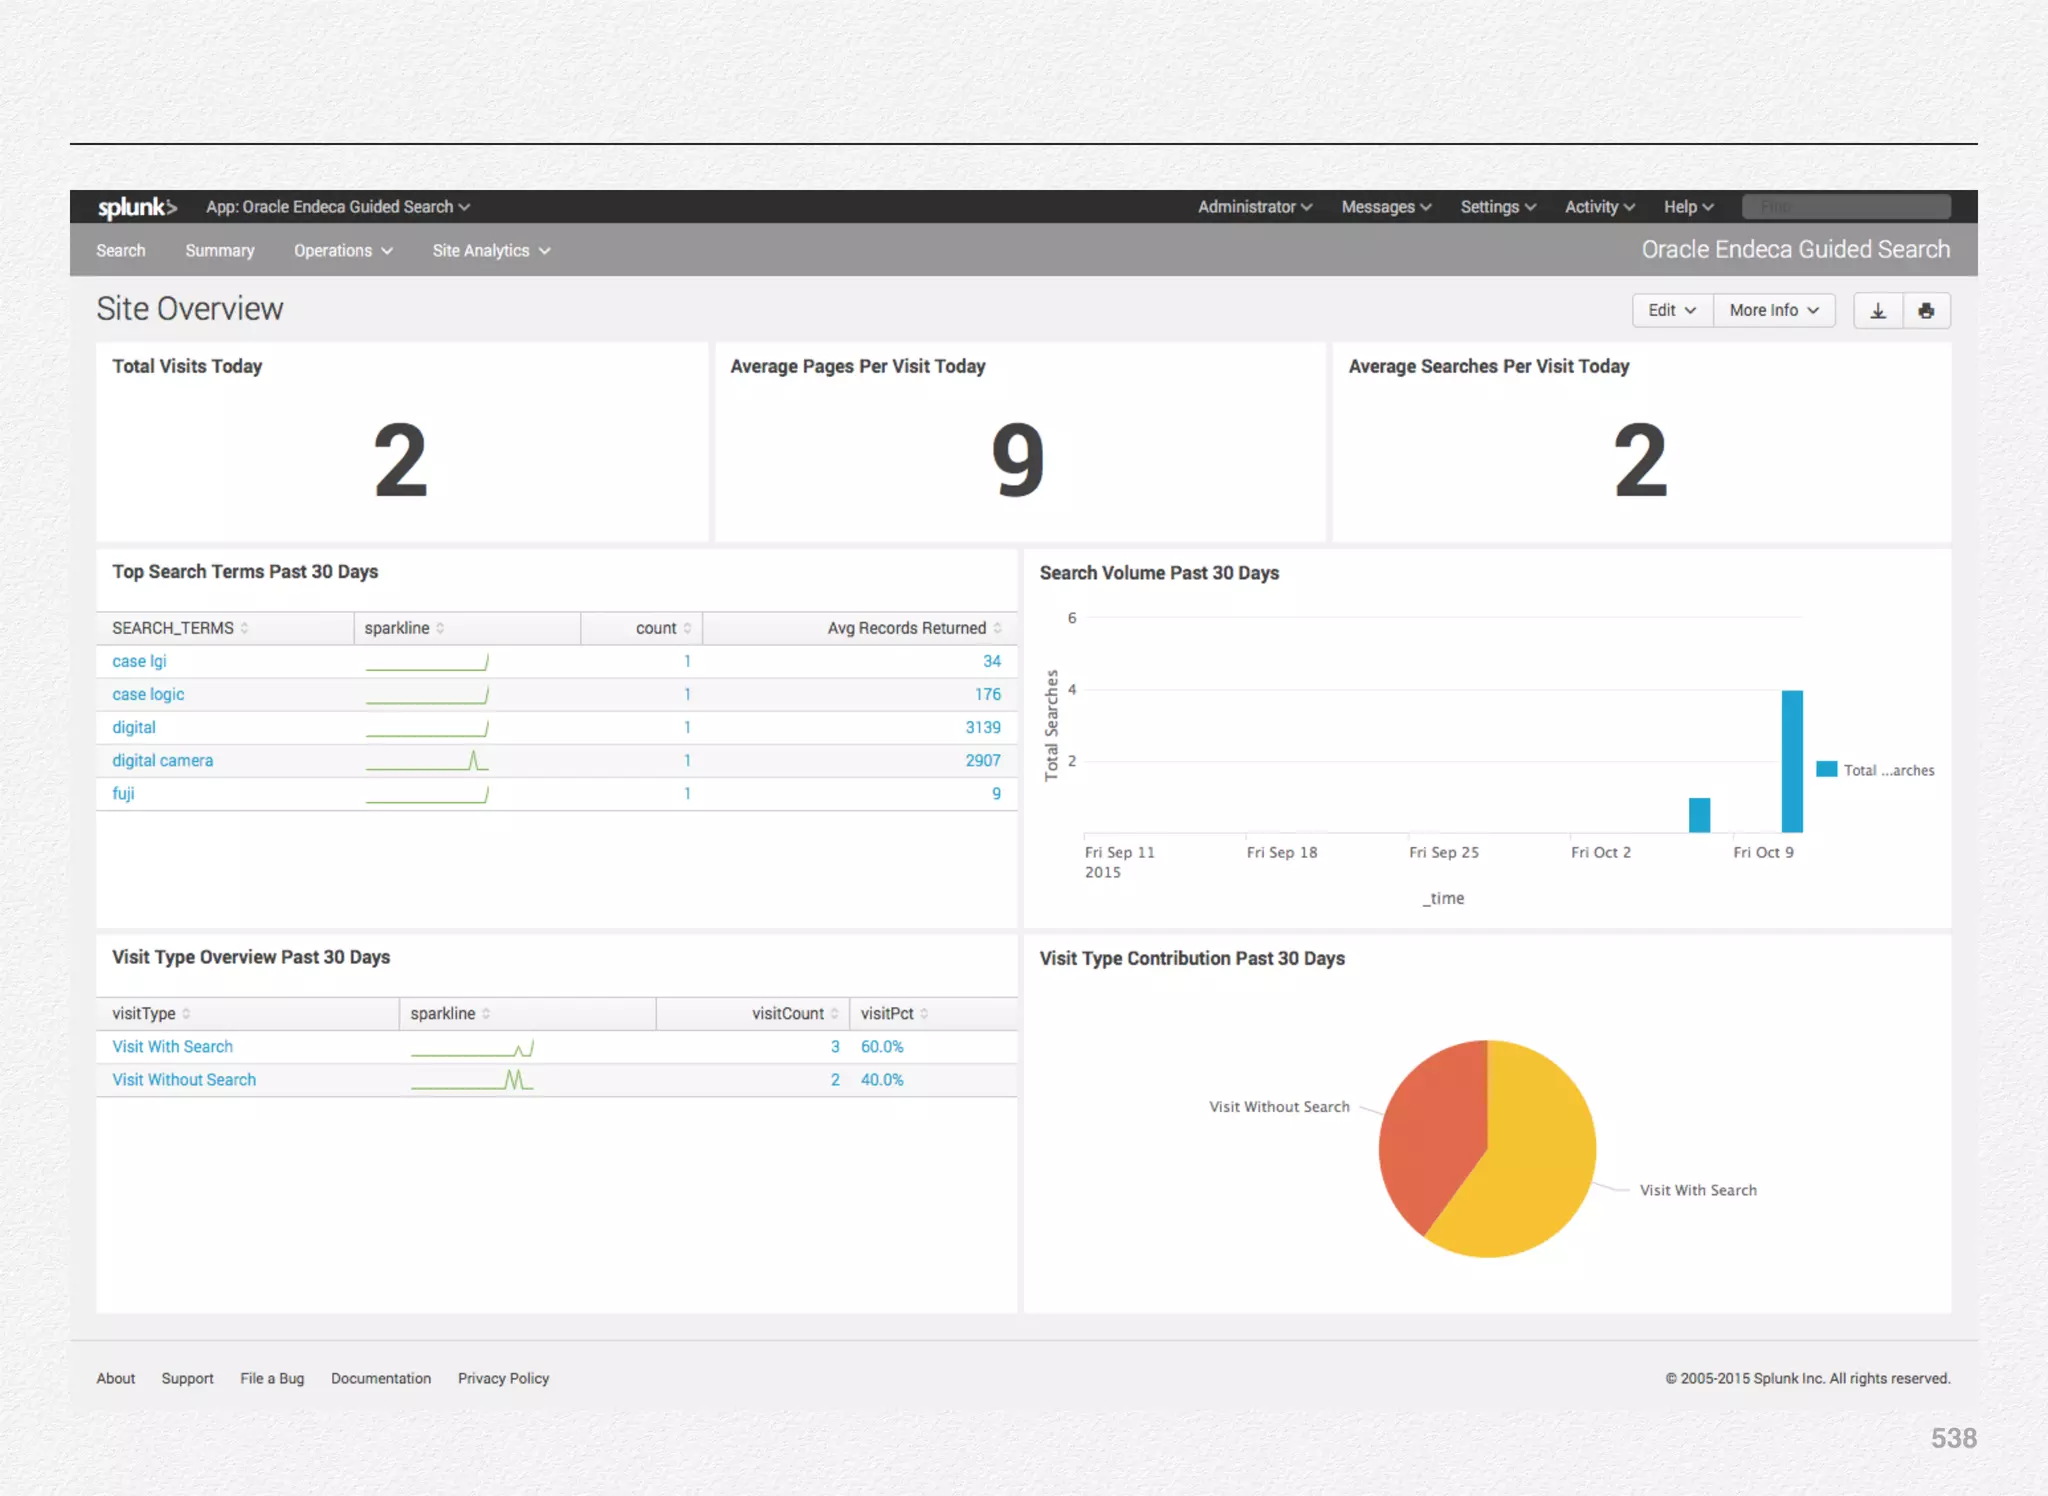
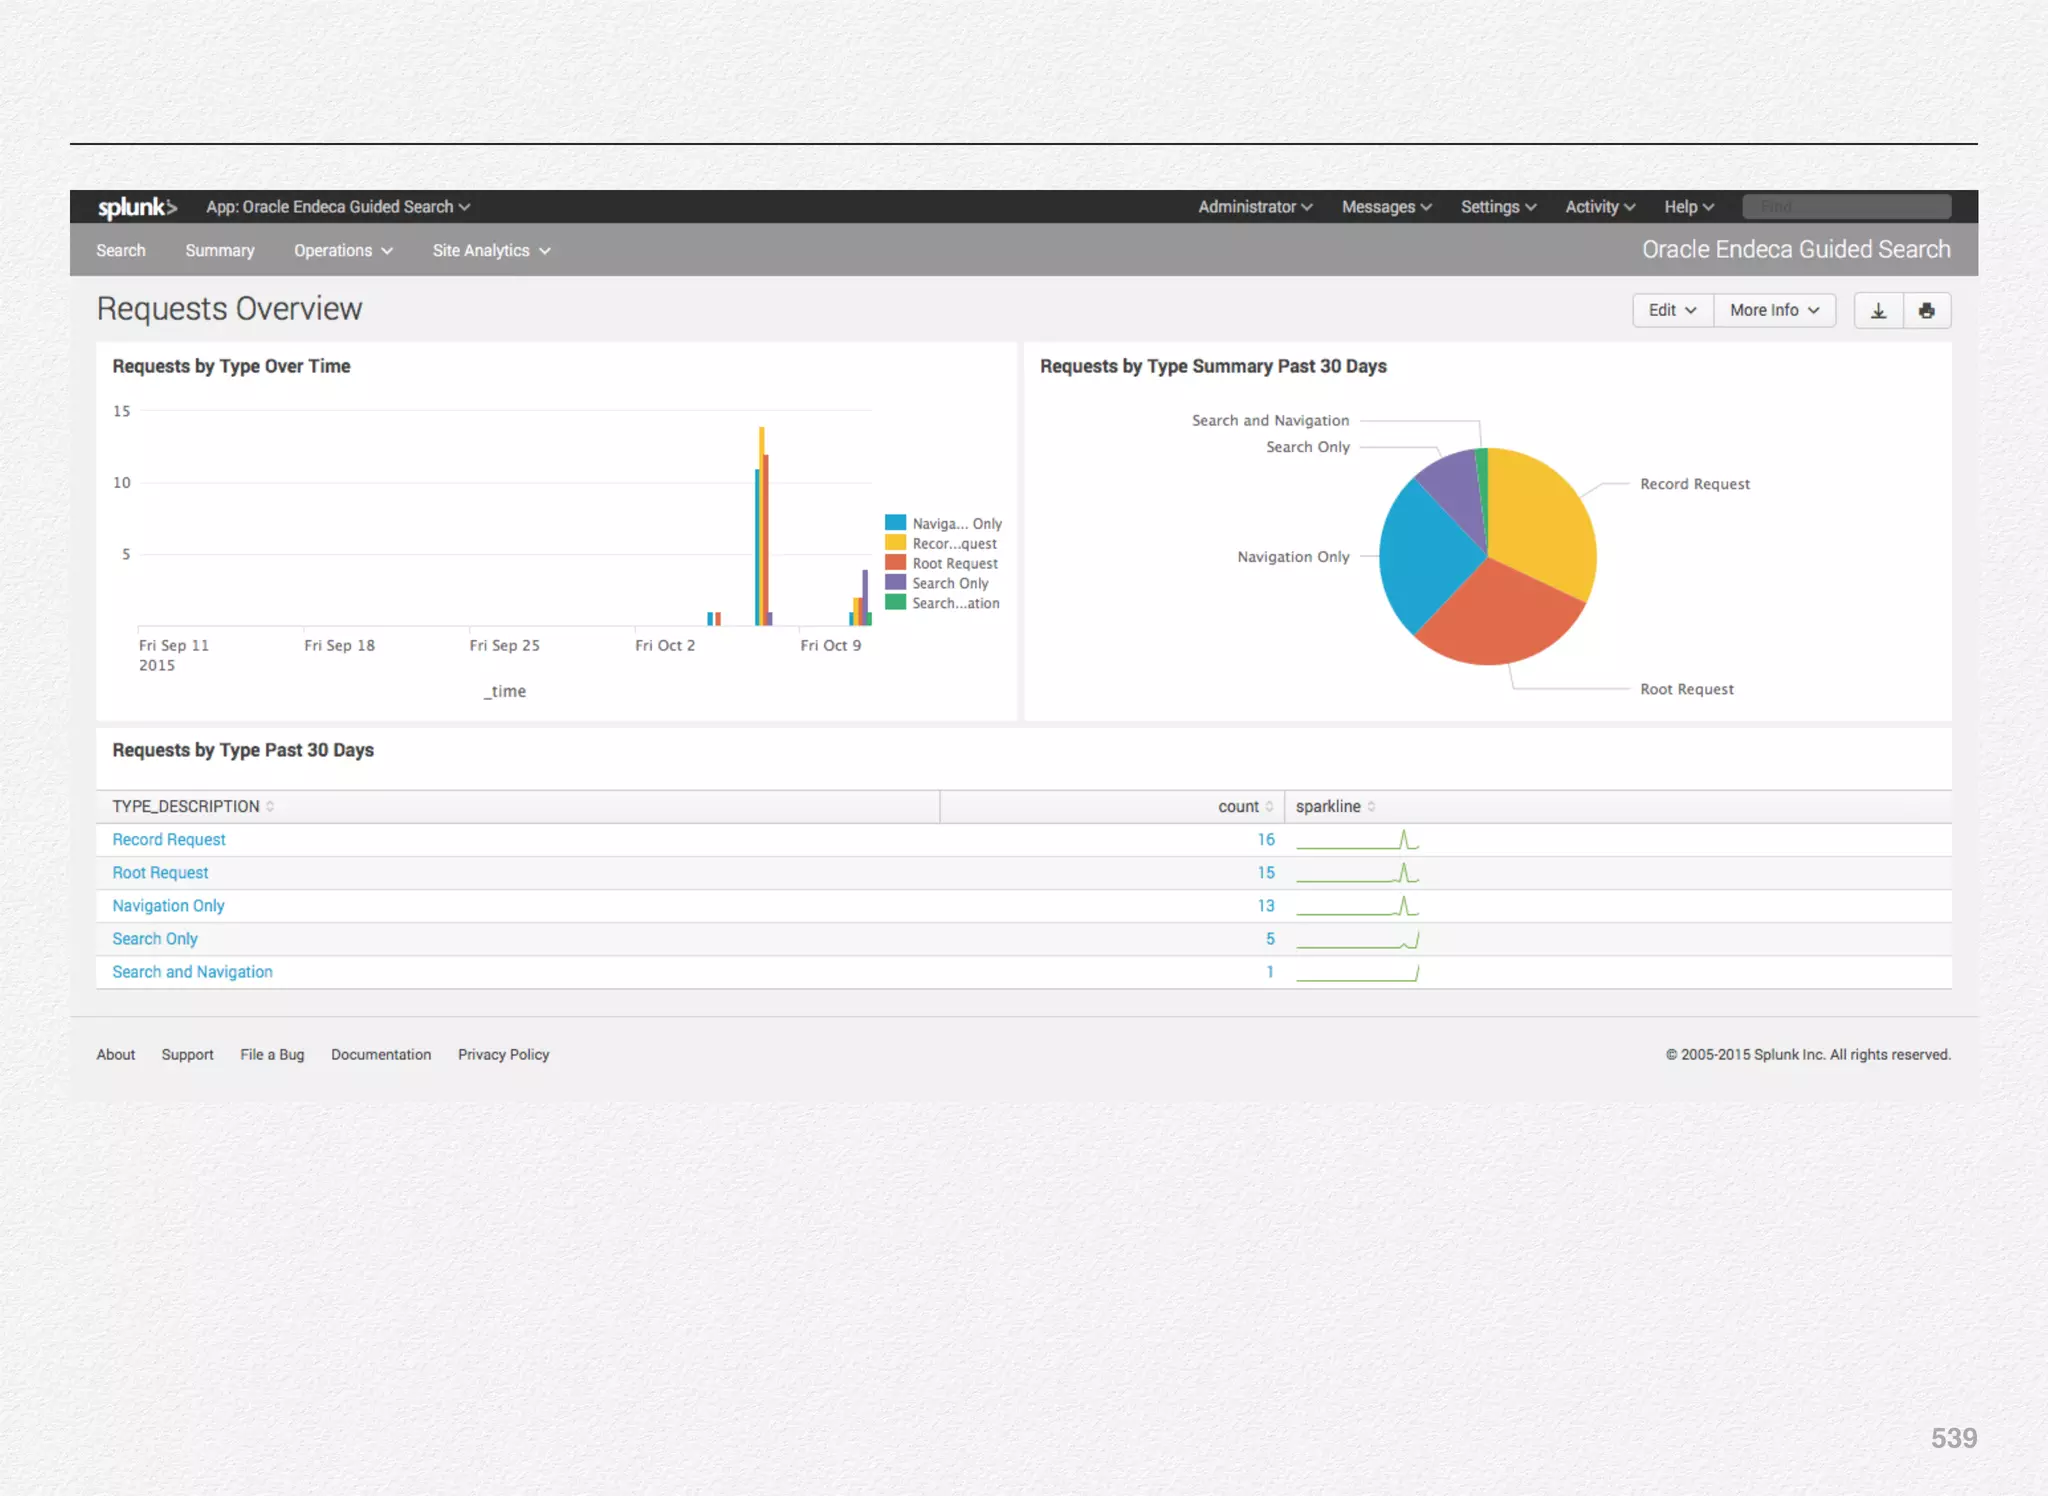
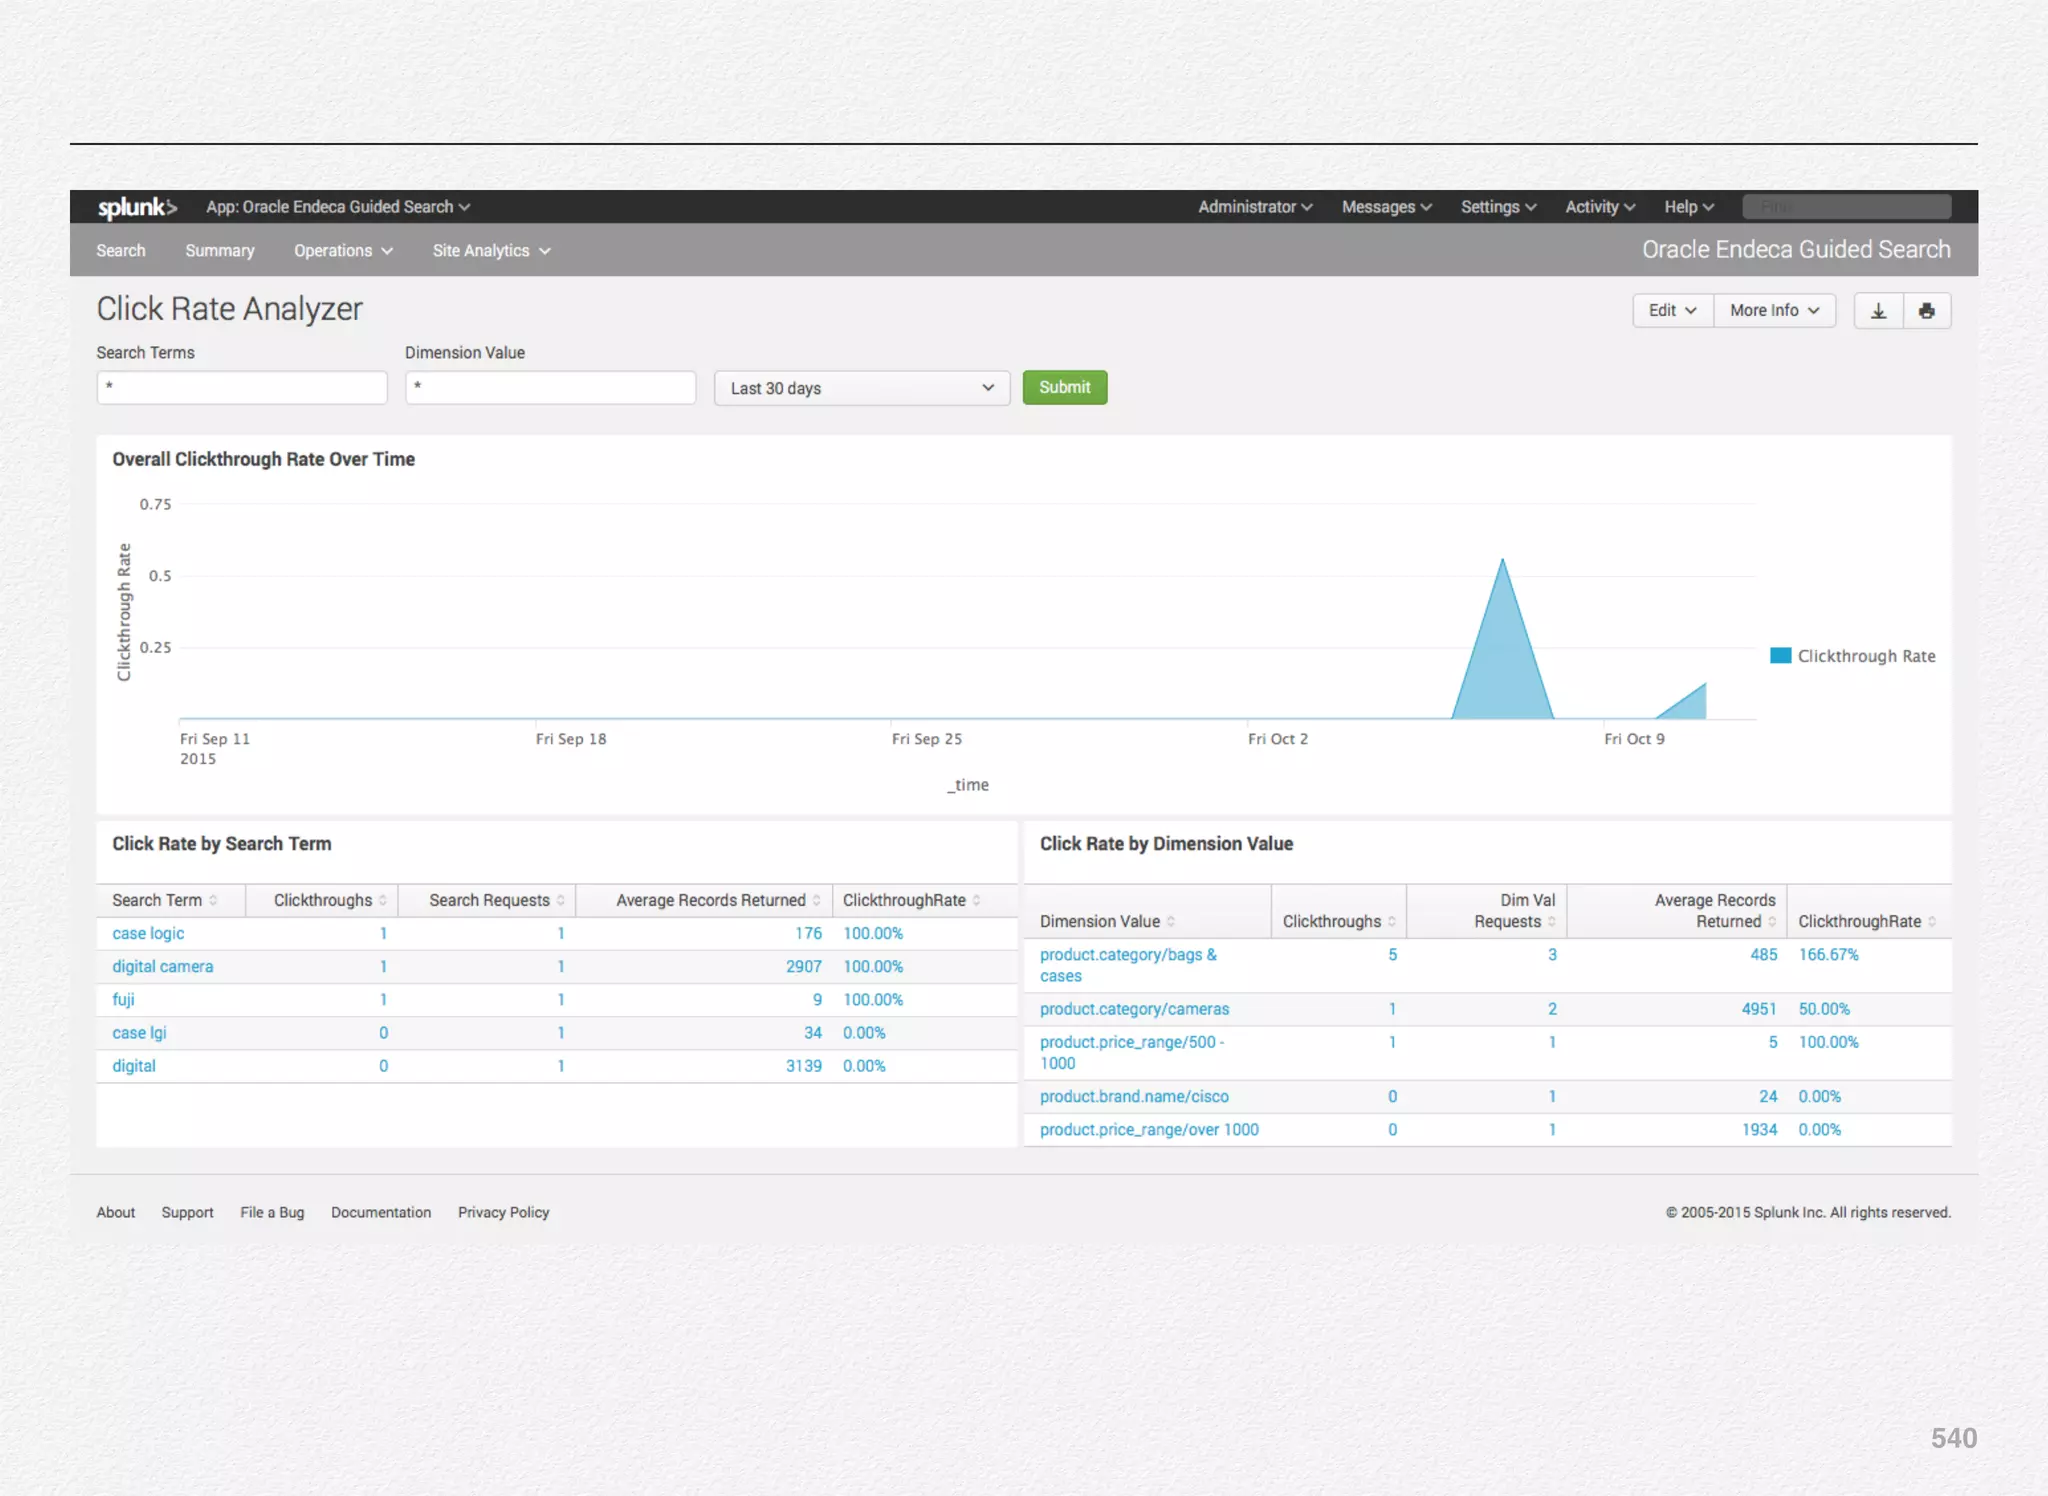
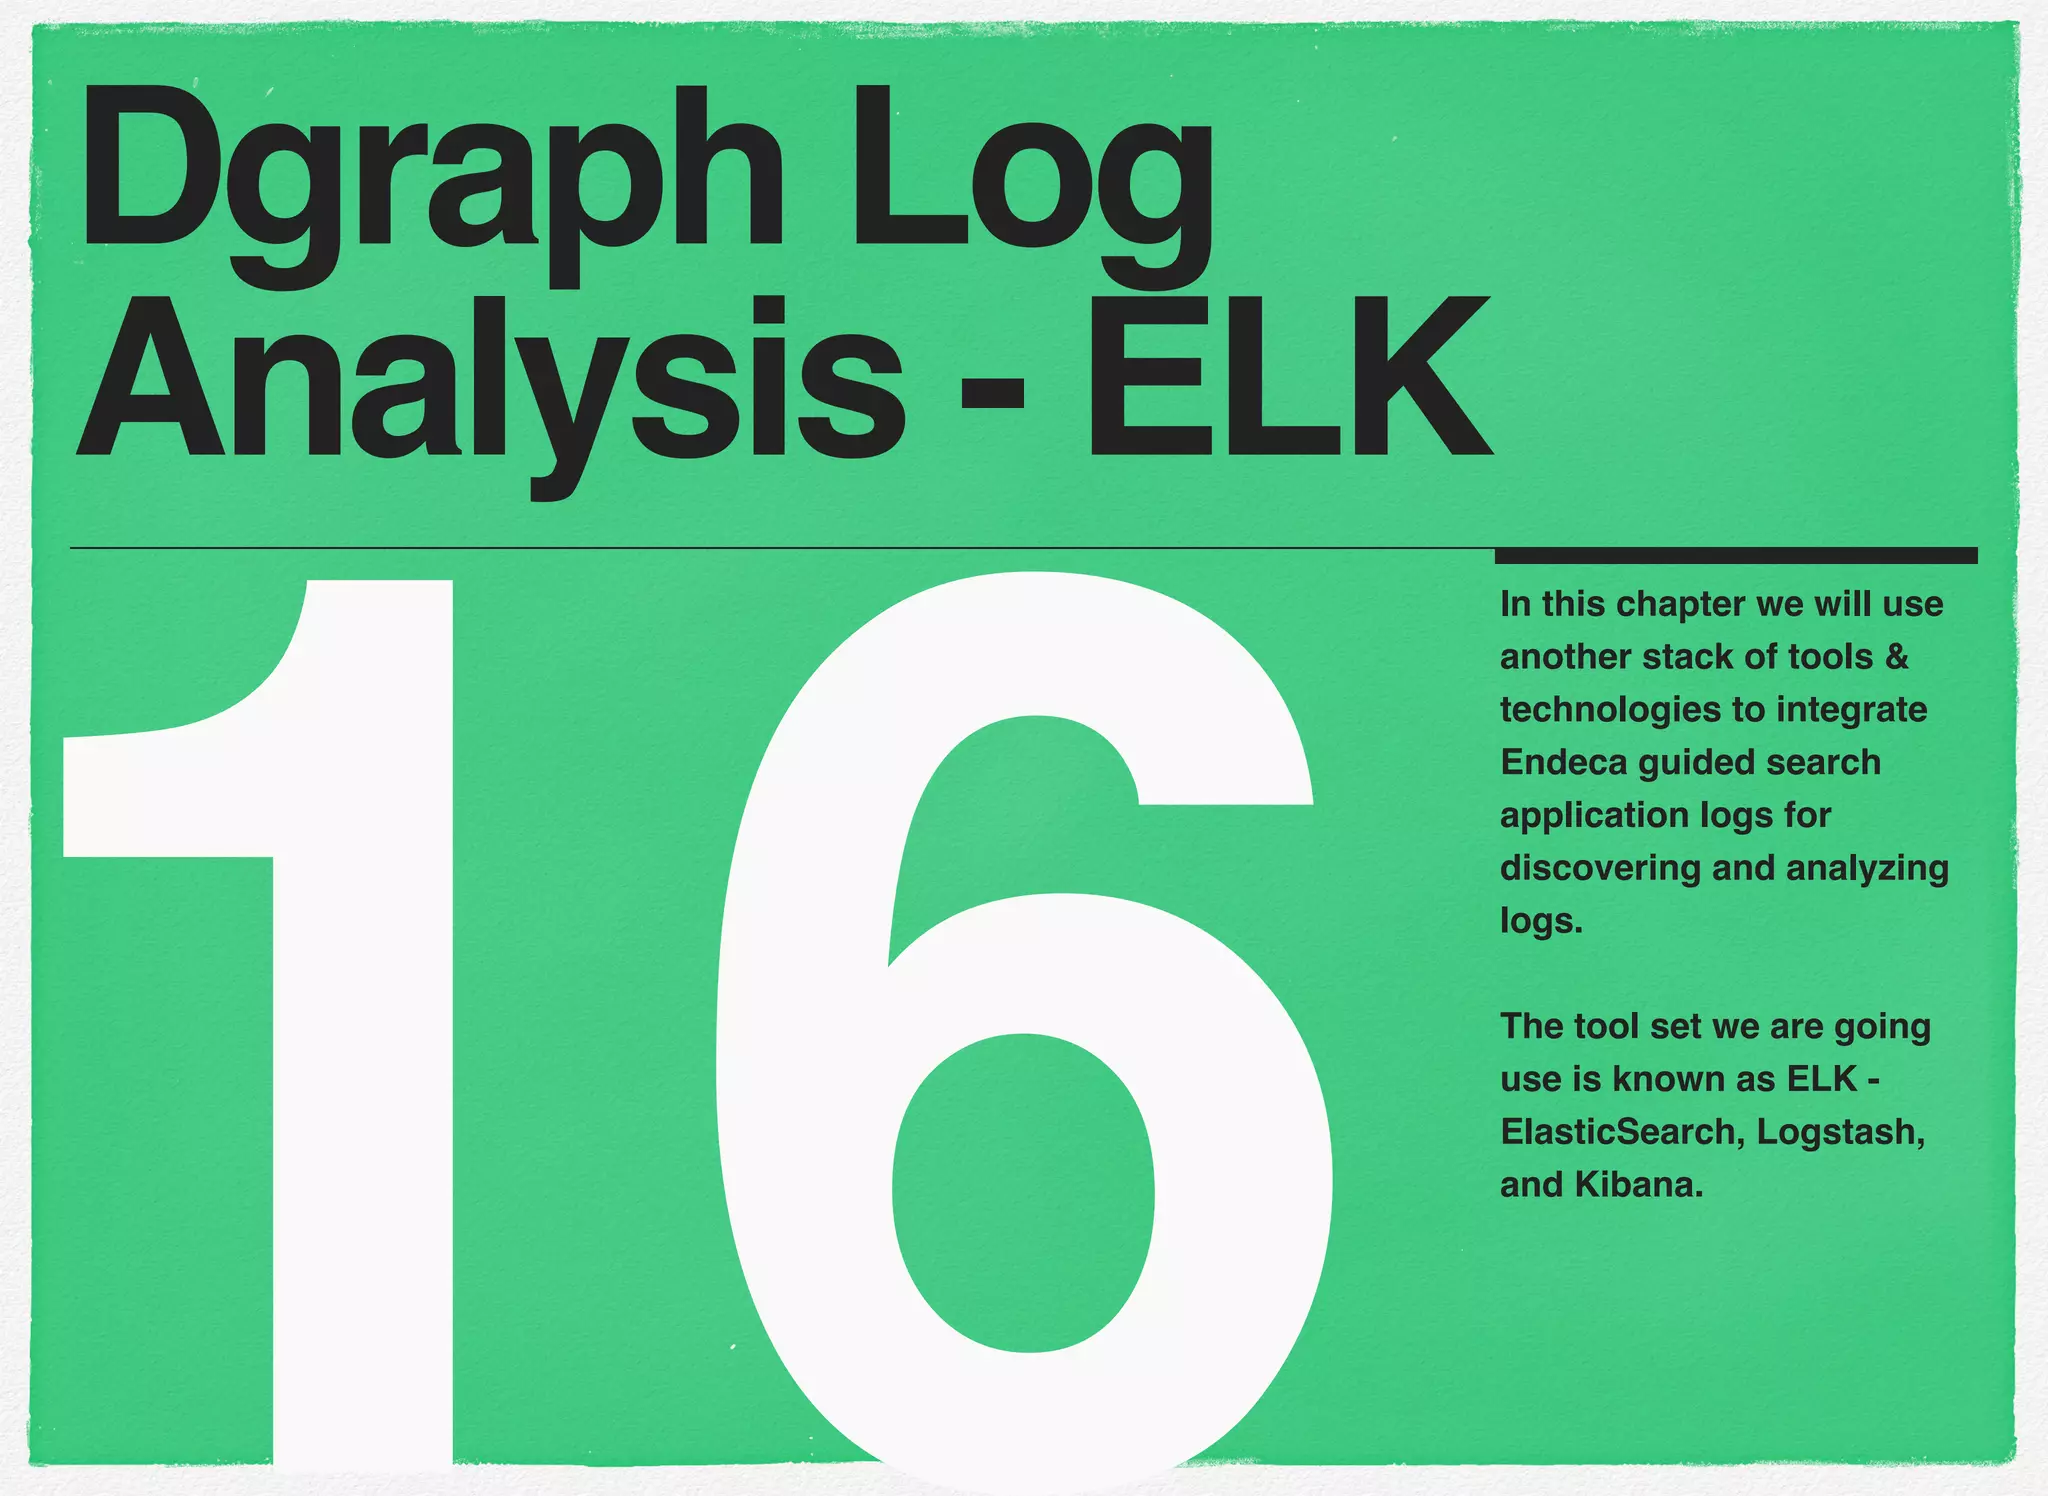
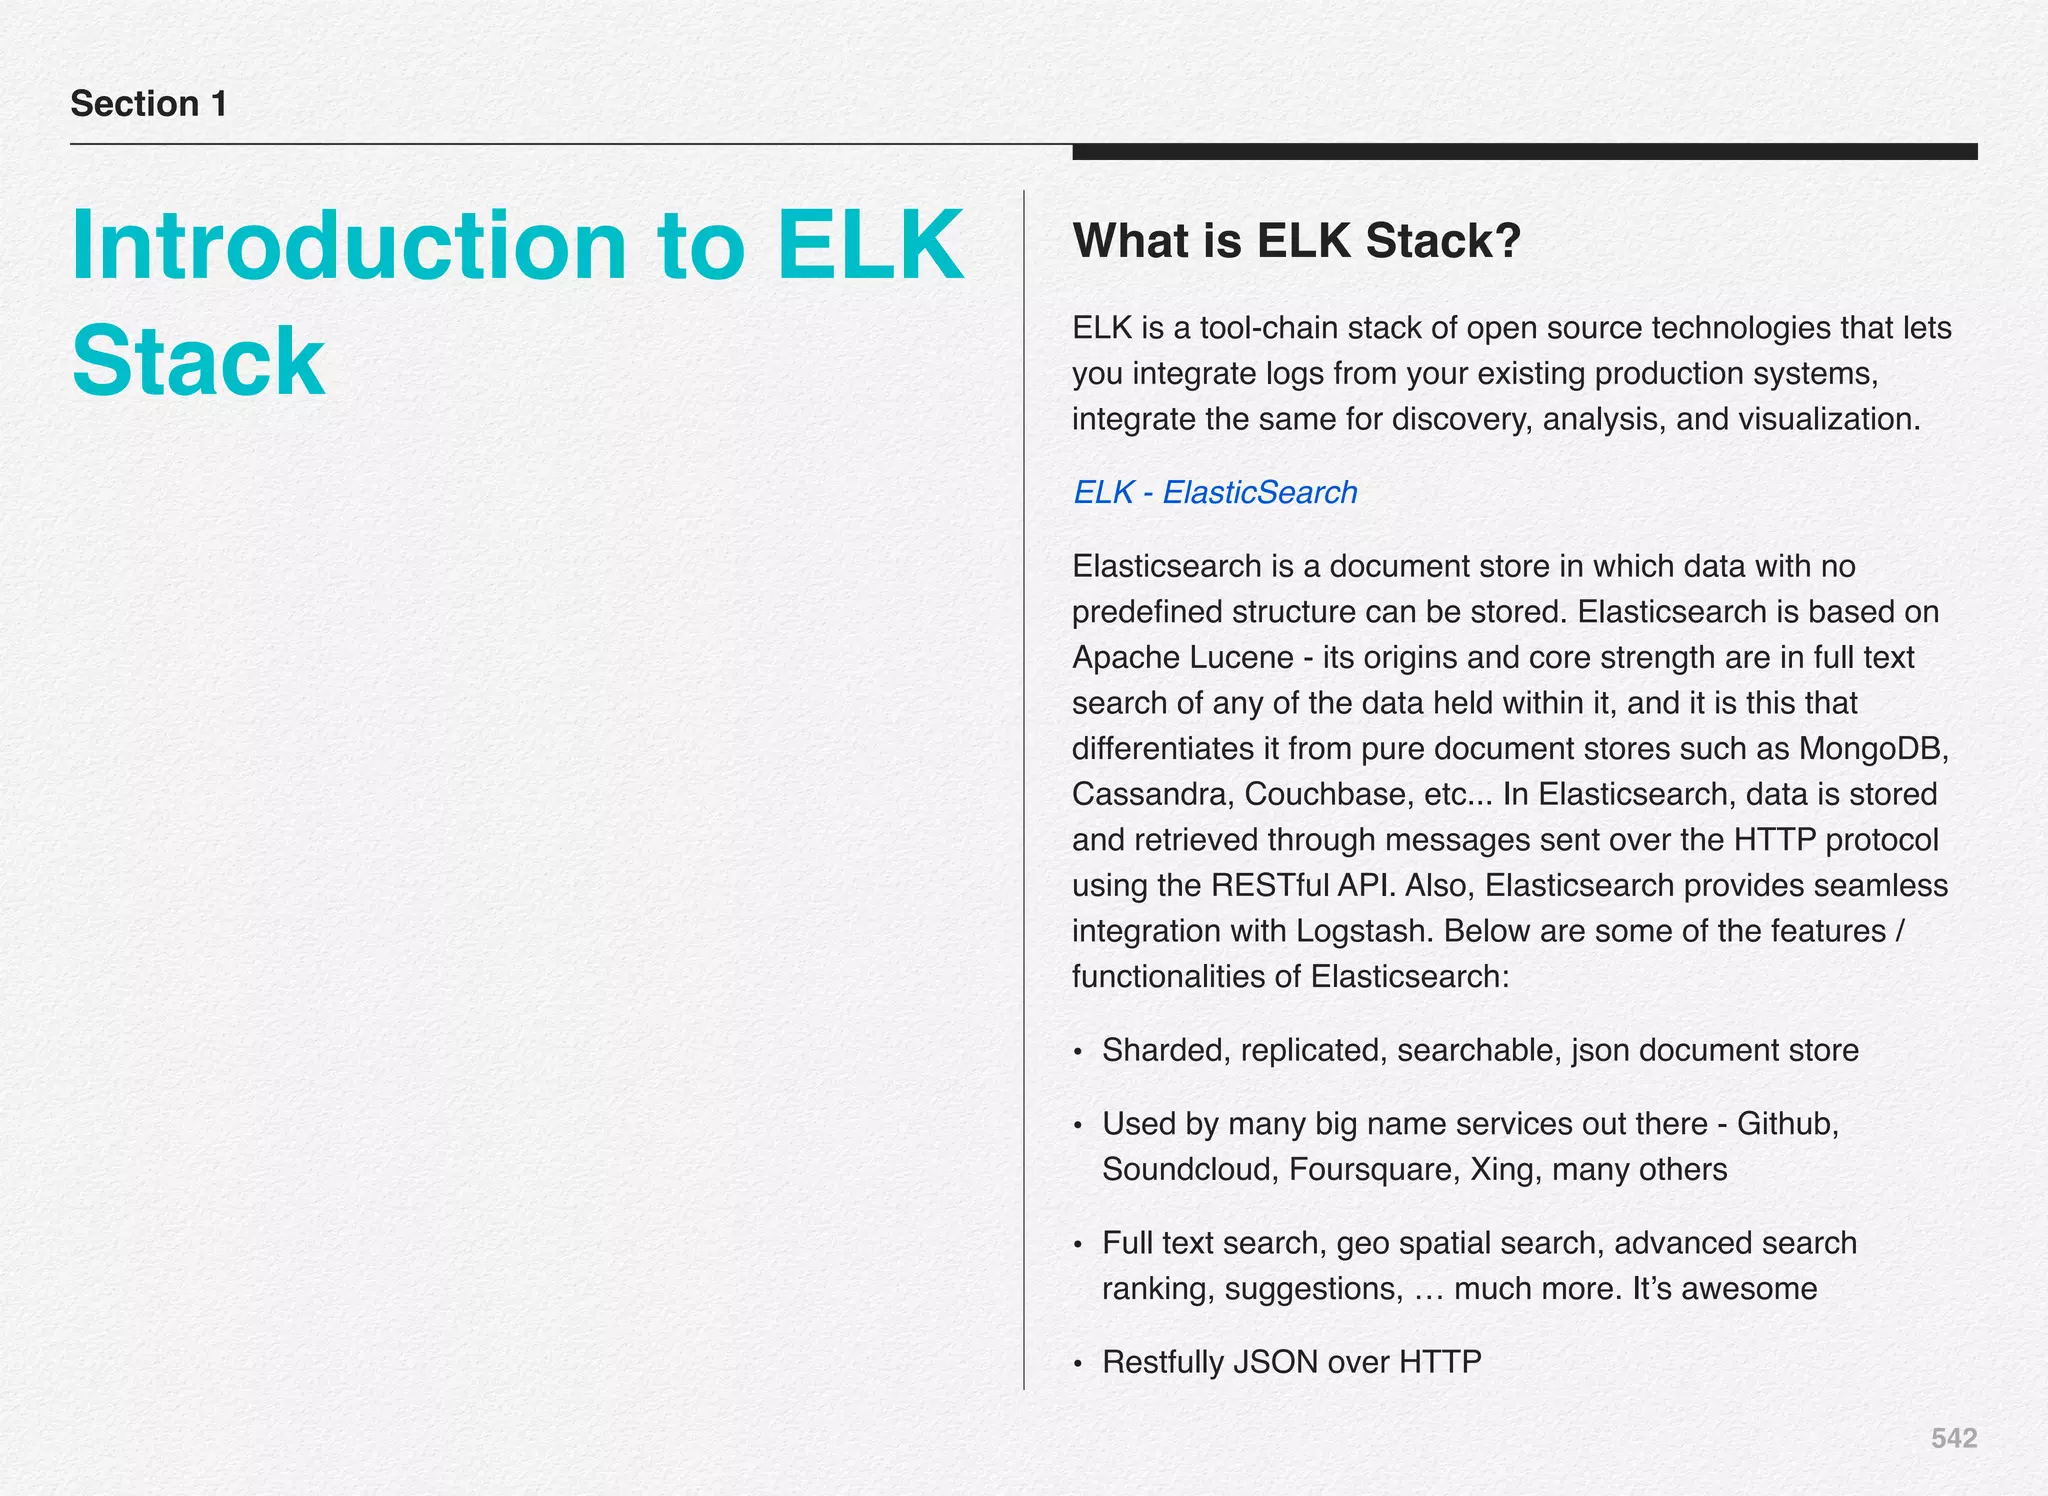
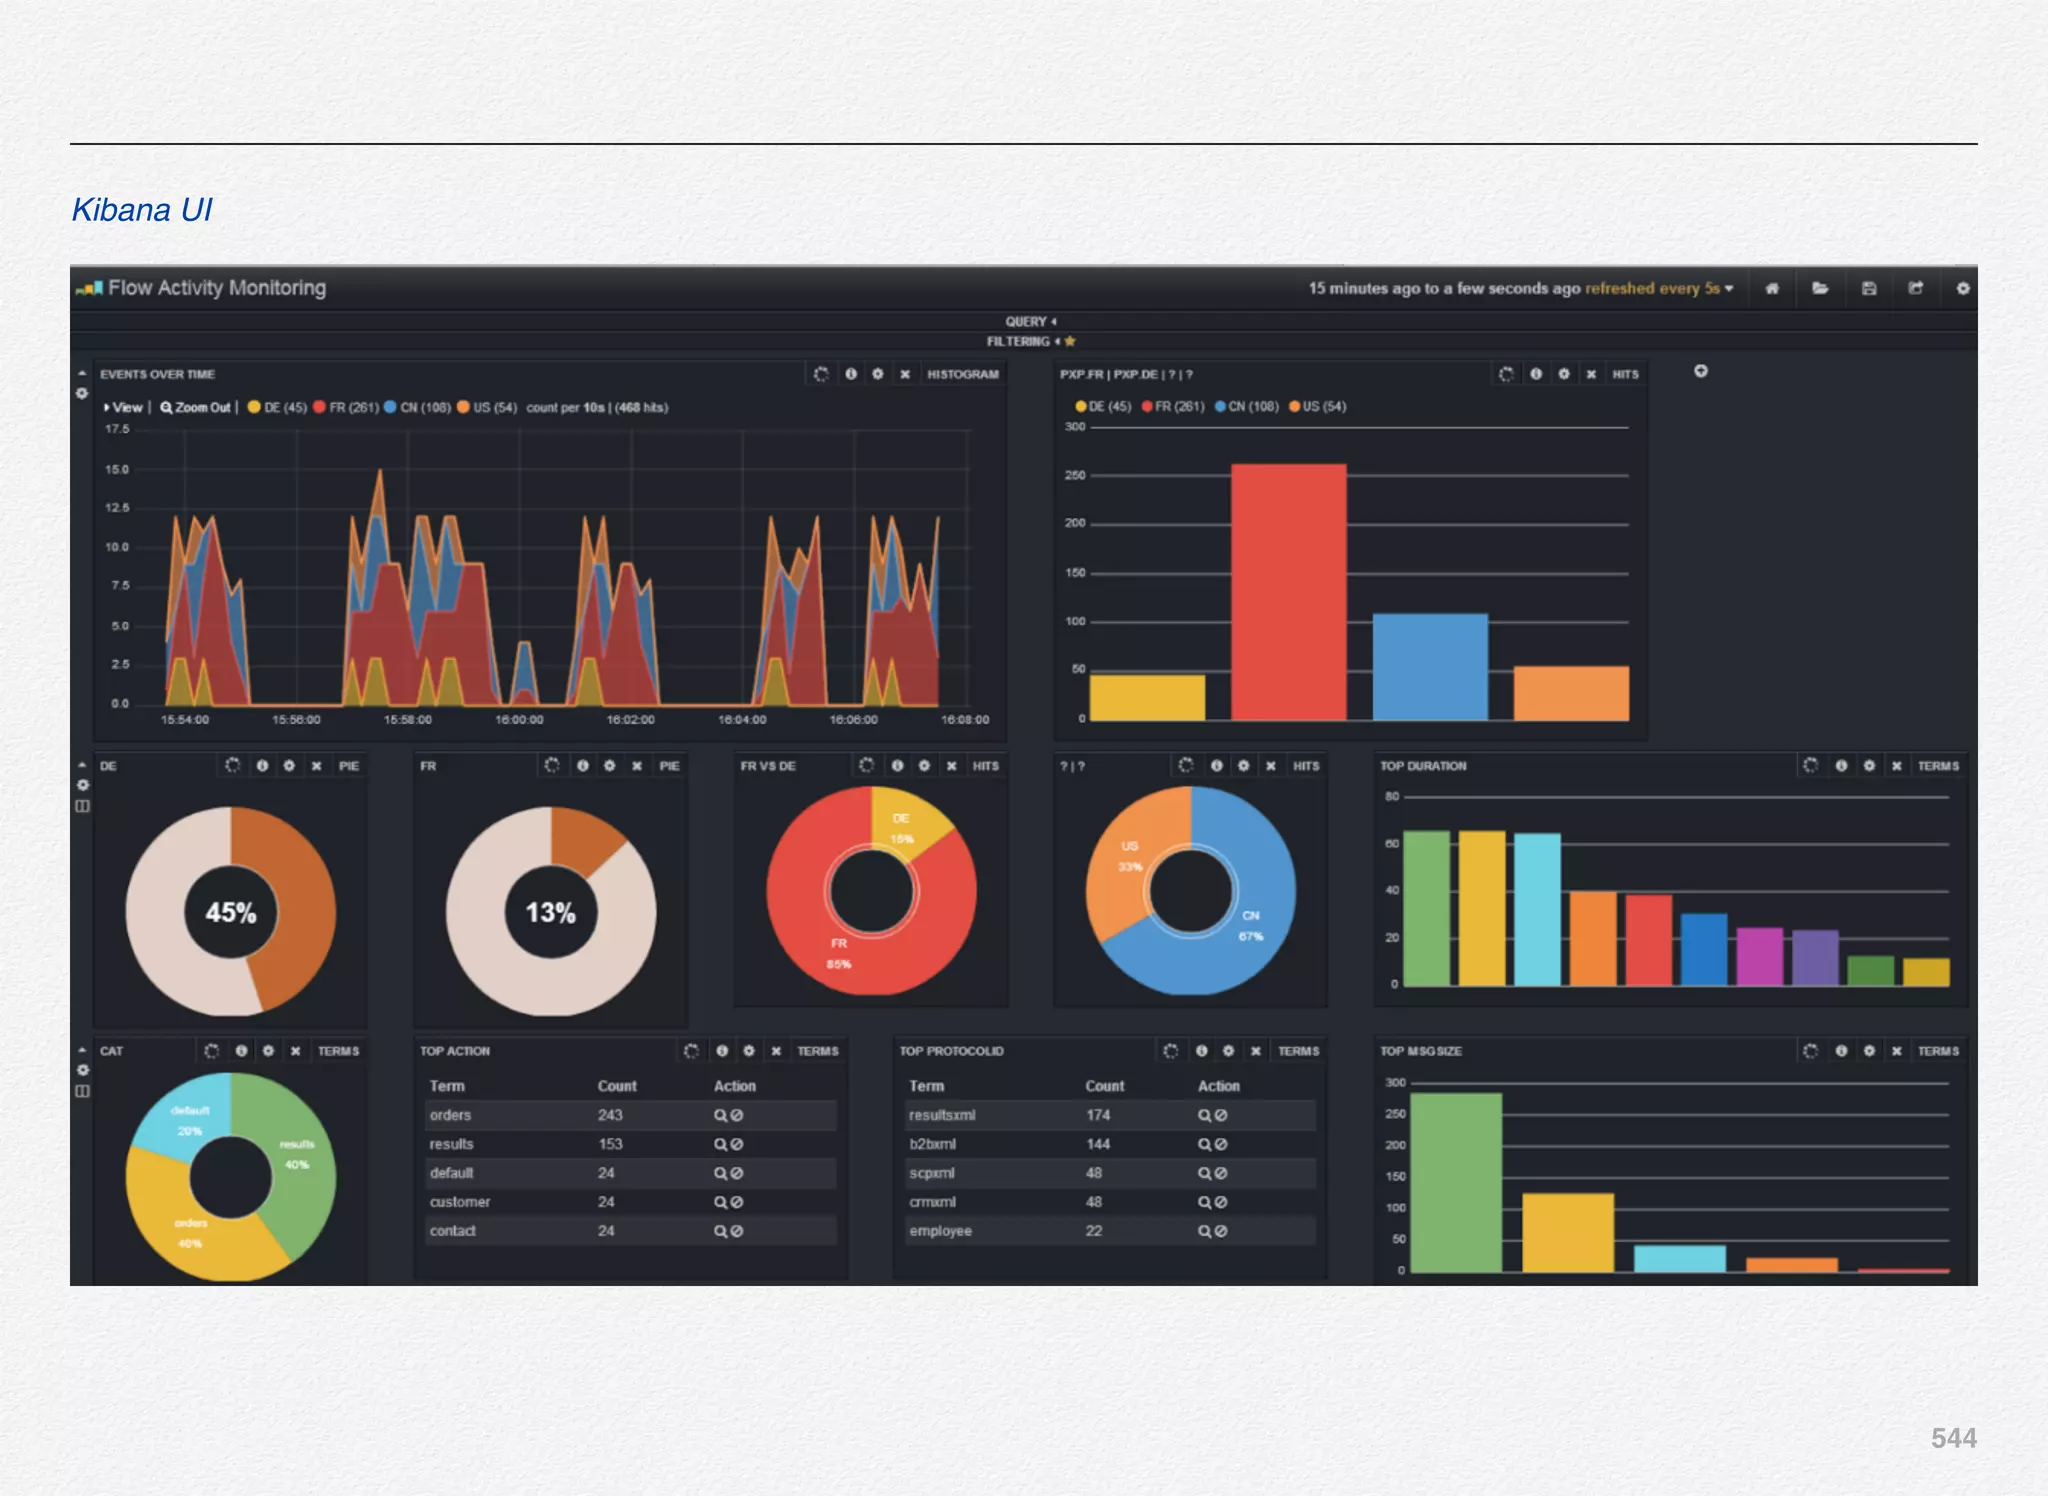
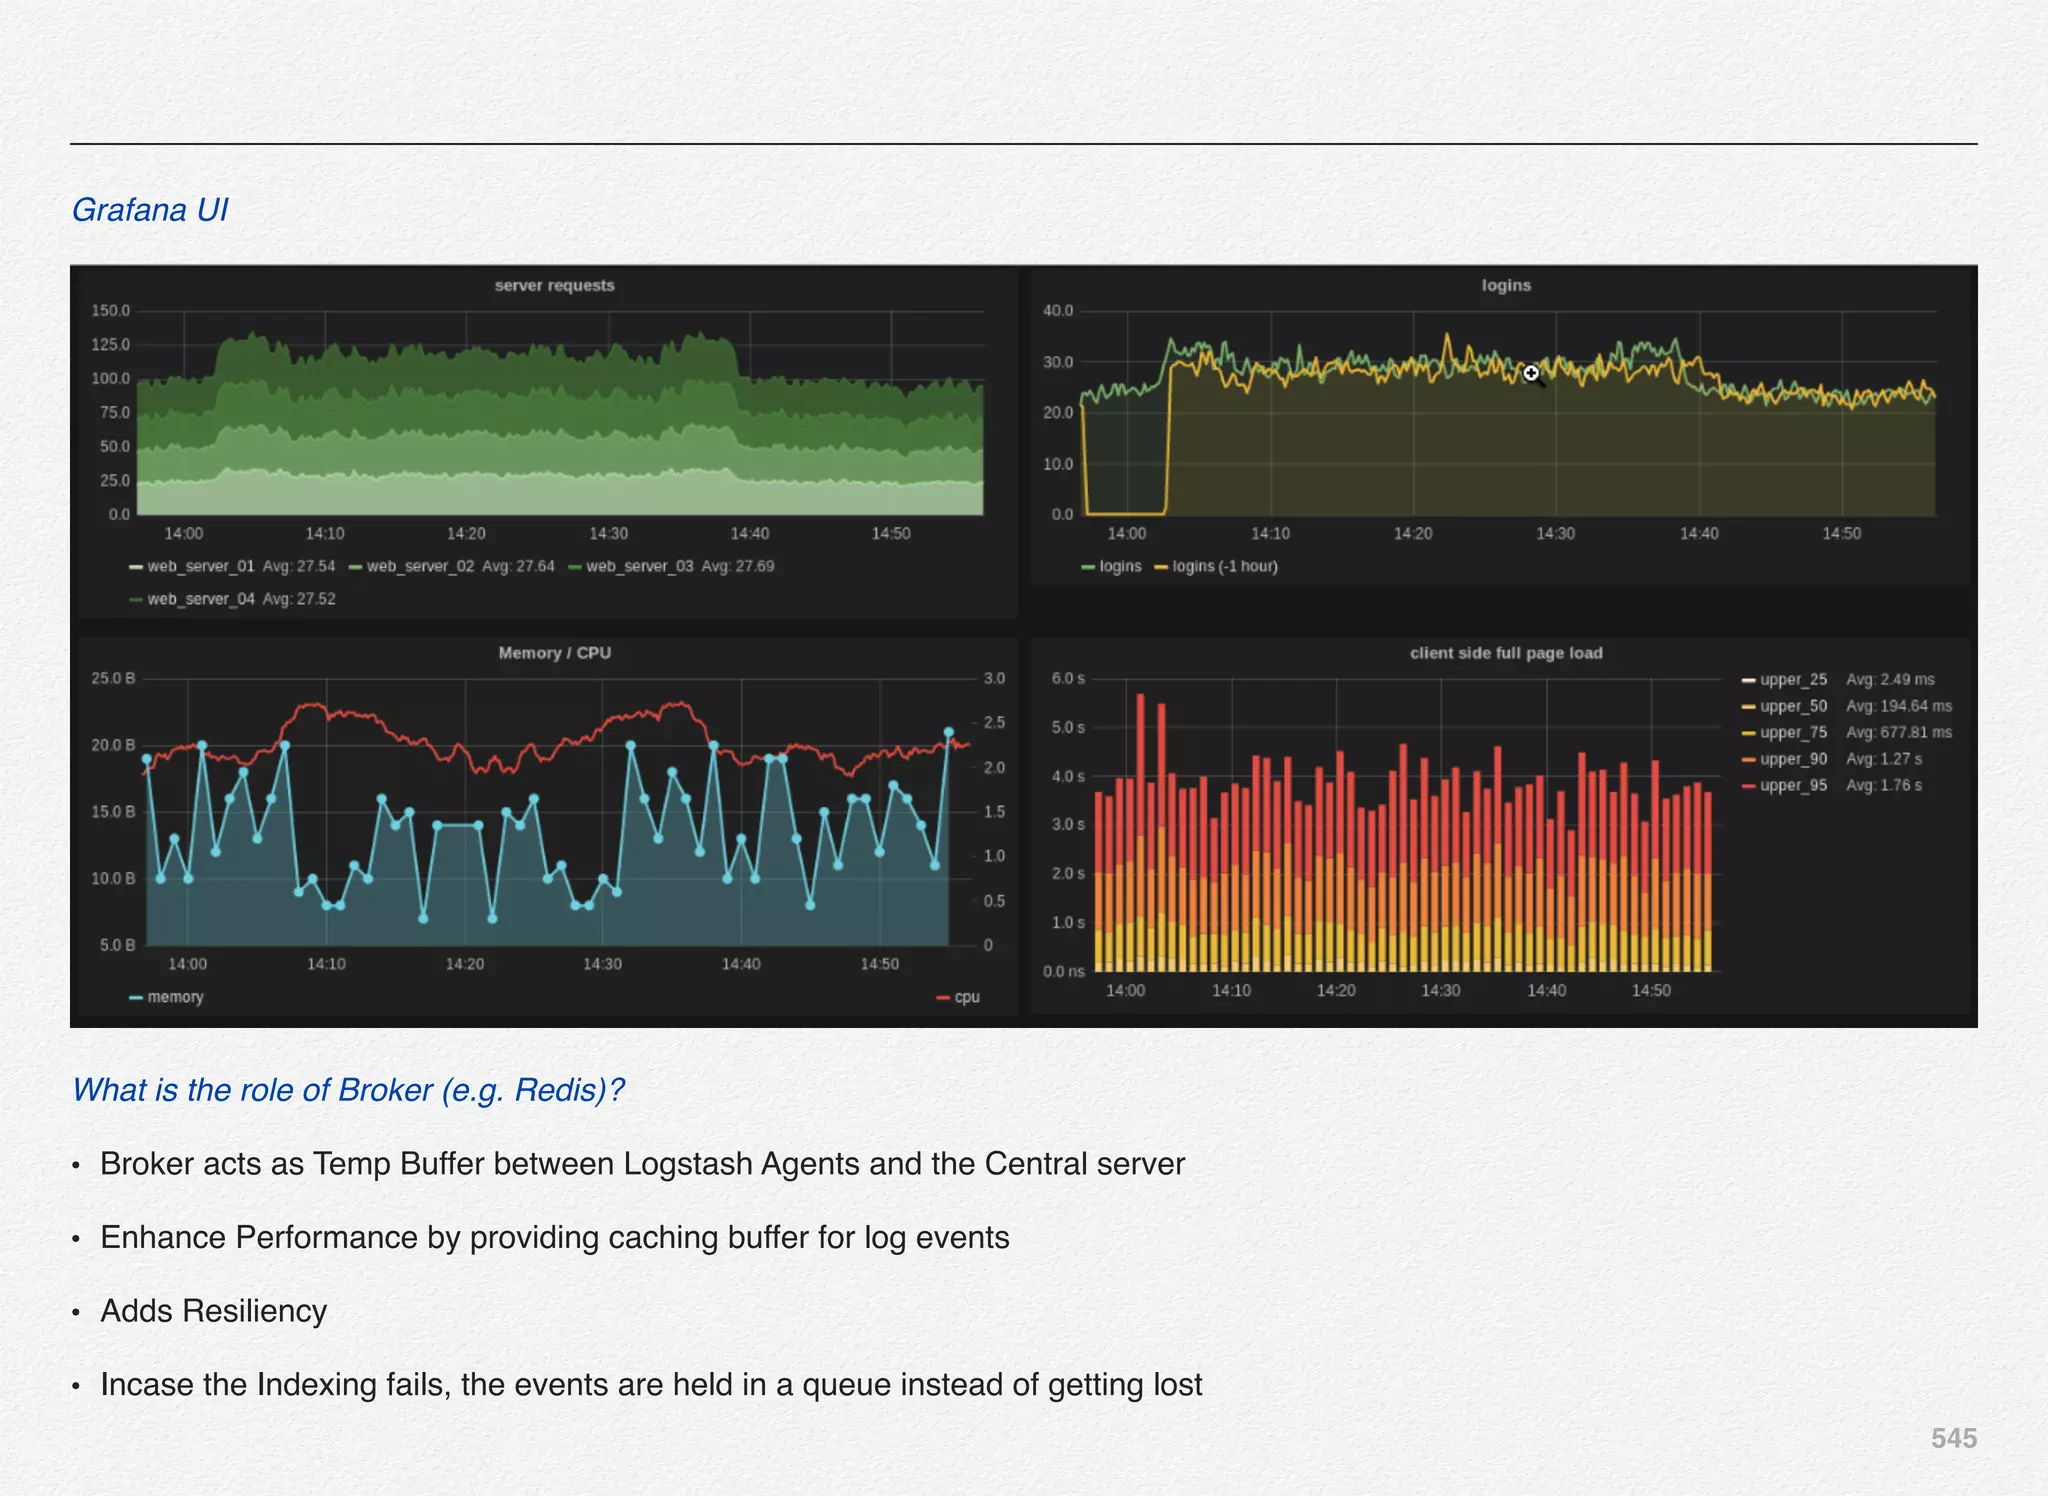
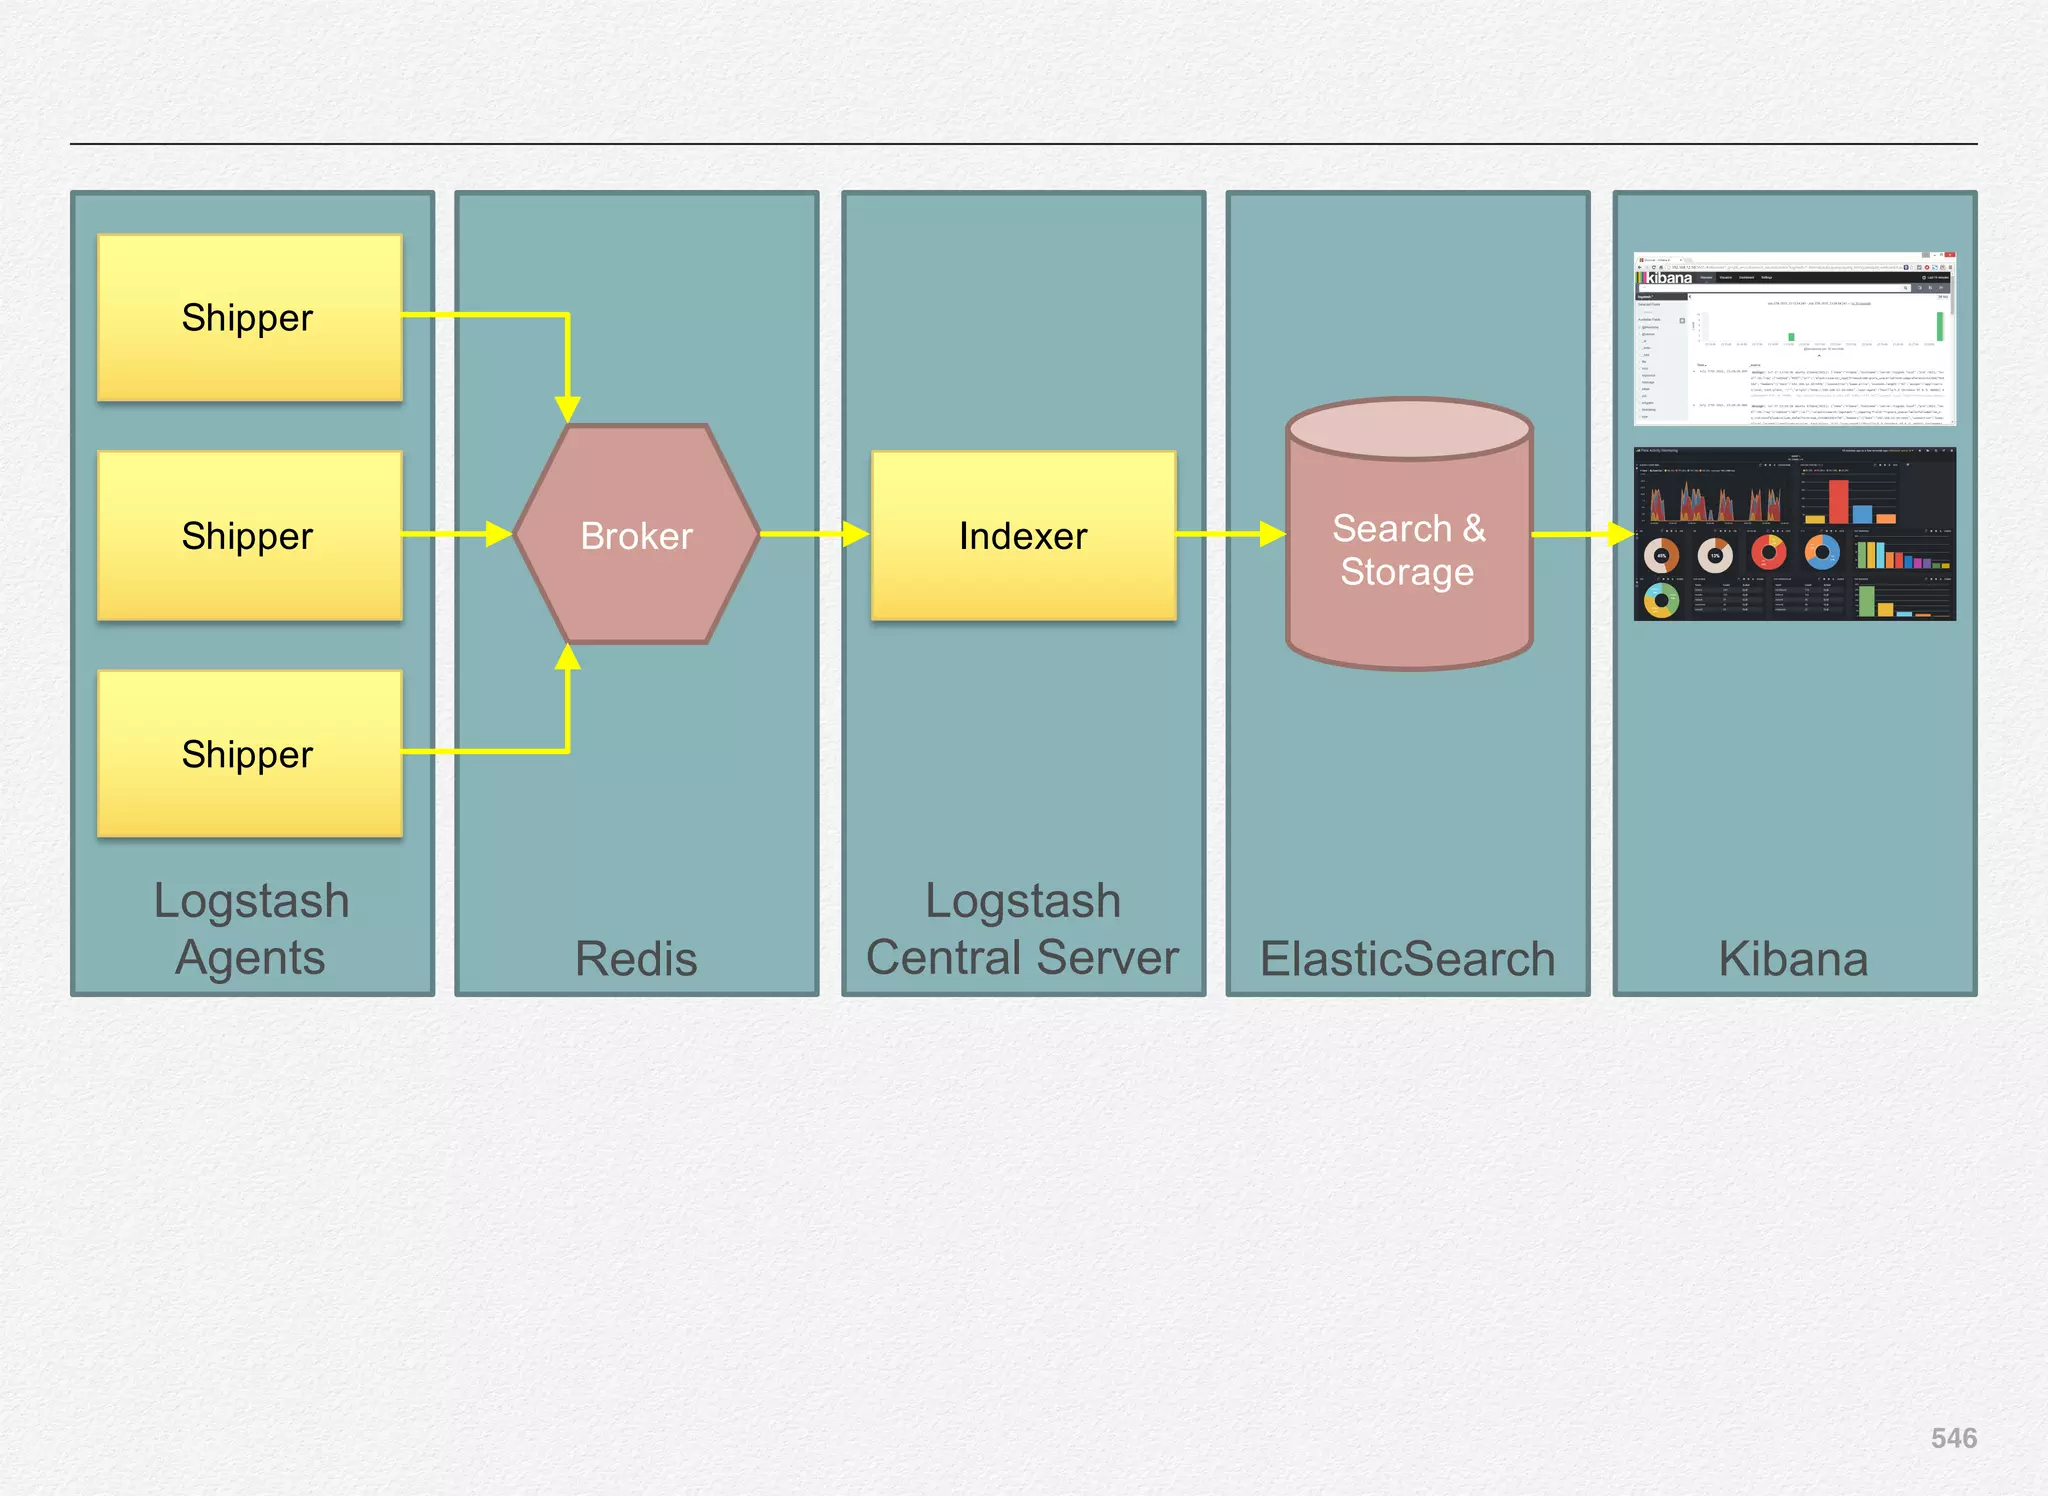
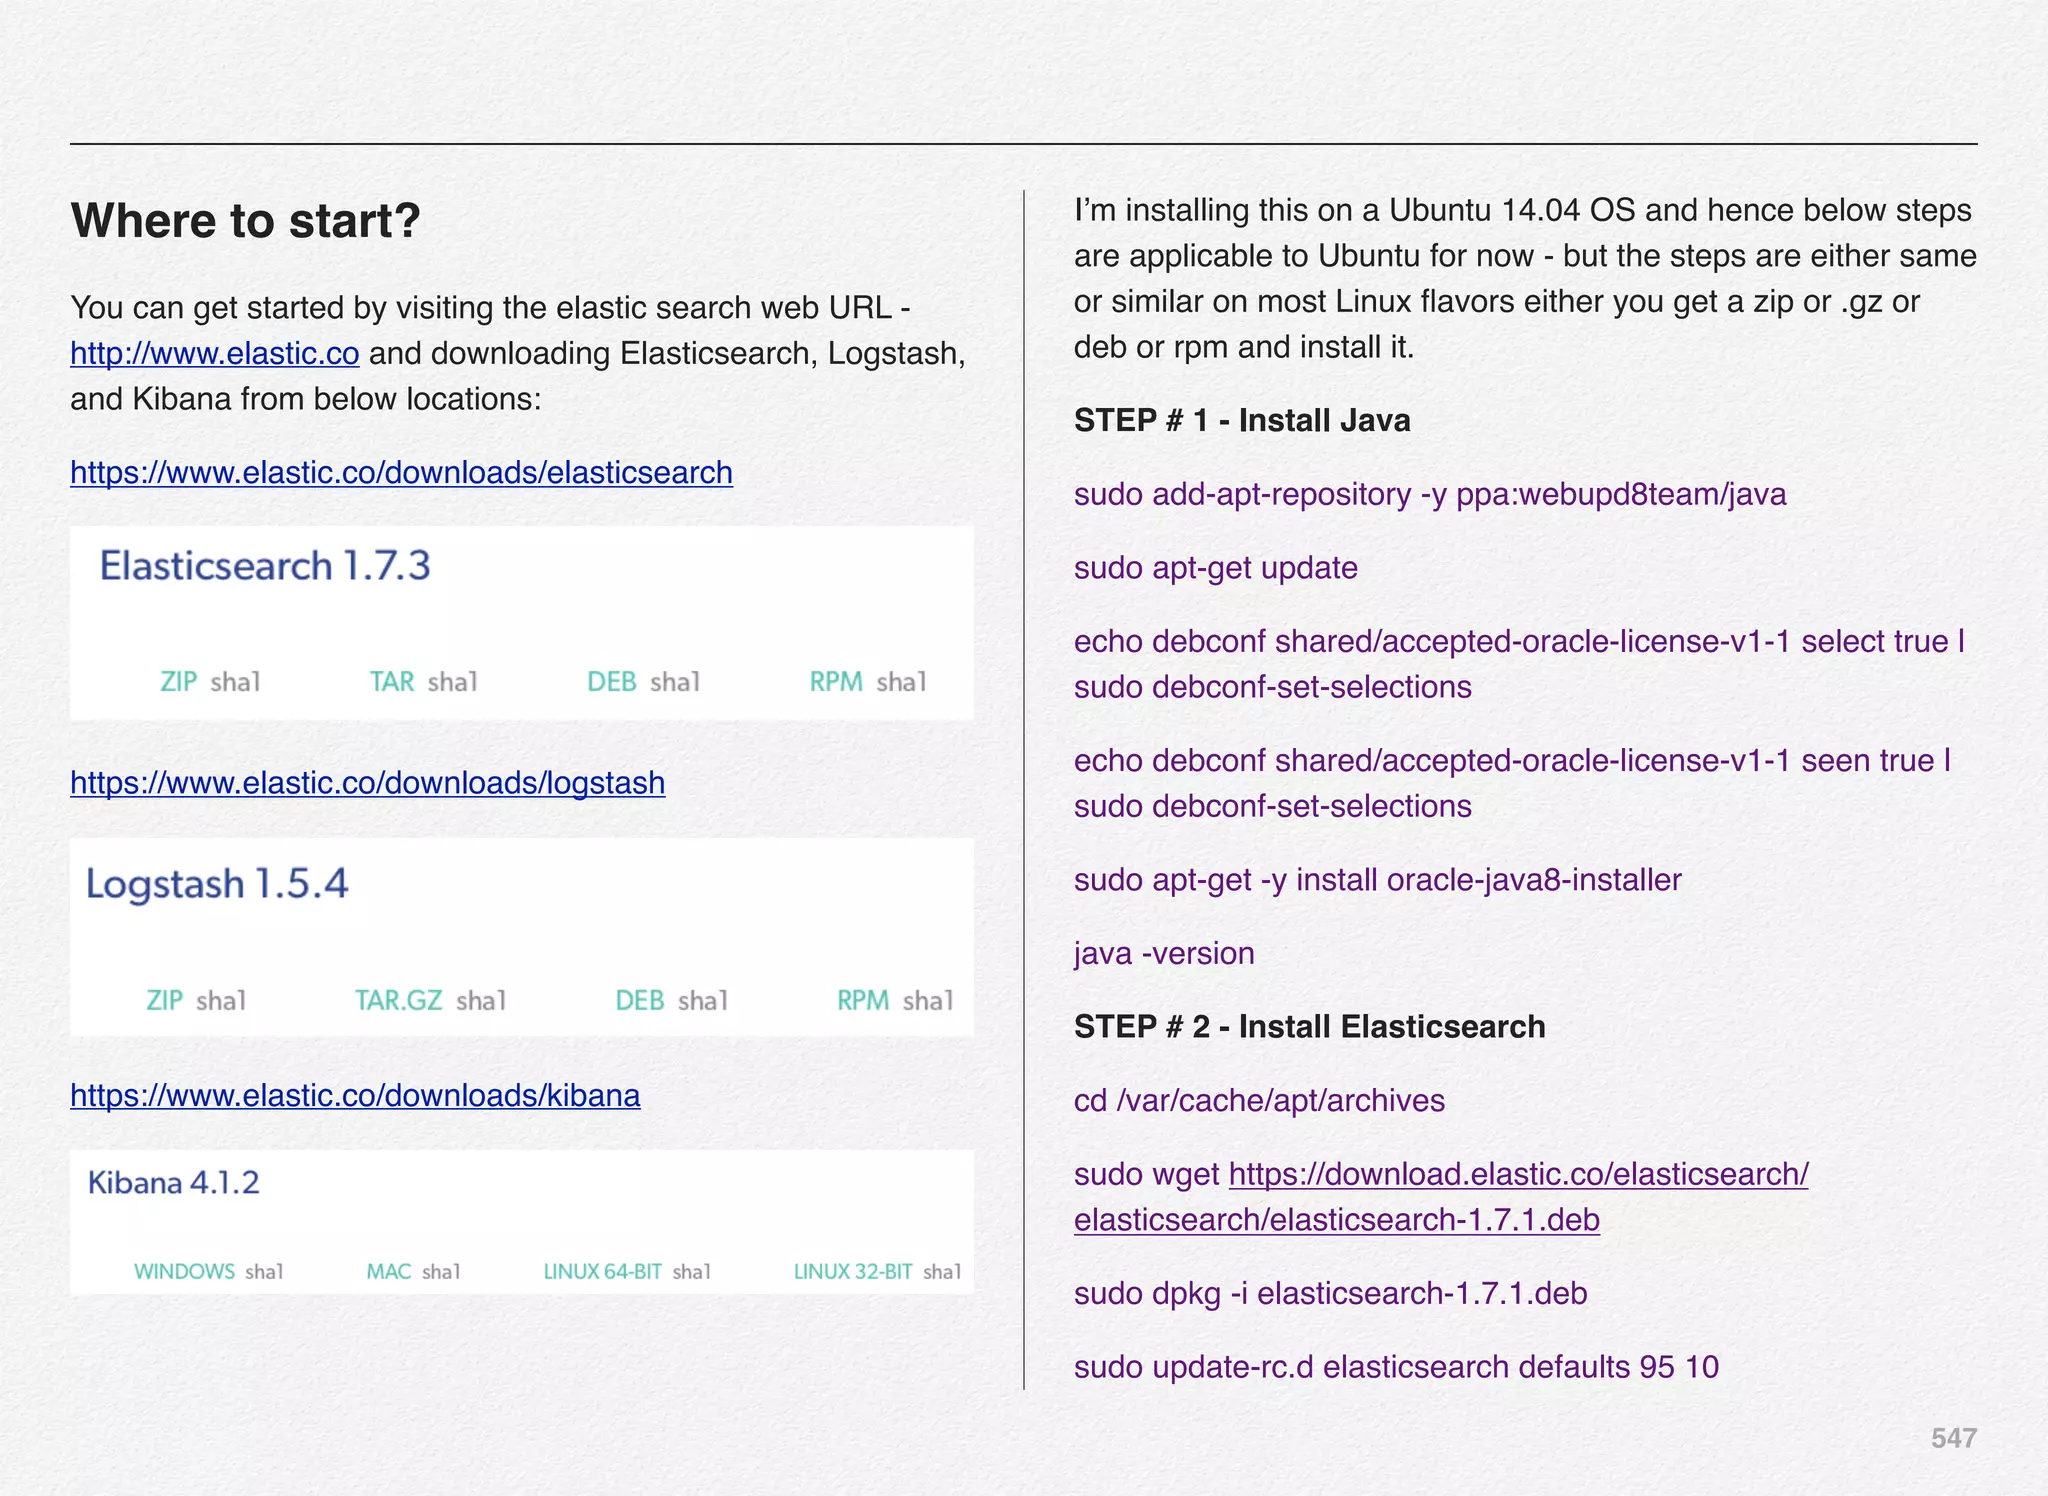
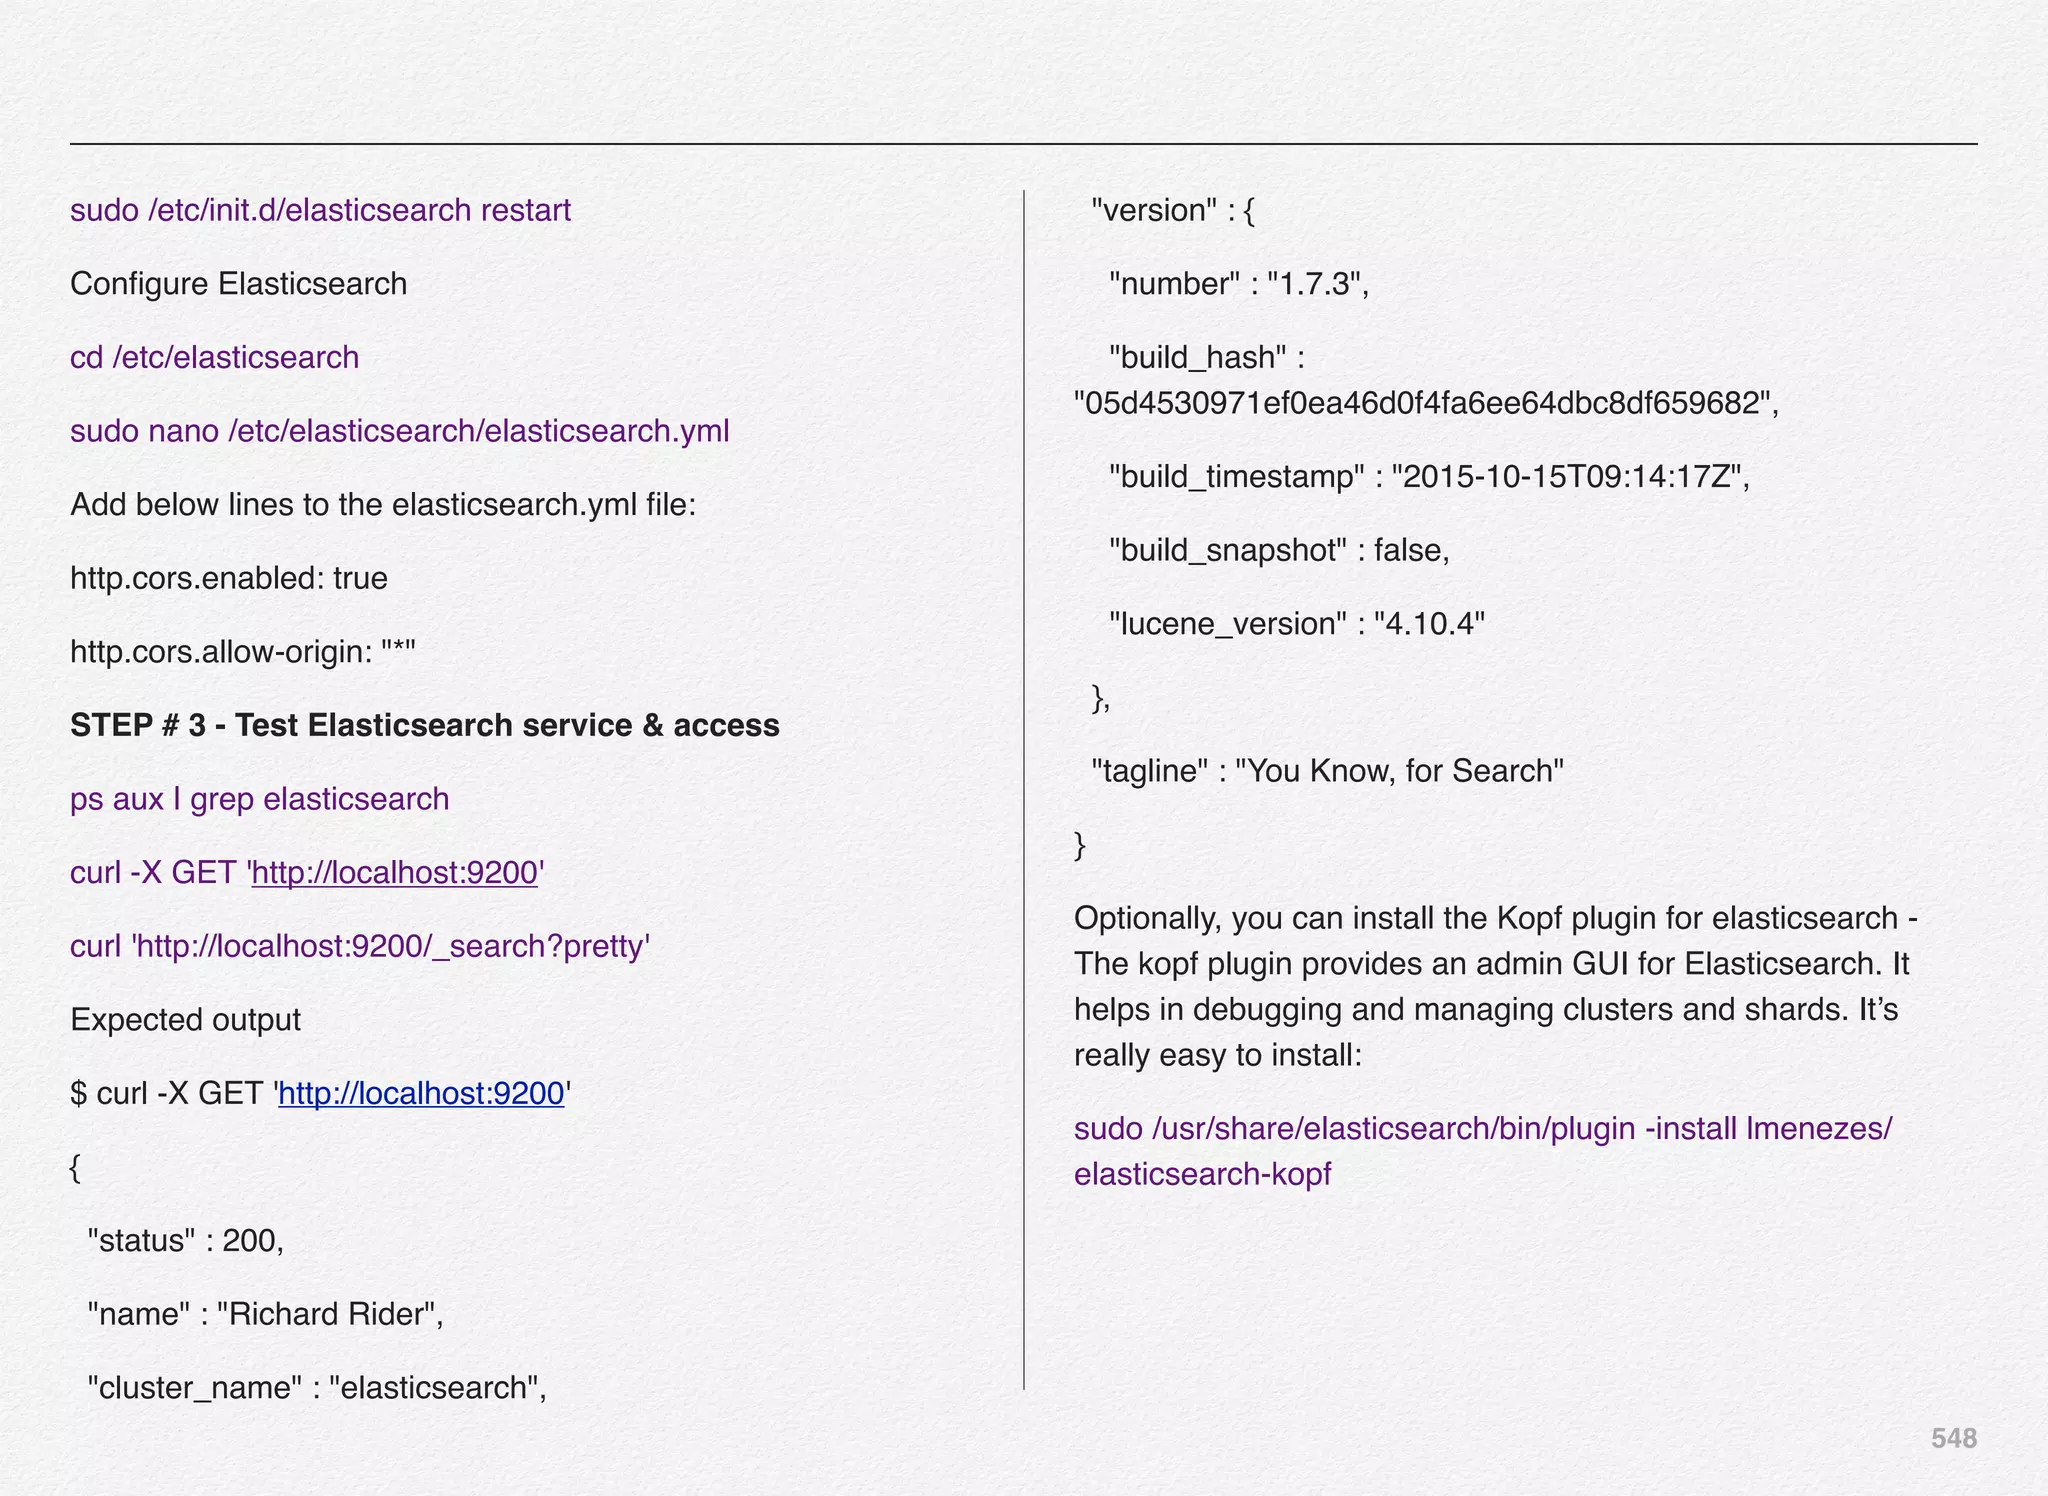
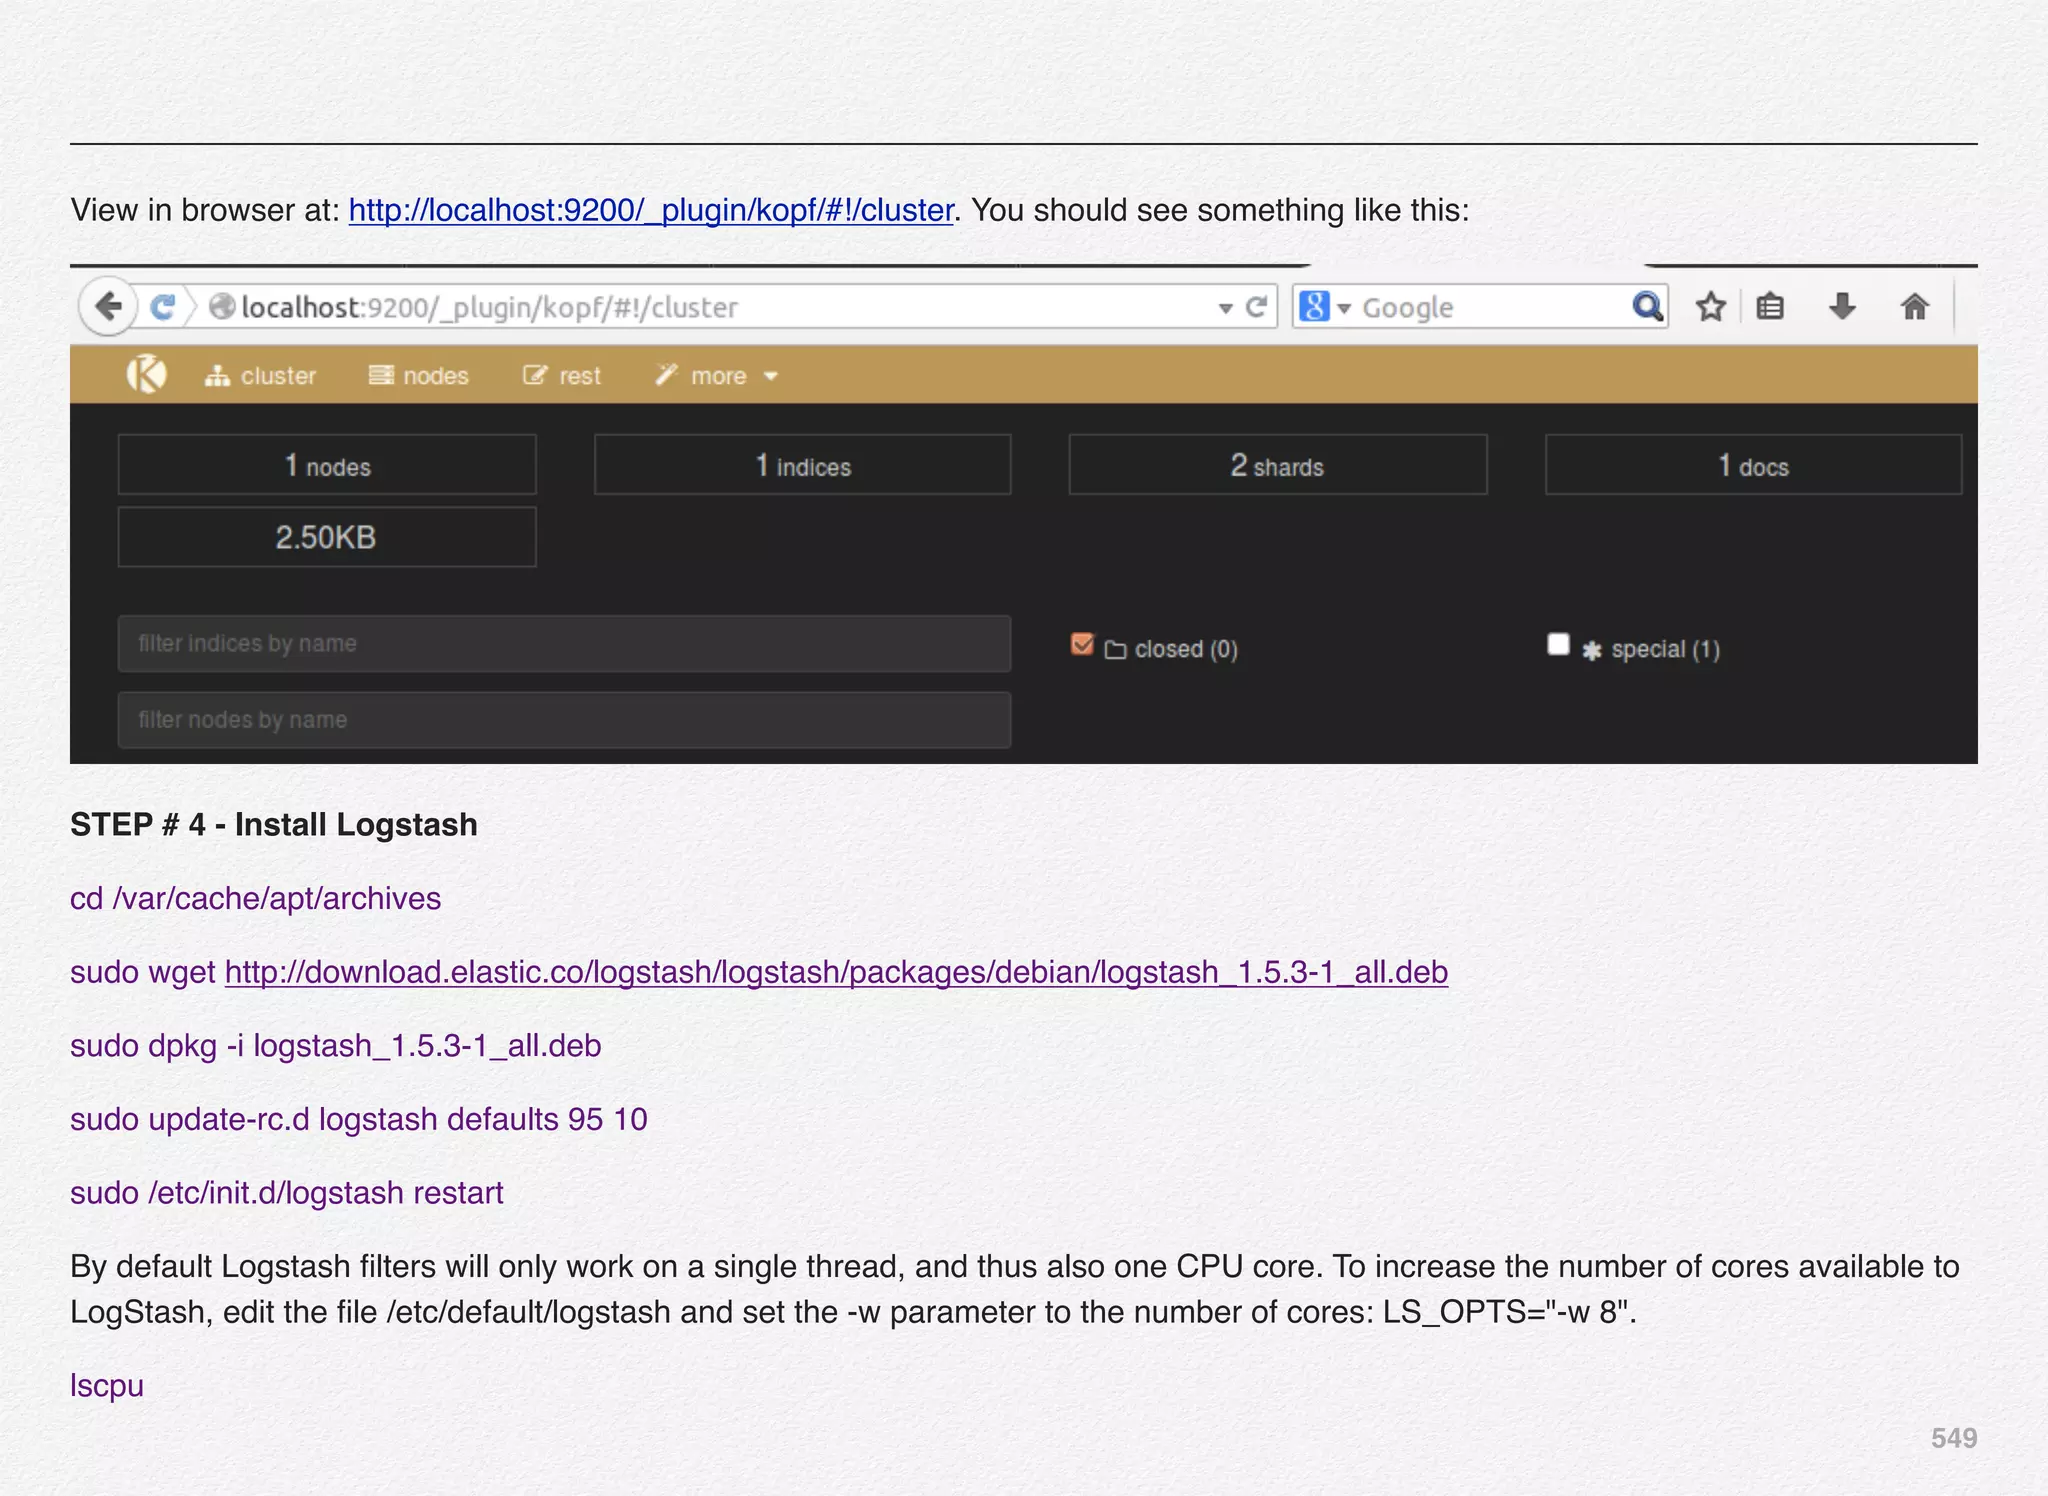

![552
Create a folder where you want to place Logstash config files
e.g. logstash-configs and create a file e.g. logstash-csv.conf
under the configs folder.
Below is the sample content for the logstash-csv.conf file:
input {
! file {
! ! path => "/home/parallels/Desktop/logstash-configs/
test.csv"
! ! type => "csv"
! ! start_position => "beginning"
! }
}
filter {
! csv {
! ! columns => ["name","age","gender"]
! ! separator => ","
! }
}
output {
! elasticsearch {
! ! action => "index"
! ! host => "localhost"
! ! index => "logstash-%{+YYYY.MM.dd}"
! ! workers => 1
! }
# stdout {
# codec => rubydebug
# }
}
INPUT BLOCK
In this config file, we have used the input {} code-block to make
Logstash aware about the source of the log/data file(s).
Logstash provides a number of different ways to get the data
into Logstash ranging from CSV, network logs, system logs,](https://image.slidesharecdn.com/oraclecommerce-doityourselfseries-160129151710/75/Oracle-Commerce-Using-ATG-Endeca-Do-It-Yourself-Series-553-2048.jpg)
![555
! •! sleep
! •! split
! •! throttle
! •! translate
! •! uuid
! •! urldecode
! •! useragent
! •! xml
! •! zeromq
We might have 10-20 attributes in the csv file (e.g. Name, Age,
Gender, Address, City, Zipcode, Occupation, etc...) - but we
might be just interested in 3-4 attributes to be used by Logstash
for indexing. Hence, we will use the filter{} block to customize
that. This helps in not burdening Logstash central server and
Elasticsearch with unnecessary data and keeps these servers
light weight.
So, while planning the storage for central server and
Elasticsearch you need to be careful and calculate based on
how much data will be pushed to Central server and
Elasticsearch v/s how much is available at the point of data
origin.
filter {
! csv {
! ! columns => ["name","age","gender"]
! ! separator => ","
! }
}
The first option, columns, allows us to specify the names of the
columns in our csv file e.g. name, age, gender. By default,
logstash will simply name them using a default name / number
format where the first column would be named column1 and the
7th column would be named column7 - if not specified.
Optionally, you can specify the names of columns you want
Logstash to extract and send to Elasticsearch for indexing e.g.
by specifying columns => [“name”, “age”, “gender”]
The second option, separator, is used to specify and tell
Logstash which character is used to separate columns. The
default separator character is "," as we set it specifically in the](https://image.slidesharecdn.com/oraclecommerce-doityourselfseries-160129151710/75/Oracle-Commerce-Using-ATG-Endeca-Do-It-Yourself-Series-556-2048.jpg)
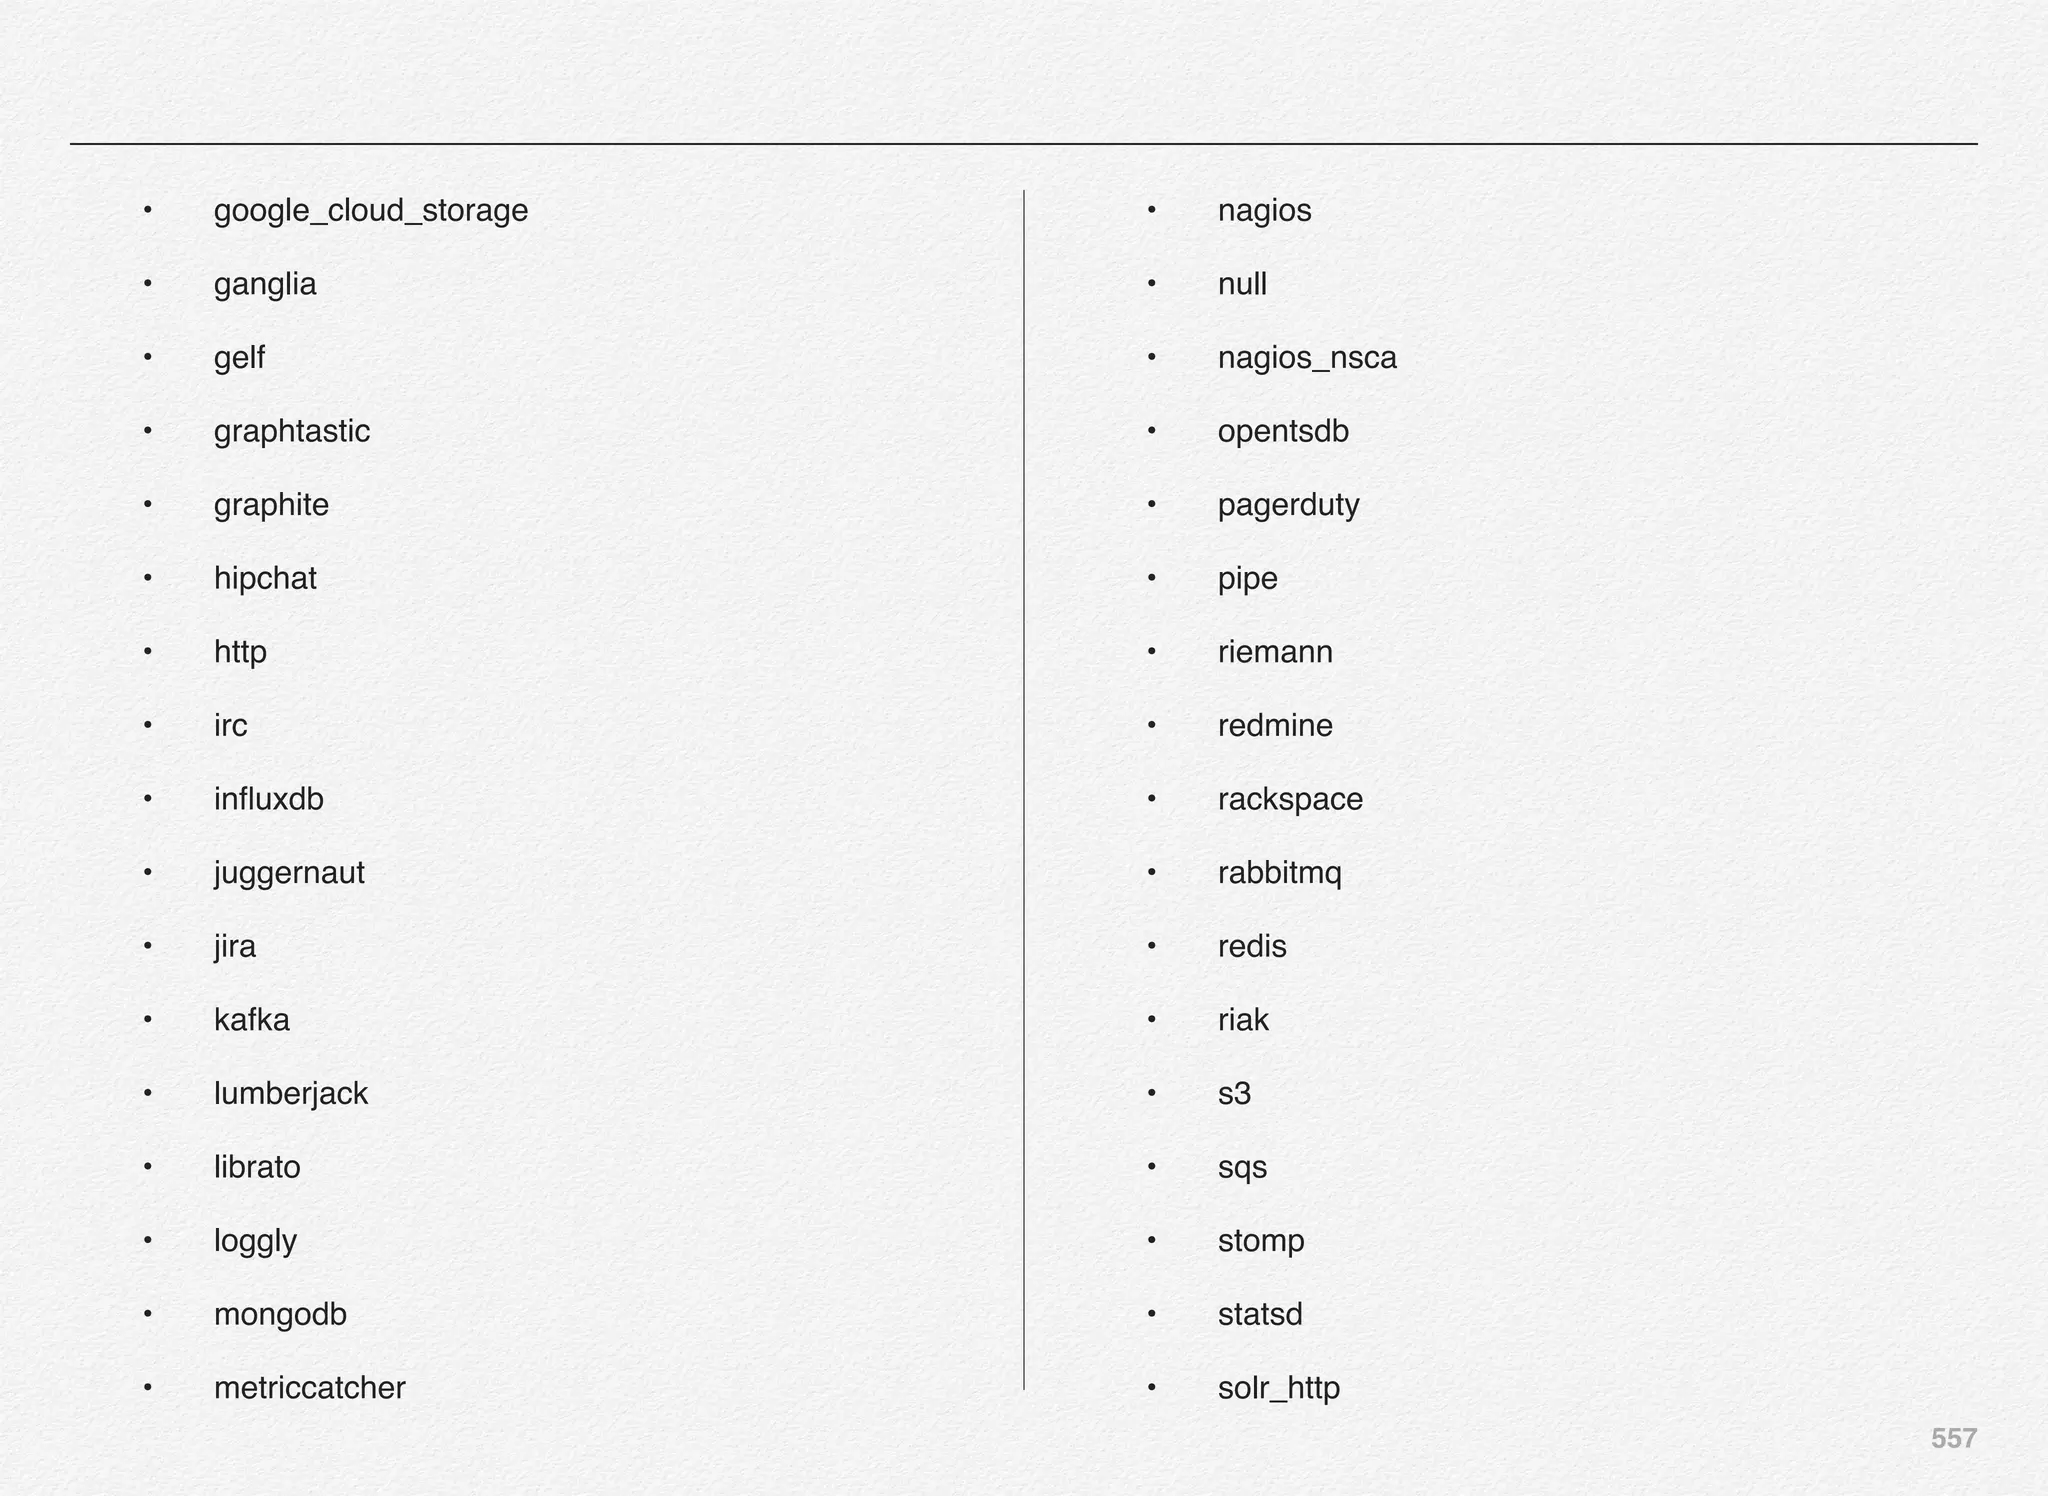
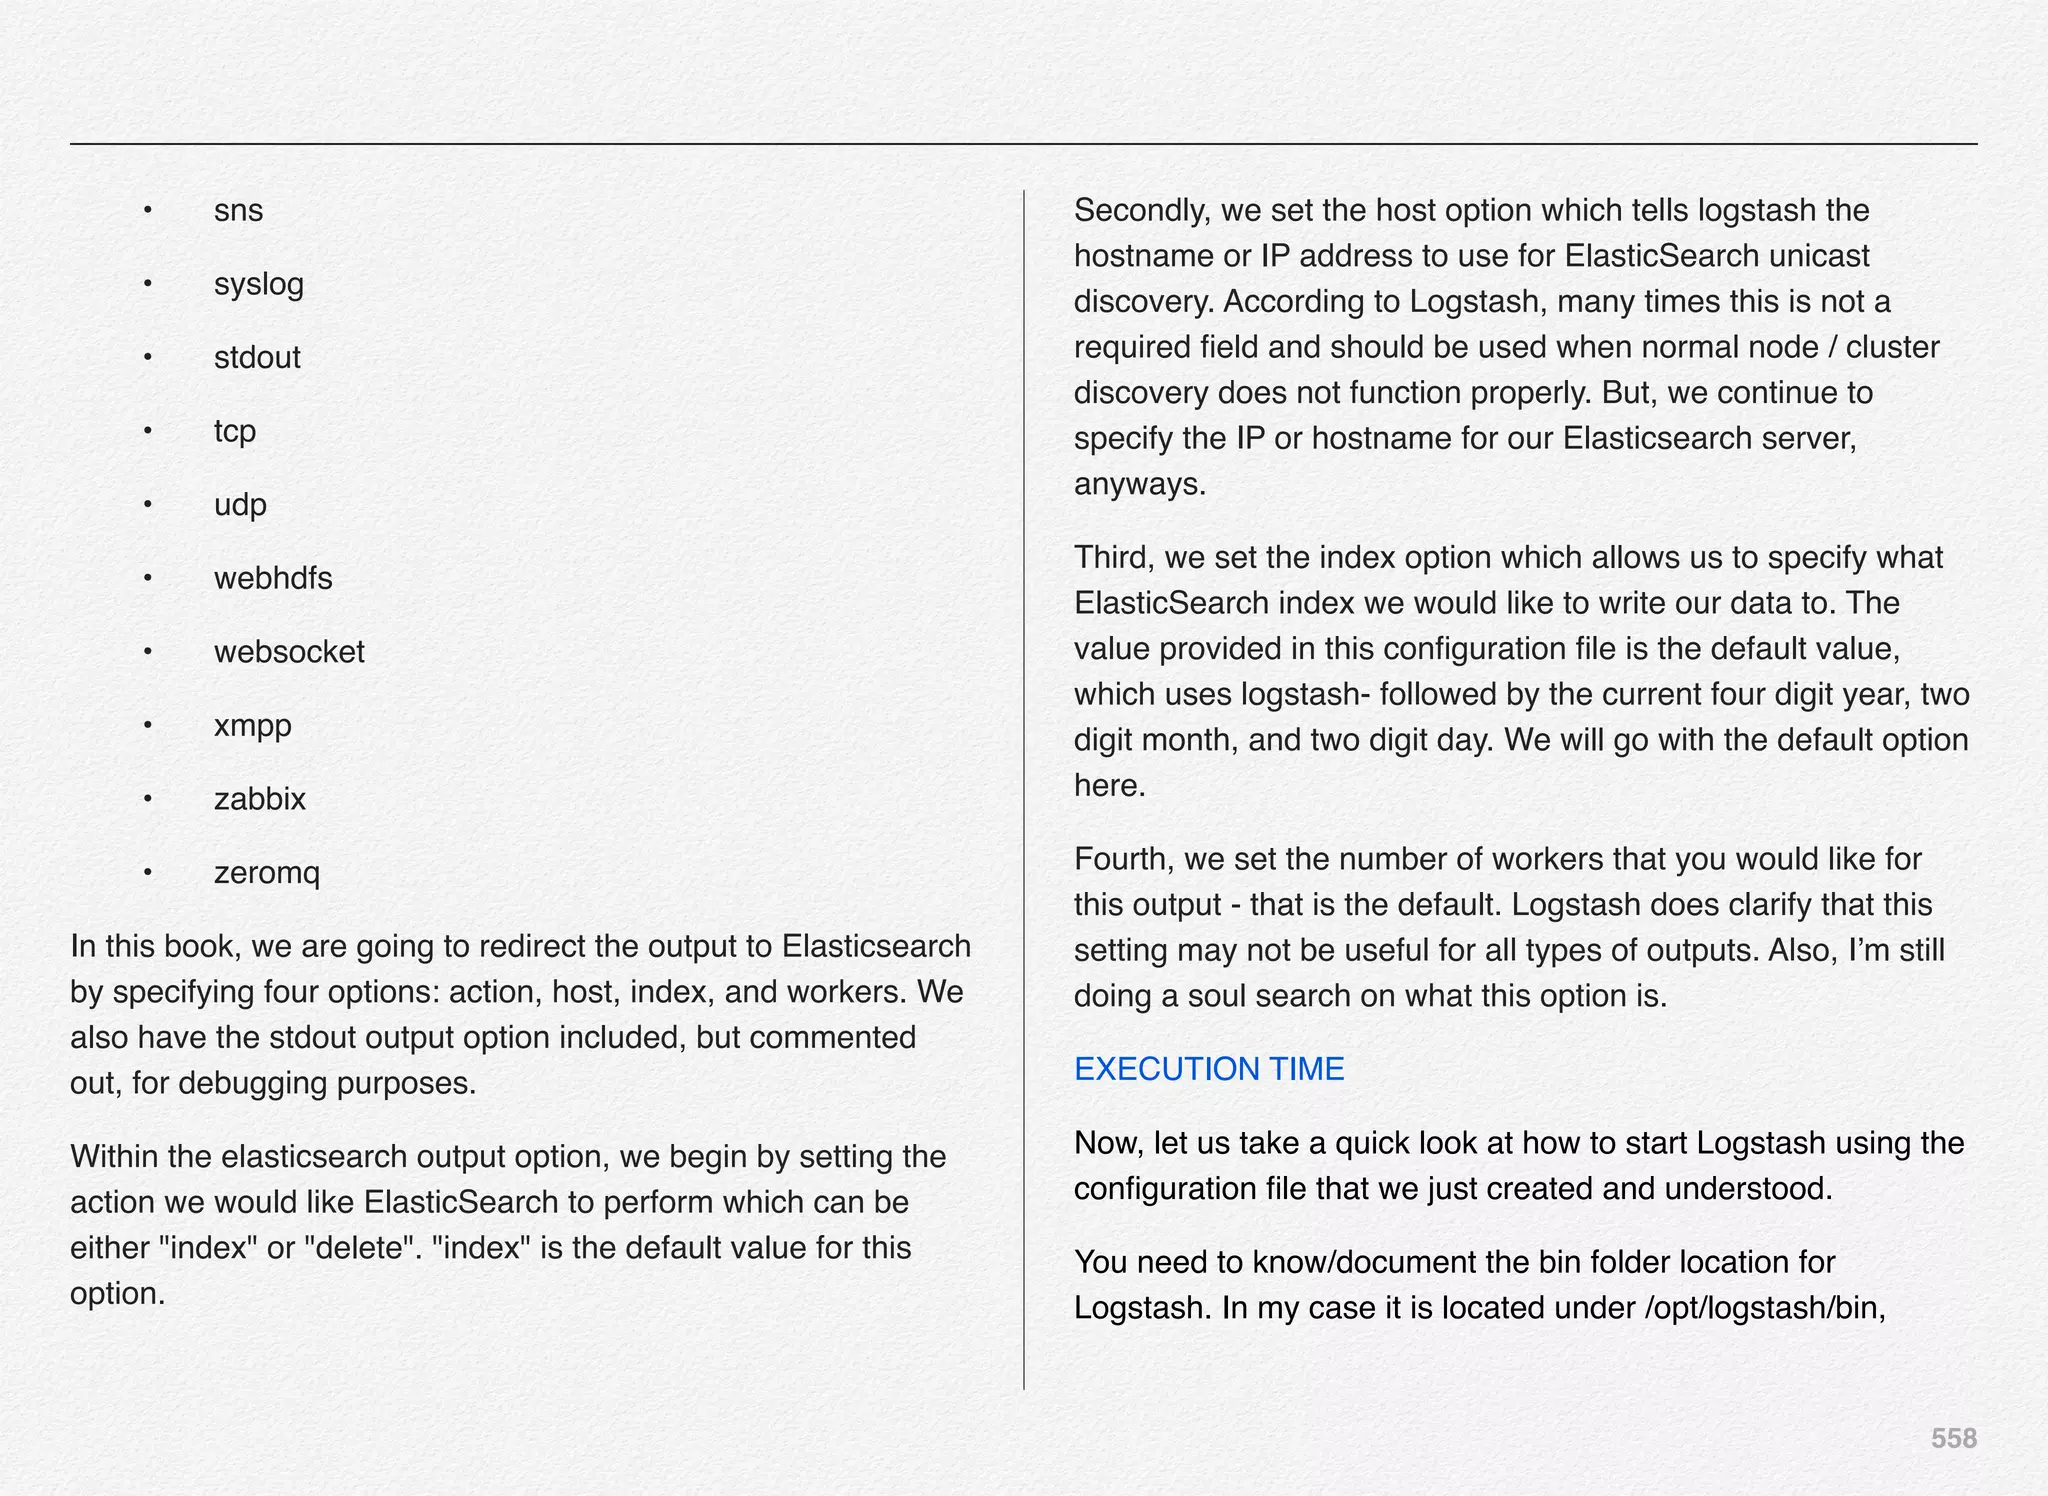
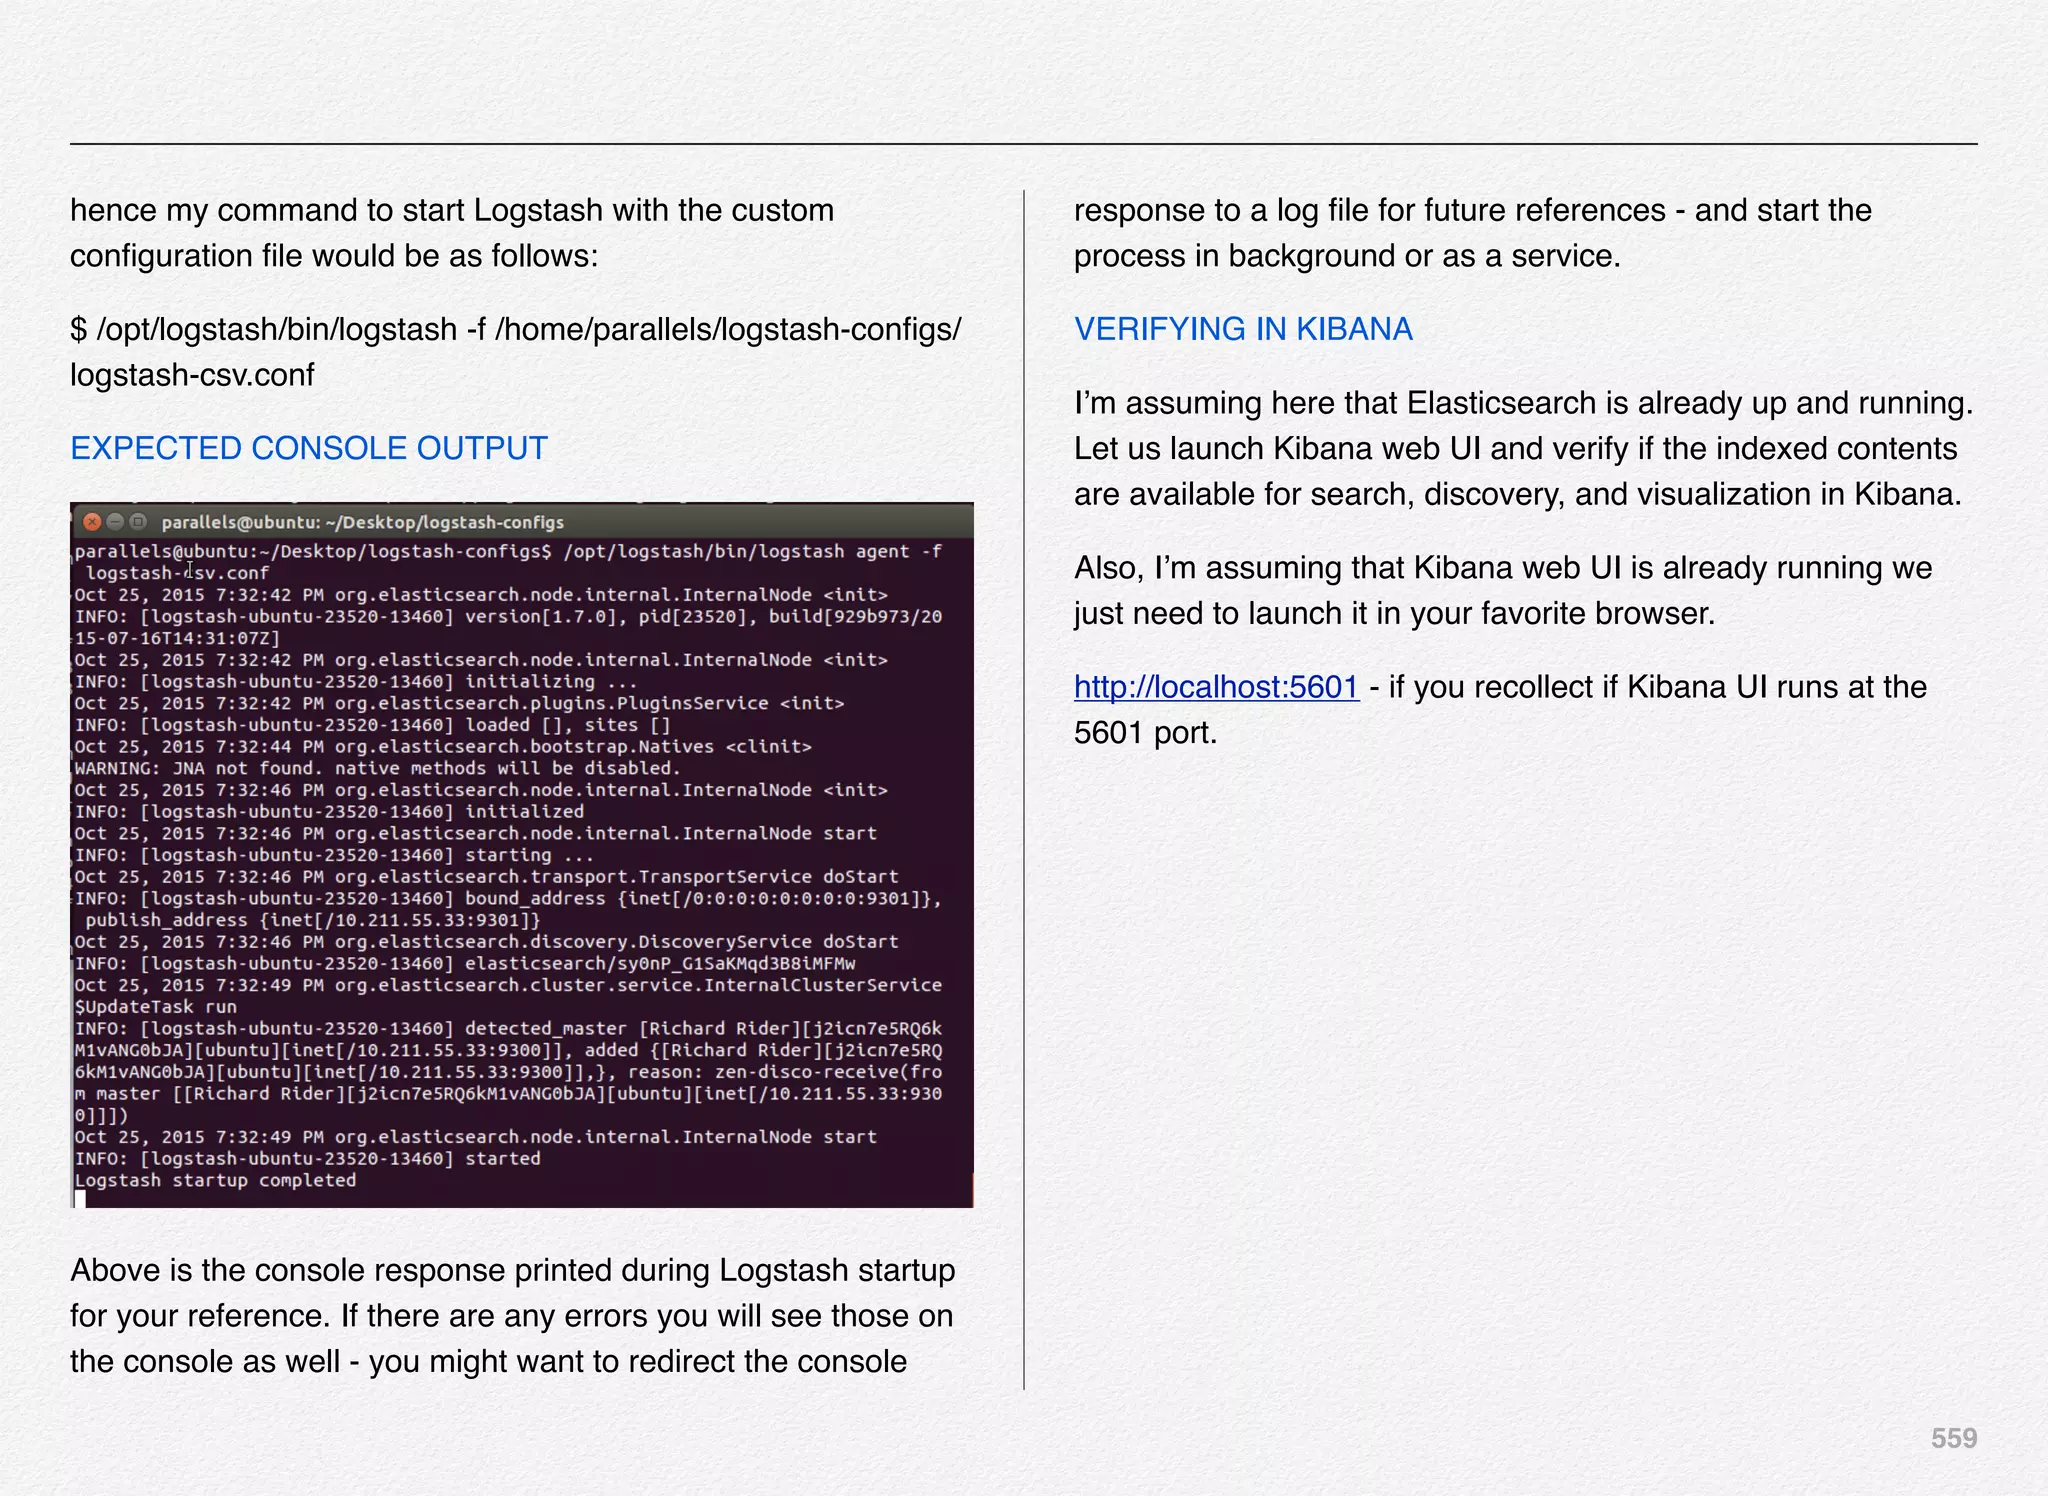
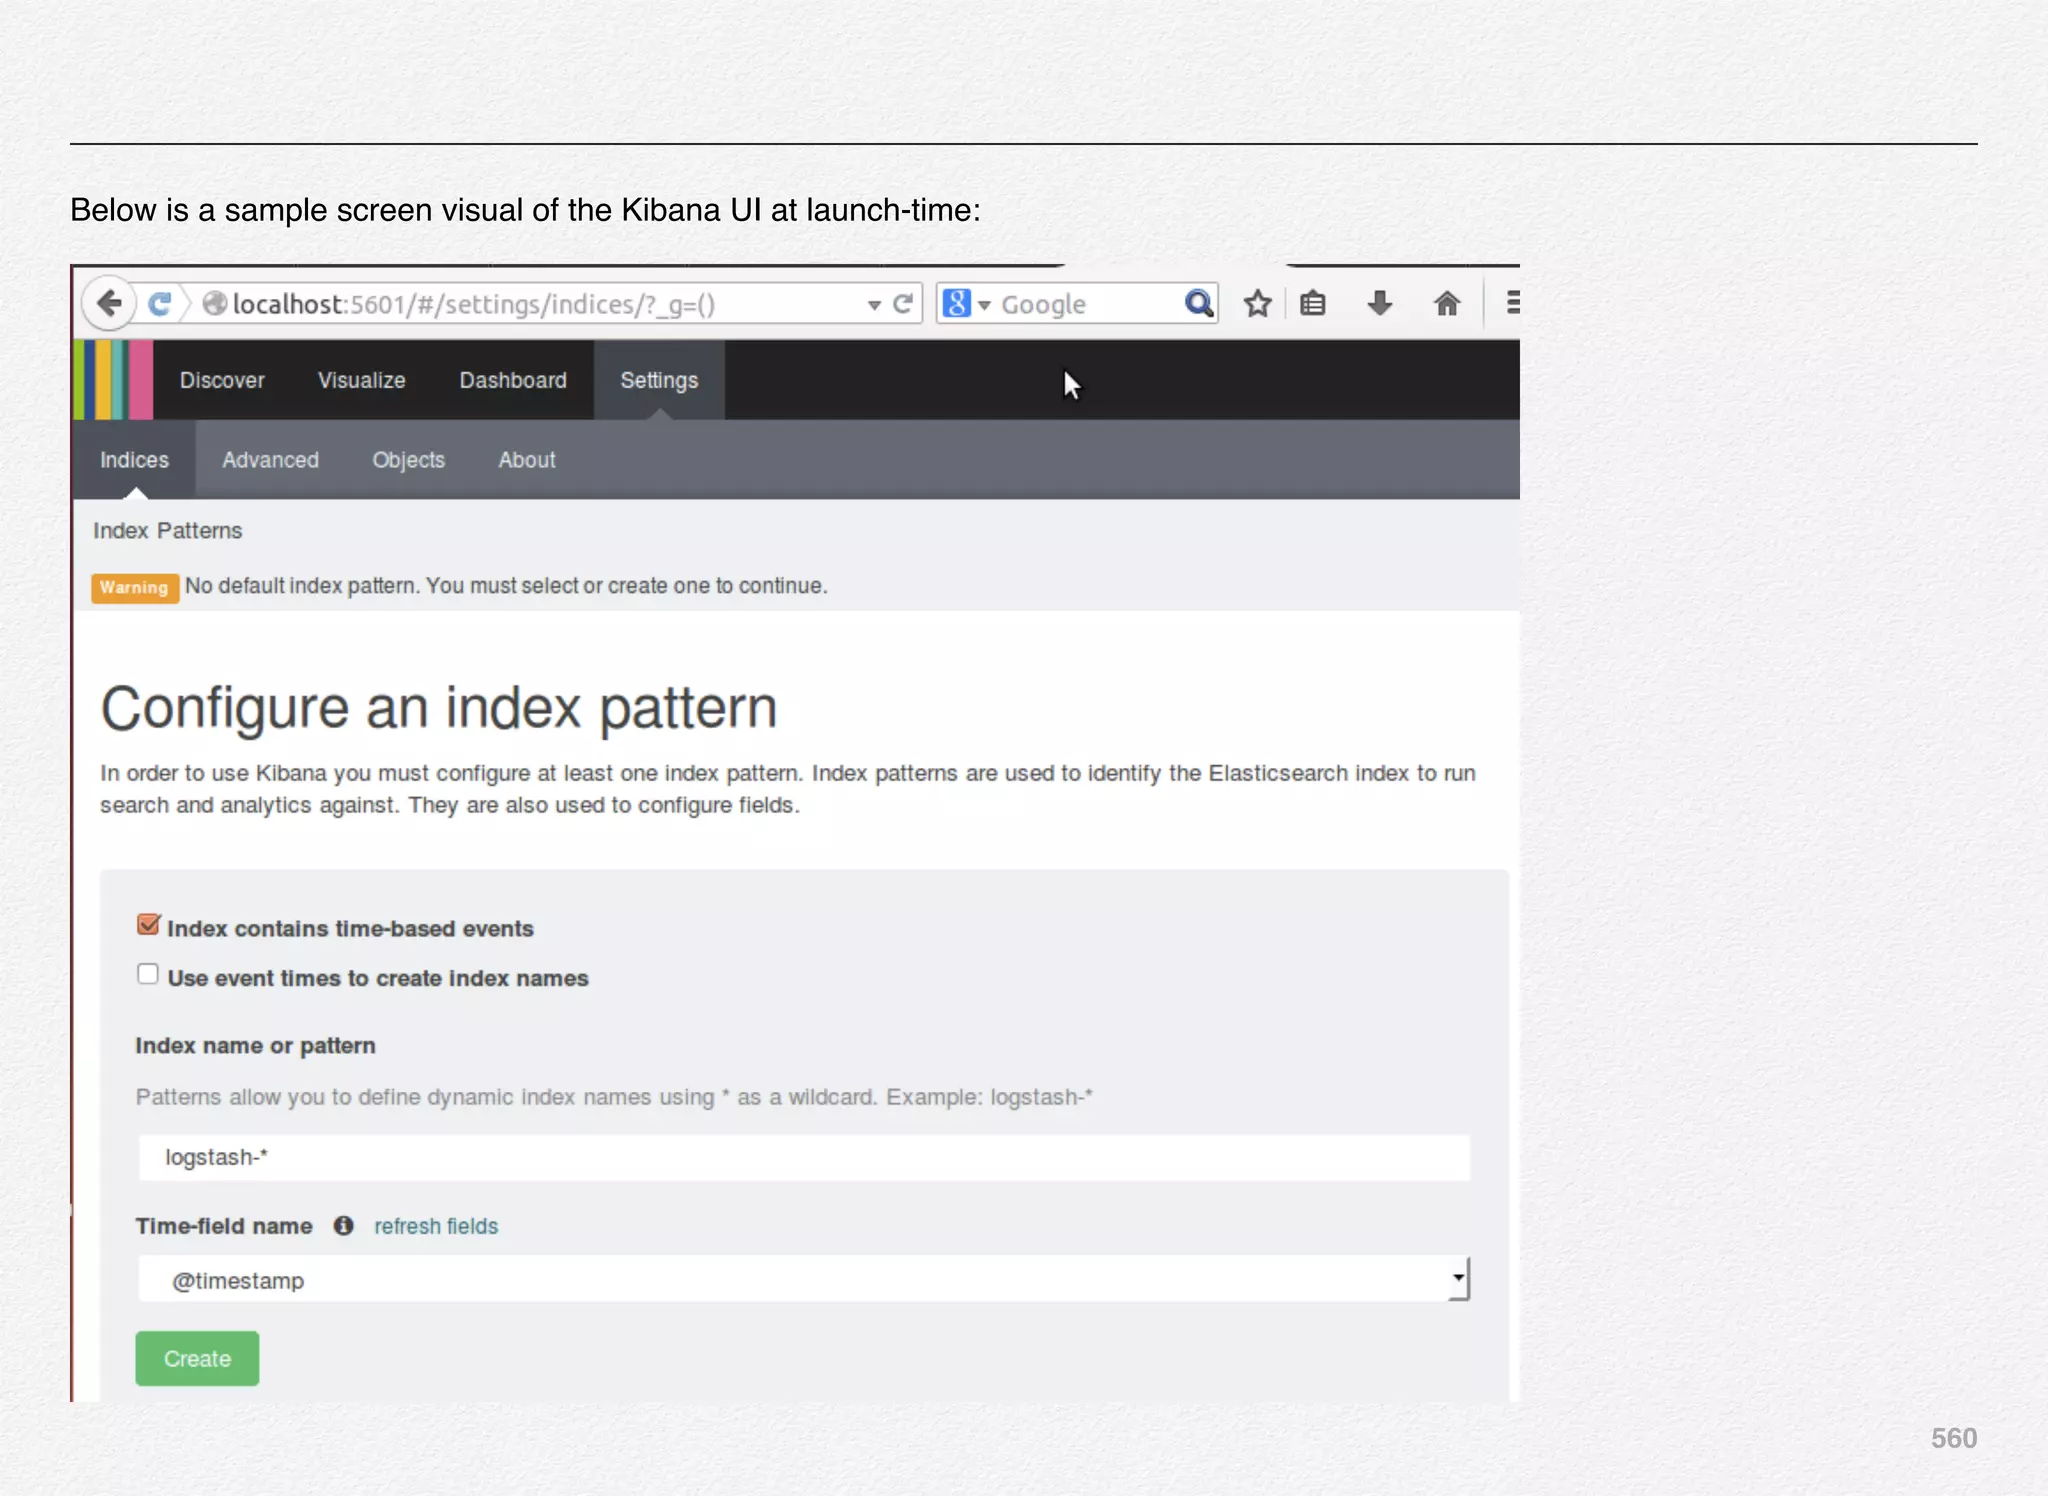
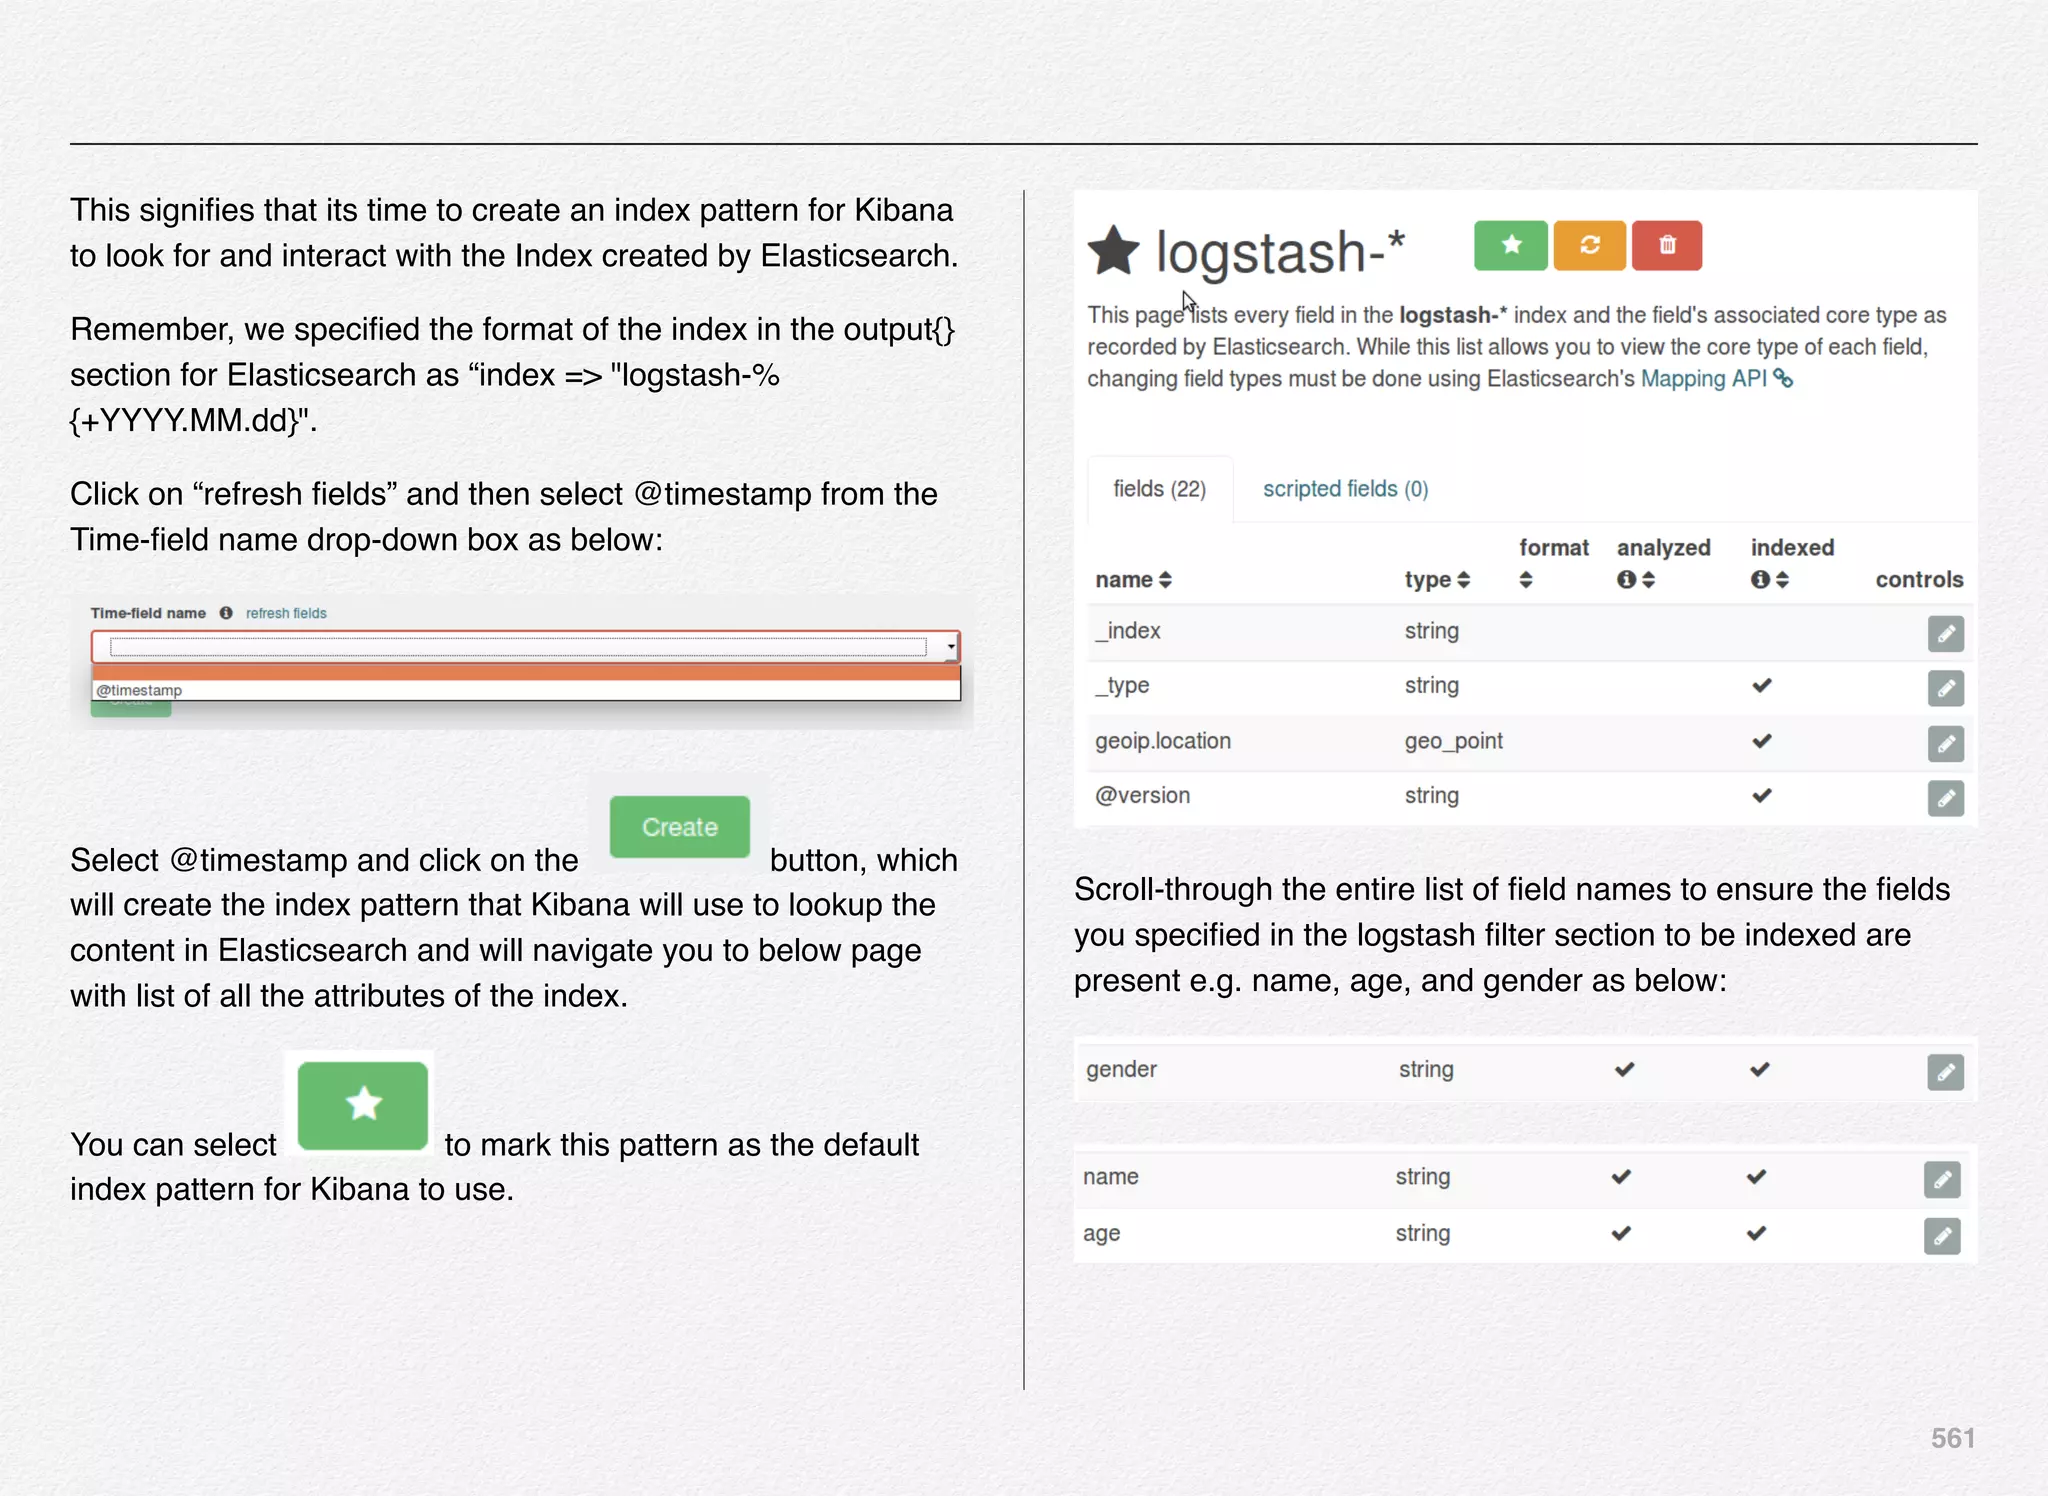
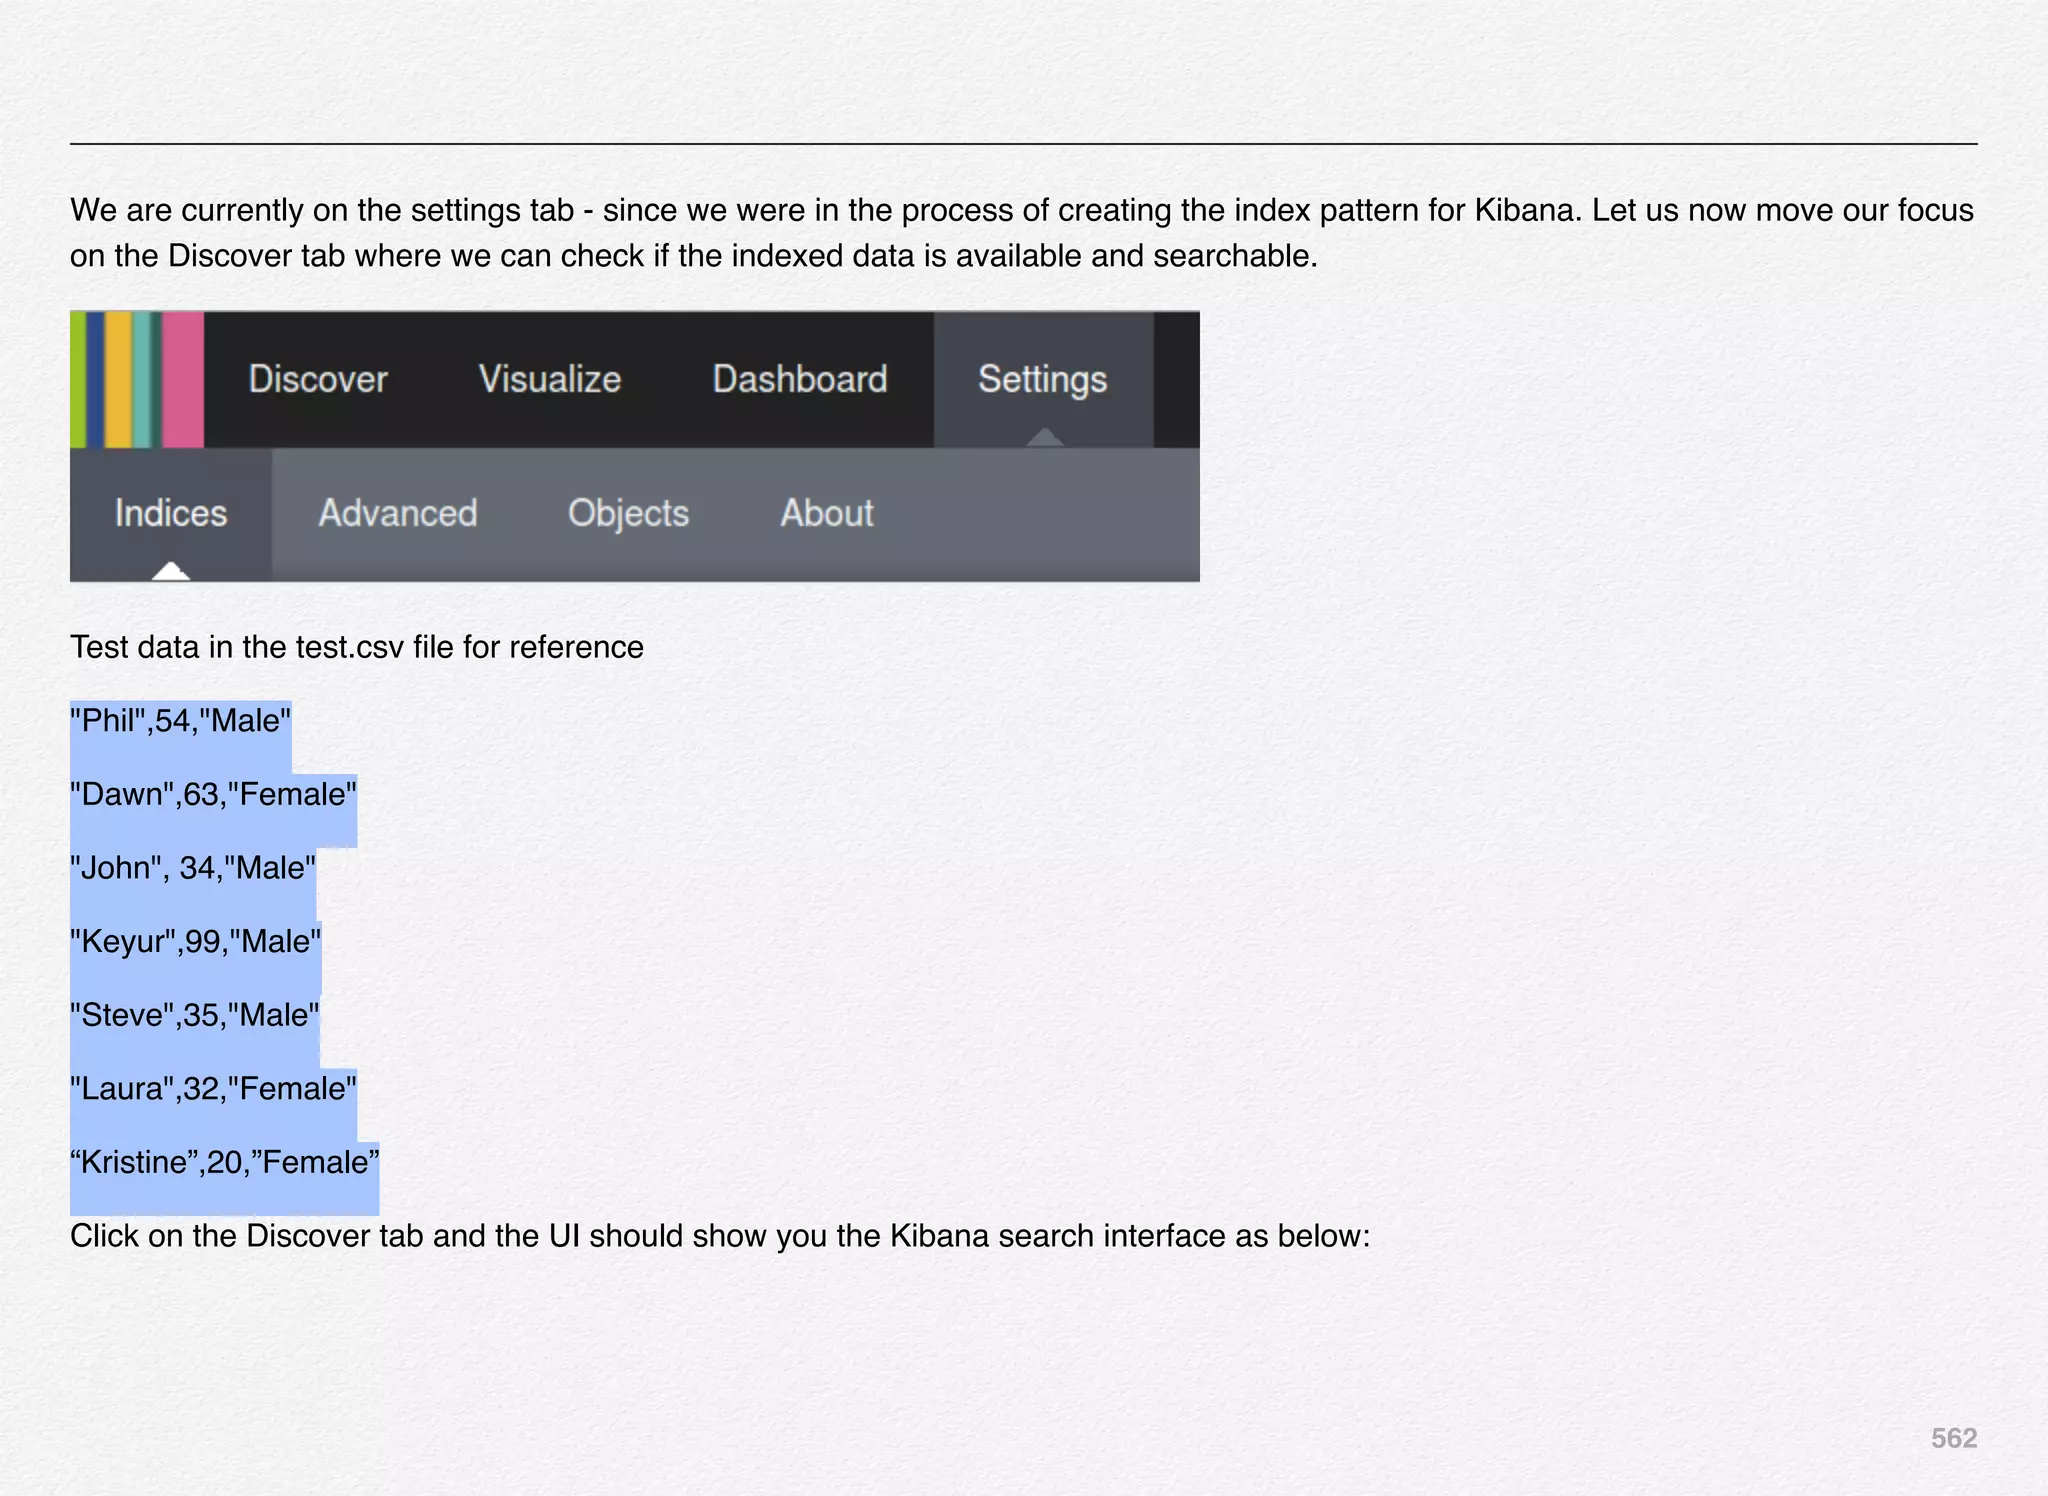
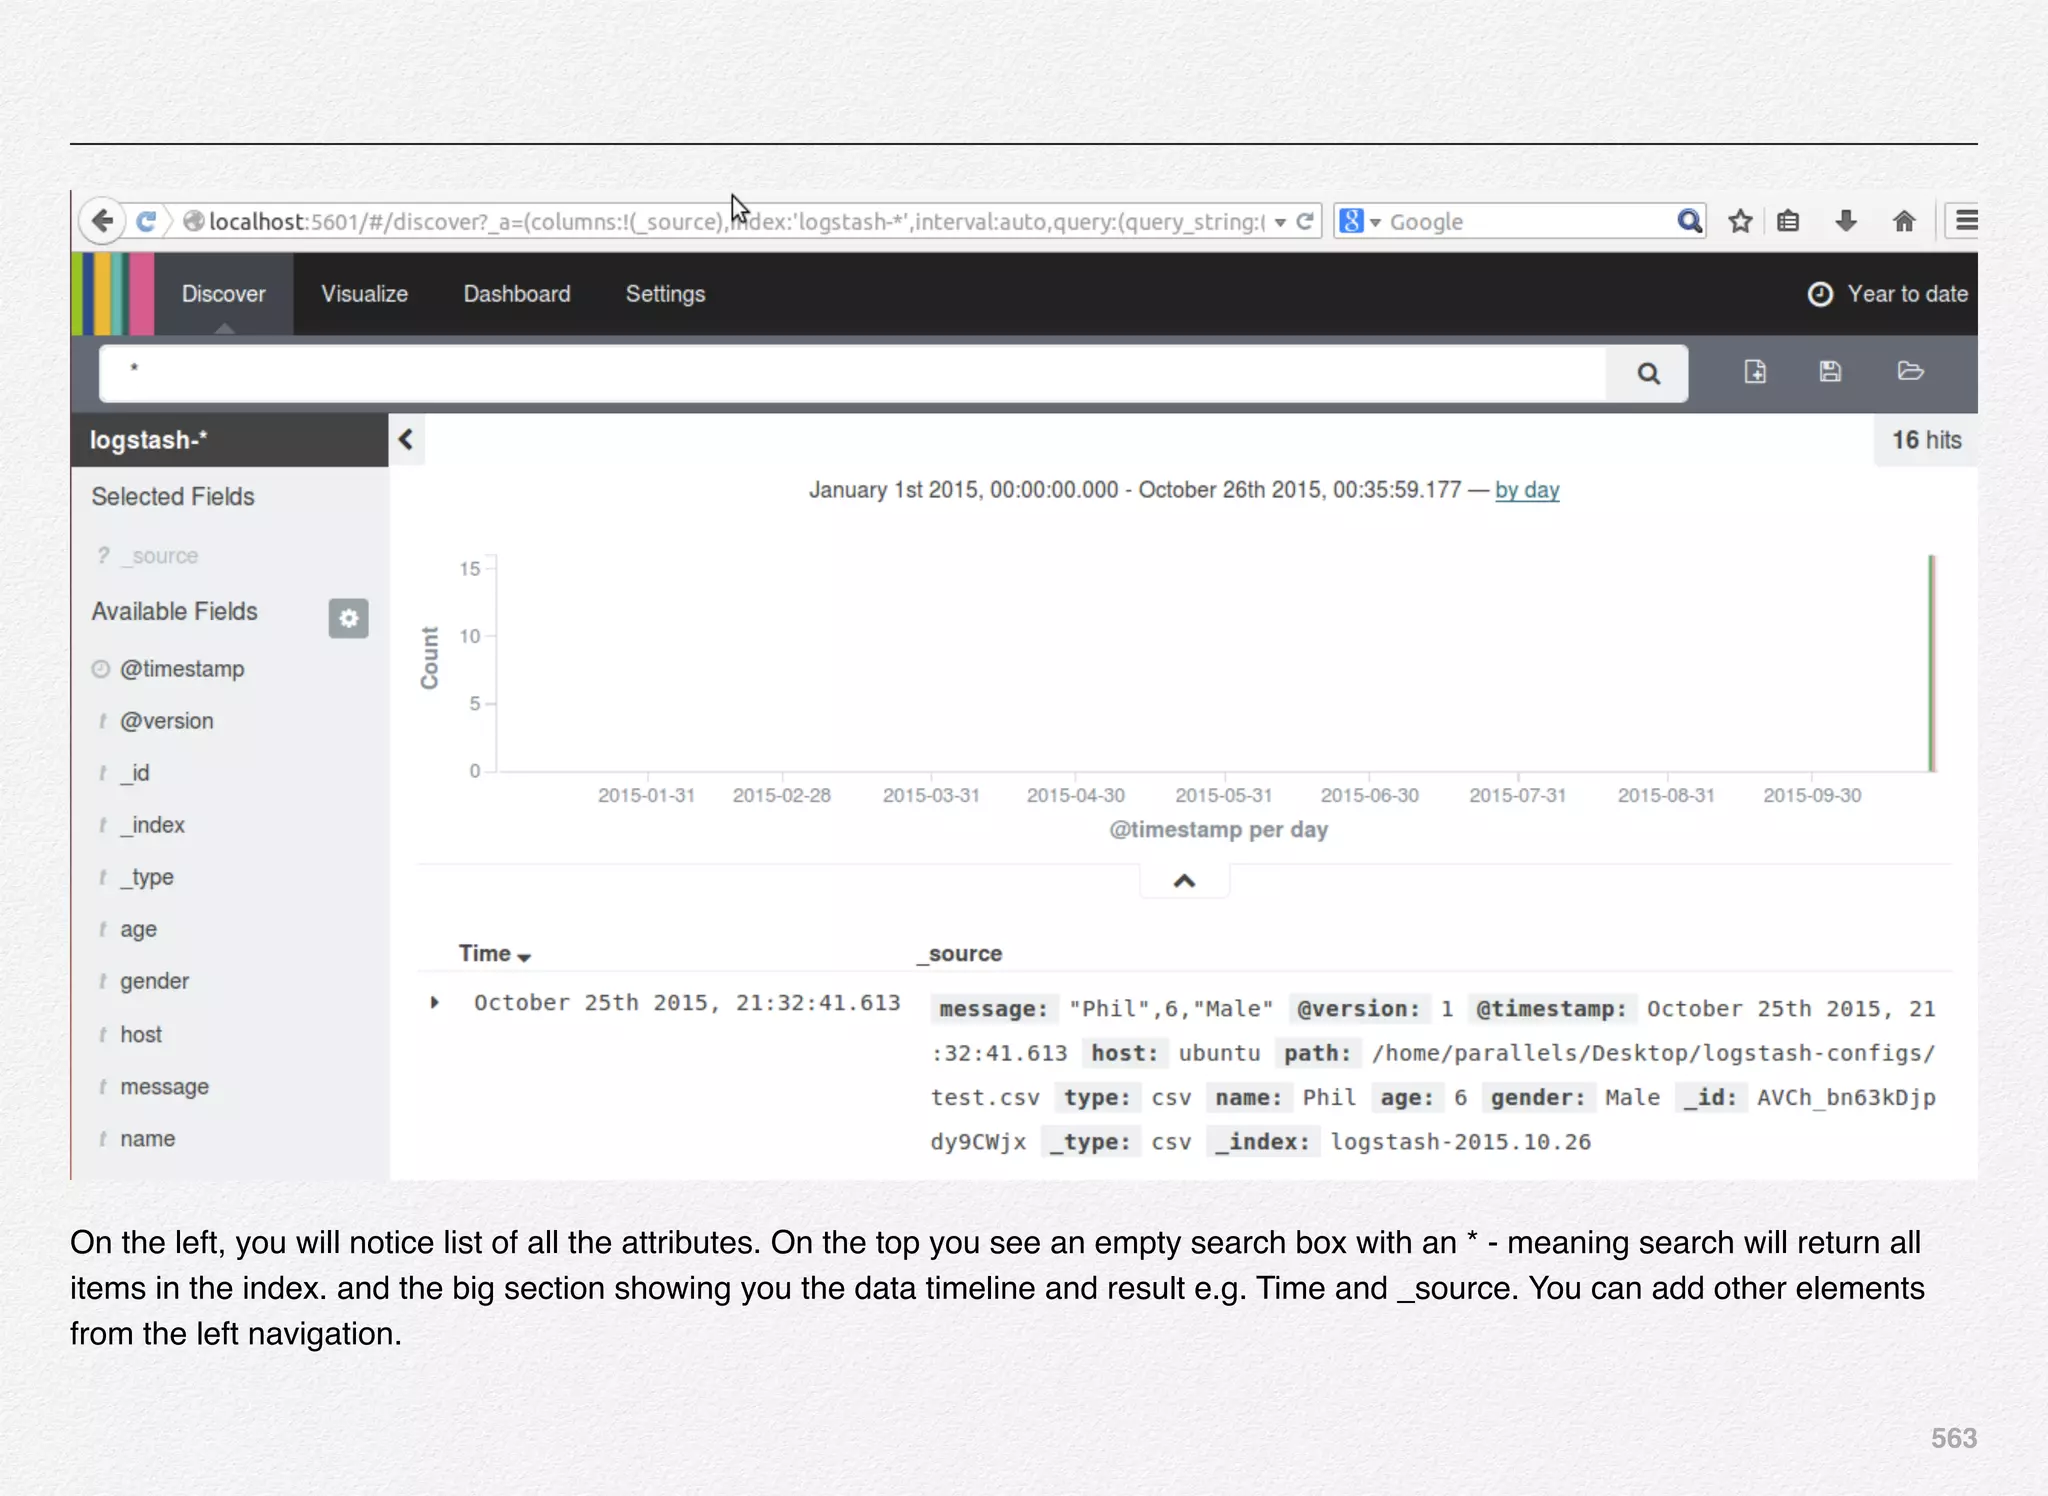
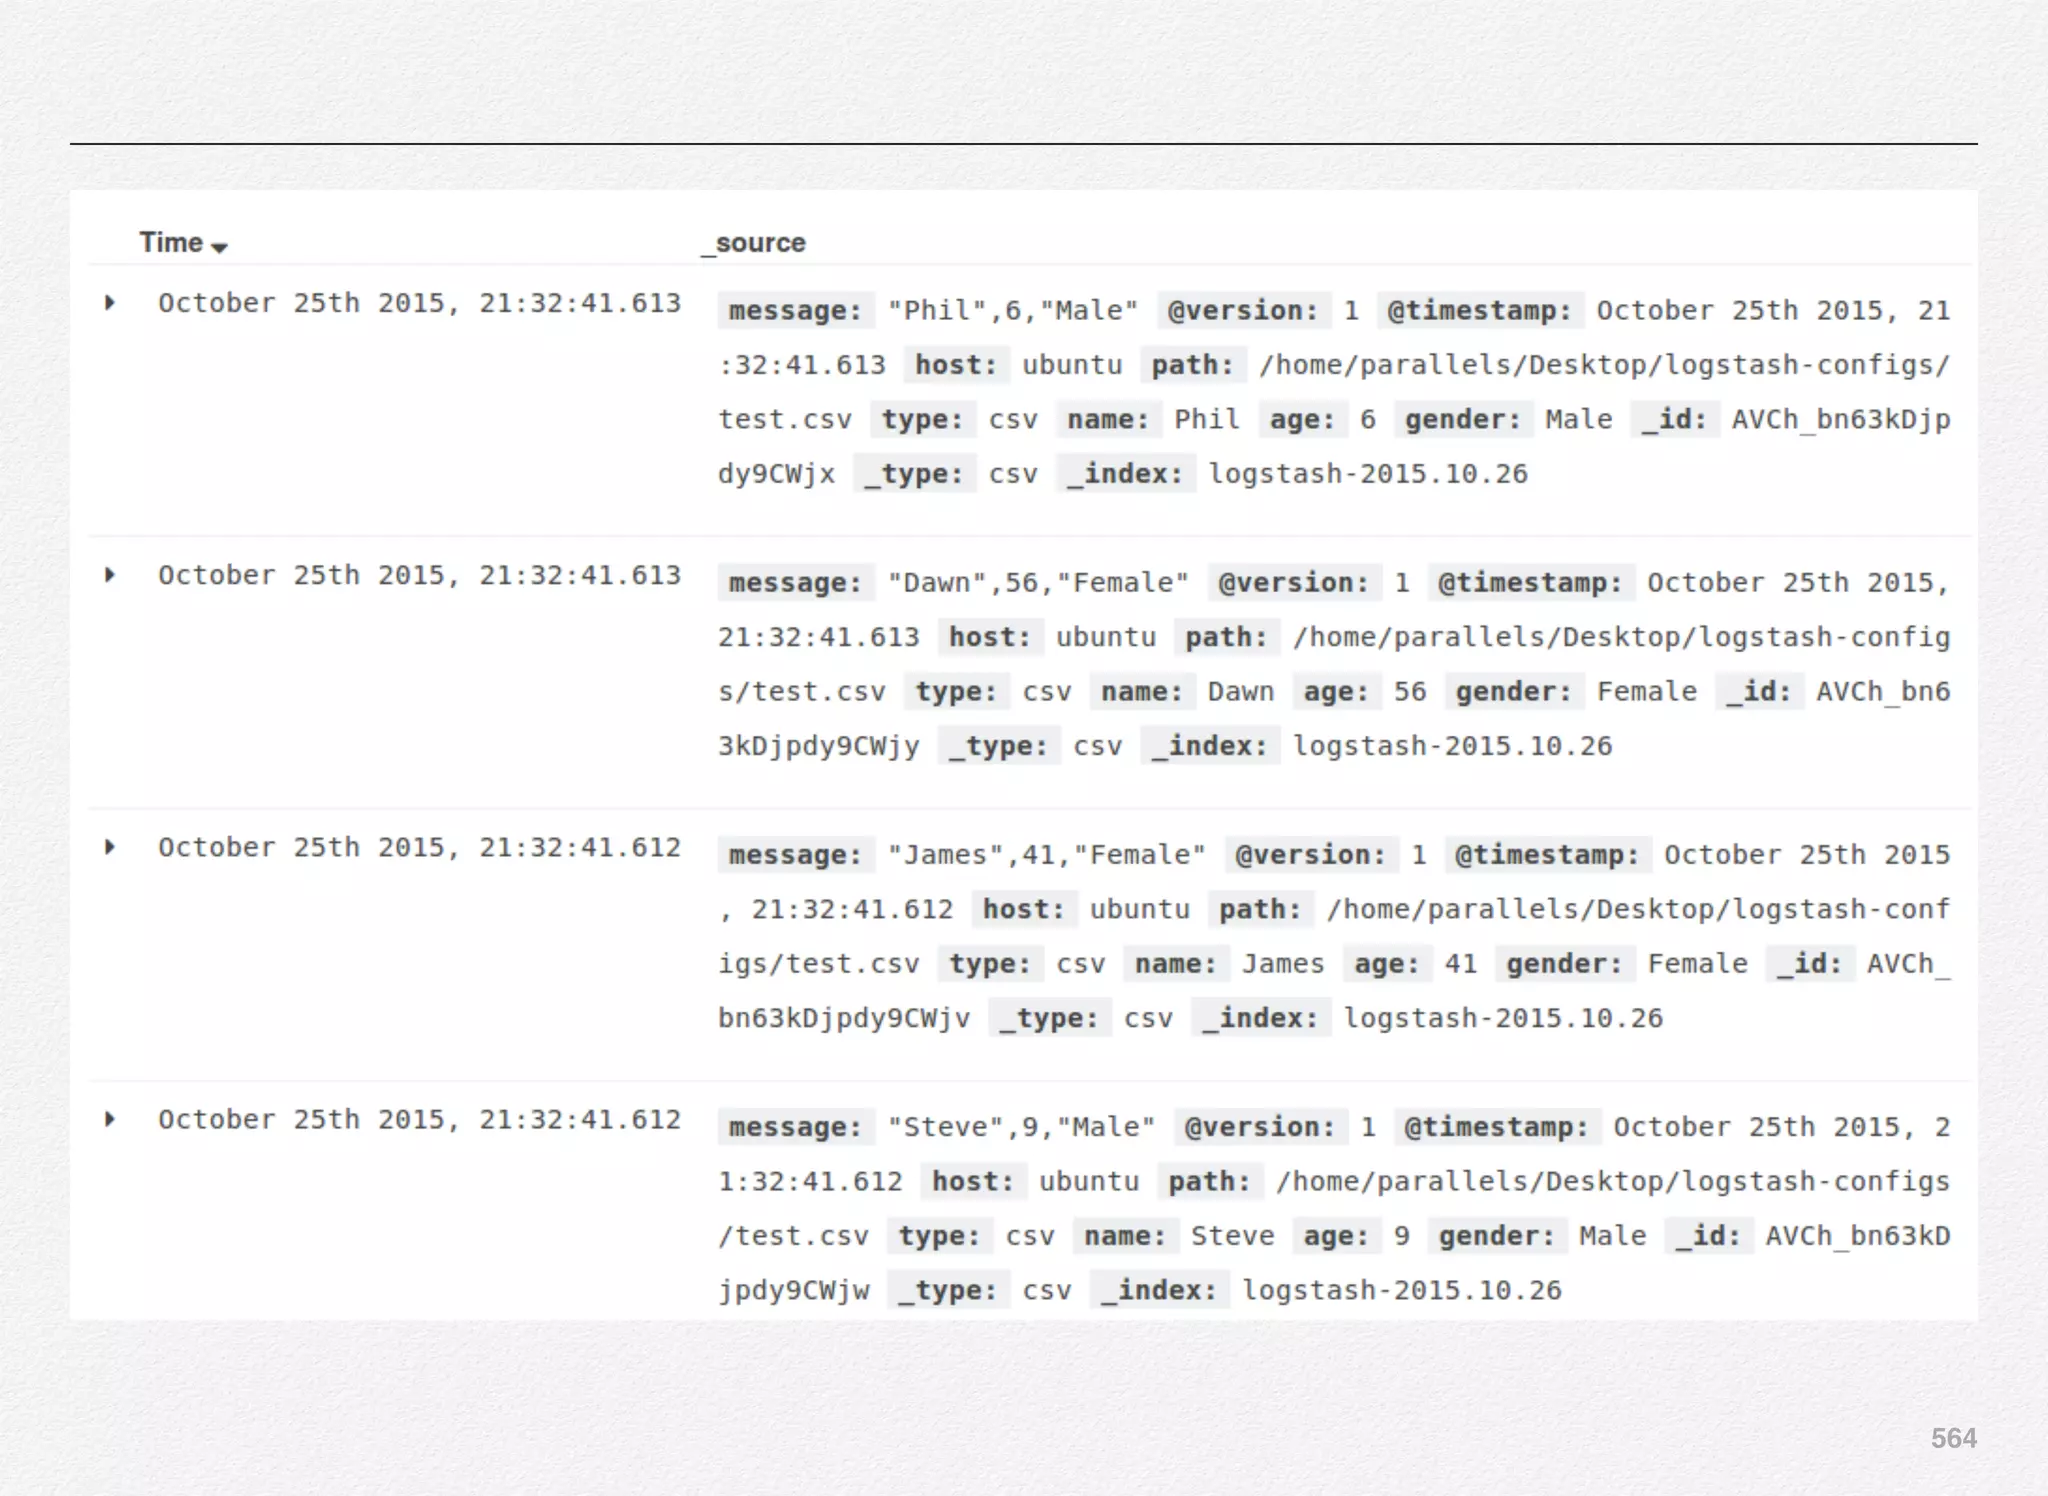
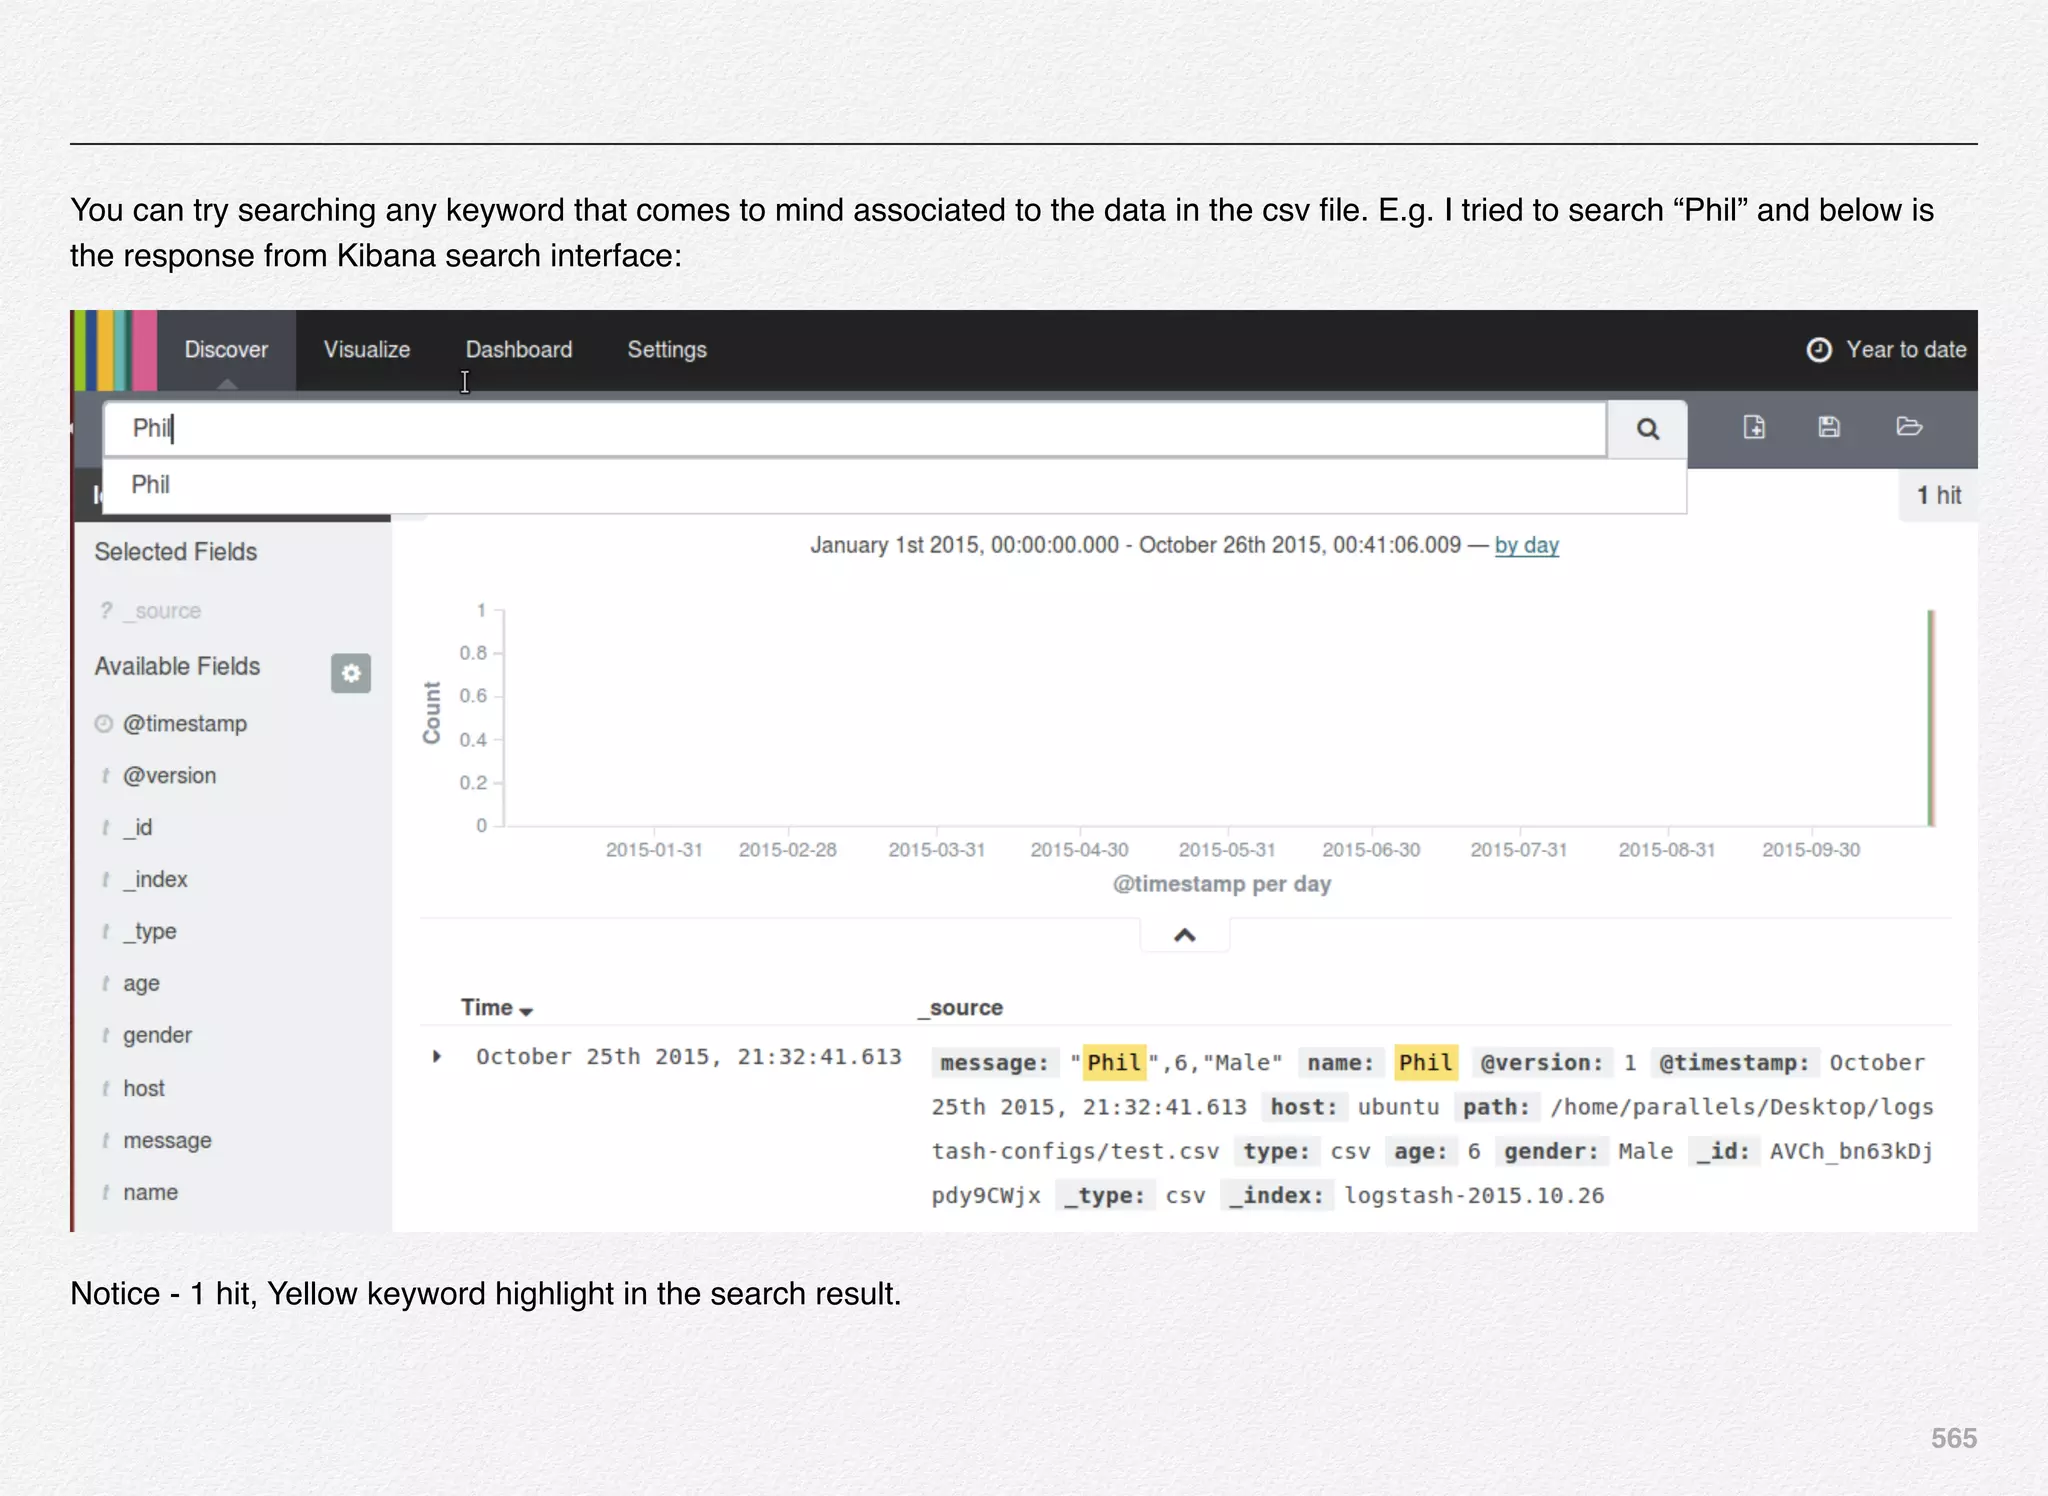
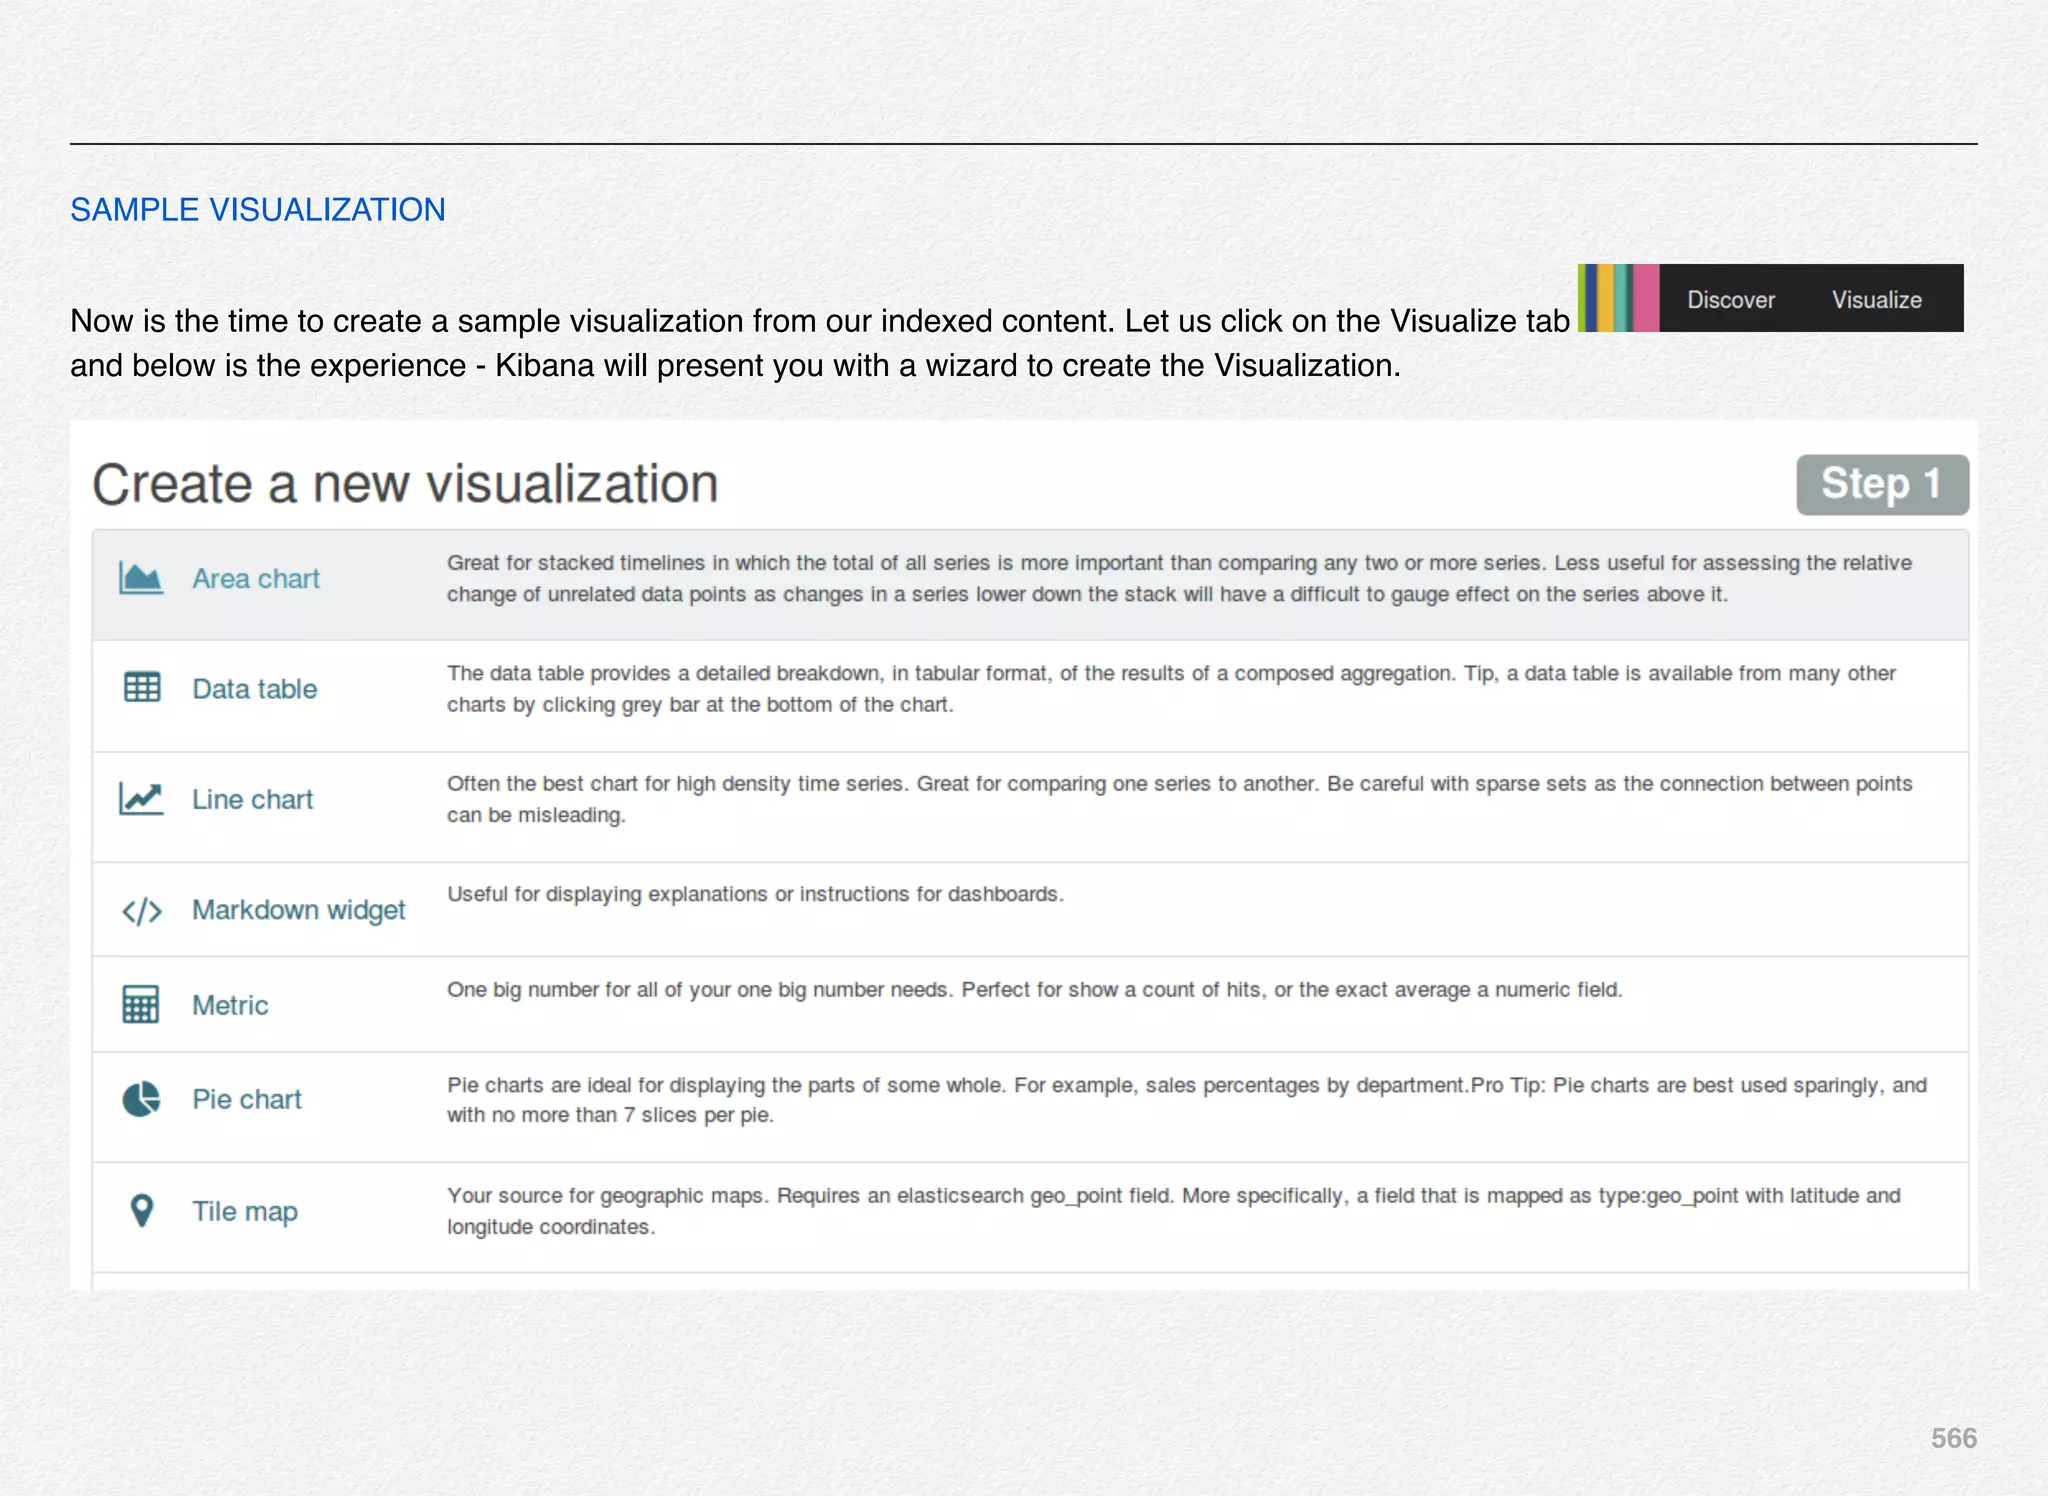
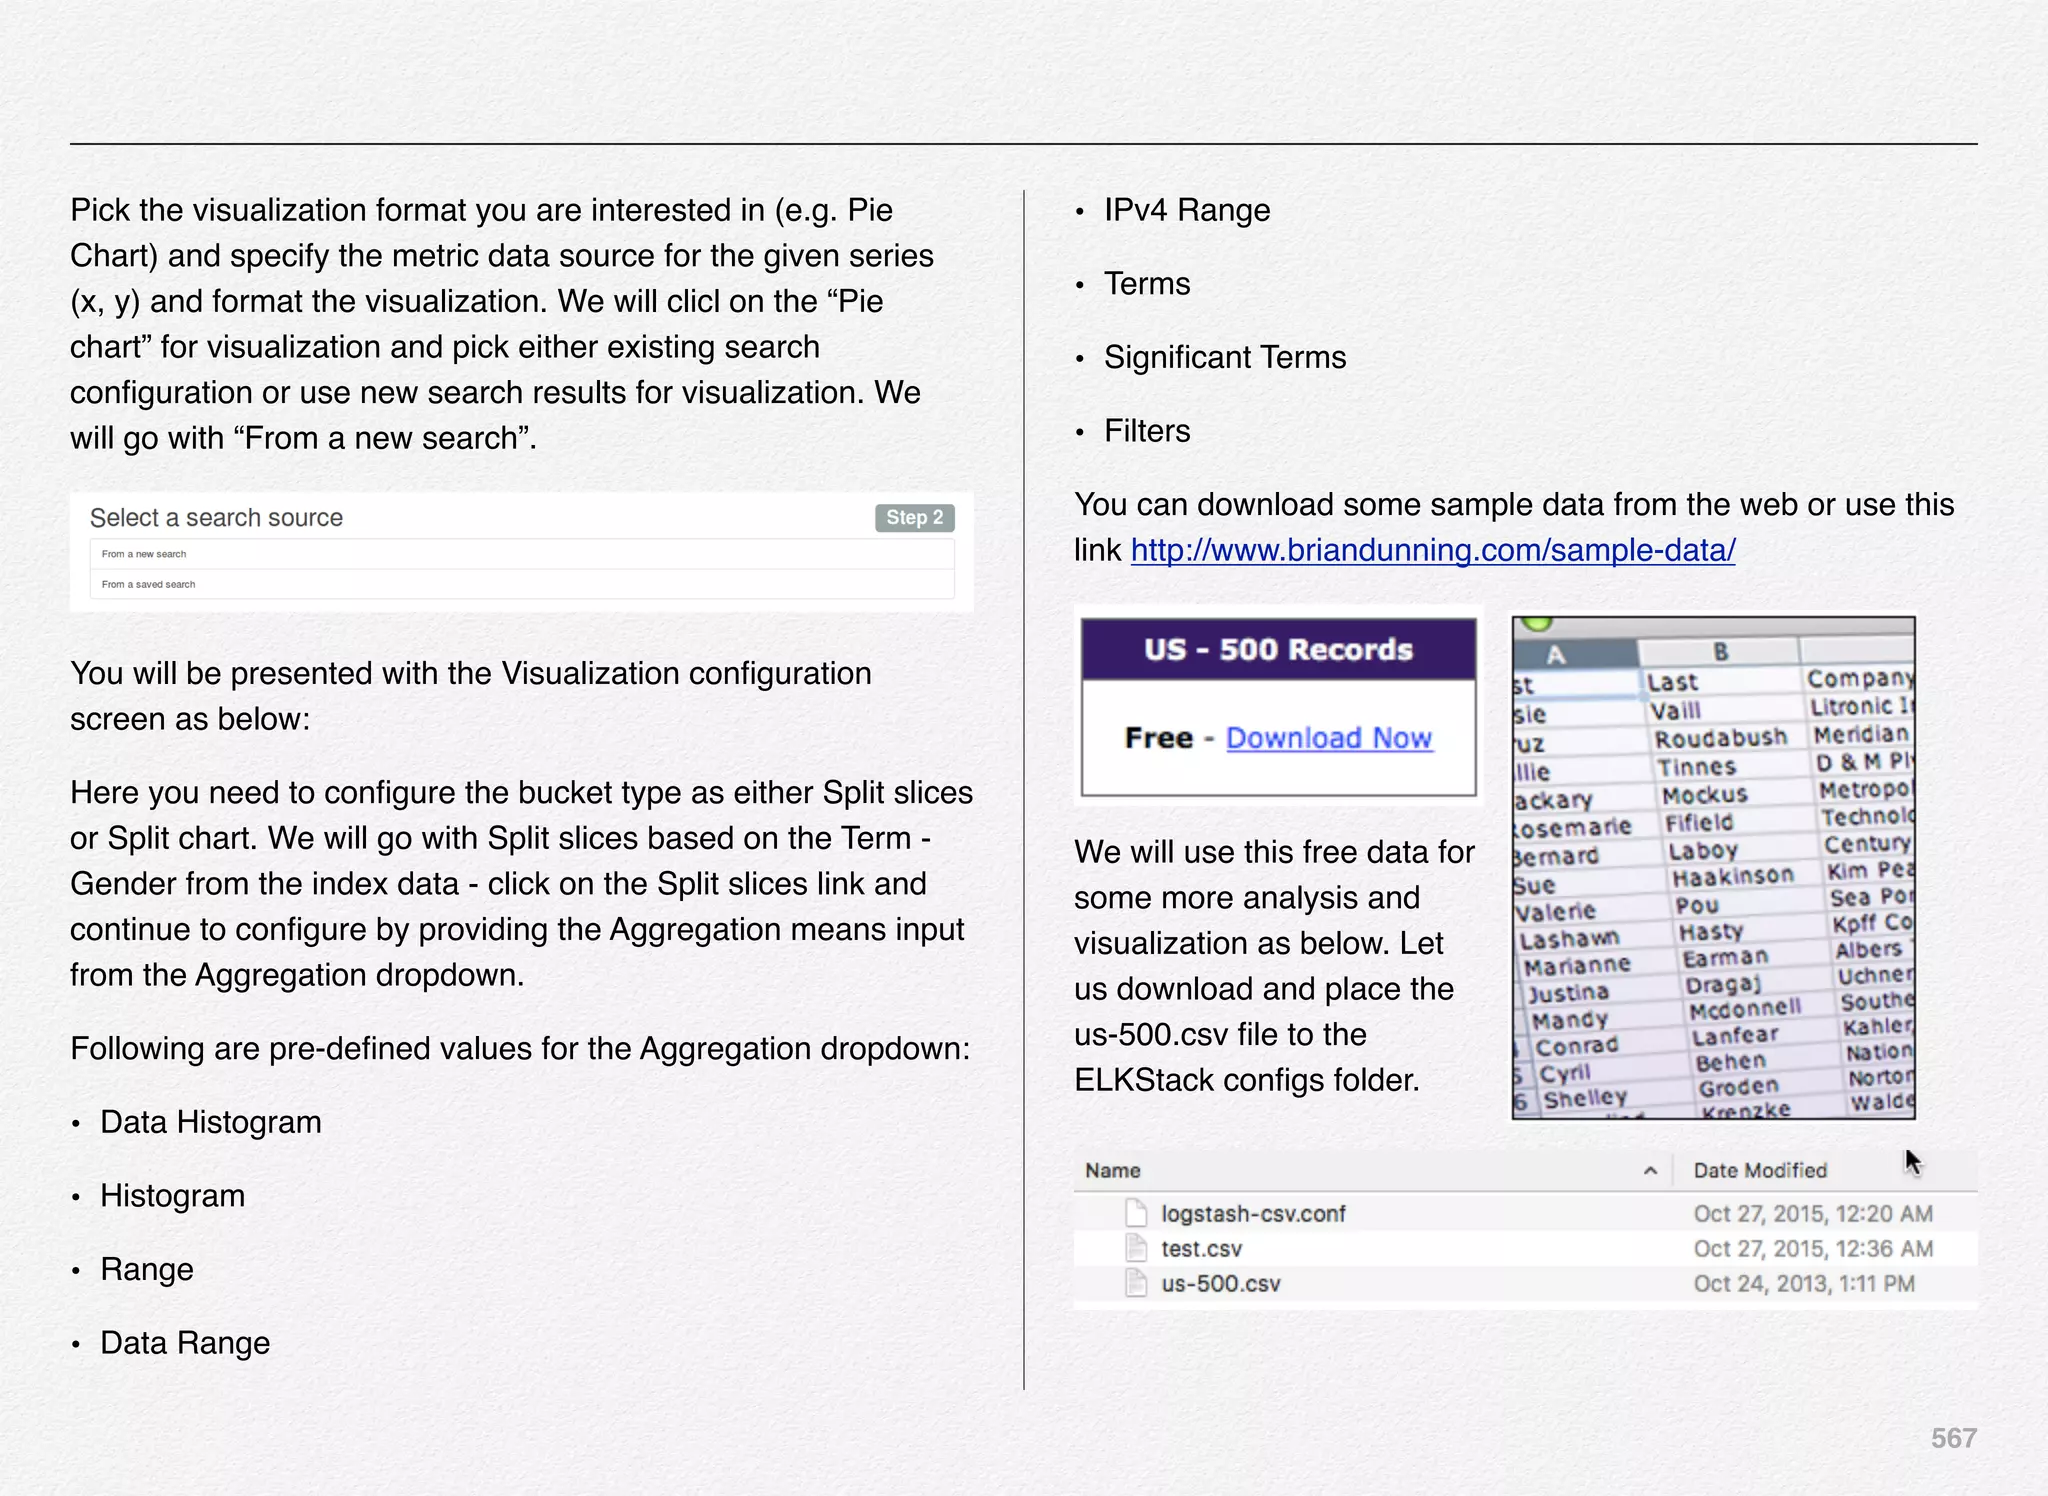
![568
Below are the list of fields in the csv file:
"first_name","last_name","company_name","address","city","co
unty","state","zip","phone1","phone2","email","web"
We will import all the 500 records using logstash CSV filter and
change the logstash-csv.conf file as per below instructions:
input {
! file {
! ! path => "/Volumes/EXTERNAL/ELKStack/configs/
us-500.csv"
! ! type => "csv"
! ! start_position => "beginning"
! }
}
filter {
! csv {
! ! columns =>
["first_name","last_name","company_name","address","city","co
unty","state","zip","phone1","phone2","email","web"]
! ! separator => ","
! }
}
output {
! elasticsearch {
! ! action => "index"
! ! hosts => "localhost"
! ! index => "logstash-%{+YYYY.MM.dd}"
! ! workers => 1
! }
# stdout {
# codec => rubydebug
# }
}](https://image.slidesharecdn.com/oraclecommerce-doityourselfseries-160129151710/75/Oracle-Commerce-Using-ATG-Endeca-Do-It-Yourself-Series-569-2048.jpg)
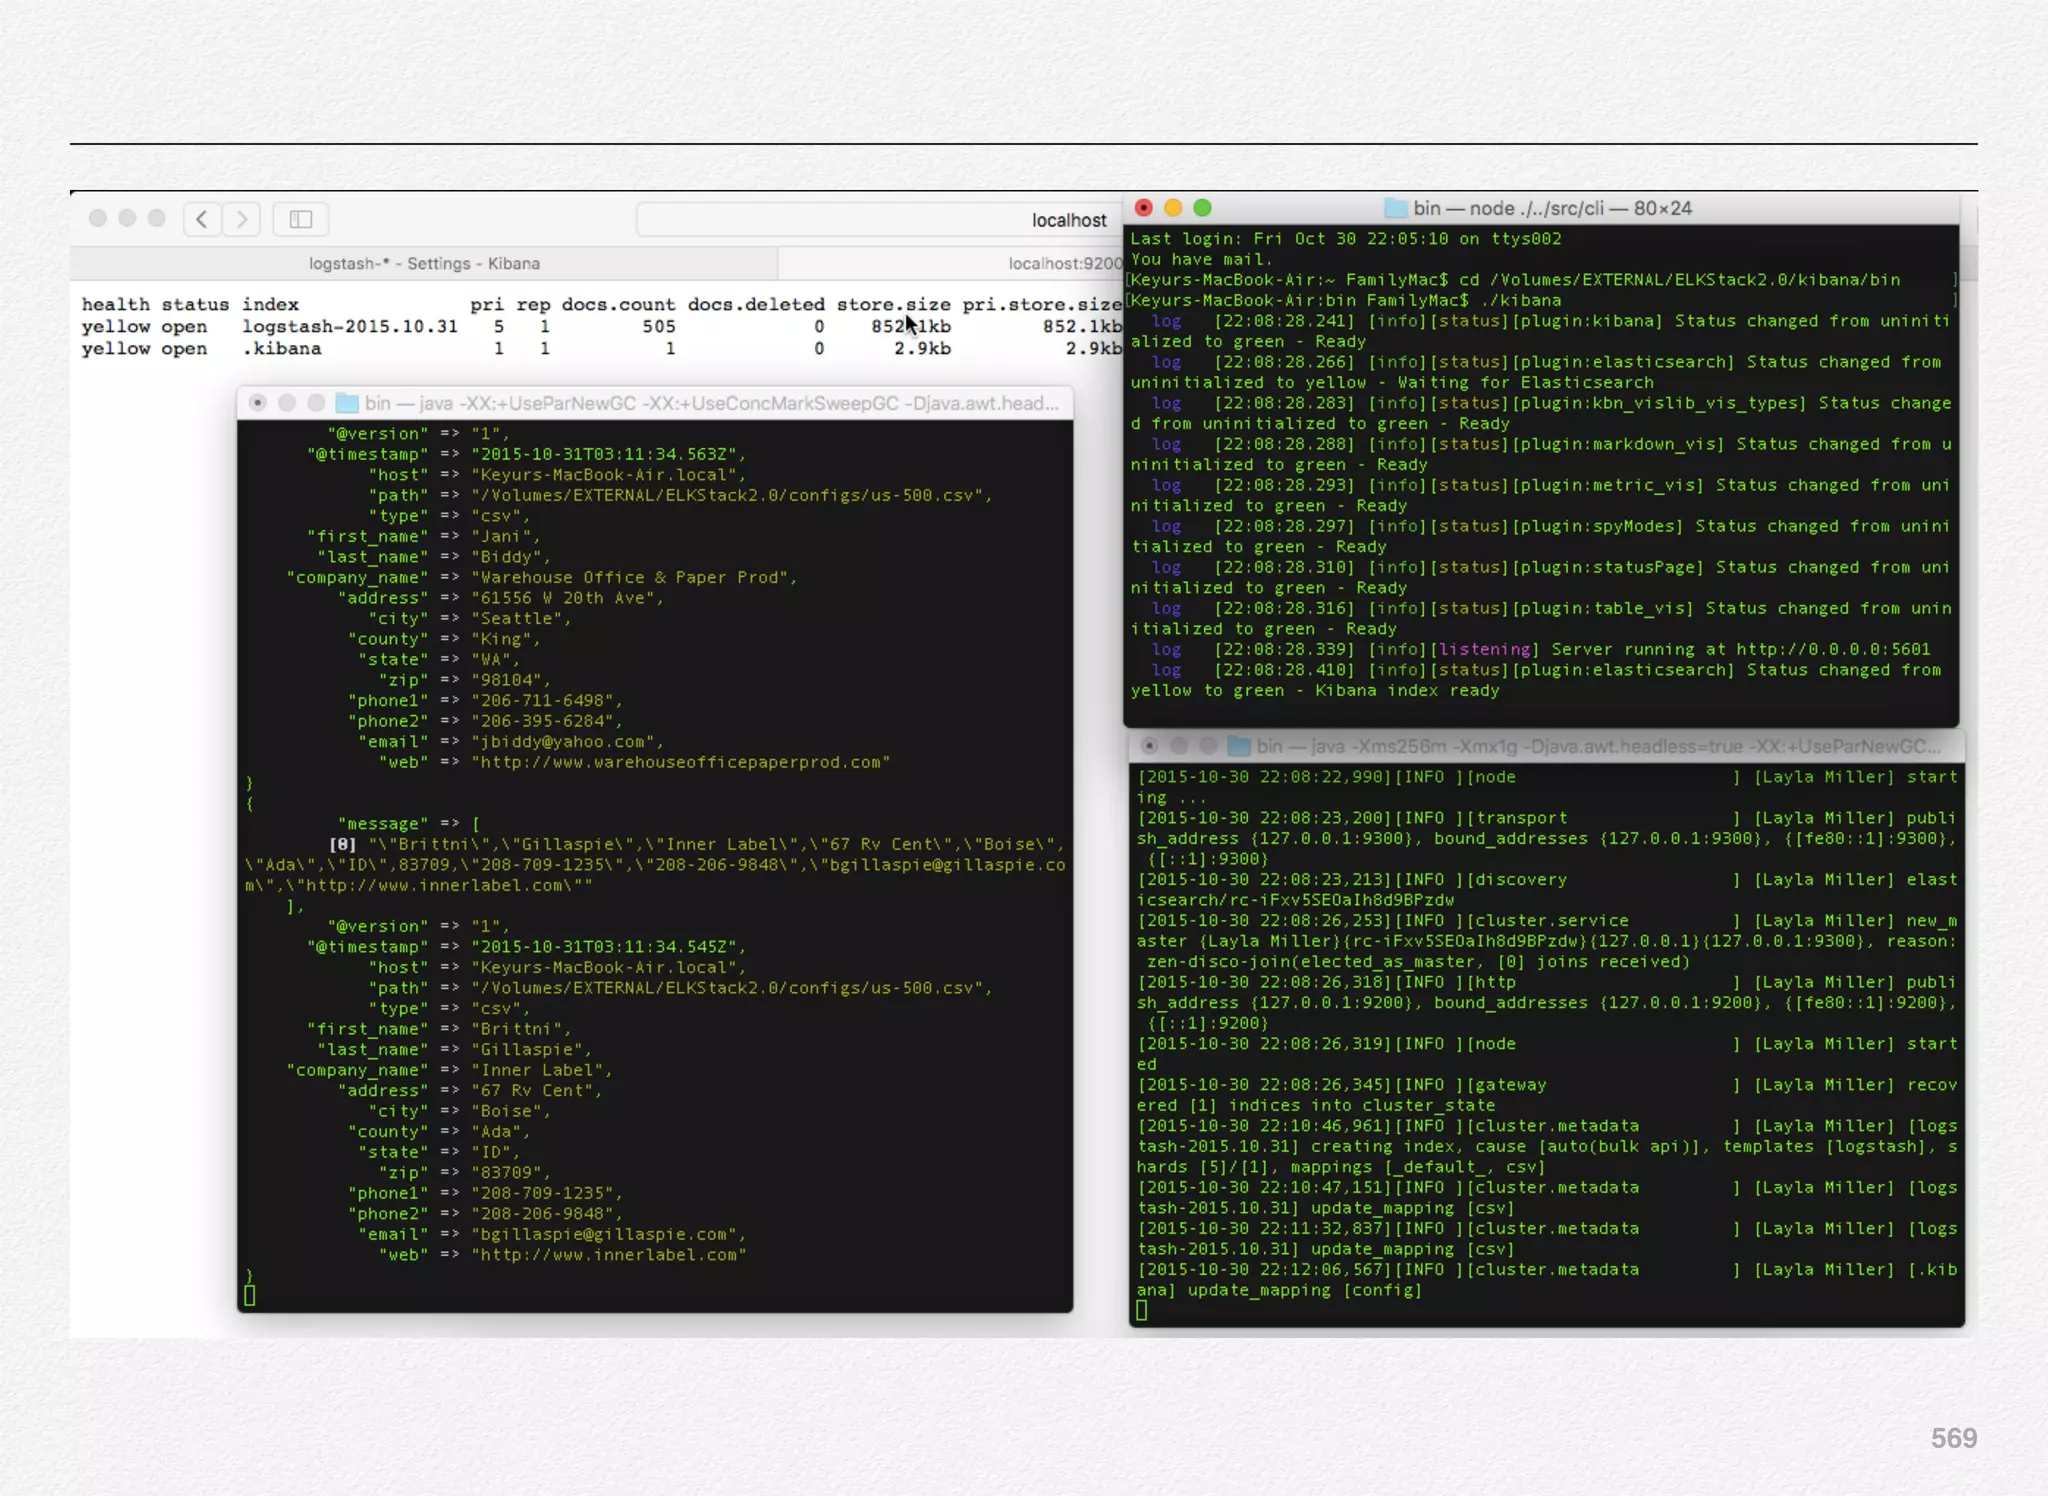
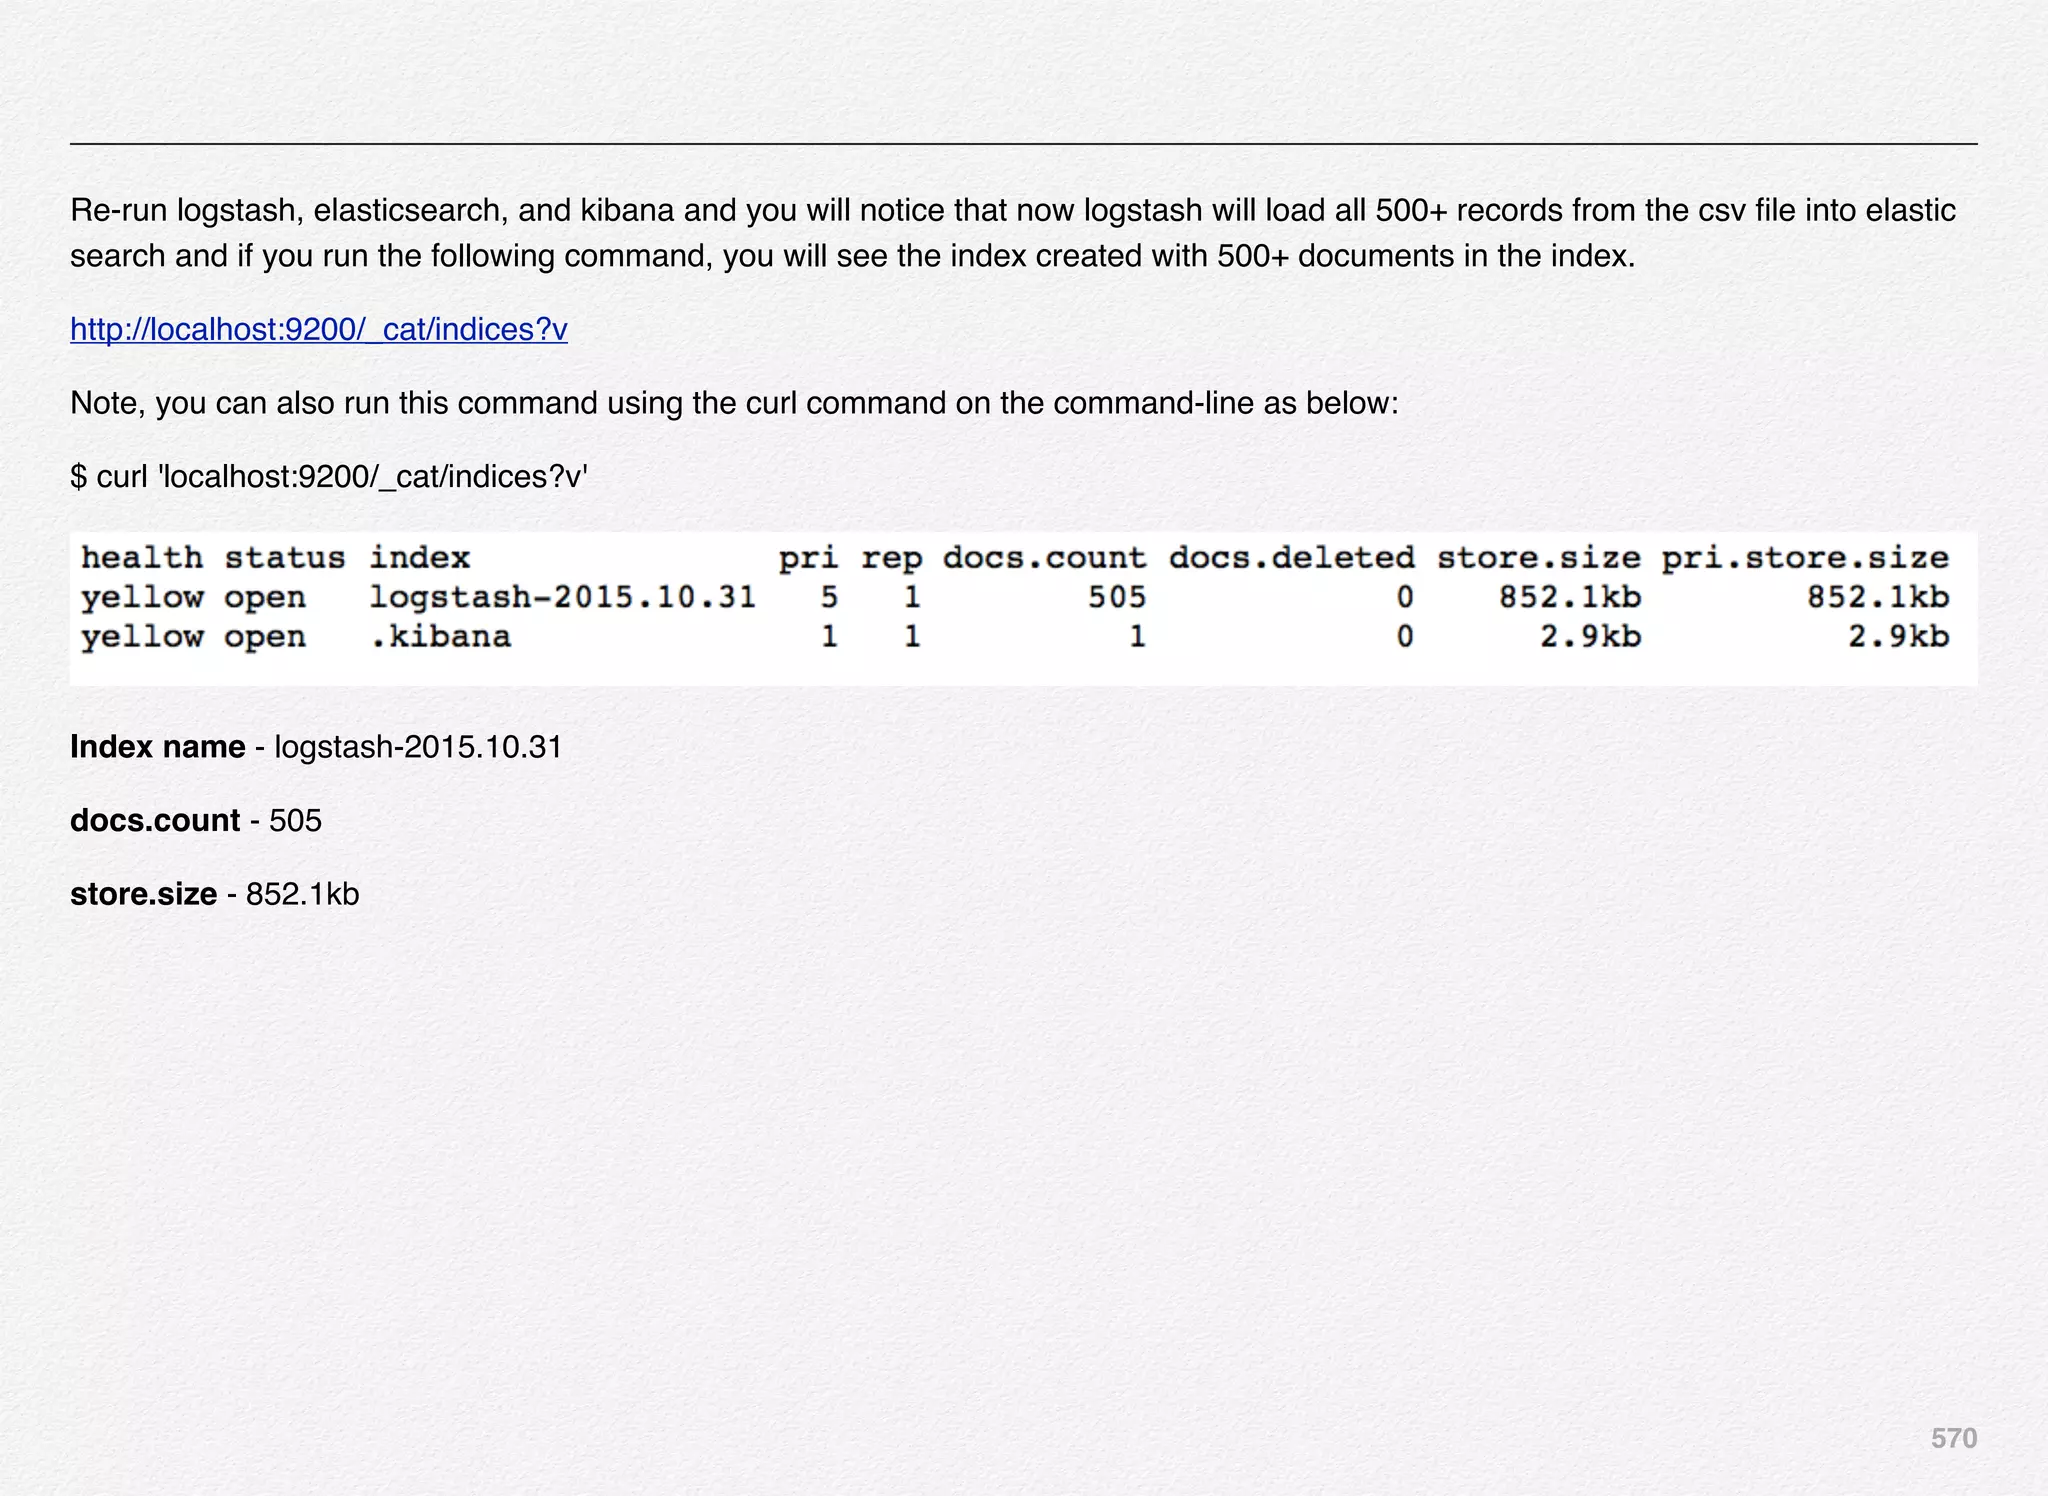
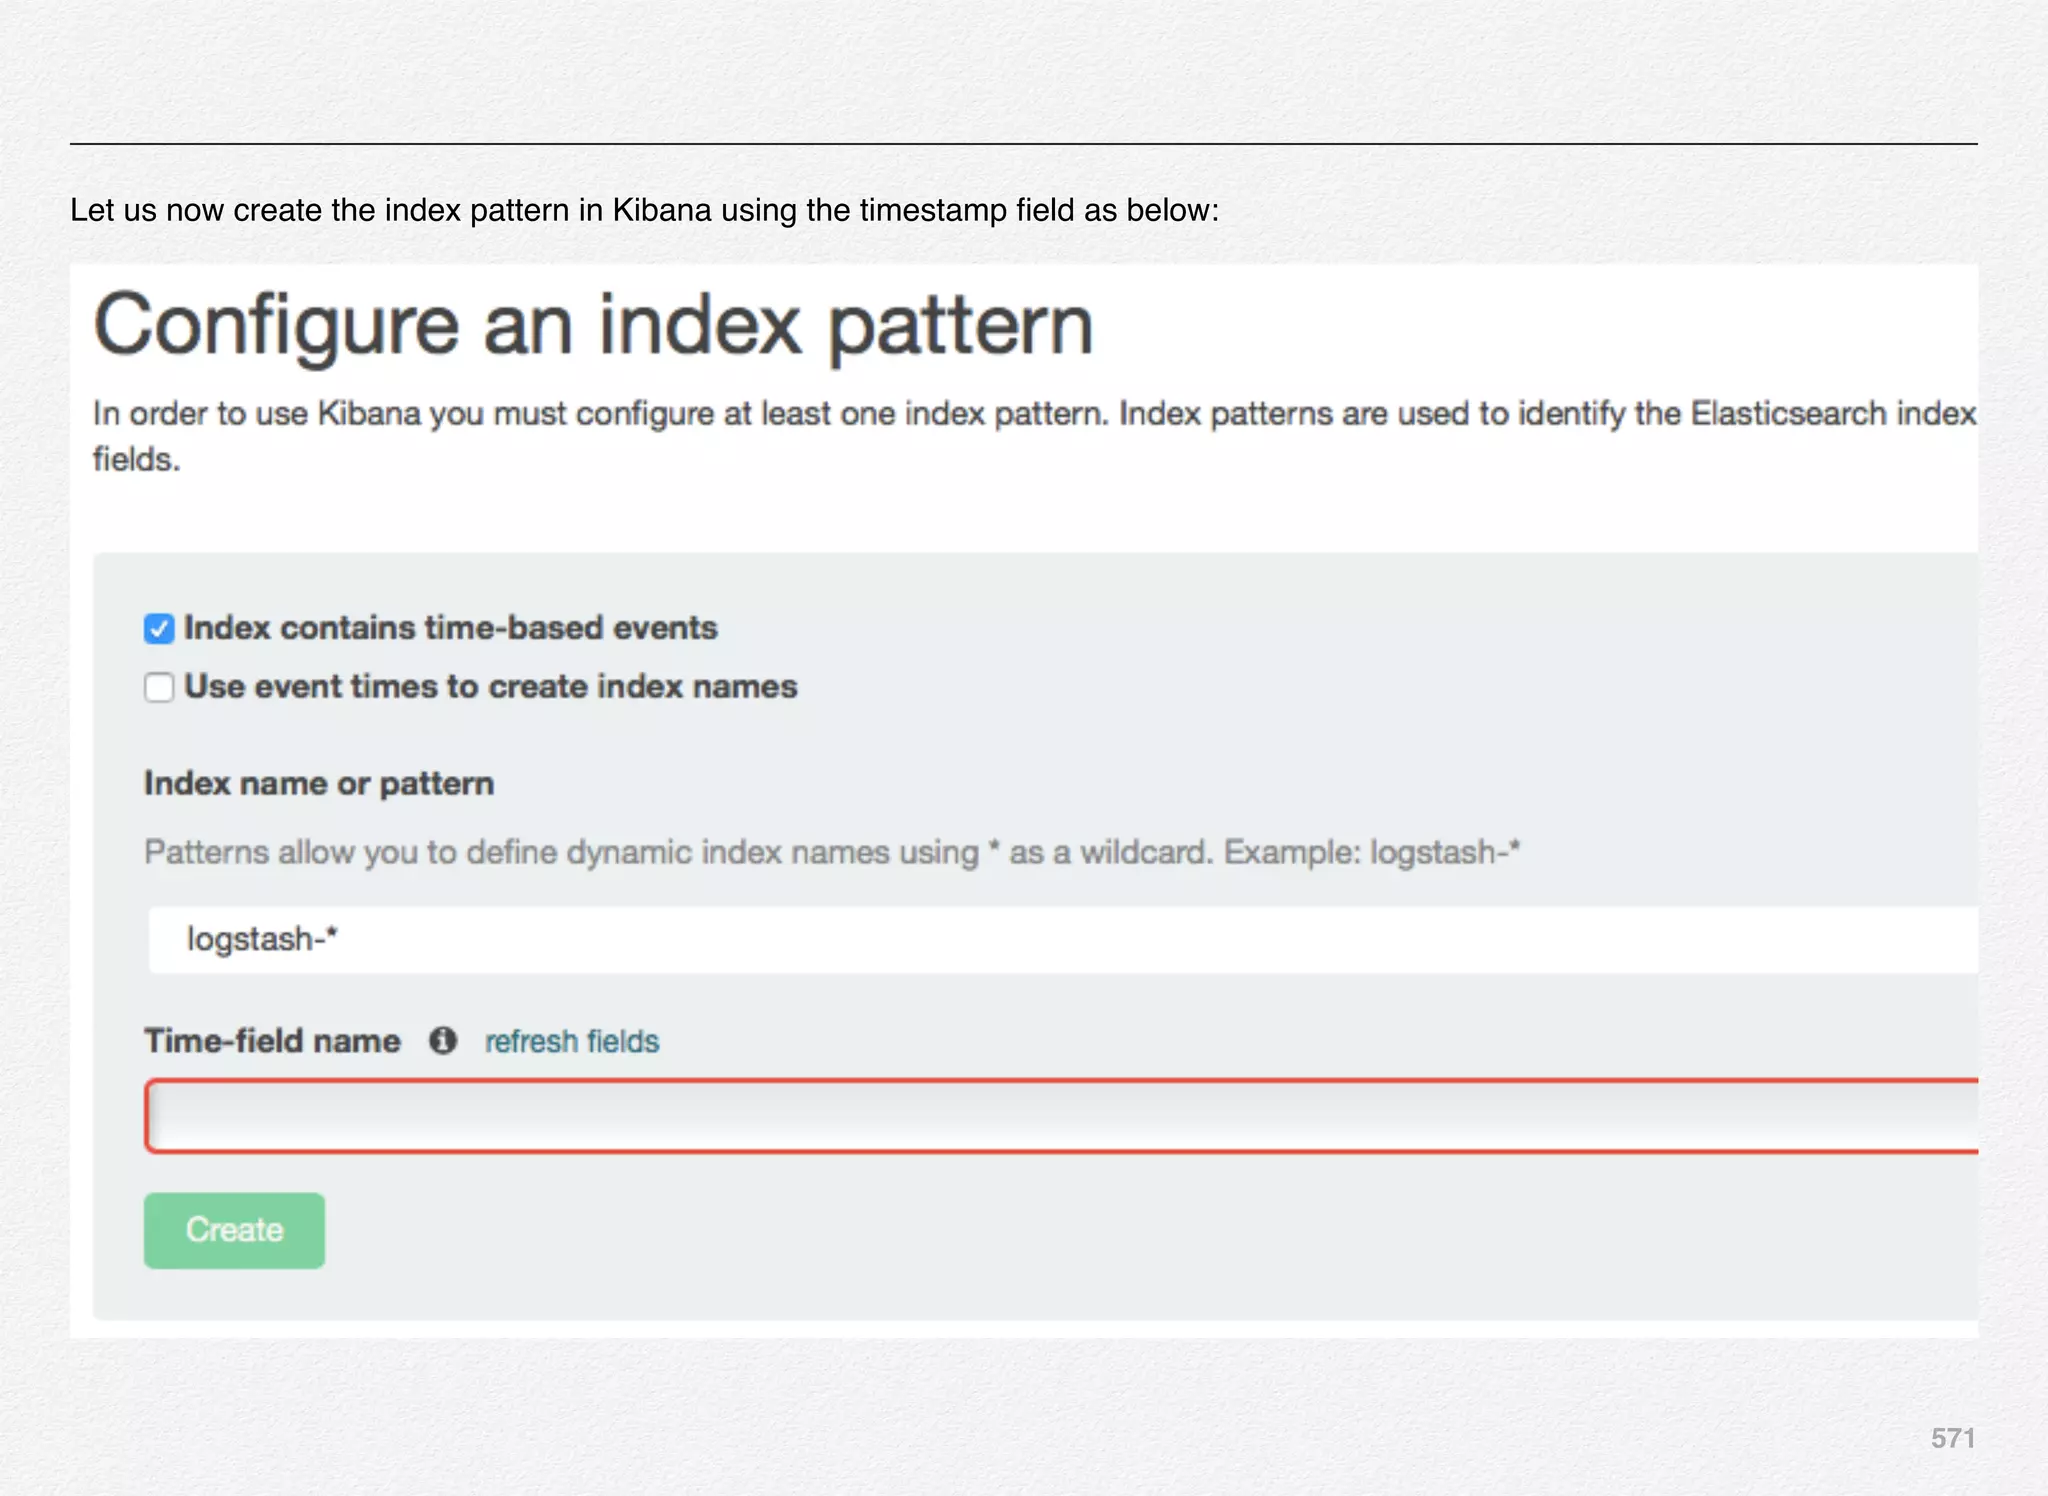
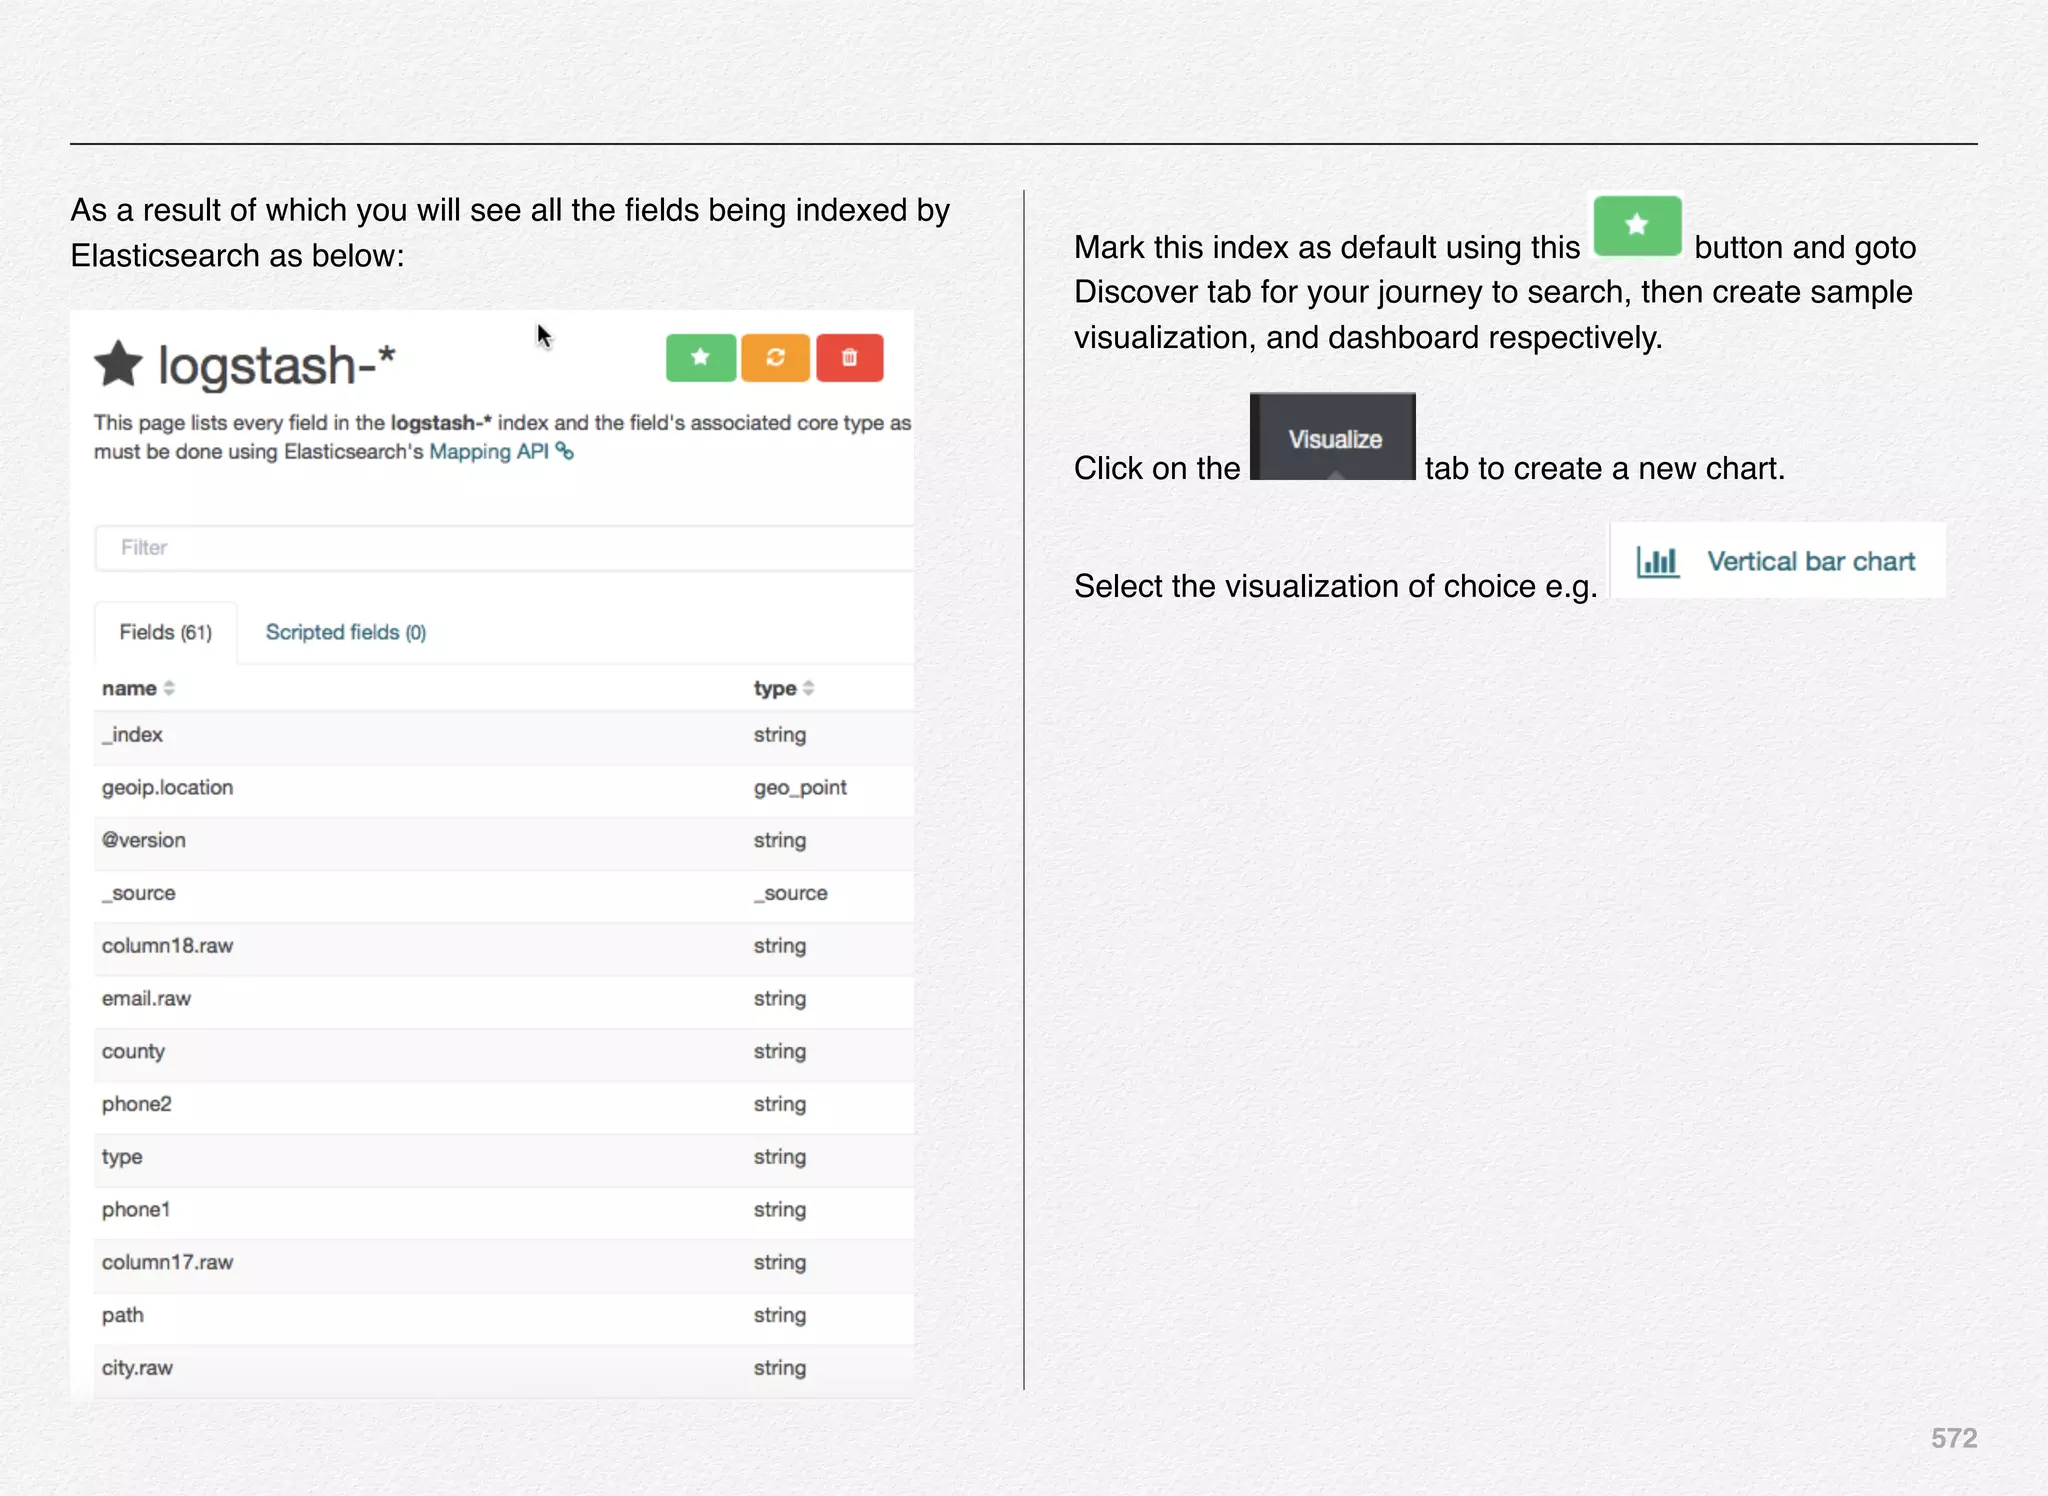
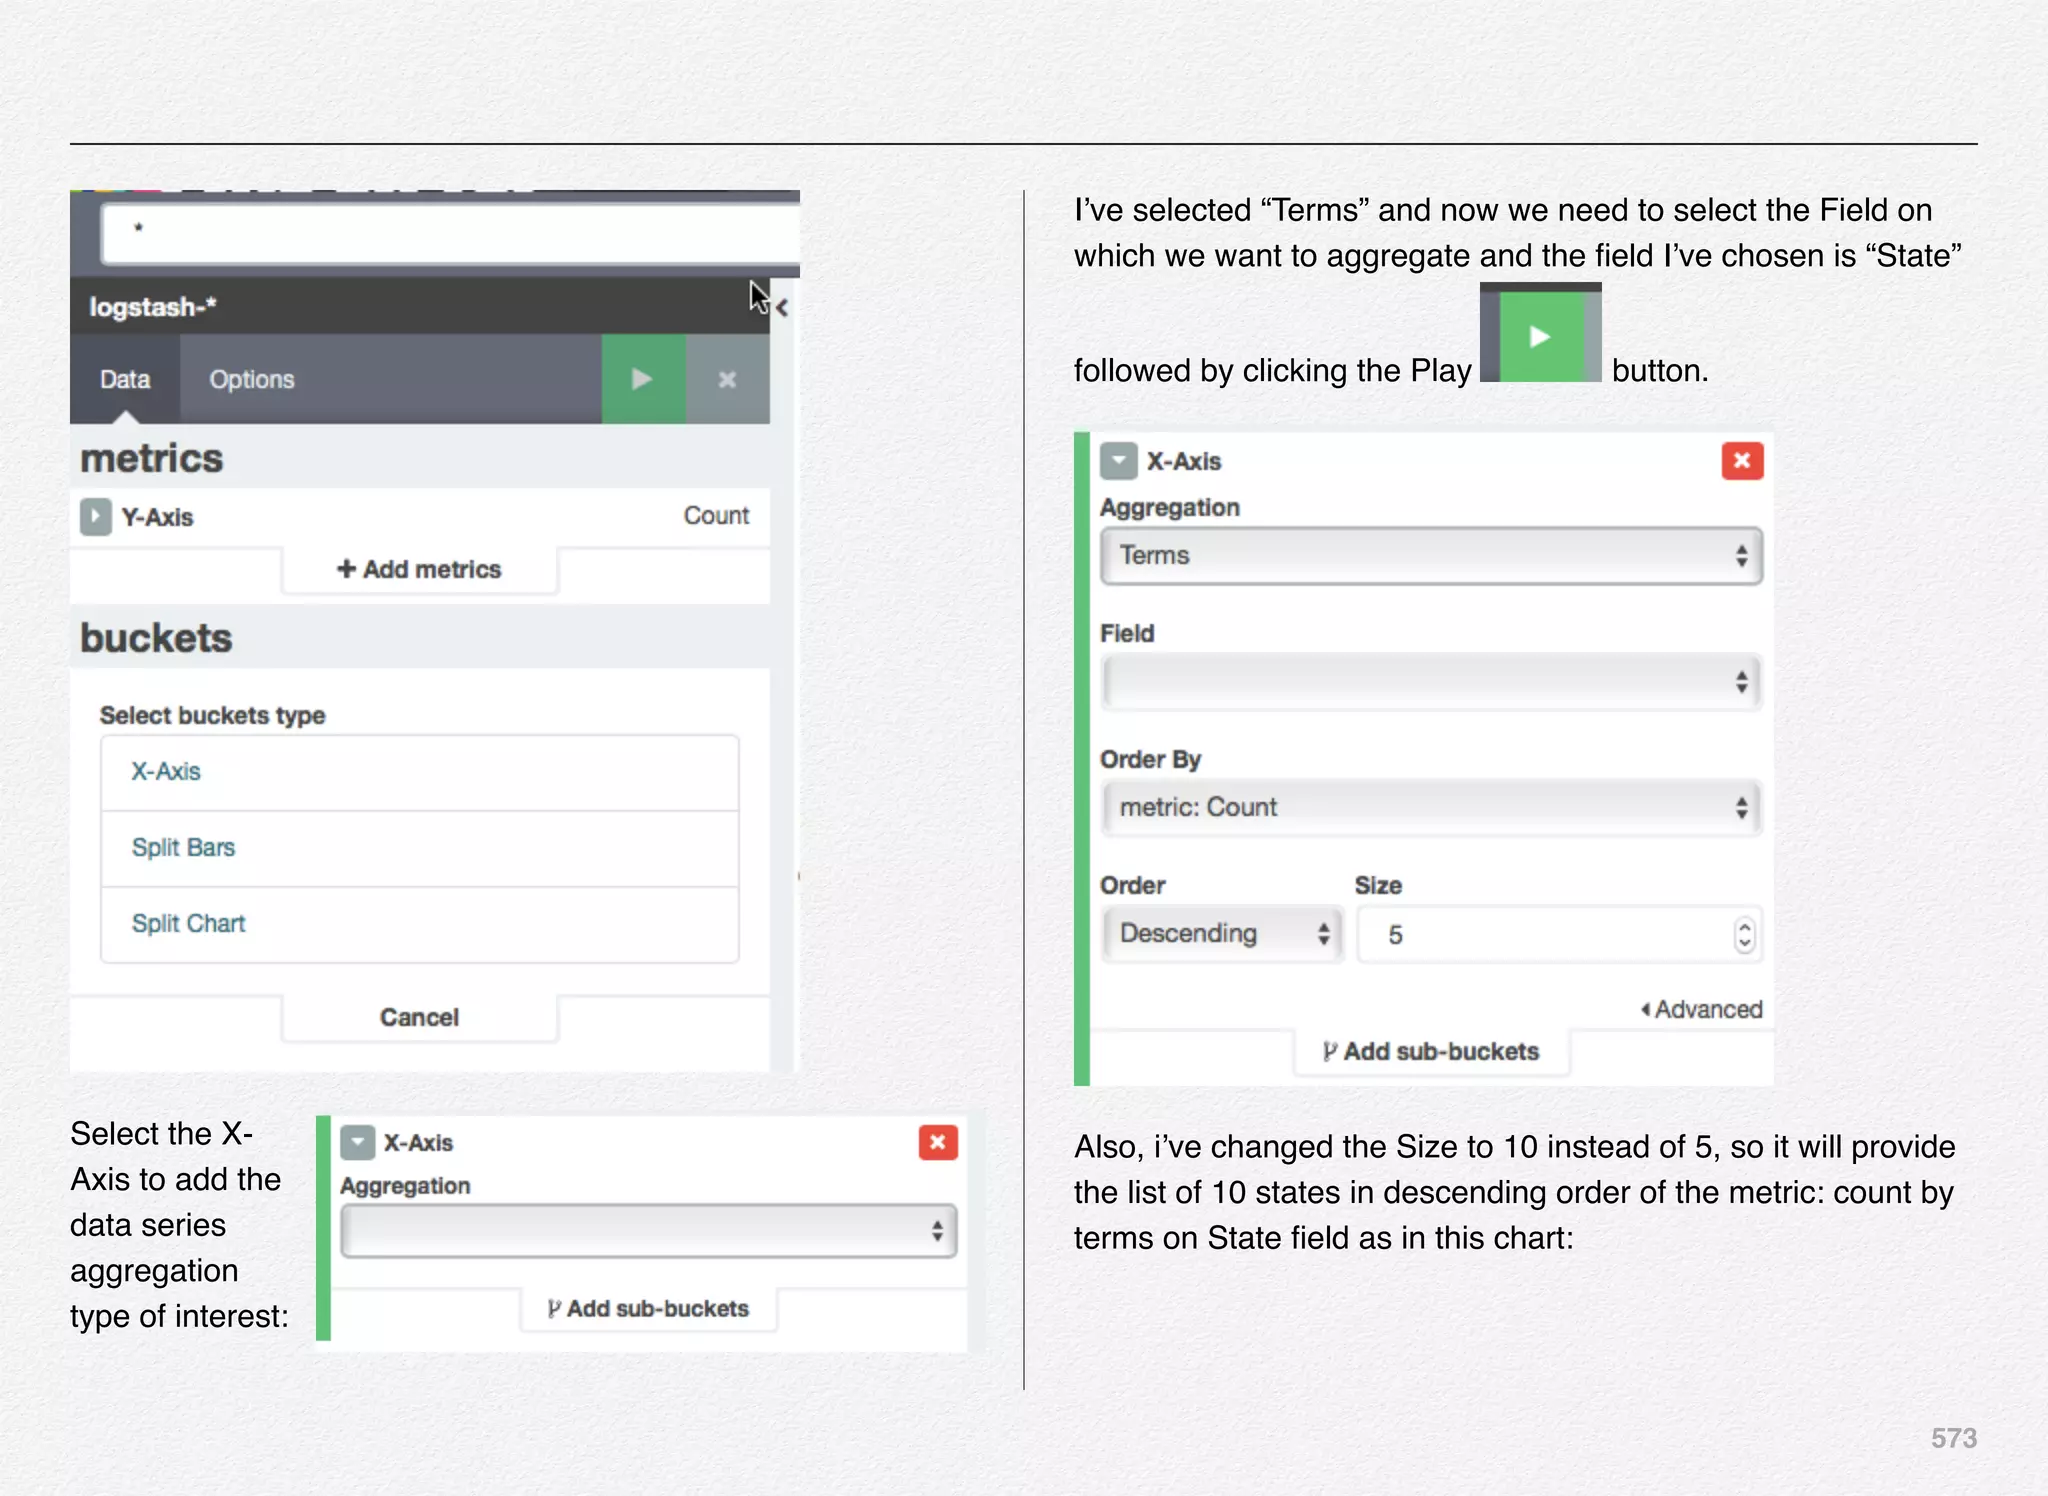
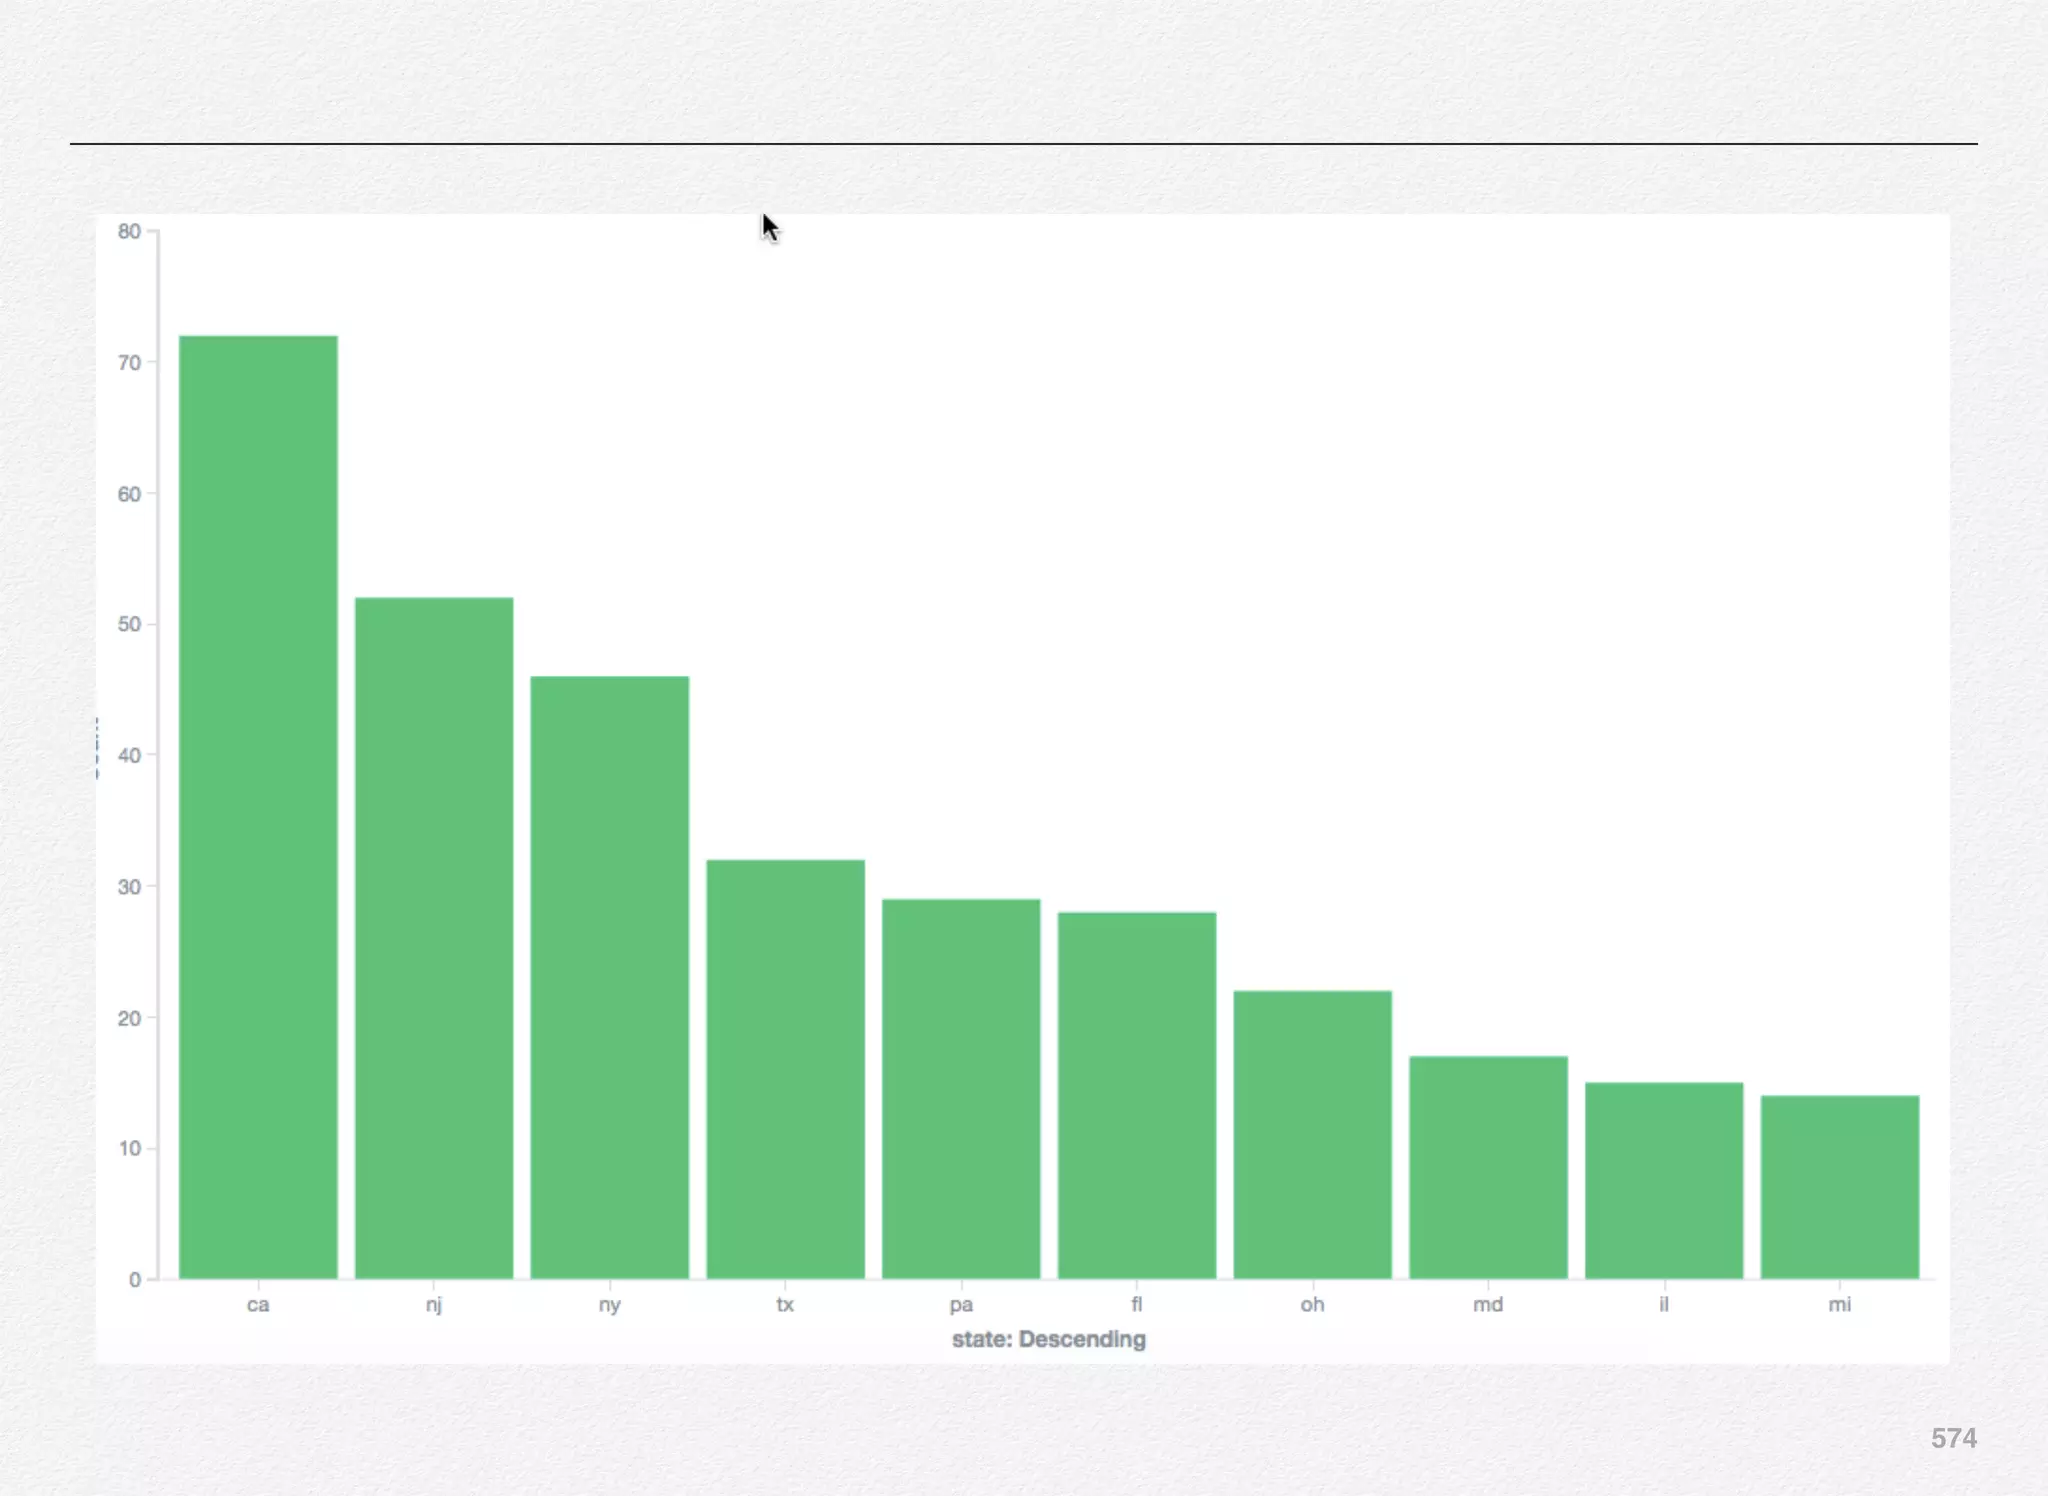
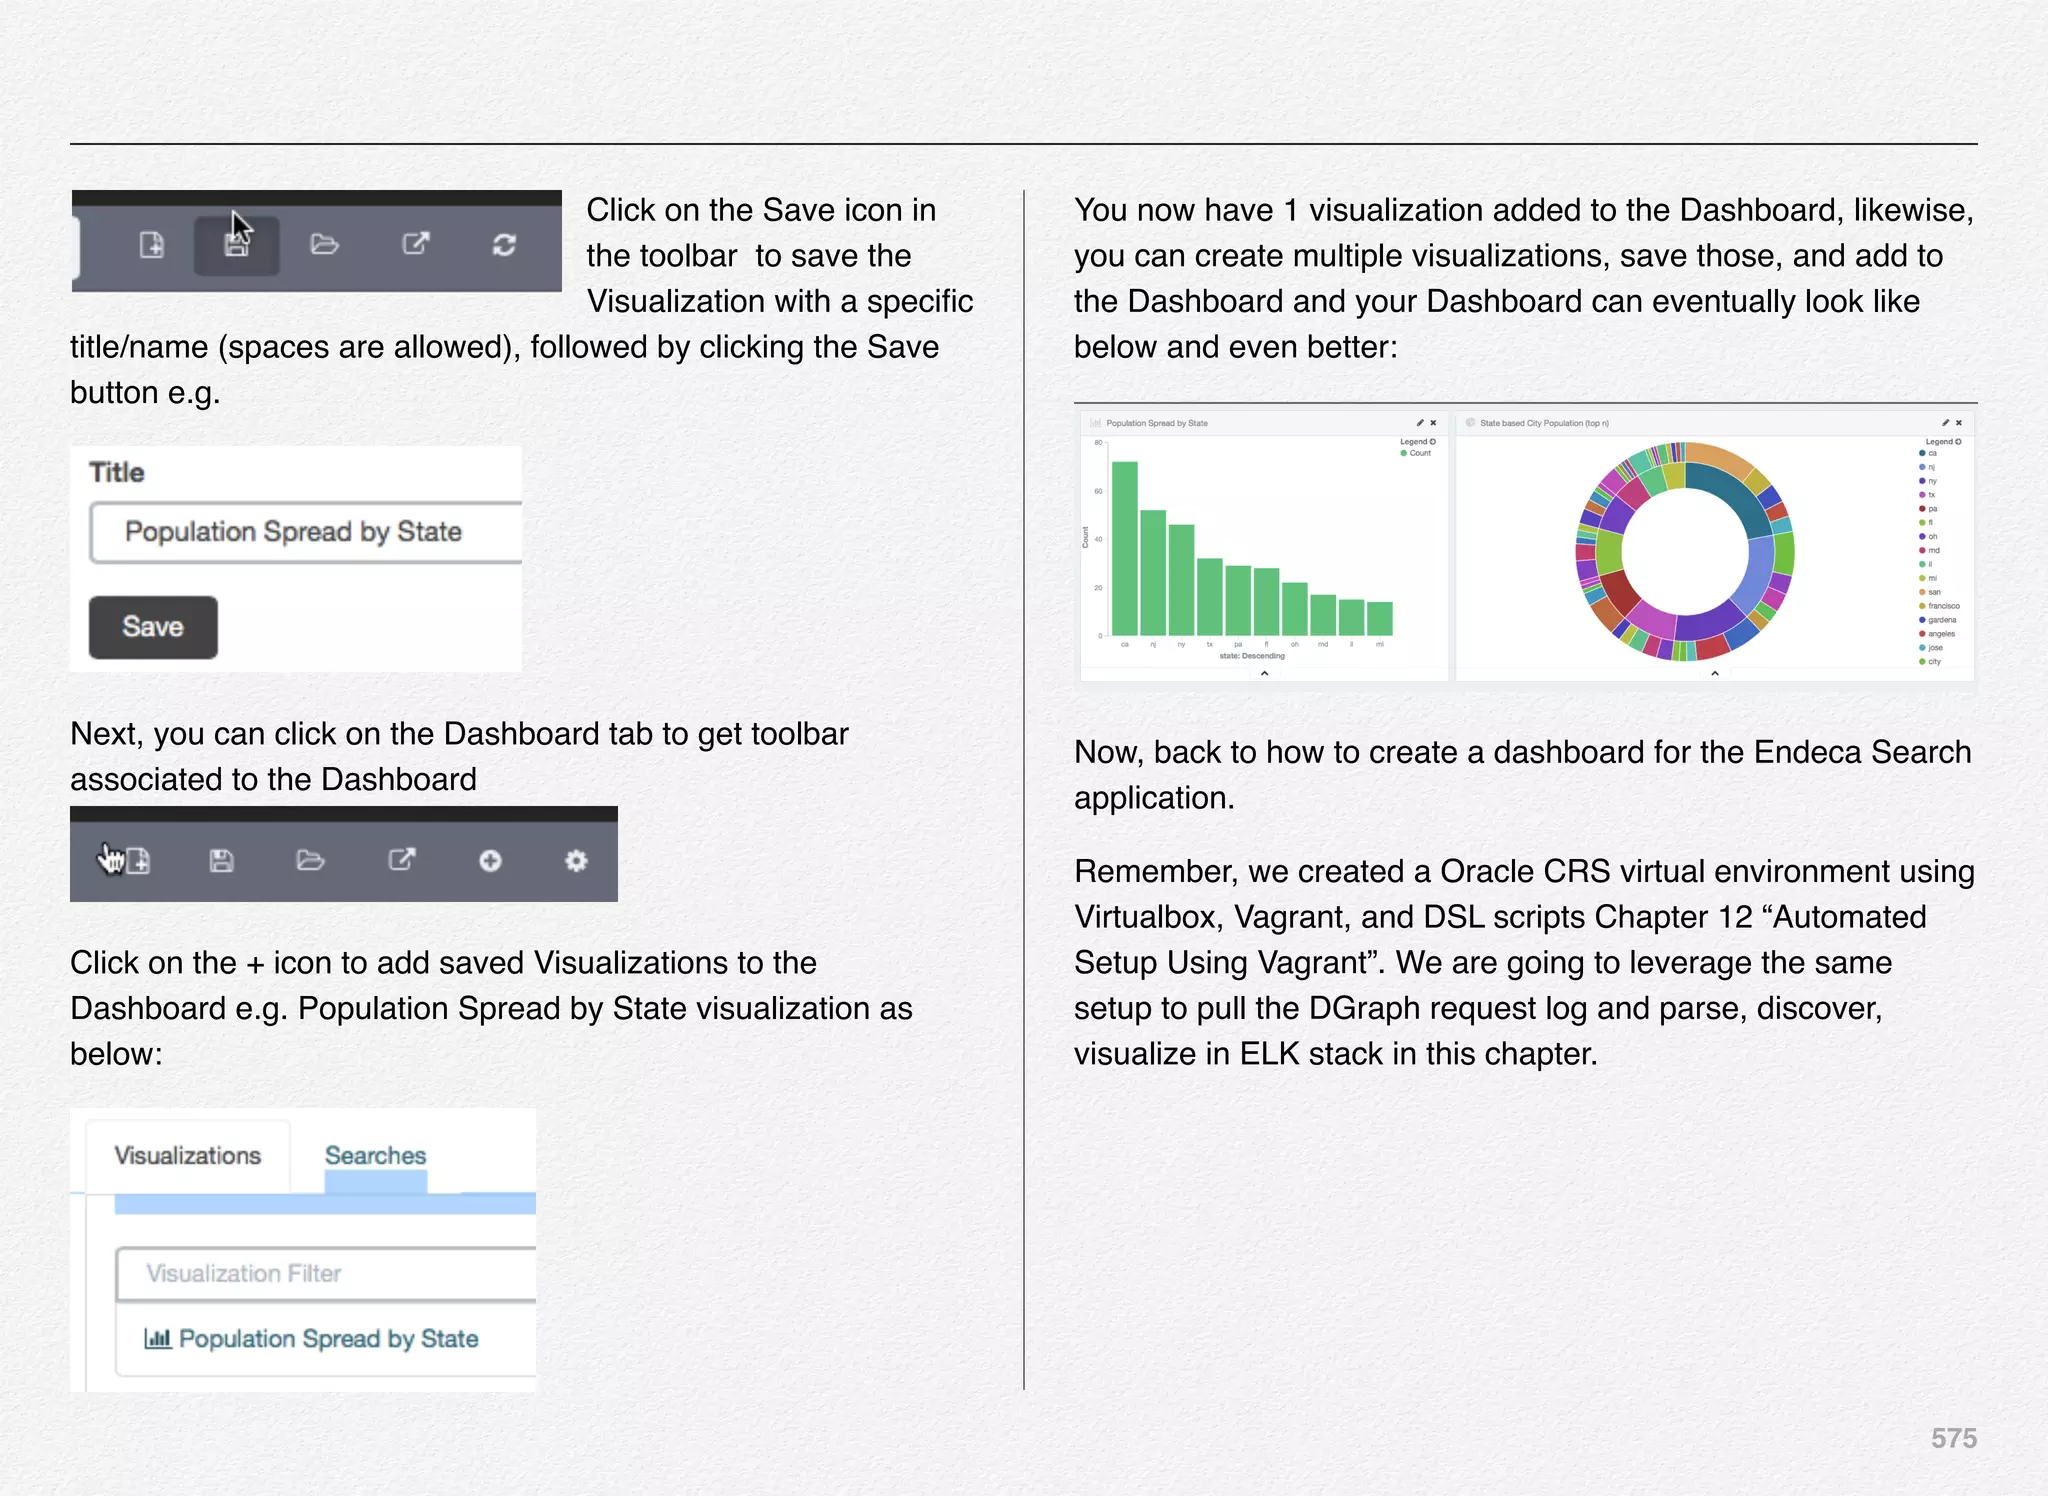
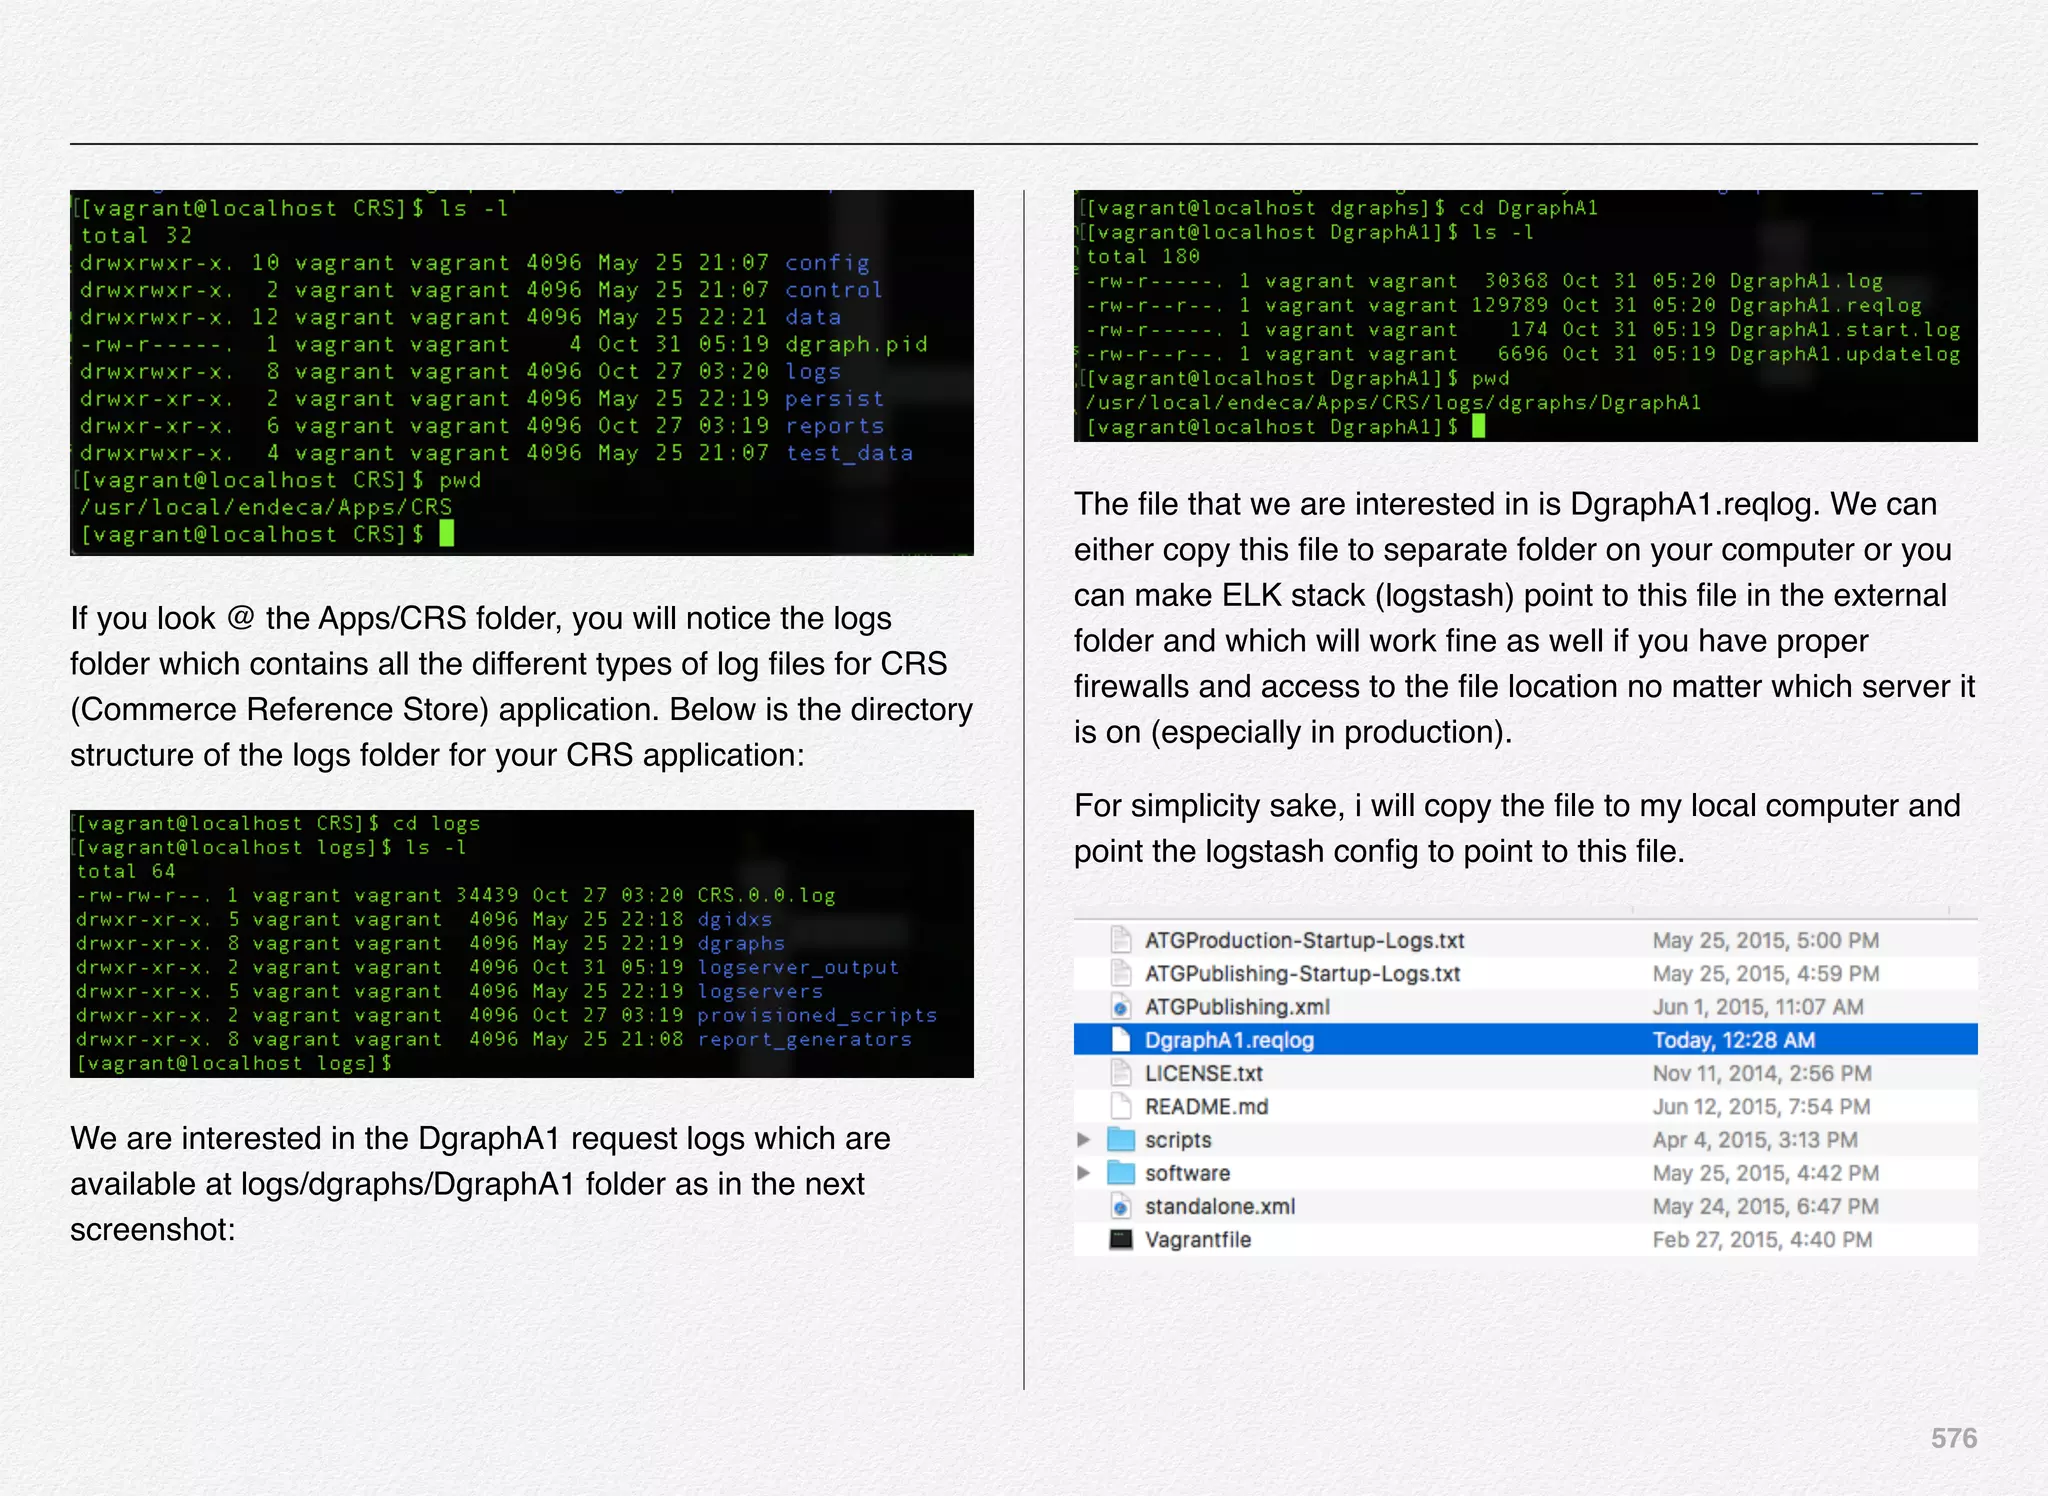
![577
The logstash config file for reading the Endeca dgraph request
log is different than from reading the CSV file, since Endeca
logs are written in different format by the MDEX engine.
Below is the entire endeca.conf content - this is based on my
experience with Endeca logs and requirement to take only the
data elements that we really need. I’m leaving out probably
some of the other data elements from the request log file.
input {
! file {
! ! type => "endeca"
! ! path => ["/Volumes/EXTERNAL/VagrantCRS/
DgraphA1.reqlog"]
! ! start_position => "beginning"
! }
}
filter {
! if [type] == "endeca" {
! ! urldecode {all_fields => true }
! ! if ([message] =~ /(graph)/) {
! ! ! drop{}
! ! }
! ! mutate {
! ! ! gsub => [ "message","[+=]"," " ]
! ! }
! ! grok {](https://image.slidesharecdn.com/oraclecommerce-doityourselfseries-160129151710/75/Oracle-Commerce-Using-ATG-Endeca-Do-It-Yourself-Series-578-2048.jpg)
![578
! ! ! match => [ "message", "%{NUMBER:timpstamp}
%{IP:clientip} - %{NUMBER:httpid} %{NUMBER:bytes} %
{NUMBER:time_taken} %{NUMBER:duration} %
{NUMBER:response} %{NUMBER:results} %
{NUMBER:Q_status} %{NUMBER:Q_status2} %{DATA:URI} %
{DATA:Terms}&" ]
! ! }
! }
}
output {
elasticsearch {
action => "index"
hosts => "127.0.0.1"
index => "endeca-search"
workers => 1
}
stdout {}
}
In endeca.conf we are using the grok filter to retrieve/match
fields from the dgraph request log file. Also, we are eliminating
some of the dgraph log entries especially which are not search
related. We are only extracting log entries which are related to
the search and navigation.
Let us now start the Logstash, Elasticsearch, and Kibana
services and watch it index the content of the dgraph request
log file.
If you look @ the list of indexes in Elasticsearch you would
notice a new index has been added by the name endeca-
search with 54 documents.](https://image.slidesharecdn.com/oraclecommerce-doityourselfseries-160129151710/75/Oracle-Commerce-Using-ATG-Endeca-Do-It-Yourself-Series-579-2048.jpg)
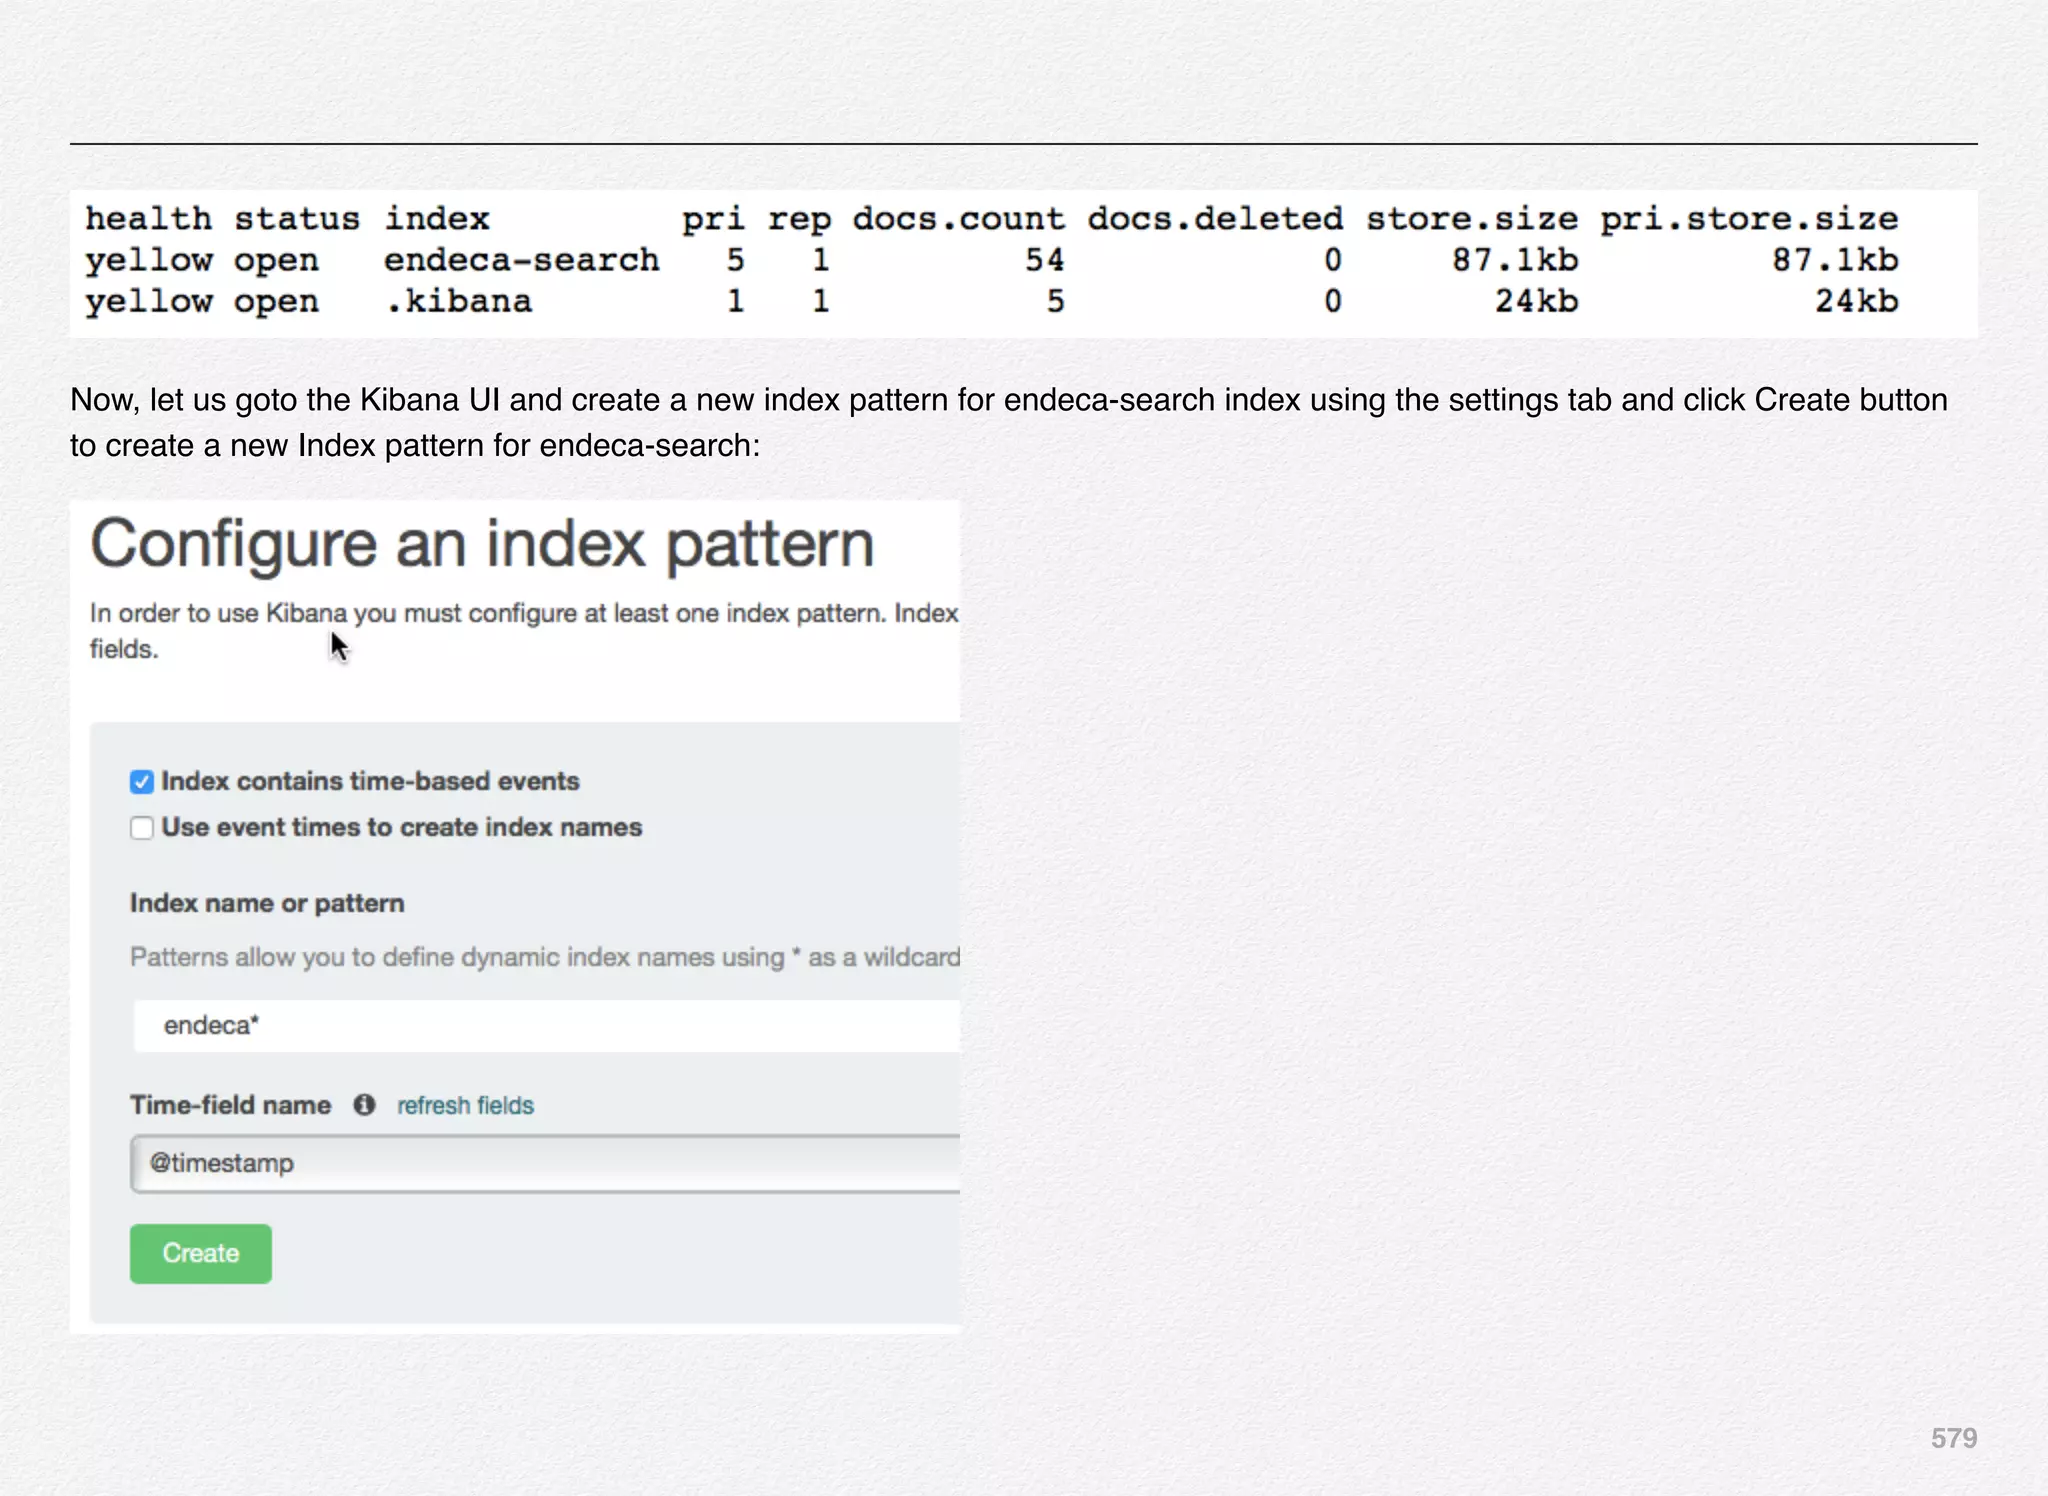
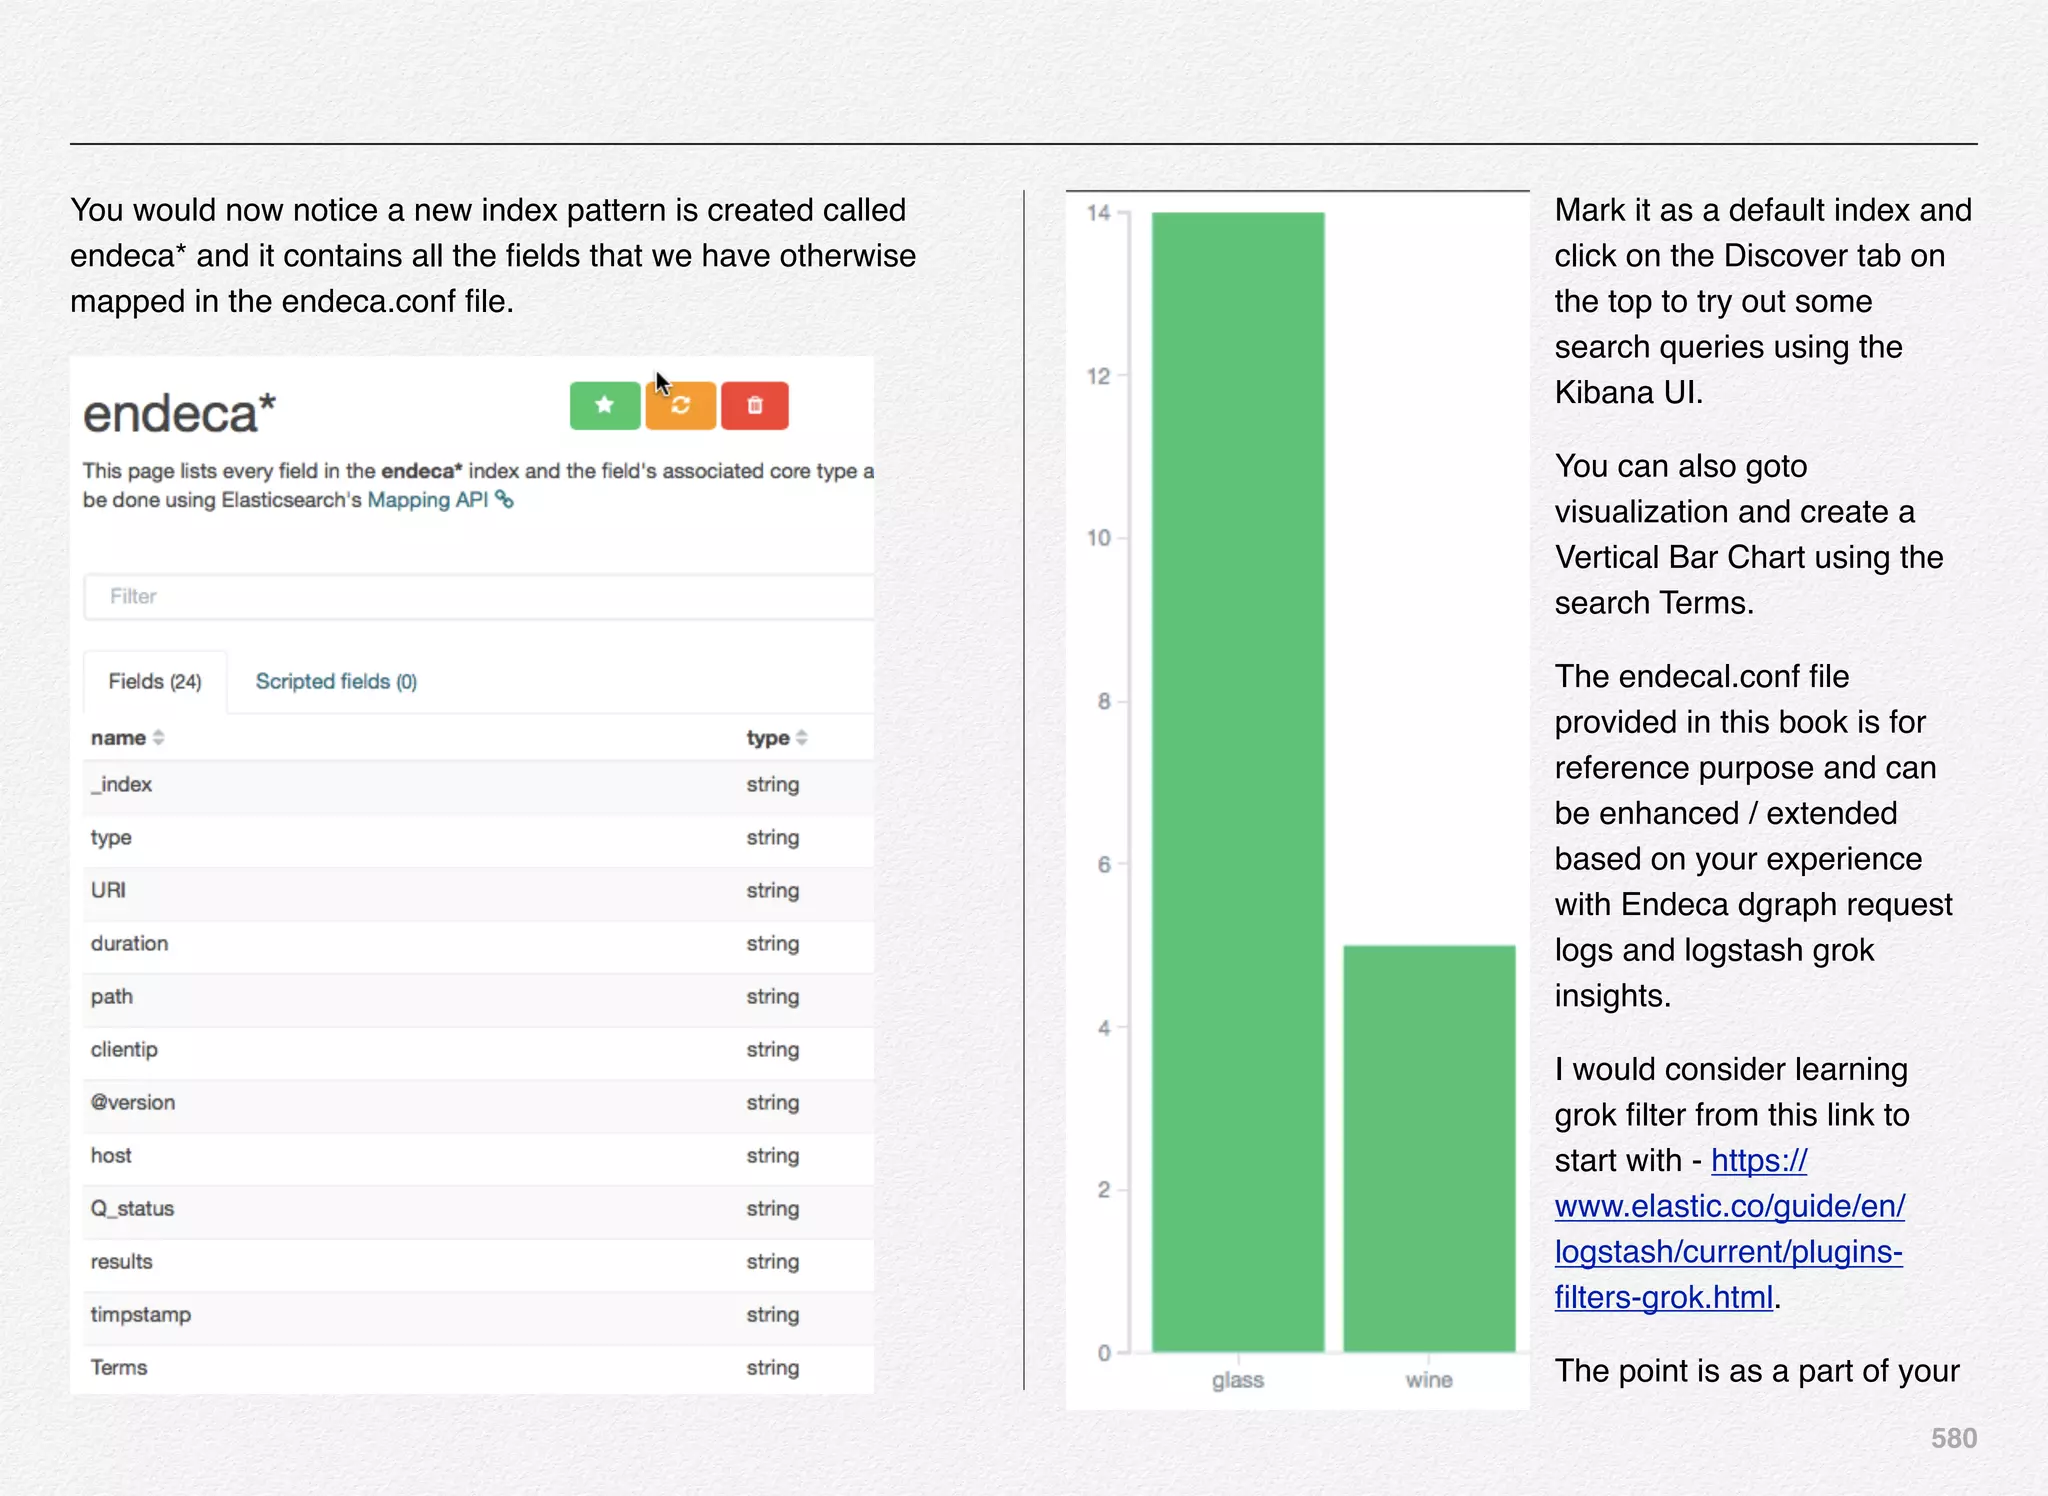
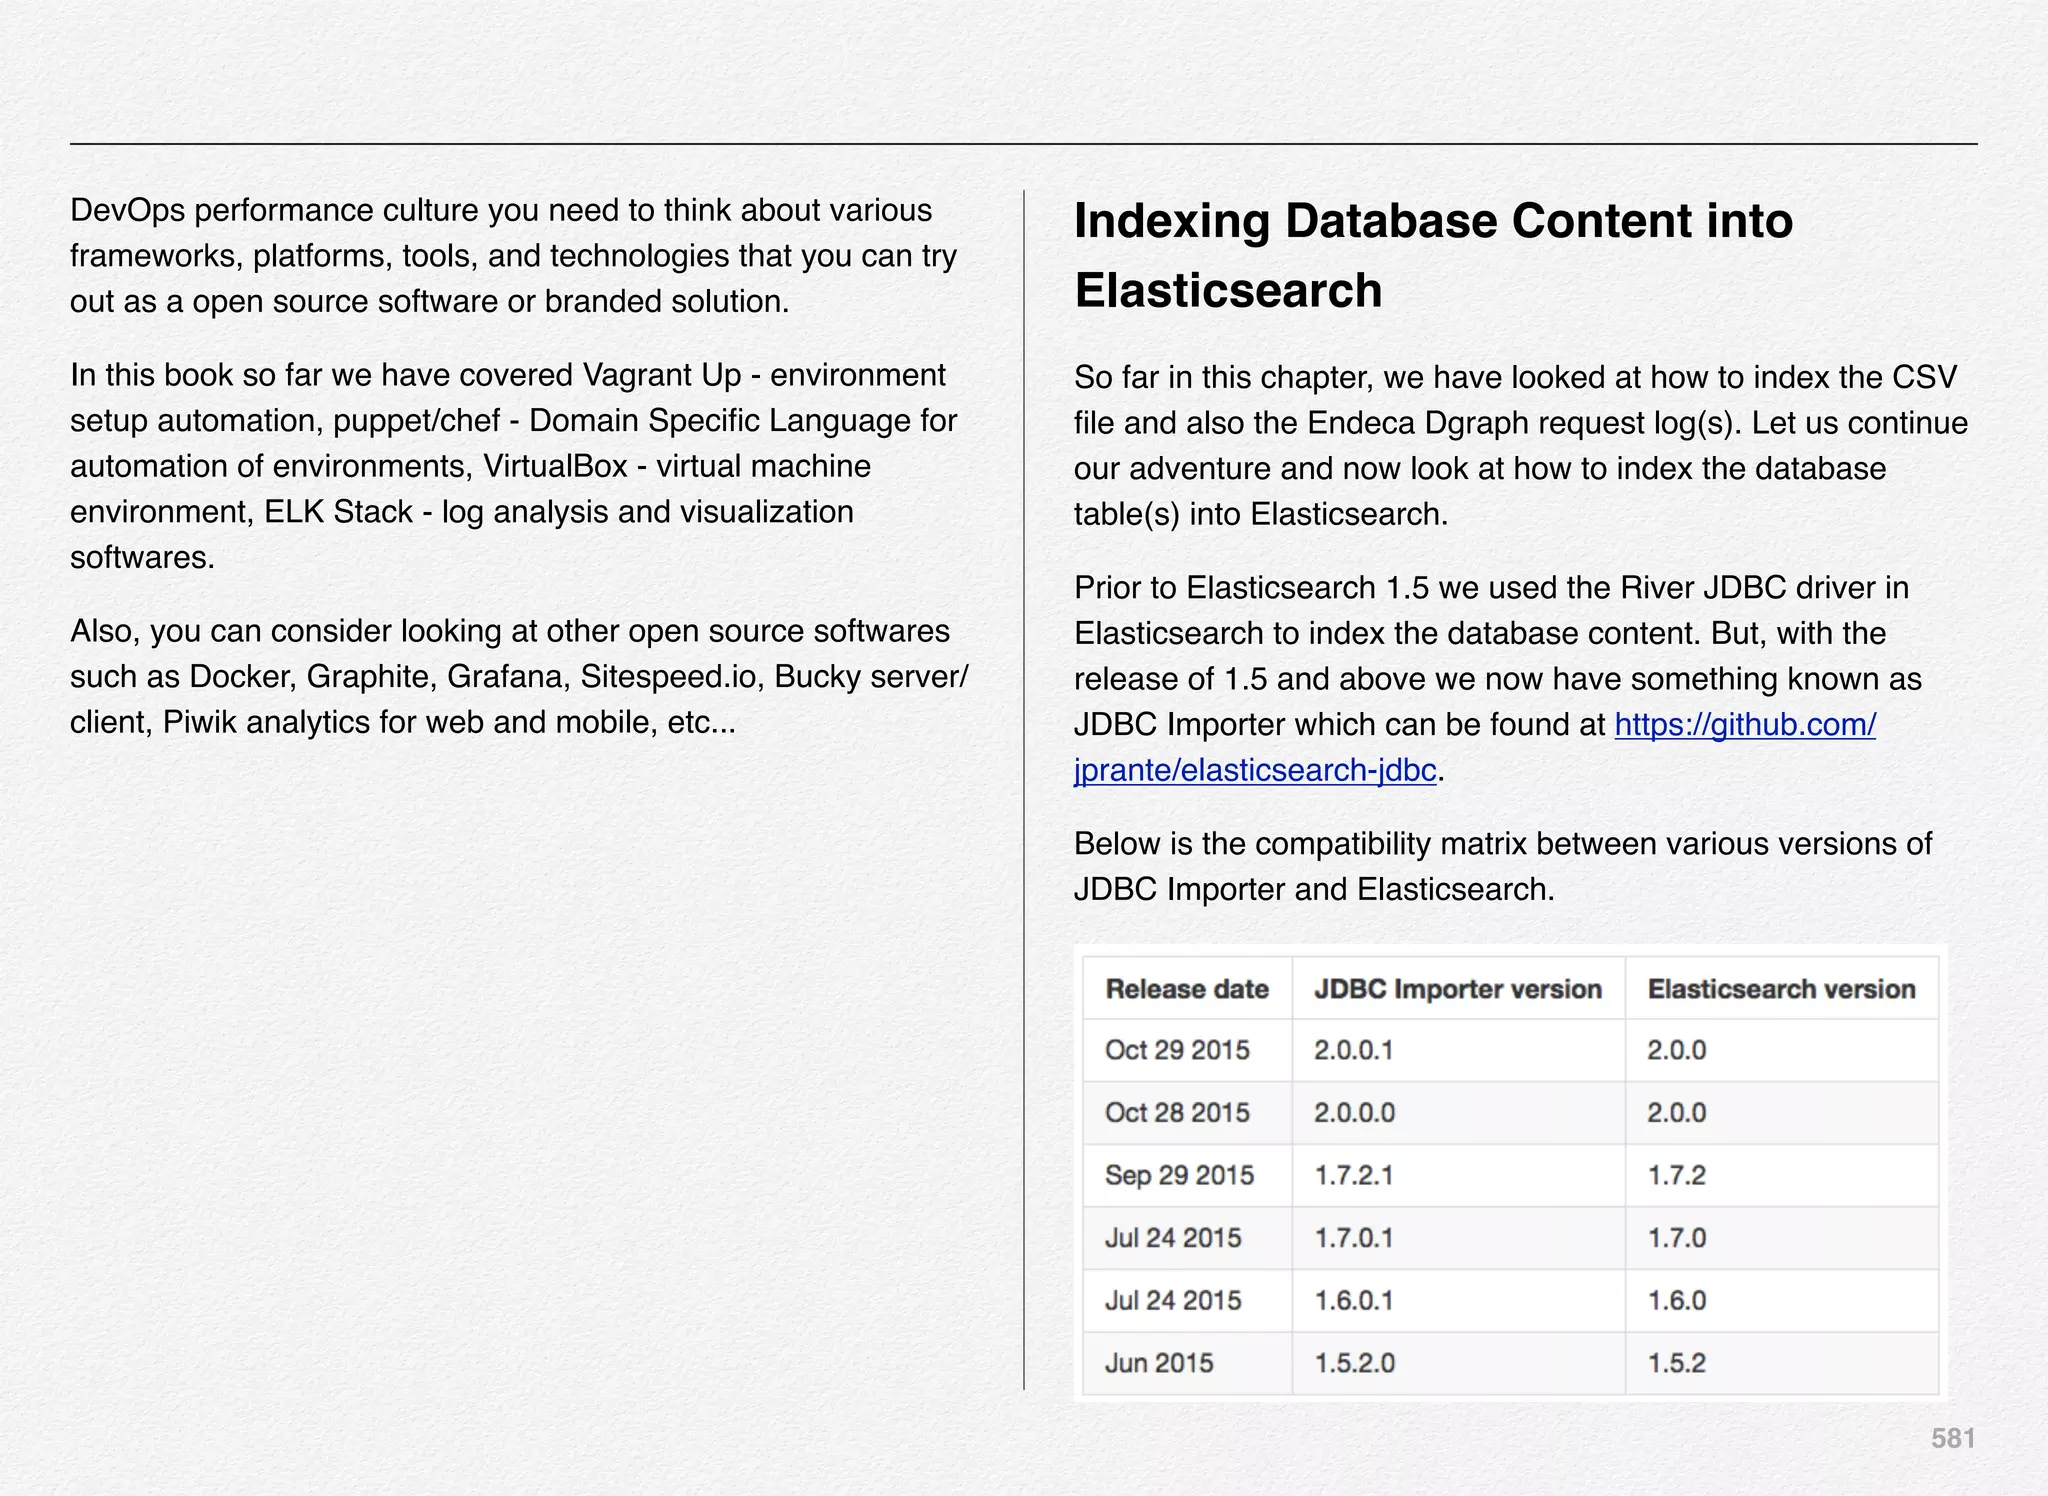
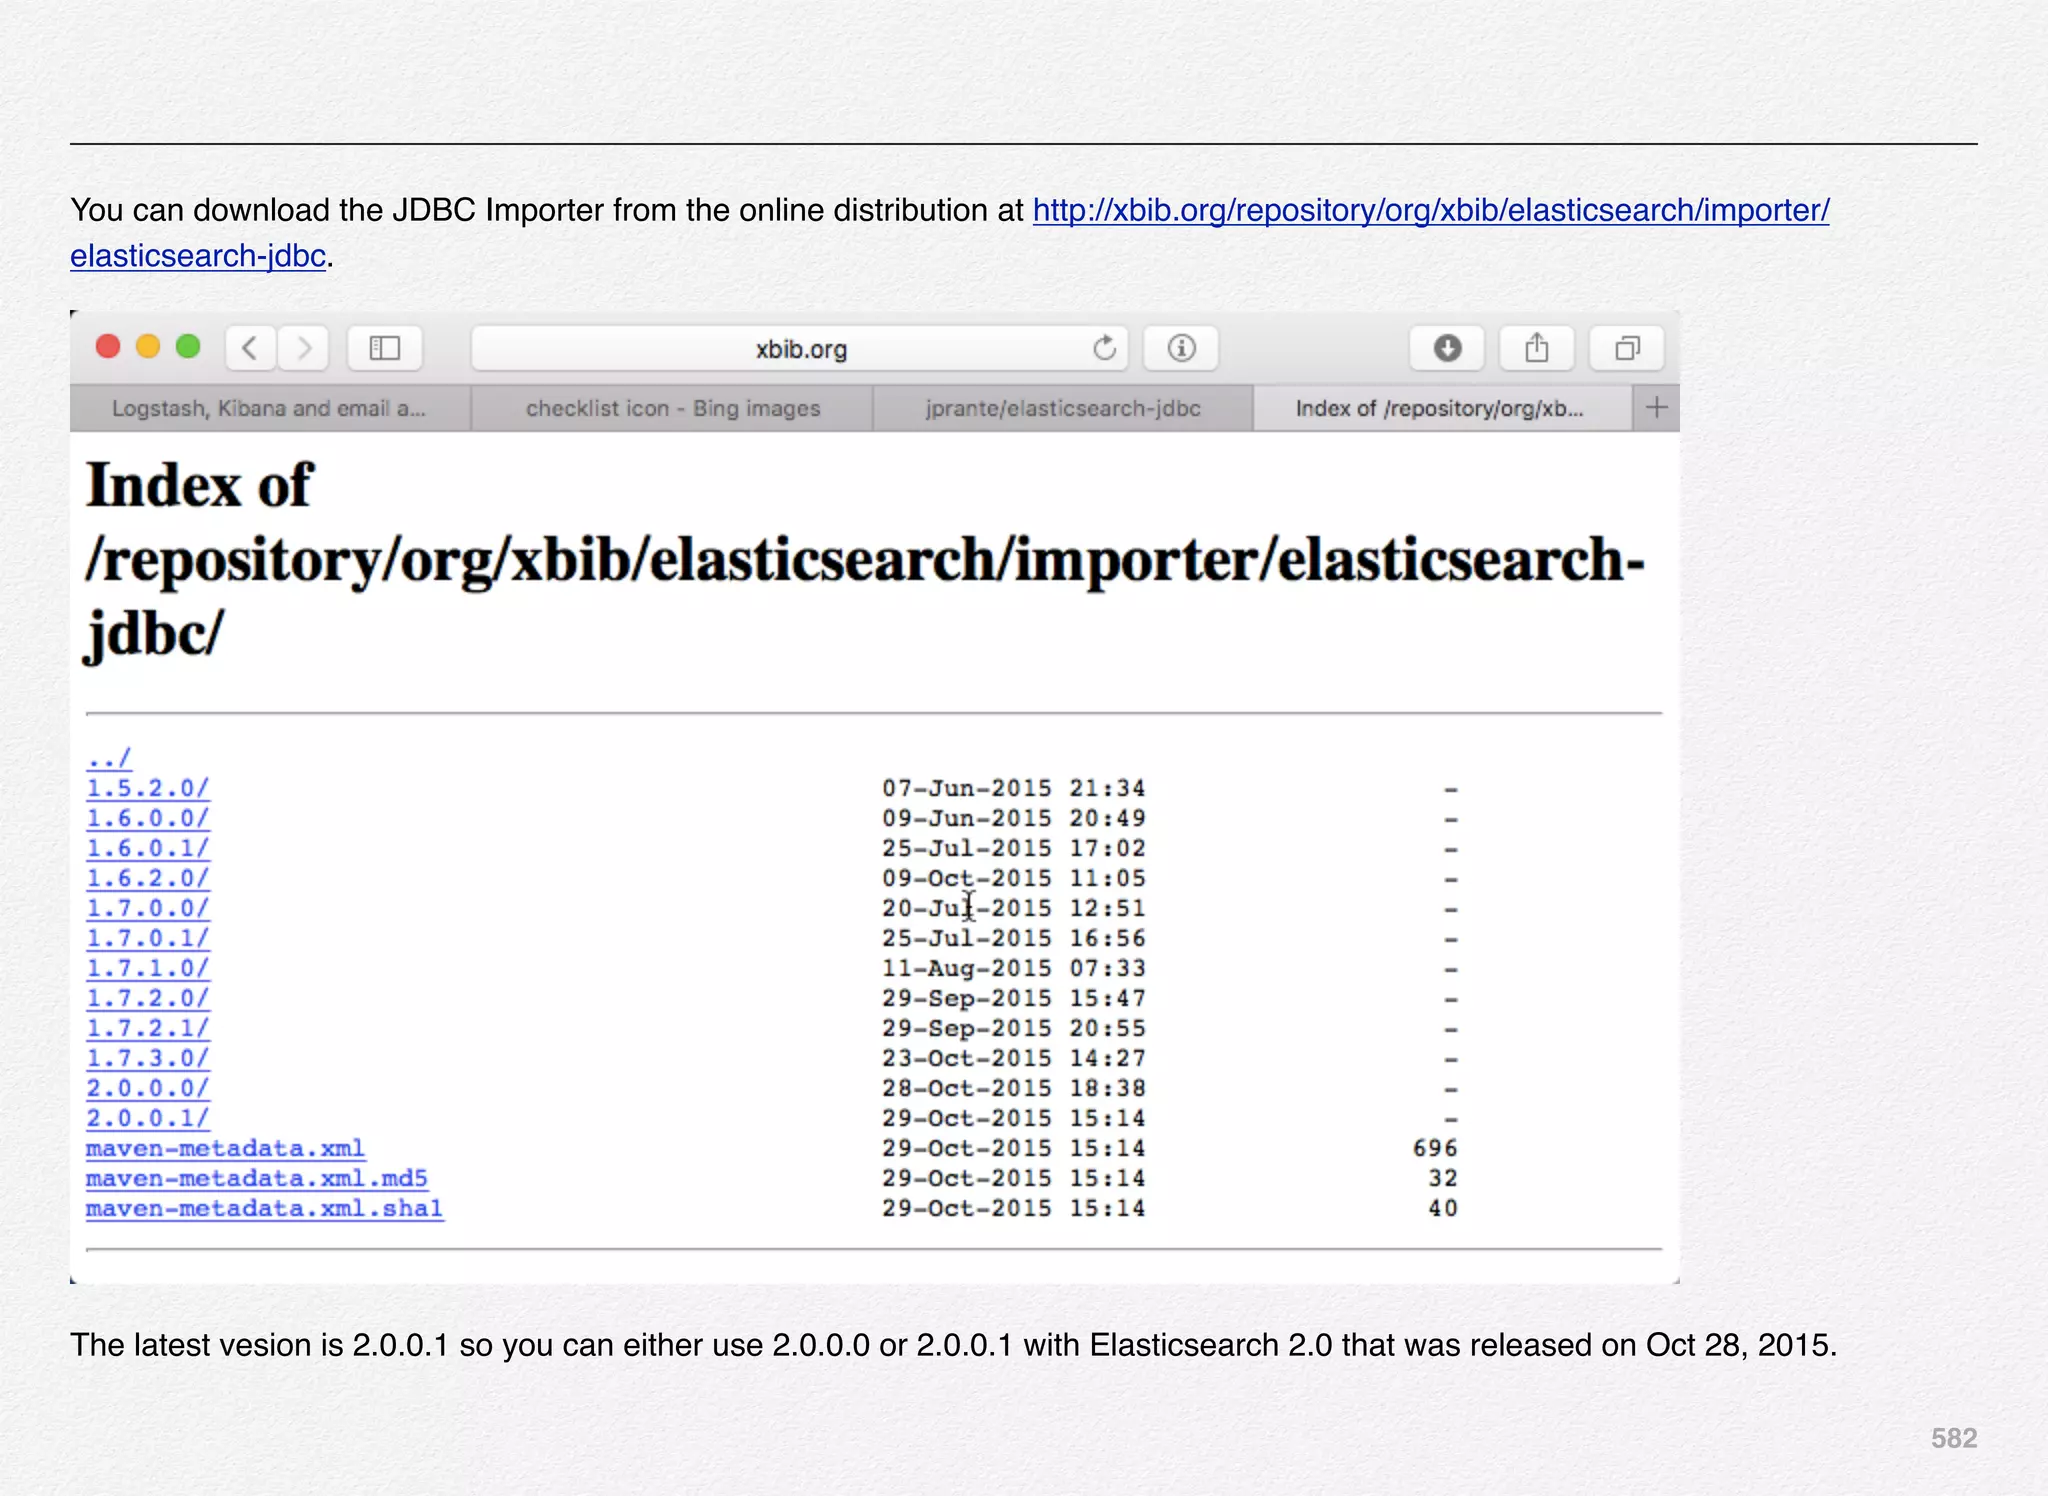
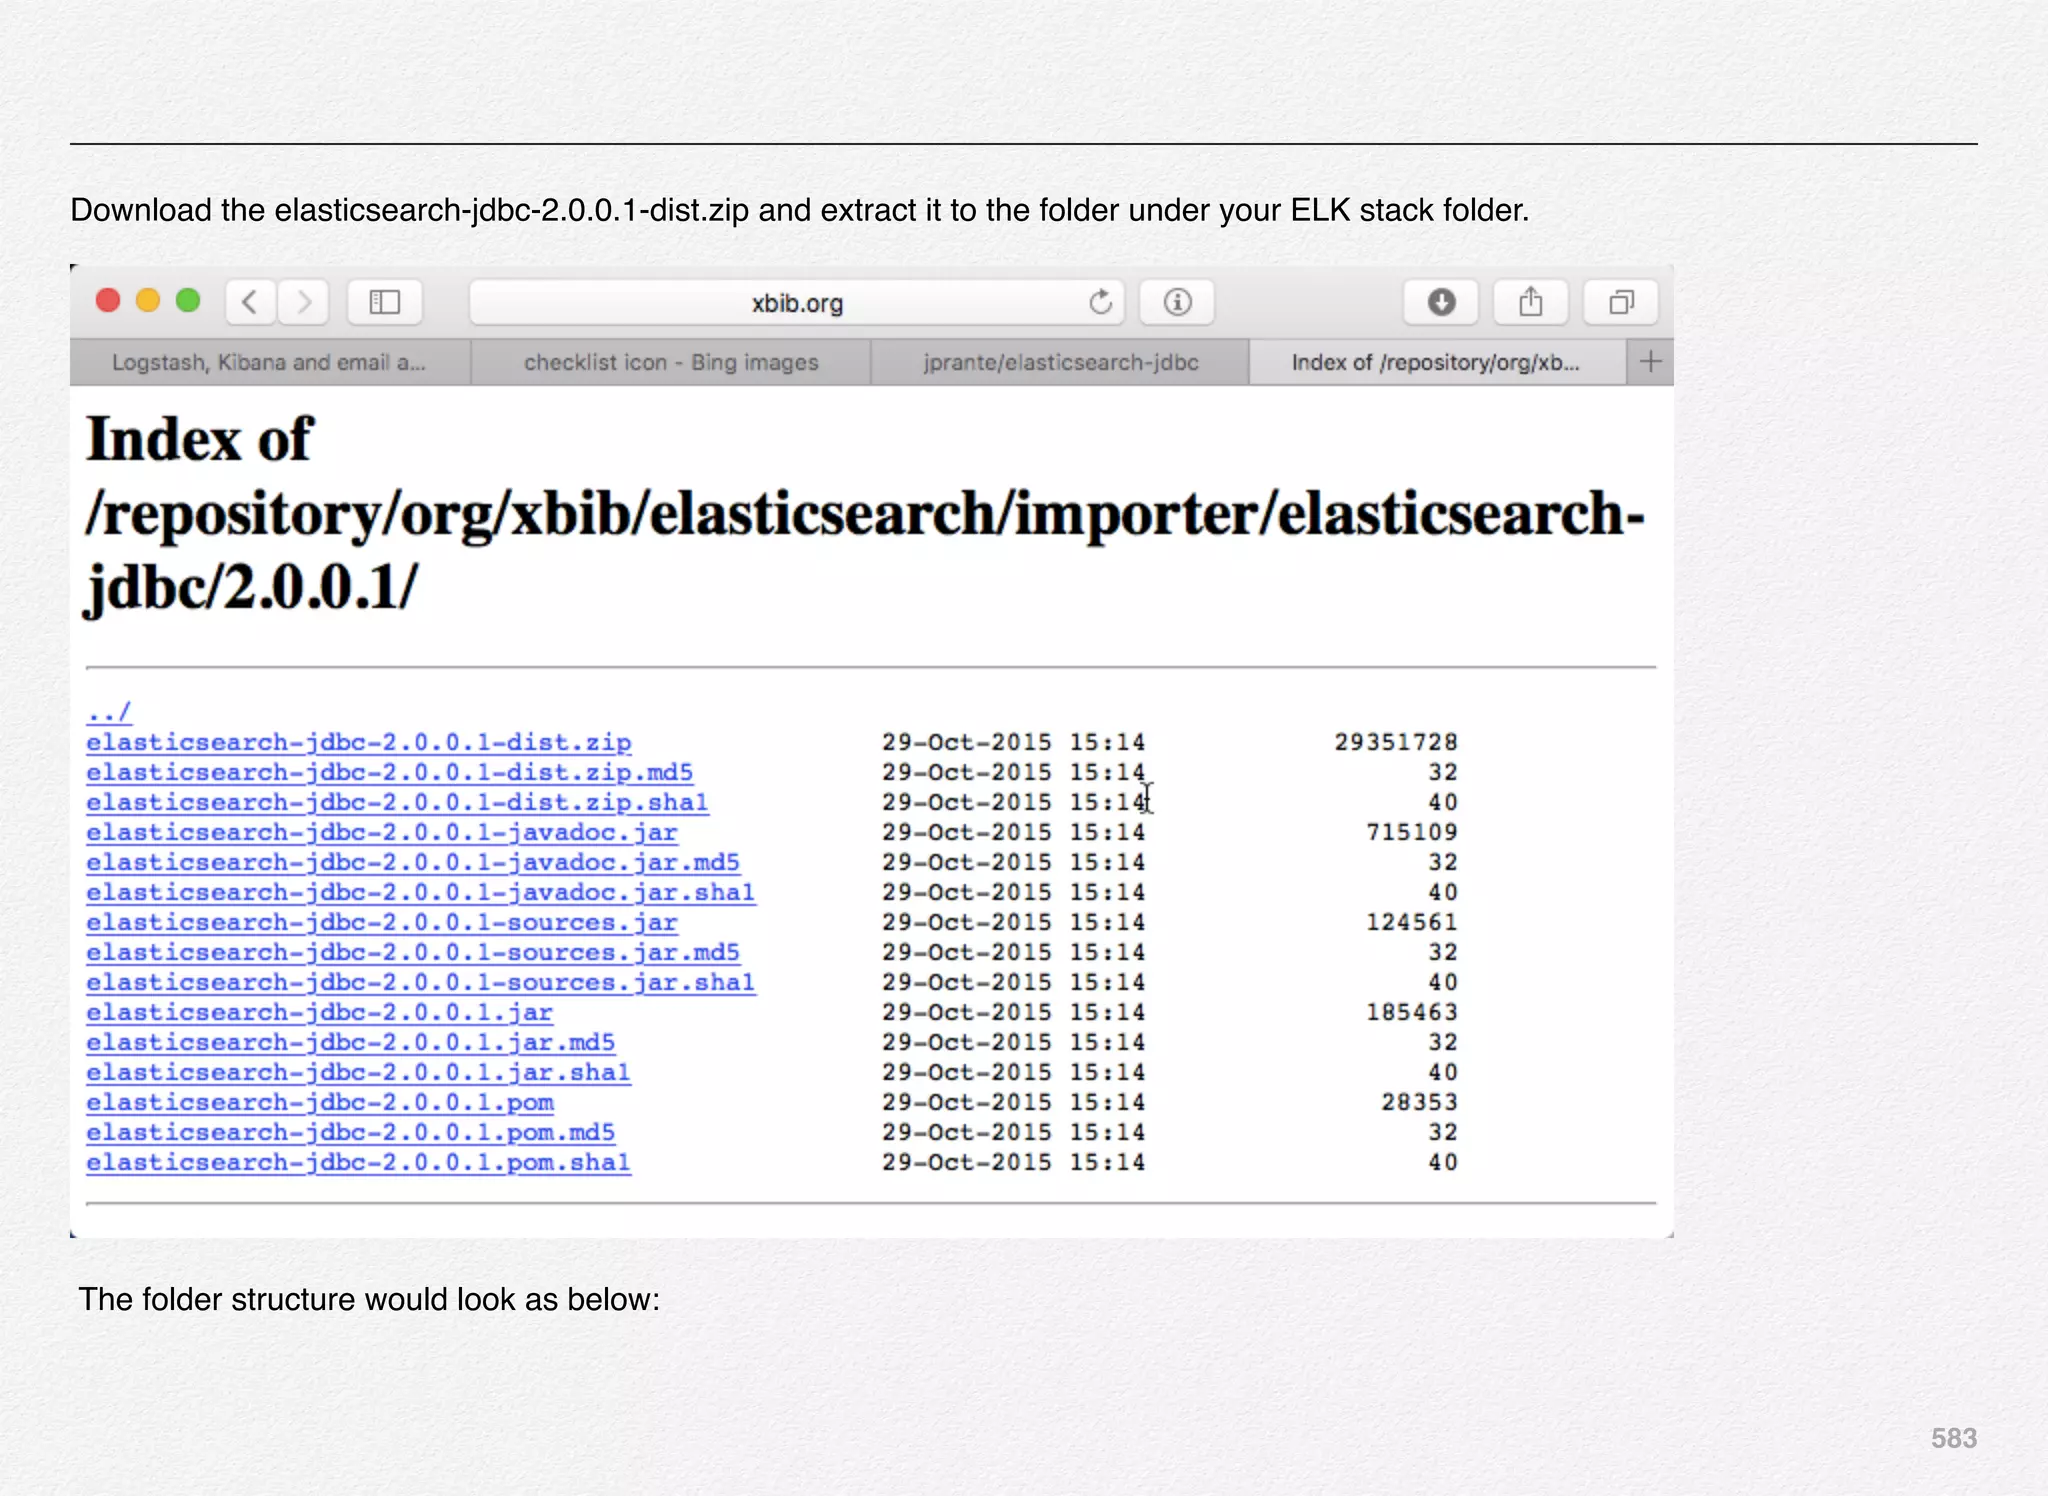
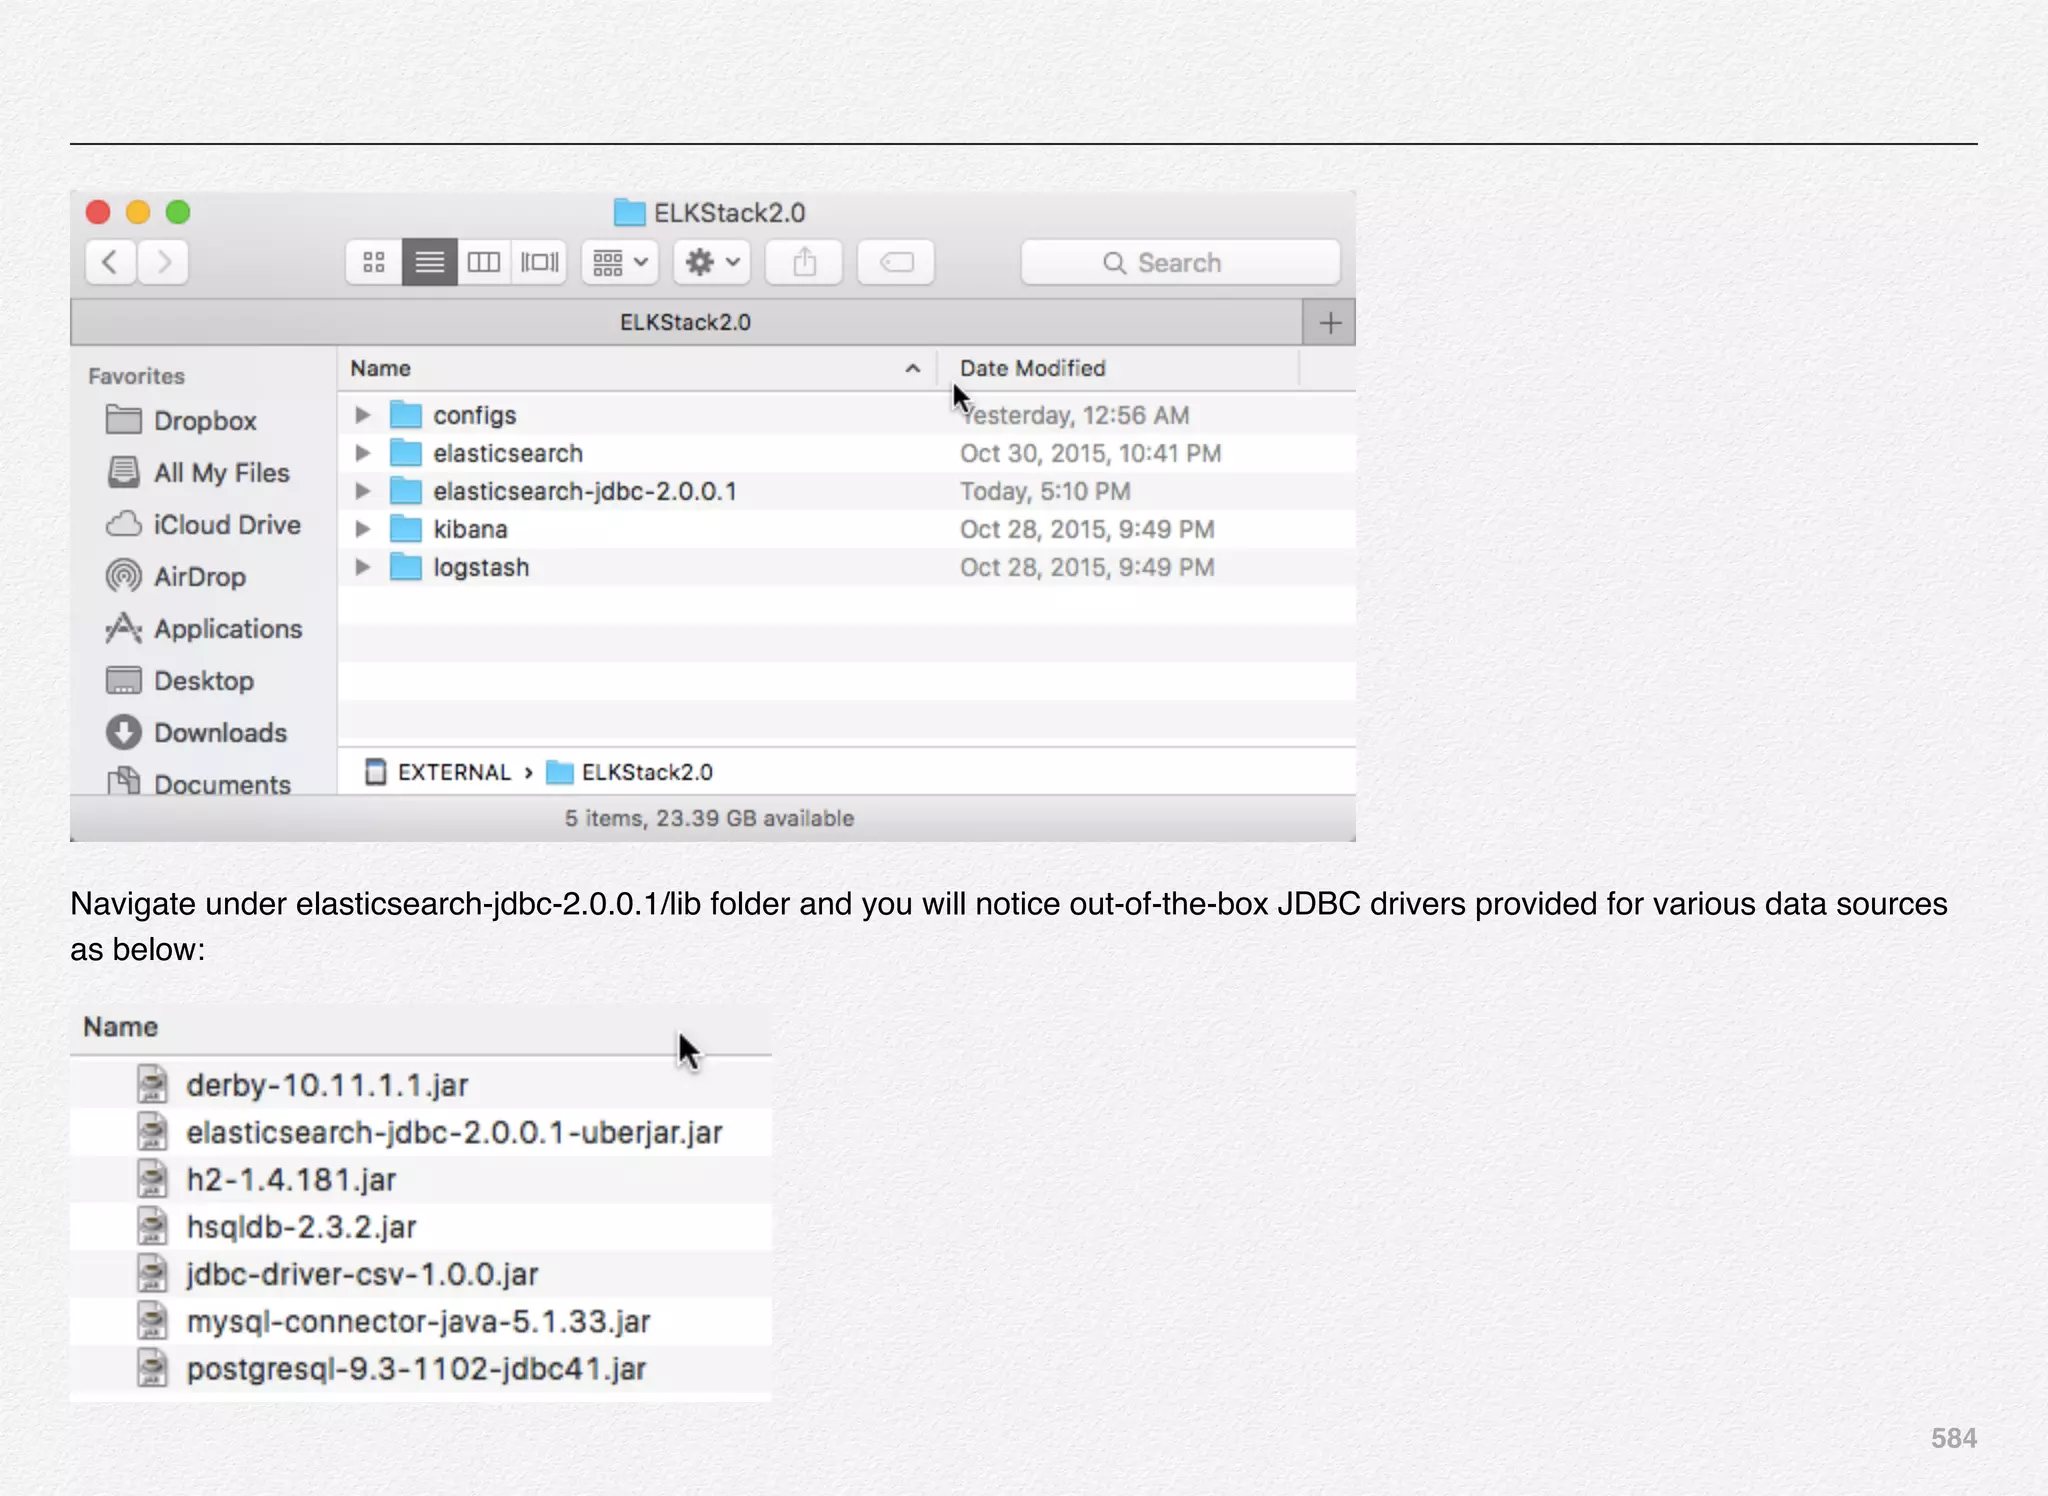
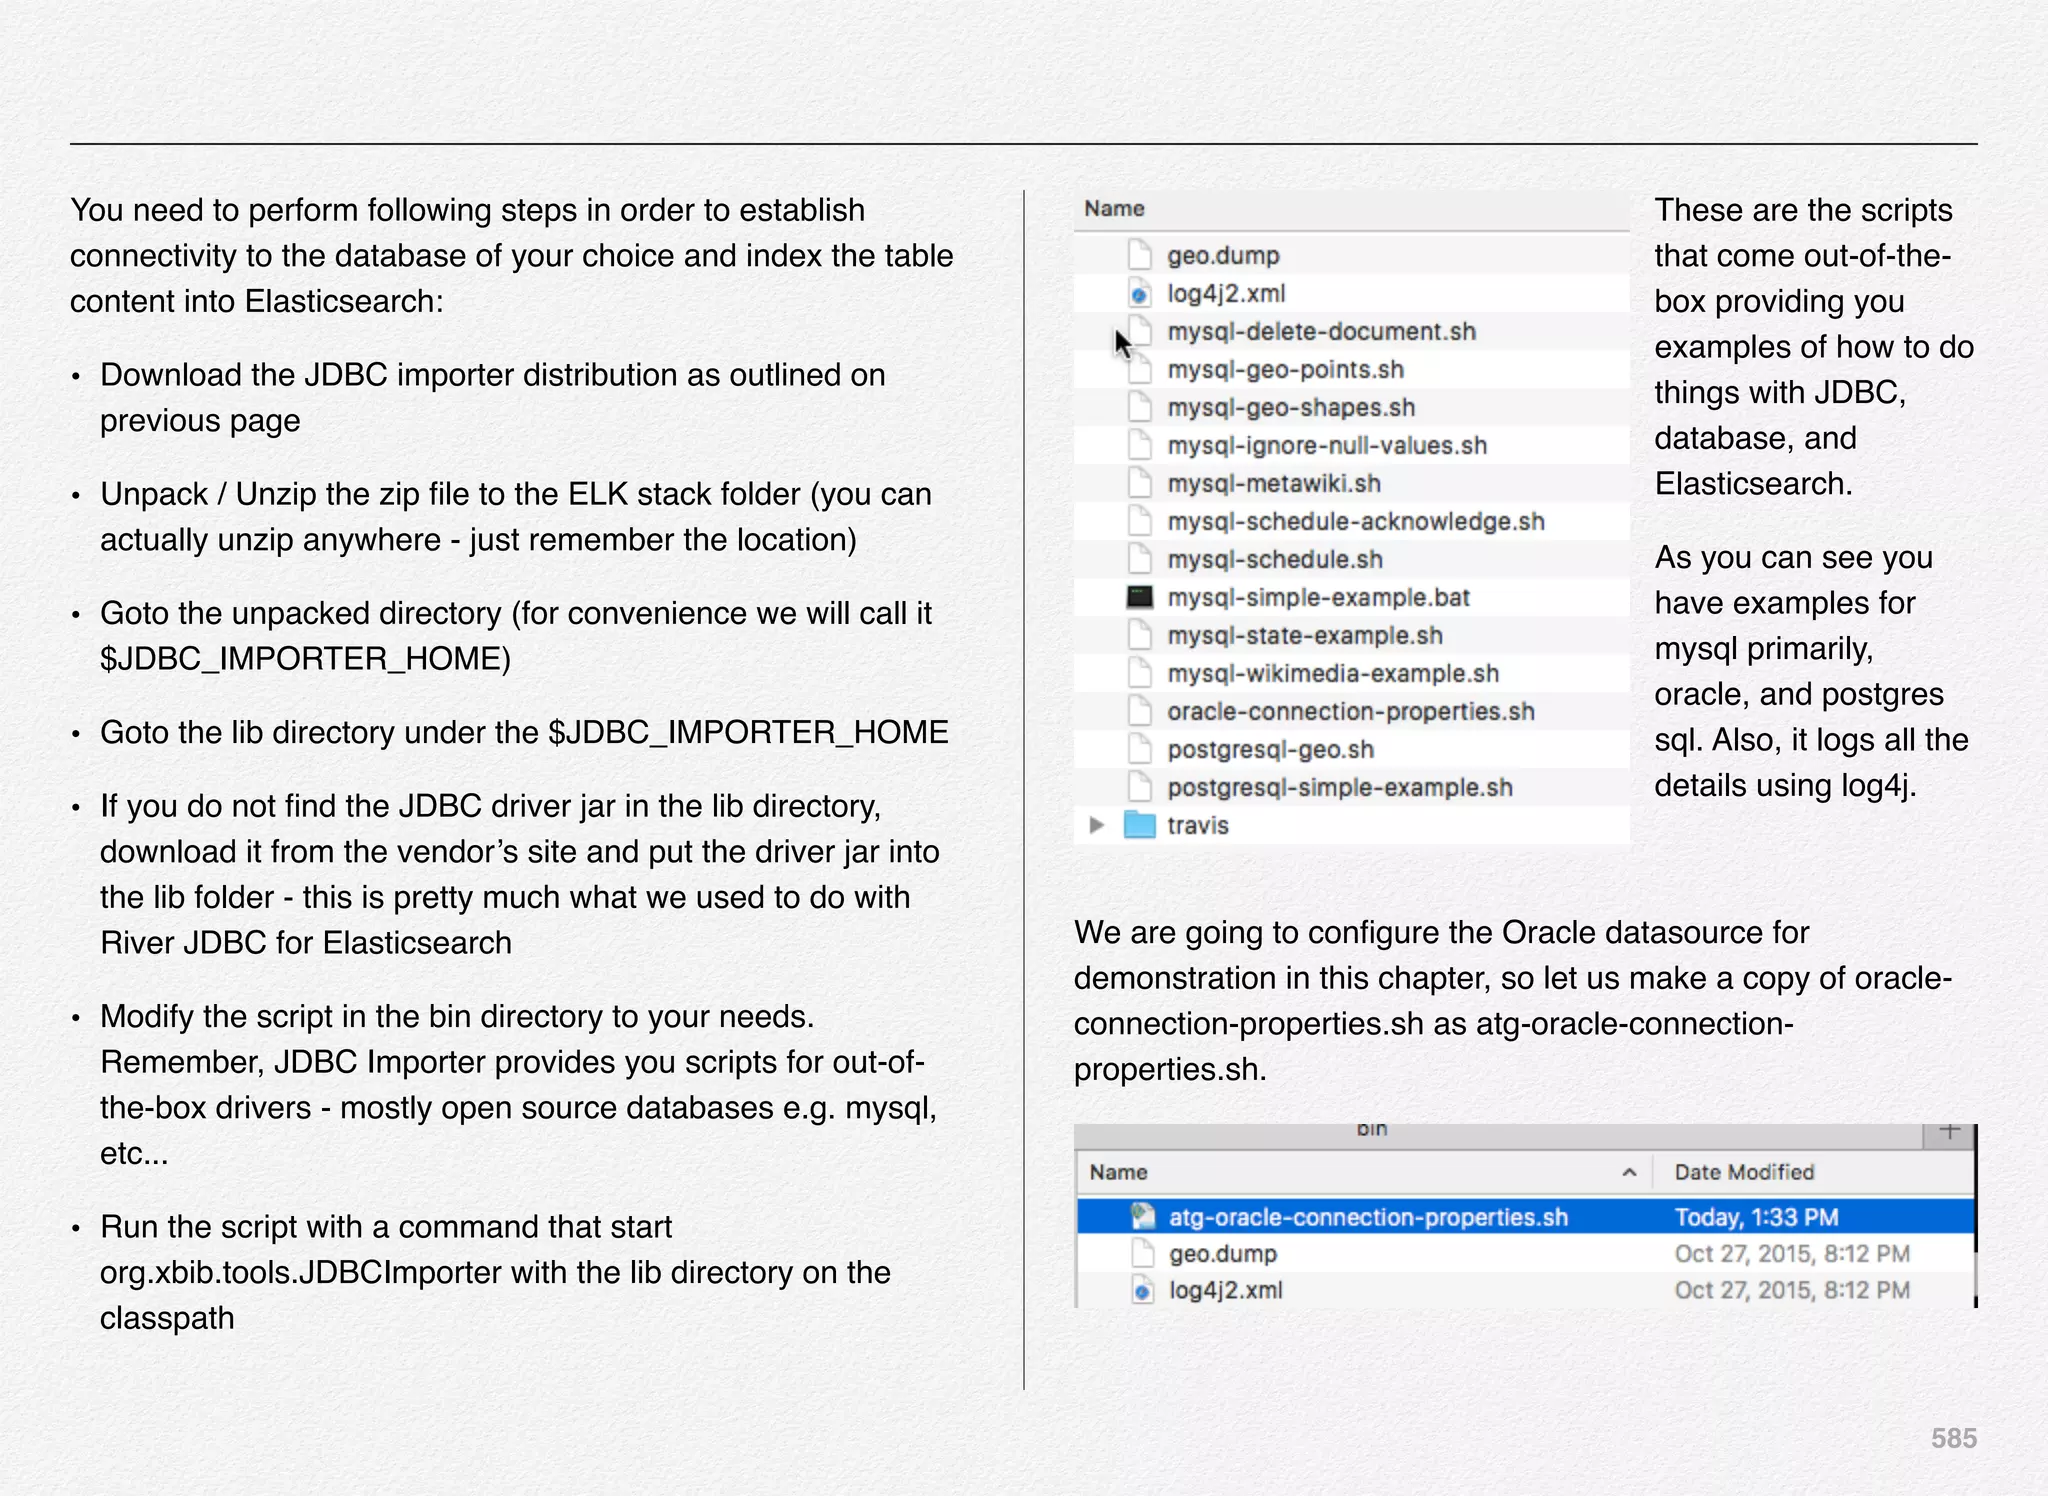
![586
Below are the content of the script file
#!/bin/sh
# This example is a template to connect to Oracle
# The JDBC URL and SQL must be replaced by working ones.
DIR="$( cd "$( dirname "${BASH_SOURCE[0]}" )" && pwd )"
bin=${DIR}/../bin
lib=${DIR}/../lib
echo '
{
"type" : "jdbc",
"jdbc" : {
"url" : "jdbc:oracle:thin:@//192.168.70.4:1521/orcl",
"connection_properties" : {
"oracle.jdbc.TcpNoDelay" : false,
"useFetchSizeWithLongColumn" : false,
"oracle.net.CONNECT_TIMEOUT" : 10000,
"oracle.jdbc.ReadTimeout" : 50000
},
"user" : "crs_pub",
"password" : "crs_pub",
"sql" : [
!{"statement" : "select a.*, sysdate from crs_prd_features
a"},
!{"statement" : "select a.*, sysdate from crs_feature a"}
! ! ! ],
"index" : "myoracle1",
"type" : "myoracle",
"elasticsearch" : {
"cluster" : "elasticsearch",
"host" : "localhost",
"port" : 9300](https://image.slidesharecdn.com/oraclecommerce-doityourselfseries-160129151710/75/Oracle-Commerce-Using-ATG-Endeca-Do-It-Yourself-Series-587-2048.jpg)
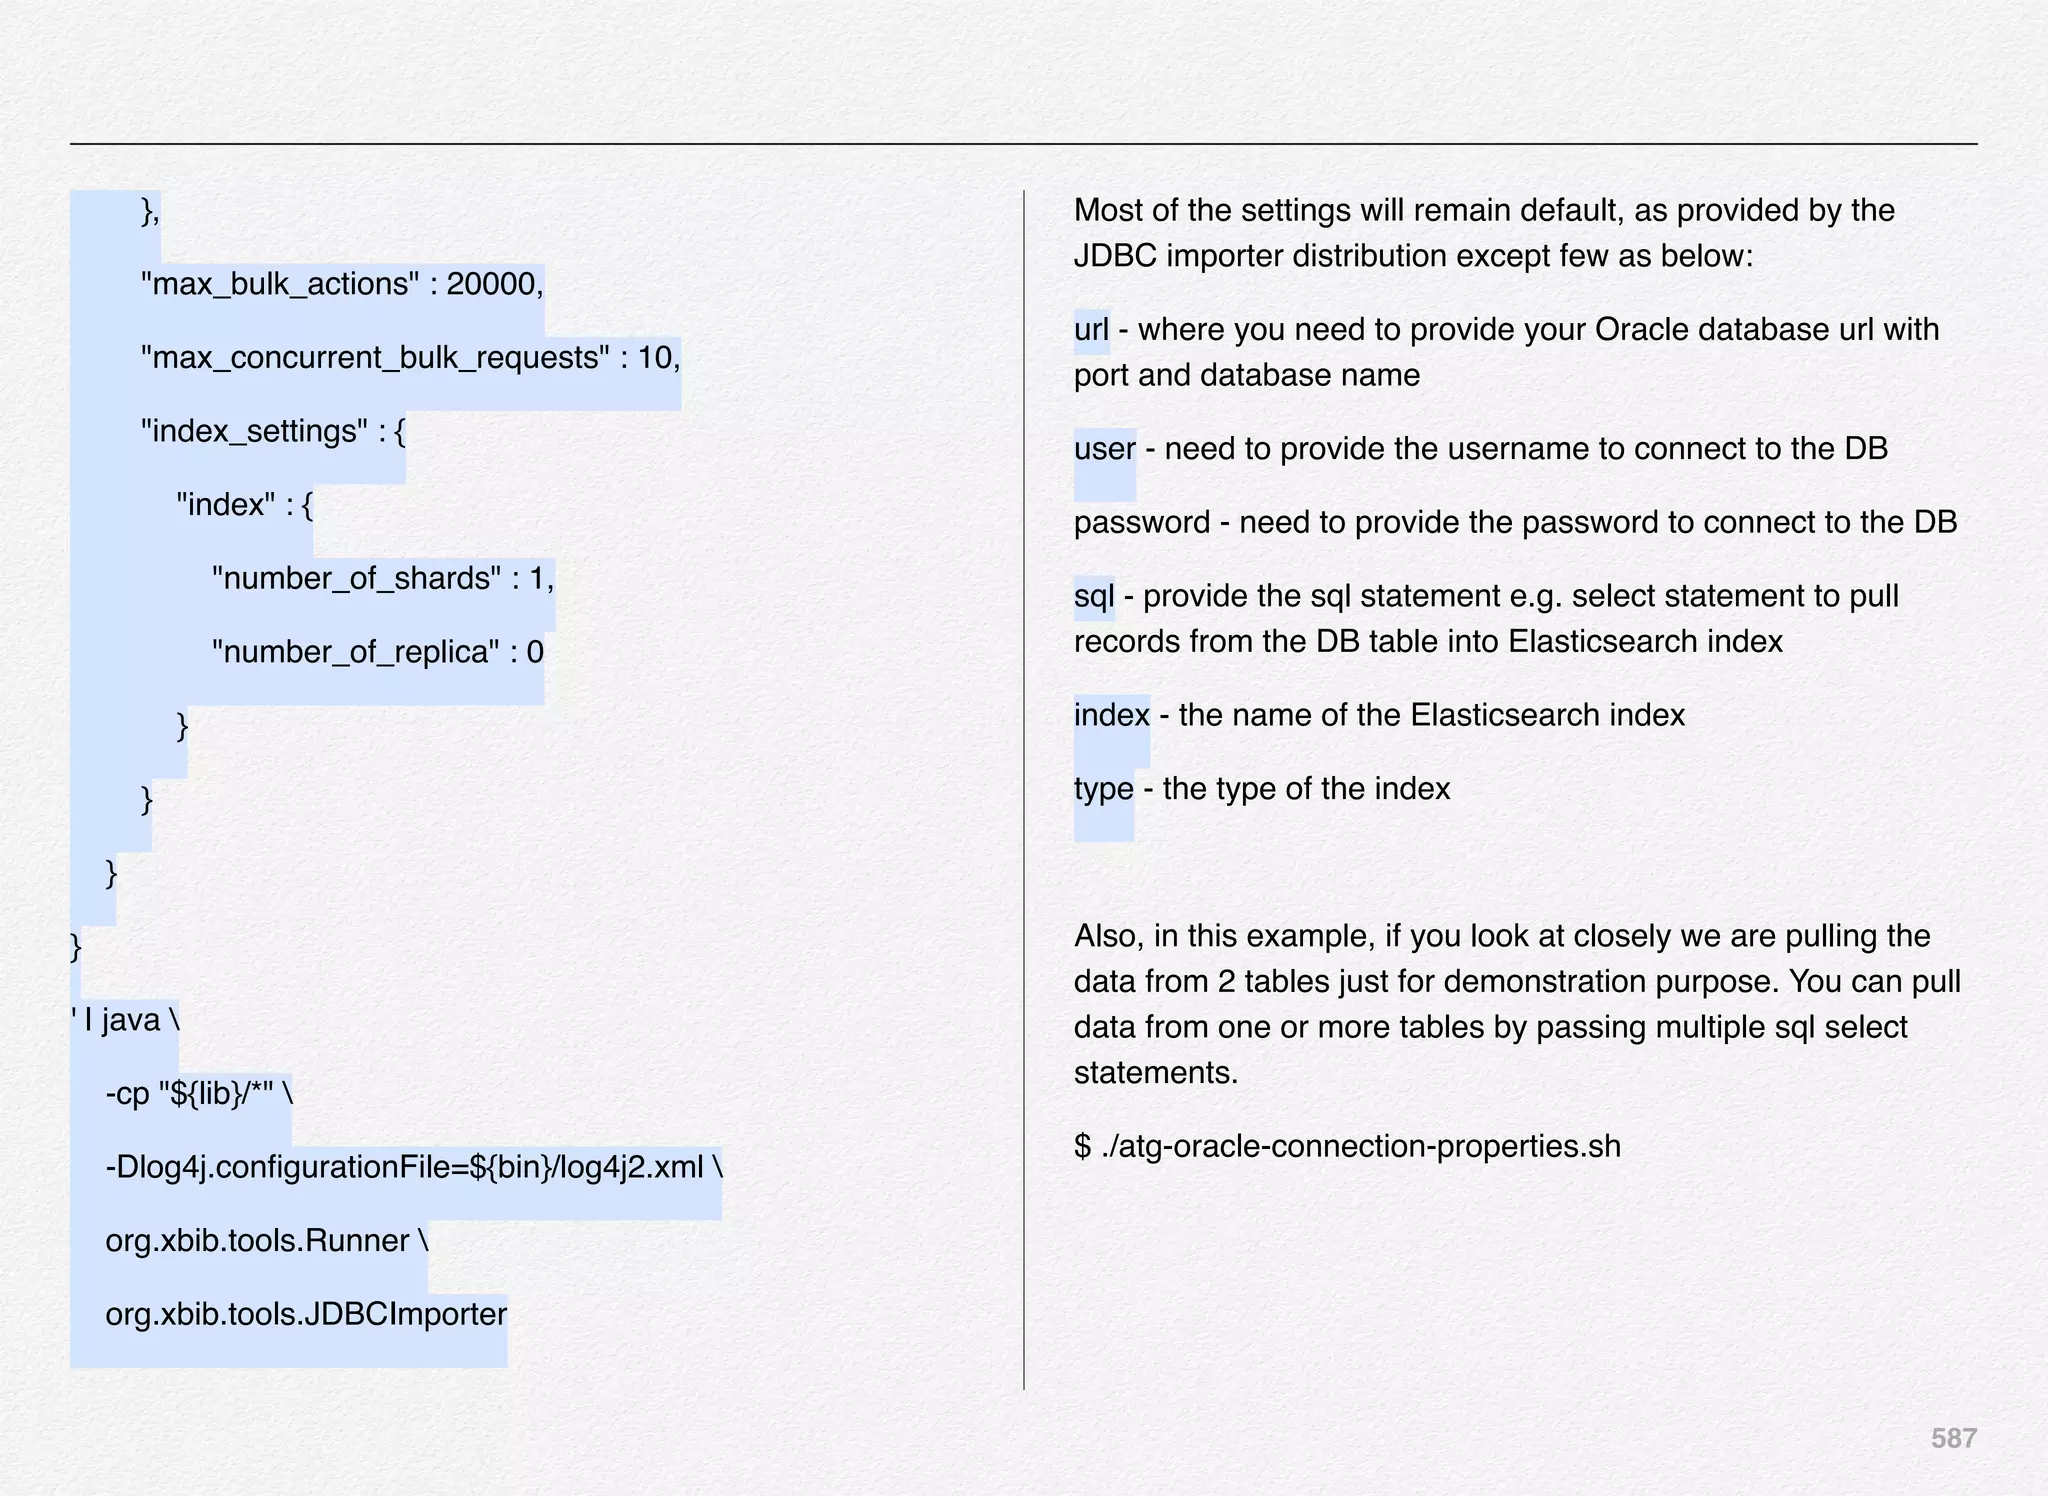
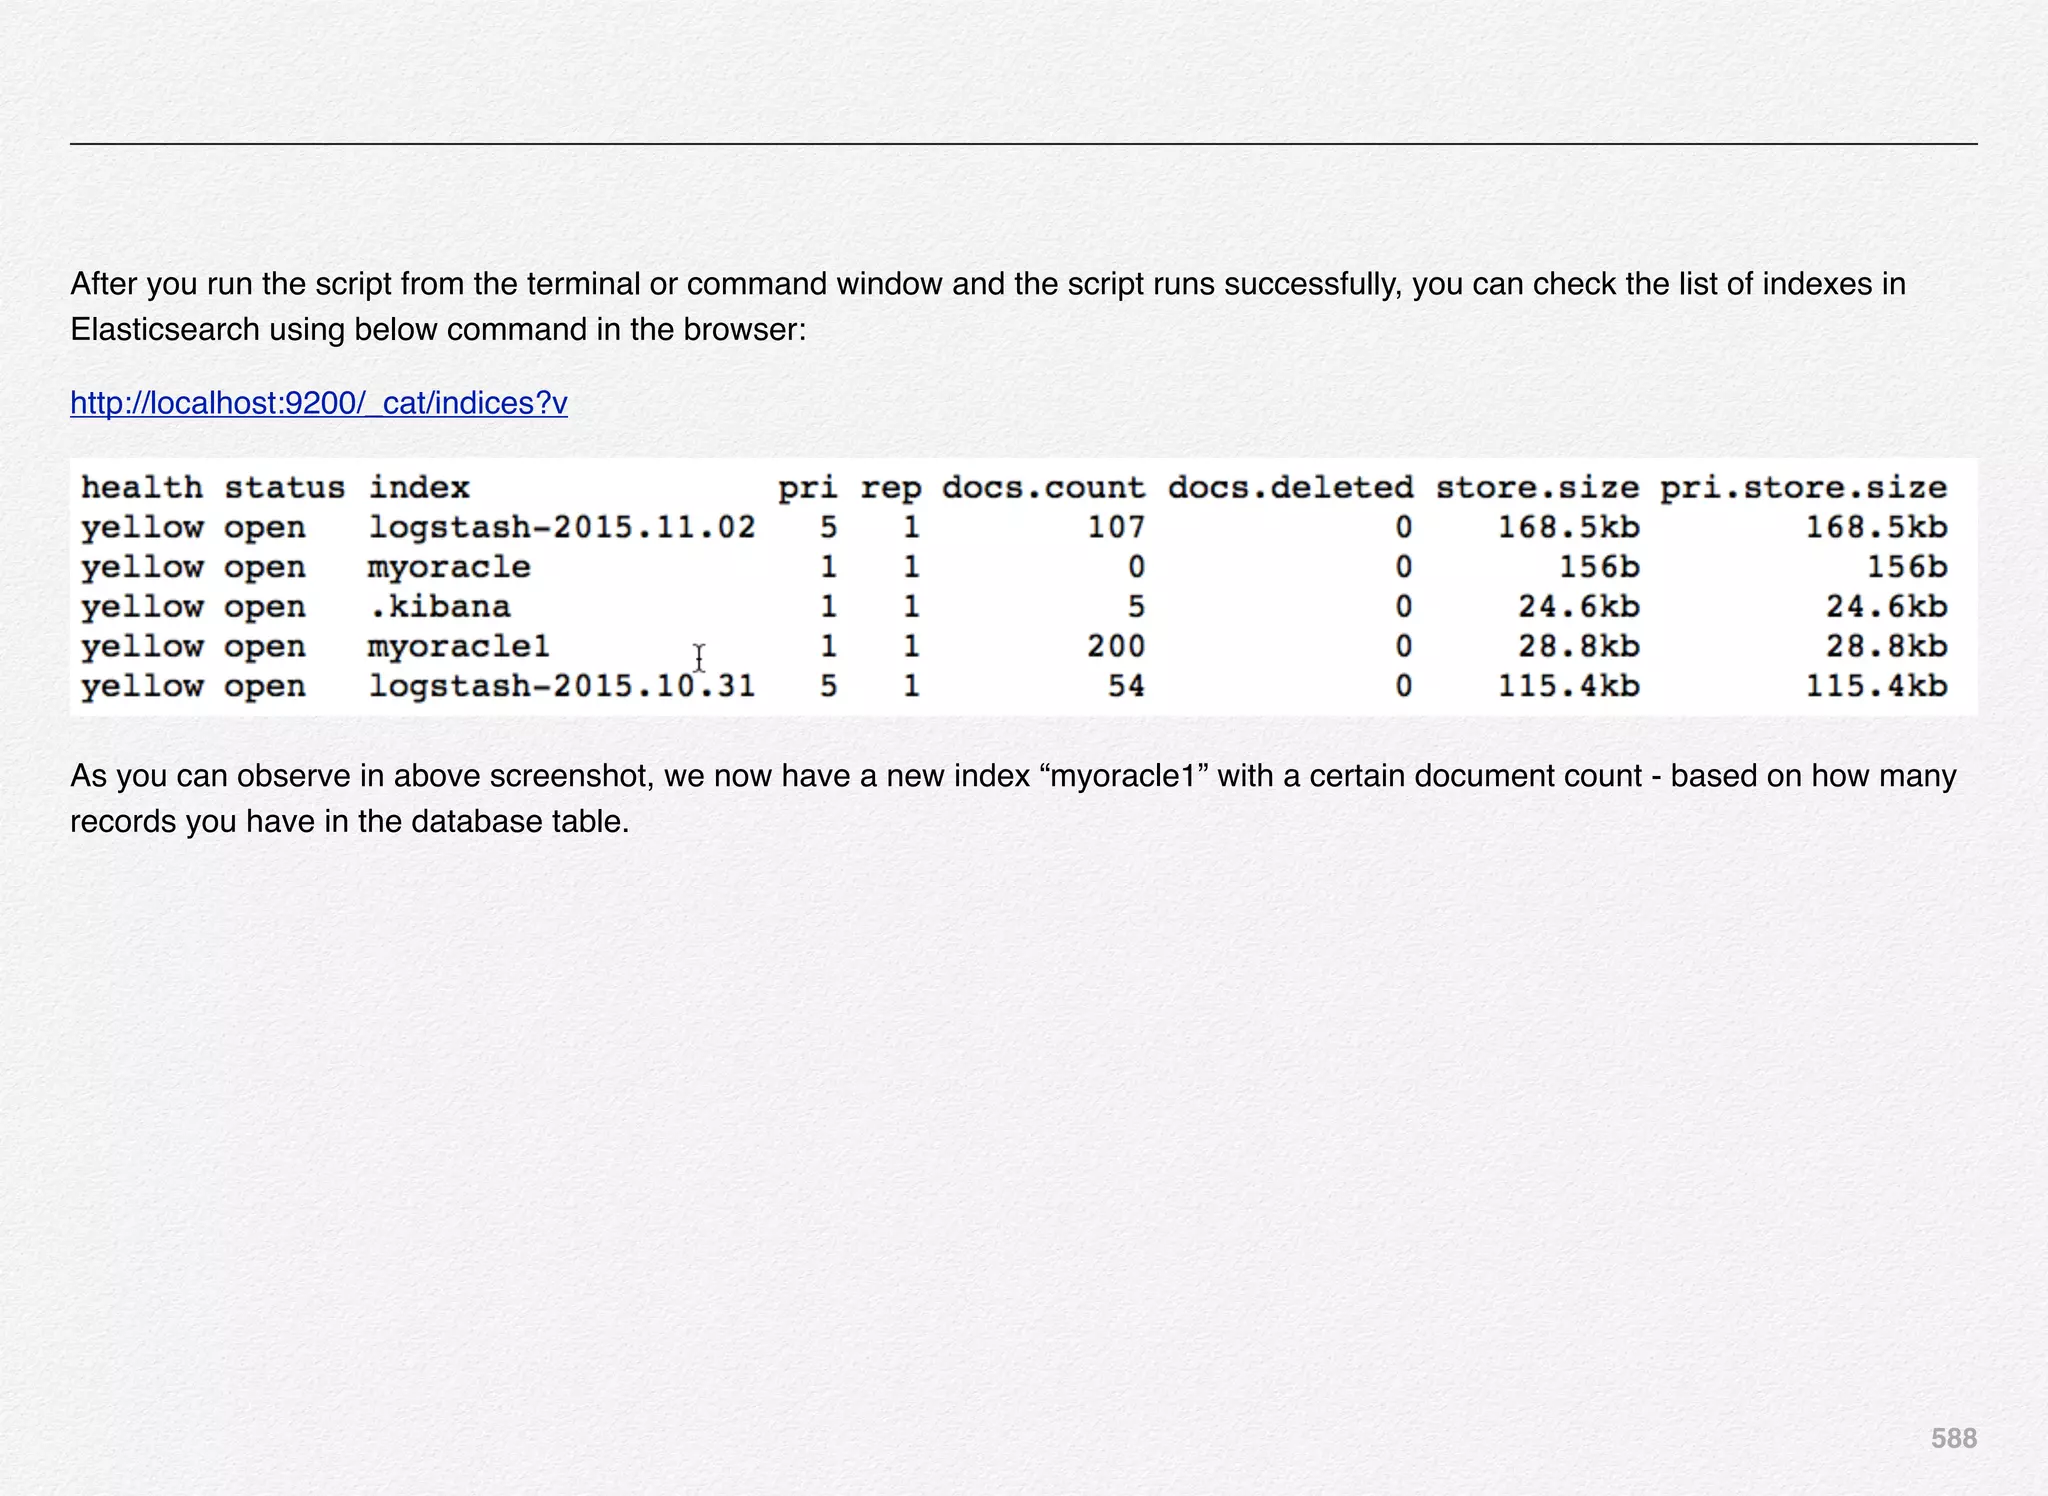
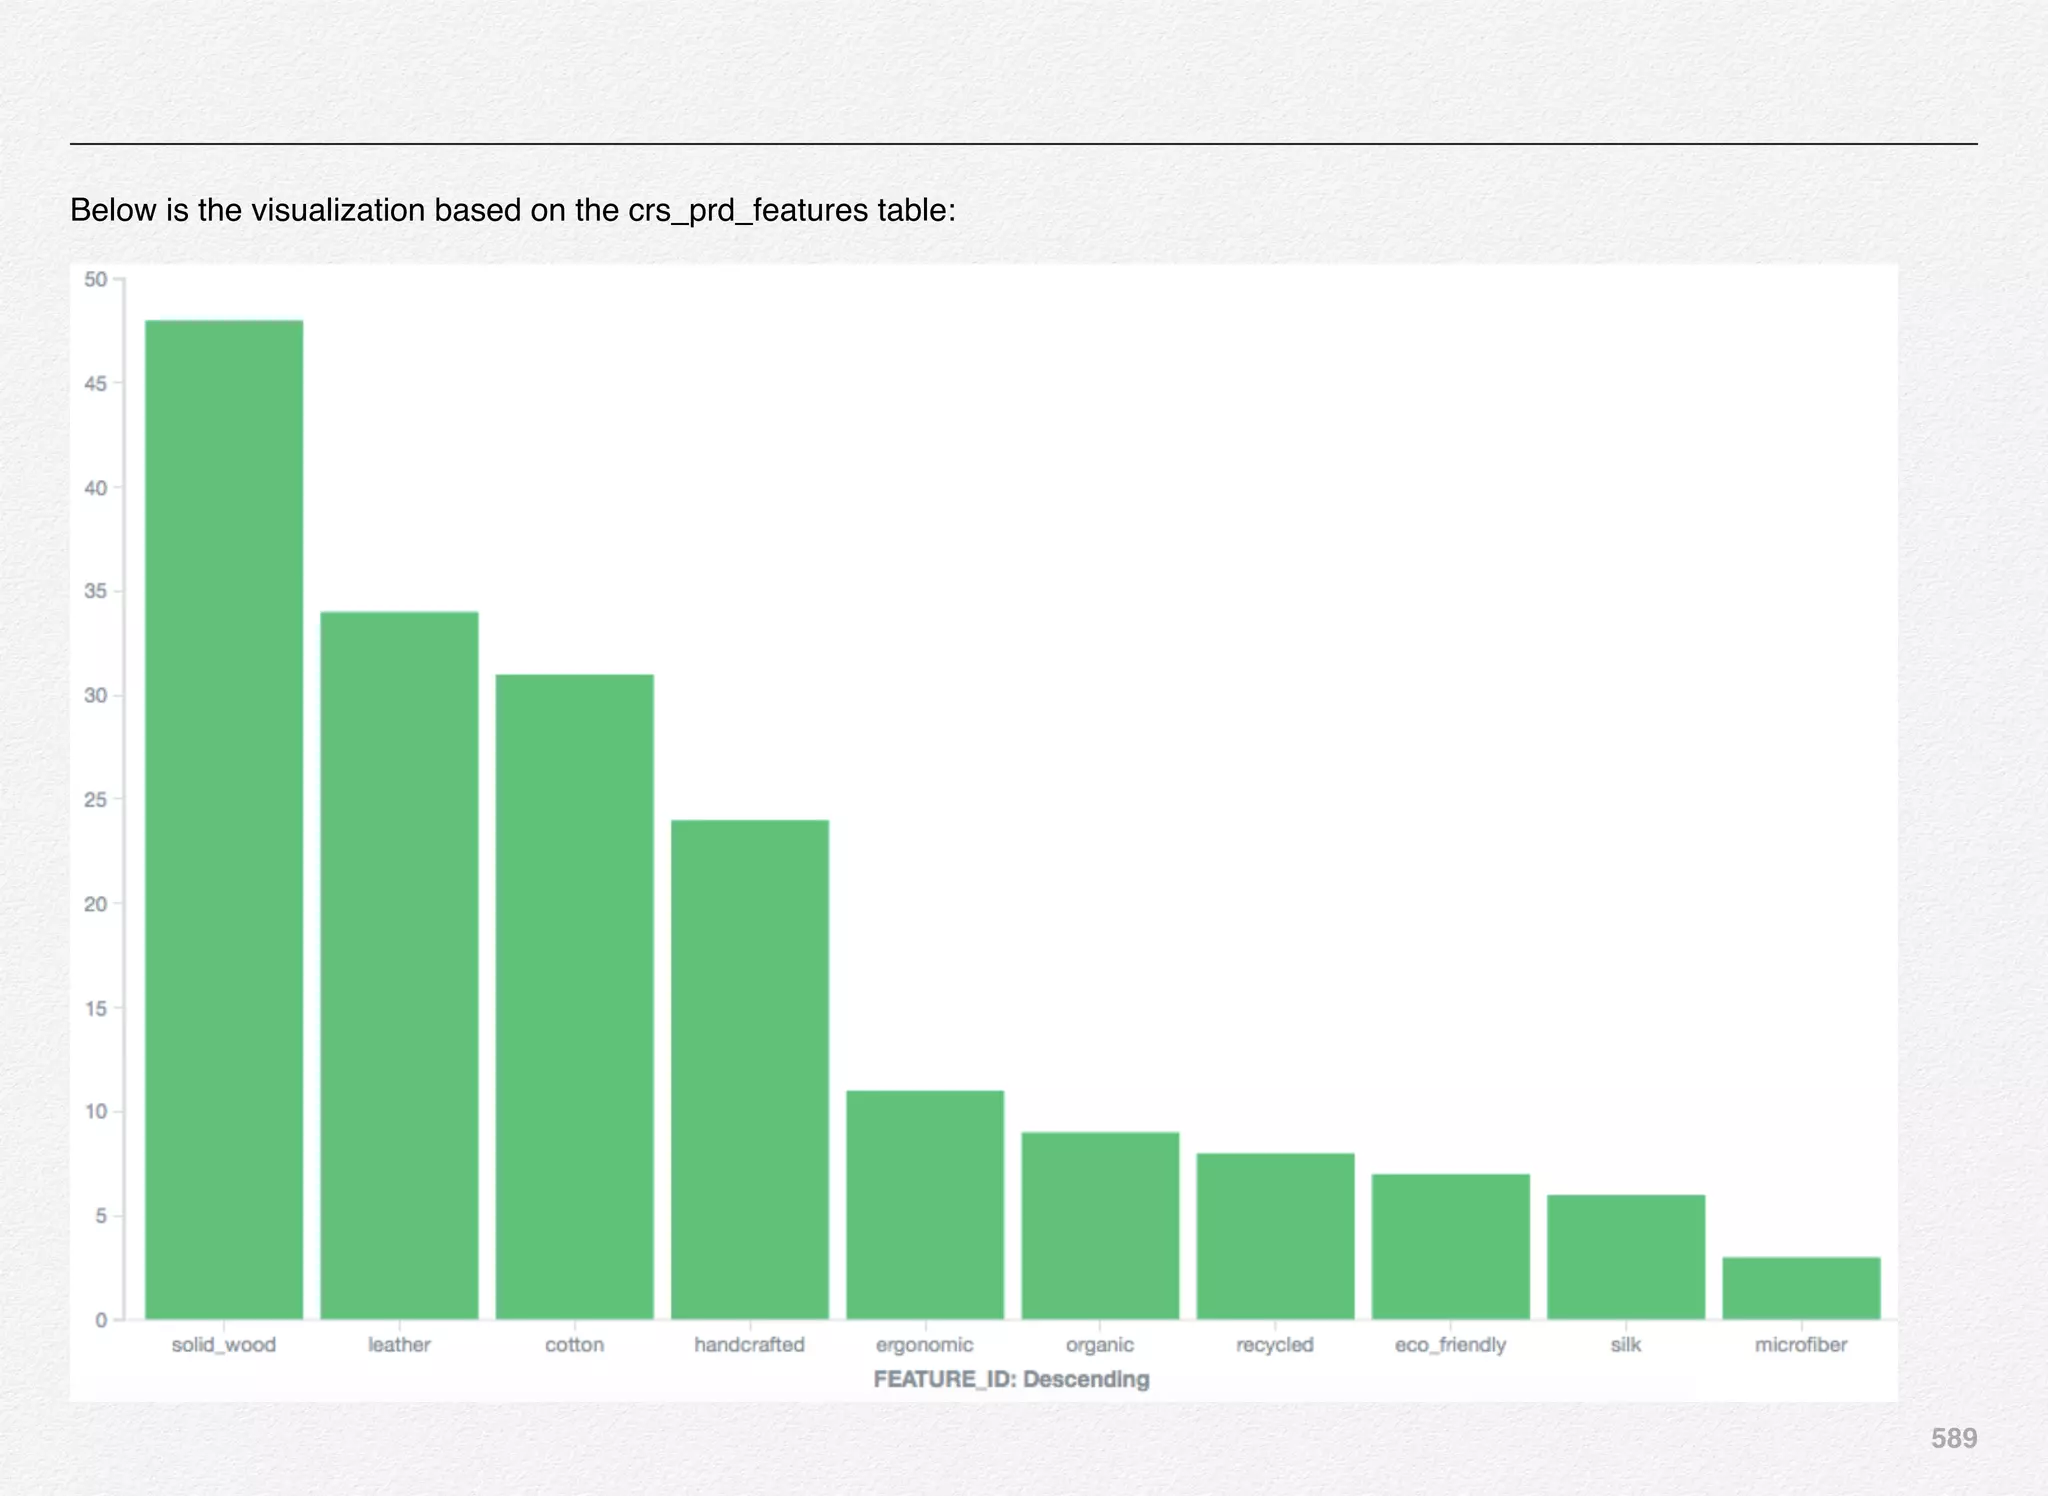

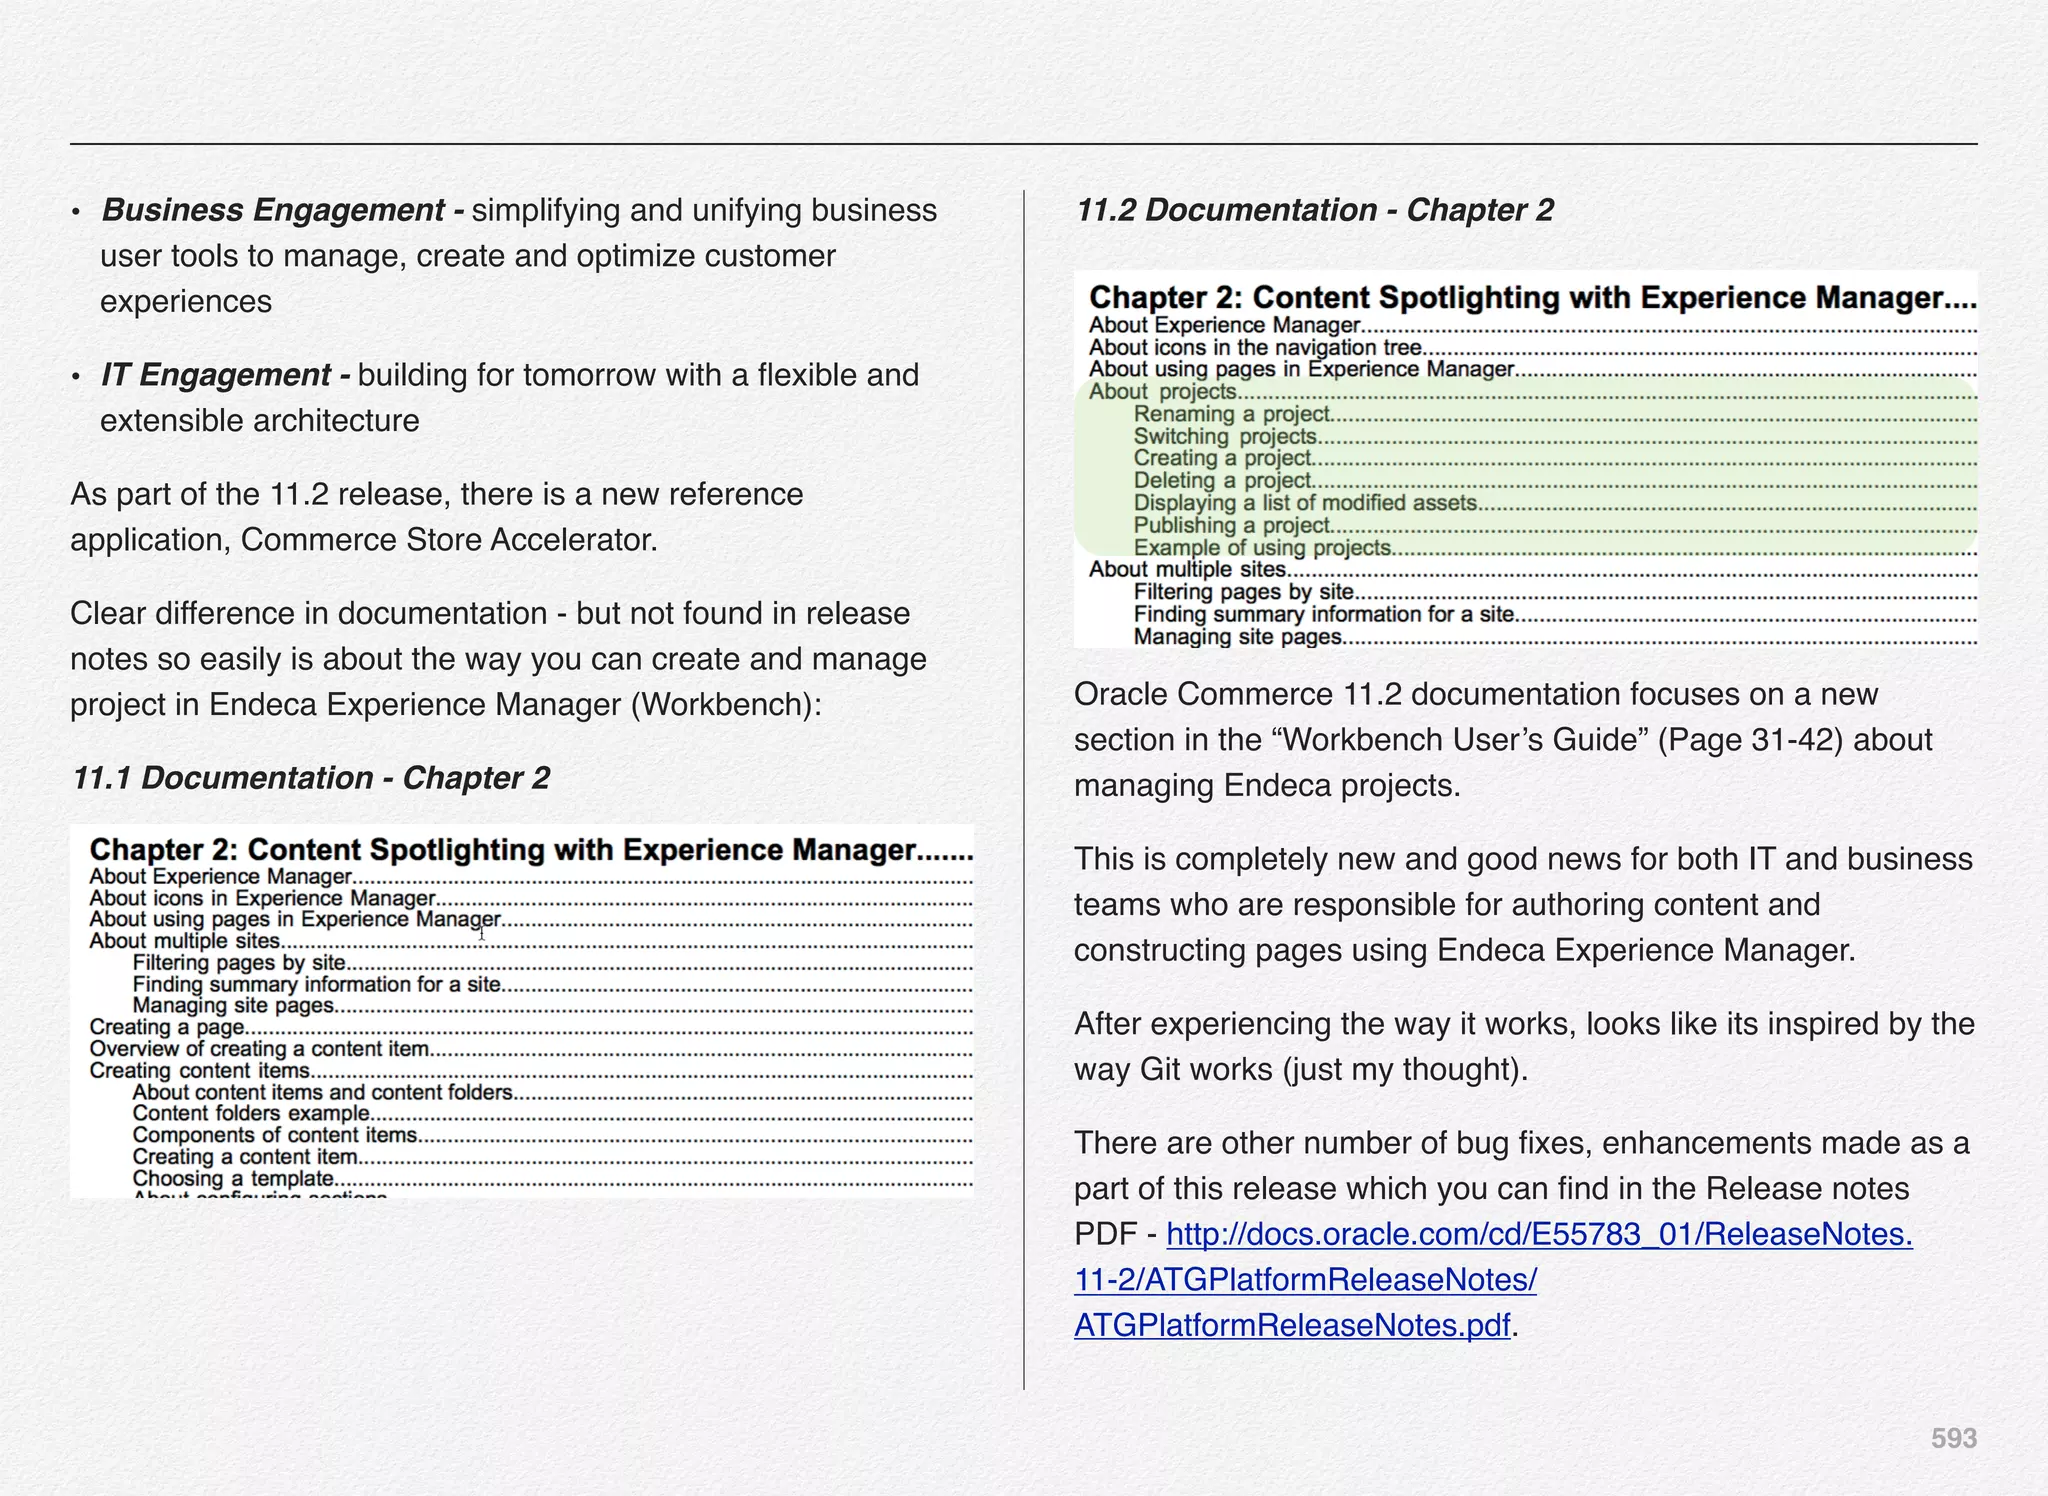
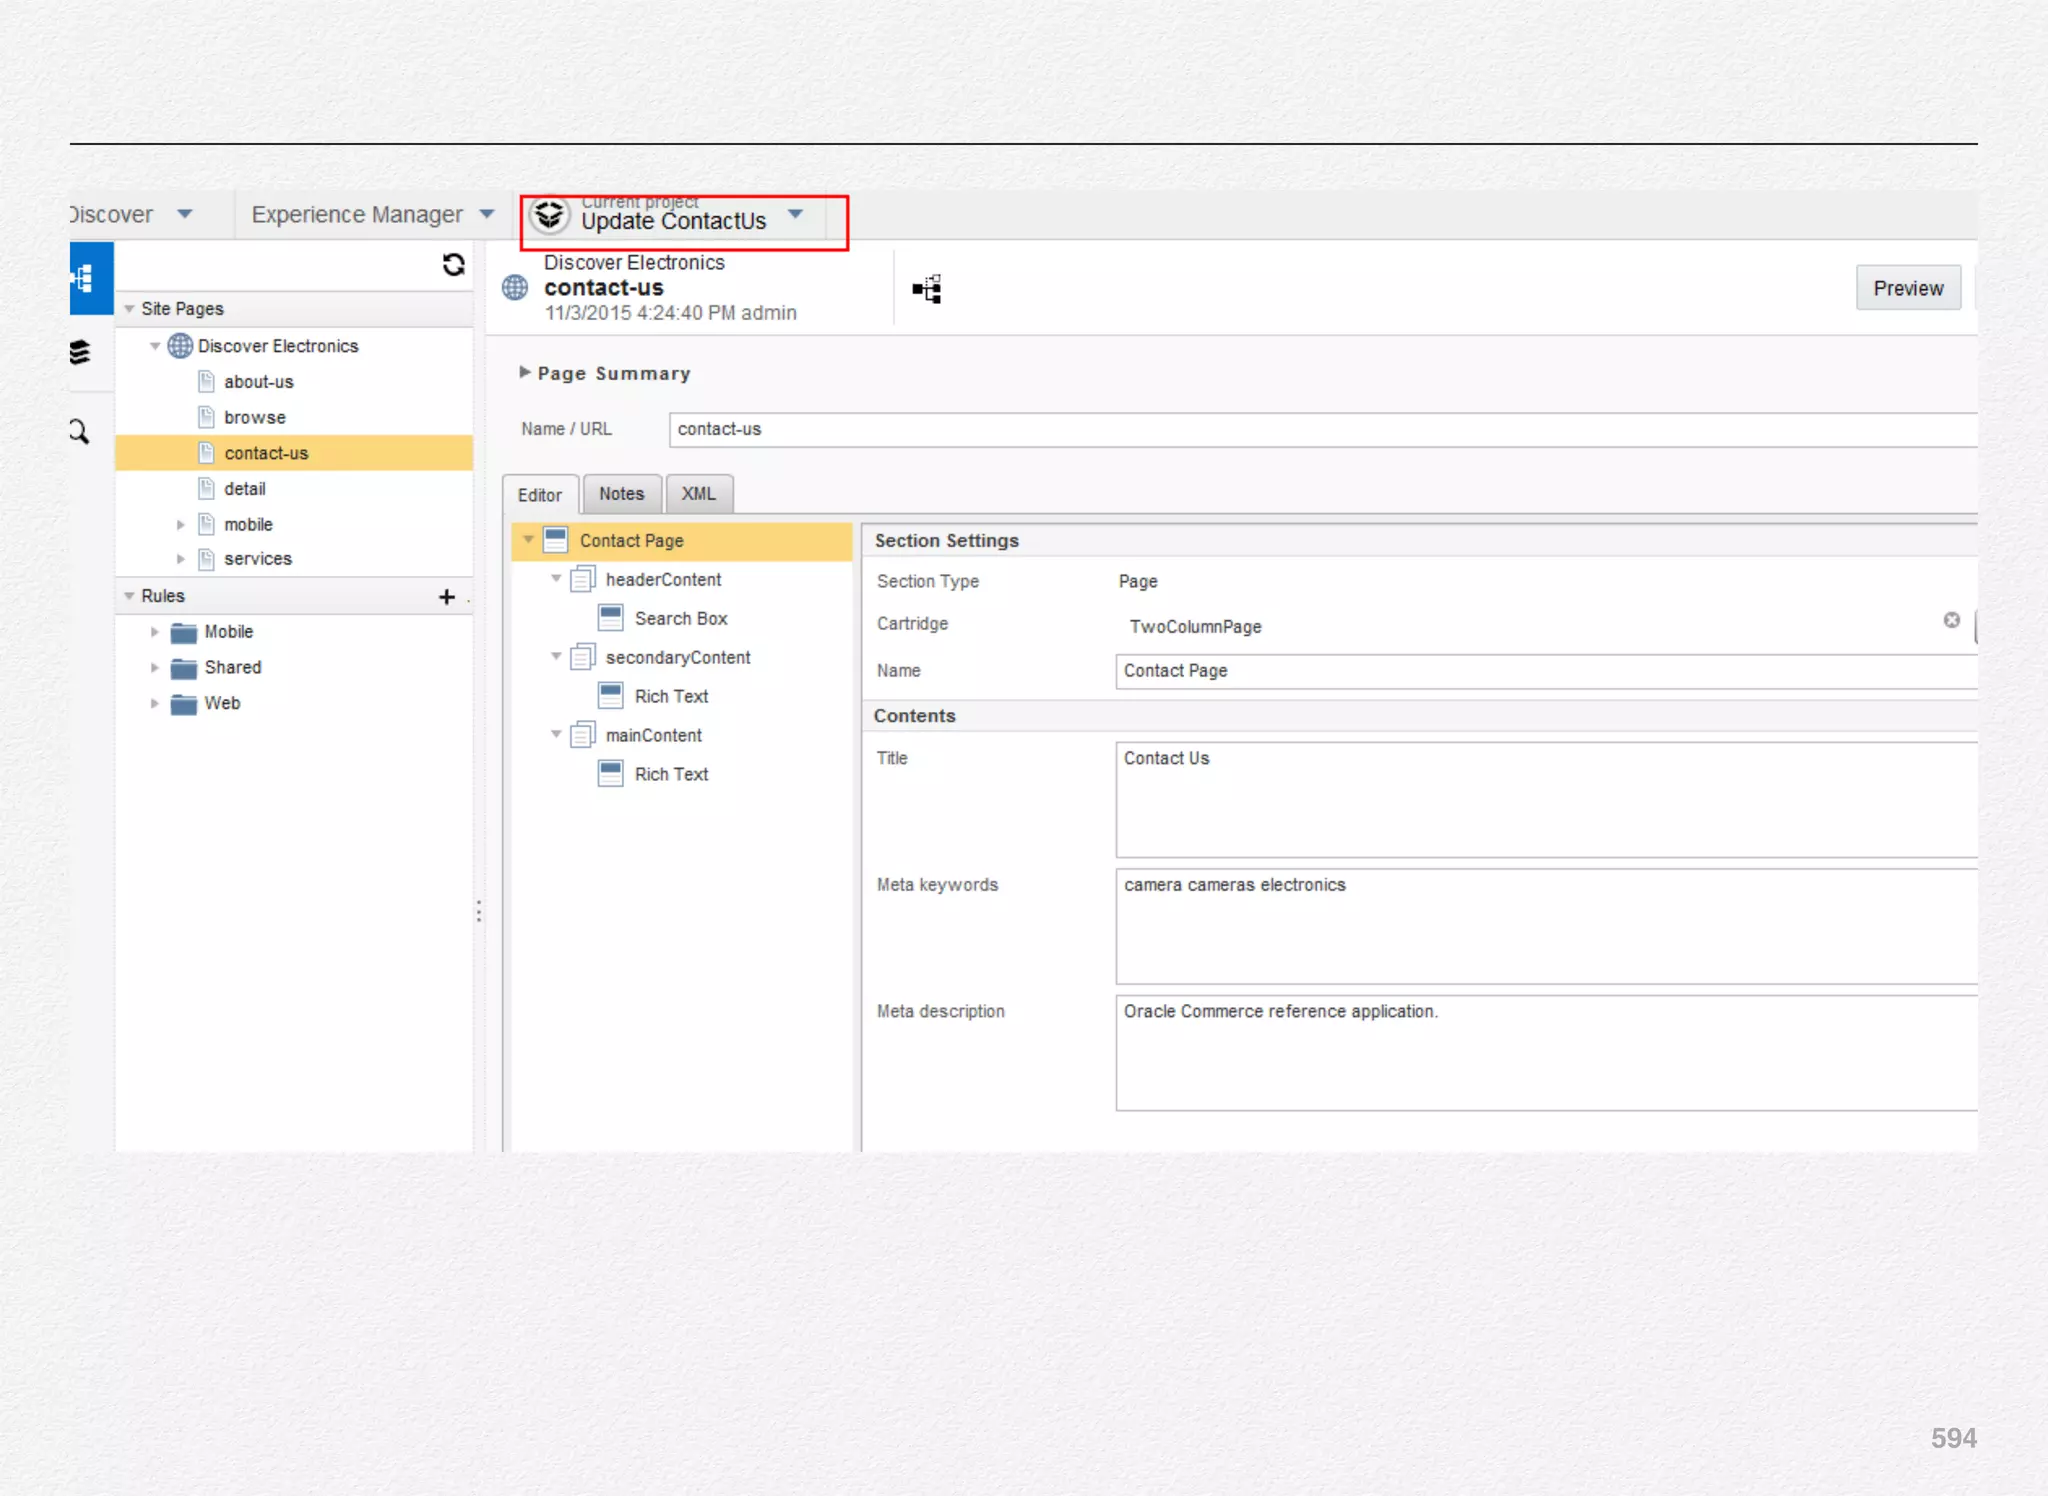
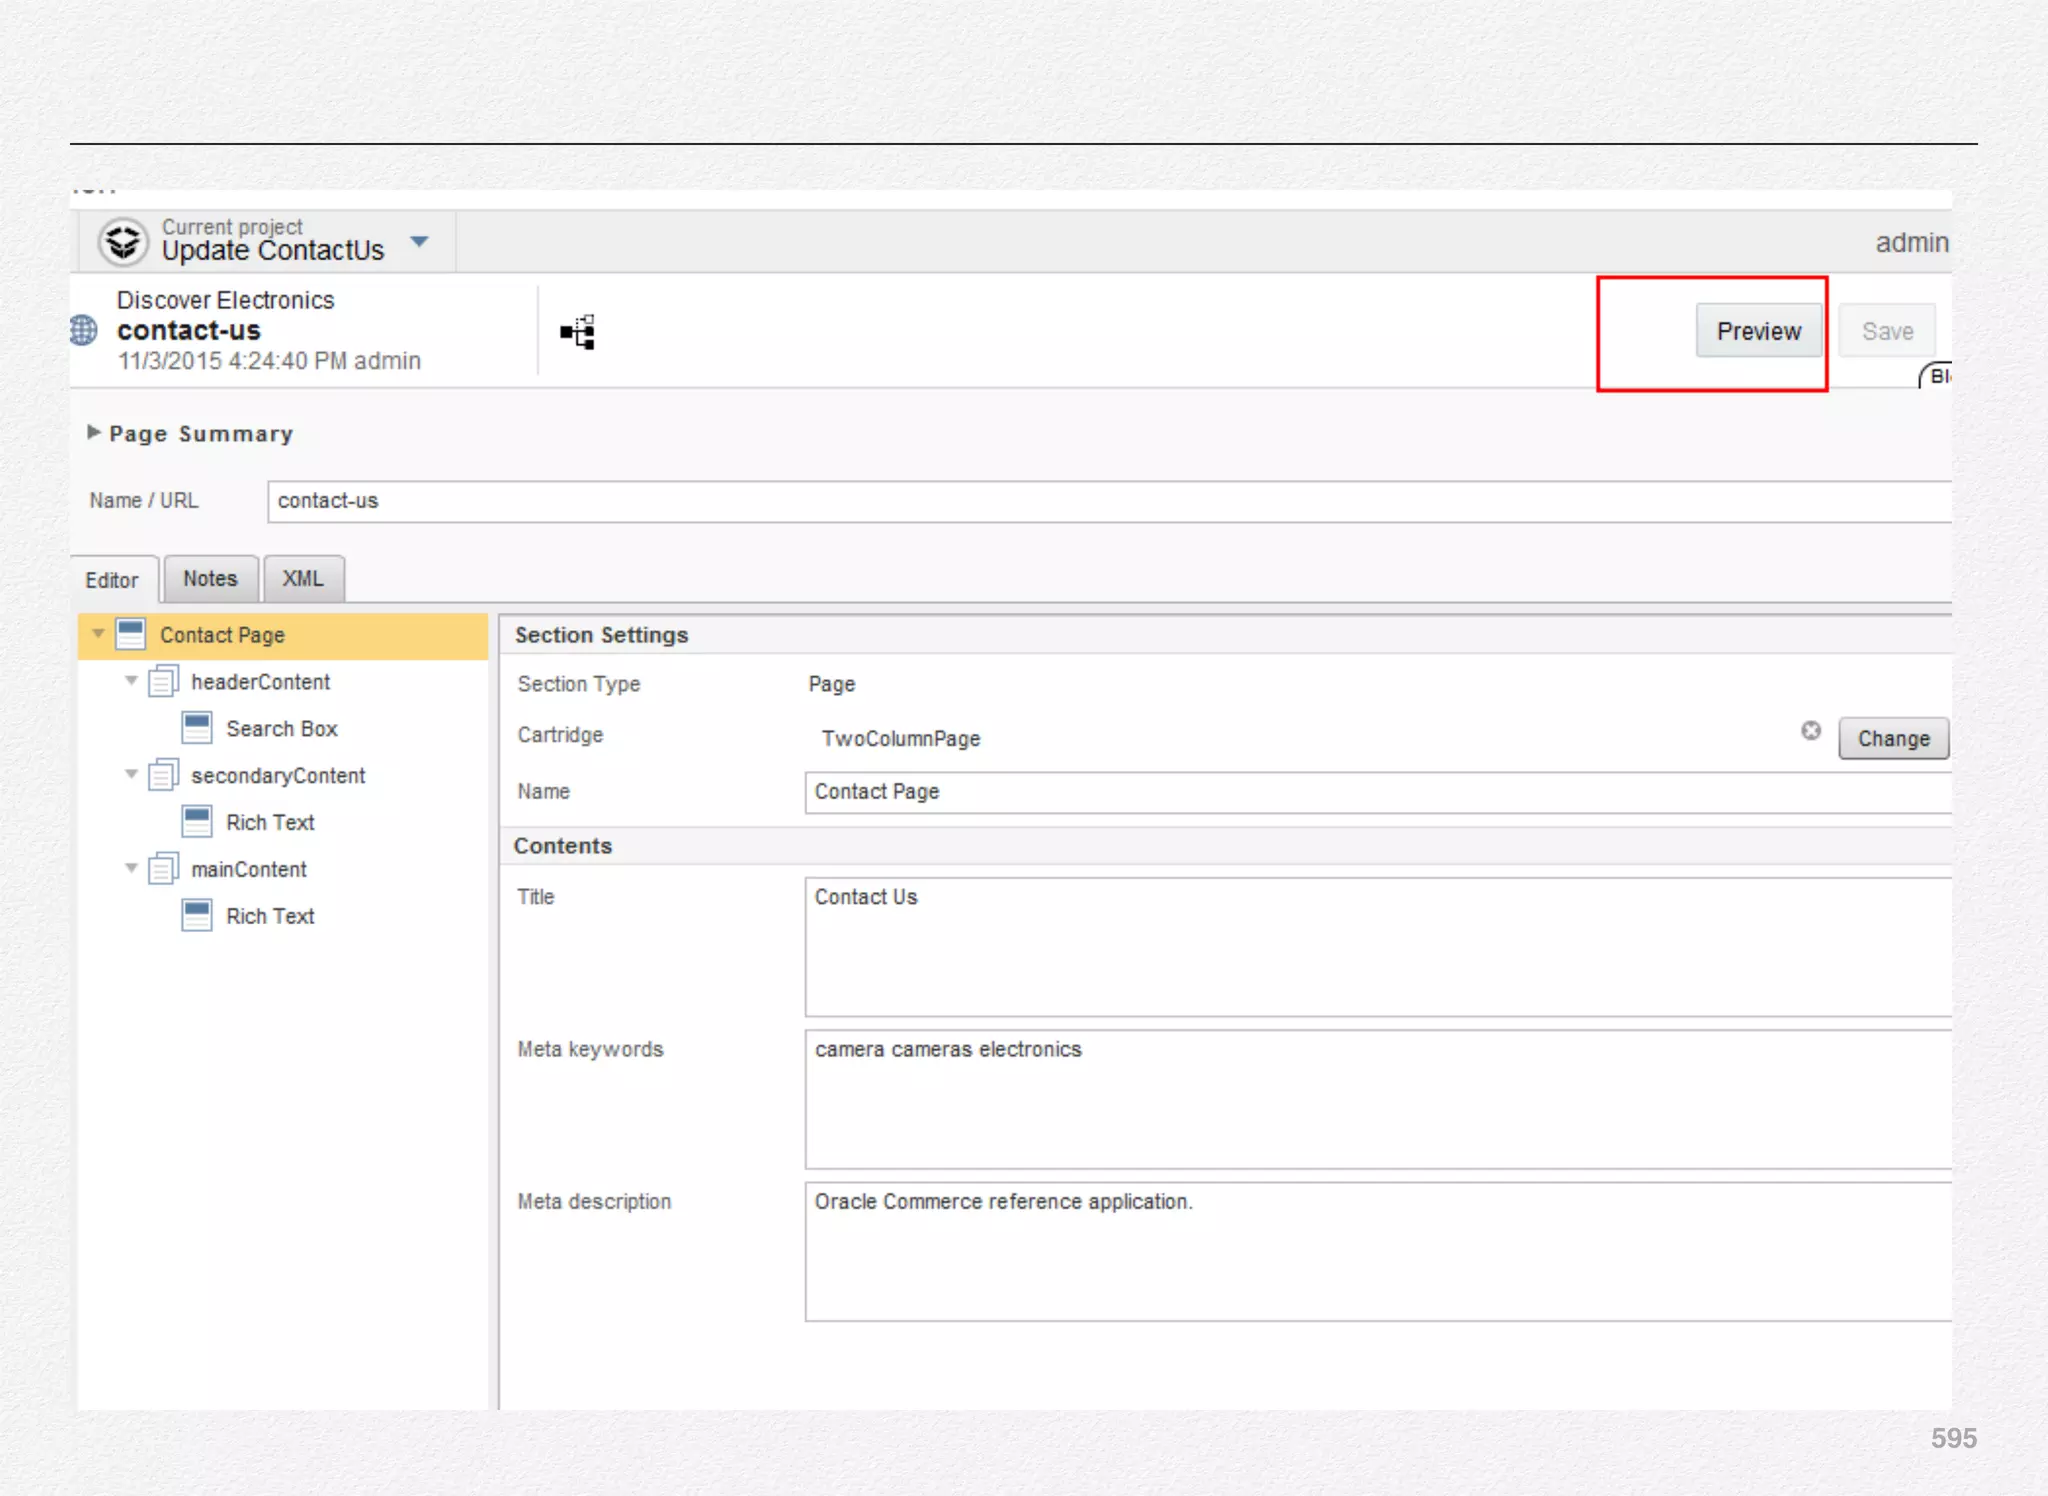
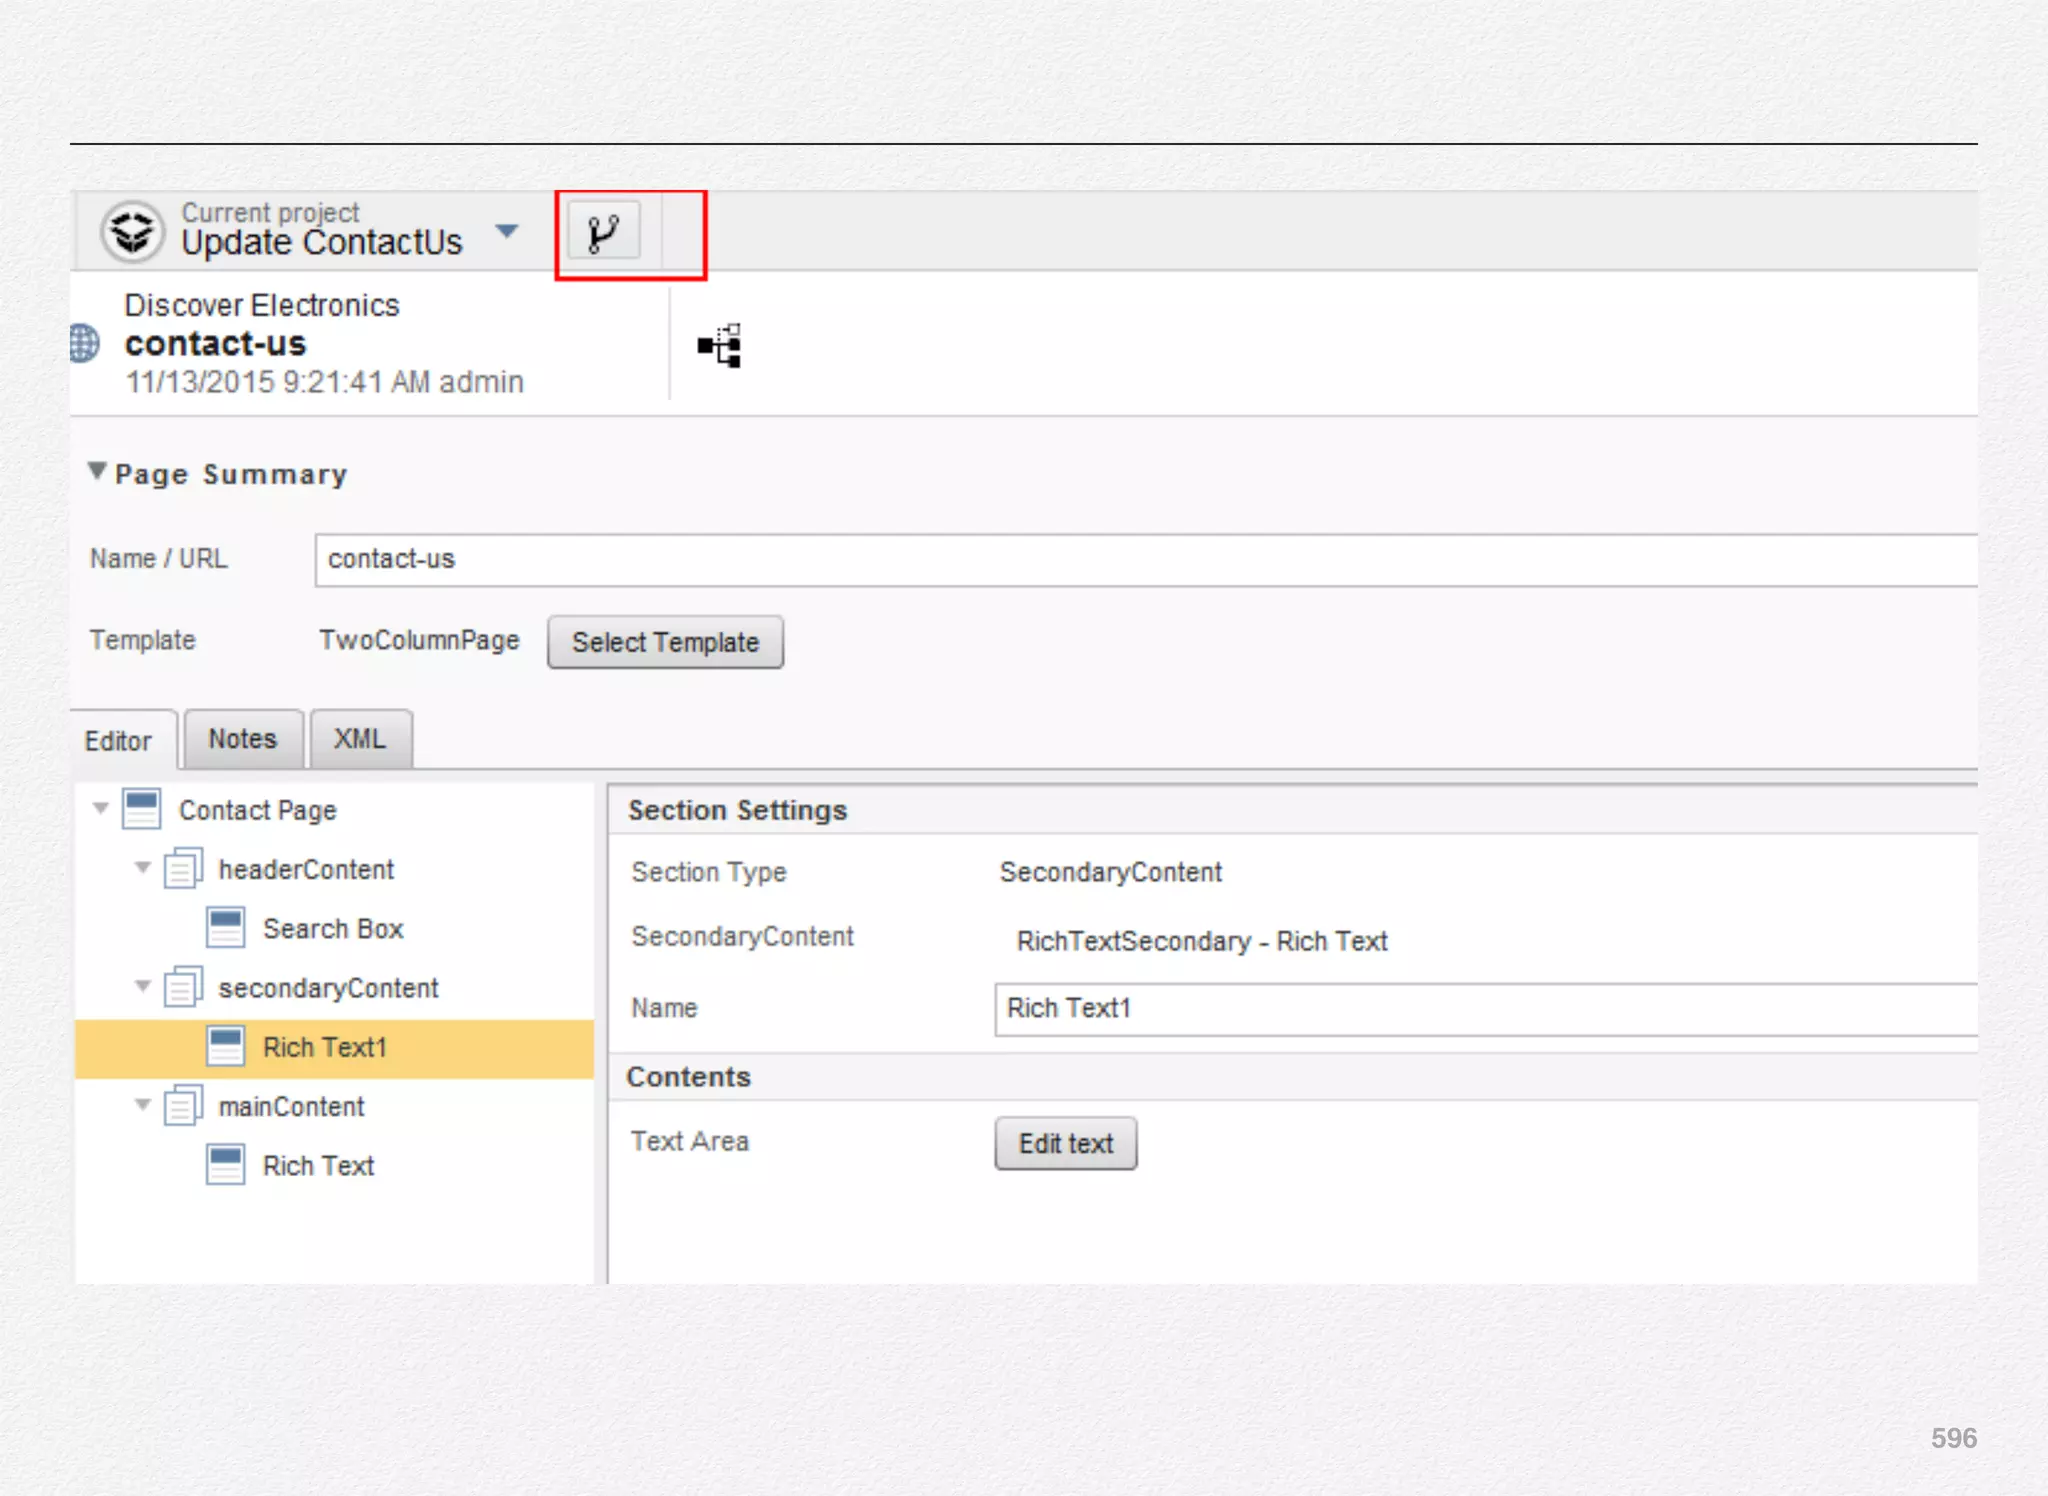
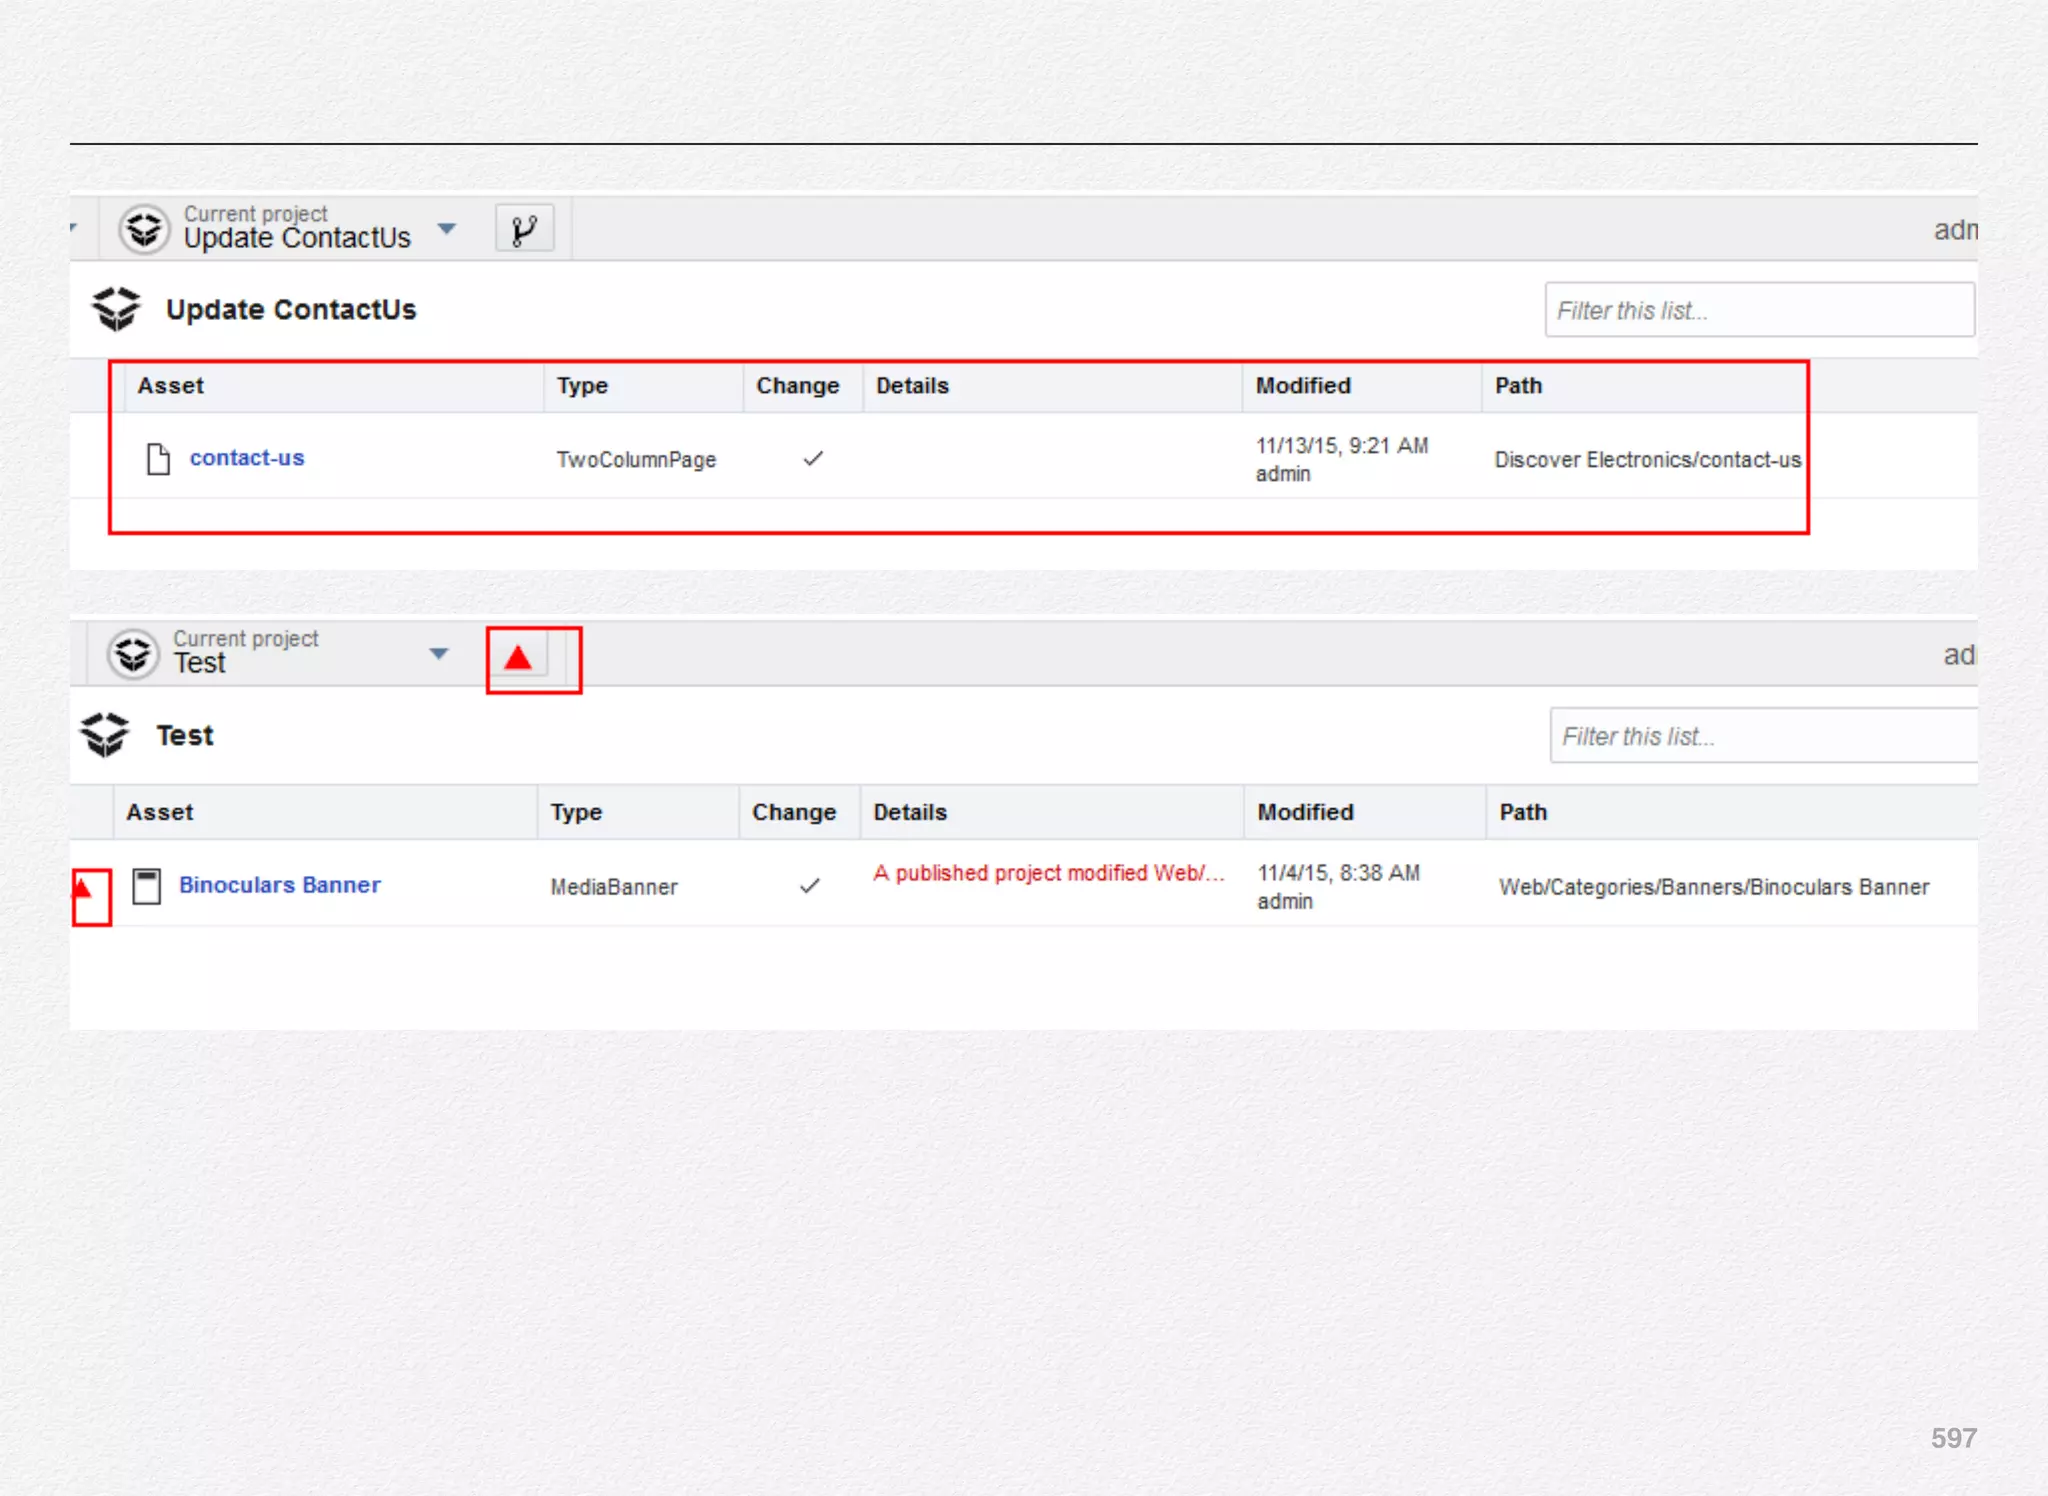
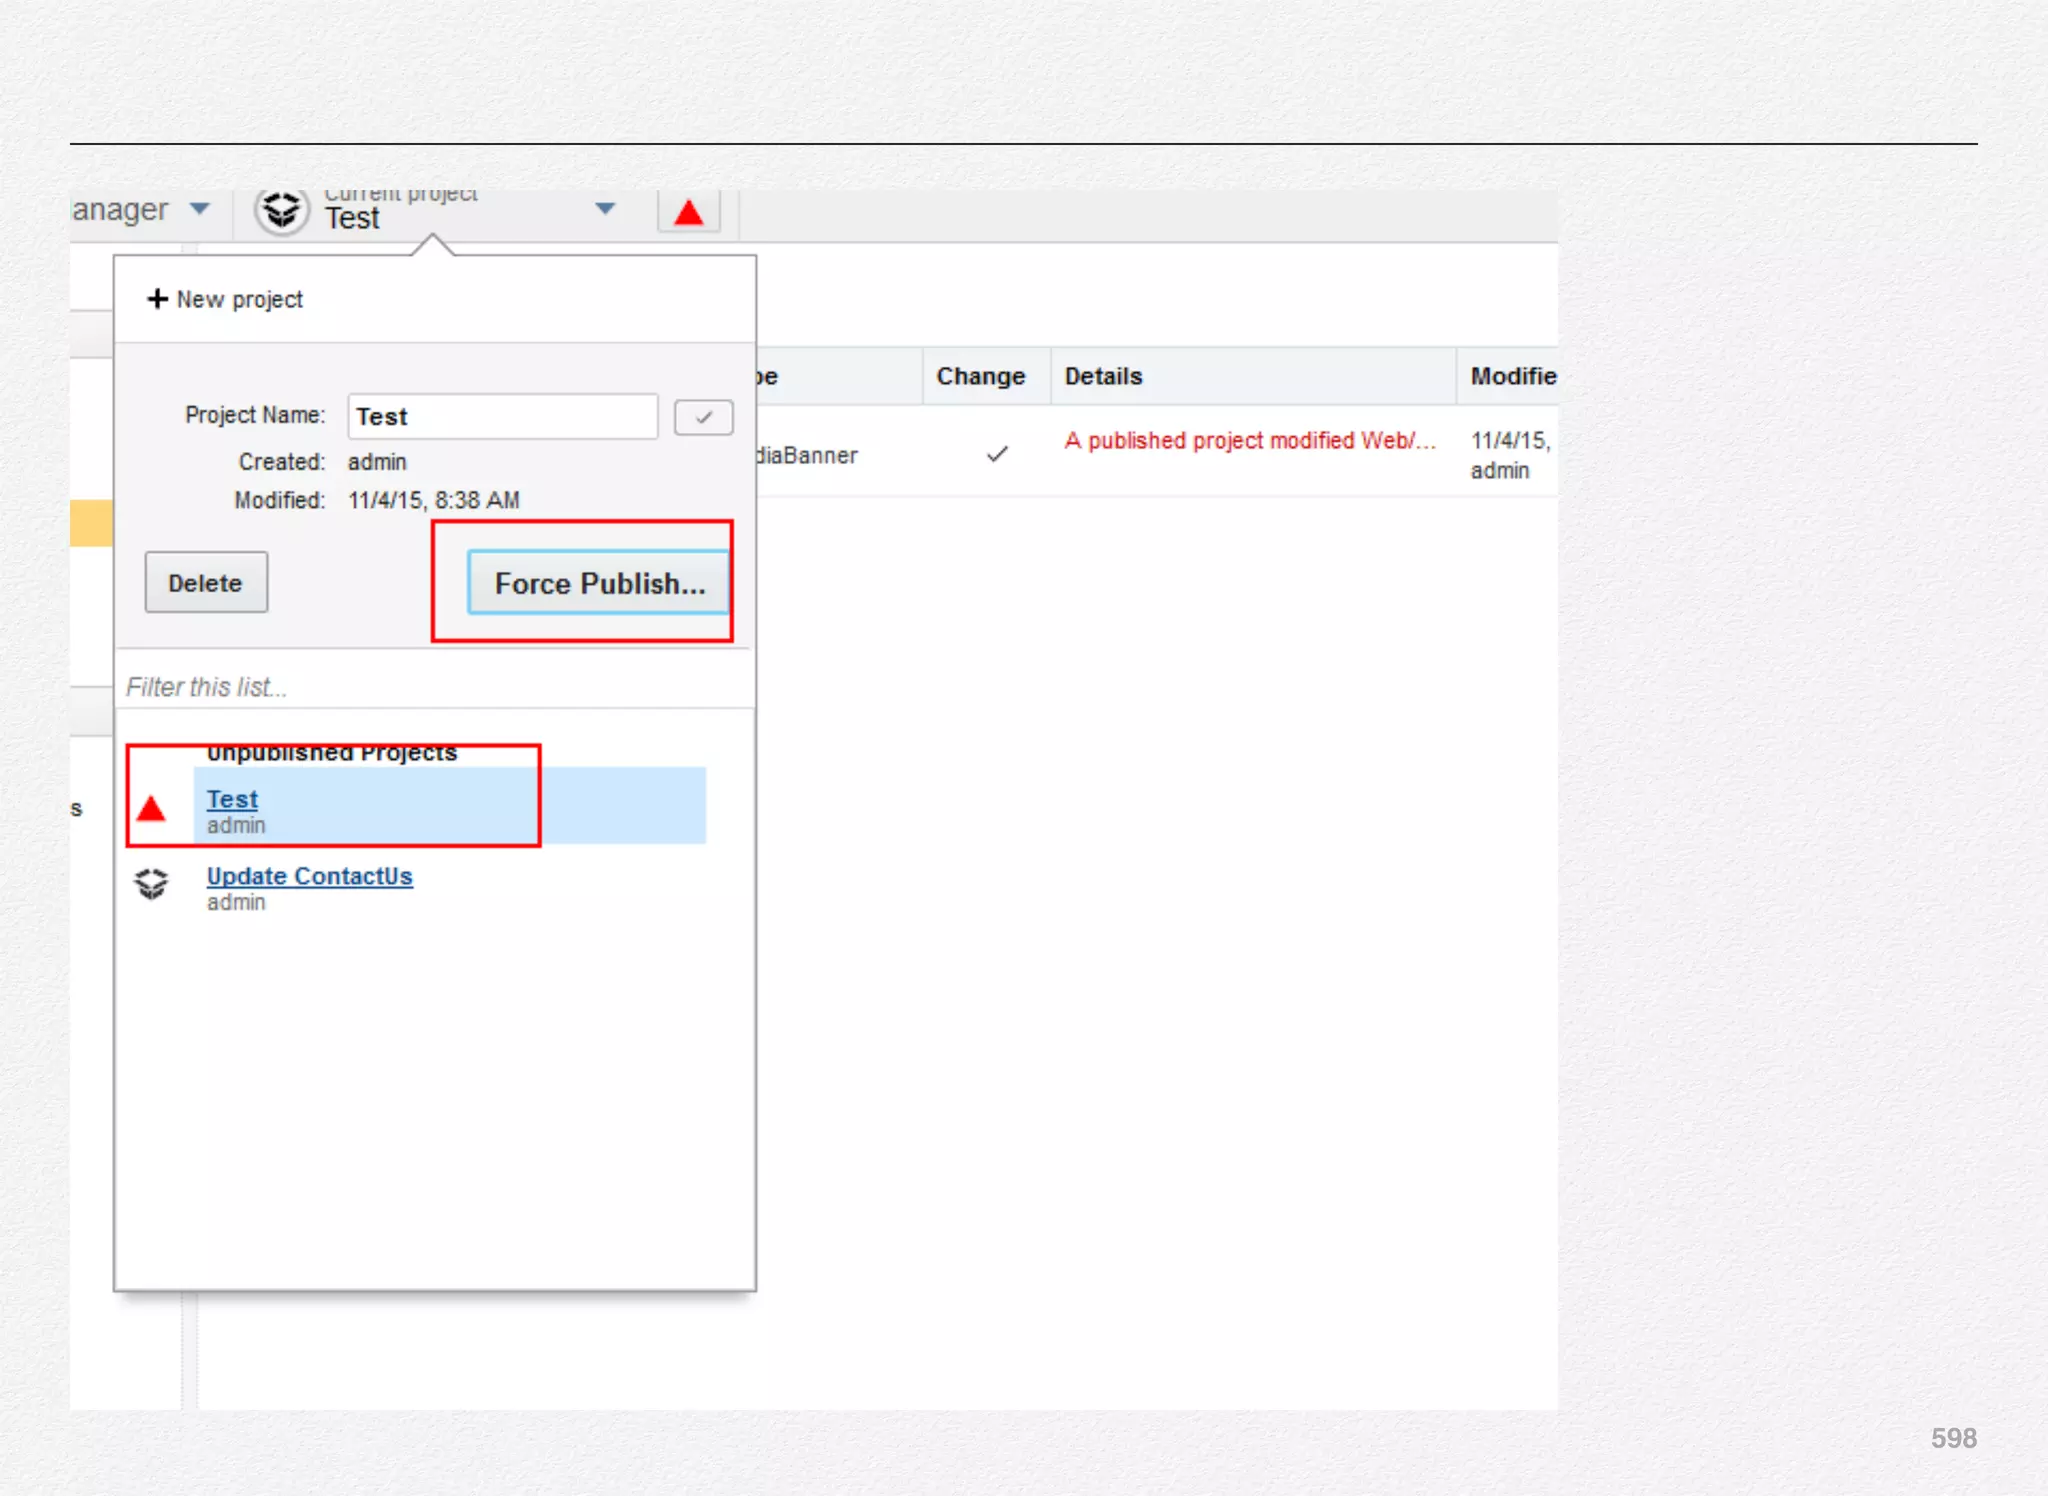
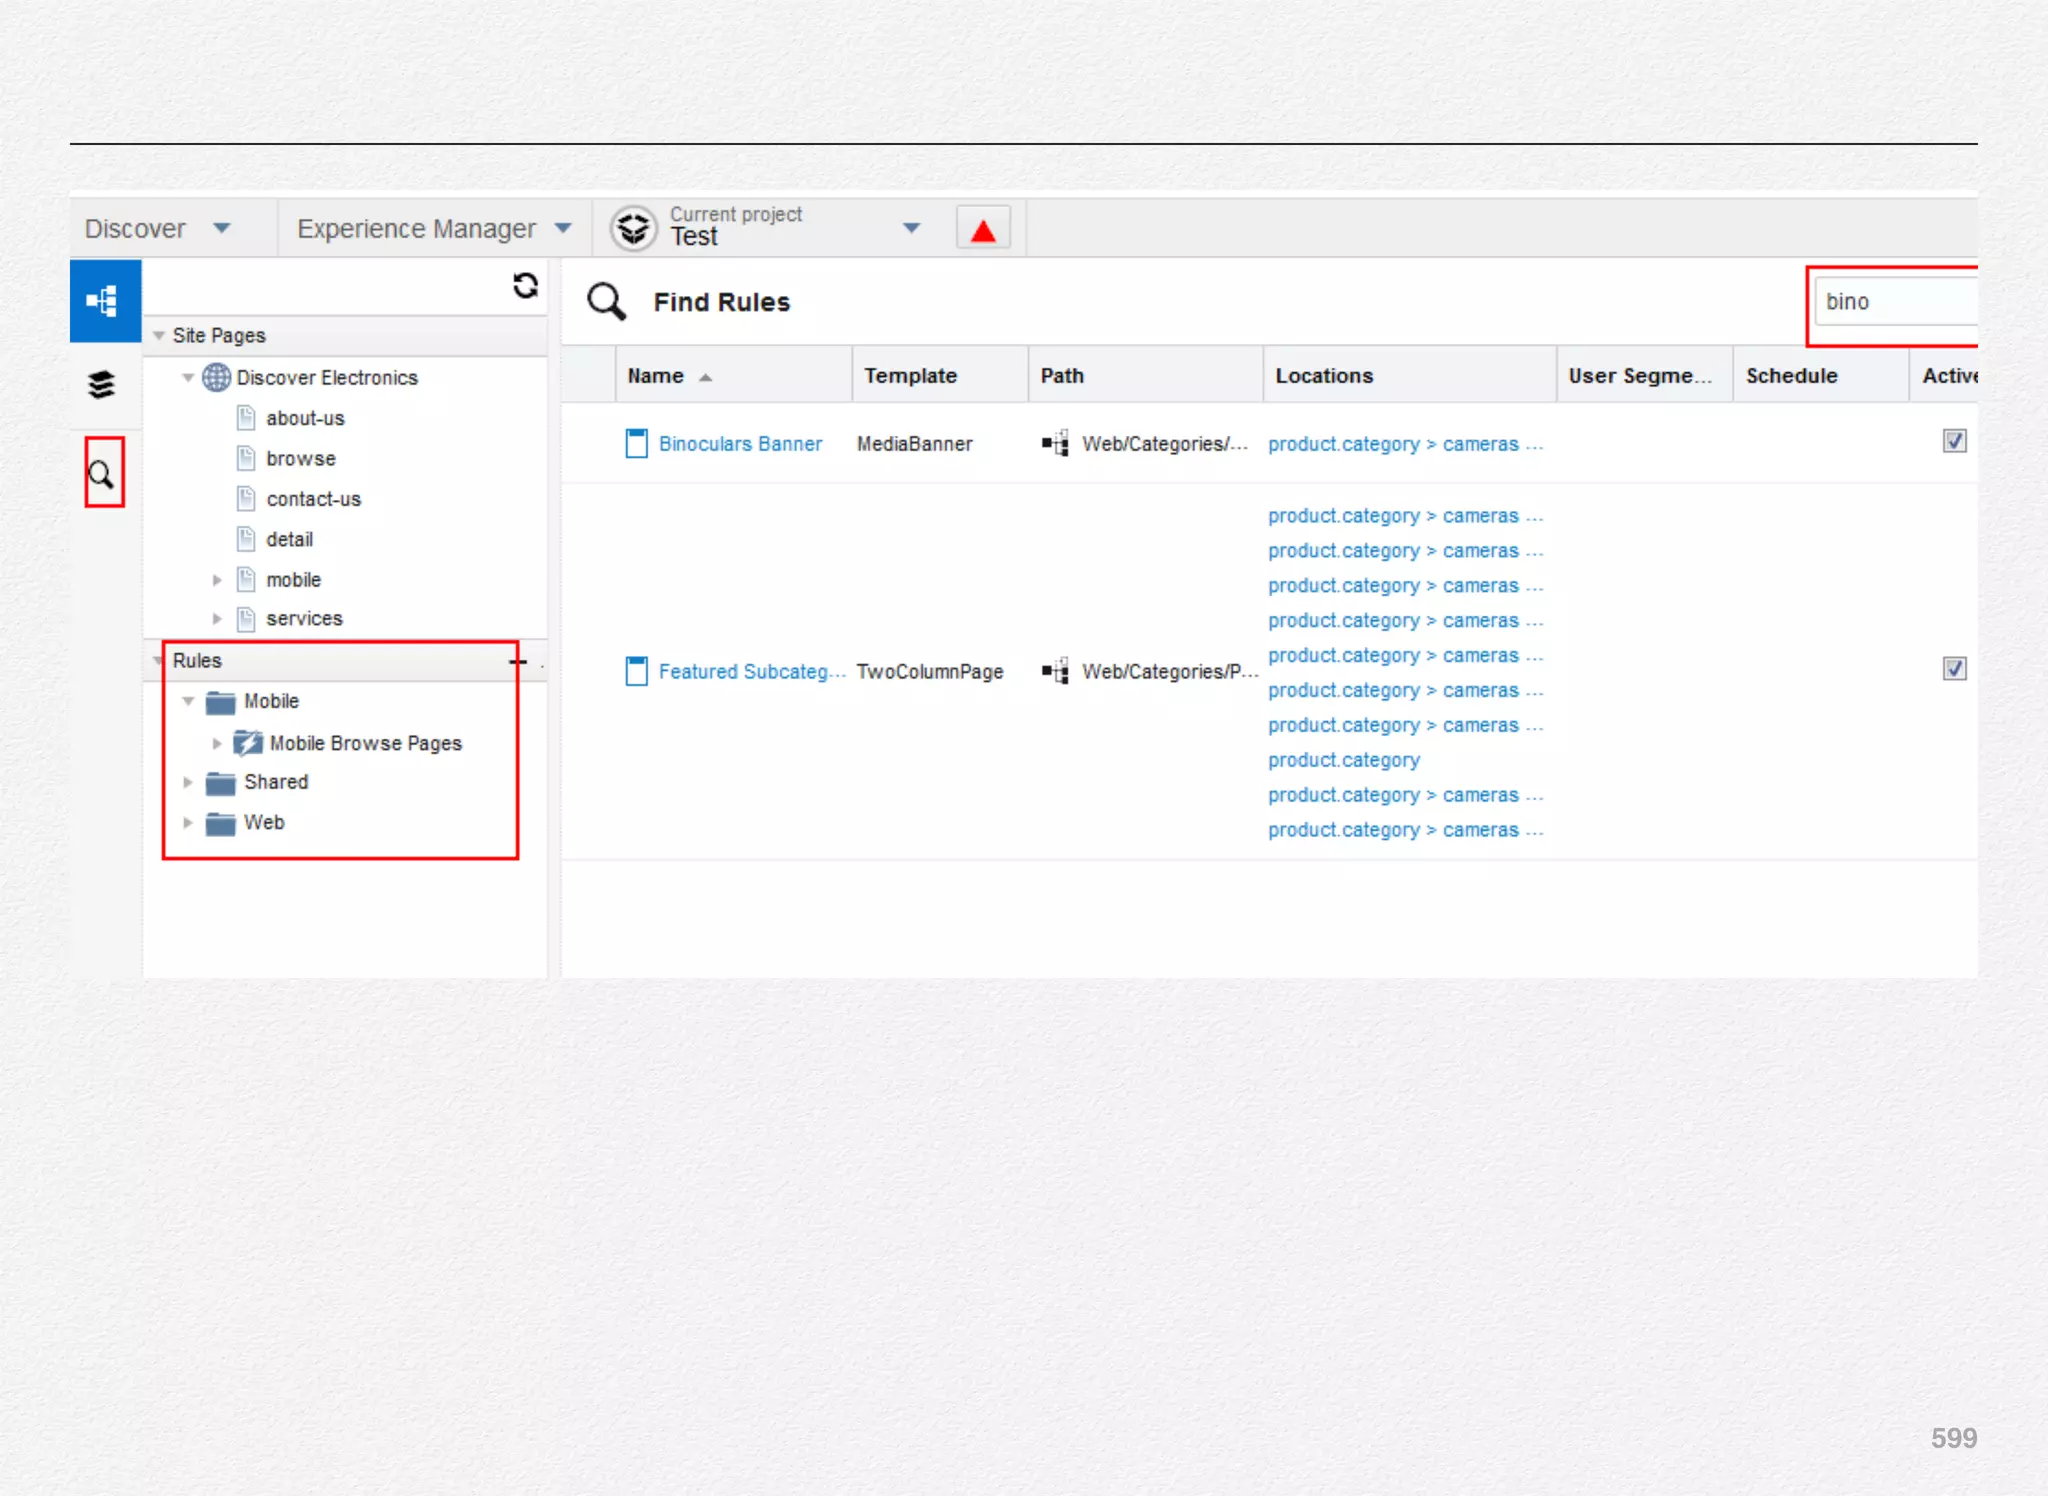
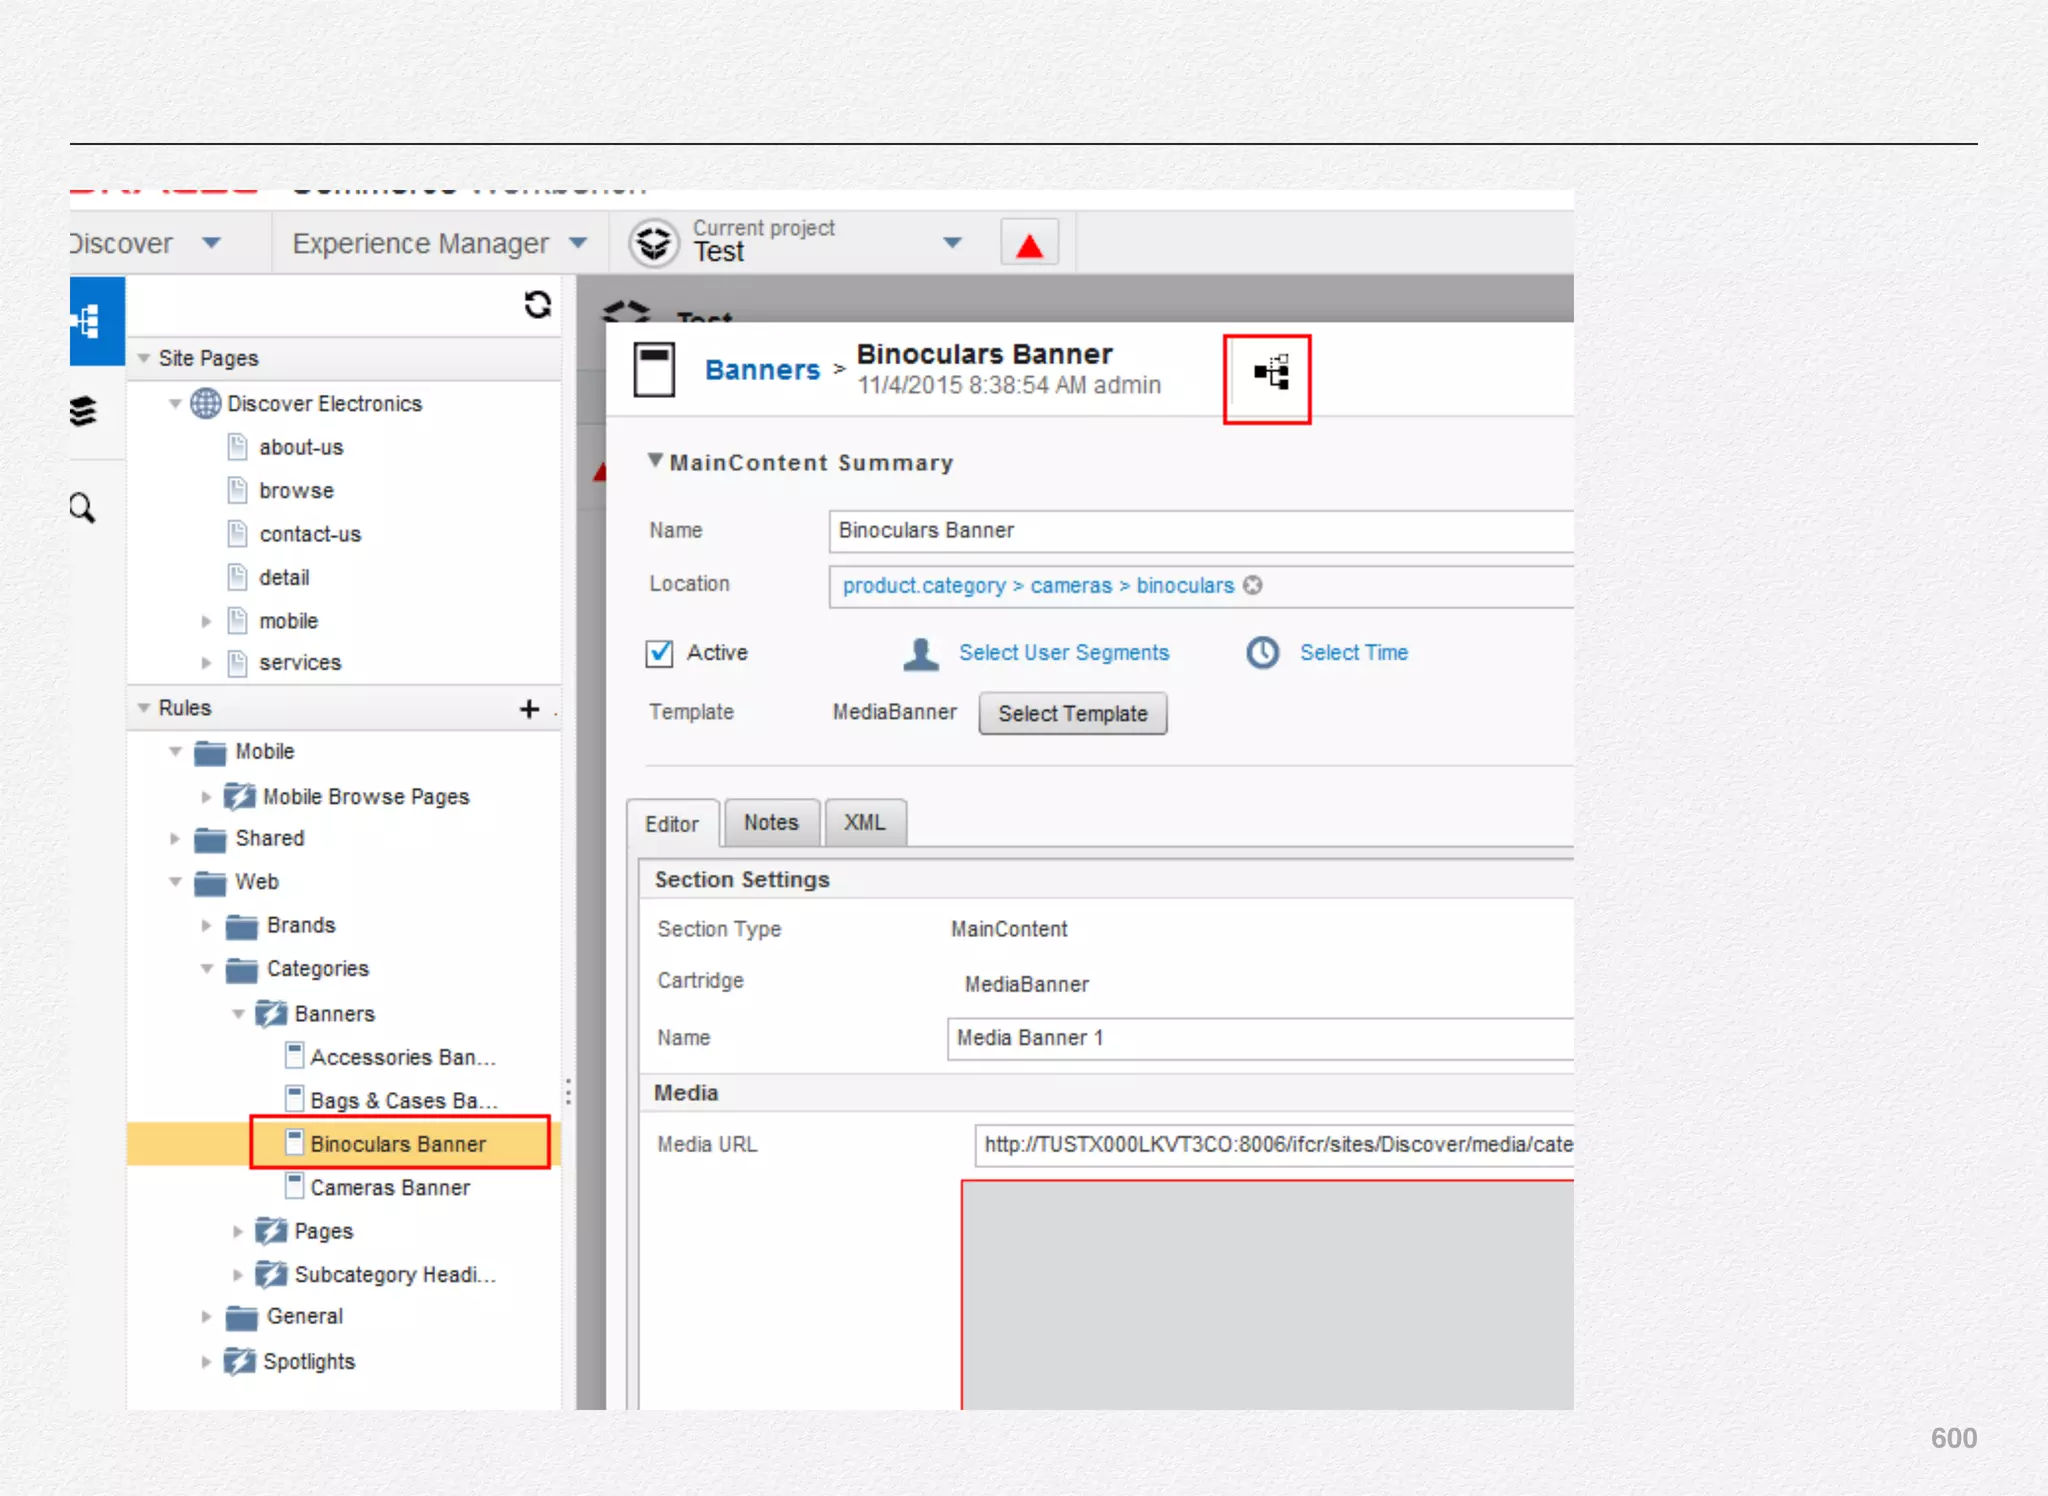
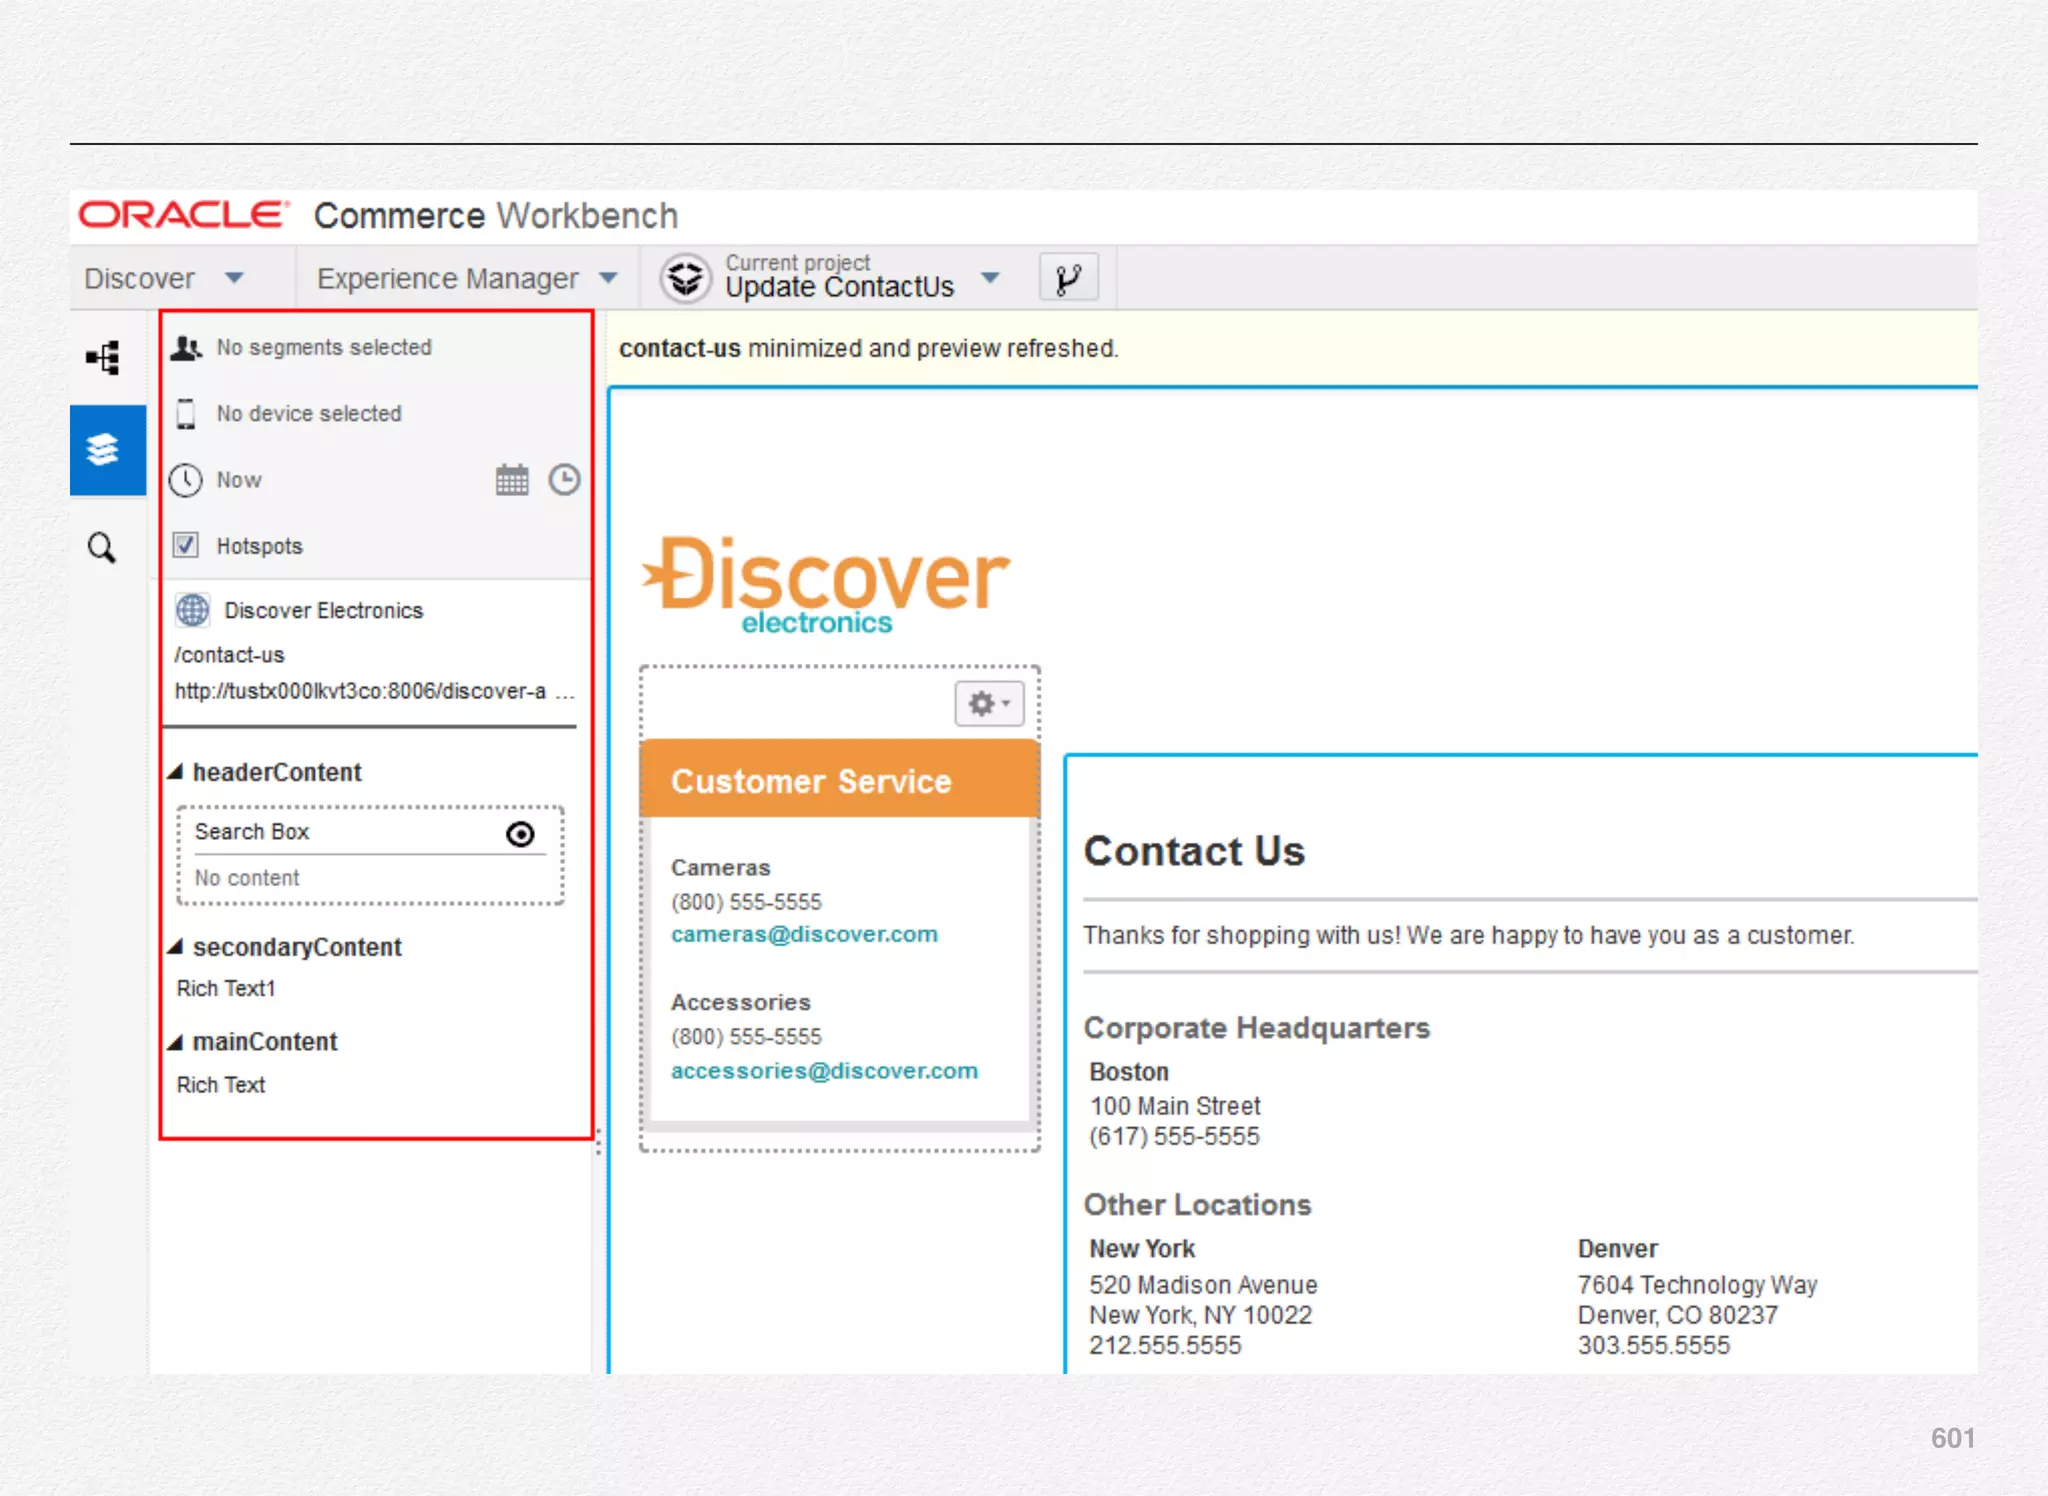
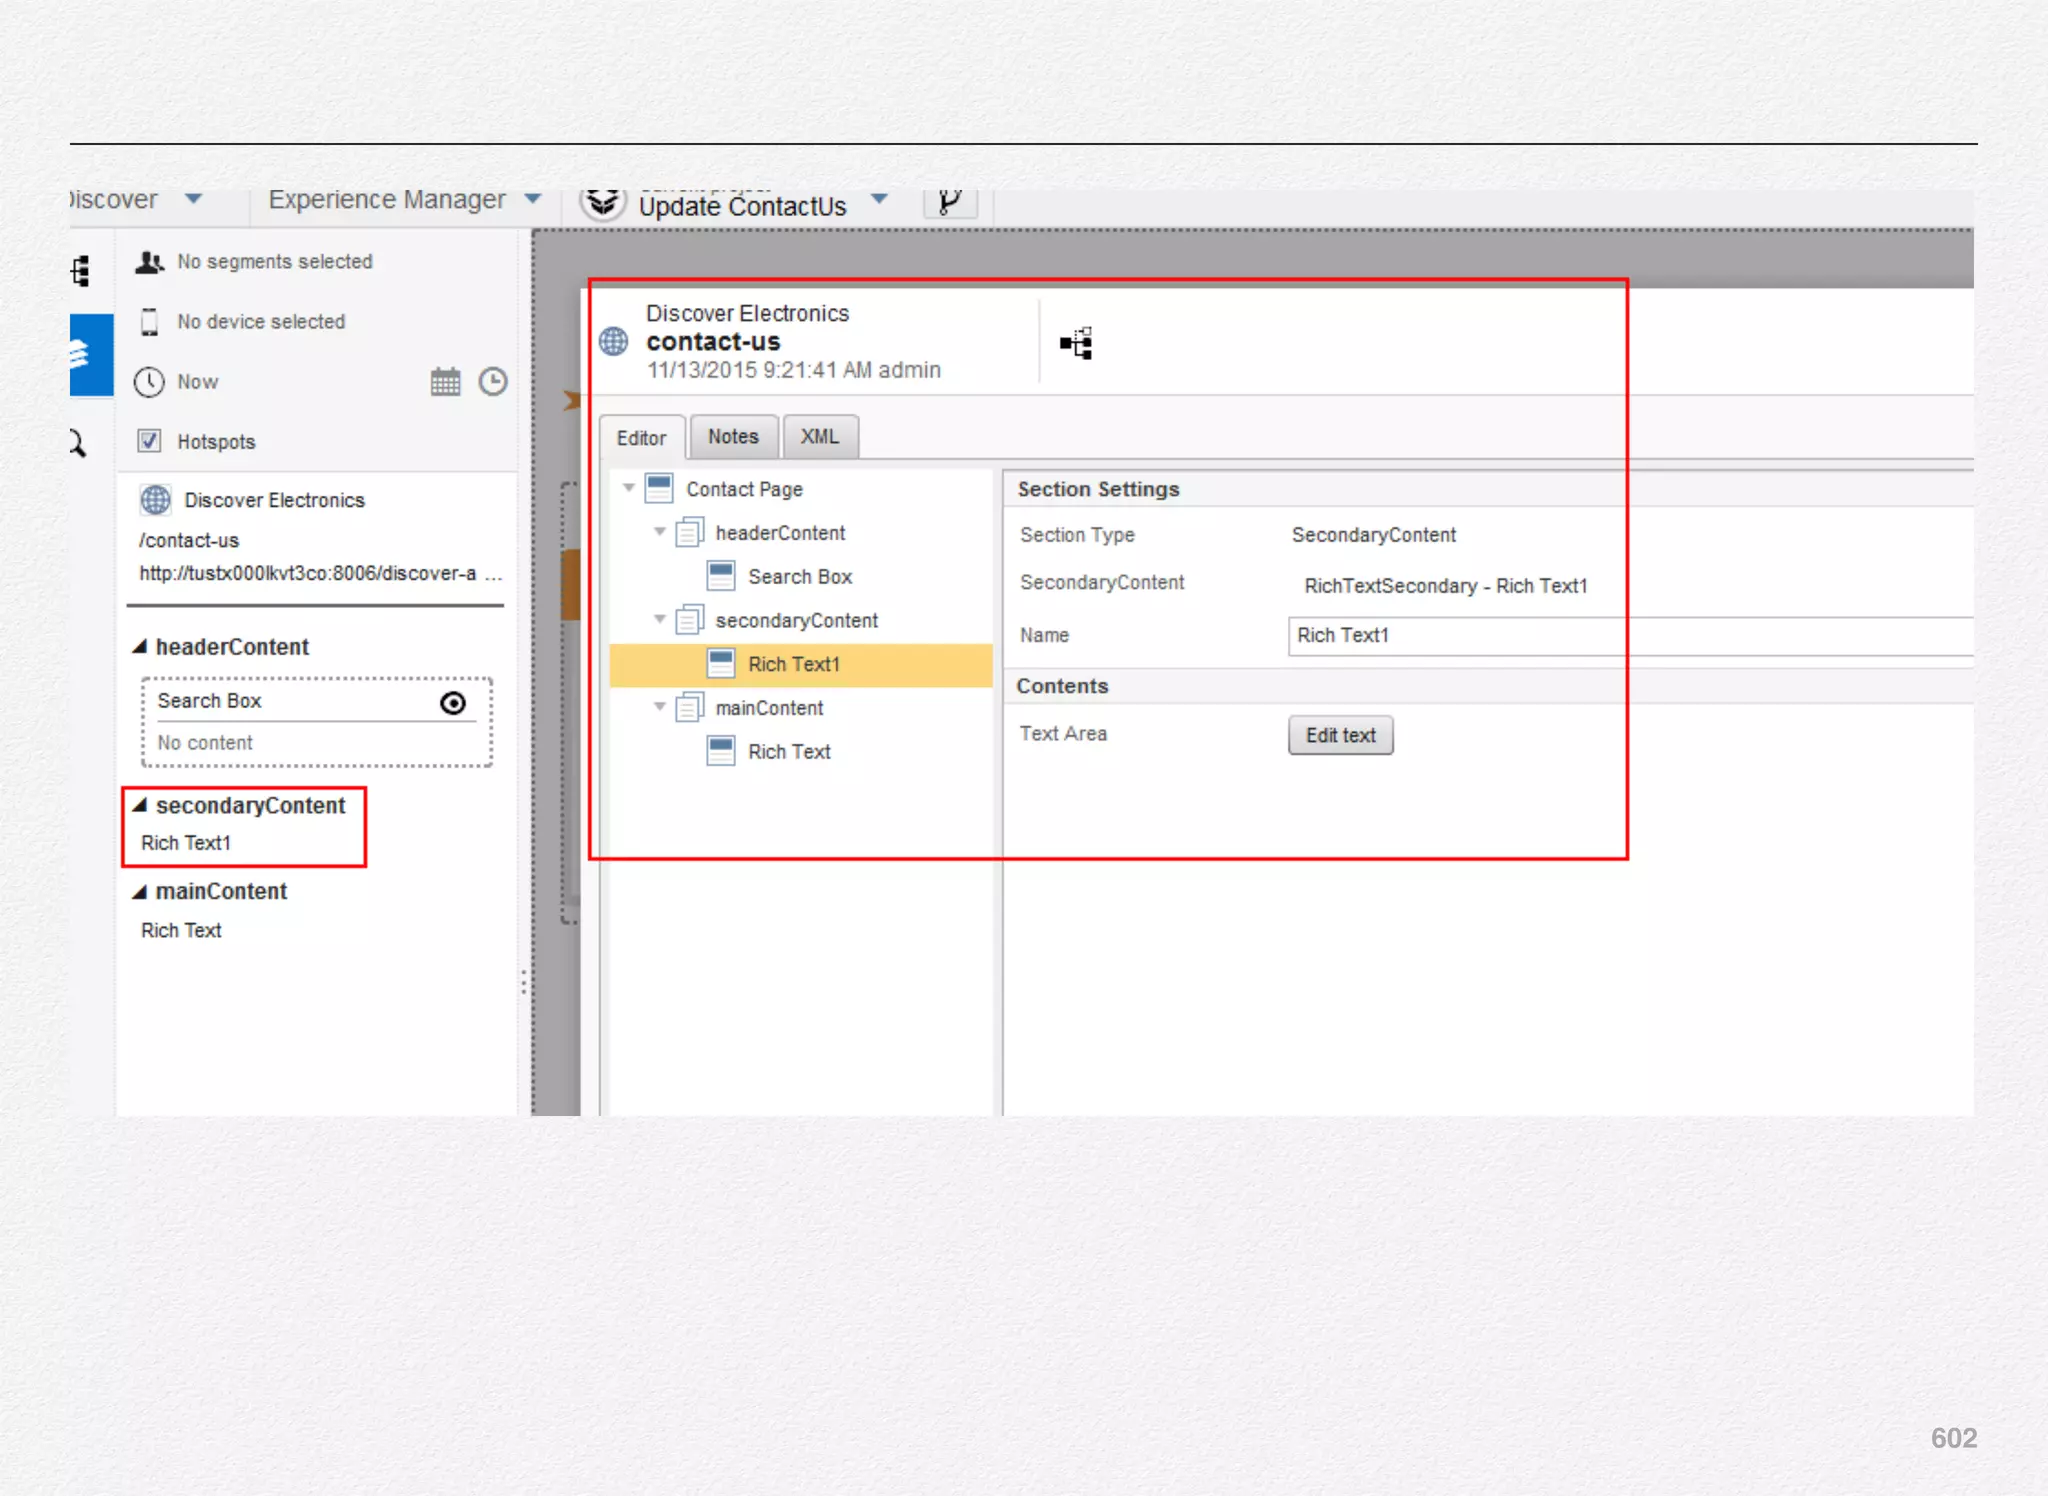
![604
Oracle ATG Blogs / Articles
• ATG REST Services Demonstration
• ATG Log Colorizer – What is it & how can you use it?
• Oracle ATG Web Commerce 10 Implementation Developer
Essentials
• Oracle/ATG Commerce Training – Your Options
• ATG Commerce Platform – Introduction
• ATG Commerce – Installation Steps [UPDATED]
• ATG Commerce – Step 1 (Install JDK)
• Preparing for the ATG Installation & Configuration
[UPDATED]
• Bringing Endeca into ATG
• Useful ATG – Blogs/Sites [UPDATED]
• Useful ATG Personalization Fundamental – Articles on
Oracle Blog
• ATG – ACC Doesnt Start with JDK 1.7 (Read about the fix)
• Oracle ATG – Introduction (Prezi)
• Builtwith – Web Sites Using ATG Commerce
• ATG CIM – Configuration and Installation Guide
• Setting up ATG Web Commerce on Mac OSX
• 5 Key Themes Driving Oracle Commerce (ATG, Endeca)
• Oracle Endeca Guided Search – Components MindMap
• ATG Web Commerce Installer – Step 3
• Spark::red – Oracle ATG Web Commerce Pricing: How
does it work?
• ATG – Merchandising Features
• ATG Commerce Services [UPDATED]
• Oracle Social ATG Shop Demo
• ATG/Endeca Commerce – Installation & Configuration
[PRESENTATION]
Section 1
Useful Links to
Online Content](https://image.slidesharecdn.com/oraclecommerce-doityourselfseries-160129151710/75/Oracle-Commerce-Using-ATG-Endeca-Do-It-Yourself-Series-605-2048.jpg)
![605
• ATG – Installing WebLogic Server [PRESENTATION] –
Step-by-Step Guide
• ATG – Installing JDK 1.7 [PRESENTATION] – Step-by-
Step Guide
• ATG – Install Oracle Express Edtion [PRESENTATION] –
Step-by-Step Guide
• ATG/Endeca – Installation Sequence [PRESENTATION]
• ATG Web Commerce 10.2 – Installation Steps
• ATG – Commerce Reference Store Installation [Step-by-
Step]
• Oracle Endeca – Installation Guide [SLIDESHARE] –
Step-by-Step
• Oracle ATG -Launch Management Framework [PART 1]
• ATG – Customer Service Center [SLIDESHARE] –
Installation
• ATG – Promotions Introduction
• ATG CIM – Logging Entire CIM Interaction (TEXT FILE)
• ATG Control Center – Installation
• Starting ATG Servers – Bypass WLS Username &
Password Prompt
• ATG -Terminologies
• ATG – CIM Clean Start (Development) [UPDATED]
• ATG – Understanding CIM Modes
• Oracle Commerce Community
• Where’s My ATG Plug-in For Eclipse?
• ATG Repository Caching – Article Series
• Oracle ATG – Scenarios & Execution
• Oracle ATG Social Integration – Gigya Module for ATG
• Oracle ATG Social Integration – Janrain | ATG Extension
• ATG Modules & Features [PREZI]
• Oracle Commerce V11 – Some high-level changes
• Oracle Commerce V11 – Now Available on eDelivery
• Replay the Oracle Commerce V11 – Webcast
• Oracle Commerce V11 – SSO Implementation
• Oracle Commerce V11- Step-by-Step CIM Responses
• ATG Products Modules & Roles [INTERESTING WORK]
• ATG Commerce – Launch Management Framework
• Oracle Commerce V11 – Enabling SSO IN
WEBSTUDIO.PROPERTIES
• Oracle Commerce V11 – Adding BCC Menu Item to
Experience Manager
• eCommerce Platforms [PRESENTATION]
• eCommerce Platform – From Business Perspective
• Anatomy of an Oracle Endeca Experience Manager Site
• Oracle Endeca Developer’s Guide [PRESENTATION +
STEPS]
• Webcast – Oracle Commerce 11.1
• Oracle Commerce 11.1 – New Training Released
Oracle Endeca Blogs / Articles
• ATG REST Services Demonstration
• Oracle Endeca Guided Search – Components MindMap
• Anatomy of an Oracle Endeca Experience Manager Site
[VIDEO]
• ATG – Install Oracle Express Edtion [PRESENTATION] –
Step-by-Step Guide
• Webinar: Drive Valuable Insight From Diverse And
Unstructured Data With Oracle Endeca Information
Discovery
• Webinar – The Power of Oracle Endeca Advanced
Enterprise Guided Search
• Oracle Endeca – Installation Guide [SLIDESHARE] –
Step-by-Step](https://image.slidesharecdn.com/oraclecommerce-doityourselfseries-160129151710/75/Oracle-Commerce-Using-ATG-Endeca-Do-It-Yourself-Series-606-2048.jpg)
![606
• Oracle Commerce Community
• Where’s My ATG Plug-in For Eclipse?
• ATG Repository Caching – Article Series
• Oracle Endeca Commerce 3.1 Implementation Developer
Exam
• Oracle ATG – Scenarios & Execution
• Endeca -Useful Links/Sites [UPDATED]
• Evolution of a Great User Experience
• Oracle ATG Social Integration – Gigya Module for ATG
• Oracle Endeca Pipeline – Introduction
• Endeca – Configuring the User Inactivity Logout
• Endeca – Check Status of Endeca Application
• ATG Modules & Features [PREZI]
• Oracle Commerce V11 – Some high-level changes
• Oracle Commerce V11 – Now Available on eDelivery
• Replay the Oracle Commerce V11 – Webcast
• Oracle Commerce V11 – SSO Implementation
• Oracle Commerce V11- Step-by-Step CIM Responses
• ATG Commerce – Launch Management Framework
• Oracle Commerce V11 – Enabling SSO IN
WEBSTUDIO.PROPERTIES
• eCommerce Platforms [PRESENTATION]
• eCommerce Platform – From Business Perspective
• Anatomy of an Oracle Endeca Experience Manager Site
• Endeca Information Discovery Architecture Video on
Vimeo
• Oracle Endeca Developer’s Guide [PRESENTATION +
STEPS]
• Endeca – Monitoring the Log Server
• Endeca – Promoting Content from Staging to Production
• Endeca – Troubleshooting Article – 1
• Webcast – Oracle Commerce 11.1
• Oracle B2C Commerce in Action
• Endeca MDEX Plugin – for New Relic by Spark::red
• Lost Endeca Workbench Password – What would you do?
• Endeca Configuration – What can a SPACE do to your
deployment?
• Oracle Commerce 11.1 – New Training Released
• Endeca Application Assembler – Web Service Workflow
• Oracle Commerce – Needs DevOps Culture & Tools
Other Online Sources for Articles
• Key ATG architecture principles
• Design for Complex ATG Applications
• ATG in Telecommunications Industry
• Personalization Fundamentals (Part 1) – The ATG Profile
• Personalization Fundamentals (Part 2) – Rule-based
Personalization
• Personalization Fundamentals (Part 3) – Event-based
Personalization
• Installing Oracle ATG Commerce 10.2 with CRS
• Installing Oracle ATG & Endeca 10.2 on Linux
• Installing Oracle ATG & Endeca 10.2 on Windows
• Learn Oracle ATG
ATG/Endeca Presentations
• Oracle - Endeca Developer's Guide - http://
www.slideshare.net/softwareklinic/oracle-endeca-developers-
guide
• Oracle - ATG Control Center - http://www.slideshare.net/
softwareklinic/atg-installing-atg-control-center-acc](https://image.slidesharecdn.com/oraclecommerce-doityourselfseries-160129151710/75/Oracle-Commerce-Using-ATG-Endeca-Do-It-Yourself-Series-607-2048.jpg)
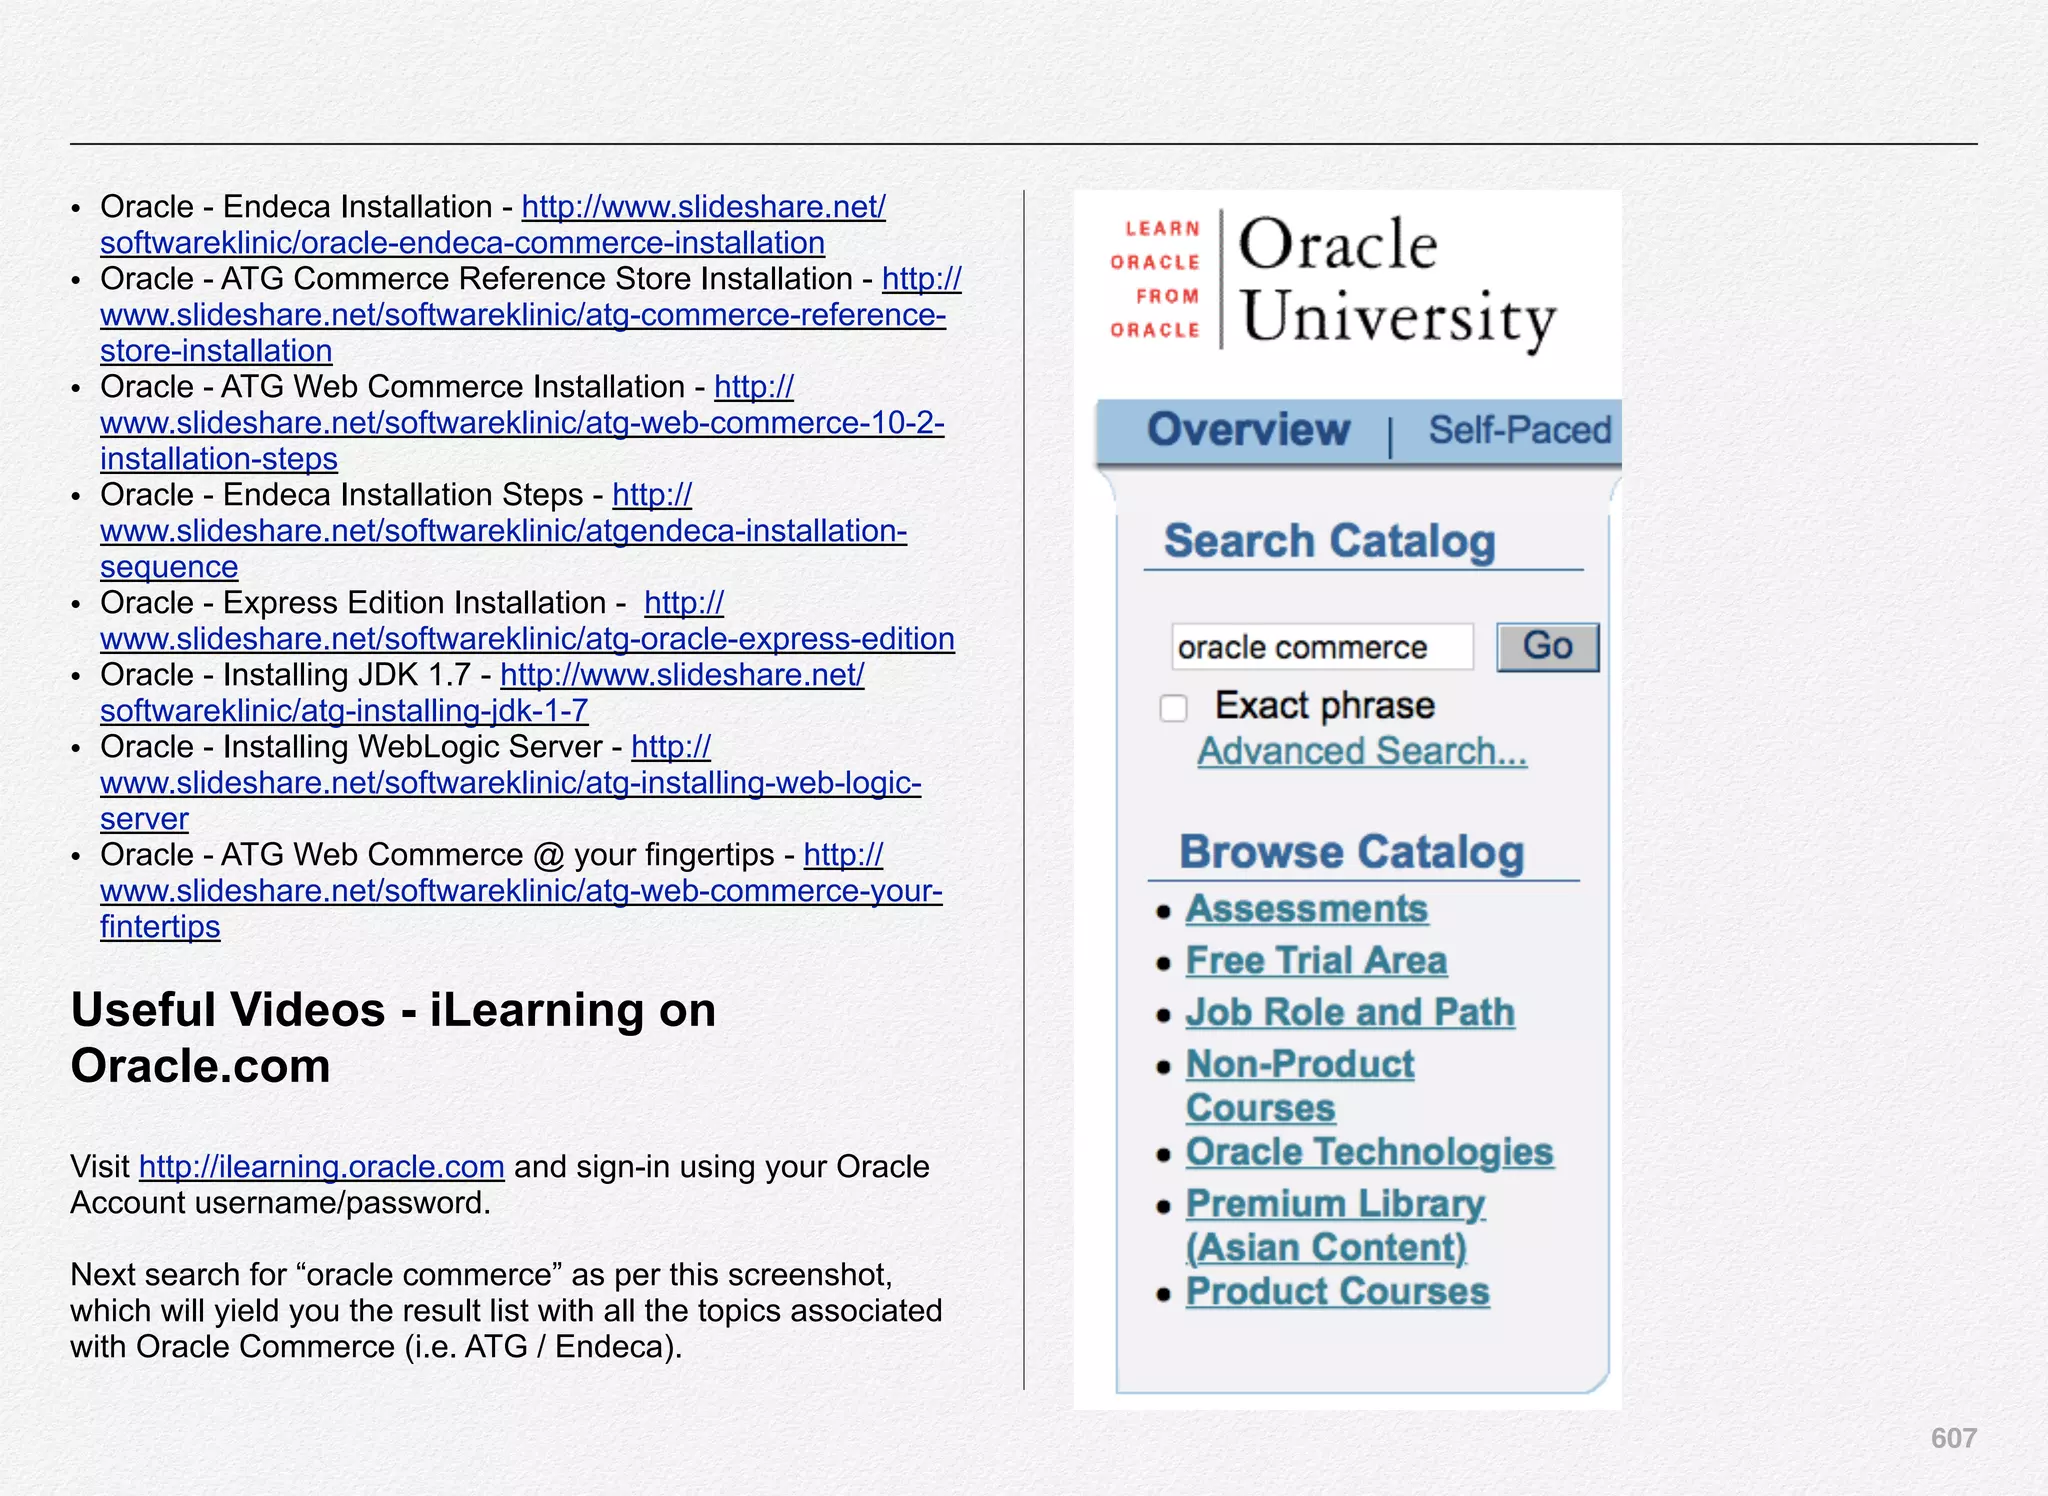
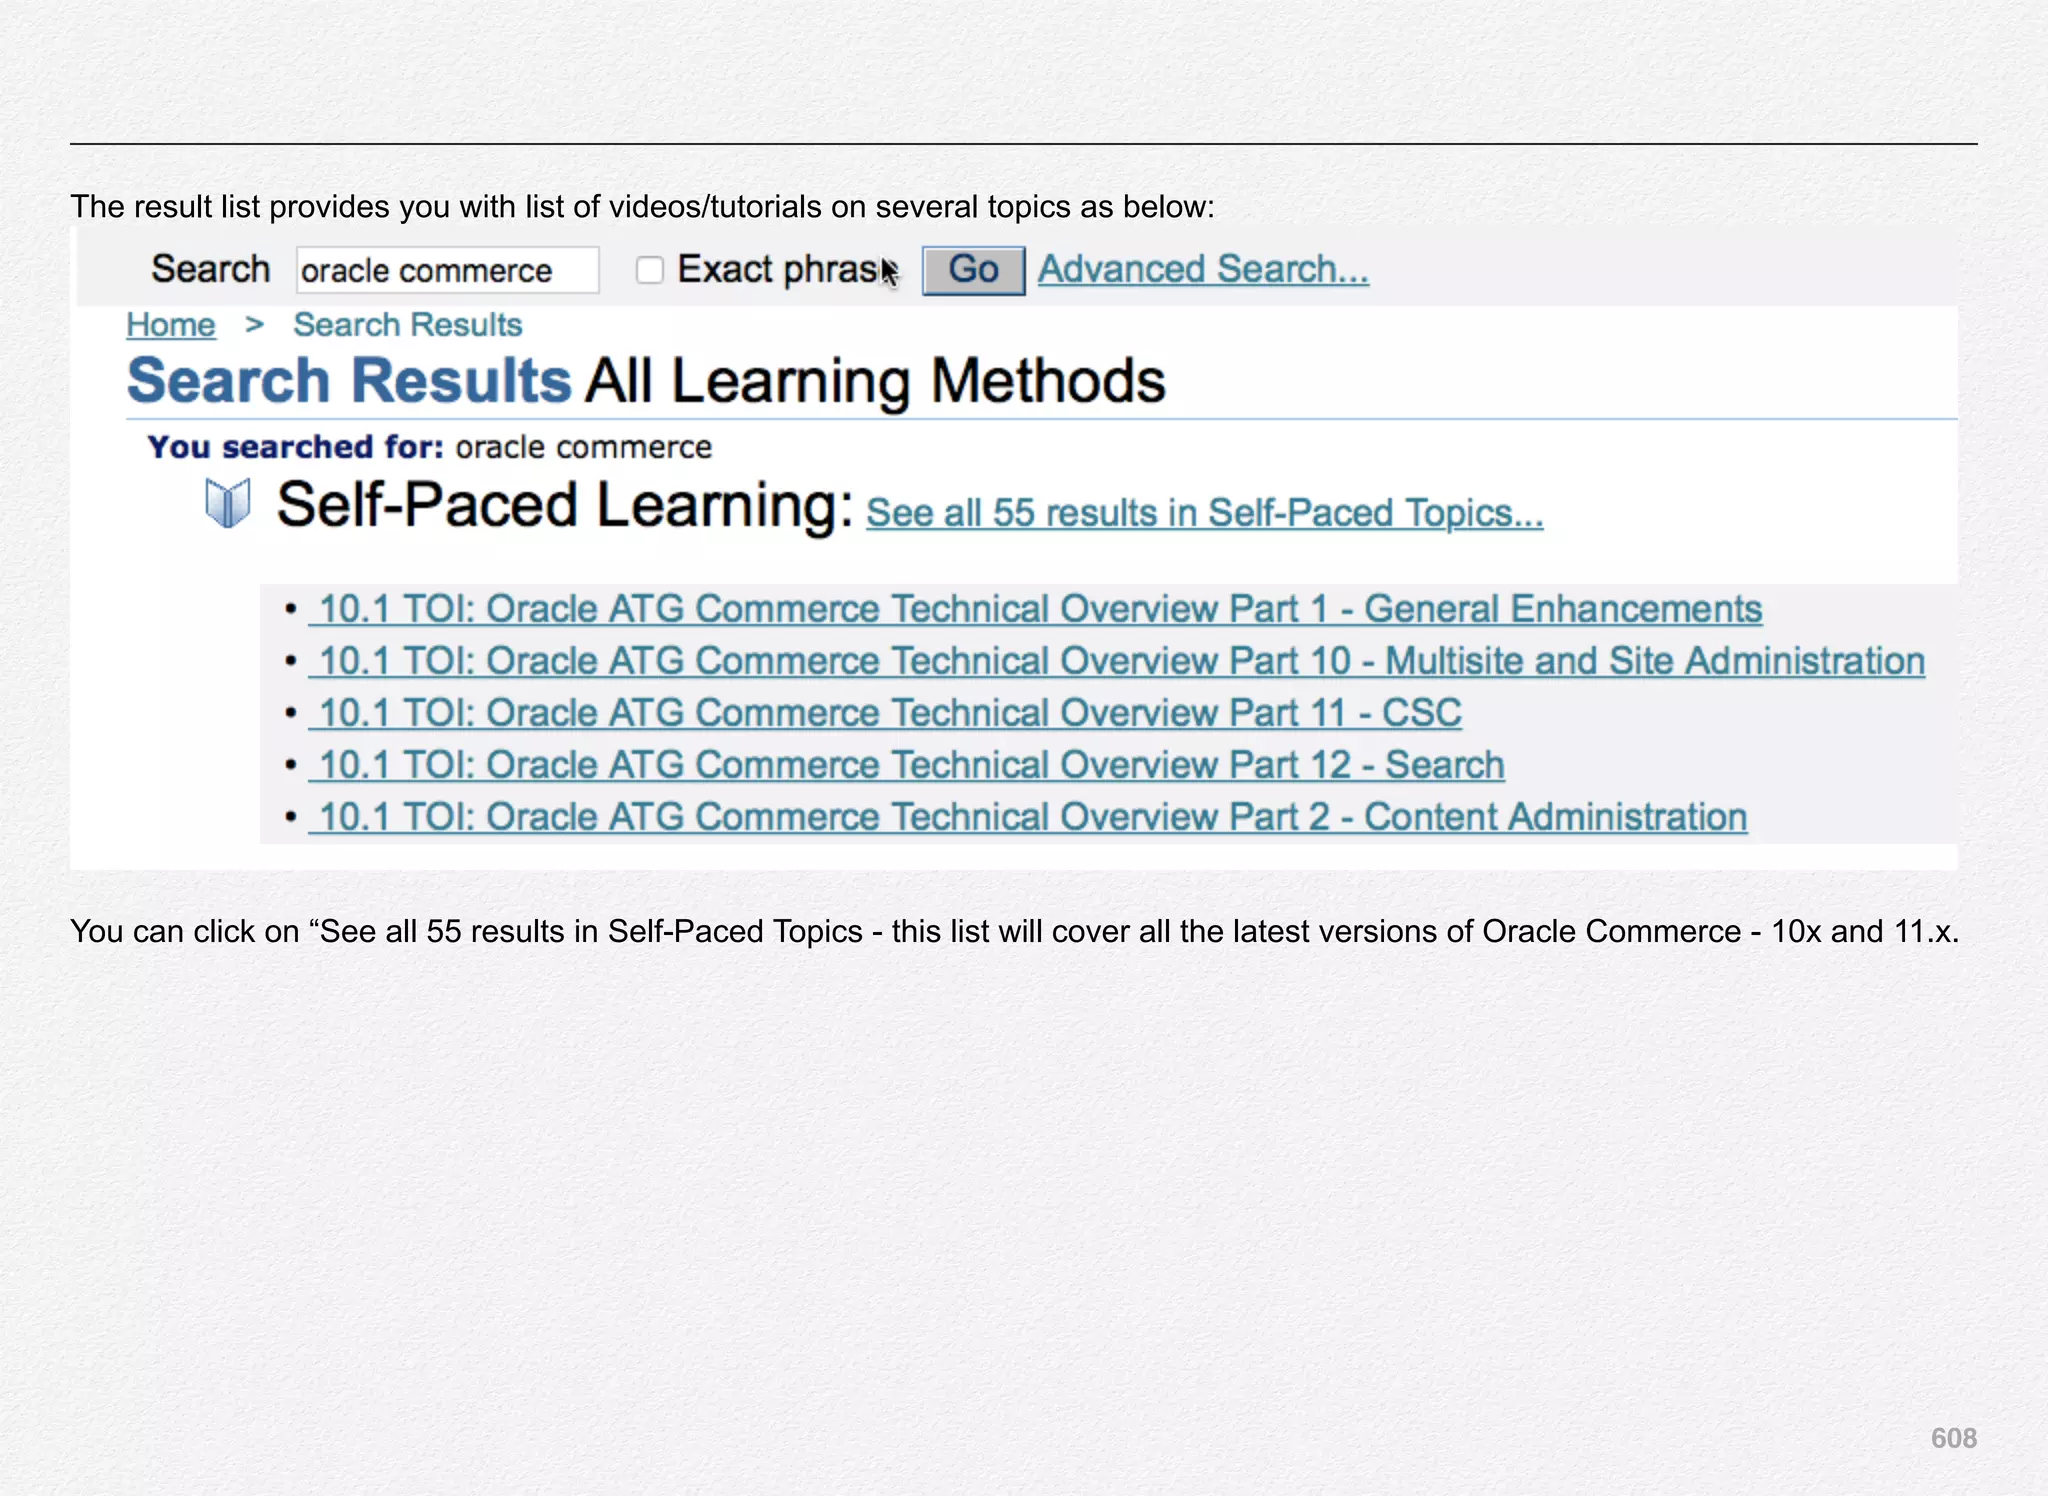

The document is a guide aiming to help developers learn the Oracle Commerce platform through a step-by-step approach, focusing on efficiency and productivity in development. It covers essential components and functionalities of ecommerce systems, including integration, personalization, performance, and inventory management, while exploring tools and frameworks that enhance the user experience. The author emphasizes the importance of understanding customer behavior and using data to create tailored ecommerce solutions.


![ATG Product Modules [INTERESTING VIEW]](https://cdn.slidesharecdn.com/ss_thumbnails/atg-140214001952-phpapp01-thumbnail.jpg?width=640&height=640&fit=bounds)
![MindMap - Developing a Business Case [Please Download for better view]](https://cdn.slidesharecdn.com/ss_thumbnails/developingabusinesscase-131126105037-phpapp02-thumbnail.jpg?width=640&height=640&fit=bounds)


![Coded Agents – with UiPath SDK + LangGraph [Virtual Hands-on Workshop]](https://cdn.slidesharecdn.com/ss_thumbnails/codedagentsdeck-251215155422-5497c599-thumbnail.jpg?width=640&height=640&fit=bounds)


