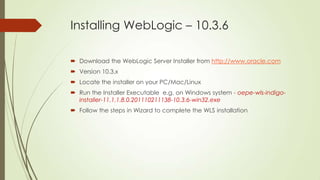
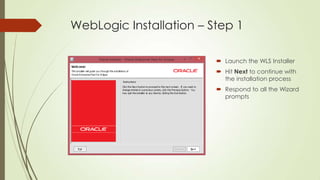
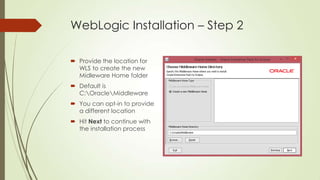
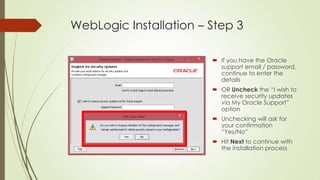
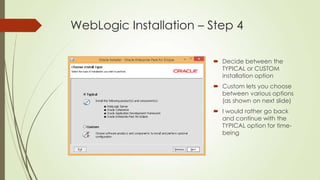
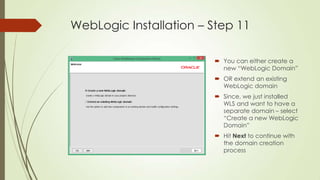
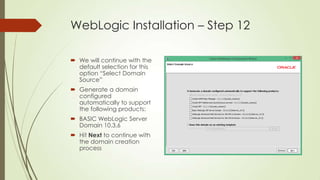
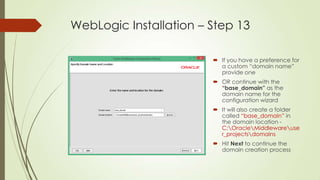
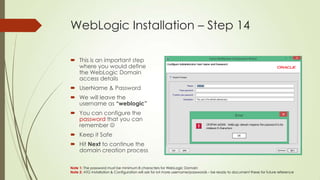
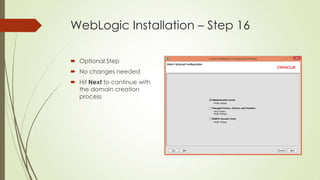
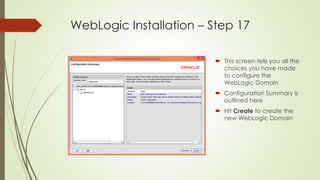
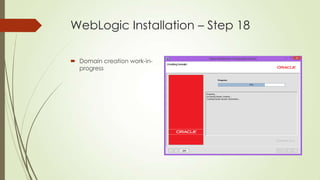
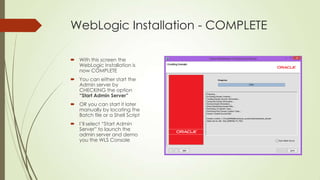
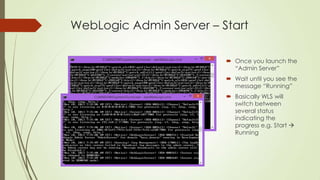
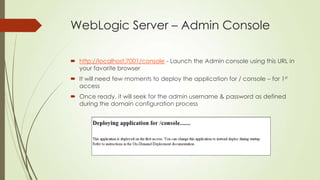
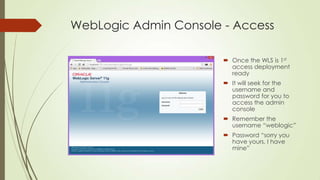
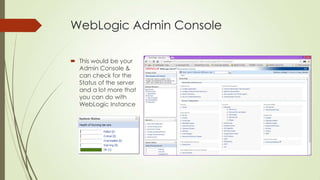
Installing WebLogic Server
11g R1 - 10.3.6
- Keyur Shah (http://www.linkedin.com/in/keyurkshah)
Installing WebLogic – 10.3.6
 Download the WebLogic Server Installer from http://www.oracle.com
 Version 10.3.x
 Locate the installer on your PC/Mac/Linux
 Run the Installer Executable e.g. on Windows system - oepe-wls-indigoinstaller-11.1.1.8.0.201110211138-10.3.6-win32.exe
 Follow the steps in Wizard to complete the WLS installation
WebLogic Installation – Step 1
 Launch the WLS Installer
 Hit Next to continue with
the installation process
 Respond to all the Wizard
prompts
WebLogic Installation – Step 2
 Provide the location for
WLS to create the new
Midleware Home folder
 Default is
C:OracleMiddleware

 You can opt-in to provide
a different location
 Hit Next to continue with
the installation process
WebLogic Installation – Step 3
 If you have the Oracle
support email / password,
continue to enter the
details
 OR Uncheck the “I wish to
receive security updates
via My Oracle Support”
option
 Unchecking will ask for
your confirmation
“Yes/No”
 Hit Next to continue with
the installation process
WebLogic Installation – Step 4
 Decide between the
TYPICAL or CUSTOM
installation option
WebLogic Installation – Step 4
 Decide between the
TYPICAL or CUSTOM
installation option
 Custom lets you choose
between various options
(as shown on next slide)
 I would rather go back
and continue with the
TYPICAL option for timebeing
WebLogic Custom Installation Options
 Check or Uncheck the
options on this screen
based on which options
you want to be installed
with WLS Installer using
CUSTOM option v/s the
TYPICAL installation option
 Hit Next to continue with
the installation process
WebLogic Installation – Step 5
 Provide the Middleware
HOME directory
 WebLogic Server Home
 Coherence Home
 Enterprise pack for Eclipse
Home
WebLogic Installation – Step 6
 You need to Choose the
Shortcut Location
 You can opt between
“All Users” vs. “Local
User”

 Hit Next by selecting “All
Users”
WebLogic Installation – Step 7
 Installation Summary
Review
 Hit Next to continue
with ATG commerce
installation
WebLogic Installation – Step 8
 Installation Begins
 Extracting & copying
necessary files
WebLogic Installation – Step 9
 Installation is now
Complete
 You have an option to
configure the “domain”
using the “Run quickstart”
option
 Recommendation is leave
“Run quickstart” checked
 Hit the Done button in
order to continue the
limitations
WebLogic Installation – Step 10
 This is the “Quickstart”
launch screen
 You can configure the
WebLogic domain by
clicking on the
“Getting start with
WebLogic Server
10.3.6”
WebLogic Installation – Step 11
 You can either create a
new “WebLogic Domain”
 OR extend an existing
WebLogic domain
 Since, we just installed
WLS and want to have a
separate domain – select
“Create a new WebLogic
Domain”
 Hit Next to continue with
the domain creation
process
WebLogic Installation – Step 12
 We will continue with the
default selection for this
option “Select Domain
Source”
 Generate a domain
configured
automatically to support
the following products:
 BASIC WebLogic Server
Domain 10.3.6
 Hit Next to continue with
the domain creation
process
WebLogic Installation – Step 13
 If you have a preference for
a custom “domain name”
provide one
 OR continue with the
“base_domain” as the
domain name for the
configuration wizard
 It will also create a folder
called “base_domain” in
the domain location C:OracleMiddlewareuse
r_projectsdomains

 Hit Next to continue the
domain creation process
WebLogic Installation – Step 14
 This is an important step
where you would define
the WebLogic Domain
access details
 UserName & Password
 We will leave the
username as “weblogic”
 You can configure the
password that you can
remember 
 Keep it Safe

 Hit Next to continue the
domain creation process
Note 1: The password must be minimum 8 characters for WebLogic Domain
Note 2: ATG Installation & Configuration will ask for lot more username/passwords – be ready to document these for future reference
WebLogic Installation – Step 15
 This is going to be our
Development instance
and hence no reason to
select production mode
 Continue with the default
“Development Mode”
 I didn’t update my JDK to
1.7 hence shows 1.6
 You can alternatively
install JDK 1.7 prior to WLS
installation to configure it
to use JDK 1.7
 Hit Next to continue with
the domain creation
process
WebLogic Installation – Step 16
 Optional Step
 No changes needed
 Hit Next to continue with
the domain creation
process
WebLogic Installation – Step 17
 This screen tells you all the
choices you have made
to configure the
WebLogic Domain
 Configuration Summary is
outlined here
 Hit Create to create the
new WebLogic Domain
WebLogic Installation – Step 18
 Domain creation work-inprogress
WebLogic Installation - COMPLETE
 With this screen the
WebLogic Installation is
now COMPLETE
 You can either start the
Admin server by
CHECKING the option
“Start Admin Server”

 OR you can start it later
manually by locating the
Batch file or a Shell Script
 I’ll select “Start Admin
Server” to launch the
admin server and demo
you the WLS Console
WebLogic Admin Server – Start
 Once you launch the
“Admin Server”
 Wait until you see the
message “Running”
 Basically WLS will
switch between
several status
indicating the
progress e.g. Start 
Running
WebLogic Server – Admin Console
 http://localhost:7001/console - Launch the Admin console using this URL in
your favorite browser
 It will need few moments to deploy the application for / console – for 1st
access
 Once ready, it will seek for the admin username & password as defined
during the domain configuration process
WebLogic Admin Console - Access
 Once the WLS is 1st
access deployment
ready
 It will seek for the
username and
password for you to
access the admin
console
 Remember the
username “weblogic”
 Password “sorry you
have yours, I have
mine”
WebLogic Admin Console
 This would be your
Admin Console &
can check for the
Status of the server
and a lot more that
you can do with
WebLogic Instance
Questions
 You can reach me @ http://www.linkedin.com/in/keyurkshah

ATG - Installing WebLogic Server

  • 1.
    Installing WebLogic Server 11gR1 - 10.3.6 - Keyur Shah (http://www.linkedin.com/in/keyurkshah)
  • 2.
    Installing WebLogic –10.3.6  Download the WebLogic Server Installer from http://www.oracle.com  Version 10.3.x  Locate the installer on your PC/Mac/Linux  Run the Installer Executable e.g. on Windows system - oepe-wls-indigoinstaller-11.1.1.8.0.201110211138-10.3.6-win32.exe  Follow the steps in Wizard to complete the WLS installation
  • 3.
    WebLogic Installation –Step 1  Launch the WLS Installer  Hit Next to continue with the installation process  Respond to all the Wizard prompts
  • 4.
    WebLogic Installation –Step 2  Provide the location for WLS to create the new Midleware Home folder  Default is C:OracleMiddleware  You can opt-in to provide a different location  Hit Next to continue with the installation process
  • 5.
    WebLogic Installation –Step 3  If you have the Oracle support email / password, continue to enter the details  OR Uncheck the “I wish to receive security updates via My Oracle Support” option  Unchecking will ask for your confirmation “Yes/No”  Hit Next to continue with the installation process
  • 6.
    WebLogic Installation –Step 4  Decide between the TYPICAL or CUSTOM installation option
  • 7.
    WebLogic Installation –Step 4  Decide between the TYPICAL or CUSTOM installation option  Custom lets you choose between various options (as shown on next slide)  I would rather go back and continue with the TYPICAL option for timebeing
  • 8.
    WebLogic Custom InstallationOptions  Check or Uncheck the options on this screen based on which options you want to be installed with WLS Installer using CUSTOM option v/s the TYPICAL installation option  Hit Next to continue with the installation process
  • 9.
    WebLogic Installation –Step 5  Provide the Middleware HOME directory  WebLogic Server Home  Coherence Home  Enterprise pack for Eclipse Home
  • 10.
    WebLogic Installation –Step 6  You need to Choose the Shortcut Location  You can opt between “All Users” vs. “Local User”  Hit Next by selecting “All Users”
  • 11.
    WebLogic Installation –Step 7  Installation Summary Review  Hit Next to continue with ATG commerce installation
  • 12.
    WebLogic Installation –Step 8  Installation Begins  Extracting & copying necessary files
  • 13.
    WebLogic Installation –Step 9  Installation is now Complete  You have an option to configure the “domain” using the “Run quickstart” option  Recommendation is leave “Run quickstart” checked  Hit the Done button in order to continue the limitations
  • 14.
    WebLogic Installation –Step 10  This is the “Quickstart” launch screen  You can configure the WebLogic domain by clicking on the “Getting start with WebLogic Server 10.3.6”
  • 15.
    WebLogic Installation –Step 11  You can either create a new “WebLogic Domain”  OR extend an existing WebLogic domain  Since, we just installed WLS and want to have a separate domain – select “Create a new WebLogic Domain”  Hit Next to continue with the domain creation process
  • 16.
    WebLogic Installation –Step 12  We will continue with the default selection for this option “Select Domain Source”  Generate a domain configured automatically to support the following products:  BASIC WebLogic Server Domain 10.3.6  Hit Next to continue with the domain creation process
  • 17.
    WebLogic Installation –Step 13  If you have a preference for a custom “domain name” provide one  OR continue with the “base_domain” as the domain name for the configuration wizard  It will also create a folder called “base_domain” in the domain location C:OracleMiddlewareuse r_projectsdomains  Hit Next to continue the domain creation process
  • 18.
    WebLogic Installation –Step 14  This is an important step where you would define the WebLogic Domain access details  UserName & Password  We will leave the username as “weblogic”  You can configure the password that you can remember   Keep it Safe  Hit Next to continue the domain creation process Note 1: The password must be minimum 8 characters for WebLogic Domain Note 2: ATG Installation & Configuration will ask for lot more username/passwords – be ready to document these for future reference
  • 19.
    WebLogic Installation –Step 15  This is going to be our Development instance and hence no reason to select production mode  Continue with the default “Development Mode”  I didn’t update my JDK to 1.7 hence shows 1.6  You can alternatively install JDK 1.7 prior to WLS installation to configure it to use JDK 1.7  Hit Next to continue with the domain creation process
  • 20.
    WebLogic Installation –Step 16  Optional Step  No changes needed  Hit Next to continue with the domain creation process
  • 21.
    WebLogic Installation –Step 17  This screen tells you all the choices you have made to configure the WebLogic Domain  Configuration Summary is outlined here  Hit Create to create the new WebLogic Domain
  • 22.
    WebLogic Installation –Step 18  Domain creation work-inprogress
  • 23.
    WebLogic Installation -COMPLETE  With this screen the WebLogic Installation is now COMPLETE  You can either start the Admin server by CHECKING the option “Start Admin Server”  OR you can start it later manually by locating the Batch file or a Shell Script  I’ll select “Start Admin Server” to launch the admin server and demo you the WLS Console
  • 24.
    WebLogic Admin Server– Start  Once you launch the “Admin Server”  Wait until you see the message “Running”  Basically WLS will switch between several status indicating the progress e.g. Start  Running
  • 25.
    WebLogic Server –Admin Console  http://localhost:7001/console - Launch the Admin console using this URL in your favorite browser  It will need few moments to deploy the application for / console – for 1st access  Once ready, it will seek for the admin username & password as defined during the domain configuration process
  • 26.
    WebLogic Admin Console- Access  Once the WLS is 1st access deployment ready  It will seek for the username and password for you to access the admin console  Remember the username “weblogic”  Password “sorry you have yours, I have mine”
  • 27.
    WebLogic Admin Console This would be your Admin Console & can check for the Status of the server and a lot more that you can do with WebLogic Instance
  • 28.
    Questions  You canreach me @ http://www.linkedin.com/in/keyurkshah