MUSIC VIDEO
PRODUCTION
PROCESS
LOG
DANIEL MORLAND
PRODUCTION LOG:
GUIDANCE
The first part of my production was the filming of my music video. I
did this in and around York all within an area of 100 meters. For
example, the 2 screen shots at the side were filmed in pretty much the
same area, but one was facing one way and the other was facing the
other. Even though the camera was only pointing a different direction,
it made a big difference. It looked like a completely different area.
My filming was all done at a time where it was darker. I wanted this to
impact the viewer. Impact them in a way of uncertainty and to make
them feel uneasy. By having my music video at night, you can link
events, such as people getting drunk, increased crime and uncultured
behaviour. This is what I wanted to give the viewer when watching the
video. They should know in England that at night, the county
completely changes.
My production were in 3 stages; however, I could only fit in 2 stages
with the time I had. The first stage of production was the filming. I did
this on 2 different days to fit with people time schedules, so that I
could get the shots I needed with each actor. The second part of
production was the editing. This consisted of compiling what shots I
had and putting them in a way that fitted the music video. The last
part of production was animating, which unfortunately I was unable to
finish in time. This would of added a frame by frame animation,
similar to my research on Yeek. His music video: "shake" included
this animation and I believe it would have been perfect for my music
video, but unfortunately, I didn’t have the time.
FILMING
My filming was one of my stonger points of my music video. I enjoyed my different use of camera angles, focusing
and differny zooms. It gave a number of different shots which stuck to the story of my music video. If I had used
similar shots within my music video, it would be rarther dull and repetitive. To have a verity of shots within my
music video, I can keep the viewer engaged in watching the music video. Otherwise they will not be as involved or
interested in watching. An example of my shots can be soon to the side. An otherwise interesting shot of a light
from a perspective of someone there.
One thing I wanted to do with filming, is to capture the perspective of someone witnessing the unkind actions seen
within a city at night. I wanted to use the zoom and camera focus to immitate the person watching being under the
influence of alcohol. This is a common occurance for people to do on the weekend. By having the camera go out
of focus and blur it can imitate the fact that the person is completely lost in the centre of York.
Explain what worked and didn’t work about your filming and how you managed this covering the following areas:
• Technical –my camera work was effective. However I wish I filmed more then twice for each shot so I got
more of a final product. This wasn’t possible for shots of the environment, but for shots with the actors, I feel
like I could of got them to film a few more times. Also I could of included some more technical equipment and
techniques like lip syncing and greenscreens. But overall I was happy how I used the camera.
• Logistical – my location was perfect for my video. All of the locations were close by to each other, so I could
just walk from one place to another. One main problem I faced was the weather. One the first two
opportunities of filming, it rained. This halted my filming, because water damage can effect pieces of
equipment like a camera. All the places I filmed in were public, so I had no issue with access problems. You
can film anywhere one public grounds.
• Personnel – I originally had a different cast for my music video, but this became a challenge when I was
unable to film with my original cast after the second time. So to get my filming done I had to muster up a
second crew who were all based in York and were able to film on the day. This was a good outcome, and all
went well. No one let me down, but it was hard to find a second crew.
• Planning – I planned to film on set dates during the half term, however as I explained, I was unable to film
due to the weather. If I had planned for bad weather. If I would have had a better time filming.
• Next steps – once I got my footage, I didn’t need to film anymore footage with my cast at least. Footage
around York was the only footage which I didn’t have to have any actors.
FILMING –
PRODUCTION STILLS
Where appropriate
add stills from
when you were
filming, annotate
where necessary
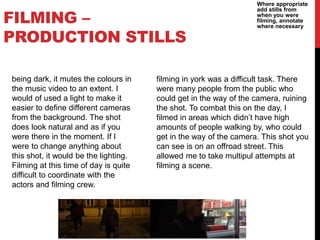
being dark, it mutes the colours in
the music video to an extent. I
would of used a light to make it
easier to define different cameras
from the background. The shot
does look natural and as if you
were there in the moment. If I
were to change anything about
this shot, it would be the lighting.
Filming at this time of day is quite
difficult to coordinate with the
actors and filming crew.
filming in york was a difficult task. There
were many people from the public who
could get in the way of the camera, ruining
the shot. To combat this on the day, I
filmed in areas which didn’t have high
amounts of people walking by, who could
get in the way of the camera. This shot you
can see is on an offroad street. This
allowed me to take multipul attempts at
filming a scene.
EDITING
Editing was not an issue for my project. My testing had gone
well, and I had got used to using the adobe premire. My edits
were Intime with the music and flowed as accordingly.
As each verse and chorus changed from one to the next, the
video story changed. The story shifted from actor to actor.
Going from Alfie, to Woody, to Dan (me) and last to Arthur.
The last scene with any actor featured Arthur interacting with
the first actor: Alfie. Creating a full circle, as if one interaction
lead to another, creating a circle of unkindness. If I had not
had that last character connection with Arthur and Alfie, the
story line wouldn’t make sense. I chose to edit in this way so
there was some sort of understandable story line.
EDITING –
FILE MANAGEMENT
I saved my work on one PC primerily. This allowed me to
keep my work in one place which would be easy to manage.
However, I did have a backup memory stick which had all of
my other work located on it. This however was not enough to
store the adobe premier pro. My phone also had some of the
footage I used for my work.
EDITING –
SETTING UP PREMIERE
As I open to start editing my project, I decide that I will use the
default settings. I set my canvas to 1080p at 30fps.
I film many of my shots in 24 fps, so I can speed some of them
up to 30 fps, to slightly remove some of the camera sway. It also
allows me to fit more of the video into the edit, if I have to speed
it up. This gives the effect of less camera shake. I shot all of my
footage in 720p.
The timeline of the video followed a 'circle of unkindness.' One
unkind action followed from one person to another. This
timeline made it easy to transition from chorus to verse. Once a
verse or chorus finished I just had to switch to the next
character. I also synced up the music to the edit of the video.
This created tense moments where you could clearly see the
effort put into editing the video correctly.
EDITING –
IMPORTING FOOTAGE
Getting the footage off of the camera was the hardest part for
my project. For some reason, the footage from my phone was
unable to be ported to an apple mac PC. This was an
irritating occourance because there were videos which I
wanted from my phone, in the music video. The last time I
went out filming, I used a DSLR camera so I could use the
micro SD card to retrieve the footage from.
I put all of my audio files into one folder on my desktop of the
Mac I used in lesson. This made it easy to find all of my clips
and put use them when I needed.
EDITING –
WORKSPACE
My premier pro workspace was designed so that I could time
the music effectively with the music. Having the audio levels
on the bottom left along with the timeline so I could scroll
through the editing to find the right part so that it would time
properly.
The editing and effects window were are separate so that I
don’t have the screen to cluttered. Having an effective
workspace is a must when it comes to using Adobe premire.
EDITING –
ASSEMBLY EDIT
I tried to keep the music video to a timeline. Following one
character and transitioning when an event occurs. The
events in the music video are: The stealing of the bag, being
beaten up, having phone stolen, and a transaction. With each
event, the shots follows the next character. There is no lip
syncing, however, the shots do time up with the music. For
example at the beginning at 15 seconds, the shot is thrown
down with the first sequence of beats. Each time the beat
ends, the shot goes black. In time where there is no music. I
used the shot itself to sync the music instead of lip syncing.
This took multiple attempts to link up and sync with the
music.
EDITING –
REFINEMENT
The first attempts at syncing the music with the music were a
fail. The hits didn’t match up at 1:28 in the music video and at
the beginning if the music video at 0:12. I kept on trying to
continue to sync the music with the video, and after many
attempts I believe that I really did a good job with lining up the
music with the video, to keep a consistent transition between
each shot.
One more thing I tried to add to the music video was an
animation. This followed the same style of the artists other
song: "Shake" (by
Yeek https://www.youtube.com/watch?v=F47sa4MCv6I) I
researched this music video, and it had a large influence on my
music video because of the animation style featured on this
song and others that Yeek has produced. However, I didn’t have
enough time to finish the animation.
EDITING –
COLOUR CORRECTION/SFX
I wanted my footage to look as plain and realistic as possible,
however, there were some shots which I did colour correct,
either to brighten or darken. The first 2 shots in the music
video were clips that I got online from a free video hosting
website which allowed me to fill some of the beginning. This
gave a little introduction of the location for the viewer of the
'location' the music video was filmed at. An urban
environment with many different people and places for
actions to occur. I had to colour correct each clip so that they
all looked as if they were from the same location from a city.
'grayish' and 'dull' looking clips would look more realistic to
the viewer.
Show and explain your colour correction process/effects
process – use staged screenshots to show each part of the
process and the effect. Explain why you chose to do this
EDITING –
EXPORT
I exported my video in the required amounts. 1280p by 720p.
This resolution allowed me to film in 24 fps which was
perfect because I aimed to speed my filming clips up to 30fps
in the export. This would speed up the clips I got in
recording. You can see this effect in the music video as the
camera has slightly jittery movements.
I chose to name my export: "Only in the west (final)" this
allowed me to easily find the file when I wanted to come back
to it and to easily find it when I wanted to upload it to
YouTube.

Mv process log form 2019

  • 1.
  • 2.
    PRODUCTION LOG: GUIDANCE The firstpart of my production was the filming of my music video. I did this in and around York all within an area of 100 meters. For example, the 2 screen shots at the side were filmed in pretty much the same area, but one was facing one way and the other was facing the other. Even though the camera was only pointing a different direction, it made a big difference. It looked like a completely different area. My filming was all done at a time where it was darker. I wanted this to impact the viewer. Impact them in a way of uncertainty and to make them feel uneasy. By having my music video at night, you can link events, such as people getting drunk, increased crime and uncultured behaviour. This is what I wanted to give the viewer when watching the video. They should know in England that at night, the county completely changes. My production were in 3 stages; however, I could only fit in 2 stages with the time I had. The first stage of production was the filming. I did this on 2 different days to fit with people time schedules, so that I could get the shots I needed with each actor. The second part of production was the editing. This consisted of compiling what shots I had and putting them in a way that fitted the music video. The last part of production was animating, which unfortunately I was unable to finish in time. This would of added a frame by frame animation, similar to my research on Yeek. His music video: "shake" included this animation and I believe it would have been perfect for my music video, but unfortunately, I didn’t have the time.
  • 3.
    FILMING My filming wasone of my stonger points of my music video. I enjoyed my different use of camera angles, focusing and differny zooms. It gave a number of different shots which stuck to the story of my music video. If I had used similar shots within my music video, it would be rarther dull and repetitive. To have a verity of shots within my music video, I can keep the viewer engaged in watching the music video. Otherwise they will not be as involved or interested in watching. An example of my shots can be soon to the side. An otherwise interesting shot of a light from a perspective of someone there. One thing I wanted to do with filming, is to capture the perspective of someone witnessing the unkind actions seen within a city at night. I wanted to use the zoom and camera focus to immitate the person watching being under the influence of alcohol. This is a common occurance for people to do on the weekend. By having the camera go out of focus and blur it can imitate the fact that the person is completely lost in the centre of York. Explain what worked and didn’t work about your filming and how you managed this covering the following areas: • Technical –my camera work was effective. However I wish I filmed more then twice for each shot so I got more of a final product. This wasn’t possible for shots of the environment, but for shots with the actors, I feel like I could of got them to film a few more times. Also I could of included some more technical equipment and techniques like lip syncing and greenscreens. But overall I was happy how I used the camera. • Logistical – my location was perfect for my video. All of the locations were close by to each other, so I could just walk from one place to another. One main problem I faced was the weather. One the first two opportunities of filming, it rained. This halted my filming, because water damage can effect pieces of equipment like a camera. All the places I filmed in were public, so I had no issue with access problems. You can film anywhere one public grounds. • Personnel – I originally had a different cast for my music video, but this became a challenge when I was unable to film with my original cast after the second time. So to get my filming done I had to muster up a second crew who were all based in York and were able to film on the day. This was a good outcome, and all went well. No one let me down, but it was hard to find a second crew. • Planning – I planned to film on set dates during the half term, however as I explained, I was unable to film due to the weather. If I had planned for bad weather. If I would have had a better time filming. • Next steps – once I got my footage, I didn’t need to film anymore footage with my cast at least. Footage around York was the only footage which I didn’t have to have any actors.
  • 4.
    FILMING – PRODUCTION STILLS Whereappropriate add stills from when you were filming, annotate where necessary being dark, it mutes the colours in the music video to an extent. I would of used a light to make it easier to define different cameras from the background. The shot does look natural and as if you were there in the moment. If I were to change anything about this shot, it would be the lighting. Filming at this time of day is quite difficult to coordinate with the actors and filming crew. filming in york was a difficult task. There were many people from the public who could get in the way of the camera, ruining the shot. To combat this on the day, I filmed in areas which didn’t have high amounts of people walking by, who could get in the way of the camera. This shot you can see is on an offroad street. This allowed me to take multipul attempts at filming a scene.
  • 5.
    EDITING Editing was notan issue for my project. My testing had gone well, and I had got used to using the adobe premire. My edits were Intime with the music and flowed as accordingly. As each verse and chorus changed from one to the next, the video story changed. The story shifted from actor to actor. Going from Alfie, to Woody, to Dan (me) and last to Arthur. The last scene with any actor featured Arthur interacting with the first actor: Alfie. Creating a full circle, as if one interaction lead to another, creating a circle of unkindness. If I had not had that last character connection with Arthur and Alfie, the story line wouldn’t make sense. I chose to edit in this way so there was some sort of understandable story line.
  • 6.
    EDITING – FILE MANAGEMENT Isaved my work on one PC primerily. This allowed me to keep my work in one place which would be easy to manage. However, I did have a backup memory stick which had all of my other work located on it. This however was not enough to store the adobe premier pro. My phone also had some of the footage I used for my work.
  • 7.
    EDITING – SETTING UPPREMIERE As I open to start editing my project, I decide that I will use the default settings. I set my canvas to 1080p at 30fps. I film many of my shots in 24 fps, so I can speed some of them up to 30 fps, to slightly remove some of the camera sway. It also allows me to fit more of the video into the edit, if I have to speed it up. This gives the effect of less camera shake. I shot all of my footage in 720p. The timeline of the video followed a 'circle of unkindness.' One unkind action followed from one person to another. This timeline made it easy to transition from chorus to verse. Once a verse or chorus finished I just had to switch to the next character. I also synced up the music to the edit of the video. This created tense moments where you could clearly see the effort put into editing the video correctly.
  • 8.
    EDITING – IMPORTING FOOTAGE Gettingthe footage off of the camera was the hardest part for my project. For some reason, the footage from my phone was unable to be ported to an apple mac PC. This was an irritating occourance because there were videos which I wanted from my phone, in the music video. The last time I went out filming, I used a DSLR camera so I could use the micro SD card to retrieve the footage from. I put all of my audio files into one folder on my desktop of the Mac I used in lesson. This made it easy to find all of my clips and put use them when I needed.
  • 9.
    EDITING – WORKSPACE My premierpro workspace was designed so that I could time the music effectively with the music. Having the audio levels on the bottom left along with the timeline so I could scroll through the editing to find the right part so that it would time properly. The editing and effects window were are separate so that I don’t have the screen to cluttered. Having an effective workspace is a must when it comes to using Adobe premire.
  • 10.
    EDITING – ASSEMBLY EDIT Itried to keep the music video to a timeline. Following one character and transitioning when an event occurs. The events in the music video are: The stealing of the bag, being beaten up, having phone stolen, and a transaction. With each event, the shots follows the next character. There is no lip syncing, however, the shots do time up with the music. For example at the beginning at 15 seconds, the shot is thrown down with the first sequence of beats. Each time the beat ends, the shot goes black. In time where there is no music. I used the shot itself to sync the music instead of lip syncing. This took multiple attempts to link up and sync with the music.
  • 11.
    EDITING – REFINEMENT The firstattempts at syncing the music with the music were a fail. The hits didn’t match up at 1:28 in the music video and at the beginning if the music video at 0:12. I kept on trying to continue to sync the music with the video, and after many attempts I believe that I really did a good job with lining up the music with the video, to keep a consistent transition between each shot. One more thing I tried to add to the music video was an animation. This followed the same style of the artists other song: "Shake" (by Yeek https://www.youtube.com/watch?v=F47sa4MCv6I) I researched this music video, and it had a large influence on my music video because of the animation style featured on this song and others that Yeek has produced. However, I didn’t have enough time to finish the animation.
  • 12.
    EDITING – COLOUR CORRECTION/SFX Iwanted my footage to look as plain and realistic as possible, however, there were some shots which I did colour correct, either to brighten or darken. The first 2 shots in the music video were clips that I got online from a free video hosting website which allowed me to fill some of the beginning. This gave a little introduction of the location for the viewer of the 'location' the music video was filmed at. An urban environment with many different people and places for actions to occur. I had to colour correct each clip so that they all looked as if they were from the same location from a city. 'grayish' and 'dull' looking clips would look more realistic to the viewer. Show and explain your colour correction process/effects process – use staged screenshots to show each part of the process and the effect. Explain why you chose to do this
  • 13.
    EDITING – EXPORT I exportedmy video in the required amounts. 1280p by 720p. This resolution allowed me to film in 24 fps which was perfect because I aimed to speed my filming clips up to 30fps in the export. This would speed up the clips I got in recording. You can see this effect in the music video as the camera has slightly jittery movements. I chose to name my export: "Only in the west (final)" this allowed me to easily find the file when I wanted to come back to it and to easily find it when I wanted to upload it to YouTube.