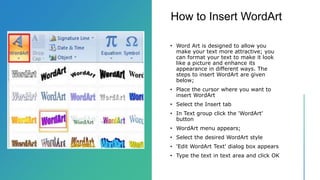
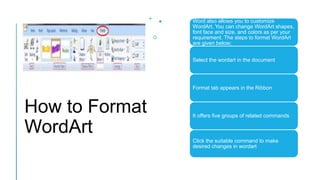
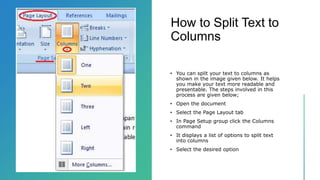
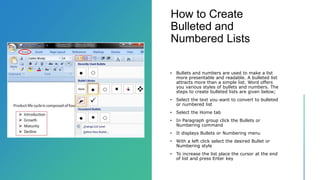
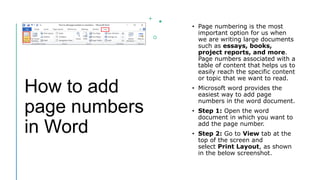
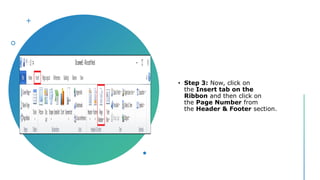
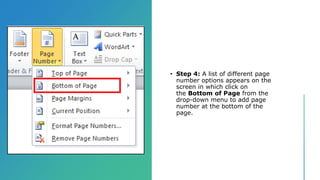
MODULE 3 Working with Objects
Dr. Pallawi Bulakh
M.Sc. M.Phil. Ph.D. Computer Science
Modern College ganeshkhind, Pune
Module
3-
Working
with
objects
Shapes, Clipart and Picture, Word Art, Smart Art
Columns and Orderings - To Add Columns to a
Document
Change the Order of Objects
Page Number, Date & Time
Inserting Text boxes
Inserting Word art
Inserting symbols
Inserting Chart
WORKING
WITH
SHAPES
How to Insert
Clip Art
Clip art refers to a graphic or a picture that you
can insert in your document. It comes in
different formats and styles. It is used to
enhance the appearance of a document. The
steps to insert a clip art are given below;
Place the cursor where you want to insert the
clip art
Select the Insert tab
In Illustrations group click the Clip Art
command;
• A task pane appears on the right
side of document
• Enter the keyword in 'Search for'
field and select the suitable option
in 'Search in' and 'Results should
be' fields
• Click Go, clip art menu will appear
• Select the desired clip art with a
left click
How to Format
Picture or Clip Art
• You can change the appearance
of your picture or clip art to
enhance its visual impact. The
format tab offers you various
options for formatting pictures
like contrast, changing color,
line style, cropping, etc. The
steps to format picture or clip
art are given below;
• Select the picture or clip art
that you want to format
• Format tab appears in the
Ribbon
• Click the Format tab
• It displays four groups of
related commands to modify or
format picture or clip art
How to Insert
Smart Art
Graphics
• You can insert Smart Art Graphics in your
document to effectively communicate
your message. You can insert a process
flow, a relationship or an organization
hierarchy. The steps to insert smart art
graphics are given below;
• Place the cursor in the document where
you want to insert graphics
• Select the Insert tab
• In Illustrations group select the 'Smart
Art' command;
Smart Art
• On left side, a dialog box appears
with list of categories
• In the center you will see the
illustrations available in a category
• Select the desired illustration and
click Ok
How to Add Text in
Smart Art Graphics
• Word also allows you to add text in Smart
Art Graphics; you can add facts, figures and
any other information. The steps to add
smart art graphics are given below;
• Select the graphic
• Task pane appears on the left side if it is not
visible then click the arrow on left side of
graphic
• Type the text in task pane fields it will
appear in the graphic
• You can also directly type the text in the
graphic in text area
• Close the task pane after entering the text
and click outside the graphic
How to Insert
Picture in
Document
• Pictures make our text more
attractive and readable. You
can insert relevant pictures in
your text by following these
steps;
• Place the cursor where you
want to insert the picture
• Select the Insert tab on Ribbon
• In Illustrations group click the
Picture command;
•
How to Insert WordArt
• Word Art is designed to allow you
make your text more attractive; you
can format your text to make it look
like a picture and enhance its
appearance in different ways. The
steps to insert WordArt are given
below;
• Place the cursor where you want to
insert WordArt
• Select the Insert tab
• In Text group click the 'WordArt'
button
• WordArt menu appears;
• Select the desired WordArt style
• 'Edit WordArt Text' dialog box appears
• Type the text in text area and click OK
How to Format
WordArt
Word also allows you to customize
WordArt. You can change WordArt shapes,
font face and size, and colors as per your
requirement. The steps to format WordArt
are given below;
Select the wordart in the document
Format tab appears in the Ribbon
It offers five groups of related commands
Click the suitable command to make
desired changes in wordart
How to Split Text to
Columns
• You can split your text to columns as
shown in the image given below. It helps
you make your text more readable and
presentable. The steps involved in this
process are given below;
• Open the document
• Select the Page Layout tab
• In Page Setup group click the Columns
command
• It displays a list of options to split text
into columns
• Select the desired option
How to Create
Bulleted and
Numbered Lists
• Bullets and numbers are used to make a list
more presentable and readable. A bulleted list
attracts more than a simple list. Word offers
you various styles of bullets and numbers. The
steps to create bulleted lists are given below;
• Select the text you want to convert to bulleted
or numbered list
• Select the Home tab
• In Paragraph group click the Bullets or
Numbering command
• It displays Bullets or Numbering menu
• With a left click select the desired Bullet or
Numbering style
• To increase the list place the cursor at the end
of list and press Enter key
How to add
page numbers
in Word
• Page numbering is the most
important option for us when
we are writing large documents
such as essays, books,
project reports, and more.
Page numbers associated with a
table of content that helps us to
easily reach the specific content
or topic that we want to read.
• Microsoft word provides the
easiest way to add page
numbers in the word document.
• Step 1: Open the word
document in which you want to
add the page number.
• Step 2: Go to View tab at the
top of the screen and
select Print Layout, as shown
in the below screenshot.
• Step 3: Now, click on
the Insert tab on the
Ribbon and then click on
the Page Number from
the Header & Footer section.
• Step 4: A list of different page
number options appears on the
screen in which click on
the Bottom of Page from the
drop-down menu to add page
number at the bottom of the
page.
• step 5: The page number
design window appears on the
screen in which select page
number design according to your
requirement. Once you select the
page number design, it
automatically adds the page
number on the page.
DATE AND
TIME
HOW TO
INSERT A
SYMBOL
How to Insert a Text Box in MS Word
• Text box allows you to control the position of a
block of text in your document. You can also
format them with borders and shading. The two
commonly used methods to insert Text Boxes
are given below:
Method 1:
• Select the Insert tab
• Locate the Text group
• Click the Text Box button
• It displays Built-In text box menu and an option
to draw table
• With a left click select the desired text box
format from the menu
Method
2:
Select 'Draw Text Box' option
A cross shaped cursor
appears
Left click the mouse and
holding it down drag it to draw
the box of desired dimensions
How to insert a
graph/chart in
Word
• A graph is a pictorial
representation of data and values.
• It provides the easiest way to
analyze and read data from the
document.
• There are the following types of
graph that you used in the Word
document -
1.Bar graph
2.Line graph
3.Pie chart
Bar Graph
• Bar Graphs are also known as the Bar Charts.
Bar Graph is used to represent data and
quantities using bars or strips. Bars can be
horizontal or vertical. Typically, bar graphs are
used in financial analysis and businesses for
displaying the data.
• There the following steps to insert a bar graph in
Word document -
• Step 1: Open the Word
document.
• Step2: Place cursor in the
document where you want to
insert a bar graph.
• Step 3: Go to the Insert
tab on the ribbon and click on
the Chart option in
the Illustrations group.
• Step 4: An Insert chart
dialog box will appear on the
screen. Click on the Bar option
from the left side panel and
select the chart that you want
to Insert. Click on
the OK button at the bottom of
the screen.
Msword  module 3
Msword  module 3
Msword  module 3
Msword  module 3

Msword module 3

  • 1.
    MODULE 3 Workingwith Objects Dr. Pallawi Bulakh M.Sc. M.Phil. Ph.D. Computer Science Modern College ganeshkhind, Pune
  • 2.
    Module 3- Working with objects Shapes, Clipart andPicture, Word Art, Smart Art Columns and Orderings - To Add Columns to a Document Change the Order of Objects Page Number, Date & Time Inserting Text boxes Inserting Word art Inserting symbols Inserting Chart
  • 3.
  • 4.
    How to Insert ClipArt Clip art refers to a graphic or a picture that you can insert in your document. It comes in different formats and styles. It is used to enhance the appearance of a document. The steps to insert a clip art are given below; Place the cursor where you want to insert the clip art Select the Insert tab In Illustrations group click the Clip Art command;
  • 5.
    • A taskpane appears on the right side of document • Enter the keyword in 'Search for' field and select the suitable option in 'Search in' and 'Results should be' fields • Click Go, clip art menu will appear • Select the desired clip art with a left click
  • 6.
    How to Format Pictureor Clip Art • You can change the appearance of your picture or clip art to enhance its visual impact. The format tab offers you various options for formatting pictures like contrast, changing color, line style, cropping, etc. The steps to format picture or clip art are given below; • Select the picture or clip art that you want to format • Format tab appears in the Ribbon • Click the Format tab • It displays four groups of related commands to modify or format picture or clip art
  • 7.
    How to Insert SmartArt Graphics • You can insert Smart Art Graphics in your document to effectively communicate your message. You can insert a process flow, a relationship or an organization hierarchy. The steps to insert smart art graphics are given below; • Place the cursor in the document where you want to insert graphics • Select the Insert tab • In Illustrations group select the 'Smart Art' command;
  • 8.
    Smart Art • Onleft side, a dialog box appears with list of categories • In the center you will see the illustrations available in a category • Select the desired illustration and click Ok
  • 9.
    How to AddText in Smart Art Graphics • Word also allows you to add text in Smart Art Graphics; you can add facts, figures and any other information. The steps to add smart art graphics are given below; • Select the graphic • Task pane appears on the left side if it is not visible then click the arrow on left side of graphic • Type the text in task pane fields it will appear in the graphic • You can also directly type the text in the graphic in text area • Close the task pane after entering the text and click outside the graphic
  • 10.
    How to Insert Picturein Document • Pictures make our text more attractive and readable. You can insert relevant pictures in your text by following these steps; • Place the cursor where you want to insert the picture • Select the Insert tab on Ribbon • In Illustrations group click the Picture command; •
  • 11.
    How to InsertWordArt • Word Art is designed to allow you make your text more attractive; you can format your text to make it look like a picture and enhance its appearance in different ways. The steps to insert WordArt are given below; • Place the cursor where you want to insert WordArt • Select the Insert tab • In Text group click the 'WordArt' button • WordArt menu appears; • Select the desired WordArt style • 'Edit WordArt Text' dialog box appears • Type the text in text area and click OK
  • 12.
    How to Format WordArt Wordalso allows you to customize WordArt. You can change WordArt shapes, font face and size, and colors as per your requirement. The steps to format WordArt are given below; Select the wordart in the document Format tab appears in the Ribbon It offers five groups of related commands Click the suitable command to make desired changes in wordart
  • 13.
    How to SplitText to Columns • You can split your text to columns as shown in the image given below. It helps you make your text more readable and presentable. The steps involved in this process are given below; • Open the document • Select the Page Layout tab • In Page Setup group click the Columns command • It displays a list of options to split text into columns • Select the desired option
  • 14.
    How to Create Bulletedand Numbered Lists • Bullets and numbers are used to make a list more presentable and readable. A bulleted list attracts more than a simple list. Word offers you various styles of bullets and numbers. The steps to create bulleted lists are given below; • Select the text you want to convert to bulleted or numbered list • Select the Home tab • In Paragraph group click the Bullets or Numbering command • It displays Bullets or Numbering menu • With a left click select the desired Bullet or Numbering style • To increase the list place the cursor at the end of list and press Enter key
  • 15.
    How to add pagenumbers in Word • Page numbering is the most important option for us when we are writing large documents such as essays, books, project reports, and more. Page numbers associated with a table of content that helps us to easily reach the specific content or topic that we want to read. • Microsoft word provides the easiest way to add page numbers in the word document. • Step 1: Open the word document in which you want to add the page number. • Step 2: Go to View tab at the top of the screen and select Print Layout, as shown in the below screenshot.
  • 16.
    • Step 3:Now, click on the Insert tab on the Ribbon and then click on the Page Number from the Header & Footer section.
  • 17.
    • Step 4:A list of different page number options appears on the screen in which click on the Bottom of Page from the drop-down menu to add page number at the bottom of the page.
  • 18.
    • step 5:The page number design window appears on the screen in which select page number design according to your requirement. Once you select the page number design, it automatically adds the page number on the page.
  • 19.
  • 20.
  • 21.
    How to Inserta Text Box in MS Word • Text box allows you to control the position of a block of text in your document. You can also format them with borders and shading. The two commonly used methods to insert Text Boxes are given below:
  • 22.
    Method 1: • Selectthe Insert tab • Locate the Text group • Click the Text Box button • It displays Built-In text box menu and an option to draw table • With a left click select the desired text box format from the menu
  • 23.
    Method 2: Select 'Draw TextBox' option A cross shaped cursor appears Left click the mouse and holding it down drag it to draw the box of desired dimensions
  • 25.
    How to inserta graph/chart in Word • A graph is a pictorial representation of data and values. • It provides the easiest way to analyze and read data from the document. • There are the following types of graph that you used in the Word document - 1.Bar graph 2.Line graph 3.Pie chart
  • 26.
    Bar Graph • BarGraphs are also known as the Bar Charts. Bar Graph is used to represent data and quantities using bars or strips. Bars can be horizontal or vertical. Typically, bar graphs are used in financial analysis and businesses for displaying the data. • There the following steps to insert a bar graph in Word document -
  • 27.
    • Step 1:Open the Word document. • Step2: Place cursor in the document where you want to insert a bar graph. • Step 3: Go to the Insert tab on the ribbon and click on the Chart option in the Illustrations group. • Step 4: An Insert chart dialog box will appear on the screen. Click on the Bar option from the left side panel and select the chart that you want to Insert. Click on the OK button at the bottom of the screen.